Tag Archives: Hybrid Cloud Management

DNS over HTTPS is now available in Amazon Route 53 Resolver

Post Syndicated from Danilo Poccia original https://aws.amazon.com/blogs/aws/dns-over-https-is-now-available-in-amazon-route-53-resolver/

Starting today, Amazon Route 53 Resolver supports using the DNS over HTTPS (DoH) protocol for both inbound and outbound Resolver endpoints. As the name suggests, DoH supports HTTP or HTTP/2 over TLS to encrypt the data exchanged for Domain Name System (DNS) resolutions.

Using TLS encryption, DoH increases privacy and security by preventing eavesdropping and manipulation of DNS data as it is exchanged between a DoH client and the DoH-based DNS resolver.

This helps you implement a zero-trust architecture where no actor, system, network, or service operating outside or within your security perimeter is trusted and all network traffic is encrypted. Using DoH also helps follow recommendations such as those described in this memorandum of the US Office of Management and Budget (OMB).

DNS over HTTPS support in Amazon Route 53 Resolver
You can use Amazon Route 53 Resolver to resolve DNS queries in hybrid cloud environments. For example, it allows AWS services access for DNS requests from anywhere within your hybrid network. To do so, you can set up inbound and outbound Resolver endpoints:

  • Inbound Resolver endpoints allow DNS queries to your VPC from your on-premises network or another VPC.Amazon Route 53 Resolver inbound endpoint architecture.
  • Outbound Resolver endpoints allow DNS queries from your VPC to your on-premises network or another VPC.Amazon Route 53 Resolver outbound endpoint architecture.

After you configure the Resolver endpoints, you can set up rules that specify the name of the domains for which you want to forward DNS queries from your VPC to an on-premises DNS resolver (outbound) and from on-premises to your VPC (inbound).

Now, when you create or update an inbound or outbound Resolver endpoint, you can specify which protocols to use:

  • DNS over port 53 (Do53), which is using either UDP or TCP to send the packets.
  • DNS over HTTPS (DoH), which is using TLS to encrypt the data.
  • Both, depending on which one is used by the DNS client.
  • For FIPS compliance, there is a specific implementation (DoH-FIPS) for inbound endpoints.

Let’s see how this works in practice.

Using DNS over HTTPS with Amazon Route 53 Resolver
In the Route 53 console, I choose Inbound endpoints from the Resolver section of the navigation pane. There, I choose Create inbound endpoint.

I enter a name for the endpoint, select the VPC, the security group, and the endpoint type (IPv4, IPv6, or dual-stack). To allow using both encrypted and unencrypted DNS resolutions, I select Do53, DoH, and DoH-FIPS in the Protocols for this endpoint option.

Console screenshot.

After that, I configure the IP addresses for DNS queries. I select two Availability Zones and, for each, a subnet. For this setup, I use the option to have the IP addresses automatically selected from those available in the subnet.

After I complete the creation of the inbound endpoint, I configure the DNS server in my network to forward requests for the amazonaws.com domain (used by AWS service endpoints) to the inbound endpoint IP addresses.

Similarly, I create an outbound Resolver endpoint and and select both Do53 and DoH as protocols. Then, I create forwarding rules that tell for which domains the outbound Resolver endpoint should forward requests to the DNS servers in my network.

Now, when the DNS clients in my hybrid environment use DNS over HTTPS in their requests, DNS resolutions are encrypted. Optionally, I can enforce encryption and select only DoH in the configuration of inbound and outbound endpoints.

Things to know
DNS over HTTPS support for Amazon Route 53 Resolver is available today in all AWS Regions where Route 53 Resolver is offered, including GovCloud Regions and Regions based in China.

DNS over port 53 continues to be the default for inbound or outbound Resolver endpoints. In this way, you don’t need to update your existing automation tooling unless you want to adopt DNS over HTTPS.

There is no additional cost for using DNS over HTTPS with Resolver endpoints. For more information, see Route 53 pricing.

Start using DNS over HTTPS with Amazon Route 53 Resolver to increase privacy and security for your hybrid cloud environments.

Danilo

Use IAM Roles Anywhere to help you improve security in on-premises container workloads

Post Syndicated from Ulrich Hinze original https://aws.amazon.com/blogs/security/use-iam-roles-anywhere-to-help-you-improve-security-in-on-premises-container-workloads/

This blog post demonstrates how to help meet your security goals for a containerized process running outside of Amazon Web Services (AWS) as part of a hybrid cloud architecture. Managing credentials for such systems can be challenging, including when a workload needs to access cloud resources. IAM Roles Anywhere lets you exchange static AWS Identity and Access Management (IAM) user credentials with temporary security credentials in this scenario, reducing security risks while improving developer convenience.

In this blog post, we focus on these key areas to help you set up IAM Roles Anywhere in your own environment: determining whether an existing on-premises public key infrastructure (PKI) can be used with IAM Roles Anywhere, creating the necessary AWS resources, creating an IAM Roles Anywhere enabled Docker image, and using this image to issue AWS Command Line Interface (AWS CLI) commands. In the end, you will be able to issue AWS CLI commands through a Docker container, using credentials from your own PKI.

The AWS Well-Architected Framework and AWS IAM best practices documentation recommend that you use temporary security credentials over static credentials wherever possible. For workloads running on AWS—such as Amazon Elastic Compute Cloud (Amazon EC2) instances, AWS Lambda functions, or Amazon Elastic Kubernetes Service (Amazon EKS) pods—assigning and assuming IAM roles is a secure mechanism for distributing temporary credentials that can be used to authenticate against the AWS API. Before the release of IAM Roles Anywhere, developers had to use IAM users with long-lived, static credentials (access key IDs and secret access keys) to call the AWS API from outside of AWS. Now, by establishing trust between your on-premises PKI or AWS Private Certificate Authority (AWS Private CA) with IAM Roles Anywhere, you can also use IAM roles for workloads running outside of AWS.

This post provides a walkthrough for containerized environments. Containers make the setup for different environments and operating systems more uniform, making it simpler for you to follow the solution in this post and directly apply the learnings to your existing containerized setup. However, you can apply the same pattern to non-container environments.

At the end of this walkthrough, you will issue an AWS CLI command to list Amazon S3 buckets in an AWS account (aws s3 ls). This is a simplified mechanism to show that you have successfully authenticated to AWS using IAM Roles Anywhere. Typically, in applications that consume AWS functionality, you instead would use an AWS Software Development Kit (SDK) for the programming language of your application. You can apply the same concepts from this blog post to enable the AWS SDK to use IAM Roles Anywhere.

Prerequisites

To follow along with this post, you must have these tools installed:

  • The latest version of the AWS CLI, to create IAM Roles Anywhere resources
  • jq, to extract specific information from AWS API responses
  • Docker, to create and run the container image
  • OpenSSL, to create cryptographic keys and certificates

Make sure that the principal used by the AWS CLI has enough permissions to perform the commands described in this blog post. For simplicity, you can apply the following least-privilege IAM policy:

{
    "Version": "2012-10-17",
    "Statement": [
        {
            "Sid": "IAMRolesAnywhereBlog",
            "Effect": "Allow",
            "Action": [
                "iam:CreateRole",
                "iam:DeleteRole",
                "iam:PutRolePolicy",
                "iam:DeleteRolePolicy",
                "iam:PassRole",
                "rolesanywhere:CreateTrustAnchor",
                "rolesanywhere:ListTrustAnchors",
                "rolesanywhere:DeleteTrustAnchor",
                "rolesanywhere:CreateProfile",
                "rolesanywhere:ListProfiles",
                "rolesanywhere:DeleteProfile"
            ],
            "Resource": [
                "arn:aws:iam::*:role/bucket-lister",
                "arn:aws:rolesanywhere:*:*:trust-anchor/*",
                "arn:aws:rolesanywhere:*:*:profile/*"
            ]
        }
    ]
}

This blog post assumes that you have configured a default AWS Region for the AWS CLI. If you have not, refer to the AWS CLI configuration documentation for different ways to configure the AWS Region.

Considerations for production use cases

To use IAM Roles Anywhere, you must establish trust with a private PKI. Certificates that are issued by this certificate authority (CA) are then used to sign CreateSession API requests. The API returns temporary AWS credentials: the access key ID, secret access key, and session key. For strong security, you should specify that the certificates are short-lived and the CA automatically rotates expiring certificates.

To simplify the setup for demonstration purposes, this post explains how to manually create a CA and certificate by using OpenSSL. For a production environment, this is not a suitable approach, because it ignores security concerns around the CA itself and excludes automatic certificate rotation or revocation capabilities. You need to use your existing PKI to provide short-lived and automatically rotated certificates in your production environment. This post shows how to validate whether your private CA and certificates meet IAM Roles Anywhere requirements.

If you don’t have an existing PKI that fulfils these requirements, you can consider using AWS Private Certificate Authority (Private CA) for a convenient way to help you with this process.

In order to use IAM Roles Anywhere in your container workload, it must have access to certificates that are issued by your private CA.

Solution overview

Figure 1 describes the relationship between the different resources created in this blog post.

Figure 1: IAM Roles Anywhere relationship between different components and resources

Figure 1: IAM Roles Anywhere relationship between different components and resources

To establish a trust relationship with the existing PKI, you will use its CA certificate to create an IAM Roles Anywhere trust anchor. You will create an IAM role with permissions to list all buckets in the account. The IAM role’s trust policy states that it can be assumed only from IAM Roles Anywhere, narrowing down which exact end-entity certificate can be used to assume it. The IAM Roles Anywhere profile defines which IAM role can be assumed in a session.

The container that is authenticating with IAM Roles Anywhere needs to present a valid certificate issued by the PKI, as well as Amazon Resource Names (ARNs) for the trust anchor, profile, and role. The container finally uses the certificate’s private key to sign a CreateSession API call, returning temporary AWS credentials. These temporary credentials are then used to issue the aws s3 ls command, which lists all buckets in the account.

Create and verify the CA and certificate

To start, you can either use your own CA and certificate or, to follow along without your own CA, manually create a CA and certificate by using OpenSSL. Afterwards, you can verify that the CA and certificate comply with IAM Roles Anywhere requirements.

To create the CA and certificate

Note: Manually creating and signing RSA keys into X.509 certificates is not a suitable approach for production environments. This section is intended only for demonstration purposes.

  1. Create an OpenSSL config file called v3.ext, with the following content.
    [ req ]
    default_bits                    = 2048
    distinguished_name              = req_distinguished_name
    x509_extensions                 = v3_ca
    
    [ v3_cert ]
    basicConstraints                = critical, CA:FALSE
    keyUsage                        = critical, digitalSignature
    
    [ v3_ca ]
    subjectKeyIdentifier            = hash
    authorityKeyIdentifier          = keyid:always,issuer:always
    basicConstraints                = CA: true
    keyUsage                        = Certificate Sign
    
    [ req_distinguished_name ]
    countryName                     = Country Name (2 letter code)
    countryName_default             = US
    countryName_min                 = 2
    countryName_max                 = 2
    
    stateOrProvinceName             = State or Province Name (full name)
    stateOrProvinceName_default     = Washington
    
    localityName                    = Locality Name (eg, city)
    localityName_default            = Seattle

  2. Create the CA RSA private key ca-key.pem and choose a passphrase.
    openssl genrsa -aes256 -out ca-key.pem 2048

  3. Create the CA X.509 certificate ca-cert.pem, keeping the default settings for all options.
    openssl req -new -x509 -nodes -days 1095 -config v3.ext -key ca-key.pem -out ca-cert.pem

    The CA certificate is valid for three years. For recommendations on certificate validity, refer to the AWS Private CA documentation.

  4. Create an RSA private key key.pem, choose a new passphrase, and create a certificate signing request (CSR) csr.pem for the container. For Common Name (eg, fully qualified host name), enter myContainer. Leave the rest of the options blank.
    openssl req -newkey rsa:2048 -days 1 -keyout key.pem -out csr.pem

  5. Use the CA private key, CA certificate, and CSR to issue an X.509 certificate cert.pem for the container.
    openssl x509 -req -days 1 -sha256 -set_serial 01 -in csr.pem -out cert.pem -CA ca-cert.pem -CAkey ca-key.pem -extfile v3.ext -extensions v3_cert

To verify the CA and certificate

  1. Check whether your CA certificate satisfies IAM Roles Anywhere constraints.
    openssl x509 -text -noout -in ca-cert.pem

    The output should contain the following.

    Certificate:
        Data:
            Version: 3 (0x2)
        ...
        Signature Algorithm: sha256WithRSAEncryption
        ...
            X509v3 extensions:
        ...
                X509v3 Basic Constraints:
                    CA:TRUE
                X509v3 Key Usage:
                    Certificate Sign
        ...

  2. Check whether your certificate satisfies IAM Roles Anywhere constraints.
    openssl x509 -text -noout -in cert.pem

    The output should contain the following.

    Certificate:
        Data:
            Version: 3 (0x2)
        ...
        Signature Algorithm: sha256WithRSAEncryption
        ...
            X509v3 extensions:
        ...
                X509v3 Basic Constraints:
                    CA:FALSE
                X509v3 Key Usage:
                    Digital Signature
        ...

    Note that IAM Roles Anywhere also supports stronger encryption algorithms than SHA256.

Create IAM resources

After you verify that your PKI complies with IAM Roles Anywhere requirements, you’re ready to create IAM resources. Before you start, make sure you have configured the AWS CLI, including setting a default AWS Region.

To create the IAM role

  1. Create a file named policy.json that specifies a set of permissions that your container process needs. For this walkthrough, you will issue the simple AWS CLI command aws s3 ls, which needs the following permissions:
    {
      "Version": "2012-10-17",
      "Statement": [
        {
          "Effect": "Allow",
          "Action": [
             "s3:ListAllMyBuckets"
          ],
          "Resource": "*"
        }
      ]
    }

  2. Create a file named trust-policy.json that contains the assume role policy for an IAM role by the service IAM Roles Anywhere. Note that this policy defines which certificate can assume the role. We define this based on the common name (CN) of the certificate, but you can explore other possibilities in the IAM Roles Anywhere documentation.
    {
      "Version": "2012-10-17",
      "Statement": [
        {
          "Effect": "Allow",
          "Principal": {
              "Service": "rolesanywhere.amazonaws.com"
          },
          "Action": [
            "sts:AssumeRole",
            "sts:TagSession",
            "sts:SetSourceIdentity"
          ],
          "Condition": {
            "StringEquals": {
              "aws:PrincipalTag/x509Subject/CN": "myContainer"
            }
          }
        }
      ]
    }

  3. Create the IAM role named bucket-lister.
    aws iam create-role --role-name bucket-lister --assume-role-policy-document file://trust-policy.json

    The response should be a JSON document that describes the role.

  4. Attach the IAM policy document that you created earlier.
    aws iam put-role-policy --role-name bucket-lister --policy-name list-buckets --policy-document file://policy.json

    This command returns without a response.

To enable authentication with IAM Roles Anywhere

  1. Establish trust between IAM Roles Anywhere and an on-premises PKI by making the CA certificate known to IAM Roles Anywhere using a trust anchor. Create an IAM Roles Anywhere trust anchor from the CA certificate by using the following command:
    aws rolesanywhere create-trust-anchor --enabled --name myPrivateCA --source sourceData={x509CertificateData="$(cat ca-cert.pem)"},sourceType=CERTIFICATE_BUNDLE

    The response should be a JSON document that describes the trust anchor.

  2. Create an IAM Roles Anywhere profile. Make sure to replace <AWS_ACCOUNT ID> with your own information.
    aws rolesanywhere create-profile --enabled --name bucket-lister --role-arns "arn:aws:iam::<AWS_ACCOUNT_ID>:role/bucket-lister"

    The response should be a JSON document that describes the profile.

Create the Docker image

The Docker image that you will create in this step enables you to issue commands with the AWS CLI that are authenticated by using IAM Roles Anywhere.

To create the Docker image

  1. Create a file named docker-entrypoint.sh that configures the AWS CLI to use the IAM Roles Anywhere signing helper.
    #!/bin/sh
    set -e
    
    openssl rsa -in $ROLESANYWHERE_KEY_LOCATION -passin env:ROLESANYWHERE_KEY_PASSPHRASE -out /tmp/key.pem > /dev/null 2>&1
    
    echo "[default]" > ~/.aws/config
    echo "  credential_process = aws_signing_helper credential-process \
        --certificate $ROLESANYWHERE_CERT_LOCATION \
        --private-key /tmp/key.pem \
        --trust-anchor-arn $ROLESANYWHERE_TRUST_ANCHOR_ARN \
        --profile-arn $ROLESANYWHERE_PROFILE_ARN \
        --role-arn $ROLESANYWHERE_ROLE_ARN" >> ~/.aws/config
    
    exec "$@"

  2. Create a file named Dockerfile. This contains a multi-stage build. The first stage builds the IAM Roles Anywhere signing helper. The second stage copies the compiled signing helper binary into the official AWS CLI Docker image and changes the container entry point to the script you created earlier.
    FROM ubuntu:22.04 AS signing-helper-builder
    WORKDIR /build
    
    RUN apt update && apt install -y git build-essential golang-go
    
    RUN git clone --branch v1.1.1 https://github.com/aws/rolesanywhere-credential-helper.git
    RUN go env -w GOPRIVATE=*
    RUN go version
    
    RUN cd rolesanywhere-credential-helper && go build -buildmode=pie -ldflags "-X main.Version=1.0.2 -linkmode=external -extldflags=-static -w -s" -trimpath -o build/bin/aws_signing_helper main.go
    
    
    FROM amazon/aws-cli:2.11.27
    COPY --from=signing-helper-builder /build/rolesanywhere-credential-helper/build/bin/aws_signing_helper /usr/bin/aws_signing_helper
    
    RUN yum install -y openssl shadow-utils
    
    COPY ./docker-entrypoint.sh /docker-entrypoint.sh
    RUN chmod +x /docker-entrypoint.sh
    
    RUN useradd user
    USER user
    
    RUN mkdir ~/.aws
    
    ENTRYPOINT ["/bin/bash", "/docker-entrypoint.sh", "aws"]

    Note that the first build stage can remain the same for other use cases, such as for applications using an AWS SDK. Only the second stage would need to be adapted. Diving deeper into the technical details of the first build stage, note that building the credential helper from its source keeps the build independent of the processor architecture. The build process also statically packages dependencies that are not present in the official aws-cli Docker image. Depending on your use case, you may opt to download pre-built artifacts from the credential helper download page instead.

  3. Create the image as follows.
    docker build -t rolesanywhere .

Use the Docker image

To use the Docker image, use the following commands to run the created image manually. Make sure to replace <PRIVATE_KEY_PASSSPHRASE> with your own data.

profile_arn=$(aws rolesanywhere list-profiles  | jq -r '.profiles[] | select(.name=="bucket-lister") | .profileArn')
trust_anchor_arn=$(aws rolesanywhere list-trust-anchors | jq -r '.trustAnchors[] | select(.name=="myPrivateCA") | .trustAnchorArn')
role_arn=$(aws iam list-roles | jq -r '.Roles[] | select(.RoleName=="bucket-lister") | .Arn')

docker run -it -v $(pwd):/rolesanywhere -e ROLESANYWHERE_CERT_LOCATION=/rolesanywhere/cert.pem -e ROLESANYWHERE_KEY_LOCATION=/rolesanywhere/key.pem -e ROLESANYWHERE_KEY_PASSPHRASE=<PRIVATE_KEY_PASSSPHRASE> -e ROLESANYWHERE_TRUST_ANCHOR_ARN=$trust_anchor_arn -e ROLESANYWHERE_PROFILE_ARN=$profile_arn -e ROLESANYWHERE_ROLE_ARN=$role_arn rolesanywhere s3 ls

This command should return a list of buckets in your account.

Because we only granted permissions to list buckets, other commands that use this certificate, like the following, will fail with an UnauthorizedOperation error.

docker run -it -v $(pwd):/rolesanywhere -e ROLESANYWHERE_CERT_LOCATION=/rolesanywhere/cert.pem -e ROLESANYWHERE_KEY_LOCATION=/rolesanywhere/key.pem -e ROLESANYWHERE_KEY_PASSPHRASE=<PRIVATE_KEY_PASSSPHRASE> -e ROLESANYWHERE_TRUST_ANCHOR_ARN=$trust_anchor_arn -e ROLESANYWHERE_PROFILE_ARN=$profile_arn -e ROLESANYWHERE_ROLE_ARN=$role_arn rolesanywhere ec2 describe-instances --region us-east-1

Note that if you use a certificate that uses a different common name than myContainer, this command will instead return an AccessDeniedException error as it fails to assume the role bucket-lister.

To use the image in your own environment, consider the following:

  • How to provide the private key and certificate to your container. This depends on how and where your PKI provides certificates. As an example, consider a PKI that rotates certificate files in a host directory, which you can then mount as a directory to your container.
  • How to configure the environment variables. Some variables mentioned earlier, like ROLESANYWHERE_TRUST_ANCHOR_ARN, can be shared across containers, while ROLESANYWHERE_PROFILE_ARN and ROLESANYWHERE_ROLE_ARN should be scoped to a particular container.

Clean up

None of the resources created in this walkthrough incur additional AWS costs. But if you want to clean up AWS resources you created earlier, issue the following commands.

  • Delete the IAM policy from the IAM role.
    aws iam delete-role-policy --role-name bucket-lister --policy-name list-buckets

  • Delete the IAM role.
    aws iam delete-role --role-name bucket-lister

  • Delete the IAM Roles Anywhere profile.
    profile_id=$(aws rolesanywhere list-profiles | jq -r '.profiles[] | select(.name=="bucket-lister") | .profileId')
    aws rolesanywhere delete-profile --profile-id $profile_id

  • Delete the IAM Roles Anywhere trust anchor.
    trust_anchor_id=$(aws rolesanywhere list-trust-anchors | jq -r '.trustAnchors[] | select(.name=="myPrivateCA") | .trustAnchorId')
    aws rolesanywhere delete-trust-anchor --trust-anchor-id $trust_anchor_id

  • Delete the key material you created earlier to avoid accidentally reusing it or storing it in version control.
    rm ca-key.pem ca-cert.pem key.pem csr.pem cert.pem

What’s next

After you reconfigure your on-premises containerized application to access AWS resources by using IAM Roles Anywhere, assess your other hybrid workloads running on-premises that have access to AWS resources. The technique we described in this post isn’t limited to containerized workloads. We encourage you to identify other places in your on-premises infrastructure that rely on static IAM credentials and gradually switch them to use IAM Roles Anywhere.

Conclusion

In this blog post, you learned how to use IAM Roles Anywhere to help you meet security goals in your on-premises containerized system. Improve your security posture by using temporary credentials instead of static credentials to authenticate against the AWS API. Use your existing private CA to make credentials short-lived and automatically rotate them.

For more information, check out the IAM Roles Anywhere documentation. The workshop Deep Dive on AWS IAM Roles Anywhere provides another walkthrough that isn’t specific to Docker containers. If you have any questions, you can start a new thread on AWS re:Post or reach out to AWS Support.

Want more AWS Security news? Follow us on Twitter.

Ulrich Hinze

Ulrich Hinze

Ulrich is a Solutions Architect at AWS. He partners with software companies to architect and implement cloud-based solutions on AWS. Before joining AWS, he worked for AWS customers and partners in software engineering, consulting, and architecture roles for over 8 years.

Alex Paramonov

Alex Paramonov

Alex is an AWS Solutions Architect for Independent Software Vendors in Germany, passionate about Serverless and how it can solve real world problems. Before joining AWS, he worked with large and medium software development companies as a Full-stack Software Engineer and consultant.

An attendee’s guide to hybrid cloud and edge computing at AWS re:Invent 2023

Post Syndicated from Chris Munns original https://aws.amazon.com/blogs/compute/an-attendees-guide-to-hybrid-cloud-and-edge-computing-at-aws-reinvent-2023/

This post is written by Savitha Swaminathan, AWS Sr. Product Marketing Manager

AWS re:Invent 2023 starts on Nov 27th in Las Vegas, Nevada. The event brings technology business leaders, AWS partners, developers, and IT practitioners together to learn about the latest innovations, meet AWS experts, and network among their peer attendees.

This year, AWS re:Invent will once again have a dedicated track for hybrid cloud and edge computing. The sessions in this track will feature the latest innovations from AWS to help you build and run applications securely in the cloud, on premises, and at the edge – wherever you need to. You will hear how AWS customers are using our cloud services to innovate on premises and at the edge. You will also be able to immerse yourself in hands-on experiences with AWS hybrid and edge services through innovative demos and workshops.

At re:Invent there are several session types, each designed to provide you with a way to learn however fits you best:

  • Innovation Talks provide a comprehensive overview of how AWS is working with customers to solve their most important problems.
  • Breakout sessions are lecture style presentations focused on a topic or area of interest and are well liked by business leaders and IT practitioners, alike.
  • Chalk talks deep dive on customer reference architectures and invite audience members to actively participate in the white boarding exercise.
  • Workshops and builder sessions popular with developers and architects, provide the most hands-on experience where attendees can build real-time solutions with AWS experts.

The hybrid edge track will include one leadership overview session and 15 other sessions (4 breakouts, 6 chalk talks, and 5 workshops). The sessions are organized around 4 key themes: Low latency, Data residency, Migration and modernization, and AWS at the far edge.

Hybrid Cloud & Edge Overview

HYB201 | AWS wherever you need it

Join Jan Hofmeyr, Vice President, Amazon EC2, in this leadership session where he presents a comprehensive overview of AWS hybrid cloud and edge computing services, and how we are helping customers innovate on AWS wherever they need it – from Regions, to metro centers, 5G networks, on premises, and at the far edge. Jun Shi, CEO and President of Accton, will also join Jan on stage to discuss how Accton enables smart manufacturing across its global manufacturing sites using AWS hybrid, IoT, and machine learning (ML) services.

Low latency

Many customer workloads require single-digit millisecond latencies for optimal performance. Customers in every industry are looking for ways to run these latency sensitive portions of their applications in the cloud while simplifying operations and optimizing for costs. You will hear about customer use cases and how AWS edge infrastructure is helping companies like Riot Games meet their application performance goals and innovate at the edge.

Breakout session

HYB305 | Delivering low-latency applications at the edge

Chalk talk

HYB308 | Architecting for low latency and performance at the edge with AWS

Workshops

HYB302 | Architecting and deploying applications at the edge

HYB303 | Deploying a low-latency computer vision application at the edge

Data residency

As cloud has become main stream, governments and standards bodies continue to develop security, data protection, and privacy regulations. Having control over digital assets and meeting data residency regulations is becoming increasingly important for public sector customers and organizations operating in regulated industries. The data residency sessions deep dive into the challenges, solutions, and innovations that customers are addressing with AWS to meet their data residency requirements.

Breakout session

HYB309 | Navigating data residency and protecting sensitive data

Chalk talk

HYB307 | Architecting for data residency and data protection at the edge

Workshops

HYB301 | Addressing data residency requirements with AWS edge services

Migration and modernization

Migration and modernization in industries that have traditionally operated with on-premises infrastructure or self-managed data centers is helping customers achieve scale, flexibility, cost savings, and performance. We will dive into customer stories and real-world deployments, and share best practices for hybrid cloud migrations.

Breakout session

HYB203 | A migration strategy for edge and on-premises workloads

Chalk talk

HYB313 | Real-world analysis of successful hybrid cloud migrations

AWS at the far edge

Some customers operate in what we call the far edge: remote oil rigs, military and defense territories, and even space! In these sessions we cover customer use cases and explore how AWS brings cloud services to the far edge and helps customers gain the benefits of the cloud regardless of where they operate.

Breakout session

HYB306 | Bringing AWS to remote edge locations

Chalk talk

HYB312 | Deploying cloud-enabled applications starting at the edge

Workshops

HYB304 | Generative AI for robotics: Race for the best drone control assistant

In addition to the sessions across the 4 themes listed above, the track includes two additional chalk talks covering topics that are applicable more broadly to customers operating hybrid workloads. These chalk talks were chosen based on customer interest and will have repeat sessions, due to high customer demand.

HYB310 | Building highly available and fault-tolerant edge applications

HYB311 | AWS hybrid and edge networking architectures

Learn through interactive demos

In addition to breakout sessions, chalk talks, and workshops, make sure you check out our interactive demos to see the benefits of hybrid cloud and edge in action:

Drone Inspector: Generative AI at the Edge

Location: AWS Village | Venetian Level 2, Expo Hall, Booth 852 | AWS for Every App activation

Embark on a competitive adventure where generative artificial intelligence (AI) intersects with edge computing. Experience how drones can swiftly respond to chat instructions for a time-sensitive object detection mission. Learn how you can deploy foundation models and computer vision (CV) models at the edge using AWS hybrid and edge services for real-time insights and actions.

AWS Hybrid Cloud & Edge kiosk

Location: AWS Village | Venetian Level 2, Expo Hall, Booth 852 | Kiosk #9 & 10

Stop by and chat with our experts about AWS Local Zones, AWS Outposts, AWS Snow Family, AWS Wavelength, AWS Private 5G, AWS Telco Network Builder, and Integrated Private Wireless on AWS. Check out the hardware innovations inside an AWS Outposts rack up close and in person. Learn how you can set up a reliable private 5G network within days and live stream video content with minimal latency.

AWS Next Gen Infrastructure Experience

Location: AWS Village | Venetian Level 2, Expo Hall, Booth 852

Check out demos across Global Infrastructure, AWS for Hybrid Cloud & Edge, Compute, Storage, and Networking kiosks, share on social, and win prizes!

The Future of Connected Mobility

Location: Venetian Level 4, EBC Lounge, wall outside of Lando 4201B

Step into the driver’s seat and experience high fidelity 3D terrain driving simulation with AWS Local Zones. Gain real-time insights from vehicle telemetry with AWS IoT Greengrass running on AWS Snowcone and a broader set of AWS IoT services and Amazon Managed Grafana in the Region. Learn how to combine local data processing with cloud analytics for enhanced safety, performance, and operational efficiency. Explore how you can rapidly deliver the same experience to global users in 75+ countries with minimal application changes using AWS Outposts.

Immersive tourism experience powered by 5G and AR/VR

Location: Venetian, Level 2 | Expo Hall | Telco demo area

Explore and travel to Chichen Itza with an augmented reality (AR) application running on a private network fully built on AWS, which includes the Radio Access Network (RAN), the core, security, and applications, combined with services for deployment and operations. This demo features AWS Outposts.

AWS unplugged: A real time remote music collaboration session using 5G and MEC

Location: Venetian, Level 2 | Expo Hall | Telco demo area

We will demonstrate how musicians in Los Angeles and Las Vegas can collaborate in real time with AWS Wavelength. You will witness songwriters and musicians in Los Angeles and Las Vegas in a live jam session.

Disaster relief with AWS Snowball Edge and AWS Wickr

Location: AWS for National Security & Defense | Venetian, Casanova 606

The hurricane has passed leaving you with no cell coverage and you have a slim chance of getting on the internet. You need to set up a situational awareness and communications network for your team, fast. Using Wickr on Snowball Edge Compute, you can rapidly deploy a platform that provides both secure communications with rich collaboration functionality, as well as real time situational awareness with the Wickr ATAK integration. Allowing you to get on with what’s important.


We hope this guide to the Hybrid Cloud and Edge track at AWS re:Invent 2023 helps you plan for the event and we hope to see you there!

Join AWS Hybrid Cloud & Edge Day to Learn How to Deploy Your Applications in the Everywhere Cloud

Post Syndicated from Channy Yun original https://aws.amazon.com/blogs/aws/join-aws-hybrid-cloud-edge-day-to-learn-how-to-deploy-your-applications-in-the-everywhere-cloud/

In his keynote of AWS re:Invent 2021, Dr. Werner Vogels shared the insight of how “the everywhere cloud” is bringing AWS to new locales through AWS hardware and services and spotlighted it as one of his tech predictions for 2022 and beyond in his blog post.

“What we will see in 2022, and even more so in the years to come, is the cloud accelerating beyond the traditional centralized infrastructure model and into unexpected environments where specialized technology is needed. The cloud will be in your car, your tea kettle, and your TV. The cloud will be in everything from trucks driving down the road, to the ships and planes that transport goods. The cloud will be globally distributed, and connected to almost any digital device or system on Earth, and even in space.”

AWS provides a truly consistent and secure experience to build and run applications across the continuum of environments where customers operate—from the cloud to large metro areas, 5G networks, on-premises locations, and to mobile and Internet of Things (IoT) devices.

To learn more, join us for AWS Hybrid Cloud & Edge Day, a free-to-attend one-day virtual event on August 30, 2023, starting at 10:00 AM PDT (1:00 PM ET). We will stream the event simultaneously across multiple platforms, including LinkedIn Live, Twitter, YouTube, and Twitch.

You can hear from AWS leaders and industry analysts on the latest hybrid cloud and edge computing trends and emerging technologies and learn best practices for using AWS hybrid cloud and edge services across the cloud continuum. Also, learn from our customers on data strategies and key use cases and gain a deeper understanding of AWS hybrid cloud and edge services and new features and benefits.

Here are some of the highlights you can expect from this event:

Leadership session – To kick off the day, we have a leadership session featuring Jan Hofmeyr, vice president of EC2 Edge, sharing insights into how customers are building high-performance, intelligent applications with recently announced AWS hybrid cloud, edge, and IoT capabilities. Elias Khnaser, chief of research at EK Media Group, will join Jan to discuss the global, business, and economic trends impacting hybrid cloud and edge computing and discuss the customer requirements and use cases.

Cloud-closer sessions – We’ll discuss how AWS is bringing the cloud closer to metro areas and telco networks. Services such as AWS Local Zones, AWS Outposts family, and AWS Wavelength bring the power of cloud compute and storage to the edge of 5G networks, unlocking more performant mobile experiences. We’ll highlight new and innovative use cases, including Norton LifeLock, Electronic Arts, and Epic Games, who have taken advantage of the operational consistency between AWS Regions and the edge. Also you can learn how to deploy in hybrid cloud scenarios in on-premises locations, such as examples from MindBody and ElToro through Onica, and more customer cases.

On-premises sessions – Learn about our options to bring AWS Cloud to your data centers and on-premises locations for a truly consistent experience across your environments. We will review real-world examples of how AWS hybrid and edge services enable local processing of data for faster response time and faster decision-making. Also, we will share how Toyota takes advantage of hybrid options from Amazon ECS and Amazon EKS to use familiar management tools across your environments to successfully modernize your applications. You can learn how to meet your on-premises regulatory requirements and real-world scenarios effectively in critical aspects of digital sovereignty and data residency.

Rugged edge sessions – You will learn about AWS services to support rugged, mobile, and disconnected edge, such as AWS Snow Family to enable organizations to deploy compute workloads in locations with denied, disrupted, intermittent, and limited (DDIL) connectivity. Learn how DDR.Live deployed their own 4G/LTE or 5G private network using AWS Private 5G for live events in the place with limited wireless connection. We will discuss the top use cases, such as deploying a pre-trained object detection model and architecting applications at the edge. Finally, we will discuss the benefits and requirements of operating at the edge with Holger Mueller, vice president and principal analyst, Constellation Research, Inc.

IoT panel discussion – We will discuss from panelist of AWS IoT customers and industry experts on their innovation journey. Join us to see how EuroTech brought to market a set of devices and services that improve operational efficiencies with connectivity at the edge. You’ll also hear how Wallbox, an Electric Vehicle charging company, reduced their operational costs and scaled efficiently with AWS IoT services.

Multicloud sessions – AWS has the tools to help you run and support your multicloud operations in the areas of governance, ops management, observability, and more. We will discuss common challenges in hybrid and multicloud environments and how AWS helps you manage, operate, and automate your processes. We’ll also talk about how Rackspace used AWS Systems Manager for instance patching across hybrid and multicloud environments, automating their infrastructure management across cloud providers.

This event is for any customer and builder who is eager to learn more about hybrid cloud, edge computing, IoT, networking, content delivery, and 5G. We’ll cover how you can support applications that need to remain on premises or at the edge due to low latency, local data processing, or data residency requirements.

To learn more details, see the event schedule, and register for AWS Hybrid Cloud & Edge Day, go to the event page.

Channy

Deploy container applications in a multicloud environment using Amazon CodeCatalyst

Post Syndicated from Pawan Shrivastava original https://aws.amazon.com/blogs/devops/deploy-container-applications-in-a-multicloud-environment-using-amazon-codecatalyst/

In the previous post of this blog series, we saw how organizations can deploy workloads to virtual machines (VMs) in a hybrid and multicloud environment. This post shows how organizations can address the requirement of deploying containers, and containerized applications to hybrid and multicloud platforms using Amazon CodeCatalyst. CodeCatalyst is an integrated DevOps service which enables development teams to collaborate on code, and build, test, and deploy applications with continuous integration and continuous delivery (CI/CD) tools.

One prominent scenario where multicloud container deployment is useful is when organizations want to leverage AWS’ broadest and deepest set of Artificial Intelligence (AI) and Machine Learning (ML) capabilities by developing and training AI/ML models in AWS using Amazon SageMaker, and deploying the model package to a Kubernetes platform on other cloud platforms, such as Azure Kubernetes Service (AKS) for inference. As shown in this workshop for operationalizing the machine learning pipeline, we can train an AI/ML model, push it to Amazon Elastic Container Registry (ECR) as an image, and later deploy the model as a container application.

Scenario description

The solution described in the post covers the following steps:

  • Setup Amazon CodeCatalyst environment.
  • Create a Dockerfile along with a manifest for the application, and a repository in Amazon ECR.
  • Create an Azure service principal which has permissions to deploy resources to Azure Kubernetes Service (AKS), and store the credentials securely in Amazon CodeCatalyst secret.
  • Create a CodeCatalyst workflow to build, test, and deploy the containerized application to AKS cluster using Github Actions.

The architecture diagram for the scenario is shown in Figure 1.

Solution architecture diagram

Figure 1 – Solution Architecture

Solution Walkthrough

This section shows how to set up the environment, and deploy a HTML application to an AKS cluster.

Setup Amazon ECR and GitHub code repository

Create a new Amazon ECR and a code repository. In this case we’re using GitHub as the repository but you can create a source repository in CodeCatalyst or you can choose to link an existing source repository hosted by another service if that service is supported by an installed extension. Then follow the application and Docker image creation steps outlined in Step 1 in the environment creation process in exposing Multiple Applications on Amazon EKS. Create a file named manifest.yaml as shown, and map the “image” parameter to the URL of the Amazon ECR repository created above.

apiVersion: apps/v1
kind: Deployment
metadata:
  name: multicloud-container-deployment-app
  labels:
    app: multicloud-container-deployment-app
spec:
  selector:
    matchLabels:
      app: multicloud-container-deployment-app
  replicas: 2
  template:
    metadata:
      labels:
        app: multicloud-container-deployment-app
    spec:
      nodeSelector:
        "beta.kubernetes.io/os": linux
      containers:
      - name: ecs-web-page-container
        image: <aws_account_id>.dkr.ecr.us-west-2.amazonaws.com/<my_repository>
        imagePullPolicy: Always
        ports:
            - containerPort: 80
        resources:
          limits:
            memory: "100Mi"
            cpu: "200m"
      imagePullSecrets:
          - name: ecrsecret
---
apiVersion: v1
kind: Service
metadata:
  name: multicloud-container-deployment-service
spec:
  type: LoadBalancer
  ports:
  - port: 80
    targetPort: 80
  selector:
    app: multicloud-container-deployment-app

Push the files to Github code repository. The multicloud-container-app github repository should look similar to Figure 2 below

Files in multicloud container app github repository 

Figure 2 – Files in Github repository

Configure Azure Kubernetes Service (AKS) cluster to pull private images from ECR repository

Pull the docker images from a private ECR repository to your AKS cluster by running the following command. This setup is required during the azure/k8s-deploy Github Actions in the CI/CD workflow. Authenticate Docker to an Amazon ECR registry with get-login-password by using aws ecr get-login-password. Run the following command in a shell where AWS CLI is configured, and is used to connect to the AKS cluster. This creates a secret called ecrsecret, which is used to pull an image from the private ECR repository.

kubectl create secret docker-registry ecrsecret\
 --docker-server=<aws_account_id>.dkr.ecr.us-west-2.amazonaws.com/<my_repository>\
 --docker-username=AWS\
 --docker-password= $(aws ecr get-login-password --region us-west-2)

Provide ECR URI in the variable “–docker-server =”.

CodeCatalyst setup

Follow these steps to set up CodeCatalyst environment:

Configure access to the AKS cluster

In this solution, we use three GitHub Actions – azure/login, azure/aks-set-context and azure/k8s-deploy – to login, set the AKS cluster, and deploy the manifest file to the AKS cluster respectively. For the Github Actions to access the Azure environment, they require credentials associated with an Azure Service Principal.

Service Principals in Azure are identified by the CLIENT_ID, CLIENT_SECRET, SUBSCRIPTION_ID, and TENANT_ID properties. Create the Service principal by running the following command in the azure cloud shell:

az ad sp create-for-rbac \
    --name "ghActionHTMLapplication" \
    --scope /subscriptions/<SUBSCRIPTION_ID>/resourceGroups/<RESOURCE_GROUP> \
    --role Contributor \
    --sdk-auth

The command generates a JSON output (shown in Figure 3), which is stored in CodeCatalyst secret called AZURE_CREDENTIALS. This credential is used by azure/login Github Actions.

JSON output stored in AZURE-CREDENTIALS secret

Figure 3 – JSON output

Configure secrets inside CodeCatalyst Project

Create three secrets CLUSTER_NAME (Name of AKS cluster), RESOURCE_GROUP(Name of Azure resource group) and AZURE_CREDENTIALS(described in the previous step) as described in the working with secret document. The secrets are shown in Figure 4.

Secrets in CodeCatalyst

Figure 4 – CodeCatalyst Secrets

CodeCatalyst CI/CD Workflow

To create a new CodeCatalyst workflow, select CI/CD from the navigation on the left and select Workflows (1). Then, select Create workflow (2), leave the default options, and select Create (3) as shown in Figure 5.

Create CodeCatalyst CI/CD workflow

Figure 5 – Create CodeCatalyst CI/CD workflow

Add “Push to Amazon ECR” Action

Add the Push to Amazon ECR action, and configure the environment where you created the ECR repository as shown in Figure 6. Refer to adding an action to learn how to add CodeCatalyst action.

Create ‘Push to ECR’ CodeCatalyst Action

Figure 6 – Create ‘Push to ECR’ Action

Select the Configuration tab and specify the configurations as shown in Figure7.

Configure ‘Push to ECR’ CodeCatalyst Action

Figure 7 – Configure ‘Push to ECR’ Action

Configure the Deploy action

1. Add a GitHub action for deploying to AKS as shown in Figure 8.

Github action to deploy to AKS

Figure 8 – Github action to deploy to AKS

2. Configure the GitHub action from the configurations tab by adding the following snippet to the GitHub Actions YAML property:

- name: Install Azure CLI
  run: pip install azure-cli
- name: Azure login
  id: login
  uses: azure/[email protected]
  with:
    creds: ${Secrets.AZURE_CREDENTIALS}
- name: Set AKS context
  id: set-context
  uses: azure/aks-set-context@v3
  with:
    resource-group: ${Secrets.RESOURCE_GROUP}
    cluster-name: ${Secrets.CLUSTER_NAME}
- name: Setup kubectl
  id: install-kubectl
  uses: azure/setup-kubectl@v3
- name: Deploy to AKS
  id: deploy-aks
  uses: Azure/k8s-deploy@v4
  with:
    namespace: default
    manifests: manifest.yaml
    pull-images: true

Github action configuration for deploying application to AKS

Figure 9 – Github action configuration

3. The workflow is now ready and can be validated by choosing ‘Validate’ and then saved to the repository by choosing ‘Commit’.
We have implemented an automated CI/CD workflow that builds the container image of the application (refer Figure 10), pushes the image to ECR, and deploys the application to AKS cluster. This CI/CD workflow is triggered as application code is pushed to the repository.

Automated CI/CD workflow

Figure 10 – Automated CI/CD workflow

Test the deployment

When the HTML application runs, Kubernetes exposes the application using a public facing load balancer. To find the external IP of the load balancer, connect to the AKS cluster and run the following command:

kubectl get service multicloud-container-deployment-service

The output of the above command should look like the image in Figure 11.

Output of kubectl get service command

Figure 11 – Output of kubectl get service

Paste the External IP into a browser to see the running HTML application as shown in Figure 12.

HTML application running successfully in AKS

Figure 12 – Application running in AKS

Cleanup

If you have been following along with the workflow described in the post, you should delete the resources you deployed so you do not continue to incur charges. First, delete the Amazon ECR repository using the AWS console. Second, delete the project from CodeCatalyst by navigating to Project settings and choosing Delete project. There’s no cost associated with the CodeCatalyst project and you can continue using it. Finally, if you deployed the application on a new AKS cluster, delete the cluster from the Azure console. In case you deployed the application to an existing AKS cluster, run the following commands to delete the application resources.

kubectl delete deployment multicloud-container-deployment-app
kubectl delete services multicloud-container-deployment-service

Conclusion

In summary, this post showed how Amazon CodeCatalyst can help organizations deploy containerized workloads in a hybrid and multicloud environment. It demonstrated in detail how to set up and configure Amazon CodeCatalyst to deploy a containerized application to Azure Kubernetes Service, leveraging a CodeCatalyst workflow, and GitHub Actions. Learn more and get started with your Amazon CodeCatalyst journey!

If you have any questions or feedback, leave them in the comments section.

About Authors

Picture of Pawan

Pawan Shrivastava

Pawan Shrivastava is a Partner Solution Architect at AWS in the WWPS team. He focusses on working with partners to provide technical guidance on AWS, collaborate with them to understand their technical requirements, and designing solutions to meet their specific needs. Pawan is passionate about DevOps, automation and CI CD pipelines. He enjoys watching MMA, playing cricket and working out in the gym.

Picture of Brent

Brent Van Wynsberge

Brent Van Wynsberge is a Solutions Architect at AWS supporting enterprise customers. He accelerates the cloud adoption journey for organizations by aligning technical objectives to business outcomes and strategic goals, and defining them where needed. Brent is an IoT enthusiast, specifically in the application of IoT in manufacturing, he is also interested in DevOps, data analytics and containers.

Picture of Amandeep

Amandeep Bajwa

Amandeep Bajwa is a Senior Solutions Architect at AWS supporting Financial Services enterprises. He helps organizations achieve their business outcomes by identifying the appropriate cloud transformation strategy based on industry trends, and organizational priorities. Some of the areas Amandeep consults on are cloud migration, cloud strategy (including hybrid & multicloud), digital transformation, data & analytics, and technology in general.

Picture of Brian

Brian Beach

Brian Beach has over 20 years of experience as a Developer and Architect. He is currently a Principal Solutions Architect at Amazon Web Services. He holds a Computer Engineering degree from NYU Poly and an MBA from Rutgers Business School. He is the author of “Pro PowerShell for Amazon Web Services” from Apress. He is a regular author and has spoken at numerous events. Brian lives in North Carolina with his wife and three kids.

How to deploy workloads in a multicloud environment with AWS developer tools

Post Syndicated from Brent Van Wynsberge original https://aws.amazon.com/blogs/devops/how-to-deploy-workloads-in-a-multicloud-environment-with-aws-developer-tools/

As organizations embrace cloud computing as part of “cloud first” strategy, and migrate to the cloud, some of the enterprises end up in a multicloud environment.  We see that enterprise customers get the best experience, performance and cost structure when they choose a primary cloud provider. However, for a variety of reasons, some organizations end up operating in a multicloud environment. For example, in case of mergers & acquisitions, an organization may acquire an entity which runs on a different cloud platform, resulting in the organization operating in a multicloud environment. Another example is in the case where an ISV (Independent Software Vendor) provides services to customers operating on different cloud providers. One more example is the scenario where an organization needs to adhere to data residency and data sovereignty requirements, and ends up with workloads deployed to multiple cloud platforms across locations. Thus, the organization ends up running in a multicloud environment.

In the scenarios described above, one of the challenges organizations face operating such a complex environment is managing release process (building, testing, and deploying applications at scale) across multiple cloud platforms. If an organization’s primary cloud provider is AWS, they may want to continue using AWS developer tools to deploy workloads in other cloud platforms. Organizations facing such scenarios can leverage AWS services to develop their end-to-end CI/CD and release process instead of developing a release pipeline for each platform, which is complex, and not sustainable in the long run.

In this post we show how organizations can continue using AWS developer tools in a hybrid and multicloud environment. We walk the audience through a scenario where we deploy an application to VMs running on-premises and Azure, showcasing AWS’ hybrid and multicloud DevOps capabilities.

Solution and scenario overview

In this post we’re demonstrating the following steps:

  • Setup a CI/CD pipeline using AWS CodePipeline, and show how it’s run when application code is updated, and checked into the code repository (GitHub).
  • Check out application code from the code repository, and use an IDE (Visual Studio Code) to make changes, and check-in the code to the code repository.
  • Check in the modified application code to automatically run the release process built using AWS CodePipeline. It makes use of AWS CodeBuild to retrieve the latest version of code from code repository, compile it, build the deployment package, and test the application.
  • Deploy the updated application to VMs across on-premises, and Azure using AWS CodeDeploy.

The high-level solution is shown below. This post does not show all of the possible combinations and integrations available to build the CI/CD pipeline. As an example, you can integrate the pipeline with your existing tools for test and build such as Selenium, Jenkins, SonarQube etc.

This post focuses on deploying application in a multicloud environment, and how AWS Developer Tools can support virtually any scenario or use case specific to your organization. We will be deploying a sample application from this AWS tutorial to an on-premises server, and an Azure Virtual Machine (VM) running Red Hat Enterprise Linux (RHEL). In future posts in this series, we will cover how you can deploy any type of workload using AWS tools, including containers, and serverless applications.

Architecture Diagram

CI/CD pipeline setup

This section describes instructions for setting up a multicloud CI/CD pipeline.

Note: A key point to note is that the CI/CD pipeline setup, and related sub-sections in this post, are a one-time activity, and you’ll not need to perform these steps every time an application is deployed or modified.

Install CodeDeploy agent

The AWS CodeDeploy agent is a software package that is used to execute deployments on an instance. You can install the CodeDeploy agent on an on-premises server and Azure VM by either using the command line, or AWS Systems Manager.

Setup GitHub code repository

Setup GitHub code repository using the following steps:

  1. Create a new GitHub code repository or use a repository that already exists.
  2. Copy the Sample_App_Linux app (zip) from Amazon S3 as described in Step 3 of Upload a sample application to your GitHub repository tutorial.
  3. Commit the files to code repository
    git add .
    git commit -m 'Initial Commit'
    git push

You will use this repository to deploy your code across environments.

Configure AWS CodePipeline

Follow the steps outlined below to setup and configure CodePipeline to orchestrate the CI/CD pipeline of our application.

  1. Navigate to CodePipeline in the AWS console and click on ‘Create pipeline’
  2. Give your pipeline a name (eg: MyWebApp-CICD) and allow CodePipeline to create a service role on your behalf.
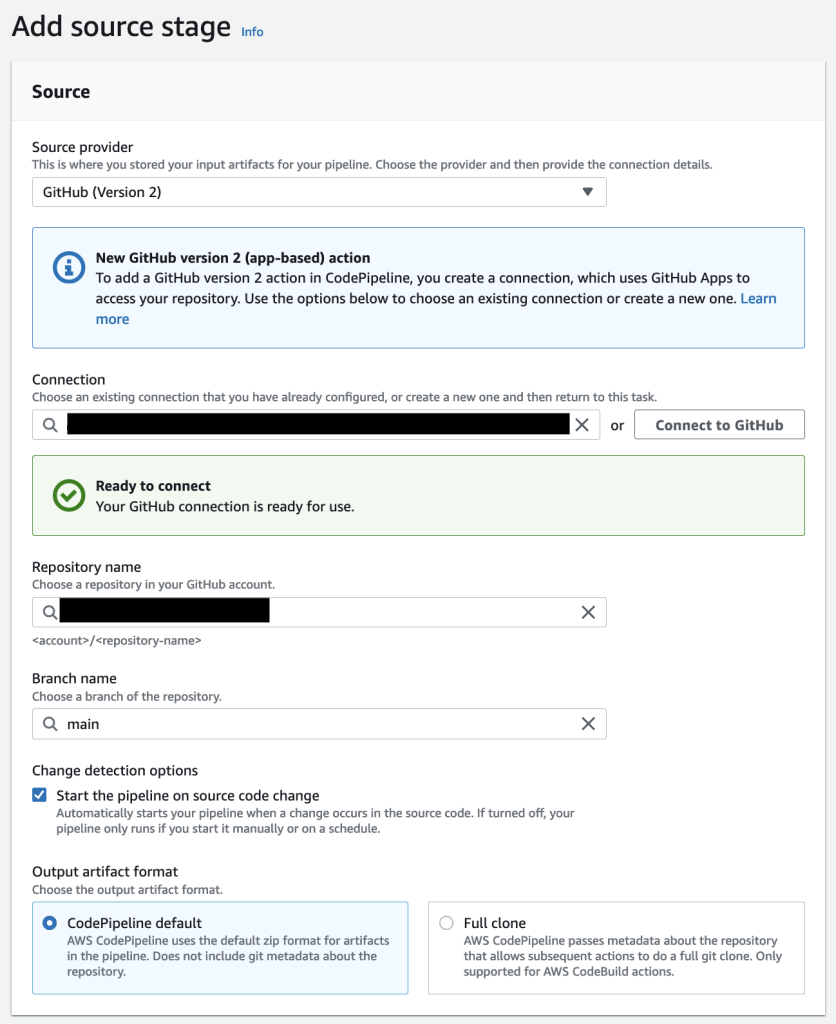
  3. For the source stage, select GitHub (v2) as your source provide and click on the Connect to GitHub button to give CodePipeline access to your git repository.
  4. Create a new GitHub connection and click on the Install a new App button to install the AWS Connector in your GitHub account.
  5. Back in the CodePipeline console select the repository and branch you would like to build and deploy.

Image showing the configured source stage

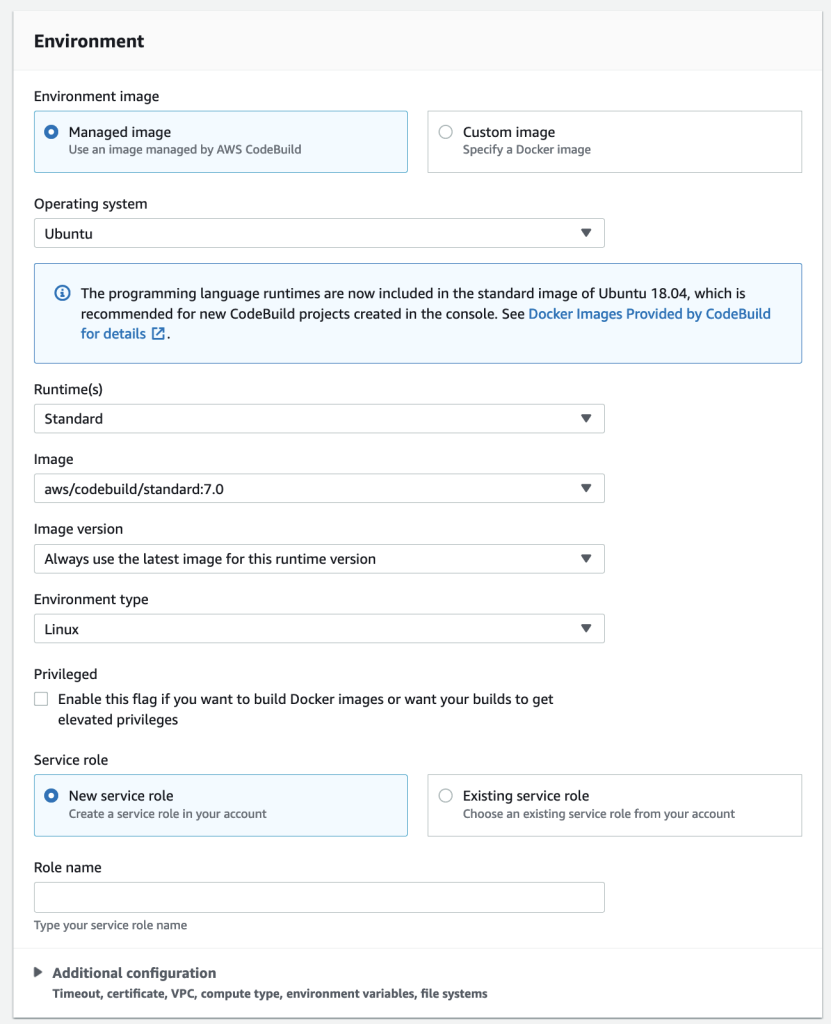
  1. Now we create the build stage; Select AWS CodeBuild as the build provider.
  2. Click on the ‘Create project’ button to create the project for your build stage, and give your project a name.
  3. Select Ubuntu as the operating system for your managed image, chose the standard runtime and select the ‘aws/codebuild/standard’ image with the latest version.

Image showing the configured environment

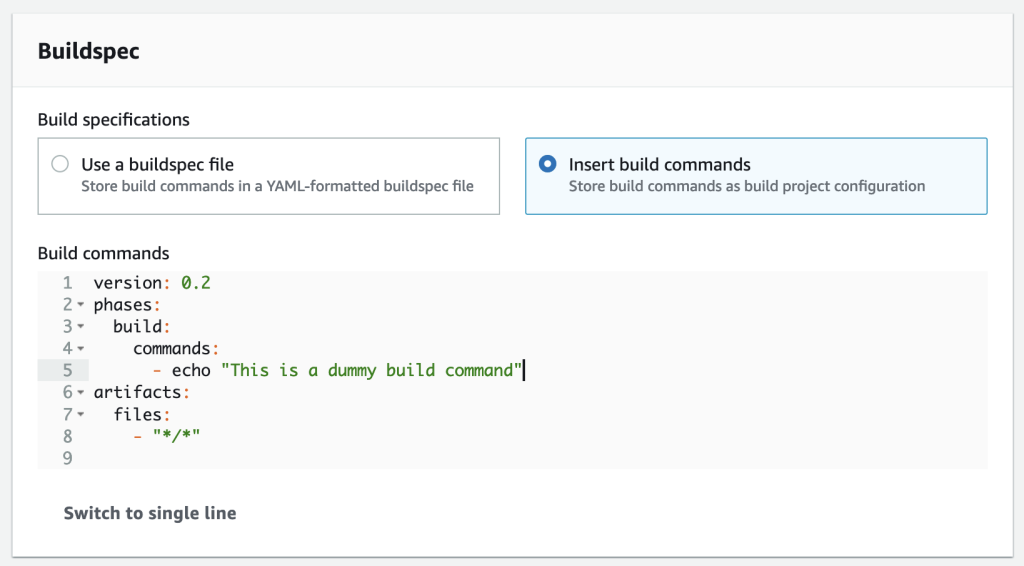
  1. In the Buildspec section select “Insert build commands” and click on switch to editor. Enter the following yaml code as your build commands:
version: 0.2
phases:
    build:
        commands:
            - echo "This is a dummy build command"
artifacts:
    files:
        - "*/*"

Note: you can also integrate build commands to your git repository by using a buildspec yaml file. More information can be found at Build specification reference for CodeBuild.

  1. Leave all other options as default and click on ‘Continue to CodePipeline’

Image showing the configured buildspec

  1. Back in the CodePipeline console your Project name will automatically be filled in. You can now continue to the next step.
  2. Click the “Skip deploy stage” button; We will create this in the next section.
  3. Review your changes and click “Create pipeline”. Your newly created pipeline will now build for the first time!

Image showing the first execution of the CI/CD pipeline

Configure AWS CodeDeploy on Azure and on-premises VMs

Now that we have built our application, we want to deploy it to both the environments – Azure, and on-premises. In the “Install CodeDeploy agent” section we’ve already installed the CodeDeploy agent. As a one-time step we now have to give the CodeDeploy agents access to the AWS environment.  You can leverage AWS Identity and Access Management (IAM) Roles Anywhere in combination with the code-deploy-session-helper to give access to the AWS resources needed.
The IAM Role should at least have the AWSCodeDeployFullAccess AWS managed policy and Read only access to the CodePipeline S3 bucket in your account (called codepipeline-<region>-<account-id>) .

For more information on how to setup IAM Roles Anywhere please refer how to extend AWS IAM roles to workloads outside of AWS with IAM Roles Anywhere. Alternative ways to configure access can be found in the AWS CodeDeploy user guide. Follow the steps below for instances you want to configure.

  1. Configure your CodeDeploy agent as described in the user guide. Ensure the AWS Command Line Interface (CLI) is installed on your VM and execute the following command to register the instance with CodeDeploy.
    aws deploy register-on-premises-instance --instance-name <name_for_your_instance> --iam-role-arn <arn_of_your_iam_role>
  1. Tag the instance as follows
    aws deploy add-tags-to-on-premises-instances --instance-names <name_for_your_instance> --tags Key=Application,Value=MyWebApp
  2. You should now see both instances registered in the “CodeDeploy > On-premises instances” panel. You can now deploy application to your Azure VM and on premises VMs!

Image showing the registered instances

Configure AWS CodeDeploy to deploy WebApp

Follow the steps mentioned below to modify the CI/CD pipeline to deploy the application to Azure, and on-premises environments.

  1. Create an IAM role named CodeDeployServiceRole and select CodeDeploy > CodeDeploy as your use case. IAM will automatically select the right policy for you. CodeDeploy will use this role to manage the deployments of your application.
  2. In the AWS console navigate to CodeDeploy > Applications. Click on “Create application”.
  3. Give your application a name and choose “EC2/On-premises” as the compute platform.
  4. Configure the instances we want to deploy to. In the detail view of your application click on “Create deployment group”.
  5. Give your deployment group a name and select the CodeDeployServiceRole.
  6. In the environment configuration section choose On-premises Instances.
  7. Configure the Application, MyWebApp key value pair.
  8. Disable load balancing and leave all other options default.
  9. Click on create deployment group. You should now see your newly created deployment group.

Image showing the created CodeDeploy Application and Deployment group

  1. We can now edit our pipeline to deploy to the newly created deployment group.
  2. Navigate to your previously created Pipeline in the CodePipeline section and click edit. Add the deploy stage by clicking on Add stage and name it Deploy. Aftewards click Add action.
  3. Name your action and choose CodeDeploy as your action provider.
  4. Select “BuildArtifact” as your input artifact and select your newly created application and deployment group.
  5. Click on Done and on Save in your pipeline to confirm the changes. You have now added the deploy step to your pipeline!

Image showing the updated pipeline

This completes the on-time devops pipeline setup, and you will not need to repeat the process.

Automated DevOps pipeline in action

This section demonstrates how the devops pipeline operates end-to-end, and automatically deploys application to Azure VM, and on-premises server when the application code changes.

  1. Click on Release Change to deploy your application for the first time. The release change button manually triggers CodePipeline to update your code. In the next section we will make changes to the repository which triggers the pipeline automatically.
  2. During the “Source” stage your pipeline fetches the latest version from github.
  3. During the “Build” stage your pipeline uses CodeBuild to build your application and generate the deployment artifacts for your pipeline. It uses the buildspec.yml file to determine the build steps.
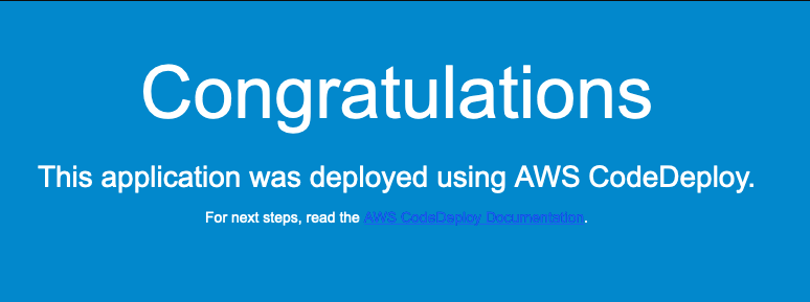
  4. During the “Deploy” stage your pipeline uses CodeDeploy to deploy the build artifacts to the configured Deployment group – Azure VM and on-premises VM. Navigate to the url of your application to see the results of the deployment process.

Image showing the deployed sample application


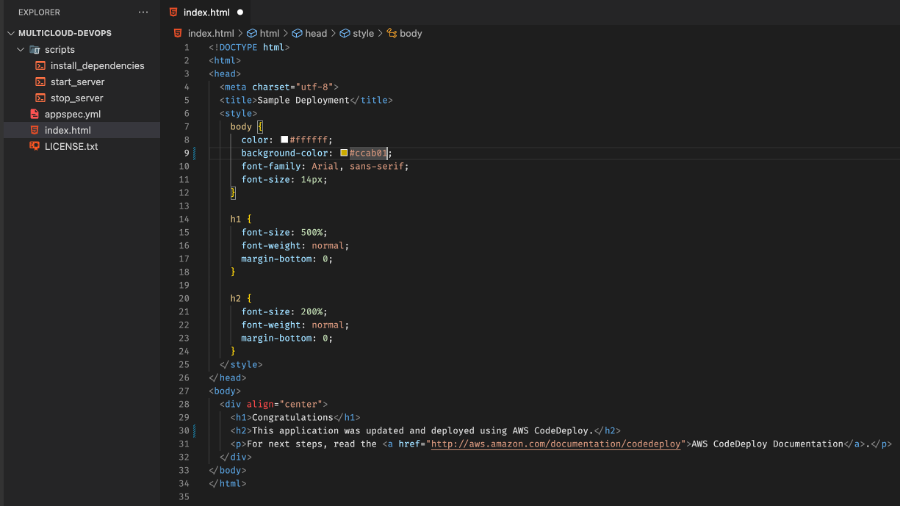
Update application code in IDE

You can modify the application code using your favorite IDE. In this example we will change the background color and a paragraph of the sample application.

Image showing modifications being made to the file

Once you’ve modified the code, save the updated file followed by pushing the code to the code repository.

git add .
git commit -m "I made changes to the index.html file "
git push

DevOps pipeline (CodePipeline) – compile, build, and test

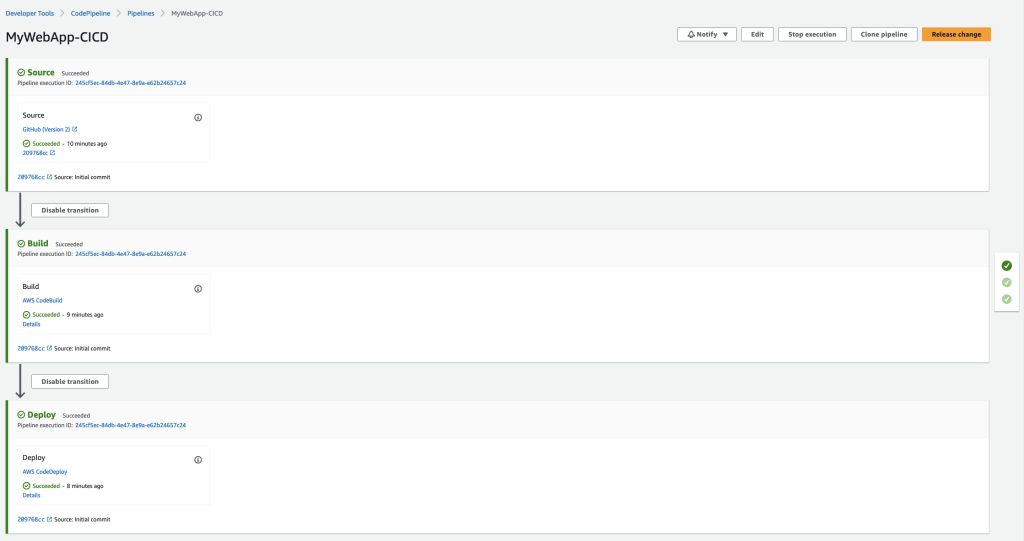
Once the code is updated, and pushed to GitHub, the DevOps pipeline (CodePipeline) automatically compiles, builds and tests the modified application. You can navigate to your pipeline (CodePipeline) in the AWS Console, and should see the pipeline running (or has recently completed). CodePipeline automatically executes the Build and Deploy steps. In this case we’re not adding any complex logic, but based on your organization’s requirements you can add any build step, or integrate with other tools.

Image showing CodePipeline in action

Deployment process using CodeDeploy

In this section, we describe how the modified application is deployed to the Azure, and on-premises VMs.

  1. Open your pipeline in the CodePipeline console, and click on the “AWS CodeDeploy” link in the Deploy step to navigate to your deployment group. Open the “Deployments” tab.

Image showing application deployment history

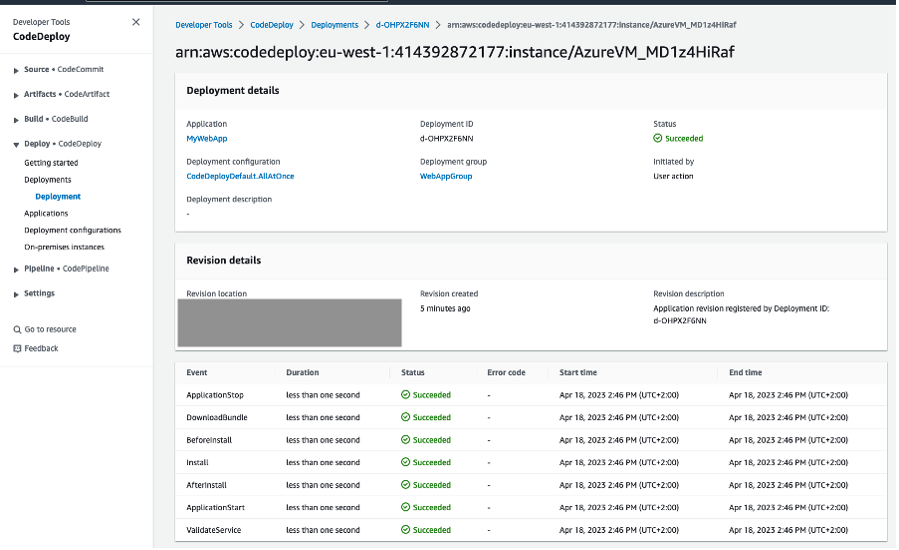
  1. Click on the first deployment in the Application deployment history section. This will show the details of your latest deployment.

Image showing deployment lifecycle events for the deployment

  1. In the “Deployment lifecycle events” section click on one of the “View events” links. This shows you the lifecycle steps executed by CodeDeploy and will display the error log output if any of the steps have failed.

Image showing deployment events on instance

  1. Navigate back to your application. You should now see your changes in the application. You’ve successfully set up a multicloud DevOps pipeline!

Image showing a new version of the deployed application

Conclusion

In summary, the post demonstrated how AWS DevOps tools and services can help organizations build a single release pipeline to deploy applications and workloads in a hybrid and multicloud environment. The post also showed how to set up CI/CD pipeline to deploy applications to AWS, on-premises, and Azure VMs.

If you have any questions or feedback, leave them in the comments section.

About the Authors

Picture of Amandeep

Amandeep Bajwa

Amandeep Bajwa is a Senior Solutions Architect at AWS supporting Financial Services enterprises. He helps organizations achieve their business outcomes by identifying the appropriate cloud transformation strategy based on industry trends, and organizational priorities. Some of the areas Amandeep consults on are cloud migration, cloud strategy (including hybrid & multicloud), digital transformation, data & analytics, and technology in general.

Picture of Pawan

Pawan Shrivastava

Pawan Shrivastava is a Partner Solution Architect at AWS in the WWPS team. He focusses on working with partners to provide technical guidance on AWS, collaborate with them to understand their technical requirements, and designing solutions to meet their specific needs. Pawan is passionate about DevOps, automation and CI CD pipelines. He enjoys watching mma, playing cricket and working out in the gym.

Picture of Brent

Brent Van Wynsberge

Brent Van Wynsberge is a Solutions Architect at AWS supporting enterprise customers. He guides organizations in their digital transformation and innovation journey and accelerates cloud adoption. Brent is an IoT enthusiast, specifically in the application of IoT in manufacturing, he is also interested in DevOps, data analytics, containers, and innovative technologies in general.

Picture of Mike

Mike Strubbe

Mike is a Cloud Solutions Architect Manager at AWS with a strong focus on cloud strategy, digital transformation, business value, leadership, and governance. He helps Enterprise customers achieve their business goals through cloud expertise, coupled with strong business acumen skills. Mike is passionate about implementing cloud strategies that enable cloud transformations, increase operational efficiency and drive business value.