All posts by Vineeth Nair

Automate Terraform Deployments with Amazon CodeCatalyst and Terraform Community action

Post Syndicated from Vineeth Nair original https://aws.amazon.com/blogs/devops/automate-terraform-deployments-with-amazon-codecatalyst-and-terraform-community-action/

Amazon CodeCatalyst integrates continuous integration and deployment (CI/CD) by bringing key development tools together on one platform. With the entire application lifecycle managed in one tool, CodeCatalyst empowers rapid, dependable software delivery. CodeCatalyst offers a range of actions which is the main building block of a workflow, and defines a logical unit of work to perform during a workflow run. Typically, a workflow includes multiple actions that run sequentially or in parallel depending on how you’ve configured them.

Introduction

Infrastructure as code (IaC) has become a best practice for managing IT infrastructure. IaC uses code to provision and manage your infrastructure in a consistent, programmatic way. Terraform by HashiCorp is one of most common tools for IaC.

With Terraform, you define the desired end state of your infrastructure resources in declarative configuration files. Terraform determines the necessary steps to reach the desired state and provisions the infrastructure automatically. This removes the need for manual processes while enabling version control, collaboration, and reproducibility across your infrastructure.

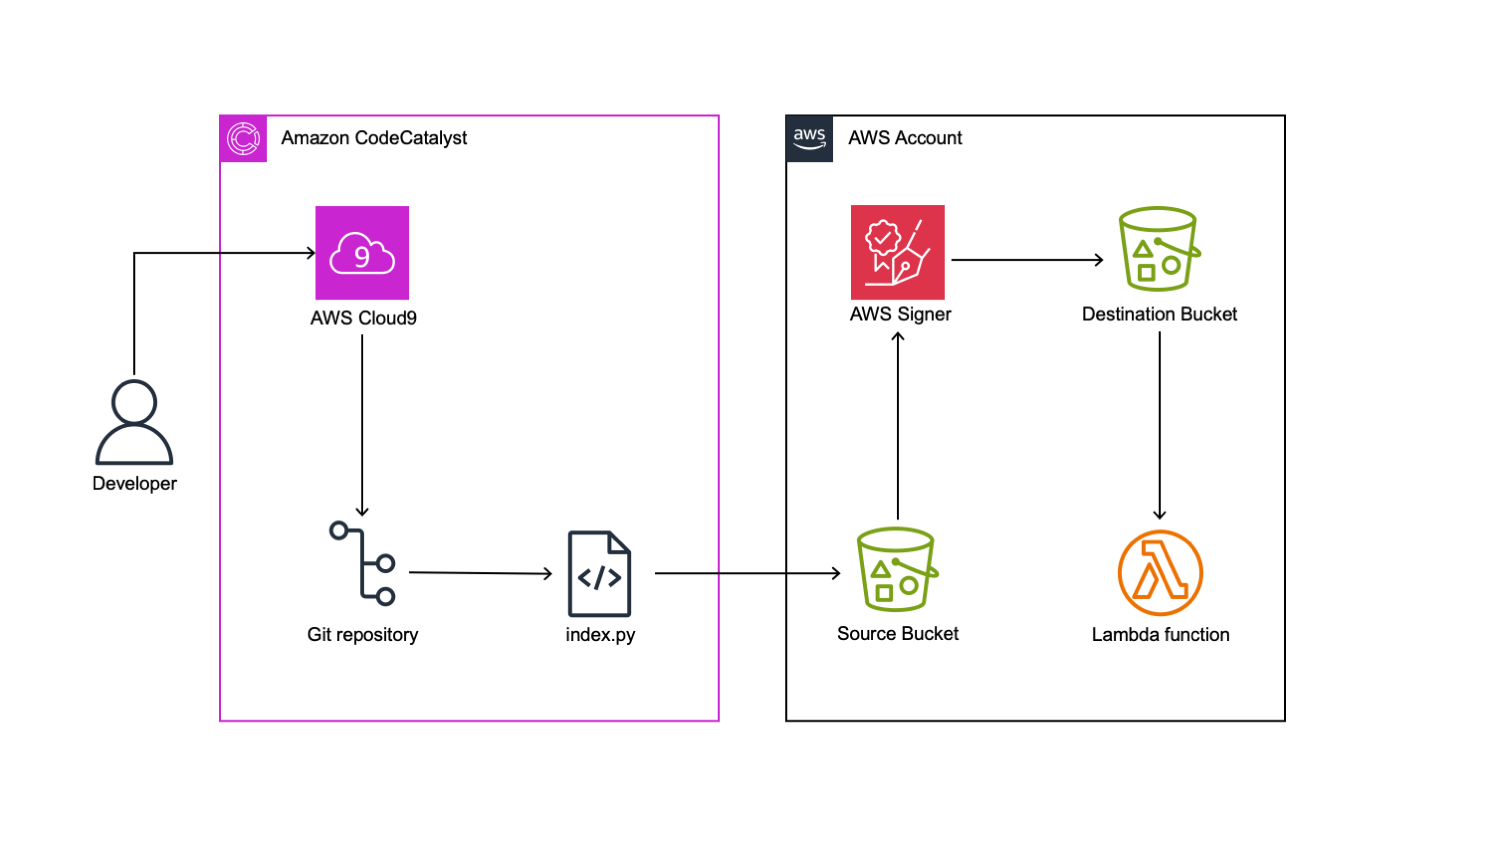
In this blog post, we will demonstrate using the “Terraform Community Edition” action in CodeCatalyst to create resources in an AWS account.

Amazon CodeCatalyst workflow overview
Figure 1: Amazon CodeCatalyst Action

Prerequisites

To follow along with the post, you will need the following items:

Walkthrough

In this walkthrough we create an Amazon S3 bucket using the Terraform Community Edition action in Amazon CodeCatalyst. The action will execute the Terraform commands needed to apply your configuration. You configure the action with a specified Terraform version. When the action runs it uses that Terraform version to deploy your Terraform templates, provisioning the defined infrastructure. This action will run terraform init to initialize the working directory, terraform plan to preview changes, and terraform apply to create the Amazon S3 bucket based on the Terraform configuration in a target AWS Account. At the end of the post your workflow will look like the following:

Amazon CodeCatalyst Workflow with Terraform Community Action

Figure 2: Amazon CodeCatalyst Workflow with Terraform Community Action

Create the base workflow

To begin, we create a workflow that will execute our Terraform code. In the CodeCatalyst project, click on CI/CD on left pane and select Workflows. In the Workflows pane, click on Create Workflow.

Creating Amazon CodeCatalyst Workflow

Figure 3: Creating Amazon CodeCatalyst Workflow

We have taken an existing repository my-sample-terraform-repository as a source repository.

Creating Workflow from source repository

Figure 4 : Creating Workflow from source repository

Once the source repository is selected, select Branch as main and click Create. You will have an empty workflow. You can edit the workflow from within the CodeCatalyst console. Click on the Commit button to create an initial commit:

Initial Workflow commit

Figure 5: Initial Workflow commit

On the Commit Workflow dialogue, add a commit message, and click on Commit. Ignore any validation errors at this stage:

Completing Initial Commit for Workflow

Figure 6: Completing Initial Commit for Workflow

Connect to CodeCatalyst Dev Environment

For this post, we will use an AWS Cloud9 Dev Environment to edit our workflow. Your first step is to connect to the dev environment. Select Code → Dev Environments.

Navigate to CodeCatalyst Dev Environments

Figure 7 : Navigate to CodeCatalyst Dev Environments

If you do not already have a Dev Environment you can create an instance by selecting the Create Dev Environment dropdown and selecting AWS Cloud9 (in browser). Leave the options as default and click on Create to provision a new Dev Environment.

Create CodeCatalyst Dev Environment

Figure 8: Create CodeCatalyst Dev Environment

Once the Dev Environment has provisioned, you are redirected to a Cloud9 instance in browser. The Dev Environment automatically clones the existing repository for the Terraform project code. We at first create a main.tf file in root of the repository with the Terraform code for creating an Amazon S3 bucket. To do this, we right click on the repository folder in the tree-pane view on the left side of the Cloud9 Console window and select New File

Creating a new file in Cloud9

Figure 9: Creating a new file in Cloud9

We are presented with a new file which we will name main.tf, this file will store the Terraform code. We then edit main.tf by right clicking on the file and selecting open. We insert the code below into main.tf. The code has a Terraform resource block to create an AWS S3 Bucket. The configuration also uses Terraform AWS datasources to obtain AWS region and AWS Account ID data which is used to form part of the bucket name. Finally, we use a backend block to configure Terraform to use an AWS S3 bucket to store Terraform state data. To save our changes we select File -> Save

: Adding Terraform Code

Figure 10: Adding Terraform Code

Now let’s start creating Terraform Workflow using Amazon CodeCatalyst Terraform Community Action. Within your repository go to .codecatalyst/workflows directory and open the <workflowname.yaml> file.

Creating CodeCatalyst Workflow

Figure 11: Creating CodeCatalyst Workflow

The below code snippet is an example workflow definition with terraform plan and terraform apply. We will enter this into our workflow file, with the relevant configuration settings for our environment.

The workflow does the following:

  • When a change is pushed to the main branch, a new workflow execution is triggered. This workflow carries a Terraform plan and subsequent apply operation.
    Name: terraform-action-workflow
    Compute:
      Type: EC2
      Fleet: Linux.x86-64.Large
    SchemaVersion: "1.0"
    Triggers:
      - Type: Push
        Branches:
          -  main
    Actions: 
      PlanTerraform:
        Identifier: codecatalyst-labs/provision-with-terraform-community@v1
        Environment:
          Name: dev 
          Connections:
            - Name: codecatalyst
              Role: CodeCatalystWorkflowDevelopmentRole # The IAM role to be used
        Inputs:
          Sources:
            - WorkflowSource
        Outputs:
          Artifacts:
            - Name: tfplan # generates a tfplan output artifact
              Files:
                - tfplan.out
        Configuration:
          AWSRegion: eu-west-2
          StateBucket: tfstate-bucket # The Terraform state S3 Bucket
          StateKey: terraform.tfstate # The Terraform state file
          StateKeyPrefix: states/ # The path to the state file (optional)
          StateTable: tfstate-table # The Dynamo DB database
          TerraformVersion: ‘1.5.1’ # The Terraform version to be used
          TerraformOperationMode: plan # The Terraform operation- can be plan or apply
      ApplyTerraform:
        Identifier: codecatalyst-labs/provision-with-terraform-community@v1
        DependsOn:
          - PlanTerraform
        Environment:
          Name: dev 
          Connections:
            - Name: codecatalyst
              Role: CodeCatalystWorkflowDevelopmentRole
        Inputs:
          Sources:
            - WorkflowSource
          Artifacts:
            - tfplan
        Configuration:
          AWSRegion: eu-west-2
          StateBucket: tfstate-bucket
          StateKey: terraform.tfstate
          StateKeyPrefix: states/
          StateTable: tfstate-table
          TerraformVersion: '1.5.1'
          TerraformOperationMode: apply
  • Key configuration parameters are:
    • Environment.Name: The name of our CodeCatalyst Environment
    • Environment.Connections.Name: The name of the CodeCatalyst connection
    • Environment.Connections.Role: The IAM role used for the workflow
    • AWSRegion: The AWS region that hosts the Terraform state bucket
    • Environment.Name: The name of our CodeCatalyst Environment
    • Identifier: codecatalyst-labs/provision-with-terraform-community@v1
    • StateBucket: The Terraform state bucket
    • StateKey: The Terraform statefile e.g. terraform.tfstate
    • StateKeyPrefix: The folder location of the State file (optional)
    • StateTable: The DynamoDB State table
    • TerraformVersion: The version of Terraform to be installed
    • TerraformOperationMode: The operation mode for Terraform – this can be either ‘plan’ or ‘apply’

The workflow now contains CodeCatalyst action for Terraform Plan and Terraform Apply.

To save our changes we select File -> Save, we can then commit these to our git repository by typing the following at the terminal:

git add . && git commit -m ‘adding terraform workflow and main.tf’ && git push

The above command adds the workflow file and Terraform code to be tracked by git. It then commits the code and pushes the changes to CodeCatalyst git repository. As we have a branch trigger for main defined, this will trigger a run of the workflow. We can monitor the status of the workflow in the CodeCatalyst console by selecting CICD -> Workflows. Locate your workflow and click on Runs to view the status. You will be able to observe that the workflow has successfully completed and Amazon S3 bucket is created.

: CodeCatalyst Workflow Status

Figure 12: CodeCatalyst Workflow Status

Cleaning up

If you have been following along with this workflow, you should delete the resources that you have deployed to avoid further charges. The walkthrough will create an Amazon S3 bucket named <your-aws-account-id>-<your-aws-region>-terraform-sample-bucket in your AWS account. In the AWS Console > S3, locate the bucket that was created, then select and click Delete to remove the bucket.

Conclusion

In this post, we explained how you can easily get started deploying IaC to your AWS accounts with Amazon CodeCatalyst. We outlined how the Terraform Community Edition action can streamline the process of planning and applying Terraform configurations and how to create a workflow that can leverage this action. Get started with Amazon CodeCatalyst today.

Richard Merritt

Richard Merritt is a Senior DevOps Consultant at Amazon Web Services (AWS), Professional Services. He works with AWS customers to accelerate their journeys to the cloud by providing scalable, secure and robust DevOps solutions.

Vineeth Nair

Vineeth Nair is a DevOps Architect at Amazon Web Services (AWS), Professional Services. He collaborates closely with AWS customers to support and accelerate their journeys to the cloud and within the cloud ecosystem by building performant, resilient, scalable, secure and cost efficient solutions.

Nagaraju Basavaraju

Nagaraju is a seasoned DevOps Architect at AWS, UKI. He specializes in assisting customers in designing and implementing secure, scalable, and resilient hybrid and cloud-native solutions with DevOps methodologies. With a profound passion for cloud infrastructure, observability and automation, Nagaraju is also an avid contributor to Open-Source projects related to Terraform and AWS CDK.

Debojit Bhadra

Debojit is a DevOps consultant who specializes in helping customers deliver secure and reliable solutions using AWS services. He concentrates on infrastructure development and building serverless solutions with AWS and DevOps. Apart from work, Debojit enjoys watching movies and spending time with his family.

Build and deploy to Amazon EKS with Amazon CodeCatalyst

Post Syndicated from Vineeth Nair original https://aws.amazon.com/blogs/devops/build-and-deploy-to-amazon-eks-with-amazon-codecatalyst/

Amazon CodeCatalyst is an integrated service for software development teams adopting continuous integration and deployment (CI/CD) practices into their software development process. CodeCatalyst puts all of the tools that development teams need in one place, allowing for a unified experience for collaborating on, building, and releasing software. You can also integrate AWS resources with your projects by connecting your AWS accounts to your CodeCatalyst space. By managing all of the stages and aspects of your application lifecycle in one tool, you can deliver software quickly and confidently.

Introduction

Containerization has revolutionized the way we develop, deploy, and scale applications. With the rise of managed container services like Amazon Elastic Kubernetes Service (EKS), developers can leverage the power of Kubernetes without worrying about the underlying infrastructure. In this post, we will focus on how DevOps teams can use CodeCatalyst to build and deploy applications to EKS clusters.

CodeCatalyst offers a collection of pre-built actions that encapsulate common container-related tasks such as building and pushing a container image to an ECR and deploying a Kubernetes manifest. In this walkthrough, we will leverage two actions that can greatly simplify the container build and deployment process. We start by building a simple container image with the ‘Push to Amazon ECR’ action from CodeCatalyst labs. This action simplifies the process of building, tagging and pushing an image to an Amazon Elastic Container Registry (ECR). We will also utilize the ‘Deploy to Kubernetes cluster’ action from AWS for pushing our Kubernetes manifests with our updated image.

Architecture diagram demonstrating how a developer uses Cloud9 and a repository to store code, then pushes the image to Amazon ECR and deploys it to Amazon EKS.
Figure 1: Architectural Diagram.

Prerequisites

To follow along with the post, you will need the following items:

Walkthrough

In this walkthrough, we will build a simple Nginx based application and push this to an ECR, we will then build and deploy this image to an EKS cluster. The emphasis of this post, will be on how to translate a fairly common pattern with microservices applications to a CodeCatalyst workflow. At the end of the post, our workflow will look like so:

The image shows how codecatalyst worflow configured. 1st stage is pusing the Image to Amazon ECR followed by Deploy to Amazon EKS
Figure 2: CodeCatalyst workflow.

Create the base workflow

To begin, we will create our workflow, in the CodeCatalyst project, Select CI/CD → Workflows → Create workflow:

Image shows how to create workflow which has Source repository and Branch to be selected from drop down option
Figure 3: Create workflow.

Leave the defaults for the Source Repository and Branch, select Create. We will have an empty workflow:

Image shows how an emapy workflow looks like. It doesn't have any sptes configured which need to be added in this file based on our requirement.
Figure 4: Empty workflow.

We can edit the workflow from within the CodeCatalyst console, or use a Dev Environment. We will create an initial commit of this workflow file, ignore any validation errors at this stage:

Image shows how to create a Dev environment. User need to provide a workflow name, commit message along with Repository name and Branch name.
Figure 5: Creating Dev environment.

Connect to CodeCatalyst Dev Environment

For this post, we will use an AWS Cloud9 Dev Environment. Our first step is to connect to the Dev environment. Select Code → Dev Environments. If you do not already a Dev Instance, you can create an instance by selecting Create Dev Environment.

Image shows how a Dev environment looks like. The environment we created in the previous step, will be listed here.
Figure 6: My Dev environment.

Create a CodeCatalyst secret

Prior to adding the code, we will add a CodeCatalyst secret that will be consumed by our workflow. Using CodeCatalyst secrets ensures that we do not store sensitive data in plaintext in our workflow file. To create the secrets in the CodeCatalyst console, browse to CICD -> Secrets. Select Create Secret with the following details:

The image shows how we can create a secret. We need to pass Name and Value along with option desctption to create a secret.
Figure 7: Adding secrets.

Name: eks_cluster_name

Value: <Your EKS Cluster name>

Connect to the CodeCatalyst Dev Environment

We already have a Dev Environment so we will select Resume Instance. A new browser tab opens for the IDE and will be available in less than a minute. Once the IDE is ready, we can go ahead and start creating the Dockerfile and Kubernetes manifest that make up our application

mkdir WebApp
cat <<EOF > WebApp/Dockerfile
FROM nginx
RUN apt-get update && apt-get install -y curl
EOF

The previous command block creates our Dockerfile, which we will build in our CodeCatalyst workflow from an Nginx base image and installs cURL. Next, we will add our Kubernetes manifest file to create a Kubernetes deployment and service for our application:

Create a directory called Manifests and a file inside the directory called demo-app.yaml. Update the file with code for deployment and Kubernetes Service.

The image shows the code structure of demo-app.yaml file
Figure 8: demo-app.yaml file.

The previous code block shows the Kubernetes manifest file for our deployment, along with a Kubernetes service. We modify the image value to include the URI for our ECR as this value is unique. Once we have created our Dockerfile and Kubernetes manifest, pull the latest changes to our repository, including our workflow file that we just created. In our environment, our repository is called eks-demo-app:

cd eks-demo-app && git pull

We can now edit this file in our IDE. In our example our workflow is Workflow_df84 , we will locate Workflow_df84.yaml in the .codecatalyst\workflows directory in our repository. From here we can double click on the file to launch in the IDE for editing:

Image shows empty workflow yaml file.
Figure 9: workflow file in yaml format.

Add the build steps to workflow

We can assign our workflow a name and configure the action for our build phase. The code outlined in the following diagram is our CodeCatalyst workflow definition

The image shows updated workflow file which has triggers and actions filled.
Figure 10: Workflow updated with build phase.

Kustomize starts from here

The image shows Kustomize steps added in the workflow file.
Figure 11: Workflow updated with Kustomize.

Deployment starts from here

The image shows deployment stage added in the workflow file.
Figure 12: Workflow updated with Deployment phase.

The workflow will now contain two CodeCatalyst actions – PushtoAmazonECR which builds and pushes our container image to the ECR. We have also added a dependent stage DeploytoKubernetesCluster which deploys our Kubernetes manifest.

To save our changes we select File -> Save, we can then commit these to our git repository by typing the following at the terminal:

git add . && git commit -m ‘adding workflow’ && git push

The previous command will commit and push our changes the CodeCatalyst source repository, as we have a branch trigger for main defined, this will trigger a run of the workflow. We can monitor the status of the workflow in the CodeCatalyst console by selecting CICD -> Workflows. Locate your workflow and click on Runs to view the status.

We will now have all two stages available, as depicted at the beginning of this walkthrough. We will now have a container image in our ECR along with the newly built image deployed to our EKS cluster.

Cleaning up

If you have been following along with this workflow, you should delete the resources that you have deployed to avoid further changes. First, delete the Amazon ECR repository and Amazon EKS cluster (along with associated IAM roles) using the AWS console. Second, delete the CodeCatalyst project by navigating to project settings and choosing to Delete Project.

Conclusion

In this post, we explained how teams can easily get started building, scanning, and deploying a microservice application to an EKS cluster using CodeCatalyst. We outlined the stages in our workflow that enabled us to achieve the end-to-end build and release cycle. We also demonstrated how to enhance the developer experience of integrating CodeCatalyst with our Cloud9 Dev Environment.

Call to Action

Learn more about CodeCatalyst here.

Vineeth Nair

Vineeth Nair is a DevOps Architect at Amazon Web Services (AWS), Professional Services. He collaborates closely with AWS customers to support and accelerate their journeys to the cloud and within the cloud ecosystem by building performant, resilient, scalable, secure and cost efficient solutions.

Richard Merritt

Richard Merritt is a DevOps Consultant at Amazon Web Services (AWS), Professional Services. He works with AWS customers to accelerate their journeys to the cloud by providing scalable, secure and robust DevOps solutions.

Automate Lambda code signing with Amazon CodeCatalyst and AWS Signer

Post Syndicated from Vineeth Nair original https://aws.amazon.com/blogs/devops/automate-lambda-code-signing-with-amazon-codecatalyst-and-aws-signer/

Amazon CodeCatalyst is an integrated service for software development teams adopting continuous integration and deployment practices into their software development process. CodeCatalyst puts the tools you need all in one place. You can plan work, collaborate on code build, test, and deploy applications with continuous integration/continuous delivery (CI/CD) tools. You can also integrate AWS resources with your projects by connecting your AWS accounts to your CodeCatalyst space. By managing all of the stages and aspects of your application lifecycle in one tool, you can deliver software quickly and confidently.

Introduction

In this post we will focus on how development teams can use Amazon CodeCatalyst with AWS Signer to fully manage the code signing process to ensure the trust and integrity of code assets. We will describe the process of building the AWS Lambda code using a CodeCatalyst workflow, we will then demonstrate the process of signing the code using a signer profile and deploying the signed code to our Lambda function.

In the Develop stage, the engineer commits the code to the Amazon CodeCatalyst repository using the Cloud 9 IDE. The CodeCatalyst workflow sends the index.py file from the repository and puts it into the S3 source bucket after compressing it. AWS Signer signs this content and pushes it to the S3 destination bucket. In the deploy stage, the signed zip file will be deployed into the AWS Lambda function.

Figure 1: Architecture Diagram.

Prerequisites

To follow along with the post, you will need the following items:

Walkthrough

During this tutorial, we will create a step-by-step guide to constructing a workflow utilizing CodeCatalyst. The objective is to employ the AWS Signer service to retrieve Python code from a specified source Amazon S3 bucket, compress and sign the code, and subsequently store it in a destination S3 bucket. Finally, we will utilize the signed code to deploy a secure Lambda function.

Create the base workflow

To begin we will create our workflow in the CodeCatalyst project.

Select CI/CD → Workflows → Create workflow:


Figure 2: Create workflow.

Leave the defaults for the Source Repository and Branch, select Create. We will have an empty workflow:


Figure 3: Empty workflow.

We can edit the workflow from the CodeCatalyst console, or use a Dev Environment. Initially, we will create an initial commit of this workflow file, ignore any validation errors at this stage:

In Commit workflow page, we can add the workflow file name, commit message. Repository name and Branch name can be selected from the drop-down option.
Figure 4: Commit workflow with workflow file name, message repository and branch name.

Connect to CodeCatalyst Dev Environment

We will use an AWS Cloud9 Dev Environment. Our first step is to connect to the dev environment.

Select Code → Dev Environments. If you do not already a Dev Instance you can create an instance by selecting Create Dev Environment.

My Dev Environment tab shows all Environment available.
Figure 5: Create Dev Environment.

We already have a Dev Environment, so will go ahead and select Resume Instance. A new browser tab opens for the IDE and will be available in less than one minute. Once the IDE is ready, we can go ahead and start building our workflow. First, open a terminal. You can then change into the source repository directory and pull the latest changes. In our example, our Git source repository name is lambda-signer

cd lambda-signer && git pull. We can now edit this file in our IDE.

Initially, we will create a basic Lambda code under artifacts directory:

mkdir artifacts
cat <<EOF > artifacts/index.py
def lambda_handler(event, context):
    print('Testing Lambda Code Signing using Signer') 
EOF

The previous command block creates our index.py file which will go inside the AWS Lambda function. When we testing the Lambda Function, we should see message “Testing Lambda Code Signing using Signer” in the console log.

As a next step, we will create the CDK directory and initiate it:

mkdir cdk;
cd cdk && cdk init --language python cdk

The previous command will create a directory called ‘cdk’ and then initiate cdk inside this directory. As a result, we will see another directory named ‘cdk’. We then need to update files inside this directory as per the following screenshot.

Shows the cdk directory structure. Inside this directory, there is a file called app.py. Also there is a subdirectory called cdk. Inside this subdirectory, there are 2 files named cdk_stack.py and lambda_stack.py.
Figure 6: Repository file structure.

Update the content of the files as per the code following snippets:

(Note: Update your region name by replacing the placeholder <Region Name> )

cdk_stack.py:

import os
from constructs import Construct
from aws_cdk import (
    Duration,
    Stack,
    aws_lambda as lambda_,
    aws_signer as signer,
    aws_s3 as s3,
    Aws as aws,
    CfnOutput
)


class CdkStack(Stack):

    def __init__(self, scope: Construct, construct_id: str, **kwargs) -> None:
        super().__init__(scope, construct_id, **kwargs)
        
         # Set the AWS region
        os.environ["AWS_DEFAULT_REGION"] = "<Region Name>"

        # Create the signer profile
        signer_profile_name = "my-signer-profile-" + aws.ACCOUNT_ID
        print(f"signer_profile_name: {signer_profile_name}")
        
        signing_profile = signer.SigningProfile(self, "SigningProfile",
            platform=signer.Platform.AWS_LAMBDA_SHA384_ECDSA,
            signing_profile_name='my-signer-profile' + aws.ACCOUNT_ID,
            signature_validity=Duration.days(365)
        )

        self.code_signing_config = lambda_.CodeSigningConfig(self, "CodeSigningConfig",
            signing_profiles=[signing_profile]
        )
        

        source_bucket_name = "source-signer-bucket-" + aws.ACCOUNT_ID
        source_bucket = s3.Bucket(self, "SourceBucket",
            bucket_name=source_bucket_name,
            block_public_access=s3.BlockPublicAccess.BLOCK_ALL,
            encryption=s3.BucketEncryption.S3_MANAGED,
            versioned=True
        )

        destination_bucket_name = "dest-signer-bucket-" + aws.ACCOUNT_ID
        self.destination_bucket = s3.Bucket(self, "DestinationBucket",
            bucket_name=destination_bucket_name,
            block_public_access=s3.BlockPublicAccess.BLOCK_ALL,
            encryption=s3.BucketEncryption.S3_MANAGED,
            versioned=True
        )
        resolved_signing_profile_name = self.resolve(signing_profile.signing_profile_name)

        CfnOutput(self,"signer-profile",value=signing_profile.signing_profile_name)
        CfnOutput(self,"src-bucket",value=source_bucket.bucket_name)
        CfnOutput(self,"dst-bucket",value=self.destination_bucket.bucket_name)

lambda_stack.py:

from constructs import Construct
from aws_cdk import (
    Duration,
    Stack,
    aws_lambda as lambda_,
    aws_signer as signer,
    aws_s3 as s3,
    Aws as aws,
    CfnOutput
)


class LambdaStack(Stack):

    def __init__(self, scope: Construct, construct_id: str, dst_bucket:s3.Bucket,codesigning_config: lambda_.CodeSigningConfig, **kwargs) -> None:
        super().__init__(scope, construct_id, **kwargs)
        
         # Set the AWS region
        # Get the code from action inputs
        bucket_name = self.node.try_get_context("bucket_name")
        key = self.node.try_get_context("key")

        lambda_function = lambda_.Function(
            self,
            "Function",
		 function_name=’sample-signer-function’,
            code_signing_config=codesigning_config,
            runtime=lambda_.Runtime.PYTHON_3_9,
            handler="index.Lambda_handler",
            code=lambda_.Code.from_bucket(dst_bucket, key)
        )

app.py:

#!/usr/bin/env python3

import aws_cdk as cdk

from cdk.cdk_stack import CdkStack
from cdk.lambda_stack import LambdaStack


app = cdk.App()
signer_stack = CdkStack(app, "cdk")
lambda_stack = LambdaStack(app, "LambdaStack", dst_bucket=signer_stack.destination_bucket,codesigning_config=signer_stack.code_signing_config)

app.synth()

Finally, we will work on Workflow:

In our example, our workflow is Workflow_d892. We will locate Workflow_d892.yaml in the .codecatalyst\workflows directory in our repository.


Figure 7: Workflow yaml file.

Update workflow with remaining steps

We can assign our workflow a name and configure the action. We have five stages in this workflow:

  • CDKBootstrap: Prepare AWS Account for CDK deployment.
  • CreateSignerResources: Deploys Signer resources into AWS Account
  • ZipLambdaCode: Compresses the index.py file and store it in the source S3 bucket
  • SignCode: Sign the compressed python file and push it to the destination S3 bucket
  • Createlambda: Creates the Lambda Function using the signed code from destination S3 bucket.

Please insert the following values for your environment into the workflow file. The environment configuration will be as per the pre-requisite configuration for CodeCatalyst environment setup:

  • <Name of your Environment>: The Name of your CodeCatalyst environment
  • <AWS Account>: The AWS Account connection ID
  • <Role Name>: The CodeCatalyst role that is configured for the environment

(Note: Feel free to update the region configuration to meet your deployment requirements. Supported regions are listed here)

Name: Workflow_d892
SchemaVersion: "1.0"

# Optional - Set automatic triggers.
Triggers:
  - Type: Push
    Branches:
      - main

# Required - Define action configurations.
Actions:
  CDKBootstrap:
    # Identifies the action. Do not modify this value.
    Identifier: aws/[email protected]

    # Specifies the source and/or artifacts to pass to the action as input.
    Inputs:
      # Optional
      Sources:
        - WorkflowSource # This specifies that the action requires this Workflow as a source

    # Required; You can use an environment, AWS account connection, and role to access AWS resources.
    Environment:
      Name: <Name of your Environment>
      Connections:
        - Name: <AWS Account>
          Role: <Role Name> # Defines the action's properties.
    Configuration:
      # Required; type: string; description: AWS region to bootstrap
      Region: <Region Name>
  CreateSignerResources:
    # Identifies the action. Do not modify this value.
    Identifier: aws/[email protected]
    DependsOn:
      - CDKBootstrap
      # Specifies the source and/or artifacts to pass to the action as input.
    Inputs:
      # Optional
      Sources:
        - WorkflowSource # This specifies that the action requires this Workflow as a source

    # Required; You can use an environment, AWS account connection, and role to access AWS resources.
    Environment:
      Name: <Name of your Environment>
      Connections:
        - Name: <AWS Account>
          Role: <Role Name> 
    Configuration:
      # Required; type: string; description: Name of the stack to deploy
      StackName: cdk
      CdkRootPath: cdk
      Region: <Region Name>
      CfnOutputVariables: '["signerprofile","dstbucket","srcbucket"]'
      Context: '{"key": "placeholder"}'
  ZipLambdaCode:
    Identifier: aws/build@v1
    DependsOn:
    - CreateSignerResources
    Inputs:
      Sources:
        - WorkflowSource
    Environment:
      Name: <Name of your Environment>
      Connections:
        - Name: <AWS Account>
          Role: <Role Name> 
#
    Configuration:
      Steps:
        - Run: sudo yum install zip -y
        - Run: cd artifacts && zip lambda-${WorkflowSource.CommitId}.zip index.py
        - Run: aws s3 cp lambda-${WorkflowSource.CommitId}.zip s3://${CreateSignerResources.srcbucket}/tobesigned/lambda-${WorkflowSource.CommitId}.zip
        - Run: S3VER=$(aws s3api list-object-versions --output text --bucket ${CreateSignerResources.srcbucket} --prefix 'tobesigned/lambda-${WorkflowSource.CommitId}.zip' --query 'Versions[*].VersionId')
    Outputs:
      Variables:
      - S3VER
           
  SignCode:
    Identifier: aws/build@v1
    DependsOn:
    - ZipLambdaCode
    Inputs:
      Sources:
        - WorkflowSource
    Environment:
      Name: <Name of your Environment>
      Connections:
        - Name: AWS Account>
          Role: <Role Name> #
    Configuration:
      Steps:
        - Run: export AWS_REGION=<Region Name>
        - Run: SIGNER_JOB=$(aws signer start-signing-job --source --output text --query 'jobId' 's3={bucketName=${CreateSignerResources.srcbucket},key=tobesigned/lambda-${WorkflowSource.CommitId}.zip,version=${ZipLambdaCode.S3VER}}' --destination 's3={bucketName=${CreateSignerResources.dstbucket},prefix=signed-}' --profile-name ${CreateSignerResources.signerprofile})
    Outputs:
      Variables:
        - SIGNER_JOB
  CreateLambda:
    # Identifies the action. Do not modify this value.
    Identifier: aws/[email protected]
    DependsOn:
      - SignCode
      # Specifies the source and/or artifacts to pass to the action as input.
    Inputs:
      # Optional
      Sources:
        - WorkflowSource # This specifies that the action requires this Workflow as a source

    # Required; You can use an environment, AWS account connection, and role to access AWS resources.
    Environment:
      Name: <Name of your Environment>
      Connections:
        - Name: AWS Account>
          Role: <Role Name>
            # Defines the action's properties.
    Configuration:
      # Required; type: string; description: Name of the stack to deploy
      StackName: LambdaStack
      CdkRootPath: cdk
      Region: <Region Name>
      Context: '{"key": "signed-${SignCode.SIGNER_JOB}.zip"}'

We can copy/paste this code into our workflow. To save our changes, we select File -> Save. We can then commit these to our git repository by typing the following at the terminal:

git add . && git commit -m ‘adding workflow’ && git push

The previous command will commit and push the changes that we have made to the CodeCatalyst source repository. As we have a branch trigger for main defined, this will trigger a run of the workflow. We can monitor the status of the workflow in the CodeCatalyst console by selecting CICD -> Workflows. Locate your workflow and click on Runs to view the status.

CodeCatalyst CICD pipeline stage starts with CDKBootstrap stage. Stage 2 is CreateSignerResources. Stage3 is ZipLambdaCode. Stage4 is SignCode and Final Stage is CreateLambda.
Figure 8: Successful workflow execution.

To validate that our newly created Lambda function is using AWS Signed code, we can open the AWS Console in our target region > Lambda > click on the sample-signer-function to inspect the properties.

When open the AWS Lambda function, code tab shows a text message “Your function has signed code and can’t be edited inline"
Figure 9: AWS Lambda function with signed code.

Under the Code Source configuration property, you should see an informational message advising that ‘Your function has signed cofde and can’t be edited inline’. This confirms that the Lambda function is successfully using signed code.

Cleaning up

If you have been following along with this workflow, you should delete the resources that you have deployed to avoid further chargers. In the AWS Console > CloudFormation, locate the LambdaStack, then select and click Delete to remove the stack. Complete the same steps for the CDK stack.

Conclusion

In this post, we explained how development teams can easily get started signing code with AWS Signer and deploying it to Lambda Functions using Amazon CodeCatalyst. We outlined the stages in our workflow that enabled us to achieve the end-to-end release cycle. We also demonstrated how to enhance the developer experience of integrating CodeCatalyst with our AWS Cloud9 Dev Environment and leveraging the power of AWS CDK to use familiar programming languages such as Python to define our infrastructure as code resources.

Richard Merritt

Richard Merritt is a DevOps Consultant at Amazon Web Services (AWS), Professional Services. He works with AWS customers to accelerate their journeys to the cloud by providing scalable, secure and robust DevOps solutions.

Vineeth Nair

Vineeth Nair is a DevOps Architect at Amazon Web Services (AWS), Professional Services. He collaborates closely with AWS customers to support and accelerate their journeys to the cloud and within the cloud ecosystem by building performant, resilient, scalable, secure and cost efficient solutions.