Post Syndicated from Kevon Mayers original https://aws.amazon.com/blogs/devops/accelerate-serverless-streamlit-app-deployment-with-terraform/
Graphic created by Kevon Mayers.
Introduction
As customers increasingly seek to harness the power of generative AI (GenAI) and machine learning to deliver cutting-edge applications, the need for a flexible, intuitive, and scalable development platform has never been greater. In this landscape, Streamlit has emerged as a standout tool, making it easy for developers to prototype, build, and deploy GenAI-powered apps with minimal friction. It is an open-source Python framework designed to simplify the development of custom web applications for data science, machine learning, and GenAI projects. With Streamlit, developers can quickly transform Python scripts into interactive dashboards, LLM-powered chatbots, and web apps, using just a few lines of code. Its unique combination of simplicity, interactivity, and speed is the perfect complement to the rapid advancements in AI.
When deploying Streamlit applications, customers often face the challenge of ensuring their applications are highly available and can scale to meet a variable amount of demand. To achieve these goals, customers are looking at serverless approaches to deploying their Streamlit apps. With a serverless application, you only pay for the resources required and do not want have to worry about managing servers or capacity planning.
In this post, we will walk you through deploying containerized, serverless Streamlit applications automatically via HashiCorp Terraform, an Infrastructure as Code (IaC) tool that enables users to define and provision infrastructure across cloud platforms.
Solution Overview
For this solution, we have the Streamlit app running on an Amazon Elastic Container Service (ECS) cluster across multiple availability zones (AZs), using AWS Fargate to manage the compute. Fargate is a serverless, pay-as-you-go compute engine that lets you focus on building apps without managing servers. Using Fargate helps reduce the undifferentiated heavy lifting that can come with building and maintaining web applications. It is also often desirable to use a Content Delivery Network (CDN) to ensure low latency for users globally by caching the content at edge locations closer to where the users are geographically located.
Let’s zoom in on the two architectures – the Streamlit App hosting architecture, and the Streamlit App deployment pipeline.
Streamlit app hosting

In the above architecture, the following flow applies:
- Users access the Streamlit App using the public DNS endpoint for an Amazon CloudFront distribution.
- Using an Internet Gateway (IGW), user requests are routed to a public-facing Application Load Balancer (ALB).
- This ALB has target groups which map to ECS task nodes that are part of an ECS cluster running in two AZs (us-east-1a and us-east-1b in this example).
- Fargate will automatically scale the underlying compute nodes in the ECS cluster based on the demand.
Streamlit app deployment pipeline

In the above architecture, the following flow applies:
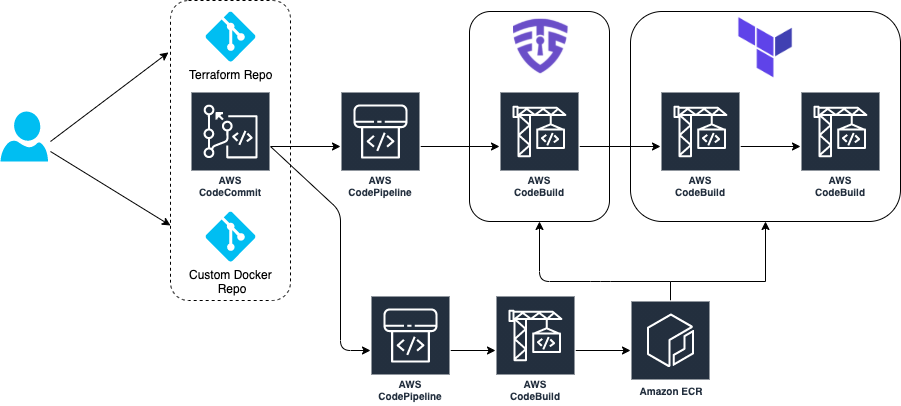
- User develops a local Streamlit App and defines the path of these assets in the module configuration, then runs terraform apply to generate a local .zip file comprised of the Streamlit App directory, and upload this to an Amazon S3 bucket (Streamlit Assets) with versioning enabled, which is configured to trigger the Streamlit CI/CD pipeline to run.
- AWS CodePipeline (Streamlit CI/CD pipeline) begins running. The pipeline copies the .zip file from the Streamlit Assets S3 Bucket, stores the contents in a connected CodePipeline Artifacts S3 bucket, and passes the asset to the AWS CodeBuild project that is also part of the pipeline.
- CodeBuild (Streamlit CodeBuild Project) configures a compute/build environment and fetches a Python Docker Image from a public Amazon ECR repository. CodeBuild uses Docker to build a new Streamlit App image based on what is defined in the Dockerfile within the .zip file, and pushes the new image to a private ECR repository. It tags the image with
latest, anapp_version(user-defined in Terraform), as well as the S3 Version ID of the .zip file and pushes the image to ECR. - ECS has a task definition that references the image in ECR based on the S3 Version ID tag which will always be a unique value, as it is generated whenever a new version of the file is created. This also serves as data lineage so versions of the Streamlit App .zip files in S3 can be linked to versions of the image stored in ECR. Once a new image is pushed to ECR (with a unique image tag), the task definition is updated and the ECS service begins a new deployment using the new version of the Streamlit App.
- When a new image is pushed to ECR, the Terraform Module is configured to use the
local-execprovisioner to run an AWS CLI command that creates a CloudFront invalidation. This enables users of the Streamlit app to use the new version without waiting for the time-to-live (TTL) of the cached file to expire on the edge locations (default is 24 hours).
Both of these pipelines are built and packaged into a Terraform module that can be reused efficiently with only a few lines of code.
Both of these pipelines are built and packaged into a Terraform module that can be reused efficiently with only a few lines of code.
Prerequisites
This solution requires the following prerequisites:
- An AWS account. If you don’t have an account, you can sign up for one.
- Terraform v1.0.0 or newer installed.
- python v3.8 or newer installed.
- A Streamlit app. If you don’t have a Streamlit project already, you can download this app directory as a sample Streamlit app for this post and save it to a local folder.
Your folder structure will look something like this:
terraform_streamlit_folder
├── README.md
└── app                 # Streamlit app directory
    ├── home.py         # Streamlit app entry point
    ├── Dockerfile      # Dockerfile
     └── pages/          # Streamlit pages
Create and initialize a Terraform project
In the same folder where you have the your Streamlit app saved, in the above example in the terraform_streamlit_folder, you will create and initialize a new Terraform project.
- In your preferred terminal, create a new file named main.tf by running the following command on Unix/Linux machines, or an equivalent command on Windows machines:
touch main.tf - Open up the
main.tffile and add the following code to it:module "serverless-streamlit-app" { source = "aws-ia/serverless-streamlit-app/aws" app_name = "streamlit-app" app_version = "v1.1.0" path_to_app_dir = "./app" # Replace with path to your app }This code utilizes a module block with a source pointing to the Terraform module, and the appropriate input variables passed in. When Terraform encounters a module block, it loads and processes that module’s configuration files using the source. The Serverless Streamlit App Terraform module has many optional input variables. If you have existing resources, such as an existing VPC, subnets, and security groups that you’d like to reuse instead of deploying new ones, you can use the module’s input variables to reference your existing resources. However, in this post, we’re deploying all of the resources in the above architecture from scratch. Here, we simply define the source that references the module hosted in the Terraform Registry, provide an
app_namethat will be used as a prefix for naming your resources, theapp_versionthat is used for tracking changes to your app, and thepath_to_app_dirwhich is the path to the local directory where the assets for your Streamlit app are stored. - Save the file.
- To initialize the Terraform working directory, run the following command in your terminal:
terraform initThe output will contain a successful message like the following:
"Terraform has been successfully initialized"
Output the CloudFront URL
To be able to easily access the Cloudfront URL of the deployed Streamlit application, you can add the URL as a Terraform output.
- In your terminal, create a new file named
outputs.tfby running the following command on Unix/Linux machines, or an equivalent command on Windows machines:touch outputs.tf - Open up the
outputs.tffile and add the following code to it:output "streamlit_cloudfront_distribution_url" { value = module.serverless-streamlit-app.streamlit_cloudfront_distribution_url } - Save the file.
Now, your folder structure will look like:terraform_streamlit_folder ├── README.md ├── app # Streamlit app directory │ ├── home.py # Streamlit app entry point │ ├── Dockerfile # Dockerfile │ └── pages/ # Streamlit pages │ ├── main.tf # Terraform Code (where you call the module) └── outputs.tf # Outputs definition
Deploy the solution
Now you can use Terraform to deploy the resources defined in your main.tf file.
- In your terminal, run the following command to apply to deploy the infrastructure. This includes the hosting for your Streamlit application using ECS and CloudFront, as well as the pipeline that is used to push updates.
terraform applyWhen the apply command finishes running, you’ll see the Terraform outputs displayed in the terminal.
- Navigate to the
streamlit_cloudfront_distribution_urlto see your Streamlit application that is hosted on AWS. - When you make changes to your Streamlit codebase, you can go ahead and re-run
terraform applyto push your new changes to your cloud environment.
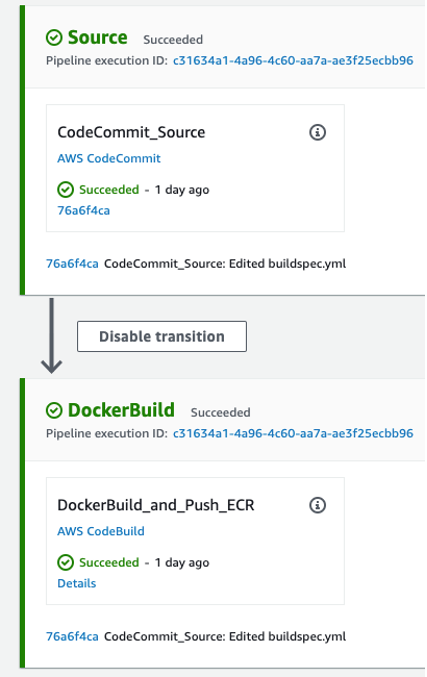
When updating the Streamlit codebase, the CodePipeline and CodeBuild processes kick off to automatically update your new changes, which get reflected on your Streamlit application. CodePipeline automates the entire software release process, managing stages like source retrieval, building, testing, and deployment. It integrates with AWS services and third-party tools (such as GitHub and Jenkins) to enhance automation, speed, and security. CodeBuild focuses on automating code compilation, testing, and packaging, supporting multiple languages and custom Docker environments, while integrating with CodePipeline for scalable, secure builds. With this CI/CD pipeline, when you make changes to your code, all you need to run is terraform apply to update your cloud environment. For an example buildspec, see the example in the repo.
You can find full examples of deploying the infrastructure with and without existing resources in the GitHub repository.
Clean up
When you no longer need the resources deployed in this post, you can clean up the resources by using the Terraform destroy command. Simply run terraform destroy . This will remove all of the resources you have deployed in this post with Terraform.
Conclusion
Building serverless Streamlit applications with Terraform on AWS offers a powerful combination of scalability, efficiency, and automation. As you continue to build and refine your Streamlit applications, Terraform’s flexibility ensures that your infrastructure can evolve seamlessly, supporting rapid innovation and agile development. With Streamlit and Terraform, you have the tools to create dynamic, serverless applications that scale effortlessly and operate reliably in the cloud.


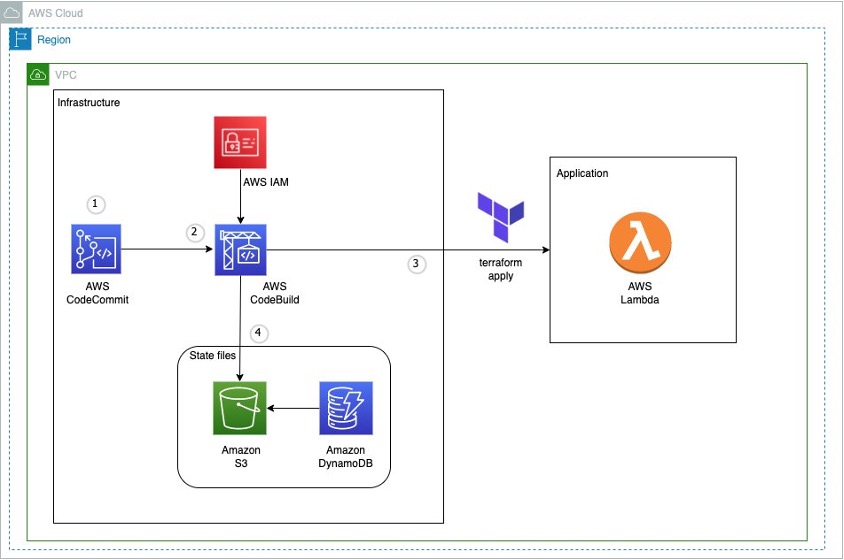
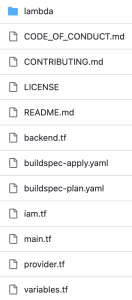
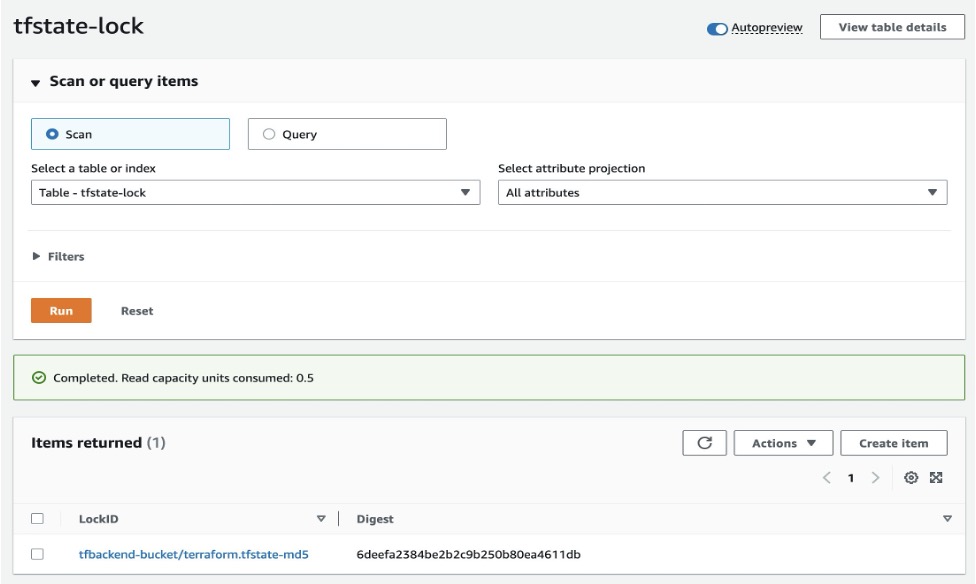


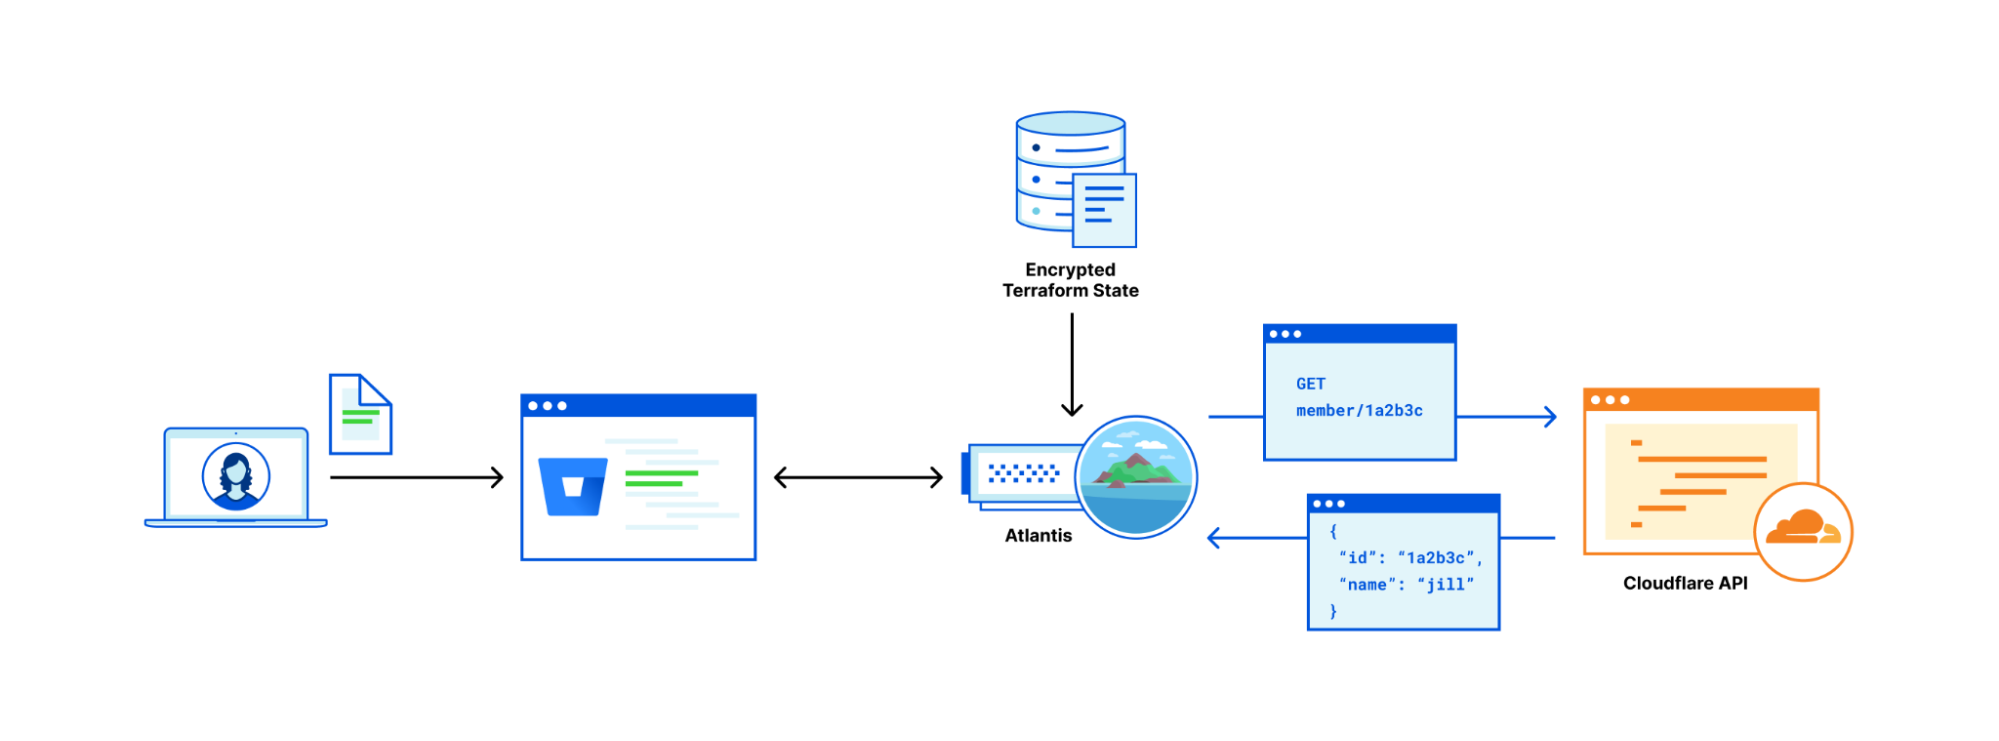
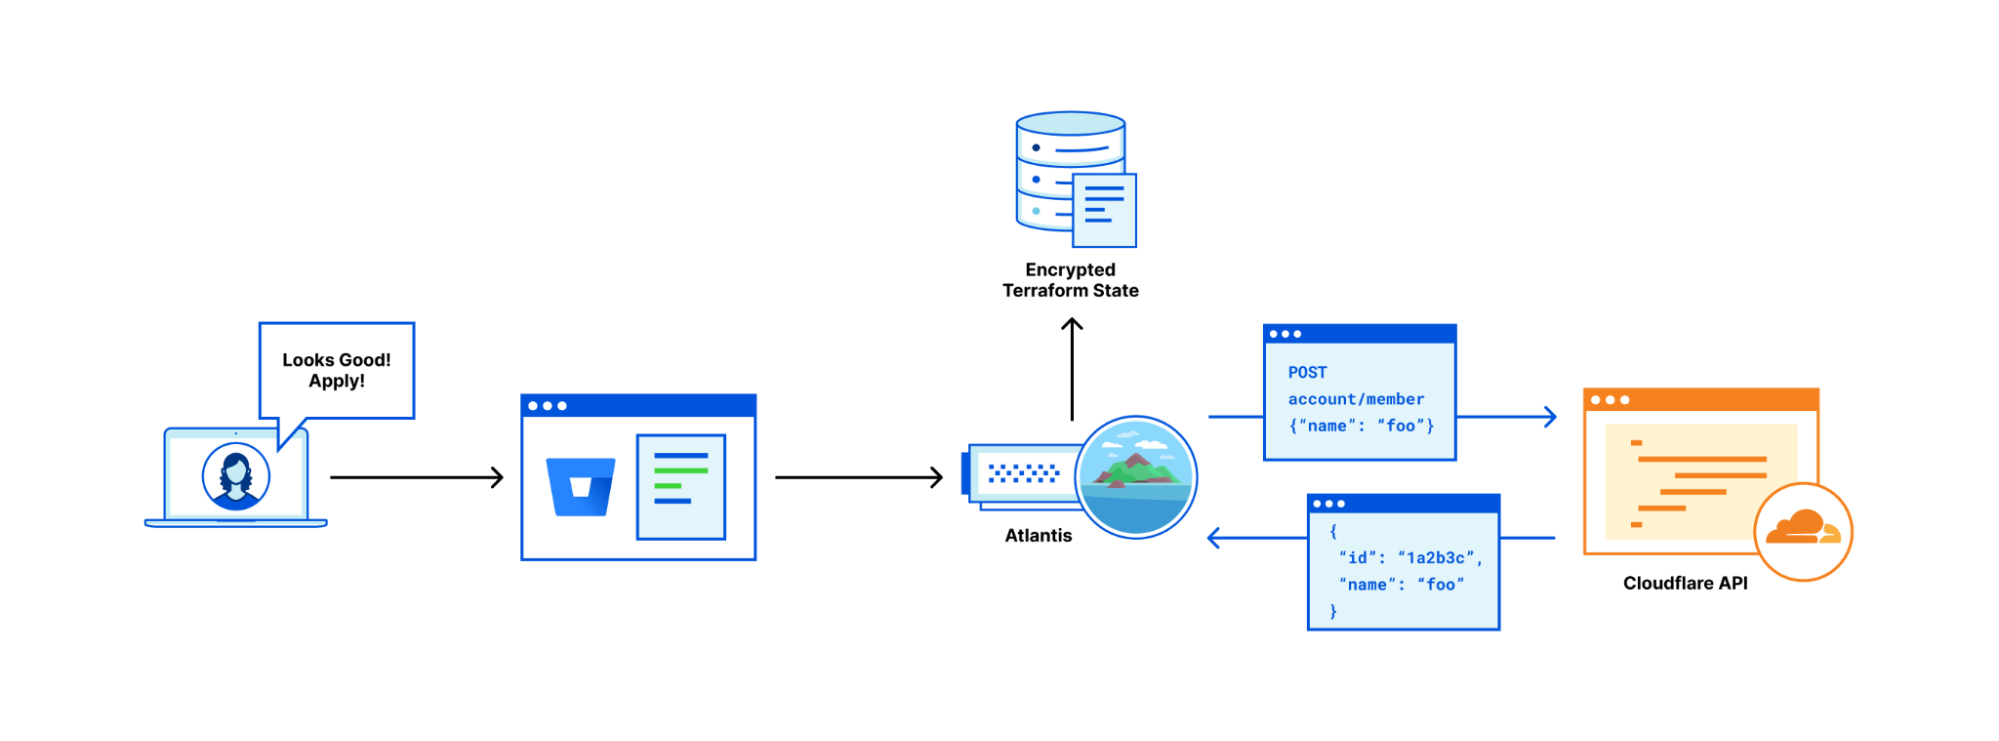


 Fig 5. Terraform state file buckets and state lock tables per environment in the central tooling account.
 Fig 6. Terraform state files per account and Region for each environment in the central tooling account
 Fig 7. Git tags and the respective Terraform state files.
 Fig 8. Multi-Region CI/CD with Terraform state resources stored in the same Region as the workload account resources for the respective Region