Streamline your AWS infrastructure development with AI-powered documentation search, validation, and troubleshooting
Introduction
Today, we’re excited to introduce the AWS Infrastructure-as-Code (IaC) MCP Server, a new tool that bridges the gap between AI assistants and your AWS infrastructure development workflow. Built on the Model Context Protocol (MCP), this server enables AI assistants like Kiro CLI, Claude or Cursor to help you search AWS CloudFormation and Cloud Development Kit (CDK) documentation, validate templates, troubleshoot deployments, and follow best practices – all while maintaining the security of local execution.
Whether you’re writing AWS CloudFormation templates or AWS Cloud Development Kit (CDK) code, the IaC MCP Server acts as an intelligent companion that understands your infrastructure needs and provides contextual assistance throughout your development lifecycle.
The Model Context Protocol (MCP) is an open standard that enables AI assistants to securely connect to external data sources and tools. Think of it as a universal adapter that lets AI models interact with your development tools while keeping sensitive operations local and under your control.
The IaC MCP Server provides nine specialized tools organized into two categories:
Remote Documentation Search Tools
These tools connect to the AWS Knowledge MCP backend to retrieve relevant, up-to-date information:
search_cdk_documentation Search the AWS CDK knowledge base for APIs, concepts, and implementation guidance.
search_cdk_samples_and_constructs Discover pre-built AWS CDK constructs and patterns from the AWS Construct Library.
search_cloudformation_documentation Query CloudFormation documentation for resource types, properties, and intrinsic functions.
read_cdk_documentation_page Retrieve and read full documentation pages returned from searches or provided URLs.
Local Validation and Troubleshooting Tools
These tools run entirely on your machine
cdk_best_practices Access a curated collection of AWS CDK best practices and design principles.
validate_cloudformation_template Perform syntax and schema validation using cfn-lint to catch errors before deployment.
check_cloudformation_template_compliance Run security and compliance checks against your templates using AWS Guard rules and cfn-guard.
troubleshoot_cloudformation_deployment Analyze CloudFormation stack deployment failures with integrated CloudTrail event analysis. This tool will use your AWS credentials to analyze your stack status.
get_cloudformation_pre_deploy_validation_instructions Returns instructions for CloudFormation’s pre-deployment validation feature, which validates templates during change set creation.
Key Use Cases
Intelligent Documentation Assistant
Instead of manually searching through documentation, ask your AI assistant natural language questions:
“How do I create an S3 bucket with encryption enabled in CDK?”
The server searches CDK best practic and samples, returning relevant code examples and explanations.
2. Proactive Template Validation
Before deploying infrastructure changes:
User: “Validate my CloudFormation template and check for security issues”
AI Agent: [Uses validate_cloudformation_template and check_cloudformation_template_compliance]
“Found 2 issues: Missing encryption on EBS volumes,
and S3 bucket lacks public access block configuration”
3. Rapid Deployment Troubleshooting
When a stack deployment fails:
User: “My stack ‘stack_03’ in us-east-1 failed to deploy. What happened?”
AI Agent: [Uses troubleshoot_stack_deployment with CloudTrail integration]
“The deployment failed due to insufficient IAM permissions.
CloudTrail shows AccessDenied for ec2:CreateVpc.
You need to add VPC permissions to your deployment role.”
4. Learning and Exploration
New to AWS CDK? The server helps you discover constructs and patterns:
User: “Show me how to build a serverless API”
AI Agent: [Searches CDK constructs and samples]
“Here are three approaches using API Gateway + Lambda…”
Architecture and Security
Security Design
Local Execution: The MCP server runs entirely on your local machine using uv (the fast Python package manager). No code or templates are sent to external services except for documentation searches.
AWS Credentials: The server uses your existing AWS credentials (from ~/.aws/credentials, environment variables, or IAM roles) to access CloudFormation and CloudTrail APIs. This follows the same security model as the AWS CLI.
stdio Communication: The server communicates with AI assistants over standard input/output (stdio), with no network ports opened.
Minimal Permissions: For full functionality, the server requires read-only access to CloudFormation stacks and CloudTrail events—no write permissions needed for validation and troubleshooting workflows.
Getting Started
Prerequisites
Python 3.10 or later uv package manager AWS credentials configured locally MCP-compatible AI client (e.g., Kiro CLI, Claude Desktop)
Configuration
Configure the MCP server in your MCP client configuration. For this blog we will focus on Kiro CLI. Edit .kiro/settings/mcp.json):
Privacy Notice: This MCP server executes AWS API calls using your credentials and shares the response data with your third-party AI model provider (e.g., Amazon Q, Claude Desktop, Cursor, VS Code). Users are responsible for understanding your AI provider’s data handling practices and ensuring compliance with your organization’s security and privacy requirements when using this tool with AWS resources.
IAM Permissions
The MCP server requires the following AWS permissions:
For Template Validation and Compliance:
No AWS permissions required (local validation only)
For Deployment Troubleshooting:
cloudformation:DescribeStacks
cloudformation:DescribeStackEvents
cloudformation:DescribeStackResources
cloudtrail:LookupEvents (for CloudTrail deep links)
IMPORTANT: Ensure you have satisfied all prerequisites before attempting these commands.
1. With the mcp.json file correctly set, try to run a sample prompt. In your terminal, run kiro-cli chat to start using Kiro-cli in the CLI.
Figure 1: Kiro-CLI with AWS IaC MCP server
Scenarios:
“What are the CDK best practices for Lambda functions?”
Figure 2: Search the CDK best practices for Lambda functions
“Search for CDK samples that use DynamoDB with Lambda”
Figure 3: Search for CDK samples that use DynamoDB with Lambda
“Validate my CloudFormation template at ./template.yaml”
Figure 4: Validate my CloudFormation template with AWS IaC MCP Server
“Check if my template complies with security best practices”
Figure 5: Check if my template complies with security best practices with AWS IaC MCP Server
Best Practices
Start with Documentation Search: Before writing code, search for existing constructs and patterns
Validate Early and Often: Run validation tools before attempting deployment
Check Compliance: Use check_template_compliance to catch security issues during development
Leverage CloudTrail: When troubleshooting, the CloudTrail integration provides detailed failure context
Follow CDK Best Practices: Use the cdk_best_practices tool to align with AWS recommendations
What’s Next?
The IAC MCP Server represents a new paradigm in the AI agentic workflow infrastructure development – one where AI assistants understand your tools, help you navigate complex documentation, and provide intelligent assistance throughout the development lifecycle.
Feedback: We welcome issues and pull requests! Or respond to our IaC survey here.
Ready to supercharge your infrastructure as code development? Install the IaC MCP Server today and experience AI-powered assistance for your AWS CDK and CloudFormation workflows.
Have questions or feedback? Reach out to the blog authors on the AWS Developer Forums.
AWS CloudFormation models and provisions cloud infrastructure as code, letting you manage entire lifecycle operations through declarative templates. Stack Refactoring console experience, announced today, extends the AWS CLI experience launched earlier. Now, you move resources between stacks, rename logical IDs, and decompose monolithic templates into focused components without touching the underlying infrastructure using the CloudFormation console. Your resources maintain stability and operational state throughout the reorganization. Whether you’re modernizing legacy stacks, aligning infrastructure with evolving architectural patterns, or improving long-term maintainability, Stack Refactoring adapts your CloudFormation stacks organization to changing requirements without forcing disruptive workarounds.
Stack Refactoring enables you to move resources between stacks, rename logical resource IDs, and split monolithic stacks into smaller, more manageable components—all while maintaining resource stability and preserving your infrastructure’s operational state. If you’re modernizing legacy infrastructure, aligning stack organization with evolving architectural patterns, or improving maintainability across your cloud resources, Stack Refactoring provides the flexibility you need to adapt your CloudFormation organization to changing
How It Works
Stack Refactoring operates through a controlled, multi-phase process designed around resource safety. When you initiate a refactor operation, CloudFormation analyzes both source and destination templates, constructs a detailed execution plan, then orchestrates resource movement without disrupting running infrastructure. Resource mappings define how assets transfer between stacks and how logical IDs should change. CloudFormation handles the orchestration complexity automatically – moving resources from source stacks, updating or creating destination stacks, and preserving all dependency relationships through exports and imports.
Each refactor operation receives a unique Stack Refactor ID for tracking progress, reviewing planned actions before execution, and monitoring the operation from initiation through completion. This preview-then-execute model gives you confidence in complex refactoring scenarios where dependencies span multiple stacks or templates.
Compared to the CLI, the console experience provides an easier way to view refactor actions, get automatic resource mapping, and easily rename logical IDs.
Example Scenario
Scenario 1: Splitting a Monolithic Stack
In this scenario, you have an Amazon Simple Notification Service (SNS) and AWS Lambda Function subscribed to it. As usage patterns evolve, you want to separate the subscriptions into a different stack for better organizational boundaries. You can also rename a resource’s logical ID to improve template clarity or align with naming conventions. Stack Refactoring handles this without recreating the underlying resource.
Create a new template MySNS.yaml using the following :
Create a new template called afterSns.yaml with the content below. This template has your SNS topic in it and has a new export in it that will export the SNS topic ARN. This export will be used by your other templates to get the required SNS topic ARN.
Create a new template afterLambda.yaml with the following content. This template includes all the resources to create a Lambda subscription to your SNS topic. This template switched the !Ref Topic to use the exported valued by using !ImportValue TopicArn. We are also updating the Logical Resource Id of Lambda function from MyFunction to Function
Go to stack refactor home page, click on ‘create stack refactor’
Provide a description to help you identify your stack refactor.
For this scenario, we are splitting a monolithic stack so select ‘Update the template for an existing stack’ and ‘Choose a stack’ options.
Search and choose the stack MySns that was created in Step 1.
Upload the afterSns.yaml file
You want to create a new stack to manage the Lambda function and SNS subscription resources. Choose ‘Create a new stack’ and name it ‘LambdaSubscription’.
Upload afterLambda.yaml template file In some scenarios, CloudFormation console can automatically detect logical resource ID renames and pre-fill the mapping for you. The resource mapping is required when there are logical resource ID changes between the original stack and refactored template. Ensure that the mappings are correct before proceeding to the next step.
The stack refactor preview will start generating. Wait for the preview to complete. You can verify actions under Stack 1 and Stack 2. It will show you the action for each resource.
You can also preview the new Stack refactored templates
Once you verify the details, go ahead and Execute Refactor. You should be redirected to the stack refactor details.
Once the Stack refactor execution is complete you can view the actions and templates for each of the stacks in your stack refactor.
Scenario 2: Move resources across multiple stacks.
This scenario demonstrates how to refactor resources across three stacks using the AWS CLI, then review and execute the operation in the CloudFormation console.
Create a new template many-stacks-original.yaml and create a new stack named ‘RefactorManyStacks’ using AWS CLI. This template contains SNS topic (IngestTopic),Lambda function(IngestFunction) and SNS subscription.
Create another template many-stacks-original-1.yaml and run the AWS CLI command to create a new stack ‘RefactorManyStacks1’. This template creates another SNS topic (UserTopic), Lambda function (UserFunction) and SNS subscription.
Create a new template many-stacks-original-2.yaml and run the AWS CLI command to create the stack RefactorManyStacks2. This template will also create SNS topic (ConsumerTopic), Lambda function (ConsumerFunction) and SNS subscription to lambda function.
Once all 3 stacks have been created successfully. Create refactored templates.
Create new template many-stacks-refactored.yaml This refactored template only contains SNS topic named IngestTopic and has a new export in it that will export the SNS topic ARN. This export will be used by your other templates to get the required SNS topic ARN.
Create another template many-stacks-refactored-1.yaml. This template **** has the SNS topic UserTopic and contains the IngestFunction and IngestSubscription and required IAM resources from ‘RefactorManyStacks’. This template switched the !Ref IngestTopic to use the exported valued by using !ImportValue IngestTopicArn. This refactored template also a new export in it that will export the UserTopic ARN.
Create another template many-stacks-refactored-2.yaml. This template has the Consumer* resources along with Lambda function (UserFunction) and SNS subscription (UserSubscription). The template is using exported value from many-stacks-refactored-1.yaml by using !ImportValue UserTopicArn
Go to stack CloudFormation console and go to ‘Stack refactor’ homepage, click on the stack refactor you just created.
Review actions for each resource and each stack. You can choose individual stacks from drop down.
Once you’re ready to execute the stack refactor, click on ‘Execute stack refactor’ and input the confirmation text.
Wait for stack refactor execution to finish.
Click on the stack in the details to navigate to the stack details. You can verify the refactor changes here.
Scenario 3: Move stacks between 2 nested child stacks stacks
This scenario demonstrates how to move resources between child stacks in a nested stack architecture. Upload child stack templates toAmazon Simple Storage Service (Amazon S3), create a parent stack that references them, then use Stack Refactoring to move resources (like a security group) from one child stack to another. The key is to work directly with the child stack names (which CloudFormation auto-generates based on parent stack name and logical IDs) rather than the parent stack itself. After refactoring, update the parent stack to reference the new child template versions in S3.
This approach lets you reorganize nested stack architectures while maintaining the parent-child relationship structure.
Create first child stack template vpc.yaml. This template creates a new Virtual Private Cloud(VPC). Upload this new template file to S3 bucket
Create second child stack template resource.yaml . This template will create S3 bucket and EC2 Security Group. Once you create this template file, upload it to an S3 bucket
Create ResourceStackAfter.yaml The resource stack will only contain s3 bucket resource. Upload this template to S3 bucket
AWSTemplateFormatVersion: '2010-09-09'
Description: 'Resource Stack AFTER - Contains only S3 bucket'

Resources:
  MyS3Bucket:
    Type: AWS::S3::Bucket

Outputs:
  S3BucketName:
    Value: !Ref MyS3Bucket
Navigate to CloudFormation Console and select Start stack refactor
Add a description for Stack refactor:
Choose “Update the template for an existing stack” and select child stack “ParentStack-VPCStack-12345”. Make sure to choose the child stack and not the Root/Parent stack.
Upload the new template VPCStackAfter.yaml
For Stack2, again select ‘Update the template for an existing stack’ and select to 2nd child stack “ParentStack-ResourceStack-12345”
Upload the template ResourceStackAfter.yaml
Review the Stack refactor. Once you have verified all the actions and details choose ‘Execute Refactor’
You can verify the refactor templates.
Lastly, update your ParentStack.yaml to reference the new child template versions in S3 bucket.
Stack Refactoring offers powerful flexibility, but a few strategic considerations will help ensure smooth operations. Test your refactoring plans in non-production environments first, particularly when working with complex dependency chains or resources that have strict ordering requirements. The preview phase becomes your primary safety mechanism—treat it as a thorough code review, examining each planned action before execution. When moving resources between stacks, pay close attention to cross-stack references. Converting direct references to export/import patterns maintains loose coupling and prevents circular dependencies. CloudFormation will automatically manage these conversions during refactoring, but understanding the resulting architecture helps you avoid introducing fragility into your infrastructure.
For scenarios where you’re emptying a source stack entirely, remember that CloudFormation requires at least one resource per stack. This makes placeholder resources like AWS::CloudFormation::WaitConditionHandle a useful temporary measure—they consume no actual AWS resources and can be safely deleted along with the stack once the refactoring completes.
Document your refactoring decisions alongside the templates themselves. Future maintainers (including yourself in six months) will appreciate understanding why resources were organized in particular ways. Include comments in your templates explaining the reasoning behind stack boundaries and resource groupings.
Consider the operational impact of your refactoring. While resources themselves remain stable, monitoring dashboards, automation scripts, or other tooling that references stack names or logical IDs may need updates. Plan these ancillary changes as part of your refactoring workflow rather than discovering them afterward.
Finally, leverage refactoring as an opportunity to improve template quality more broadly. If you’re already reorganizing resources, consider also updating documentation, standardizing naming conventions, or adding tags for better resource management.
Conclusion
CloudFormation Stack Refactoring transforms how you organize and maintain infrastructure as code, enabling stack architecture to evolve alongside applications and organizational needs. This capability provides the flexibility to restructure without the risk and complexity of traditional resource recreation approaches. Whether you’re breaking apart monolithic stacks, consolidating fragmented infrastructure, or simply renaming resources to match current conventions, Stack Refactoring lets you adapt CloudFormation organization to changing requirements without operational disruption.
To get started, visit the CloudFormation console or explore the AWS CloudFormation API reference for programmatic access patterns. Stack Refactoring is available today in all commercial AWS regions.
AWS CloudFormation StackSets enable you to deploy CloudFormation stacks across multiple AWS accounts and regions with a single operation, providing centralized management of infrastructure at scale through AWS Organizations integration. In enterprise environments, multiple StackSet often need to deploy in a specific order. For example, networking infrastructure must be ready before applications can deploy successfully.
Figure 1: Example of a multi-region AWS CloudFormation StackSet architecture with an administrative account and target accounts
Previously, when multiple StackSets had auto-deployment enabled, they operated independently without coordination. This could cause deployment failures when dependent infrastructure wasn’t ready, forcing customers to implement complex workarounds or disable auto-deployment entirely.
We are announcing StackSets dependencies, a new feature that gives you fine-grained control over the deployment order of your auto-deployed StackSets, elegantly solving these orchestration challenges.
Feature Overview
This new feature introduces the ability to define dependencies between StackSets using the new DependsOn parameter in the AutoDeployment configuration. When accounts move between Organizational Units or are added to your organization, StackSets automatically orchestrates deployments according to your defined sequence, ensuring foundational infrastructure deploys before dependent applications.
Key capabilities include:
Dependency Management: Define up to 10 dependencies per StackSet, with up to 100 dependencies per account. For example, if you have 5 StackSets with 5 dependencies each, you have 25 dependencies counting towards the 100 dependency limit. You can request a limit increase through the service quota console.
Cycle Detection: Built-in validation prevents circular dependencies with error messages.
Cross-Region Support: Dependencies work across regions.
Automatic Cleanup: Dependencies are removed when StackSets are deleted or Organizations are deactivated.
How it works
Let’s walk through this feature with a practical example. Consider an infrastructure setup where you have: A central Infrastructure StackSet that creates IAM roles and networking components and multiple Application StackSets that depend on these foundational resources.
With StackSets dependencies, you can make sure the Infrastructure StackSet completes deployment before any Application StackSets begin, preventing deployment failures due to missing dependencies.
Implementation Scenarios
Let’s explore three common scenarios where StackSets Dependencies provides value:
Scenario 1: Foundation-First Deployment
Use Case: You have a foundational Infrastructure StackSet that creates IAM roles and networking components, and multiple Application StackSets that depend on these resources.
Setup:
Infrastructure StackSet ARNs (creates IAM roles, VPCs, security groups)
App1 StackSet (web application requiring IAM roles)
App2 StackSet (API service requiring networking components)
No additional permissions are required to use this feature.
Console Experience
The CloudFormation console provides an intuitive interface for managing StackSet dependencies. Log into the AWS console with your credentials, with an IAM user or administrative user, according to your access. Navigate to the Cloudformation service and create a new Stack or add a YAML/JSON template, where you will be configuring dependencies. In the Step 4 of the Create StackSet wizard, you’ll find a new “StackSet dependencies” form field in the Auto-deployment options section. You can use the attribute editor to add StackSet ARNs for dependencies. The console includes input validation for ARN format and helpful alerts about dependency behavior.
As a result, Networking and Security StackSets deploy in parallel, and Application waits for both to complete before starting.
Scenario 3: Resolving Dependency Conflicts
Use Case: You need to update existing StackSets to fix incorrect dependency relationships.
Problem: You have App1 and App2 StackSets. There is an existing dependency that App2 has on App1, but you realize App1 should depend on App2, not the other way around.
Implementation:
First, try to set App1 to depend on App2 (this will fail due to cycle):
This action will result in error: “Detected cycle(s) between auto-deployment dependencies”. If dependency validation cannot be completed, you’ll receive appropriate error messages to help troubleshoot configuration issues.
Now let’s remove the existing dependency from App2:
This scenario demonstrates cycle detection and how to resolve dependency conflicts.
Getting Started
StackSet dependencies is available now in all AWS Regions where CloudFormation StackSets are supported. To get started:
Identify Dependencies: Determine which StackSets should deploy first in your infrastructure.
Configure Relationships: Use the CloudFormation console or AWS CLI to set up dependencies using StackSet ARNs.
Test Your Sequence: Validate your dependency configuration in a test environment.
Monitor Deployments: Use CloudFormation events to track sequenced deployments.
Log into your account in the console and visit the AWS CloudFormation StackSets console or use the AWS CLI/SDK with AWS credentials configured to start controlling StackSet dependencies today.
Authors
Tanvi Ravindra Malali
Tanvi Ravindra Malali is an Associate Delivery Consultant in the AWS A2C team in ProServe. She is based in New York City. She handles customer projects and codebases, specializing in AI/ML, Data Engineering and Infrastructure as Code. Outside of work, she loves to paint landscapes, DJing her favorite songs, and dances Tango.
Idriss Laouali Abdou
Idriss Laouali Abdou is a Sr. Product Manager Technical on the AWS Infrastructure-as-Code team based in Seattle. He focuses on improving developer productivity through CloudFormation and StackSets Infrastructure provisioning experiences. Outside of work, you can find him creating educational content for thousands of students, cooking, or dancing.
Is configuration drift preventing you from accessing the speed, safety, and governance benefits of AWS CloudFormation for infrastructure management? Configuration drift occurs when cloud resources are modified outside of CloudFormation, leading to a mismatch in the actual state and template definition of resources. Drift tends to accumulate from infrastructure changes that engineers make via the AWS Management Console to resolve production incidents or troubleshoot malfunctioning applications. Drift can cause unexpected changes during subsequent IaC deployments or leave resources in a non-compliant state. Unresolved drift can lead to cost increases when resources are over-provisioned outside of template definitions, or compliance violations that may result in audit penalties. Additionally, drift makes it hard to reproduce applications for testing or disaster recovery.
CloudFormation now offers drift-aware change sets that allow you to safely handle configuration drift and keep your infrastructure in sync with your templates. In this post, we will explore the process of leveraging drift-aware change sets to resolve common scenarios in which drift impacts the availability or security of your application.
Solution Overview
Drift-aware change sets are a type of CloudFormation change sets that can bring drifted resources in line with template definitions and preview the required changes to actual infrastructure states before deployment. Drift-aware change sets surface a three-way comparison of your new template, actual resource states, and previous template before deployment, allowing you to prevent unexpected overwrites of drift. Additionally, drift-aware change sets offer you a systematic mechanism to restore drifted resources to approved template definitions, strengthening the reproducibility and compliance posture of applications. You can create drift-aware change sets either from the CloudFormation Management Console or from the AWS CLI or SDK by passing the --deployment-mode REVERT_DRIFT parameter to the CreateChangeSet API.
Prerequisites
• AWS CLI latest version with CloudFormation permissions configured.
Important Note: These sample templates are provided for educational purposes only and should not be used in production environments without proper security review and testing. You are responsible for testing, securing, and optimizing these templates based on your specific quality control practices and standards. Deploying these templates may incur AWS charges for creating or using AWS resources. Work with your security and legal teams to meet your organizational security, regulatory, and compliance requirements before any production deployment.
Scenario 1: Prevent Dangerous Overwrites
This scenario demonstrates how drift-aware change sets prevent dangerous overwrites when Lambda function memory is increased outside of CloudFormation during an outage, and a subsequent template update could accidentally reduce memory, causing performance issues.
Story: Your team deploys a Lambda function with 128 MB memory via CloudFormation. During a production outage, an engineer increases the memory to 512 MB through the Lambda Console to resolve performance issues. Later, another developer updates the template to 256 MB for a code change, unaware of the console modification. Without drift-aware change sets, CloudFormation would unexpectedly reduce memory from 512 MB to 256 MB—potentially causing the outage to recur.
User journey: Create stack with 128MB => Increase memory to 512MB via console during outage => Create drift-aware change set with 256MB template => Review three-way comparison showing dangerous memory reduction => Cancel change set to prevent outage => Update template to match production state (512MB) => Create and execute drift-aware change set with updated template (512MB) to resolve drift
Scenario Flow
1. Create Stack
Deploy CloudFormation stack with Lambda function (128 MB memory).
CloudFormation stack “lambda-memory-drift-test” successfully deployed with CREATE_COMPLETE status
2. Emergency Memory Increase (Console)
Manually increase Lambda memory to 512 MB through AWS Console (simulating emergency performance fix during outage).
Initial Lambda function showing 128 MB memory as configured in template
Lambda memory increased to 512 MB through console during outage, creating drift from template
3. Create Drift-Aware Change Set
Create change set with 256 MB template using drift-aware mode to reveal the dangerous memory reduction.
CloudFormation console showing the new “Drift aware change set” option selected. This compares the new template with the live state of your stack and shows changes to drifted resources before deployment, unlike standard change sets that only compare templates.
4. Review Change Set – The Critical Three-Way Comparison
Examine the drift-aware change set to see the dangerous memory reduction that would occur.
Critical insight revealed: The change set shows Live resource state (512 MB) vs Proposed resource state (256 MB), revealing a dangerous memory reduction that would impact performance.
Drift analysis: Clicking “View drift” reveals the complete picture – Previous template (128 MB) vs Live resource state (512 MB). This shows the live state has 4x more memory than the original template, indicating emergency changes were made during the outage that must be preserved.
Key Insight: The drift-aware change set reveals that:
Previous template: 128 MB (original deployment)
Live resource state: 512 MB (emergency change during outage)
Proposed template: 256 MB (new deployment)
This would cause a dangerous reduction from 512 MB to 256 MB, potentially recreating the original performance issue. Without drift-aware change sets, this critical information would be hidden.
5. Recreate Drift-aware Change Set with Updated Template (512MB) to Resolve Drift
Update the template to match the live production state (512 MB) and create a new drift-aware change set to safely resolve the drift.
Resolution confirmed: The drift-aware change set shows both Live resource state and Proposed resource state at 512 MB, with change set action ” Sync with live”. This verifies that the updated template now matches production, preventing the dangerous memory reduction and safely resolving the drift without impacting performance.
This scenario demonstrates how drift-aware change sets systematically remediate unauthorized changes when a developer adds temporary debugging rules to a security group but forgets to remove them, creating a compliance violation.
Story: Your team deploys a security group with only HTTP access via CloudFormation for compliance. During debugging, a developer adds SSH access (port 22) through the AWS Console for their IP address to troubleshoot an application issue. They forget to remove this rule after debugging. Later, security compliance requires reverting to the original template state. A standard change set shows no changes since the template is unchanged, but a drift-aware change set can detect and systematically remove the unauthorized SSH rule.
User journey: Create stack with HTTP-only access => Add SSH rule via console for debugging => Forget to remove SSH rule => Create drift-aware change set with REVERT_DRIFT mode => Review change set showing SSH rule removal => Execute change set to restore compliance
Scenario Flow
1. Create Stack
Deploy CloudFormation stack with security group allowing only HTTP traffic.
CloudFormation stack “sg-revert-drift-test” successfully deployed with DriftTestSecurityGroup resource
2. Make Unauthorized Changes (Console)
Manually add SSH ingress rule through AWS Console (simulating developer debugging access that wasn’t removed).
Initial security group showing only HTTP (port 80) access as configured in template – compliant state
Security group now shows 2 permission entries: SSH (port 22) for specific IP and HTTP (port 80) for all traffic. The SSH rule creates drift and a compliance violation that needs systematic removal.
3. Create Drift-Aware Change Set
Create change set using REVERT_DRIFT mode to systematically remove the unauthorized SSH rule.
Creating drift-aware change set for security group compliance restoration. Note the “Drift aware change set” option is selected to compare with live state and detect unauthorized changes.
4. Review Change Set – Systematic Compliance Restoration
Examine the drift-aware change set to see systematic removal of unauthorized SSH rule.
Compliance violation detected: The drift -aware change set shows that the SSH rule in the live resource state (rule 232 for IP 15.248.7.53/32 on port 22) is not present in the proposed resource state derived from the template. This unauthorized SSH rule violates security policy and will be systematically removed
Key Insight: The drift-aware change set enables systematic compliance restoration by:
Previous template: Only HTTP (port 80) access – compliant state
Live resource state: HTTP + SSH (port 22) for 15.248.7.53/32 – compliance violation
Action: Remove unauthorized SSH rule to restore compliance
This provides a systematic, auditable way to remove unauthorized changes rather than manual cleanup.
Stack events showing successful execution of the drift-aware change set – SSH rule removed
CloudFormation Templates
security-group-drift-scenario.yaml:
Resources:
  DriftTestSecurityGroup:
    Type: AWS::EC2::SecurityGroup
    Properties:
      GroupDescription: "Security group for drift testing"
      SecurityGroupIngress:
        - IpProtocol: tcp
          FromPort: 80
          ToPort: 80
          CidrIp: 0.0.0.0/0
          Description: "Allow HTTP traffic for demo purposes"
      SecurityGroupEgress:
        - IpProtocol: -1
          CidrIp: 0.0.0.0/0
          Description: "Allow all outbound traffic"
This scenario demonstrates drift detection when a dependent resource (logs bucket) is accidentally deleted outside of CloudFormation during troubleshooting. The main application bucket depends on this logs bucket for access logging. You need to recreate the deleted resource while maintaining the existing infrastructure dependencies.
Story: Your team deploys a main S3 bucket with a dependent logs bucket for access logging via CloudFormation. During troubleshooting, an operator accidentally deletes the logs bucket through the AWS Console. The main bucket still exists but its logging configuration now references a non-existent bucket. You need to recreate the deleted logs bucket while maintaining the dependency relationship.
User journey: Create stack with main and logs buckets => Accidentally delete logs bucket => Create drift-aware change set with REVERT_DRIFT mode => Review change set showing LogBucket will be recreated => Execute change set to restore deleted resource
Scenario Flow
1. Create Stack
Deploy CloudFormation stack with main S3 bucket and dependent logs bucket.
CloudFormation stack “s3-deletion-drift-test” successfully deployed with both LogBucket and MainBucket resources in CREATE_COMPLETE status
2. Accidental Deletion (Console)
Manually delete the logs bucket through AWS Console (simulating accidental deletion during troubleshooting).
LogBucket accidentally deleted outside of CloudFormation during troubleshooting, creating drift – the MainBucket still exists but its logging configuration now references a non-existent bucket
3. Create Drift-Aware Change Set
Create change set using REVERT_DRIFT mode to recreate the deleted LogBucket.
Creating drift-aware change set with “Drift aware change set” option selected to detect and recreate the deleted resource by comparing template with live state
When working with drift-aware change sets, consider these best practices:
• Always review three-way comparisons before executing change sets to understand the full impact
• Use REVERT_DRIFT deployment mode when you want to bring resources back to template compliance
• Document emergency changes made outside of CloudFormation to inform future template updates
• Implement change management processes to minimize unauthorized drift
• Regular drift detection helps identify configuration changes before they become problematic
• Test drift-aware change sets in non-production environments first
Cleanup
Important: Execute these cleanup commands promptly after completing the scenarios to avoid incurring unnecessary AWS charges. Resources such as Lambda functions, S3 buckets (even if empty), and security groups may incur costs if left running. Ensure all stacks are successfully deleted by verifying the DELETE_COMPLETE status.
Note: CloudFormation will automatically clean up all resources created by the stacks, including Lambda functions, security groups, and S3 buckets.
Conclusion
Drift-aware change sets enable you to mitigate the operational and security risks of configuration drift, allowing you to confidently automate and govern your infrastructure updates with CloudFormation. Through the scenarios described in this post, you have seen how you can leverage drift-aware change sets to prevent outages in production environments, maintain the integrity of your test environments, and manage the compliance posture of all environments. Remember to thoroughly review the infrastructure changes previewed by drift-aware change sets before executing deployments.
Available Now
Drift-aware change sets are available in AWS Regions where CloudFormation is available. Please refer to the AWS Region table to learn more.
Organizations operating at scale on AWS often need to manage resources across multiple accounts and regions. Whether it’s deploying security controls, compliance configurations, or shared services, maintaining consistency can be challenging.
AWS CloudFormation StackSets (StackSets) has been helping organizations deploy resources across multiple accounts and regions since its launch. While the service is powerful on its own, combining it with Infrastructure as Code (IaC) tools and implementing automated deployments can significantly enhance its capabilities.
In this post, we’ll show you how to leverage AWS CloudFormation StackSets at scale using AWS CDK and implement a robust CI/CD pipeline for automated deployments with AWS CodePipeline.
StackSets key concepts
AWS CloudFormation StackSets allows you to create, update, or delete CloudFormation stacks across multiple AWS accounts and regions with a single operation. It’s essentially a way to manage infrastructure at scale across your AWS organization. Using an administrator account, you define and manage a CloudFormation template, and use the template as the basis for provisioning stacks into selected target accounts across specified AWS Regions:
Figure 1. StackSets overview.
The Administrator Account is the AWS account where you create and manage StackSets and the Target Accounts are the AWS accounts where the stack instances are deployed.
The Stack Instances are individual stacks created from the StackSet template deployed to specific account-region combinations.
You can make the following operations using StackSets: Create, update, and delete actions performed on stack instances. These operations can be applied in concurrent or sequential way.
Sequential Deployment:
Account-by-account deployment
Region-by-region within accounts
Configurable failure thresholds
Parallel Deployment:
Concurrent account deployments
Maximum concurrent account setting
Region priority configuration
Hybrid Deployment:
Combine sequential and parallel
Account group-based deployment
Regional deployment strategies
The power of StackSets
The use of StackSets allows us to extend AWS CloudFormation’s capabilities in several important ways:
Governance
It provides you with Centralized Management as a single point of control while including consistent deployment patterns and automated stack instance management across AWS accounts and regions.
With Drift Detection feature, you can identify if any of the stack instances of your StackSet have configuration differences according to its expected configuration. You detect changes made outside CloudFormation and changes made to an instance stack through CloudFormation directly without using the StackSet.
Flexible Deployment
You also have flexible deployment options with controlled rollout. For example, with Concurrent Deployments you can deploy to multiple accounts within each region simultaneously while controlling deployment order. It also includes failure tolerance with automated retry failed operations.
Operational Efficiency
It reduces manual effort in managing multi-account and multi-region environments while minimizes human error in deployments.
Cost Management
It delivers comprehensive resource organization and streamlined tracking of resources across accounts and regions containing instance stacks. Using centralized management, simplifies the resource tracking and organization enabling you you to have:
unified visibility: view all related stacks from a single StackSet console (with their deployment status)
consistent tagging: apply standardized tags across all stack instances for cost allocation and resource grouping
drift detection: run drift detection across all stack instances simultaneously
operations tracking: track all operations (create, update and delete) across account/regions from one place
Built-in Safety
You can establish maximum concurrent operation limits, failure tolerance thresholds and automatic retry mechanisms. You also have recovery capabilities through update operations. All these features make a built-in safety mechanisms that prevent widespread failures.
Let’s say you have 100 target accounts, with the maximum concurrent limits, you can for example deploy a change to only 10 accounts. Also, with a failure threshold you can set how many failures do you allow before automatically stopping the process (e.g., stop if more than 5 accounts fail). This way you can gradually deploy and test your templates with a little group, establishing failure thresholds, instead of affecting the stacks preventing mass failures.
When an operation fails, AWS CloudFormation performs a rollback in the stack instances deploying the previous working template. You will still need to correct the template and apply it again in all the stack instances. With StackSets, you can fix the issues in the template and run again an update across all the stacks including the concurrent limit and failure threshold mentioned before to safety test the fix.
Security and Compliance management
This security-focused approach with StackSets helps organizations maintain a strong security posture across their AWS environment while reducing the operational overhead of managing security at scale.
You can use StackSets to deploy standardized security policies across accounts, enforce security baselines automatically and implement security guardrails organization-wide. For example, you can deploy detective control resource and its configuration in all your accounts like Amazon GuardDuty or Amazon Macie. You can also deploy preventive controls like SCPs, AWS Firewall Manager or AWS Shield Advanced. For example you can deploy through StackSets the following CloudFormation template en each target account to block certain actions in a region:
<code>AWSTemplateFormatVersion: '2010-09-09'</code><br /><code>Description: 'Service Control Policy to block access to specific AWS regions'</code><br /><br /><code>Parameters:</code><br /><code> PolicyName:</code><br /><code> Type: String</code><br /><code> Default: 'RegionDenyPolicy'</code><br /><code> Description: 'Name for the Service Control Policy'</code><br /><code> </code><br /><code> PolicyDescription:</code><br /><code> Type: String</code><br /><code> Default: 'Blocks access to Singapore region (ap-southeast-1) while allowing global services'</code><br /><code> Description: 'Description for the Service Control Policy'</code><br /><code> </code><br /><code> BlockedRegion:</code><br /><code> Type: String</code><br /><code> Default: 'ap-southeast-1'</code><br /><code> Description: 'AWS Region to block access to'</code><br /><code> AllowedValues:</code><br /><code> - 'ap-southeast-1'</code><br /><code> - 'ap-southeast-2'</code><br /><code> - 'eu-west-3'</code><br /><code> - 'us-west-1'</code><br /><code> - 'ca-central-1'</code><br /><code> </code><br /><code> TargetOUId:</code><br /><code> Type: String</code><br /><code> Description: 'Organizational Unit ID to attach the policy to (e.g., ou-root-xxxxxxxxxx)'</code><br /><code> </code><br /><code>Resources:</code><br /><code> RegionDenySCP:</code><br /><code> Type: AWS::Organizations::Policy</code><br /><code> Properties:</code><br /><code> Name: !Ref PolicyName</code><br /><code> Description: !Ref PolicyDescription</code><br /><code> Type: SERVICE_CONTROL_POLICY</code><br /><code> Content:</code><br /><code> Version: '2012-10-17'</code><br /><code> Statement:</code><br /><code> - Sid: DenyAccessToSpecificRegion</code><br /><code> Effect: Deny</code><br /><code> NotAction:</code><br /><code> - 'route53:*'</code><br /><code> - 'cloudfront:*'</code><br /><code> - 'sts:*'</code><br /><code> Resource: '*'</code><br /><code> Condition:</code><br /><code> StringEquals:</code><br /><code> 'aws:RequestedRegion':</code><br /><code> - !Ref BlockedRegion</code><br /><code> TargetIds:</code><br /><code> - !Ref TargetOUId</code><br /><code> Tags:</code><br /><code> - Key: Purpose</code><br /><code> Value: RegionCompliance</code><br /><code> - Key: ManagedBy</code><br /><code> Value: CloudFormation</code><br /><br /><code>Outputs:</code><br /><code> PolicyId:</code><br /><code> Description: 'ID of the created Service Control Policy'</code><br /><code> Value: !Ref RegionDenySCP</code><br /><code> Export:</code><br /><code> Name: !Sub '${AWS::StackName}-PolicyId'</code><br /><code> </code><br /><code> PolicyArn:</code><br /><code> Description: 'ARN of the created Service Control Policy'</code><br /><code> Value: !GetAtt RegionDenySCP.Arn</code><br /><code> Export:</code><br /><code> Name: !Sub '${AWS::StackName}-PolicyArn'</code>
Other capabilities include compliance-related resources consistently, maintain audit trails of security configurations and ensure regulatory requirements are met across all accounts. For example, you can enable CouldTrail and deploy AWS Config rules across all the instance stacks managed by the StackSet.
For both Security and Compliance incidents you can use StackSets to deploy automated response workflows, configure event notifications and implement remediation actions across your accounts and regions.
Import existing stacks into StackSets
A stack import operation can import existing stacks into new or existing StackSets, so that you can migrate existing stacks to a StackSet in one operation.
Solution Overview
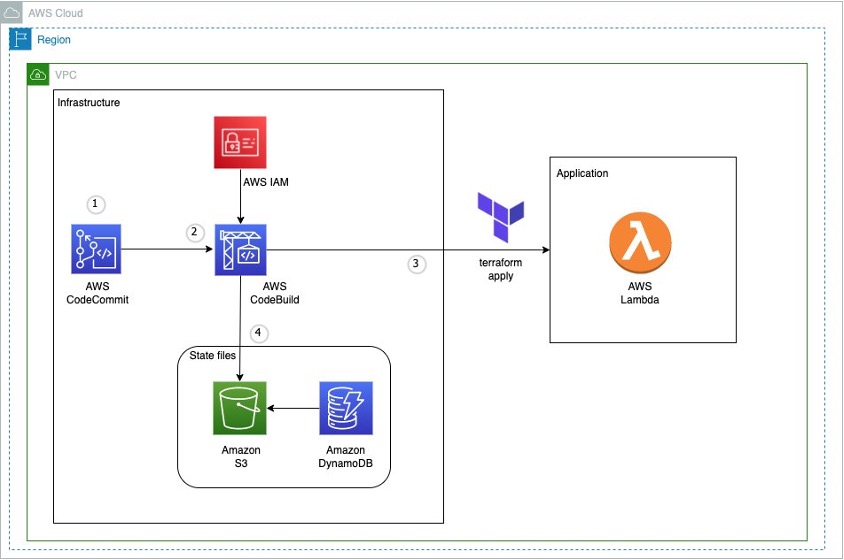
This solution includes an AWS CodePipeline stack that creates a CI/CD pipeline to deploy our StackSet. This pipeline deploys an application stack containing the AWS CloudFormation StackSet with a monitoring dashboard in AWS CloudWatch.
Figure 2. Solution overview
The following Amazon CloudWatch dashboard is an example of what you will in the target accounts after the StackSet is deployed:
Figure 3. Dashboard example
In the CI/CD pipeline, before running the deployment commands, it applies python security and quality code checks to ensure code quality and security and cdk-nag to ensure AWS Well Architected best practices. You can find more details about these checks in the solution repository in README.md file.
The solution includes 2 AWS CloudFormation stacks defined by in the AWS CDK application and a template for the StackSet that will be deployed in the target accounts and regions. This stack contains the monitoring dashboard that will be deployed en the target regions of each target account as a single unit.
The idea of using AWS CodePipeline with IaC is that development teams can define and share “pipelines-as-code” patterns for deploying their applications making it easy to add stages. This way, security and quality code testing can run any time you change the source code.
Figure 4. Pipeline overview
The best practice is to ensure shift-left: adding this checks to the earlier stages of the SDLC. You can accomplish this complementing your CI/CD pipeline with githooks or IDE Plugins. For example with Amazon Q Developer IDE extension you can use the review function to analyze the security of your code locally.
To use the CI/CD pipeline just create a repository using any of the AWS CodeConnection git supported providers and add the contents of the folder. All details are included in the README.md so you can always get the latest version of the code and how it works.
Conclusion
In this post, we showed how to use AWS CDK to deploy AWS CloudFormation StackSets to reduce operational overhead and ensure consistency, compliance and security across multiple regions and accounts. We also learned how to create a CI/CD pipeline to guarantee a robust DevSecOps cycle for our Infrastructure as Code.
Now that we’ve explored the main concepts together, you can clone the example repository from the walkthrough section, follow the setup instructions, and customize the implementation to enhance AWS resources management across accounts and regions. Whether you’re managing a single account or multiple organizations, these practices can be adapted to your specific needs. Now that you learned the main concepts, go ahead and clone the example repository from walkthrough section, follow the setup instructions and customize the implementation to improve the AWS resources management across your accounts and regions.
As organizations adopt multi-account strategies for improved security features and governance, AWS CloudFormation StackSets enables organizations to deploy infrastructure across multiple accounts and regions. However, monitoring and tracking these distributed deployments across multiple accounts presents operational challenges. When a critical security baseline deployed across 50 accounts suddenly starts failing, teams face the daunting task of logging into each account individually to understand what went wrong and which accounts were affected.
This operational overhead scales exponentially with organization growth, requiring platform teams to spend countless hours switching between accounts and manually correlating deployment events. The lack of centralized visibility slows incident response and makes it difficult to identify patterns or implement proactive monitoring. In this blog post, we’ll explore a solution that centralizes AWS CloudFormation logs from multiple accounts into a single management account, making it easier to monitor and troubleshoot StackSets deployments.
Solution Architecture
Our solution creates a centralized logging system that collects AWS CloudFormation events from all target accounts and forwards them to a central management account. This approach provides a single pane of glass for monitoring and troubleshooting AWS CloudFormation deployments across your entire organization.
Figure 1. Architecture diagram showing event flow from member accounts to management account through EventBridge and CloudWatch Logs.
The architecture consists of four main components:
Management Account Setup: Creates a central event bus, log group, and necessary permissions in the organization’s management account.
Target Account Configuration: Deployed via StackSets to configure event rules that forward AWS CloudFormation events to the management account.
Resource Deployment: Uses StackSets to deploy common resources across target accounts, generating the events we want to monitor.
Monitoring and Visualization: Provides dashboards and queries for operational insights.
Event Capture:Amazon EventBridge rules in each target account capture these AWS CloudFormation events based on defined patterns.
Cross-Account Forwarding: Events are forwarded to a custom event bus in the management account using cross-account permissions.
Centralized Logging: The central event bus routes all events to a Amazon CloudWatch Log Group with structured logging.
Monitoring and Alerting: Administrators can view consolidated logs, create custom queries, and set up alerts from a single location.
Prerequisites
Before implementing this solution, ensure you have the following prerequisites in place:
AWS account: Ensure you have valid AWS account.
AWS Organizations: You must have an AWS Organization structure set up with a primary management account and several member accounts under the management account.
Appropriate Permissions: You must have access to the management account or be configured as a delegated administrator to create and manage StackSets. For detailed information about permissions and security considerations when using StackSets with AWS Organizations, please review the Prerequisites in the AWS CloudFormation StackSets documentation.
Implementation Deep Dive
The solution is implemented using two AWS CloudFormation templates that work together to create a comprehensive monitoring system:
This template establishes the central logging infrastructure in the management account by creating a custom Amazon EventBridge event bus with cross-account access policies and an encrypted Amazon CloudWatch Log Group using a customer-managed AWS Key Management Service (AWS KMS) key. A key feature is the included stack set resource that automatically deploys the target account configuration to all member accounts, eliminating manual setup and ensuring consistent configuration across the entire organization.
This template creates a service-managed stack set that deploys common resources to all accounts in specified organizational units. The StackSet is configured with auto-deployment enabled to automatically provision new accounts added to the organization and includes operation preferences for parallel regional deployment with fault tolerance settings.
On the Stacks page, choose Create stack at top right, and then choose With new resources (standard).
On the Create stack page, Upload a template file, choose Choose File to choose a template file from your local computer.
Choose Next to continue and to validate the template.
On the Specify stack details page, type a stack name in the Stack name box.
In the Parameters section, specify values for the parameters that were defined in the template.
Choose Next to continue creating the stack.
Acknowledge capabilities and transforms.
Choose Next to continue.
Choose Submit to launch your stack.
This creates a stack set that deploys Amazon Simple Storage Service (Amazon S3) infrastructure to all target accounts, generating AWS CloudFormation events that will be captured by your centralized logging system.
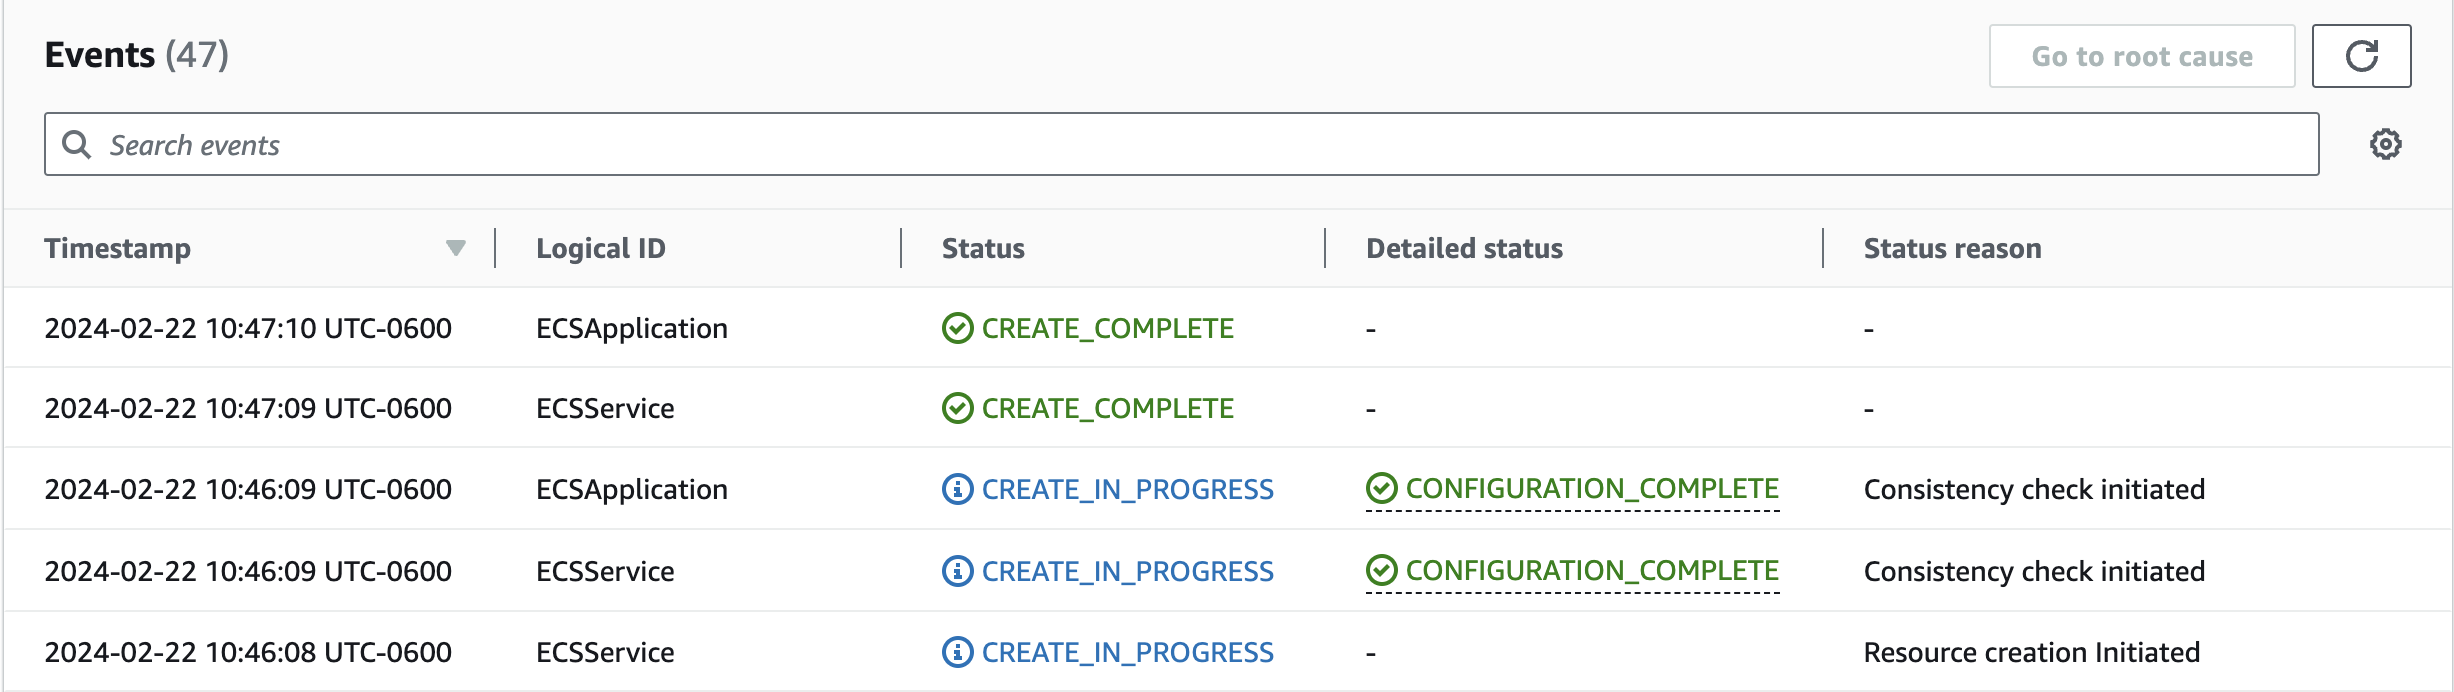
Figure 3: Screenshot showing successful deployment of common-resources-stackset.yaml template for target accounts
Step 4: Validation and Testing
Confirm event flow and monitoring functionality by viewing the log streams in the ‘central-cloudformation-logs’ log group.
Monitoring and Visualization
The centralized logging solution provides advanced monitoring capabilities through Amazon CloudWatch Logs Insights and custom dashboards.
You can customize your queries to get:
Recent AWS CloudFormation events across all accounts.
Failed stack operations for quick troubleshooting.
Successful deployments for verification.
Event distribution by account and region.
Status breakdown of all AWS CloudFormation operations.
The following query helps you analyze CloudFormation events across your organization by showing:
You can customize your queries to filter for specific conditions such as failed deployment status, particular resource types, or specific accounts to quickly identify and troubleshoot issues across your organization’s AWS CloudFormation deployments.
Cost Implications
When implementing this centralized monitoring solution, you should consider the following cost components:
Amazon EventBridge pricing – Costs associated with events being published across accounts to the central event bus
Amazon CloudWatch pricing – Storage costs for the centralized log group storing CloudFormation events from all accounts. Query costs when analyzing the centralized logs
To clean up the resources created in this solution, follow these steps:
First, delete the common resources stack set (common-resources-stackset) from the AWS CloudFormation console in your management account. This will remove all the resources deployed across your member accounts.
After the stack set operations are complete, delete the management account logging setup stack (log-setup-management) to remove the centralized logging infrastructure, including the event bus, log groups, and associated IAM roles.
Note: Make sure all stack set operations are complete before deleting the management account logging setup to ensure proper cleanup of all resources.
Conclusion
Managing infrastructure across multiple AWS accounts doesn’t have to be complex. By centralizing AWS CloudFormation logs, you can gain visibility into your multi-account deployments, troubleshoot issues more efficiently, and help achieve consistent resource deployment across your organization.
This solution demonstrates how AWS services like AWS CloudFormation StackSets, Amazon EventBridge, and Amazon CloudWatch Logs can be combined to create a powerful monitoring system for your infrastructure as code deployments.
Get started today by implementing this solution in your AWS Organization to gain immediate visibility into your multi-account deployments. Download the templates from our GitHub repository and follow the step-by-step guide to enhance your cloud operations.
This post is cowritten by Danilo Tommasina and Lalit Kumar B from Thomson Reuters.
Large organizations often struggle with infrastructure management challenges including compliance issues, development bottlenecks and errors from inconsistent AWS resource creation across teams. Without standardized naming, tagging and policy enforcement, teams face repeated boilerplate code and difficulty accessing centrally-managed resources.
In this post, we will show you how Thomson Reuters developed an extension of the AWS Cloud Development Kit (CDK) to automate compliance, standardization and policy enforcement in Infrastructure as Code (IaC) scripts. We will explore the strategic reasoning behind this initiative, outline foundational design principles, and provide technical details on TR’s journey from concept to implementation. The solution accelerates and standardizes cloud infrastructure deployment and management through seamless integration between TR’s custom library and AWS CDK.
Thomson Reuters (TR) is one of the world’s leading information organizations for businesses and professionals. TR provides companies with the intelligence, technology, and human expertise they need to find trusted answers, enabling them to make better decisions more quickly. TR’s customers span the financial, risk, legal, tax, accounting, and media industries.
Overview
In a large organization that offers a variety of customer products, it is essential to manage numerous cloud resources effectively. This involves overseeing multiple AWS accounts, implementing access control or addressing financial tracking challenges. These tasks require the application of centrally defined standards and conventions, with additional requirements tailored to specific sub-organizations.
Infrastructure as Code (IaC) is an effective method for managing cloud resources. However, utilizing vanilla AWS CloudFormation for extensive and intricate infrastructure can pose challenges. It requires careful attention to naming conventions, tagging standards, security, and best practices for infrastructure deployments. Additionally, repeating infrastructure patterns across various services and products often leads to excessive use of copy-paste and dealing with boilerplate code. When projects require configurable and dynamic components – including conditionals, loops, repeatable patterns, and distribution to a large user base – delivering CloudFormation scripts can become quite cumbersome and prone to errors.
AWS CDK addresses these challenges by enabling IaC development in high-level programming languages like TypeScript, JavaScript, Python, Java. AWS CDK Level 2 and 3 constructs simplify and reduce the amount of code to be written to manage complex infrastructure. It allows TR to create custom libraries that extend the vanilla AWS CDK with additional patterns and utilities. The extension libraries can also be distributed for multiple programming languages and package managers thanks to JSII. JSII enables TypeScript libraries to be automatically compiled and packaged for native consumption in each target language, allowing CDK libraries to be written once but used in many different programming environments.
Solution to optimize the process
In a medium to large company, different teams provide the fundamental infrastructure services (e.g. authentication and authorization, networking, security, financial tracking and optimization, base infrastructure provisioning, etc.) to enable use of the cloud for a large community of developers.
Figure 1 illustrates the conventional method involving teams producing documentation that outlines the usage of pre-deployed infrastructure. This includes naming and tagging standards, required security boundaries, default settings and other relevant guidelines. Subsequently, the implementation team reviews these documents and integrates the established rules into their tool chain consistently, often working in isolation. This results in inefficiencies, misinterpretation risks and maintenance challenges when specifications change.
Figure 1: The traditional approach
TR’s optimized approach replaces documentation with working code as shown in Figure 2.
Figure 2: The optimized approach
Infrastructure teams contribute their specifications into an extension library for AWS CDK, while the implementation teams can also contribute common patterns back into the central extension. The central extension library is released as polyglot packages allowing the implementation teams to pick the programming language that fits best to their knowledge.
With this approach, TR introduce a “shift-left” in the development and delivery lifecycle. Standards and best practices are introduced early, things are done right by default, and TR minimizes the risks of getting inappropriately configured resources to be deployed, which leads to a reduction in the number of governance and security incidents. Implementation delivery teams can share well architected patterns for re-use by other teams to improve overall effectiveness.
Implementation
Design principles
Key factors for the adoption of a framework are:
Simplicity, ease-of-use, self-service, and fast onboarding
Low maintenance effort and cost
Controlled roll-out, ability to quickly roll-back
With the above in mind, TR delivered a minimally invasive framework that can be enabled with a tiny set of custom code on top of vanilla AWS CDK code.
Using the TR-AWS CDK core library is straightforward – users simply import the package and adapt their entry point. From there, they can leverage standard AWS CDK code and documentation for most development tasks. There’s no need to learn custom construct classes or follow extensive specialized tutorials – vanilla AWS CDK knowledge is sufficient for most requirements. Additionally, developers can quickly incorporate open-source construct libraries through standard package managers. These third-party libraries integrate seamlessly with the TR implementation, automatically conforming to company standards without requiring additional configuration.
By managing distribution of the library following standard software packaging and release procedures TR enable consumers to adopt new capabilities in a controlled way, with the ability to roll-back to previous versions if something goes wrong during an update.
All this together allows TR to tick off the key factors listed above.
The monorepo approach
TR created a monorepo (monolithic repository) which is a version control strategy where multiple projects or packages are stored in a single repository. This approach offers several advantages over maintaining separate repositories for each package: unified versioning, simplified dependency management, consistent tooling, atomic changes across packages and improved collaboration.
This setup mirrors the configuration used by AWS CDK itself.
TR organized their monorepo following this structure:
repo/package.json: Defines dev dependencies and global scripts used by all packages
repo/packages: contains the different modules
repo/packages/core/package.json: deps of core module and scripts for core module
repo/packages/core/lib/*: typescript code that composes the core module
repo/packages/core/lib/augmentation/*: module augmentations for AWS CDK core components
repo/packages/constructs-pattern-X: define multiple reusable and independent level 3 constructs
repo/packages/tr-cdk-lib/package.json: assembly module that defines scripts to assemble the final mono package that will be shared via a npm repository
Figure 3: Repo structure
This structure enables TR to maintain a collection of related, but distinct CDK constructs while making sure they work together seamlessly.
The modules are assembled and released into one single versioned package which simplifies the end-user’s consumption.
The core module: Foundation of TR AWS CDK library
The core module is the foundation of TR’s CDK extension library, it consists of several key components that work together to “TR-ify” AWS resources and offer simplified access to centrally managed infrastructure resources that are provided by TR’s AWS landing zone teams.
TR refers to “TR-ification”, as the process of dynamically adapting AWS CDK constructs to meet their standards and best practices. From a user perspective, the process happens in a minimally invasive way, for most of the time the user is coding with vanilla AWS CDK components, while having access to short-cuts to a variety of TR specific resources.
The core module serves several critical purposes:
Standardization: makes sure the AWS resources follow TR naming conventions and tagging standards
Simplification: abstracts away complex configurations required for TR compliance
Integration: provides seamless access to TR-managed resources like VPCs, security groups, and Route53 hosted zones
Policy Enforcement: automatically applies custom security and financial optimization policies
The “TR-ification” process happens on every construct following a consistent order, for each construct it will:
If applicable, set a name following a consistent pattern
Apply custom initialization logic (e.g. set IAM permission boundary)
Apply security and financial optimization defaults (if not set)
Perform custom validations
Verify security and financial optimization policies
Tag resources
TR uses a single root-level Aspect instead of multiple Aspects to avoid complex resource type checking and improve maintainability:
// This is the entrypoint that triggers the trification process on all CDK constructs
// we apply all TR specific transformations at this point
Aspects.of(this).add({
  visit: (node: IConstruct) => {
    node.getTRifier().trify();
  },
});
The careful readers at this point will scream: Wait a moment! node.getTRifier().trify() won’t compile!
Which is absolutely correct… unless you know a topic in TypeScript called module augmentation, in TR’s case, they augment the IConstruct interface and Construct class as follows:
/** Defines the set of functionality needed when trifying resources */
export interface ITRifier {
    trify(): void;
    readonly name: string | undefined;
    readonly nameFromTree: string;
}

declare module 'constructs/lib/construct' {
    interface IConstruct {
        /** Obtain the ITRifier responsible to add TR specific features to this CDK IConstruct */
        getTRifier(): ITRifier;

        trContext(): AppContext | StageContext | StackContext;
    }

    interface Construct extends IConstruct {
        /** Build the ITRifier responsible to add TR specific features to this CDK IConstruct */
        buildTRifier(): ITRifier;
    }
}
Then provide default implementations for the generic Construct:
Construct.prototype.getTRifier = function () {
    // Lazy getter, build the TRifier only when needed and cache it
    return ObjectUtils.lazyGetFrom(this, 'trifier', () => this.buildTRifier());
};

Construct.prototype.buildTRifier = function () {
    return new ConstructTRifier(this); // Default dummy implementation
};

Construct.prototype.trContext = function (): StackContext {
    return Stack.of(this).trContext() as StackContext;
};
Since AWS CDK constructs implement the IConstruct interface, respectively extend the Construct class automatically, the “TR-ification” process becomes available for many types of constructs. All you need to do now is inject your custom logic for all resources you need customization and make sure the module is loaded, e.g. in case of a Lambda function, it uses:
lambda.CfnFunction.prototype.buildTRifier = function () {
    return new CfnResourceTRifierLambda.CfnFunction(
        this,
        () => { // Accessor for retrieving the lambda function name
            return this.functionName;
        },
        (name: string) => { // Accessor for setting the lambda function name
                this.functionName = name;
        },
        () => {
            // Our own stuff to set defaults for financial optimizations
            const policyChecker = FinOps.Lambda.Defaults.apply(this);

            this.node.addValidation({
                validate: () => {
                    // Inject a custom validation logic to check compliance with financial policies
                    return policyChecker.addErrorIfNotCompliant(this);
                }
            });
        }
    );
};
TR targets L1 (Cfn) constructs like CfnFunction because the higher-level L2 and L3 constructs internally create L1 constructs during synthesis. This architectural decision makes sure TR-ification is applied universally, whether users write new lambda.Function() or new lambda.CfnFunction(), both will be TR-ified. This approach provides complete coverage with a single implementation point while remaining completely transparent to library users who can continue using their preferred abstraction level without awareness of this internal mechanism.
Naming standardization
TR uses standardized naming to support IAM policy filtering and consistent resource management. In order to support a broad range of use-cases, TR defined the resource name pattern as follows: <segregationPrefix>[-appPrefix]-<resourceName>[-region]-<envSuffix> where the elements mean:
segregationPrefix: A prefix used for grouping resources for a specific asset, it implies that a segregated administrative group is responsible for this resource, where applicable it is used for ARN based IAM resource filtering.
appPrefix: Optional, a prefix used to map a resource to a specific application or service, this is shared across stacks within a CDK app.
resourceName: The name of a resource indicating its purpose.
region: Optional, applied only to resources that are global but are part of a CDK stack that is bound to a specific region.
envSuffix: A suffix used to segregate different deployment environments, e.g. development, continuous integration, quality assurance, production.
Traditional approaches require developers to manually construct these names, propagating prefixes and suffixes throughout their code:
new lambda.Function(stack, 'foo', {
    runtime: lambda.Runtime.NODEJS_LATEST,
    handler: 'index.handler',
    code: new lambda.InlineCode('bar'),
    functionName: `\${segregationPrefix}-\${appPrefix}-compute-stats-\${envSuffix}`,
});
With TR AWS CDK extension, the code is simplified to:
new lambda.Function(stack, 'MyFunction', {
  runtime: lambda.Runtime.NODEJS_LATEST,
  handler: 'index.handler',
  code: new lambda.InlineCode('foo'),
  functionName: 'compute-stats',
});
The functionName describes what the function does without “noise”, TR AWS CDK will transparently generate and inject the name into the synthetized CloudFormation script, matching the specification. Note that functionName is optional and TR-CDK will either TR-ify a provided name or automatically generate a valid one if the user omits it, making sure CloudFormation receives a properly formatted name.
Access to “Landing Zone” resources
TR’s central AWS Landing Zone team is responsible of inflating a set of standard resources (e.g. VPC, subnets, security groups, Route 53 zones, golden AMIs, etc.) into AWS accounts that are made available to application development teams.
Through module augmentation (shown earlier), the TR-ifier defines the function trContext() which provides access to a context-aware utility. When calling this function on a resource that resides within a Stack, it will return an object that implements StackContext interface.
export interface StackContext extends StageContext {
  /** Get access to the TR IVpc */
  readonly vpc: IVpc;

  /** Provides access to standard security groups that are available in all TR accounts */
  readonly securityGroups: trparams.ISecurityGroupsResolver;

  /** Provides access to private and public hosted zones (with numeric digits) that are available in all TR accounts */
  readonly route53: trparams.IRoute53Resolver;

  /** Provides access to TR golden AMIs that are available in all TR accounts */
  readonly goldenAMI: TRGoldenAMI;
}
The readonly attributes are accessors for the AWS Landing Zones resources listed above. With calls like the following examples, you have a simple way to obtain access to the standard VPC, subnets selections, route 53 private hosted zone, …
// Get the IVpc:
const trVpc: IVpc = stack.trContext().vpc;

// Get the private subnets as array
const privateSubnets: ISubnet[] = trVpc.privateSubnets;

// Get the private subnets as SubnetSelection
const privateSubSel: SubnetSelection = trVpc.selectSubnets({
    subnetType: SubnetType.PRIVATE_WITH_EGRESS,
});

// Get the private Route53 hosted zone
const privateHZ = stack.trContext().route53.privateHostedZone;
You might now wonder how TR resolves the resources and obtain objects implementing IVpc, ISubnet, ISecurityGroup, …
Instead of using hard-coded resource attributes (e.g. Id, ARN, …) or complex lookups, TR uses CloudFormation’s ability to resolve Systems Manager parameters at execution time, as part of the AWS account initial inflation along with the resources, Systems Manager parameters are registered as well. The parameter names are the same across TR’s AWS accounts, the value contains e.g. the id of the matching AWS Landing Zone standard resource, e.g. /landing-zone/vpc/vpc-id, /landing-zone/vpc/subnets/private-1-id, /landing-zone/vpc/subnets/private-2-id, …
TR then defined custom IVpc, ISubnet, IHostedZone… implementations and for each function they implemented dynamic resolution of resource attributes via Systems Manager parameters. With this approach, TR obtains portable code that runs on AWS accounts initialized via TR inflation process. There are no hard-coded resource identifiers, and there is no need for lookups via AWS SDK during synthesis.
As a user of the TR AWS CDK library, TR developers interact with an object implementing the IVpc interface and do not have to care about how to obtain e.g. the VPC-id and subnet ids. The same principle applies to Route53 hosted zones, Golden AMI ids, etc.
Application initialization
As mentioned previously, one key design principle is to minimize the custom code that a user of TR AWS CDK is required to use compared to using vanilla AWS CDK. This approach leverages existing AWS CDK and reduces the learning curve for developers.
This is how TR developers initialize an App with vanilla CDK, compared to how they initialize it with TR AWS CDK.
From this point on, the developers can continue using vanilla AWS CDK code, the value returned by TRCdk.newApp(…) is an instance of an extension of CDK’s App class and is fully compatible with it. It, however, injects the TR-ification aspect, manages the tagging process, and initializes contextual information.
Here and there, e.g. when they need to pass the VPC into a construct, they will need to call TR AWS CDK code via the trContext() entry point that is exposed on CDK constructs through TypeScript’s module augmentation feature, but that’s it! 99% of the code is vanilla AWS CDK code.
The segregationId, namingProps, and deploymentEnv attributes are used for multiple purposes like formatting resource names and tagging resources.
Standardized Tagging
TR defines tagging standards, there are mandatory tags (e.g. for attribution to a specific product asset and for tracking resource ownership), and there are optional tags (e.g. for specifying resources that belong to different services within the same product asset).
The segregationId, the resourceOwner, and deploymentEnv attributes are used to set mandatory tags using CDK’s built-in functionality for tagging. TR also defines a standardized set of optional tags that can be passed into the application context or set ad-hoc on individual constructs.
This approach maintains consistency in the use of tag names and setting the values, it happens automatically behind the scenes and will be applied to the taggable constructs. No copy-pasting of tag definitions like in AWS CloudFormation, no issues dealing with CloudFormation’s inconsistent syntax for tag declarations, no forgetting of tagging resources.
Conclusion
In this post, we discussed how the monorepo approach to AWS CDK development, centered around the core module, has significantly improved the infrastructure management at Thomson Reuters. By providing well-architected L3 constructs, standardizing and simplifying AWS resource creation, they’ve reduced errors, enhanced governance, and accelerated development.
The core module’s ability to enforce policies, standardize naming and tagging, and provide access to TR-managed resources makes it an invaluable tool for teams working with AWS infrastructure at Thomson Reuters.
To get started with AWS CDK and build your CDK solutions, check out the AWS CDK Developer Guide.
We are excited to announce a new AWS Cloud Development Kit (CDK) feature that makes it easier and safer to refactor your infrastructure as code. CDK Refactor aims to preserve your AWS resources as you rename constructs, move resources between stacks, and reorganize your CDK applications – operations that previously risked resource replacement.
When writing infrastructure as code with the CDK, developers occasionally need to rename Constructs or move them between Stacks or directories. Whether they need to better organize their code, adhere to coding best practices, or take advantage of object-oriented programming patterns like class inheritance, these changes can be risky in environments with deployed resources, because they change the CDK-generated logical ID of those resources. During a CDK deploy, AWS CloudFormation interprets these changes as new resources, which often requires deletion of the existing resource and creation of a new resource with the new logical ID. For stateful resources, this could cause potential downtime and even data loss. To mitigate this effect of ID changes, developers had to stage their changes to create new resources, create a data or network migration plan, and then delete the old resources to prevent these refactoring effects. Sometimes, developers decide the risk of these changes outweigh the benefit of the refactor and choose not perform the refactor at all.
Today, developers can use the new CDK refactor command to detect, review, confirm, and safely apply refactored changes to their resources without resource replacement. This feature leverages the recently-launched AWS CloudFormation refactor feature, but the CDK automatically computes the mappings that CloudFormation needs to redefine the refactored resources, providing a layer of abstraction that allows developers to focus on code rather than resource configuration. Let’s walk through an example to demonstrate the benefits of this refactor capability.
Prerequisites
Along with the usual CDK prerequisites, if you bootstrapped your CDK project before this launch, you need to re-bootstrap your environment to obtain the new permissions associated with the CDK refactor capabilities before attempting your refactor.
Monolith to micro-service example
For this example, let’s say that we have a legacy CDK App that deploys a monolithic Stack with Amazon DynamoDB tables for users, products, and orders, and an AWS Lambda function that implements CRUD operations on all entities.
Monolithic application
function monolithApp() {
  const monolith = new CdkAppStack(app, monolithStackName, {env});
  const usersTable = makeTable(monolith, 'users');
  const productsTable = makeTable(monolith, 'products');
  const ordersTable = makeTable(monolith, 'orders');

  // We have a single Lambda function in our application
  const func = new Function(monolith, `MonolithFunction`, {
    code: Code.fromInline(`Some code that accesses all three tables`),
    runtime: Runtime.NODEJS_22_X,
    handler: 'index.handler',
  });

  usersTable.grantReadWriteData(func);
  productsTable.grantReadWriteData(func);
  ordersTable.grantReadWriteData(func);

  // This function creates a REST API, resources, methods, and links
  // everything together to the functions. Right now, we are passing
  // the same function in three places.
  makeApi(monolith, {
    usersFunction: func,
    productsFunction: func,
    ordersFunction: func,
  });
}

monolithApp();
We’ve been asked to adhere to Well Architected Framework best practices and break up the monolith into separate Lambda functions so they can scale independently. Because they’re so similar, we’re also going to create an inheritable Lambda class that we can reuse to improve readability and maintainability of the code, and avoid having to re-define Lambda configuration settings that are consistent across all of the functions.
Finally, the monolith uses only L1 CDK Constructs. To further abstract our code and take advantage of helper functions, we’re going to start using L2 CDK Constructs for DynamoDB, Lambda, and API Gateway. This change will allow the IAM Roles and permissions to be defined automatically, further simplifying our code.
Proposed refactored application into separate stacks for each domain.
Without the refactor feature, CloudFormation would delete and re-create the Lambda and DynamoDB resources, which would cause all of the data in the latter to be lost. Alternatively, you could create net-new Lambdas and Amazon DynamoDB tables in one deployment, execute an out-of-band, point-in time and streaming data migration from the old tables to the new ones, update the API Gateway configuration to target the new Lambdas in a second deploy, and turn off the streaming migration process.
With the refactor feature, we can move the resource definitions to new files, update them to L2 Constructs, and leave the stateful resources in place!
Replace stateless resources First, let’s refactor our CDK code to break the monolithic Lambda into 3 domain-specific Lambdas. CloudFormation’s refactor capability doesn’t support creating new resources or updating configuration of existing resources, so we will deploy these changes as usual, without using the new refactor feature. All resources will stay inside the monolithic stack for now.
Refactor stateless single lambda function into 3 functions as a prerequisite to the refactor of stateful DynamoDB tables.
function singleStackMicroservicesApp() {
  // We still have a single stack
  const monolith = new CdkAppStack(app, monolithStackName, {env});

  // makeFunctionAndTable creates a different Lambda function and a DynamoDB table
  // for each domain that is passed as a parameter.
  // In a real CDK application, you would probably define each of them independently.
  makeApi(monolith, {
    usersFunction: makeFunctionAndTable(monolith, 'users'),
    productsFunction: makeFunctionAndTable(monolith, 'products'),
    ordersFunction: makeFunctionAndTable(monolith, 'orders'),
  });
}

singleStackMicroservicesApp();
Refactor stateful resources Now we can refactor the stateful DynamoDB tables and their respective Lambdas to their own stacks, using cdk refactor to map their new IDs without replacing the resources.
Before refactoring, though, we need to create the new stacks that will receive the functions and tables:
  singleStackMicroservicesApp();

  const usersStack = new Stack(app, 'Users', {env});
  const productsStack = new Stack(app, 'Products', {env});
  const ordersStack = new Stack(app, 'Orders', {env});
Refactored Lambda functions and DynamoDB tables into their own separate stacks.
function fullMicroservicesApp() {
    const monolith = new Stack(app, monolithStackName, {env});

    const usersStack = new Stack(app, 'Users', {env});
    const productsStack = new Stack(app, 'Products', {env});
    const ordersStack = new Stack(app, 'Orders', {env});

    makeApi(monolith, {
        // Now each pair function + table is in its own stack
        usersFunction: makeFunctionAndTable(usersStack, 'users'),
        productsFunction: makeFunctionAndTable(productsStack, 'products'),
        ordersFunction: makeFunctionAndTable(ordersStack, 'orders'),
    });
}

fullMicroservicesApp();
Running cdk refactor –unstable=refactor starts the process. (The unstable flag is required as this feature is still subject to breaking changes.) The CDK will compare the current state of your application (the deployed monolithic app) with the new state (the output of your refactored CDK application).
CDK refactor confirmation dialog
As expected, it shows a table of resources that were moved from the Monolith stack to their respective refactored stacks. By default, the CLI asks for confirmation before proceeding. Bypass the confirmation by passing the –force flag, or confirm the changes and execute the refactor: All resources, including the stateful tables, were safely moved to other stacks, and we now have our well-architected application.
CDK refactor results
Conclusion With the CDK refactor feature, developers can take full advantage of the object-oriented definition of AWS resources, including the ability to change the structure and layers of abstraction without orchestrating complex migration mechanisms or scheduled downtime. Since the CDK is open source, you can learn more about how the CDK automatically determines what resources need to be refactored via the README. Understanding when resources need to be replaced and refactored will help you plan your infrastructure as code roadmap and when you should use this new refactoring capability.
If you’ve got a refactor that you’ve been waiting to execute, read more about the feature set in the CDK refactor documentation and start refactoring your own CDK App today!
This post demonstrates how to leverage AWS CloudFormation Lambda Hooks to enforce compliance rules at provisioning time, enabling you to evaluate and validate Lambda function configurations against custom policies before deployment. Often these policies impact the way a software should be built, restricting language versions and runtimes. A great example is applying those policies on AWS Lambda, a serverless compute service for running code without having to provision or manage servers. While AWS Lambda already manages the deprecation of runtimes, preventing you from deploying unsupported runtimes, organizations may need to provide and enforce their specific compliance rules not directly linked to the deprecation of a specific language version.
Introducing Lambda Hooks
AWS CloudFormation Lambda Hooks are a powerful feature that allows developers to evaluate CloudFormation and AWS Cloud Control API operations against custom code implemented as Lambda functions. This capability enables proactive inspection of resource configurations before provisioning, enhancing security, compliance, and operational efficiency.
Lambda Hooks provide a mechanism to intercept and evaluate various CloudFormation operations, including resource operations, stack operations, and change set operations (they can also be used with Cloud Control API, but in this post we’re focusing on CloudFormation). By activating a Lambda Hook, CloudFormation creates an entry in your account’s registry as a private Hook, allowing you to configure it for specific AWS accounts and regions. When configuring Lambda Hooks, you can specify one or more Lambda functions to be invoked during the evaluation process. These functions can be in the same AWS account and Region as the Hook, or in another Account you own, provided proper permissions are set up. The evaluation process occurs at specific points in the CloudFormation Stack lifecycle. For instance, during stack creation, update, or deletion, the configured Lambda functions are invoked to assess the proposed changes against your defined compliance rules. Based on the evaluation results, the hook can either block the operation or issue a warning, allowing the operation to proceed.
Lambda Hooks evaluate resources before they are provisioned through CloudFormation, providing a pre-emptive layer of governance. This means that non-compliant resources are caught and prevented from being deployed, rather than requiring retroactive fixes. By leveraging Lambda Hooks, organizations can automate and standardize their compliance checks across all AWS accounts and regions. This centralized approach to policy enforcement ensures consistency and reduces the overhead of managing compliance manually.
Solution Overview
The following sections demonstrate a practical use case for AWS CloudFormation Lambda Hooks, focusing on enforcing compliance rules on AWS Lambda runtimes.
Meet AnyCompany, a forward-thinking enterprise with a robust set of compliance rules governing their software development practices. Among these rules is a strict policy on the use of specific AWS Lambda runtimes.
As they continue to embrace serverless architecture, AnyCompany faces a challenge: how to prevent the deployment of Lambda functions that use non-compliant runtimes. Given their commitment to AWS CloudFormation for deploying Lambda functions, AnyCompany is keen to leverage the power of AWS CloudFormation Lambda Hooks.
We’ll explore the setup process, demonstrate the hook in action, and discuss the broader implications for maintaining compliance in a dynamic cloud environment.
Architecture
The following architecture highlights the implementation of the Lambda Hook. In this implementation, we are using AWS CloudFormation Lambda Hooks to intercept the deployment of Lambda Functions and perform the compliance checks on these resources. The Lambda Hook will interact with an AWS Lambda Function, which will perform the compliance checks. Finally, we’re using AWS Systems Manager Parameter Store to store the Configuration Parameter which contains the list of permitted Lambda Runtimes.
Figure 1: Architecture of the Solution
A Developer (or a CI/CD pipeline) deploys a CloudFormation stack containing Lambda functions.
CloudFormation invokes the respective Lambda Hook, which is configured to intercept operations on AWS Lambda Resources. We are setting this hook to “FAIL” deployment in case checks are not successful.
hook-lambda: directory containing all the code related to the CloudFormation Lambda Hook (Validation Lambda Function, and the CloudFormation template for the Solution)
sample: directory containing the code of the sample used to test the CloudFormation Lambda Hook
deploy.sh: utility script to deploy the Solution via AWS CLI
cleanup.sh: utility script to clean up the AWS CloudFormation Hook infrastructure via the AWS CLI
template.yml: AWS CloudFormation Template containing all the AWS Resources involved in the Solution
Prerequisites
You must have the following prerequisites for this solution:
An AWS account or sign up to create and activate one.
The following software installed on your development machine:
Install the AWS Command Line Interface (AWS CLI) and configure it to point to your AWS account.
Install Node.js and use a package manager such as npm.
Appropriate AWS credentials for interacting with resources in your AWS account.
Walkthrough
Creating the AWS Lambda Validation Function – Lambda Code
The CloudFormation Lambda Hook interacts with a specific Lambda (referred to as Validation Lambda throughout the rest of this post), which gets invoked during CloudFormation CREATE and UPDATE STACK operations involving Lambda Functions. The goal is to check if these Lambda functions have runtimes that comply with AnyCompany’s rules.
Below is the detailed description of the steps that the Validation Lambda function handler follows (the code is written in Typescript).
First, the Validation Lambda retrieves an environment variable containing the SSM Parameter Store parameter name which contains the compliant runtimes list. Additionally, safety checks ensure that only Lambda Resources are considered and that their Runtime property is defined.
Note that both safety checks could be skipped, since the Hook should already be configured to interact only with Lambda Resources and the Lambda’s Runtime property is always required. However, they remain in place to demonstrate how to retrieve this information from the Lambda Hook event in your handler.
const parameterName = process.env.PERMITTED_RUNTIMES_PARAM;
if (!parameterName) {
	throw new Error('Permitted Runtimes Parameter is not set');
}

const resourceProperties = event.requestData.targetModel.resourceProperties;
// Check if this is a Lambda function resource
if (event.requestData.targetType !== 'AWS::Lambda::Function') {
console.log("Resource is not a Lambda function, skipping");
	return {
		hookStatus: 'SUCCESS',
		message: 'Not a Lambda function resource, skipping validation',
		clientRequestToken: event.clientRequestToken
	}
}

// Check runtime version compliance
const runtime = resourceProperties.Runtime;
if (!runtime) {
	console.log("Runtime not defined, failing");
	return {
		hookStatus: 'FAILURE',
		errorCode: 'NonCompliant',
		message: 'Runtime is required for Lambda functions',
		clientRequestToken: event.clientRequestToken
	}
}
Then the Validation Lambda retrieves the value of the Configuration Parameter from SSM Parameter Store through a utility class called ParameterStoreService. For this post, consider that the value inside that Configuration Parameter is a list of strings, where each string contains one of the possible Lambda runtime values that you can find here (e.g. nodejs22.x,nodejs20.x,python3.11,python3.10,java17,java11,dotnet6). After retrieving the value, the Validation Lambda checks if the runtime of the Lambda Resource complies with the configured admitted runtimes. If the runtime is not compliant, you’ll receive a properly formatted response with FAILURE as hookStatus, otherwise the response will contain a SUCCESS hookStatus.
// Retrieve configuration from Parameter Store
const compliantRuntimes = await parameterStoreService.getParameterFromStore(parameterName);

// Check if Lambda runtime is permitted or not
if (!compliantRuntimes.includes(runtime)) {
console.log("Runtime " + runtime + " not compliant ");
	return {
		hookStatus: 'FAILURE',
		errorCode: 'NonCompliant',
		message: `Runtime ${runtime} is not compliant. Please use one of: ${compliantRuntimes.join(', ')}`,
		clientRequestToken: event.clientRequestToken
	}
}

return {
	hookStatus: 'SUCCESS',
	message: 'Runtime version compliance check passed',
	clientRequestToken: event.clientRequestToken
}
For more information about the possible response values of CloudFormation Lambda Hooks Lambda, have a look at this link.
Creating the validation Lambda – Lambda CloudFormation definition
The Validation Lambda function will be deployed via CloudFormation, in the same Stack with the CloudFormation Lambda Hook definition and the AWS Systems Manager Parameter Store Parameter. Here’s the fragment of the CloudFormation Template containing its definition:
Please note that the above template contains a reference to an IAM Role because the Hook requires proper permissions to call the target (Lambda Function). Here’s the IAM Role definition:
Configuring the compliant runtimes – Using Systems Manager Parameter Store
AWS Systems Manager Parameter Store is a secure, hierarchical storage service for configuration data management and secrets management, allowing users to store and retrieve data such as configurations, database strings etc. as parameter values.
In this specific example, we’ll leverage Parameter Store to store our permitted Lambda runtimes configuration. This configuration value is a StringList parameter, containing a comma-separated list of permitted runtimes. Here’s the fragment of the CloudFormation template that defines the Parameter:
Please note the usage of CloudFormation parameters for the ‘Name’ and ‘Value’ properties, allowing for dynamic input when deploying the CloudFormation template.
Deploying the Solution
To deploy the solution you can leverage the script deploy.sh in the root folder of the repository. This script will perform the following actions:
Compile and build the Validation Lambda Function
Create an Amazon S3 Bucket to store the CloudFormation Template
Upload the CloudFormation template and Lambda code to the S3 Bucket
Deploy the CloudFormation template
Testing the Lambda Hook
To test the CloudFormation Lambda Hook, deploy a simple testing CloudFormation template containing a Hello World Lambda function. First, test the Lambda configured with a permitted Lambda runtime, then modify the template to configure the Lambda with a non-compliant runtime.
Here’s the initial definition of the testing CloudFormation Template:
Please note that the Runtime value is nodejs22.x, which is currently in the list of permitted runtimes. The expectation is that the deployment of this function will succeed.
As expected, the deployment was successful. You can also see that the CloudFormation Lambda Hook has been invoked by taking a look at the CloudWatch Logs:
Figure 3: Validation Lambda Function Logs with successful validation
Now modify the original sample Template in order to set a Lambda Runtime which is not inside the list of permitted runtimes:
Deploy this template via AWS CLI with the same command used before and check the CloudFormation Console:
Figure 4: CloudFormation Console showing failed Stack deployment due to Hook intervention
As expected, the deployment was not successful. The CloudFormation Lambda Hook has been invoked, and since the Lambda Runtime was not present in the permitted runtimes list, the deployment failed.
You can also see that the hook failed In the CloudWatch Logs:
Figure 5: Validation Lambda Function Logs with validation error
Cleaning up
To clean up the resources related to the sample, you can run the script cleanup_sample.sh inside the sample folder. This script will delete the sample’s CloudFormation Template through the AWS CLI.
To cleanup the resources related to the solution described above and based on AWS CloudFormation Lambda Hook, you can leverage the script cleanup.sh in the root folder of the repository. This script will perform the following actions:
Delete the CloudFormation Stack
Empty the S3 Bucket used for the deployment of the Stack
Delete the S3 Bucket
Conclusion
In this post, you explored the implementation of CloudFormation Hooks to enforce runtime compliance in Lambda functions across your AWS infrastructure. By leveraging the Lambda hook’s capabilities, you learned how to create a preventative control that validates Lambda runtime configurations before deployment.
By activating the Lambda hook and implementing a custom Lambda function validator, you established an automated mechanism to ensure that only compliant runtimes are used within your organization’s Lambda functions during CloudFormation stack creation and updates. The solution’s integration with common development tools like AWS CLI, AWS SAM, CI/CD pipelines, and AWS CDK makes it straightforward to implement these controls within existing workflows, eliminating the need for manual runtime checks or post-deployment remediation.
The validation approach demonstrated in this post extends beyond Lambda runtimes and can be adapted to different AWS Resources supported by CloudFormation, allowing you to enforce policies on different infrastructure components offered by AWS.
AWS CloudFormation enables you to model and provision your cloud application infrastructure as code-base templates. Whether you prefer writing templates directly in JSON or YAML, or using programming languages like Python, Java, and TypeScript with the AWS Cloud Development Kit (CDK), CloudFormation and CDK provide the flexibility you need. For organizations adopting multi-account strategies, CloudFormation StackSets offers a powerful capability to deploy resources across multiple regions and accounts in parallel.
Last year, we delivered broad set of enhancements that accelerated the development cycle, simplified troubleshooting, and introduced new deployment safety and configuration governance capabilities. Let’s dive into the key launches that shaped CloudFormation in 2024.
Development cycle improvements
Deploy stacks up to 40% faster with optimistic stabilization and configuration complete
In March, we introduced optimistic stabilization with the new CONFIGURATION_COMPLETE event, delivering up to 40% faster stack creation times. This new event signals that CloudFormation has created the resource and applied the configuration as defined in the stack template, allowing us to begin parallel creation of dependent resources. For example, if your stack contains resource B that depends on resource A, CloudFormation will now start provisioning resource B when resource A reaches the CONFIGURATION_COMPLETE state, rather than waiting for full stabilization. Read How we sped up AWS CloudFormation deployments with optimistic stabilization to learn more.
Figure 1: CloudFormation’s old and new deployment strategy
Catch template errors before deployment with early validation
In March, we launched early resource properties validation checks. This feature validates your stack operation upfront for invalid resource property errors, helping you fail fast and minimize the steps required for a successful deployment. Previously, you had to wait until CloudFormation attempted to provision a resource before discovering property-related errors. Now, we validate your template before deploying the first resource and provide clear error messages upfront.
Figure 2: CloudFormation’s early template properties validation feature
Safely clean up failed stacks with enhanced deletion controls
In May, we enhanced the DeleteStack API with a new DeletionMode parameter, allowing you to safely delete stacks that are in DELETE_FAILED state. By passing the FORCE_DELETE_STACK value to this parameter, you can now resolve stuck stacks more efficiently during your development and testing cycles.
Accelerate feedback loops with CloudFormation custom resource timeout controls
In June, we introduced the ServiceTimeout property for custom resources. This new capability allows you to set custom timeout values for your custom resource logic execution. Previously, custom resources had a fixed one-hour timeout, which could lead to long wait times when debugging custom resource logic. Now, you can set appropriate timeout values to accelerate your development feedback loops. Refer to the custom resourcesdocumentation to learn more about the ServiceTimeout property.
Figure 3: CloudFormation’s ServiceTimeout property for Custom resource
Streamlined Troubleshooting Experience
Resolve deployment issues faster with one-click CloudTrail access
In May, we launched integration with AWS CloudTrail in the Events tab of the CloudFormation console. Troubleshooting some failed stack operations can be time-consuming, so we have streamlined this process by providing direct links from stack operation events to relevant CloudTrail events. When you click ‘Detect Root Cause’ in the CloudFormation Console, you’ll now see a pre-configured CloudTrail deep-link to the API events generated by your stack operation, eliminating multiple manual steps from the troubleshooting process.
Figure 4: CloudFormation troubleshooting with CloudTrail integration
Visualize your entire deployment process with timeline view
In November, we launched deployment timeline view. It gives you unprecedented visibility into your stack operations. This visual tool shows the sequence of actions CloudFormation takes during a deployment, helping you understand resource dependencies and provisioning duration. You can see which resources are being created in parallel, track their status through color-coding, and quickly identify bottlenecks in your deployments.
Get instant troubleshooting help with Amazon Q Developer
We integrated Amazon Q Developer to provide AI-powered assistance for troubleshooting. When you encounter a failed stack operation, you can now click “Diagnose with Q” to receive a clear, human-readable analysis of the error. Need more help? The “Help me resolve” button provides actionable steps tailored to your specific scenario.
Figure 6: CloudFormation troubleshooting with Q feature
We’ve also improved how change sets handle references. When referenced values are available before deployment, Change sets can now resolve them to their expected values, giving you a more accurate preview of your planned changes.
Figure 7: CloudFormation’s change sets feature
Easy onboarding to Infrastructure-as-Code (IaC)
Eliminate weeks of manual effort with IaC Generator
In February, we launched the CloudFormation IaC Generator, a capability addressing one of our customers’ biggest challenges: onboarding existing cloud resources to CloudFormation. This feature makes it easier to generate CloudFormation templates for existing AWS resources. You can now onboard workloads to IaC in minutes instead of spending weeks writing templates manually.
The IaC generator supports over 600 AWS resource types and provides recommendations for related resources. For instance, when you select an S3 bucket, it automatically suggests including associated bucket policies. You can use the generated templates to import resources into CloudFormation, download them for deployment.
Figure 8: CloudFormation’s IaC Generator
In August, we enhanced the IaC Generator with two improvements. First, we added a graphical summary view that helps you quickly find resources after the account scan completes. Second, we integrated with AWS Infrastructure Composer to visualize your application architecture, making it easier to understand resource relationships and configurations.
Figure 9: IaC generator resource scan
Proactive Control Improvements
In November, we launched major enhancements to CloudFormation Hooks, giving you easier ways to author proactive configuration controls and more points to enforce them with your cloud infrastructure provisioning.
CloudFormation Hooks for stack and change set target invocation points
First, we introduced stack and change set target invocation points for CloudFormation Hooks. This extends Hooks beyond individual resource validation, allowing you to run validation checks against entire templates and examine resource relationships. For example, you can now create hooks that validate architectural patterns across multiple resources or enforce team-specific deployment standards. With the change set invocation point, you can automate your change set reviews and reduce the time needed to resolve compliance issues. Refer to the Hooks developer guide to learn more.
Figure 10: CloudFormation’s Hooks for stack and change set target invocation points
Managed hooks for the CloudFormation Guard domain specific language
We introduced the managed hooks to author configuration controls using CloudFormation Guard domain-specific language. This simplifies the hook creation process—you can now write hooks by providing your Guard rule set stored as an S3 object. This is particularly valuable if you’re already using Guard for static template validation, as you can extend these rules to dynamic checks before deployments. To learn more about the Guard hook, check out the AWS DevOps Blog or refer to the Guard Hook User Guide.
Figure 11: CloudFormation Hooks’ Guard language feature
Figure 12: CloudFormation Hooks’ Lambda function feature
CloudFormation Hooks for AWS Cloud Control API target invocation points
Lastly, we extended Hooks to support AWS Cloud Control API (CCAPI) resource configurations. This means your existing resource Hooks can now evaluate configurations from CCAPI create and update operations, allowing you to standardize your proactive control evaluation regardless your IaC tool. If you’re already using pre-built Lambda or Guard hooks, you simply need to specify “Cloud_Control” as a target in your hooks’ configuration to extend their coverage. Learn the detail of this feature from this AWS DevOps Blog. Figure 13: CloudFormation Hooks for AWS Cloud Control API target invocation point
Additional Platform Improvements
StackSets ListStackSetAutoDeploymentTargets API
In March, we enhanced StackSets with the ListStackSetAutoDeploymentTargets API. This new capability gives you better visibility into your auto-deployment configurations by allowing you to list existing target Organizational Units (OUs) and AWS Regions for a given stack set. Instead of logging into individual accounts to understand your deployment scope, you can now get this information in a single API call.
CloudFormation Git sync with request review support
In September, we improved CloudFormation Git sync with pull request workflow support. When you create or update a pull request in a linked repository, CloudFormation automatically posts change set information as PR comments. This integration provides a clear overview of proposed changes within your familiar Git workflow, allowing team members to review infrastructure changes alongside code changes. Visit our user guide and launch blog to learn more.
Figure 14: CloudFormation Git sync with request review support feature
Early 2025 improvements
Reshape your AWS CloudFormation stacks seamlessly with stack refactoring
In February 2025, CloudFormation introduced a new capability called stack refactoring that makes it easy to reorganize cloud resources across your CloudFormation stacks. Stack refactoring enables you to move resources from one stack to another, split monolithic stacks into smaller components, and rename the logical name of resources within a stack. This enables you to adapt your stacks to meet architectural patterns, operational needs, or business requirements. To explore an example scenario, read Introducing AWS CloudFormation Stack Refactoring.
Learn more
Here are some resources to help you get started learning and using CloudFormation to manage your cloud infrastructure:
As we are starting 2025, our focus remains on making infrastructure deployment faster, safer, and more manageable. These enhancements reflect our commitment to solving real customer challenges and improving the CloudFormation experience. We are excited about the roadmap ahead and look forward to bringing you more innovations in 2025.
We encourage you to try these new features and share your feedback. For more detailed information about any of these launches, visit our documentation or check out the AWS DevOps Blog.
AWS CloudFormation is a service that allows you to define, manage, and provision your AWS cloud infrastructure using code. To enhance this process and ensure your infrastructure meets your organization’s standards, AWS offers CloudFormation Hooks. These Hooks are extension points that allow you to invoke custom logic at specific points during CloudFormation stack operations, enabling you to perform validations, make modifications, or trigger additional processes. Among these, the Lambda hook is a powerful option provided by AWS. This managed hook allows you to use Lambda functions to validate your CloudFormation templates before deployment. By using a Lambda hook, you can invoke custom logic to check infrastructure configurations on create or update or delete CloudFormation resources or stacks or change sets, as well as create or update operations for AWS Cloud Control API (CCAPI) resources. This enables you to enforce defined policies for your infrastructure-as-code (IaC), preventing the deployment of non-compliant resources or emitting warnings for potential issues. In this blog post, you will explore how to use a Lambda hook to validate your CloudFormation templates before deployment, ensuring your infrastructure is compliant and secure from the start.
Introducing Lambda Hook
The Lambda hook is an AWS-provided managed hook with the type AWS::Hooks::LambdaHook. It simplifies the integration of custom logic into CloudFormation stacks. This powerful feature allows you to focus on building and testing your custom logic as a Lambda function, without the complexity of creating a hook from scratch.
By using the Lambda hook, you can activate a pre-built hook and deploy your custom logic into a Lambda function using familiar tools like AWS CLI or AWS Serverless Application Model (SAM) or AWS Cloud Development Kit (CDK). This approach reduces the number of components you need to manage in your workflow, allowing for more streamlined operations. The Lambda hook also offers flexible evaluation capabilities, enabling you to respond to specific template properties or configurations as needed.
One of the key advantages of the Lambda hook is the enhanced control it provides. You can benefit from features such as VPC integration, local logging, and granular resource management, all while leveraging the power of AWS Lambda functions. To get started with the Lambda hook, you’ll need to activate it in your AWS account. This activation process eliminates the need for authoring, testing, packaging, and deploying a custom hook using the AWS CloudFormation Command Line Interface (CFN-CLI), significantly simplifying your workflow.
Example Use Case: S3 Bucket Versioning Validation
This blog post demonstrates using the Lambda hook to validate S3 Bucket versioning before deployment. While focused on S3 buckets, this approach can be applied to other resource types, properties, stack, and change set operations.
By leveraging the Lambda hook, you’ll streamline custom logic integration into your CloudFormation stacks. The process involves:
This example showcases how to enhance your infrastructure-as-code practices, ensuring compliant and secure deployments from the start.
Architecture
This section shows you how the Lambda hook and Lambda function work together to enhance your CloudFormation deployments.
Lambda hook and Lambda function
First, you need to create a Lambda function with the business logic to respond to the hook. Then, you need to create an IAM execution role with the necessary permissions to invoke the Lambda Function. Once you have the Lambda function and the IAM execution role, you can activate the AWS provided Lambda hook. Follow the steps in the documentation to activate a Lambda hook from the AWS console. Alternatively, you can activate it using the AWS Command Line Interface (AWS CLI) by using the activate-type and set-type-configuration commands. Lastly, you can also use AWS::CloudFormation::LambdaHook as a CloudFormation resource to activate and configure Lambda hook from a CloudFormation template. You can share this resource across your other accounts and regions using AWS CloudFormation StackSets by following this blog.
Lambda hook in action
The following diagram and explanation illustrate the step-by-step workflow of how Lambda hook integrates with your CloudFormation operations, providing a visual representation of the process from template creation to resource deployment or modification.
Diagram 1: Lambda hooks in action
The architecture diagram illustrates the step-by-step flow of how the Lambda hook is used during a CloudFormation stack operation.
Author a template: Author a CloudFormation template, including the necessary resources to configure.
Create the stack: The CloudFormation stack creation process has started, but the process of creating the defined resources in the template has not yet begun.
Request is received by CloudFormation service: When a resource creation, update, or deletion is requested, the CloudFormation service receives the request.
Invoke the Hook: The CloudFormation service then invokes the Lambda hook.
The hook invokes your the Lambda Function: The Lambda hook, in turn, triggers the execution of the Lambda function that was defined in the hook activation.
The Lambda function processes the request and responds back to the Hook: The Lambda function processes the request, performing validation, or additional tasks as required. The Lambda function then responds back to the Lambda hook.
The stack workflow progresses further in either continuing the resource creation/update/deletion with/without a warning or fails: Based on the Lambda function’s output, the Lambda hook either allows the stack operation to proceed with the resource operation (for example, creation of the resource), or deny the resource operation causing a rollback of the stack.
This workflow demonstrates how Lambda hook seamlessly integrates into the CloudFormation stack deployment process, allowing you to implement custom validations, enforce policies, and extend the capabilities of your infrastructure-as-code deployments through the power of Lambda functions. By leveraging the Lambda hook and the custom Lambda function, customers can extend the capabilities of their CloudFormation deployments, enabling advanced use cases such as resource validation, or additional task execution.
Sample Deployment
This section shows you how to enable the Lambda hook, which is of type AWS::Hooks::LambdaHook, and add the business logic in the Lambda function to validate the versioning configuration of an S3 bucket. The sample solution shown in this blog post demonstrates the hook triggering for the resource type AWS::S3::Bucket, and if you want to trigger this for every resource type, then you can use the Resource filter within Hook filters configuration that can take wildcard"AWS::*::*" as a value or multiple targets of resource types for example "AWS::S3::Bucket", "AWS::DynamoDB::Table", and you’ll also want to make sure that the Lambda Function has the logic to handle the additional resource type. You can also add additional Hook targets , for example to validate your STACK or CHANGE_SET.
In the example used in this blog post, you will configure the hook and activate on create and update operations operations. For more information about TargetFilters, see Hook configuration schema and for more information about Lambda hook see here. With these modifications, you need to consider two important points: First, you will need to handle the business logic to deal with different resource types in your Lambda function code. Second, additional pricing may apply based on your resource usage, for more details see the Lambda pricing page.
Creating the Lambda Function
You can create a Lambda function in several ways – on the AWS Console, using CloudFormation, using AWS CLI, or by directly invoking the API via SDK. In this section, we will cover creating a Lambda function with a few clicks on the AWS console. See Using Lambda with infrastructure as code (IaC) for deploying Lambda Function using SAM CLI, CDK or CloudFormation.
The Lambda Function code is designed to process the event received from the Lambda hook and validate the versioning configuration of the target S3 bucket resource. Here’s a detailed explanation of the code:
The function first extracts the relevant information from the event, including the invocation point and the target resource type.
It then checks if the current invocation point is in the configured HOOK_INVOCATION_POINTS list and if the target resource type is AWS::S3::Bucket. If not, the function returns a success response, skipping the validation for this particular invocation.
Note: this code that skips the validation is put here as a fallback logic in the event the user has not chosen to use TargetFilters. As this is a wildcard hook, without TargetFilters the hook will always be invoked for any AWS resource type described in the template, and since the hook targets preCreate, preUpdate, and preDelete by default, the hook will be invoked for these invocation points by default. To narrow the scope and reduce costs by avoiding to invoke the hook for all AWS resource type targets and invocation points, use TargetFilters.
Next, the function retrieves the resource properties from the event, specifically looking for the VersioningConfiguration property and its Status.
If the VersioningConfiguration property is not present or its Status is not set to Enabled, the function returns a failure response, indicating that the versioning is not enabled for the S3 bucket.
If the versioning is enabled, the function returns a success response.
The function also includes a fallback mechanism to return a failure response in case of any other exceptions. By evaluating this sample code, you can validate the versioning configuration of the S3 bucket during the CloudFormation stack creation and update processes, with your infrastructure-as-code policies.
Enabling Lambda Hook in your AWS Account/Region
Navigate to the AWS CloudFormation service on the AWS Console, then choose “Create Hook” → “with Lambda” from the main Hooks page:
Diagram 2: Create a Hook with Lambda console page
You will see the page explaining how the Lambda function work as a hook.
Diagram 3: Provide a Lambda function to Hook Console page
Provide the Hooks details: the name, the Lambda function it should take, the type, and the mode. You can also create your execution role directly from the console by choosing “New execution role”.
Diagram 3: Provide a Lambda function to Hook Console page
You can review the Lambda hook and activate it from the next page.
Diagram 4: Review Lambda hook Console page
Test a sample
In this section, you will test the hook and the Lambda Function that you activated for a S3 bucket resource.
Create an S3 Bucket without versioning
AWSTemplateFormatVersion: "2010-09-09"

Description: This CloudFormation template provisions an S3 Bucket without versioning enabled

Resources:
  S3Bucket:
    DeletionPolicy: Delete
    Type: AWS::S3::Bucket
    Properties:
      BucketName: !Sub test-bucket-versioning-1-${AWS::Region}-${AWS::AccountId}
You will see the hook invoking Lambda function and the Lambda Function responding back with a failure message since the Versioning is not enabled.
When you create or update a stack with the template above, the Lambda hook will be invoked, and the Lambda Function will respond with a failure message since bucket versioning is not enabled. The Lambda Function code will extract the resourceProperties from the event, check the VersioningConfiguration property, and find that the Status is not set to Enabled. As a result, if you use the example template above where you describe the S3 bucket without versioning enabled, the Lambda Function will send a failure response back to the hook, causing the CloudFormation stack operation to fail as shown in the following screenshot.
Diagram 5: Lambda Hook failure Stack
Create an S3 Bucket with versioning enabled You can try creating an S3 Bucket with versioning enabled to see how Hooks assessment succeeded.
AWSTemplateFormatVersion: "2010-09-09"

Description: This CloudFormation template provisions an S3 Bucket with Versioning enabled

Resources:
  S3Bucket:
    DeletionPolicy: Delete
    Type: AWS::S3::Bucket
    Properties:
      BucketName: !Sub test-bucket-versioning-2-${AWS::Region}-${AWS::AccountId}
      VersioningConfiguration:
        Status: Enabled
In this case, you will see the hook invoking the Lambda function and getting a success message since the Versioning is enabled
When you create a stack with this CloudFormation template, the Lambda hook will be invoked, and the Lambda Function will respond with a success message since the versioning is enabled. The Lambda Function code will extract the resourceProperties from the event, check the VersioningConfiguration property, and find that the Status is set to Enabled. As a result, the Lambda Function will send a success response back to the hook, allowing the CloudFormation stack operation to proceed as shown in the following screenshot.
Diagram 6: Lambda Hook success Stack
By testing these two scenarios, you can verify that the Lambda hook and the associated Lambda Function are working as expected, enforcing the S3 bucket versioning policy during CloudFormation stack operations.
In this blog post, you explored the capabilities of CloudFormation Hooks and how they can be leveraged to extend the functionality of your infrastructure-as-code deployments. Specifically, you learned about the Lambda hook, a pre-built hook that simplifies the process of integrating custom logic into your CloudFormation stacks.
By activating the Lambda hook, and deploying a custom Lambda Function, you were able to validate the versioning configuration of an S3 bucket during the CloudFormation stack creation and update processes. This approach allows you to enforce infrastructure-as-code policies and ensure compliance at the point of deployment, rather than relying on post-deployment checks or indirect governance mechanisms. The ability to leverage familiar tools and workflows, such as the AWS CLI, AWS SAM, CI/CD pipelines, or the AWS CDK, makes it easier to incorporate custom logic into your CloudFormation deployments. This reduces the overhead and complexity associated with traditional hook orchestration and packaging, empowering you to streamline your infrastructure-as-code practices.
As you continue to build and deploy your cloud infrastructure, consider exploring the various CloudFormation Hooks available, for example, see aws-cloudformation/aws-cloudformation-samples and aws-cloudformation/community-registry-extensions GitHub repositories. The approach demonstrated in this blog post can be applied to other resource types supported by CloudFormation, allowing you to validate and enforce policies for a wide range of infrastructure components, from EC2 instances and VPCs to databases and application services.
About the Author
Kirankumar Chandrashekar is a Sr. Solutions Architect for Strategic Accounts at AWS. He focuses on leading customers in architecting DevOps, modernization using serverless, containers and container orchestration technologies like Docker, ECS, EKS to name a few. Kirankumar is passionate about DevOps, Infrastructure as Code, modernization and solving complex customer issues. He enjoys music, as well as cooking and traveling.
Stella Hie is a Sr. Product Manager Technical for AWS Infrastructure as Code. She focuses on proactive control and governance space, working on delivering the best experience for customers to use AWS solutions safely. Outside of work, she enjoys hiking, playing piano, and watching live shows.
In today’s cloud-driven world, maintaining compliance and enforcing organizational policies across your infrastructure is more critical than ever. AWS CloudFormation, a service that enables you to model, provision, and manage AWS and third-party resources through Infrastructure as Code (IaC), has been a cornerstone for automating cloud deployments. While CloudFormation simplifies resource management, ensuring compliance with internal and external standards requires robust tools and strategies to align with organizational and regulatory requirements.
Enter the new managed hook for Guard, a new hook designed to seamlessly integrate compliance into your AWS CloudFormation workflows. AWS CloudFormation Hooks are a powerful tool that allow you to validate and enforce policies during the provisioning and management of resources in your CloudFormation stacks. With a Guard hook, you can now bring your AWS CloudFormation Guard rules directly into your CloudFormation stacks, change sets, and individual resources. This feature eliminates the need to incorporate the Guard runtime into custom hooks, simplifying compliance enforcement and enhancing your security posture.
What is a Guard hook?
A Guard hook is a service-managed CloudFormation Hook that integrates AWS CloudFormation Guard—a policy-as-code tool—directly into your CloudFormation deployment process. AWS CloudFormation Guard uses a domain-specific language (DSL) to define compliance rules in an easily readable and reusable format, enabling you to codify and enforce organizational policies. This hook allows you to automatically validate your CloudFormation templates against these established compliance rules, enforcing policies seamlessly without the need to manage custom Lambda functions or Guard runtimes. By identifying non-compliant resources early, it helps streamline deployments and ensures that your infrastructure aligns with organizational standards right from the start.
Benefits of Using a Guard hook
Guard hooks provide unique advantages by combining the flexibility of CloudFormation Hooks with the expressiveness of the Guard Domain Specific Language (DSL), giving you a powerful tool for infrastructure compliance and security. As a fully managed CloudFormation hook, Guard hooks eliminate the need for a custom hook implementation and management, allowing you to leverage AWS’s service-driven infrastructure to streamline policy enforcement.With a Guard hook, you can express compliance rules and configurations directly in the Guard DSL.
Guard hooks specifically add value by enabling these Guard-based compliance policies to be applied automatically during stack operations. This helps validate that your infrastructure consistently aligns with security and compliance standards, reducing the risks of misconfiguration and non-compliance. Additionally, Guard hooks allow you to take advantage of CloudFormation’s native stack-level and resource-level hooks, adding depth to your compliance by enforcing policies across entire stacks and individual resources alike.
Use Cases
Guard hooks can be applied in various scenarios to enhance compliance and security. In security compliance, for instance, it can ensure that all databases and storage services have encryption enabled or prevent security groups from allowing unrestricted inbound traffic. Regarding resource configuration, it can enforce the use of approved EC2 instance types or require specific tags on all resources for cost tracking and management.
For operational governance, Guard hooks can validate that resources do not exceed predefined thresholds, such as storage size, ensuring that resources are provisioned within acceptable limits. It can also enforce network policies by ensuring the use of approved VPCs and subnets, maintaining network security and compliance with organizational standards.
A resource hook in CloudFormation targets individual resources within a template, such as EC2 instances, S3 buckets, or IAM roles. It is particularly useful for enforcing specific standards or compliance requirements on individual resources, thereby helping customers ensure each one meets defined criteria. For instance, you could use a resource-level hook to enforce that every S3 bucket created through CloudFormation has server-side encryption enabled. In contrast, a stack or change set hook targets the entire CloudFormation stack as a single entity, allowing for the application of guardrails or validation requirements across all resources within the stack collectively. This helps to ensure that the entire stack, not just individual resources, aligns with set policies before the stack is created or updated. For example, a stack-level hook could be used to prevent a stack from containing certain types of resources or to ensure that a specific number of resources are created in each stack. Together, these hooks provide different layers of validation to enforce compliance and configuration standards at both the resource and stack levels.
Getting Started
Getting started with a Guard hook involves configuring the hook, uploading your Guard rules to Amazon S3, activating the hook, and enabling it to run against your CloudFormation stacks. Below are the detailed steps to help you set up and start using Guard Hook effectively.
Pre-requisites Create an Amazon S3 Bucket
If you do not have one already, you will need to create an S3 bucket in your region. This bucket will hold your Guard policy files and optionally the full Guard evaluation output if so desired.
Configuring a Guard hook Create your rule
In this section, you will provide an example of AWS CloudFormation Guard rules that help enforce best practices for Amazon S3 buckets. Please create a file called safebucket.guard and include the following rules:
# Rule Identifier:
#    S3_BUCKET_PUBLIC_WRITE_PROHIBITED
#
# Select all S3 resources from the incoming template (payload)
#
let s3_buckets_public_write_prohibited = Resources.*[ Type == 'AWS::S3::Bucket' ]

rule S3_BUCKET_PUBLIC_WRITE_PROHIBITED when %s3_buckets_public_write_prohibited !empty {
  %s3_buckets_public_write_prohibited.Properties.PublicAccessBlockConfiguration exists
  %s3_buckets_public_write_prohibited.Properties.PublicAccessBlockConfiguration.BlockPublicAcls == true
  %s3_buckets_public_write_prohibited.Properties.PublicAccessBlockConfiguration.BlockPublicPolicy == true
  %s3_buckets_public_write_prohibited.Properties.PublicAccessBlockConfiguration.IgnorePublicAcls == true
  %s3_buckets_public_write_prohibited.Properties.PublicAccessBlockConfiguration.RestrictPublicBuckets == true
  <<
    Violation: S3 Bucket public write access must be restricted.
    Fix: Set the S3 Bucket PublicAccessBlockConfiguration properties—BlockPublicAcls, BlockPublicPolicy, IgnorePublicAcls, RestrictPublicBuckets—to true.
  >>
}

# Rule Identifier:
#    S3_BUCKET_VERSIONING_ENABLED
#
# Select all S3 resources from the incoming template (payload)
#
let s3_buckets_versioning_enabled = Resources.*[ Type == 'AWS::S3::Bucket' ]

rule S3_BUCKET_VERSIONING_ENABLED when %s3_buckets_versioning_enabled !empty {
  %s3_buckets_versioning_enabled.Properties.VersioningConfiguration exists
  %s3_buckets_versioning_enabled.Properties.VersioningConfiguration.Status == 'Enabled'
  <<
    Violation: S3 Bucket versioning must be enabled.
    Fix: Set the S3 Bucket property VersioningConfiguration.Status to 'Enabled'.
  >>
}
In this file, you can define rules to prevent public write access and require versioning on all S3 buckets. Here’s what the two rules in this example do:
S3_BUCKET_PUBLIC_WRITE_PROHIBITED:
This rule identifies S3 buckets within a CloudFormation template and checks if the public write access is restricted. It ensures that each S3 bucket has PublicAccessBlockConfiguration properties enabled to block public ACLs, block public policies, ignore public ACLs, and restrict public buckets. If a bucket does not meet these criteria, a violation message is triggered, instructing the user to set these properties to true.
S3_BUCKET_VERSIONING_ENABLED:
This rule targets S3 buckets and verifies that versioning is enabled. The rule checks if the VersioningConfiguration property exists and has its Status set to 'Enabled'. If this configuration is missing or set incorrectly, it alerts the user to enable versioning on the S3 bucket, providing an additional layer of data protection.
These rules help you maintain strict security and operational best practices by ensuring that S3 buckets are configured according to compliance requirements. Place these rules in safebucket.guard, and you’re ready to start applying them to your CloudFormation templates using Guard Hook to enforce policies without any manual intervention.
Upload your rules to S3
The Guard hook expects your policy files to be uploaded to an S3 bucket to then be pulled down during hook execution time. The hook expects your rules to be either a single .guard file, or multiple .guard files uploaded as a .zip or .tar.gz
Once you have uploaded your Guard rule or Guard rules bundle to S3, take note of the S3 URI of the uploaded object, as you will need this later to configure the Guard hook. Example: s3://your-bucket-name/safebucket.guard
You can also get the S3 URI by copy-pasting it from the console
Authoring the Hook
You can author and activate a Guard hook from the console, CLI, and using the AWS::CloudFormation::GuardHook CloudFormation resource.
Console
You can use the new console flow to define and activate your hook. Click on Create a Hook and choose With Guard.
You can type in your Guard rules S3 URI from the step before, or you can browse your S3 bucket using the console button.
You can configure the hook by performing the following steps:
In the Hook Name field, enter My::Company::GuardHook.
Under Hook Targets, select both Stacks and Resources. By selecting both Stacks and Resources under Hook Targets, you’re instructing CloudFormation to apply your hook validations at both levels. This ensures that individual resources and the overall stack comply with your defined policies, providing a comprehensive safeguard across deployments.
For Hook Mode, choose Fail.
In Execution Role, select New execution role and enter my-guard-hook-role for the name if you want CloudFormation to create the necessary role and permissions. Alternatively, an IAM role ARN you created manually (learn more here).
While we didn’t include a filter in this example, you can limit the executions of the hook to the intended resource types by using a filter. For more information about filters view our documentation page. You can skip to the next step if you do not have anything to filter.
Review the hook details and then click the Activate Hook button.
Note: You can create your own type-name-alias → MyCompany::Hooks::GuardHook is just an example
Using the CloudFormation resource
Using the AWS::CloudFormation::GuardHook resource in a CloudFormation template allows you to enforce compliance checks and validations on your AWS resources before creating, modifying, or deleting them within a stack. By specifying Guard rules using the Guard domain-specific language (DSL), you can define policies to assess resource configurations and security standards. When integrated into a CloudFormation template, AWS::CloudFormation::GuardHook evaluates the resources during stack operations and can either block non-compliant actions or provide warnings, depending on the configuration. This tool benefits organizations by automating governance, enhancing security, and reducing manual intervention, which help ensure that deployments adhere to best practices and compliance requirements consistently across environments.
Here is an example of how to create a Guard hook with the AWS::CloudFormation::GuardHook resource in a YAML file.
For more about AWS::CloudFormation::GuardHook , see our docs.
Testing your hook (non-compliant stack)
Now at this point, the Guard Hook should be running against all S3 buckets deployed via CloudFormation stacks in your account. We can confirm this by creating a new stack, from the CLI.
To do so, create a file named s3-fail.yaml and add the following content:
AWSTemplateFormatVersion: "2010-09-09"
Description: This template creates a simple s3 bucket

Resources:
  DemoBucket:
   Type: AWS::S3::Bucket
Create a stack, and specify your template in the AWS Command Line Interface (AWS CLI). In the following example, specify the stack name as my-fail-stack and the template name as s3-fail.yaml.
You can see the completed assessment and the result (how many rules compliant vs. not compliant as part of describe-stack-events. As the Hook Failure Mode is set to Fail, you can see the stack status: CREATE_FAILED due to Hook failure.
For more information about downloading S3 Object, see our docs.
Testing your hook (compliant stack)
To do so, create a file named s3-pass.yaml and add the following content:
AWSTemplateFormatVersion: "2010-09-09"
Description: This template creates a simple S3 bucket with versioning enabled and public write access disabled

Resources:
  DemoBucket:
   Type: AWS::S3::Bucket
   Properties:
      VersioningConfiguration:
        Status: Enabled
      PublicAccessBlockConfiguration:
        BlockPublicAcls: true
        IgnorePublicAcls: true
        BlockPublicPolicy: true
        RestrictPublicBuckets: true
Notice in the template, our bucket now does not allow public write access and enables versioning.
Create a stack, and specify your template in the AWS Command Line Interface (AWS CLI). In the following example, specify the stack name as my-pass-stack and the template name as s3-pass.yaml.
Guard hooks revolutionize the way you enforce compliance and security policies within your AWS infrastructure. By leveraging a service-managed hook, you can seamlessly integrate policy validation into your CloudFormation deployments without additional operational overhead.
Take advantage of Guard hooks today to:
Simplify compliance enforcement.
Enhance your security posture.
Streamline your deployment workflows.
Focus on innovation rather than infrastructure management.
Ready to enhance your cloud compliance and security? Start integrating Guard hooks into your CloudFormation templates and experience a new level of simplicity and efficiency in policy enforcement.
As customers increasingly seek to harness the power of generative AI (GenAI) and machine learning to deliver cutting-edge applications, the need for a flexible, intuitive, and scalable development platform has never been greater. In this landscape, Streamlit has emerged as a standout tool, making it easy for developers to prototype, build, and deploy GenAI-powered apps with minimal friction. It is an open-source Python framework designed to simplify the development of custom web applications for data science, machine learning, and GenAI projects. With Streamlit, developers can quickly transform Python scripts into interactive dashboards, LLM-powered chatbots, and web apps, using just a few lines of code. Its unique combination of simplicity, interactivity, and speed is the perfect complement to the rapid advancements in AI.
When deploying Streamlit applications, customers often face the challenge of ensuring their applications are highly available and can scale to meet a variable amount of demand. To achieve these goals, customers are looking at serverless approaches to deploying their Streamlit apps. With a serverless application, you only pay for the resources required and do not want have to worry about managing servers or capacity planning.
In this post, we will walk you through deploying containerized, serverless Streamlit applications automatically via HashiCorp Terraform, an Infrastructure as Code (IaC) tool that enables users to define and provision infrastructure across cloud platforms.
Solution Overview
For this solution, we have the Streamlit app running on an Amazon Elastic Container Service (ECS) cluster across multiple availability zones (AZs), using AWS Fargate to manage the compute. Fargate is a serverless, pay-as-you-go compute engine that lets you focus on building apps without managing servers. Using Fargate helps reduce the undifferentiated heavy lifting that can come with building and maintaining web applications. It is also often desirable to use a Content Delivery Network (CDN) to ensure low latency for users globally by caching the content at edge locations closer to where the users are geographically located.
Let’s zoom in on the two architectures – the Streamlit App hosting architecture, and the Streamlit App deployment pipeline.
Streamlit app hosting
In the above architecture, the following flow applies:
Users access the Streamlit App using the public DNS endpoint for an Amazon CloudFront distribution.
Using an Internet Gateway (IGW), user requests are routed to a public-facing Application Load Balancer (ALB).
This ALB has target groups which map to ECS task nodes that are part of an ECS cluster running in two AZs (us-east-1a and us-east-1b in this example).
Fargate will automatically scale the underlying compute nodes in the ECS cluster based on the demand.
Streamlit app deployment pipeline
In the above architecture, the following flow applies:
User develops a local Streamlit App and defines the path of these assets in the module configuration, then runs terraform apply to generate a local .zip file comprised of the Streamlit App directory, and upload this to an Amazon S3 bucket (Streamlit Assets) with versioning enabled, which is configured to trigger the Streamlit CI/CD pipeline to run.
AWS CodePipeline (Streamlit CI/CD pipeline) begins running. The pipeline copies the .zip file from the Streamlit Assets S3 Bucket, stores the contents in a connected CodePipeline Artifacts S3 bucket, and passes the asset to the AWS CodeBuild project that is also part of the pipeline.
CodeBuild (Streamlit CodeBuild Project) configures a compute/build environment and fetches a Python Docker Image from a public Amazon ECR repository. CodeBuild uses Docker to build a new Streamlit App image based on what is defined in the Dockerfile within the .zip file, and pushes the new image to a private ECR repository. It tags the image with latest, an app_version (user-defined in Terraform), as well as the S3 Version ID of the .zip file and pushes the image to ECR.
ECS has a task definition that references the image in ECR based on the S3 Version ID tag which will always be a unique value, as it is generated whenever a new version of the file is created. This also serves as data lineage so versions of the Streamlit App .zip files in S3 can be linked to versions of the image stored in ECR. Once a new image is pushed to ECR (with a unique image tag), the task definition is updated and the ECS service begins a new deployment using the new version of the Streamlit App.
When a new image is pushed to ECR, the Terraform Module is configured to use the local-exec provisioner to run an AWS CLI command that creates a CloudFront invalidation. This enables users of the Streamlit app to use the new version without waiting for the time-to-live (TTL) of the cached file to expire on the edge locations (default is 24 hours). Both of these pipelines are built and packaged into a Terraform module that can be reused efficiently with only a few lines of code.
Both of these pipelines are built and packaged into a Terraform module that can be reused efficiently with only a few lines of code.
Prerequisites
This solution requires the following prerequisites:
An AWS account. If you don’t have an account, you can sign up for one.
Terraform v1.0.0 or newer installed.
python v3.8 or newer installed.
A Streamlit app. If you don’t have a Streamlit project already, you can download this app directory as a sample Streamlit app for this post and save it to a local folder.
Your folder structure will look something like this:
In the same folder where you have the your Streamlit app saved, in the above example in the terraform_streamlit_folder, you will create and initialize a new Terraform project.
In your preferred terminal, create a new file named main.tf by running the following command on Unix/Linux machines, or an equivalent command on Windows machines:
touch main.tf
Open up the main.tf file and add the following code to it:
module "serverless-streamlit-app" {
  source          = "aws-ia/serverless-streamlit-app/aws"
  app_name        = "streamlit-app"
  app_version     = "v1.1.0"
  path_to_app_dir = "./app" # Replace with path to your app
}
This code utilizes a module block with a source pointing to the Terraform module, and the appropriate input variables passed in. When Terraform encounters a module block, it loads and processes that module’s configuration files using the source. The Serverless Streamlit App Terraform module has many optional input variables. If you have existing resources, such as an existing VPC, subnets, and security groups that you’d like to reuse instead of deploying new ones, you can use the module’s input variables to reference your existing resources. However, in this post, we’re deploying all of the resources in the above architecture from scratch. Here, we simply define the source that references the module hosted in the Terraform Registry, provide an app_name that will be used as a prefix for naming your resources, the app_version that is used for tracking changes to your app, and the path_to_app_dir which is the path to the local directory where the assets for your Streamlit app are stored.
Save the file.
To initialize the Terraform working directory, run the following command in your terminal:
terraform init
The output will contain a successful message like the following:
"Terraform has been successfully initialized"
Output the CloudFront URL
To be able to easily access the Cloudfront URL of the deployed Streamlit application, you can add the URL as a Terraform output.
In your terminal, create a new file named outputs.tf by running the following command on Unix/Linux machines, or an equivalent command on Windows machines:
touch outputs.tf
Open up the outputs.tf file and add the following code to it:
output "streamlit_cloudfront_distribution_url" {
  value = module.serverless-streamlit-app.streamlit_cloudfront_distribution_url
}
Save the file. Now, your folder structure will look like:
Now you can use Terraform to deploy the resources defined in your main.tf file.
In your terminal, run the following command to apply to deploy the infrastructure. This includes the hosting for your Streamlit application using ECS and CloudFront, as well as the pipeline that is used to push updates.
terraform apply
When the apply command finishes running, you’ll see the Terraform outputs displayed in the terminal.
Navigate to the streamlit_cloudfront_distribution_url to see your Streamlit application that is hosted on AWS.
When you make changes to your Streamlit codebase, you can go ahead and re-run terraform apply to push your new changes to your cloud environment.
When updating the Streamlit codebase, the CodePipeline and CodeBuild processes kick off to automatically update your new changes, which get reflected on your Streamlit application. CodePipeline automates the entire software release process, managing stages like source retrieval, building, testing, and deployment. It integrates with AWS services and third-party tools (such as GitHub and Jenkins) to enhance automation, speed, and security. CodeBuild focuses on automating code compilation, testing, and packaging, supporting multiple languages and custom Docker environments, while integrating with CodePipeline for scalable, secure builds. With this CI/CD pipeline, when you make changes to your code, all you need to run is terraform apply to update your cloud environment. For an example buildspec, see the example in the repo.
You can find full examples of deploying the infrastructure with and without existing resources in the GitHub repository.
Clean up
When you no longer need the resources deployed in this post, you can clean up the resources by using the Terraform destroy command. Simply run terraform destroy . This will remove all of the resources you have deployed in this post with Terraform.
Conclusion
Building serverless Streamlit applications with Terraform on AWS offers a powerful combination of scalability, efficiency, and automation. As you continue to build and refine your Streamlit applications, Terraform’s flexibility ensures that your infrastructure can evolve seamlessly, supporting rapid innovation and agile development. With Streamlit and Terraform, you have the tools to create dynamic, serverless applications that scale effortlessly and operate reliably in the cloud.
We are pleased to announce the general availability of the AWS Cloud Control provider for Pulumi, an modern infrastructure management platform, which allows our customers to adopt AWS innovations faster than ever before. AWS has consistently expanded its range of services to support any cloud workload, supporting over 200 fully featured services and introducing more than 3,400 significant new features in 2024. This growth meant that Pulumi customers needed to wait for the community to add support for the new service or feature in the Classic provider. The AWS Cloud Control provider offers Day 1 support for new AWS capabilities, allowing customers to accelerate time-to-market by building cloud infrastructure with the latest AWS innovations using Pulumi. Customers can now use the AWS Cloud Control provider in Pulumi to adopt best practices to provision and manage new AWS capabilities at scale.
The AWS Cloud Control provider leverages AWS Cloud Control API to automatically generate support for hundreds of AWS resource types, such as Amazon EC2 instances and Amazon S3 buckets. Since this provider is automatically generated, new features and services on AWS can be supported as soon as they are available in the AWS Cloud Control API, complementing capabilities that might not be immediately available in the standard Pulumi AWS Provider. Today, the AWS Cloud Control provider supports 1,000+ AWS resources and data sources, with more support being added as AWS continues to adopt the Cloud Control API standard. At launch, the AWS Cloud Control provider supports 550+ AWS capabilities which are not available in the Pulumi’s standard AWS provider, such as Amazon Q Business and Amazon Keyspaces (for Apache Cassandra).
The AWS Cloud Control provider is now generally available and can be used by customers to access newly launched AWS features and services using Pulumi. We plan to continue to add support for more resources and improve our user guide. You can start using this new provider alongside your existing AWS Classic provider. To learn more about the AWS Cloud Control provider, please check the provider documentation. For more examples, or if you run into any issues with the new provider, please don’t hesitate to submit your issue in the Pulumi AWS CC provider GitHub repository.
By Priya Mallya, Managing Director – Accenture, Sandeep Singh Bhatia, Sr Manager – Accenture
Vikas Purohit – Sr. Solutions Architect – AWS
Being able to internally setup and manage flexible, efficient infrastructure can be painful. Manually authoring your Infrastructure as Code (IaC) templates is error prone and time consuming. However, adoption of generative AI coding tools is changing the way infrastructure engineers can carry out their day-to-day activities. Accenture utilizing Amazon Q Developer to create IaC templates for one of their US based customer became a game changer.
We will discuss how Accenture used Amazon Q Developer to boost the productivity of their infrastructure team. They were responsible for deploying an Amazon Web Services (AWS) Control Tower based landing zone, central networking and security, and centralized service deployment using AWS Service Catalog for a large US-based financial client.
The Challenge
Accenture was working with a US-based financial client that was not using AWS and approached Accenture to support a green field deployment. They wanted help with:
AWS best practices for a multi-account strategy
Centralized logging
Networking and security
Setting up a infrastructure catalog managed by a central team
Distributing the catalog of newly managed services to their lines of business (LOBs)
Team involved decided on Hashicorp’s Terraform as the IaC language for this project.
The customer’s critical business needs drove a short time frame for the project. The customer wanted to build their infrastructure right from the outset, but typically manually creating Terraform scripts can be time intensive. Implementing infrastructure as code (IaC) is considered a best practice, as manual “click-ops” are error prone.
Solution Overview
In order to achieve adherence to the best deployment practices using IaC, as well as meeting the customer’s delivery timelines, Accenture decided to explore Amazon Q Developer for reducing the time to write the Terraform IaC code files.
Amazon Q Developer helps developers and IT professionals (IT pros) with all of their tasks across the software development lifecycle—from coding, testing, and upgrading, to troubleshooting, performing security scanning and fixes, optimizing AWS resources, and creating data engineering pipelines. It can help Terraform practitioners to focus on creating an end-to-end workflow. Amazon Q Developer features an open-source reference tracker and built-in security scans that are available while writing IaC code using Terraform. In order to generate high-quality code suggestions, HashiCorp and the Amazon Q Developer team worked together to ensure the generated code recommendations met the requirements of the Terraform practitioners.
Accenture team created a PoC to evaluate the accuracy of the recommendations generated by Amazon Q Developer. Upon successful completion of the POCs that delivered good quality code in quick timeframe, and seeking approvals from the customer, the Accenture team started writing Terraform IaC artifacts using Amazon Q Developer.
Amazon Q Developer was used to generate Terraform IaC artifacts for more than 50 AWS services as part of the project including AWS Control Tower, central networking using AWS Transit Gateway, AWS Network Firewall and Amazon Route 53 hosted zones. AWS Service Catalog products were created to manage central cataloging and deployment of products and services approved by the customer’s IT team.
Benefits observed by Accenture:
Using Amazon Q Developer resulted in accelerating the time to write the Terraform code by 30%.
Generated Terraform code had an accuracy of close to 99%, avoiding frequent context switching to reference the HashiCorp site to get the correct resource definition.
Using Amazon Q Developer, the Accenture team had a conversational interface to have queries on AWS services quickly answered further speeding up the development process.
Accenture also used Amazon Q Developer to identify and fix potential errors and edge cases.
Best Practices followed during project:
Temporarily writing variables in the local file helped Amazon Q Developer access all necessary information in the local file
AWS recommends a ‘human in the loop approach’, where a team member checks the code after it’s been generated. This code review process is a best practice regardless of which person or system created the code. This way, there were able to quickly catch and fix issues in the few instances they arose.
Conclusion
Amazon Q Developer helps developers and IT professionals (IT pros) with all of their tasks—from coding, testing, and upgrading, to troubleshooting, performing security scanning and fixes, optimizing AWS resources, and creating data engineering pipelines. We highlighted how Accenture used Amazon Q Developer for generating coding recommendations for Terraform, HashiCorp’s IaC language, to increase productivity and reduce the time for writing complex Terraform codes.
You can start using Amazon Q Developer in your IDE today to automatically build entire application features, find and fix security vulnerabilities and more. Visit Amazon Q Developer to get started.
Accenture is an AWS Premier Tier Services Partner and MSP that provides end-to-end solutions to migrate to and manage operations on AWS. By working with the Accenture AWS Business Group (AABG), a strategic collaboration by Accenture and AWS, organizations can accelerate the pace of innovation to deliver disruptive products and services.
Today, we are pleased to announce the general availability of the Terraform AWS Cloud Control (AWS CC) Provider, enabling our customers to take advantage of AWS innovations faster. AWS has been continually expanding its services to support virtually any cloud workload; supporting over 200 fully featured services and delighting customers through its rapid pace of innovation with over 3,400 significant new features in 2023. Our customers use Infrastructure as Code (IaC) tools such as HashiCorp Terraform among others as a best-practice to provision and manage these AWS features and services as part of their cloud infrastructure at scale. With the Terraform AWS CC Provider launch, AWS customers using Terraform as their IaC tool can now benefit from faster time-to-market by building cloud infrastructure with the latest AWS innovations that are typically available on the Terraform AWS CC Provider on the day of launch. For example, AWS customer Meta’s Oculus Studios was able to quickly leverage Amazon GameLift to support their game development. “AWS and Hashicorp have been great partners in helping Oculus Studios standardize how we deploy our GameLift infrastructure using industry best practices.” said Mick Afaneh, Meta’s Oculus Studios Central Technology.
The Terraform AWS CC Provider leverages AWS Cloud Control API to automatically generate support for hundreds of AWS resource types, such as Amazon EC2 instances and Amazon S3 buckets. Since the AWS CC provider is automatically generated, new features and services on AWS can be supported as soon as they are available on AWS Cloud Control API, addressing any coverage gaps in the existing Terraform AWS standard provider. This automated process allows the AWS CC provider to deliver new resources faster because it does not have to wait for the community to author schema and resource implementations for each new service. Today, the AWS CC provider supports 950+ AWS resources and data sources, with more support being added as AWS service teams continue to adopt the Cloud Control API standard.
As a Terraform practitioner, using the AWS CC Provider would feel familiar to the existing workflow. You can employ the configuration blocks shown below, while specifying your preferred region.
During Terraform plan or apply, the AWS CC Terraform provider interacts with AWS Cloud Control API to provision the resources by calling its consistent Create, Read, Update, Delete, or List (CRUD-L) APIs.
AWS Cloud Control API
AWS service teams own, publish, and maintain resources on the AWS CloudFormation Registry using a standardized resource model. This resource model uses uniform JSON schemas and provisioning logic that codifies the expected behavior and error handling associated with CRUD-L operations. This resource model enables AWS service teams to expose their service features in an easily discoverable, intuitive, and uniform format with standardized behavior. Launched in September 2021, AWS Cloud Control API exposes these resources through a set of five consistent CRUD-L operations without any additional work from service teams. Using Cloud Control API, developers can manage the lifecycle of hundreds of AWS and third-party resources with consistent resource-oriented API instead of using distinct service-specific APIs. Furthermore, Cloud Control API is up-to-date with the latest AWS resources as soon as they are available on the CloudFormation Registry, typically on the day of launch. You can read more on launch day requirement for Cloud Control API in this blog post. This enables AWS Partners such as HashiCorp to take advantage of consistent CRUD-L API operations and integrate Terraform with Cloud Control API just once, and then automatically access new AWS resources without additional integration work.
History and Evolution of the Terraform AWS CC Provider
The general availability of Terraform AWS CC Provider project is a culmination of 4+ years of collaboration between AWS and HashiCorp. Our teams partnered across the Product, Engineering, Partner, and Customer Support functions in influencing, shaping, and defining the customer experience leading up to the the technical preview announcement of the AWS CC provider in September 2021. At technical preview, the provider supported more than 300 resources. Since then, we have added an additional 600+ resources to the provider, bringing the total to 950+ supported resources at general availability.
Beyond just increasing resource coverage, we gathered additional signals from customer feedback during the technical preview and rolled out several improvements since September 2021. Customers care deeply about the user experience on the providers available on the Terraform registry. Customers sought practical examples in the form of sample HCL configurations for each resource that they could use to immediately test in order to confidently start using the provider. This prompted us to enrich the AWS CC provider with hundreds of practical examples for popular AWS CC provider resources in the Terraform registry. This was made possible by contributions of hundreds of Amazonians who became early adopters of the AWS CC provider. We also published a how-to guide for anyone interested in contributing to AWS CC provider examples. Furthermore, customers also wanted to minimize context switching by moving between Terraform and AWS service documentation on what each attribute of a resource signified and the type of values it needed as part of configuration. This empowered us to prioritize augmenting the provider with rich resource attribute description with information taken from AWS documentation. The documentation provides detailed information of how to use the attributes, enumerations of the accepted attribute values and other relevant information for dozens of popularly used AWS resources.
We also worked with HashiCorp on various bug fixes and feature enhancements for the AWS CC provider, as well as the upstream Cloud Control API dependencies. We improved handling for resources with complex nested attribute schemas, implemented various bug fixes to resolve unintended resource replacement, and refined provider behavior under various conditions to support the idempotency expected by Terraform practitioners. While this are not an exhaustive list of improvements, we continue to listen to customer feedback and iterate on improving the experience. We encourage you to try out the provider and share feedback on the AWS CC provider’s GitHub page.
Using the AWS CC Provider
Let’s take an example of a recently introduced service, Amazon Q Business, a fully managed, generative AI-powered assistant that you can configure to answer questions, provide summaries, generate content, and complete tasks based on your enterprise data. Amazon Q Business resources were available in AWS CC provider shortly after the April 30th 2024 launch announcement. In the following example, we’ll create a demo Amazon Q Business application and deploy the web experience.
As you see in this example, you can use both the AWS and AWS CC providers in the same configuration file. This allows you to easily incorporate new resources available in the AWS CC provider into your existing configuration with minimal changes. The AWS CC provider also accepts the same authentication method and provider-level features available in the AWS provider. This means you don’t have to add additional configuration in your CI/CD pipeline to start using the AWS CC provider. In addition, you can also add custom agent information inside the provider block as described in this documentation.
Things to know
The AWS CC provider is unique due to how it was developed and its dependencies with Cloud Control API and AWS resource model in the CloudFormation registry. As such, there are things that you should know before you start using the AWS CC provider.
The AWS CC provider is generated from the latest CloudFormation schemas, and will release weekly containing all new AWS services and enhancements added to Cloud Control API.
Certain resources available in the CloudFormation schema are not compatible with the AWS CC provider due to nuances in the schema implementation. You can find them on the GitHub issue list here. We are actively working to add these resources to the AWS CC provider.
The AWS CC provider requires Terraform CLI version 1.0.7 or higher.
Every AWS CC provider resource includes a top-level attribute `id` that acts as the resource identifier. If the CloudFormation resource schema also has a similarly named top-level attribute `id`, then that property is mapped to a new attribute named `<type>_id`. For example `web_experience_id` for `awscc_qbusiness_web_experience` resource.
If a resource attribute is not defined in the Terraform configuration, the AWS CC provider will honor the default values specified in the CloudFormation resource schema. If the resource schema does not include a default value, AWS CC provider will use attribute value stored in the Terraform state (taken from Cloud Control API GetResponse after resource was created).
In correlation to the default value behavior as stated above, when an attribute value is removed from the Terraform configuration (e.g. by commenting the attribute), the AWS CC provider will use the previous attribute value stored in the Terraform state. As such, no drift will be detected on the resource configuration when you run Terraform plan / apply.
The AWS CC provider data sources are either plural or singular with filters based on `id` attribute. Currently there is no native support for metadata sources such as `aws_region` or `aws_caller_identity`. You can continue to leverage the AWS provider data sources to complement your Terraform configuration.
If you want to dive deeper into AWS CC provider resource behavior, we encourage you to check the documentation here.
Conclusion
The AWS CC provider is now generally available and will be the fastest way for customers to access newly launched AWS features and services using Terraform. We will continue to add support for more resources, additional examples and enriching the schema descriptions. You can start using the AWS CC provider alongside your existing AWS standard provider. To learn more about the AWS CC provider, please check the HashiCorp announcement blog post. You can also follow the workshop on how to get started with AWS CC provider. If you are interested in contributing with practical examples for AWS CC provider resources, check out the how-to guide. For more questions or if you run into any issues with the new provider, don’t hesitate to submit your issue in the AWS CC provider GitHub repository.
Amazon CodeCatalyst integrates continuous integration and deployment (CI/CD) by bringing key development tools together on one platform. With the entire application lifecycle managed in one tool, CodeCatalyst empowers rapid, dependable software delivery. CodeCatalyst offers a range of actions which is the main building block of a workflow, and defines a logical unit of work to perform during a workflow run. Typically, a workflow includes multiple actions that run sequentially or in parallel depending on how you’ve configured them.
Introduction
Infrastructure as code (IaC) has become a best practice for managing IT infrastructure. IaC uses code to provision and manage your infrastructure in a consistent, programmatic way. Terraform by HashiCorp is one of most common tools for IaC.
With Terraform, you define the desired end state of your infrastructure resources in declarative configuration files. Terraform determines the necessary steps to reach the desired state and provisions the infrastructure automatically. This removes the need for manual processes while enabling version control, collaboration, and reproducibility across your infrastructure.
In this blog post, we will demonstrate using the “Terraform Community Edition” action in CodeCatalyst to create resources in an AWS account.
Figure 1: Amazon CodeCatalyst Action
Prerequisites
To follow along with the post, you will need the following items:
An Amazon DynamoDB Table to manage the locking of the state file during Terraform operations.
Walkthrough
In this walkthrough we create an Amazon S3 bucket using the Terraform Community Edition action in Amazon CodeCatalyst. The action will execute the Terraform commands needed to apply your configuration. You configure the action with a specified Terraform version. When the action runs it uses that Terraform version to deploy your Terraform templates, provisioning the defined infrastructure. This action will run terraform init to initialize the working directory, terraform plan to preview changes, and terraform apply to create the Amazon S3 bucket based on the Terraform configuration in a target AWS Account. At the end of the post your workflow will look like the following:
Figure 2: Amazon CodeCatalyst Workflow with Terraform Community Action
Create the base workflow
To begin, we create a workflow that will execute our Terraform code. In the CodeCatalyst project, click on CI/CD on left pane and select Workflows. In the Workflows pane, click on Create Workflow.
Figure 3: Creating Amazon CodeCatalyst Workflow
We have taken an existing repository my-sample-terraform-repository as a source repository.
Figure 4 : Creating Workflow from source repository
Once the source repository is selected, select Branch as main and click Create. You will have an empty workflow. You can edit the workflow from within the CodeCatalyst console. Click on the Commit button to create an initial commit:
Figure 5: Initial Workflow commit
On the Commit Workflow dialogue, add a commit message, and click on Commit. Ignore any validation errors at this stage:
Figure 6: Completing Initial Commit for Workflow
Connect to CodeCatalyst Dev Environment
For this post, we will use an AWS Cloud9 Dev Environment to edit our workflow. Your first step is to connect to the dev environment. Select Code→ Dev Environments.
Figure 7 : Navigate to CodeCatalyst Dev Environments
If you do not already have a Dev Environment you can create an instance by selecting the Create Dev Environment dropdown and selecting AWS Cloud9 (in browser). Leave the options as default and click on Create to provision a new Dev Environment.
Figure 8: Create CodeCatalyst Dev Environment
Once the Dev Environment has provisioned, you are redirected to a Cloud9 instance in browser. The Dev Environment automatically clones the existing repository for the Terraform project code. We at first create a main.tf file in root of the repository with the Terraform code for creating an Amazon S3 bucket. To do this, we right click on the repository folder in the tree-pane view on the left side of the Cloud9 Console window and select New File
Figure 9: Creating a new file in Cloud9
We are presented with a new file which we will name main.tf, this file will store the Terraform code. We then edit main.tf by right clicking on the file and selecting open. We insert the code below into main.tf. The code has a Terraform resource block to create an AWS S3 Bucket. The configuration also uses Terraform AWS datasources to obtain AWS region and AWS Account ID data which is used to form part of the bucket name. Finally, we use a backend block to configure Terraform to use an AWS S3 bucket to store Terraform state data. To save our changes we select File -> Save
Figure 10: Adding Terraform Code
Now let’s start creating Terraform Workflow using Amazon CodeCatalyst Terraform Community Action. Within your repository go to .codecatalyst/workflows directory and open the <workflowname.yaml> file.
Figure 11: Creating CodeCatalyst Workflow
The below code snippet is an example workflow definition with terraform plan and terraform apply. We will enter this into our workflow file, with the relevant configuration settings for our environment.
The workflow does the following:
When a change is pushed to the main branch, a new workflow execution is triggered. This workflow carries a Terraform plan and subsequent apply operation.
Name: terraform-action-workflow
Compute:
  Type: EC2
  Fleet: Linux.x86-64.Large
SchemaVersion: "1.0"
Triggers:
  - Type: Push
    Branches:
      -  main
Actions:
  PlanTerraform:
    Identifier: codecatalyst-labs/provision-with-terraform-community@v1
    Environment:
      Name: dev
      Connections:
        - Name: codecatalyst
          Role: CodeCatalystWorkflowDevelopmentRole # The IAM role to be used
    Inputs:
      Sources:
        - WorkflowSource
    Outputs:
      Artifacts:
        - Name: tfplan # generates a tfplan output artifact
          Files:
            - tfplan.out
    Configuration:
      AWSRegion: eu-west-2
      StateBucket: tfstate-bucket # The Terraform state S3 Bucket
      StateKey: terraform.tfstate # The Terraform state file
      StateKeyPrefix: states/ # The path to the state file (optional)
      StateTable: tfstate-table # The Dynamo DB database
      TerraformVersion: ‘1.5.1’ # The Terraform version to be used
      TerraformOperationMode: plan # The Terraform operation- can be plan or apply
  ApplyTerraform:
    Identifier: codecatalyst-labs/provision-with-terraform-community@v1
    DependsOn:
      - PlanTerraform
    Environment:
      Name: dev
      Connections:
        - Name: codecatalyst
          Role: CodeCatalystWorkflowDevelopmentRole
    Inputs:
      Sources:
        - WorkflowSource
      Artifacts:
        - tfplan
    Configuration:
      AWSRegion: eu-west-2
      StateBucket: tfstate-bucket
      StateKey: terraform.tfstate
      StateKeyPrefix: states/
      StateTable: tfstate-table
      TerraformVersion: '1.5.1'
      TerraformOperationMode: apply
Key configuration parameters are:
Environment.Name: The name of our CodeCatalyst Environment
Environment.Connections.Name: The name of the CodeCatalyst connection
Environment.Connections.Role: The IAM role used for the workflow
AWSRegion: The AWS region that hosts the Terraform state bucket
Environment.Name: The name of our CodeCatalyst Environment
The above command adds the workflow file and Terraform code to be tracked by git. It then commits the code and pushes the changes to CodeCatalyst git repository. As we have a branch trigger for main defined, this will trigger a run of the workflow. We can monitor the status of the workflow in the CodeCatalyst console by selecting CICD -> Workflows. Locate your workflow and click on Runs to view the status. You will be able to observe that the workflow has successfully completed and Amazon S3 bucket is created.
Figure 12: CodeCatalyst Workflow Status
Cleaning up
If you have been following along with this workflow, you should delete the resources that you have deployed to avoid further charges. The walkthrough will create an Amazon S3 bucket named <your-aws-account-id>-<your-aws-region>-terraform-sample-bucket in your AWS account. In the AWS Console > S3, locate the bucket that was created, then select and click Delete to remove the bucket.
Conclusion
In this post, we explained how you can easily get started deploying IaC to your AWS accounts with Amazon CodeCatalyst. We outlined how the Terraform Community Edition action can streamline the process of planning and applying Terraform configurations and how to create a workflow that can leverage this action. Get started with Amazon CodeCatalyst today.
Organizations often use Terraform Modules to orchestrate complex resource provisioning and provide a simple interface for developers to enter the required parameters to deploy the desired infrastructure. Modules enable code reuse and provide a method for organizations to standardize deployment of common workloads such as a three-tier web application, a cloud networking environment, or a data analytics pipeline. When building Terraform modules, it is common for the module author to start with manual testing. Manual testing is performed using commands such as terraform validate for syntax validation, terraform plan to preview the execution plan, and terraform apply followed by manual inspection of resource configuration in the AWS Management Console. Manual testing is prone to human error, not scalable, and can result in unintended issues. Because modules are used by multiple teams in the organization, it is important to ensure that any changes to the modules are extensively tested before the release. In this blog post, we will show you how to validate Terraform modules and how to automate the process using a Continuous Integration/Continuous Deployment (CI/CD) pipeline.
Terraform Test
Terraform test is a new testing framework for module authors to perform unit and integration tests for Terraform modules. Terraform test can create infrastructure as declared in the module, run validation against the infrastructure, and destroy the test resources regardless if the test passes or fails. Terraform test will also provide warnings if there are any resources that cannot be destroyed. Terraform test uses the same HashiCorp Configuration Language (HCL) syntax used to write Terraform modules. This reduces the burden for modules authors to learn other tools or programming languages. Module authors run the tests using the command terraform test which is available on Terraform CLI version 1.6 or higher.
Module authors create test files with the extension *.tftest.hcl. These test files are placed in the root of the Terraform module or in a dedicated tests directory. The following elements are typically present in a Terraform tests file:
Provider block: optional, used to override the provider configuration, such as selecting AWS region where the tests run.
Variables block: the input variables passed into the module during the test, used to supply non-default values or to override default values for variables.
Run block: used to run a specific test scenario. There can be multiple run blocks per test file, Terraform executes run blocks in order. In each run block you specify the command Terraform (plan or apply), and the test assertions. Module authors can specify the conditions such as: length(var.items) != 0. A full list of condition expressions can be found in the HashiCorp documentation.
Terraform tests are performed in sequential order and at the end of the Terraform test execution, any failed assertions are displayed.
Basic test to validate resource creation
Now that we understand the basic anatomy of a Terraform tests file, let’s create basic tests to validate the functionality of the following Terraform configuration. This Terraform configuration will create an AWS CodeCommit repository with prefix name repo-.
Now we create a Terraform test file in the tests directory. See the following directory structure as an example:
├── main.tf
└── tests
└── basic.tftest.hcl
For this first test, we will not perform any assertion except for validating that Terraform execution plan runs successfully. In the tests file, we create a variable block to set the value for the variable repository_name. We also added the run block with command = plan to instruct Terraform test to run Terraform plan. The completed test should look like the following:
# basic.tftest.hcl

variables {
  repository_name = "MyRepo"
}

run "test_resource_creation" {
  command = plan
}
Now we will run this test locally. First ensure that you are authenticated into an AWS account, and run the terraform init command in the root directory of the Terraform module. After the provider is initialized, start the test using the terraform test command.
❯ terraform test
tests/basic.tftest.hcl... in progress
run "test_resource_creation"... pass
tests/basic.tftest.hcl... tearing down
tests/basic.tftest.hcl... pass
Our first test is complete, we have validated that the Terraform configuration is valid and the resource can be provisioned successfully. Next, let’s learn how to perform inspection of the resource state.
Create resource and validate resource name
Re-using the previous test file, we add the assertion block to checks if the CodeCommit repository name starts with a string repo- and provide error message if the condition fails. For the assertion, we use the startswith function. See the following example:
# basic.tftest.hcl

variables {
  repository_name = "MyRepo"
}

run "test_resource_creation" {
  command = plan

  assert {
    condition = startswith(aws_codecommit_repository.test.repository_name, "repo-")
    error_message = "CodeCommit repository name ${var.repository_name} did not start with the expected value of ‘repo-****’."
  }
}
Now, let’s assume that another module author made changes to the module by modifying the prefix from repo- to my-repo-. Here is the modified Terraform module.
We can catch this mistake by running the the terraform test command again.
❯ terraform test
tests/basic.tftest.hcl... in progress
run "test_resource_creation"... fail
╷
│ Error: Test assertion failed
│
│ on tests/basic.tftest.hcl line 9, in run "test_resource_creation":
│ 9: condition = startswith(aws_codecommit_repository.test.repository_name, "repo-")
│ ├────────────────
│ │ aws_codecommit_repository.test.repository_name is "my-repo-MyRepo"
│
│ CodeCommit repository name MyRepo did not start with the expected value 'repo-***'.
╵
tests/basic.tftest.hcl... tearing down
tests/basic.tftest.hcl... fail

Failure! 0 passed, 1 failed.
We have successfully created a unit test using assertions that validates the resource name matches the expected value. For more examples of using assertions see the Terraform Tests Docs. Before we proceed to the next section, don’t forget to fix the repository name in the module (revert the name back to repo- instead of my-repo-) and re-run your Terraform test.
Testing variable input validation
When developing Terraform modules, it is common to use variable validation as a contract test to validate any dependencies / restrictions. For example, AWS CodeCommit limits the repository name to 100 characters. A module author can use the length function to check the length of the input variable value. We are going to use Terraform test to ensure that the variable validation works effectively. First, we modify the module to use variable validation.
# main.tf

variable "repository_name" {
  type = string
  validation {
    condition = length(var.repository_name) <= 100
    error_message = "The repository name must be less than or equal to 100 characters."
  }
}

resource "aws_codecommit_repository" "test" {
  repository_name = format("repo-%s", var.repository_name)
  description = "Test repository."
}
By default, when variable validation fails during the execution of Terraform test, the Terraform test also fails. To simulate this, create a new test file and insert the repository_name variable with a value longer than 100 characters.
# var_validation.tftest.hcl

variables {
  repository_name = “this_is_a_repository_name_longer_than_100_characters_7rfD86rGwuqhF3TH9d3Y99r7vq6JZBZJkhw5h4eGEawBntZmvy”
}

run “test_invalid_var” {
  command = plan
}
Notice on this new test file, we also set the command to Terraform plan, why is that? Because variable validation runs prior to Terraform apply, thus we can save time and cost by skipping the entire resource provisioning. If we run this Terraform test, it will fail as expected.
❯ terraform test
tests/basic.tftest.hcl… in progress
run “test_resource_creation”… pass
tests/basic.tftest.hcl… tearing down
tests/basic.tftest.hcl… pass
tests/var_validation.tftest.hcl… in progress
run “test_invalid_var”… fail
╷
│ Error: Invalid value for variable
│
│ on main.tf line 1:
│ 1: variable “repository_name” {
│ ├────────────────
│ │ var.repository_name is “this_is_a_repository_name_longer_than_100_characters_7rfD86rGwuqhF3TH9d3Y99r7vq6JZBZJkhw5h4eGEawBntZmvy”
│
│ The repository name must be less than or equal to 100 characters.
│
│ This was checked by the validation rule at main.tf:3,3-13.
╵
tests/var_validation.tftest.hcl… tearing down
tests/var_validation.tftest.hcl… fail

Failure! 1 passed, 1 failed.
For other module authors who might iterate on the module, we need to ensure that the validation condition is correct and will catch any problems with input values. In other words, we expect the validation condition to fail with the wrong input. This is especially important when we want to incorporate the contract test in a CI/CD pipeline. To prevent our test from failing due introducing an intentional error in the test, we can use the expect_failures attribute. Here is the modified test file:
# var_validation.tftest.hcl

variables {
  repository_name = “this_is_a_repository_name_longer_than_100_characters_7rfD86rGwuqhF3TH9d3Y99r7vq6JZBZJkhw5h4eGEawBntZmvy”
}

run “test_invalid_var” {
  command = plan

  expect_failures = [
    var.repository_name
  ]
}
Now if we run the Terraform test, we will get a successful result.
❯ terraform test
tests/basic.tftest.hcl… in progress
run “test_resource_creation”… pass
tests/basic.tftest.hcl… tearing down
tests/basic.tftest.hcl… pass
tests/var_validation.tftest.hcl… in progress
run “test_invalid_var”… pass
tests/var_validation.tftest.hcl… tearing down
tests/var_validation.tftest.hcl… pass

Success! 2 passed, 0 failed.
As you can see, the expect_failures attribute is used to test negative paths (the inputs that would cause failures when passed into a module). Assertions tend to focus on positive paths (the ideal inputs). For an additional example of a test that validates functionality of a completed module with multiple interconnected resources, see this example in the Terraform CI/CD and Testing on AWS Workshop.
Orchestrating supporting resources
In practice, end-users utilize Terraform modules in conjunction with other supporting resources. For example, a CodeCommit repository is usually encrypted using an AWS Key Management Service (KMS) key. The KMS key is provided by end-users to the module using a variable called kms_key_id. To simulate this test, we need to orchestrate the creation of the KMS key outside of the module. In this section we will learn how to do that. First, update the Terraform module to add the optional variable for the KMS key.
# main.tf

variable "repository_name" {
  type = string
  validation {
    condition = length(var.repository_name) <= 100
    error_message = "The repository name must be less than or equal to 100 characters."
  }
}

variable "kms_key_id" {
  type = string
  default = ""
}

resource "aws_codecommit_repository" "test" {
  repository_name = format("repo-%s", var.repository_name)
  description = "Test repository."
  kms_key_id = var.kms_key_id != "" ? var.kms_key_id : null
}
In a Terraform test, you can instruct the run block to execute another helper module. The helper module is used by the test to create the supporting resources. We will create a sub-directory called setup under the tests directory with a single kms.tf file. We also create a new test file for KMS scenario. See the updated directory structure:
The new test will use two separate run blocks. The first run block (setup) executes the helper module to generate a KMS key. This is done by assigning the command apply which will run terraform apply to generate the KMS key. The second run block (codecommit_with_kms) will then use the KMS key ARN output of the first run as the input variable passed to the main module.
# with_kms.tftest.hcl

run "setup" {
  command = apply
  module {
    source = "./tests/setup"
  }
}

run "codecommit_with_kms" {
  command = apply

  variables {
    repository_name = "MyRepo"
    kms_key_id = run.setup.kms_key_id
  }

  assert {
    condition = aws_codecommit_repository.test.kms_key_id != null
    error_message = "KMS key ID attribute value is null"
  }
}
Go ahead and run the Terraform init, followed by Terraform test. You should get the successful result like below.
❯ terraform test
tests/basic.tftest.hcl... in progress
run "test_resource_creation"... pass
tests/basic.tftest.hcl... tearing down
tests/basic.tftest.hcl... pass
tests/var_validation.tftest.hcl... in progress
run "test_invalid_var"... pass
tests/var_validation.tftest.hcl... tearing down
tests/var_validation.tftest.hcl... pass
tests/with_kms.tftest.hcl... in progress
run "create_kms_key"... pass
run "codecommit_with_kms"... pass
tests/with_kms.tftest.hcl... tearing down
tests/with_kms.tftest.hcl... pass

Success! 4 passed, 0 failed.
We have learned how to run Terraform test and develop various test scenarios. In the next section we will see how to incorporate all the tests into a CI/CD pipeline.
Terraform Tests in CI/CD Pipelines
Now that we have seen how Terraform Test works locally, let’s see how the Terraform test can be leveraged to create a Terraform module validation pipeline on AWS. The following AWS services are used:
AWS CodeCommit – a secure, highly scalable, fully managed source control service that hosts private Git repositories.
AWS CodeBuild – a fully managed continuous integration service that compiles source code, runs tests, and produces ready-to-deploy software packages.
AWS CodePipeline – a fully managed continuous delivery service that helps you automate your release pipelines for fast and reliable application and infrastructure updates.
In the above architecture for a Terraform module validation pipeline, the following takes place:
A developer pushes Terraform module configuration files to a git repository (AWS CodeCommit).
AWS CodePipeline begins running the pipeline. The pipeline clones the git repo and stores the artifacts to an Amazon S3 bucket.
An AWS CodeBuild project configures a compute/build environment with Checkov installed from an image fetched from Docker Hub. CodePipeline passes the artifacts (Terraform module) and CodeBuild executes Checkov to run static analysis of the Terraform configuration files.
Another CodeBuild project configured with Terraform from an image fetched from Docker Hub. CodePipeline passes the artifacts (repo contents) and CodeBuild runs Terraform command to execute the tests.
CodeBuild uses a buildspec file to declare the build commands and relevant settings. Here is an example of the buildspec files for both CodeBuild Projects:
In the above buildspec, Checkov is run against the root directory of the cloned CodeCommit repository. This directory contains the configuration files for the Terraform module. Checkov also saves the output to a file named checkov.result.txt for further review or handling if needed. If Checkov fails, the pipeline will fail.
# Terraform Test
version: 0.1
phases:
  pre_build:
    commands:
      - terraform init
      - terraform validate

  build:
    commands:
      - terraform test
In the above buildspec, the terraform init and terraform validate commands are used to initialize Terraform, then check if the configuration is valid. Finally, the terraform test command is used to run the configured tests. If any of the Terraform tests fails, the pipeline will fail.
For a full example of the CI/CD pipeline configuration, please refer to the Terraform CI/CD and Testing on AWS workshop. The module validation pipeline mentioned above is meant as a starting point. In a production environment, you might want to customize it further by adding Checkov allow-list rules, linting, checks for Terraform docs, or pre-requisites such as building the code used in AWS Lambda.
Choosing various testing strategies
At this point you may be wondering when you should use Terraform tests or other tools such as Preconditions and Postconditions, Check blocks or policy as code. The answer depends on your test type and use-cases. Terraform test is suitable for unit tests, such as validating resources are created according to the naming specification. Variable validations and Pre/Post conditions are useful for contract tests of Terraform modules, for example by providing error warning when input variables value do not meet the specification. As shown in the previous section, you can also use Terraform test to ensure your contract tests are running properly. Terraform test is also suitable for integration tests where you need to create supporting resources to properly test the module functionality. Lastly, Check blocks are suitable for end to end tests where you want to validate the infrastructure state after all resources are generated, for example to test if a website is running after an S3 bucket configured for static web hosting is created.
When developing Terraform modules, you can run Terraform test in command = plan mode for unit and contract tests. This allows the unit and contract tests to run quicker and cheaper since there are no resources created. You should also consider the time and cost to execute Terraform test for complex / large Terraform configurations, especially if you have multiple test scenarios. Terraform test maintains one or many state files within the memory for each test file. Consider how to re-use the module’s state when appropriate. Terraform test also provides test mocking, which allows you to test your module without creating the real infrastructure.
Conclusion
In this post, you learned how to use Terraform test and develop various test scenarios. You also learned how to incorporate Terraform test in a CI/CD pipeline. Lastly, we also discussed various testing strategies for Terraform configurations and modules. For more information about Terraform test, we recommend the Terraform test documentation and tutorial. To get hands on practice building a Terraform module validation pipeline and Terraform deployment pipeline, check out the Terraform CI/CD and Testing on AWS Workshop.
AWS CloudFormation customers often inquire about the behind-the-scenes process of provisioning resources and why certain resources or stacks take longer to provision compared to the AWS Management Console or AWS Command Line Interface (AWS CLI). In this post, we will delve into the various factors affecting resource provisioning in CloudFormation, specifically focusing on resource stabilization, which allows CloudFormation and other Infrastructure as Code (IaC) tools to ensure resilient deployments. We will also introduce a new optimistic stabilization strategy that improves CloudFormation stack deployment times by up to 40% and provides greater visibility into resource provisioning through the new CONFIGURATION_COMPLETE status.
AWS CloudFormation is an IaC service that allows you to model your AWS and third-party resources in template files. By creating CloudFormation stacks, you can provision and manage the lifecycle of the template-defined resources manually via the AWS CLI, Console, AWS SAM, or automatically through an AWS CodePipeline, where CLI and SAM can also be leveraged or through Git sync. You can also use AWS Cloud Development Kit (AWS CDK) to define cloud infrastructure in familiar programming languages and provision it through CloudFormation, or leverage AWS Application Composer to design your application architecture, visualize dependencies, and generate templates to create CloudFormation stacks.
Deploying a CloudFormation stack
Let’s examine a deployment of a containerized application using AWS CloudFormation to understand CloudFormation’s resource provisioning.
Figure 1. Sample application architecture to deploy an ECS service
For deploying a containerized application, you need to create an Amazon ECS service. To set up the ECS service, several key resources must first exist: an ECS cluster, an Amazon ECR repository, a task definition, and associated Amazon VPC infrastructure such as security groups and subnets. Since you want to manage both the infrastructure and application deployments using AWS CloudFormation, you will first define a CloudFormation template that includes: an ECS cluster resource (AWS::ECS::Cluster), a task definition (AWS::ECS::TaskDefinition), an ECR repository (AWS::ECR::Repository), required VPC resources like subnets (AWS::EC2::Subnet) and security groups (AWS::EC2::SecurityGroup), and finally, the ECS Service (AWS::ECS::Service) itself. When you create the CloudFormation stack using this template, the ECS service (AWS::ECS::Service) is the final resource created, as it waits for the other resources to finish creation. This brings up the concept of Resource Dependencies.
Resource Dependency:
In CloudFormation, resources can have dependencies on other resources being created first. There are two types of resource dependencies:
Implicit: CloudFormation automatically infers dependencies when a resource uses intrinsic functions to reference another resource. These implicit dependencies ensure the resources are created in the proper order.
Explicit: Dependencies can be directly defined in the template using the DependsOn attribute. This allows you to customize the creation order of resources.
The following template snippet shows the ECS service’s dependencies visualized in a dependency graph:
In the above template snippet, the ECS Service (AWS::ECS::Service) resource has an explicit dependency on the PublicRoute resource, specified using the DependsOn attribute. The ECS service also has implicit dependencies on the ECSCluster, SecurityGroup, PublicSubnet, and TaskDefinition resources. Even without an explicit DependsOn, CloudFormation understands that these resources must be created before the ECS service, since the service references them using the Ref intrinsic function. Now that you understand how CloudFormation creates resources in a specific order based on their definition in the template file, let’s look at the time taken to provision these resources.
Resource Provisioning Time:
The total time for CloudFormation to provision the stack depends on the time required to create each individual resource defined in the template. The provisioning duration per resource is determined by several time factors:
Engine Time: CloudFormation Engine Time refers to the duration spent by the service reading and persisting data related to a resource. This includes the time taken for operations like parsing and interpreting the CloudFormation template, and for the resolution of intrinsic functions like Fn::GetAtt and Ref.
Resource Creation Time: The actual time an AWS service requires to create and configure the resource. This can vary across resource types provisioned by the service.
Resource Stabilization Time: The duration required for a resource to reach a usable state after creation.
What is Resource Stabilization?
When provisioning AWS resources, CloudFormation makes the necessary API calls to the underlying services to create the resources. After creation, CloudFormation then performs eventual consistency checks to ensure the resources are ready to process the intended traffic, a process known as resource stabilization. For example, when creating an ECS service in the application, the service is not readily accessible immediately after creation completes (after creation time). To ensure the ECS service is available to use, CloudFormation performs additional verification checks defined specifically for ECS service resources. Resource stabilization is not unique to CloudFormation and must be handled to some degree by all IaC tools.
Stabilization Criteria and Stabilization Timeout
For CloudFormation to mark a resource as CREATE_COMPLETE, the resource must meet specific stabilization criteria called stabilization parameters. These checks validate that the resource is not only created but also ready for use.
If a resource fails to meet its stabilization parameters within the allowed stabilization timeout period, CloudFormation will mark the resource status as CREATE_FAILED and roll back the operation. Stabilization criteria and timeouts are defined uniquely for each AWS resource supported in CloudFormation by the service, and are applied during both resource create and update workflows.
AWS CloudFormation vs AWS CLI to provision resources
Now, you will create a similar ECS service using the AWS CLI. You can use the following AWS CLI command to deploy an ECS service using the same task definition, ECS cluster and VPC resources created earlier using CloudFormation.
The following snippet from the output of the above command shows that the ECS Service has been successfully created and its status is ACTIVE.
Figure 3. Snapshot of the ECS service API call
However, when you navigate to the ECS console and review the service, tasks are still in the Pending state, and you are unable to access the application.
Figure 4. ECS console view
You have to wait for the service to reach a steady state before you can successfully access the application.
Figure 5. ECS service events from the AWS console
When you create the same ECS service using AWS CloudFormation, the service is accessible immediately after the resource reaches a status of CREATE_COMPLETE in the stack. This reliable availability is due to CloudFormation’s resource stabilization process. After initially creating the ECS service, CloudFormation waits and continues calling the ECS DescribeServices API action until the service reaches a steady state. Once the ECS service passes its consistency checks and is fully ready for use, only then will CloudFormation mark the resource status as CREATE_COMPLETE in the stack. This creation and stabilization orchestration allows you to access the service right away without any further delays.
The following is an AWS CloudTrail snippet of CloudFormation performing DescribeServices API calls during Stabilization:
Figure 6. Snapshot of AWS CloudTrail event
By handling resource stabilization natively, CloudFormation saves you the extra coding effort and complexity of having to implement custom status checks and availability polling logic after resource creation. You would have to develop this additional logic using tools like the AWS CLI or API across all the infrastructure and application resources. With CloudFormation’s built-in stabilization orchestration, you can deploy the template once and trust that the services will be fully ready after creation, allowing you to focus on developing your application functionality.
Evolution of Stabilization Strategy
CloudFormation’s stabilization strategy couples resource creation with stabilization such that the provisioning of a resource is not considered COMPLETE until stabilization is complete.
Historic Stabilization Strategy
For resources that have no interdependencies, CloudFormation starts the provisioning process in parallel. However, if a resource depends on another resource, CloudFormation will wait for the entire resource provisioning operation of the dependency resource to complete before starting the provisioning of the dependent resource.
The diagram above shows a deployment of some of the ECS application resources that you deploy using AWS CloudFormation. The Task Definition (AWS::ECS::TaskDefinition) resource depends on the ECR Repository (AWS::ECR::Repository) resource, and the ECS Service (AWS::ECS:Service) resource depends on both the Task Definition and ECS Cluster (AWS::ECS::Cluster) resources. The ECS Cluster resource has no dependencies defined. CloudFormation initiates creation of the ECR Repository and ECS Cluster resources in parallel. It then waits for the ECR Repository to complete consistency checks before starting provisioning of the Task Definition resource. Similarly, creation of the ECS Service resource begins only when the Task Definition and ECS Cluster resources have been created and are ready. This sequential approach ensures safety and stability but causes delays. CloudFormation strictly deploys dependent resources one after the other, slowing down deployment of the entire stack. As the number of interdependent resources grows, the overall stack deployment time increases, creating a bottleneck that prolongs the whole stack operation.
New Optimistic Stabilization Strategy
To improve stack provisioning times and deployment performance, AWS CloudFormation recently launched a new optimistic stabilization strategy. The optimistic strategy can reduce customer stack deployment duration by up to 40%. It allows dependent resources to be created in parallel. This concurrent resource creation helps significantly improve deployment speed.
Figure 8. CloudFormation’s new optimistic stabilization strategy
The diagram above shows deployment of the same 4 resources discussed in the historic strategy. The Task Definition (AWS::ECS::TaskDefinition) resource depends on the ECR Repository (AWS::ECR::Repository) resource, and the ECS Service (AWS::ECS:Service) resource depends on both the Task Definition and ECS Cluster (AWS::ECS::Cluster) resources. The ECS Cluster resource has no dependencies defined. CloudFormation initiates creation of the ECR Repository and ECS Cluster resources in parallel. Then, instead of waiting for the ECR Repository to complete consistency checks, it starts creating the Task Definition when the ECR Repository completes creation, but before stabilization is complete. Similarly, creation of the ECS Service resource begins after Task Definition and ECS Cluster creation. The change was made because not all resources require their dependent resources to complete consistency checks before starting creation. If the ECS Service fails to provision because the Task Definition or ECS Cluster resources are still undergoing consistency checks, CloudFormation will wait for those dependencies to complete their consistency checks before attempting to create the ECS Service again.
Figure 9. CloudFormation’s new stabilization strategy with the retry capability
This parallel creation of dependent resources with automatic retry capabilities results in faster deployment times compared to the historical linear resource provisioning strategy. The Optimistic stabilization strategy currently applies only to create workflows with resources that have implicit dependencies. For resources with an explicit dependency, CloudFormation leverages the historic strategy in deploying resources.
Improved Visibility into Resource Provisioning
When creating a CloudFormation stack, a resource can sometimes take longer to provision, making it appear as if it’s stuck in an IN_PROGRESS state. This can be because CloudFormation is waiting for the resource to complete consistency checks during its resource stabilization step. To improve visibility into resource provisioning status, CloudFormation has introduced a new “CONFIGURATION_COMPLETE” event. This event is emitted at both the individual resource level and the overall stack level during create workflow when resource(s) creation or configuration is complete, but stabilization is still in progress.
Figure 10. CloudFormation stack events of the ECS Application
The above diagram shows the snapshot of stack events of the ECS application’s CloudFormation stack named ECSApplication. Observe the events from the bottom to top:
At 10:46:08 UTC-0600, ECSService (AWS::ECS::Service) resource creation was initiated.
At 10:46:09 UTC-0600, the ECSService has CREATE_IN_PROGRESS status in the Status tab and CONFIGURATION_COMPLETE status in the Detailed status tab, meaning the resource was successfully created and the consistency check was initiated.
At 10:46:09 UTC-0600, the stack ECSApplication has CREATE_IN_PROGRESS status in the Status tab and CONFIGURATION_COMPLETE status in the Detailed status tab, meaning all the resources in the ECSApplication stack are successfully created and are going through stabilization. This stack level CONFIGURATION_COMPLETE status can also be viewed in the stack’s Overview tab.
Figure 11. CloudFormation Overview tab for the ECSApplication stack
At 10:47:09 UTC-0600, the ECSService has CREATE_COMPLETE status in the Status tab, meaning the service is created and completed consistency checks.
At 10:47:10 UTC-0600, ECSApplication has CREATE_COMPLETE status in the Status tab, meaning all the resources are successfully created and completed consistency checks.
Conclusion:
In this post, I hope you gained some insights into how CloudFormation deploys resources and the various time factors that contribute to the creation of a stack and its resources. You also took a deeper look into what CloudFormation does under the hood with resource stabilization and how it ensures the safe, consistent, and reliable provisioning of resources in critical, high-availability production infrastructure deployments. Finally, you learned about the new optimistic stabilization strategy to shorten stack deployment times and improve visibility into resource provisioning.
Today customers want to reduce manual operations for deploying and maintaining their infrastructure. The recommended method to deploy and manage infrastructure on AWS is to follow Infrastructure-As-Code (IaC) model using tools like AWS CloudFormation, AWS Cloud Development Kit (AWS CDK) or Terraform.
One of the critical components in terraform is managing the state file which keeps track of your configuration and resources. When you run terraform in an AWS CI/CD pipeline the state file has to be stored in a secured, common path to which the pipeline has access to. You need a mechanism to lock it when multiple developers in the team want to access it at the same time.
In this blog post, we will explain how to manage terraform state files in AWS, best practices on configuring them in AWS and an example of how you can manage it efficiently in your Continuous Integration pipeline in AWS when used with AWS Developer Tools such as AWS CodeCommit and AWS CodeBuild. This blog post assumes you have a basic knowledge of terraform, AWS Developer Tools and AWS CI/CD pipeline. Let’s dive in!
Challenges with handling state files
By default, the state file is stored locally where terraform runs, which is not a problem if you are a single developer working on the deployment. However if not, it is not ideal to store state files locally as you may run into following problems:
When working in teams or collaborative environments, multiple people need access to the state file
Data in the state file is stored in plain text which may contain secrets or sensitive information
Local files can get lost, corrupted, or deleted
Best practices for handling state files
The recommended practice for managing state files is to use terraform’s built-in support for remote backends. These are:
Remote backend on Amazon Simple Storage Service (Amazon S3): You can configure terraform to store state files in an Amazon S3 bucket which provides a durable and scalable storage solution. Storing on Amazon S3 also enables collaboration that allows you to share state file with others.
Remote backend on Amazon S3 with Amazon DynamoDB: In addition to using an Amazon S3 bucket for managing the files, you can use an Amazon DynamoDB table to lock the state file. This will allow only one person to modify a particular state file at any given time. It will help to avoid conflicts and enable safe concurrent access to the state file.
There are other options available as well such as remote backend on terraform cloud and third party backends. Ultimately, the best method for managing terraform state files on AWS will depend on your specific requirements.
When deploying terraform on AWS, the preferred choice of managing state is using Amazon S3 with Amazon DynamoDB.
AWS configurations for managing state files
Create an Amazon S3 bucket using terraform. Implement security measures for Amazon S3 bucket by creating an AWS Identity and Access Management (AWS IAM) policy or Amazon S3 Bucket Policy. Thus you can restrict access, configure object versioning for data protection and recovery, and enable AES256 encryption with SSE-KMS for encryption control.
Next create an Amazon DynamoDB table using terraform with Primary key set to LockID. You can also set any additional configuration options such as read/write capacity units. Once the table is created, you will configure the terraform backend to use it for state locking by specifying the table name in the terraform block of your configuration.
For a single AWS account with multiple environments and projects, you can use a single Amazon S3 bucket. If you have multiple applications in multiple environments across multiple AWS accounts, you can create one Amazon S3 bucket for each account. In that Amazon S3 bucket, you can create appropriate folders for each environment, storing project state files with specific prefixes.
Now that you know how to handle terraform state files on AWS, let’s look at an example of how you can configure them in a Continuous Integration pipeline in AWS.
Architecture
Figure 1: Example architecture on how to use terraform in an AWS CI pipeline
This diagram outlines the workflow implemented in this blog:
The AWS CodeCommit repository contains the application code
The AWS CodeBuild job contains the buildspec files and references the source code in AWS CodeCommit
The AWS Lambda function contains the application code created after running terraform apply
Amazon S3 contains the state file created after running terraform apply. Amazon DynamoDB locks the state file present in Amazon S3
Implementation
Pre-requisites
Before you begin, you must complete the following prerequisites:
Install the latest version of AWS Command Line Interface (AWS CLI)
After cloning, you could see the following folder structure:
Figure 2: AWS CodeCommit repository structure
Let’s break down the terraform code into 2 parts – one for preparing the infrastructure and another for preparing the application.
Preparing the Infrastructure
The main.tf file is the core component that does below:
It creates an Amazon S3 bucket to store the state file. We configure bucket ACL, bucket versioning and encryption so that the state file is secure.
It creates an Amazon DynamoDB table which will be used to lock the state file.
It creates two AWS CodeBuild projects, one for ‘terraform plan’ and another for ‘terraform apply’.
Note – It also has the code block (commented out by default) to create AWS Lambda which you will use at a later stage.
AWS CodeBuild projects should be able to access Amazon S3, Amazon DynamoDB, AWS CodeCommit and AWS Lambda. So, the AWS IAM role with appropriate permissions required to access these resources are created via iam.tf file.
Next you will find two buildspec files named buildspec-plan.yaml and buildspec-apply.yaml that will execute terraform commands – terraform plan and terraform apply respectively.
Modify AWS region in the provider.tf file.
Update Amazon S3 bucket name, Amazon DynamoDB table name, AWS CodeBuild compute types, AWS Lambda role and policy names to required values using variable.tf file. You can also use this file to easily customize parameters for different environments.
With this, the infrastructure setup is complete.
You can use your local terminal and execute below commands in the same order to deploy the above-mentioned resources in your AWS account.
terraform init
terraform validate
terraform plan
terraform apply
Once the apply is successful and all the above resources have been successfully deployed in your AWS account, proceed with deploying your application.
Preparing the Application
In the cloned repository, use the backend.tf file to create your own Amazon S3 backend to store the state file. By default, it will have below values. You can override them with your required values.
bucket = "tfbackend-bucket"
key    = "terraform.tfstate"
region = "eu-central-1"
The repository has sample python code stored in main.py that returns a simple message when invoked.
In the main.tf file, you can find the below block of code to create and deploy the Lambda function that uses the main.py code (uncomment these code blocks).
Now you can deploy the application using AWS CodeBuild instead of running terraform commands locally which is the whole point and advantage of using AWS CodeBuild.
Run the two AWS CodeBuild projects to execute terraform plan and terraform apply again.
Once successful, you can verify your deployment by testing the code in AWS Lambda. To test a lambda function (console):
Open AWS Lambda console and select your function “tf-codebuild”
In the navigation pane, in Code section, click Test to create a test event
Provide your required name, for example “test-lambda”
Accept default values and click Save
Click Test again to trigger your test event “test-lambda”
It should return the sample message you provided in your main.py file. In the default case, it will display “Hello from AWS Lambda !” message as shown below.
Figure 3: Sample Amazon Lambda function response
To verify your state file, go to Amazon S3 console and select the backend bucket created (tfbackend-bucket). It will contain your state file.
Figure 4: Amazon S3 bucket with terraform state file
Open Amazon DynamoDB console and check your table tfstate-lock and it will have an entry with LockID.
Figure 5: Amazon DynamoDB table with LockID
Thus, you have securely stored and locked your terraform state file using terraform backend in a Continuous Integration pipeline.
Cleanup
To delete all the resources created as part of the repository, run the below command from your terminal.
terraform destroy
Conclusion
In this blog post, we explored the fundamentals of terraform state files, discussed best practices for their secure storage within AWS environments and also mechanisms for locking these files to prevent unauthorized team access. And finally, we showed you an example of how efficiently you can manage them in a Continuous Integration pipeline in AWS.
To provide the best experiences, we use technologies like cookies to store and/or access device information. Consenting to these technologies will allow us to process data such as browsing behavior or unique IDs on this site. Not consenting or withdrawing consent, may adversely affect certain features and functions.
Functional
Always active
The technical storage or access is strictly necessary for the legitimate purpose of enabling the use of a specific service explicitly requested by the subscriber or user, or for the sole purpose of carrying out the transmission of a communication over an electronic communications network.
Preferences
The technical storage or access is necessary for the legitimate purpose of storing preferences that are not requested by the subscriber or user.
Statistics
The technical storage or access that is used exclusively for statistical purposes.The technical storage or access that is used exclusively for anonymous statistical purposes. Without a subpoena, voluntary compliance on the part of your Internet Service Provider, or additional records from a third party, information stored or retrieved for this purpose alone cannot usually be used to identify you.
Marketing
The technical storage or access is required to create user profiles to send advertising, or to track the user on a website or across several websites for similar marketing purposes.
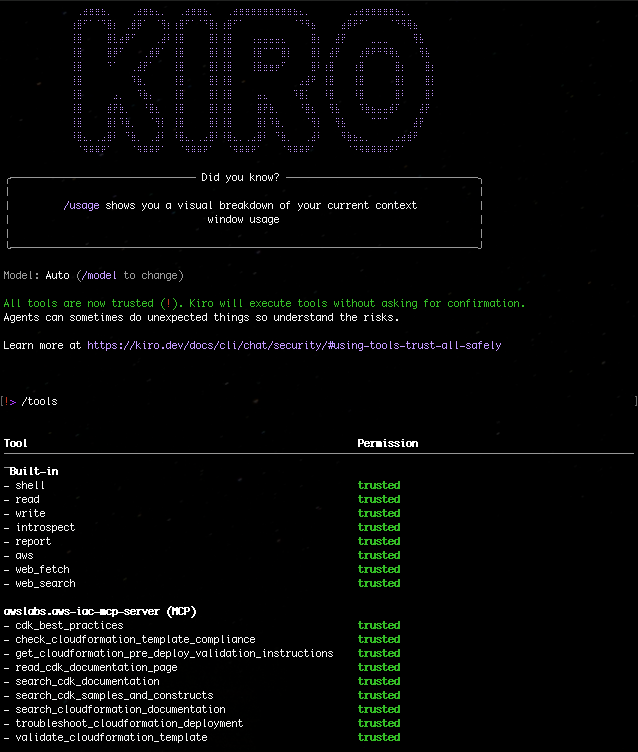
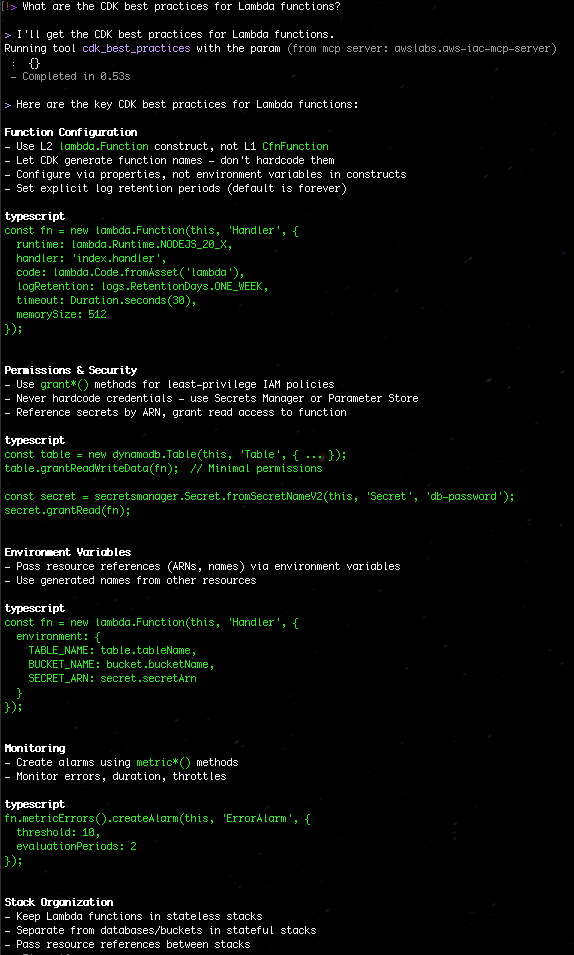

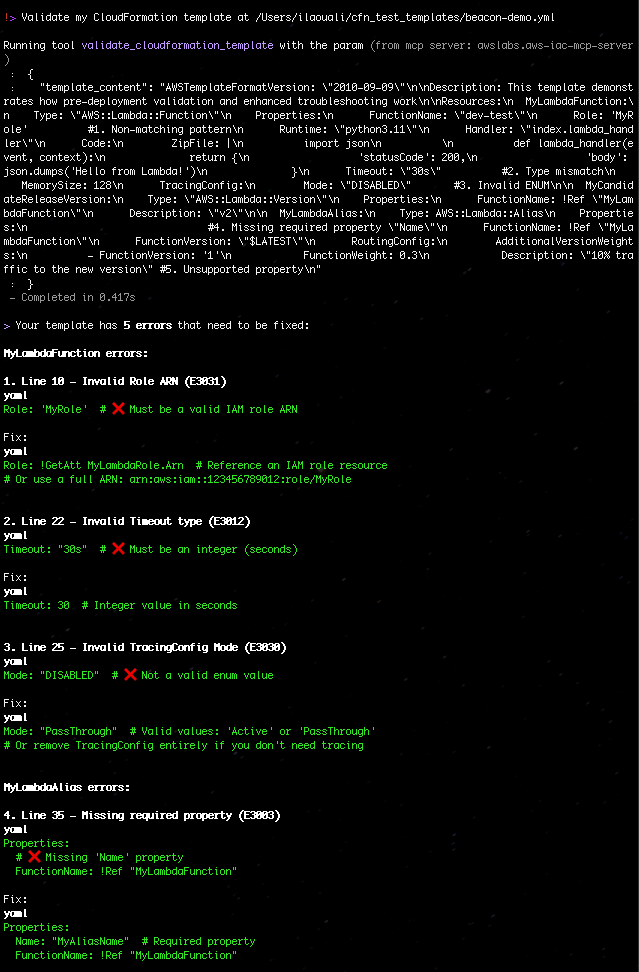
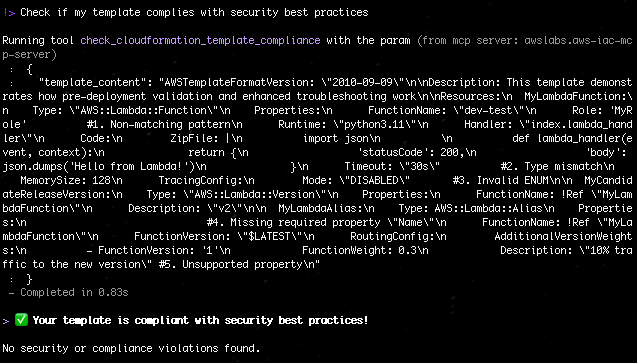
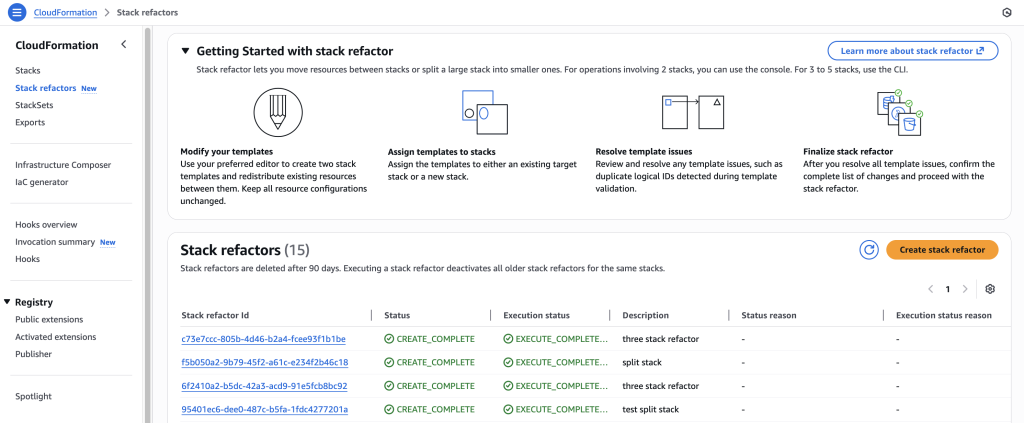
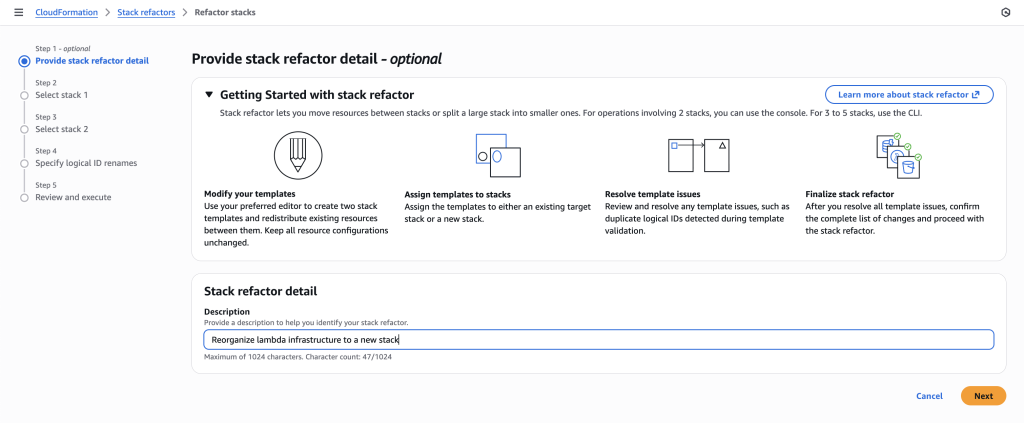
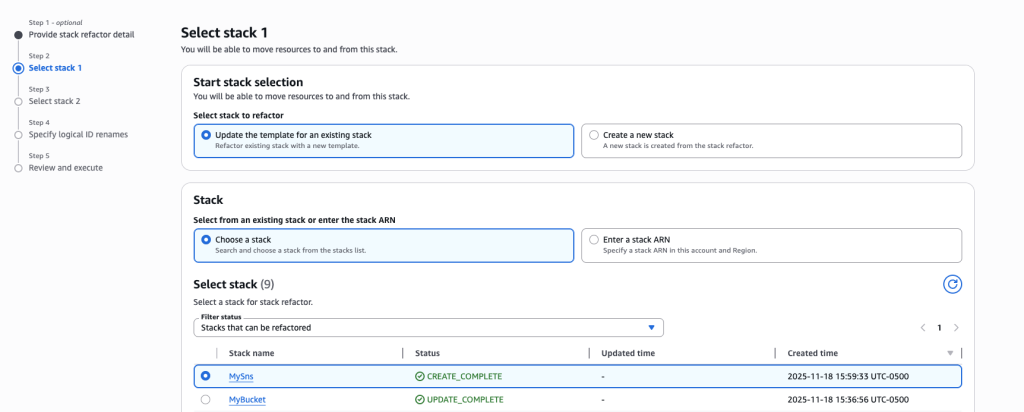
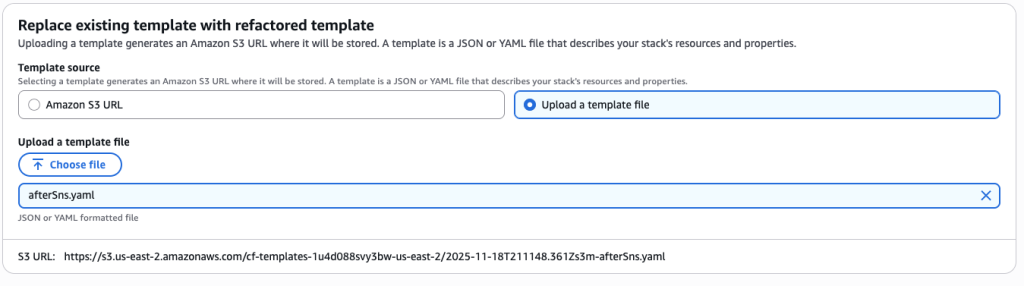
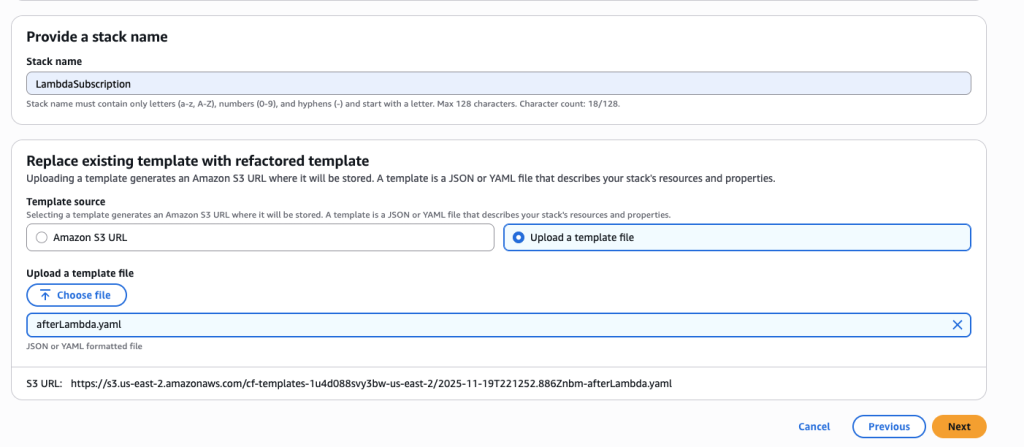 In some scenarios, CloudFormation console can automatically detect logical resource ID renames and pre-fill the mapping for you. The resource mapping is required when there are logical resource ID changes between the original stack and refactored template. Ensure that the mappings are correct before proceeding to the next step.
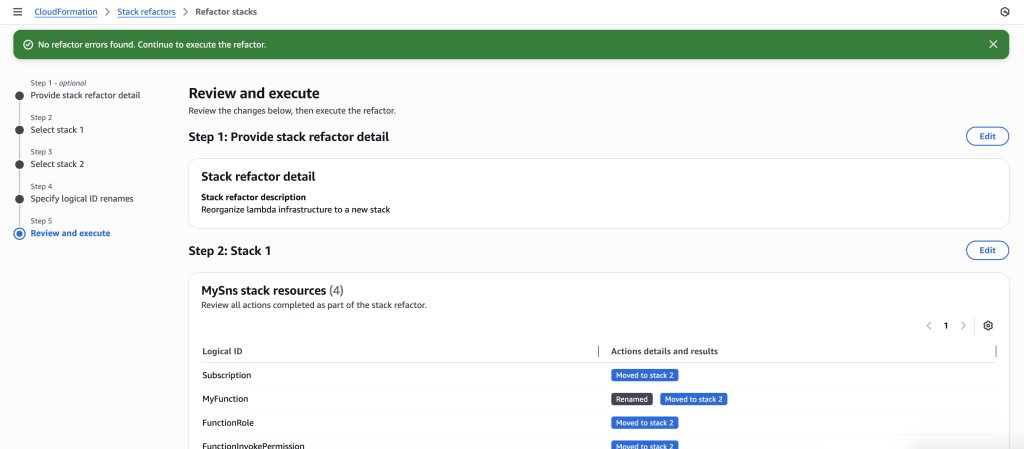
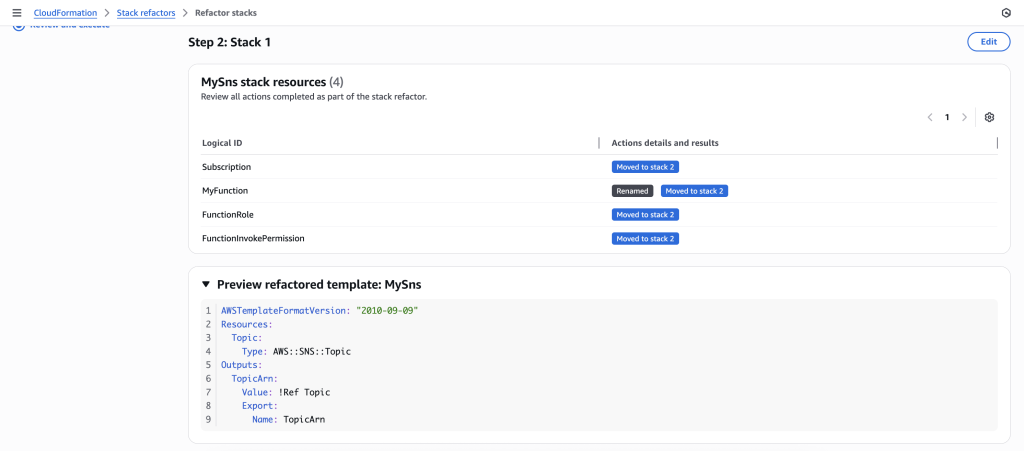


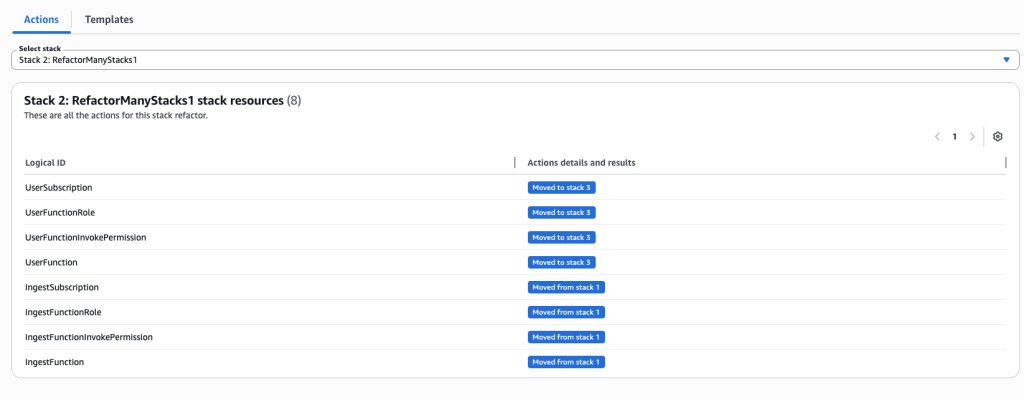
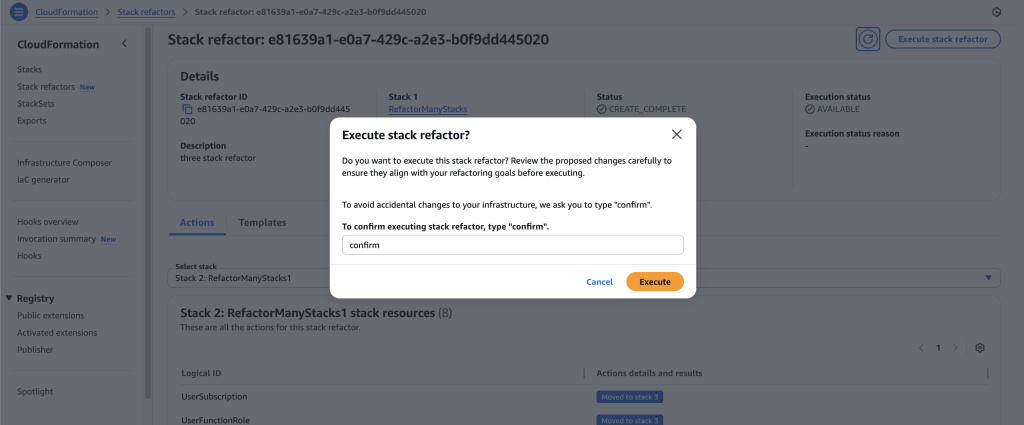
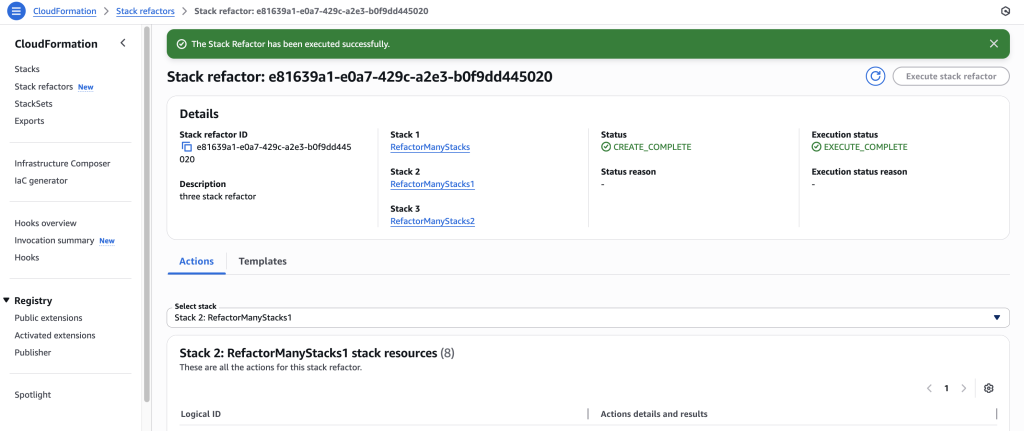
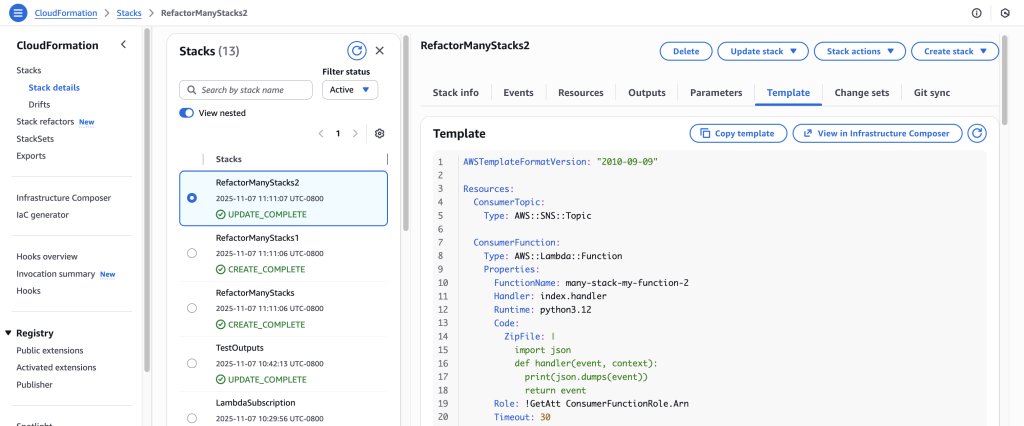

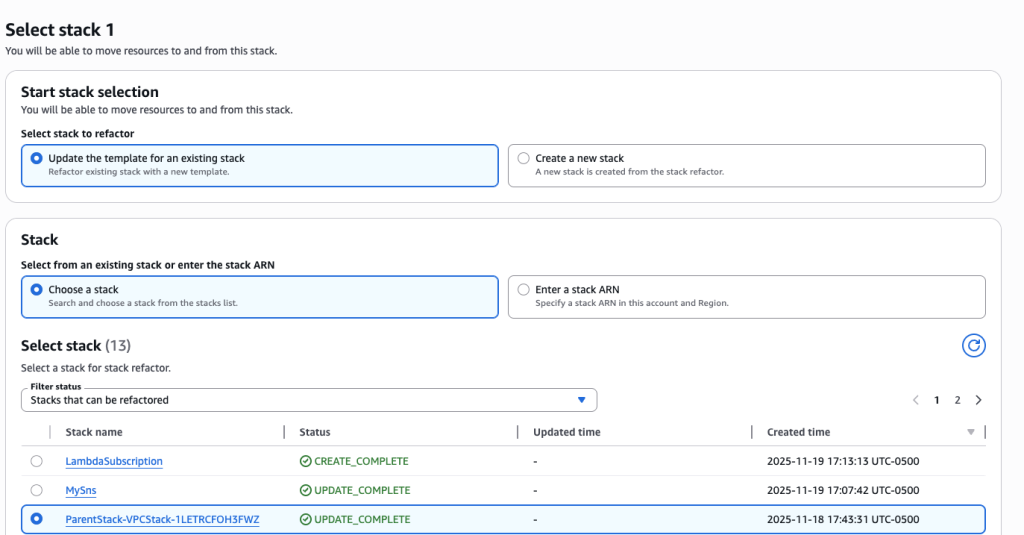
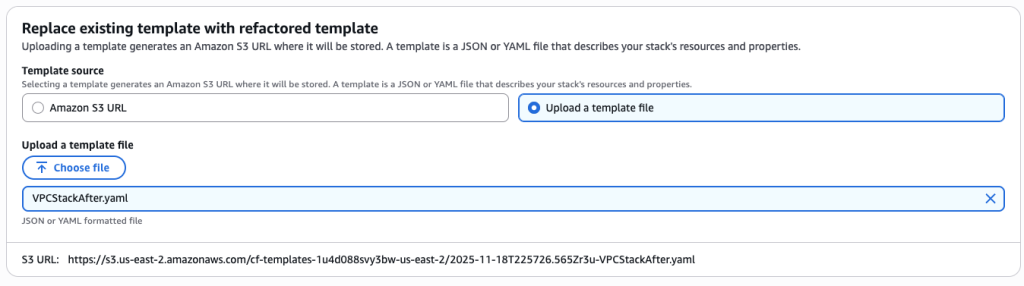
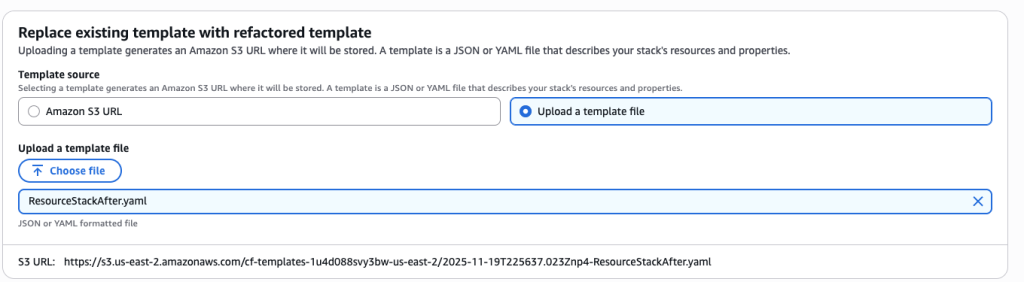
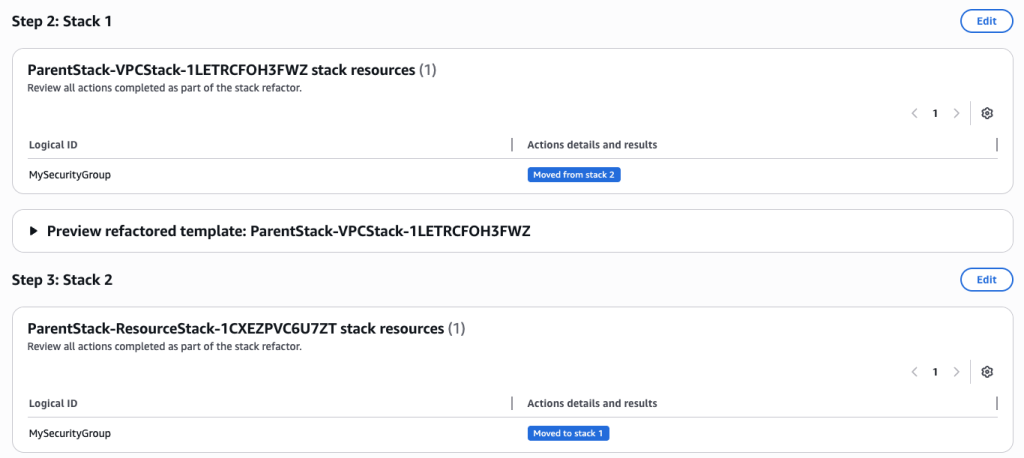
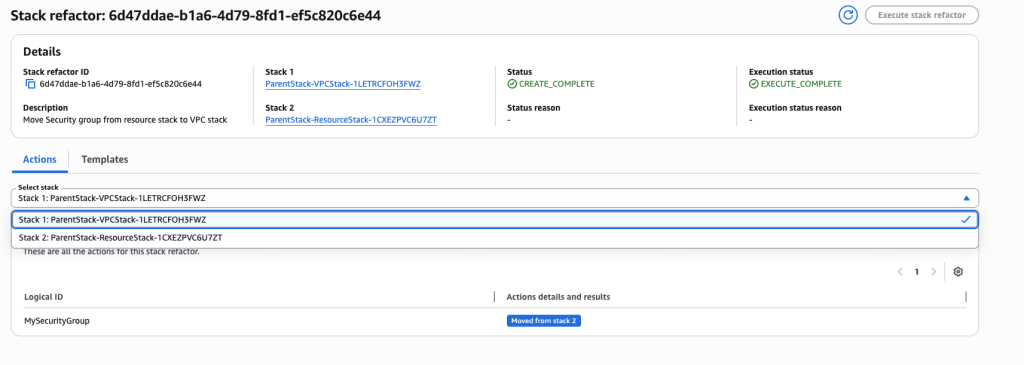
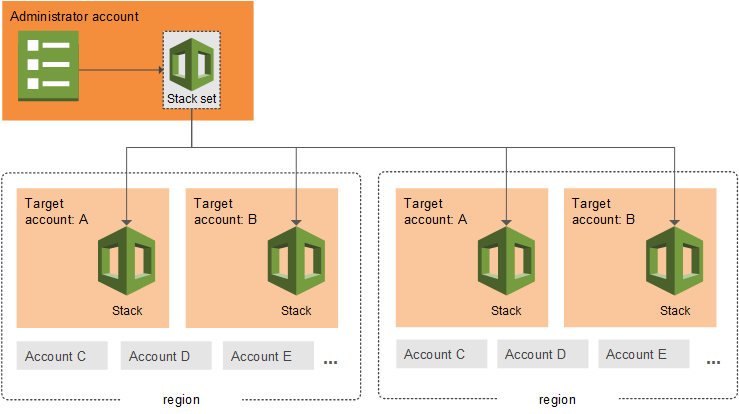
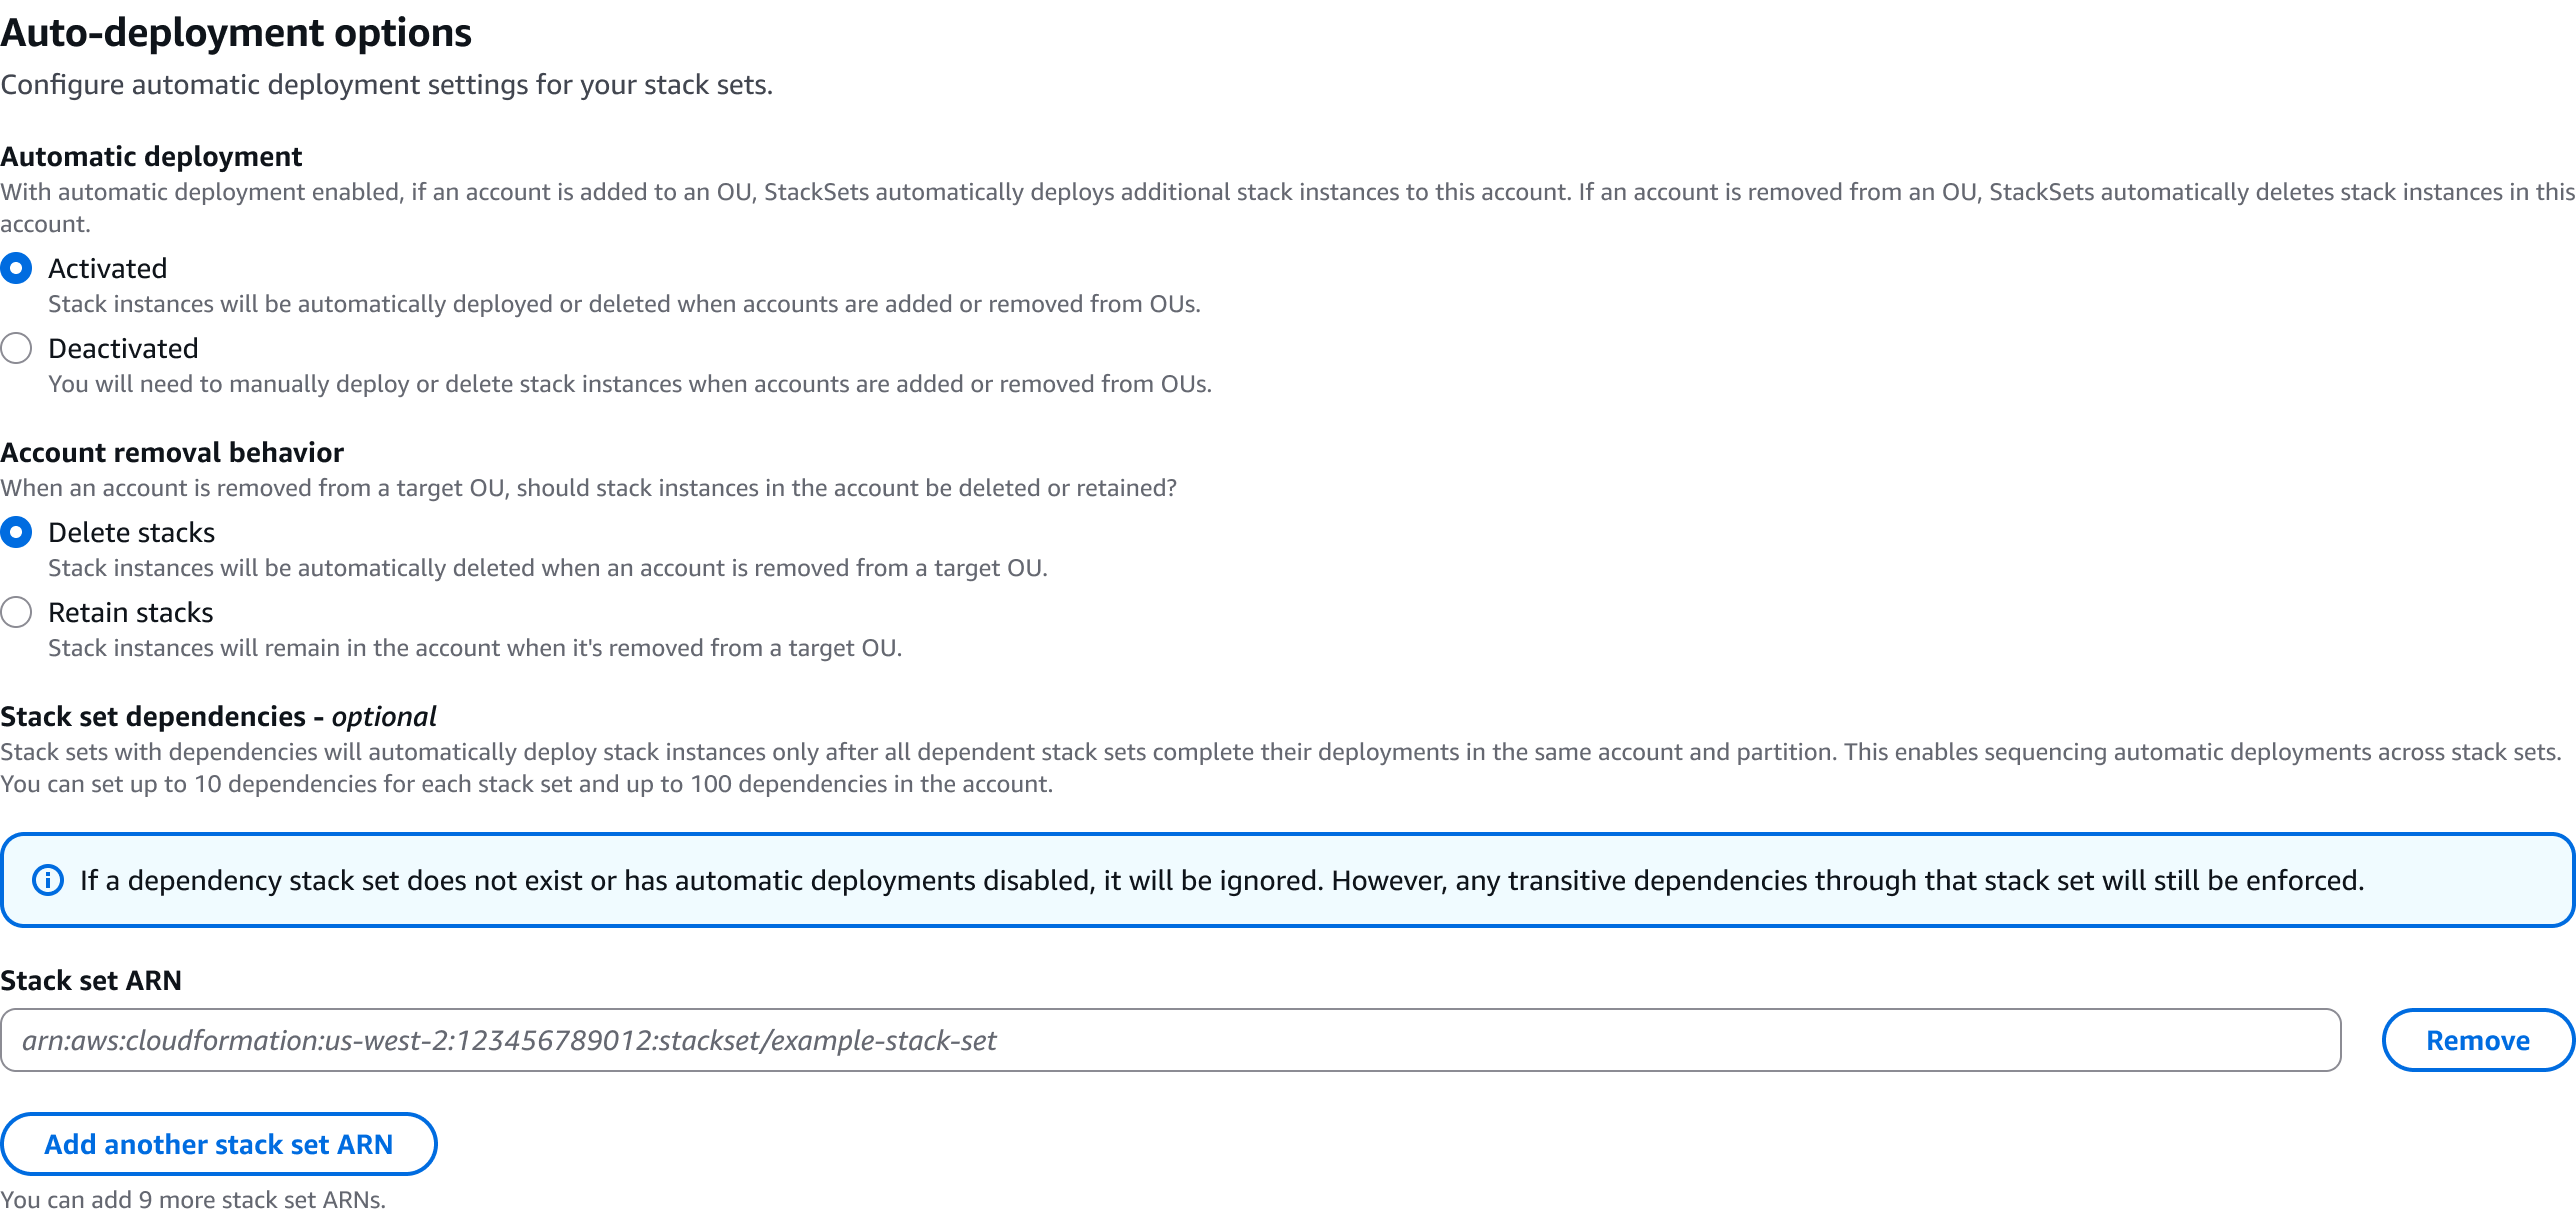


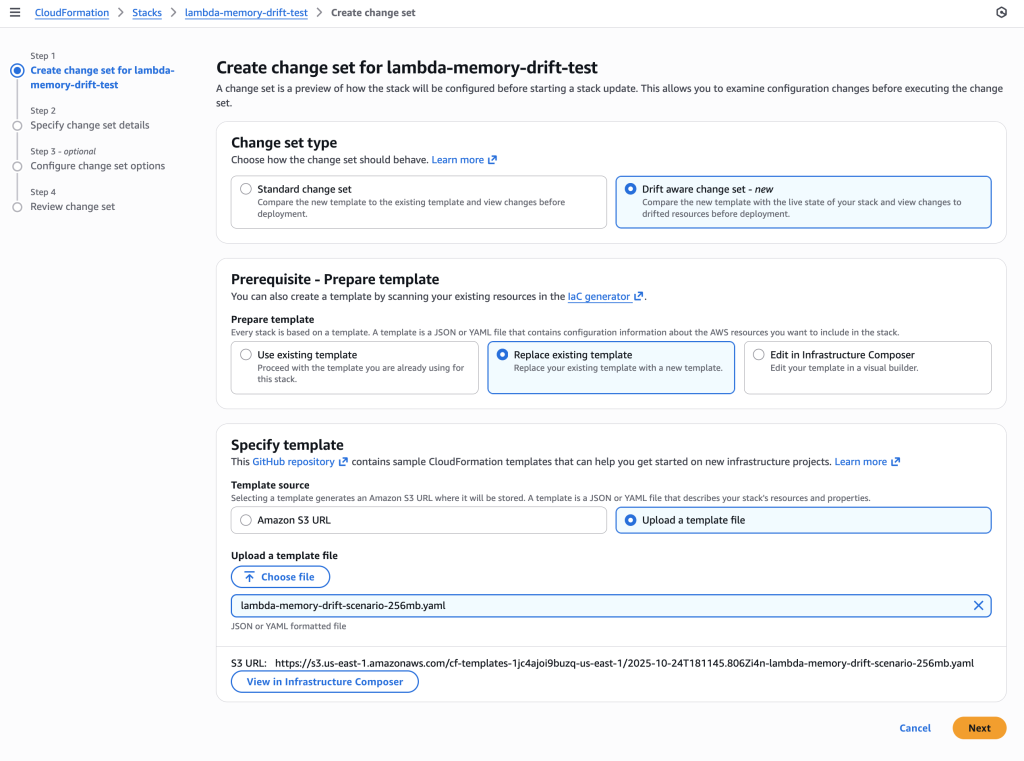
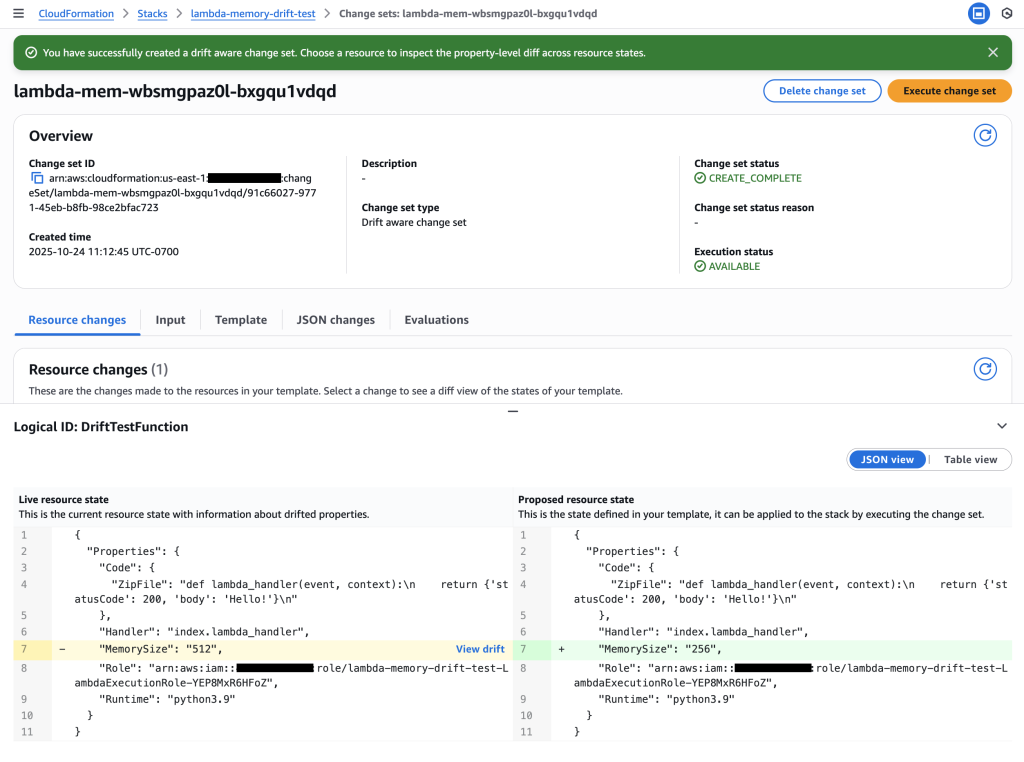
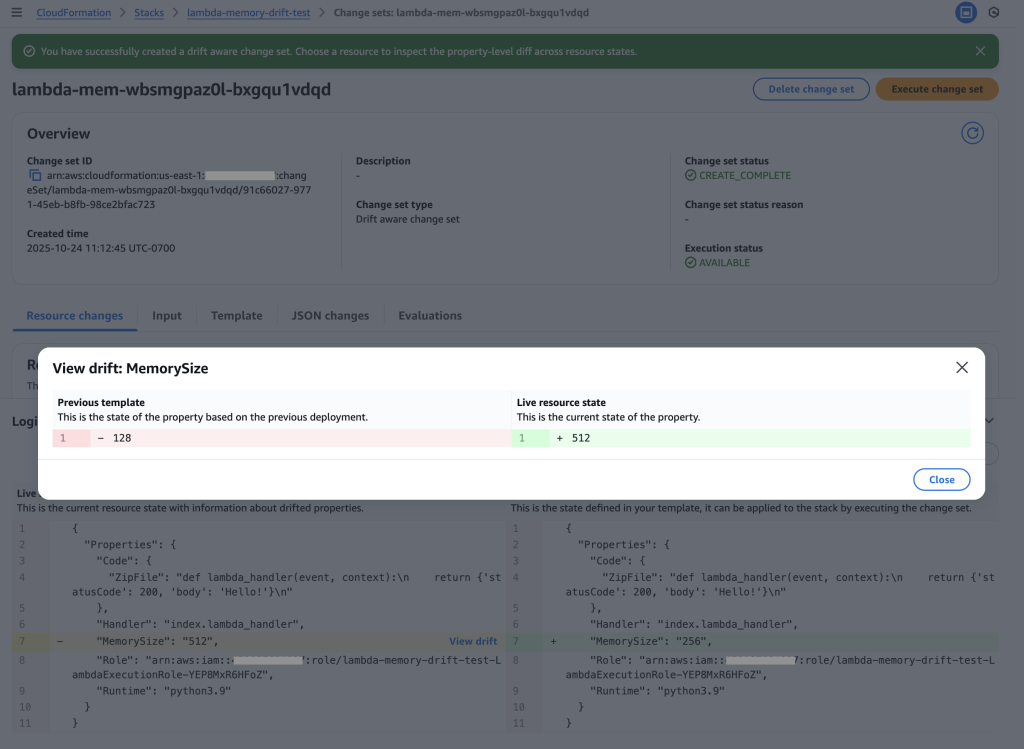
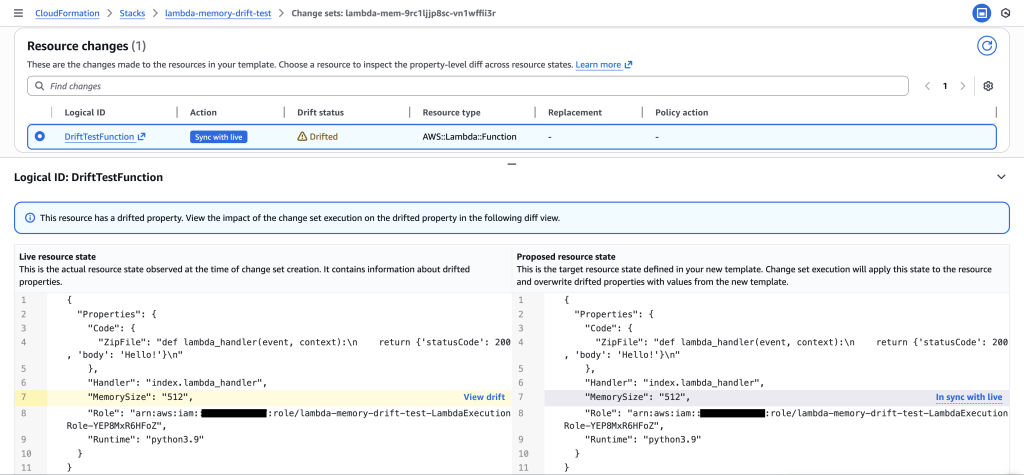
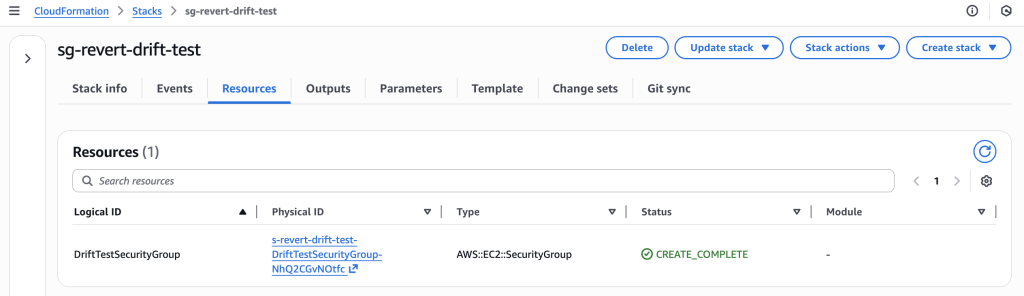
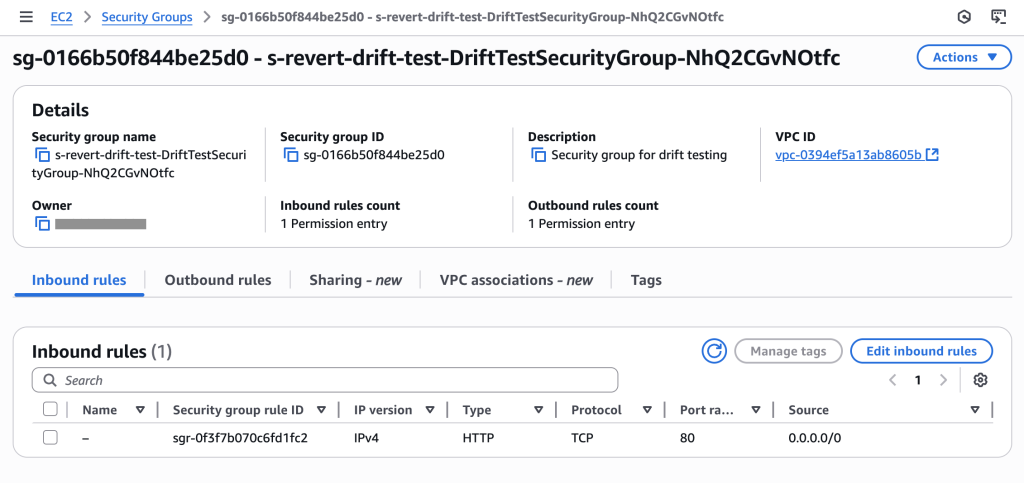
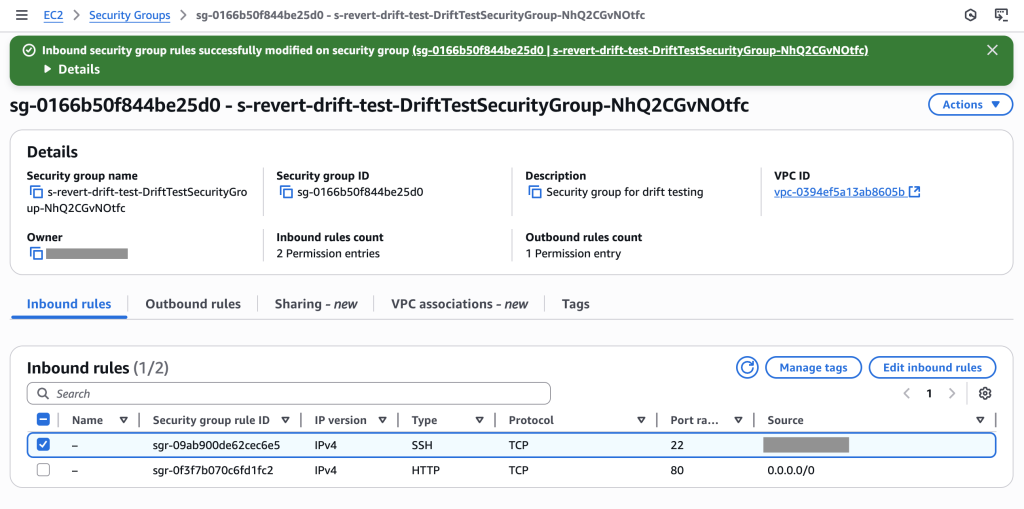
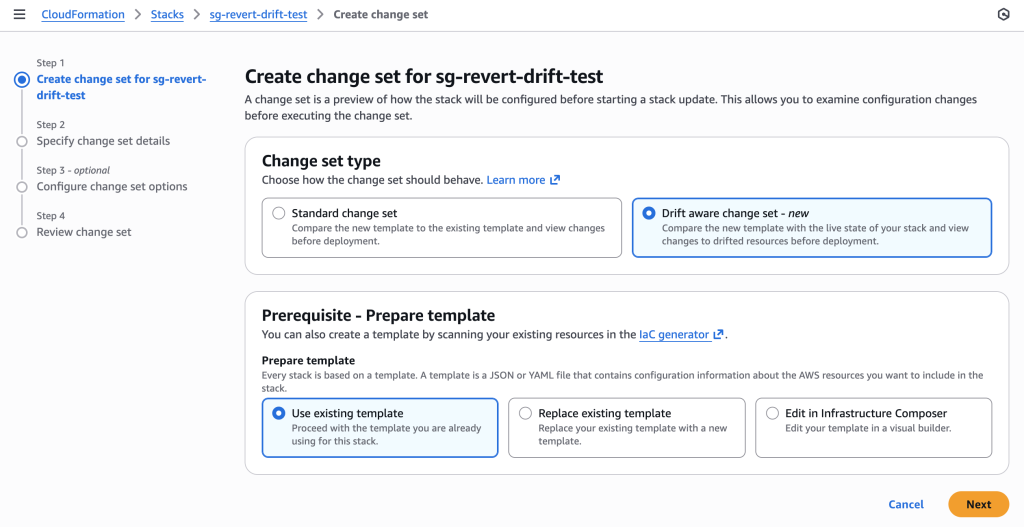
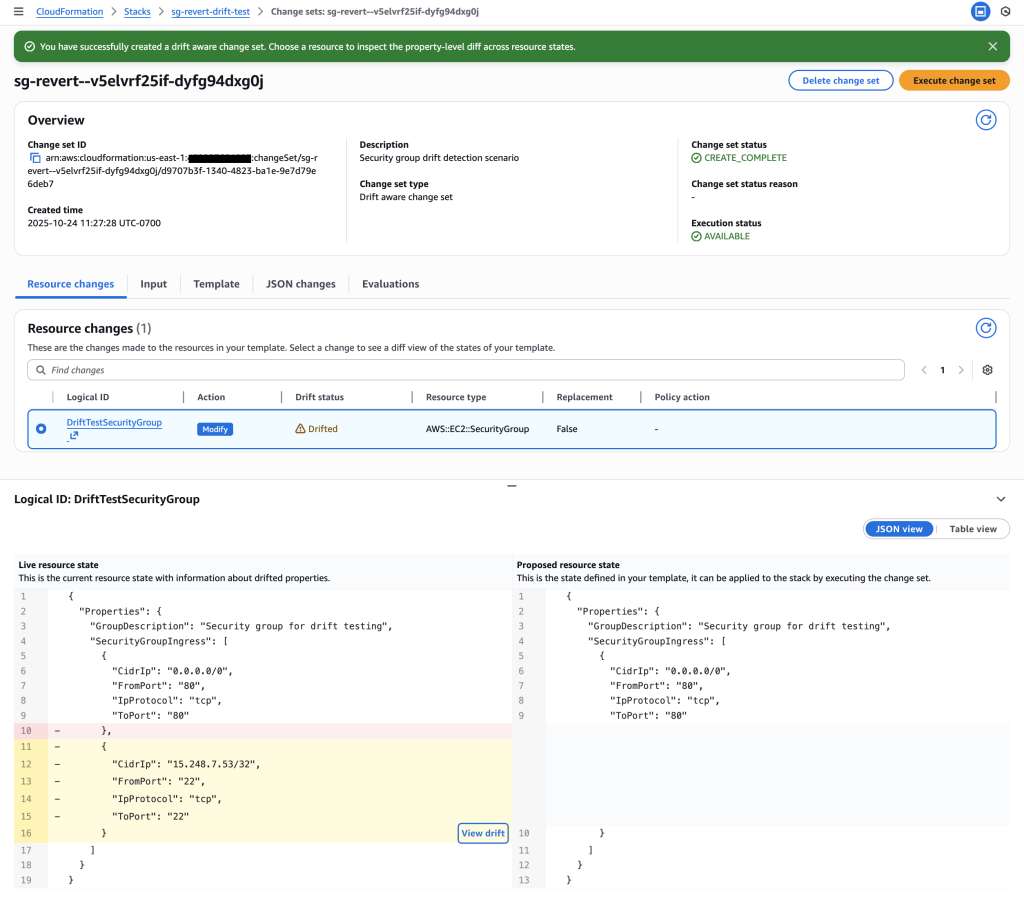
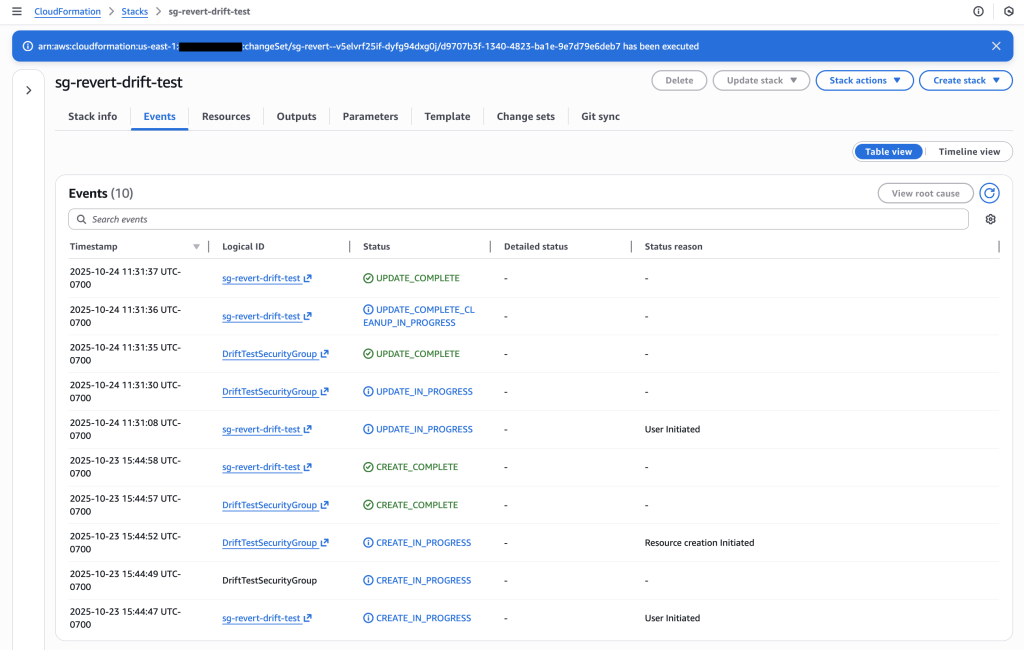

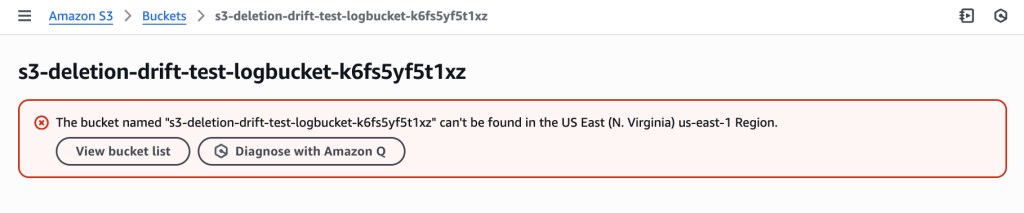

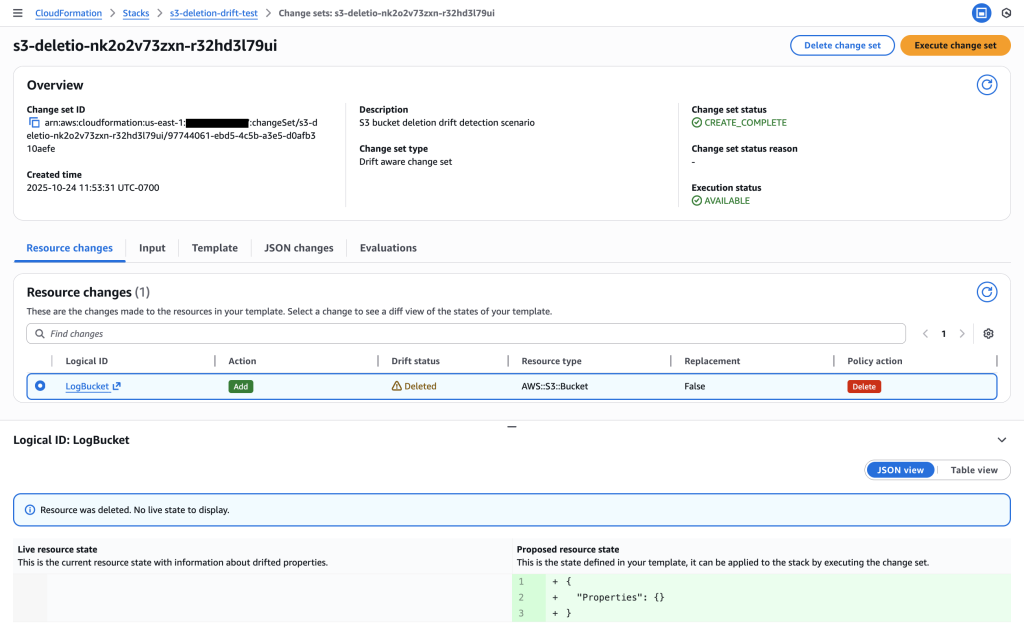
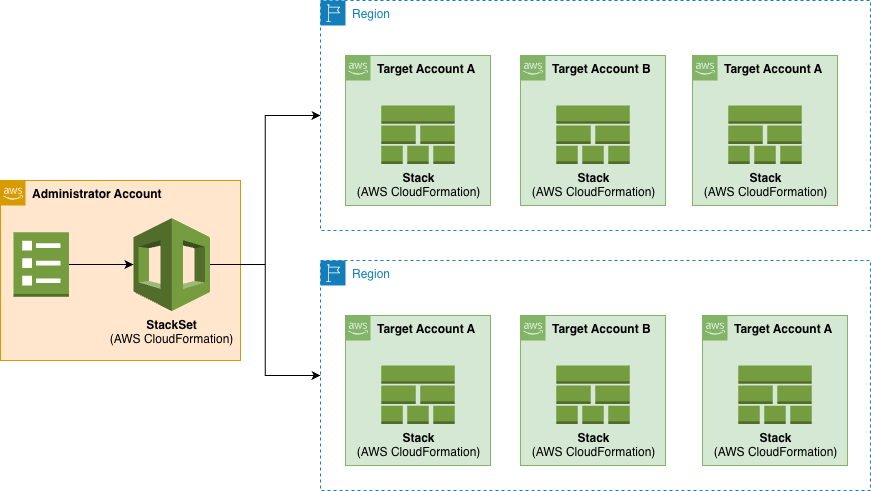
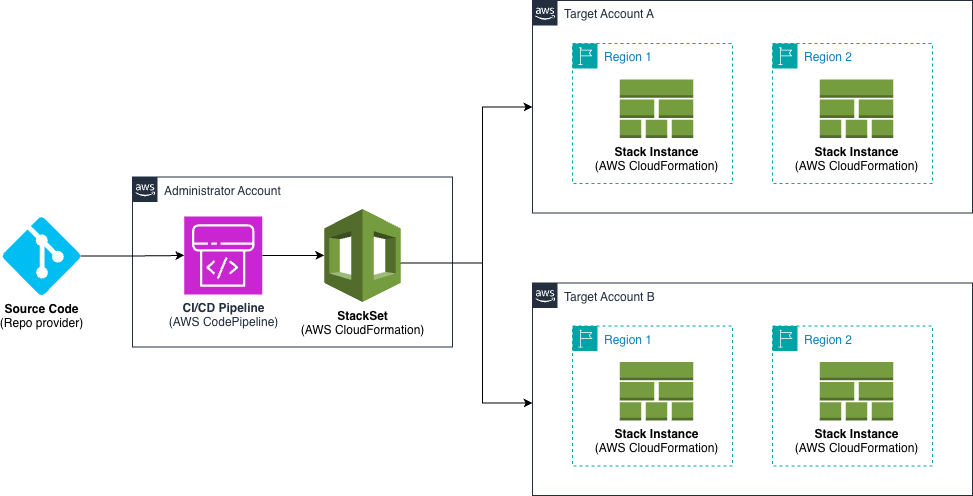
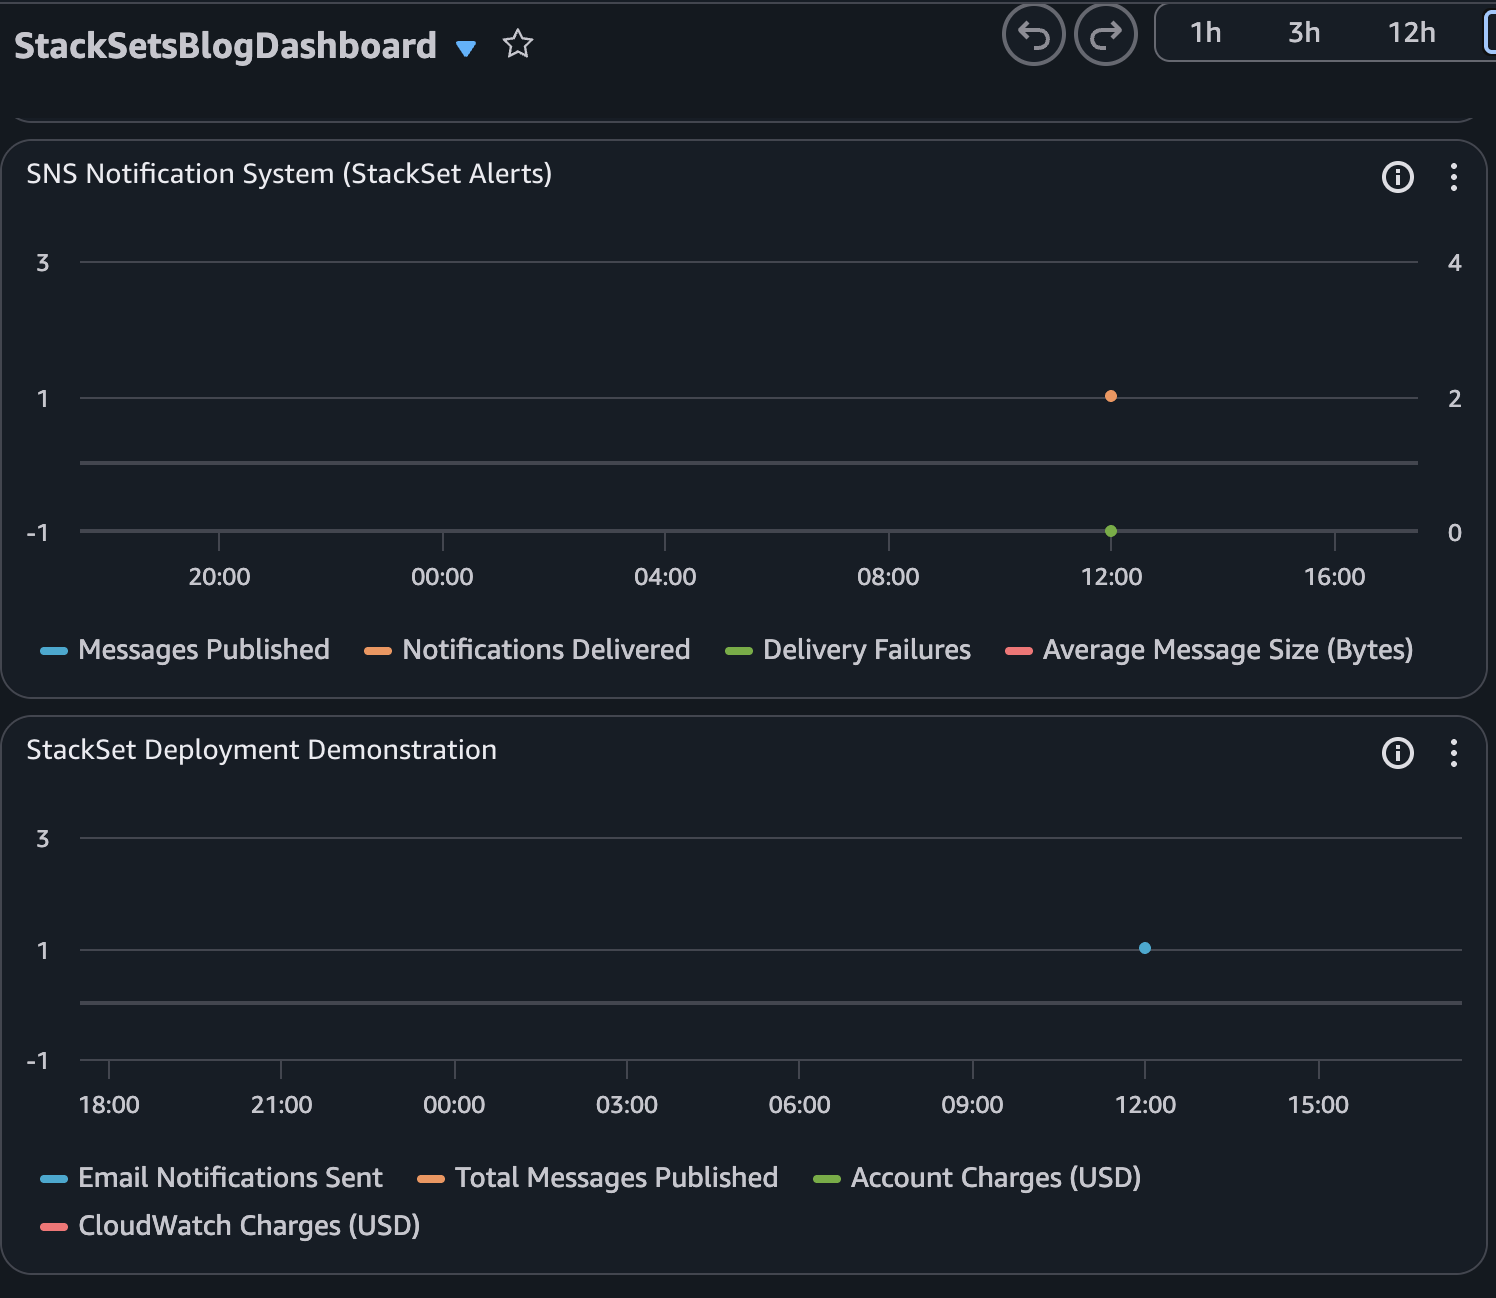
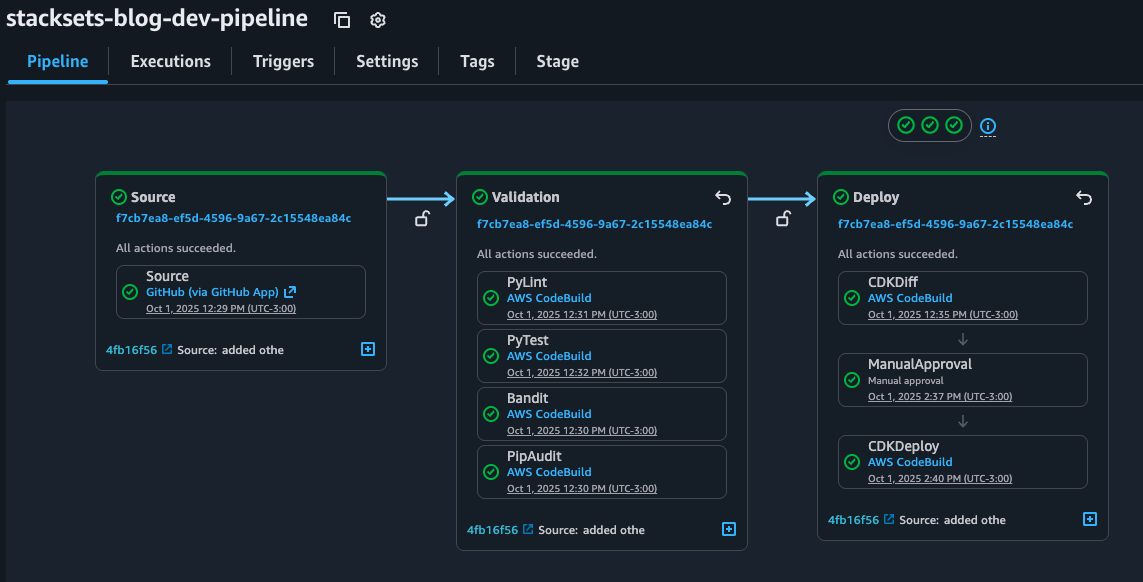
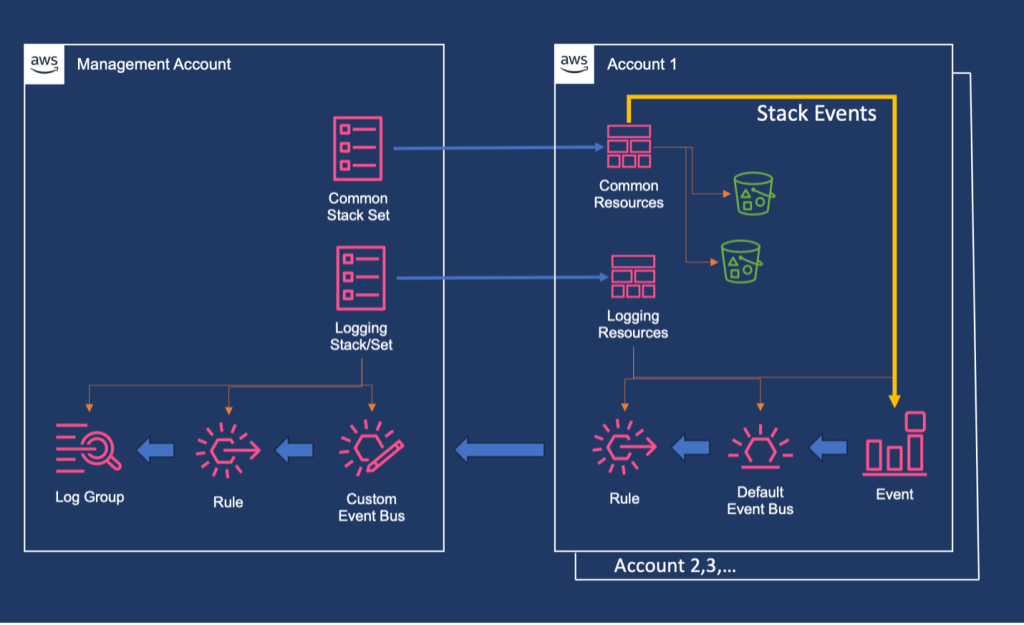
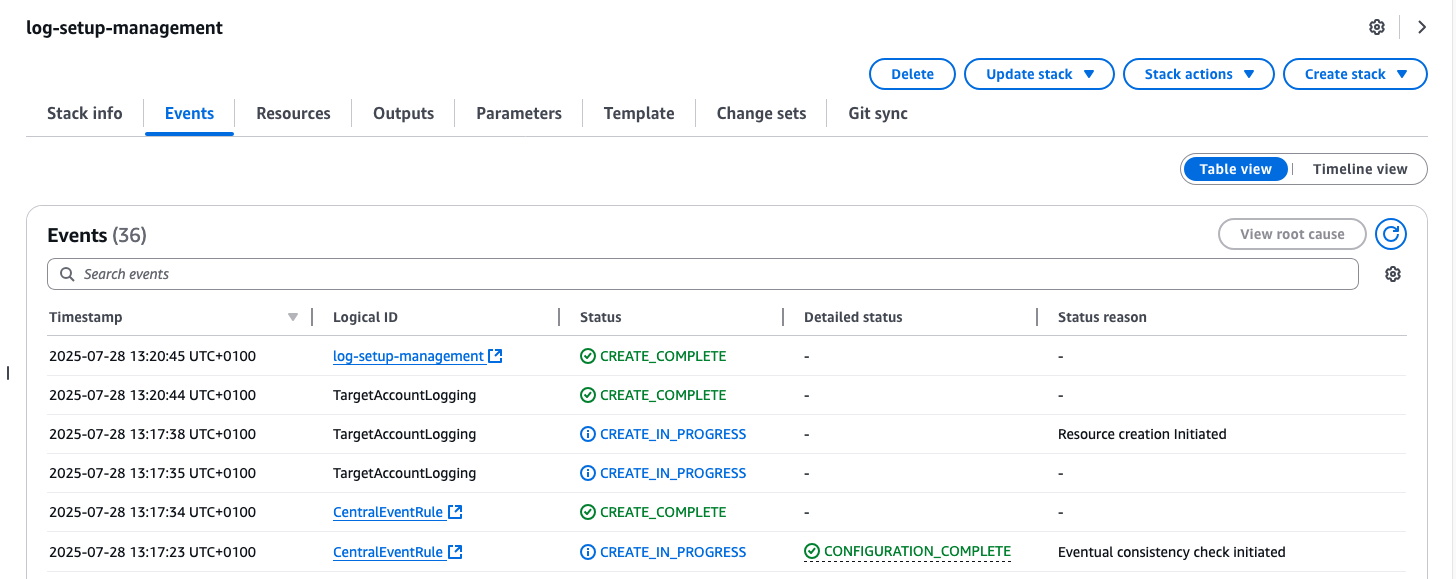
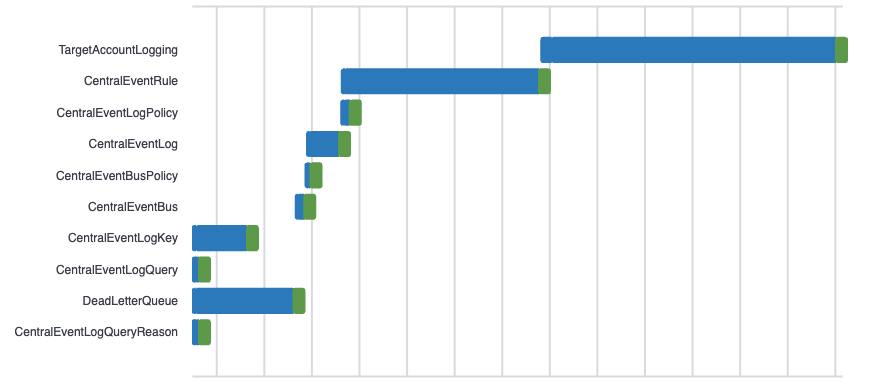
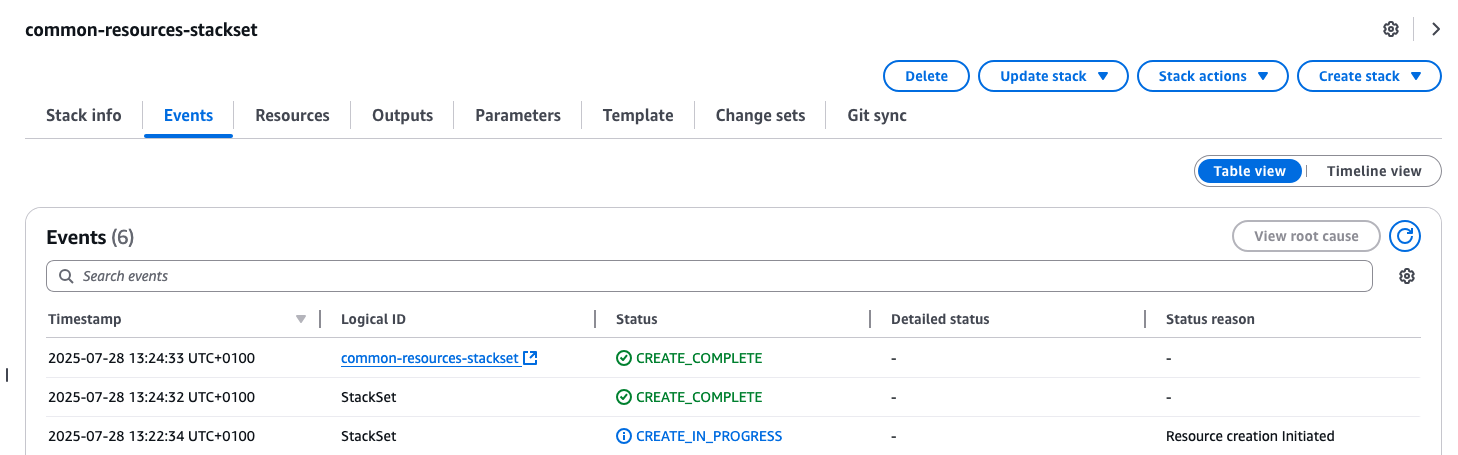
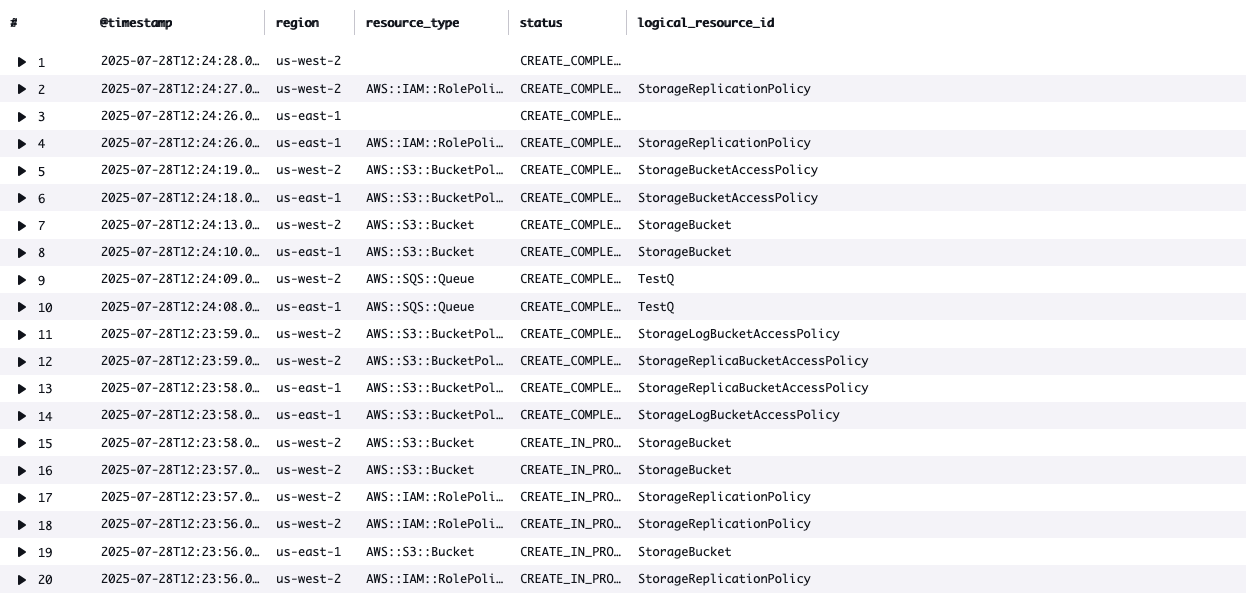
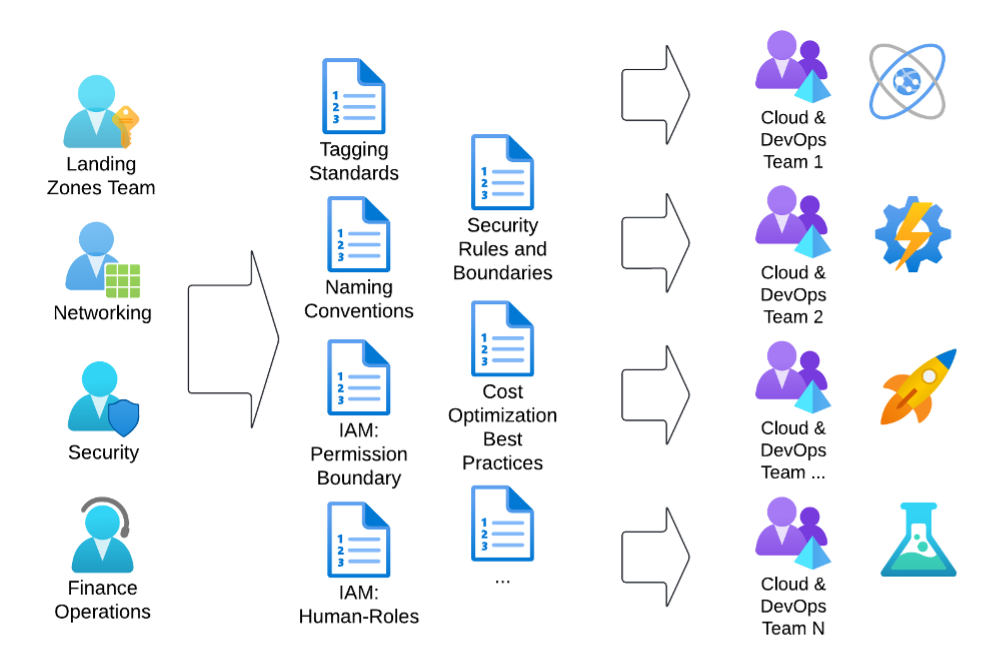
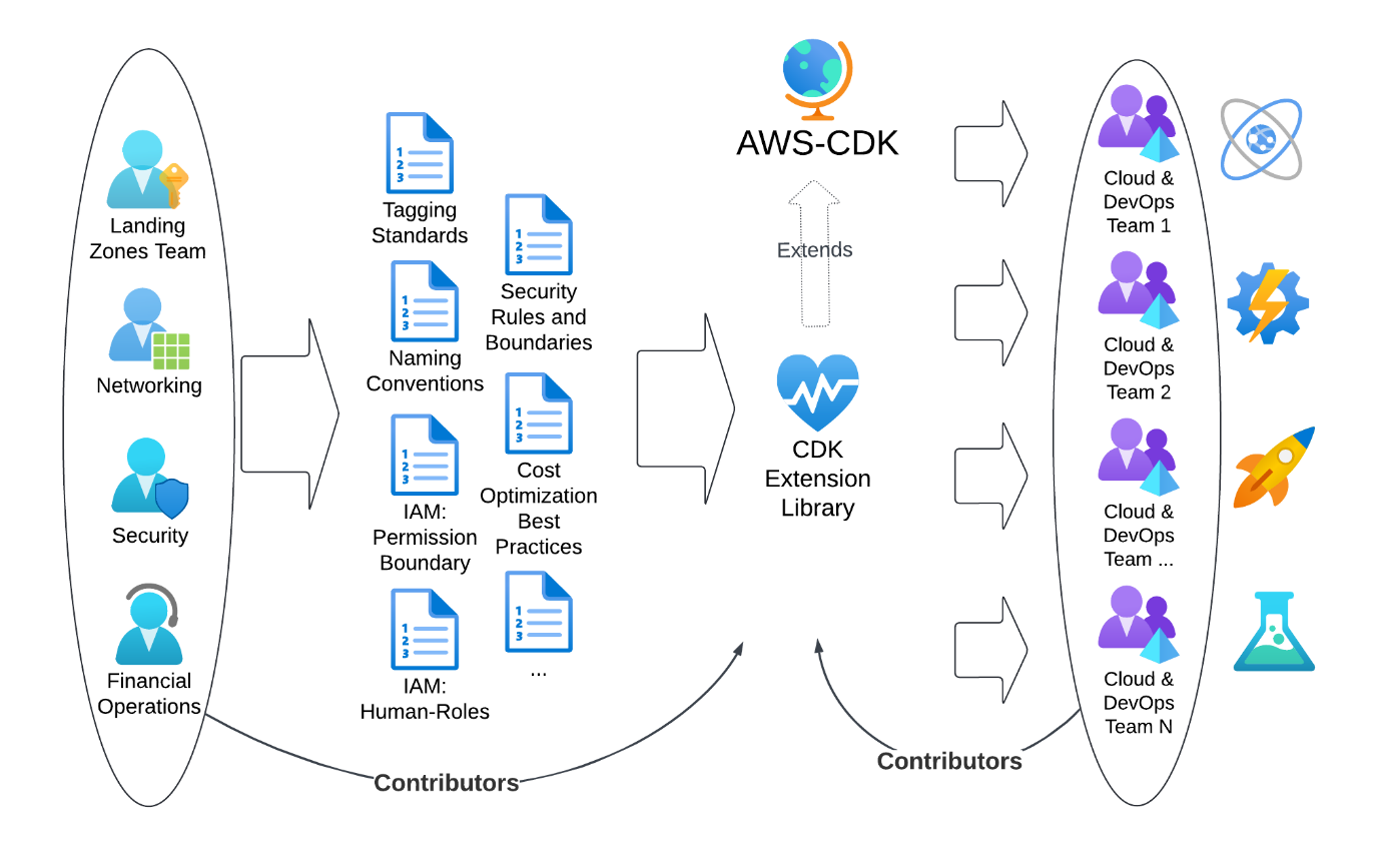
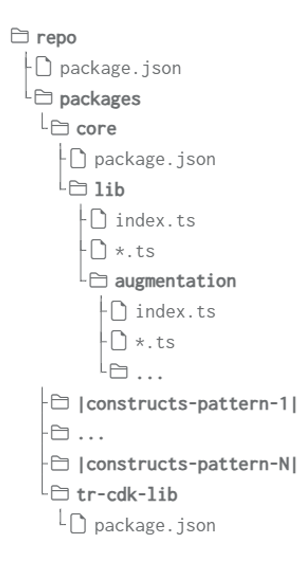
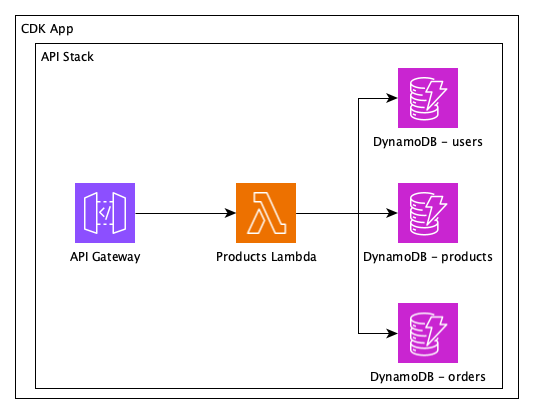
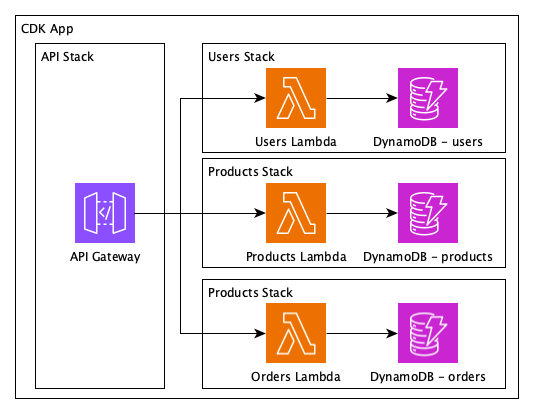
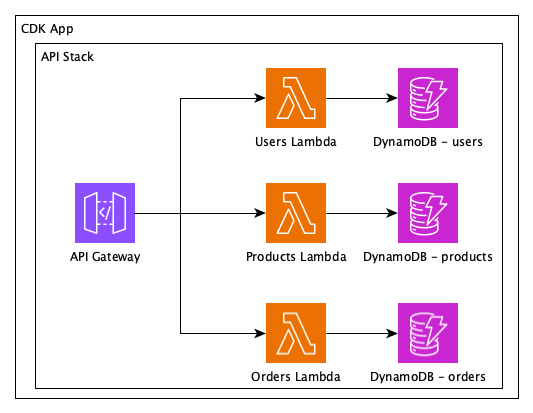
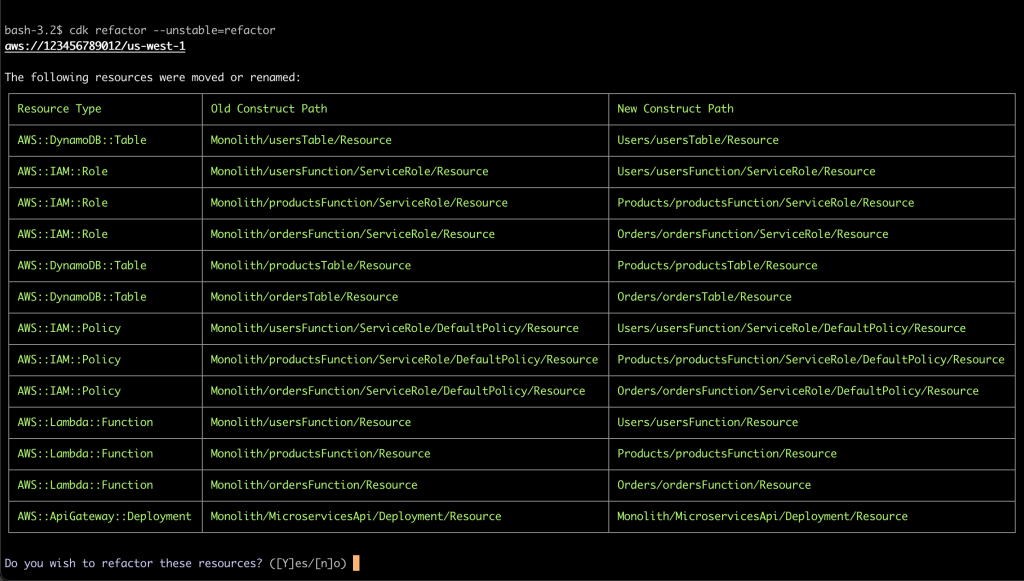
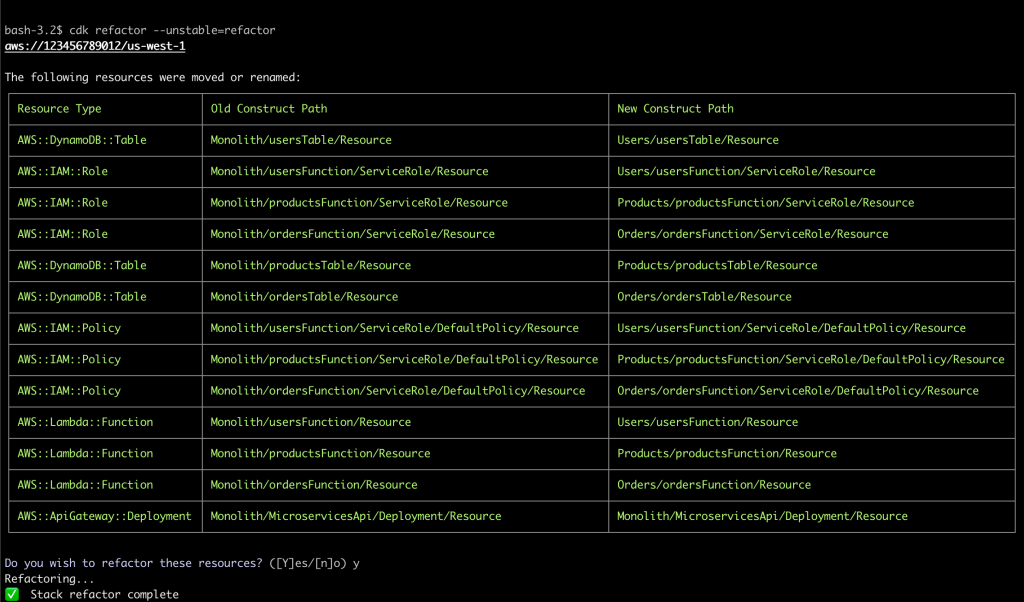
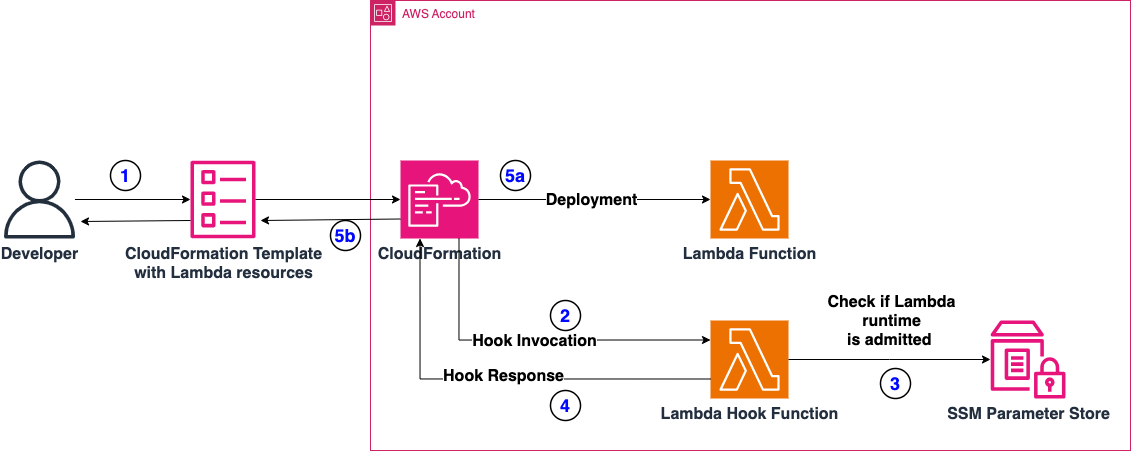
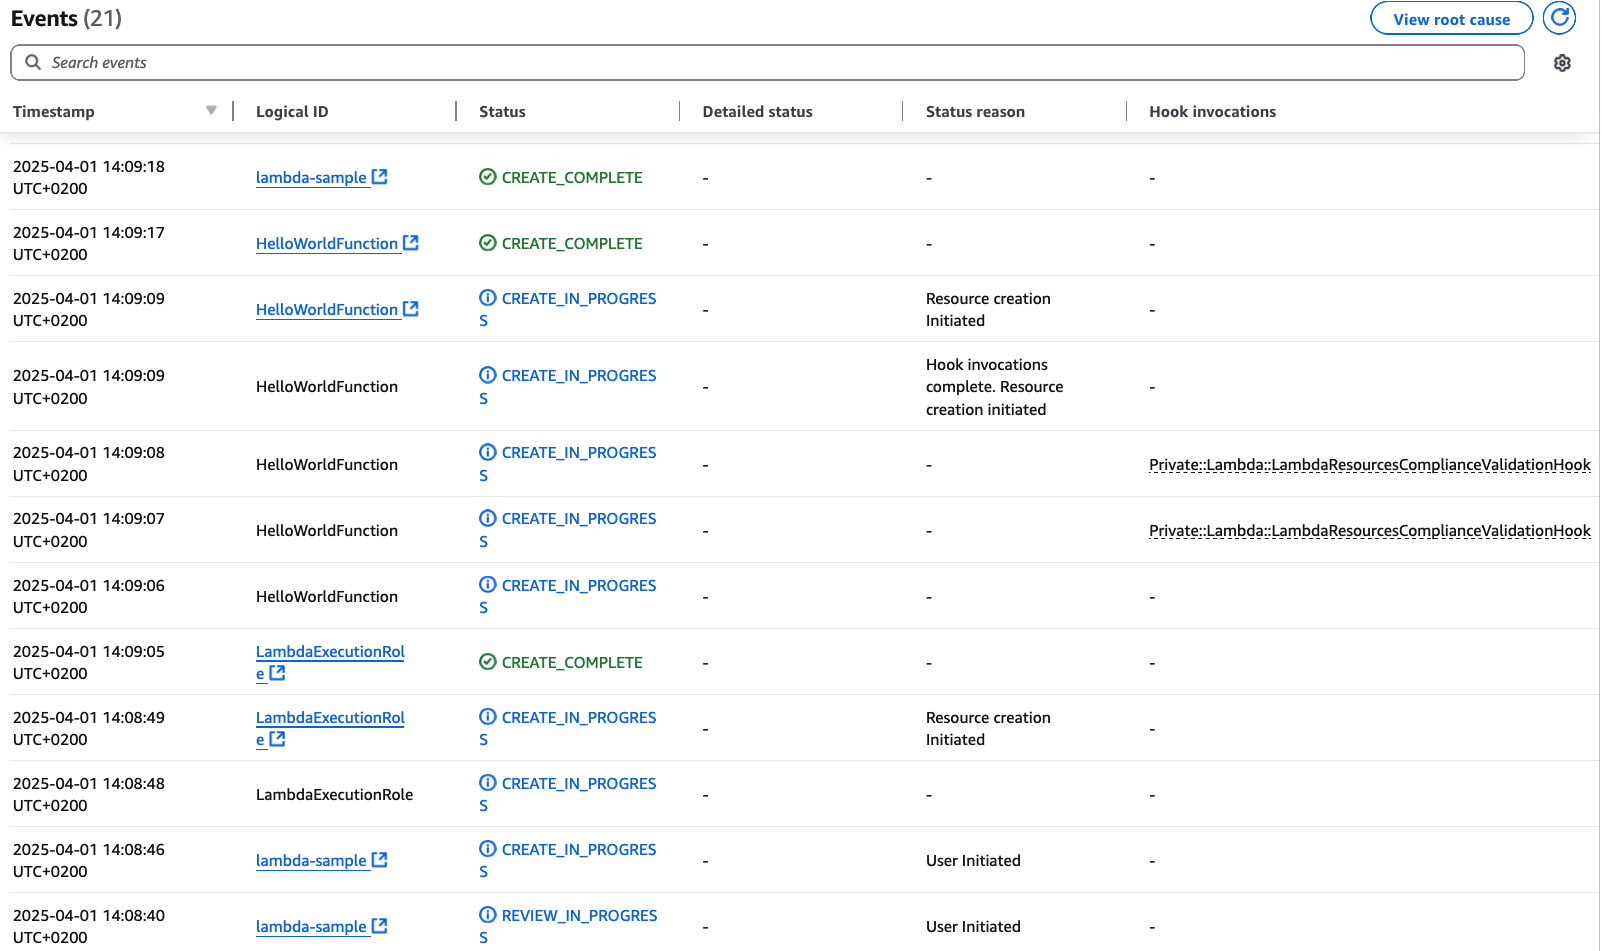
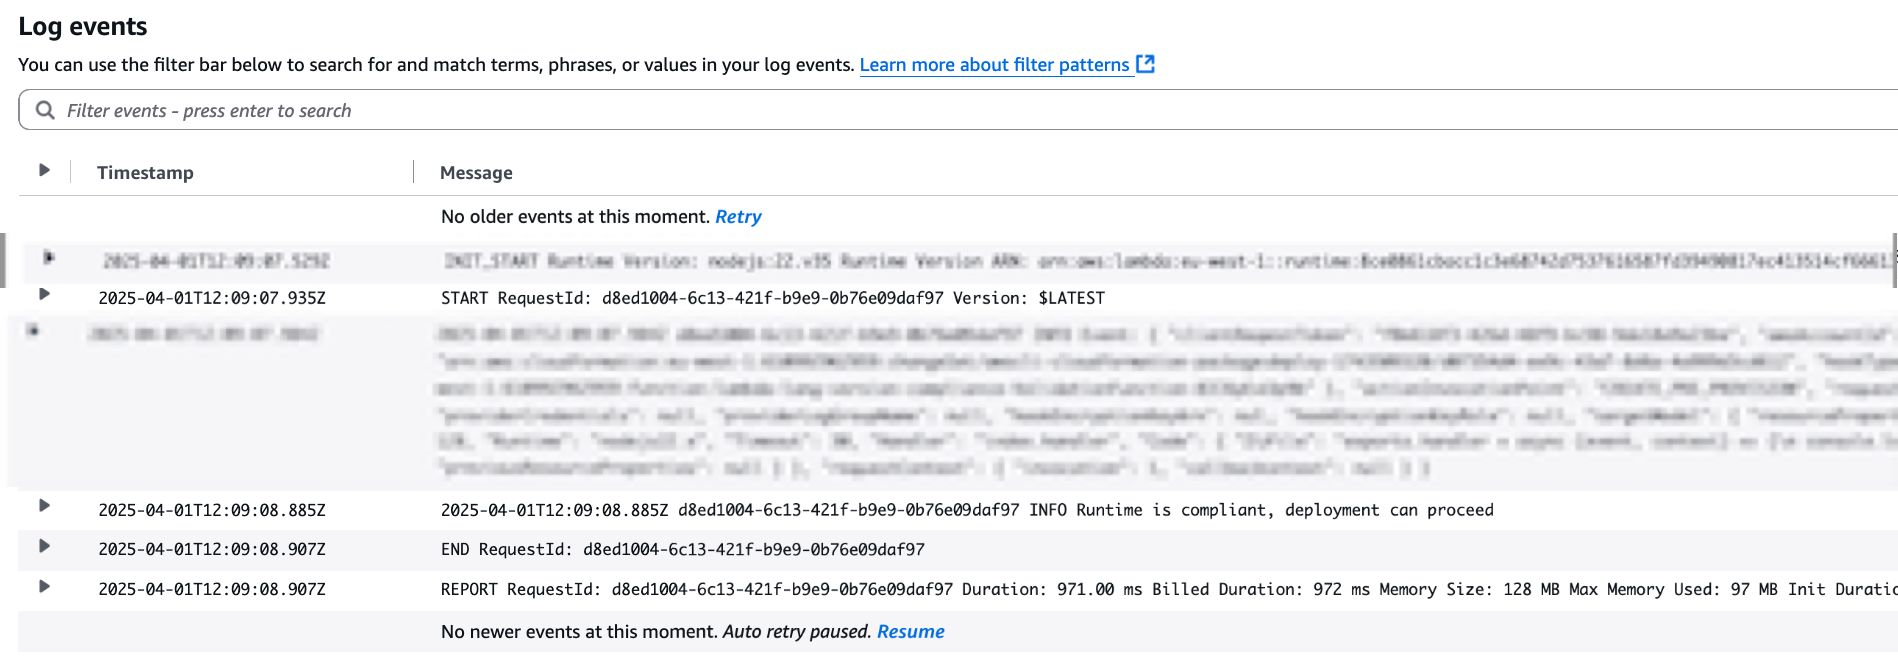
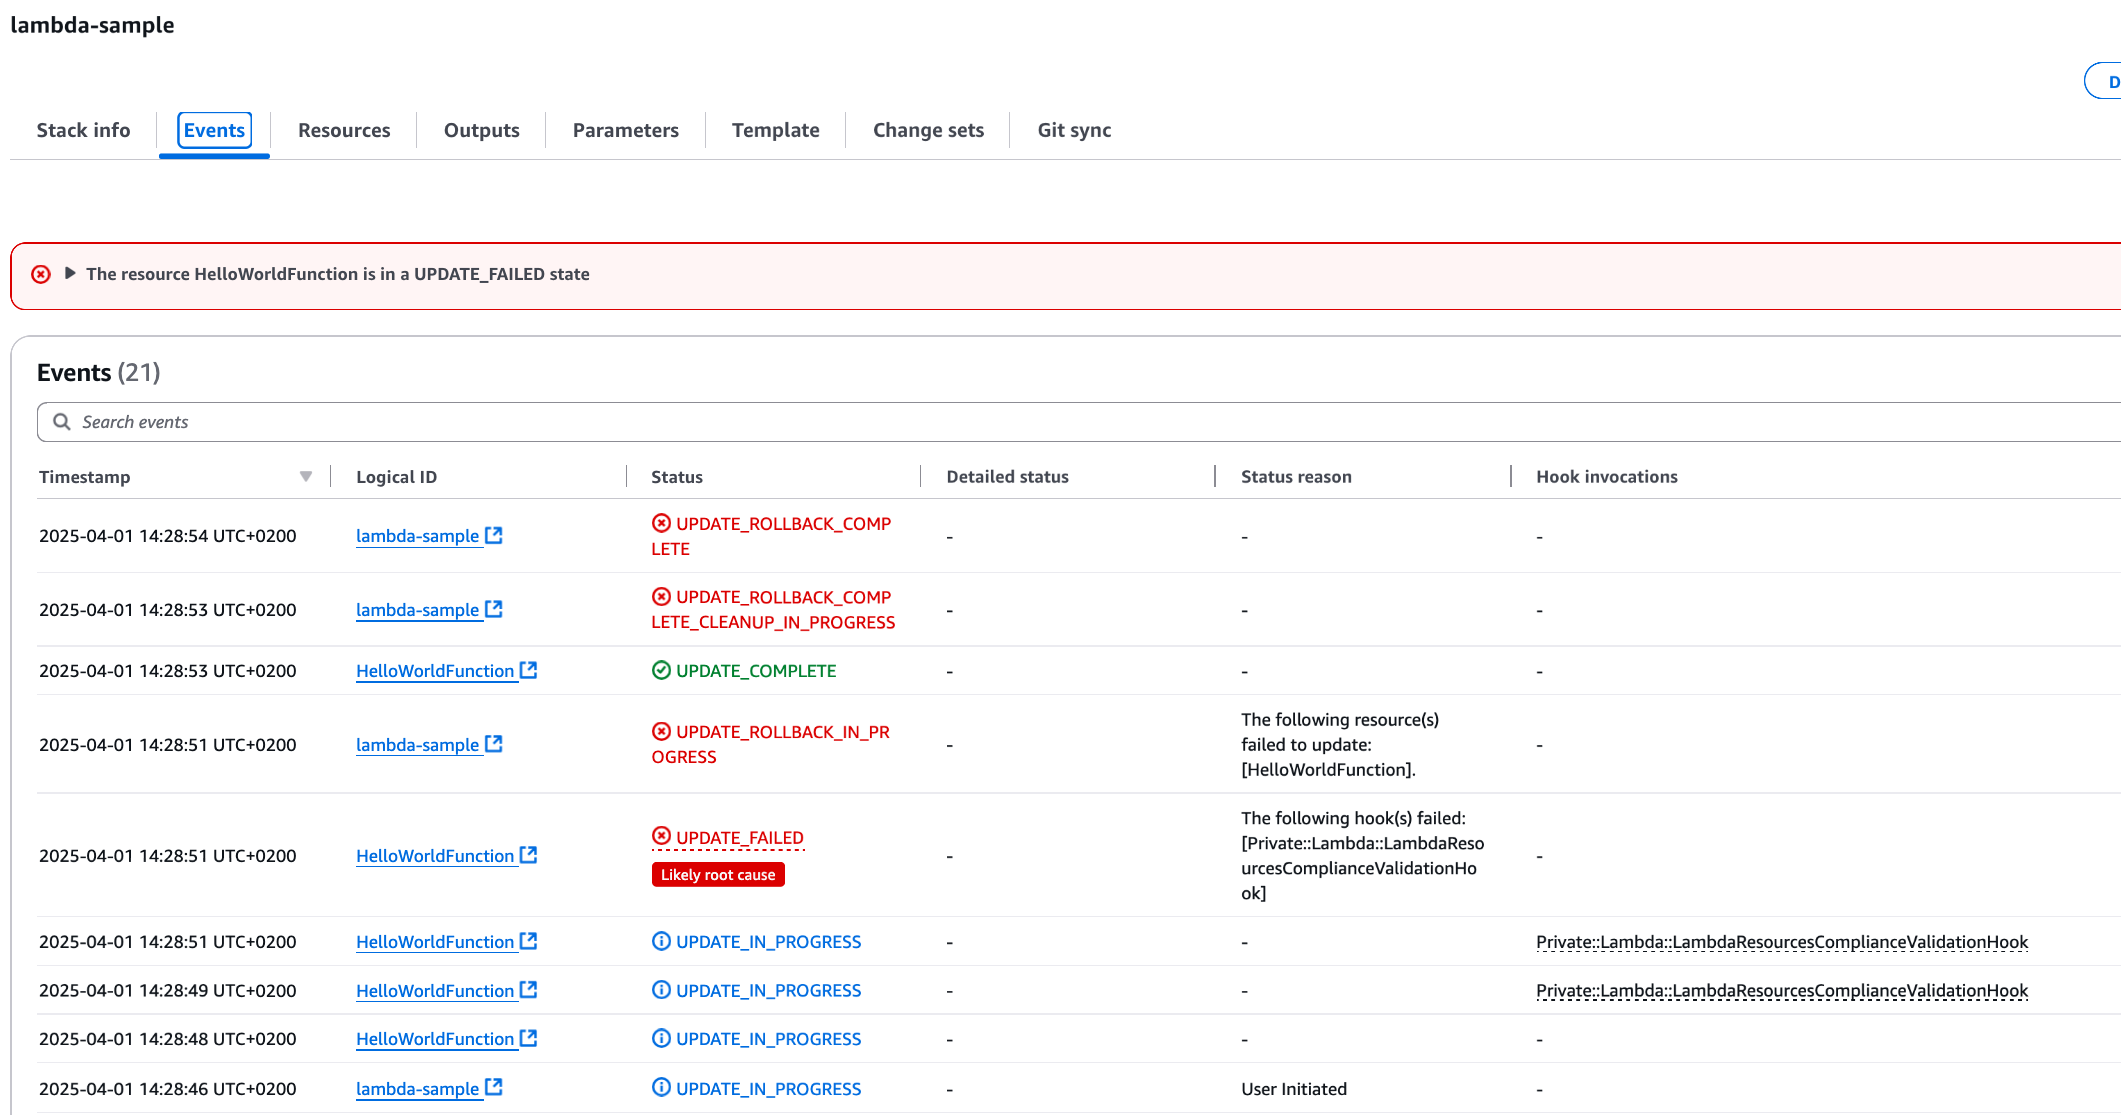
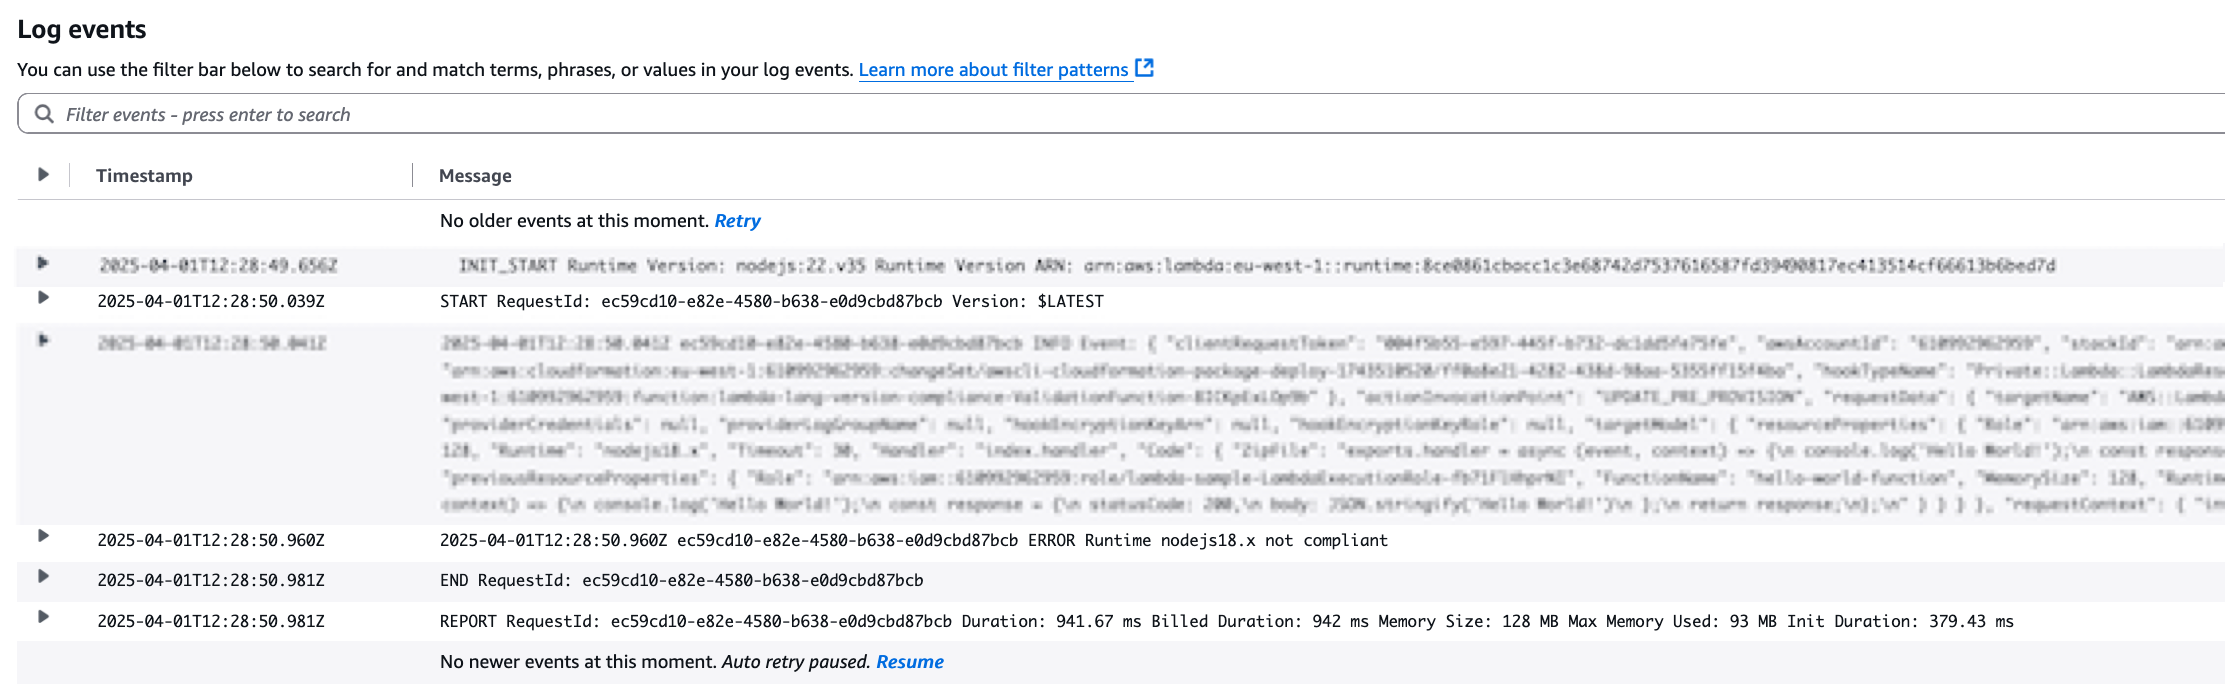


 Figure 4: CloudFormation troubleshooting with CloudTrail integration
 Figure 6: CloudFormation troubleshooting with Q feature

 Figure 9: IaC generator resource scan

 Figure 12: CloudFormation Hooks’ Lambda function feature
 Figure 14: CloudFormation Git sync with request review support feature


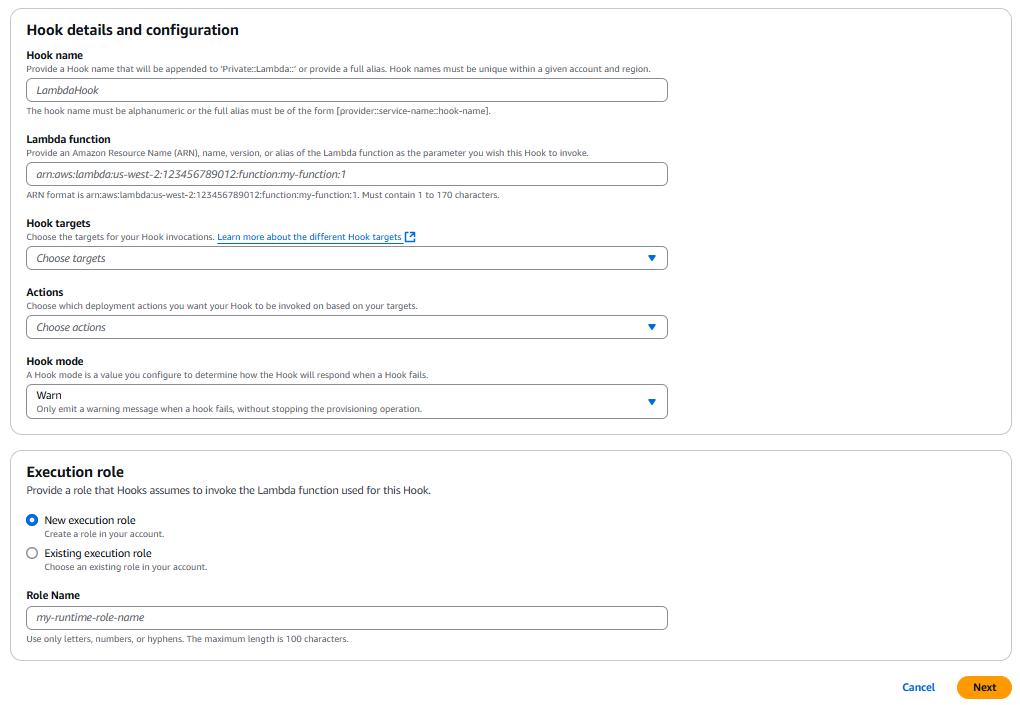


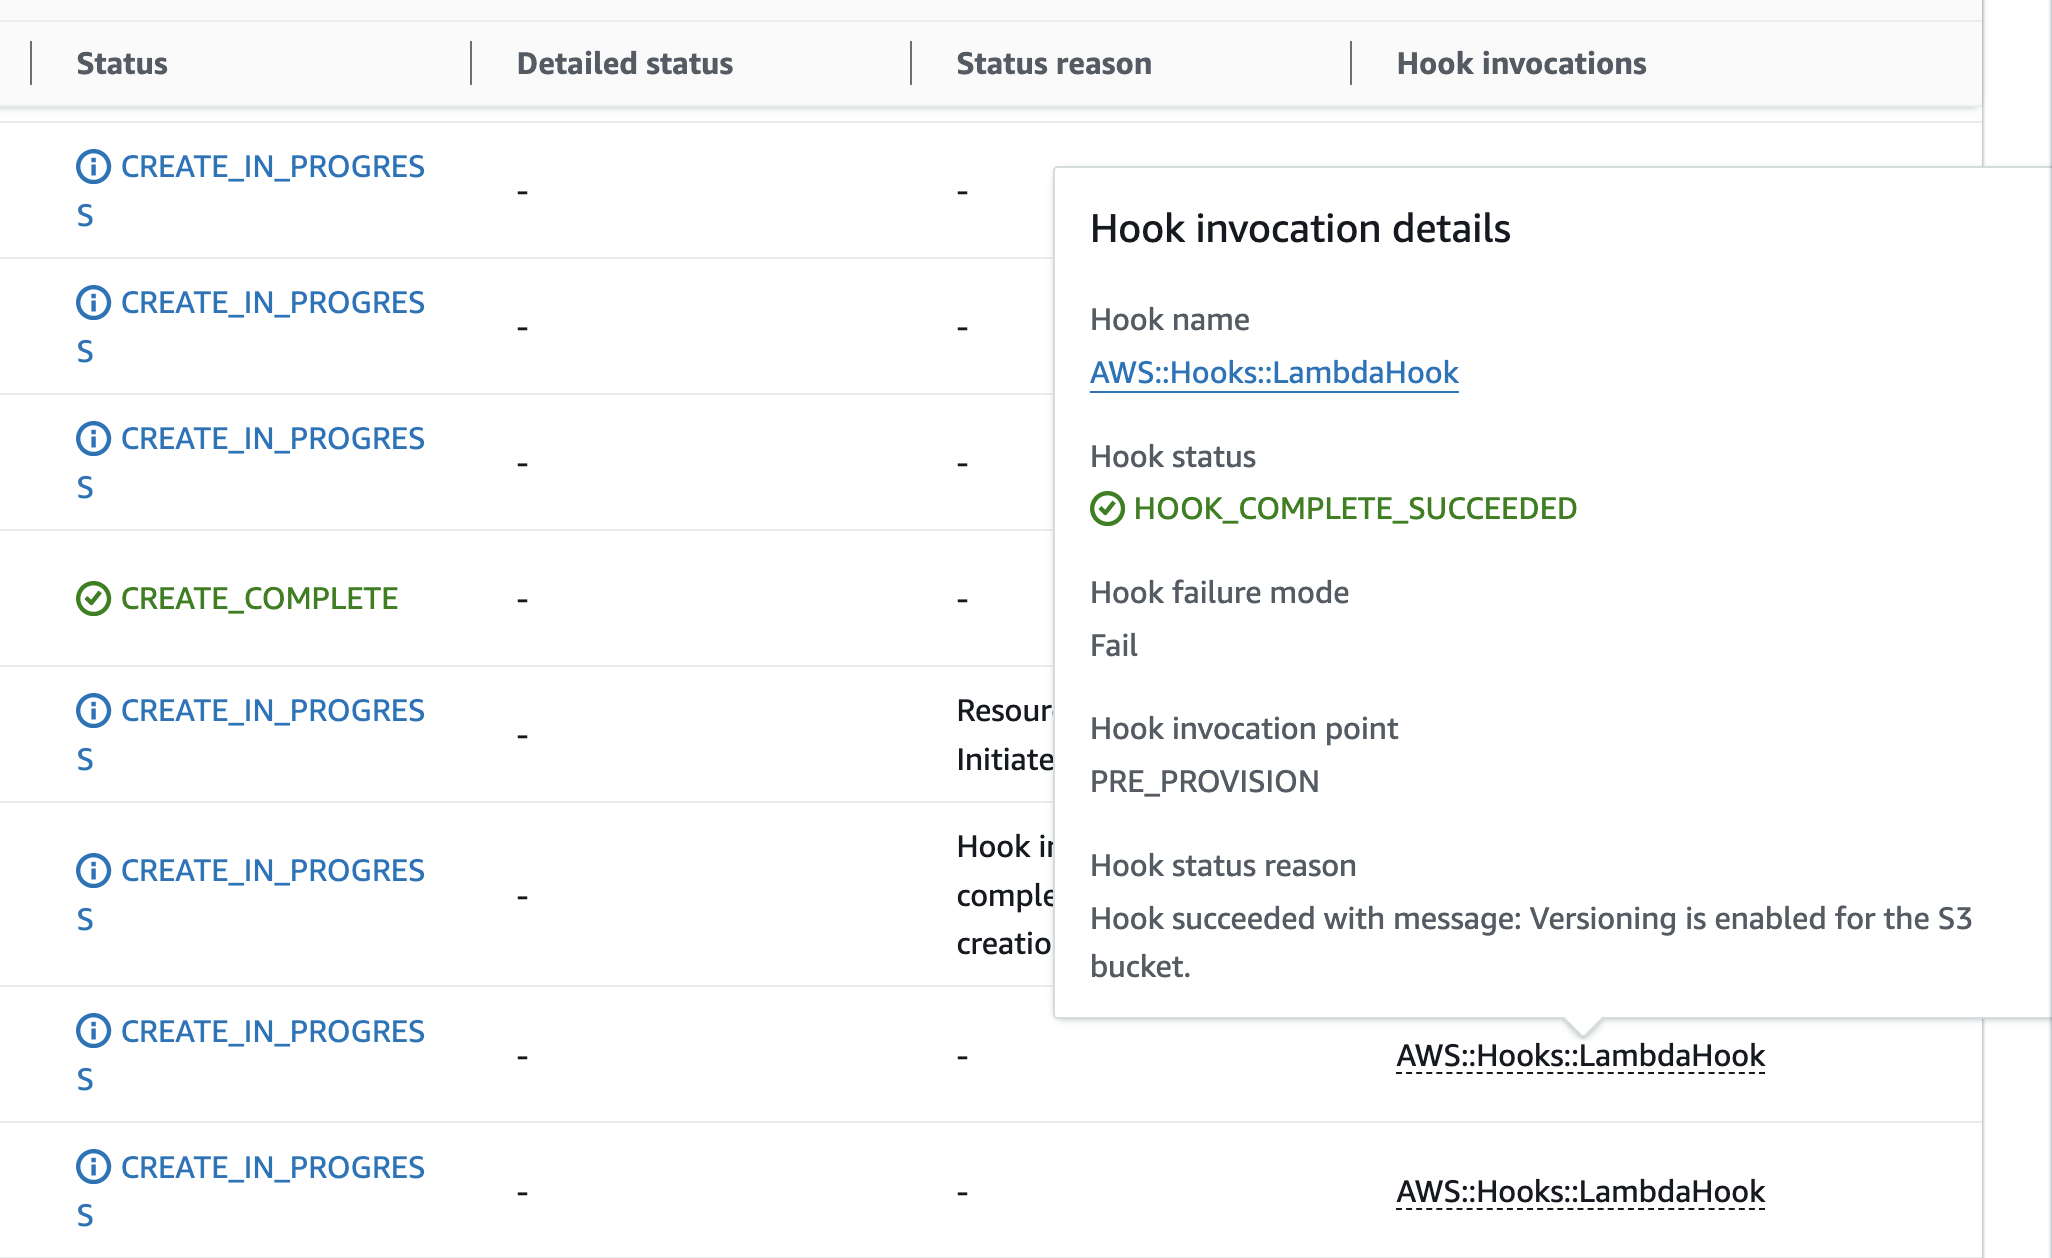

 Stella Hie is a Sr. Product Manager Technical for AWS Infrastructure as Code. She focuses on proactive control and governance space, working on delivering the best experience for customers to use AWS solutions safely. Outside of work, she enjoys hiking, playing piano, and watching live shows.