All posts by Viral Shah

View summarized data with Amazon OpenSearch Service Index Transforms

Post Syndicated from Viral Shah original https://aws.amazon.com/blogs/big-data/view-summarized-data-with-amazon-opensearch-service-index-transforms/

Amazon OpenSearch Service (successor to Amazon Elasticsearch Service) recently announced support for Index Transforms. You can use Index Transforms to extract meaningful information from an existing index, and store the aggregated information in a new index. The key benefit of Index Transforms is faster retrieval of data by performing aggregations, grouping in advance, and storing those results in summarized views. For example, you can run continuous aggregations on ecommerce order data to summarize and learn the spending behaviors of your customers. With Index Transforms, you have the flexibility to select specific fields from the source index. You can also run Index Transform jobs on indices that don’t have a timestamp field.

There are two ways to configure Index Transform jobs: by using the OpenSearch Dashboards UI or index transform REST APIs.  In this post, we discuss these two methods and share some best practices.

Use the OpenSearch Dashboards UI

To configure an Index Transform job in the Dashboards UI, first identify the source index you want to transform. You can also use sample ecommerce orders data available on the OpenSearch Dashboards home page.

  1. After you log into Kibana Dashboards, choose Home in the navigation pane, then choose Add sample data.
  2. Choose Add Data to create a sample index (for example, opensearch_dashboards_sample_data_ecommerce).
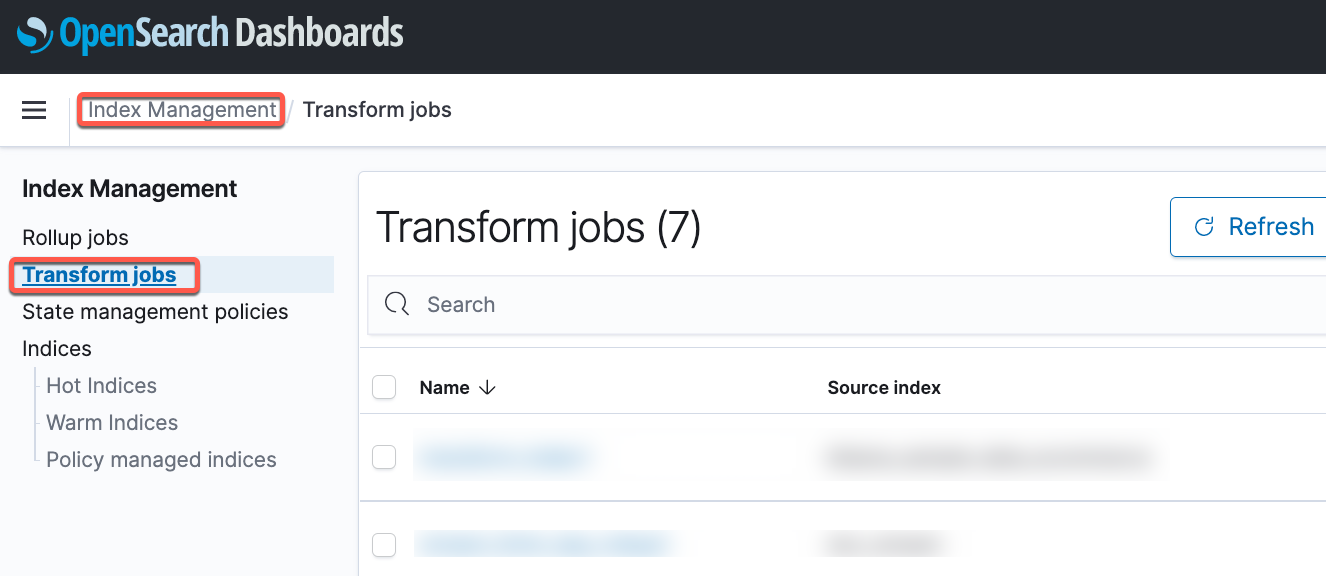
  3. Launch OpenSearch Dashboards and on the menu bar, choose Index Management.
  4. Choose Transform Jobs in the navigation pane.
  5. Choose Create Transform Job.
  6. Specify the Index Transform job name and select the recently created sample ecommerce index as the source.
  7. Choose an existing index or create a new one when selecting the target index.
  8. Choose Edit data filter, you have an option to run transformations only on the filtered data. For this post, we run transformations on products sold more than 10 times but less than 200.
  9. Choose Next.

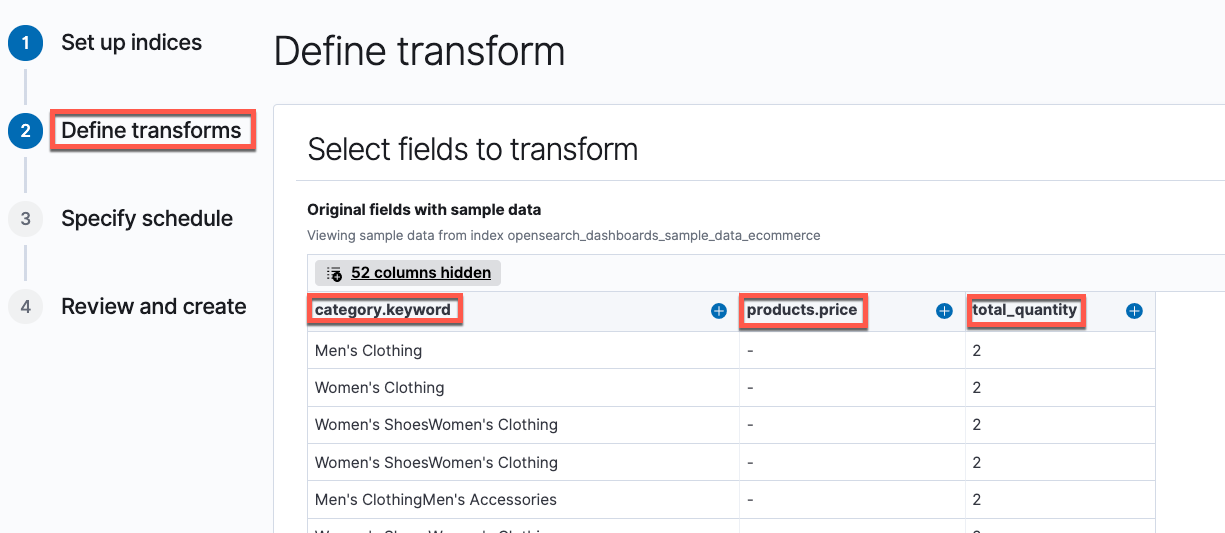
The sample ecommerce source index has over 50 fields. We only want to select the fields that are relevant to tracking the sales data by product category.

  1. Select the fields category.keyword, total_quantity, and products.price. Index transform wizard allows to filter specific fields of interest, and then select transform operations on these selected fields.
  2. Because we want to aggregate by product category, choose the plus sign next to the field category.keyword and choose Group by terms.
  3. Similarly, choose Aggregate by max, min, avg for the products.price field and Aggregate by sum for the total_quantity field.

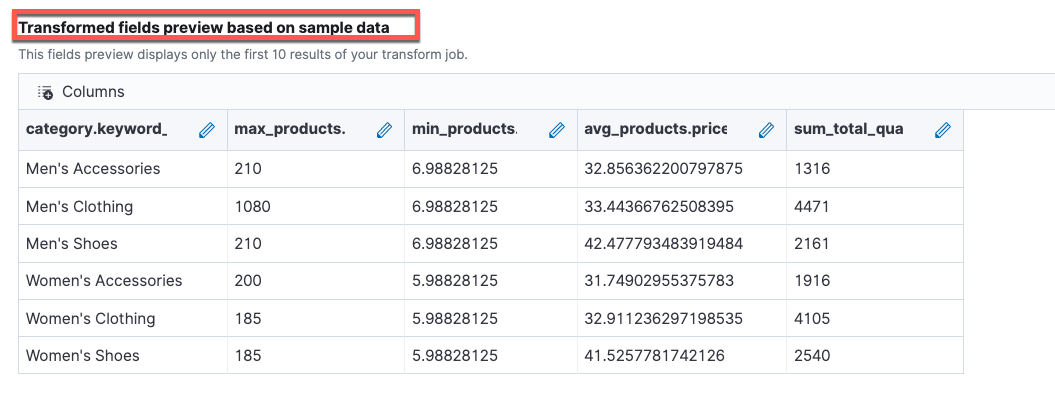
Index transform wizard provides preview capability of transformed fields on sample data for quick review. Additionally, you can also edit the transformed field names in favor of more descriptive names.

Currently, Index Transform jobs support histogram, date_histogram, and terms groupings. For more information about groupings, see Bucket aggregations. For metrics aggregations, you can choose from sum, avg, max, min, value_count, percentiles, and scripted_metric.

Scripted metrics can be useful when you need to calculate a value based on an existing attribute of the document. For example, finding a latest follower count on a continuous social feed or finding the customer who placed the first order over certain amount on a particular day. Scripted metrics can be coded in painless scripts —simple, secure scripting language designed specifically for use with search platforms.

The following is the example script to find the first customer who placed an order valued more than $100.

{
   "init_script": "state.timestamp_earliest = -1l; state.order_total = 0l; state.customer_id = ''",
   "map_script": "if (!doc['order_date'].empty) { def current_date = doc['order_date'].getValue().toInstant().toEpochMilli(); def order_total = doc['taxful_total_price'].getValue(); if ((current_date < state.timestamp_earliest && order_total >= 100) || (state.timestamp_earliest == -1 && order_total >= 100)) { state.timestamp_earliest = current_date; state.customer_id = doc['customer_id'].getValue();}}",
   "combine_script": "return state",
   "reduce_script": "def customer_id = ''; def earliest_timestamp = -1L;for (s in states) { if (s.timestamp_earliest < earliest_timestamp || earliest_timestamp == -1){ earliest_timestamp = s.timestamp_latest; customer_id = s.customer_id;}} return customer_id"
}

Scripted metrics run in four phases:

  • Initialize phase (init_script) – Optional initialization phase where shard level variables can be initialized.
  • Map phase (map_script) – Runs the code on each collected document.
  • Combine phase (combine_script) – Returns the results from all shards ornodes to the coordinator node.
  • Reduce phase (reduce_script) – Produces the final result by processing the results from all shards.

If your use case involves multiple complex scripted metrics calculations, plan to perform calculations prior to ingesting data into the OpenSearch Service domain.

  1. In the last step, specify the schedule for the Index Transform job, for example every 12 hours.
  2. On the Advanced tab, you can modify the pages per run.

This setting indicates the data that can be processed in each search request. Raising this number can increase the memory utilization and lead to higher latency. We recommend using the default setting (1000 pages per run).

  1. Review all the selection and choose Create to schedule the Index Transform job.

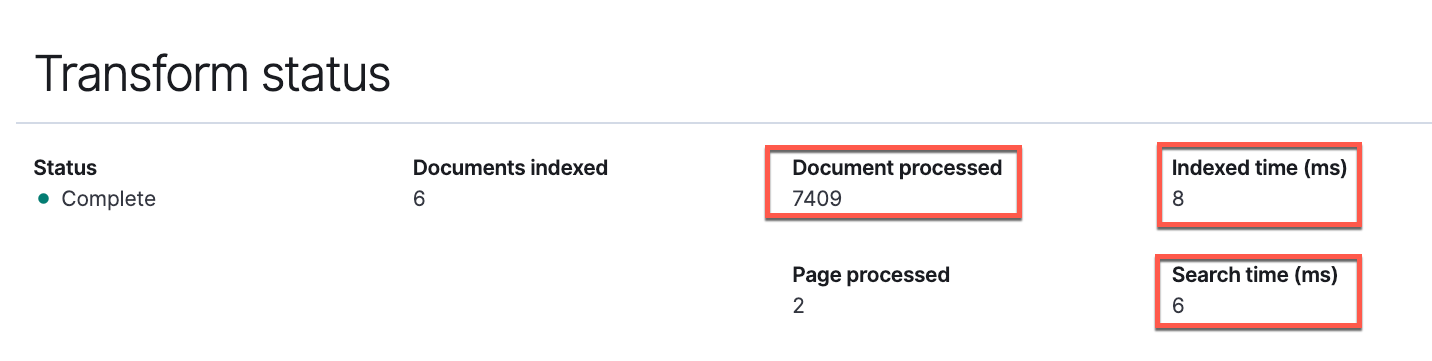
Index Transform jobs are enabled by default and run based on a selected schedule.  Choose Refresh to view the status of the Index Transform job.

After the job runs successfully, you can view the details around the number of documents processed, and the time taken to index and search the data.

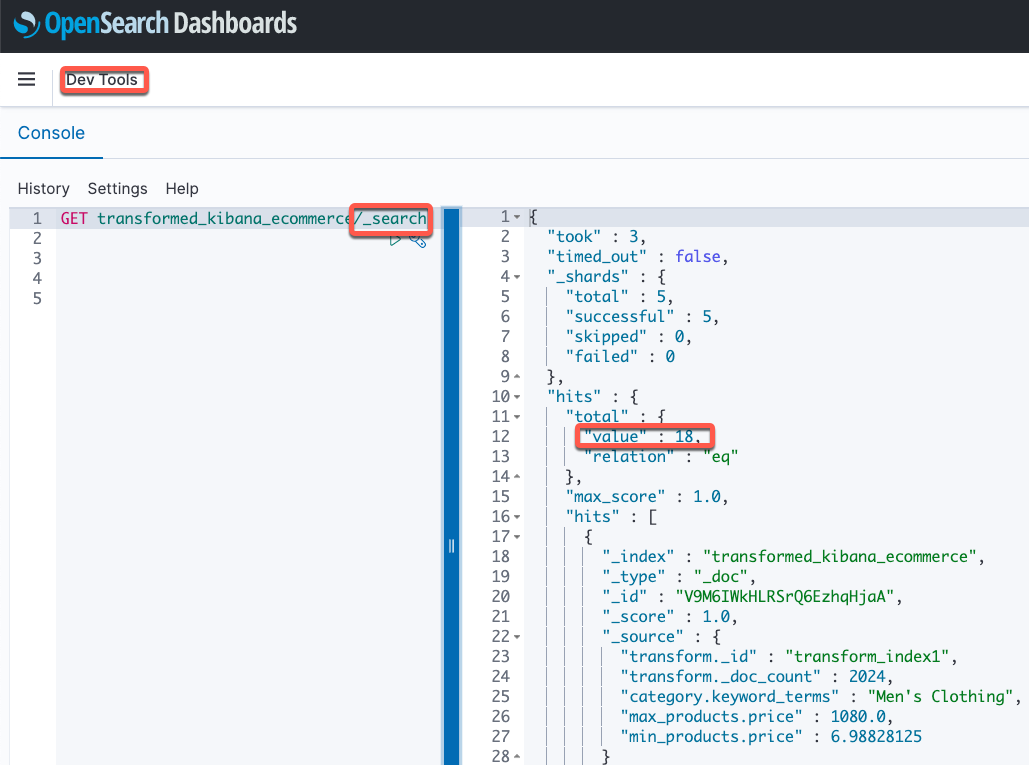
You can also view the target index contents using the _search API using the OpenSearch Dev Tools console.

Use REST APIs

Index Transform APIs can also be used to create, update, start, and stop Index Transform job operations. For example, refer Create Transform API to create Index Transform job to execute every minute. Index Transform API provides flexibility to customize the job interval to meet your specific requirements.

Use the following API to get details of your scheduled Index Transform job:

GET _plugins/_transform/kibana_ecommerce_transform_job

To preview results of a previously run Index Transform job:

GET _plugins/_transform/kibana_ecommerce_transform_job/_explain

We get the following response from our API call:

{
  "kibana_ecommerce_transform_job" : {
    "metadata_id" : "uA45cToY8nOCsVSyCZs2yA",
    "transform_metadata" : {
      "transform_id" : "kibana_ecommerce_transform_job",
      "last_updated_at" : 1633987988049,
      "status" : "finished",
      "failure_reason" : null,
      "stats" : {
        "pages_processed" : 2,
        "documents_processed" : 7409,
        "documents_indexed" : 6,
        "index_time_in_millis" : 56,
        "search_time_in_millis" : 7
      }
    }
  }
}

To delete an existing Index Transform job, disable the job and then issue the Delete API:

POST _plugins/_transform/kibana_ecommerce_transform_job/_stop

DELETE _plugins/_transform/kibana_ecommerce_transform_job

Response:
{
  "took" : 12,
  "errors" : false,
  "items" : [
    {
      "delete" : {
        "_index" : ".opendistro-ism-config",
        "_type" : "_doc",
        "_id" : "kibana_ecommerce_transform_job",
        "_version" : 3,
        "result" : "deleted",
        "forced_refresh" : true,
        "_shards" : {
          "total" : 2,
          "successful" : 2,
          "failed" : 0
        },
        "_seq_no" : 35091,
        "_primary_term" : 1,
        "status" : 200
      }
    }
  ]
}

Best practices:

Index Transform jobs are ideal for continuous aggregation of data and maintaining summarized data instead of performing complex aggregations at query time over and over. It’s designed to run on an index or indices, and not on changes between job runs.

Consider the following best practices when using Index Transforms:

  • Avoid running Index Transform jobs on rotating indexes with index patterns as the job scans all documents in those indices at each run. Use APIs to create a new Index Transform job for each rotating index.
  • Factor in additional compute capacity if your Index Transform job involves multiple aggregations because this process can be CPU intensive.  For example, If your job scans 5 indices with 3 shards each and takes 5 minutes to complete, then minimum of 17 (5*3=15 for reading source indices and 2 for writing to target index considering 1 replica) vCPUs are required for 5minutes to complete.
  • Try to schedule Index Transform jobs at non-peak times to minimize the impact on real-time search queries.
  • Make sure that there is sufficient storage for the target indexes. The size of the target index depends on the cardinality of the chosen group by term(s) and a number of attributes are computed as part of the transform. Make sure you have enough storage overhead discussed in our sizing guide.
  • Monitor and adjust the OpenSearch Service cluster configurations.

Conclusion

This post describes how you can use OpenSearch Index Transforms to aggregate specific fields from an existing index and store the summarized data into a new index using the OpenSearch Dashboards UI or Index Transform REST APIs. The Index Transform feature is powered by OpenSearch, an open-source search and analytics engine that makes it easy for you to perform interactive log analytics, real-time application monitoring, website search, and more. Index Transforms are available on all domains running Amazon OpenSearch Service 1.0 or greater, across 25 AWS Regions globally.


About the Authors

Viral Shah is a Principal Solutions Architect with the AWS Data Lab team based out of New York, NY. He has over 20 years of experience working with enterprise customers and startups, primarily in the data and database space. He loves to travel and spend quality time with his family.-

Arun Lakshmanan is a Search Specialist Solution Architect at AWS based out of Chicago, IL.

Stream CDC into an Amazon S3 data lake in Parquet format with AWS DMS

Post Syndicated from Viral Shah original https://aws.amazon.com/blogs/big-data/stream-cdc-into-an-amazon-s3-data-lake-in-parquet-format-with-aws-dms/

Most organizations generate data in real time and ever-increasing volumes. Data is captured from a variety of sources, such as transactional and reporting databases, application logs, customer-facing websites, and external feeds. Companies want to capture, transform, and analyze this time-sensitive data to improve customer experiences, increase efficiency, and drive innovations. With increased data volume and velocity, it’s imperative to capture the data from source systems as soon as they are generated and store them on a secure, scalable, and cost-efficient platform.

AWS Database Migration Service (AWS DMS) performs continuous data replication using change data capture (CDC). Using CDC, you can determine and track data that has changed and provide it as a stream of changes that a downstream application can consume and act on. Most database management systems manage a transaction log that records changes made to the database contents and metadata. AWS DMS reads the transaction log by using engine-specific API operations and functions and captures the changes made to the database in a nonintrusive manner.

Amazon Simple Storage Service (Amazon S3) is the largest and most performant object storage service for structured and unstructured data and the storage service of choice to build a data lake. With Amazon S3, you can cost-effectively build and scale a data lake of any size in a secure environment where data is protected by 99.999999999% of durability.

AWS DMS offers many options to capture data changes from relational databases and store the data in columnar format (Apache Parquet) into Amazon S3:

The second option helps you build a flexible data pipeline to ingest data into an Amazon S3 data lake from several relational and non-relational data sources, compared to just relational data sources support in the former option. Kinesis Data Firehose provides pre-built AWS Lambda blueprints for converting common data sources such as Apache logs and system logs to JSON and CSV formats or writing your own custom functions. It can also convert the format of incoming data from JSON to Parquet or Apache ORC before storing the data in Amazon S3. Data stored in columnar format gives you faster and lower-cost queries with downstream analytics services like Amazon Athena.

In this post, we focus on the technical challenges outlined in the second option and how to address them.

As shown in the following reference architecture, data is ingested from a database into Parquet format in Amazon S3 via AWS DMS integrating with Kinesis Data Streams and Kinesis Data Firehose.

Our solution provides flexibility to ingest data from several sources using Kinesis Data Streams and Kinesis Data Firehose with built-in data format conversion and integrated data transformation capabilities before storing data in a data lake. For more information about data ingestion into Kinesis Data Streams, see Writing Data into Amazon Kinesis Data Streams. You can then query Parquet data in Amazon S3 efficiently with Athena.

Implementing the architecture

AWS DMS can migrate data to and from most widely used commercial and open-source databases. You can migrate and replicate data directly to Amazon S3 in CSV and Parquet formats, and store data in Amazon S3 in Parquet because it offers efficient compression and encoding schemes. Parquet format allows compression schemes on a per-column level, and is future-proofed to allow adding more encodings as they are invented and implemented.

AWS DMS supports Kinesis Data Streams as a target. Kinesis Data Streams is a massively scalable and durable real-time data streaming service that can collect and process large streams of data records in real time. AWS DMS service publishes records to a data stream using JSON. For more information about configuration details, see Use the AWS Database Migration Service to Stream Change Data to Amazon Kinesis Data Streams.

Kinesis Data Firehose can pull data from Kinesis Data Streams. It’s a fully managed service that delivers real-time streaming data to destinations such as Amazon S3, Amazon Redshift, Amazon Elasticsearch Service (Amazon ES), and Splunk. Kinesis Data Firehose can convert the format of input data from JSON to Parquet or ORC before sending it to Amazon S3. It needs reference schema to interpret the AWS DMS streaming data in JSON and convert into Parquet. In this post, we use AWS Glue, a fully managed ETL service, to create a schema in the AWS Glue Data Catalog for Kinesis Data Firehose to reference.

When AWS DMS migrates records, it creates additional fields (metadata) for each migrated record. The metadata provides additional information about the record being migrated, such as source table name, schema name, and type of operation. Most metadata fields add – in their field names (for example, record-type, schema-name, table-name, transaction-id). See the following code:

{
        "data": {
            "MEET_CODE": 5189459,
            "MEET_DATE": "2020-02-21T19:20:04Z",
            "RACE_CODE": 5189459,
            "LAST_MODIFIED_DATE": "2020-02-24T19:20:04Z",
            "RACE_ENTRY_CODE": 11671651,
            "HORSE_CODE": 5042811
        },
        "metadata": {
            "transaction-id": 917505,
            "schema-name": "SH",
            "operation": "insert",
            "table-name": "RACE_ENTRY",
            "record-type": "data",
            "timestamp": "2020-02-26T00:20:07.482592Z",
            "partition-key-type": "schema-table"
        }
    }

Additional metadata added by AWS DMS leads to an error during the data format conversion phase in Kinesis Data Firehose. Kinesis Data Firehose follows Hive style formatting and therefore doesn’t recognize the – character in the metadata field names during data conversion from JSON into Parquet and returns an error message: expected at the position 30 of ‘struct’ but ‘-’ is found. For example, see the following code:

{
	"deliveryStreamARN": "arn:aws:firehose:us-east-1:1234567890:deliverystream/abc-def-KDF",
	"destination": "arn:aws:s3:::abc-streaming-bucket",
	"deliveryStreamVersionId": 13,
	"message": "The schema is invalid. Error parsing the schema:
	 Error: : expected at the position 30 of 'struct<timestamp:string,record-type:string,operation:string,partition-key-type:string,schema-name:string,table-name:string,transaction-id:int>' but '-' is found.",
	"errorCode": "DataFormatConversion.InvalidSchema"
}

You can resolve the issue by making the following changes: specifying JSON key mappings and creating a reference table in AWS Glue before configuring Kinesis Data Firehose.

Specifying JSON key mappings

In your Kinesis Data Firehose configuration, specify JSON key mappings for fields with – in their names. Mapping transforms these specific metadata fields names to _ (for example, record-type changes to record_type).

Use AWS Command Line Interface (AWS CLI) to create Kinesis Data Firehose with the JSON key mappings. Modify the parameters to meet your specific requirements.

Kinesis Data Firehose configuration mapping is only possible through the AWS CLI or API and not through the AWS Management Console.

The following code configures Kinesis Data Firehose with five columns with – in their field names mapped to new field names with _”:

"S3BackupMode": "Disabled",
                    "DataFormatConversionConfiguration": {
                        "SchemaConfiguration": {
                            "RoleARN": "arn:aws:iam::123456789012:role/sample-firehose-delivery-role",
                            "DatabaseName": "sample-db",
                            "TableName": "sample-table",
                            "Region": "us-east-1",
                            "VersionId": "LATEST"
                        },
                        "InputFormatConfiguration": {
                            "Deserializer": {
                                "OpenXJsonSerDe": {
                                "ColumnToJsonKeyMappings":
                                {
                                 "record_type": "record-type","partition_key_type": "partition-key-type","schema_name":"schema-name","table_name":"table-name","transaction_id":"transaction-id"
                                }
                                }

Creating a reference table in AWS Glue

Because Kinesis Data Firehose uses the Data Catalog to reference schema for Parquet format conversion, you must first create a reference table in AWS Glue before configuring Kinesis Data Firehose. Use Athena to create a Data Catalog table. For instructions, see CREATE TABLE. In the table, make sure that the column name uses _ in their names, and manually modify it in advance through the Edit schema option for the referenced table in AWS Glue, if needed.

Use Athena to query the results of data ingested by Kinesis Data Firehose into Amazon S3.

This solution is only applicable in the following use cases:

  • Capturing data changes from your source with AWS DMS
  • Converting data into Parquet with Kinesis Data Firehose

If you want to store data in non-Parquet format (such CSV or JSON) or ingest into Kinesis through other routes, then you don’t need to modify your Kinesis Data Firehose configuration.

Conclusion

This post demonstrated how to convert AWS DMS data into Parquet format and specific configurations to make sure metadata follows the expected format of Kinesis Data Streams and Kinesis Data Firehose. We encourage you to try this solution and take advantage of all the benefits of using AWS DMS with Kinesis Data Streams and Kinesis Data Firehose. For more information, see Getting started with AWS Database Migration Service and Setting up Amazon Kinesis Firehose.

If you have questions or suggestions, please leave a comment.


About the Author

Viral Shah is a Data Lab Architect with Amazon Web Services. Viral helps our customers architect and build data and analytics prototypes in just four days in the AWS Data Lab. He has over 20 years of experience working with enterprise customers and startups primarily in the Data and Database space.