Tag Archives: Amazon Elastic VMware Service (Amazon EVS)

Deploy Oracle Database step by step on Amazon EVS with FSx for ONTAP

Post Syndicated from Satish Bhoi original https://aws.amazon.com/blogs/architecture/deploy-oracle-database-step-by-step-on-amazon-evs-with-fsx-for-ontap/


This post provides step-by-step procedures to deploy Oracle Database on Amazon Elastic VMware Service (Amazon EVS) with Amazon FSx for NetApp ONTAP as NFS datastore storage. You will provision storage volumes, mount NFS datastores, install Oracle, and configure SnapMirror replication for cross-region disaster recovery.

Enterprises running Oracle databases on VMware want a path to AWS that preserves their existing operational workflows with no rearchitecting and retraining. In our related post, Architect highly available Oracle Database on Amazon EVS and FSx for ONTAP, we explained how to design that environment: selecting Amazon Elastic Compute Cloud (Amazon EC2) bare metal instances, sizing VMs, splitting storage between vSAN and FSx for NetApp ONTAP, and planning SnapMirror replication for cross-region DR.

This post picks up where the architecture left off. We provide step-by-step procedures to deploy the entire stack — from provisioning your first Oracle VM and creating FSx for ONTAP volumes, through mounting NFS datastores, installing Oracle 19c, and configuring SnapMirror and SnapCenter. We also cover four migration paths for moving existing on-premises Oracle workloads to EVS and day-2 operations including snapshot backup, point-in-time recovery, and database cloning.

For architecture decisions, instance type selection, storage design rationale, and high availability planning, see our related post: Architect highly available Oracle Database on Amazon EVS and FSx for ONTAP.


Step-by-step deployment procedures

This section walks through the end-to-end deployment workflow: provisioning the Oracle VM, creating FSx for ONTAP storage volumes, mounting NFS datastores in vSphere, installing Oracle 19c, and configuring SnapMirror for cross-region DR. Complete the prerequisites first, then follow Steps 1 through 8 in order.

Prerequisites


Step 1: Deploy Oracle VM on EVS

  1. Log in to the vSphere Client connected to your EVS vCenter.
  2. Create a new Virtual Machine in the Production DB Cluster:
    • Guest OS: Red Hat Enterprise Linux 8 (64-bit) or Oracle Linux 8.
    • vCPU: Size per Oracle workload (8–32 vCPU typical)
    • Memory: 32–256 GiB based on SGA/PGA requirements.
    • Disk: 100 GiB on vSAN datastore (OS + Oracle Home + swap + temp tablespace)
    • Network: Attach to DB segment on the prod-trusted Tier-1 gateway.
  3. Power on the VM and configure the guest OS:
# Set hostname
hostnamectl set-hostname ora-db1

# Create swap on vSAN-backed disk (local NVMe, single-digit ms latency)
# The vSAN datastore is already available as the VM's primary disk
# Allocate a dedicated partition or LV for swap
lvcreate -L 16G -n swap vgos
mkswap /dev/vgos/swap
swapon /dev/vgos/swap
echo "/dev/vgos/swap swap swap defaults 0 0" >> /etc/fstab

# Install Oracle prerequisites
sudo yum install -y oracle-database-preinstall-19c python3

For HA/DR, consider replicating the entire Oracle VM rather than maintaining a separate licensed instance in the DR cluster (see DR Licensing Consideration in the architecture post).

Oracle licensing consideration: Instance type selection affects Oracle license cost, which is an important factor to take into consideration. We recommend requesting an AWS Optimization and Licensing Assessment (AWS OLA) for further guidelines.


Step 2: Provision FSx for NetApp ONTAP

  1. Open the Amazon FSx console, select Create file system, then select Amazon FSx for NetApp ONTAP.
  2. Select Standard create and configure:
Setting Value
Deployment type Single-AZ (required for EVS)
SSD storage capacity Size for Oracle data + logs + 20% headroom
Throughput capacity 512–2,048 MB/s (size for write workload. See asymmetry note)
IOPS Automatic (3/GiB) or user-provisioned (up to 80,000)
VPC Same VPC as EVS environment
Subnet EVS service access subnet, same AZ as DB cluster
Security group Allow NFS (TCP 2049, 111, 635) from EVS management VLAN
  1. Set the fsxadmin password (required for ONTAP CLI automation).
  2. Create an SVM (Storage Virtual Machine) with vsadmin password.
  3. Disable automatic daily backups. Use SnapCenter for Oracle-aware scheduling instead.
  4. After creation, select SVM, select Endpoints, and copy the NFS DNS name.

Step 3: Create Oracle database volumes

Connect to the FSx for ONTAP cluster using SSH (ssh fsxadmin@management-endpoint) and create volumes:

# Oracle binary volume
vol create -volume oradb1bin -aggregate aggr1 -size 50G \
  -state online -policy default -tiering-policy none \
  -junction-path /oradb1bin

# Oracle data volume
vol create -volume oradb1data -aggregate aggr1 -size 500G \
  -state online -policy default -tiering-policy none \
  -junction-path /oradb1data

# Oracle log volume (redo + archive)
vol create -volume oradb1log -aggregate aggr1 -size 250G \
  -state online -policy default -tiering-policy none \
  -junction-path /oradb1log

Set -tiering-policy none to pin all data to SSD tier. Size the log volume for 24 hours of archive logs.


Step 4: Mount FSx for ONTAP as NFS datastore in vSphere

  1. In vSphere Client, select the DB Cluster, then select Configure > Storage > New Datastore.
  2. Select NFS, then select NFS 3.
  3. Enter:
    • Server: svm-id.fs-id.fsx.region.amazonaws.com
    • Folder: /oradb1data
    • Datastore name: fsx-ora-db1-data
  4. Repeat for binary (/oradb1bin) and log (/oradb1log) volumes.
  5. Verify all three datastores show correct capacity in the cluster storage view.

Step 5: Create Oracle VMDKs on FSx for ONTAP datastores

With the NFS datastores mounted at the ESXi host level (Step 4), create virtual disks for Oracle on these datastores:

  1. In vSphere Client, select the Oracle VM, select Edit Settings, then select Add New Device > Hard Disk.
  2. Create these VMDKs:
VMDK Datastore Size Guest Mount Purpose
Hard Disk 2 fsx-ora-db1-data 500 GiB /u02 Oracle data files
Hard Disk 3 fsx-ora-db1-log 250 GiB /u03 Oracle redo + archive logs
Hard Disk 4 fsx-ora-db1-bin 50 GiB /u01 Oracle Home binaries
  1. Select Thick Provision, Eager Zeroed for data and log VMDKs (best Oracle performance).

Oracle Database can be created on Oracle ASM or Filesystem (local/NFS). This installation is based on creating the Oracle database on local XFS filesystem.

Inside the Oracle VM guest OS, partition and mount the new disks:

# Identify new disks
lsblk

# Create filesystem on each disk (example: /dev/sdb for data)
mkfs.xfs /dev/sdb
mkfs.xfs /dev/sdc
mkfs.xfs /dev/sdd

# Create mount points
mkdir -p /u01 /u02 /u03

# Mount
mount /dev/sdd /u01   # Oracle Home (binaries)
mount /dev/sdb /u02   # Oracle data files
mount /dev/sdc /u03   # Oracle redo + archive logs

# Persist in /etc/fstab
cat >> /etc/fstab <<EOF
/dev/sdb /u02 xfs defaults,noatime 0 0
/dev/sdc /u03 xfs defaults,noatime 0 0
/dev/sdd /u01 xfs defaults,noatime 0 0
EOF

# Set ownership
chown -R oracle:oinstall /u01 /u02 /u03

Key insight: The Oracle VM accesses /u02 and /u03 as local XFS block devices. It has no awareness that the underlying storage is an NFS datastore backed by FSx for ONTAP. All NFS communication happens at the ESXi host level, where each host uses its own network path to FSx for ONTAP.


Step 6: Install and configure Oracle 19c

# As oracle user
export ORACLE_HOME=/u01/app/oracle/product/19.0.0/dbhome_1
cd $ORACLE_HOME
./runInstaller -silent -responseFile /path/to/db_install.rsp

Create the database with data on /u02 and logs on /u03:

CREATE DATABASE orcl
  DATAFILE '/u02/oradata/orcl/system01.dbf' SIZE 1G
  LOGFILE
    GROUP 1 '/u03/oralogs/orcl/redo01.log' SIZE 512M,
    GROUP 2 '/u03/oralogs/orcl/redo02.log' SIZE 512M,
    GROUP 3 '/u03/oralogs/orcl/redo03.log' SIZE 512M;

Oracle accesses /u02 and /u03 as local XFS filesystems. Standard Oracle ASM or filesystem-based storage management applies. No NFS-specific Oracle configuration is needed because the NFS layer is abstracted by the ESXi hypervisor.


Step 7: Set up SnapMirror for cross-region DR

Peer clusters (production → DR):

cluster peer create -peer-addrs <dr-cluster-intercluster-ip> \
  -username fsxadmin -initial-allowed-vserver-peers *

Peer SVMs:

vserver peer create -vserver svm-prod -peer-vserver svm-dr \
  -peer-cluster FSxDR -applications snapmirror

Create DP volumes on DR FSx for ONTAP:

vol create -volume oradb1bin -aggregate aggr1 -size 50G -state online -type DP
vol create -volume oradb1data -aggregate aggr1 -size 500G -state online -type DP
vol create -volume oradb1log -aggregate aggr1 -size 250G -state online -type DP

Create and initialize SnapMirror:

snapmirror create -source-path svm-prod:oradb1data \
  -destination-path svm-dr:oradb1data -throttle unlimited \
  -policy MirrorAllSnapshots -type DP

snapmirror create -source-path svm-prod:oradb1log \
  -destination-path svm-dr:oradb1log -throttle unlimited \
  -policy MirrorAllSnapshots -type DP

snapmirror create -source-path svm-prod:oradb1bin \
  -destination-path svm-dr:oradb1bin -throttle unlimited \
  -policy MirrorAllSnapshots -type DP

# Initialize
snapmirror initialize -destination-path svm-dr:oradb1data
snapmirror initialize -destination-path svm-dr:oradb1log
snapmirror initialize -destination-path svm-dr:oradb1bin

Important: Consider Oracle licensing requirements when planning your DR strategy. An alternative is to replicate the Oracle VM through NetApp SnapMirror from Production to DR. Keep the DR replicated volumes as data-protection (DP) volumes that are NOT mounted as NFS datastores on DR hosts until a failover event is declared to avoid Oracle double licensing. Only then break the SnapMirror, mount the NFS datastore on the DR Host, and power on the VM. Pre-mounting the SnapMirror volume as a datastore — even with no VM powered on — means Oracle binaries are accessible on those hosts, which Oracle may consider an “installation” requiring licenses across the entire DR cluster. We recommend requesting an AWS Optimization and Licensing Assessment (AWS OLA) for further guidelines.


Step 8: Configure SnapCenter backup

  1. Deploy SnapCenter Server (or use SnapCenter SaaS).
  2. Add FSx for ONTAP storage system using the cluster management IP.
  3. Install SnapCenter Plugin for Oracle on each Oracle VM.
  4. Create backup policies:
Policy Scope Frequency SnapMirror Update
Full DB Backup Data + Control + Archive Every 4–6 hours Yes
Archive Log Archive logs only Every 10–15 minutes Yes
  1. Create resource groups, assign policies, and schedule.

Database migration from on-premises VMware to EVS

Option 1: VMware HCX live migration

For enterprises with existing VMware on-premises:

  1. Deploy HCX Connector on-premises, HCX Cloud Manager on EVS.
  2. Create site pairing and network extensions (L2 stretch).
  3. Migrate Oracle VMs using HCX vMotion (zero downtime) or Bulk Migration.
  4. Post-migration: storage vMotion Oracle VMDKs from vSAN to FSx for ONTAP NFS datastores for snapshot/replication capabilities.

Option 2: SnapMirror ONTAP-to-ONTAP

If on-premises Oracle already uses NetApp ONTAP storage:

  1. Establish SnapMirror between on-premises ONTAP and AWS FSx for ONTAP.
  2. Incrementally replicate until cutover.
  3. At switchover: quiesce Oracle, flush archive logs, final SnapMirror sync, break mirror.
  4. Mount FSx for ONTAP volumes on EVS Oracle VM, recover database, open for service.

Option 3: Oracle PDB relocation (multitenant)

For Oracle databases already in PDB/CDB multitenant model:

  1. Create target CDB on EVS with FSx for ONTAP storage.
  2. Use PDB hot clone to relocate PDBs from on-premises CDB to AWS CDB.
  3. Minimal service interruption. Only final switchover requires brief outage.

Option 4: RMAN backup/restore (non-ONTAP on-premises)

If Oracle runs on non-ONTAP storage on-premises:

  1. Create RMAN backup, stage to Amazon Simple Storage Service (Amazon S3) using AWS DataSync or AWS Direct Connect.
  2. Provision Oracle VM on EVS, mount FSx for ONTAP volumes.
  3. Restore from RMAN backup, apply archive logs.
  4. Open database and redirect applications.

Day-2 operations

Snapshot backup

SnapCenter manages full database snapshots as storage-layer operations, providing efficient backup capabilities.

Point-in-time recovery

In SnapCenter, select the SCN or timestamp, mount the log snapshot, restore the data snapshot, apply archive logs, and open with RESETLOGS.

Database cloning

SnapCenter FlexClone creates space-efficient database copies. Clones share unchanged blocks with the source and consume storage only for deltas. Use for dev/test, patch validation, and reporting.

HA failover procedure

  1. Break SnapMirror on DR volumes.
  2. Mount SnapMirror volumes as NFS datastores on DR ESXi hosts, then power on the Oracle VM.
  3. Recover to last available archive log.
  4. Open database. Update DNS/connection strings.

Clean up

To stop incurring charges after testing this deployment, remove the following resources in this order:

  1. Oracle VMs — Power off and delete Oracle database VMs from the vSphere inventory.
  2. NFS datastores — Unmount FSx for ONTAP datastores from ESXi hosts in vSphere.
  3. SnapMirror relationships — Delete SnapMirror relationships and DP volumes on the DR FSx for ONTAP file system.
  4. FSx for ONTAP file systems — Delete both production and DR file systems from the Amazon FSx console. This action deletes all volumes and data on those file systems.
  5. Amazon EVS environment — Delete the EVS environment from the Amazon EVS console. This terminates the underlying EC2 bare metal instances.
  6. Networking — Remove Transit Gateway attachments, VPC Route Server configurations, and Direct Connect connections if they were created solely for this deployment.

Important: Deleting an FSx for ONTAP file system permanently removes all data. Confirm that you have backed up any data you need before proceeding.


Conclusion

In this post, we walked through deploying Oracle Database on Amazon Elastic VMware Service (Amazon EVS) with Amazon FSx for NetApp ONTAP as NFS datastore storage. You provisioned the Oracle VM, created FSx for ONTAP volumes, mounted NFS datastores in vSphere, installed Oracle 19c, and configured SnapMirror for cross-region disaster recovery and SnapCenter for Oracle-aware backup. We also covered four migration paths for existing on-premises Oracle workloads and day-2 operations for backup, point-in-time recovery, and cloning.

To get started, review the Amazon EVS User Guide and Configure FSx for ONTAP as NFS Datastore for EVS, then deploy your first Oracle VM on Amazon EVS. For the architecture decisions behind this deployment, see our related post, Architect highly available Oracle Database on Amazon EVS and FSx for ONTAP. Share your feedback and questions in the comments.


Additional resources


About the authors

Architect highly available Oracle Database on Amazon EVS and FSx for ONTAP

Post Syndicated from Satish Bhoi original https://aws.amazon.com/blogs/architecture/architect-highly-available-oracle-database-on-amazon-evs-and-fsx-for-ontap/


Enterprises with existing VMware Cloud Foundation (VCF) investments want to migrate their Oracle databases to AWS without rearchitecting applications or retraining operations teams. Oracle on Amazon Elastic VMware Service (Amazon EVS) can take advantage of sub-millisecond storage latency, snapshot-based backup, cross-region disaster recovery (DR), and independent storage scaling, all while preserving existing VMware operational workflows.

In this post, we show you how to architect a complete Oracle Database environment on Amazon EVS with Amazon FSx for NetApp ONTAP. You learn how the storage, compute, networking, and disaster recovery layers work together to deliver high availability, cross-region DR, and sub-millisecond storage latency while maintaining your familiar VMware operational tooling.

In this post, you learn how to:

  • Design Oracle Database architecture on Amazon EVS running VMware Cloud Foundation 9.1.
  • Select optimal EC2 bare metal instance types and VM sizing for Oracle workloads.
  • Architect storage using Amazon FSx for NetApp ONTAP as NFS datastores for Oracle data and log volumes.
  • Plan SnapMirror replication for cross-region disaster recovery.
  • Evaluate migration options for moving existing Oracle workloads from on-premises VMware to EVS.

Amazon EVS directly runs VMware Cloud Foundation (VCF) environments on Amazon Elastic Compute Cloud (Amazon EC2) bare metal instances within an Amazon Virtual Private Cloud (Amazon VPC). With VCF 9.x, Amazon EVS provisions the bare metal infrastructure and VLAN subnets, and you then deploy VCF using Broadcom’s VCF Installer (the self-deployed model). VCF 9.x also supports evaluation mode, so you can validate the design before applying license keys, and the Solutions for Amazon EVS GitHub repository provides CloudFormation and Terraform templates to automate the phased VCF 9 deployment. Amazon FSx for NetApp ONTAP provides managed ONTAP storage with NFS, SMB, iSCSI, and NVMe over TCP access. FSx for NetApp ONTAP can deliver sub-millisecond response times, multiple GBps of throughput, and up to 80,000 IOPS per file system (see FSx for ONTAP performance).

For more information, see FSx for NetApp ONTAP features.

For step-by-step deployment procedures including provisioning, storage configuration, Oracle installation, and SnapMirror setup, see our companion post: Deploy Oracle Database step by step on Amazon EVS with FSx for ONTAP.


Solution architecture

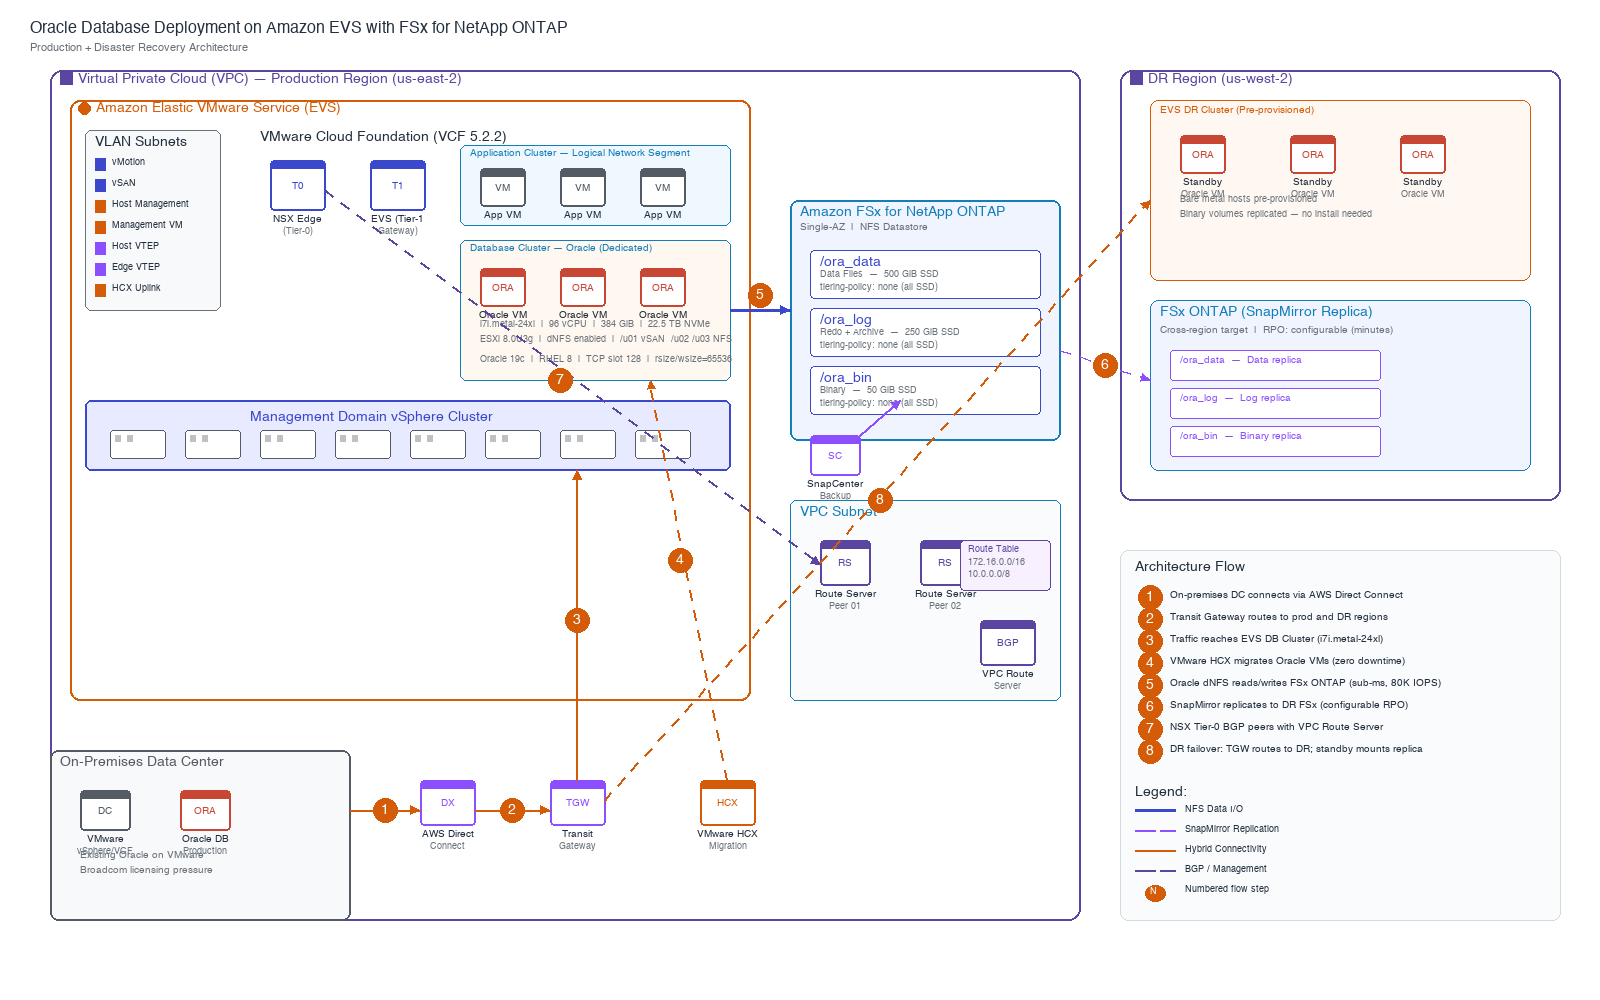
This section describes a highly available Oracle Database deployment on Amazon EVS with Amazon FSx for NetApp ONTAP storage across two AWS Regions. Figure 1 illustrates the numbered data flow from on-premises through hybrid connectivity into the production EVS environment and cross-region DR.

Oracle on Amazon EVS reference architecture showing on-premises to AWS connectivity, the production EVS cluster on FSx for ONTAP, and cross-region SnapMirror DR

Figure 1: Oracle Database on Amazon EVS with FSx for NetApp ONTAP and cross-region SnapMirror DR

The architecture consists of eight functional components, described in the following section.

Architecture components

These numbered items correspond to the data flow shown in the diagram.

  1. Hybrid link — On-premises data center connects to AWS through AWS Direct Connect for dedicated, low-latency bandwidth.
  2. Transit routing — AWS Transit Gateway routes traffic between the production VPC, DR region, and on-premises networks.
  3. Workload landing — Traffic reaches the EVS Database Cluster running on i7i.metal-24xl Amazon EC2 bare metal instances with VCF 9.1.
  4. Live migration — VMware HCX (Hybrid Cloud Extension) migrates Oracle VMs from on-premises VMware to EVS with near-zero downtime using Replication Assisted vMotion or bulk migration.
  5. NFS data path — Each ESXi host mounts Amazon FSx for NetApp ONTAP as an NFS datastore. Oracle VMs access database volumes as block devices (VMDKs on the NFS datastore) with sub-millisecond latency and up to 80,000 IOPS. Each host has its own independent NFS path to FSx for ONTAP, distributing bandwidth across the cluster.
  6. Cross-region DR — SnapMirror asynchronously replicates FSx for ONTAP volumes (data, logs, binaries) to the DR region with configurable Recovery Point Objective (RPO).
  7. Dynamic routing — NSX Tier-0 gateway peers through BGP with Amazon VPC Route Server. This is one-way BGP. Route Server listens for routes advertised by NSX and writes them to the VPC route table, but does not advertise VPC routes back to NSX.
  8. DR failover — On failover, Transit Gateway routes to the DR region where pre-provisioned standby Oracle VMs mount the SnapMirror replica volumes.

Factors to consider for Oracle Database deployment on EVS

Before you begin deployment, evaluate your Oracle workload requirements against the available infrastructure options. The decisions you make for instance types, VM sizing, and storage architecture directly affect database performance, cost, and operational complexity.

Oracle licensing consideration: Instance type selection affects Oracle license cost, which is an important factor to take into consideration. We recommend requesting an AWS Optimization and Licensing Assessment (AWS OLA) for further guidelines.

EC2 instance type selection for ESXi hosts

Amazon EVS currently supports three bare metal instance types for ESXi hosts. The choice depends on whether you prioritize per-core compute speed (i7i) or per-host memory and storage density (i4i), and on how much you want to scale a single host vertically. For most new Oracle deployments, i7i is the better choice because Oracle query performance is sensitive to CPU instruction throughput and storage IO latency.

  • i7i.metal-24xl (recommended default): 96 vCPUs (48 cores), 768 GiB RAM. 5th Gen Intel Xeon delivers improved compute performance, critical for Oracle CPU-bound queries. 3rd Gen AWS Nitro SSDs provide enhanced real-time storage performance and lower IO latency for vSAN.
  • i7i.metal-48xl: Same 5th Gen Intel Xeon as the 24xl but double the capacity per host (192 vCPUs, 96 cores, 1,536 GiB RAM, up to 100 Gbps network and 60 Gbps Amazon Elastic Block Store (Amazon EBS) bandwidth). Choose this when you want to scale a single Oracle host vertically, such as for large SGAs, high core counts, or fewer and denser hosts to reduce VMware per-host licensing. It keeps the same per-core performance profile as the 24xl.
  • i4i.metal: Higher per-host density (128 vCPUs, 1,024 GiB RAM, 30 TB NVMe) suits environments requiring fewer, larger hosts to reduce VMware licensing costs.

VCF compatibility: All three instance types support VCF 9.1 with ESXi 9.1 (build 9.1.0.0100.25433460). VCF 5.2.2 (ESXi 8.0U3g) remains available but is on a path to end of support, so new deployments should default to 9.x. An EVS environment supports 4–32 hosts per cluster. You can mix instance types across clusters within the same SDDC.

VM sizing for Oracle Database guests

Size Oracle Database VMs based on these workload characteristics:

  • Allocate vCPU count matching Oracle CPU_COUNT parameter.
  • Size memory for SGA + PGA + OS overhead (typically 75–85% of allocated VM memory for SGA)
  • Configure VM swap on vSAN datastore (not NFS). vSAN uses local NVMe with single-digit millisecond latency.
  • Use NUMA-aware VM placement for VMs exceeding single-socket core count.
  • Place OS swap and Oracle temp tablespace on the vSAN datastore for single digit ms latency at no additional cost.

Storage architecture: vSAN + FSx for NetApp ONTAP

The recommended design splits storage responsibilities between two tiers:

  • vSAN (backed by local NVMe drives on each ESXi host) handles low-latency, non-replicated workloads: VM boot disks, OS swap, and Oracle temp tablespace.
  • FSx for NetApp ONTAP handles Oracle data files and redo logs that require snapshot-based backup and cross-region replication. ESXi hosts mount FSx for ONTAP volumes as NFS datastores, and Oracle VMs access standard VMDKs on those datastores.

This separation gives local NVMe speed for transient IO while adding snapshot, clone, and SnapMirror capabilities for persistent database files.

Why NFS datastore (host-level) instead of in-guest NFS (dNFS)? With in-guest NFS, all Oracle NFS traffic routes through the NSX overlay and an NSX Edge node before reaching FSx for ONTAP. This creates a single Edge chokepoint. With NFS datastores, each ESXi host talks NFS directly to FSx for ONTAP using its own network bandwidth. There is no Edge bottleneck and no extra latency hop.

FSx for NetApp ONTAP sizing considerations

Important: Use 100% SSD for Oracle. We recommend against using capacity pool tiering for Oracle database volumes. Keep tiering policy set to none for all Oracle volumes.

Important: SSD capacity planning. If the SSD tier fills to capacity, FSx for ONTAP blocks writes. Monitor SSD utilization and provision headroom (minimum 20% free).

Important: Read/write throughput asymmetry. On a 6 GB/s filesystem, read throughput can reach 6 GB/s, but write throughput is limited to approximately 1 GB/s. Size throughput capacity based on Oracle write workload requirements. This write ceiling applies per high-availability (HA) pair. To scale write throughput beyond a single HA pair, deploy a file system with more than one HA pair and distribute Oracle volumes across the additional aggregates so writes are spread across pairs. This placement is not automatic, so plan the layout up front to keep write-heavy datasets balanced.


Network architecture

Amazon EVS uses VLAN subnets (defined at environment creation and unchangeable later) to segment traffic.

VPC Route Server replaces static routes within the VPC. NSX Tier-0 gateways peer through BGP with Route Server endpoints. This is one-way BGP: Route Server listens for routes from NSX and programs them into the VPC route table but does not advertise VPC routes back to NSX. Beyond the VPC, routes remain static at Transit Gateway.

NSX-T segmentation for Oracle

  • Dedicated Tier-1 gateway for production database segments (DB subnets)
  • Separate Tier-1 for application tier (App subnets) and perimeter network.
  • Distributed firewall rules restrict Oracle listener access (TCP 1521) to authorized application segments only.
  • Micro-segmentation between Oracle instances prevents lateral movement.

Important: Security group rules are not enforced on VLAN subnet interfaces. Use network ACLs and NSX distributed firewall for traffic control.


High availability and disaster recovery

  • SnapMirror replication frequency determines RPO. Configure based on business requirements.
  • Pre-provision standby Oracle VMs in the DR cluster to reduce Recovery Time Objective (RTO).
  • Replicate binary volumes so that Oracle installation is not required during recovery.
  • Automate failover with Ansible/SnapCenter to reduce human error.

Oracle licensing consideration for DR: There are license impacts based on how DR replication is implemented. If you have licensing questions, we recommend requesting an AWS Optimization and Licensing Assessment (AWS OLA).

To comply with the Oracle licensing rules, an alternative is to replicate the Oracle VM through NetApp SnapMirror from Production to DR. Keep the DR replicated volumes as data-protection (DP) volumes that are NOT mounted as NFS datastores on DR hosts until a failover event is declared to avoid Oracle double licensing. Only then break the SnapMirror, mount the NFS datastore on the DR Host, and power on the VM. Pre-mounting the SnapMirror volume as a datastore, even with no VM powered on, means Oracle binaries are accessible on those hosts, which Oracle may consider an “installation” requiring licenses across the entire DR cluster.


Database migration from on-premises VMware to EVS

The following table compares migration options from on-premises VMware to EVS.

Option Method Best for Downtime
1 VMware HCX Live Migration Existing VMware on-prem Near-zero (vMotion) or planned bulk
2 SnapMirror ONTAP-to-ONTAP On-prem Oracle on NetApp ONTAP Minutes (final sync switchover)
3 Oracle PDB Relocation PDB/CDB multitenant model Brief (final switchover only)
4 RMAN Backup/Restore Non-ONTAP on-prem (universal) Hours (backup + restore + apply)

For detailed procedures on each migration option, see our companion post: Deploy Oracle Database step by step on Amazon EVS with FSx for ONTAP.


Security

Security for Oracle on Amazon EVS spans multiple layers from network isolation to database-level encryption. The following table summarizes the security controls across each layer.

Layer Control
Network segmentation NSX-T Tier-1 gateways isolate DB/App/perimeter network segments
East-west traffic NSX Distributed Firewall: restrict TCP 1521 to authorized app segments
North-south traffic FortiGate or equivalent inspection VPC for ingress/egress filtering
Encryption at rest FSx for ONTAP volumes encrypted with AWS Key Management Service (AWS KMS)
Encryption in transit VPC encryption for NFS traffic, and IPsec for SnapMirror cross-region
Database encryption Oracle TDE (Transparent Data Encryption) for additional protection
Administrative access Zero-trust access (for example, Banyan or Zscaler) for VMware admin consoles
VLAN subnet security Network ACLs (security groups not enforced on VLAN interfaces)

Cost optimization

Cost optimization for Oracle on Amazon EVS focuses on matching infrastructure capacity to workload demands and using AWS pricing models. The following table summarizes key strategies across compute, storage, networking, and Oracle licensing. We recommend requesting an AWS Optimization and Licensing Assessment (AWS OLA) for further guidelines.

Component Strategy
EC2 bare metal hosts Compute Savings Plans or Reserved Instances (up to 54% savings)
Instance type selection i7i.metal-24xl delivers ~10% price-performance over i4i.metal
FSx for ONTAP throughput Right-size for the write workload, and adjust on the fly
FSx for ONTAP storage 100% SSD for Oracle, and storage efficiency for non-production
Data transfer Place FSx for ONTAP in same AZ as EVS cluster
SnapMirror replication Schedule frequency based on RPO (less frequent = lower cost)
Oracle DR licensing Replicate the Oracle VMs through NetApp SnapMirror from Production to DR, keeping the DR replicated volumes as data-protection (DP) volumes that are NOT mounted as NFS datastores on DR hosts until a failover event is declared to avoid Oracle double licensing. When a failover event is declared, then break the SnapMirror, mount the NFS datastore on the DR Host, and power on the VM. We recommend requesting an AWS Optimization and Licensing Assessment (AWS OLA) for further guidelines.
Non-production Use fewer hosts, and apply tiering for dev/test data

Summary

Deploying Oracle databases on Amazon EVS with Amazon FSx for NetApp ONTAP provides high availability, cross-region DR, and sub-millisecond storage latency while combining VMware operational consistency with AWS cloud economics:

  • Performance: i7i.metal-24xl delivers up to 23% better compute and 50% lower IO latency. FSx for ONTAP delivers sub-millisecond latency with up to 80,000 IOPS. For details, see Amazon EC2 i7i instances in the AWS GovCloud (US) Regions.
  • Availability: vSphere HA, SnapMirror cross-region replication, and optional Oracle Data Guard.
  • Manageability: SnapCenter for backup, clone, and recovery in seconds regardless of database size.
  • Migration flexibility: HCX (live), SnapMirror (ONTAP-to-ONTAP), PDB Relocation (multi-tenant), and RMAN (universal).
  • Security: NSX micro-segmentation, AWS KMS encryption, and zero-trust access.
  • Cost efficiency: Improved price performance with i7i, on-the-fly throughput adjustment, and AWS Savings Plans.

This architecture provides you with high availability, cross-region DR, and storage-based backup and cloning similar to Oracle RAC and Data Guard functions while maintaining your familiar VMware operational tooling and procedures.


Next steps

To get started with this deployment:

  1. Provision an Amazon EVS environment in your target Region. See the Amazon EVS User Guide for setup instructions.
  2. Deploy an Amazon FSx for NetApp ONTAP file system in the same VPC and Availability Zone as your EVS cluster.
  3. Follow the step-by-step procedures in our companion post to mount NFS datastores, create Oracle VMDKs, and configure SnapMirror DR.
  4. Test in a non-production environment first, then migrate production Oracle workloads.

Additional resources


About the authors

Secure Amazon Elastic VMware Service (Amazon EVS) with AWS Network Firewall

Post Syndicated from Sheng Chen original https://aws.amazon.com/blogs/architecture/secure-amazon-elastic-vmware-service-amazon-evs-with-aws-network-firewall/

Amazon Elastic VMware Service (Amazon EVS) helps organizations migrate, run, and scale VMware workloads natively on AWS. It delivers a VMware Cloud Foundation (VCF) environment that operates directly within your Amazon Virtual Private Cloud (Amazon VPC) on Amazon EC2 bare-metal instances. The solution helps customers accelerate cloud migrations and data center exits without needing to refactor existing applications.

For customers considering a hybrid cloud architecture, a unified network security solution is required to protect application traffic across Amazon EVS environments, Amazon VPCs, on-premises data centers and the internet. It also needs to provide a single point of control for firewall policy management, centralized logging, and monitoring to streamline network security operations.

AWS Network Firewall is a managed firewall and intrusion detection and prevention service (IDS/IPS) that can help address these requirements. Built on AWS managed infrastructure, it automatically scales with traffic demands while maintaining high availability and consistent performance. The service provides centralized policy management and traffic inspection across multiple VPCs and AWS accounts. Additionally, it provides comprehensive visibility and reporting through firewall log collections to Amazon Simple Storage Service (Amazon S3), Amazon CloudWatch Logs, or Amazon Data Firehose.

In this post, we demonstrate how to utilize AWS Network Firewall to secure an Amazon EVS environment, using a centralized inspection architecture across an EVS cluster, VPCs, on-premises data centers and the internet. We walk through the implementation steps to deploy this architecture using AWS Network Firewall and AWS Transit Gateway.

Architecture overview

AWS Network Firewall operates as a “bump-in-the-wire” solution, which transparently inspects and filters network traffic across Amazon VPCs. It is inserted directly into the traffic path by updating VPC or Transit Gateway route tables, allowing it to examine all packets without requiring any changes to the existing application flow patterns.

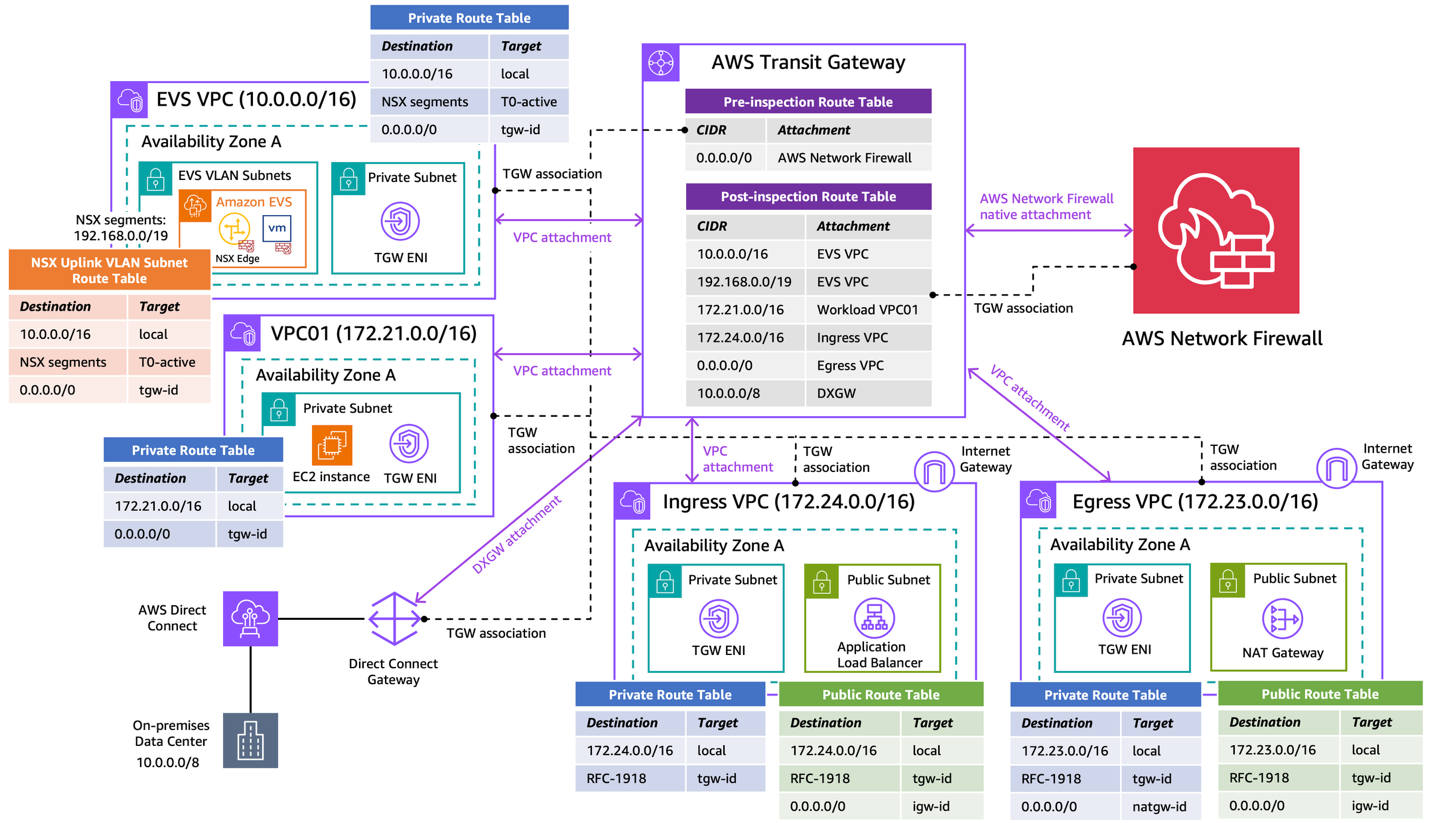
The following diagram depicts the architecture overview of our centralized inspection model using AWS Network Firewall.

Figure 1: Secure Amazon EVS with AWS Network Firewall using centralized inspection architecture

Figure 1: Secure Amazon EVS with AWS Network Firewall using centralized inspection architecture

The Amazon EVS environment is deployed directly within a customer VPC (i.e. EVS VPC), which consists of EVS VLAN subnets that form the underlay networks for VCF deployment. This infrastructure provides connectivity for NSX overlay networks, host management, vMotion, and vSAN. Amazon VPC Route Server enables dynamic routing between the underlay networks and overlay networks. For more information, see Concepts and components of Amazon EVS.

The architecture also includes a standard workload VPC (i.e. VPC01), and a Direct Connect Gateway connects to the on-premises data center via an AWS Direct Connect connection. We use a dedicated egress VPC with NAT gateways for centralized internet egress, and a separate ingress VPC with Application Load Balancers to terminate ingress web traffic and steer flows back to the target services.

With this architecture, the following traffic flow patterns can be inspected:

East-West Traffic:

  • Between EVS VPCs and Workload VPCs
  • Between Workload VPCs

North-South Traffic:

  • Between EVS/Workload VPCs and on-premises
  • Between EVS/Workload VPCs and internet
  • Between on-premises and internet

The centralized inspection architecture provides several benefits:

  • Single point of control for network security inspection across multiple VPCs
  • Enhanced rule enforcement across AWS infrastructure, on-premises resources, and the internet
  • Centralized logging and monitoring

For this demo we use the AWS Network Firewall native integration with AWS Transit Gateway capability to streamline firewall deployment and management. With a native firewall attachment, AWS automatically provisions and manages all the necessary VPC resources, reducing the operational overhead of managing subnets, route tables, and firewall endpoints within the inspection VPC.

Prerequisites

This post assumes familiarity with: AWS Command Line Interface (AWS CLI), Amazon VPC, Amazon EC2, NAT gateway, Application Load Balancer, Internet gateway, AWS Direct Connect, AWS Transit Gateway and the VMware VCF platform.

The following prerequisites are necessary to complete this solution.

  • An EVS VPC includes:
    • An Amazon EVS cluster (minimum 4x i4i nodes)
    • VPC CIDR: 10.0.0.0/16
    • NSX Segments CIDR: 192.168.0.0/19 (summarized)
    • A VPC Route Server deployed in the EVS VPC to receive NSX segment routes via BGP dynamic routing. Refer to the EVS User Guide for more details.
  • A Workload VPC (VPC01):
    • CIDR: 172.21.0.0/16
  • An Egress VPC:
    • CIDR: 172.23.0.0/16
    • 1x Internet Gateway
    • 1x NAT Gateway
  • An Ingress VPC:
    • CIDR: 172.24.0.0/16
    • 1x Internet Gateway
    • 1x Application Load Balancer
  • Optional: a Direct Connect Gateway:
    •  connecting to the on-premises environment (10.0.0.0/8)

Note: The CIDR blocks used in this example are for demo purposes only; change the address spaces to match your own networking environment. The design can also be scaled to include additional EVS environments and/or other VPCs based on workload needs.

Walkthrough

In this section, we walk through the implementation steps to deploy the centralized inspection architecture with AWS Network Firewall and AWS Transit Gateway. We focus on the overall network integration of the architecture without diving into the detailed configurations of AWS Network Firewall or Transit Gateway.

1. Create an AWS Transit Gateway

In the VPC console, create a Transit Gateway. Make sure to deselect the following options:

  • Default route table association
  • Default route table propagation

Create two empty transit gateway route tables and associate them with the Transit Gateway.

  • Pre-inspection route table: steers traffic into the AWS Network Firewall for centralized inspection
  • Post-inspection route table: returns traffic back to its original destination after inspection and is permitted by the AWS Network Firewall

2. Attach VPCs to the Transit Gateway

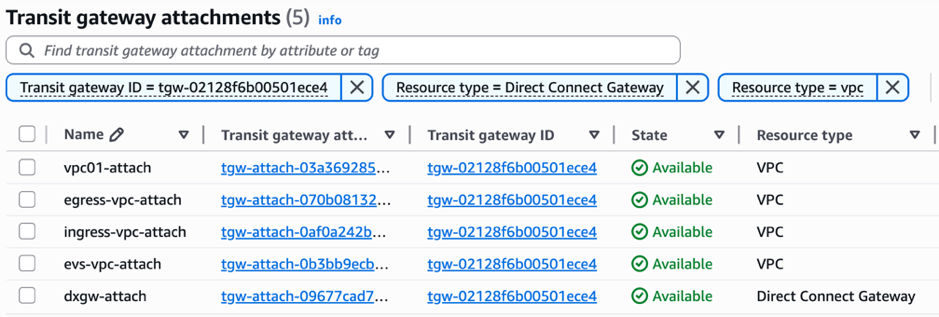
Attach all four VPCs (EVS, VPC01, Ingress, Egress) to the same Transit Gateway. The Direct Connect Gateway can also be attached to the Transit Gateway if AWS Network Firewall is needed to inspect traffic between the on-premises environment and AWS or the internet.

Figure 2: Attach VPCs to the Transit Gateway

Figure 2: Attach VPCs to the Transit Gateway

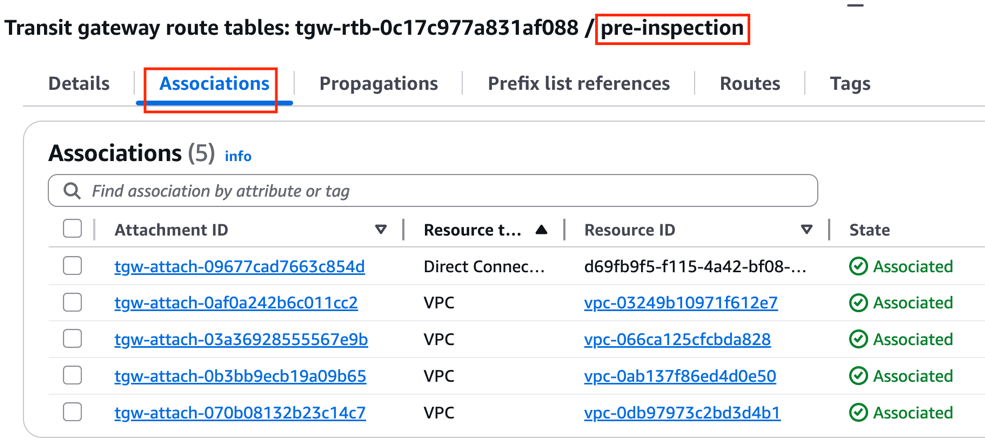
Associate all attachments to the pre-inspection Transit Gateway route table.

Figure 3: Associate VPC attachments to the pre-inspection route table

Figure 3: Associate VPC attachments to the pre-inspection route table

3. Create an AWS Network Firewall with Transit Gateway native integration

In the Network Firewall section of the VPC console, choose Create firewall.

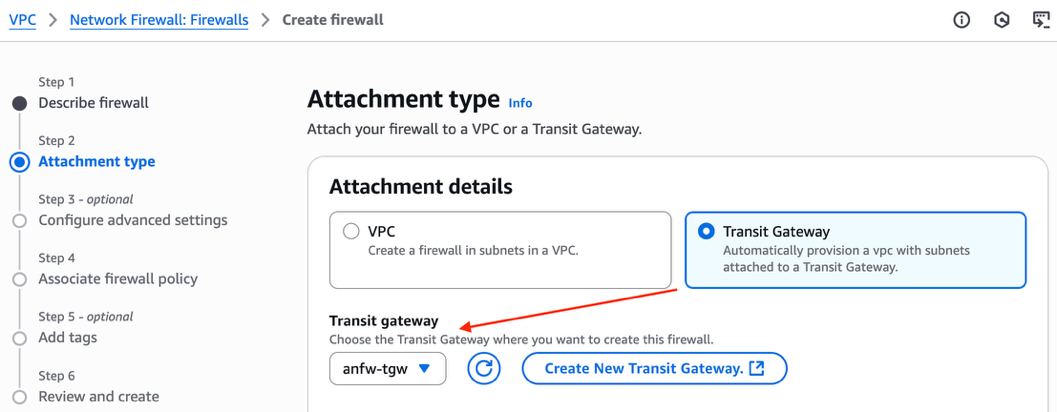
At the Attachment type section, select Transit Gateway to enable native integration with the existing Transit Gateway.

Figure 4: Enable AWS Network Firewall native integration with Transit Gateway

Figure 4: Enable AWS Network Firewall native integration with Transit Gateway

At the Logging configuration, enable the following log types with CloudWatch log group as the log destination. Create a log group for each log type in the CloudWatch Console.

  • Alert: /anfw-centralized/anfw01/alert
  • Flow: /anfw-centralized/anfw01/flow

Create and associate an empty firewall policy to deploy the AWS Network Firewall instance. The firewall policy contains a list of rule groups that define how the firewall inspects and manages traffic. This empty firewall policy can be configured later.

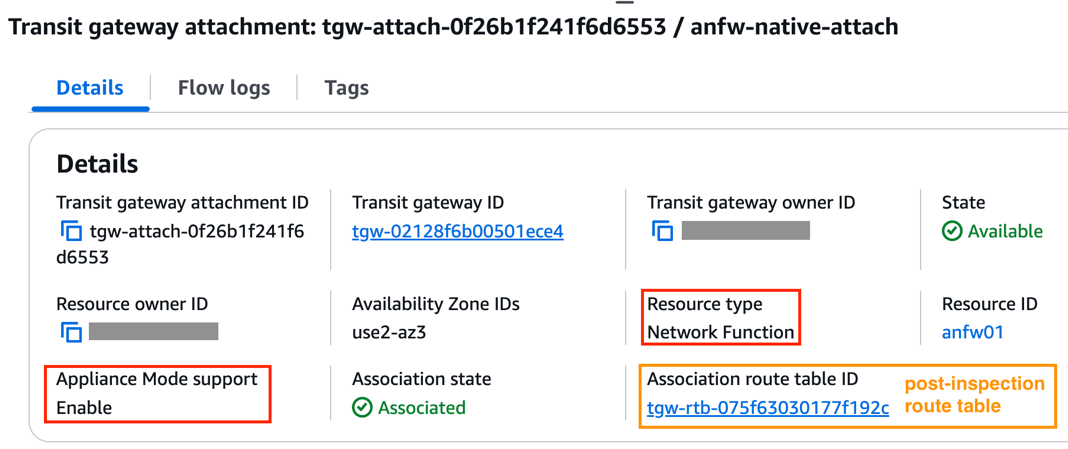
With the Transit Gateway native integration enabled, a Transit Gateway attachment is automatically created for the AWS Network Firewall, with the resource type shown as Network Function. In addition, the Appliance Mode is automatically enabled for the firewall attachment to make sure the Transit Gateway continues to use the same Availability Zone (AZ) for the attachment over the lifetime of a flow.

Associate the firewall attachment to the post-inspection Transit Gateway route table.

Figure 5: AWS Network Firewall native attachment

Figure 5: AWS Network Firewall native attachment

4. Update Transit Gateway route tables

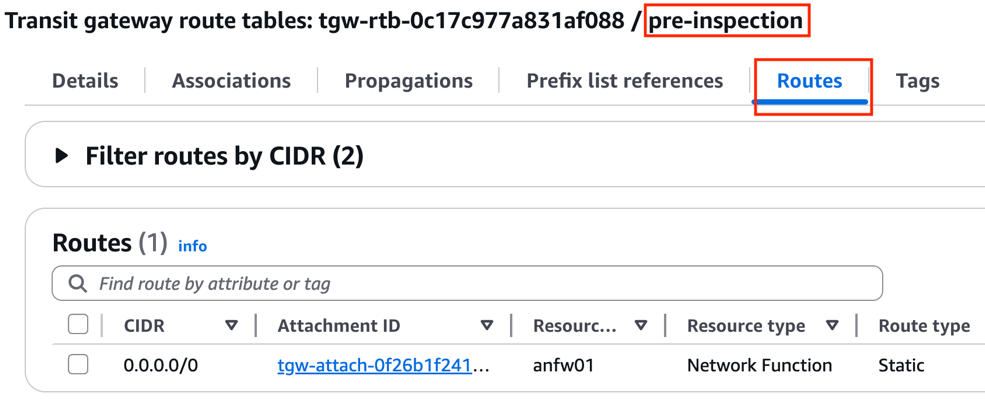
Update the pre-inspection Transit Gateway route table with a default route that points to the AWS Network Firewall attachment. This makes sure traffic that arrives to the Transit Gateway from all VPC attachments and the Direct Connect Gateway attachment is sent to the firewall for centralized inspection.

Figure 6: Transit Gateway pre-inspection route table

Figure 6: Transit Gateway pre-inspection route table

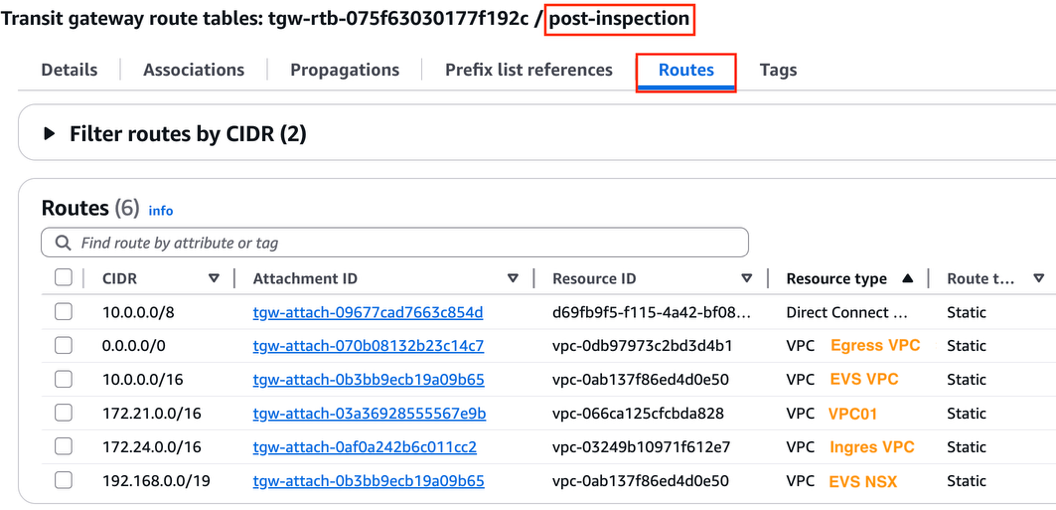
Add the following static routes to the post-inspection route table to direct return traffic back to each VPC and the Direct Connect Gateway accordingly.

Figure 7: Transit Gateway post-inspection route table

Figure 7: Transit Gateway post-inspection route table

5. Update VPC route tables

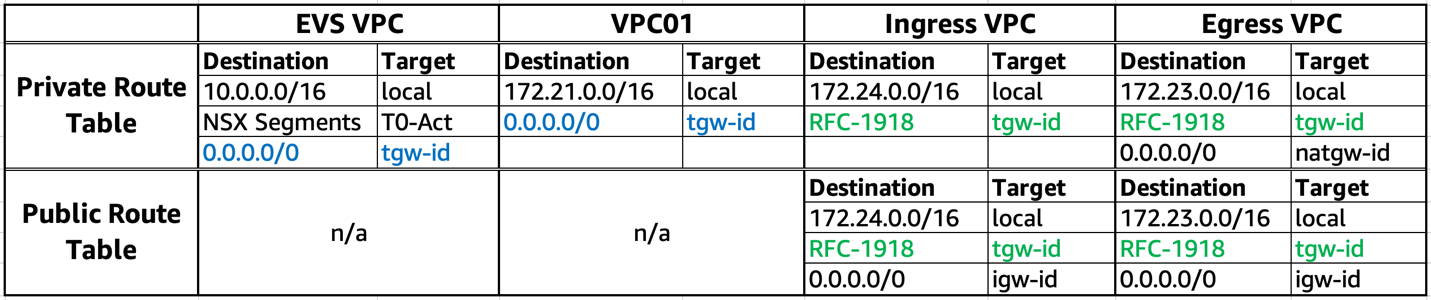
Finally, update route tables at each VPC as per the following table.

Make sure to add the following routes at the relevant VPC route tables:

  • EVS VPC and VPC01 have a default route (marked in blue) to steer all egress flows into AWS Network Firewall for centralized inspection.
  • Ingress VPC and Egress VPC have RFC-1918 routes (marked in green) to direct return traffic to the Transit Gateway.

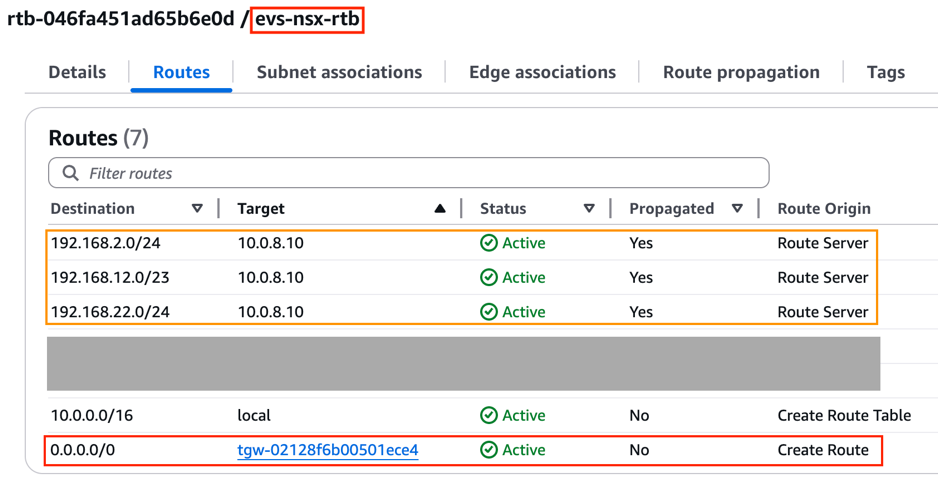
Within the EVS VPC, notice the NSX segment routes are automatically propagated to the NSX uplink subnet route table and the private subnet route table via the VPC Route Server.

Figure 8: NSX uplink subnet route table within EVS VPC

Figure 8: NSX uplink subnet route table within EVS VPC

A centralized security inspection architecture has now been deployed for the EVS environment, using AWS Network Firewall with Transit Gateway native integration.

6. Testing

Egress inspection (FQDN filtering)

To test egress inspection from EVS VPC or VPC01 to the internet, create a stateful rule group for the firewall instance using FQDN filtering:

  • Rule group format: Domain list
  • Domain names: .google.com
  • Source IPs: 192.168.0.0/19, 172.21.0.0/16
  • Protocols: HTTP & HTTPS
  • Action: Allow

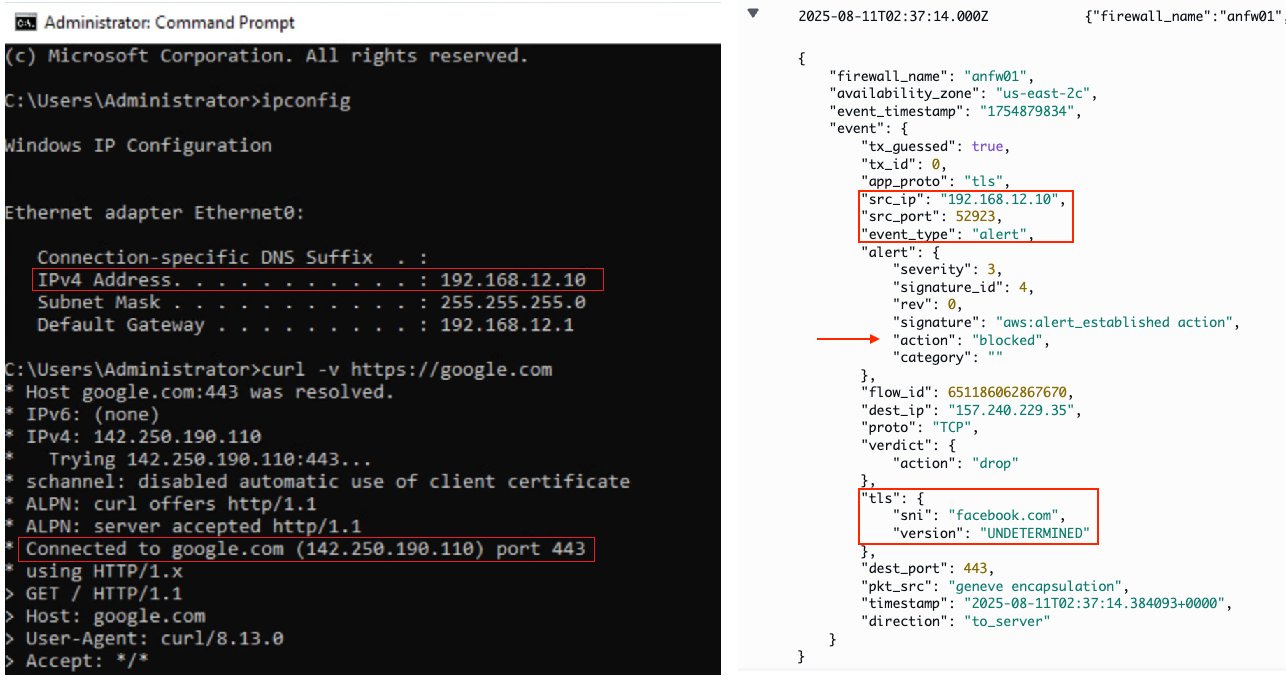
As expected, testing web access from a virtual machine (192.168.12.10) within the EVS environment to the allowed domain (i.e. google.com) is permitted by the AWS Network Firewall. However, access to unauthorized domain (i.e. facebook.com) is blocked at the firewall with an alert trigged, which can be verified at the CloudWatch log group at /aws/network-firewall/alert/.

Figure 9: Egress inspection from EVS to internet with FQDN filtering

Figure 9: Egress inspection from EVS to internet with FQDN filtering

Ingress inspection

Create another stateful rule group to allow Application Load Balancers deployed within the Ingress VPC to access a web server running in the EVS environment via HTTP protocol:

  • Rule group format: Standard stateful rule
  • Geographic IP Filtering: Disable Geographic IP filtering
  • Protocol: HTTP
  • Source: 172.24.0.0/16
  • Source Port: ANY
  • Destination: 192.168.12.10/32
  • Destination Port ANY
  • Traffic direction: Forward
  • Action: Alert

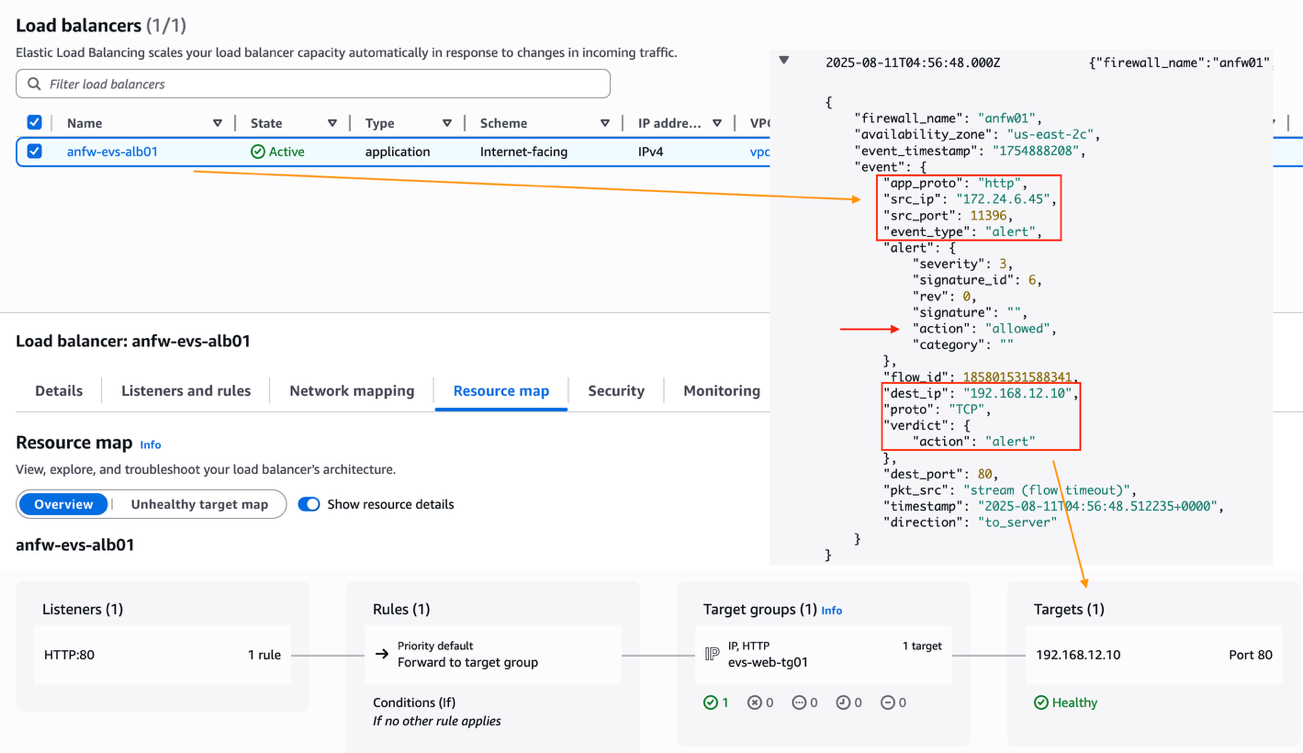
The CloudWatch firewall logs show an Application Load Balancer (172.24.6.45) from the Ingress VPC can establish HTTP connection to the EVS web server (192.168.12.10). Additionally, the Application Load Balancer has successfully registered the EVS web server as a remote IP target.

Figure 10: Ingress inspection from Ingress VPC to EVS

Figure 10: Ingress inspection from Ingress VPC to EVS

East-West inspection

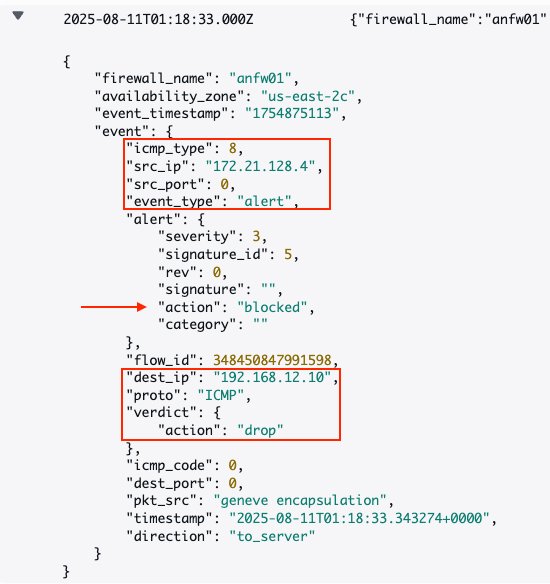
For East-West inspection testing, update the previous stateful rule group to add a new rule to block ICMP traffic from VPC01 to the EVS VPC.

  • Rule group format: Standard stateful rule
  • Geographic IP Filtering: Disable Geographic IP filtering
  • Protocol: ICMP
  • Source: 172.21.0.0/16
  • Source Port: ANY
  • Destination: 192.168.0.0/19
  • Destination Port: ANY
  • Action: Drop

As a result, pings from an EC2 instance (172.21.128.4) from VPC01 to the EVS web server (192.168.12.10) are being dropped.

Figure 11: East-West Inspection from VPC01 to EVS

Figure 11: East-West Inspection from VPC01 to EVS

Conclusion

In this post, we demonstrated how to utilize AWS Network Firewall to secure Amazon EVS workloads and to provide centralized traffic inspection between Amazon EVS environments, Amazon VPCs, on-premises data centers, and the internet. We walked through the implementation steps for deploying the centralized inspection architecture using AWS Network Firewall and AWS Transit Gateway.

To learn more, review these resources:


About the authors

AWS Weekly Roundup: OpenAI models, Automated Reasoning checks, Amazon EVS, and more (August 11, 2025)

Post Syndicated from Veliswa Boya original https://aws.amazon.com/blogs/aws/aws-weekly-roundup-openai-models-automated-reasoning-checks-amazon-evs-and-more-august-11-2025/

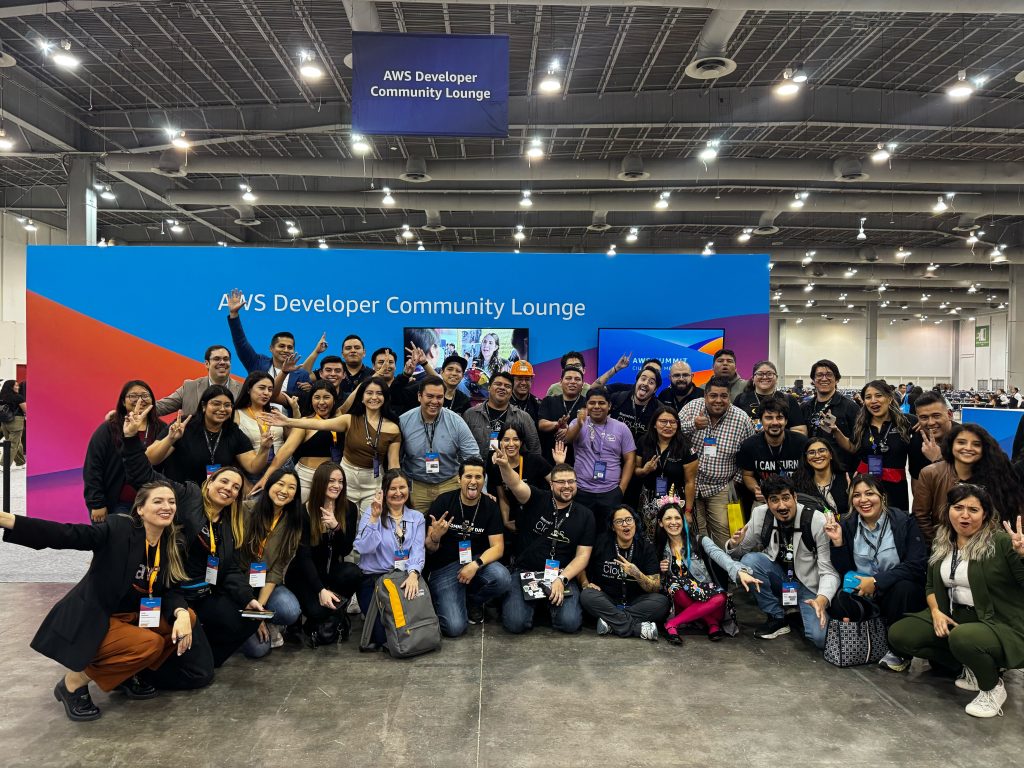
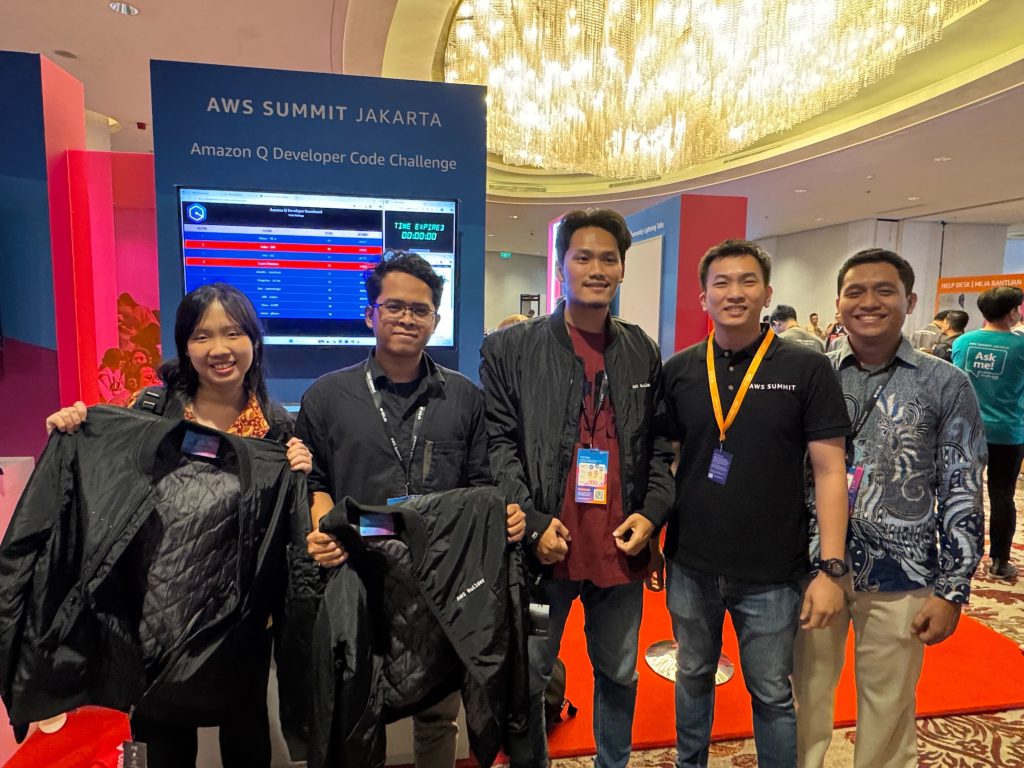
AWS Summits in the northern hemisphere have mostly concluded but the fun and learning hasn’t yet stopped for those of us in other parts of the globe. The community, customers, partners, and colleagues enjoyed a day of learning and networking last week at the AWS Summit Mexico City and the AWS Summit Jakarta.


Last week’s launches
These are the launches from last week that caught my attention:

  • OpenAI open weight models on AWS — OpenAI open weight models (gpt-oss-120b and gpt-oss-20b) are now available on AWS. These open weight models excel at coding, scientific analysis, and mathematical reasoning, with performance comparable to leading alternatives.
  • Amazon Elastic VMware Service — Amazon Elastic VMware Service (Amazon EVS), a new AWS service that lets you run VMware Cloud Foundation (VCF) environments directly within your Amazon Virtual Private Cloud (Amazon VPC), is now generally available.
  • Automated Reasoning checks — Automated Reasoning checks, a new Amazon Bedrock Guardrails policy that was previewed during AWS re:Invent, is now generally available. Automated Reasoning checks helps you validate the accuracy of content generated by foundation models (FMs) against a domain knowledge. Read more in Danilo’s post on how this can help prevent factual errors that can be caused by AI hallucinations.
  • Multi-Region application recovery service — In this post, Sébastien writes about the announcement of Amazon Application Recovery Controller (ARC) Region switch, a fully managed, highly available capability that enables organizations to plan, practice, and orchestrate Region switches with confidence, eliminating the uncertainty around cross-Region recovery operations.

Additional updates
I thought these projects, blog posts, and news items were also interesting:

Upcoming AWS events
Keep a look out and be sure to sign up for these upcoming events:

AWS re:Invent 2025 (December 1-5, 2025, Las Vegas) — AWS’s flagship annual conference offering collaborative innovation through peer-to-peer learning, expert-led discussions, and invaluable networking opportunities.

AWS Summits — Join free online and in-person events that bring the cloud computing community together to connect, collaborate, and learn about AWS. Coming up soon are the summits at São Paulo (August 13) and Johannesburg (August 20).

AWS Community Days — Join community-led conferences that feature technical discussions, workshops, and hands-on labs led by expert AWS users and industry leaders from around the world: Australia (August 15), Adria (September 5), Baltic (September 10), Aotearoa (September 18), and South Africa (September 20).

Join the AWS Builder Center to learn, build, and connect with builders in the AWS community. Browse here for upcoming in-person and virtual developer-focused events.

That’s all for this week. Check back next Monday for another Weekly Roundup!

– Veliswa.