Tag Archives: annotations

Design system annotations, part 2: Advanced methods of annotating components

Post Syndicated from Jan Maarten original https://github.blog/engineering/user-experience/design-system-annotations-part-2-advanced-methods-of-annotating-components/


In part one of our design system annotation series, we discussed the ways in which accessibility can get left out of design system components from one instance to another. Our solution? Using a set of “Preset annotations” for each component with Primer. This allows designers to include specific pre-set details that aren’t already built into the component and visually communicated in the design itself. 

That being said, Preset annotations are unique to each design system — and while ours may be a helpful reference for how to build them — they’re not something other organizations can utilize if you’re not also using the Primer design system. 

Luckily, you can build your own. Here’s how. 

How to make Preset annotations for your design system

Start by assessing components to understand which ones would need Preset annotations—not all of them will. Prioritize components that would benefit most from having a Preset annotation, and build that key information into each one. Next, determine what properties should be included. Only include key information that isn’t conveyed visually, isn’t in the component properties, and isn’t already baked into a coded component. 

The start of a list of Primer components with notes for those which need Preset annotations. There are notes pointing to ActionBar, ActionMenu, and Autocomplete with details about what information should be documented in their Preset.

Prioritizing components

When a design system has 60+ components, knowing where to start can be a challenge. Which components need these annotations the most? Which ones would have the highest impact for both design teams and our users? 

When we set out to create a new set of Preset annotations based on our proof of concept, we decided to use ten Primer components that would benefit the most. To help pick them, we used an internal tool called Primer Query that tracks all component implementations across the GitHub codebase as well as any audit issues connected to them. Here is a video breakdown of how it works, if you’re curious. 

We then prioritized new Preset annotations based on the following criteria:

  1. Components that align to organization priorities (i.e. high value products and/or those that receive a lot of traffic).
  2. Components that appear frequently in accessibility audit issues.
  3. Components with React implementations (as our preferred development framework).
  4. Most frequently implemented components. 

Mapping out the properties

For each component, we cross-referenced multiple sources to figure out what component properties and attributes would need to be added in each Preset annotation. The things we were looking for may only exist in one or two of those places, and thus are less likely to be accounted for all the way through the design and development lifecycle. The sources include:

Component documentation on Primer.style

Design system docs should contain usage guidance for designers and developers, and accessibility requirements should be a part of this guidance as well. Some of the guidance and requirements get built into the component’s Figma asset, while some only end up in the coded component. 

Look for any accessibility requirements that are not built into either Figma or code. If it’s built in, putting the same info in the Preset annotation may be redundant or irrelevant.

Coded demos in Storybook 

Our component sandbox helped us see how each component is built in React or Rails, as well as what the HTML output is. We looked for any code structure or accessibility attributes that are not included in the component documentation or the Figma asset itself—especially when they may vary from one implementation to another. 

Component properties in the Figma asset library

Library assets provide a lot of flexibility through text layers, image fills, variants, and elaborate sets of component properties. We paid close attention to these options to understand what designers can and can’t change. Worthwhile additions to a Preset Annotation are accessibility attributes, requirements, and usage guidance in other sources that aren’t built into the Figma component. 

Other potential sources 

  • Experiences from team members: The designers, developers, and accessibility specialists you work with may have insight into things that the docs and design tools may have missed. If your team and design system have been around for a while, their insights may be more valuable than those you’ll find in the docs, component demos, or asset libraries. Take some time to ask which components have had challenging bugs and which get intentionally broken when implemented.
  • Findings from recent audits: Design system components themselves may have unresolved audit issues and remediation recommendations. If that’s the case, those issues are likely present in Storybook demos and may be unaccounted for in the component documentation. Design system audit issues may have details that both help create a Preset annotation and offer insights about what should not be carried over from existing resources.

What we learned from creating Preset annotations

Preset annotations may not be for every team or organization. However, they are especially well suited for younger design systems and those that aren’t well adopted. 

Mature design systems like Primer have frequent updates. This means that without close monitoring, the design system components themselves may fall out of sync with how a Preset annotation is built. This can end up causing confusion and rework after development starts, so it may be wise to make sure there’s some capacity to maintain these annotations after they’ve been created. 

For newer teams at GitHub, new members of existing teams, and team members who were less familiar with the design system, the built-in guidance and links to documentation and component demos proved very useful. Those who are more experienced are also able to fine-tune the Presets and how they’re used.

If you don’t already have extensive experience with the design system components (or peers to help build them), it can take a lot of time to assess and map out the properties needed to build a Preset. It can also be challenging to name a component property succinctly enough that it doesn’t get truncated in Figma’s properties panel. If the context is not self-evident, some training or additional documentation may help.

It’s not always clear that you need a Preset annotation

There may be enough overlap between the Preset annotation for a component and types of annotations that aren’t specific to the design system. 
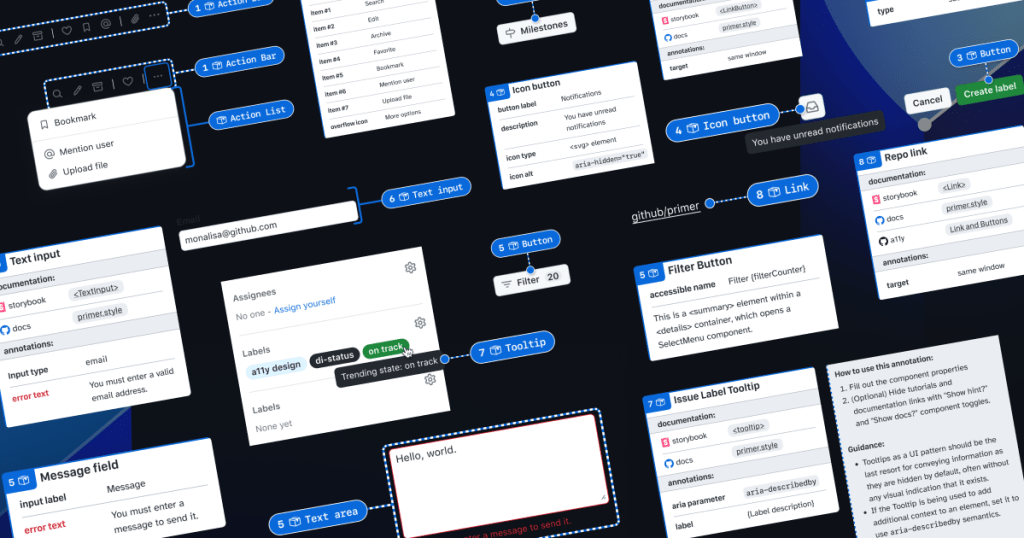
For example, the GitHub Annotation Toolkit has components to annotate basic <textarea> form elements in addition to a Preset annotation for our <TextArea> Primer component:

Comparison between a Form Element annotation for the textarea HTML element and a Preset annotation for the TextArea Primer component.

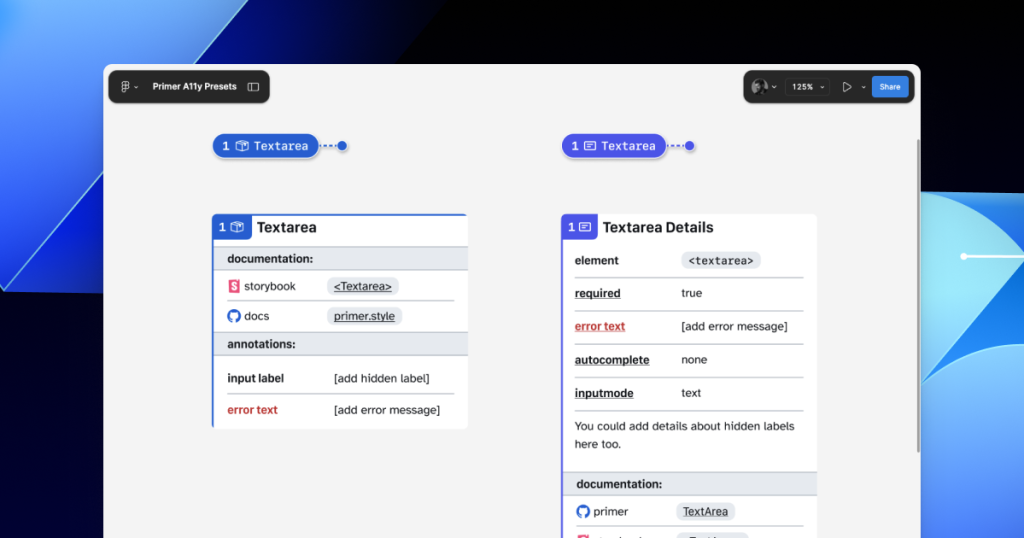
In many instances, this flexibility may be confusing because you could use either annotation. For example, the Primer <TextArea> Preset has built-in links to specific Primer docs, and while the non-Preset version doesn’t, you could always add the links manually. While there’s some overlap between the two, using either one is better than none. 

One way around this confusion is to add Primer-specific properties to the default set of annotations. This would allow you to do things like toggle a boolean property on a normal Button annotation and have it show links and properties specific to your design system’s button component. 

Our Preset creation process may unlock automation

There are currently a number of existing Figma plugins that advertise the ability to scan a design file to help with annotations. That being said, the results are often mixed and contain an unmanageable amount of noise and false positives. One of the reasons these issues happen is that these public plugins are design system agnostic.

Current automated annotation tools aren’t able to understand that any design system components are being used without bespoke programming or thorough training of AI models. For plugins like this to be able to label design elements accurately, they first need to understand how to identify the components on the canvas, the variants used, and the set properties. 

A Figma file showing an open design for Releases with an expanded layer tree highlighting a Primer Button component in the design. To the left of the screenshot are several git-lines and a Preset annotation for a Primer Button with a zap icon intersecting it. The git-line trails and the direction of the annotation give the feeling of flying toward the layer tree, which visually suggests this Primer Button layer can be automatically identified and annotated.

With that in mind, perhaps the most exciting insight is that the process of mapping out component properties for a Preset annotation—the things that don’t get conveyed in the visual design or in the code—is also something that would need to be done in any attempt to automate more usable annotations. 

In other words, if a team uses a design system and wants to automate adding annotations, the tool they use would need to understand their components. In order for it to understand their components well enough to automate accurately, these hidden component properties would need to be mapped out. The task of creating a set of Preset annotations may be a vital stepping stone to something even more streamlined. 

A promising new method: Figma’s Code Connect 

While building our new set of Preset annotations, we experimented with other ways to enhance Primer with annotations. Though not all of those experiments worked out, one of them did: adding accessibility attributes through Code Connect. 

Primer was one of the early adopters of Figma’s new Code Connect feature in Dev Mode. Says Lukas Oppermann, our staff systems designer, “With Code Connect, we can actually move the design and the code a little bit further apart again. We can concentrate on creating the best UX for the designers working in Figma with design libraries and, on the code side, we can have the best developer experience.” 

To that end, Code Connect allows us to bypass much of our Preset annotations, as well as the downsides of some of our other experiments. It does this by adding key accessibility details directly into the code that developers can export from Figma.

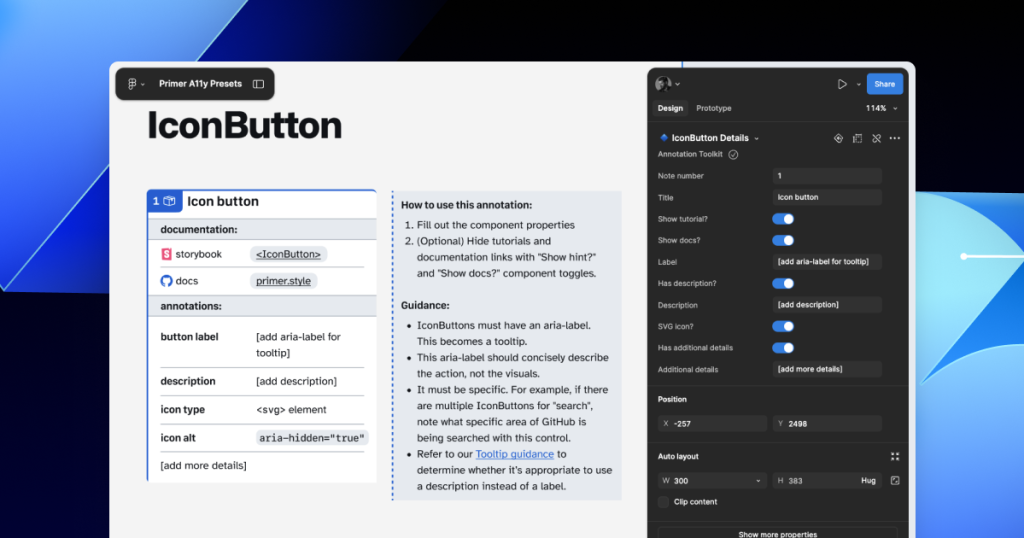
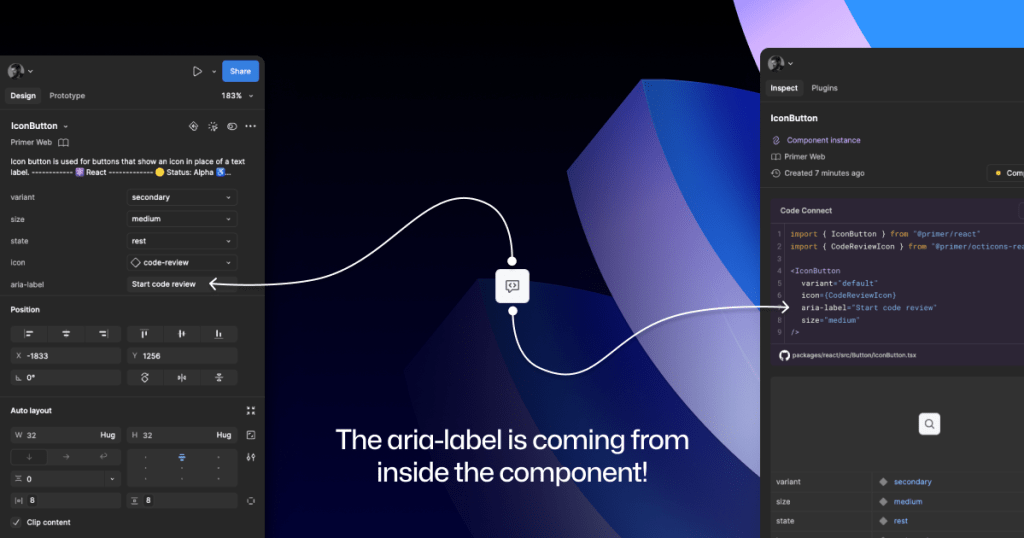
GitHub’s Octicons are used in many of our Primer components. They are decorative by default, but they sometimes need alt text or aria-label attributes depending on how they’re used. In the IconButton component, that button uses an Octicon and needs an accessible name to describe its function. 

When using a basic annotation kit, this may mean adding stamps for a Button and Decorative Image as well as a note in the margins that specifies what the aria-label should be. When using Preset annotations, there are fewer things to add to the canvas and the annotation process takes less time.

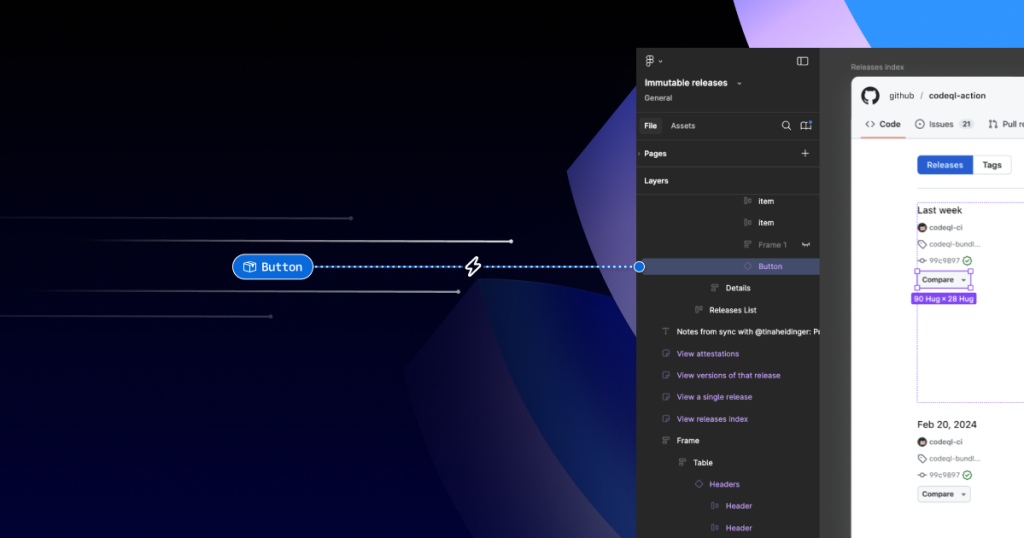
With Code Connect set up, Lukas added a hidden layer in the IconButton Figma component. It has a text property for aria-label which lets designers add the value directly from the component properties panel. No annotations needed. The hidden layer doesn’t disrupt any of the visuals, and the aria-label property gets exported directly with the rest of the component’s code.

An IconButton component with a code-review icon. On the left is a screenshot of the component’s properties panel, with an aria-label value of: Start code review. On the right is the Code Connect output showing usable React code for an IconButton that includes the parameter: aria-label=Start code review.

It takes time to set up Code Connect with each of your design system components. Here are a few tips to help:

  • Consistency is key. Make sure that the properties you create and how you place hidden layers is consistent across components. This helps set clear expectations so your teams can understand how these hidden layers and properties function. 
  • Use a branch of your design system library to experiment. Hiding attributes like aria-label is quite simple compared to other complex information that Preset annotations are capable of handling. 
  • Use visual regression testing (VRT). Adding complexity directly to a component comes with increased risk of things breaking in the future, especially for those with many variants. Figma’s merge conflict UI is helpful, but may not catch everything.

We’ve made the GitHub Annotation Toolkit open source, so you can see first-hand how we’ve implemented our Primer A11y Preset annotations and visual regression tests. Check it out and start annotating today!

Figma library cover for the GitHub Annotation Toolkit with a grid background that looks like a starry night sky. There's an armada of little annotation stamp labels covering the bottom two thirds of the image, all at an angle. There's a series of angled git lines above them. Both look like they're launching from the ground and through into the sky grid.

Further reading

Accessibility annotation kits are a great resource, provided they’re used responsibly. Eric Bailey, one of the contributors to our forthcoming GitHub Annotation Toolkit, has written extensively about how annotations can highlight and amplify deeply structural issues when you’re building digital products.

The post Design system annotations, part 2: Advanced methods of annotating components appeared first on The GitHub Blog.

Design system annotations, part 1: How accessibility gets left out of components

Post Syndicated from Jan Maarten original https://github.blog/engineering/user-experience/design-system-annotations-part-1-how-accessibility-gets-left-out-of-components/


When it comes to design systems, every organization tends to be at a different place in their accessibility journey. Some have put a great deal of work into making their design system accessible while others have a long way to go before getting there. To help on this journey, many organizations rely on accessibility annotations to make sure there are no access barriers when a design is ready to be built. 

However, it’s a common misconception (especially for organizations with mature design systems) that accessible components will result in accessible designs. While design systems are fantastic for scaling standards and consistency, they can’t prevent every issue with our designs or how we build them. Access barriers can still slip through the cracks and make it into production.

This is the root of the problem our Accessibility Design team set out to solve. 

In this two-part series, we’ll show you exactly how accessible design system components can produce inaccessible designs. Then we’ll demonstrate our solution: integrating annotations with our Primer components. This allows us to spend less time annotating, increases design system adoption, and reaches teams who may not have accessibility support. And in our next post, we’ll walk you through how you can do the same for your own components.

Let’s dig in.

What are annotations and their benefits? 

Annotations are notes included in design projects that help make the unseen explicit by conveying design intent that isn’t shown visually. They improve the usability of digital experiences by providing a holistic picture for developers of how an experience should function. Integrating annotations into our design process helps our teams work better together by closing communication gaps and preventing quality issues, accessibility audit issues, and expensive re-work. 

Some of the questions annotations help us answer include:

  • How is assistive technology meant to navigate a page from one element to another?
  • What’s the alternative text for informative images and buttons without labels?
  • How does content shift depending on viewport size, screen orientation, or zoom level?
  • Which virtual keyboard should be used for a form input on mobile?
  • How should focus be managed for complex interactions?

Our answers to questions like this—or the lack thereof—can make or break the experience of the web for a lot of people, especially users with disabilities. Some annotation tools are built specifically to help with this by guiding designers to include key details about web standards, platform functionality, and accessibility (a11y). 

Most public annotation kits are well suited for teams who are creating new design system components, teams who aren’t already using a design system, or teams who don’t have specialized accessibility knowledge. They usually help annotate things like:

  • Controls such as buttons and links
  • Structural elements such as headings and landmarks
  • Decorative images and informative descriptions 
  • Forms and other elements that require labels and semantic roles 
  • Focus order for assistive technology and keyboard navigation

GitHub’s annotation’s toolkit

One of our top priorities is to meet our colleagues where they’re at. We wanted all our designers to be able to use annotations out of the box because we believe they shouldn’t need to be a certified accessibility specialist in order to get things built in an accessible way. 

 A browser window showing the Web Accessibility Annotation Kit in the cvs-health/annotations repository.

To this end, last year we began creating an internal Figma library—the GitHub Annotation Toolkit—which is now open source! Our toolkit builds on the legacy of the former Inclusive Design team at CVS Health. Their two open source annotation kits help make documentation that’s easy to create and consume, and are among the most widely used annotation libraries in the Figma Community. 

While they add clarity, annotations can also add overhead. If teams are only relying on specialists to interpret designs and technical specifications for developers, the hand-off process can take longer than it needs to. To create our annotation toolkit, we rebuilt its predecessor from the ground up to avoid that overhead, making extensive improvements and adding inline documentation to make it more intuitive and helpful for all of our designers—not just accessibility specialists. 

Design systems can also help reduce that overhead. When you audit your design systems for accessibility, there’s less need for specialist attention on every product feature, since you’re using annotations to add technical semantics and specialist knowledge into every component. This means that designers and developers only need to adhere to the usage guidelines consistently, right?

The problems with annotations and design system components

Unfortunately, it’s not that simple. 

Accessibility is not binary

While design systems can help drive more accessible design at scale, they are constantly evolving and the work on them is never done. The accessibility of any component isn’t binary. Some may have a few severe issues that create access barriers, such as being inoperable with a keyboard or missing alt text. Others may have a few trivial issues, such as generic control labels. 

Most of the time, it will be a misnomer to claim that your design system is “fully accessible.” There’s always more work to do—it’s just a question of how much. The Web Content Accessibility Guidelines (WCAG) are a great starting point, but their “Success Criteria” isn’t tailored for the unique context that is your website or product or audience. 

While the WCAG should be used as a foundation to build from, it’s important to understand that it can’t capture every nuance of disabled users’ needs because your users’ needs are not every user’s needs. It would be very easy to believe that your design system is “fully accessible” if you never look past WCAG to talk to your users. If Primer has accessible components, it’s because we feel that direct participation and input from daily assistive technology users is the most important aspect of our work. Testing plans with real users—with and without disabilities—is where you really find what matters most. 

Accessible components do not guarantee accessible designs

Arranging a series of accessible components on a page does not automatically create an accurate and informative heading hierarchy. There’s a good chance that without additional documentation, the heading structure won’t make sense visually—nor as a medium for navigating with assistive technology.

A page wireframe showing a linear layout of an H1 title, an H2 in a banner below it, and a row of several cards below with headings of H4. The caption reads: this accessible card has an H4, breaking the page structure by skipping heading levels. Next to the wireframe is a diagram showing the page structure as a tree view, highlighting the level skipping from H2 to H4.

It’s great when accessible components are flexible and responsive, but what about when they’re placed in a layout that the component guidance doesn’t account for? Do they adapt to different zoom levels, viewport sizes, and screen orientations? Do they lose any functionality or context when any of those things change?

Component usage is contextual. You can add an image or icon to your design, but the design system docs can’t write descriptive text for you. You can use the same image in multiple places, but the image description may need to change depending on context. 

Similarly, forms built using the same input components may do different things and require different error validation messages. It’s no wonder that adopting design system components doesn’t get rid of all audit issues.

Design system components in Figma don’t include all the details

Annotation kits don’t include components for specific design systems because almost every organization is using their own. When annotation kits are adopted, teams often add ways to label their design system components. 

This labeling lets developers know they can use something that’s already been built, and that they don’t need to build something from scratch. It also helps identify any design system components that get ‘detached’ in Figma. And it reduces the number of things that need to be annotated. 

Let’s look at an example:

A green Primer button with a lightning bolt icon and a label that says: this button does something. To the right is a set of Figma component properties that control the button’s visual appearance.

If we’re using this Primer Button component from the Primer Web Figma library, there are a few important things that we won’t know just by looking at the design or the component properties:

  • Functional differences when components are implemented. Is this a link that just looks visually like a button? If so, a developer would use the <LinkButton> React component instead of <Button>.
  • Accessible labels for folks using assistive technology. The icon may need alt text. In some cases, the button text might need some visually-hidden text to differentiate it from similar buttons. How would we know what that text is? Without annotations, the Figma component doesn’t have a place to display this.
  • Whether user data is submitted. When a design doesn’t include an obvious form with input fields, how do we convey that the button needs specific attributes to submit data? 

It’s risky to leave questions like this unanswered, hoping someone notices and guesses the correct answer. 

A solution that streamlines the annotation process while minimizing risk

When creating new components, a set of detailed annotations can be a huge factor in how robust and accessible they are. Once the component is built, design teams can start to add instances of that component in their designs. When those designs are ready to be annotated, those new components shouldn’t need to be annotated again. In most cases, it would be redundant and unnecessary—but not in every case. 

There are some important details in many Primer components that may change from one instance to another. If we use the CVS Health annotation kit out of the box, we should be able to capture those variations, but we wouldn’t be able to avoid those redundant and unnecessary annotations. As we built our own annotation toolkit, we built a set of annotations for each Primer component to do both of those things at once. 

An annotated Primer Brand accordion with six Stamps and four Detail notes in the margins.

This accordion component has been thoroughly annotated so that an engineer has everything they need to build it the first time. These include heading levels, semantics for <detail> and <summary> elements, landmarks, and decorative icons. All of this is built into the component so we don’t need to annotate most of this when adding the accordion to our new designs.

However, there are two important things we need to annotate, as they can change from one instance to another:

  1. The optional title at the top.
  2. The heading level of each item within the accordion.

If we don’t specify these things, we’re leaving it to chance that the page’s heading structure will break or that the experience will be confusing for people to understand and navigate the page. The risks may be low for a single button or basic accordion, but they grow with pattern complexity, component nesting, interaction states, duplicated instances, and so on. 

An annotated Primer Brand accordion with one Stamp and one Detail note in the margins.

Instead of annotating what’s already built into the component or leaving these details to chance, we can add two quick annotations. One Stamp to point to the component, and one Details annotation where we fill in some blanks to make the heading levels clear. 

Because the prompts for specific component details are pre-set in the annotation, we call them Preset annotations.

A mosaic of preset annotation for various Primer components.

Introducing our Primer A11y Preset annotations

With this proof of concept, we selected ten frequently used Primer components for the same treatment and built a new set of Preset annotations to document these easily missed accessibility details—our Primer A11y Presets. 

Those Primer components tend to contribute to more accessibility audit issues when key details are missing on implementation. Issues for these components relate to things like lack of proper labels, error validation messages, or missing HTML or ARIA attributes

IconButton Preset annotation, with guidance toggled on.

Each of our Preset annotations is linked to component docs and Storybook demos. This will hopefully help developers get straight to the technical info they need without designers having to find and add links manually. We also included guidance for how to fill out each Preset, as well as how to use the component in an accessible way. This helps designers get support inline without leaving their Figma canvas. 

Want to create your own? Check out Design system annotations, part 2

Button components in Google’s Material Design and Shopify’s Polaris, IBM’s Carbon, or our Primer design system are all very different from one another. Because Preset annotations are based on specific components, they only work if you’re also using the design system they’re made for. 

In part 2 of this series, we’ll walk you through how you can build your own set of Preset annotations for your design system, as well as some different ways to document important accessibility details before development starts.

You may also like: 

If you’re more of a visual learner, you can watch Alexis Lucio explore Preset annotations during GitHub’s Dev Community Event to kick off Figma’s Config 2024. 

Get the guide to GitHub’s Annotation Toolkit >

The post Design system annotations, part 1: How accessibility gets left out of components appeared first on The GitHub Blog.

Data ingestion pipeline with Operation Management

Post Syndicated from Netflix Technology Blog original https://netflixtechblog.com/data-ingestion-pipeline-with-operation-management-3c5c638740a8

by Varun Sekhri, Meenakshi Jindal, Burak Bacioglu

Introduction

At Netflix, to promote and recommend the content to users in the best possible way there are many Media Algorithm teams which work hand in hand with content creators and editors. Several of these algorithms aim to improve different manual workflows so that we show the personalized promotional image, trailer or the show to the user.

These media focused machine learning algorithms as well as other teams generate a lot of data from the media files, which we described in our previous blog, are stored as annotations in Marken. We designed a unique concept called Annotation Operations which allows teams to create data pipelines and easily write annotations without worrying about access patterns of their data from different applications.

Goals

Annotation Operations

Lets pick an example use case of identifying objects (like trees, cars etc.) in a video file. As described in the above picture

  • During the first run of the algorithm it identified 500 objects in a particular Video file. These 500 objects were stored as annotations of a specific schema type, let’s say Objects, in Marken.
  • The Algorithm team improved their algorithm. Now when we re-ran the algorithm on the same video file it created 600 annotations of schema type Objects and stored them in our service.

Notice that we cannot update the annotations from previous runs because we don’t know how many annotations a new algorithm run will result into. It is also very expensive for us to keep track of which annotation needs to be updated.

The goal is that when the consumer comes and searches for annotations of type Objects for the given video file then the following should happen.

  • Before Algo run 1, if they search they should not find anything.
  • After the completion of Algo run 1, the query should find the first set of 500 annotations.
  • During the time when Algo run 2 was creating the set of 600 annotations, clients search should still return the older 500 annotations.
  • When all of the 600 annotations are successfully created, they should replace the older set of 500.
  • So now when clients search annotations for Objects then they should get 600 annotations.

Does this remind you of something? This seems very similar (not exactly same) to a distributed transaction.

Typically, an algorithm run can have 2k-5k annotations. There are many naive solutions possible for this problem for example:

  • Write different runs in different databases. This is obviously very expensive.
  • Write algo runs into files. But we cannot search or present low latency retrievals from files
  • Etc.

Instead our challenge was to implement this feature on top of Cassandra and ElasticSearch databases because that’s what Marken uses. The solution which we present in this blog is not limited to annotations and can be used for any other domain which uses ES and Cassandra as well.

Marken Architecture

Marken’s architecture diagram is as follows. We refer the reader to our previous blog article for details. We use Cassandra as a source of truth where we store the annotations while we index annotations in ElasticSearch to provide rich search functionalities.

Marken Architecture

Our goal was to help teams at Netflix to create data pipelines without thinking about how that data is available to the readers or the client teams. Similarly, client teams don’t have to worry about when or how the data is written. This is what we call decoupling producer flows from clients of the data.

Lifecycle of a movie goes through a lot of creative stages. We have many temporary files which are delivered before we get to the final file of the movie. Similarly, a movie has many different languages and each of those languages can have different files delivered. Teams generally want to run algorithms and create annotations using all those media files.

Since algorithms can be run on a different permutations of how the media files are created and delivered we can simplify an algorithm run as follows

  • Annotation Schema Type — identifies the schema for the annotation generated by the Algorithm.
  • Annotation Schema Version — identifies the schema version of the annotation generated by the Algorithm.
  • PivotId — a unique string identifier which identifies the file or method which is used to generate the annotations. This could be the SHA hash of the file or simply the movie Identifier number.

Given above we can describe the data model for an annotation operation as follows.

{
"annotationOperationKeys": [
{
"annotationType": "string", ❶
"annotationTypeVersion": “integer”,
"pivotId": "string",
"operationNumber": “integer” ❷
}
],
"id": "UUID",
"operationStatus": "STARTED", ❸
"isActive": true ❹
}
  1. We already explained AnnotationType, AnnotationTypeVersion and PivotId above.
  2. OperationNumber is an auto incremented number for each new operation.
  3. OperationStatus — An operation goes through three phases, Started, Finished and Canceled.
  4. IsActive — Whether an operation and its associated annotations are active and searchable.

As you can see from the data model that the producer of an annotation has to choose an AnnotationOperationKey which lets them define how they want UPSERT annotations in an AnnotationOperation. Inside, AnnotationOperationKey the important field is pivotId and how it is generated.

Cassandra Tables

Our source of truth for all objects in Marken in Cassandra. To store Annotation Operations we have the following main tables.

  • AnnotationOperationById — It stores the AnnotationOperations
  • AnnotationIdByAnnotationOperationId — it stores the Ids of all annotations in an operation.

Since Cassandra is NoSql, we have more tables which help us create reverse indices and run admin jobs so that we can scan all annotation operations whenever there is a need.

ElasticSearch

Each annotation in Marken is also indexed in ElasticSearch for powering various searches. To record the relationship between annotation and operation we also index two fields

  • annotationOperationId — The ID of the operation to which this annotation belongs
  • isAnnotationOperationActive — Whether the operation is in an ACTIVE state.

APIs

We provide three APIs to our users. In following sections we describe the APIs and the state management done within the APIs.

StartAnnotationOperation

When this API is called we store the operation with its OperationKey (tuple of annotationType, annotationType Version and pivotId) in our database. This new operation is marked to be in STARTED state. We store all OperationIDs which are in STARTED state in a distributed cache (EVCache) for fast access during searches.

StartAnnotationOperation

UpsertAnnotationsInOperation

Users call this API to upsert the annotations in an Operation. They pass annotations along with the OperationID. We store the annotations and also record the relationship between the annotation IDs and the Operation ID in Cassandra. During this phase operations are in isAnnotationOperationActive = ACTIVE and operationStatus = STARTED state.

Note that typically in one operation run there can be 2K to 5k annotations which can be created. Clients can call this API from many different machines or threads for fast upserts.

UpsertAnnotationsInOperation

FinishAnnotationOperation

Once the annotations have been created in an operation clients call FinishAnnotationOperation which changes following

  • Marks the current operation (let’s say with ID2) to be operationStatus = FINISHED and isAnnotationOperationActive=ACTIVE.
  • We remove the ID2 from the Memcache since it is not in STARTED state.
  • Any previous operation (let’s say with ID1) which was ACTIVE is now marked isAnnotationOperationActive=FALSE in Cassandra.
  • Finally, we call updateByQuery API in ElasticSearch. This API finds all Elasticsearch documents with ID1 and marks isAnnotationOperationActive=FALSE.
FinishAnnotationOperation

Search API

This is the key part for our readers. When a client calls our search API we must exclude

  • any annotations which are from isAnnotationOperationActive=FALSE operations or
  • for which Annotation operations are currently in STARTED state. We do that by excluding the following from all queries in our system.

To achieve above

  1. We add a filter in our ES query to exclude isAnnotationOperationStatus is FALSE.
  2. We query EVCache to find out all operations which are in STARTED state. Then we exclude all those annotations with annotationId found in memcache. Using memcache allows us to keep latencies for our search low (most of our queries are less than 100ms).

Error handling

Cassandra is our source of truth so if an error happens we fail the client call. However, once we commit to Cassandra we must handle Elasticsearch errors. In our experience, all errors have happened when the Elasticsearch database is having some issue. In the above case, we created a retry logic for updateByQuery calls to ElasticSearch. If the call fails we push a message to SQS so we can retry in an automated fashion after some interval.

Future work

In near term, we want to write a high level abstraction single API which can be called by our clients instead of calling three APIs. For example, they can store the annotations in a blob storage like S3 and give us a link to the file as part of the single API.


Data ingestion pipeline with Operation Management was originally published in Netflix TechBlog on Medium, where people are continuing the conversation by highlighting and responding to this story.

Scalable Annotation Service — Marken

Post Syndicated from Netflix Technology Blog original https://netflixtechblog.com/scalable-annotation-service-marken-f5ba9266d428

Scalable Annotation Service — Marken

by Varun Sekhri, Meenakshi Jindal

Introduction

At Netflix, we have hundreds of micro services each with its own data models or entities. For example, we have a service that stores a movie entity’s metadata or a service that stores metadata about images. All of these services at a later point want to annotate their objects or entities. Our team, Asset Management Platform, decided to create a generic service called Marken which allows any microservice at Netflix to annotate their entity.

Annotations

Sometimes people describe annotations as tags but that is a limited definition. In Marken, an annotation is a piece of metadata which can be attached to an object from any domain. There are many different kinds of annotations our client applications want to generate. A simple annotation, like below, would describe that a particular movie has violence.

  • Movie Entity with id 1234 has violence.

But there are more interesting cases where users want to store temporal (time-based) data or spatial data. In Pic 1 below, we have an example of an application which is used by editors to review their work. They want to change the color of gloves to rich black so they want to be able to mark up that area, in this case using a blue circle, and store a comment for it. This is a typical use case for a creative review application.

An example for storing both time and space based data would be an ML algorithm that can identify characters in a frame and wants to store the following for a video

  • In a particular frame (time)
  • In some area in image (space)
  • A character name (annotation data)
Pic 1 : Editors requesting changes by drawing shapes like the blue circle shown above.

Goals for Marken

We wanted to create an annotation service which will have the following goals.

  • Allows to annotate any entity. Teams should be able to define their data model for annotation.
  • Annotations can be versioned.
  • The service should be able to serve real-time, aka UI, applications so CRUD and search operations should be achieved with low latency.
  • All data should be also available for offline analytics in Hive/Iceberg.

Schema

Since the annotation service would be used by anyone at Netflix we had a need to support different data models for the annotation object. A data model in Marken can be described using schema — just like how we create schemas for database tables etc.

Our team, Asset Management Platform, owns a different service that has a json based DSL to describe the schema of a media asset. We extended this service to also describe the schema of an annotation object.

{
"type": "BOUNDING_BOX", ❶
"version": 0, ❷
"description": "Schema describing a bounding box",
"keys": {
"properties": { ❸
"boundingBox": {
"type": "bounding_box",
"mandatory": true
},
"boxTimeRange": {
"type": "time_range",
"mandatory": true
}
}
}
}

In the above example, the application wants to represent in a video a rectangular area which spans a range of time.

  1. Schema’s name is BOUNDING_BOX
  2. Schemas can have versions. This allows users to make add/remove properties in their data model. We don’t allow incompatible changes, for example, users can not change the data type of a property.
  3. The data stored is represented in the “properties” section. In this case, there are two properties
  4. boundingBox, with type “bounding_box”. This is basically a rectangular area.
  5. boxTimeRange, with type “time_range”. This allows us to specify start and end time for this annotation.

Geometry Objects

To represent spatial data in an annotation we used the Well Known Text (WKT) format. We support following objects

  • Point
  • Line
  • MultiLine
  • BoundingBox
  • LinearRing

Our model is extensible allowing us to easily add more geometry objects as needed.

Temporal Objects

Several applications have a requirement to store annotations for videos that have time in it. We allow applications to store time as frame numbers or nanoseconds.

To store data in frames clients must also store frames per second. We call this a SampleData with following components:

  • sampleNumber aka frame number
  • sampleNumerator
  • sampleDenominator

Annotation Object

Just like schema, an annotation object is also represented in JSON. Here is an example of annotation for BOUNDING_BOX which we discussed above.

{  
"annotationId": { ❶
"id": "188c5b05-e648-4707-bf85-dada805b8f87",
"version": "0"
},
"associatedId": { ❷
"entityType": "MOVIE_ID",
"id": "1234"
},
"annotationType": "ANNOTATION_BOUNDINGBOX", ❸
"annotationTypeVersion": 1,
"metadata": { ❹
"fileId": "identityOfSomeFile",
"boundingBox": {
"topLeftCoordinates": {
"x": 20,
"y": 30
},
"bottomRightCoordinates": {
"x": 40,
"y": 60
}
},
"boxTimeRange": {
"startTimeInNanoSec": 566280000000,
"endTimeInNanoSec": 567680000000
}
}
}
  1. The first component is the unique id of this annotation. An annotation is an immutable object so the identity of the annotation always includes a version. Whenever someone updates this annotation we automatically increment its version.
  2. An annotation must be associated with some entity which belongs to some microservice. In this case, this annotation was created for a movie with id “1234”
  3. We then specify the schema type of the annotation. In this case it is BOUNDING_BOX.
  4. Actual data is stored in the metadata section of json. Like we discussed above there is a bounding box and time range in nanoseconds.

Base schemas

Just like in Object Oriented Programming, our schema service allows schemas to be inherited from each other. This allows our clients to create an “is-a-type-of” relationship between schemas. Unlike Java, we support multiple inheritance as well.

We have several ML algorithms which scan Netflix media assets (images and videos) and create very interesting data for example identifying characters in frames or identifying match cuts. This data is then stored as annotations in our service.

As a platform service we created a set of base schemas to ease creating schemas for different ML algorithms. One base schema (TEMPORAL_SPATIAL_BASE) has the following optional properties. This base schema can be used by any derived schema and not limited to ML algorithms.

  • Temporal (time related data)
  • Spatial (geometry data)

And another one BASE_ALGORITHM_ANNOTATION which has the following optional properties which is typically used by ML algorithms.

  • label (String)
  • confidenceScore (double) — denotes the confidence of the generated data from the algorithm.
  • algorithmVersion (String) — version of the ML algorithm.

By using multiple inheritance, a typical ML algorithm schema derives from both TEMPORAL_SPATIAL_BASE and BASE_ALGORITHM_ANNOTATION schemas.

{
"type": "BASE_ALGORITHM_ANNOTATION",
"version": 0,
"description": "Base Schema for Algorithm based Annotations",
"keys": {
"properties": {
"confidenceScore": {
"type": "decimal",
"mandatory": false,
"description": "Confidence Score",
},
"label": {
"type": "string",
"mandatory": false,
"description": "Annotation Tag",
},
"algorithmVersion": {
"type": "string",
"description": "Algorithm Version"
}
}
}
}

Architecture

Given the goals of the service we had to keep following in mind.

  • Our service will be used by a lot of internal UI applications hence the latency for CRUD and search operations must be low.
  • Besides applications we will have ML algorithm data stored. Some of this data can be on the frame level for videos. So the amount of data stored can be large. The databases we pick should be able to scale horizontally.
  • We also anticipated that the service will have high RPS.

Some other goals came from search requirements.

  • Ability to search the temporal and spatial data.
  • Ability to search with different associated and additional associated Ids as described in our Annotation Object data model.
  • Full text searches on many different fields in the Annotation Object
  • Stem search support

As time progressed the requirements for search only increased and we will discuss these requirements in detail in a different section.

Given the requirements and the expertise in our team we decided to choose Cassandra as the source of truth for storing annotations. For supporting different search requirements we chose ElasticSearch. Besides to support various features we have bunch of internal auxiliary services for eg. zookeeper service, internationalization service etc.

Marken architecture

Above picture represents the block diagram of the architecture for our service. On the left we show data pipelines which are created by several of our client teams to automatically ingest new data into our service. The most important of such a data pipeline is created by the Machine Learning team.

One of the key initiatives at Netflix, Media Search Platform, now uses Marken to store annotations and perform various searches explained below. Our architecture makes it possible to easily onboard and ingest data from Media algorithms. This data is used by various teams for eg. creators of promotional media (aka trailers, banner images) to improve their workflows.

Search

Success of Annotation Service (data labels) depends on the effective search of those labels without knowing much of input algorithms details. As mentioned above, we use the base schemas for every new annotation type (depending on the algorithm) indexed into the service. This helps our clients to search across the different annotation types consistently. Annotations can be searched either by simply data labels or with more added filters like movie id.

We have defined a custom query DSL to support searching, sorting and grouping of the annotation results. Different types of search queries are supported using the Elasticsearch as a backend search engine.

  • Full Text Search — Clients may not know the exact labels created by the ML algorithms. As an example, the label can be ‘shower curtain’. With full text search, clients can find the annotation by searching using label ‘curtain’ . We also support fuzzy search on the label values. For example, if the clients want to search ‘curtain’ but they wrongly typed ‘curtian` — annotation with the ‘curtain’ label will be returned.
  • Stem Search — With global Netflix content supported in different languages, our clients have the requirement to support stem search for different languages. Marken service contains subtitles for a full catalog of titles in Netflix which can be in many different languages. As an example for stem search , `clothing` and `clothes` can be stemmed to the same root word `cloth`. We use ElasticSearch to support stem search for 34 different languages.
  • Temporal Annotations Search — Annotations for videos are more relevant if it is defined along with the temporal (time range with start and end time) information. Time range within video is also mapped to the frame numbers. We support labels search for the temporal annotations within the provided time range/frame number also.
  • Spatial Annotation Search — Annotations for video or image can also include the spatial information. For example a bounding box which defines the location of the labeled object in the annotation.
  • Temporal and Spatial Search — Annotation for video can have both time range and spatial coordinates. Hence, we support queries which can search annotations within the provided time range and spatial coordinates range.
  • Semantics Search — Annotations can be searched after understanding the intent of the user provided query. This type of search provides results based on the conceptually similar matches to the text in the query, unlike the traditional tag based search which is expected to be exact keyword matches with the annotation labels. ML algorithms also ingest annotations with vectors instead of actual labels to support this type of search. User provided text is converted into a vector using the same ML model, and then search is performed with the converted text-to-vector to find the closest vectors with the searched vector. Based on the clients feedback, such searches provide more relevant results and don’t return empty results in case there are no annotations which exactly match to the user provided query labels. We support semantic search using Open Distro for ElasticSearch . We will cover more details on Semantic Search support in a future blog article.
Semantic search
  • Range Intersection — We recently started supporting the range intersection queries across multiple annotation types for a specific title in the real time. This allows the clients to search with multiple data labels (resulted from different algorithms so they are different annotation types) within video specific time range or the complete video, and get the list of time ranges or frames where the provided set of data labels are present. A common example of this query is to find the `James in the indoor shot drinking wine`. For such queries, the query processor finds the results of both data labels (James, Indoor shot) and vector search (drinking wine); and then finds the intersection of resulting frames in-memory.

Search Latency

Our client applications are studio UI applications so they expect low latency for the search queries. As highlighted above, we support such queries using Elasticsearch. To keep the latency low, we have to make sure that all the annotation indices are balanced, and hotspot is not created with any algorithm backfill data ingestion for the older movies. We followed the rollover indices strategy to avoid such hotspots (as described in our blog for asset management application) in the cluster which can cause spikes in the cpu utilization and slow down the query response. Search latency for the generic text queries are in milliseconds. Semantic search queries have comparatively higher latency than generic text searches. Following graph shows the average search latency for generic search and semantic search (including KNN and ANN search) latencies.

Average search latency
Semantic search latency

Scaling

One of the key challenges while designing the annotation service is to handle the scaling requirements with the growing Netflix movie catalog and ML algorithms. Video content analysis plays a crucial role in the utilization of the content across the studio applications in the movie production or promotion. We expect the algorithm types to grow widely in the coming years. With the growing number of annotations and its usage across the studio applications, prioritizing scalability becomes essential.

Data ingestions from the ML data pipelines are generally in bulk specifically when a new algorithm is designed and annotations are generated for the full catalog. We have set up a different stack (fleet of instances) to control the data ingestion flow and hence provide consistent search latency to our consumers. In this stack, we are controlling the write throughput to our backend databases using Java threadpool configurations.

Cassandra and Elasticsearch backend databases support horizontal scaling of the service with growing data size and queries. We started with a 12 nodes cassandra cluster, and scaled up to 24 nodes to support current data size. This year, annotations are added approximately for the Netflix full catalog. Some titles have more than 3M annotations (most of them are related to subtitles). Currently the service has around 1.9 billion annotations with data size of 2.6TB.

Analytics

Annotations can be searched in bulk across multiple annotation types to build data facts for a title or across multiple titles. For such use cases, we persist all the annotation data in iceberg tables so that annotations can be queried in bulk with different dimensions without impacting the real time applications CRUD operations latency.

One of the common use cases is when the media algorithm teams read subtitle data in different languages (annotations containing subtitles on a per frame basis) in bulk so that they can refine the ML models they have created.

Future work

There is a lot of interesting future work in this area.

  1. Our data footprint keeps increasing with time. Several times we have data from algorithms which are revised and annotations related to the new version are more accurate and in-use. So we need to do cleanups for large amounts of data without affecting the service.
  2. Intersection queries over a large scale of data and returning results with low latency is an area where we want to invest more time.

Acknowledgements

Burak Bacioglu and other members of the Asset Management Platform contributed in the design and development of Marken.


Scalable Annotation Service — Marken was originally published in Netflix TechBlog on Medium, where people are continuing the conversation by highlighting and responding to this story.