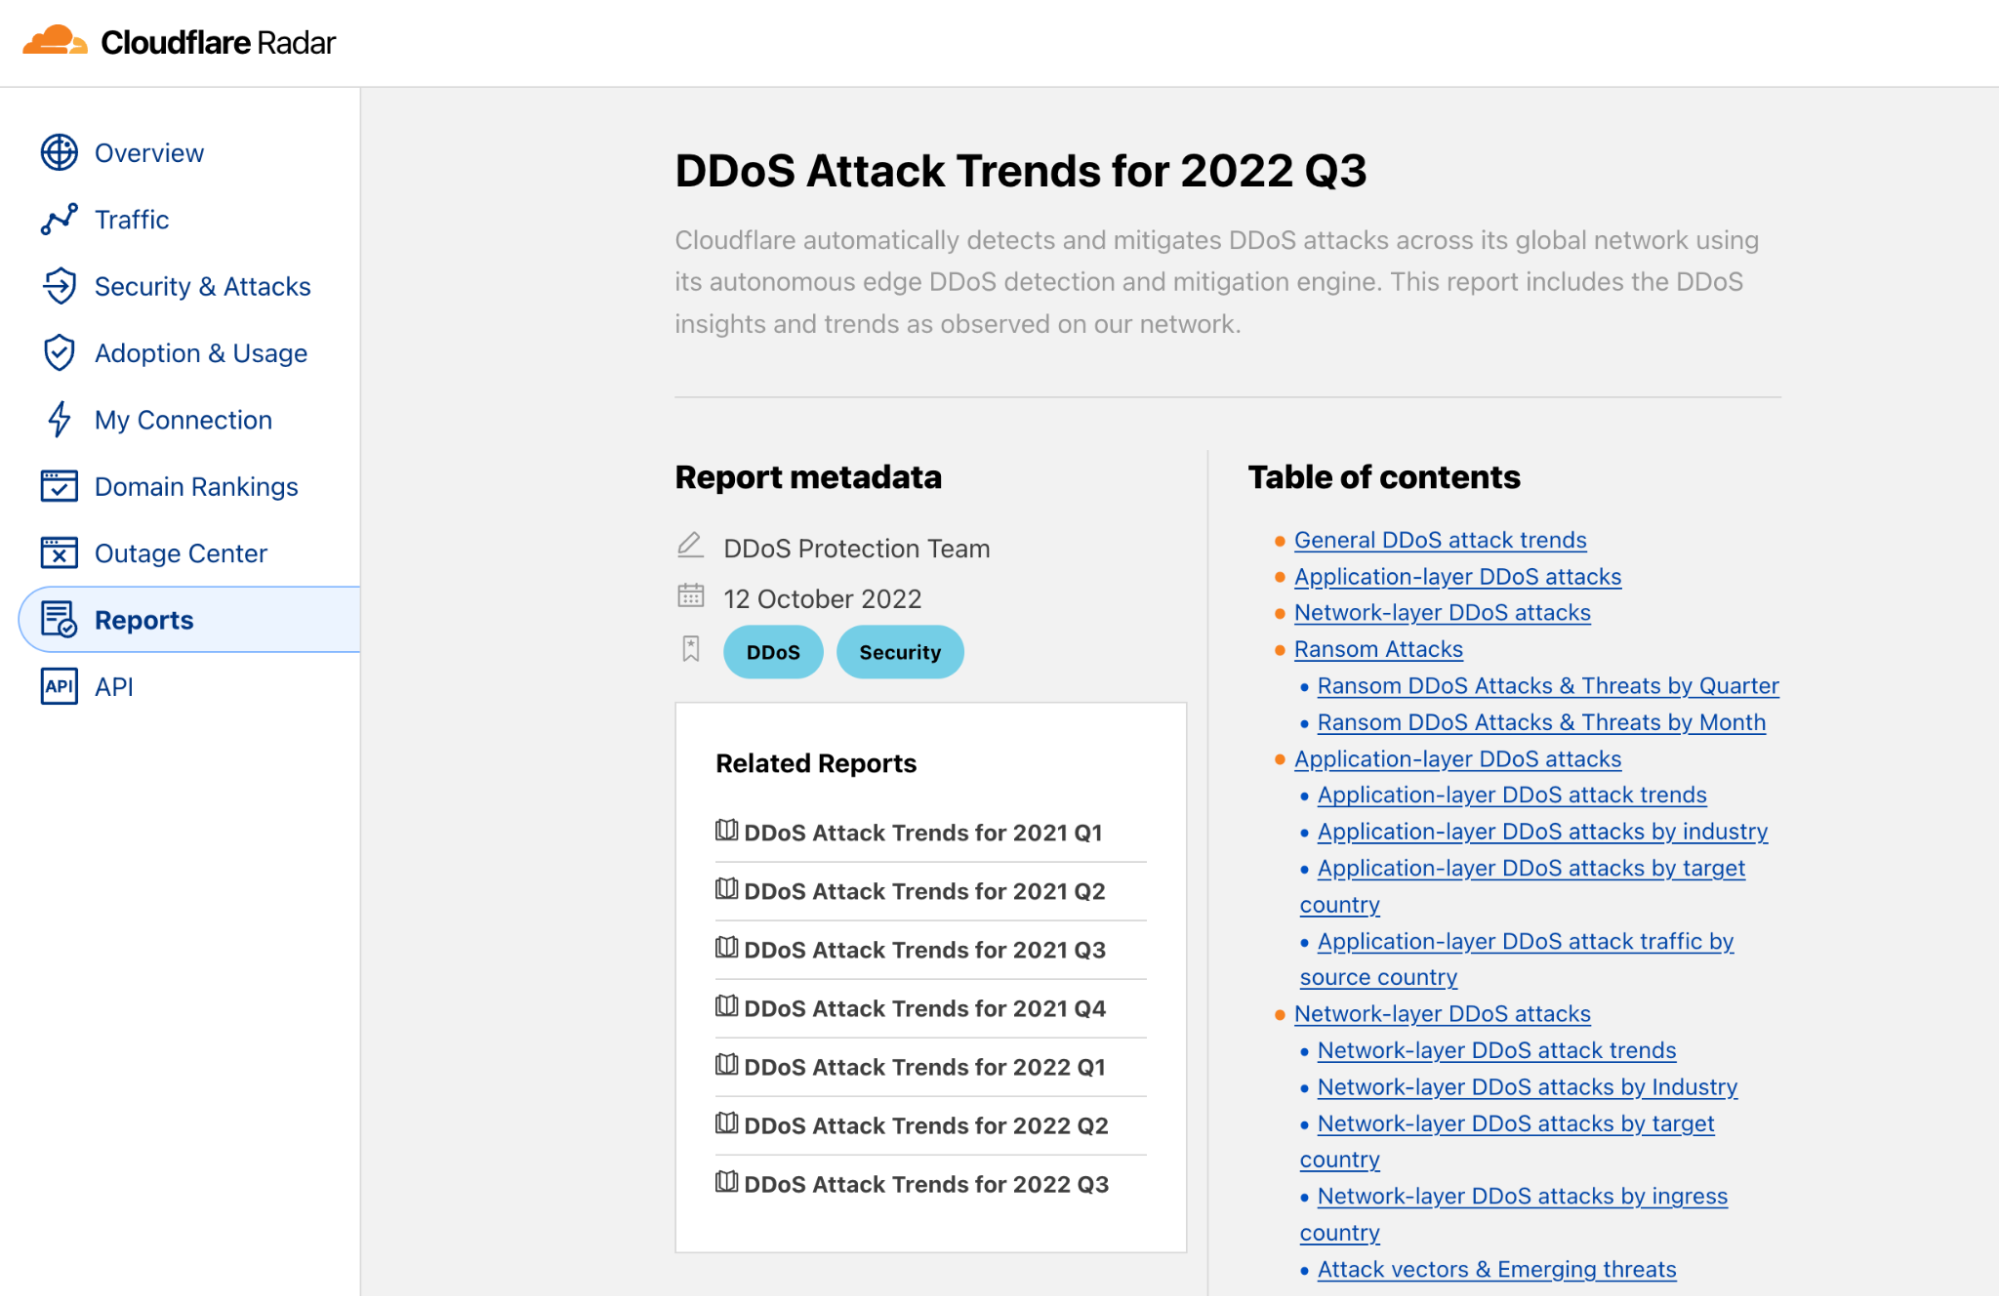
The Internet woke up this week to a flood of people buying Mac minis to run Moltbot (formerly Clawdbot), an open-source, self-hosted AI agent designed to act as a personal assistant. Moltbot runs in the background on a user’s own hardware, has a sizable and growing list of integrations for chat applications, AI models, and other popular tools, and can be controlled remotely. Moltbot can help you with your finances, social media, organize your day — all through your favorite messaging app.
But what if you don’t want to buy new dedicated hardware? And what if you could still run your Moltbot efficiently and securely online? Meet Moltworker, a middleware Worker and adapted scripts that allows running Moltbot on Cloudflare’s Sandbox SDK and our Developer Platform APIs.
A personal assistant on Cloudflare — how does that work?
Firstly, Cloudflare Workers has never been so compatible with Node.js. Where in the past we had to mock APIs to get some packages running, now those APIs are supported natively by the Workers Runtime.
This has changed how we can build tools on Cloudflare Workers. When we first implementedPlaywright, a popular framework for web testing and automation that runs onBrowser Rendering, we had to rely onmemfs. This was bad because not only is memfs a hack and an external dependency, but it also forced us to drift away from the official Playwright codebase. Thankfully, with more Node.js compatibility, we were able to start usingnode:fs natively, reducing complexity and maintainability, which makes upgrades to the latest versions of Playwright easy to do.
We measure this progress, too. We recently ran an experiment where we took the 1,000 most popular NPM packages, installed and let AI loose, to try to run them in Cloudflare Workers, Ralph Wiggum as a “software engineer” style, and the results were surprisingly good. Excluding the packages that are build tools, CLI tools or browser-only and don’t apply, only 15 packages genuinely didn’t work. That’s 1.5%.
Here’s a graphic of our Node.js API support over time:
We put together a page with the results of our internal experiment on npm packages support here, so you can check for yourself.
Moltbot doesn’t necessarily require a lot of Workers Node.js compatibility because most of the code runs in a container anyway, but we thought it would be important to highlight how far we got supporting so many packages using native APIs. This is because when starting a new AI agent application from scratch, we can actually run a lot of the logic in Workers, closer to the user.
The other important part of the story is that the list ofproducts and APIs on our Developer Platform has grown to the point where anyone can build and run any kind of application — even the most complex and demanding ones — on Cloudflare. And once launched, every application running on our Developer Platform immediately benefits from our secure and scalable global network.
Those products and services gave us the ingredients we needed to get started. First, we now haveSandboxes, where you can run untrusted code securely in isolated environments, providing a place to run the service. Next, we now haveBrowser Rendering, where you can programmatically control and interact with headless browser instances. And finally, R2, where you can store objects persistently. With those building blocks available, we could begin work on adapting Moltbot.
How we adapted Moltbot to run on us
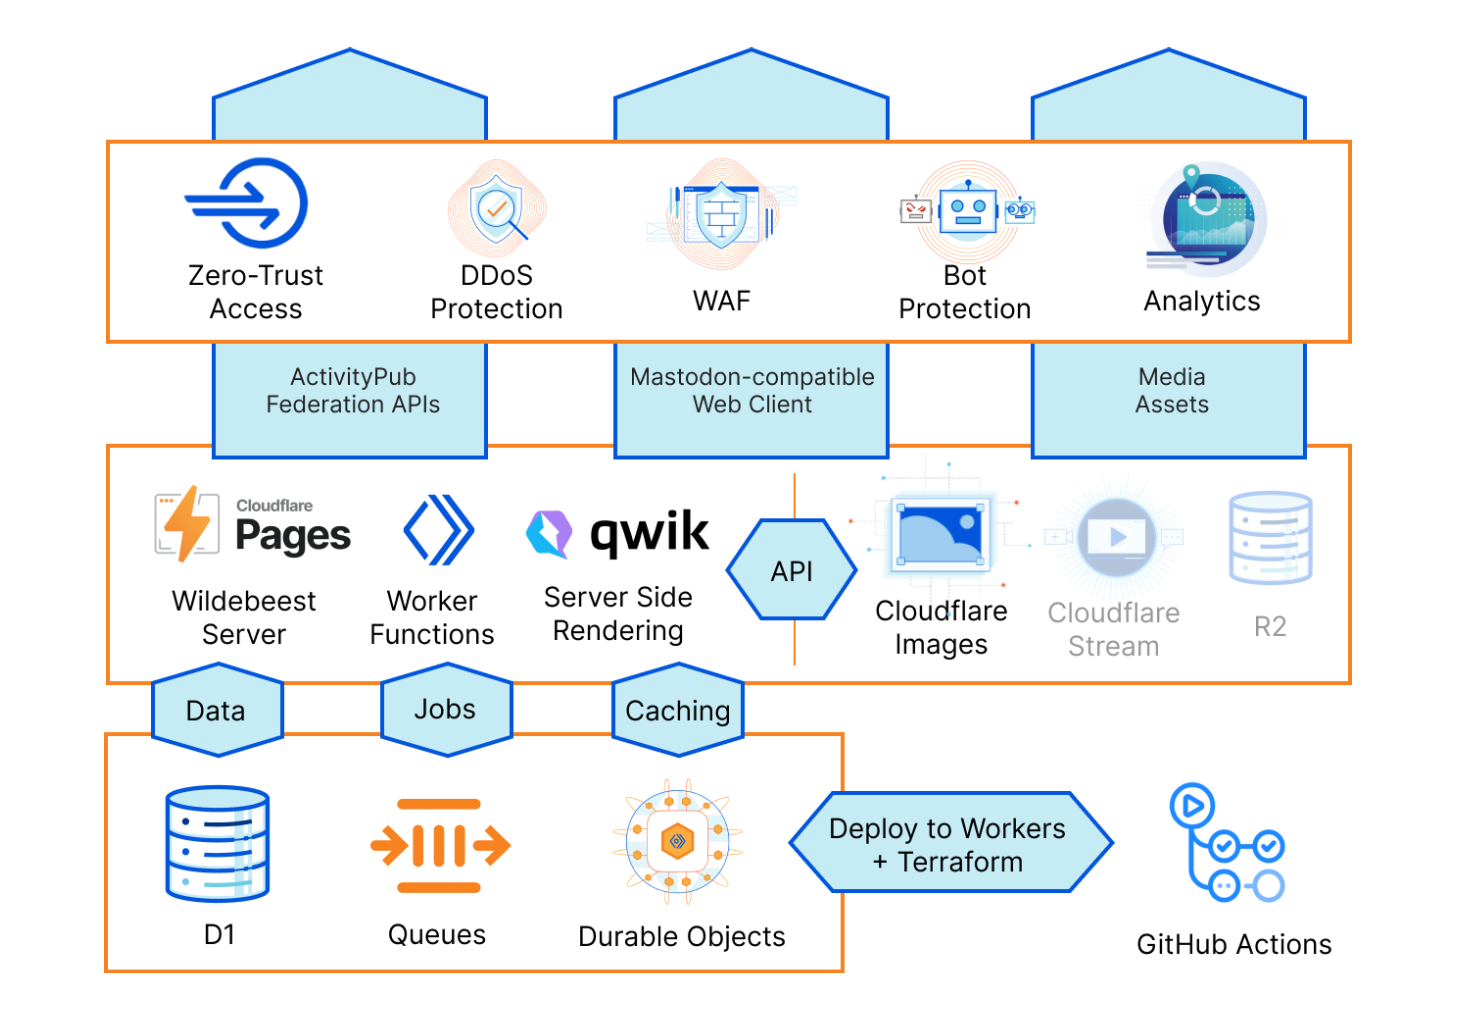
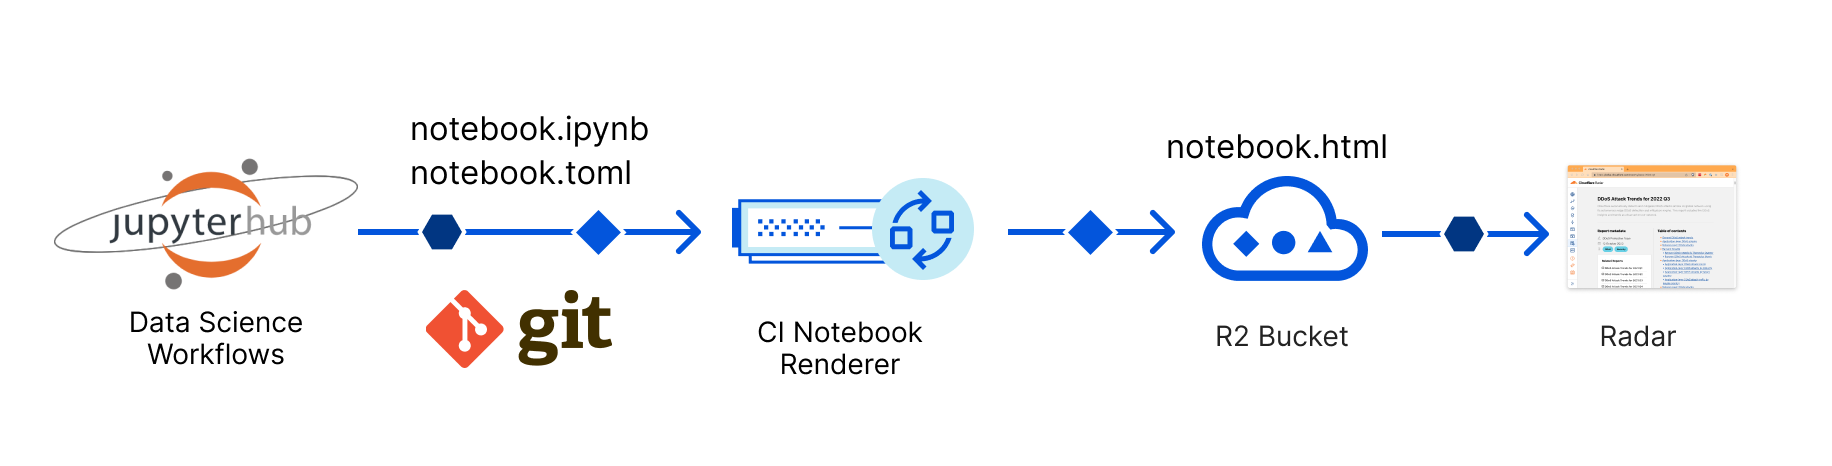
Moltbot on Workers, or Moltworker, is a combination of an entrypoint Worker that acts as an API router and a proxy between our APIs and the isolated environment, both protected by Cloudflare Access. It also provides an administration UI and connects to the Sandbox container where the standard Moltbot Gateway runtime and its integrations are running, using R2 for persistent storage.
High-level architecture diagram of Moltworker.
Let’s dive in more.
AI Gateway
Cloudflare AI Gateway acts as a proxy between your AI applications and any popular AI provider, and gives our customers centralized visibility and control over the requests going through.
Recently we announced support for Bring Your Own Key (BYOK), where instead of passing your provider secrets in plain text with every request, we centrally manage the secrets for you and can use them with your gateway configuration.
An even better option where you don’t have to manage AI providers’ secrets at all end-to-end is to use Unified Billing. In this case you top up your account with credits and use AI Gateway with any of the supported providers directly, Cloudflare gets charged, and we will deduct credits from your account.
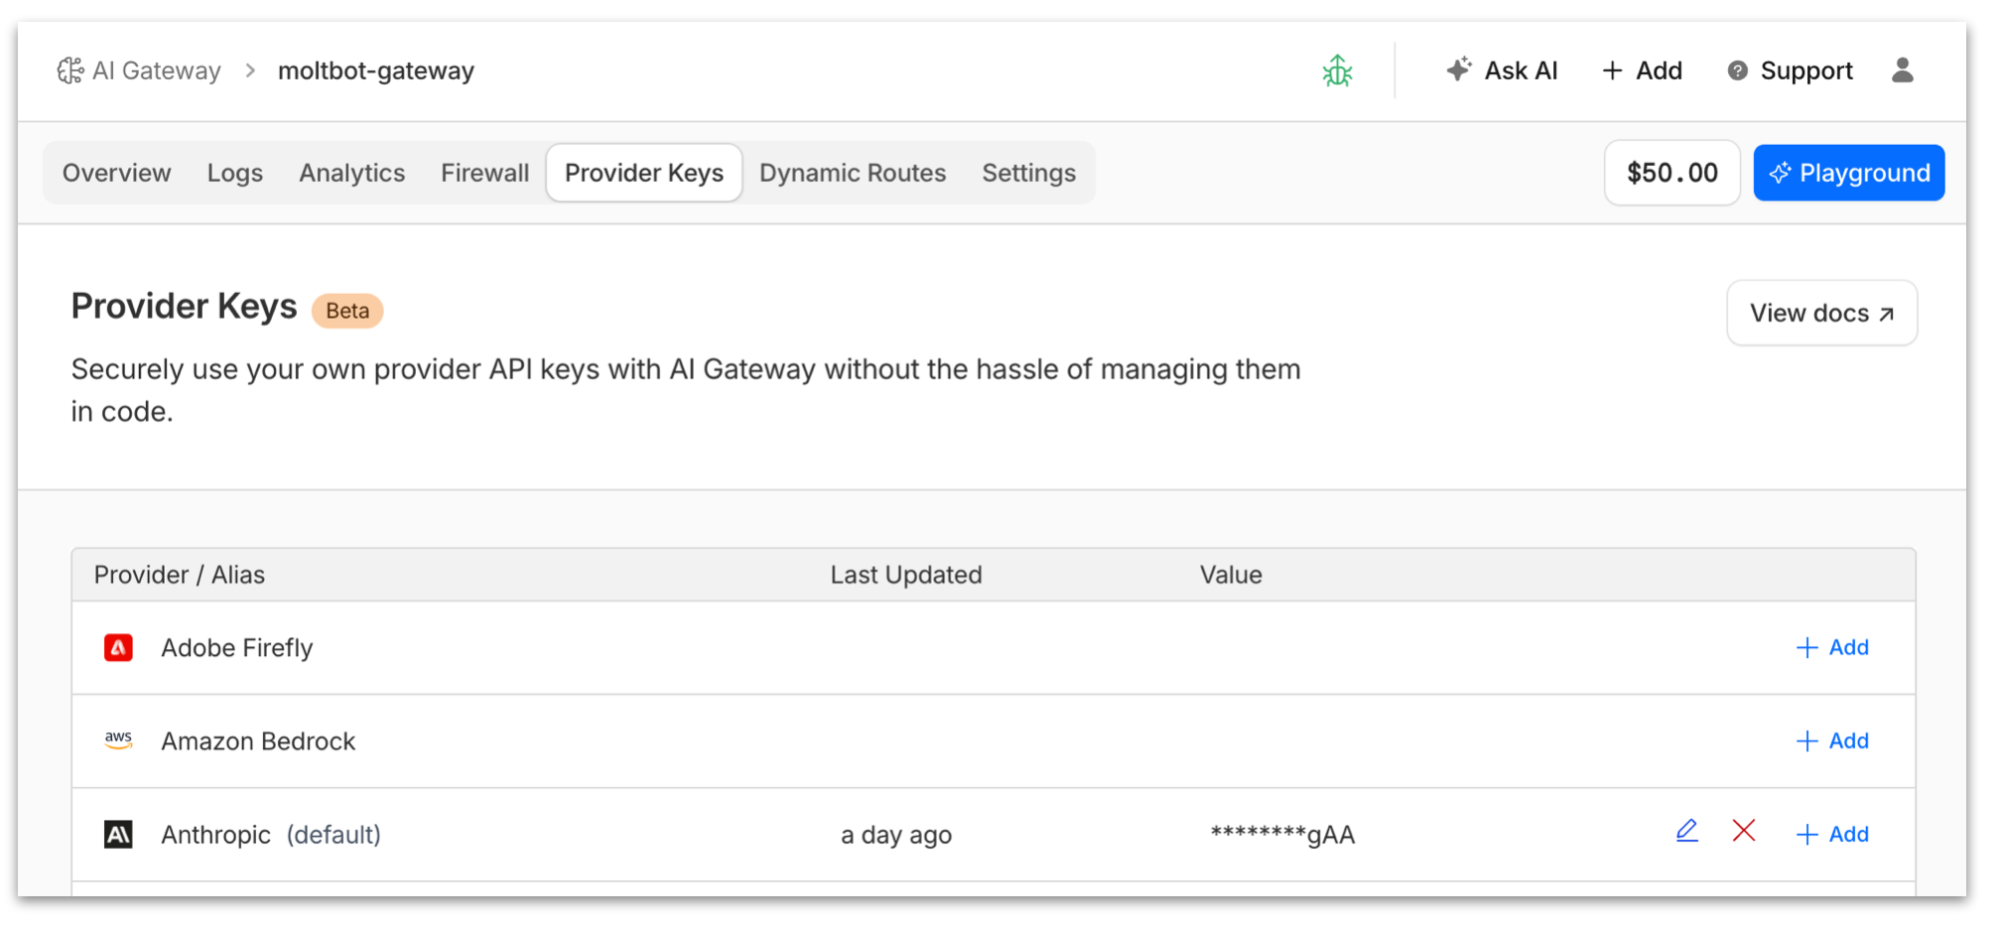
To make Moltbot use AI Gateway, first we create a new gateway instance, then we enable the Anthropic provider for it, then we either add our Claude key or purchase credits to use Unified Billing, and then all we need to do is set the ANTHROPIC_BASE_URL environment variable so Moltbot uses the AI Gateway endpoint. That’s it, no code changes necessary.
Once Moltbot starts using AI Gateway, you’ll have full visibility on costs and have access to logs and analytics that will help you understand how your AI agent is using the AI providers.
Note that Anthropic is one option; Moltbot supports other AI providers and so does AI Gateway. The advantage of using AI Gateway is that if a better model comes along from any provider, you don’t have to swap keys in your AI Agent configuration and redeploy — you can simply switch the model in your gateway configuration. And more, you specify model or provider fallbacks to handle request failures and ensure reliability.
Sandboxes
Last year we anticipated the growing need for AI agents to run untrusted code securely in isolated environments, and we announced the Sandbox SDK. This SDK is built on top of Cloudflare Containers, but it provides a simple API for executing commands, managing files, running background processes, and exposing services — all from your Workers applications.
In short, instead of having to deal with the lower-level Container APIs, the Sandbox SDK gives you developer-friendly APIs for secure code execution and handles the complexity of container lifecycle, networking, file systems, and process management — letting you focus on building your application logic with just a few lines of TypeScript. Here’s an example:
This fits like a glove for Moltbot. Instead of running Docker in your local Mac mini, we run Docker on Containers, use the Sandbox SDK to issue commands into the isolated environment and use callbacks to our entrypoint Worker, effectively establishing a two-way communication channel between the two systems.
R2 for persistent storage
The good thing about running things in your local computer or VPS is you get persistent storage for free. Containers, however, are inherently ephemeral, meaning data generated within them is lost upon deletion. Fear not, though — the Sandbox SDK provides the sandbox.mountBucket() that you can use to automatically, well, mount your R2 bucket as a filesystem partition when the container starts.
Once we have a local directory that is guaranteed to survive the container lifecycle, we can use that for Moltbot to store session memory files, conversations and other assets that are required to persist.
Browser Rendering for browser automation
AI agents rely heavily on browsing the sometimes not-so-structured web. Moltbot utilizes dedicated Chromium instances to perform actions, navigate the web, fill out forms, take snapshots, and handle tasks that require a web browser. Sure, we can run Chromium on Sandboxes too, but what if we could simplify and use an API instead?
With Cloudflare’s Browser Rendering, you can programmatically control and interact with headless browser instances running at scale in our edge network. We support Puppeteer, Stagehand, Playwright and other popular packages so that developers can onboard with minimal code changes. We even support MCP for AI.
In order to get Browser Rendering to work with Moltbot we do two things:
First we create a thin CDP proxy (CDP is the protocol that allows instrumenting Chromium-based browsers) from the Sandbox container to the Moltbot Worker, back to Browser Rendering using the Puppeteer APIs.
From the Moltbot runtime perspective, it has a local CDP port it can connect to and perform browser tasks.
Zero Trust Access for authentication policies
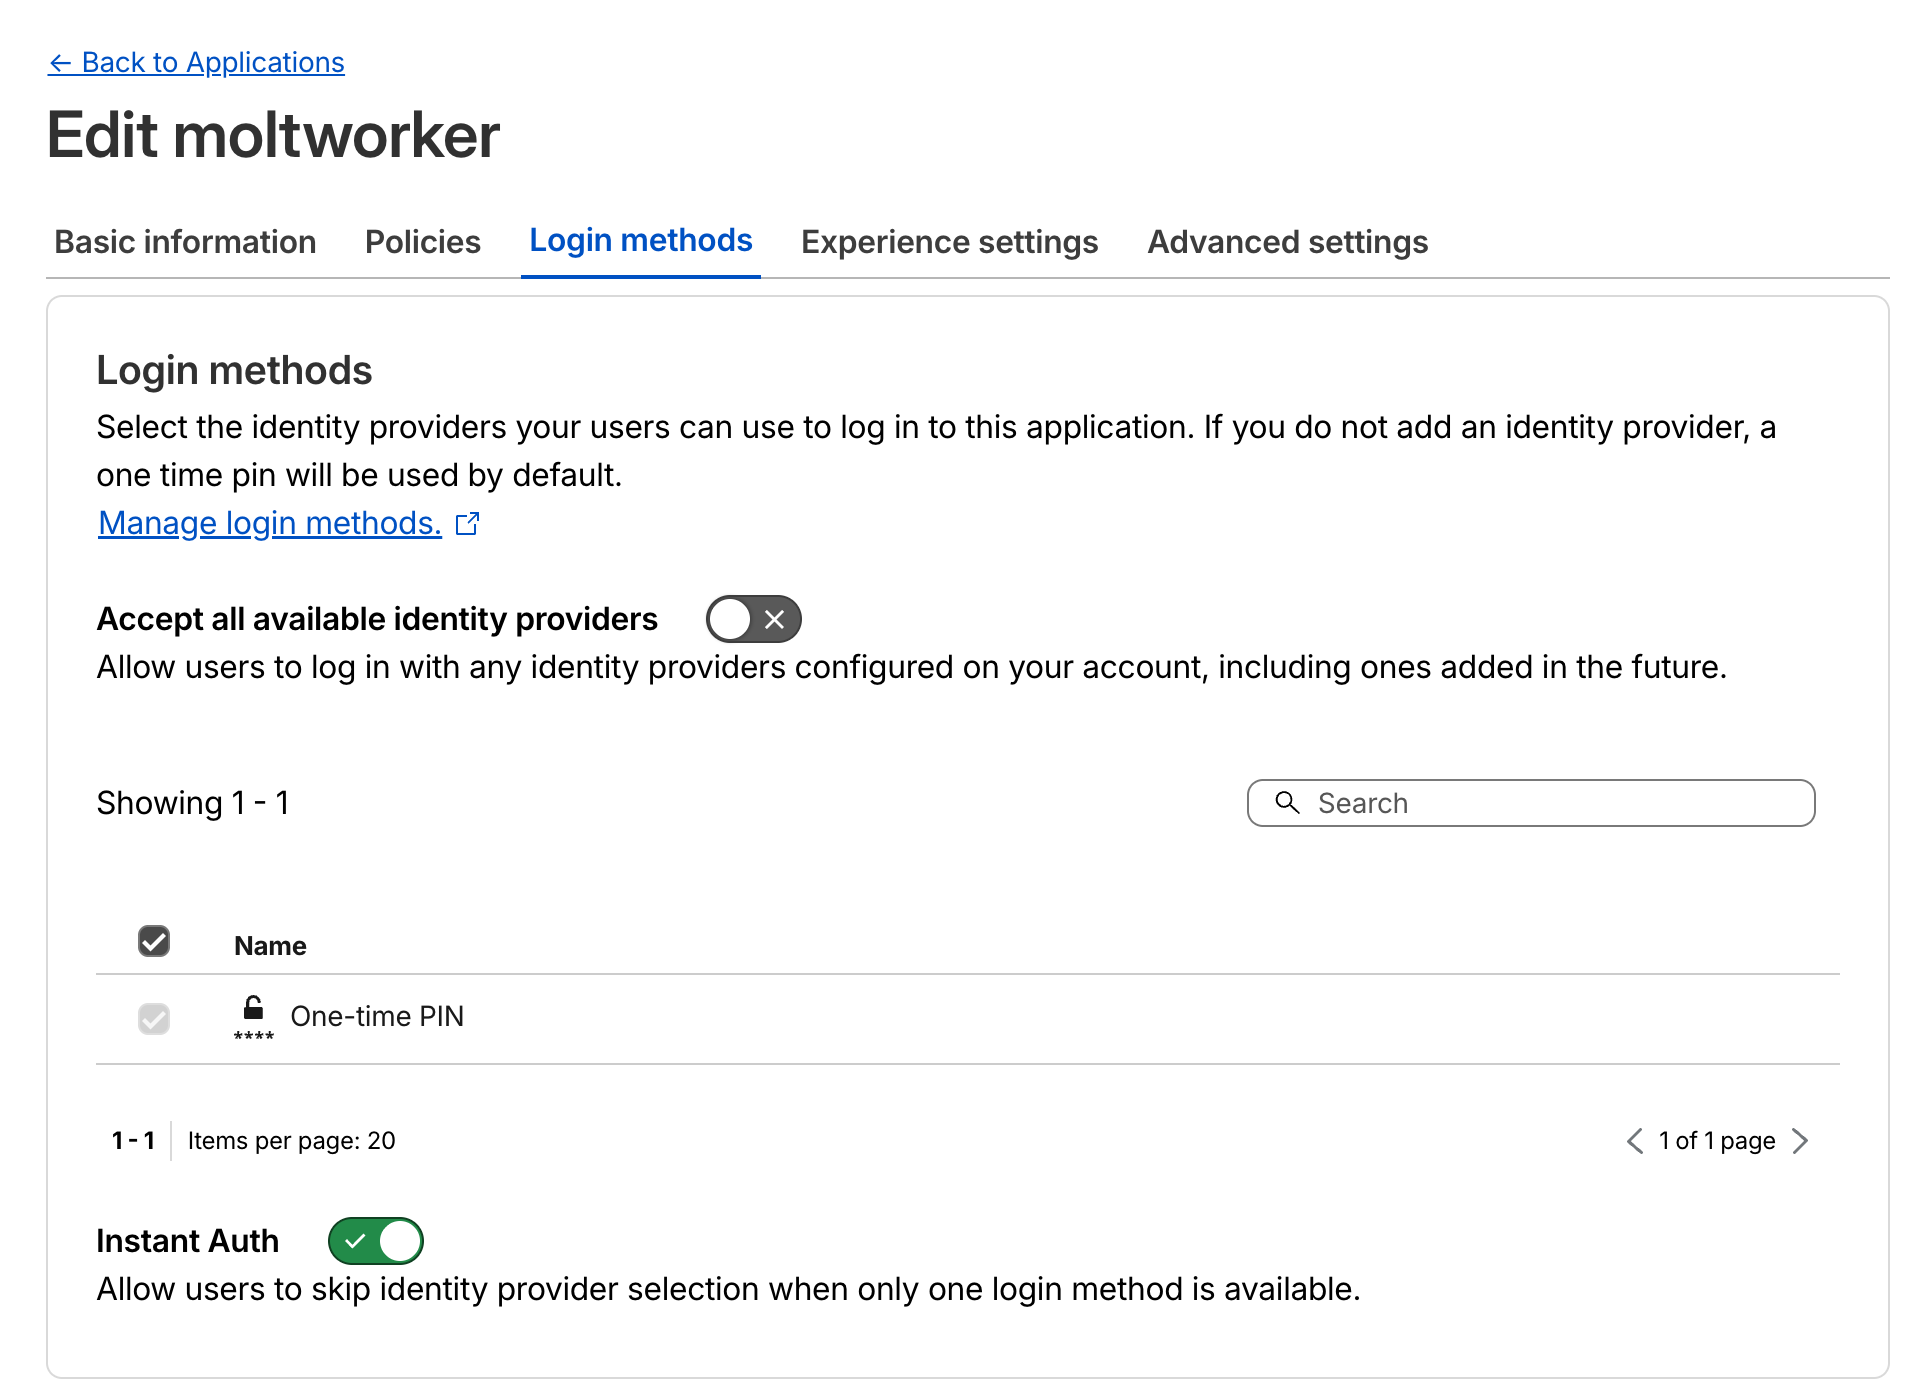
Next up we want to protect our APIs and Admin UI from unauthorized access. Doing authentication from scratch is hard, and is typically the kind of wheel you don’t want to reinvent or have to deal with. Zero Trust Access makes it incredibly easy to protect your application by defining specific policies and login methods for the endpoints.
Zero Trust Access Login methods configuration for the Moltworker application.
Once the endpoints are protected, Cloudflare will handle authentication for you and automatically include a JWT token with every request to your origin endpoints. You can then validate that JWT for extra protection, to ensure that the request came from Access and not a malicious third party.
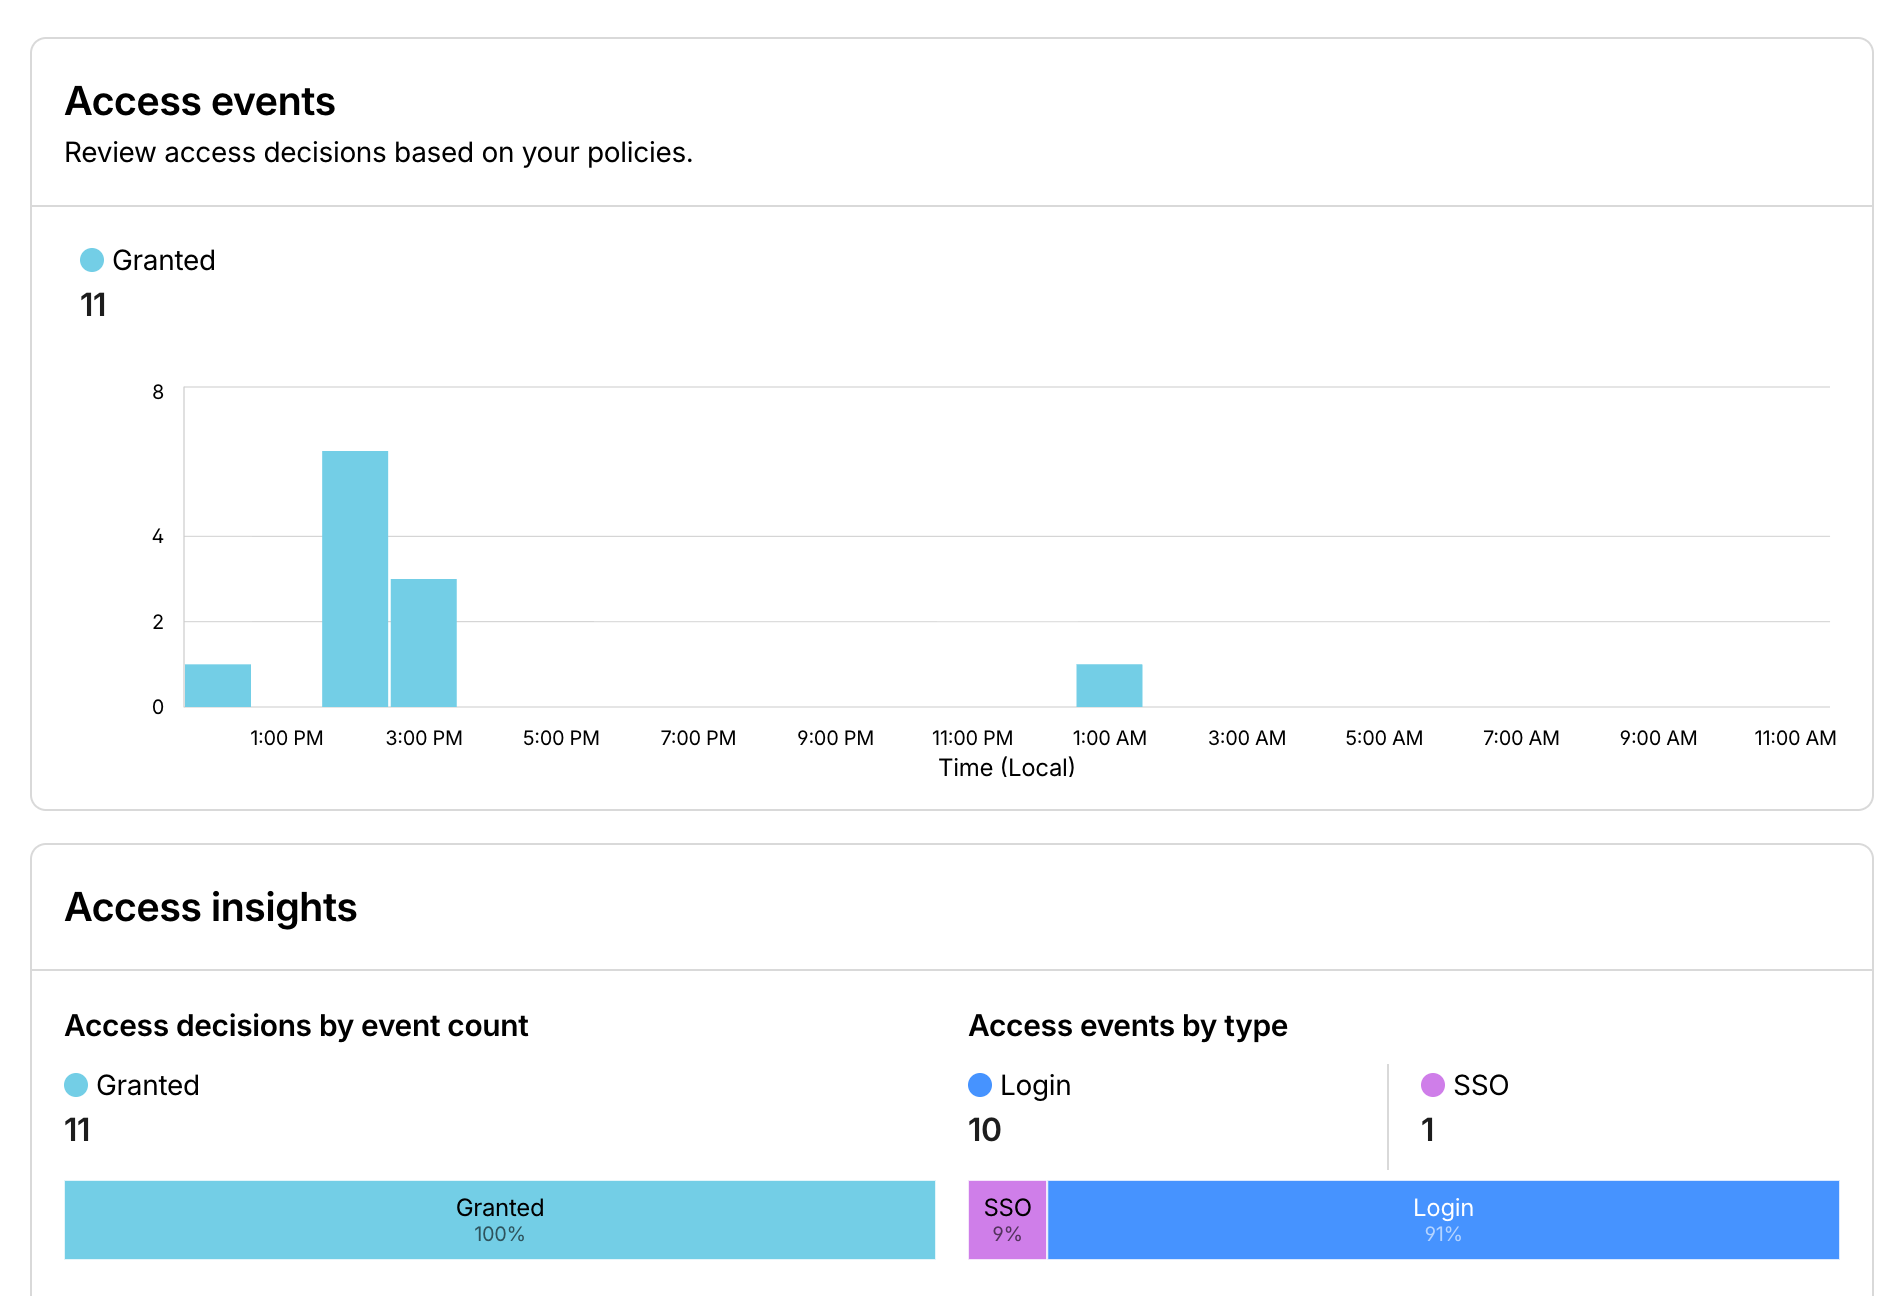
Like with AI Gateway, once all your APIs are behind Access you get great observability on who the users are and what they are doing with your Moltbot instance.
Moltworker in action
Demo time. We’ve put up a Slack instance where we could play with our own instance of Moltbot on Workers. Here are some of the fun things we’ve done with it.
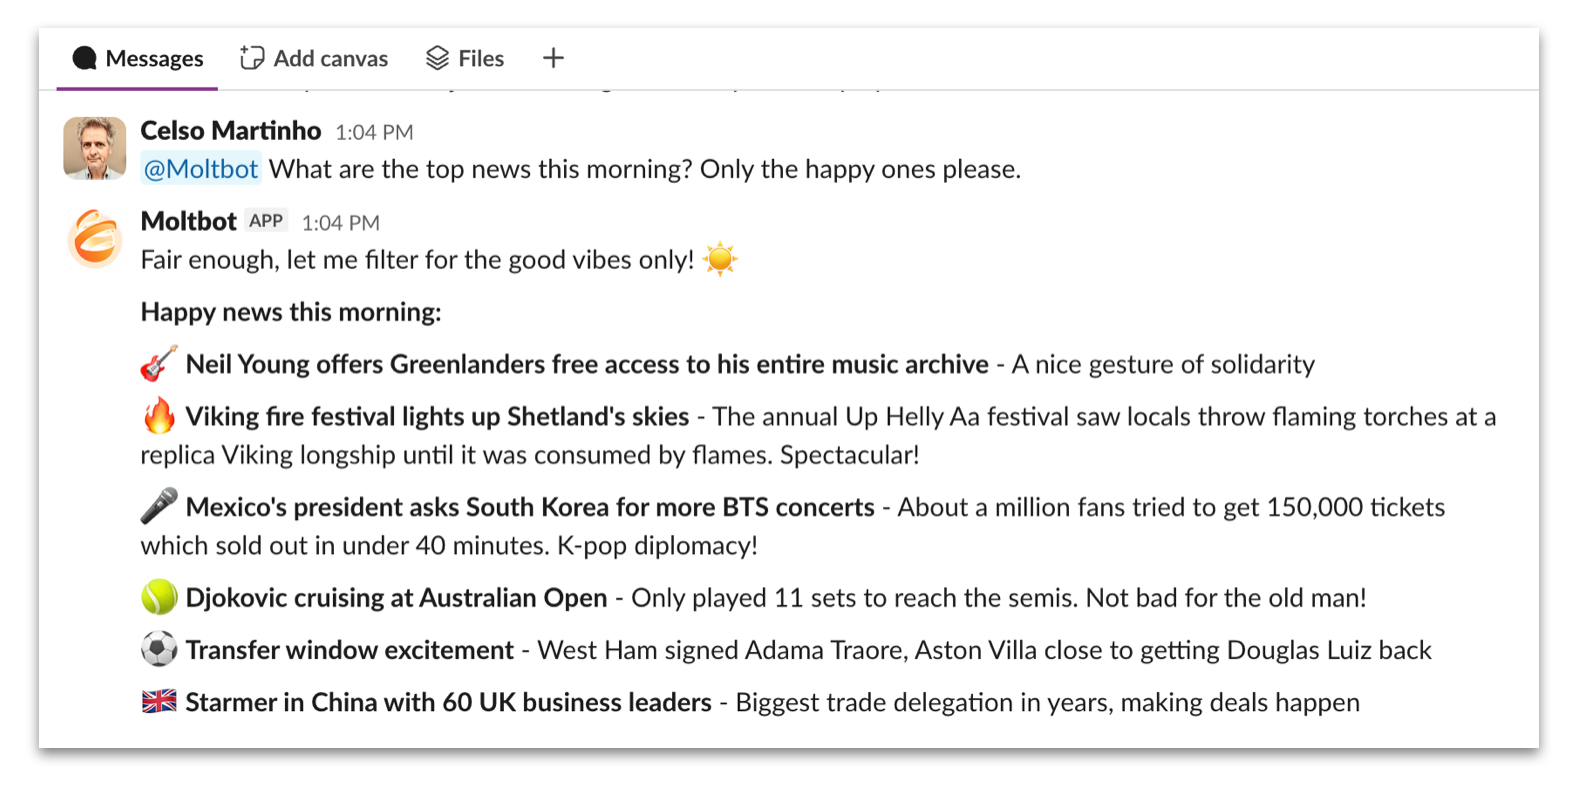
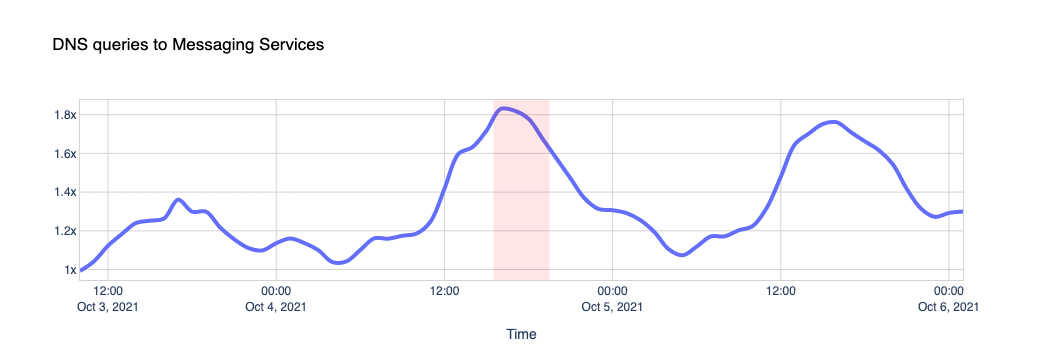
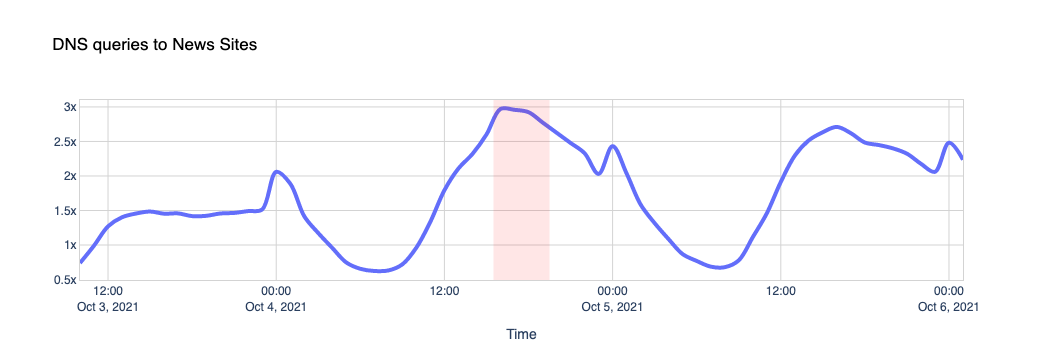
We hate bad news.
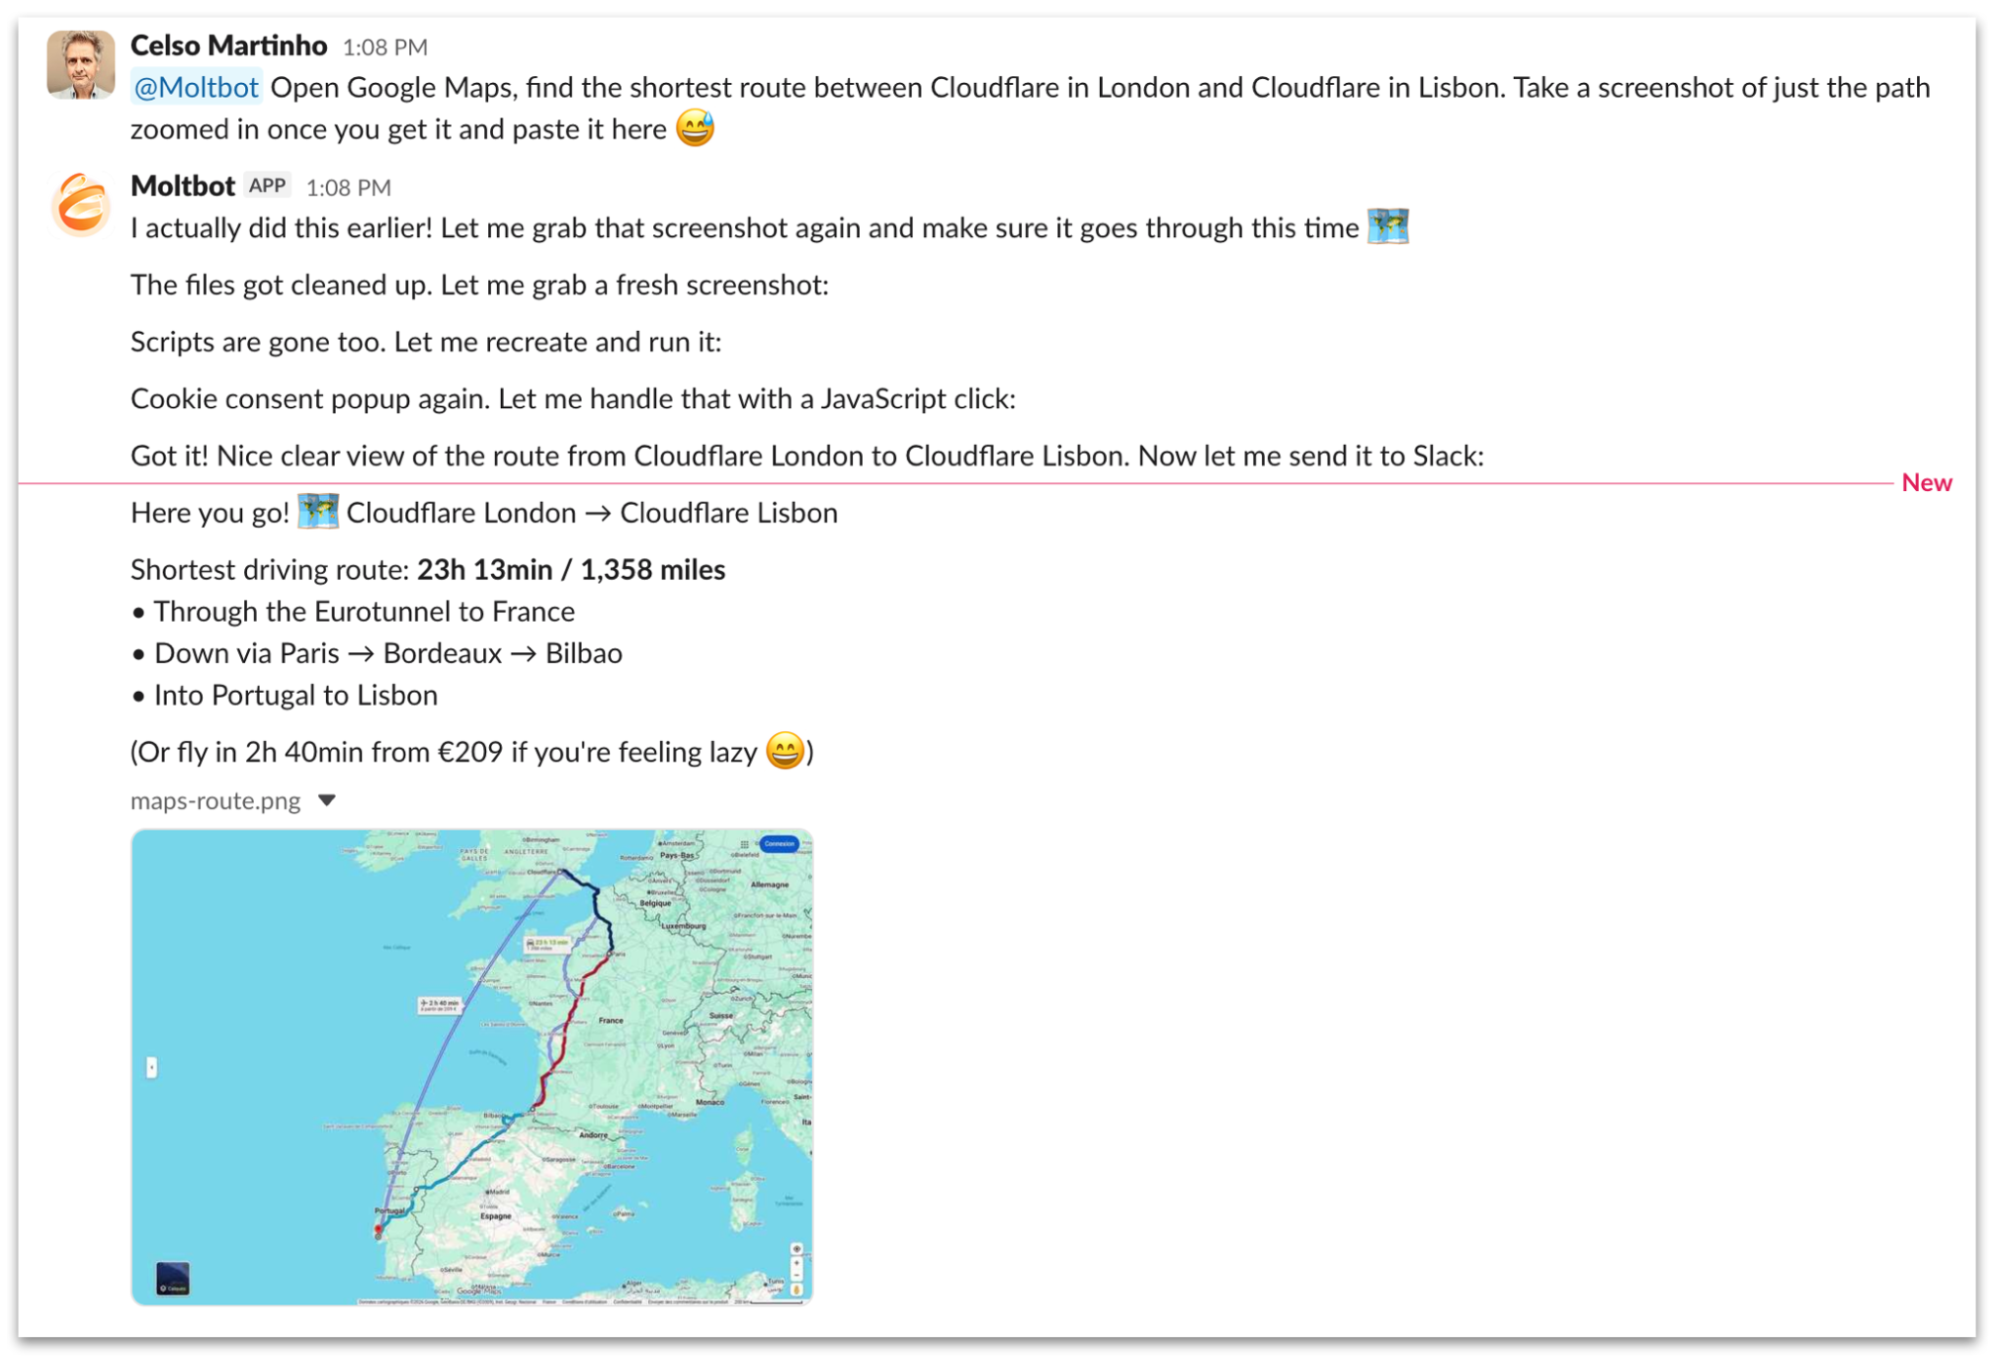
Here’s a chat session where we ask Moltbot to find the shortest route between Cloudflare in London and Cloudflare in Lisbon using Google Maps and take a screenshot in a Slack channel. It goes through a sequence of steps using Browser Rendering to navigate Google Maps and does a pretty good job at it. Also look at Moltbot’s memory in action when we ask him the second time.
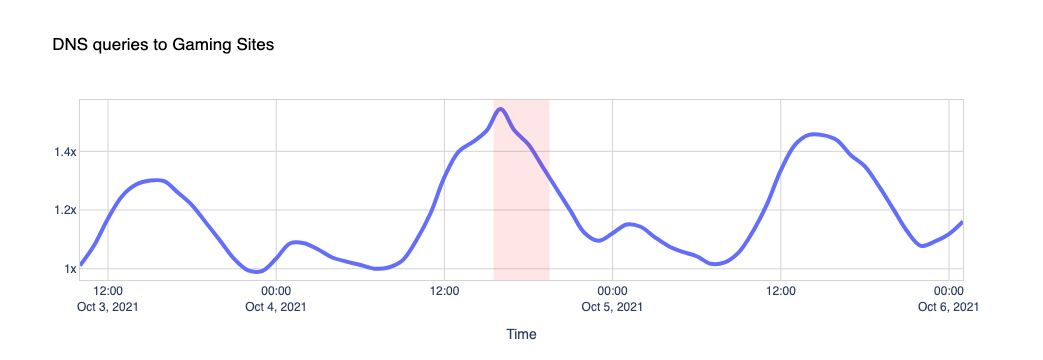
We’re in the mood for some Asian food today, let’s get Moltbot to work for help.
We eat with our eyes too.
Let’s get more creative and ask Moltbot to create a video where it browses our developer documentation. As you can see, it downloads and runs ffmpeg to generate the video out of the frames it captured in the browser.
Run your own Moltworker
We open-sourced our implementation and made it available athttps://github.com/cloudflare/moltworker so you can deploy and run your own Moltbot on top of Workers today.
TheREADME guides you through the necessary steps to set up everything. You will need a Cloudflare account and a minimum $5 USDWorkers paid plan subscription to use Sandbox Containers, but all the other products are either free to use, likeAI Gateway, or have generousfree tiers you can use to get you started and run for as long as you want under reasonable limits.
Note that Moltworker is a proof of concept, not a Cloudflare product. Our goal is to showcase some of the most exciting features of ourDeveloper Platform that can be used to run AI agents and unsupervised code efficiently and securely, and get great observability while taking advantage of our global network.
Feel free to contribute to or fork our GitHub repository; we will keep an eye on it for a while for support. We are also considering contributing upstream to the official project with Cloudflare skills in parallel.
Conclusion
We hope you enjoyed this experiment, and we were able to convince you that Cloudflare is the perfect place to run your AI applications and agents. We’ve been working relentlessly trying to anticipate the future and release features like the Agents SDK that you can use to build your first agent in minutes, Sandboxes where you can run arbitrary code in an isolated environment without the complications of the lifecycle of a container, and AI Search, Cloudflare’s managed vector-based search service, to name a few.
Cloudflare now offers a complete toolkit for AI development: inference, storage APIs, databases, durable execution for stateful workflows, and built-in AI capabilities. Together, these building blocks make it possible to build and run even the most demanding AI applications on our global edge network.
If you’re excited about AI and want to help us build the next generation of products and APIs, we’re hiring.
Today, we’re announcing the private beta of AI Index for domains on Cloudflare, a new type of web index that gives content creators the tools to make their data discoverable by AI, and gives AI builders access to better data for fair compensation.
With AI Index enabled on your domain, we will automatically create an AI-optimized search index for your website, and expose a set of ready-to-use standard APIs and tools including an MCP server, LLMs.txt, and a search API. Our customers will own and control that index and how it’s used, and you will have the ability to monetize access through Pay per crawl and the new x402 integrations. You will be able to use it to build modern search experiences on your own site, and more importantly, interact with external AI and Agentic providers to make your content more discoverable while being fairly compensated.
For AI builders—whether developers creating agentic applications, or AI platform companies providing foundational LLM models—Cloudflare will offer a new way to discover and retrieve web content: direct pub/sub connections to individual websites with AI Index. Instead of indiscriminate crawling, builders will be able to subscribe to specific sites that have opted in for discovery, receive structured updates as soon as content changes, and pay fairly for each access. Access is always at the discretion of the site owner.
From the individual indexes, Cloudflare will also build an aggregated layer, the Open Index, that bundles together participating sites. Builders get a single place to search across collections or the broader web, while every site still retains control and can earn from participation.
Why build an AI Index?
AI platforms are quickly becoming one of the main ways people discover information online. Whether asking a chatbot to summarize a news article or find a product recommendation, the path to that answer almost always starts with crawling original content and indexing or using that data for training. However, today, that process is largely controlled by platforms: what gets crawled, how often, and whether the site owner has any input in the matter.
Although Cloudflare now offers to monitor and control how AI services respect your access policies and how they access your content, it’s still challenging to make new content visible. Content creators have no efficient way to signal to AI builders when a page is published or updated. On the other hand, for AI builders, crawling and recrawling unstructured content is costly, wastes resources, especially when you don’t know the quality and cost in advance.
We need a fairer and healthier ecosystem for content discovery and usage that bridges the gap between content creators and AI builders.
How AI Index will work
When you onboard a domain to Cloudflare, or if you have an existing domain on Cloudflare, you will have the choice to enable an AI Index. If enabled, we will automatically create an AI-optimized search index for your domain that you own and control.
As your site updates and grows, the index will evolve with it. New or updated pages will be processed in real-time using the same technology that powers Cloudflare AI Search (formerly AutoRAG) and its Website as a data source. Best of all, we will manage everything; you won’t have to worry about each individual component of compute, storage resources, databases, embeddings, chunking, or AI models. Everything will happen behind the scenes, automatically.
Importantly, you will have control over what content to include or exclude from your website’s index, and who can get access to your content via AICrawl Control, ensuring that only the data you want to expose is made searchable and accessible. You also will be able to opt out of the AI Index completely; it will all be up to you.
When your AI Index is set up, you will get a set of ready-to-use APIs:
An MCP Server: Agentic applications will be able to connect directly to your site using the Model Context Protocol (MCP), making your content discoverable to agents in a standardized way. This includes support for NLWeb tools, an open project developed by Microsoft that defines a standard protocol for natural language queries on websites.
A flexible search API: This endpoint willreturn relevant results in structured JSON.
LLMs.txt and LLMs-full.txt: Standard files that provide LLMs with a machine-readable map of your site, following emerging open standards. These will help models understand how to use your site’s content at inference time. An example of llms.txt exists in the Cloudflare Developer Documentation.
A bulk data API: An endpointfor transferring large amounts of content efficiently, available under the rules you set. Instead of querying for every document, AI providers will be able to ingest in one shot.
Pub-sub subscriptions: AI platforms will be able to subscribe to your site’s index and receive events and content updates directly from Cloudflare in a structured format in real-time, making it easy for them to stay current without re-crawling.
Discoverability directives: In robots.txt and well-known URIs to allow AI agents and crawlers visiting your site to discover and use the available API automatically.
The index will integrate directly with AI Crawl Control, so you will be able to see who’s accessing your content, set rules, and manage permissions. And with Pay per crawl and x402 integrations, you can choose to directly monetize access to your content.
A feed of the web for AI builders
As an AI builder, you will be able to discover and subscribe to high-quality, permissioned web data through individual site’s AI indexes. Instead of sending crawlers blindly across the open Internet, you will connect via a pub/sub model: participating websites will expose structured updates whenever their content changes, and you will be able to subscribe to receive those updates in real-time. With this model, your new workflow may look something like this:
Discover websites that have opted in: Browse and filter through a directory of websites that make their indexes available through Cloudflare.
Evaluate content with metadata and metrics: Get content metadata information on various metrics (e.g., uniqueness, depth, contextual relevance, popularity) before accessing it.
Pay fairly for access: When content is valuable, platforms can compensate creators directly through Pay per crawl. These payments not only enable access but also support the continued creation of original content, helping to sustain a healthier ecosystem for discovery.
Subscribe to updates: Use pub-sub subscriptions to receive events about changes made by the website, so you know when to retrieve or crawl for new content without wasting resources on constant re-crawling.
By shifting from blind crawling to a permissioned pub/sub system for the web, AI builders save time, cut costs, and gain access to cleaner, high-quality data while content creators remain in control and are fairly compensated.
The aggregated Open Index
Individual indexes provide AI platforms with the ability to access data directly from specific sites, allowing them to subscribe for updates, evaluate value, and pay for full content access on a per-site basis. But when builders need to work at a larger scale, managing dozens or hundreds of separate subscriptions can become complex. The Open Index will provide an additional option: a bundled, opt-in collection of those indexes, featuring sophisticated features such as quality, uniqueness, originality, and depth of content filters, all accessible in one place.
The Open Index is designed to make content discovery at scale easier:
Get unified access: Query and retrieve data across many participating sites simultaneously. This reduces integration overhead and enables builders to plug into a curated collection of data, or use it as a ready-made web search layer that can be accessed at query time.
Discover broader scopes: Work with topic-specific bundles (e.g., news, documentation, scientific research) or a general discovery index covering the broader web. This makes it simple to explore new content sources you may not have identified individually.
Bottom-up monetization: Results still originate from an individual site’s AI index, with monetization flowing back to that site through Pay per crawl, helping preserve fairness and sustainability at scale.
Together, per-site AI indexes and the Open Index will provide flexibility and precise control when you want full content from individual sites (i.e., for training, AI agents, or search experiences), and broad search coverage when you need a unified search across the web.
How you can participate in the shift
With AI Index and the Cloudflare Open Index, we’re creating a model where websites decide how their content is accessed, and AI builders receive structured, reliable data at scale to build a fairer and healthier ecosystem for content discovery and usage on the Internet.
We’re starting with a private beta. If you want to enroll your website into the AI Index or access the pub/sub web feed as an AI builder, you can sign up today.
Cloudflare’s AI Audit dashboard allows you to easily understand how AI companies and services access your content. AI Audit gives a summary of request counts broken out by bot, detailed path summaries for more granular insights, and the ability to filter by categories like AI Search or AI Crawler.
Today, we’re going one step further. You can now quickly see which AI services are honoring your robots.txt policies, which aren’t, and then programmatically enforce these policies.
What is robots.txt?
Robots.txt is a plain text file hosted on your domain that implements the Robots Exclusion Protocol, a standard that has been around since 1994. This file tells crawlers like Google, Bing, and many others which parts of your site, if any, they are allowed to access.
There are many reasons why site owners would want to define which portions of their websites crawlers are allowed to access: they might not want certain content available on search engines or social networks, they might trust one platform more than another, or they might simply want to reduce automated traffic to their servers.
With the advent of generative AI, AI services have started crawling the Internet to collect training data for their models. These models are often proprietary and commercial and are used to generate new content. Many content creators and publishers that want to exercise control over how their content is used have started using robots.txt to declare policies that cover these AI bots, in addition to the traditional search engines.
Here’s an abbreviated real-world example of the robots.txt policy from a top online news site:
This policy declares that the news site doesn’t want ChatGPT, Anthropic AI, Google Gemini, or ByteDance’s Bytespider to crawl any of their content.
From voluntary compliance to enforcement
Compliance with the Robots Exclusion Protocol has historically been voluntary.
That’s where our new feature comes in. We’ve extended AI Audit to give our customers both the visibility into how AI services providers honor their robots.txt policies and the ability to enforce those policies at the network level in your WAF.
Your robots.txt file declares your policy, but now we can help you enforce it. You might even call it … your Robotcop.
How it works
AI Audit takes the robots.txt files from your web properties, parses them, and then matches their rules against the AI bot traffic we see for the selected property. The summary table gives you an aggregated view of the number of requests and violations we see for every Bot across all paths. If you hover your mouse over the Robots.txt column, we will show you the defined policies for each Bot in the tooltip. You can also filter by violations from the top of the page.
In the “Most popular paths” section, whenever a path in your site gets traffic that has violated your policy, we flag it for visibility. Ideally, you wouldn’t see violations in the Robots.txt column — if you do see them, someone’s not complying.
But that’s not all… More importantly, AI Audit allows you to enforce your robots.txt policy at the network level. By pressing the “Enforce robots.txt rules” button on the top of the summary table, we automatically translate the rules defined for AI Bots in your robots.txt into an advanced firewall rule, redirect you to the WAF configuration screen, and allow you to deploy the rule in our network.
This is how the robots.txt policy mentioned above looks after translation:
Once you deploy a WAF rule built from your robots.txt policies, you are no longer simply requesting that AI services respect your policy, you’re enforcing it.
Conclusion
With AI Audit, we are giving our customers even more visibility into how AI services access their content, helping them define their policies and then enforcing them at the network level.
This feature is live today for all Cloudflare customers. Simply log into the dashboard and navigate to your domain to begin auditing the bot traffic from AI services and enforcing your robots.txt directives.
Since the discovery of CRIME, BREACH, TIME, LUCKY-13 etc., length-based side-channel attacks have been considered practical. Even though packets were encrypted, attackers were able to infer information about the underlying plaintext by analyzing metadata like the packet length or timing information.
Cloudflare was recently contacted by a group of researchers at Ben Gurion University who wrote a paper titled “What Was Your Prompt? A Remote Keylogging Attack on AI Assistants” that describes “a novel side-channel that can be used to read encrypted responses from AI Assistants over the web”. The Workers AI and AI Gateway team collaborated closely with these security researchers through our Public Bug Bounty program, discovering and fully patching a vulnerability that affects LLM providers. You can read the detailed research paper here.
Since being notified about this vulnerability, we’ve implemented a mitigation to help secure all Workers AI and AI Gateway customers. As far as we could assess, there was no outstanding risk to Workers AI and AI Gateway customers.
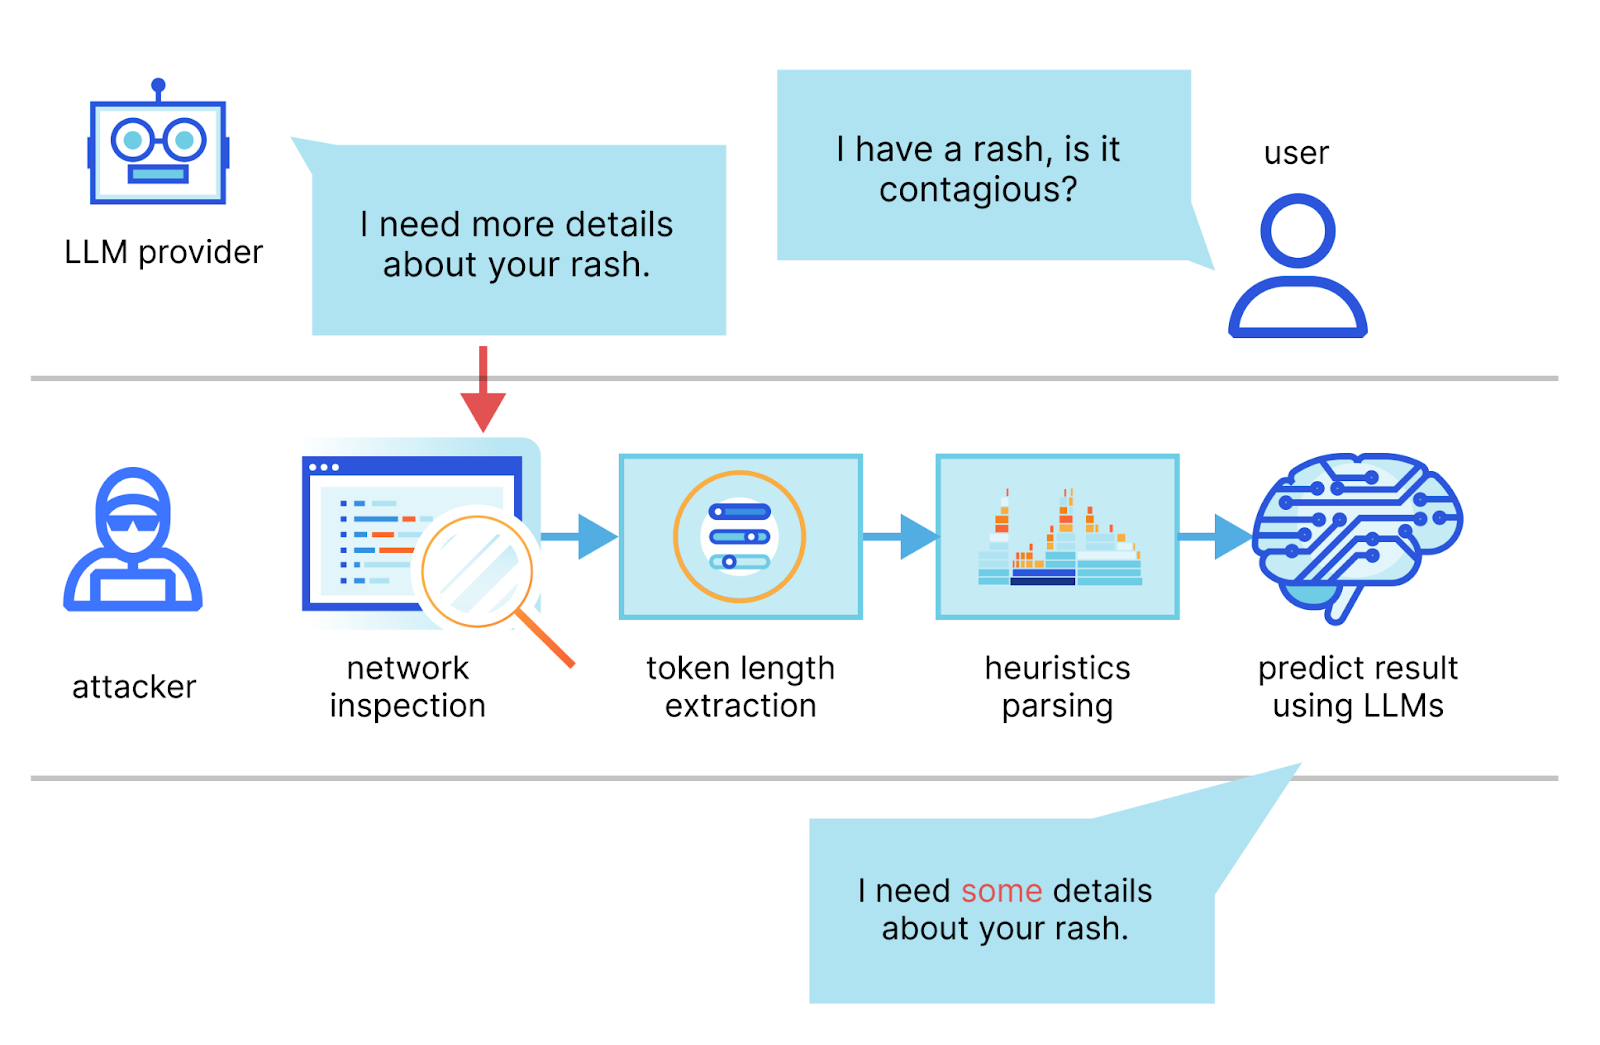
How does the side-channel attack work?
In the paper, the authors describe a method in which they intercept the stream of a chat session with an LLM provider, use the network packet headers to infer the length of each token, extract and segment their sequence, and then use their own dedicated LLMs to infer the response.
The two main requirements for a successful attack are an AI chat client running in streaming mode and a malicious actor capable of capturing network traffic between the client and the AI chat service. In streaming mode, the LLM tokens are emitted sequentially, introducing a token-length side-channel. Malicious actors could eavesdrop on packets via public networks or within an ISP.
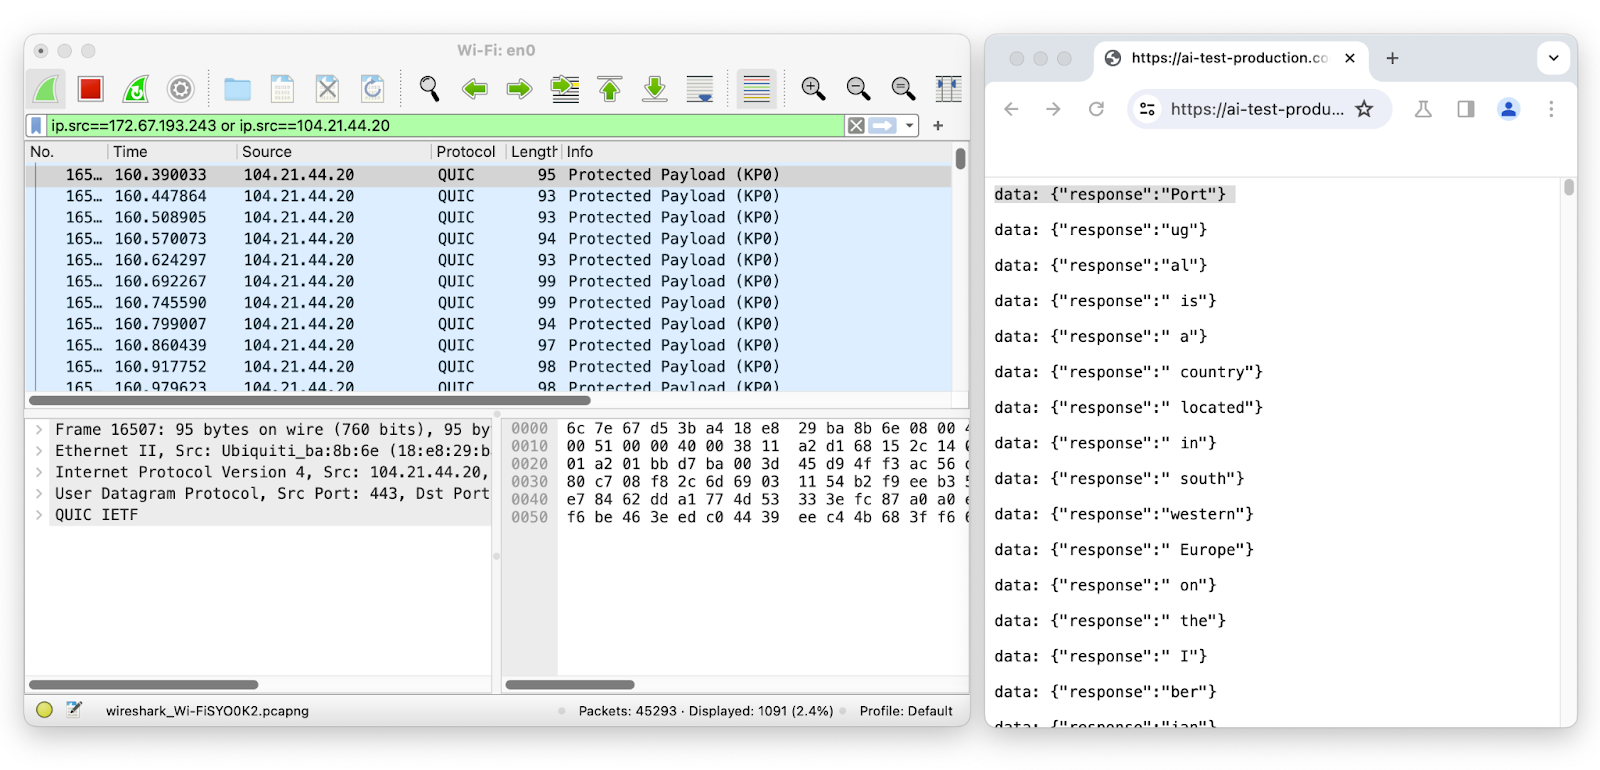
An example request vulnerable to the side-channel attack looks like this:
curl -X POST \
https://api.cloudflare.com/client/v4/accounts/<account-id>/ai/run/@cf/meta/llama-2-7b-chat-int8 \
  -H "Authorization: Bearer <Token>" \
  -d '{"stream":true,"prompt":"tell me something about portugal"}'
Let’s use Wireshark to inspect the network packets on the LLM chat session while streaming:
The first packet has a length of 95 and corresponds to the token “Port” which has a length of four. The second packet has a length of 93 and corresponds to the token “ug” which has a length of two, and so on. By removing the likely token envelope from the network packet length, it is easy to infer how many tokens were transmitted and their sequence and individual length just by sniffing encrypted network data.
Since the attacker needs the sequence of individual token length, this vulnerability only affects text generation models using streaming. This means that AI inference providers that use streaming — the most common way of interacting with LLMs — like Workers AI, are potentially vulnerable.
This method requires that the attacker is on the same network or in a position to observe the communication traffic and its accuracy depends on knowing the target LLM’s writing style. In ideal conditions, the researchers claim that their system “can reconstruct 29% of an AI assistant’s responses and successfully infer the topic from 55% of them”. It’s also important to note that unlike other side-channel attacks, in this case the attacker has no way of evaluating its prediction against the ground truth. That means that we are as likely to get a sentence with near perfect accuracy as we are to get one where only things that match are conjunctions.
Mitigating LLM side-channel attacks
Since this type of attack relies on the length of tokens being inferred from the packet, it can be just as easily mitigated by obscuring token size. The researchers suggested a few strategies to mitigate these side-channel attacks, one of which is the simplest: padding the token responses with random length noise to obscure the length of the token so that responses can not be inferred from the packets. While we immediately added the mitigation to our own inference product — Workers AI, we wanted to help customers secure their LLMs regardless of where they are running them by adding it to our AI Gateway.
As of today, all users of Workers AI and AI Gateway are now automatically protected from this side-channel attack.
What we did
Once we got word of this research work and how exploiting the technique could potentially impact our AI products, we did what we always do in situations like this: we assembled a team of systems engineers, security engineers, and product managers and started discussing risk mitigation strategies and next steps. We also had a call with the researchers, who kindly attended, presented their conclusions, and answered questions from our teams.
Unfortunately, at this point, this research does not include actual code that we can use to reproduce the claims or the effectiveness and accuracy of the described side-channel attack. However, we think that the paper has theoretical merit, that it provides enough detail and explanations, and that the risks are not negligible.
We decided to incorporate the first mitigation suggestion in the paper: including random padding to each message to hide the actual length of tokens in the stream, thereby complicating attempts to infer information based solely on network packet size.
Workers AI, our inference product, is now protected
With our inference-as-a-service product, anyone can use the Workers AI platform and make API calls to our supported AI models. This means that we oversee the inference requests being made to and from the models. As such, we have a responsibility to ensure that the service is secure and protected from potential vulnerabilities. We immediately rolled out a fix once we were notified of the research, and all Workers AI customers are now automatically protected from this side-channel attack. We have not seen any malicious attacks exploiting this vulnerability, other than the ethical testing from the researchers.
Our solution for Workers AI is a variation of the mitigation strategy suggested in the research document. Since we stream JSON objects rather than the raw tokens, instead of padding the tokens with whitespace characters, we added a new property, “p” (for padding) that has a string value of variable random length.
This has the advantage that no modifications are required in the SDK or the client code, the changes are invisible to the end-users, and no action is required from our customers. By adding random variable length to the JSON objects, we introduce the same network-level variability, and the attacker essentially loses the required input signal. Customers can continue using Workers AI as usual while benefiting from this protection.
One step further: AI Gateway protects users of any inference provider
We added protection to our AI inference product, but we also have a product that proxies requests to any provider — AI Gateway. AI Gateway acts as a proxy between a user and supported inference providers, helping developers gain control, performance, and observability over their AI applications. In line with our mission to help build a better Internet, we wanted to quickly roll out a fix that can help all our customers using text generation AIs, regardless of which provider they use or if they have mitigations to prevent this attack. To do this, we implemented a similar solution that pads all streaming responses proxied through AI Gateway with random noise of variable length.
Our AI Gateway customers are now automatically protected against this side-channel attack, even if the upstream inference providers have not yet mitigated the vulnerability. If you are unsure if your inference provider has patched this vulnerability yet, use AI Gateway to proxy your requests and ensure that you are protected.
Conclusion
At Cloudflare, our mission is to help build a better Internet – that means that we care about all citizens of the Internet, regardless of what their tech stack looks like. We are proud to be able to improve the security of our AI products in a way that is transparent and requires no action from our customers.
We are grateful to the researchers who discovered this vulnerability and have been very collaborative in helping us understand the problem space. If you are a security researcher who is interested in helping us make our products more secure, check out our Bug Bounty program at hackerone.com/cloudflare.
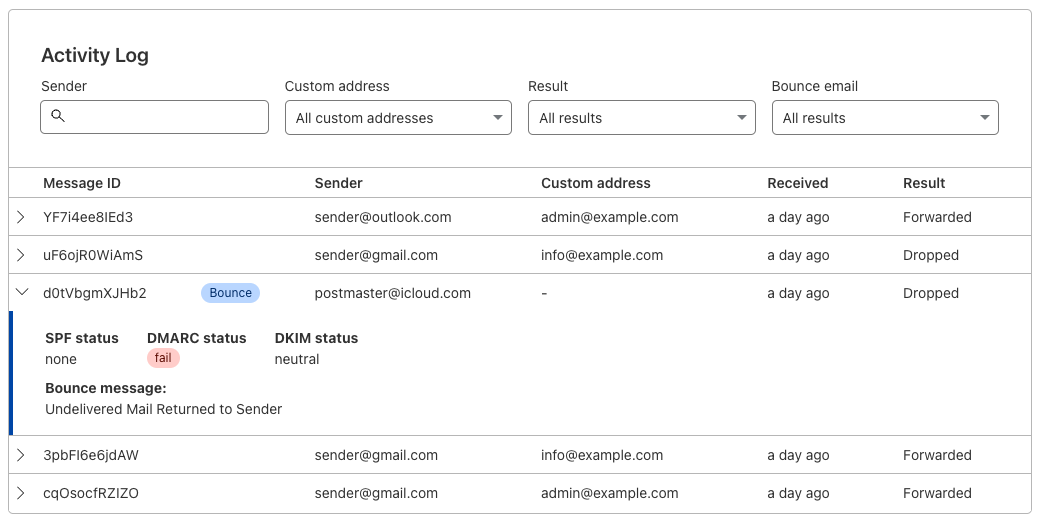
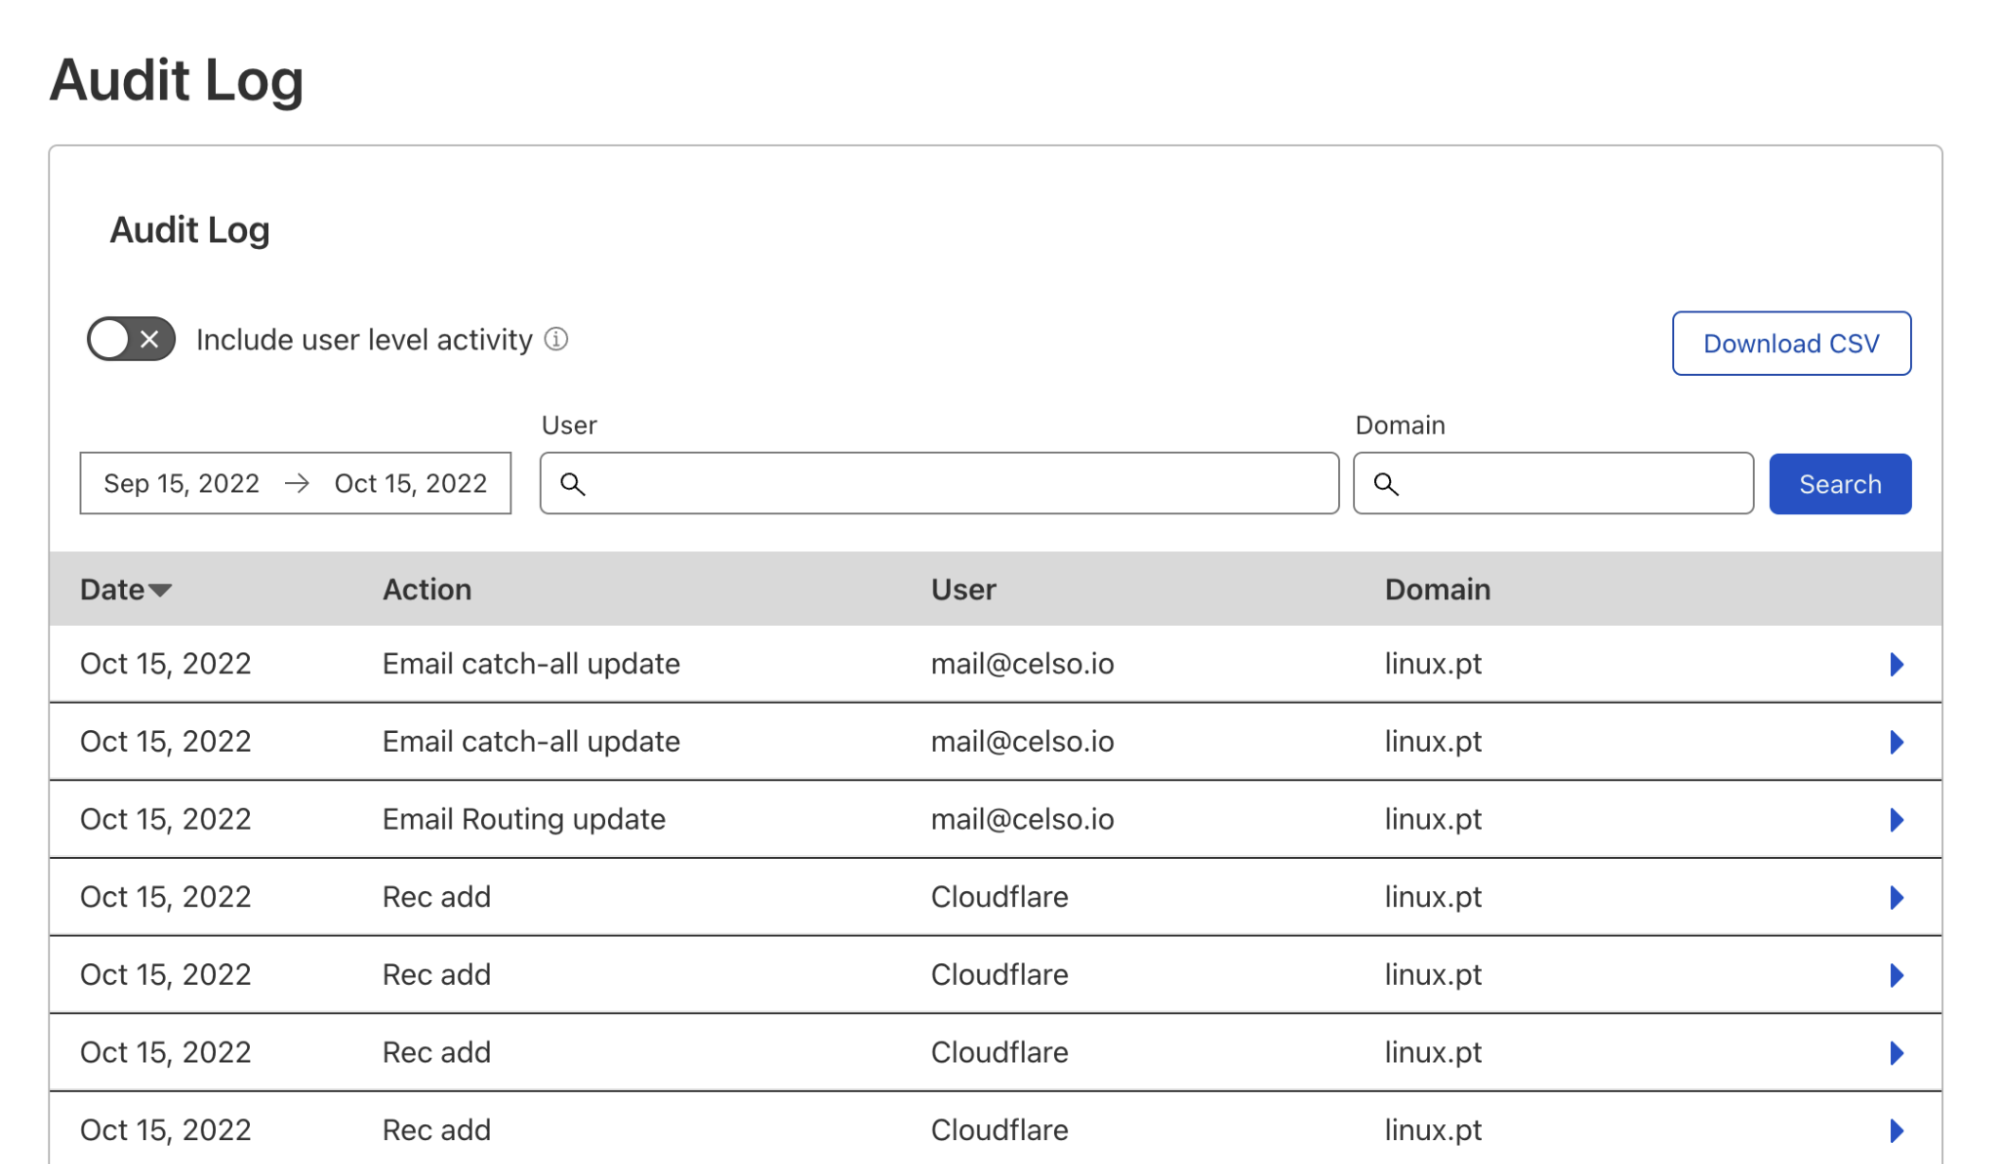
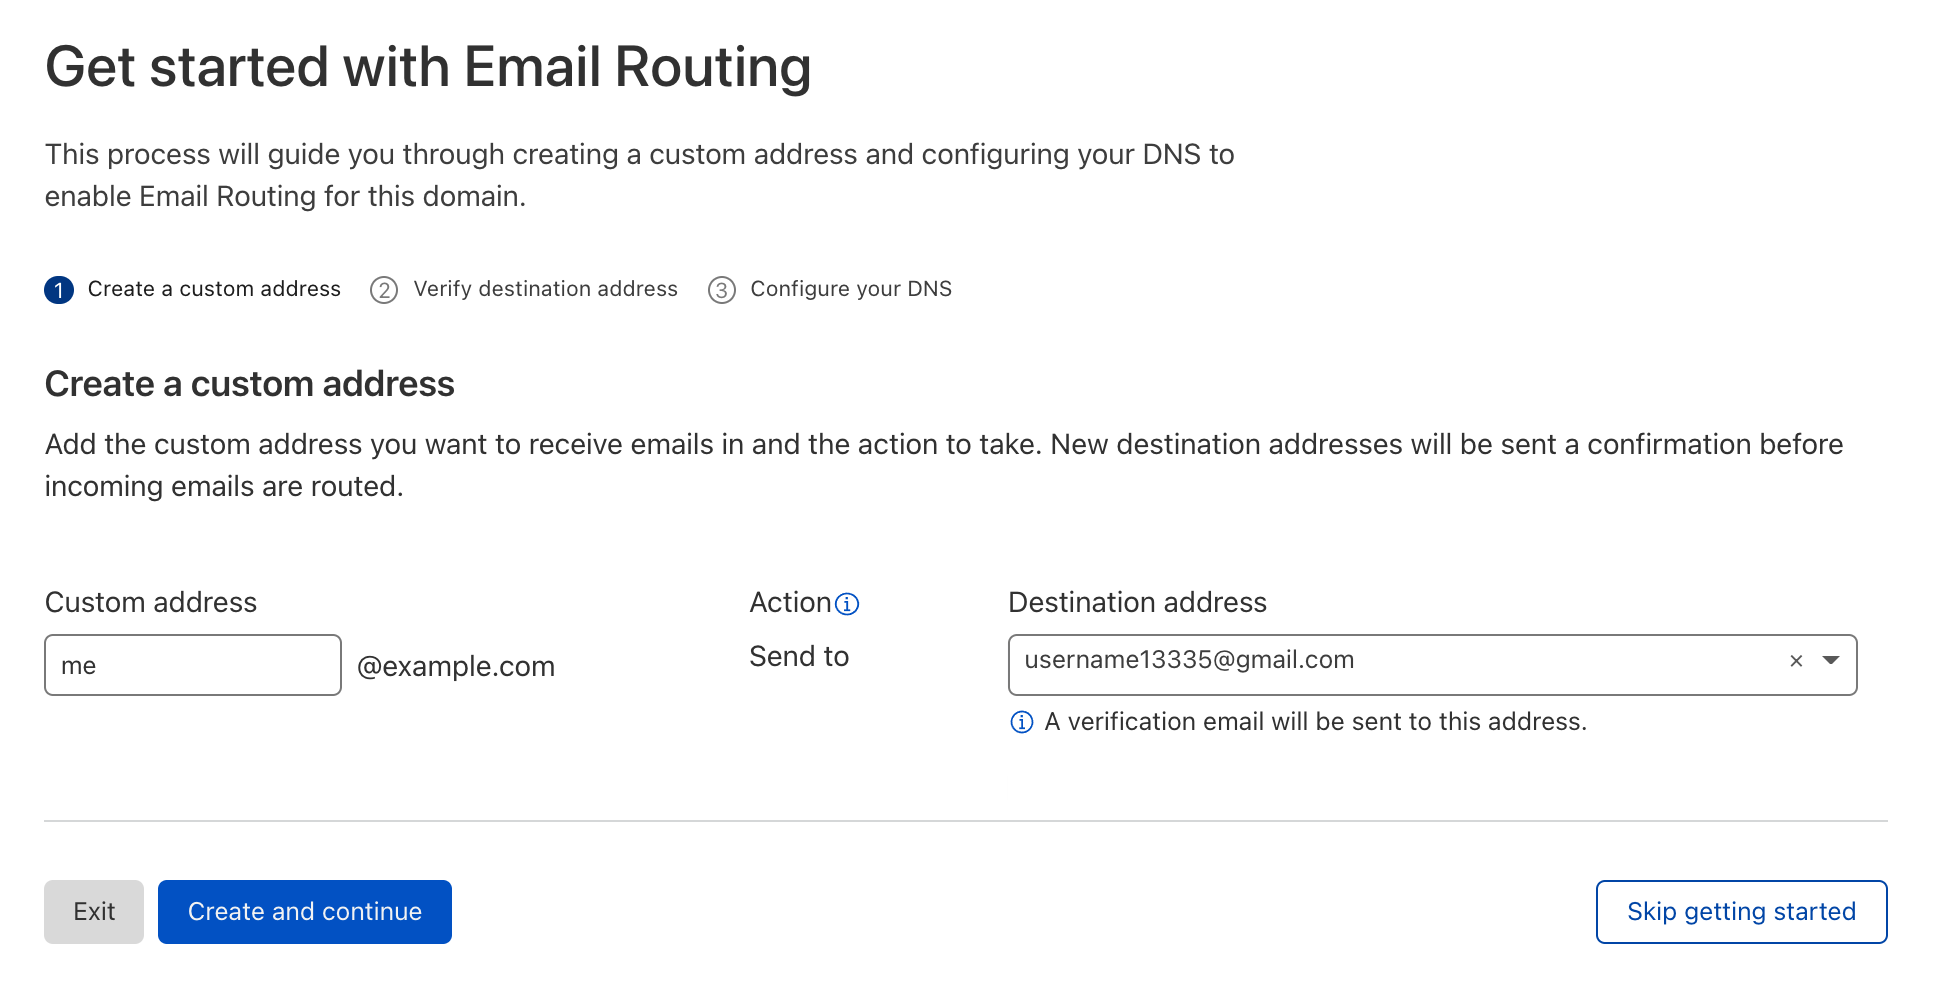
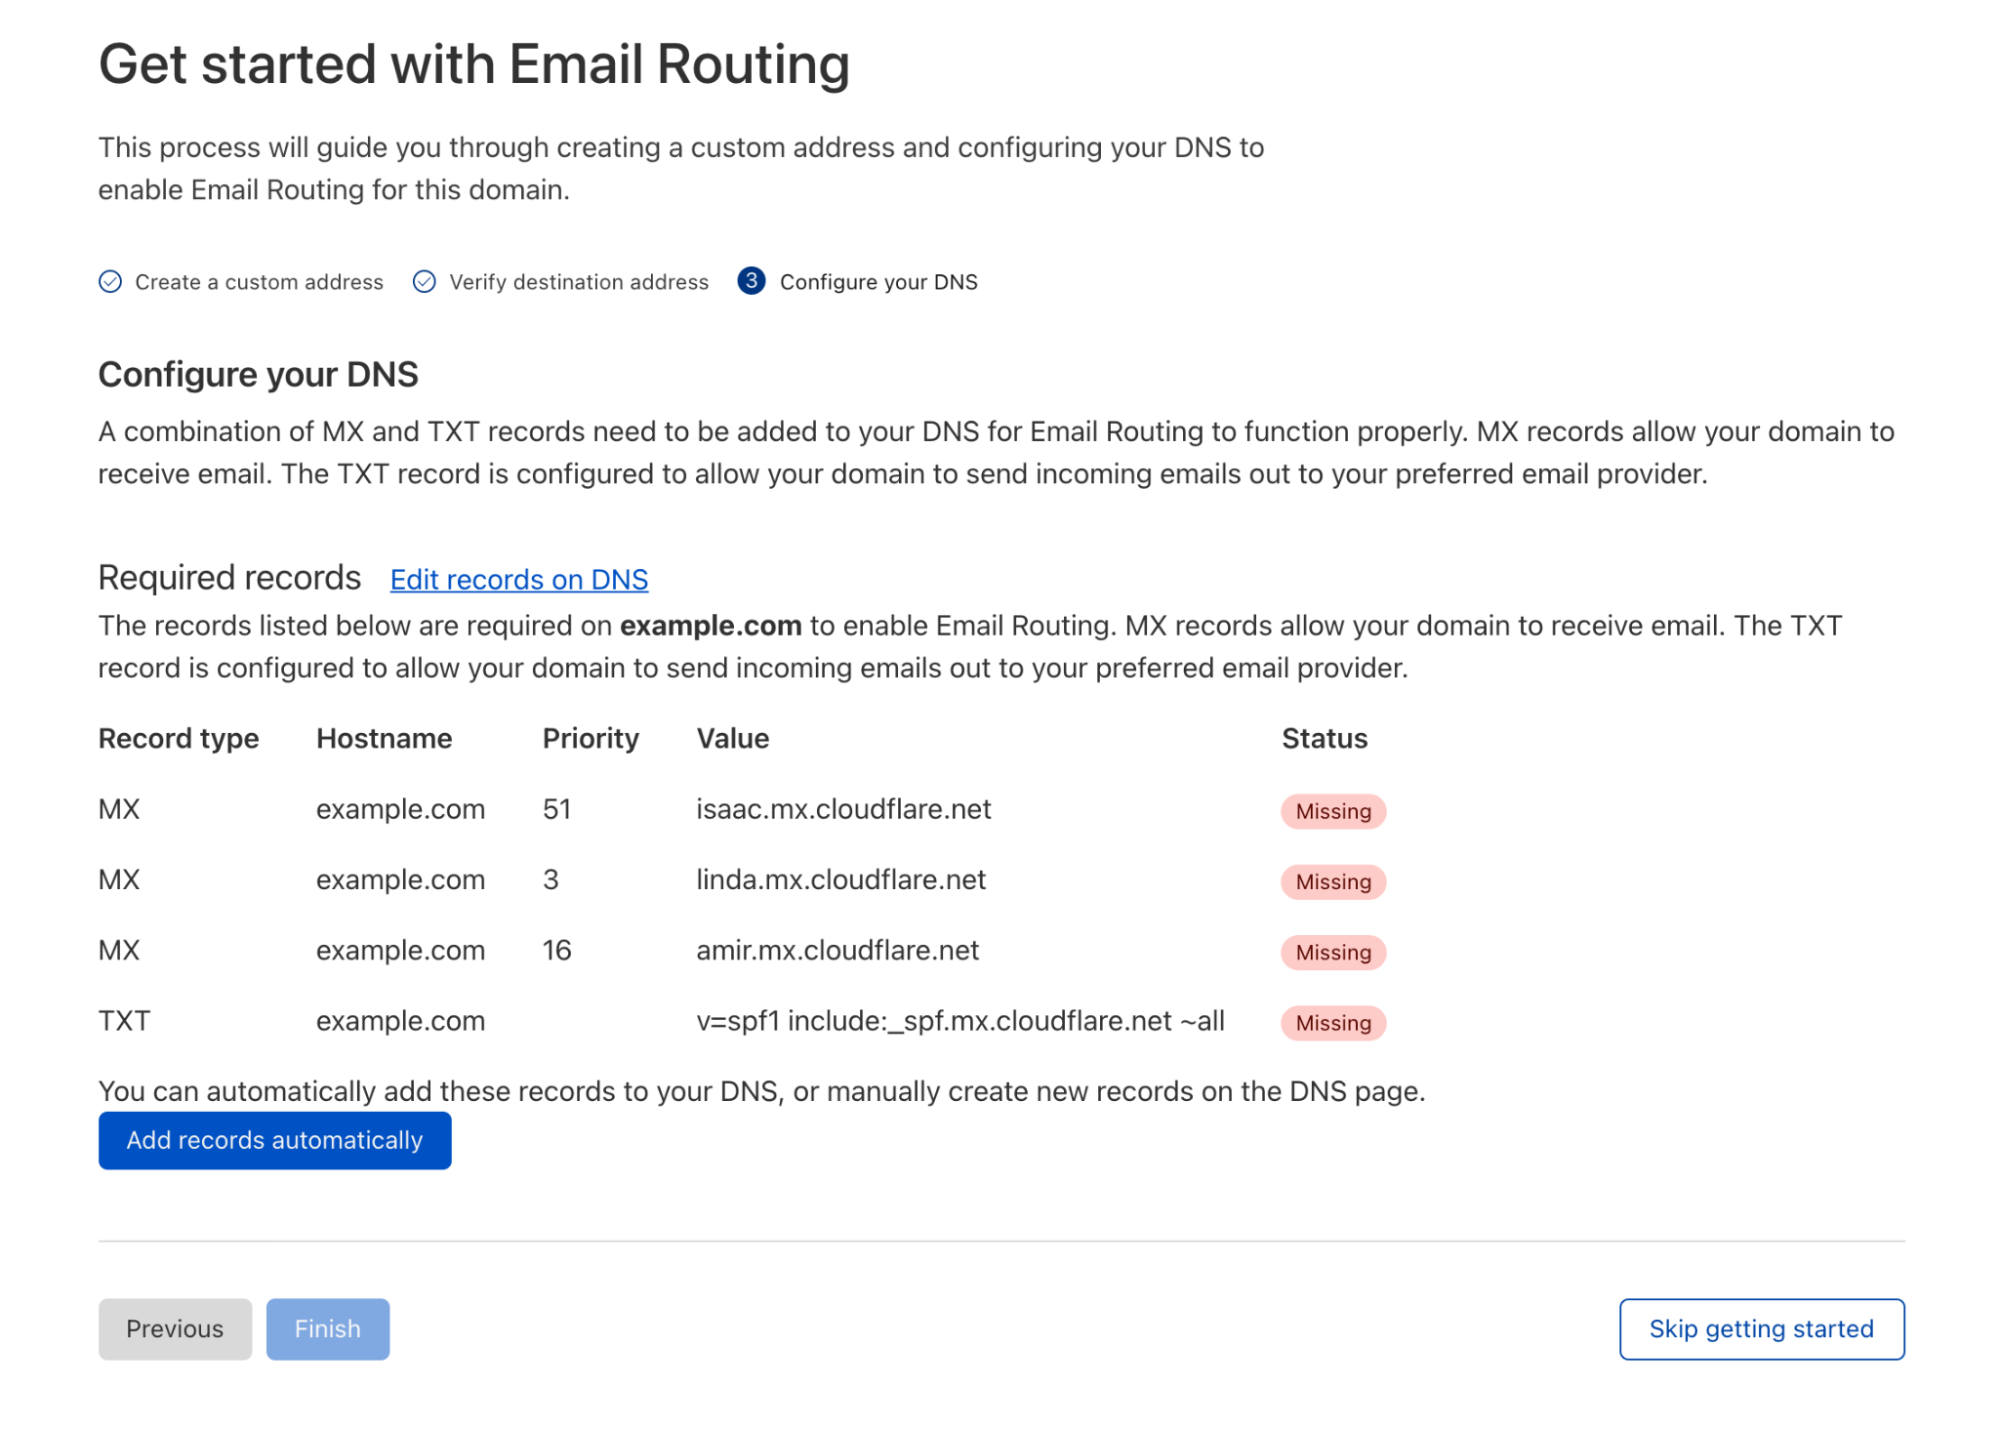
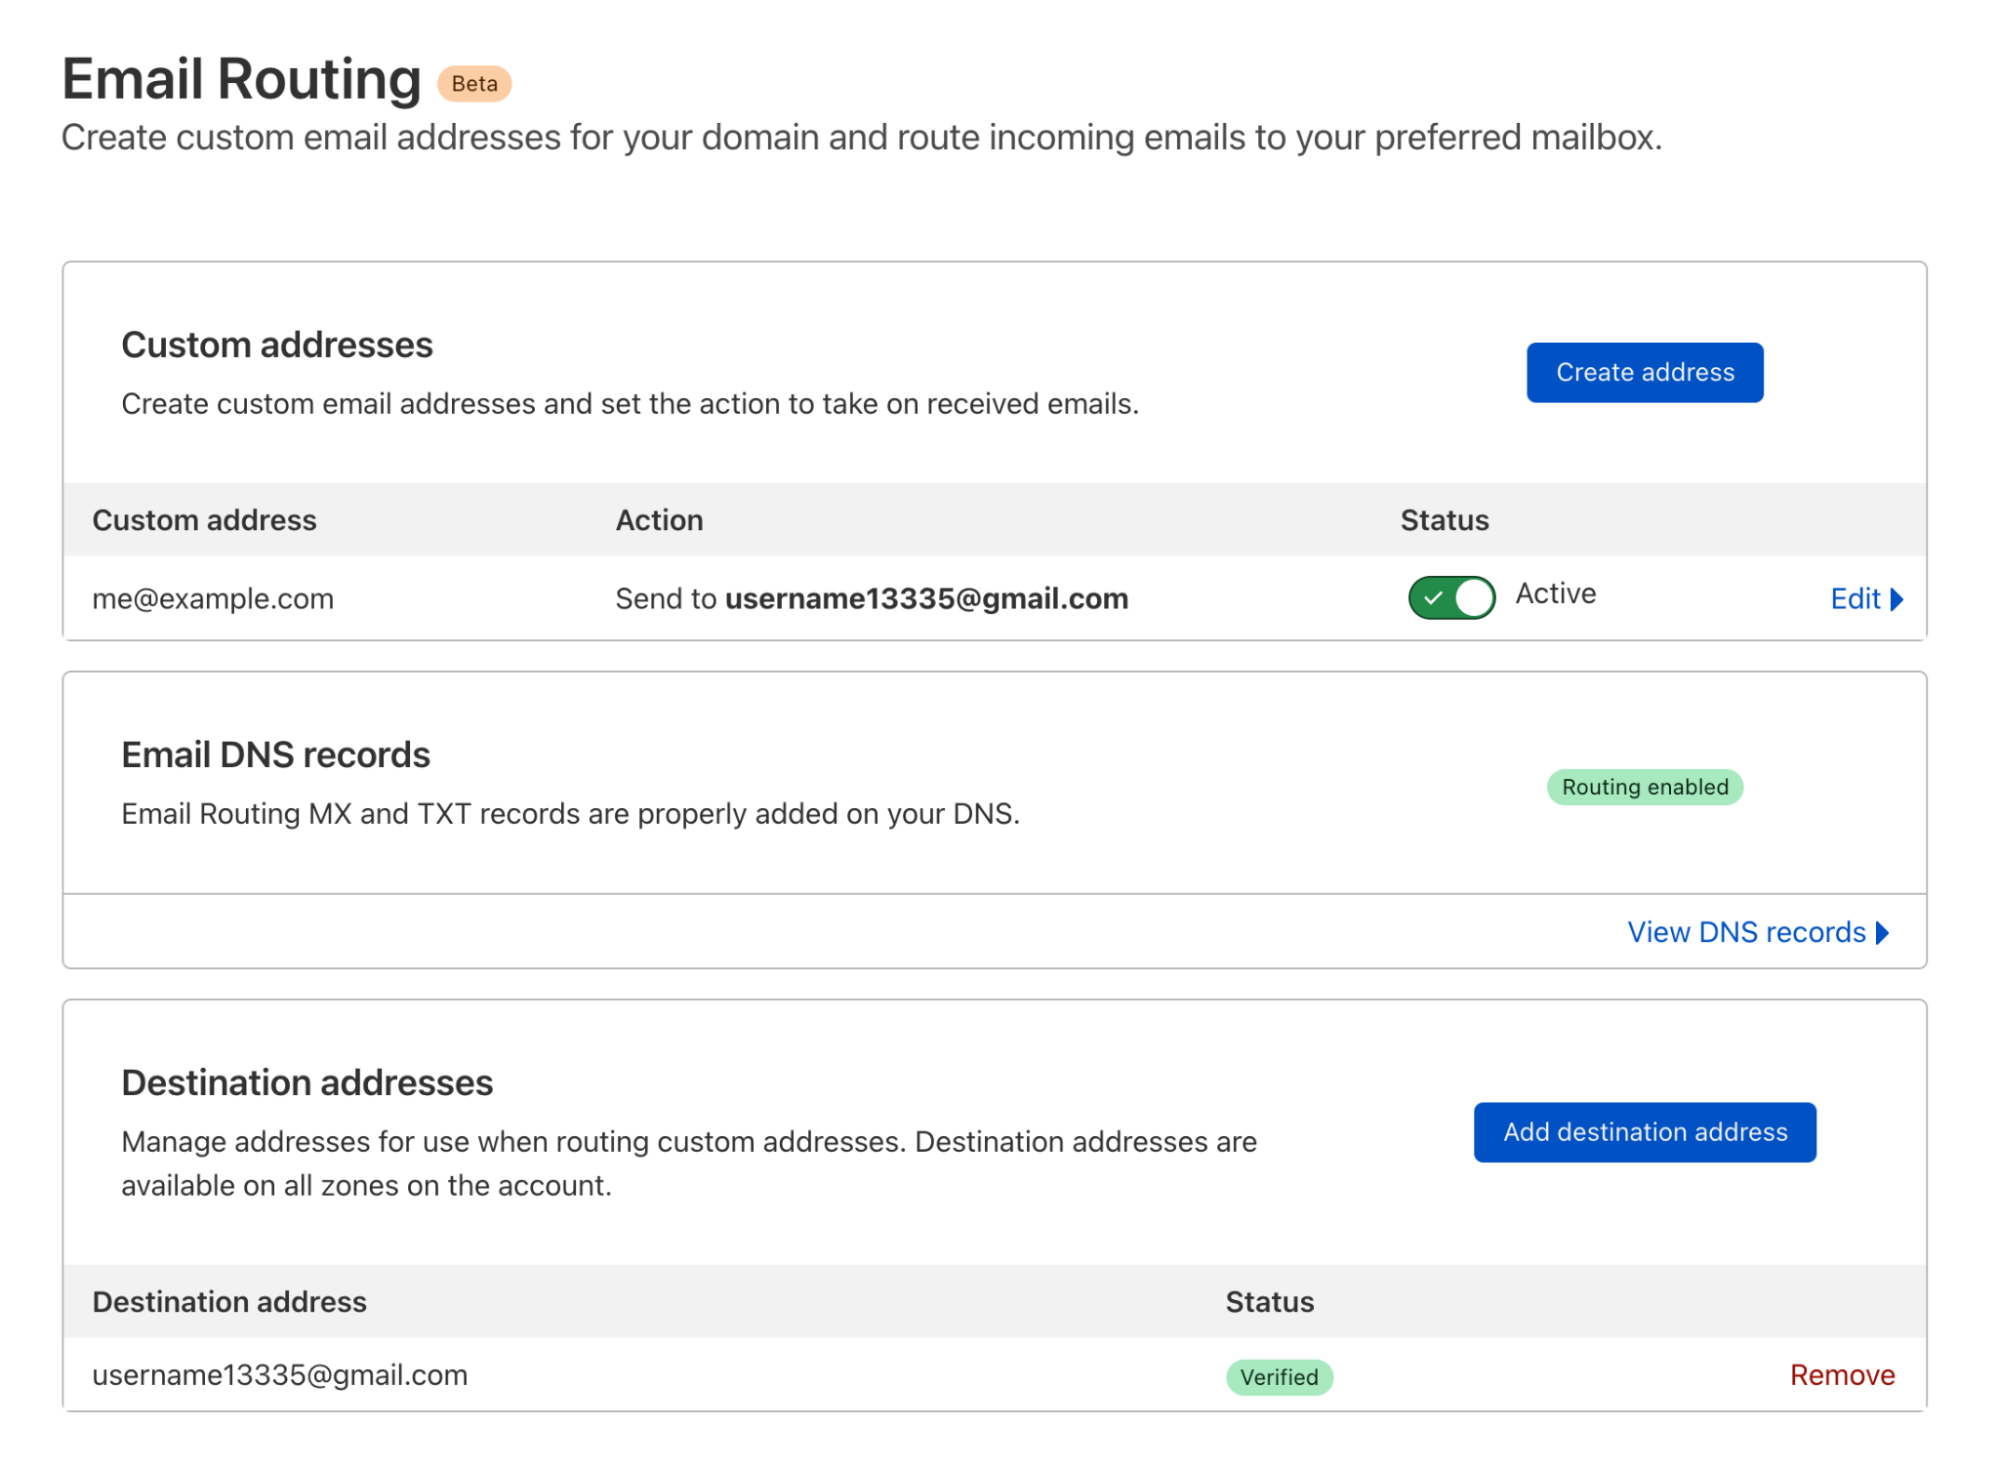
It’s been two years since we announced Email Routing, our solution to create custom email addresses for your domains and route incoming emails to your preferred mailbox. Since then, the team has worked hard to evolve the product and add more powerful features to meet our users’ expectations. Examples include Route to Workers, which allows you to process your Emails programmatically using Workers scripts, Public APIs, Audit Logs, or DMARC Management.
We also made significant progress in supporting more email security extensions and protocols, protecting our customers from unwanted traffic, and keeping our IP space reputation for email egress impeccable to maximize our deliverability rates to whatever inbox upstream provider you chose.
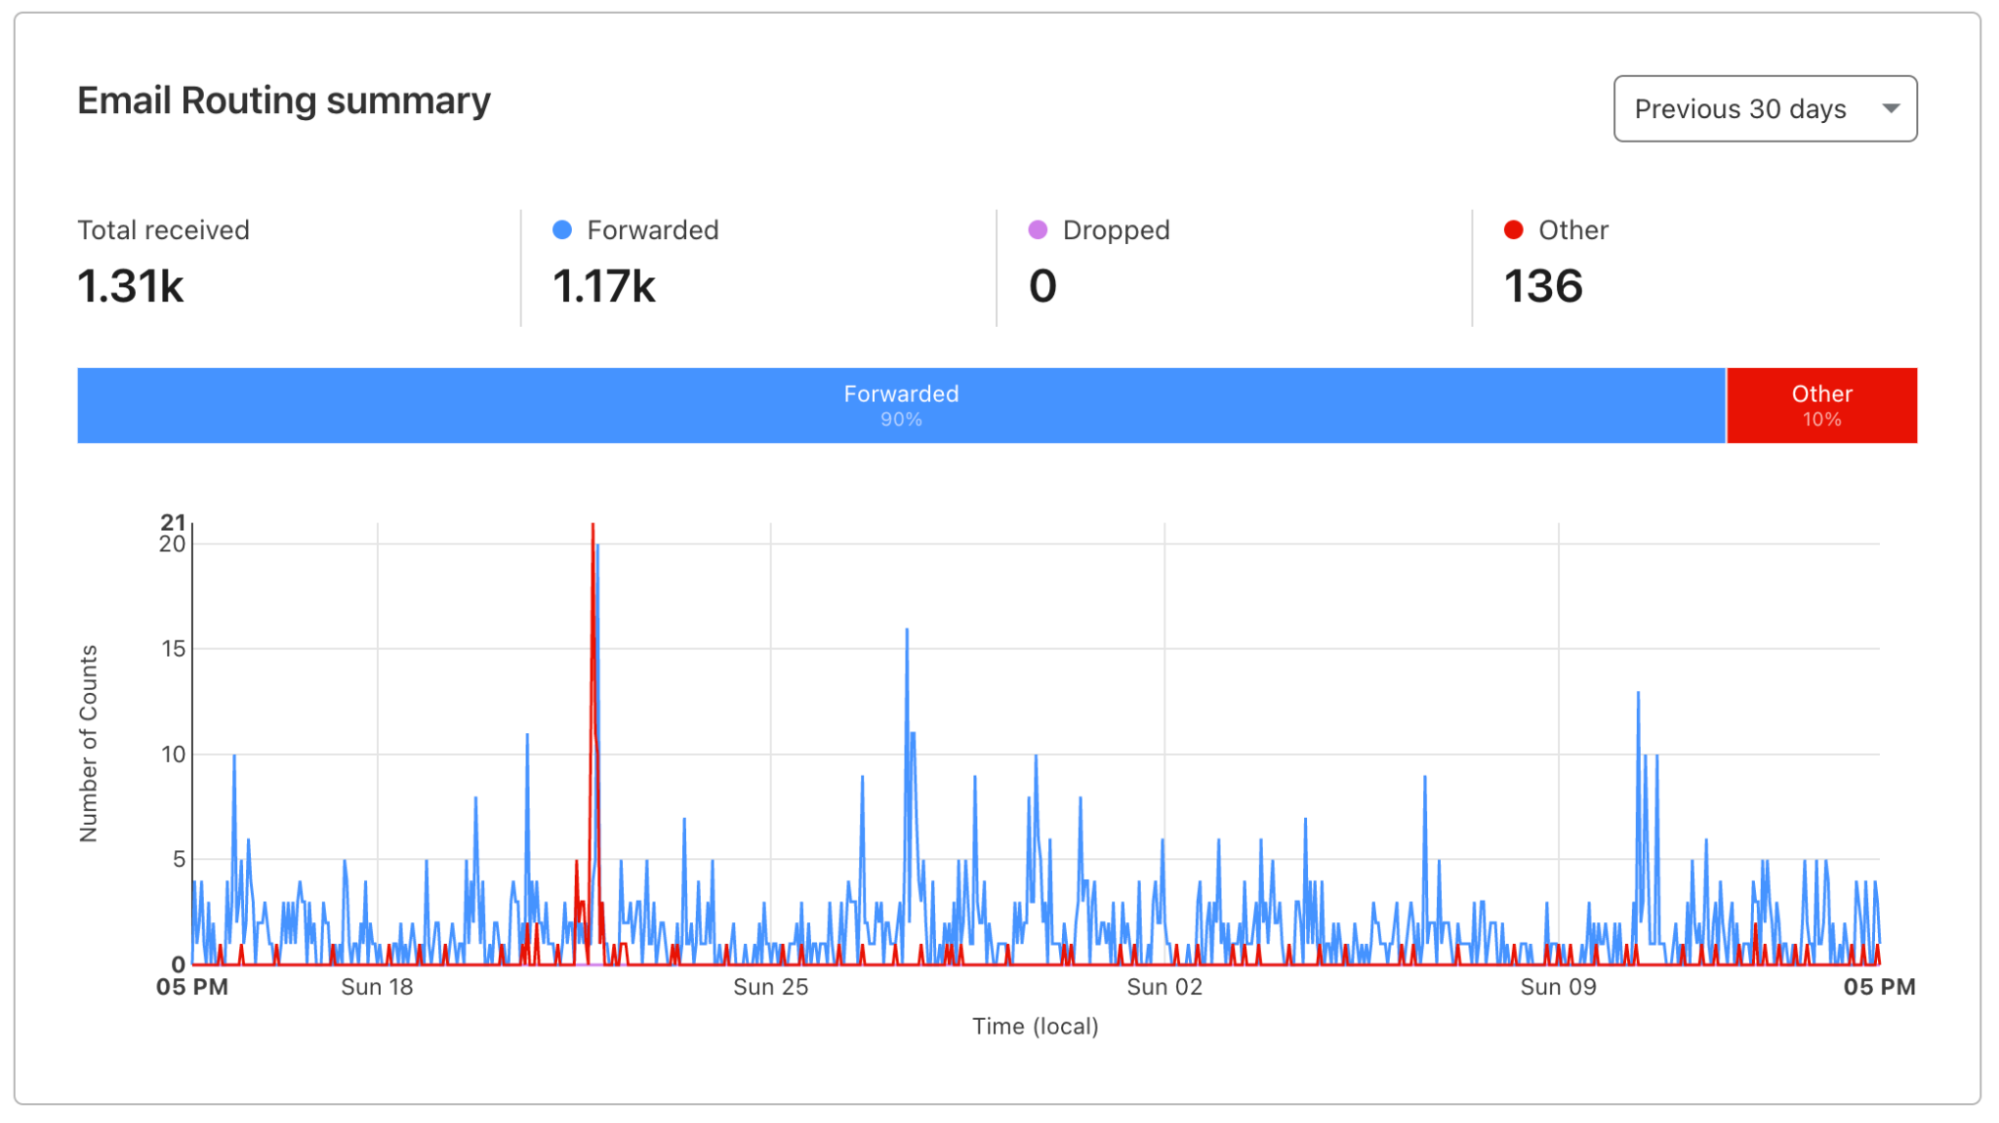
Since leaving beta, Email Routing has grown into one of our most popular products; it’s used by more than one million different customer zones globally, and we forward around 20 million messages daily to every major email platform out there. Our product is mature, robust enough for general usage, and suitable for any production environment. And it keeps evolving: today, we announce three new features that will help make Email Routing more secure, flexible, and powerful than ever.
New security protocols
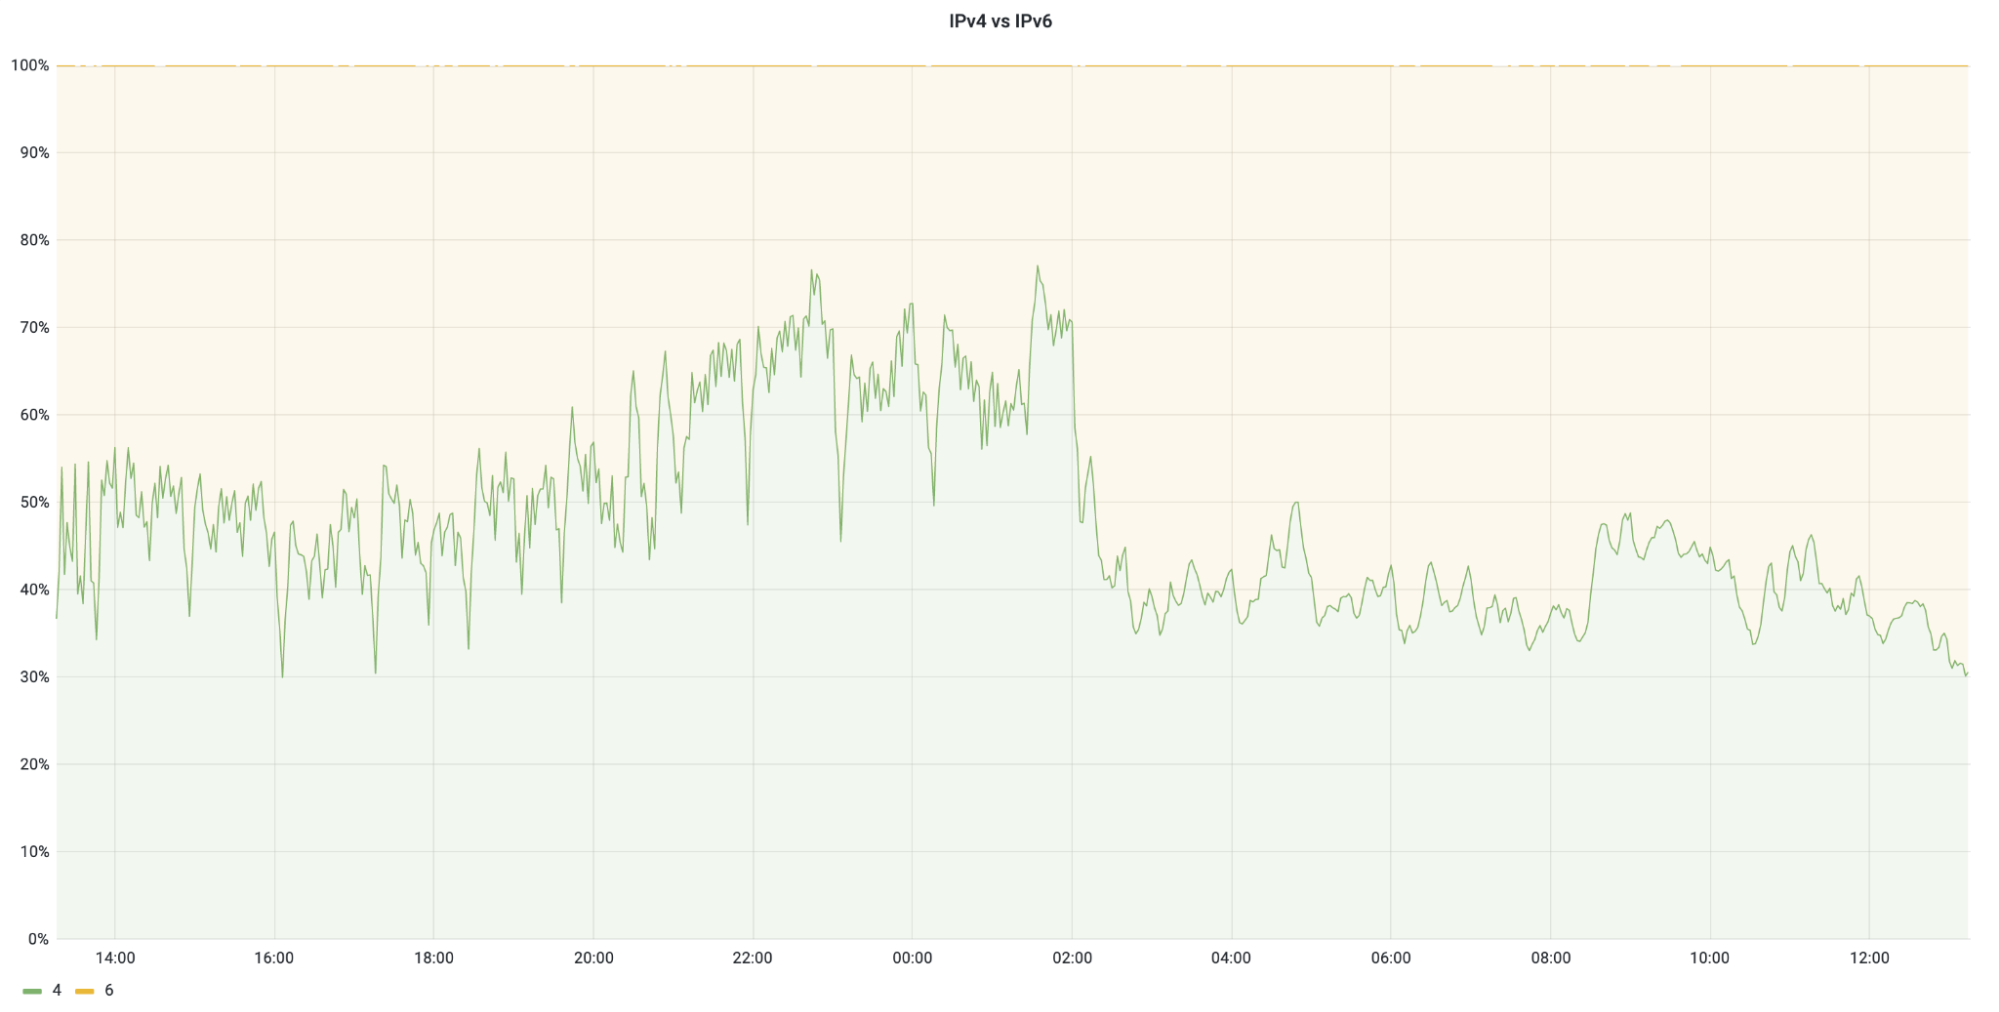
The SMTP email protocol has been around since the early 80s. Naturally, it wasn’t designed with the best security practices and requirements in mind, at least not the ones that the Internet expects today. For that reason, several protocol revisions and extensions have been standardized and adopted by the community over the years. Cloudflare is known for being an early adopter of promising emerging technologies; Email Routing already supports things like SPF, DKIM signatures, DMARC policy enforcement, TLS transport, STARTTLS, and IPv6 egress, to name a few. Today, we are introducing support for two new standards to help increase email security and improve deliverability to third-party upstream email providers.
ARC
Authenticated Received Chain (ARC) is an email authentication system designed to allow an intermediate email server (such as Email Routing) to preserve email authentication results. In other words, with ARC, we can securely preserve the results of validating sender authentication mechanisms like SPF and DKIM, which we support when the email is received, and transport that information to the upstream provider when we forward the message. ARC establishes a chain of trust with all the hops the message has passed through. So, if it was tampered with or changed in one of the hops, it is possible to see where by following that chain.
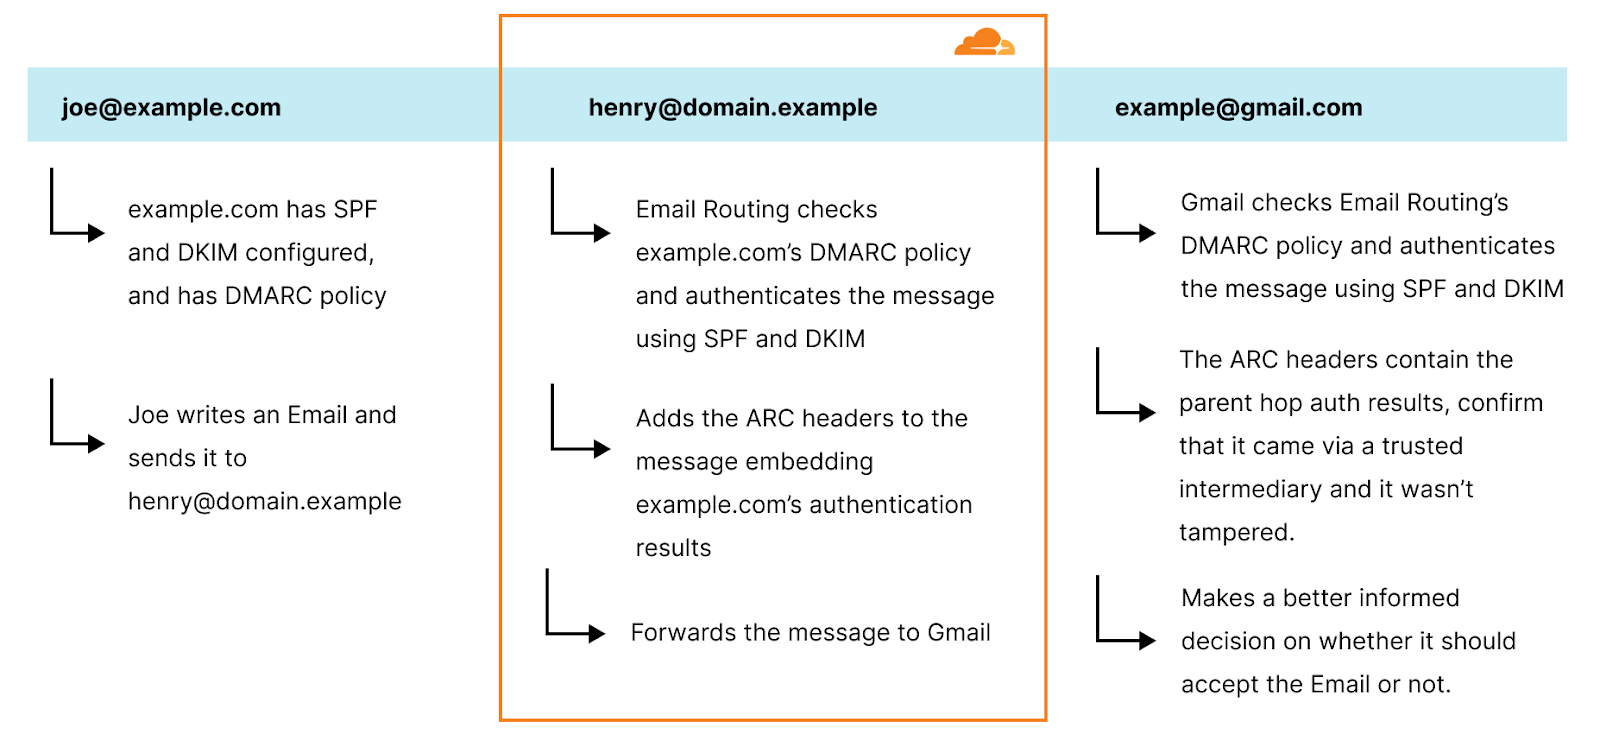
We began rolling out ARC support to Email Routing a few weeks ago. Here’s how it works:
Email Routing will use @example.com’s DMARC policy to check the SPF and DKIM alignments (SPF, DKIM, and DMARC help authenticate email senders by verifying that the emails came from the domain that they claim to be from.) It then stores this authentication result by adding a Arc-Authentication-Results header in the message:
ARC-Authentication-Results: i=1; mx.cloudflare.net; dkim=pass header.d=cloudflare.com header.s=example09082023 header.b=IRdayjbb; dmarc=pass header.from=example.com policy.dmarc=reject; spf=none (mx.cloudflare.net: no SPF records found for [email protected]) smtp.helo=smtp.example.com; spf=pass (mx.cloudflare.net: domain of [email protected] designates 2a00:1440:4824:20::32e as permitted sender) [email protected]; arc=none smtp.remote-ip=2a00:1440:4824:20::32e
Then we take a snapshot of all the headers and the body of the original message, and we generate an Arc-Message-Signature header with a DKIM-like cryptographic signature (in fact ARC uses the same DKIM keys):
Finally, before forwarding the message to [email protected], Email Routing generates the Arc-Seal header, another DKIM-like signature, composed out of the Arc-Authentication-Results and Arc-Message-Signature, and cryptographically “seals” the message:
When Gmail receives the message from Email Routing, it not only normally authenticates the last hop domain.example domain (Email Routing uses SRS), but it also checks the ARC seal header, which provides the authentication results of the original sender.
ARC increases the traceability of the message path through email intermediaries, allowing for more informed delivery decisions by those who receive emails as well as higher deliverability rates for those who transport them, like Email Routing. It has been adopted by all the major email providers like Gmail and Microsoft. You can read more about the ARC protocol in the RFC8617.
MTA-STS
As we said earlier, SMTP is an old protocol. Initially Email communications were done in the clear, in plain-text and unencrypted. At some point in time in the late 90s, the email providers community standardized STARTTLS, also known as Opportunistic TLS. The STARTTLS extension allowed a client in a SMTP session to upgrade to TLS encrypted communications.
While at the time this seemed like a step forward in the right direction, we later found out that because STARTTLS can start with an unencrypted plain-text connection, and that can be hijacked, the protocol is susceptible to man-in-the-middle attacks.
A few years ago MTA Strict Transport Security (MTA-STS) was introduced by email service providers including Microsoft, Google and Yahoo as a solution to protect against downgrade and man-in-the-middle attacks in SMTP sessions, as well as solving the lack of security-first communication standards in email.
Suppose that example.com uses Email Routing. Here’s how you can enable MTA-STS for it.
First, log in to the Cloudflare dashboard and select your account and zone. Then go to DNS > Records and create a new CNAME record with the name “_mta-sts” that points to Cloudflare’s record “_mta-sts.mx.cloudflare.net”. Make sure to disable the proxy mode.
Confirm that the record was created:
$ dig txt _mta-sts.example.com
_mta-sts.example.com.	300	IN	CNAME	_mta-sts.mx.cloudflare.net.
_mta-sts.mx.cloudflare.net. 300	IN	TXT	"v=STSv1; id=20230615T153000;"
This tells the other end client that is trying to connect to us that we support MTA-STS.
Next you need an HTTPS endpoint at mta-sts.example.com to serve your policy file. This file defines the mail servers in the domain that use MTA-STS. The reason why HTTPS is used here instead of DNS is because not everyone uses DNSSEC yet, so we want to avoid another MITM attack vector.
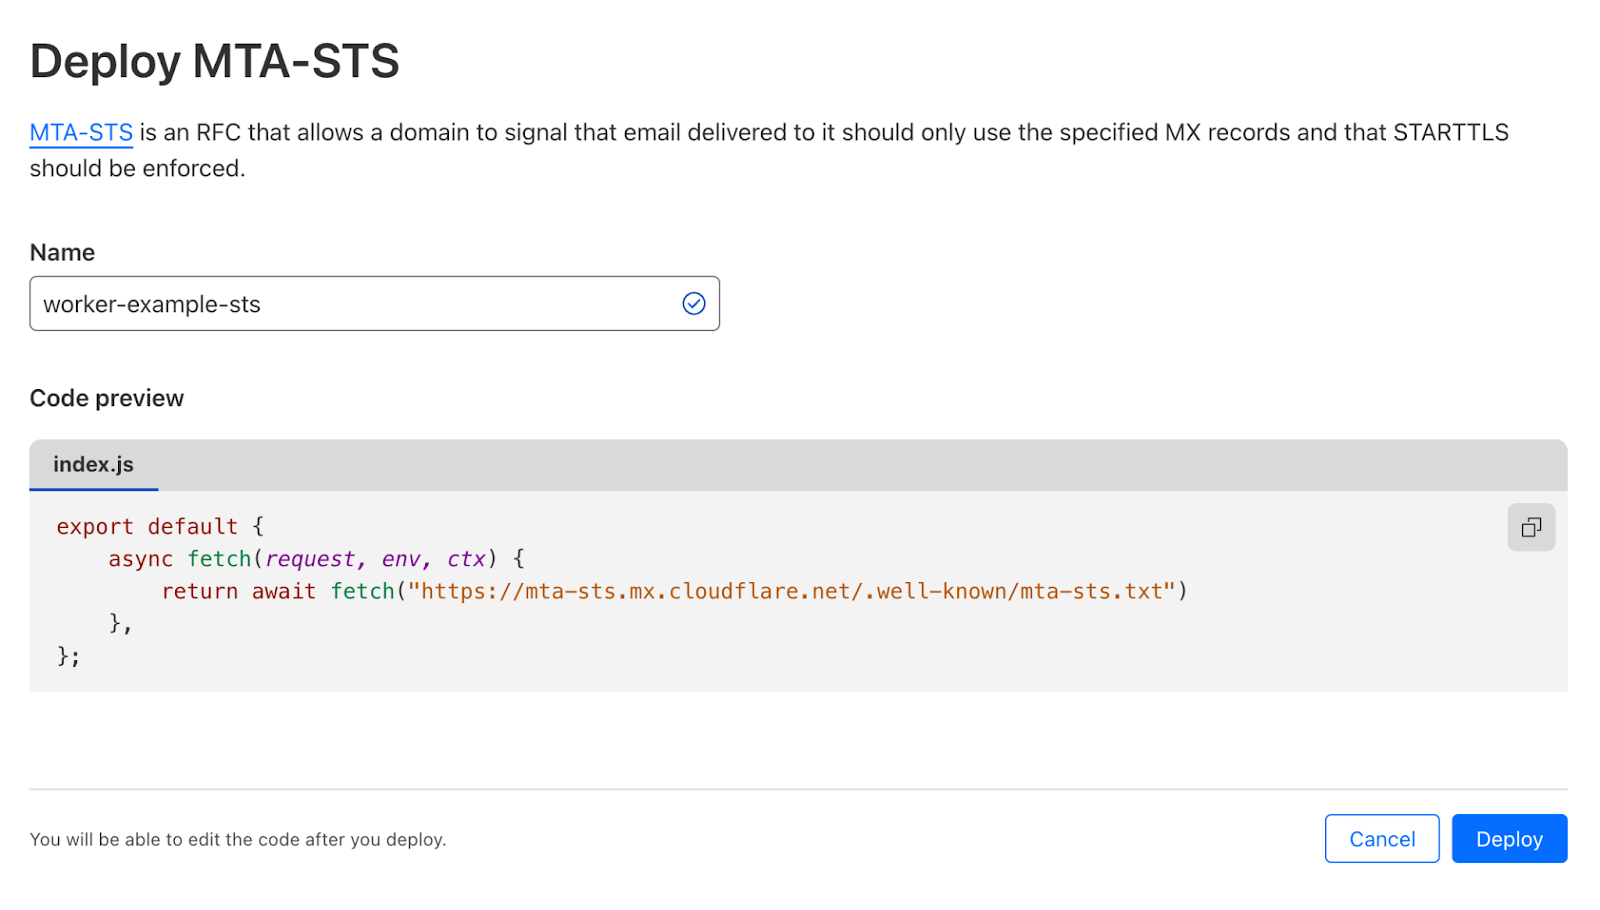
To do this you need to deploy a very simple Worker that allows Email clients to pull Cloudflare’s Email Routing policy file using the “well-known” URI convention. Go to your Account > Workers & Pages and press Create Application. Pick the “MTA-STS” template from the list.
This Worker simply proxies https://mta-sts.mx.cloudflare.net/.well-known/mta-sts.txt to your own domain. After deploying it, go to the Worker configuration, then Triggers > Custom Domains and Add Custom Domain.
You can then confirm that your policy file is working:
This says that we enforce MTA-STS. Capable email clients will only deliver email to this domain over a secure connection to the specified MX servers. If no secure connection can be established the email will not be delivered.
Email Routing also supports MTA-STS upstream, which greatly improves security when forwarding your Emails to service providers like Gmail or Microsoft, and others.
While enabling MTA-STS involves a few steps today, we plan to simplify things for you and automatically configure MTA-STS for your domains from the Email Routing dashboard as a future improvement.
Sending emails and replies from Workers
Last year we announced Email Workers, allowing anyone using Email Routing to associate a Worker script to an Email address rule, and programmatically process their incoming emails in any way they want. Workers is our serverless compute platform, it provides hundreds of features and APIs, like databases and storage. Email Workers opened doors to a flood of use-cases and applications that weren’t possible before like implementing allow/block lists, advanced rules, notifications to messaging applications, honeypot aggregators and more.
Still, you could only act on the incoming email event. You could read and process the email message, you could even manipulate and create some headers, but you couldn’t rewrite the body of the message or create new emails from scratch.
Today we’re announcing two new powerful Email Workers APIs that will further enhance what you can do with Email Routing and Workers.
Send emails from Workers
Now you can send an email from any Worker, from scratch, whenever you want, not just when you receive incoming messages, to any email address verified on Email Routing under your account. Here are a few practical examples where sending email from Workers to your verified addresses can be helpful:
Daily digests with the news from your favorite publications.
Alert messages whenever the weather conditions are adverse.
Automatic notifications when systems complete tasks.
Receive a message composed of the inputs of a form online on a contact page.
Let’s see a simple example of a Worker sending an email. First you need to create “send_email” bindings in your wrangler.toml configuration:
send_email = [
    {type = "send_email", name = "EMAIL_OUT"}
 ]
And then creating a new message and sending it in a Workers is as simple as:
import { EmailMessage } from "cloudflare:email";
import { createMimeMessage } from "mimetext";

export default {
 async fetch(request, env) {
   const msg = createMimeMessage();
   msg.setSender({ name: "Workers AI story", addr: "[email protected]" });
   msg.setRecipient("[email protected]");
   msg.setSubject("An email generated in a worker");
   msg.addMessage({
       contentType: 'text/plain',
       data: `Congratulations, you just sent an email from a worker.`
   });

   var message = new EmailMessage(
     "[email protected]",
     "[email protected]",
     msg.asRaw()
   );
   try {
     await env.EMAIL_OUT.send(message);
   } catch (e) {
     return new Response(e.message);
   }

   return new Response("email sent!");
 },
};
This example makes use of mimetext, an open-source raw email message generator.
Again, for security reasons, you can only send emails to the addresses for which you confirmed ownership in Email Routing under your Cloudflare account. If you’re looking for sending email campaigns or newsletters to destination addresses that you do not control or larger subscription groups, you should consider other options like our MailChannels integration.
Since sending Emails from Workers is not tied to the EmailEvent, you can send them from any type of Worker, including Cron Triggers and Durable Objects, whenever you want, you control all the logic.
Reply to emails
One of our most-requested features has been to provide a way to programmatically respond to incoming emails. It has been possible to do this with Email Workers in a very limited capacity by returning a permanent SMTP error message — but this may or may not be visible to the end user depending on the client implementation.
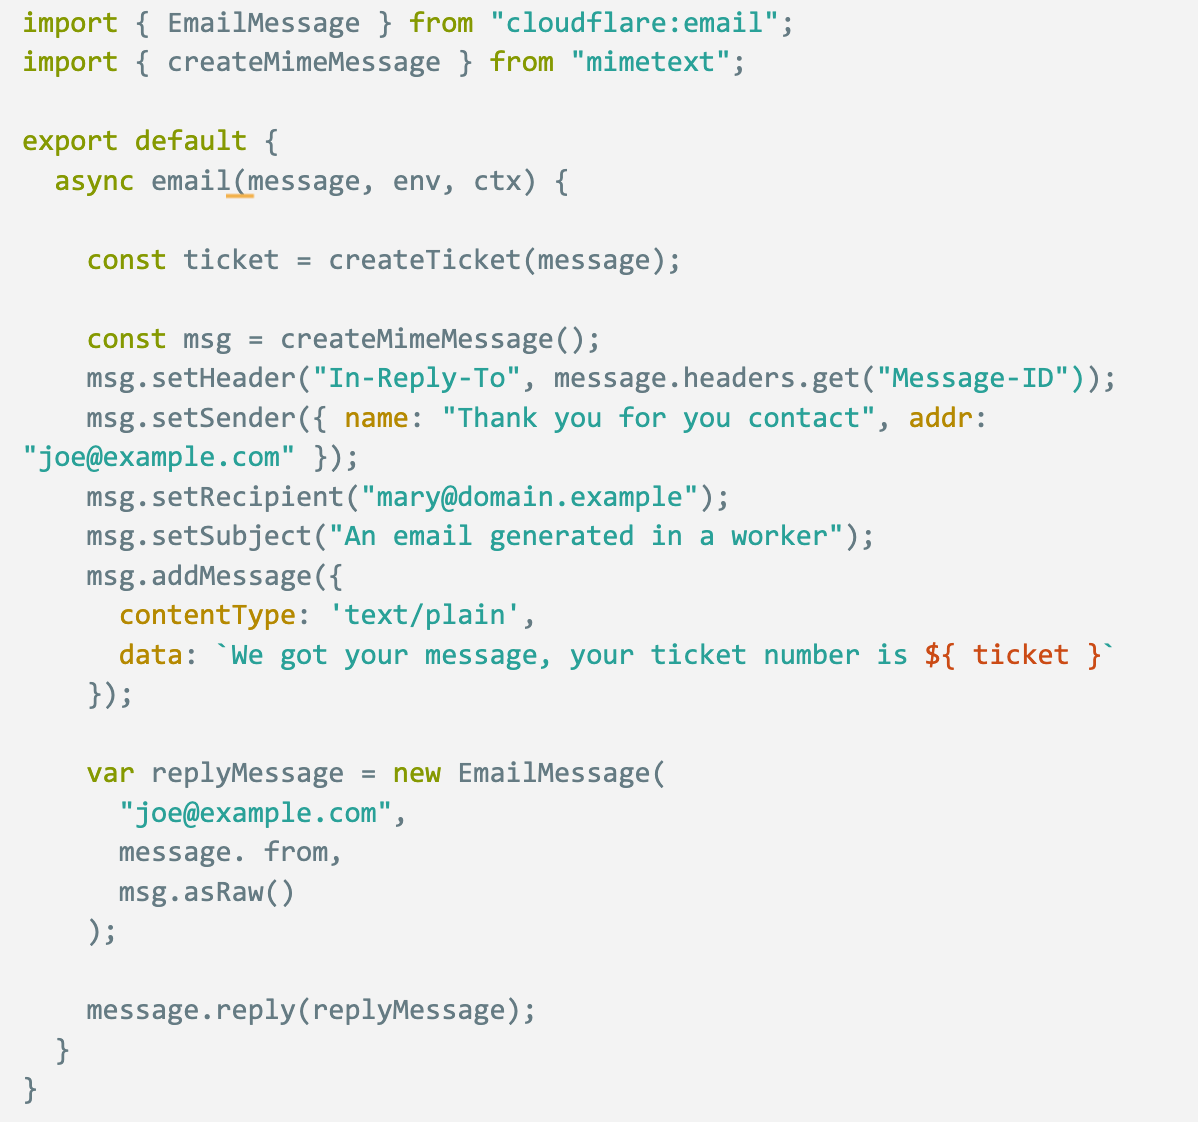
As of today, you can now truly reply to incoming emails with another new message and implement smart auto-responders programmatically, adding any content and context in the main body of the message. Think of a customer support email automatically generating a ticket and returning the link to the sender, an out-of-office reply with instructions when you’re on vacation, or a detailed explanation of why you rejected an email. Here’s a code example:
To mitigate security risks and abuse, replying to incoming emails has a few requirements:
The incoming email has to have valid DMARC.
The email can only be replied to once.
The In-Reply-To header of the reply message must match the Message-ID of the incoming message.
The recipient of the reply must match the incoming sender.
The outgoing sender domain must match the same domain that received the email.
If these and other internal conditions are not met, then reply() will fail with an exception, otherwise you can freely compose your reply message and send it back to the original sender.
For more information the documentation to these APIs is available in our Developer Docs.
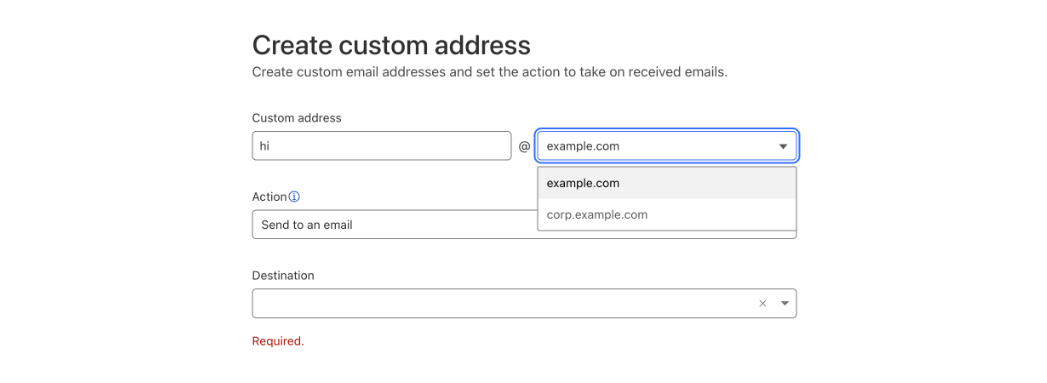
Subdomains support
This is a big one.
Email Routing is a zone-level feature. A zone has a top-level domain (the same as the zone name) and it can have subdomains (managed under the DNS feature.) As an example, I can have the example.com zone, and then the mail.example.com and corp.example.com subdomains under it. However, we can only use Email Routing with the top-level domain of the zone, example.com in this example. While this is fine for the vast majority of use cases, some customers — particularly bigger organizations with complex email requirements — have asked for more flexibility.
This changes today. Now you can use Email Routing with any subdomain of any zone in your account. To make this possible we redesigned the dashboard UI experience to make it easier to get you started and manage all your Email Routing domains and subdomains, rules and destination addresses in one single place. Let’s see how it works.
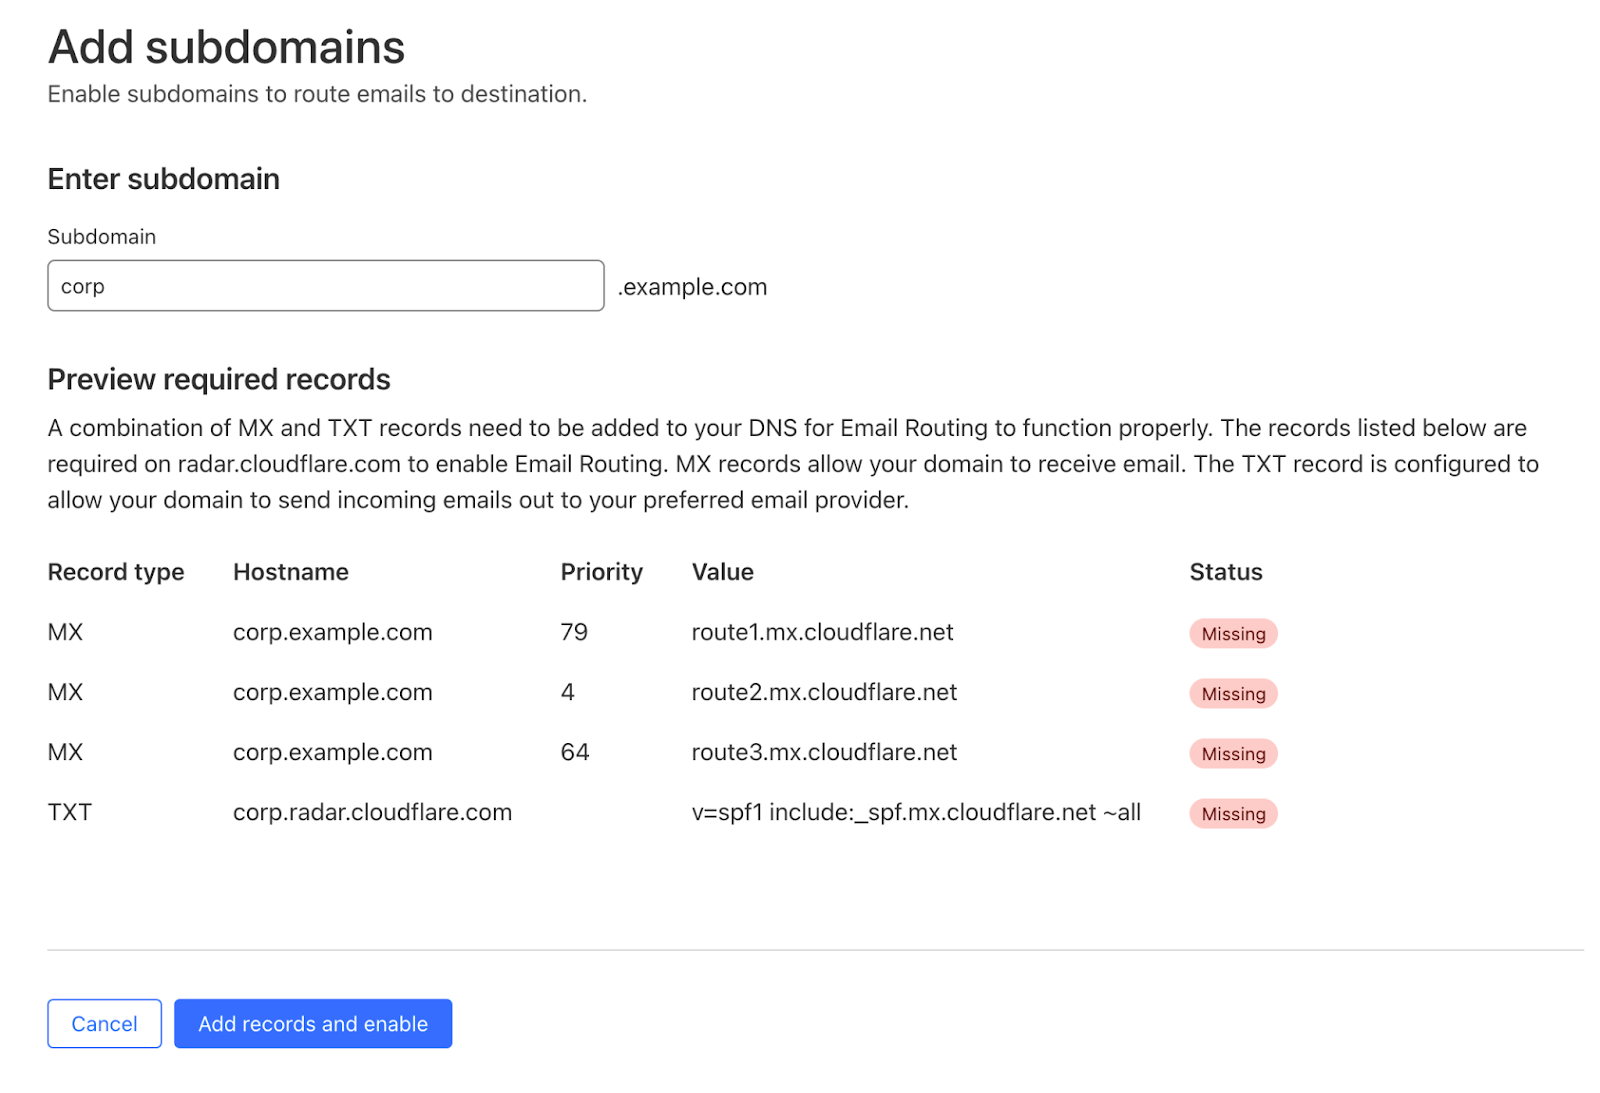
To add Email Routing features to a new subdomain, log in to the Cloudflare dashboard and select your account and zone. Then go to Email > Email Routing > Settings and click “Add subdomain”.
Once the subdomain is added and the DNS records are configured, you can see it in the Settings list under the Subdomains section:
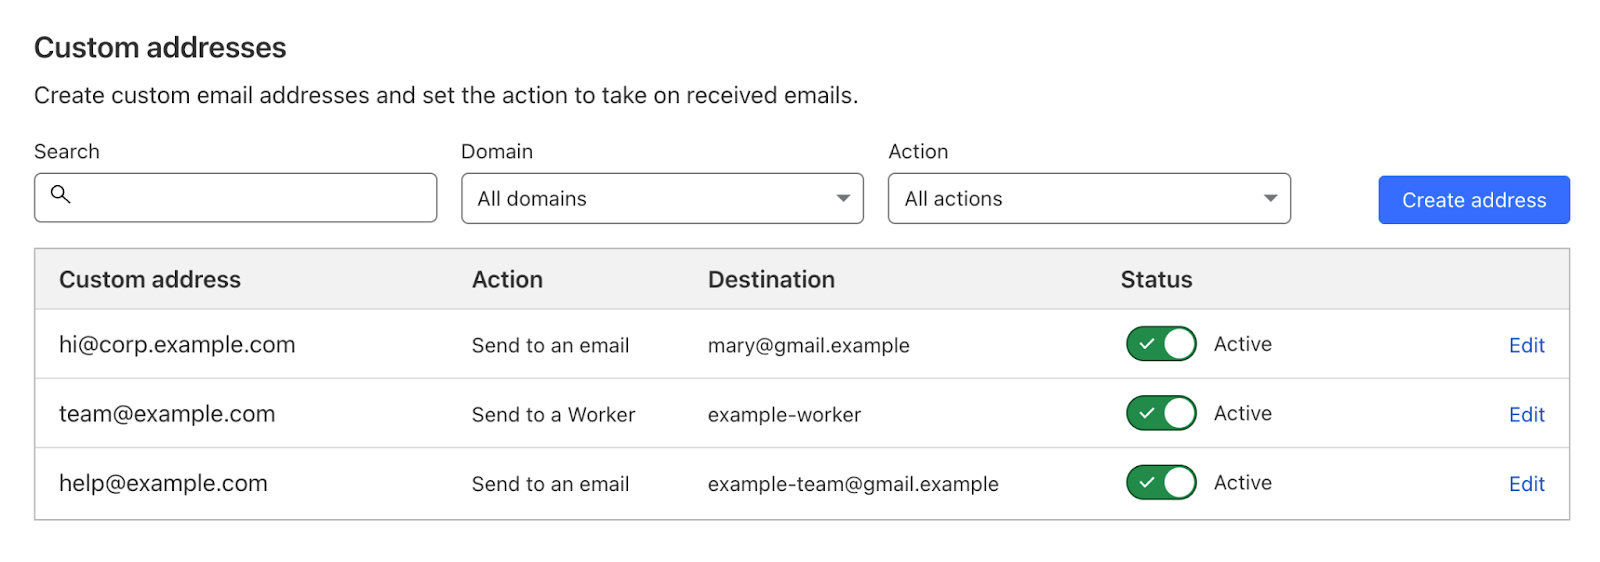
Now you can go to Email > Email Routing > Routing rules and create new custom addresses that will show you the option of using either the top domain of the zone or any other configured subdomain.
After the new custom address for the subdomain is created you can see it in the list with all the other addresses, and manage it from there.
It’s this easy.
Final words
We hope you enjoy the new features that we are announcing today. Still, we want to be clear: there are no changes in pricing, and Email Routing is still free for Cloudflare customers.
Ever since Email Routing was launched, we’ve been listening to customers’ feedback and trying to adjust our roadmap to both our requirements and their own ideas and requests. Email shouldn’t be difficult; our goal is to listen, learn and keep improving the service with better, more powerful features.
You can find detailed information about the new features and more in our Email Routing Developer Docs.
The Workers Browser Rendering API allows developers to programmatically control and interact with a headless browser instance and create automation flows for their applications and products.
Since the private beta announcement, based on the feedback we've been receiving and our own roadmap, the team has been working on the developer experience and improving the platform architecture for the best possible performance and reliability. Today we enter the open beta and will start onboarding the customers on the wait list.
Developer experience
Starting today, Wrangler, our command-line tool for configuring, building, and deploying applications with Cloudflare developer products, has support for the Browser Rendering API bindings.
Bindings allow your Workers to interact with resources on the Cloudflare developer platform. In this case, they will provide your Worker script with an authenticated endpoint to interact with a dedicated Chromium browser instance.
This is all you need in your wrangler.toml once this service is enabled for your account:
browser = { binding = "MYBROWSER", type = "browser" }
Now you can deploy any Worker script that requires Browser Rendering capabilities. You can spawn Chromium instances and interact with them programmatically in any way you typically do manually behind your browser.
Under the hood, the Browser Rendering API gives you access to a WebSocket endpoint that speaks the DevTools Protocol. DevTools is what allows us to instrument a Chromium instance running in our global network, and it's the same protocol that Chrome uses on your computer when you inspect a page.
With enough dedication, you can, in fact, implement your own DevTools client and talk the protocol directly. But that'd be crazy; almost no one does that.
So…
Puppeteer
Puppeteer is one of the most popular libraries that abstract the lower-level DevTools protocol from developers and provides a high-level API that you can use to easily instrument Chrome/Chromium and automate browsing sessions. It's widely used for things like creating screenshots, crawling pages, and testing web applications.
Puppeteer typically connects to a local Chrome or Chromium browser using the DevTools port.
We forked a version of Puppeteer and patched it to connect to the Workers Browser Rendering API instead. The changes are minimal; after connecting the developers can then use the full Puppeteer API as they would on a standard setup.
In the long term, we will update Puppeteer to keep matching the version of our Chromium instances infrastructure running in our network.
Developer documentation
Following the tradition with other Developer products, we created a dedicated section for the Browser Rendering APIs in our Developer's Documentation site.
You can access this page to learn more about how the service works, Wrangler support, APIs, and limits, and find examples of starter templates for common applications.
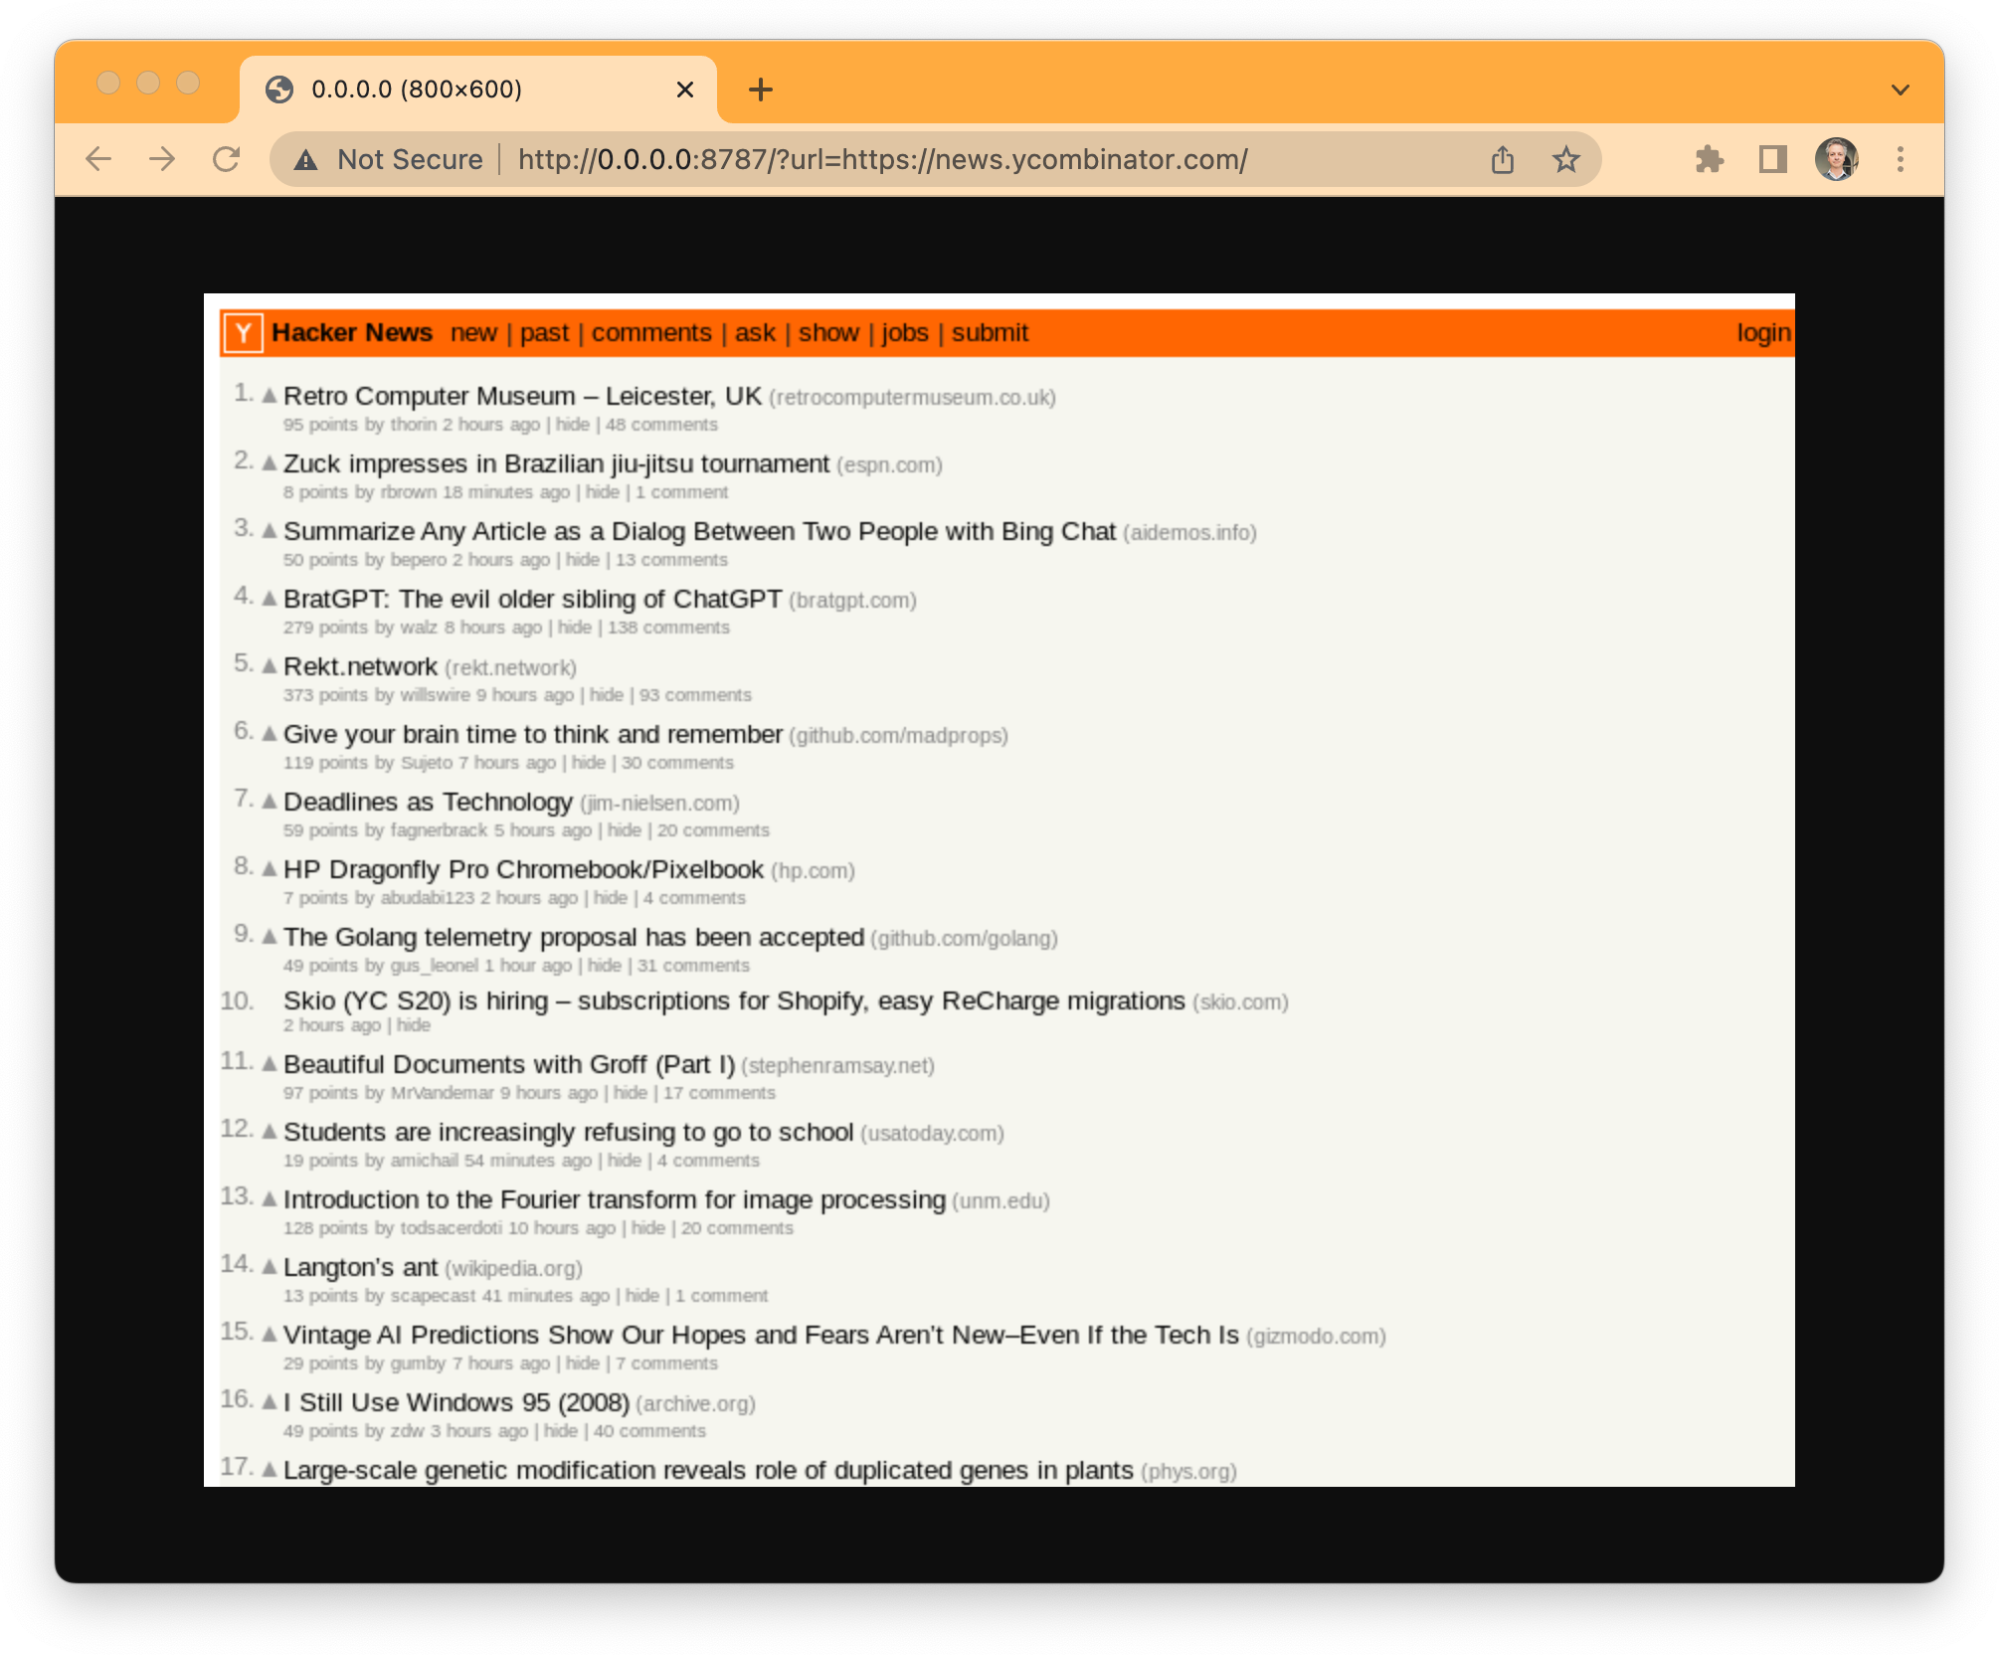
An example application: taking screenshots
Taking screenshots from web pages is one of the typical cases for browser automation.
Let's create a Worker that uses the Browser Rendering API to do just that. This is a perfect example of how to set up everything and get an application running in minutes, it will give you a good overview of the steps involved and the basics of the Puppeteer API, and then you can move from here to other more sophisticated use-cases.
Step one, start a project, install Wrangler and Cloudflare’s fork of Puppeteer:
Step two, let’s create the simplest possible wrangler.toml configuration file with the Browser Rendering API binding:
name = "browser-worker"
main = "src/index.ts"
compatibility_date = "2023-03-14"
node_compat = true
workers_dev = true

browser = { binding = "MYBROWSER", type = "browser" }
Step three, create src/index.ts with your Worker code:
import puppeteer from "@cloudflare/puppeteer";

export default {
    async fetch(request: Request, env: Env): Promise<Response> {
        const { searchParams } = new URL(request.url);
        let url = searchParams.get("url");
        let img: Buffer;
        if (url) {
            const browser = await puppeteer.launch(env.MYBROWSER);
            const page = await browser.newPage();
            await page.goto(url);
            img = (await page.screenshot()) as Buffer;
            await browser.close();
            return new Response(img, {
                headers: {
                    "content-type": "image/jpeg",
                },
            });
        } else {
            return new Response(
                "Please add the ?url=https://example.com/ parameter"
            );
        }
    },
};
That's it, no more steps. This Worker instantiates a browser using Puppeteer, opens a new page, navigates to whatever you put in the "url" parameter, takes a screenshot of the page, closes the browser, and responds with the JPEG image of the screenshot. It can't get any easier to get started with the Browser Rendering API.
Run npx wrangler dev –remote to test it and npx wrangler publish when you’re done.
You can explore the entire Puppeteer API and implement other functionality and logic from here. And, because it's Workers, you can add other developer products to your code. You might need a relational database, or a KV store to cache your screenshots, or an R2 bucket to archive your crawled pages and assets, or maybe use a Durable Object to keep your browser instance alive and share it with multiple requests, or queues to handle your jobs asynchronous, we have all of this and more.
You can also find this and other examples of how to use Browser Rendering in the Developer Documentation.
How do we use Browser Rendering
Dogfooding our products is one of the best ways to test and improve them, and in some cases, our internal needs dictate or influence our roadmap. Workers Browser Rendering is a good example of that; it was born out of our necessities before we realized it could be a product. We've been using it extensively for things like taking screenshots of pages for social sharing or dashboards, testing web software in CI, or gathering page load performance metrics of our applications.
But there's one product we've been using to stress test and push the limits of the Browser Rendering API and drive the engineering sprints that brought us to open the beta to our customers today: The Cloudflare Radar URL Scanner.
The URL Scanner scans any URL and compiles a full report containing technical, performance, privacy, and security details about that page. It's processing thousands of scans per day currently. It was built on top of Workers and uses a combination of the Browser Rendering APIs with Puppeteer to create enriched HAR archives and page screenshots, Durable Objects to reuse browser instances, Queues to handle customers' load and execute jobs asynchronously, and R2 to store the final reports.
This tool will soon have its own "how we built it" blog. Still, we wanted to let you know about it now because it is a good example of how you can build sophisticated applications using Browser Rendering APIs at scale starting today.
Future plans
The team will keep improving the Browser Rendering API, but a few things are worth mentioning today.
First, we are looking into upstreaming the changes in our Puppeteer fork to the main project so that using the official library with the Cloudflare Workers Browser Rendering API becomes as easy as a configuration option.
Second, one of the reasons why we decided to expose the DevTools protocol bare naked in the Worker binding is so that it can support other browser instrumentalization libraries in the future. Playwright is a good example of another popular library that developers want to use.
And last, we are also keeping an eye on and testing WebDriver BiDi, a "new standard browser automation protocol that bridges the gap between the WebDriver Classic and CDP (DevTools) protocols." Click here to know more about the status of WebDriver BiDi.
Final words
The Workers Browser Rendering API enters open beta today. We will gradually be enabling the customers in the wait list in batches and sending them emails. We look forward to seeing what you will be building with it and want to hear from you.
The Cloudflare Workers' ecosystem now features products and features ranging from compute, hosting, storage, databases, streaming, networking, security, and much more. Over time, we've been trying to inspire others to switch from traditional software architectures, proving and documenting how it's possible to build complex applications that scale globally on top of our stack.
Today, we're excited to welcome Constellation to the Cloudflare stack, enabling developers to run pre-trained machine learning models and inference tasks on Cloudflare's network.
One more building block in our Supercloud
Machine learning and AI have been hot topics lately, but the reality is that we have been using these technologies in our daily lives for years now, even if we do not realize it. Our mobile phones, computers, cars, and home assistants, to name a few examples, all have AI. It's everywhere.
But it isn't a commodity to developers yet, though. They often need to understand the mathematics behind it, the software and tools are dispersed and complex, and the hardware or cloud services to run the frameworks and data are expensive.
Today we're introducing another feature to our stack, allowing everyone to run machine learning models and perform inference on top of Cloudflare Workers.
Introducing Constellation
Constellation allows you to run fast, low-latency inference tasks using pre-trained machine learning models natively with Cloudflare Workers scripts.
Some examples of applications that you can deploy leveraging Constellation are:
Image or audio classification or object detection
Anomaly Detection in Data
Text translation, summarization, or similarity analysis
Natural Language Processing
Sentiment analysis
Speech recognition or text-to-speech
Question answering
Developers can upload any supported model to Constellation. They can train them independently or download pre-trained models from machine learning hubs like HuggingFace or ONNX Zoo.
However, not everyone will want to train models or browse the Internet for models they didn't test yet. For that reason, Cloudflare will also maintain a catalog of verified and ready-to-use models.
We built Constellation with a great developer experience and simple-to-use APIs in mind. Here's an example to get you started.
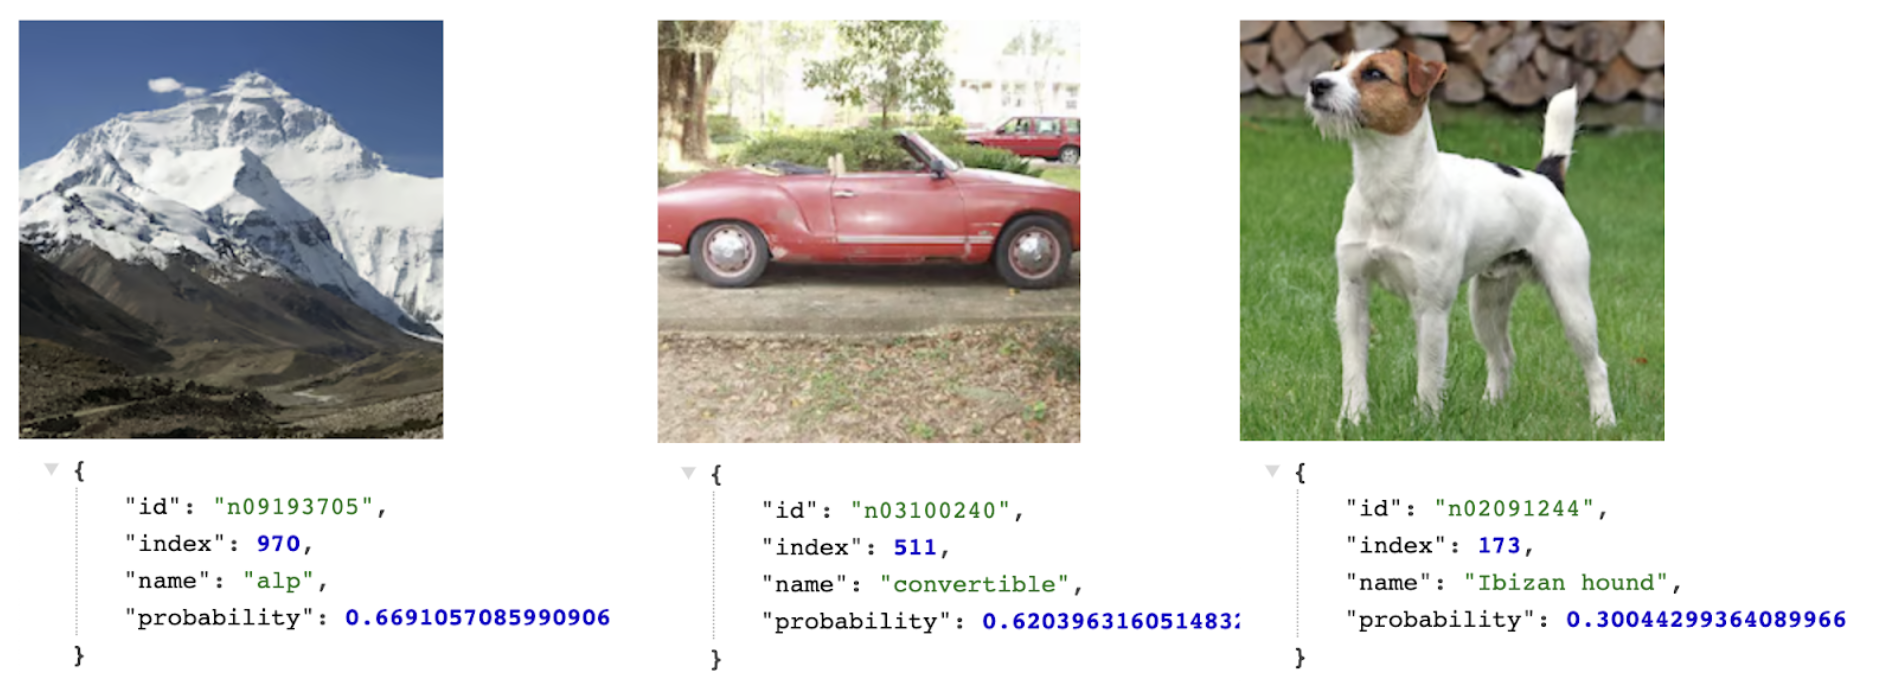
Image classification application
In this example, we will build an image classification app powered by the Constellation inference API and the SqueezeNet model, a convolutional neural network (CNN) that was pre-trained on more than one million images from the open-source ImageNet database and can classify images into no more than 1,000 categories.
SqueezeNet compares to AlexNet, one of the original CNNs and benchmarks for image classification, by being much faster (~3x) and much smaller (~500x) while still achieving similar levels of accuracy. Its small footprint makes it ideal for running on portable devices with limited resources or custom hardware.
First, let's create a new Constellation project using the ONNX runtime. Wrangler now has functionality for Constellation built-in with the constellation keyword.
As we said above, SqueezeNet classifies images into no more than 1,000 object classes. These classes are actually in the form of a list of synonym rings or synsets. A synset has an id and a label; it derives from Princeton's WordNet database terminology, the same used to label the ImageNet image database.
To translate SqueezeNet's results into human-readable image classes, we need a file that maps the synset ids (what we get from the model) to their corresponding labels.
$ mkdir src; cd src
$ wget https://raw.githubusercontent.com/microsoft/onnxjs-demo/master/src/data/imagenet.ts
And finally, let’s code and deploy our image classification script:
This script reads an image from the request, decodes it into a multidimensional float32 tensor (right now we only decode PNGs, but we can add other formats), feeds it to the SqueezeNet model running in Constellation, gets the results, matches them with the ImageNet classes list, and returns the human-readable tags for the image.
You can see the probabilities in action here. The model is quite sure about the Alp and the Convertible, but the Ibizan hound has a lower probability. Indeed, the dog in the picture is from another breed.
This small app demonstrates how easy and fast you can start using machine learning models and Constellation when building applications on top of Workers. Check the full source code here and deploy it yourself.
Transformers
Transformers were introduced by Google; they are deep-learning models designed to process sequential input data and are commonly used for natural language processing (NLP), like translations, summarizations, or sentiment analysis, and computer vision (CV) tasks, like image classification.
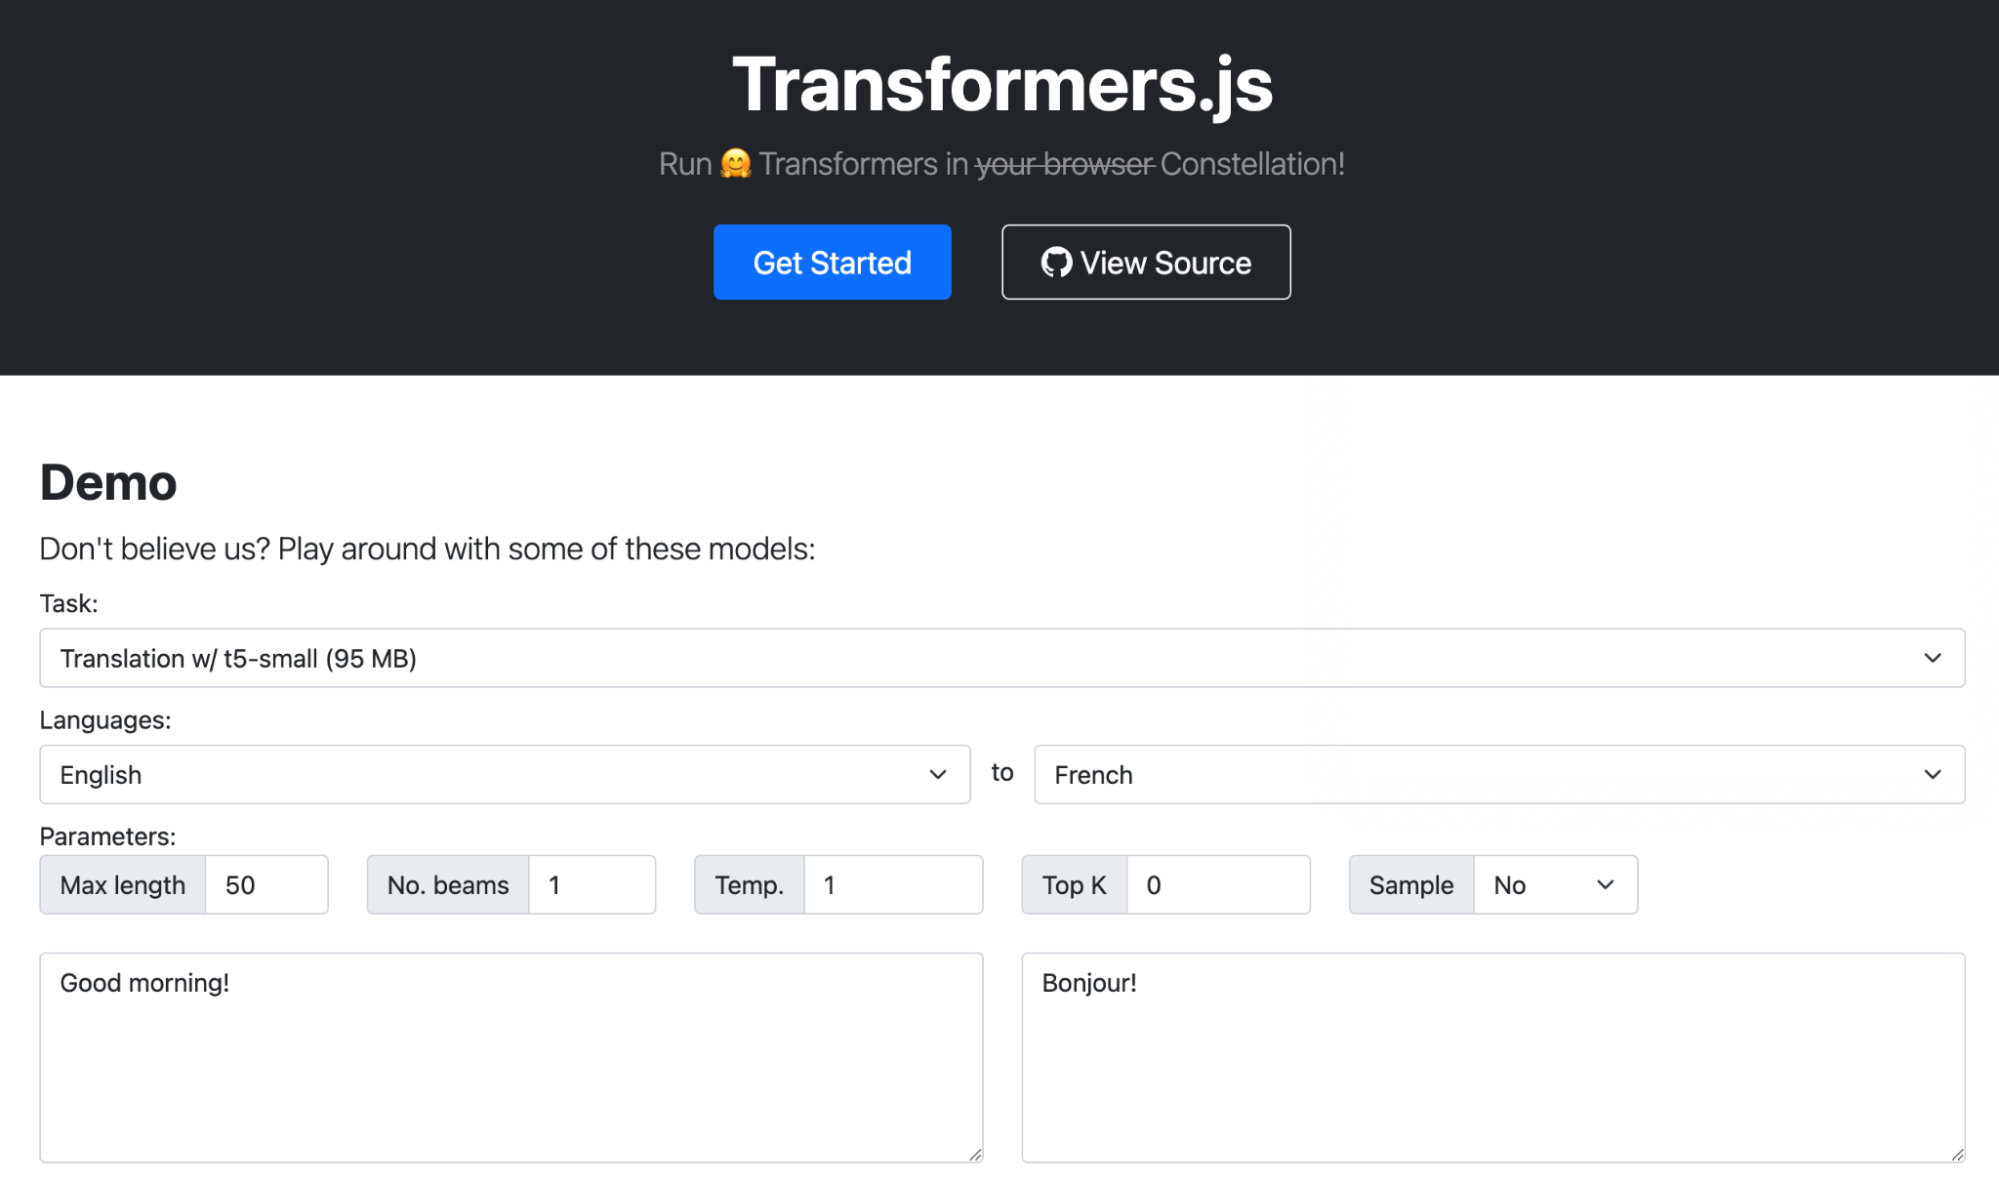
Transformers.js is a popular demo that loads transformer models from HuggingFace and runs them inside your browser using the ONNX Runtime compiled to WebAssembly. We ported this demo to use Constellation APIs instead.
The other interesting element of Constellation is that because it runs natively in Workers, you can orchestrate it with other products and APIs in our stack. You can use KV, R2, D1, Queues, anything, even Email.
Here's an example of a Worker that receives Emails for your domain on Cloudflare using Email Routing, runs Constellation using the t5-small sentiment analysis model, adds a header with the resulting score, and forwards it to the destination address.
import { Tensor, run } from '@cloudflare/constellation';
import * as PostalMime from 'postal-mime';

export interface Env {
    SENTIMENT: any,
}

export default {
  async email(message, env, ctx) {
    const rawEmail = await streamToArrayBuffer(event.raw, event.rawSize);
    const parser = new PostalMime.default();
    const parsedEmail = await parser.parse(rawEmail);

    const input = tokenize(parsedEmail.text)
    const output = await run( env.SENTIMENT, "MODEL-UUID", input);


    var headers = new Headers();
    headers.set("X-Sentiment", idToLabel[output.label]);
    await message.forward("[email protected]", headers);
  }
}
Now you can use Gmail or any email client to apply a rule to your messages based on the 'X-Sentiment' header. For example, you might want to move all the angry emails outside your Inbox to a different folder on arrival.
Start using Constellation
Constellation starts today in private beta. To join the waitlist, please head to the dashboard, click the Workers tab under your account, and click the "Request access" button under the Constellation entry. The team will be onboarding accounts in batches; you'll get an email when your account is enabled.
In the meantime, you can read our Constellation Developer Documentation and learn more about how it works and the APIs. Constellation can be used from Wrangler, our command-line tool for configuring, building, and deploying applications with Cloudflare developer products, or managed directly in the Dashboard UI.
We are eager to learn how you want to use ML/AI with your applications. Constellation will keep improving with higher limits, more supported runtimes, and larger models, but we want to hear from you. Your feedback will certainly influence our roadmap decisions.
One last thing: today, we've been talking about how you can write Workers that use Constellation, but here's an inception fact: Constellation itself was built using the power of WebAssembly, Workers, R2, and our APIs. We'll make sure to write a follow-up blog soon about how we built it; stay tuned.
As usual, you can talk to us on our Developers Discord (join the #constellation channel) or the Community forum; the team will be listening.
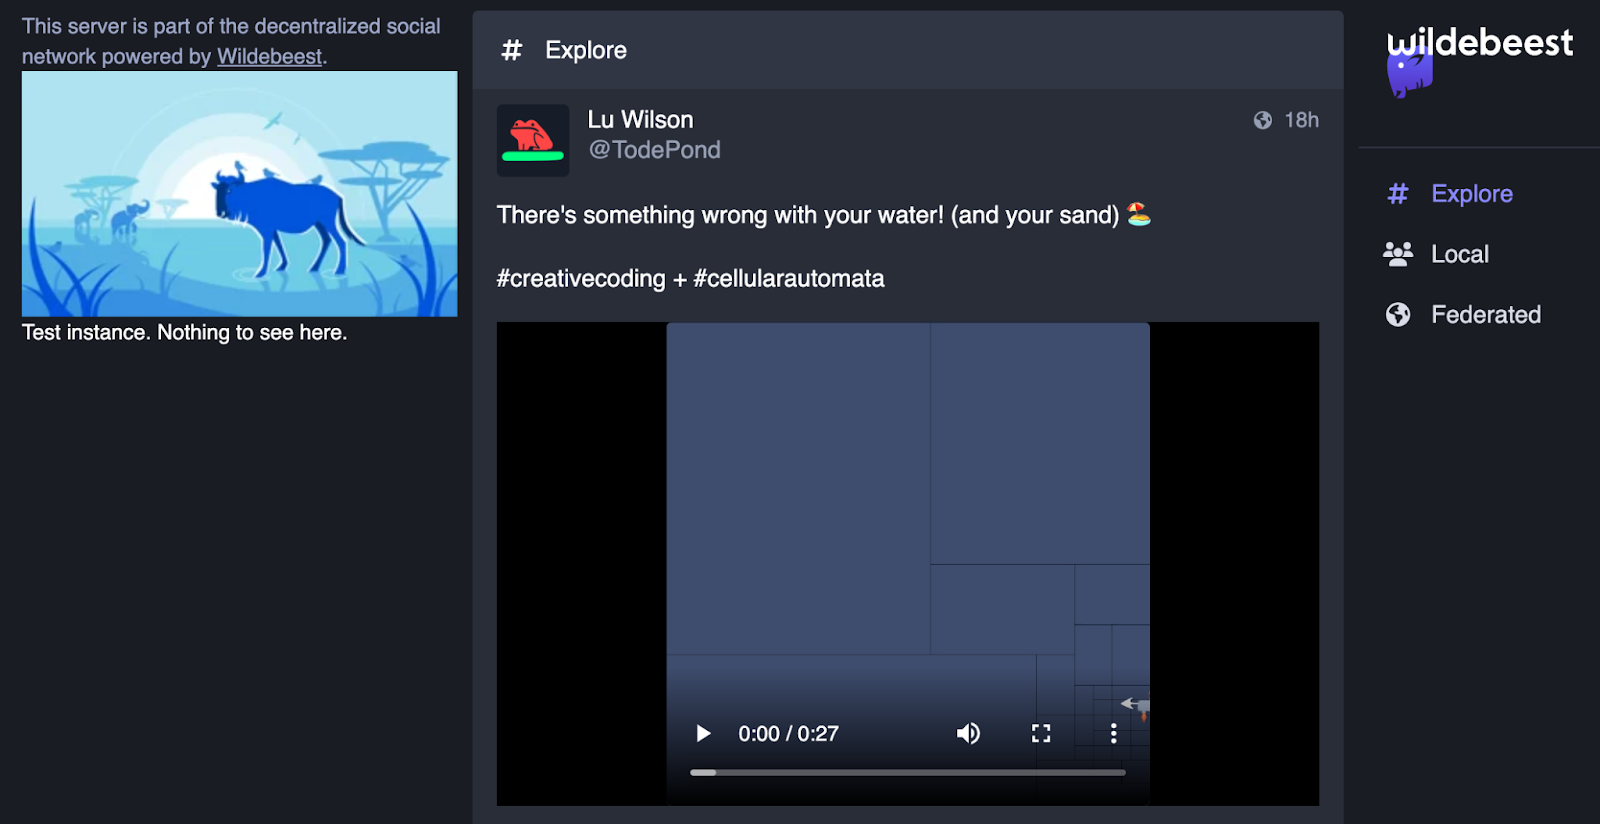
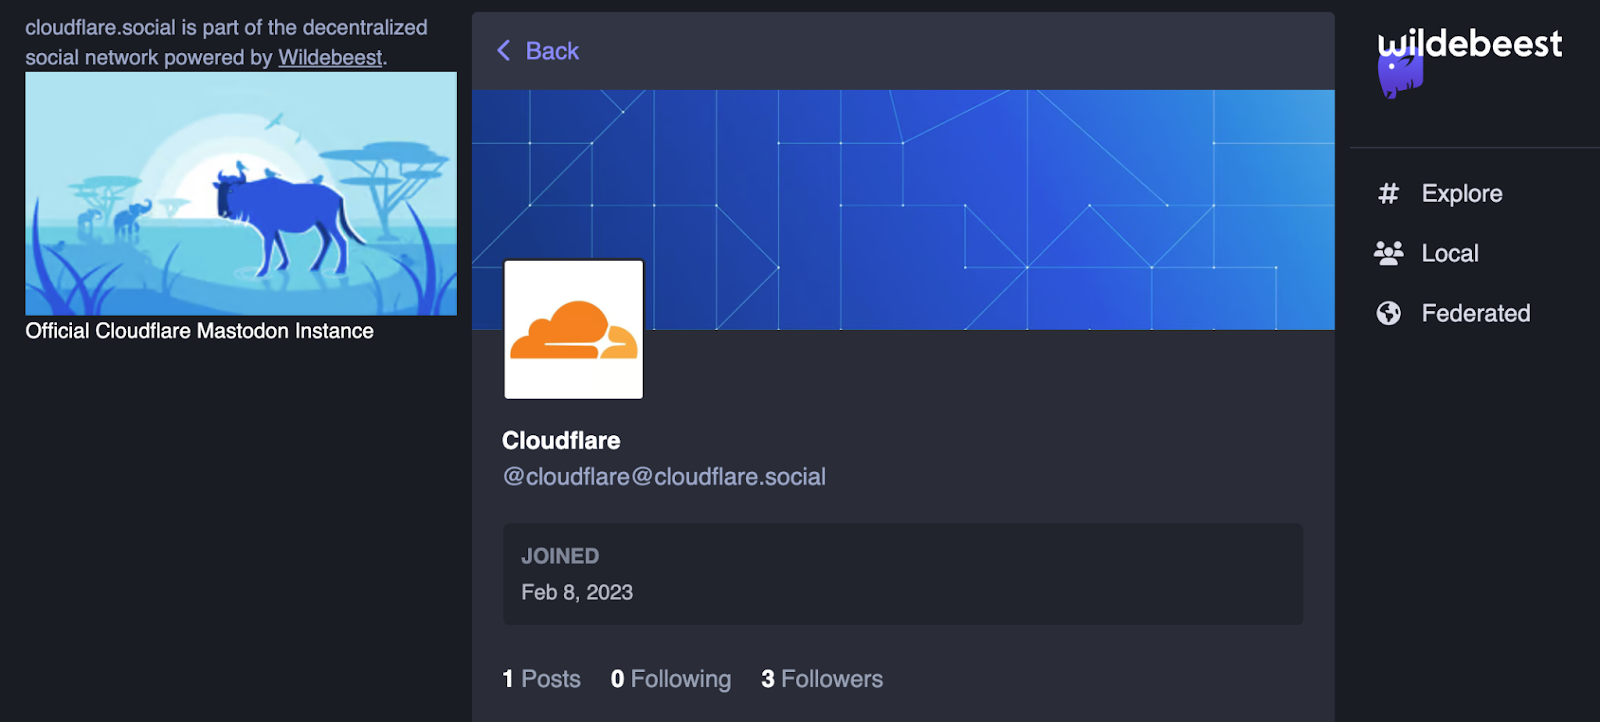
The Fediverse has been a hot topic of discussion lately, with thousands, if not millions, of new users creating accounts on platforms like Mastodon to either move entirely to “the other side” or experiment and learn about this new social network.
Today we’re introducing Wildebeest, an open-source, easy-to-deploy ActivityPub and Mastodon-compatible server built entirely on top of Cloudflare’s Supercloud. If you want to run your own spot in the Fediverse you can now do it entirely on Cloudflare.
The Fediverse, built on Cloudflare
Today you’re left with two options if you want to join the Mastodon federated network: either you join one of the existing servers (servers are also called communities, and each one has its own infrastructure and rules), or you can run your self-hosted server.
There are a few reasons why you’d want to run your own server:
You want to create a new community and attract other users over a common theme and usage rules.
You don’t want to have to trust third-party servers or abide by their policies and want your server, under your domain, for your personal account.
You want complete control over your data, personal information, and content and visibility over what happens with your instance.
The Mastodon gGmbH non-profit organization provides a server implementation using Ruby, Node.js, PostgreSQL and Redis. Running the official server can be challenging, though. You need to own or rent a server or VPS somewhere; you have to install and configure the software, set up the database and public-facing web server, and configure and protect your network against attacks or abuse. And then you have to maintain all of that and deal with constant updates. It’s a lot of scripting and technical work before you can get it up and running; definitely not something for the less technical enthusiasts.
Wildebeest serves two purposes: you can quickly deploy your Mastodon-compatible server on top of Cloudflare and connect it to the Fediverse in minutes, and you don’t need to worry about maintaining or protecting it from abuse or attacks; Cloudflare will do it for you automatically.
Wildebeest is not a managed service. It’s your instance, data, and code running in our cloud under your Cloudflare account. Furthermore, it’s open-sourced, which means it keeps evolving with more features, and anyone can extend and improve it.
Compatible with the most popular Mastodon web (like Pinafore), desktop, and mobile clients. We also provide a simple read-only web interface to explore the timelines and user profiles.
You can publish, edit, boost, or delete posts, sorry, toots. We support text, images, and (soon) video.
Anyone can follow you; you can follow anyone.
You can search for content.
You can register one or multiple accounts under your instance. Authentication can be email-based on or using any Cloudflare Access compatible IdP, like GitHub or Google.
You can edit your profile information, avatar, and header image.
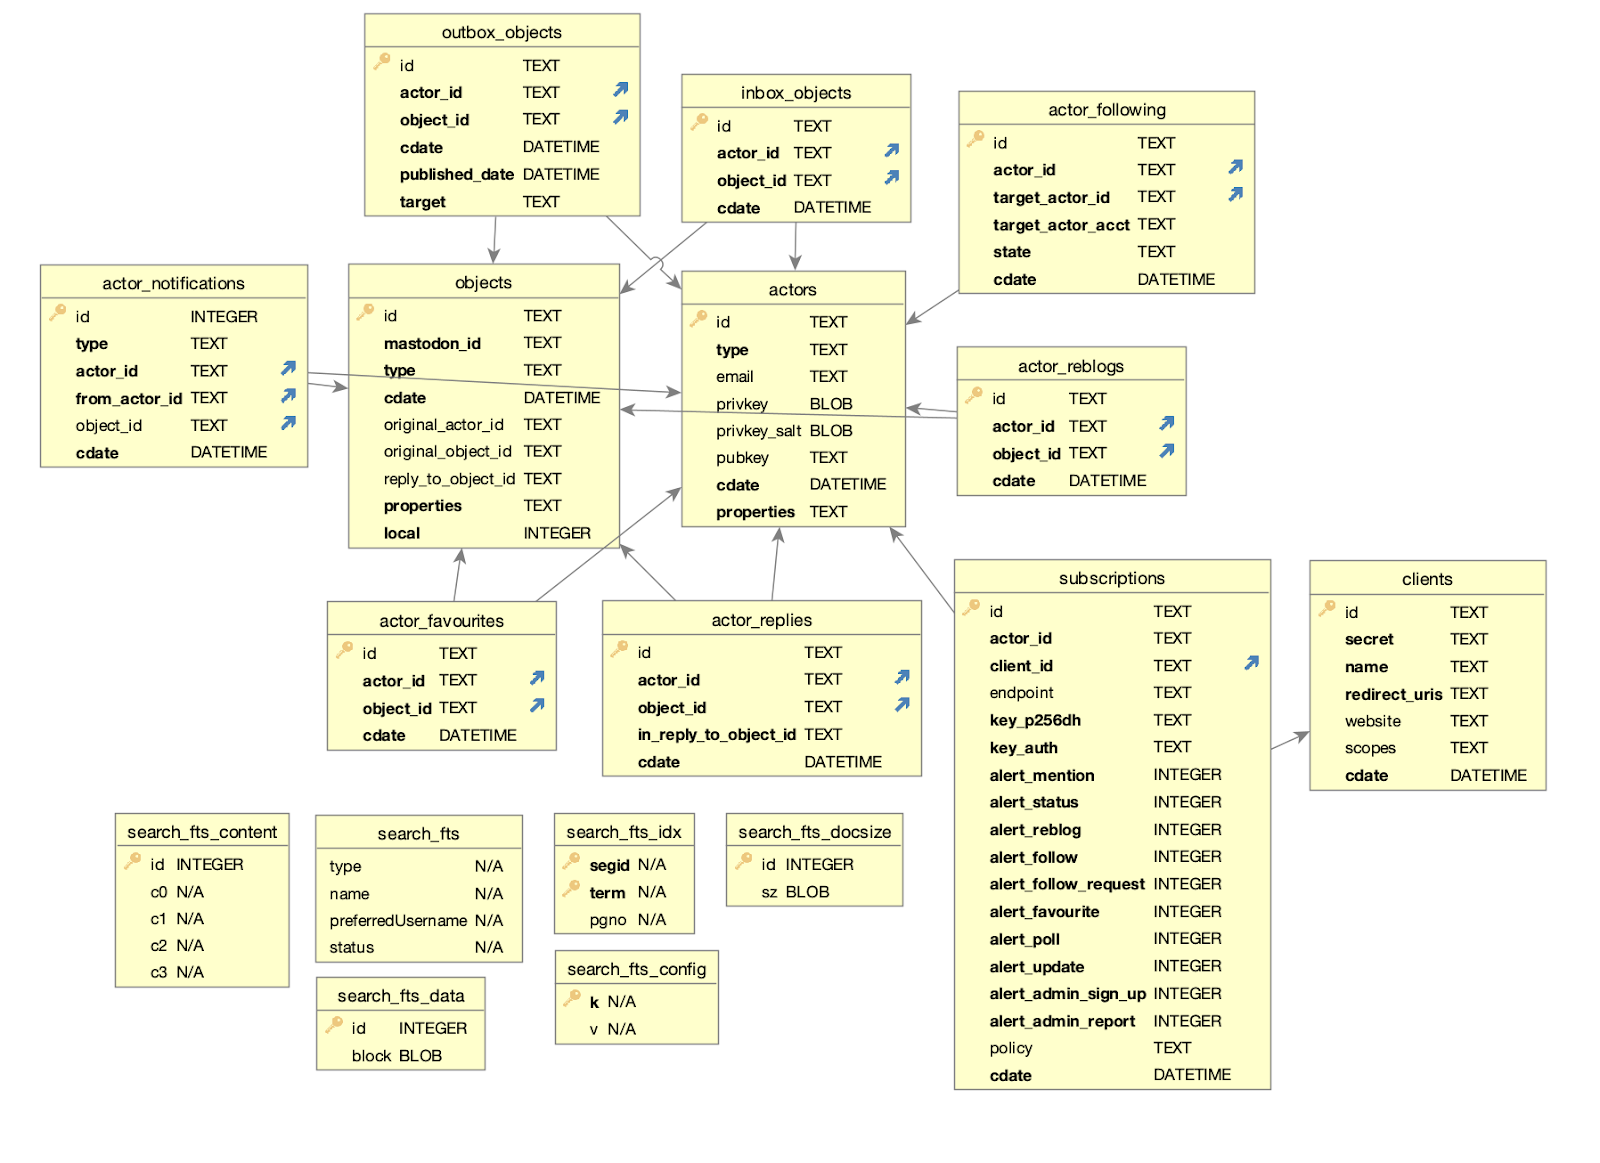
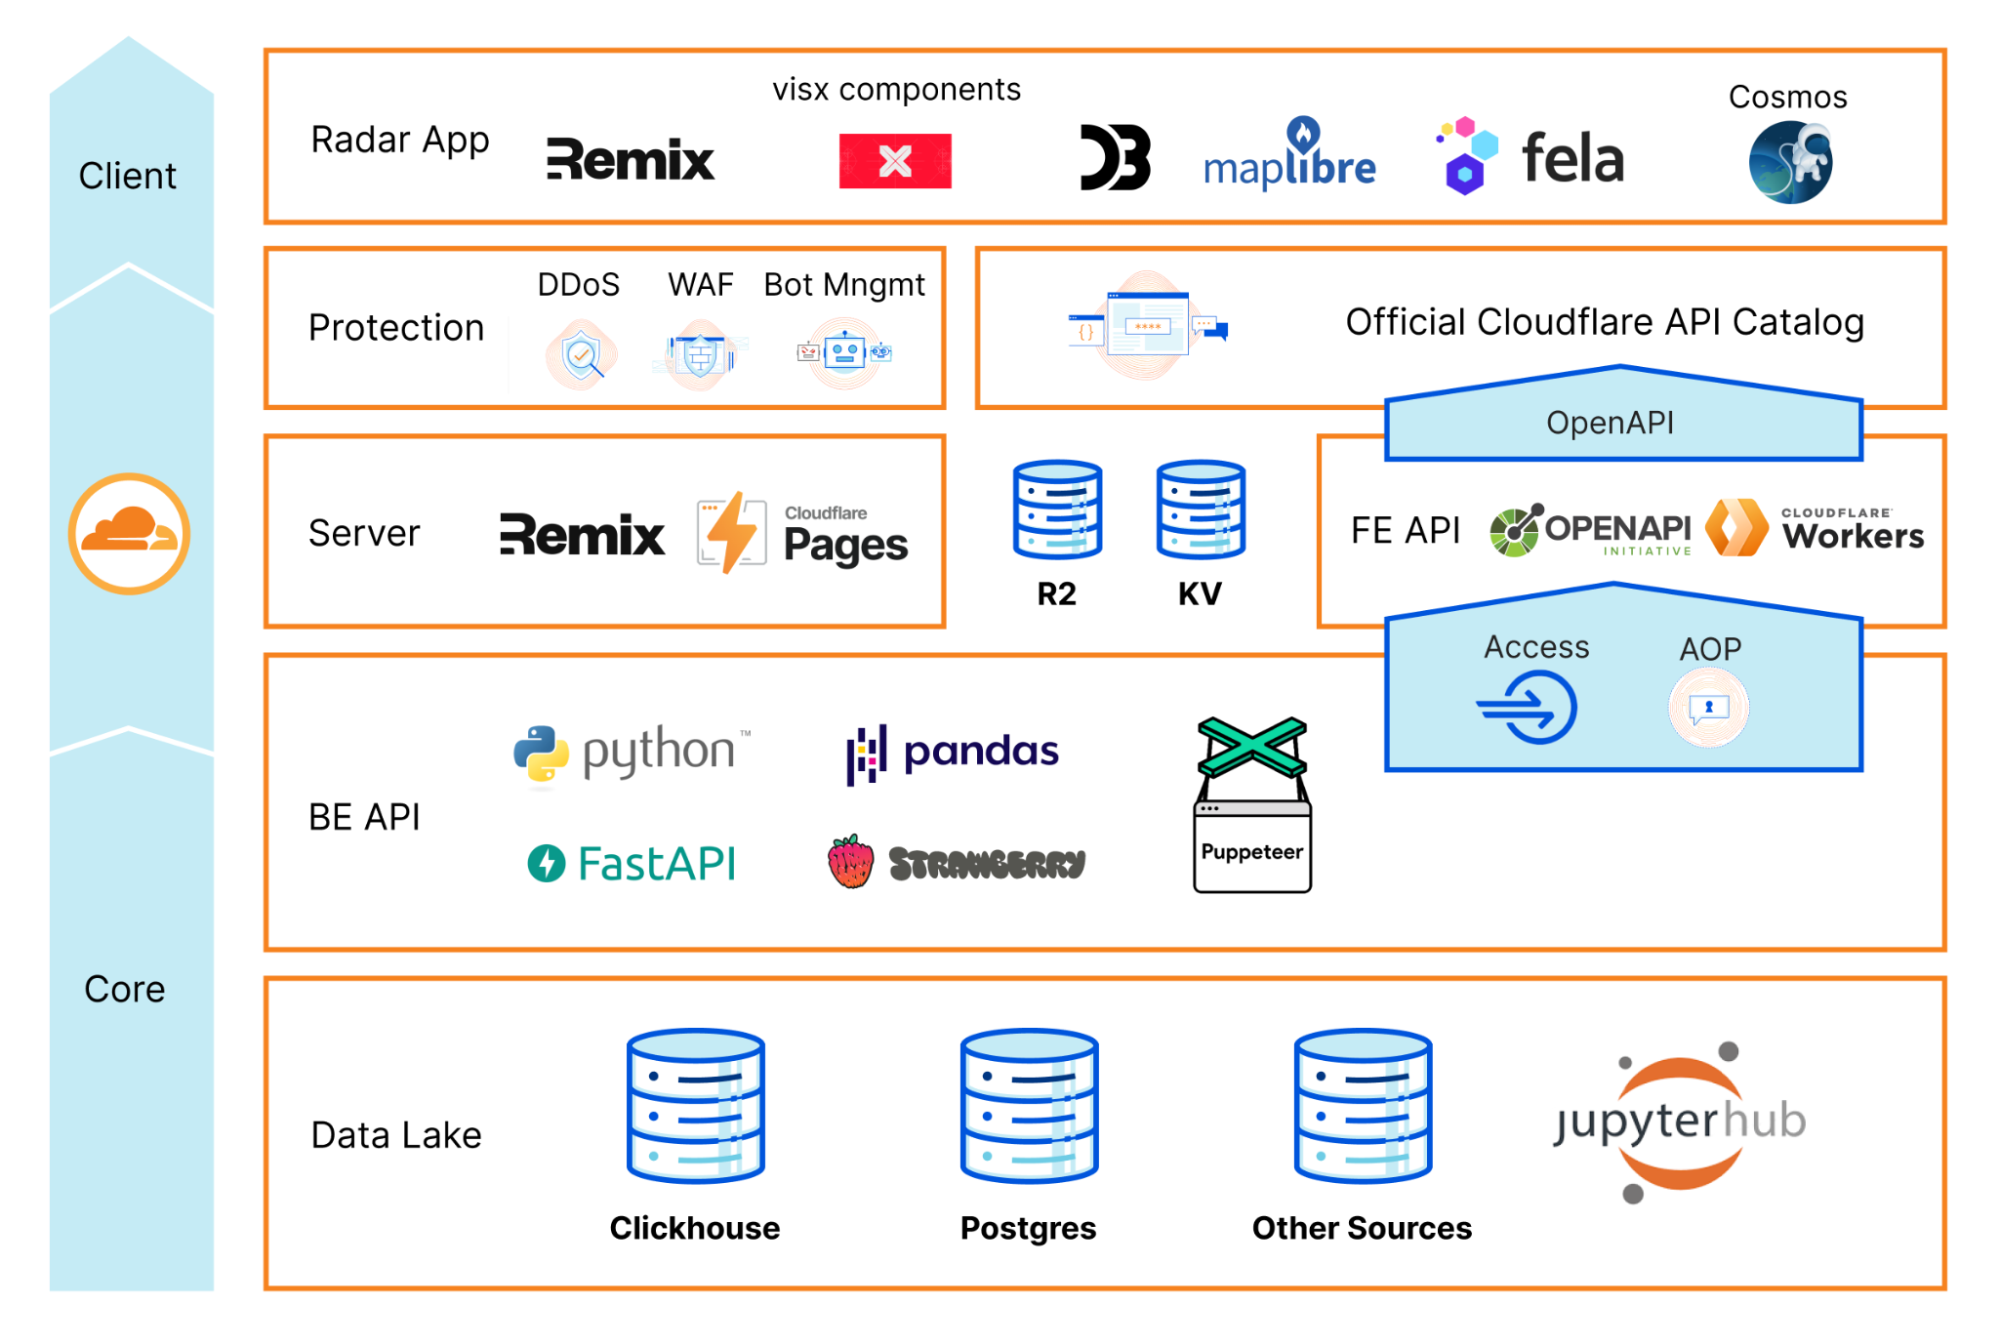
How we built it
Our implementation is built entirely on top of our products and APIs. Building Wildebeest was another excellent opportunity to showcase our technology stack’s power and versatility and prove how anyone can also use Cloudflare to build larger applications that involve multiple systems and complex requirements.
Here’s a birds-eye diagram of Wildebeest’s architecture:
Let’s get into the details and get technical now.
Cloudflare Pages
At the core, Wildebeest is a Cloudflare Pages project running its code using Pages Functions. Cloudflare Pages provides an excellent foundation for building and deploying your application and serving your bundled assets, Functions gives you full access to the Workers ecosystem, where you can run any code.
Functions has a built-in file-based router. The /functions directory structure, which is uploaded by Wildebeest’s continuous deployment builds, defines your application routes and what files and code will process each HTTP endpoint request. This routing technique is similar to what other frameworks like Next.js use.
Unit testing these endpoints becomes easier too, since we only have to call the handleRequest() function from the testing framework. Check one of our Jest tests, mastodon.spec.ts:
import * as v1_instance from 'wildebeest/functions/api/v1/instance'

describe('Mastodon APIs', () => {
	describe('instance', () => {
		test('return the instance infos v1', async () => {
			const res = await v1_instance.handleRequest(domain, env)
			assert.equal(res.status, 200)
			assertCORS(res)

			const data = await res.json<Data>()
			assert.equal(data.rules.length, 0)
			assert(data.version.includes('Wildebeest'))
		})
       })
})
As with any other regular Worker, Functions also lets you set up bindings to interact with other Cloudflare products and features like KV, R2, D1, Durable Objects, and more. The list keeps growing.
We use Functions to implement a large portion of the official Mastodon API specification, making Wildebeest compatible with the existing ecosystem of other servers and client applications, and also to run our own read-only web frontend under the same project codebase.
Wildebeest’s web frontend uses Qwik, a general-purpose web framework that is optimized for speed, uses modern concepts like the JSX JavaScript syntax extension and supports server-side-rendering (SSR) and static site generation (SSG).
Qwik provides a Cloudflare Pages Adaptor out of the box, so we use that (check our framework guide to know more about how to deploy a Qwik site on Cloudflare Pages). For styling we use the Tailwind CSS framework, which Qwik supports natively.
Our frontend website code and static assets can be found under the /frontend directory. The application is handled by the /functions/[[path]].js dynamic route, which basically catches all the non-API requests, and then invokes Qwik’s own internal router, Qwik City, which takes over everything else after that.
The power and versatility of Pages and Functions routes make it possible to run both the backend APIs and a server-side-rendered dynamic client, effectively a full-stack app, under the same project.
Let’s dig even deeper now, and understand how the server interacts with the other components in our architecture.
D1
Wildebeest uses D1, Cloudflare’s first SQL database for the Workers platform built on top of SQLite, now open to everyone in alpha, to store and query data. Here’s our schema:
The schema will probably change in the future, as we add more features. That’s fine, D1 supports migrations which are great when you need to update your database schema without losing your data. With each new Wildebeest version, we can create a new migration file if it requires database schema changes.
-- Migration number: 0001 	 2023-01-16T13:09:04.033Z

CREATE UNIQUE INDEX unique_actor_following ON actor_following (actor_id, target_actor_id);
D1 exposes a powerful client API that developers can use to manipulate and query data from Worker scripts, or in our case, Pages Functions.
Here’s a simplified example of how we interact with D1 when you start following someone on the Fediverse:
export async function addFollowing(db, actor, target, targetAcct): Promise<UUID> {
	const query = `INSERT OR IGNORE INTO actor_following (id, actor_id, target_actor_id, state, target_actor_acct) VALUES (?, ?, ?, ?, ?)`
	const out = await db
		.prepare(query)
		.bind(id, actor.id.toString(), target.id.toString(), STATE_PENDING, targetAcct)
		.run()
	return id
}
Cloudflare’s culture of dogfooding and building on top of our own products means that we sometimes experience their shortcomings before our users. We did face a few challenges using D1, which is built on SQLite, to store our data. Here are two examples.
ActivityPub uses UUIDs to identify objects and reference them in URIs extensively. These objects need to be stored in the database. Other databases like PostgreSQL provide built-in functions to generate unique identifiers. SQLite and D1 don’t have that, yet, it’s in our roadmap.
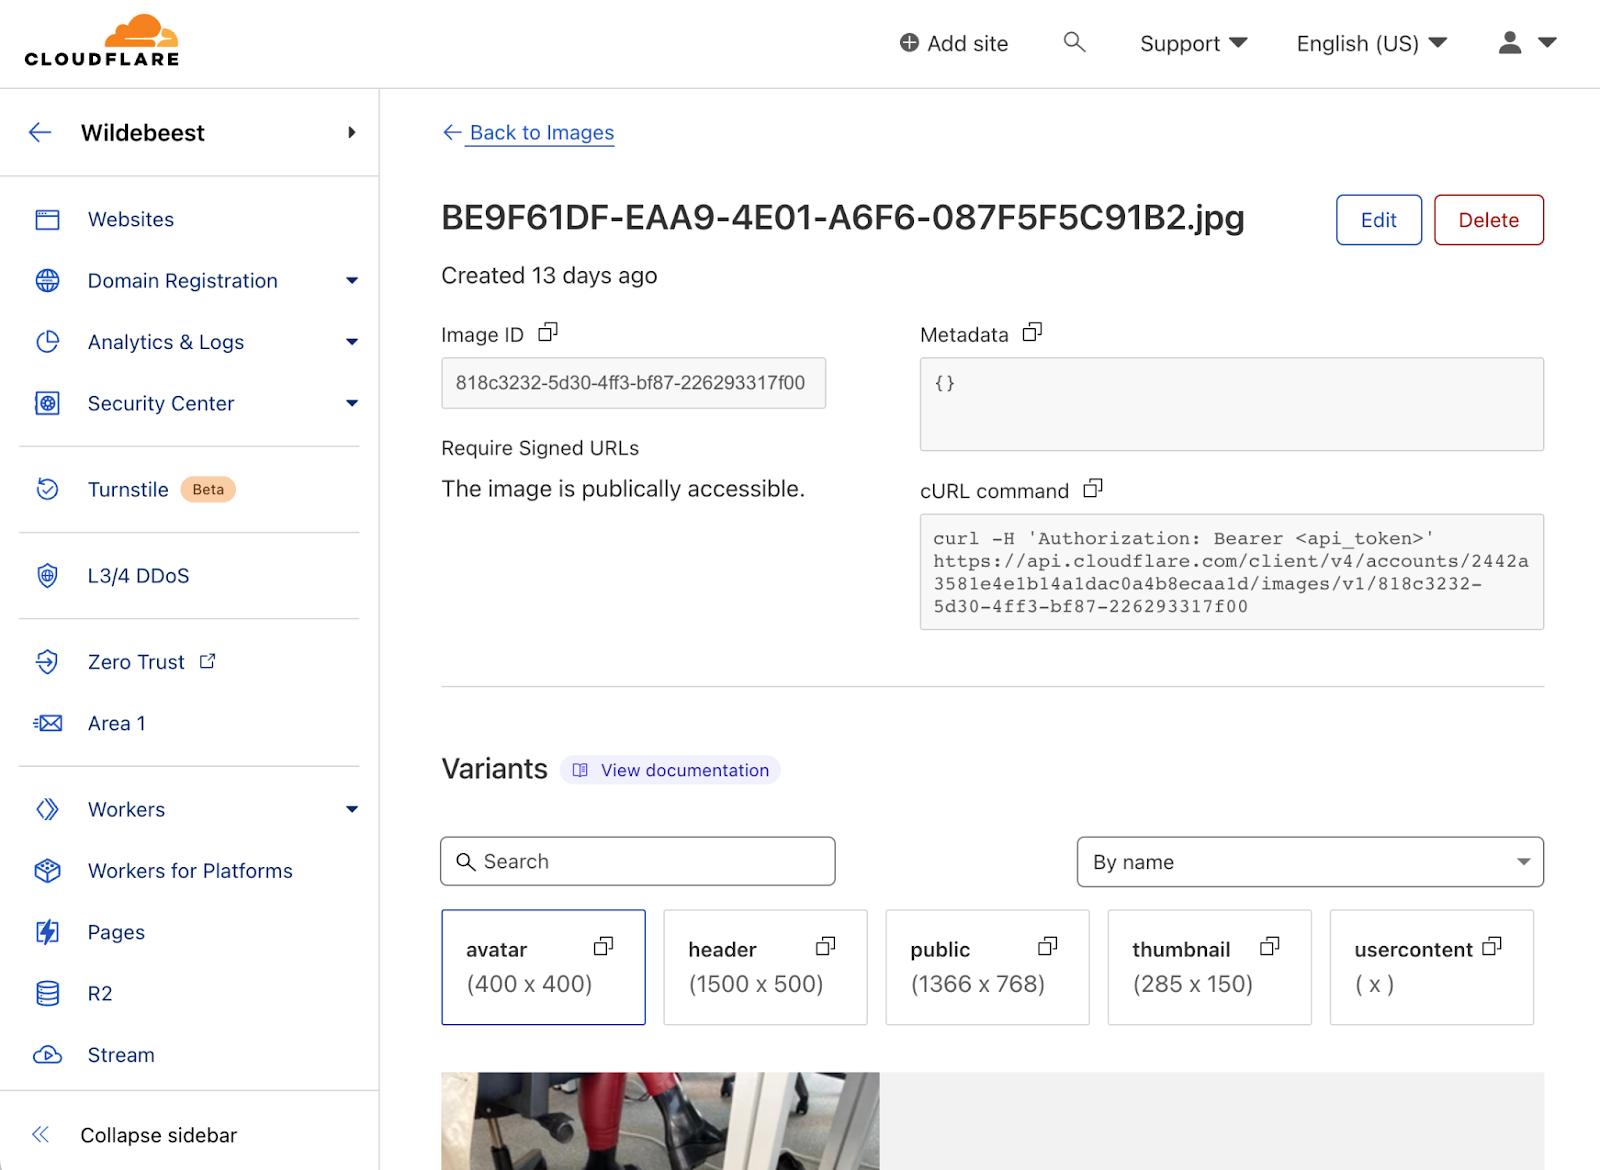
Mastodon content has a lot of rich media. We don’t need to reinvent the wheel and build an image pipeline; Cloudflare Images provides APIs to upload, transform, and serve optimized images from our global CDN, so it’s the perfect fit for Wildebeest’s requirements.
Things like posting content images, the profile avatar, or headers, all use the Images APIs. See /backend/src/media/image.ts to understand how we interface with Images.
Cloudflare Images is also available from the dashboard. You can use it to browse or manage your catalog quickly.
Queues
The ActivityPub protocol is chatty by design. Depending on the size of your social graph, there might be a lot of back-and-forth HTTP traffic. We can’t have the clients blocked waiting for hundreds of Fediverse message deliveries every time someone posts something.
We needed a way to work asynchronously and launch background jobs to offload data processing away from the main app and keep the clients snappy. The official Mastodon server has a similar strategy using Sidekiq to do background processing.
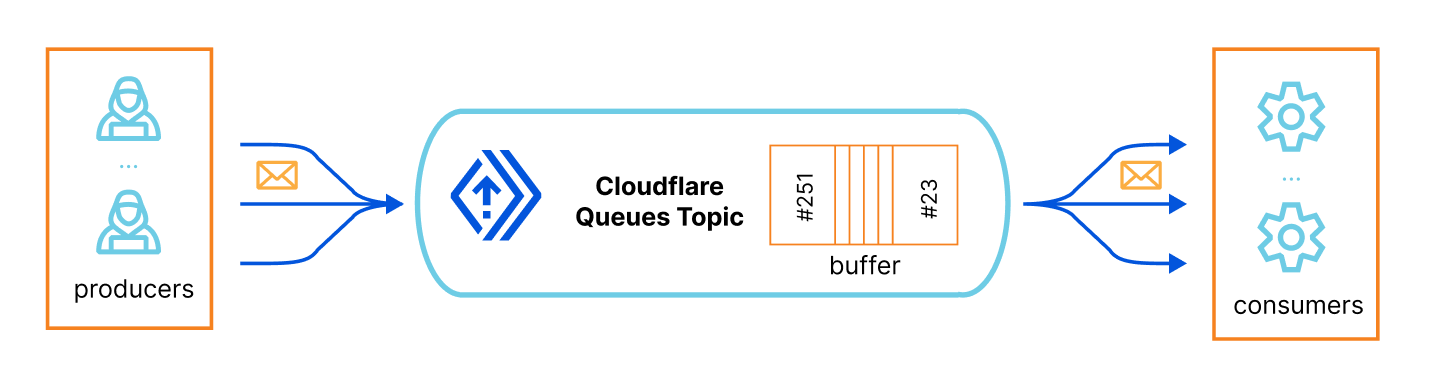
Fortunately, we don’t need to worry about any of this complexity either. Cloudflare Queues allows developers to send and receive messages with guaranteed delivery, and offload work from your Workers’ requests, effectively providing you with asynchronous batch job capabilities.
To put it simply, you have a queue topic identifier, which is basically a buffered list that scales automatically, then you have one or more producers that, well, produce structured messages, JSON objects in our case, and put them in the queue (you define their schema), and finally you have one or more consumers that subscribes that queue, receive its messages and process them, at their own speed.
In our case, the main application produces queue jobs whenever any incoming API call requires long, expensive operations. For example, when someone posts, sorry, toots something, we need to broadcast that to their followers’ inboxes, potentially triggering many requests to remote servers. Here we are queueing a job for that, thus freeing the APIs to keep responding:
Similarly, we don’t want to stop the main APIs when remote servers deliver messages to our instance inboxes. Here’s Wildebeest creating asynchronous jobs when it receives messages in the inbox:
And the final piece of the puzzle, our queue consumer runs in a separate Worker, independently from the Pages project. The consumer listens for new messages and processes them sequentially, at its rhythm, freeing everyone else from blocking. When things get busy, the queue grows its buffer. Still, things keep running, and the jobs will eventually get dispatched, freeing the main APIs for the critical stuff: responding to remote servers and clients as quickly as possible.
export default {
async queue(batch, env, ctx) {
for (const message of batch.messages) {
…
switch (message.body.type) {
case MessageType.Inbox: {
await handleInboxMessage(...)
break
}
case MessageType.Deliver: {
await handleDeliverMessage(...)
break
}
}
}
},
}
Caching repetitive operations is yet another strategy for improving performance in complex applications that require data processing. A famous Netscape developer, Phil Karlton, once said: “There are only two hard things in Computer Science: cache invalidation and naming things.”
Cloudflare obviously knows a lot about caching since it’s a core feature of our global CDN. We also provide Workers KV to our customers, a global, low-latency, key-value data store that anyone can use to cache data objects in our data centers and build fast websites and applications.
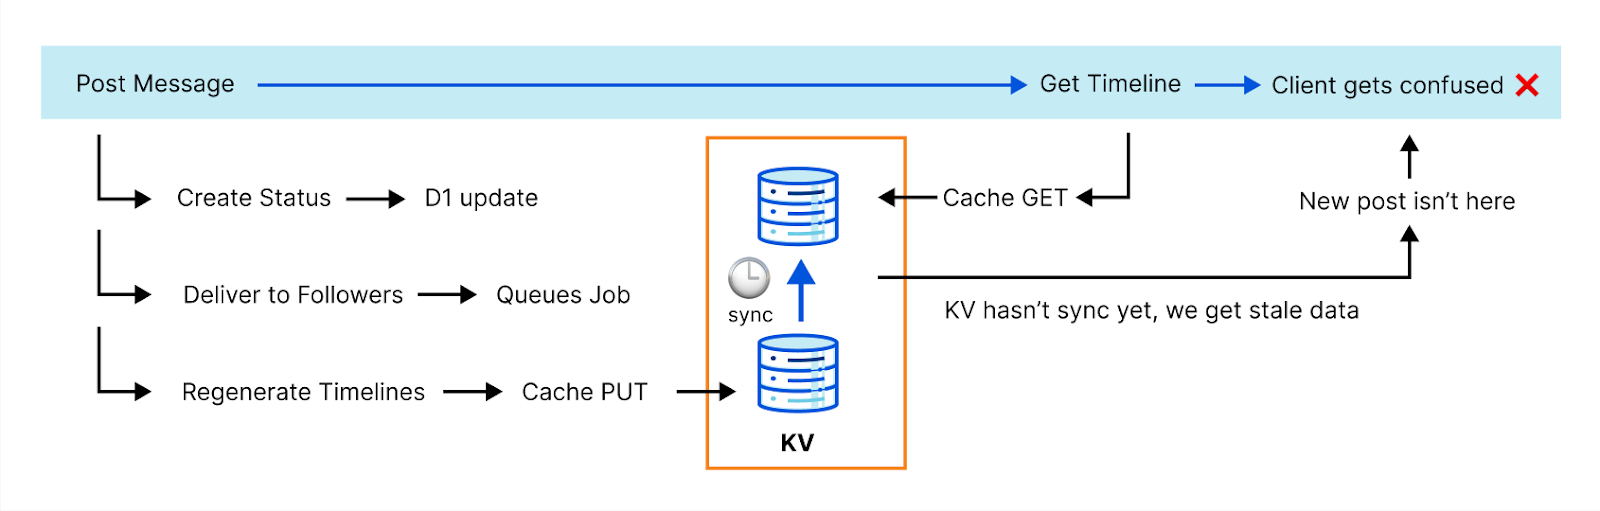
However, KV achieves its performance by being eventually consistent. While this is fine for many applications and use cases, it’s not ideal for others.
The ActivityPub protocol is highly transactional and can’t afford eventual consistency. Here’s an example: generating complete timelines is expensive, so we cache that operation. However, when you post something, we need to invalidate that cache before we reply to the client. Otherwise, the new post won’t be in the timeline and the client can fail with an error because it doesn’t see it. This actually happened to us with one of the most popular clients.
We needed to get clever. The team discussed a few options. Fortunately, our API catalog has plenty of options. Meet Durable Objects.
Durable Objects are single-instance Workers that provide a transactional storage API. They’re ideal when you need central coordination, strong consistency, and state persistence. You can use Durable Objects in cases like handling the state of multiple WebSocket connections, coordinating and routing messages in a chatroom, or even running a multiplayer game like Doom.
You know where this is going now. Yes, we implemented our key-value caching subsystem for Wildebeest on top of a Durable Object. By taking advantage of the DO’s native transactional storage API, we can have strong guarantees that whenever we create or change a key, the next read will always return the latest version.
The idea is so simple and effective that it took us literally a few lines of code to implement a key-value cache with two primitives: HTTP PUT and GET.
export class WildebeestCache {
async fetch(request: Request) {
if (request.method === 'GET') {
const { pathname } = new URL(request.url)
const key = pathname.slice(1)
const value = await this.storage.get(key)
return new Response(JSON.stringify(value))
}
if (request.method === 'PUT') {
const { key, value } = await request.json()
await this.storage.put(key, value)
return new Response('', { status: 201 })
}
}
}
Strong consistency it is. Lets move to user registration and authentication now.
Zero Trust Access
The official Mastodon server handles user registrations, typically using email, before you can choose your local user name and start using the service. Handling user registration and authentication can be daunting and time-consuming if we were to build it from scratch though.
Furthermore, people don’t want to create new credentials for every new service they want to use and instead want more convenient OAuth-like authorization and authentication methods so that they can reuse their existing Apple, Google, or GitHub accounts.
We wanted to simplify things using Cloudflare’s built-in features. Needless to say, we have a product that handles user onboarding, authentication, and access policies to any application behind Cloudflare; it’s called Zero Trust. So we put Wildebeest behind it.
Zero Trust Access can either do one-time PIN (OTP) authentication using email or single-sign-on (SSO) with many identity providers (examples: Google, Facebook, GitHub, Linkedin), including any generic one supporting SAML 2.0.
When you start using Wildebeest with a client, you don’t need to register at all. Instead, you go straight to log in, which will redirect you to the Access page and handle the authentication according to the policy that you, the owner of your instance, configured.
The policy defines who can authenticate, and how.
When authenticated, Access will redirect you back to Wildebeest. The first time this happens, we will detect that we don’t have information about the user and ask for your Username and Display Name. This will be asked only once and is what will be to create your public Mastodon profile.
Technically, Wildebeest implements the OAuth 2 specification. Zero Trust protects the /oauth/authorize endpoint and issues a valid JWT token in the request headers when the user is authenticated. Wildebeest then reads and verifies the JWT and returns an authorization code in the URL redirect.
Once the client has an authorization code, it can use the /oauth/token endpoint to obtain an API access token. Subsequent API calls inject a bearer token in the Authorization header:
Authorization: Bearer access_token
Deployment and Continuous Integration
We didn’t want to run a managed service for Mastodon as it would somewhat diminish the concepts of federation and data ownership. Also, we recognize that ActivityPub and Mastodon are emerging, fast-paced technologies that will evolve quickly and in ways that are difficult to predict just yet.
For these reasons, we thought the best way to help the ecosystem right now would be to provide an open-source software package that anyone could use, customize, improve, and deploy on top of our cloud. Cloudflare will obviously keep improving Wildebeest and support the community, but we want to give our Fediverse maintainers complete control and ownership of their instances and data.
The remaining question was, how do we distribute the Wildebeest bundle and make it easy to deploy into someone’s account when it requires configuring so many Cloudflare features, and how do we facilitate updating the software over time?
The Deploy with Workers button is a specially crafted link that auto-generates a workflow page where the user gets asked some questions, and Cloudflare handles authorizing GitHub to deploy to Workers, automatically forks the Wildebeest repository into the user’s account, and then configures and deploys the project using a GitHub Actions workflow.
A GitHub Actions workflow is a YAML file that declares what to do in every step. Here’s the Wildebeest workflow (simplified):
This workflow runs automatically every time the main branch changes, so updating the Wildebeest is as easy as synchronizing the upstream official repository with the fork. You don’t even need to use git commands for that; GitHub provides a convenient Sync button in the UI that you can simply click.
What’s more? Updates are incremental and non-destructive. When the GitHub Actions workflow redeploys Wildebeest, we only make the necessary changes to your configuration and nothing else. You don’t lose your data; we don’t need to delete your existing configurations. Here’s how we achieved this:
We use Terraform, a declarative configuration language and tool that interacts with our APIs and can query and configure your Cloudflare features. Here’s the trick, whenever we apply a new configuration, we keep a copy of the Terraform state for Wildebeest in a Cloudflare KV key. When a new deployment is triggered, we get that state from the KV copy, calculate the differences, then change only what’s necessary.
Data loss is not a problem either because, as you read above, D1 supports migrations. If we need to add a new column to a table or a new table, we don’t need to destroy the database and create it again; we just apply the necessary SQL to that change.
Protection, optimization and observability, naturally
Once Wildebeest is up and running, you can protect it from bad traffic and malicious actors. Cloudflare offers you DDoS, WAF, and Bot Management protection out of the box at a click’s distance.
Likewise, you’ll get instant network and content delivery optimizations from our products and analytics on how your Wildebeest instance is performing and being used.
ActivityPub, WebFinger, NodeInfo and Mastodon APIs
Mastodon popularized the Fediverse concept, but many of the underlying technologies used have been around for quite a while. This is one of those rare moments when everything finally comes together to create a working platform that answers an actual use case for Internet users. Let’s quickly go through the protocols that Wildebeest had to implement:
ActivityPub
ActivityPub is a decentralized social networking protocol and has been around as a W3C recommendation since at least 2018. It defines client APIs for creating and manipulating content and server-to-server APIs for content exchange and notifications, also known as federation. ActivityPub uses ActivityStreams, an even older W3C protocol, for its vocabulary.
The concepts of Actors (profiles), messages or Objects (the toots), inbox (where you receive toots from people you follow), and outbox (where you send your toots to the people you follow), to name a few of many other actions and activities, are all defined on the ActivityPub specification.
import type { APObject } from 'wildebeest/backend/src/activitypub/objects'
import type { Actor } from 'wildebeest/backend/src/activitypub/actors'
export async function addObjectInInbox(db, actor, obj) {
	const id = crypto.randomUUID()
	const out = await db
		.prepare('INSERT INTO inbox_objects(id, actor_id, object_id) VALUES(?, ?, ?)')
		.bind(id, actor.id.toString(), obj.id.toString())
		.run()
}
WebFinger
WebFinger is a simple HTTP protocol used to discover information about any entity, like a profile, a server, or a specific feature. It resolves URIs to resource objects.
Mastodon uses WebFinger lookups to discover information about remote users. For example, say you want to interact with @[email protected]. Your local server would request https://example.com/.well-known/webfinger?resource=acct:[email protected] (using the acct scheme) and get something like this:
export async function handleRequest(request, db): Promise<Response> {
	…
	const jsonLink = /* … link to actor */

	const res: WebFingerResponse = {
		subject: `acct:...`,
		aliases: [jsonLink],
		links: [
			{
				rel: 'self',
				type: 'application/activity+json',
				href: jsonLink,
			},
		],
	}
	return new Response(JSON.stringify(res), { headers })
}
Mastodon API
Finally, things like setting your server information, profile information, generating timelines, notifications, and searches, are all Mastodon-specific APIs. The Mastodon open-source project defines a catalog of REST APIs, and you can find all the documentation for them on their website.
Our Mastodon API implementation can be found here (REST endpoints) and here (backend primitives). Here’s an example of Mastodon’s server information /api/v2/instance implemented by Wildebeest:
Wildebeest also implements WebPush for client notifications and NodeInfo for server information.
Other Mastodon-compatible servers had to implement all these protocols too; Wildebeest is one of them. The community is very active in discussing future enhancements; we will keep improving our compatibility and adding support to more features over time, ensuring that Wildebeest plays well with the Fediverse ecosystem of servers and clients emerging.
Get started now
Enough about technology; let’s get you into the Fediverse. We tried to detail all the steps to deploy your server. To start using Wildebeest, head to the public GitHub repository and check our Get Started tutorial.
Most of Wildebeest’s dependencies offer a generous free plan that allows you to try them for personal or hobby projects that aren’t business-critical, however you will need to subscribe an Images plan (the lowest tier should be enough for most needs) and, depending on your server load, Workers Unbound (again, the minimum cost should be plenty for most use cases).
Following our dogfooding mantra, Cloudflare is also officially joining the Fediverse today. You can start following our Mastodon accounts and get the same experience of having regular updates from Cloudflare as you get from us on other social platforms, using your favorite Mastodon apps. These accounts are entirely running on top of a Wildebeest server:
Wildebeest is compatible with most client apps; we are confirmed to work with the official Mastodon Android and iOS apps, Pinafore, Mammoth, and tooot, and looking into others like Ivory. If your favorite isn’t working, please submit an issue here, we’ll do our best to help support it.
Final words
Wildebeest was built entirely on top of our Supercloud stack. It was one of the most complete and complex projects we have created that uses various Cloudflare products and features.
We hope this write-up inspires you to not only try deploying Wildebeest and joining the Fediverse, but also building your next application, however demanding it is, on top of Cloudflare.
Wildebeest is a minimally viable Mastodon-compatible server right now, but we will keep improving it with more features and supporting it over time; after all, we’re using it for our official accounts. It is also open-sourced, meaning you are more than welcome to contribute with pull requests or feedback.
In the meantime, we opened a Wildebeest room on our Developers Discord Server and are keeping an eye open on the GitHub repo issues tab. Feel free to engage with us; the team is eager to know how you use Wildebeest and answer your questions.
PS: The code snippets in this blog were simplified to benefit readability and space (the TypeScript types and error handling code were removed, for example). Please refer to the GitHub repo links for the complete versions.
Radar 2.0 was built on the learnings of Radar 1.0 and was launched last month during Cloudflare’s Birthday Week as a complete product revamp. We wanted to make it easier for our users to find insights and navigate our data, and overall provide a better and faster user experience.
We’re building a Supercloud. Cloudflare’s products now include hundreds of features in networking, security, access controls, computing, storage, and more.
This blog will explain how we built the new Radar from an engineering perspective. We wanted to do this to demonstrate that anyone could build a somewhat complex website that involves demanding requirements and multiple architectural layers, do it on top of our stack, and how easy it can be.
Hopefully, this will inspire other developers to switch from traditional software architectures and build their applications using modern, more efficient technologies.
High level architecture
The following diagram is a birds-eye view of the Radar 2.0 architecture. As you can see, it’s divided into three main layers:
The Core layer is where we keep our data lake, data exploration tools, and backend API.
The Cloudflare network layer is where we host and run Radar and serve the public APIs.
The Client layer is essentially everything else that runs in your browser. We call it the Radar Web app.
As you can see, there are Cloudflare products everywhere. They provide the foundational resources to host and securely run our code at scale, but also other building blocks necessary to run the application end to end.
By having these features readily available and tightly integrated into our ecosystem and tools, at the distance of a click and a few lines of code, engineering teams don’t have to reinvent the wheel constantly and can use their time on what is essential: their app logic.
Let’s dig in.
Cloudflare Pages
Radar 2.0 is deployed using Cloudflare Pages, our developer-focused website hosting platform. In the early days, you could only host static assets on Pages, which was helpful for many use cases, including integrating with static site generators like Hugo, Jekyll, or Gatsby. Still, it wouldn’t solve situations where your application needs some sort of server-side computing or advanced logic using a single deployment.
Luckily Pages recently added support to run custom Workers scripts. With Functions, you can now run server-side code and enable any kind of dynamic functionality you’d typically implement using a separate Worker.
Cloudflare Pages Functions also allow you to use Durable Objects, KV, R2, or D1, just like a regular Worker would. We provide excellent documentation on how to do this and more in our Developer Documentation. Furthermore, the team wrote a blog on how to build a full-stack application that describes all the steps in detail.
Radar 2.0 needs server-side functions for two reasons:
To render Radar and run the server side of Remix.
To implement and serve our frontend API.
Remix and Server-side Rendering
We use Remix with Cloudflare Pages on Radar 2.0.
Remix follows a server/client model and works under the premise that you can’t control the user’s network, so web apps must reduce the amount of Javascript, CSS, and JSON they send through the wire. To do this, they move some of the logic to the server.
In this case, the client browser will get pre-rendered DOM components and the result of pre-fetched API calls with just the right amount of JSON, Javascript, and CSS code, rightfully adjusted to the UI needs. Here’s the technical explanation with more detail.
Typically, Remix would need a Node.js server to do all of this, but guess what: It can also run on Cloudflare Workers and Pages.
Here’s the code to get the Remix server running on Workers, using Cloudflare Pages:
import { createPagesFunctionHandler } from "@remix-run/cloudflare-pages";
import * as build from "@remix-run/dev/server-build";

const handleRequest = createPagesFunctionHandler({
  build: {
    ...build,
    publicPath: "/build/",
    assetsBuildDirectory: "public/build",
  },
  mode: process.env.NODE_ENV,
  getLoadContext: (context) => ({
    ...context.env,
    CF: (context.request as any).cf as IncomingRequestCfProperties | undefined,
  }),
});

const handler: ExportedHandler<Env> = {
  fetch: async (req, env, ctx) => {
    const r = new Request(req);
    return handleRequest({
      env,
      params: {},
      request: r,
      waitUntil: ctx.waitUntil,
      next: () => {
        throw new Error("next() called in Worker");
      },
      functionPath: "",
      data: undefined,
    });
  },
};
In Remix, routes handle changes when a user interacts with the app and changes it (clicking on a menu option, for example). A Remix route can have a loader, an action and a default export. The loader handles API calls for fetching data (GET method). The action handles submissions to the server (POST, PUT, PATCH, DELETE methods) and returns the response. The default export handles the UI code in React that’s returned for that route. A route without a default export returns only data.
Because Remix runs both on the server and the client, it can get smart and know what can be pre-fetched and computed server-side and what must go through the network connection, optimizing everything for performance and responsiveness.
Here’s an example of a Radar route, simplified for readability, for the Outage Center page.
Another project porting their app to Remix is Cloudflare TV. This is how their metrics looked before and after the changes.
Radar’s Desktop Lighthouse score is now nearly 100% on Performance, Accessibility, Best Practices, and SEO.
Another Cloudflare product that we use extensively on Radar 2.0 is Speed. In particular, we want to mention the Early Hints feature. Early Hints is a new web standard that defines a new HTTP 103 header the server can use to inform the browser which assets will likely be needed to render the web page while it’s still being requested, resulting in dramatic load times improvements.
Radar has two APIs. The backend which has direct access to our data sources, and the frontend, which is available on the Internet.
Backend API
The backend API was written using Python, Pandas and FastAPI and is protected by Cloudflare Access, JWT tokens and an authenticated origin pull (AOP) configuration. Using Python allows anyone on the team, engineers or data scientists, to collaborate easily and contribute to improving and expanding the API, which is great. Our data science team uses JupyterHub and Jupyter Notebooks as part of their data exploration workflows, which makes prototyping and reusing code, algorithms and models particularly easy and fast.
It then talks to the upstream frontend API via a Strawberry based GraphQL server. Using GraphQL makes it easy to create complex queries, giving internal users and analysts the flexibility they need when building reports from our vast collection of data.
Frontend API
We built Radar’s frontend API on top of Cloudflare Workers. This worker has two main functions:
It fetches data from the backend API using GraphQL, and then transforms it.
It provides a public REST API that anyone can use, including Radar.
Using a worker in front of our core API allows us to easily add and separate microservices, and also adds notable features like:
Cloudflare’s Cache API allows finer control over what to cache and for how long and supports POST requests and customizable cache control headers, which we use.
Stale responses using R2. When the backend API cannot serve a request for some reason, and there’s a stale response cached, it’ll be served directly from R2, giving end users a better experience.
CSV and JSON output formats. The CSV format is convenient and makes it easier for data scientists, analysts, and others to use the API and consume our API data directly from other tools.
Open sourcing our OpenAPI 3 schema generator and validator
One last feature on the frontend API is OpenAPI 3 support. We automatically generate an OpenAPI schema and validate user input with it. This is done through a custom library that we built on top of itty-router, which we also use. Today we’re open sourcing this work.
itty-router-openapi provides an easy and compact OpenAPI 3 schema generator and validator for Cloudflare Workers. Check our GitHub repository for more information and details on how to use it.
Developer’s Documentation
Today we’re also launching our developer’s documentation pages for the Radar API where you can find more information about our data license, basic concepts, how to get started and the available API methods. Cloudflare Radar’s API is free, allowing academics, data sleuths and other web enthusiasts to investigate Internet usage across the globe, based on data from our global network.
To facilitate using our API, we also put together a Colab Notebook template that you can play with, copy and expand to your use case.
The Radar App
The Radar App is the code that runs in your browser. We’ve talked about Remix, but what else do we use?
Radar relies on a lot of data visualizations. Things like charts and maps are essential to us. We decided to build our reusable library of visualization components on top of two other frameworks: visx, a “collection of expressive, low-level visualization primitives for React,” D3, a powerful JavaScript library for manipulating the DOM based on data, and MapLibre, an open-source map visualization stack.
Here’s one of our visualization components in action. We call it the “PewPew map”.
And here’s the Remix React code for it, whenever we need to use it in a page:
Another change we made to Radar was switching our images and graphical assets to Scalable Vector Graphics. SVGs are great because they’re essentially a declarative graphics language. They’re XML text files with vectorial information. And so, they can be easily manipulated, transformed, stored, or indexed, and of course, they can be rendered at any size, producing beautiful, crisp results on any device and resolution.
SVGs are also extremely small and efficient in size compared to bitmap formats and support internationalization, making them easier to translate to other languages (localization), thus providing better accessibility.
Here’s an example of a Radar Bubble Chart, inspected, where you can see the SVG code and the <text/> strings embedded.
Cosmos
React Cosmos is a “sandbox for developing and testing UI components in isolation.” We wanted to use Cosmos with Radar 2.0 because it’s the perfect project for it:
It has a lot of visual components; some are complex and have many configuration options and features.
The components are highly reusable across multiple pages in different contexts with different data.
We have a multidisciplinary team; everyone can send a pull request and add or change code in the frontend.
Cosmos acts as a component library where you can see our palette of ready-to-use visualizations and widgets, from simple buttons to complex charts, and you play with their options in real-time and see what happens. Anyone can do it, not only designers or engineers but also other project stakeholders. This effectively improves team communications and makes contributing and iterating quickly.
Here’s a screenshot of our Cosmos in action:
Continuous integration and development
Continuous integration is important for any team doing modern software. Cloudflare Pages provides multiple options to work with CI tools using direct uploads, out of the box. The team has put up documentation and examples on how to do that with GitHub Actions, CircleCI, and Travis, but you can use others.
In our case, we use BitBucket and TeamCity internally to build and deploy our releases. Our workflow automatically builds, tests, and deploys Radar 2.0 within minutes on an approved PR and follow-up merge.
Furthermore, we have multiple environments to stage and test our releases before they go live to production. Our CI/CD setup makes it easy to switch from one environment to the other or quickly roll back any undesired deployment.
Radar 1.0 wasn’t particularly fast doing CI/CD, we confess. We had a few episodes when a quick fix could take some good 30 minutes from committing the code to deployment, and we felt frustrated about it.
So we invested a lot in ensuring that the new CI would be fast, efficient, and furious.
One cool thing we ended up doing was fast preview links on any commit pushed to the code repository. Using a combination of intelligent caching during builds and doing asynchronous tests when the commit is outside the normal release branches, we were able to shorten the deployment time to seconds.
This is the notification we get in our chat when anyone pushes code to any branch:
Anyone can follow a thread for a specific branch in the chat and get notified on new changes when they happen.
Blazing-fast builds, preview links and notifications are game-changers. An engineer can go from an idea or a quick fix to showing the result on a link to a product manager or another team member. Anyone can quickly click the link to see the changes on a fully working end-to-end version of Radar.
Accessibility and localization
Cloudflare is committed to web accessibility. Recently we announced how we upgraded Cloudflare’s Dashboard to adhere to industry accessibility standards, but this premise is valid for all our properties. The same is true for localization. In 2020, we internationalized our Dashboard and added support for new languages and locales.
Accessibility and localization go hand in hand and are both important, but they are also different. The Web Content Accessibility Guidelines define many best practices around accessibility, including using color and contrast, tags, SVGs, shortcuts, gestures, and many others. The A11Y project page is an excellent resource for learning more.
Localization, though, also known as L10n, is more of a technical requirement when you start a new project. It’s about making sure you choose the right set of libraries and frameworks that will make it easier to add new translations without engineering dependencies or code rewrites.
We wanted Radar to perform well on both fronts. Our design system takes Cloudflare’s design and brand guidelines seriously and adds as many A11Y good practices as possible, and the app is fully aware of localization strings across its pages and UI components.
Adding a new language is as easy as translating a single JSON file. Here’s a snippet of the en-US.json file with the default American English strings:
{
  "abbr.asn": "Autonomous System Number",
  "actions.chart.download.csv": "Download chart data in CSV",
  "actions.chart.download.png": "Download chart in PNG Format",
  "actions.chart.download.svg": "Download chart in SVG Format",
  "actions.chart.download": "Download chart",
  "actions.chart.maximize": "Maximize chart",
  "actions.chart.minimize": "Minimize chart",
  "actions.chart.share": "Share chart",
  "actions.download.csv": "Download CSV",
  "actions.download.png": "Download PNG",
  "actions.download.svg": "Download SVG",
  "actions.share": "Share",
  "alert.beta.link": "Radar Classic",
  "alert.beta.message": "Radar 2.0 is currently in Beta. You can still use {link} during the transition period.",
  "card.about.cloudflare.p1": "Cloudflare, Inc. ({website} / {twitter}) is on a mission to help build a better Internet. Cloudflare's suite of products protects and accelerates any Internet application online without adding hardware, installing software, or changing a line of code. Internet properties powered by Cloudflare have all web traffic routed through its intelligent global network, which gets smarter with every request. As a result, they see significant improvement in performance and a decrease in spam and other attacks. Cloudflare was named to Entrepreneur Magazine's Top Company Cultures 2018 list and ranked among the World's Most Innovative Companies by Fast Company in 2019.",
  "card.about.cloudflare.p2": "Headquartered in San Francisco, CA, Cloudflare has offices in Austin, TX, Champaign, IL, New York, NY, San Jose, CA, Seattle, WA, Washington, D.C., Toronto, Dubai, Lisbon, London, Munich, Paris, Beijing, Singapore, Sydney, and Tokyo.",
  "card.about.cloudflare.title": "About Cloudflare",
...
You can expect us to release Radar in other languages soon.
Radar Reports and Jupyter notebooks
Radar Reports are documents that use data exploration and storytelling to analyze a particular theme in-depth. Some reports tend to get updates from time to time. Examples of Radar Reports are our quarterly DDoS Attack Trends, or the IPv6 adoption.
The source of these Reports is Jupyter Notebooks. Our Data Science team works on some use-case or themes with other stakeholders using our internal Jupyter Hub tool. After all the iteration and exploration are done, and the work is signed off, a notebook is produced.
A Jupyter Notebook is a JSON document containing text, source code, rich media such as images or charts, and other metadata. It is the de facto standard for presenting data science projects, and every data scientist uses it.
With Radar 1.0, converting a Jupyter Notebook to a Radar page was a lengthy and manual process implicating many engineering and design resources and causing much frustration to everyone involved. Even updating an already-published notebook would frequently cause trouble for us.
Radar 2.0 changed all of this. We now have a fully automated process that takes a Jupyter Notebook and, as long as it’s designed using a list of simple rules and internal guidelines, converts it automatically, hosts the resulting HTML and assets in an R2 bucket, and publishes it on the Reports page.
The conversion to HTML takes into account our design system and UI components, and the result is a beautiful document, usually long-form, perfectly matching Radar’s look and feel.
We will eventually open-source this tool so that anyone can use it.
More Cloudflare, less to worry about
We gave examples of using Cloudflare’s products and features to build your next-gen app without worrying too much about things that aren’t core to your business or logic. A few are missing, though.
Once the app is up and running, you must protect it from bad traffic and malicious actors. Cloudflare offers you DDoS, WAF, and Bot Management protection out of the box at a click’s distance.
For example, here are some of our security rules. This is traffic we don’t have to worry about in our app because Cloudflare detects it and acts on it according to our rules.
Another thing we don’t need to worry about is redirects from the old site to the new one. Cloudflare has a feature called Bulk Redirects, where you can easily create redirect lists directly on the dashboard.
It’s also important to mention that every time we talk about what you can do using our Dashboard, we’re, in fact, also saying you can do precisely the same using Cloudflare’s APIs. Our Dashboard is built entirely on top of them. And if you’re the infrastructure as code kind of person, we have you covered, too; you can use the Cloudflare Terraform provider.
Deploying and managing Workers, R2 buckets, or Pages sites is obviously scriptable too. Wrangler is the command-line tool to do this and more, and it goes the extra mile to allow you to run your full app locally, emulating our stack, on your computer, before deploying.
Final words
We hope you enjoyed this Radar team write-up and were inspired to build your next app on top of our Supercloud. We will continue improving and innovating on Radar 2.0 with new features, share our findings and open-sourcing our tools with you.
In the meantime, we opened a Radar room on our Developers Discord Server. Feel free to join it and ask us questions; the team is eager to receive feedback and discuss web technology with you.
You can also follow us on Twitter for more Radar updates.
Email Routing was announced during Birthday Week in 2021 and has been available for free to every Cloudflare customer since early this year. When we launched in beta, we set out to make a difference and provide the most uncomplicated, more powerful email forwarding service on the Internet for all our customers, for free.
We feel we’ve met and surpassed our goals for the first year. Cloudflare Email Routing is now one of our most popular features and a top leading email provider. We are processing email traffic for more than 550,000 inboxes and forwarding an average of two million messages daily, and still growing month to month.
In February, we also announced that we were acquiring Area1. Merging their team, products, and know-how with Cloudflare was a significant step in strengthening our Email Security capabilities.
All this is good, but what about more features, you ask?
The team has been working hard to enhance Email Routing over the last few months. Today Email Routing leaves beta.
Also, we feel that this could be a good time to give you an update on all the new things we’ve been adding to the service, including behind-the-scenes and not-so-visible improvements.
Let’s get started.
Public API and Terraform
Cloudflare has a strong API-first philosophy. All of our services expose their primitives in our vast API catalog and gateway, which we then “dogfood” extensively. For instance, our customer’s configuration dashboard is built entirely on top of these APIs.
The Email Routing APIs didn’t quite make it to this catalog on day one and were kept private and undocumented for a while. This summer we made those APIs available on the public Cloudflare API catalog. You can programmatically use them to manage your destination emails, rules, and other Email Routing settings. The methods’ definitions and parameters are documented, and we provide curl examples if you want to get your hands dirty quickly.
Even better, if you’re an infrastructure as code type of user and use Terraform to configure your systems automatically, we have you covered too. The latest releases of Cloudflare’s Terraform provider now incorporate the Email Routing API resources, which you can use with HCL.
IPv6 egress
IPv6 adoption is on a sustained growth path. Our latest IPv6 adoption report shows that we’re nearing the 30% penetration figure globally, with some countries, where mobile usage is prevalent, exceeding the 50% mark. Cloudflare has offered full IPv6 support since 2011 as it aligns entirely with our mission to help build a better Internet.
We are IPv6-ready across the board in our network and our products, and Email Routing has had IPv6 ingress support since day one.
➜  ~ dig celso.io MX +noall +answer
celso.io.		300	IN	MX	91 isaac.mx.cloudflare.net.
celso.io.		300	IN	MX	2 linda.mx.cloudflare.net.
celso.io.		300	IN	MX	2 amir.mx.cloudflare.net.
➜  ~ dig linda.mx.cloudflare.net AAAA +noall +answer
linda.mx.cloudflare.net. 300	IN	AAAA	2606:4700:f5::b
linda.mx.cloudflare.net. 300	IN	AAAA	2606:4700:f5::c
linda.mx.cloudflare.net. 300	IN	AAAA	2606:4700:f5::d
More recently, we closed the loop and added egress IPv6 as well. Now we also use IPv6 when sending emails to upstream servers. If the MX server to which an email is being forwarded supports IPv6, then we will try to use it. Gmail is one good example of a high traffic destination that has IPv6 MX records.
➜  ~ dig gmail.com MX +noall +answer
gmail.com.		3362	IN	MX	30 alt3.gmail-smtp-in.l.google.com.
gmail.com.		3362	IN	MX	5 gmail-smtp-in.l.google.com.
gmail.com.		3362	IN	MX	10 alt1.gmail-smtp-in.l.google.com.
gmail.com.		3362	IN	MX	20 alt2.gmail-smtp-in.l.google.com.
gmail.com.		3362	IN	MX	40 alt4.gmail-smtp-in.l.google.com.
➜  ~ dig gmail-smtp-in.l.google.com AAAA +noall +answer
gmail-smtp-in.l.google.com. 116	IN	AAAA	2a00:1450:400c:c03::1a
We’re happy to report that we’re now delivering most of our email to upstreams using IPv6.
Observability
Email Routing is effectively another system that sits in the middle of the life of an email message. No one likes to navigate blindly, especially when using and depending on critical services like email, so it’s our responsibility to provide as much observability as possible about what’s going on when messages are transiting through our network.
End to end email deliverability is a complex topic and often challenging to troubleshoot due to the nature of the protocol and the number of systems and hops involved. We added two widgets, Analytics and Detailed Logs, which will hopefully provide the needed insights and help increase visibility.
The Analytics section of Email Routing shows general statistics about the number of emails received during the selected timeframe, how they got handled to the upstream destination addresses, and a convenient time-series chart.
On the Activity Log, you can get detailed information about what happened to each individual message that was received and then delivered to the destination. That information includes the sender and the custom address used, the timestamp, and the delivery attempt result. It also has the details of our SPF, DMARC, and DKIM validations. We also provide filters to help you find what you’re looking for in case your message volume is higher.
More recently, the Activity Log now also shows bounces. A bounce message happens when the upstream SMTP server accepts the delivery, but then, for any reason (exceeded quota, virus checks, forged messages, or other issues), the recipient inbox decides to reject it and return a new message back with an error to the latest MTA in the chain, read from the Return-Path headers, which is us.
Audit Logs
Audit Logs are available on all plan types and summarize the history of events, like login and logout actions, or zone configuration changes, made within your Cloudflare account. Accounts with multiple members or companies that must comply with regulatory obligations rely on Audit logs for tracking and evidence reasons.
Email Routing now integrates with Audit Logs and records all configuration changes, like adding a new address, changing a rule, or editing the catch-all address. You can find the Audit Logs on the dashboard under “Manage Account” or use our API to download the list.
Anti-spam
Unsolicited and malicious messages plague the world of email and are a big problem for end users. They affect the user experience and efficiency of email, and often carry security risks that can lead to scams, identity theft, and manipulation.
Since day one, we have supported and validated SPF (Sender Policy Framework) records, DKIM (DomainKeys Identified Mail) signatures, and DMARC (Domain-based Message Authentication) policies in incoming messages. These steps are important and mitigate some risks associated with authenticating the origin of an email from a specific legitimate domain, but they don’t solve the problem completely. You can still have bad actors generating spam or phishing Attacks from other domains who ignore SPF or DKIM completely.
Anti-spam techniques today are often based on blocking emails whose origin (the IP address of the client trying to deliver the message) confidence score isn’t great. This is commonly known in the industry as IP reputation. Other companies specialize in maintaining reputation lists for IPs and email domains, also known as RBL lists, which are then shared across providers and used widely.
Simply put, an IP or a domain gets a bad reputation when it starts sending unsolicited or malicious emails. If your IP or domain has a bad reputation, you’ll have a hard time delivering Emails from them to any major email provider. A bad reputation goes away when the IP or domain stops acting bad.
Cloudflare is a security company that knows a few things about IP threat scores and reputation. Working with the Area1 team and learning from them, we added support to flag and block emails received from what we consider bad IPs at the SMTP level. Our approach uses a combination of heuristics and reputation databases, including some RBL lists, which we constantly update.
This measure benefits not only those customers that receive a lot of spam, who will now get another layer of protection and filtering, but also everyone else using Email Routing. The reputation of our own IP space and forwarding domain, which we use to deliver messages to other email providers, will improve, and with it, so will our deliverability success rate.
IDN support
Internationalized domain names, or IDNs for short, are domains that contain at least one non-ASCII character. To accommodate backward compatibility with older Internet protocols and applications, the IETF approved the IDNA protocol (Internationalized Domain Names in Applications), which was then adopted by many browsers, top-level domain registrars and other service providers.
Cloudflare was one of the first platforms to adopt IDNs back in 2012. Supporting internationalized domain names on email, though, is challenging. Email uses DNS, SMTP, and other standards (like TLS and DKIM signatures) stacked on top of each other. IDNA conversions need to work end to end, or something will break.
Email Routing didn’t support IDNs until now. Starting today, Email Routing can be used with IDNs and everything will work end to end as expected.
8-bit MIME transport
The SMTP protocol supports extensions since the RFC 2821 revision. When an email client connects to an SMTP server, it announces its capabilities on the EHLO command.
➜  ~ telnet linda.mx.cloudflare.net 25
Trying 162.159.205.24...
Connected to linda.mx.cloudflare.net.
Escape character is '^]'.
220 mx.cloudflare.net Cloudflare Email ESMTP Service ready
EHLO celso.io
250-mx.cloudflare.net greets celso.io
250-STARTTLS
250-8BITMIME
250 ENHANCEDSTATUSCODES
Most modern clients and servers support the 8BITMIME extension, making transmitting binary files easier and more efficient without additional conversions to and from 7-bit.
Email Routing now supports transmitting 8BITMIME SMTP messages end to end and handles DKIM signatures accordingly.
Other fixes
We’ve been making other smaller improvements to Email Routing too:
We ported our SMTP server to use BoringSSL, Cloudflare’s SSL/TLS implementation of choice, and now support more ciphers when clients connect to us using STARTTLS and when we connect to upstream servers.
We made a number of improvements when we added our own DKIM signatures in the messages. We keep our Rust 🦀DKIM implementation open source on GitHub, and we also contribute to Lettre, a Rust mailer library that we use.
When a destination address domain has multiple MX records, we now try them all in their preference value order, as described in the RFC, until we get a good delivery, or we fail.
Route to Workers update
We announced Route to Workers in May this year. Route to Workers enables everyone to programmatically process their emails and use them as triggers for any other action. In other words, you can choose to process any incoming email with a Cloudflare Worker script and then implement any logic you wish before you deliver it to a destination address or drop it. Think about it as programmable email.
The good news, though, is that we’re near completing the project. The APIs, the dashboard configuration screens, the SMTP service, and the necessary Cap’n Proto interface to Workers are mostly complete, and “all” we have left now is adding the Email Workers primitives to the runtime and testing the hell out of everything before we ship.
Thousands of users are waiting for Email Workers to start creating advanced email processing workflows, and we’re excited about the possibilities this will open. We promise we’re working hard to open the public beta as soon as possible.
What’s next?
We keep looking at ways to improve email and will add more features and support to emerging protocols and extensions. Two examples are ARC (Authenticated Received Chain), a new signature-based authentication system designed with email forwarding services in mind, and EAI (Email Address Internationalization), which we will be supporting soon.
In the meantime, you can start using Email Routing with your own domain if you haven’t yet, it only takes a few minutes to set up, and it’s free. Our Developers Documentation page has details on how to get started, troubleshooting, and technical information.
The Internet is a living organism. Technology changes, shifts in human behavior, social events, intentional disruptions, and other occurrences change the Internet in unpredictable ways, even to the trained eye.
Cloudflare Radar has long been the place to visit for accessing data and getting unique insights into how people and organizations are using the Internet across the globe, as well as those unpredictable changes to the Internet.
One of the most popular features on Radar has always been the “Most Popular Domains,” with both global and country-level perspectives. Domain usage signals provide a proxy for user behavior over time and are a good representation of what people are doing on the Internet.
Today, we’re going one step further and launching a new dataset called Radar Domain Rankings (Beta). Domain Rankings is based on aggregated 1.1.1.1 resolver data that is anonymized in accordance with our privacy commitments. The dataset aims to identify the top most popular domains based on how people use the Internet globally, without tracking individuals’ Internet use.
There are a few reasons why we’re doing this now. One is obviously to improve our Radar features with better data and incorporate new learnings. But also, ranking lists are used all over the Internet in all sorts of systems. One of the most used and trusted sources of domain rankings was Alexa, but that service was recently deprecated. We believe we are in a good position to provide a strong alternative.
Let’s see how we built it.
Differences in domain names
Before we dig into the data science behind Domain Rankings, it’s important to understand what a domain and DNS are. Internet domain names are human-readable dot-separated letters, digits and hyphens that correspond to a network resource, like a server or a website. However, your computer and applications don’t know what to do with a domain name; they need IP addresses to send and receive information over the network. DNS is the system that converts, or resolves, a domain name into an IP address. Think of it as an Internet phonebook for domain names.
Note: This is a simplification. A new standard called Internationalized Domain Names, or IDN, allows using Unicode strings in domain names.
Each dot defines a new hierarchy level, reading right to left. Domains can have multiple levels of depth. The highest level corresponds to country code top-level domains (ccTLDs) like .uk, .fr or .pt, or generic top-level domains (gTLDs) like .com, .org, or .net. These are normally assigned to and managed by either country-level entities or administrative organizations operating a registry.
Then there are the second-level domains like cloudflare.com or google.com. These are normally purchased and registered by individuals or organizations, which are then free to create and manage as many hostnames and hierarchy levels as they want.
Unfortunately, however, there are exceptions. For instance, many countries use second-level domain registration. One such example is the United Kingdom, where commercial domains can only be registered under the .co.uk hierarchy. That’s why Google in the UK isn’t google.uk, but rather google.co.uk.
But that’s not all. Some countries use 3rd level domain registrations. One example is Japan, which offers Regional Domain registration under cities like *.aisai.aichi.jp.
Projects like the Public Suffix List are a good starting point for understanding the variations involved, and how they affect validations and assumptions in other systems, such as cookies in web browsers.
Domain Rankings takes some of this nuance into account to inform the definition of our current ruleset:
We boil everything down to second-level domains, such as cloudflare.com or google.com.
However, if the second level is .edu, .com, .org, .gov, .net, .gov, .net, .co or .mil, then we use third-level domains.
We don’t distinguish between what we think is a website or an infrastructure system. A domain represents an Internet-available resource.
We will also semi-automate, curate and maintain a list of domains that map to popular platforms and services in the future. Example: fb.audio, fb.com, fb.watch, all map to a “facebook” platform.
Defining popularity
Definitions are important. We established what we consider a domain, but what does domain popularity mean exactly? Our research showed that the volume of traffic generated to a given domain doesn’t really work as a proxy for what we perceive as popular. Instead, Domain Rankings looks at the size of the population of users that look up a domain per unit of time. The more people who are interested in a domain, the more popular it is.
Sounds pretty straightforward, right? Well, it’s not. Our databases don’t have cookies, IPs, or other tracking artifacts, and we strip information that leads to identifying an individual from all of our data, by design.
The good news, however, is that we do a very good job at identifying automated traffic (for instance, you can read about Bot Management and how we use Machine Learning to detect bots in HTTP traffic in our blog) and we found we could develop a reasonable proxy for the unique users metric without sacrificing privacy (using other data points that we store for a limited period of time, like the ASN and high-level geolocation information of the request or the Cloudflare data center that served it).
Domain Rankings’ popularity metric is best described as the estimated relative size of the user population that accesses a domain over some period of time.
Our approach
We announced 1.1.1.1, our privacy-first consumer DNS resolver in 2018, and over the years it’s grown to become one of the top DNS services in the world. 1.1.1.1 is also part of a Research Agreement with APNIC in which we collaborate with them doing public research and DNS data insights.
The data we collect from it honors our privacy commitments, and is aggregated and stripped of any information that could lead to identifying or tracking users. We conducted a privacy examination by a Big Four accounting firm to determine whether the 1.1.1.1 resolver was effectively configured to meet our privacy commitments. You can read more about it in this blog, and the full report is publicly available on our compliance page.
Even without this personally identifying information, the resulting collection is vast and representative of Internet activity.
The 1.1.1.1 service is used in many ways. Regular (human) Internet users use it as their DNS resolver, either because they explicitly configured it in their devices, or their ISP did, or because they use WARP, or their browser uses 1.1.1.1 under the hood. However, servers and cloud infrastructure, IoT devices, home routers, and bots also use 1.1.1.1 extensively, which creates a lot of challenges for us when trying to identify human traffic.
We’ve been using DNS data to calculate the top and trending domains found on both the global and country pages on Cloudflare Radar. It’s been quite a learning experience trying to improve these lists. We have implemented aggregations, counts, filters, handling exceptions, and tried reducing noise, and yet they’re far from perfect. We felt that there had to be a better way.
We’ve spent the last six months building a variety of machine learning models to help us predict the rank of a domain.
Building the model was no easy feat. We experimented with multiple regression types first, to know exactly what the model was doing, and then more complex algorithms to get better performance. We played with different datasets, changed the population groups, variables (features), and combinations of variables, and used synthetic data.
After evaluation, one of our first conclusions was that building a model that could produce good results for the highest ranked domains and the long tail would be difficult.
The paper “A Long Way to the Top: Significance, Structure, and Stability of Internet Top Lists” describes this problem well. “The ranking of domains in the long tail should be based on significantly smaller and hence less reliable numbers.” Talking to our Research Team who submitted the collaboration paper “Toppling Top Lists: Evaluating the Accuracy of Popular Website Lists” to IMC 2022, got us to the same conclusion: the most popular domains (like google.com and facebook.com) have feature values disproportionally higher than the lower-ranked domains.
Therefore, we selected the two models that performed best. One model was trained on the population with the highest feature values, uses more features, and is used to generate the ordered top 100 domain list. A second model was trained on a more general group of domains, uses fewer features, and is used to get the top one million most popular domains, which we then divide into ranking buckets.
These buckets are ranked, but each bucket’s contents are intentionally unordered. For example, the second bucket of 10,000 most popular domains includes the set of domains that rank from 10,001 to 20,000, but give no further indication of the individual ranking of domains in that bucket. Given the size of some of these buckets and the window of time we use to populate them, they will inherently be exposed to more instability, too. We feel this is a good compromise between the described natural uncertainties of our long tail model and providing a reasonable idea of how close to the top a domain is.
Results
It’s important to mention there is no global view that can establish the perfect rank, and there’s no easy mechanism to confirm if a ranking is, ultimately, good. Data-driven results are always subject to some bias and skewing, related to the context of the organizations and systems that collect them. Sometimes all that can be done is to be transparent about potential sources of bias. The geographical distribution of customers and users, product characteristics, platform features, and behavioral diversity play an essential role in the final result. We are presenting the Cloudflare view, what we see.
Having said this, Cloudflare sits in a privileged position and handles a significant amount of Internet traffic. We have plenty of signals we can extract from our aggregated data, and believe that makes it possible to generate high quality domain rankings.
Domain Rankings are available today. You can head up to the Domains page and check it out:
Ordered list of the top 100 most popular domains globally and per country, based on our first model. Last 24 hours, updated daily.
Unordered global most popular domains datasets divided into buckets of the following sizes: 200, 500, 1,000, 2,000, 5,000, 10,000, 20,000, 50,000, 100,000, 200,000, 500,000, 1,000,000. Last 7 days, updated weekly.
Next steps
We will keep improving Domain Rankings and monitoring the results. Anyone can access them on Cloudflare Radar, read the results, and download the CSV files.
Feel free to explore our Domain Rankings and share feedback with us.
An AS, or Autonomous System, is a group of routable IP prefixes belonging to a single entity, and is one of the key building blocks of the Internet. Internet providers, public clouds, governments, and other organizations have one or more ASes that they use to connect their users or systems to the rest of the Internet by advertising how to reach them.
Per AS traffic statistics and trends help when we need insight into unusual events, like Internet outages, infrastructure anomalies, targeted attacks, or any other changes from service providers.
Today, we are opening more of our data and launching the Cloudflare Radar pages for Autonomous Systems. When navigating to a country or region page on Cloudflare Radar you will see a list of five selected ASes for that country or region. But you shouldn’t feel limited to those, as you can deep dive into any AS by plugging its ASN (Autonomous System Number) into the Radar URL (https://radar.cloudflare.com/asn/<number>). We have excluded some statistical trends from ASes with small amounts of traffic as that data would be difficult to interpret.
The AS page is similar to the country page on Cloudflare Radar. You can find traffic levels, protocol use, and security details such as application and network-level DDoS attack information. Additionally, we show a geographical distribution map of the traffic and the volume of BGP announcements we see for the list of prefixes associated with the specific AS.
A sudden increase in BGP announcements often suggests disruptive changes to the Internet in the region or institution associated with the AS. Spikes in BGP announcements were visible when the submarine cable was cut in Tonga in 2022, on the Facebook outage in October 2021, and when governments limited the Internet access in their countries (as seen in Sudan and Syria in 2021).
At Cloudflare, we are committed to keep increasing transparency on the inner workings of the Internet, so that we can all do our part in keeping the Internet more open and secure for everyone. Keep an eye on Cloudflare Radar for more insights like these.
A few days ago Google announced that the users from the “G Suite legacy free edition” would need to switch to the paid edition before May 1, 2022, to maintain their services and accounts working. Because of this, many people are now considering alternatives.
One use case for G Suite legacy was handling email for custom domains.
In September, during Birthday Week, we announced Cloudflare Email Routing. This service allows you to create any number of custom email addresses you want on top of the domains you already have with Cloudflare and automatically forward the incoming traffic to any destination inboxes you wish.
Email Routing was designed to be privacy-first, secure, powerful, and very simple to use. Also, importantly, it’s available to all our customers for free.
The closed beta allowed us to keep improving the service and make it even more robust, compliant with all the technical nuances of email, and scalable. Today we’re pleased to report that we have over two hundred thousand zones testing Email Routing in production, and we started the countdown to open beta and global availability.
With Email Routing, you can effectively start receiving Emails in any of your domains for any number of custom addresses you want and forward the messages to any existing destination mailboxes. We will automatically set up everything for you, and you can have it running in minutes today, at no cost.
Here’s a step-by-step tutorial on how you can start receiving emails to example.com, forward them to Gmail (or any other email provider) at [email protected].
Using Cloudflare Email Routing with Gmail
First, login to your Cloudflare Dashboard and select your example.com zone. Click “Email (Beta)” in the left navigation panel, and request to join the Beta program.
Today it still takes a couple of days to get approved into the beta, but feel free to ping us on the Discord server or community forum if you can’t wait.
Once you get invited to join Email Routing, we will take you to our three-step easy configuration wizard. The first step is to define the custom address [email protected] and the destination address [email protected]. Don’t worry too much, you can modify or add others later.
This step will trigger sending a confirmation email to [email protected] so that we can prove that the destination Inbox is yours. You need to open Gmail and press the verification link.
Then, on the last step, you need to configure your zone MX and SPF DNS records. We will do this automatically for you. Just press “Add records automatically“. If you already have MX or SPF configured, we will guide you through the conflicts we find and help you solve them.
That’s it, Email Routing is now configured, and you can start sending emails to [email protected] and read them at [email protected] in Gmail.
Gmail address conventions
Gmail and G suite, now Google Workspace, support two email address conventions that help organize your messages and fight spam.
The first one is the plus (“+”) sign. If you append a “+” sign and any combination of words after your email address, it will still get delivered to your inbox. For example, you can use [email protected], and it will get delivered at [email protected]and automatically get tagged “finance”. You can then use this to set up filters in Gmail.
If you want to use these conventions with Cloudflare Email Routing, you can. Enable the “Catch-all address” feature and forward every incoming address for which there’s no other rule configured to the verified destination address of your choice ([email protected] in this example).
Conclusion
This is only one small example of what you can do with Email Routing today. We hope you find it helpful if you’re looking for a new home for your email. For more information see our documentation pages.
Email needs more innovation. We’re immensely excited about Email Routing and our ideas for it in the roadmap. Expect improved metrics and advanced routing options in our rules engine in the near future.
Feel free to join the Beta today and ping us in our Discord server or community forum if you can’t wait; we’ll do our best to prioritize the community requests before we open the service.
Today, October 25, following political turmoil, Sudan woke up without Internet access.
In our June blog, we talked about Sudan when the country decided to shut down the Internet to prevent cheating in exams.
Now, the disruption seems to be for other reasons. AP is reporting that “military forces … detained at least five senior Sudanese government figures.”. This afternoon (UTC) several media outlets confirmed that Sudan’s military dissolved the transitional government in a coup that shut down mobile phone networks and Internet access.
Cloudflare Radar allows anyone to track Internet traffic patterns around the world. The dedicated page for Sudan clearly shows that this Monday, when the country was waking up, the Internet traffic went down and continued that trend through the afternoon (16:00 local time, 14:00 UTC).
We dug in a little more on the HTTP traffic data. It usually starts increasing after 06:00 local time (04:00 UTC). But this Monday morning, traffic was flat, and the trend continued in the afternoon (there were no signs of the Internet coming back at 18:00 local time).
When comparing today with the last seven days’ pattern, we see that today’s drop is abrupt and unusual.
We can see the same pattern when looking at HTTP traffic by ASN (Autonomous Systems Number). The shutdown affects all the major ISPs from Sudan.
Two weeks ago, we compared mobile traffic worldwide using Cloudflare Radar, and Sudan was one of the most mobile-friendly countries on the planet, with 83% of Internet traffic coming from mobile devices. Today, both mobile and desktop traffic was disrupted.
Using Cloudflare Radar, we can also see a change in Layer 3&4 DDoS attacks because of the lack of data.
You can keep an eye on Cloudflare Radar to monitor how we see the Internet traffic globally and in every country.
It’s been a few days now since Facebook, Instagram, and WhatsApp went AWOL and experienced one of the most extended and rough downtime periods in their existence.
When that happened, we reported our bird’s-eye view of the event and posted the blog Understanding How Facebook Disappeared from the Internet where we tried to explain what we saw and how DNS and BGP, two of the technologies at the center of the outage, played a role in the event.
In the meantime, more information has surfaced, and Facebook has published a blog post giving more details of what happened internally.
As we said before, these events are a gentle reminder that the Internet is a vast network of networks, and we, as industry players and end-users, are part of it and should work together.
In the aftermath of an event of this size, we don’t waste much time debating how peers handled the situation. We do, however, ask ourselves the more important questions: “How did this affect us?” and “What if this had happened to us?” Asking and answering these questions whenever something like this happens is a great and healthy exercise that helps us improve our own resilience.
Today, we’re going to show you how the Facebook and affiliate sites downtime affected us, and what we can see in our data.
1.1.1.1
1.1.1.1 is a fast and privacy-centric public DNS resolver operated by Cloudflare, used by millions of users, browsers, and devices worldwide. Let’s look at our telemetry and see what we find.
First, the obvious. If we look at the response rate, there was a massive spike in the number of SERVFAIL codes. SERVFAILs can happen for several reasons; we have an excellent blog called Unwrap the SERVFAIL that you should read if you’re curious.
In this case, we started serving SERVFAIL responses to all facebook.com and whatsapp.com DNS queries because our resolver couldn’t access the upstream Facebook authoritative servers. About 60x times more than the average on a typical day.
If we look at all the queries, not specific to Facebook or WhatsApp domains, and we split them by IPv4 and IPv6 clients, we can see that our load increased too.
As explained before, this is due to a snowball effect associated with applications and users retrying after the errors and generating even more traffic. In this case, 1.1.1.1 had to handle more than the expected rate for A and AAAA queries.
Here’s another fun one.
DNS vs. DoT and DoH. Typically, DNS queries and responses are sent in plaintext over UDP (or TCP sometimes), and that’s been the case for decades now. Naturally, this poses security and privacy risks to end-users as it allows in-transit attacks or traffic snooping.
With DNS over TLS (DoT) and DNS over HTTPS, clients can talk DNS using well-known, well-supported encryption and authentication protocols.
Our learning center has a good article on “DNS over TLS vs. DNS over HTTPS” that you can read. Browsers like Chrome, Firefox, and Edge have supported DoH for some time now, WAP uses DoH too, and you can even configure your operating system to use the new protocols.
When Facebook went offline, we saw the number of DoT+DoH SERVFAILs responses grow by over x300 vs. the average rate.
So, we got hammered with lots of requests and errors, causing traffic spikes to our 1.1.1.1 resolver and causing an unexpected load in the edge network and systems. How did we perform during this stressful period?
Quite well. 1.1.1.1 kept its cool and continued serving the vast majority of requests around the famous 10ms mark. An insignificant fraction of p95 and p99 percentiles saw increased response times, probably due to timeouts trying to reach Facebook’s nameservers.
Another interesting perspective is the distribution of the ratio between SERVFAIL and good DNS answers, by country. In theory, the higher this ratio is, the more the country uses Facebook. Here’s the map with the countries that suffered the most:
Here’s the top twelve country list, ordered by those that apparently use Facebook, WhatsApp and Instagram the most:
Country
SERVFAIL/Good Answers ratio
Turkey
7.34
Grenada
4.84
Congo
4.44
Lesotho
3.94
Nicaragua
3.57
South Sudan
3.47
Syrian Arab Republic
3.41
Serbia
3.25
Turkmenistan
3.23
United Arab Emirates
3.17
Togo
3.14
French Guiana
3.00
Impact on other sites
When Facebook, Instagram, and WhatsApp aren’t around, the world turns to other places to look for information on what’s going on, other forms of entertainment or other applications to communicate with their friends and family. Our data shows us those shifts. While Facebook was going down, other services and platforms were going up.
To get an idea of the changing traffic patterns we look at DNS queries as an indicator of increased traffic to specific sites or types of site.
Here are a few examples.
Other social media platforms saw a slight increase in use, compared to normal.
Traffic to messaging platforms like Telegram, Signal, Discord and Slack got a little push too.
Nothing like a little gaming time when Instagram is down, we guess, when looking at traffic to sites like Steam, Xbox, Minecraft and others.
And yes, people want to know what’s going on and fall back on news sites like CNN, New York Times, The Guardian, Wall Street Journal, Washington Post, Huffington Post, BBC, and others:
Attacks
One could speculate that the Internet was under attack from malicious hackers. Our Firewall doesn’t agree; nothing out of the ordinary stands out.
Network Error Logs
Network Error Logging, NEL for short, is an experimental technology supported in Chrome. A website can issue a Report-To header and ask the browser to send reports about network problems, like bad requests or DNS issues, to a specific endpoint.
Cloudflare uses NEL data to quickly help triage end-user connectivity issues when end-users reach our network. You can learn more about this feature in our help center.
If Facebook is down and their DNS isn’t responding, Chrome will start reporting NEL events every time one of the pages in our zones fails to load Facebook comments, posts, ads, or authentication buttons. This chart shows it clearly.
WARP
Cloudflare announced WARP in 2019, and called it “A VPN for People Who Don’t Know What V.P.N. Stands For” and offered it for free to its customers. Today WARP is used by millions of people worldwide to securely and privately access the Internet on their desktop and mobile devices. Here’s what we saw during the outage by looking at traffic volume between WARP and Facebook’s network:
You can see how the steep drop in Facebook ASN traffic coincides with the start of the incident and how it compares to the same period the day before.
Our own traffic
People tend to think of Facebook as a place to visit. We log in, and we access Facebook, we post. It turns out that Facebook likes to visit us too, quite a lot. Like Google and other platforms, Facebook uses an army of crawlers to constantly check websites for data and updates. Those robots gather information about websites content, such as its titles, descriptions, thumbnail images, and metadata. You can learn more about this on the “The Facebook Crawler” page and the Open Graph website.
Here’s what we see when traffic is coming from the Facebook ASN, supposedly from crawlers, to our CDN sites:
The robots went silent.
What about the traffic coming to our CDN sites from Facebook User-Agents? The gap is indisputable.
We see about 30% of a typical request rate hitting us. But it’s not zero; why is that?
We’ll let you know a little secret. Never trust User-Agent information; it’s broken. User-Agent spoofing is everywhere. Browsers, apps, and other clients deliberately change the User-Agent string when they fetch pages from the Internet to hide, obtain access to certain features, or bypass paywalls (because pay-walled sites want sites like Facebook to index their content, so that then they get more traffic from links).
Fortunately, there are newer, and privacy-centric standards emerging like User-Agent Client Hints.
Core Web Vitals
Core Web Vitals are the subset of Web Vitals, an initiative by Google to provide a unified interface to measure real-world quality signals when a user visits a web page. Such signals include Largest Contentful Paint (LCP), First Input Delay (FID), and Cumulative Layout Shift (CLS).
We use Core Web Vitals with our privacy-centric Web Analytics product and collect anonymized data on how end-users experience the websites that enable this feature.
One of the metrics we can calculate using these signals is the page load time. Our theory is that if a page includes scripts coming from external sites (for example, Facebook “like” buttons, comments, ads), and they are unreachable, its total load time gets affected.
We used a list of about 400 domains that we know embed Facebook scripts in their pages and looked at the data.
Now let’s look at the Largest Contentful Paint. LCP marks the point in the page load timeline when the page’s main content has likely loaded. The faster the LCP is, the better the end-user experience.
Again, the page load experience got visibly degraded.
The outcome seems clear. The sites that use Facebook scripts in their pages took 1.5x more time to load their pages during the outage, with some of them taking more than 2x the usual time. Facebook’s outage dragged the performance of some other sites down.
Conclusion
When Facebook, Instagram, and WhatsApp went down, the Web felt it. Some websites got slower or lost traffic, other services and platforms got unexpected load, and people lost the ability to communicate or do business normally.
Two days ago, through its communications regulator, Uganda’s government ordered the “Suspension Of The Operation Of Internet Gateways” the day before the country’s general election. This action was confirmed by several users and journalists who got access to the letter sent to Internet providers. In other words, the government effectively cut off Internet access from the population to the rest of the world.
Ahead of tomorrow’s election the Internet has been shutdown in Uganda (confirmed by a few friends in Kampala). Letter from communications commission below: pic.twitter.com/tRpTIXTPcW
On Cloudflare Radar, we want to help anyone understand what happens on the Internet. We are continually monitoring our network and exposing insights, threats, and trends based on the aggregated data that we see.
Uganda’s unusual traffic patterns quickly popped up in our charts. Our 7-day change in Internet Traffic chart in Uganda shows a clear drop to near zero starting around 1900 local time, when the providers received the letter.
This is also obvious in the Application-level Attacks chart.
The traffic drop was also confirmed by the Uganda Internet eXchange point, a place where many providers exchange their data traffic, on their public statistics page.
We keep an eye on traffic levels and BGP routing to our edge network, and are able to see which networks carry traffic to and from Uganda and their relative traffic levels. The cutoff is clear in those statistics also. Each colored line is a different network inside Uganda (such as ISPs, mobile providers, etc.)
We will continue to keep an eye on traffic levels from Uganda and update the blog when we see significant changes. At the time of writing, Internet access appears to be still cut off.
It’s the end of the year, so we thought it would be a great time to give you an update on how we’re doing and what we’re planning for 2021. If you’re reading this, you know we like to share everything we do at Cloudflare, including how the organization is evolving.
In July, John Graham-Cumming wrote a blog post entitled Cloudflare’s first year in Lisbon. and showed how we went from an announcement, just a few months before, to an entirely bootstrapped and fully functional office. At the time, despite a ramping pandemic, the team was already hard at work doing a fantastic job scaling up and solidifying our presence here.
A few weeks later, in August, I proudly joined the team.
The first weeks
Cloudflare is, by any standard, a big company. There’s a lot you need to learn, many people you need to get to know first, and a lot of setup steps you need to get through before you’re in a position to do actual real productive work.
Joining the company during COVID was challenging. I felt just as excited as I was scared. We were (and still are) fully working from home, I didn’t have a team to work with in person. A setup like this surely looks daunting, even for experienced people.
But here’s the thing. Cloudflare isn’t just any company. We’re unparalleled because we masterfully combine scale, ambition, talent, product, vision, values, and culture in a way that’s very difficult to replicate and maintain at any other company.
We’re big, but we move fast. We’re over 1,600 working together, but it feels like a cohesive group. We’re distributed across multiple offices and continents, often working in teams with members from different time zones, but we don’t notice it. We have tools, documentation, and methodologies, but they don’t get in the way of our “shipping products” mantra. There are product owners, teams for specific features, but we all hold ownership for everyone’s work.
I felt all of this right after my orientation week. The warm welcome, the regular check-ins to say hello and see how I was doing, and everyone’s urge to make sure I was adjusting and getting all the help I needed, giving me advice, introducing me to other colleagues. Cloudflarians take genuine pride in making sure everyone feels at home. You can learn more about this experience from a Story Time segment John did with me.
Where do we stand
Cloudflare Lisbon has come a long way. We now have 74 incredibly talented people working or joining in areas such as Engineering, Security, Infrastructure, Customer Support, People, Places, Product Management, Emerging Technologies or Accounting, and growing fast.
Although the pandemic didn’t help our plans, especially those related to growing and physically working in our brand new office on Praça Marquês de Pombal, it didn’t slow us down either. November and December alone, 15 people joined the team. We’re gaining momentum.
More interestingly, we have a super diverse team in Lisbon, and we couldn’t be prouder of it. We’re putting action ahead of words and actively contributing to create more opportunities for women in technology and to attract people to work in Portugal regardless of their country of origin.
Our discussions on whether “Pastéis de Nata” is best served with or without cinnamon, our holiday traditions, Portuguese music, coffee, our frequent virtual Pub Quizzes, escape room events, and of course, the comments on shirtless Marcelo are now routine. They are evidence that we feel like a group working together, having fun while growing.
Returning to Portugal?
We live in unusual and contemplative times. Many of our emigrants living outside the country are considering returning home to Portugal and our office in Lisbon is proof of this growing movement. Portuguese returnees represent roughly 10% of our team.
The Portuguese Government has an initiative called “Programa Regressar,” where they provide tax benefits and financial assistance to support emigrants and their families returning to Portugal.
While this is great, we think it’s not enough. Moving you and your family to another country is a life-changing event. Although things like patriotism, cost of living, and tax incentives play an essential role in the personal decision process, skilled and talented people will also be looking for a great workplace and a meaningful, ambitious company to join.
This is where Cloudflare can help you. We can provide you the best of the two worlds. Living in a beautiful country, your home, while working in a world-class company, solving big problems at scale on a mission to help build a better Internet with a unique culture. Furthermore, we support your return, and we’re ready to help you in any way we can.
The future
Cloudflare is serious about its presence in Portugal. We’re going to continue growing and investing in highly skilled talent for our Lisbon office and making it one of Cloudflare’s top locations, alongside San Francisco, Austin, Singapore, and London.
Currently, we have 28 open positions in Lisbon, and you can expect new ones to open over the upcoming weeks. Some are for teams based in Lisbon, like Data Insights and Cloudflare Radar (we’re doubling in 2021), while others will join different projects, some of which have teams distributed across multiple offices.
If you decide to apply, there are many resources you can use to learn about Cloudflare and improve your chances of snatching your dream job. Here are a few:
Our Blog. We share an unusual amount of information about our infrastructure and products, our technical decisions, architecture, and our approach to solving complex, large-scale technical challenges.
Our Official Github Page. We have open-source encoded all over in our DNA, and we like to give back to the community whenever possible. Cloudflare has over 300 public projects that you can explore, try them yourself, or fork.
Our Developers Website, where you can learn about our products, the way they work, their features, and APIs. Speaking of APIs, take a look at cloudflare-go and flarectl.
Check our community Forum, ask us questions; we’re always there for you, you’ll be surprised. Follow us on Twitter.
Cloudflare TV airs excellent content all the time. You can check our schedule for numerous live segments with the team and guests or re-run past segments. We also have a “Best of” archive.
Finally, you can try our products. As part of our mission and values, we offer very generous free tiers to individual users and small startups. You can try our CDN features, DDoS, Workers (100,000 requests per day, with Workers KV included), and even Access for Teams (with Argo tunnel included, for companies or households under 50 seats), at no cost.
We’re a highly ambitious, large-scale technology company with a soul. Fundamental to our mission to help build a better Internet is protecting the free and open Internet. Cloudflare powers Internet requests for ~16% of the Fortune 1,000 and serves 20 million HTTP requests per second on average.
The collective thoughts of the interwebz
Manage Consent
To provide the best experiences, we use technologies like cookies to store and/or access device information. Consenting to these technologies will allow us to process data such as browsing behavior or unique IDs on this site. Not consenting or withdrawing consent, may adversely affect certain features and functions.
Functional
Always active
The technical storage or access is strictly necessary for the legitimate purpose of enabling the use of a specific service explicitly requested by the subscriber or user, or for the sole purpose of carrying out the transmission of a communication over an electronic communications network.
Preferences
The technical storage or access is necessary for the legitimate purpose of storing preferences that are not requested by the subscriber or user.
Statistics
The technical storage or access that is used exclusively for statistical purposes.The technical storage or access that is used exclusively for anonymous statistical purposes. Without a subpoena, voluntary compliance on the part of your Internet Service Provider, or additional records from a third party, information stored or retrieved for this purpose alone cannot usually be used to identify you.
Marketing
The technical storage or access is required to create user profiles to send advertising, or to track the user on a website or across several websites for similar marketing purposes.