For people in the early stages of development, a cloud storage provider that offers free credits might seem like a great deal. And diversified cloud providers do offer these kinds of promotions to help people get started with storing data: Google Cloud Free Tier and AWS Free Tier offer credits and services for a limited time, and both providers also have incentive funds for startups which can be unlocked through incubators that grant additional credits of up to tens of thousands of dollars.
Before you run off to give them a try though, it’s important to consider the long-term realities that await you on the far side of these promotions.
The reality is that once they’re used up, budget items that were zeros yesterday can become massive problems tomorrow. Twitter is littered with countless experiences of developers finding themselves surprised with an unexpected bill and the realization that they need to figure out how to navigate the complexities of their cloud provider—fast.
we made the unfortunate mistake (and I'm sure this is how they get you) of not watching our cloud costs so when the generous credits ran out we were hit with big bills until we did major refactoring. Lessons learned early on
What to Do When You Run Out of Free Cloud Storage Credits
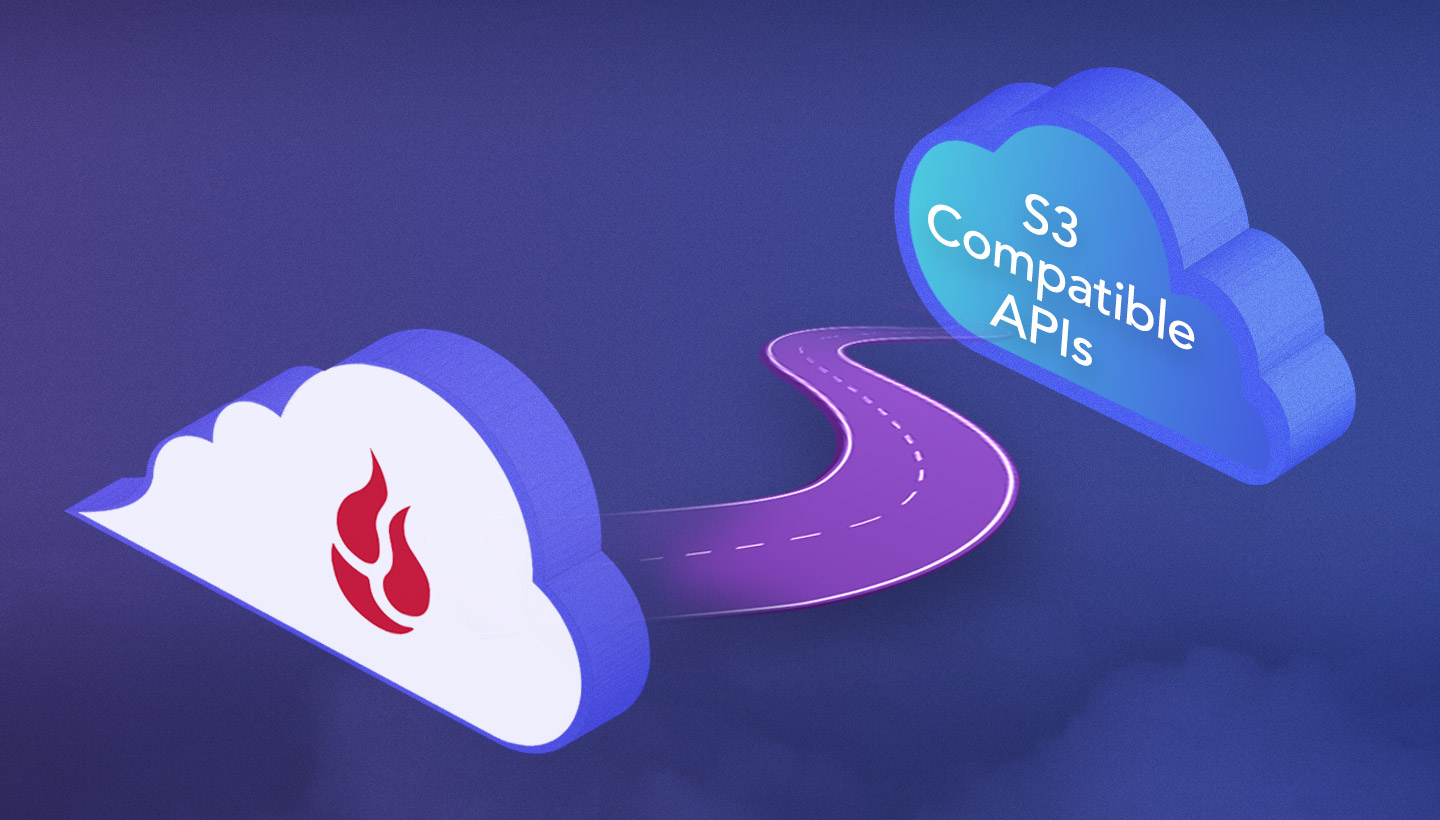
So, what do you do once you’re out of credits? You could try signing up with different emails to game the system, or look into getting into a different incubator for more free credits. If you plan on your app being around for a few years and succeeding, the solution of finding more credits isn’t scalable, and the process of applying to another incubator would take too long. You can always switch from Google Cloud Platform to AWS to get free credits elsewhere, but transferring data between providers almost always incurs painful egress charges.
If you’re already sure about taking your data out of your current provider, read ahead to the section titled “Cloud to Cloud Migration” to learn how transferring your data can be easier and faster than you think.
Because chasing free credits won’t work forever, this post offers three paths for navigating your cloud bills after free tiers expire. It covers:
Staying with the same provider. Once you run out of free credits, you can optimize your storage instances and continue using (and paying) for the same provider.
Exploring multi-cloud options. You can port some of your data to another solution and take advantage of the freedom of a multi-cloud strategy.
Choosing another provider. You can transfer all of your data to a different cloud that better suits your needs.
Path 1: Stick With Your Current Cloud Provider
If you’re running out of promotional credits with your current provider, your first path is to just continue using their storage services. Many people see this as your only option because of the frighteningly high egress fees you’d face if you try to leave. If you choose to stay with the same provider, be sure to review and account for all of the instances you’ve spun up.
Here’s an example of a bill that one developer faced after their credits expired: This user found themselves locked into an unexpected $2,700 bill because of egress costs. Looking closer at their experience, the spike in charges was due to a data transfer of 30TB of data. The first 1GB of data transferred out is free, followed by egress costing $0.09 per gigabyte for the first 10TB and $0.085 per gigabyte for the next 40TB. Doing the math, that’s:
$0.085/GB x 20,414 GB = $1735, $0.090/GB x 10,239 GB = $921
Choosing to stay with your current cloud provider is a straightforward path, but it’s not necessarily the easiest or least expensive option, which is why it’s important to conduct a thorough audit of the current cloud services you have in use to optimize your cloud spend.
Optimizing Your Current Cloud Storage Solution
Over time, cloud infrastructure tends to become more complex and varied, and your cloud storage bills follow the same pattern. Cloud pricing transparency in general is an issue with most diversified providers—in short: It’s hard to understand what you’re paying for, and when. If you haven’t seen a comparison yet, a breakdown contrasting storage providers is shared in this post.
Many users find that AWS and Google Cloud are so complex that they turn to services that can help them monitor and optimize their cloud spend. These cost management services charge based on a percentage of your AWS spend. For a startup with limited resources, paying for these professional services can be challenging, but manually predicting cloud costs and optimizing spending is also difficult, as well as time consuming.
The takeaway for sticking with your current provider: Be a budget hawk for every fee you may be at risk of incurring, and ensure your development keeps you from unwittingly racking up heavy fees.
Path 2: Take a Multi-cloud Approach
For some developers, although you may want to switch to a different cloud after your free credits expire, your code can’t be easily separated from your cloud provider. In this case, a multi-cloud approach can achieve the necessary price point while maintaining the required level of service.
Short term, you can mitigate your cloud bill by immediately beginning to port any data you generate going forward to a more affordable solution. Even if the process of migrating your existing data is challenging, this move will stop your current bill from ballooning.
Beyond mitigation, there are multiple benefits to using a multi-cloud solution. A multi-cloud strategy gives companies the freedom to use the best possible cloud service for each workload. There are other benefits to taking a multi-cloud approach:
Redundancy: Some major providers have faced outages recently. A multi-cloud strategy allows you to have a backup of your data to continue serving your customers even if your primary cloud provider goes down.
Functionality: With so many providers introducing new features and services, it’s unlikely that a single cloud provider will meet all of your needs. With a multi-cloud approach, you can pick and choose the best services from each provider. Multinational companies can also optimize for their particular geographical regions.
Flexibility: Avoid vendor lock-in if you outgrow a single cloud provider with a diverse cloud infrastructure.
Cost: You may find that one cloud provider offers a lower price for compute and another for storage. A multi-cloud strategy allows you to pick and choose which works best for your budget.
The takeaway for pursuing multi-cloud: It might not solve your existing bill, but it will mitigate your exposure to additional fees going forward. And it offers the side benefit of providing a best-of-breed approach to your development tech stack.
Path 3: Find a New Cloud Provider
Finally, you can choose to move all of your data to a different cloud storage provider. We recommend taking a long-term approach: Look for cloud storage that allows you to scale with the least amount of friction while continuing to support everything you need for a good customer experience in your app. You’ll want to consider cost, usability, and solutions when looking for a new provider.
Cost
Many cloud providers use a multi-tier approach, which can become complex as your business starts to scale its cloud infrastructure. Switching to a provider that has single-tier pricing helps businesses planning for growth predict their cloud storage cost and optimize its spend, saving time and money for use on future opportunities. You can use this pricing calculator to check storage costs of Backblaze B2 Cloud Storage against AWS, Azure, and Google Cloud.
One example of a startup that saved money and was able to grow their business by switching to another storage provider is CloudSpot, a SaaS photography platform. They had initially gotten their business off the ground with the help of a startup incubator. Then in 2019, their AWS storage costs skyrocketed, but their team felt locked in to using Amazon.
When they looked at other cloud providers and eventually transferred their data out of AWS, they were able to save on storage costs that allowed them to reintroduce services they had previously been forced to shut down due to their AWS bill. Reviving these services made an immediate impact on customer acquisition and recurring revenue.
Usability
Time spent trying to navigate a complicated platform is a significant cost to business. Aiden Korotkin of AK Productions, a full-service video production company based in Washington, D.C., experienced this first hand. Korotkin initially stored his client data in Google Cloud because the platform had offered him a promotional credit. When the credits ran out in about a year, he found himself frustrated with the inefficiency, privacy concerns, and overall complexity of Google Cloud.
Korotkin chose to switch to Backblaze B2 Cloud Storage with the help of solution engineers that helped him figure out the best storage solution for his business. After quickly and seamlessly transferring his first 12TB in less than a day, he noticed a significant difference from using Google Cloud. “If I had to estimate, I was spending between 30 minutes to an hour trying to figure out simple tasks on Google (e.g. setting up a new application key, or syncing to a third-party source). On Backblaze it literally takes me five minutes,” he emphasized.
Integrations
Workflow integrations can make cloud storage easier to use and provide additional features. By selecting multiple best-of-breed providers, you can achieve better functionality with significantly reduced price and complexity.
Content delivery network (CDN) partnerships with Cloudflare and Fastly allow developers using services like Backblaze B2 to take advantage of free egress between the two services. Game developers can serve their games to users without paying egress between their origin source and their CDN, and media management solutions that can integrate directly with cloud storage to make media assets easy to find, sort, and pull into a new project or editing tool. Take a look at other solutions integrated with cloud storage that can support your workflows.
Cloud to Cloud Migration
After choosing a new cloud provider, you can plan your data migration. Your data may be spread out across multiple buckets, service providers, or different storage tiers—so your first task is discovering where your data is and what can and can’t move. Once you’re ready, there is a range of solutions for moving your data, but when it comes to moving between cloud services, a data migration tool like Flexify.IO can help make things a lot easier and faster.
Instead of manually offloading static and production data from your current cloud storage provider and reuploading it into your new provider, Flexify.IO reads the data from the source storage and writes it to the destination storage via inter-cloud bandwidth. Flexify.IO achieves fast and secure data migration at cloud-native speeds because the data transfer happens within the cloud environment.
For developers with customer-facing applications, it’s especially important that customers still retain access to data during the migration from one cloud provider to another. When CloudSpot moved about 700TB of data from AWS to Backblaze B2 in just six days with help from Flexify.IO, customers were actually still uploading images to their Amazon S3 buckets. The migration process was able to support both environments and allowed them to ensure everything worked properly. It was also necessary because downtime was out of the question—customers access their data so frequently that one of CloudSpot’s galleries is accessed every one or two seconds.
If you’re interested in exploring a different cloud storage service for your solution, you can easily sign up today, or contact us for more information on how to run a free POC or just to begin transferring your data out of your current cloud provider.
As network attached storage (NAS) devices have become more advanced, NAS have large storage capacities, include advanced features for virtualization and application hosting, and are one of the more scalable and cost-effective storage options for businesses of all sizes and in a variety of industries.
NAS devices are popular for many types of workflows, including media, enterprise, and backup and archive. Whether you’re a long-time user or first-time buyer, the number of choices and features NAS systems offer today are overwhelming, especially when you’re trying to buy something that will work now and in the future.
This post aims to make your process a little easier. The following content will help you:
Review the benefits of a NAS system.
Navigate the options you’ll need to choose from.
Understand the reason to pair your NAS with cloud storage.
How Can NAS Benefit Your Business?
There are multiple benefits that a NAS system can provide to users on your network, but we’ll recap a few of the key advantages here.
More Storage: It’s a tad obvious, but the primary benefit of a NAS system is that it will provide a significant addition to your storage capacity if you’re relying on workstations and hard drives. NAS systems create a single storage volume from several drives (often arranged in a RAID scheme).
Data Redundancy: Many NAS systems are equipped with RAID (Redundant Array of Independent Disks) configurations, which provide redundancy. This means that even if one or more hard drives fail, the data remains accessible and the system continues to function. While RAID provides protection against physical disk failures, it does not protect against the broader range of events that could result in data loss, including natural disasters, theft, or ransomware attacks. Learn more about RAID configurations in our NAS RAID guide.
Security and Speed: Beyond protection from drive failure, NAS also provides security for your data from outside actors as it is only accessible on your local office network and to user accounts which you can control. Not only that, but it generally works as fast as your local office network speeds. And, there are several ways to optimize NAS performance over time, which gives them a longer shelf life than other types of hardware.
Better Data Management Tools. Fully automated backups, deduplication, compression, and encryption are just a handful of the functions you can put to work on a NAS system—all of which make your data storage more efficient and secure. You can also configure sync workflows to ease collaboration for your team, enable services to manage your users and groups with directory services, and even add services like photo or media management.
If this all sounds useful for your business, read on to learn more about bringing these benefits in-house.
The Network Attached Storage (NAS) Buyer’s Guide
How do you evaluate the differences between different NAS vendors? Or even within a single company’s product line? We’re here to help. This tour of the major components of a NAS system will help you to develop a list for the sizing and features of a system that will fit your needs.
Choosing a NAS: The Components
How your NAS performs is dictated by the components that make up the system, and capability of future upgrades. Let’s walk through the different options.
NAS Storage Capacity: How Many Bays Do You Need?
One of the first ways to distinguish between different NAS systems is the number of drive bays a given system offers, as this determines how many disks the system can hold. Generally speaking, the larger the number of drive bays, the more storage you can provide to your users and the more flexibility you have around protecting your data from disk failure.
In a NAS system, storage is defined by the number of drives, the shared volume they create, and their striping scheme (e.g. RAID 0, 1, 5, 6, etc.). For example, a single drive gives no additional performance or protection.
Two (or more) drives allow the option of simple mirroring. Mirroring is also referred to as RAID 1, when one volume is built from two drives, allowing for the failure of one of those drives without data loss.
Mirroring: Data is written simultaneously to two disks, providing redundancy by having two copies of the data. But, mirroring also requires twice as many disks for the same total storage capacity.
Mirroring: Data is written simultaneously to two disks, providing redundancy by having two copies of the data. But, mirroring also requires twice as many disks for the same total storage capacity.
Mirroring: Data is written simultaneously to two disks, providing redundancy by having two copies of the data. But, mirroring also requires twice as many disks for the same total storage capacity.
More than two drives also allow for striping—referred to as RAID 0—when one volume is “stretched” across two drives, making a single, larger drive that also gives some performance improvement, but increases risk because the loss of one drive means that the entire volume will be unavailable.
Striping distributes your data over multiple drives. However, striping doesn’t provide any redundancy, and usually is used in combination with other storage techniques.
Striping distributes your data over multiple drives. However, striping doesn’t provide any redundancy, and usually is used in combination with other storage techniques.
Striping distributes your data over multiple drives. However, striping doesn’t provide any redundancy, and usually is used in combination with other storage techniques.
Refresher: How Does RAID Work Again?
A redundant array of independent disks, or RAID, combines multiple hard drives into one or more storage volumes. RAID distributes data and parity (drive recovery information) across the drives in different ways, and each layout provides different degrees of data protection. Learn more about different RAID levels and how to choose the right RAID level in our NAS RAID guide.
Three drives are the minimum for RAID 5, which can survive the loss of one drive, though four drives are a more common NAS system configuration. Five drives allow for RAID 6, which can survive the loss of two drives. Six to eight drives are very common NAS configurations that allow more storage, space, performance, and even drive sparing—the ability to designate a stand-by drive to immediately rebuild a failed drive.
Many believe that, if you’re in the market for a NAS system with multiple bays, you should opt for capacity that allows for RAID 6 if possible. RAID 6 can survive the loss of two drives, and delivers performance nearly equal to RAID 5 with better protection.
It’s understandable to think, “Why do I need to prepare in case two drives fail?” Well, when a drive fails and you replace it with a fresh drive, the rebuilding process to restore that drive’s data and parity information can take a long time. Though it’s rare, it’s possible to have another drive fail during the rebuilding process. In that scenario, if you have RAID 6, you’re likely going to be okay. On the other hand, if you have RAID 5, you may have just lost data.
NAS Drives: Should I Buy a NAS that Includes Drives?
Buyer’s Note: Some systems are sold without drives. Should you buy NAS with or without drives? That decision usually boils down to the size and type of drives you’d like to have.
When buying a NAS system with drives provided:
The drives are usually covered by the manufacturer’s warranty as part of the complete system.
The drives are typically bought directly from the manufacturer’s supply chain and shipped directly from the hard drive manufacturer.
If you choose to buy drives separately from your NAS:
The drives may be a mix of drive production runs, and have been in the supply chain longer. Match the drive capacities and models for the most predictable performance across the RAID volume.
Choose drives rated for NAS systems—NAS vendors publish lists of supported drive types. Here’s a list from QNAP, for example.
Check the warranty and return procedures, and if you are moving a collection of older drives into your NAS, you may also consider how much of the warranty has already run out.
Buyer Takeaway: Choose a system that can support RAID 5 or RAID 6 to allow a combination of more storage space, performance, and drive failure protection. But be sure to check whether the NAS system is sold with or without drives.
Choosing the Right Drive for Your NAS: Hard Disk Drives (HDD) vs. Solid State Drives (SSD)
While most default to using HDDs in NAS drive bays, as NAS have gotten more advanced and the prices of SSDs have dropped, many NAS are compatible with SSDs as well. Some models, like the Synology DiskStation DS923+ can even support both HDDs and SSDs in the same NAS device, giving you maximum flexibility to manage your data.
There are benefits to each drive type, and which one you’d choose depends on your standard workflows. Here’s a breakdown of when you’d choose an HDD vs. an SSD for your NAS device:
Feature
HDD
SSD
Cost per Gigabyte
Lower
Higher
Capacity
Higher (up to 20TB+ per drive)
Lower (typically up to 8TB per drive)
Speed
Slower read/write speeds
Faster read/write speeds
Durability (Moving Parts)
Less durable due to spinning disks
More durable from a hardware perspective; however, limited write cycles can decrease longevity
Noise Level
Can generate noticeable noise due to spinning disks
Silent operation
Power Consumption
(Idle) 2–5 watts
(Active) 2–6 watts
(Idle) 0.5–1 watt
(Active) 2–3 watts
Ideal Use Cases
– Bulk data storage (e.g., media, library, backups)
– Archival storage
– Applications with frequent data access
– Performance-critical applications (e.g., video editing, databases)
– Frequently accessed files
– Applications requiring fast loading times
For cost-effective bulk storage and archival needs, HDDs are the clear choice. Their high capacity per gigabyte makes them ideal for storing large media files, backups, and infrequently accessed data. On the other hand, if you prioritize speed and performance for applications like video editing, databases, or frequently accessed files, SSDs are a better option. They offer significantly faster read/write speeds, resulting in quicker loading times and a smoother overall user experience.
And, you can always have your cake and eat it, too. A hybrid approach lets you leverage the strengths of both technologies: HDDs for bulk storage and SSDs for performance-critical tasks. As we mentioned above, some devices support both drive types, or you can create separate storage and processing pools within your storage architecture.
Buyer takeaway: Ultimately, choosing the right option comes down to budget and use case.
Selecting Drive Capacity for NAS: What Size of Drives Should You Buy?
You can quickly estimate how much storage you’ll need by adding up the hard drives and external drives of all the systems you’ll be backing up in your office, adding the amount of shared storage you’ll want to provide to your users, and factor in any growing demand you project for shared storage.
If you have any historical data under management from previous years, you can calculate a simple growth rate. Generally, plan for systems that are two to four times your current data capacity. For example, if your total storage needs (including hard drives, external drives, and shared storage) amount to 20TB, double that to 40TB to account for growth. Then, divide by a common hard drive size, such as 10TB, indicating that you’ll need at least a four-bay NAS system. With that in mind, you can start shopping for four bay systems and larger.
Formula 1:
((Number of NAS Users x Hard Drive Size ) + Shared Storage) * Growth Factor = NAS Storage Needed
Example: There are six users in an office that will each be backing up their 2TB workstations and laptops. The team will want to use another 6TB of shared storage for documents, images, and videos for everyone to use. Multiplied times a growth factor of two, you’d start shopping for NAS systems that offer at least 36TB of storage.
Example: Continuing the example above, when looking for a new NAS system using 12TB drives, accounting for two additional drives for RAID 6, you’d look for NAS systems that can support five or more drive bays of 12TB hard drives.
(( 36TB / 12TB ) + 2 additional drives ) = 5 drive bays and up
If your budget allows, opting for larger drives and more drive bays will give you more storage overhead that you’ll surely grow into over time. Factor in, however, that if you go too big, you’re paying for unused storage space for a longer period of time. And if you use GAAP accounting, you’ll need to capitalize that investment over the same time window as a smaller NAS system which will hit your bottom line on an annual basis. This is the classic CapEx vs. Opex dilemma you can learn more about here.
If your cash budget is tight you can always purchase a NAS system with more bays but smaller drives, which will significantly reduce your upfront pricing. You can then replace those drives in the future with larger ones when you need them. Hard drive prices generally fall over time, so they will likely be less expensive in the future. You’ll end up purchasing two sets of drives over time, which will be less cash-intensive at the outset, but likely more expensive in the long run.
Similarly, you can partially fill the drive bays. If you want to get an eight bay system, but only have the budget for six drives, just add the other drives later. One of the best parts of NAS systems is the flexibility they allow you for right-sizing your shared storage approach.
Buyer Takeaway: Estimate how much storage you’ll need, add the amount of shared storage you’ll want to provide to your users, and factor in growing demand for shared storage—then balance long term growth potential against cash flow.
Processor, Controllers, and Memory: What Performance Levels Do You Require?
Is it better to have big onboard processors or controllers? Smaller, embedded chips common in smaller NAS systems provide basic functionality, but might bog down when serving many users or crunching through deduplication and encryption tasks, which are options with many backup solutions. Larger NAS systems typically stored in IT data center racks usually offer multiple storage controllers that can deliver the fastest performance and even failover capability.
Processor: Provides compute power for the system operation, services, and applications.
Controller: Manages the storage volume presentation and health.
Memory: Improves speed of applications and file serving performance.
ARM and Intel Atom chips are suitable for basic systems. For more demanding tasks such as encryption, deduplication, and running on-board applications, processors such as the Intel Corei3 and Corei5 remain reliable options. Additionally, the latest intel Corei7 and i9 processors offer even greater performance for these tasks. Many rack-mounted NAS systems feature Intel Xeon or AMD EPYC server-class processors, providing robust capabilities for enterprise level storage solutions.
So if you’re just looking for basic storage expansion, the entry-level systems with more modest, basic chips will likely suit you just fine. If deduplication, encryption, sync, and other functions many NAS systems offer as optional tools are part of your future workflow, this is one area where you shouldn’t cut corners.
Adding memory modules to your NAS can be a simple performance upgrade.
Adding memory modules to your NAS can be a simple performance upgrade.
Adding memory modules to your NAS can be a simple performance upgrade.
If you have the option to expand the system memory, this can be an easy performance upgrade. Generally, the higher the ratio of memory to drives will benefit the performance of reading and writing to disk and the speed of on-board applications.
Buyer Takeaway: Entry-level NAS systems provide good basic functionality, but you should ensure your components are up to the challenge if you plan to make heavy use of deduplication, encryption, compression, and other functions.
Network and Connections: What Capacity for Speed Do You Need?
A basic NAS typically includes a Gigabit Ethernet connection (1GigE), which provides a throughput of 1 Gb/s, equivalent to 125 MB/s from your storage system. This bandwidth is usually sufficient for serving a few users. However, with increasing data demands, many modern NAS systems now come with built-in 2.5GigE or even 10GigE connections, offering higher throughput to support more users and faster data access. Additionally, most systems include expansion ports, allowing you to upgrade to 10GigE or higher network cards as your needs grow.
An example of a small 10GigE add-in card that can boost your NAS network performance.
An example of a small 10GigE add-in card that can boost your NAS network performance.
An example of a small 10GigE add-in card that can boost your NAS network performance.
While modern NAS systems offer 2.5 Gb/s, 5 Gb/s, or even 10Gb/s connections on their systems for significantly better performance than 1GigE connections, you’d require a compatible network switch, and possibly, USB adapters or expansion cards for every system that will connect to that NAS via the switch. If your office is already wired for 10GigE, make sure your NAS is also 10GigE. Otherwise, the more network ports in the back of the system, the better. If you aren’t ready to get a 10GigE capable system now, but you think you might be in the future, select a system that has expansion capability.
Some systems provide another option of Thunderbolt connections in addition to Ethernet connections. These allow laptops and workstations with Thunderbolt ports to directly connect to the NAS and offer much higher bandwidth—up to 40GigE (5 GB/s)—and are good for systems that need to edit large files directly on the NAS, such as is often the case in video editing. If you’ll be directly connecting systems that need the fastest possible speeds, select a system with Thunderbolt ports, one per Thunderbolt-connected user.
Some NAS systems offer not only multiple network ports, but faster connections as well, such as Thunderbolt.
Some NAS systems offer not only multiple network ports, but faster connections as well, such as Thunderbolt.
Some NAS systems offer not only multiple network ports, but faster connections as well, such as Thunderbolt.
Buyer Takeaway: It’s best to have more network ports in the back of your system. Or, select a system with network expansion card capability.
Caching and Hybrid Drive Features: How Fast Do You Need to Serve Files?
Many of the higher-end NAS systems can complement standard 3.5” hard drives with higher performing, smaller form factor SSD or M.2 drives. These smaller, faster drives can dramatically improve the NAS file serving performance by caching files in most recent, or most frequently requested files. By combining these different types of drives, the NAS can deliver both improved file serving performance, and large capacity.
As the number of users you support in each office grows, these capabilities will become more important as a relatively simple way to boost performance. Like we mentioned earlier, you can purchase a system with these slots unpopulated and add them in later.
Buyer Takeaway: Combine different types of drives, like smaller form factor SSD or M.2 storage with 3.5” hard drives to gain improved file serving performance.
Operating System: What Kind of Management Features Do You Require?
The NAS operating systems of the major vendors generally provide the same services in an operating system (OS)-like interface delivered via an on-board web server. By simply typing in your NAS’s IP address, you can sign in and manage your system’s settings, create and manage the storage volumes, set up groups of users on your network who have access, configure and monitor backup and sync tasks, and more.
Synology Diskstation Manager
Synology Diskstation Manager
Synology Diskstation Manager
If there are specific user management features in your IT environment that you need, or want to test how the NAS OS works, you can test them by spinning up a demonstration virtual machine offered by some NAS vendors. You can test service configuration and get a feel for the interface and tools, but obviously as a virtual environment you won’t be able to manage hardware directly. Here are some options:
Buyer Takeaway: The on-board NAS OS looks similar to a Mac or PC OS to make it easy to navigate system setup and maintenance and allows you to manage settings, storage, and tasks.
Solutions: What Added Services Do You Require?
While the onboard processor and memory on your NAS are primarily for file service, backup, and sync tasks, you can also install other solutions directly onto it. For instance, QNAP and Synology—two popular NAS providers—have app stores accessible from their management software where you can select applications to download and install on your NAS. You might be interested in a backup and sync solution such as Archiware, or integrating with CMS solutions like Joomla or WordPress.
Synology add-on packages.
Synology add-on packages.
Synology add-on packages.
However, beyond backup solutions, you’d benefit from installing mission-critical apps onto a dedicated system rather than on your NAS. For a small number of users, running applications directly on the NAS can be a good temporary use or a pathway to testing something out. But if the application becomes very busy, it could impact the other services of the NAS. Big picture, native apps on your NAS can be useful, but don’t overdo it.
Buyer Takeaway: The main backup and sync apps from the major NAS vendors are excellent—give them a good test drive, but know that there are many excellent backup and sync solutions available as well.
Why Adding Cloud Storage to Your NAS Offers Additional Benefits
When you pair cloud storage with your NAS, you gain access to features that complement the security of your data and your ability to share files both locally and remotely.
To start with, cloud storage provides off-site backup protection. This aligns your NAS setup with the industry standard for data protection: a 3-2-1 backup strategy—which ensures that you have three copies of your data, the source data and two backups. One backup copy is stored on your NAS, and the second backup copy is stored off-site, such as in the cloud. And in the event of data loss, you can restore your systems directly from the cloud even if all the systems in your office are knocked out or destroyed.
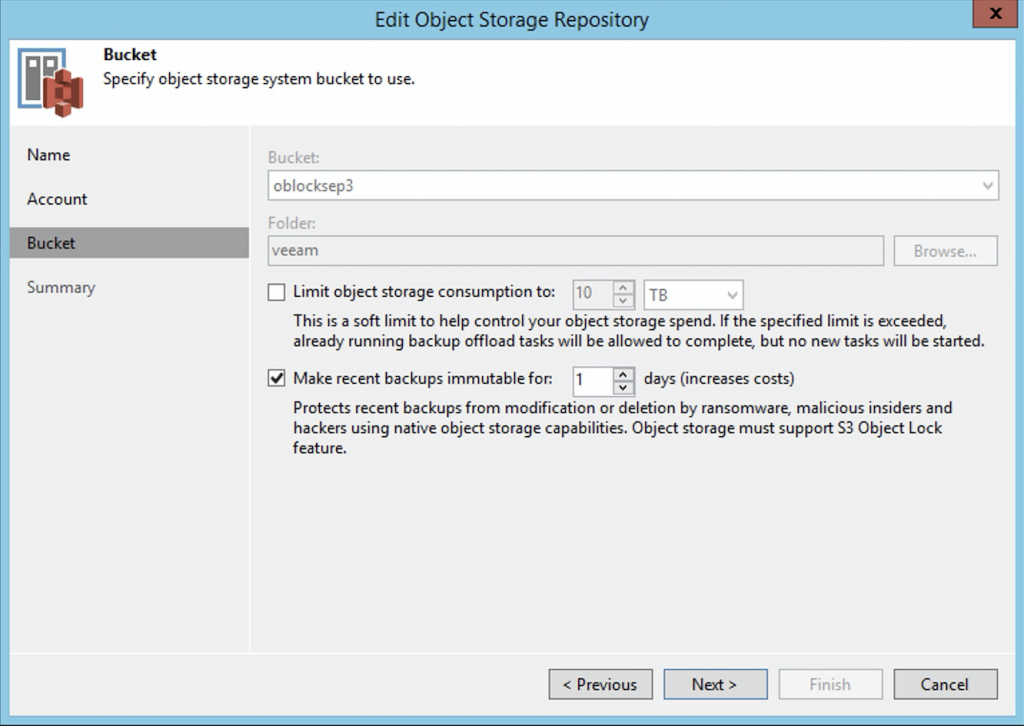
While data sent to the cloud is encrypted in-flight via SSL, you can also encrypt your backups so that they are only openable with your team’s encryption key. The cloud can also give you advanced storage options for your backup files like WORM (Write Once, Read Many) or immutability—making your data immutable for a defined period of time—or set custom data lifecycle rules at the bucket level to help match your ideal backup workflow.
Additionally, cloud storage provides valuable access to your data and documents from your NAS through sync capabilities. In case anyone on your team needs to access a file when they are away from the office, or as is more common now, in case your entire team is working from home, they’ll be able to access the files that have been synced to the cloud through your NAS’s secure sync program. You can even sync across multiple locations using the cloud as a two-way sync to quickly replicate data across locations. For employees collaborating across great distances, this helps to ensure they’re not waiting on the internet to deliver critical files—they’re already on-site. The only caveat: It’s important to remember that sync is not backup and to incorporate that into your overall data management strategy.
Refresher: What’s the Difference Between Cloud Sync, Cloud Backup, and Cloud Storage?
Sync services allow multiple users across multiple devices to access the same file. Backup stores a copy of those files somewhere remote from your work environment, oftentimes in an off-site server like cloud storage. While they serve different purposes, they can work well together when properly coordinated. You can read more about the differences in this blog post.
Ready to Set Up Your NAS with Cloud Storage?
To summarize, here are a few things to remember when shopping for a NAS system:
Consider how much storage you’ll need for both local backup and for shared user storage.
Look for a system with three to five drive bays at minimum.
Check that the NAS system is sold with drives—if not, you’ll have to source enough of the same size drives.
Opt for a system that lets you upgrade the memory and network options.
Choose a system that meets your needs today; you can always upgrade in the future.
Coupled with cloud storage like Backblaze B2 Cloud Storage, which works with a wide range of NAS systems including Synology, QNAP, TrueNAS, OWC Jellyfish, and more, you gain necessary backup protection and restoration from the cloud, as well as the capability to sync across locations.
Have more questions about NAS features or how to implement a NAS system in your environment? Ask away in the comments.
In 2020, Backblaze added 39,792 hard drives and as of December 31, 2020 we had 165,530 drives under management. Of that number, there were 3,000 boot drives and 162,530 data drives. We will discuss the boot drives later in this report, but first we’ll focus on the hard drive failure rates for the data drive models in operation in our data centers as of the end of December. In addition, we’ll welcome back Western Digital to the farm and get a look at our nascent 16TB and 18TB drives. Along the way, we’ll share observations and insights on the data presented and as always, we look forward to you doing the same in the comments.
2020 Hard Drive Failure Rates
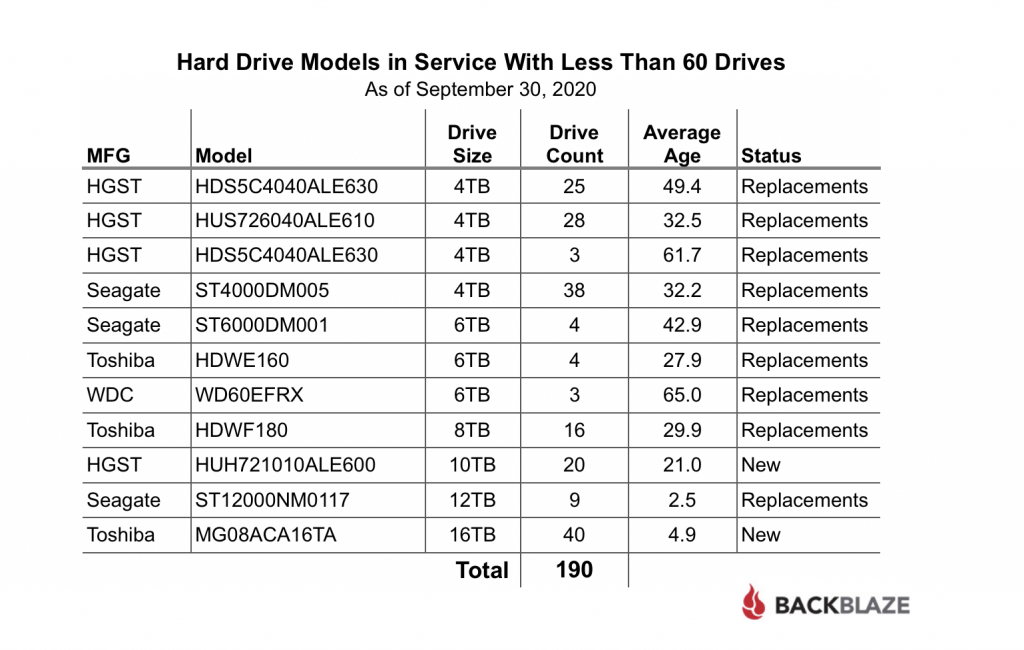
At the end of 2020, Backblaze was monitoring 162,530 hard drives used to store data. For our evaluation, we remove from consideration 231 drives which were used for testing purposes and those drive models for which we did not have at least 60 drives. This leaves us with 162,299 hard drives in 2020, as listed below.
Observations
The 231 drives not included in the list above were either used for testing or did not have at least 60 drives of the same model at any time during the year. The data for all drives, data drives, boot drives, etc., is available for download on the Hard Drive Test Data webpage.
For drives which have less than 250,000 drive days, any conclusions about drive failure rates are not justified. There is not enough data over the year-long period to reach any conclusions. We present the models with less than 250,000 drive days for completeness only.
For drive models with over 250,000 drive days over the course of 2020, the Seagate 6TB drive (model: ST6000DX000) leads the way with a 0.23% annualized failure rate (AFR). This model was also the oldest, in average age, of all the drives listed. The 6TB Seagate model was followed closely by the perennial contenders from HGST: the 4TB drive (model: HMS5C4040ALE640) at 0.27%, the 4TB drive (model: HMS5C4040BLE640), at 0.27%, the 8TB drive (model: HUH728080ALE600) at 0.29%, and the 12TB drive (model: HUH721212ALE600) at 0.31%.
The AFR for 2020 for all drive models was 0.93%, which was less than half the AFR for 2019. We’ll discuss that later in this report.
What’s New for 2020
We had a goal at the beginning of 2020 to diversify the number of drive models we qualified for use in our data centers. To that end, we qualified nine new drives models during the year, as shown below.
Actually, there were two additional hard drive models which were new to our farm in 2020: the 16TB Seagate drive (model: ST16000NM005G) with 26 drives, and the 16TB Toshiba drive (model: MG08ACA16TA) with 40 drives. Each fell below our 60-drive threshold and were not listed.
Drive Diversity
The goal of qualifying additional drive models proved to be prophetic in 2020, as the effects of Covid-19 began to creep into the world economy in March 2020. By that time we were well on our way towards our goal and while being less of a creative solution than drive farming, drive model diversification was one of the tactics we used to manage our supply chain through the manufacturing and shipping delays prevalent in the first several months of the pandemic.
Western Digital Returns
The last time a Western Digital (WDC) drive model was listed in our report was Q2 2019. There are still three 6TB WDC drives in service and 261 WDC boot drives, but neither are listed in our reports, so no WDC drives—until now. In Q4 a total of 6,002 of these 14TB drives (model: WUH721414ALE6L4) were installed and were operational as of December 31st.
These drives obviously share their lineage with the HGST drives, but they report their manufacturer as WDC versus HGST. The model numbers are similar with the first three characters changing from HUH to WUH and the last three characters changing from 604, for example, to 6L4. We don’t know the significance of that change, perhaps it is the factory location, a firmware version, or some other designation. If you know, let everyone know in the comments. As with all of the major drive manufacturers, the model number carries patterned information relating to each drive model and is not randomly generated, so the 6L4 string would appear to mean something useful.
WDC is back with a splash, as the AFR for this drive model is just 0.16%—that’s with 6,002 drives installed, but only for 1.7 months on average. Still, with only one failure during that time, they are off to a great start. We are looking forward to seeing how they perform over the coming months.
New Models From Seagate
There are six Seagate drive models that were new to our farm in 2020. Five of these models are listed in the table above and one model had only 26 drives, so it was not listed. These drives ranged in size from 12TB to 18TB and were used for both migration replacements as well as new storage. As a group, they totaled 13,596 drives and amassed 1,783,166 drive days with just 46 failures for an AFR of 0.94%.
Toshiba Delivers More Zeros
The new Toshiba 14TB drive (model: MG07ACA14TA) and the new Toshiba 16TB (model: MG08ACA16TEY) were introduced to our data centers in 2020 and they are putting up zeros, as in zero failures. While each drive model has only been installed for about two months, they are off to a great start.
Comparing Hard Drive Stats for 2018, 2019, and 2020
The chart below compares the AFR for each of the last three years. The data for each year is inclusive of that year only and for the drive models present at the end of each year.
The Annualized Failure Rate for 2020 Is Way Down
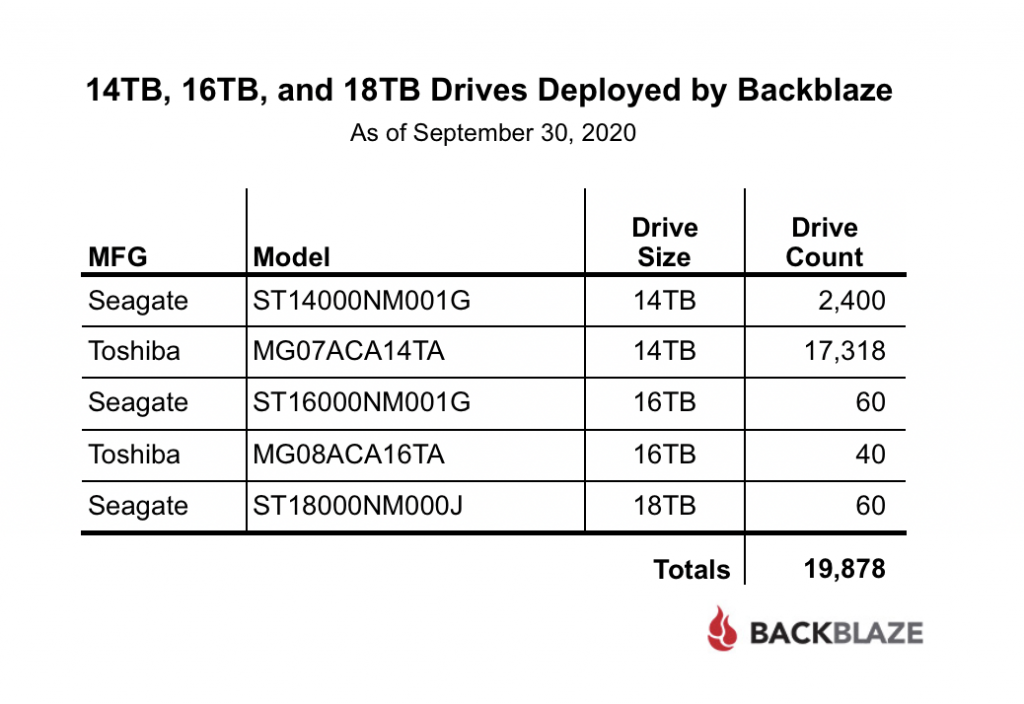
The AFR for 2020 dropped below 1% down to 0.93%. In 2019, it stood at 1.89%. That’s over a 50% drop year over year. So why was the 2020 AFR so low? The answer: It was a group effort. To start, the older drives: 4TB, 6TB, 8TB, and 10TB drives as a group were significantly better in 2020, decreasing from a 1.35% AFR in 2019 to a 0.96% AFR in 2020. At the other end of the size spectrum, we added over 30,000 larger drives: 14TB, 16TB, and 18TB, which as a group recorded an AFR of 0.89% for 2020. Finally, the 12TB drives as a group had a 2020 AFR of 0.98%. In other words, whether a drive was old or new, or big or small, they performed well in our environment in 2020.
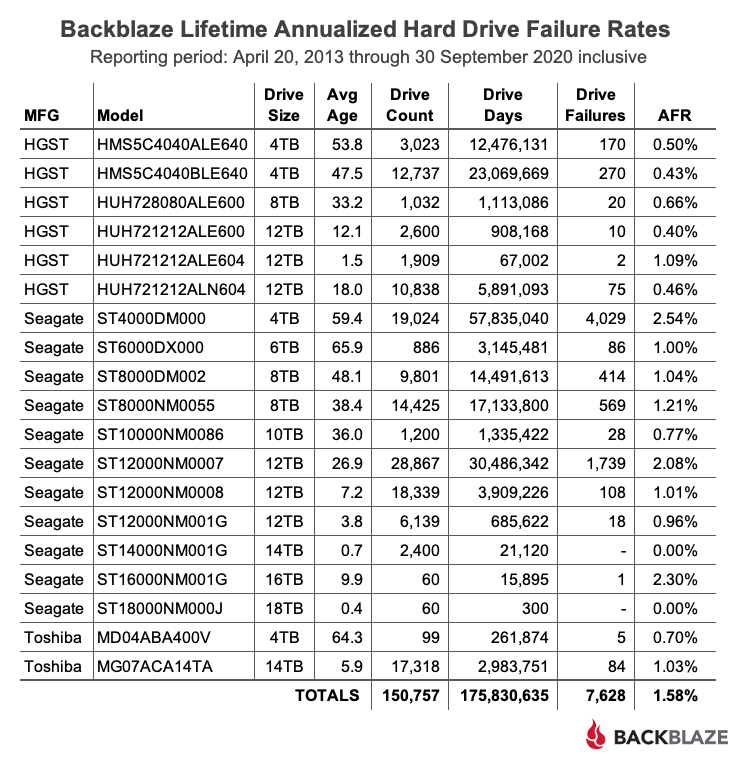
Lifetime Hard Drive Stats
The chart below shows the lifetime annualized failure rates of all of the drives models in production as of December 31, 2020.
AFR and Confidence Intervals
Confidence intervals give you a sense of the usefulness of the corresponding AFR value. A narrow confidence interval range is better than a wider range, with a very wide range meaning the corresponding AFR value is not statistically useful. For example, the confidence interval for the 18TB Seagate drives (model: ST18000NM000J) ranges from 1.5% to 45.8%. This is very wide and one should conclude that the corresponding 12.54% AFR is not a true measure of the failure rate of this drive model. More data is needed. On the other hand, when we look at the 14TB Toshiba drive (model: MG07ACA14TA), the range is from 0.7% to 1.1% which is fairly narrow, and our confidence in the 0.9% AFR is much more reasonable.
3,000 Boot Drives
We always exclude boot drives from our reports as their function is very different from a data drive. While it may not seem obvious, having 3,000 boot drives is a bit of a milestone. It means we have 3,000 Backblaze Storage Pods in operation as of December 31st. All of these Storage Pods are organized into Backblaze Vaults of 20 Storage Pods each or 150 Backblaze Vaults.
Over the last year or so, we moved from using hard drives to SSDs as boot drives. We have a little over 1,200 SSDs acting as boot drives today. We are validating the SMART and failure data we are collecting on these SSD boot drives. We’ll keep you posted if we have anything worth publishing.
The complete data set used to create the information used in this review is available on our Hard Drive Test Data page. You can download and use this data for free for your own purpose. All we ask are three things: 1) you cite Backblaze as the source if you use the data, 2) you accept that you are solely responsible for how you use the data, and 3) you do not sell this data to anyone; it is free.
If you just want the summarized data used to create the tables and charts in this blog post you can download the ZIP file containing the CSV files for each chart.
Good luck and let us know if you find anything interesting.
We spoke with Umar Mustafa, the Facebook Partner Engineer who led the project, about his team’s role in the Data Transfer Project (DTP) and the development process in configuring the data portability feature for Backblaze B2 Cloud Storage using open-source code. Read on to learn about the challenges of developing data portability including security and privacy practices, coding with APIs, and the technical design of the project.
Q: Can you tell us about the origin of Facebook’s data portability project?
A: Over a decade ago, Facebook launched a portability tool that allowed people to download their information. Since then, we have been adding functionality for people to have more control over their data.
In 2018, we joined the Data Transfer Project (DTP), which is an open-source effort by various companies, like Google, Microsoft, Twitter, and Apple, that aims to build products to allow people to easily transfer a copy of their data between services. The DTP tackles common problems like security, bandwidth limitations, and just the sheer inconvenience when it comes to moving large amounts of data.
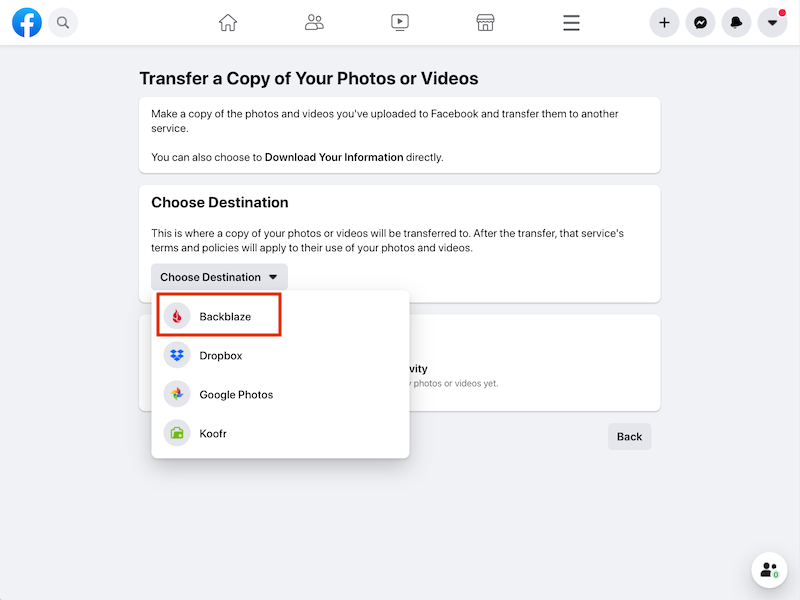
And so in connection with this project, we launched a tool in 2019 that lets people port their photos and videos. Google was the first destination and we have partnered with more companies since then, with Backblaze being the most recent one.
Q: As you worked on this tool, did you have a sense for the type of Facebook customer that chooses to copy or transfer their photos and videos over to cloud storage?
A: Yes, we thought of various ways that people could use the tool. Someone might want to try out a new app that manages photos or they might want to archive all the photos and videos they’ve posted over the years in a private cloud storage service.
Q: Would you walk us through the choice to develop it using the open-source DTP code?
A: In order to transfer data between two services, you’d typically use the API from the first service to read data, then transform it if necessary for the second service, and finally use the API from the second service to upload it. While this approach works, you can imagine that it requires a lot of effort every time you need to add a new source or destination. And an API change by any one service would force all its collaborators to make updates.
The DTP solves these problems by offering an open-source data portability platform. It consists of standard data models and a set of service adapters. Companies can create their import and export adapters, or for services with a public API, anyone can contribute the adapters to the project. As long as two services have adapters available for a specific data type (e.g. photos), that data can be transferred between them.
Being open-source also means anyone can try it out. It can be run locally using Docker, and can also be deployed easily in enterprise or cloud-based environments. At Facebook, we have a team that contributes to the project, and we encourage more people from the open-source community to join the effort. More details can be found about the project on GitHub.
Integrating a new service as a destination or a source for an existing data type normally requires adding two types of extensions, an auth extension and a transfer extension. The open-source code is well organized, so you can find all available auth extensions under the extensions/auth module and all transfer extensions under the extensions/data-transfer module, which you can refer to for guidance.
The auth extension only needs to be written once for a service and can be reused for each different data type that the service supports. Some common auth extensions, like OAuth, are already available in the project’s libraries folder and can be extended with very minimal code (mostly config). Alternatively, you can add your own auth extension as long as it implements the AuthServiceExtension interface.
A transfer extension consists of import adapters and export adapters for a service, and each of them is for a single data type. You’ll find them organized by service and data type in the extensions/data-transfer module. In order to add one, you’ll have to add a similar package structure, and write your adapter by implementing the Importer<a extends AuthData, T extends DataModel> interface using the respective AuthData and DataModel classes for the adapter.
For example, in Backblaze we created two import adapters, one for photos and one for videos. Each of them uses the TokenSecretAuthData containing the application key and secret. The photos importer uses the PhotosContainerResource as the DataModel and the videos importer uses the VideosContainerResource. Once you have the boilerplate code in place for the importer or exporter, you have to implement the required methods from the interface to get it working, using any relevant SDKs as you need. As Backblaze offers the Backblaze S3 Compatible APIs, we were able to use the AWS S3 SDK to implement the Backblaze adapters.
Q: Why did you choose Backblaze as a storage endpoint?
A: We want people to be able to choose where they want to take their data. Backblaze B2 is a cloud storage of choice for many people and offers Backblaze S3 Compatible APIs for easy integration. We’re happy to see people using Backblaze to save a copy of their photos and videos.
Q: Can you tell us about the comprehensive security and compliance review you conducted before locking in on Backblaze?
A: Privacy and security is of utmost importance for us at Facebook. When engaging with any partner, we check that they comply with certain standards. Some of the things that help us evaluate a partner include:
Information security policies.
Privacy policies.
Third-party security certifications, as available.
Q: Describe the process of coding to Backblaze, anything you particularly enjoyed? Anything you found different or challenging? Anything surprising?
A: The integration for the data itself was easy to build. The Backblaze S3 Compatible APIs make coding the adapters pretty straightforward, and Backblaze has good documentation around that.
The only difference between Backblaze and our other existing destinations was with authentication. Most adapters in the DTP use OAuth for authentication, where users log in to each service before initiating a transfer. Backblaze is different as it uses API keys-based authentication. This meant that we had to extend the UI in our tool to allow users to enter their application key details and wire that up as TokenSecretAuthData to the import adapters to transfer jobs securely.
Q: What interested you in data portability?
A: The concept of data portability sparked my interest once I began working at Facebook. Coincidentally, I had recently wondered if it would be possible to move my photos from one cloud backup service to another, and I was glad to discover a project at Facebook addressing the issue. More importantly, I felt that the problem it solves is important.
Facebook is always looking for new ways to innovate, so it comes with an opportunity to potentially influence how data portability will be commonly used and perceived in the future.
Q: What are the biggest challenges for DTP? It seems to be a pretty active project three years after launch. Given all the focus on it, what is it that keeps the challenge alive? What areas are particularly vexing for the project overall?
One major challenge we’ve faced is around technical design—currently the tool has to be deployed and run independently as a single instance to be able to make transfers. This has its advantages and disadvantages. On one hand, any entity or individual can run the project completely and enable transfers to any of the available services as long as the respective credentials are available. On the other hand, in order to integrate a new service, you need to redeploy all the instances where you need that service.
At the moment, Google has their own instance of the project deployed on their infrastructure, and at Facebook we have done the same, as well. This means that a well-working partnership model is required between services to offer the service to their respective users. As one of the maintainers of the project, we try to make this process as swift and hassle-free as possible for new partners.
With more companies investing time in data portability, we’ve started to see increased improvements over the past few months. I’m sure we’ll see more destinations and data types offered soon.
If you build apps, you’ve probably considered working in Go. After all, the open-source language has become more popular with developers every year since its introduction. With a reputation for simplicity in meeting modern programming needs, it’s no surprise that GitHub lists it as the 10th most popular coding language out there. Docker, Kubernetes, rclone—all developed in Go.
If you’re not using Go, this post will suggest a few reasons you might give it a shot in your next application, with a specific focus on another reason for its popularity: its ease of use in connecting to cloud storage—an increasingly important requirement as data storage and delivery becomes central to wide swaths of app development. With this in mind, the following content will also outline some basic and relatively straightforward steps to follow for building an app in Go and connecting it to cloud storage.
But first, if you’re not at all familiar with this programming language, here’s a little more background to get you started.
What Is Go?
Go (sometimes referred to as Golang) is a modern coding language that can perform as well as low-level languages like C, yet is simpler to program and takes full advantage of modern processors. Similar to Python, it can meet many common programming needs and is extensible with a growing number of libraries. However, these advantages don’t mean it’s necessarily slower—in fact, applications written in Go compile to a binary that runs nearly as fast as programs written in C. It’s also designed to take advantage of multiple cores and concurrency routines, compiles to machine code, and is generally regarded as being faster than Java.
Why Use Go With Cloud Storage?
No matter how fast or efficient your app is, how it interacts with storage is crucial. Every app needs to store content on some level. And even if you keep some of the data your app needs closer to your CPU operations, or on other storage temporarily, it still benefits you to use economical, active storage.
Here are a few of the primary reasons why:
Massive amounts of user data. If your application allows users to upload data or documents, your eventual success will mean that storage requirements for the app will grow exponentially.
Application data. If your app generates data as a part of its operation, such as log files, or needs to store both large data sets and the results of compute runs on that data, connecting directly to cloud storage helps you to manage that flow over the long run.
Large data sets. Any app that needs to make sense of giant pools of unstructured data, like an app utilizing machine learning, will operate faster if the storage for those data sets is close to the application and readily available for retrieval.
Generally speaking, active cloud storage is a key part of delivering ideal OpEx as your app scales. You’re able to ensure that as you grow, and your user or app data grows along with you, your need to invest in storage capacity won’t hamper your scale. You pay for exactly what you use as you use it.
Whether you buy the argument here, or you’re just curious, it’s easy and free to test out adding this power and performance to your next project. Follow along below for a simple approach to get you started, then tell us what you think.
How to Connect an App Written in Go With Cloud Storage
Once you have your Go environment set up, you’re ready to start building code in your main Gopath’s directory ($GOPATH). This example builds a Go app that connects to Backblaze B2 Cloud Storage using the AWS S3 SDK.
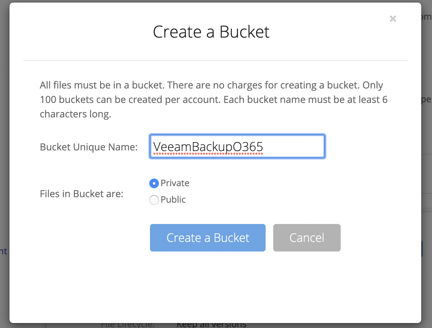
Next, create a bucket to store content in. You can create buckets programmatically in your app later, but for now, create a bucket in the Backblaze B2 web interface, and make note of the associated server endpoint.
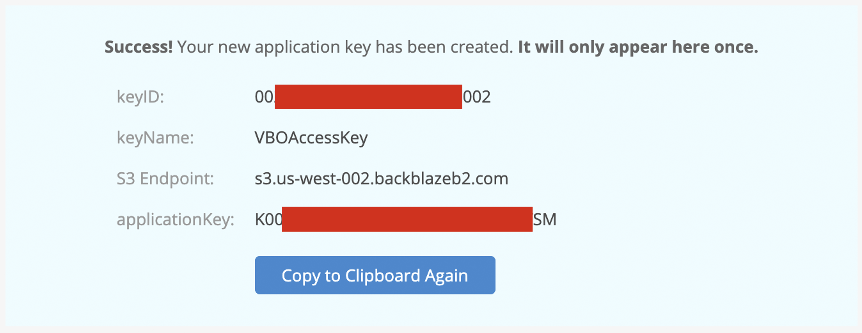
Now, generate an application key for the tool, scope bucket access to the the new bucket only, and make sure that “Allow listing all bucket names” is selected:
Make note of the bucket server connection and app key details. Use a Go module—for instance, this popular one, called godotenv—to make the configuration available to the app that will look in the app root for a .env (hidden) file.
Create the .env file in the app root with your credentials:
With configuration complete, build a package that connects to Backblaze B2 using the S3 API and S3 Go packages.
First, import the needed modules:
Then create a new client and session that uses those credentials:
And then write functions to upload, download, and delete files:
Now, put it all to work to make sure everything performs.
In the main test app, first import the modules, including godotenv and the functions you wrote:
Read in and reference your configuration:
And now, time to exercise those functions and see files upload and download.
For example, this extraordinarily compact chunk of code is all you need to list, upload, download, and delete objects to and from local folders:
If you haven’t already, run go mod init to initialize the module dependencies, and run the app itself with go run backblaze_example_app.go.
Here, a listResult has been thrown in after each step with comments so that you can follow the progress as the app lists the number of objects in the bucket (in this case, zero), upload your specified file from the dir_upload folder, then download it back down again to dir_download:
Use another tool like rclone to list the bucket contents independently and verify the file was uploaded:
Or, of course, look in the Backblaze B2 web admin:
And finally, looking in the local system’s dir_download folder, see the file you downloaded:
With that—and code at https://github.com/GiantRavens/backblazeS3—you have enough to explore further, connect to Backblaze B2 buckets with the S3 API, list objects, pass in file names to upload, and more.
Get Started With Go and Cloud Storage
With your app written in Go and connected to cloud storage, you’re able to grow at hyperscale. Happy hunting!
If you’ve already built an app with Go and have some feedback for us, we’d love to hear from you in the comments. And if it’s your first time writing in Go, let us know what you’d like to learn more about!
Every industry uses its own terminology. Originally, most jargon emerges out of the culture the industry was founded in, but then evolves over time as culture and technology change and grow. This is certainly true in the software industry. From its inception, tech has adopted terms—like hash, cloud, bug, ether, etc.—regardless of their original meanings and used them to describe processes, hardware issues, and even relationships between data architectures. Oftentimes, the cultural associations these terms carry with them are quickly forgotten, but sometimes they remain problematically attached.
In the software industry, the terms “master” and “slave” have been commonly used as a pair to identify a primary database (the “master”) where changes are written, and a replica (the “slave”) that serves as a duplicate to which the changes are propagated. The industry also commonly uses other terms, such as “blacklist” and whitelist,” whose definitions reflect or at least suggest identity-based categorizations, like the social concept of race.
Recently, the Backblaze Engineering team discussed some examples of language in the Backblaze code that carried negative cultural biases that the team, and the broader company, definitely didn’t endorse. Their conversation centered around the idea of changing the terms used to describe branches in our repositories, and we thought it would be interesting for the developers in our audience to hear about that discussion, and the work that came out of it.
Getting Started: An Open Conversation About Software Industry Standard Terms
The Backblaze Engineering team strives to cultivate a collaborative environment, an effort which is reflected in the structure of their weekly team meetings. After announcements, any member of the team is welcome to bring up any topics they want to discuss. As a result, these meetings work as a kind of forum where team members encourage each other to share their thoughts, especially about anything they might want to change related to internal processes or more generally about current events that may be affecting their thinking about their work.
Earlier this year, the team discussed the events that lead to protests in many U.S. cities as well as to new prominence for the Black Lives Matter movement. The conversation brought up a topic that had been discussed briefly before these events, but now had renewed relevance: mindfulness around terms used as a software industry standard that could reflect biases against certain people’s identities.
These conversations among the team did not start with the intention to create specific procedures, but focused on emphasizing awareness of words used within the greater software industry and what they might mean to different members of the community. Eventually, however, the team’s thinking progressed to include different words and concepts the Backblaze Engineering team resolved to adopt moving forward.
Why Change the Branch Names?
The words “master” and “slave” have long held harmful connotations, and have been used to distance people from each other and to exclude groups of people from access to different areas of society and community. Their accepted use today as synonyms for database dependencies could be seen as an example of systemic racism: racist concepts, words, or practices embedded as “normal” uses within a society or an organization.
The engineers discussed whether the use of “master” and “slave” terminologies reflected an unconscious practice on the team’s part that could be seen as supporting systemic racism. In this case, the question alone forced them to acknowledge that their usage of these terms could be perceived as an endorsement of their historic meanings. Whether intentionally or not, this is something the engineers did not want to do.
The team decided that, beyond being the right thing to do, revising the use of these terms would allow them to reinforce Backblaze’s reputation as an inclusive place to work. Just as they didn’t want to reiterate any historically harmful ideas, they also didn’t want to keep using terms that someone on the team might feel uncomfortable using, or accidentally make potential new hires feel unwelcome on the team. Everything seemed to point them back to a core part of Backblaze’s values: the idea that we “refuse to take history or habit to mean something is ‘right.’” Oftentimes this means challenging stale approaches to engineering issues, but here it meant accepting terminology that is potentially harmful just because it’s “what everyone does.”
Overall, it was one of those choices that made more sense the longer they looked at it. Not only were the uses of “master” and “slave” problematic, they were also harder and less logical to use. The very effort to replace the words revealed that the dependency they described in the context of data architectures could be more accurately characterized using more neutral terms and shorter terms.
The Engineering team discussed a proposal to update the terms at a team meeting. In unanimous agreement, the term “main” was selected to replace “master” because it is a more descriptive title, it requires fewer keystrokes to type, and since it starts with the same letter as “master,” it would be easier to remember after the change. The terms “whitelist” and “blacklist” are also commonly used terms in tech, but the team decided to opt for “allowlist” and “denylist” because they’re more accurate and don’t associate color with value.
Rolling Out the Changes and Challenges in the Process
The practical procedure of changing the names of branches was fairly straightforward: Engineers wrote scripts that automated the process of replacing the terms. The main challenge that the Engineering team experienced was in coordinating the work alongside team members’ other responsibilities. Short of stopping all other projects to focus on renaming the branches, the engineers had to look for a way to work within the constraints of Gitea, the constraints of the technical process of renaming, and also avoid causing any interruptions or inconveniences for the developers.
First, the engineers prepared each repository for renaming by verifying that each one didn’t contain any files that referenced “master” or by updating files that referenced the “master” branch. For example, one script was going to be used for a repository that would update multiple branches at the same time. These changes were merged to a special branch called “master-to-main” instead of the “master” branch itself. That way, when that repository’s “master” branch was renamed, the “master-to-main” branch was merged into “main” as a final step. Since Backblaze has a lot of repositories, and some take longer than others to complete the change, people divided the jobs to help spread out the work.
While the actual procedure did not come with many challenges, writing the scripts required thoughtfulness about each database. For example, in the process of merging changes to the updated “main” branch in Git, it was important to be sure that any open pull requests, where the engineers review and approve changes to the code, were saved. Otherwise, developers would have to recreate them, and could lose history of their work, changes, and other important comments from projects unrelated to the renaming effort. While writing the script to automate the name change, engineers were careful to preserve any existing or new pull requests that might have been created at the same time.
Once they finished prepping the repositories, the team agreed on a period of downtime—evenings after work—to go through each repository and rename its “master” branch using the script they had previously written. Afterwards, each person had to run another short script to pick up the change and remove dangling references to the “master” branch.
Managers also encouraged members of the Engineering team to set aside some time throughout the week to prep the repositories and finish the naming changes. Team members also divided and shared the work, and helped each other by pointing out any areas of additional consideration.
Moving Forward: Open Communication and Collaboration
In September, the Engineering team completed renaming the source control branch from “master” to “main.” It was truly a team effort that required unanimous support and time outside of regular work responsibilities to complete the change. Members of the Engineering team reflected that the project highlighted the value of having a diverse team where each person brings a different perspective to solving problems and new ideas.
Earlier this year, some of the people on the Engineering team also became members of the employee-led Diversity, Equity, and Inclusion Committee. Along with Engineering, other teams are having open discussions about diversity and how to keep cultivating inclusionary practices throughout the organization. The full team at Backblaze understands that these changes might be small in the grand scheme of things, but we’re hopeful our intentional approach to those issues we can address will encourage other business and individuals to look into what’s possible for them.
Since its inception in 2009, Cross-Origin Resource Sharing (CORS) has offered developers a convenient way of bypassing an inherently secure default setting—namely the same-origin policy (SOP). Allowing selective cross-origin requests via CORS has saved developers countless hours and money by reducing maintenance costs and code complexity. And now with CORS support for Backblaze’s recently launched S3 Compatible APIs, developers can continue to scale their experience without needing a complete code overhaul.
If you haven’t been able to adopt Backblaze B2 Cloud Storage in your development environment because of issues related to CORS, we hope this latest release gives you an excuse to try it out. Whether you are using our B2 Native APIs or S3 Compatible APIs, CORS support allows you to build rich client-side web applications with Backblaze B2. With the simplicity and affordability this service offers, you can put your time and money back to work on what’s really important: serving end users.
Top Three Reasons to Enable CORS
B2 Cloud Storage is popular among agile teams and developers who want to take advantage of easy to use and affordable cloud storage while continuing to seamlessly support their applications and workflows with minimal to no code changes. With Backblaze S3 Compatible APIs, pointing to Backblaze B2 for storage is dead simple. But if CORS is key to your workflow, there are three additional compelling reasons for you to test it out today:
Compatible storage with no re-coding. By enabling CORS rules for your custom web application or SaaS service that uses our S3 Compatible APIs, your development team can serve and upload data via B2 Cloud Storage without any additional coding or reconfiguring required. This will save you valuable development time as you continue to deliver a robust experience for your end users.
Seamless integration with your plugins. Even if you don’t choose B2 Cloud Storage as the primary backend for your business but you do use it for discreet plugins or content serving sites, enabling CORS rules for those applications will come in handy. Developers who configure PHP, NodeJS, and WordPress plugins via the S3 Compatible APIs to upload or download files from web applications can do so easily by enabling CORS rules in their Backblaze B2 Buckets. With CORS support enabled, these plugins work seamlessly.
Serving your web assets with ease. Consider an even simpler scenario in which you want to serve a custom web font from your B2 Cloud Storage Bucket. Most modern browsers will require a preflight check for loading the font. By configuring the CORS rules in that bucket to allow the font to be served in the origin(s) of your choice, you will be able to use your custom font seamlessly across your domains from a single source.
Whether you are relying on B2 Cloud Storage as your primary cloud infrastructure for your web application or simply using it to serve cross-origin assets such as fonts or images, enabling CORS rules in your buckets will allow for proper and secure resource sharing.
Enabling CORS Made Simple and Fast
If your web page or application is hosted in a different origin from images, fonts, videos, or stylesheets stored in B2 Cloud Storage, you need to add CORS rules to your bucket to achieve proper functionality. Thankfully, enabling CORS rules is easy and can be found in your B2 Cloud Storage settings:
You will have the option of sharing everything in your bucket with every origin, select origins, or defining custom rules with the Backblaze B2 CLI.
Learning More and Getting Started
If you’re dying to learn more about the fundamentals of CORS as well as additional specifics about how it works with B2 Cloud Storage, you can dig into this informative Knowledge Base article. If you’re just pumped that CORS is now easily available in our S3 Compatible APIs suite, well then, you’re probably already on your way to a smoother, more reasonably priced development experience. If you’ve got a question or a response, we always love to hear from you in the comments or you can contact us for assistance.
Most teams use their Synology NAS device primarily as a common space to store active data. It’s helpful for collaboration and cuts down on the amount of storage you need to buy for each employee in a media workflow. But if your teams are geographically dispersed, a NAS device at each location will also allow you to sync specific folders across offices and protect the data in them with more reliable and non-duplicative workflows. By setting up an integrated cloud storage tier and using Synology Drive ShareSync, Cloud Sync, and Hyper Backup—all free tools that come with the purchase of your NAS device—you can improve your collaboration capabilities further, and simplify and strengthen data protection for your NAS.
Drive ShareSync: Synchronizes folders and files across linked NAS devices.
Cloud Sync: Copies files to cloud storage automatically as they’re created or changed.
Hyper Backup: Backs up file and systems data to local or cloud storage.
Taken together, these tools, paired with a reasonable and reliable cloud storage, will grow your remote collaboration capacity while better protecting your data. Properly architected, they can make sharing and protecting large files easy, efficient, and secure for internal production, while also making it all look effortless for external clients’ approval and final delivery.
We’ll break out how it all works in the sections below. If you have questions, please reach out in the comments, or contact us.
If you’re more of a visual learner, our Cloud University series also offers an on-demand webinar featuring a demo laboratory showing how to set up cross-office collaboration on a Synology NAS. Otherwise, read on.
In a multi-site file exchange configuration, Synology NAS devices are synced between offices, while cloud storage provides an archive and backup storage target for Synology Cloud Sync and Hyper Backup.
Synchronizing Two or More NAS Devices With Synology Drive ShareSync
Moving media files to a NAS is a great first step towards easier sharing and ensuring that everyone on the team is working on the correct version of any given project. But taking an additional step to also sync folders across multiple NAS devices guarantees that each file is only transferred between sites once, instead of every time a team member accesses the file. This is also a way to reduce network traffic and share large media files that would otherwise require more time and resources.
With Synology Drive ShareSync, you can also choose which specific folders to sync, like folders with corporate brand images or folders for projects which team members across different offices are working on. You also have the option between a one-way and two-way sync, and Synology Drive ShareSync automatically filters out temporary files so that they’re not replicated from primary to secondary.
With Synology Drive ShareSync, specific folders on NAS devices can be synced in a two-way or one-way fashion.
Backing Up and Archiving Media Files With Synology Cloud Sync and Cloud Storage
With Cloud Sync, another tool included with your Synology NAS, you can make a copy of your media files to a cloud storage bucket as soon as they are ingested into the NAS. For creative agencies and corporate video groups that work with high volumes of video and images, syncing data to the cloud on ingest protects the data while it’s active and sets up an easy way to archive it once the project is complete. Here’s how it works:
1. After a multiple day video or photo shoot, upload the source media files to your Synology NAS. When new media files are found on the NAS, Synology Cloud Sync makes a copy of them to cloud storage.
2. While the team works on the project, the copies of the media files in the cloud storage bucket serve as a backup in case a file is accidentally deleted or corrupted on the NAS.
3. Once the team completes the project, you can switch off Synology Cloud Sync for just that folder, then delete the raw footage files from the NAS. This allows you to free up storage space for a new project.
4. The video and photo files remain in the bucket for the long term, serving as archive copies for future use or when a client returns for another project.
You can configure Synology Cloud Sync to watch folders for new files in specific time periods and control the upload speed to prevent saturating your internet connection.
Using Cloud Sync for Content Review With External Clients
Cloud Sync can also be used to simplify and speed up the editorial review process with clients. Emailing media files like videos and high-res images to external approvers is generally not feasible due to size, and setting up and maintaining FTP servers can be time consuming for you and complicated or confusing for your clients. It’s not an elegant way to put your best creative work in front of them. To simplify the process, create content review folders for each client, generate a link to a ZIP file in a bucket, and share the link with them via email.
Protecting Your NAS Data With Synology Hyper Backup and Backblaze B2
Last, but not least, Synology Hyper Backup can also be configured to do weekly full backups and daily incremental backups of all your NAS data to your cloud storage bucket. Disks can crash and valuable files can be deleted or corrupted, so ensuring you have complete data protection is an essential step in your storage infrastructure.
Hyper Backup will allow you to back up files, folders, and other settings to another destination (like cloud storage) according to a schedule. It also offers flexible retention settings, which allow you to restore an entire shared folder from different points in time. You can learn about how to set it up using this Knowledge Base article.
With Hyper Backup, you gain more control over setting up and managing weekly and daily backups to cloud storage. You can:
Encrypt files before transferring them, so that your data will be stored as encrypted files.
Choose to only encrypt files during the transfer process.
Enable an integrity check to confirm that files were backed up correctly and can be successfully restored.
Set integrity checks to run at specific frequencies and times.
Human error is often the inspiration to reach for a backup, but ransomware attacks are on the rise, and a strategy of recycle and rotation practices alongside file encryption helps backups remain unreachable by a ransomware infection. Hyper Backup allows for targeted backup approaches, like saving hourly versions from the previous 24 hours of work, daily versions from the previous month of work, and weekly versions from older than one month. You choose what makes the most sense for your work. You can also set a maximum number of versions if there’s a certain cap you don’t want to exceed. Not only do these smart recycle and rotation practices manage your backups to help protect your organization against ransomware, but they can also reduce storage costs.
Hyper Backup allows you to precisely configure which folders to back up. In this example, raw video footage is excluded because a copy was made by Cloud Sync on upload with the archive-on-ingest strategy.
Set Up Multi-site File Exchange With Synology NAS and Cloud Storage
To learn more about how you can set up your Synology NAS with cloud storage to implement a collaboration and data protection solution like this, one of our solutions engineers recently crafted a guide outlining how to do so with our cloud storage solution.
At the end of the day, collaboration is the soul of much creative work, and orienting your system to make the nuts and bolts of collaboration invisible to the creatives themselves, while ensuring all their content is fully protected, will set your team up for the greatest success. Synology NAS, its impressive built-in software suite, and cloud storage can help you get there.
Ben Young works for vBridge, a cloud service provider in New Zealand. He specializes in the automation and integration of a broad range of cloud & virtualization technologies. Ben is also a member of the Veeam® Vanguard program, Veeam’s top-level influencer community. (He is not an employee of Veeam). Because Backblaze’s new S3 Compatible APIs enable Backblaze B2 Cloud Storage as an endpoint in the Veeam ecosystem, we reached out to Ben, in his role as a Veeam Vanguard, to break down some common use cases for us. If you’re working with Veeam and Microsoft 365, this post from Ben could help save you some time and headaches.
—Natasha Rabinov, Backblaze
Backing Up Microsoft Office 365 via Veeam in Backblaze B2 Cloud Storage
Veeam Backup for Microsoft Office 365 v4 included a number of enhancements, one of which was the support for object-based repositories. This is a common trend for new Veeam product releases. The flagship Veeam Backup & Replication product now supports a growing number of object enabled capabilities.
So, why object storage over block-based repositories? There are a number of reasons but scalability is, I believe, the biggest. These platforms are designed to handle petabytes of data with very good durability, and object storage is better suited to that task.
With the data scalability sorted, you only need to worry about monitoring and scaling out the compute workload of the proxy servers (worker nodes). Did I mention you no longer need to juggle data moves between repositories?! These enhancements create a number of opportunities to simplify your workflows.
So naturally, with the recent announcement from Backblaze saying they now have S3 Compatible API support, I wanted to try it out with Veeam Backup for Microsoft Office 365.
Let’s get started. You will need:
A Backblaze B2 account: You can create one here for free. The first 10GB are complimentary so you can give this a go without even entering a credit card.
A Veeam Backup for Microsoft Office 365 environment setup: You can also get this for free (up to 10 users) with their Community Edition.
An organization connected to the Veeam Backup for Microsoft Office 365 environment: View the options and how-to guide here.
Configuring Your B2 Cloud Storage Bucket
In the Backblaze B2 console, you need to create a bucket. If you already have one, you may notice that there is a blank entry next to “endpoint.” This is because buckets created before May 4, 2020 cannot be used with the Backblaze S3 Compatible APIs.
So, let’s create a new bucket. I used “VeeamBackupO365.”
This bucket will now appear with an S3 endpoint, which we will need for use in Veeam Backup for Microsoft Office 365.
Before you can use the new bucket, you’ll need to create some application keys/credentials. Head into the App Keys settings in Backblaze and select “create new.” Fill out your desired settings and, as good practice, make sure you only give access to this bucket, or the buckets you want to be accessible.
Your application key(s) will now appear. Make sure to save these keys somewhere secure, such as a password manager, as they only will appear once. You should also keep them accessible now as you are going to need them shortly.
The Backblaze setup is now done.
Configuring Your Veeam Backup
Now you’ll need to head over to your Veeam Backup for Microsoft Office 365 Console.
Note: You could also achieve all of this via PowerShell or the RESTful API included with this product if you wanted to automate.
It is time to create a new backup repository in Veeam. Click into your Backup Infrastructure panel and add a new backup repository and give it a name…
…Then select the “S3 Compatible” option:
Enter the S3 endpoint you generated earlier in the Backblaze console into the Service endpoint on the Veeam wizard. This will be something along the lines of: s3.*.backblazeb2.com.
Now select “Add Credential,” and enter the App Key ID and Secret that you generated as part of the Backblaze setup.
With your new credentials selected, hit “Next.” Your bucket(s) will now show up. Select your desired backup bucket—in this case I’m selecting the one I created earlier: “VeeamBackupO365.” Now you need to browse for a folder which Veeam will use as its root folder to base the backups from. If this is a new bucket, you will need to create one via the Veeam console like I did below, called “Data.”
If you are curious, you can take a quick look back in your Backblaze account, after hitting “Next,” to confirm that Veeam has created the folder you entered, plus some additional parent folders, as you can see in the example below:
Now you can select your desired retention. Remember, all jobs targeting this repository will use this retention setting, so if you need a different retention for, say, Exchange and OneDrive, you will need two different repositories and you will need to target each job appropriately.
Once you’ve selected your retention, the repository is ready for use and can be used for backup jobs.
Now you can create a new backup job. For this demo, I am going to only back up my user account. The target will be our new repository backed by Backblaze S3 Compatible storage. The wizard walks users through this process.
Giving the backup job a name.
Select your entire organization or desired users/groups and what to process (Exchange, OneDrive, and/or Sharepoint).
Select the object-backed backblazeb2-s3 backup repository you created.
That is it! Right click and run the job—you can see it starting to process your organization.
As this is the first job you’ve run, it may take some time and you might notice it slowing down. This slow down is a result of the Microsoft data being pulled out of O365. But Veeam is smart enough to have added in some clever user-hopping, so as it detects throttling it will jump across and start a new user, and then loop back to the others to ensure your jobs finish as quickly as possible.
While this is running, if you open up Backblaze again you will see the usage starting to show.
Done and Done
And there it is—a fully functional backup of your Microsoft Office 365 tenancy using Veeam Backup for Microsoft Office 365 and Backblaze B2 Cloud Storage.
We really appreciate Ben’s guide and hope it helps you try out Backblaze as a repository for your Veeam data. If you do—or if you’ve already set us as a storage target—we’d love to hear how it goes in the comments.
Here at Backblaze, we’ve been known to do things a bit differently. From Storage Pods and Backblaze Vaults to drive farming and hard drive stats, we often take a different path. So, it’s no surprise we love stories about people who think outside of the box when presented with a challenge. This is especially true when that story involves building a mongo storage server, a venerable Toyota 4Runner, and a couple of IT engineers hell-bent on getting 1.2 petabytes of their organization’s data off-site. Let’s meet Alex Acosta and Andrew Davis of Gladstone Institutes.
Data on the Run
The security guard at the front desk nodded knowingly as Alex and Andrew rolled the three large Turtle cases through the lobby and out the front door of Gladstone Institutes. Well known and widely respected, the two IT engineers comprised two-thirds of the IT Operations staff at the time and had 25 years of Gladstone experience between them. So as odd as it might seem to have IT personnel leaving a secure facility after-hours with three large cases, everything was on the up-and-up.
It was dusk in mid-February. Alex and Andrew braced for the cold as they stepped out into the nearly empty parking lot toting the precious cargo within those three cases. Andrew’s 4Runner was close, having arrived early that day—the big day, moving day. They gingerly lugged the heavy cases into the 4Runner. Most of the weight was the cases themselves, the rest of one was a 4U storage server, and in the other two, 36 hard drives. An insignificant part of the weight, if any at all, was the reason they were doing all of this—200 terabytes of Gladstone Institutes research data.
They secured the cases, slammed the tailgate shut, climbed into the 4Runner, and put the wheels in motion for the next part of their plan. They eased onto Highway 101 and headed south. Traffic was terrible, even the carpool lane; dinner would be late, like so many dinners before.
Photo Credit: Gladstone Institutes.
Back to the Beginning
There had been many other late nights since they started on this project six months before. The Fireball XXXL project, as Alex and Andrew eventually named it, was driven by their mission to safeguard Gladstone’s biomedical research data from imminent disaster. On an unknown day in mid-summer, Alex and Andrew were in the server room at Gladstone surrounded by over 900 tapes that were posing as a backup system.
Andrew mused, “It could be ransomware, the building catches on fire, somebody accidentally deletes the datasets because of a command-line entry, any number of things could happen that would destroy all this.” Alex, as he waved his hand across the ever expanding tape library, added, “We can’t rely on this anymore. Tapes are cumbersome, messy and they go bad even when you do everything right. We waste so much time just troubleshooting things that in 2020 we shouldn’t be troubleshooting anymore.” They resolved to find a better way to get their data off-site.
Reality Check
Alex and Andrew listed the goals for their project: get the 1.2 petabytes of data currently stored on-site and in their tape library safely off-site, be able to add 10–20 terabytes of new data each day, and be able to delete files as they needed along the way. The fact that practically every byte of data in question represented biomedical disease research—including data with direct applicability to fighting a global pandemic—meant that they needed to accomplish all of the above with minimal downtime and maximum reliability. Oh, and they had to do all of this without increasing their budget. Optimists.
With cloud storage as the most promising option, they first considered building their own private cloud in the distant data center in the desert. They quickly dismissed the idea as the upfront costs were staggering, never mind the ongoing personnel and maintenance costs of managing their distant systems.
They decided the best option was using a cloud storage service and they compared the leading vendors. Alex was familiar with Backblaze, having followed the blog for years, especially the posts on drive stats and Storage Pods. Even better, the Backblaze B2 Cloud Storage service was straight-forward and affordable. Something he couldn’t say about the other leading cloud storage vendors.
The next challenge was bandwidth. You might think having a 5 Gb/s connection would be enough, but they had a research-heavy, data-hungry organization using that connection. They sharpened their bandwidth pencils and, taking into account institutional usage, they calculated they could easily support the 10–20 terabytes per day uploads. Trouble was, getting the existing 1.2 petabytes of data uploaded would be another matter entirely. They contacted their bandwidth provider and were told they could double their current bandwidth to 10 Gb/s for a multi-year agreement at nearly twice the cost and, by the way, it would be several months to a year before they could start work. Ouch.
They turned to Backblaze, who offered their Backblaze Fireball data transfer service which could upload about 70 terabytes per trip. “Even with the Fireball, it will take us 15, maybe 20, round trips,” lamented Andrew during another late night session of watching backup tapes. “I wish they had a bigger box,” said Alex, to which Andrew replied, “Maybe we could build one.”
The plan was born: build a mongo storage server, load it with data, take it to Backblaze.
Photo Credit: Gladstone Institutes.
Andrew Davis in Gladstone’s server room.
The Ask
Before they showed up at a Backblaze data center with their creation, they figured they should ask Backblaze first. Alex noted, “With most companies if you say, ‘Hey, I want to build a massive file server, shuttle it into your data center, and plug it in. Don’t you trust me?’ They would say, ‘No,’ and hang up, but Backblaze didn’t, they listened.”
After much consideration, Backblaze agreed to enable Gladstone personnel to enter a nearby data center that was a peering point for the Backblaze network. Thrilled to find kindred spirits, Alex and Andrew now had a partner in the Fireball XXXL project. While this collaboration was a unique opportunity for both parties, for Andrew and Alex it would also mean more late nights and microwaved burritos. That didn’t matter now, they felt like they had a great chance to make their project work.
The Build
Alex and Andrew had squirreled away some budget for a seemingly unrelated project: to build an in-house storage server to serve as a warm backup system for currently active lab projects. That way if anything went wrong in a lab, they could retrieve the last saved version of the data as needed. Using those funds, they realized they could build something to be used as their supersized Fireball XXXL, and then once the data transfer cycles were finished, they could repurpose the system to be the backup server they had budgeted.
Inspired by Backblaze’s open-source Storage Pod, they worked with Backblaze on the specifications for their Fireball XXXL. They went the custom build route starting with a 4U chassis and big drives, and then they added some beefy components of their own.
Fireball XXXL
Chassis: 4U Supermicro 36-bay, 3.5 in disc chassis, built by iXsystems.
Processor: Dual CPU Intel Xeon Gold 5217.
RAM: 4 x 32GB (128GB).
Data Drives: 36 14TB HE14 from Western Digital.
ZIL: 120GB NVMe SSD.
L2ARC: 512GB SSD.
They basically built a 36-bay, 200 terabyte RAID 1+0 system to do the data replication using rclone. Andrew noted, “Rclone is resource-heavy, both on RAM and CPU cycles. When we spec’d the system we needed to make sure we had enough muscle so rclone could push data at 10 Gb/s. It’s not just reading off the drives; it’s the processing required to do that.”
Loading Up
Gladstone runs TrueNAS on their on-premise production systems so it made sense to use it on their newly built data transfer server. “We were able to do a ZFS send from our in-house servers to what looked like a gigantic external hard drive, for lack of a better description,” Andrew said. “It allowed us to replicate at the block level, compressed, so it was much higher performance in copying data over to that system.”
Andrew and Alex had previously determined that they would start with the four datasets that were larger than 40 terabytes each. Each dataset represented years of research from their respective labs, placing them at the top of the off-site backup queue. Over the course of 10 days, they loaded the Fireball XXXL with the data. Once finished, they shut the system down and removed the drives. Opening the foam lined Turtle cases they had previously purchased, they gingerly placed the chassis into one case and the 36 drives in the other two. They secured the covers and headed towards the Gladstone lobby.
At the Data Center
Alex and Andrew eventually arrived at the data center where they’d find the needed Backblaze network peering point. Upon entry, inspections ensued and even though Backblaze had vouched for the Gladstone chaps, the process to enter was arduous. As it should be. Once in their assigned room, they connected a few cables, typed in a few terminal commands and data started uploading to their Backblaze B2 account. The Fireball XXXL performed as expected, with a sustained transfer rate of between eight and 10 Gb/s. It took a little over three days to upload all the data.
They would make another trip a few weeks later and have planned two more. With each trip, more Gladstone data is safely stored off-site.
Gladstone Institutes, with over 40 years of history behind them and more than 450 staff, is a world leader in the biomedical research fields of cardiovascular and neurological diseases, genomic immunology, and virology, with some labs recently shifting their focus to SARS-CoV-2, the virus that causes COVID-19. The researchers at Gladstone rely on their IT team to protect and secure their life-saving research.
Photo Credit: Gladstone Institutes.
When data is literally life-saving, backing up is that much more important.
Epilogue
Before you load up your 200 terabyte media server into the back of your SUV or pickup and head for a Backblaze data center—stop. While we admire the resourcefulness of Andrew and Alex, on our side the process was tough. The security procedures, associated paperwork, and time needed to get our Gladstone heroes access to the data center and our network with their Fireball XXXL were “substantial.” Still, we are glad we did it. We learned a tremendous amount during the process, and maybe we’ll offer our own Fireball XXXL at some point. If we do, we know where to find a couple of guys who know how to design one kick-butt system. Thanks for the ride, gents.
Editor’s Note: As demand for localized entertainment grows rapidly around the globe, the amount of media that production companies handle has skyrocketed at the same time as the production process has become endlessly diverse. In a recent blog post, iconik highlighted one business that uses Backblaze B2 Cloud Storage and the iconik asset management platform together to develop a cloud-based, resource-efficient workflow perfectly suited to their unique needs. Read on for some key learnings from their case study, which we’ve adapted for our blog.
Celebrating Culture With Content
THEMA is a Canal+ Group company that has more than 180 television channels in its portfolio. It helps with the development of these channels and has built strong partnerships with major pay-TV platforms worldwide.
THEMA started with a focus on ethnic, localized entertainment, and has grown that niche into the foundation of a large, expansive service. Today, THEMA has a presence in nearly every region of the world, where viewers can enjoy programming that celebrates their heritage and offers a taste of home wherever they are.
Cédric Pierre-Louis, Director of Programming for the African Fiction Channels at THEMA, and Gareth Howells, Director of Out Point Media—which was created to assist THEMA quality control and content operations, mainly for its African channels—faced a problem shared by many media organizations: As demand for their content rose, so did the amount of media they were handling. To the extent that their systems were not able to scale with their growth.
A Familiar Challenge
Early on, most media asset management solutions that the African Fiction Channels at THEMA considered for dealing with their expanding content needs had a high barrier to entry, requiring large upfront investments. To stay cost-efficient, THEMA used more manual solutions, but this would eventually prove to be an unsustainable path.
As THEMA moved into creating and managing channels, the increase of content and the added complexity of their workflows brought the need for media management front and center.
Charting a Course for Better Workflows
When Cédric took on leadership of his department at THEMA, he and Gareth both shared a strong desire to make their workflows more agile and efficient. They began by evaluating solutions using a few key points.
Cloud-Based
To start, THEMA needed a solution that could improve how they work across all their global teams. The operation needed to work from anywhere, supporting team members working in Paris and London, as well as content production teams in Nigeria, Ghana, and Ivory Coast.
Minimal Cloud Resources
There was also a unique challenge to overcome with connectivity and bandwidth restrictions facing the distributed teams. They needed a light solution requiring minimal cloud resources. Teams with limited internet access would also need immediate access to the content when they were online.
Proxy Workflows
They also couldn’t afford to continue working with large files. Previously, teams had to upload hi-res, full master versions of media, which then had to be downloaded by every editor who worked on the project. They needed proxy workflows to allow creation to happen faster with much smaller files.
Adobe Integration
The team needed to be able to find content fast and have the ability to simply drag it into their timelines from a panel within their Adobe programs. This ability to self serve and find media without any bottlenecks would have a great impact on production speed.
Affordable Startup Costs
They also needed to stay within a budget. There could not be any costly installation of new infrastructure.
Landing at iconik
While Cédric was searching for the right solution, he took a trip to Stockholm, where he met with iconik’s CEO, Parham Azimi. After a short talk and demo, it was clear that iconik satisfied all of the evaluation points they were looking for in one solution. Soon after that meeting, Cédric and Gareth began to implement iconik with the help of IVORY, who represents iconik in France.
A note on storage: As a storage option within iconik, Backblaze B2 offers teams storage that is both oriented to their use case and economically priced. THEMA needed simple, cloud-based storage with a price tag that was both right-sized and predictable, and in selecting Backblaze B2, they got it.
Today, THEMA uses iconik as a full content management system that offers nearly end-to-end control for their media workflows.
This is how they utilize iconik for their broadcast work:
1. Film and audio is created at the studios in Nigeria and Ghana.2. The media is uploaded to Backblaze B2.3. Backblaze B2 assets are then represented in iconik as proxies.4. Quality control and compliance teams use the iconik Adobe panel with proxy versions for quality control, checking compliance, and editing.5. Master files are downloaded to create the master copy.6. The master copy is distributed for playout.
While all this is happening, the creative teams at THEMA can also access content in iconik to edit promotional media.
Visions to Expand iconik’s Use
With the experience THEMA has had so far, the team is excited to implement iconik for even more of their workflows. In the future, they plan to integrate iconik with their broadcast management system to share metadata and files with their playout system. This would save a lot of time and work, as much of the data in iconik is also relevant for the media playout system.
Further into the future, THEMA hopes to achieve a total end to end workflow with iconik. The vision is to use iconik as soon as a movie comes in, so their team can put it through all the steps in a workflow such as quality control, compliance, transcoding, and sending media to third parties for playout or VOD platforms.
For this global team that needed their media managed in a way that would be light and resource efficient, iconik—with the storage provided by Backblaze B2—delivered in a big way.
Rclone is described as the “Swiss Army chainsaw” of storage movement tools. While it may seem, at first, to be a simple tool with two main commands to copy and sync data between two storage locations, deeper study reveals a hell of a lot more. True to the image of a “Swiss Army chainsaw,” rclone contains an extremely deep and powerful feature set that empowers smart storage admins and workflow scripters everywhere to meet almost any storage task with ease and efficiency.
Rclone—rsync for cloud storage—is a powerful command line tool to copy and sync files to and from local disk, SFTP servers, and many cloud storage providers. Rclone’s Backblaze B2 Cloud Storage page has many examples of configuration and options with Backblaze B2.
Continued Steps on the Path to rclone Mastery
In our in-depth webinar with Nick Craig-Wood, developer and principal maintainer of rclone, we discussed a number of power moves you can use with rclone and Backblaze B2. This post takes it a number of steps further with five more advanced techniques to add to your rclone mastery toolkit.
Have you tried these and have a different take? Just trying them out for the first time? We hope to hear more and learn more from you in the comments.
Use --track-renames to Save Bandwidth and Increase Data Movement Speed
If you’re moving files constantly from disk to the cloud, you know that your users frequently re-organize and rename folders and files on local storage. Which means that when it’s time to back up those renamed folders and files again, your object storage will see the files as new objects and will want you to re-upload them all over again.
Rclone is smart enough to take advantage of Backblaze B2 Native APIs for remote copy functionality, which saves you from re-uploading files that are simply renamed and not otherwise changed.
By specifying the --track-renames flag, rclone will keep track of file size and hashes during operations. When source and destination files match, but the names are different, rclone will simply copy them over on the server side with the new name, saving you having to upload the object again. Use the --progress or --verbose flags to see these remote copy messages in the log.
2020-10-22 17:03:26 INFO : customer artwork/145.jpg: Copied (server side copy)
2020-10-22 17:03:26 INFO : customer artwork//159.jpg: Copied (server side copy)
2020-10-22 17:03:26 INFO : customer artwork/163.jpg: Copied (server side copy)
2020-10-22 17:03:26 INFO : customer artwork/172.jpg: Copied (server side copy)
2020-10-22 17:03:26 INFO : customer artwork/151.jpg: Copied (server side copy)
With the --track-renames flag, you’ll see messages like these when the renamed files are simply copied over directly to the server instead of having to re-upload them.
When migrating data to Backblaze B2, it’s good practice to inventory the data about to be moved, then get reporting that confirms every byte made it over properly, afterwards.
For example, you could use the rclone lsf -R command to recursively list the contents of your source and destination storage buckets, compare the results, then save the reports in a simple comma-separated-values (CSV) list. This list is then easily parsable and processed by your reporting tool of choice.
Example CSV output of file names and file hashes in source and target folders.
You can even feed the results of regular storage operations into a system dashboard or reporting tool by specifying JSON output with the --use-json-log flag.
In the following example, we want to build a report listing missing files in either the source or the destination location:
The resulting log messages make it clear that the comparison failed. The JSON format lets me easily select log warning levels, timestamps, and file names for further action.
{“level”:”error”,”msg”:”File not in parent bucket path customer_archive_destination”,”object”:”216.jpg”,”objectType”:”*b2.Object”,”source”:”operations
/check.go:100″,”time”:”2020-10-23T16:07:35.005055-05:00″}
{“level”:”error”,”msg”:”File not in parent bucket path customer_archive_destination”,”object”:”219.jpg”,”objectType”:”*b2.Object”,”source”:”operations
/check.go:100″,”time”:”2020-10-23T16:07:35.005151-05:00″}
{“level”:”error”,”msg”:”File not in parent bucket path travel_posters_source”,”object”:”.DS_Store”,”objectType”:”*b2.Object”,”source”:”operations
/check.go:78″,”time”:”2020-10-23T16:07:35.005192-05:00″}
{“level”:”warning”,”msg”:”12 files missing”,”object”:”parent bucket path customer_archive_destination”,”objectType”:”*b2.Fs”,”source”:”operations
/check.go:225″,”time”:”2020-10-23T16:07:35.005643-05:00″}
{“level”:”warning”,”msg”:”1 files missing”,”object”:”parent bucket path travel_posters_source”,”objectType”:”*b2.Fs”,”source”:”operations
/check.go:228″,”time”:”2020-10-23T16:07:35.005714-05:00″}
{“level”:”warning”,”msg”:”13 differences found”,”object”:”parent bucket path customer_archive_destination”,”objectType”:”*b2.Fs”,”source”:”operations
/check.go:231″,”time”:”2020-10-23T16:07:35.005746-05:00″}
{“level”:”warning”,”msg”:”13 errors while checking”,”object”:”parent bucket path customer_archive_destination”,”objectType”:”*b2.Fs”,”source”:”operations
/check.go:233″,”time”:”2020-10-23T16:07:35.005779-05:00″}
{“level”:”warning”,”msg”:”28 matching files”,”object”:”parent bucket path customer_archive_destination”,”objectType”:”*b2.Fs”,”source”:”operations
/check.go:239″,”time”:”2020-10-23T16:07:35.005805-05:00″}
2020/10/23 16:07:35 Failed to check with 14 errors: last error was: 13 differences found
Example: JSON output from rclone check command comparing two data locations.
Use a Static Exclude File to Ban File System Lint
While rclone has a host of flags you can specify on the fly to match or exclude files for a data copy or sync task, it’s hard to remember all the operating system or transient files that can clutter up your cloud storage. Who hasn’t had to laboriously delete macOS’s hidden folder view settings (.DS_Store), or Window’s ubiquitous thumbnails database from your pristine cloud storage?
By building your own customized exclude file of all the files you never want to copy, you can effortlessly exclude all such files in a single flag to consistently keep your storage buckets lint free.
In the following example, I saved a text file under my user directory’s rclone folder and call it with --exclude-from rather than using --exclude (as I would if filtering on the fly):
Example of exclude.conf that lists all of the files you explicitly don’t want to ever sync or copy, including Apple storage system tags, Trash files, git files, and more.
Mount a Cloud Storage Bucket or Folder as a Local Disk
Rclone takes your cloud-fu to a truly new level with these last two moves.
Since Backblaze B2 is active storage (all contents are immediately available) and extremely cost-effective compared to other media archive solutions, it’s become a very popular archive destination for media.
If you mount extremely large archives as if they were massive, external disks on your server or workstation, you can make visual searching through object storage, as well as a whole host of other possibilities, a reality.
For example, suppose you are tasked with keeping a large network of digital signage kiosks up-to-date. Rather than trying to push from your source location to each and every kiosk, let the kiosks pull from your single, always up-to-date archive in Backblaze!
With FUSE installed on your system, rclone can mount your cloud storage to a mount point on your system or server’s OS. It will appear instantly, and your OS will start building thumbnails and let you preview the files normally.
rclone mount b2:art-assets/video ~/Documents/rclone_mnt/
Almost immediately after mounting this cloud storage bucket of HD and 4K video, macOS has built thumbnails, and even lets me preview these high-resolution video files.
Behind the scenes, rclone’s clever use of VFS and caching makes this magic happen. You can tweak settings to more aggressively cache the object structure for your use case.
Serve Content Directly From Cloud Storage With a Pop-up Web or SFTP Server
Many times, you’re called on to give users temporary access to certain cloud files quickly. Whether it’s for an approval, a file hand off, or whatever, this requires thinking about how to get the file to a place where the user can have access to it with tools they know how to use. Trying to email a 100GB file is no fun, and spending the time to download and move it to another system that the user can access can take up a lot of time.
Or perhaps you’d like to set up a simple, uncomplicated way to let users browse a large PDF library of product documents. Instead of moving files to a dedicated SFTP or web server, simply serve them directly from your cloud storage archive with rclone using a single command.
Rclone’s serve command can present your content stored with Backblaze via a range of protocols as easy for users to access as a web browser—including FTP, SFTP, WebDAV, HTTP, HTTPS, and more.
In the following example, I export the contents of the same folder of high-resolution video used above and present it using the WebDAV protocol. With zero HTML or complicated server setups, my users instantly get web access to this content, and even a searchable interface:
rclone serve b2:art_assets/video
2020/10/23 17:13:59 NOTICE: B2 bucket art_assets/video: WebDav Server started on http://127.0.0.1:8080/
Immediately after exporting my cloud storage folder via WebDAV, users can browse to my system and search for all “ProRes” files and download exactly what they need.
For more advanced needs, you can choose the HTTP or HTTPS option and specify custom data flags that populate web page templates automatically.
Continuing Your Study
Combined with our rclone webinar, these five moves will place you well on your path to rclone storage admin mastery, letting you confidently take on complicated data migration tasks with an ease and efficiency that will amaze your peers.
We look forward to hearing of the moves and new use cases you develop with these tools.
Whether you need to deliver fast-changing application updates to users around the world, manage an asset-heavy website, or deliver a full-blown video streaming service—there are two critical parts of your solution you need to solve for: your origin store and your CDN.
You need an origin store that is a reliable place to store the content your app will use. And you need a content delivery network (CDN) to cache and deliver that content closer to every location your users happen to be so that your application delivers an optimized user experience.
These table stakes are simple, but platforms that try to serve both functions together generally end up layering on excessive complexity and fees to keep your content locked on their platform. When you can’t choose the right components for your solution, your content service can’t scale as fast as it needs to today and the premium you pay for unnecessary features inhibits your growth in the future.
That’s why we’re excited to announce our collaboration with Fastly in our campaign to bring choice, affordability, and simplicity to businesses with diverse content delivery needs.
Fastly: The Newest Edge Cloud Platform Partner for Backblaze B2 Cloud Storage
Our new collaboration with Fastly, a global edge cloud platform and CDN, offers an integrated solution that will let you store and serve rich media files seamlessly, free from the lock-in fees and functionality of closed “goliath” cloud storage platforms, and all with free egress from Backblaze B2 Cloud Storage to Fastly.
Fastly’s edge cloud platform enables users to create great digital experiences quickly, securely, and reliably by processing, serving, and securing customers’ applications as close to end-users as possible. Fastly’s edge cloud platform takes advantage of the modern internet, and is designed both for programmability and to support agile software development.
Get Ready to Go Global
The Fastly edge cloud platform is for any business that wants to serve data and content efficiently with the best user experience. Getting started only takes minutes: Fastly’s documentation will help you spin up your account and then help you explore how to use their features like image optimization, video and streaming acceleration, real-time logs, analytic services, and more.
If you’d like to learn more, join us for a webinar with Simon Wistow, Co-Founder & VP of Strategic Initiatives for Fastly, on November 19th at 10 a.m. PST.
Backblaze Covers Migration Egress Fees
To pair this functionality with best in class storage and pricing, you simply need a Backblaze B2 Cloud Storage account to set as your origin store. If you’re already using Fastly but have a different origin store, you might be paying a lot of money for data egress. Maybe even enough that the concept of migrating to another store seems impossible.
Backblaze has the solution: Migrate 50TB (or more), store it with us for at least 12 months, and we’ll pay the data transfer fees.
Or, if you have data on-premise, we have a number of solutions for you. And if the content you want to move is less than 50TB, we still have a way to cut your egress charges from your old provider by over 50%. Contact our team for details.
With Backblaze as your origin store and Fastly as your CDN and edge cloud platform, you can reduce your applications storage and network costs by up to 80% based on joint solution pricing vs. closed platform alternatives. Contact the Backblaze team if you have any questions.
Perhaps I’m dating myself when I say that I’ve been using Facebook for a very long time. So long that the platform is home to many precious photos and videos that I couldn’t imagine losing. And even though they’re mostly shared to Facebook from my phone or other apps, some aren’t. So I’ve periodically downloaded my Facebook albums to my Mac, which I’ve of course set to automatically back up with Backblaze, to ensure they’re safely archived.
And while it’s good to know how to download and back up your social media profile, you might be excited to learn that it’s just become a lot easier: Facebook has integrated Backblaze B2 Cloud Storage directly as a data transfer destination for your photos and videos. This means you can now migrate or copy years of memories in a matter of clicks.
What Data Transfer Means for You
If you use Facebook and want to exercise even greater control over the media you’ve posted there, you’ll find that this seamless integration enables:
Personal safeguarding of images and videos in Backblaze.
Enhanced file sharing and access control options.
Ability to organize, modify, and collaborate on content.
How to Move Your Data to Backblaze B2
Current Backblaze B2 customers can start data transfers within Facebook via Settings & Privacy > Settings / Your Facebook Information / Transfer a Copy of Your Photos or Videos / Choose Destination / Backblaze.
1. You can find Settings & Privacy listed in the options when you click your profile icon.2. Under Settings & Privacy, select Settings.3. Go to Your Facebook Information and select “View” next to Transfer a Copy of Your Photos or Videos.
4. Under Choose Destination, simply select Backblaze and your data transfer will begin.
If you don’t have a Backblaze B2 account, you can create one here. You’ll need a Key ID and an Application Key when you select Backblaze.
The Data Transfer Project and B2 Cloud Storage
The secure, encrypted data transfer service is based on code Facebook developed through the open-source Data Transfer Project (and you all know we love open-source projects, from our original Storage Pod design to Reed-Solomon erasure coding). Data routed to your B2 Cloud Storage account enjoys our standard $5/TB month pricing with a standard 10GB of free capacity.
Our Co-Founder and CEO, Gleb Budman, noted that this new integration harkens back to our roots: “We’ve been helping people safely store their photos and videos in our cloud for almost as long as Facebook has been providing the means to post content. For people on Facebook who want more choice in hosting their data outside the platform, we’re happy to make our cloud a seamlessly available destination.”
As of September 30, 2020, Backblaze had 153,727 spinning hard drives in our cloud storage ecosystem spread across four data centers. Of that number, there were 2,780 boot drives and 150,947 data drives. This review looks at the Q3 2020 and lifetime hard drive failure rates of the data drive models currently in operation in our data centers and provides a handful of insights and observations along the way. As always, we look forward to your comments.
Quarterly Hard Drive Failure Stats for Q3 2020
At the end of Q3 2020, Backblaze was using 150,974 hard drives to store customer data. For our evaluation we remove from consideration those drive models for which we did not have at least 60 drives (more on that later). This leaves us with 150,757 hard drives in our review. The table below covers what happened in Q3 2020.
Observations on the Q3 Stats
There are several models with zero drive failures in the quarter. That’s great, but when we dig in a little we get different stories for each of the drives.
The 18TB Seagate model (ST18000NM000J) has 300 drive days and they’ve been in service for about 12 days. There were no out of the box failures which is a good start, but that’s all you can say.
The 16TB Seagate model (ST16000NM001G) has 5,428 drive days which is low, but they’ve been around for nearly 10 months on average. Still, I wouldn’t try to draw any conclusions yet, but a quarter or two more like this and we might have something to say.
The 4TB Toshiba model (MD04ABA400V) has only 9,108 drive days, but they have been putting up zeros for seven quarters straight. That has to count for something.
The 14TB Seagate model (ST14000NM001G) has 21,120 drive days with 2,400 drives, but they have only been operational for less than one month. Next quarter will give us a better picture.
The 4TB HGST (model: HMS5C4040ALE640) has 274,923 drive days with no failures this quarter. Everything else is awesome, but hold on before you run out and buy one. Why? You’re probably not going to get a new one and if you do, it will really be at least three years old, as HGST/WDC hasn’t made these drives in at least that long. If someone from HGST/WDC can confirm or deny that for us in the comments that would be great. There are stories dating back to 2016 where folks tried to order this drive and got a refurbished drive instead. If you want to give a refurbished drive a try, that’s fine, but that’s not what our numbers are based on.
The Q3 2020 annualized failure rate (AFR) of 0.89% is slightly higher than last quarter at 0.81%, but significantly lower than the 2.07% from a year ago. Even with the lower drive failure rates, our data center techs are not bored. In this quarter they added nearly 11,000 new drives totaling over 150PB of storage, all while operating under strict Covid-19 protocols. We’ll cover how they did that in a future post, but let’s just say they were busy.
The Island of Misfit Drives
There were 190 drives (150,947 minus 150,757) that were not included in the Q3 2020 Quarterly Chart above because we did not have at least 60 drives of a given model. Here’s a breakdown:
Nearly all of these drives were used as replacement drives. This happens when a given drive model is no longer available for purchase, but we have many in operation and we need a replacement. For example, we still have three WDC 6TB drives in use; they are installed in three different Storage Pods, along with 6TB drives from Seagate and HGST. Most of these drives were new when they were installed, but sometimes we reuse a drive that was removed from service, typically via a migration. Such drives are, of course, reformatted, wiped, and then must pass our qualification process to be reinstalled.
There are two “new” drives on our list. These are drives that are qualified for use in our data centers, but we haven’t deployed in quantity yet. In the case of the 10TB HGST drive, the availability and qualification of multiple 12TB models has reduced the likelihood that we would use more of this drive model. The 16TB Toshiba drive model is more likely to be deployed going forward as we get ready to deploy the next wave of big drives.
The Big Drives Are Here
When we first started collecting hard drive data back in 2013, a big drive was 4TB, with 5TB and 6TB drives just coming to market. Today, we’ll define big drives as 14TB, 16TB, and 18TB drives. The table below summarizes our current utilization of these drives.
The total of 19,878 represents 13.2% of our operational data drives. While most of these are the 14TB Toshiba drives, all of the above have been qualified for use in our data centers.
For all of the drive models besides the Toshiba 14TB drive, the number of drive days is still too small to conclude anything, although the Seagate 14TB model, the Toshiba 16TB model, and the Seagate 18TB model have experienced no failures to date.
We will continue to add these large drives over the coming quarters and track them along the way. As of Q3 2020, the lifetime AFR for this group of drives is 1.04%, which as we’ll see, is below the lifetime AFR for all of the drive models in operation.
Lifetime Hard Drive Failure Rates
The table below shows the lifetime AFR for the hard drive models we had in service as of September 30, 2020. All of the drive models listed were in operation during this timeframe.
The lifetime AFR as of Q3 2020 was 1.58%, the lowest since we started keeping track in 2013. That is down from 1.73% one year ago, and down from 1.64% last quarter.
We added back the average age column as “Avg Age.” This is in months and is the average age of the drives used to compute the data in the table and is based on the amount of time they have been in operation. One thing to remember is that our environment is very dynamic with drives being added, being migrated, and leaving on a regular basis and this could impact the average age. For example, we could retire a Storage Pod with mostly older drives and that could lower the average age of the remaining drives of that model while those remaining drives got older.
Looking at the average age, the 6TB Seagate drives are the oldest cohort, averaging nearly five and a half years of service each. These drives have actually gotten better over the last couple years and are aging well with a current lifetime AFR of 1.0%.
If you’d like to learn more, join us for a webinar Q&A with the author of Hard Drive Stats, Andy Klein, on October 22, 10:00 a.m. PT.
The Hard Drive Stats Data
The complete data set used to create the information used in this review is available on our Hard Drive Test Data webpage. You can download and use this data for free for your own purpose. All we ask are three things: 1) You cite Backblaze as the source if you use the data, 2) You accept that you are solely responsible for how you use the data, and 3) You do not sell this data to anyone—it is free.
If you just want the summarized data used to create the tables and charts in this blog post, you can download the ZIP file containing the MS Excel spreadsheet.
Good luck and let us know if you find anything interesting.
Protecting businesses and organizations from ransomware has become one of the most, if not the most, essential responsibilities for IT directors and CIOs. Ransomware attacks are on the rise, occuring every 14 seconds, but you likely already know that. That’s why a top requested feature for Backblaze’s S3 Compatible APIs is Veeam® immutability—to increase your organization’s protection from ransomware and malicious attacks.
We heard you and are happy to announce that Backblaze B2 Cloud Storage now supports data immutability for Veeam backups. It is available immediately.
The solution, which earned a Veeam Ready-Object with Immutability qualification, means a good, clean backup is just clicks away when reliable recovery is needed.
It is the only public cloud storage alternative to Amazon S3 to earn Veeam’s certifications for both compatibility and immutability. And it offers this at a fraction of the cost.
“I am happy to see Backblaze leading the way here as the first cloud storage vendor outside of AWS to give us this feature. It will hit our labs soon, and we’re eager to test this to be able to deploy it in production.”—Didier Van Hoye, Veeam Vanguard and Technology Strategist
Using Veeam Backup & Replication, you can now simply check a box and make recent backups immutable for a specified period of time. Once that option is selected, nobody can modify, encrypt, tamper with, or delete your protected data. Recovering from ransomware is as simple as restoring from your clean, safe backup.
Freedom From Tape, Wasted Resources, and Concern
Prevention is the most pragmatic ransomware protection to implement. Ensuring that backups are up-to-date, off-site, and protected with a 3-2-1 strategy is the industry standard for this approach. But up to now, this meant that IT directors who wanted to create truly air-gapped backups were often shuttling tapes off-site—adding time, the necessity for on-site infrastructure, and the risk of data loss in transit to the process.
With object lock functionality, there is no longer a need for tapes or a Veeam virtual tape library. You can now create virtual air-gapped backups directly in the capacity tier of a Scale-out Backup Repository (SOBR). In doing so, data is Write Once, Read Many (WORM) protected, meaning that even during the locked period, data can be restored on demand. Once the lock expires, data can safely be modified or deleted as needed.
Some organizations have already been using immutability with Veeam and Amazon S3, a storage option more complex and expensive than needed for their backups. Now, Backblaze B2’s affordable pricing and clean functionality mean that you can easily opt in to our service to save up to 75% off of your storage invoice. And with our Cloud to Cloud Migration offers, it’s easier than ever to achieve these savings.
In either scenario, there’s an opportunity to enhance data protection while freeing up financial and personnel resources for other projects.
Backblaze B2 customer Alex Acosta, Senior Security Engineer at Gladstone Institutes—an independent life science research organization now focused on fighting COVID-19—explained that immutability can help his organization maintain healthy operations. “Immutability reduces the chance of data loss,” he noted, “so our researchers can focus on what they do best: transformative scientific research.”
Enabling Immutability
How to Set Object Lock:
Data immutability begins by creating a bucket that has object lock enabled. Then within your SOBR, you can simply check a box to make recent backups immutable and specify a period of time.
What Happens When Object Lock Is Set:
The true nature of immutability is to prevent modification, encryption, or deletion of protected data. As such, selecting object lock will ensure that no one can:
Manually remove backups from Capacity Tier.
Remove data using an alternate retention policy.
Remove data using lifecycle rules.
Remove data via tech support.
Remove by the “Remove deleted items data after” option in Veeam.
Once the lock period expires, data can be modified or deleted as needed.
Getting Started Today
With immutability set on critical data, administrators navigating a ransomware attack can quickly restore uninfected data from their immutable Backblaze backups, deploy them, and return to business as usual without painful interruption or expense.
Get started with improved ransomware protection today. If you already have Veeam, you can create a Backblaze B2 account to get started. It’s free, easy, and quick, and you can begin protecting your data right away.
This spotlight series calls attention to developers who are creating inspiring, innovative, and functional solutions with cloud storage. This month, we asked Tim Child, Co-founder of iconik, to explain the development of their cloud-based content management and collaboration solution.
How iconik Built a Multi-Cloud SaaS
The Challenge:
Back when we started designing iconik, we knew that we wanted to have a media management system that was hugely scalable, beyond anything our experienced team had seen before.
With a combined 50 years in the space, we had worked with many customer systems and not one of them was identical. Each customer had different demands for what systems should offer—whether it was storage, CPU, or database—and these demands changed over the lifecycle of the customer’s needs. Change was the only constant. And we knew that systems that couldn’t evolve and scale couldn’t keep up.
Identifying the Needs:
We quickly realized that we would need to meet constantly changing demands on individual parts of the system and that we needed to be able to scale up and down capabilities at a granular level. We wanted to have thousands of customers with each one potentially having hundreds of thousands, if not millions, of assets on the same instance, leading to the potential for billions of files being managed. We also wanted to have the flexibility to run private instances for customers if they so demanded.
With these needs in mind, we knew our service had to be architected and built to run in the cloud, and that we would run the business as a SaaS solution.
Mapping Our Architecture
Upon identifying this challenge, we settled on using a microservices architecture with each functional unit broken up and then run in Docker containers. This provided the granularity around functions that we knew customers would need. This current map of iconik’s architecture is nearly identical to what we planned from the start.
To manage these units while also providing for the scaling we sought, the architecture required an orchestration layer. We decided upon Kubernetes, as it was:
A proven technology with a large, influential community supporting it.
A system that functionally supported what we needed to do while also providing the ability to automatically scale, distribute, and handle faults for all of our containers.
During this development process, we also invested time in working with leading cloud IaaS and PaaS providers, in particular both Amazon AWS and Google Cloud, to discover the right solutions for production systems, AI, transcode, CDN, Cloud Functions, and compute.
Choosing a Multi-Cloud Approach
Based upon the learnings from working with a variety of cloud providers, we decided that our strategy would be to avoid being locked into any one cloud vendor, and instead pursue a multi-cloud approach—taking the best from each and using it to our customers’ advantage.
As we got closer to launching iconik.io in 2017, we started looking at where to run our production systems, and Google Cloud was clearly the winner in terms of their support for Kubernetes and their history with the project.
Looking at the larger picture, Google Cloud also had:
A world-class network with a presence of 93+ points in 64 global regions.
BigQuery, with its on-demand pricing, advanced scalability features, and ease of use.
Machine learning and AI tools that we had been involved in beta testing before they were built in, and which would provide an important element in our offering to give deep insights around media.
APIs that were rock solid.
These important factors became the deciding points on launching with Google Cloud. But, moving forward, we knew that our architecture would not be difficult to shift to another service if necessary as there was very little lock-in for these services. In fact, the flexibility provided allows us to run dedicated deployments for customers on their cloud platform of choice and even within their own virtual private cloud.
Offering Freedom of Choice for Storage
With our multi-cloud approach in mind, we wanted to bring the same flexibility we developed in production systems to our storage offering. Google Cloud Services was a natural choice because it was native to our production systems platform. From there, we grew options in line with the best fit for our customers, either based on their demands or based on what the vendor could offer.
From the start, we supported Amazon S3 and quickly brought Backblaze B2 Cloud Storage on board. We also allowed our customers to use their own Buckets to be truly in charge of their files. We continued to be led by the search for maximum scalability and flexibility to change on the fly.
While a number of iconik customers use B2 Cloud Storage or Amazon S3 as their only storage solution, many also take a multiple vendor approach because it can best meet their needs either in terms of risk management, delivery of files, or cost management.
As we have grown, our multi-cloud approach has allowed us to onboard more services from Amazon—including AI, transcode, CDN, Cloud Functions, and compute for our own infrastructure. In the future, we intend to do the same with Azure and with IBM. We encourage the same for our customers as we allow them to mix and match AWS, Backblaze, GCS, IBM, and Microsoft Azure to match their strategy and needs.
Reaping the Benefits of a Multi-Cloud Solution
To date, our cloud-agnostic approach to building iconik has paid off.
This year, when iconik’s asset count increased by 293% to over 28M assets, there was no impact on performance.
As new technology has become available, we have been able to improve a single section of our architecture without impacting other parts.
By not limiting cloud services that can be used in iconik, we have been able to establish many rewarding partnerships and accommodate customers who want to keep the cloud services they already use.
Hopefully our story can help shed some light to help any others who are venturing out to build a SaaS of their own. We wish you luck!
With a mission of empowering creatives, the team at Streamlabs was driven to follow up their success in live streaming by looking beyond the stream—and so, Oslo was born.
Oslo, generally available as of today, is the place where solo YouTubers and small video editing teams can upload, review, collaborate, and share videos. But, the road from Streamlabs to Oslo wasn’t a straight line. The intrepid team from Streamlabs had to muddle through painfully truthful market research, culture shock, an affordability dilemma, and a pandemic to get Oslo into the hands of their customers. Let’s take a look at how they did it.
Market Research and the Road to Oslo
In September 2019, Streamlabs was acquired by Logitech. Yes, that Logitech, the one who makes millions of keyboards and mice, and all kinds of equipment for gamers. That Logitech acquired a streaming company. Bold, different, and yet it made sense to nearly everyone, especially anyone in the video gaming industry. Gamers rely on Logitech for a ton of hardware, and many of them rely on Streamlabs to stream their gameplay on Twitch, YouTube, and Facebook.
About the same time, Ashray Urs, Head of Product at Streamlabs, and his team were in the middle of performing market research and initial design work on their next product: video editing software for the masses. And what they were learning from the market research was disconcerting. While their target audience thought it would be awesome if Streamlabs built a video editor, the market was already full of them and nearly everybody already had one, or two, or even three editing tools on hand. In addition, the list of requirements to build a video editor was daunting, especially for Ashray and his small team of developers.
The future of Oslo was looking bleak when a fork in the road appeared. While video editing wasn’t a real pain point, many solo creators and small video editing teams were challenged and often overwhelmed by a key function in any project: collaboration. Many of these creators spent more time sending emails, uploading and downloading files, keeping track of versions and updates, and managing storage instead of being creative. Existing video collaboration tools were expensive, complex, and really meant for larger teams. Taking all this in, Ashray and his team decided on a different road to Oslo. They would build a highly affordable, yet powerful, video collaboration and sharing service.
Culture Shock: Hardware Versus Software
As the Oslo project moved forward, a different challenge emerged for Ashray: communicating their plans and processes for the Oslo service to their hardware oriented parent company, Logitech.
For example, each thought quite differently about the product release process. Oslo, as a SaaS service could, if desired, update their product daily to all their customers, and they could add new features and new upsells in weeks or maybe months. Logitech’s production process, on the other hand, was oriented toward having everything ready so they could make a million units of a keyboard. With the added challenge of not having an “update now” button on those keyboards.
Logitech was not ignorant of software, having created and shipped device drivers, software tools, and other utilities. But to them, the Oslo release process felt like a product launch on steroids. This is the part in the story where the bigger company tells the little company they have to do things “our” way. And it would have been stereotypically “corporate” for Logitech to say no to Oslo, then bury it in the backyard and move on. Instead, they gave the project the green light and fully supported Ashray and his team as they moved forward.
Backblaze B2 Powers Affordability
As the feature requirements around Oslo began to coalesce, attention turned to how Oslo would deliver on the goal to provide them at an affordable price. After all, solo YouTubers and small video teams were not known to have piles of money to spend on tools. The question became moot when they chose Backblaze B2 Cloud Storage as their storage vendor.
To start, Backblaze enabled Oslo to meet the pricing targets they had determined were optimal for their market. Choosing any of the other leading cloud storage vendors would have doubled or even tripled the subscription price of Oslo. That would have made Oslo a non-starter for much of its target audience.
On the cost side, many of the other cloud storage providers have complex or hidden terms, like charging for files you delete if you don’t keep them around long enough—30 day minimum for some vendors, 90 day minimum for others. Ashray had no desire to explain to customers that they had to pay extra for deleted files, nor did he want to explain to his boss why 20% of the cloud storage costs for the Oslo service were for deleted files. With Backblaze he didn’t have to do either, as each day Oslo’s data storage charges are based on the files they currently have stored, and not for files they deleted 30, 60, or even 89 days ago.
On the features side, the Backblaze B2 Native APIs enabled Oslo to implement their special upload links feature which allows collaborators to add files directly into a specific project. As the project editor, this feature allows you to send upload links to collaborators that they can use to upload files. The links can be time-based—e.g. good for 24 hours—and password protected, if desired.
New Product Development in a Pandemic
About the time the Oslo team was ready to start development, they were sent home as their office closed due to the Covid-19 pandemic. The whiteboards full of flow charts, UI diagrams, potential issues, and more essential information were locked away. Ad hoc discussions and decisions from hallway encounters, lunchroom conversations, and cups of tea with colleagues stopped.
The first few days were eerie and uncertain, but like many other technology companies they began to get used to their new work environment. Yes, they had the advantage of being technologically capable as meeting apps, collaboration services, and messaging systems were well within their grasp, but they were still human. While it took some time to get into the work from home groove, they were able to develop, QA, run a beta program, and deliver Oslo, without a single person stepping back in the office. Impressive.
Oslo 1.0
Every project, software, hardware, whatever, has some twists and turns as you go through the process. Oslo could have been just another video editing service, could have cost three times as much, or could have been one more cancelled project due to Covid-19. Instead, the Oslo team delivered YouTubers and the like an affordable video collaboration and sharing service with lots of cool features aimed at having them spend less time being project managers and more time being creators.
Nice job, we’re glad Backblaze could help. You can get the full scoop about Oslo at oslo.io.
How do you grow your production process without missing a beat as you evolve over 20 years from a single magazine to a multichannel media powerhouse? Since there are some cool learnings for many of you, here’s a summary of our recent case study deep dive into Verizon’s Complex Networks.
Founders Marc Eckō of Eckō Unlimited and Rich Antoniello started Complex in 2002 as a bi-monthly print magazine. Over almost 20 years, they’ve grown to produce nearly 50 episodic series in addition to monetizing more than 100 websites. They have a huge audience reaching 21 billion lifetime views and 52.2 million YouTube subscribers with premium distributors including Netflix, Hulu, Corus, Facebook, Snap, MSG, Fuse, Pluto TV, Roku, and more. Their team of creatives produce new content constantly—covering everything from music to movies, sports to video games, and fashion to food—which means that production workflows are the pulse of what they do.
Looking for Data Storage During Constant Production
In 2016, the Complex production team was expanding rapidly, with recent acquisitions bringing on multiple new groups that all had their own workflows. They used a Terrablock by Facilis and a few “homebrewed solutions,” but there was no unified, central storage location, and they were starting to run out of space. As many organizations with tons of data and no space do, they turned to Amazon Glacier.
There were problems:
Visibility: They started out with Glacier Vault, but with countless hours of good content, they constantly needed to access their archive—which required accessing the whole thing just to see what was in there.
Accessibility: An upgrade to S3 Glacier made their assets more visible, but retrieving those assets still involved multiple steps, various tools, and long retrieval times—sometimes ranging to 12 hours.
Complexity: S3 has multiple storage classes, each with its own associated costs, fees, and wait times.
Expense: The worst of the issue was that this glacial process didn’t just slow down production, it also incurred huge expenses through egress charges.
The worst thing was, staff would wade through this process only to sometimes realize that the content sent back to them wasn’t what they were looking for. The main issue for the team was that they struggled to see all of their storage systems clearly.
Organizing Storage With Transparent Asset Management
They resolved to fix the problem once and for all by investing in three areas:
Empower their team to collaborate and share at the speed of their work.
Identify tools that would scale with their team instantaneously.
Incorporate off-site storage that mimicked their on-site solutions’ scaling and simplicity.
To remedy their first issue, they set up a centralized SAN—a Quantum StorNext—that allowed the entire team to work on projects simultaneously.
Second, they found iconik, which moved them away from the inflexible on-prem integration philosophies of legacy MAM systems. Even better, they could test-run iconik before committing.
Finally, because iconik is integrated with Backblaze B2 Cloud Storage, the team at Complex decided to experiment with a B2 Bucket. Backblaze B2’s pay-as-you-go service with no upload fees, no deletion fees, and no minimum data size requirements fit the philosophy of their approach.
There was one problem: It was easy enough to point new projects toward Backblaze B2, but they still had petabytes of data they’d need to move to fully enable this new workflow.
Setting Up Active Archive Storage
The post and studio operations and media infrastructure and technology teams estimated that they would have to copy at least 550TB of 1.5PB of data from cold storage for future distribution purposes in 2020. Backblaze partners were able to help solve the problem.
Flexify.IO uses cloud internet connections to achieve significantly faster migrations for large data transfers. Pairing Flexify with a bare-metal cloud services platform to set up metadata ingest servers in the cloud, Complex was able to migrate to B2 Cloud Storage directly with their files and file structure intact. This allowed them to avoid the need to pull 550TB of assets into local storage just to ingest assets and make proxy files.
More Creative Possibilities With a Flexible Workflow
Now, Complex Networks is free to focus on creating new content with lightning-fast distribution. Their creative team can quickly access 550TB of archived content via proxies that are organized and scannable in iconik. They can retrieve entire projects and begin fresh production without any delays. “Hot Ones,” “Sneaker Shopping,” and “The Burger Show”—the content their customers like to consume, literally and figuratively, is flowing.
Check out our Cloud to Cloud Migration offer and other transfer partners—we’ll pay for your data transfer if you need to move more than 50TB out of Amazon.
We launched our Backblaze S3 Compatible APIs in May of 2020 and released them for GA in July. After a launch, it’s easy to forget about the hard work that made it a reality. With that in mind, we’ve asked Malay Shah, our Senior Software Engineering Manager, to explain one of the challenges he found intriguing in the process. If you’re interested in developing your own APIs, or just curious about how ours have come to be, we think you’ll find Malay’s perspective interesting.
When we started building our Backblaze S3 Compatible APIs, we already had Backblaze B2 Cloud Storage, so the hard work to create a durable, scalable, and highly performant object store was already done. And B2 was already conceptually similar to S3, so the task seemed far from impossible. That’s not to say that it was easy or without any challenges. There were enough differences between the B2 Native APIs and the S3 API to make the project interesting, and one of those is authentication. In this post, I’m going to walk you through how we approached the challenge of authentication in our development of Backblaze S3 Compatible APIs.
The Challenge of Authentication: S3 vs. B2 Cloud Storage
B2 Cloud Storage’s approach to authentication is login/session based, where the API key ID and secret are used to log in and obtain a session ID, which is then provided on each subsequent request. S3 requires each individual request to be signed using the key ID and secret.
Our login/session approach does not require storing the API key secret on our end, only a hash of it. As a result, any compromise of our database would not allow hackers to impersonate customers and access their data. However, this approach is susceptible to “man-in-the-middle” attacks. Capturing the login request (API call to b2_authorize_account) would reveal the API key ID and secret to the attacker; capturing subsequent requests would reveal the session ID which is valid for 24 hours. Either of these would allow a hacker to impersonate a customer, which is clearly not a good thing. That said, our system and basic data safety practices will protect users. First, it is important to maintain your trusted certificate list. Our APIs are only available over HTTPS, and HTTPS in conjunction with a well managed trusted certificate list mitigates the likelihood of a “man-in-the-middle” attack.
Amazon’s approach with S3 requires their backend to store the secret because authenticating a request requires the backend to replicate the request signing process for each call. As a result, request signing is much less susceptible to a “man-in-the-middle” attack. The most any bad actor could do is replay the request; a hacker would not be able to impersonate the customer and make other requests. However, compromising the systems that store the API key secret would allow impersonation of the customer. This risk is typically mitigated by encrypting the API key secret and storing that key somewhere else, thus requiring multiple systems to be compromised.
Both approaches are common patterns for authentication, each with their own strengths and risks.
Storing the API Key Secret
To implement AWS’s request signing in our system, we first needed to figure out how to store the API key secret. A compromise of our database by a hacker who has obtained the hash of the secret for B2 does not allow that hacker to impersonate customers, but if we stored the secret itself, it absolutely would. So we couldn’t store the secret alongside the other application key data. We needed another solution, and it needed to handle the number of application keys we have (millions) and the volume of API requests we service (hundreds of thousands per minute), without slowing down requests or adding additional risks of failure.
Our solution is to encrypt the secret and store that alongside the other application key data in our database. The encryption key is then kept in a secrets management solution. The database already supports the volume of requests we service and decrypting the secret is computationally trivial, so there is no noticeable performance overhead.
With this approach, a compromise of the database alone would only reveal the encrypted version of the secret, which is just as useless as having the hash. Multiple systems must be compromised to obtain the API key secret.
Implementing the Request Signing Algorithm
We chose to only implement AWS’s Signature Version 4 as Version 2 is deprecated and is not allowed for use on newly created buckets. Within Version 4, there are multiple ways to sign the request: sign only the headers, sign the whole request, sign individual chunks, and pre-signed URLs. All of these follow a similar pattern but differ enough to warrant individual consideration for testing. We absolutely needed to get this right so we tested authentication in many ways:
Ran through Amazon’s test suite of example requests and expected signatures
Tested 20 applications that work with Backblaze S3 Compatible APIs including Veeam and Synology
Ran Ceph’s S3-tests suite
Manually tested using the AWS command line interface
Manually tested using Postman
Built automated tests using both the Python and Java SDKs
Made HTTP requests directly to test cases not possible through the Python or Java SDKs
Hired hackers security researchers to break our implementation
With the B2 Native API authentication model, we can verify authentication by examining the “Authorization” header and only then move on to processing the request, but S3 requests—where the whole request is signed or uses signed chunks—can only be verified after reading the entire request body. For most of the S3 APIs, this is not an issue. The request bodies can be read into memory, verified, and then continue on to processing. However, for file uploads, the request body can be as large as 5GB—far too much to store in memory—so we reworked our uploading logic to handle authentication failures occurring at the end of the upload and to only record API usage after authentication passes.
The different ways to sign requests meant that in some cases we have to verify the request after the headers arrive, and in other cases verify only after the entire request body is read. We wrote the signature verification algorithm to handle each of these request types. Amazon had published a test suite (which is now no longer available, unfortunately) for request signing. This test suite was designed to help people call into the Amazon APIs, but due to the symmetric nature of the request signing process, we were able to use it as well to test our server-side implementation. This was not an authoritative or comprehensive test suite, but it was a very helpful starting point. As was the AWS command line interface, which in debug mode will output the intermediate calculations to generate the signature, namely the canonical request and string to sign.
However, when we built our APIs on top of the signature validation logic, we discovered that our APIs handled reading the request body in different ways, leading to some APIs succeeding without verifying the request, yikes! So there were even more combinations that we needed to test, and not all of these combinations could be tested using the AWS software development kits (SDKs).
For file uploads, the SDKs only signed the headers and not the request body—a reasonable choice for file uploads. But as implementers, we must support all legal requests so we made direct HTTP requests to verify whole request signing and signed chunk requests. There’s also instrumentation now to ensure that all successful requests are verified.
Looking Back
We expected this to be a big job, and it was. Testing all the corner cases of request authentication was the biggest challenge. There was no single approach that covered everything; all of the above items tested different aspects of authentication. Having a comprehensive and multifaceted testing plan allowed us to find and fix issues we would have never thought of, and ultimately gave us confidence in our implementation.
To provide the best experiences, we use technologies like cookies to store and/or access device information. Consenting to these technologies will allow us to process data such as browsing behavior or unique IDs on this site. Not consenting or withdrawing consent, may adversely affect certain features and functions.
Functional
Always active
The technical storage or access is strictly necessary for the legitimate purpose of enabling the use of a specific service explicitly requested by the subscriber or user, or for the sole purpose of carrying out the transmission of a communication over an electronic communications network.
Preferences
The technical storage or access is necessary for the legitimate purpose of storing preferences that are not requested by the subscriber or user.
Statistics
The technical storage or access that is used exclusively for statistical purposes.The technical storage or access that is used exclusively for anonymous statistical purposes. Without a subpoena, voluntary compliance on the part of your Internet Service Provider, or additional records from a third party, information stored or retrieved for this purpose alone cannot usually be used to identify you.
Marketing
The technical storage or access is required to create user profiles to send advertising, or to track the user on a website or across several websites for similar marketing purposes.


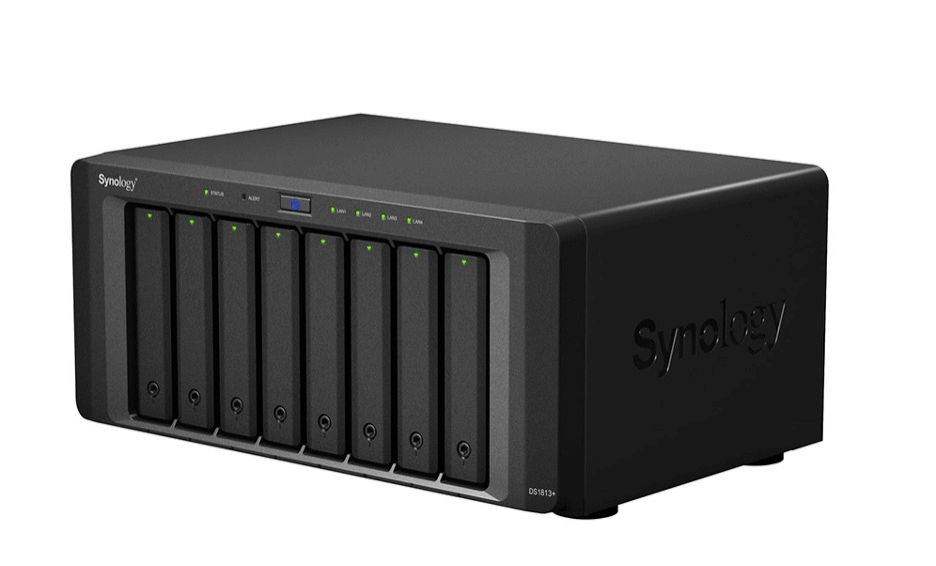


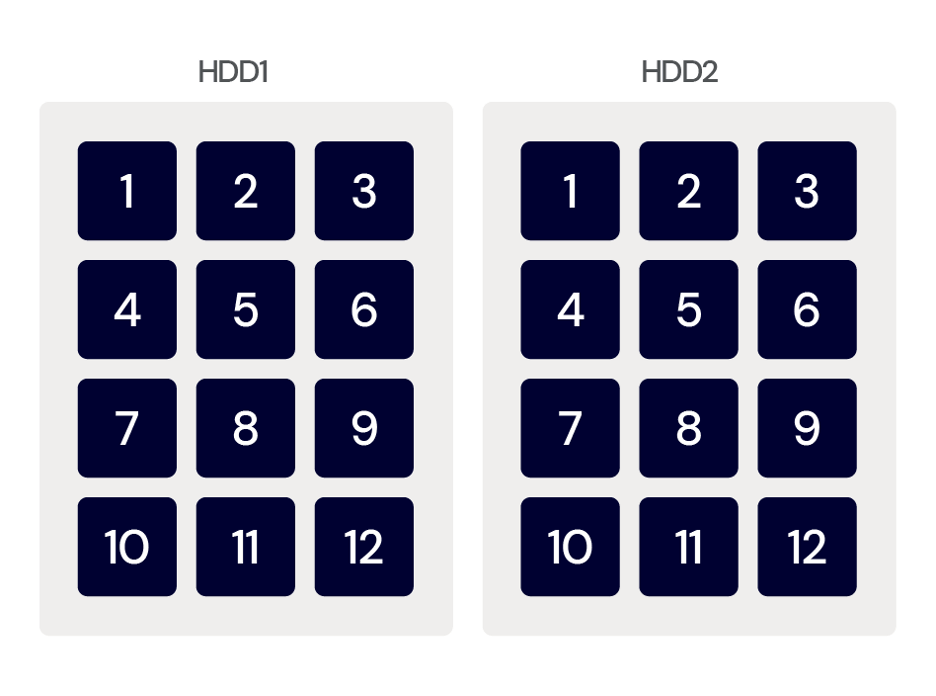
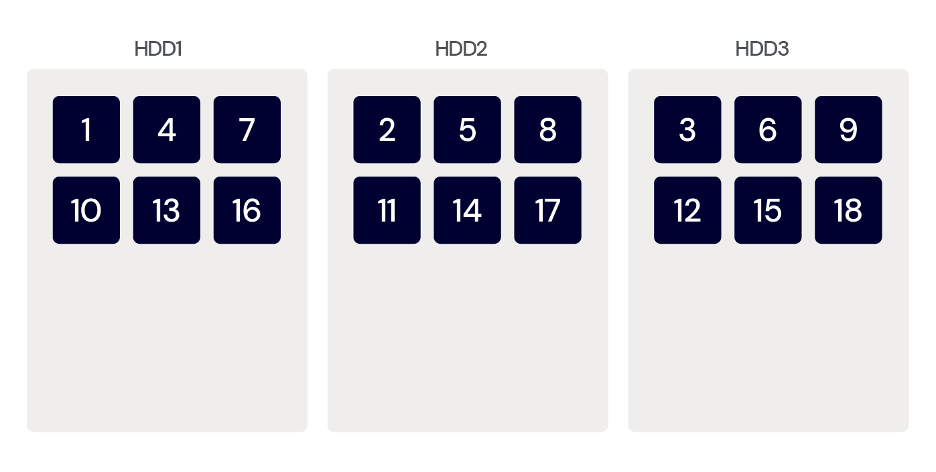
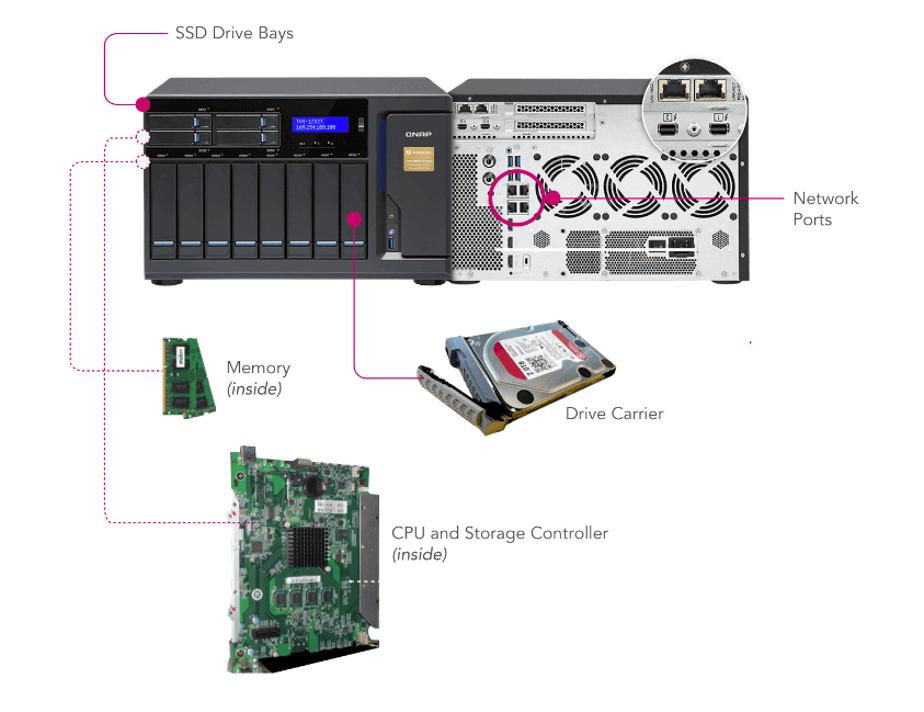
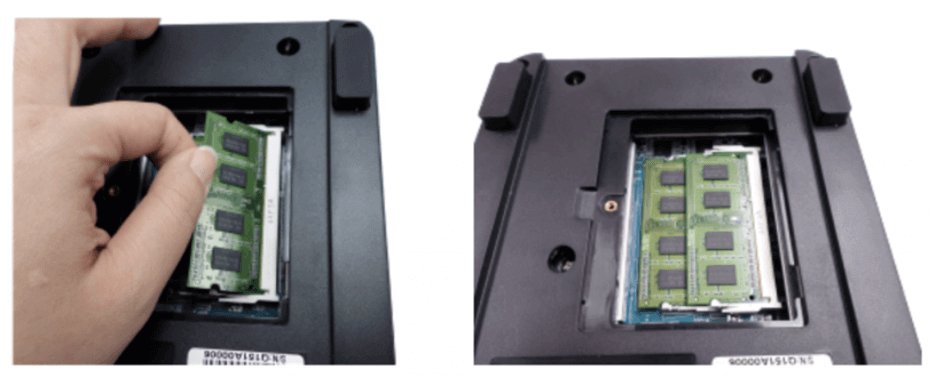

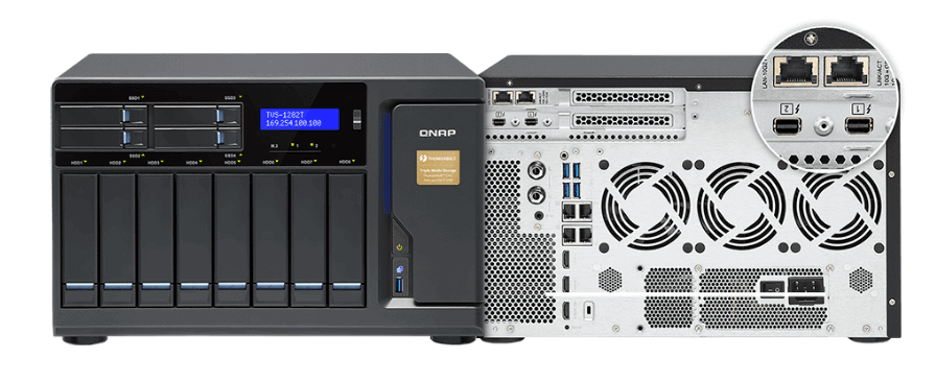
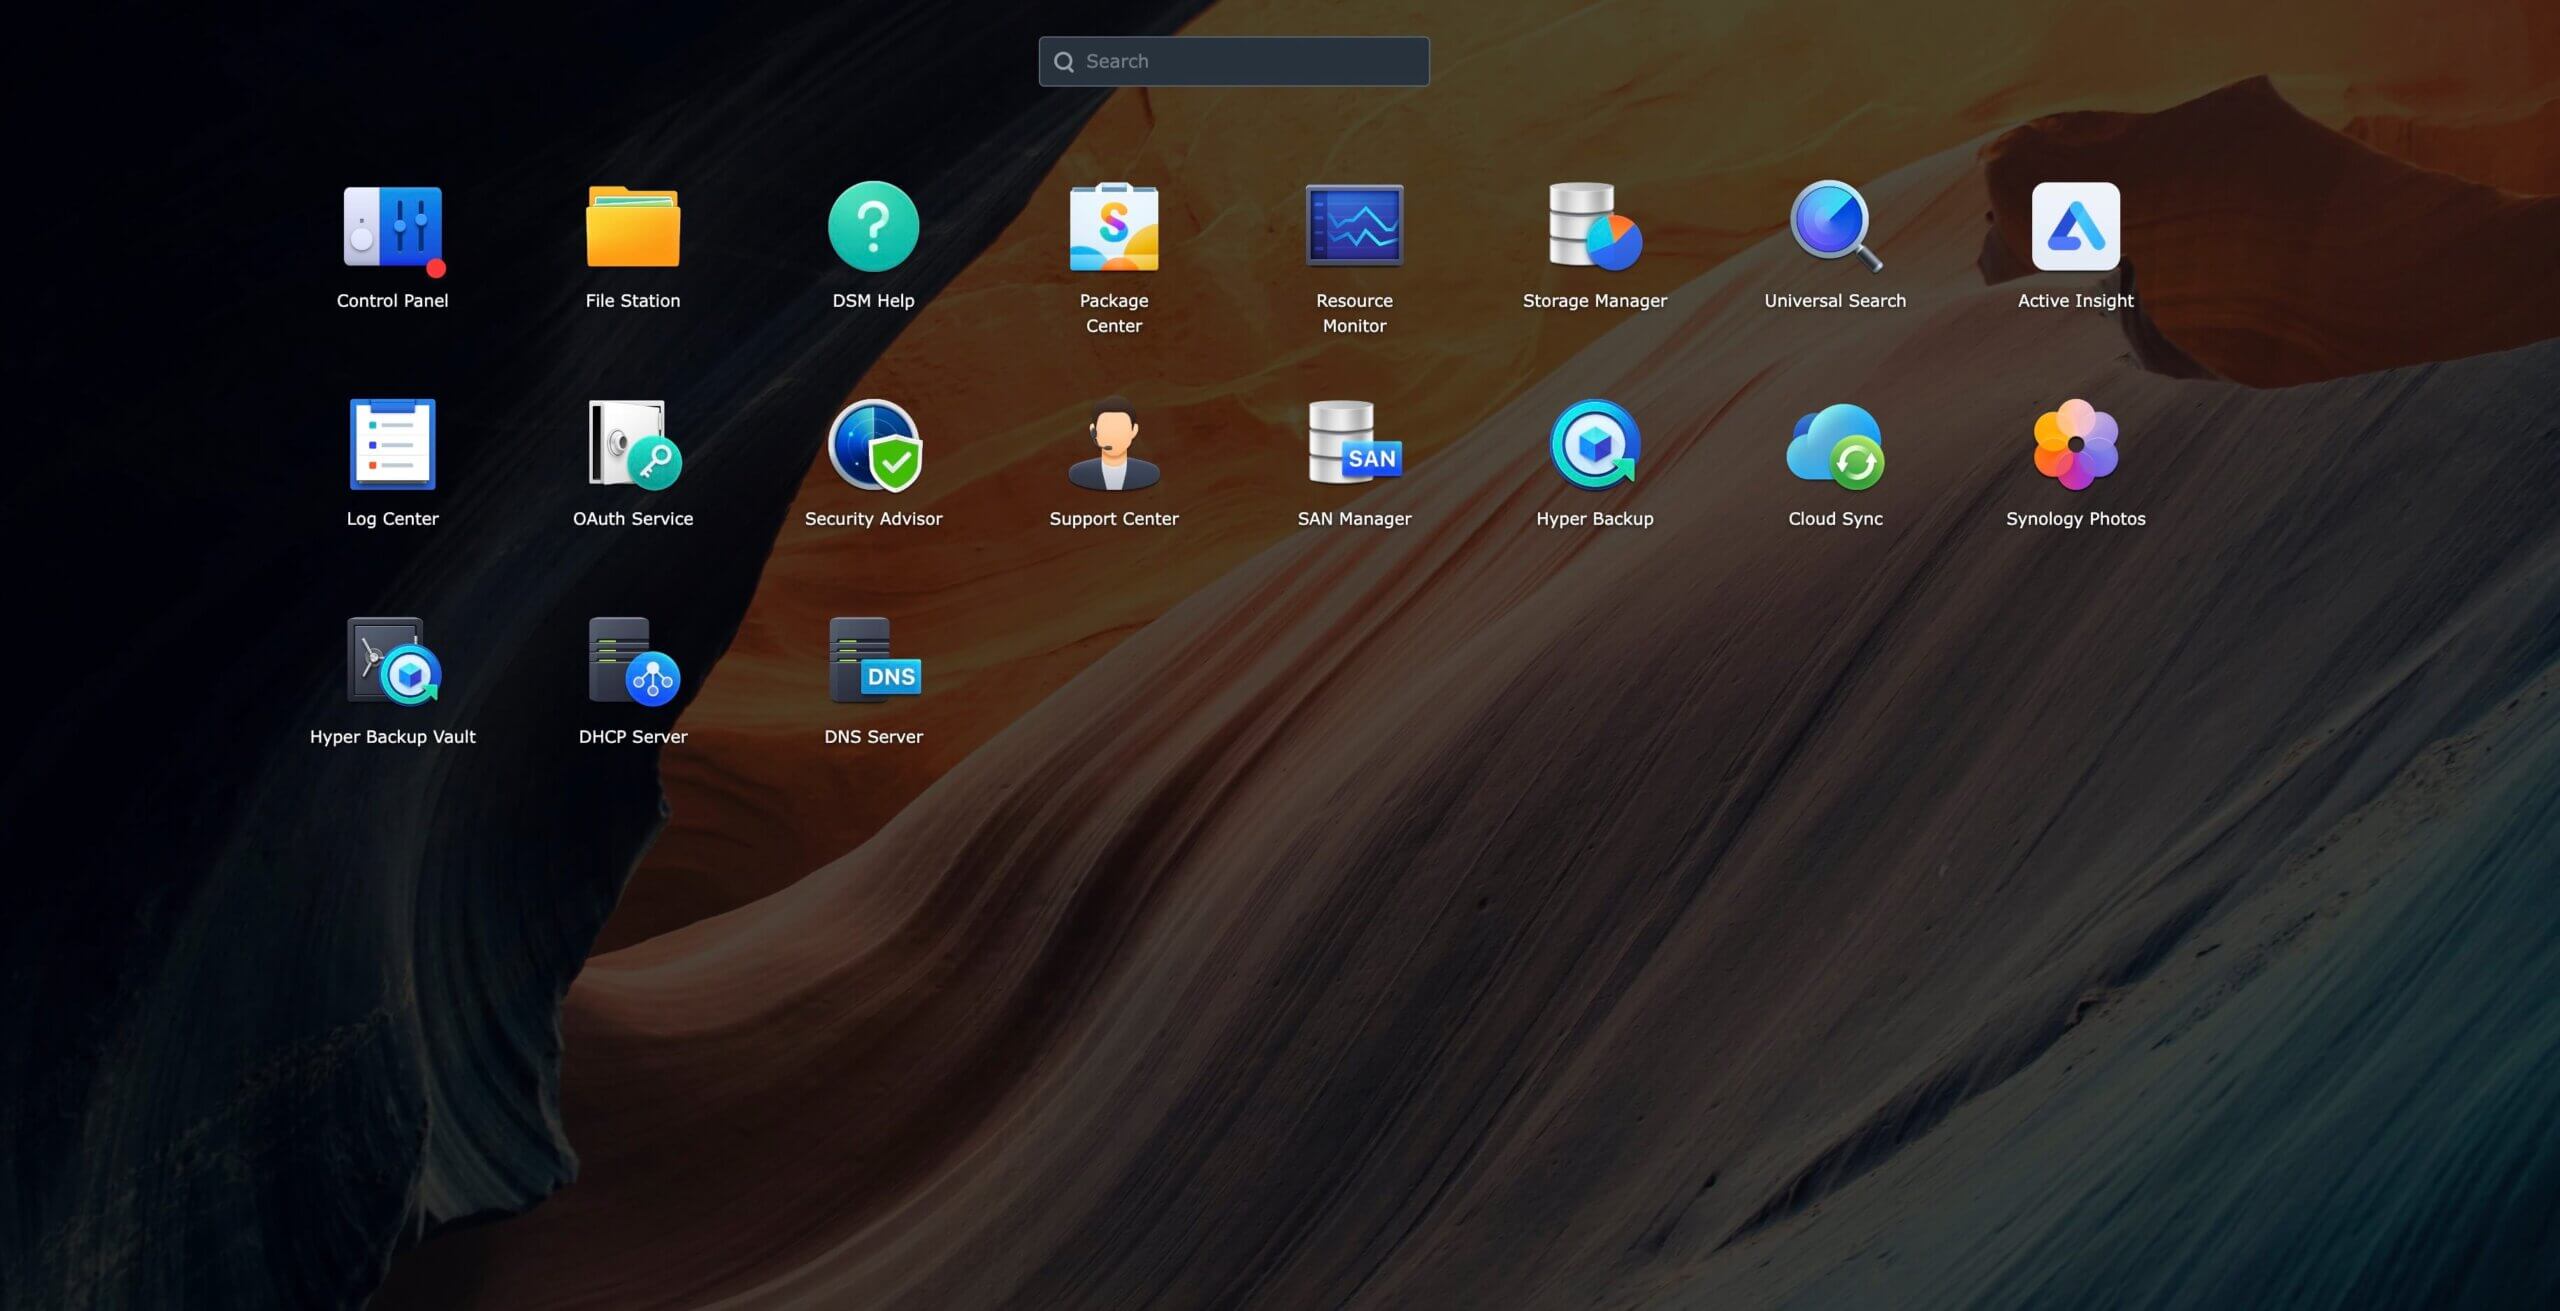
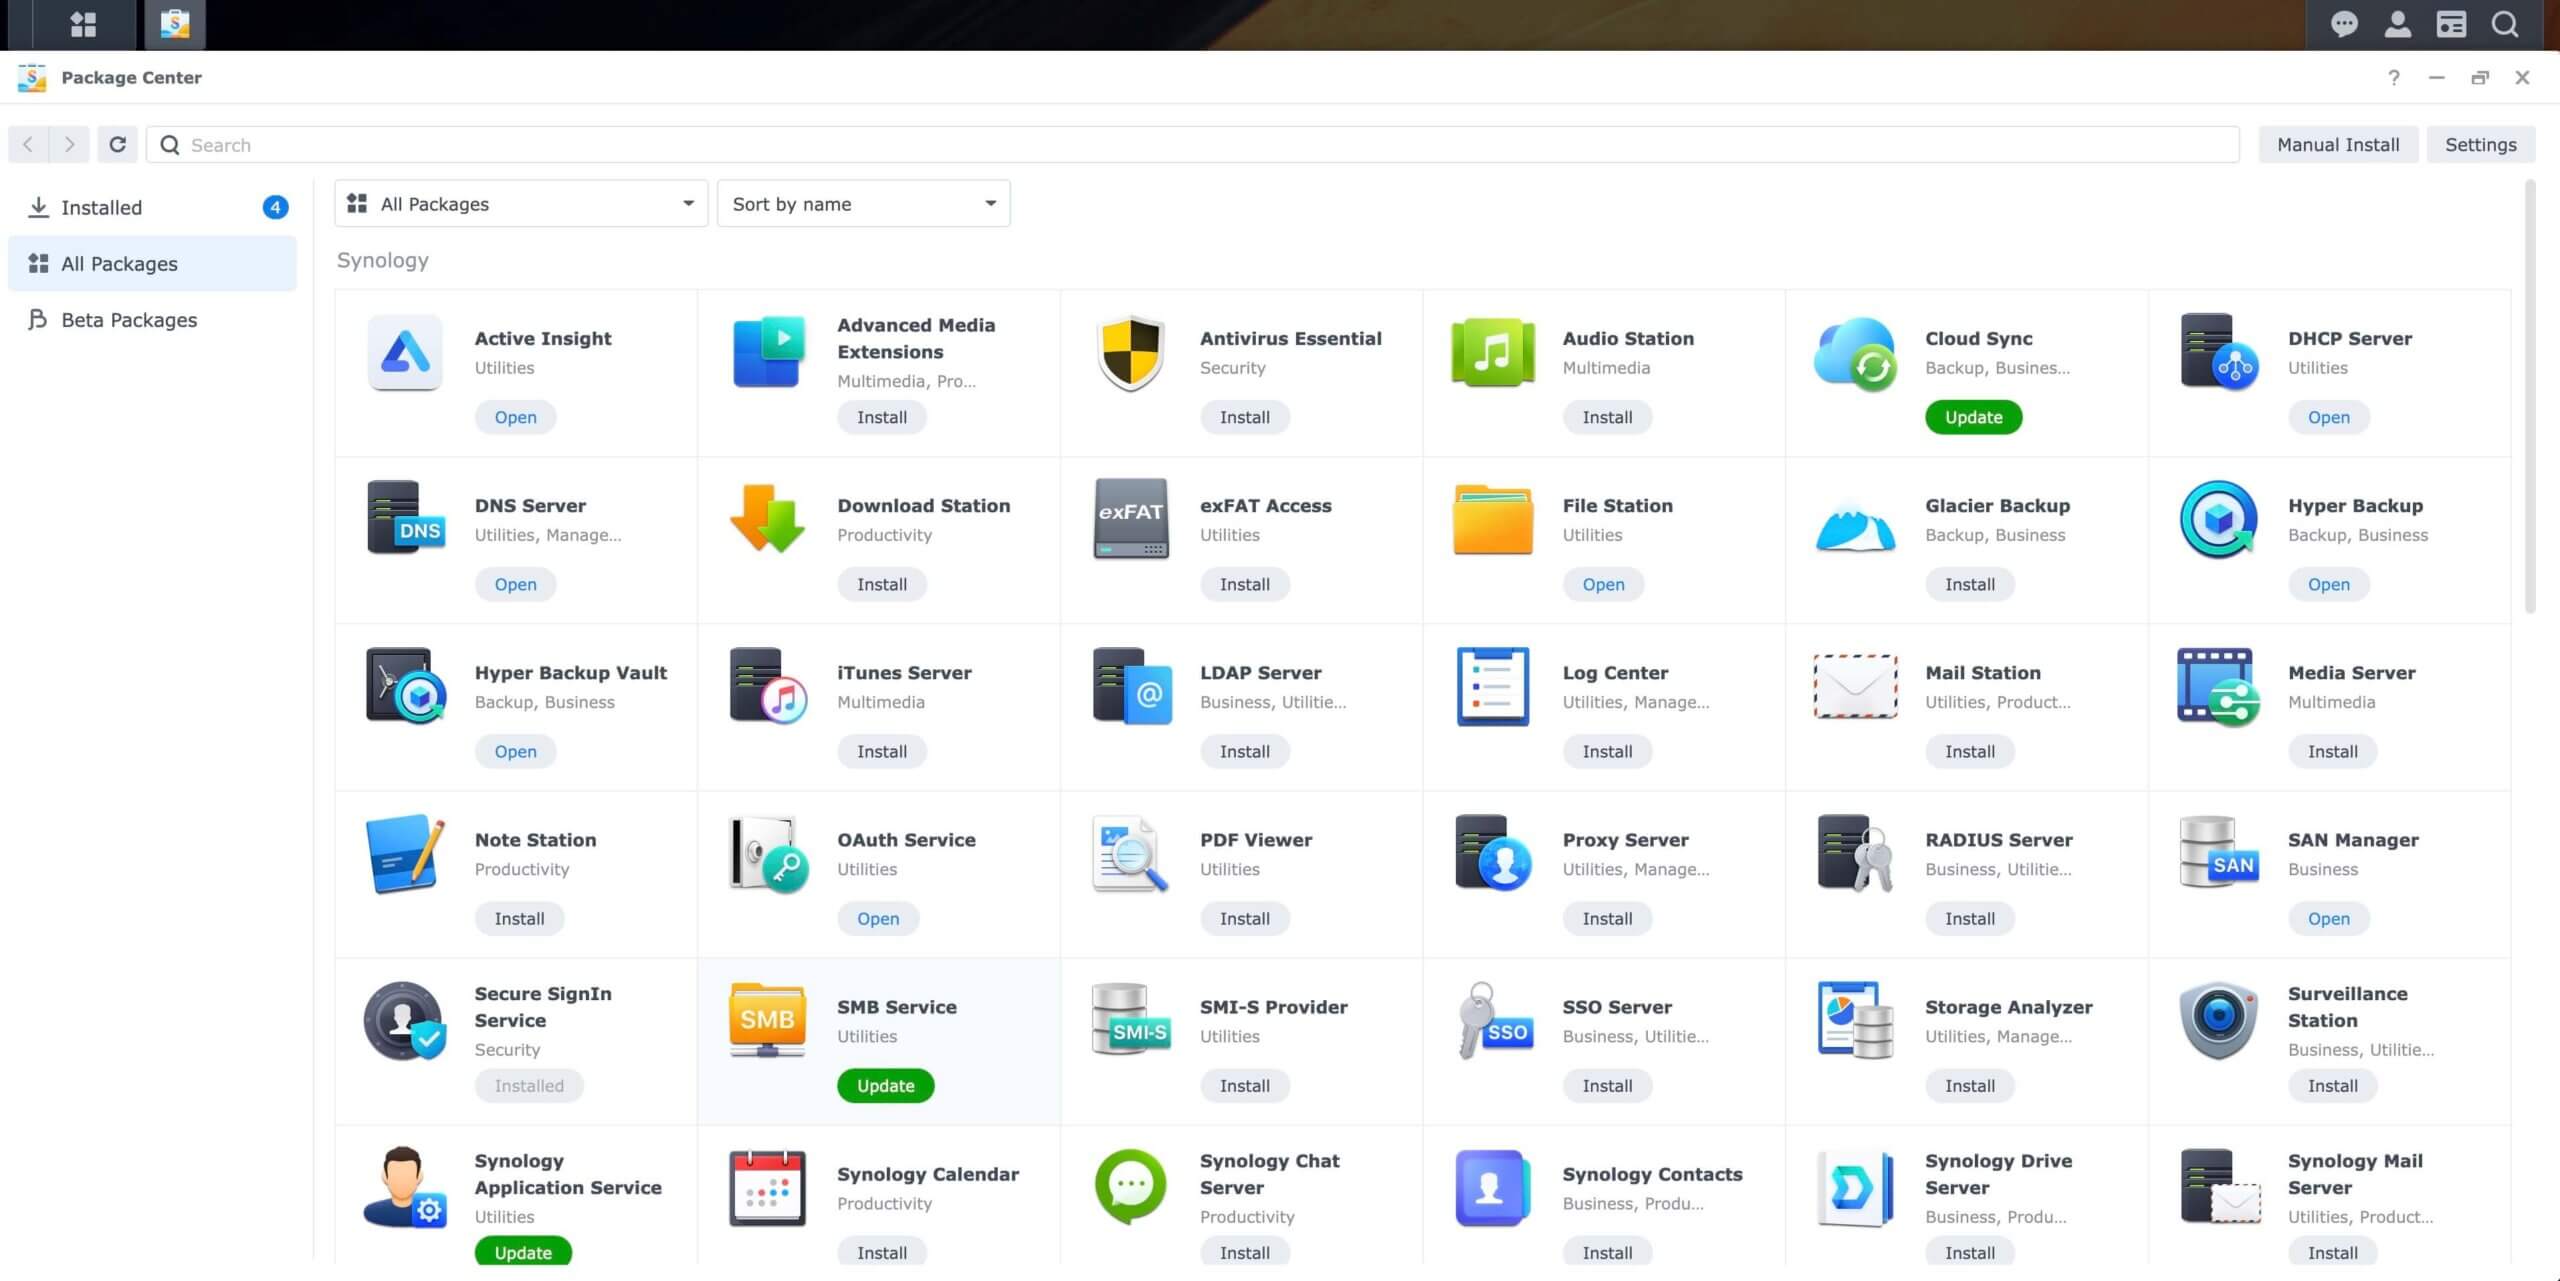

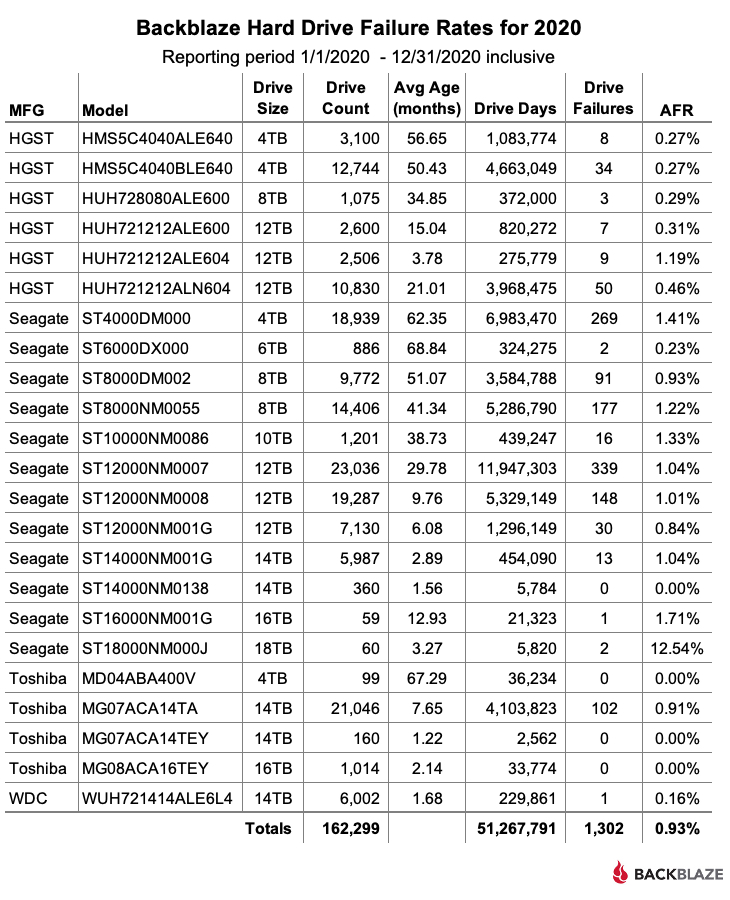
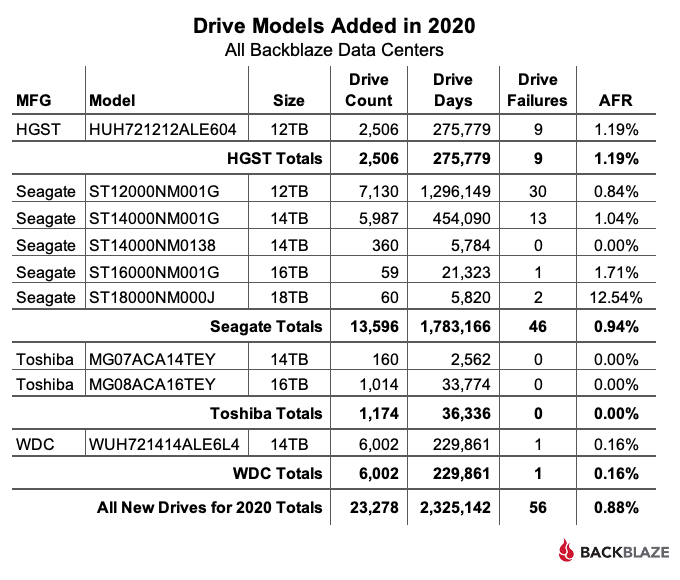
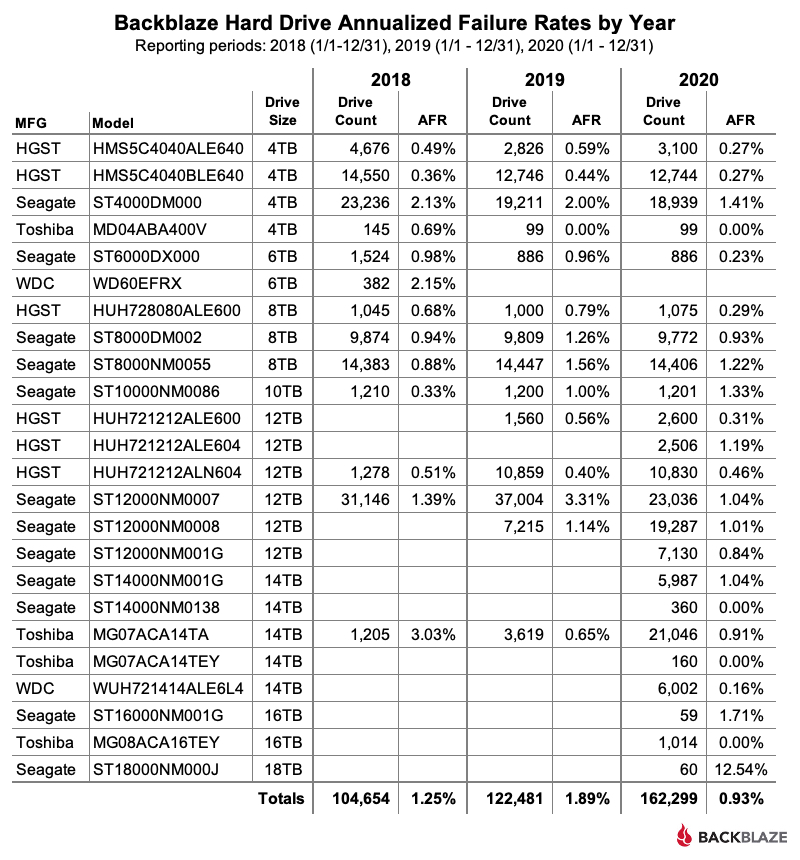
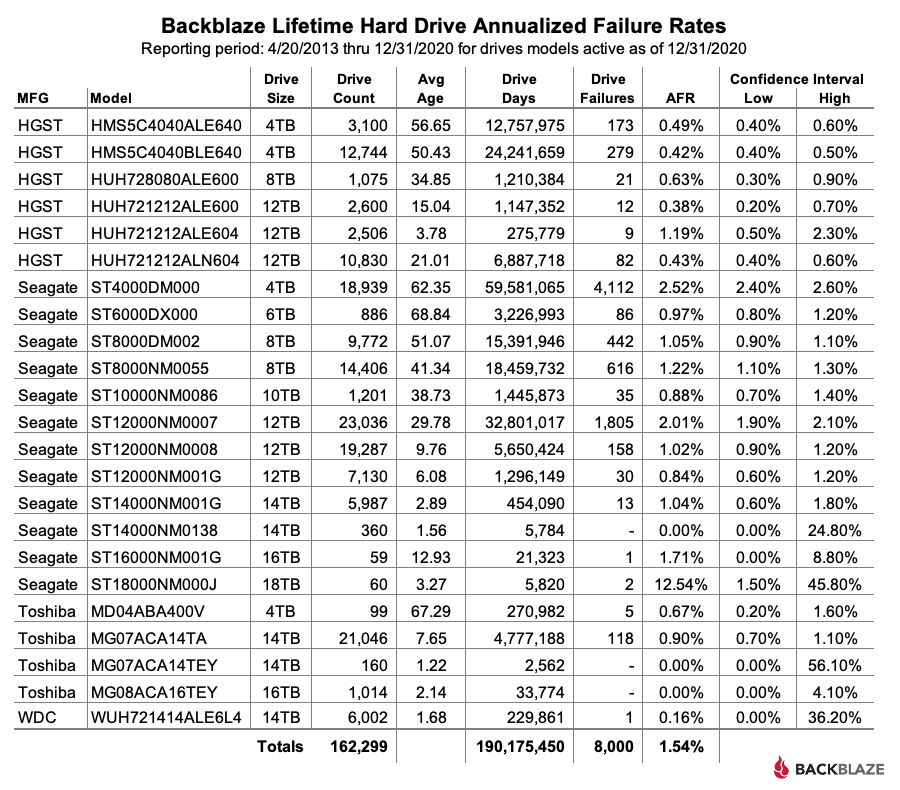

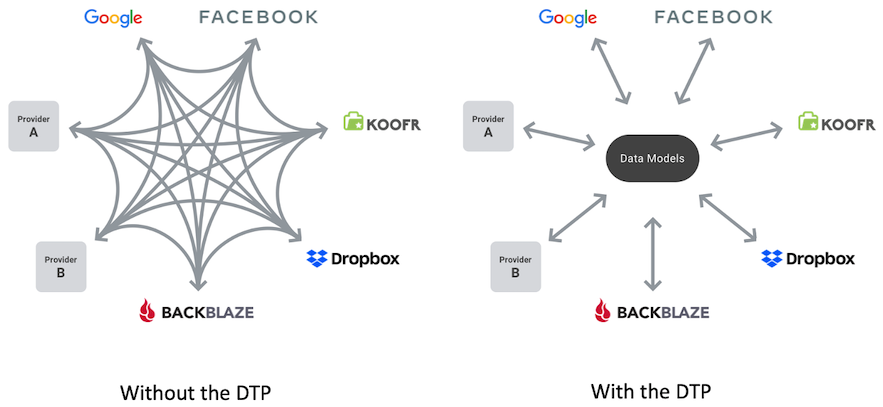

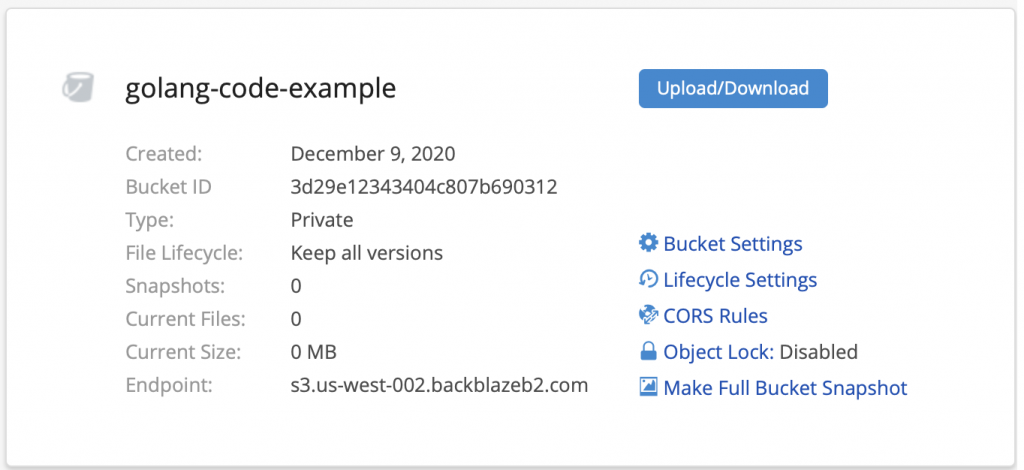
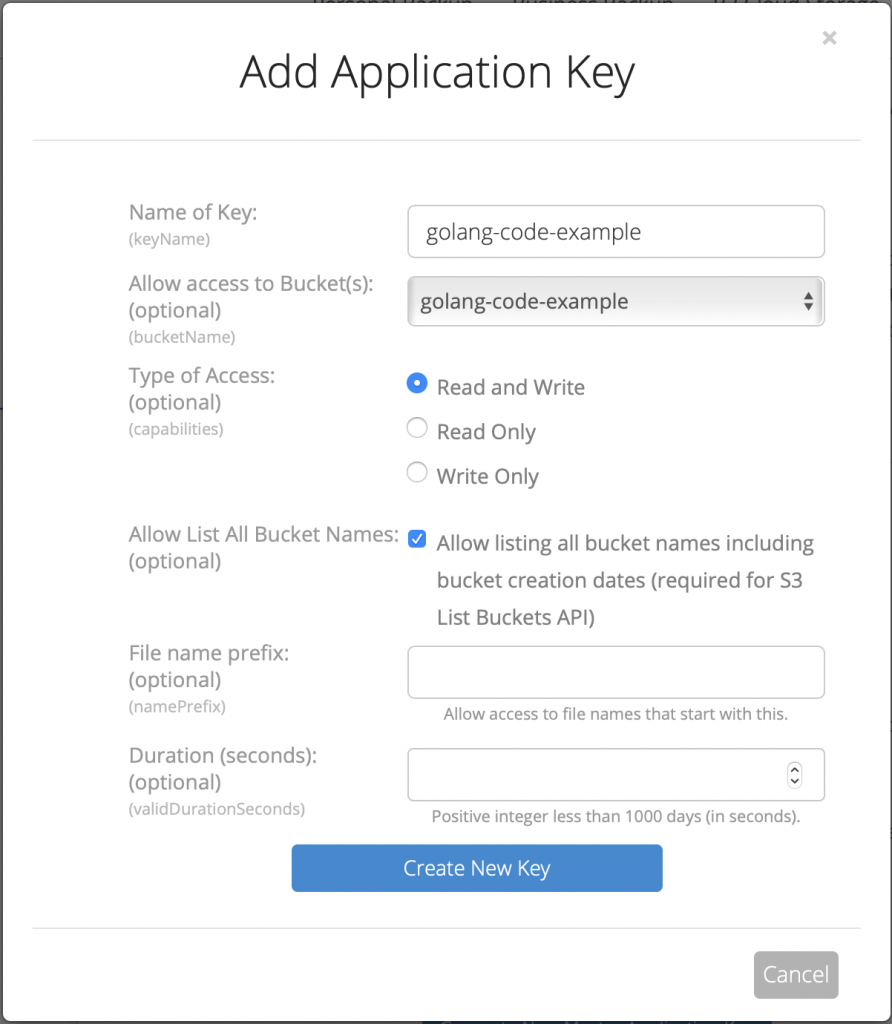
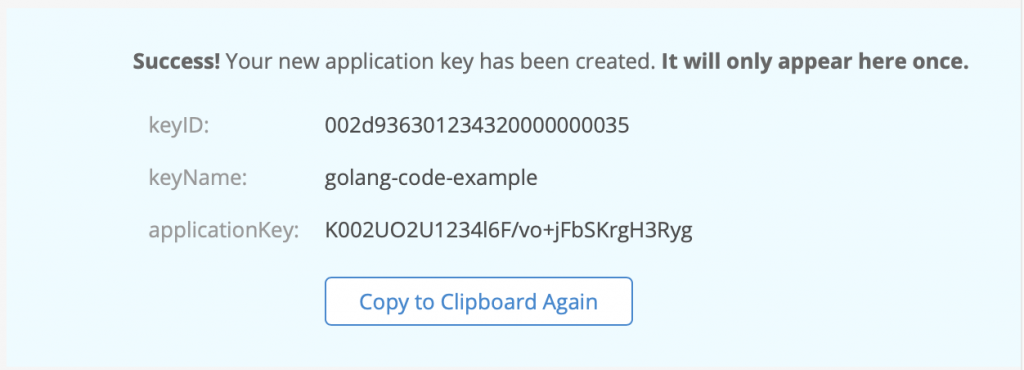
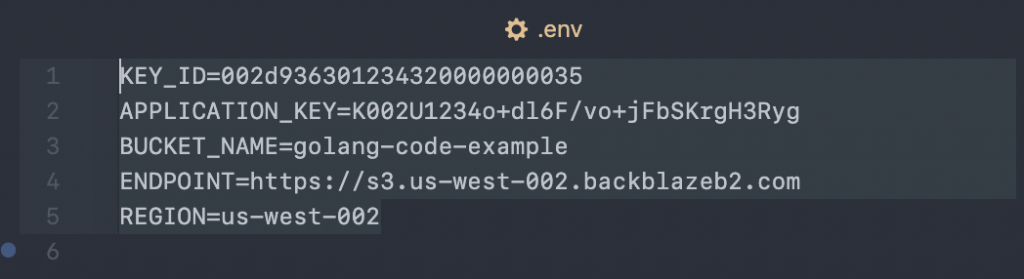
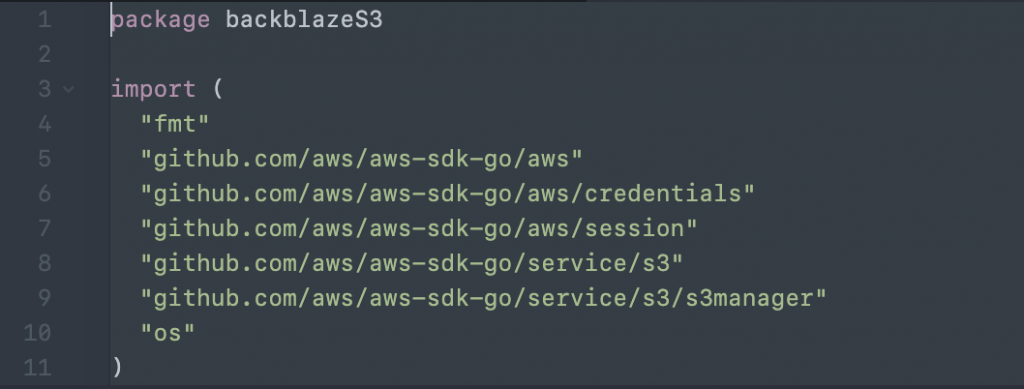
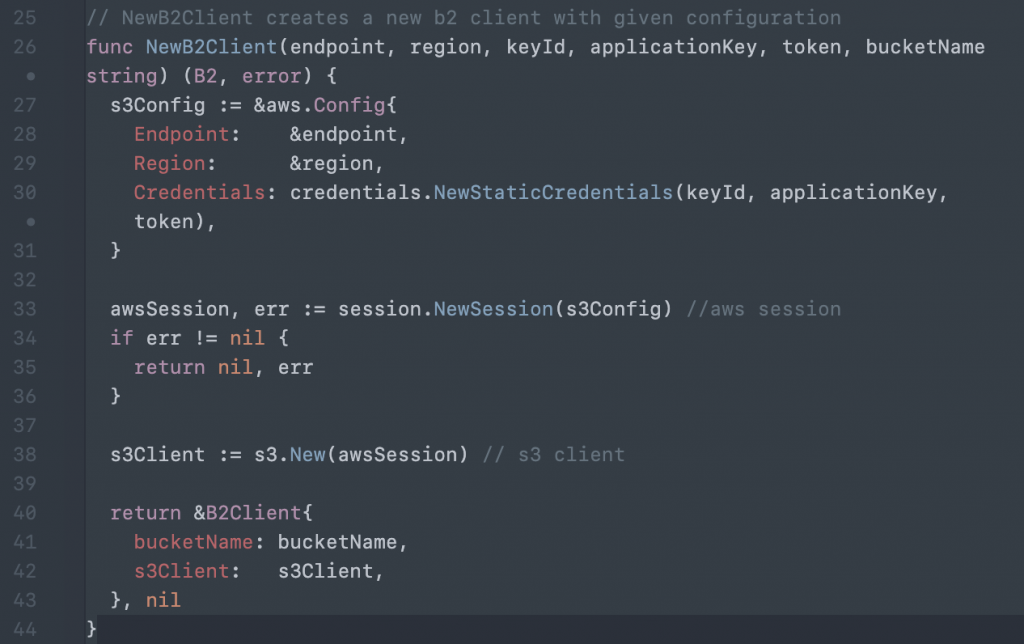
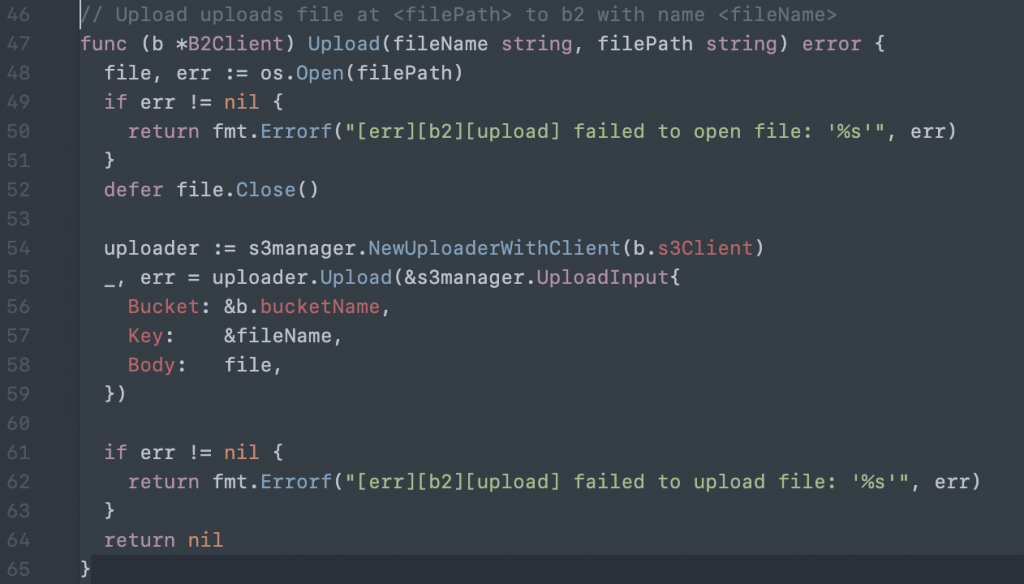
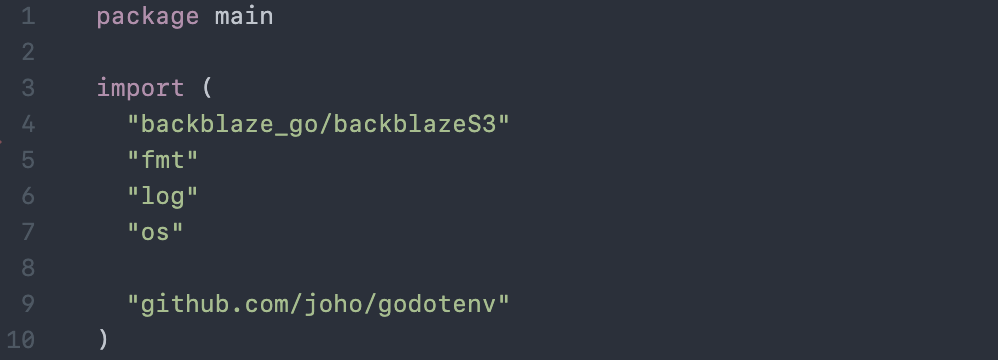
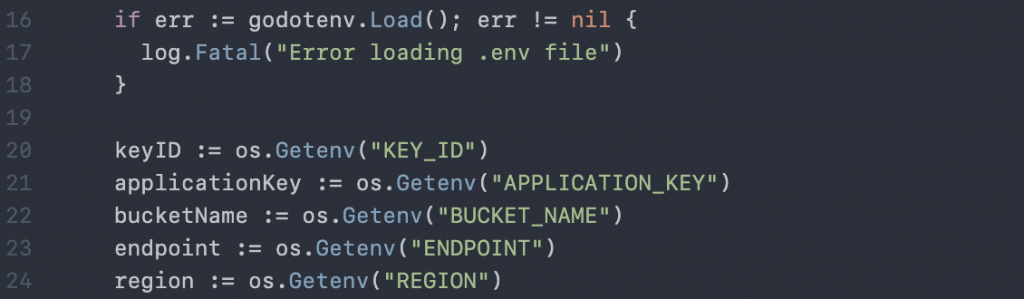
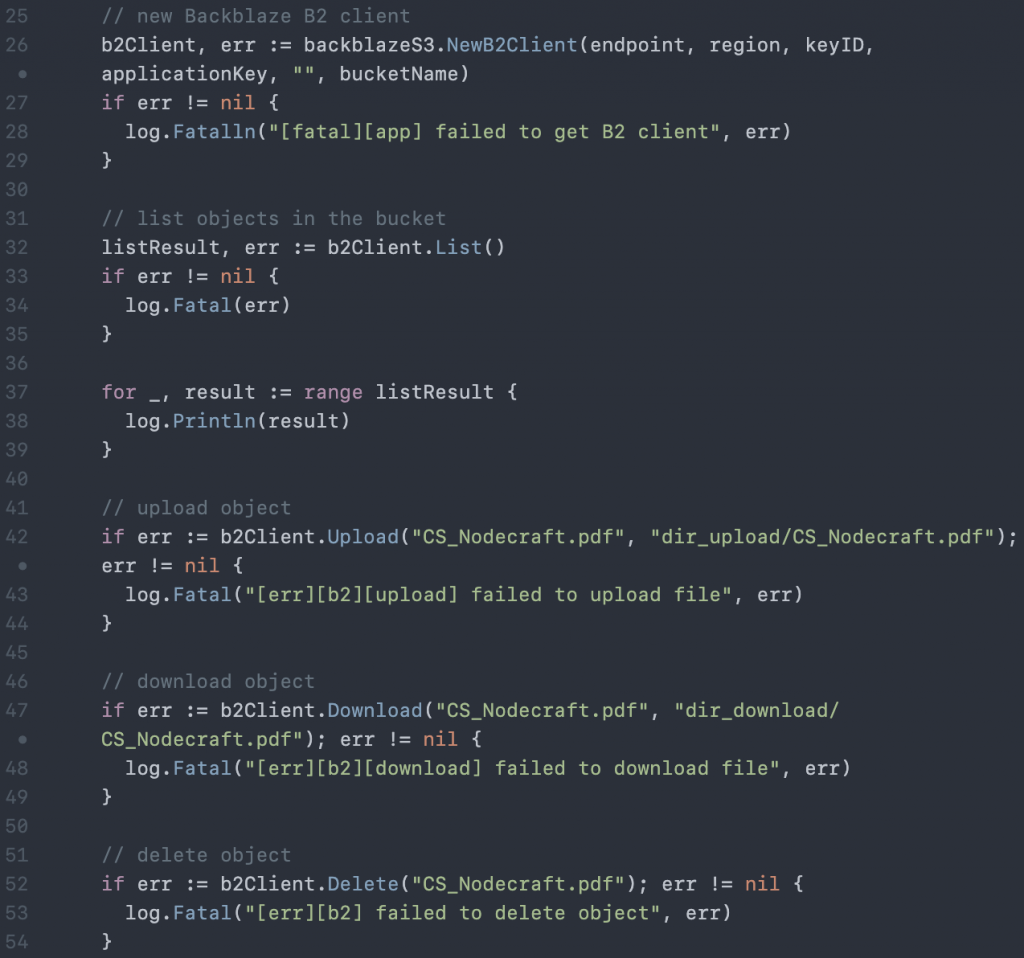
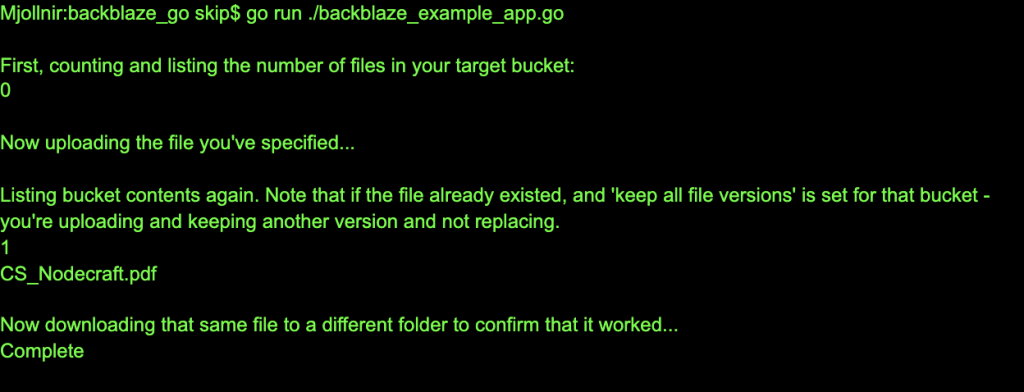

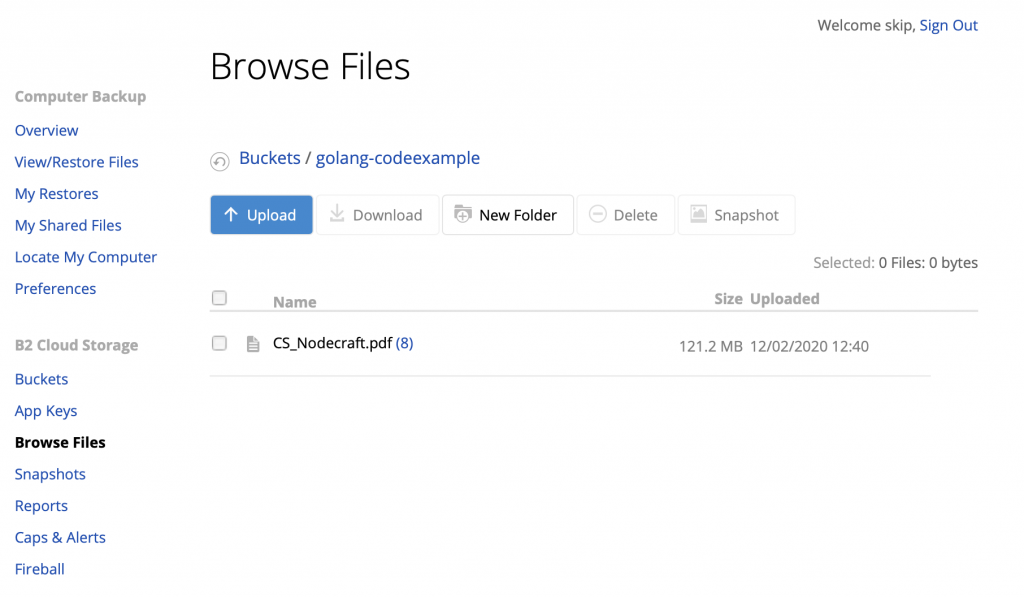
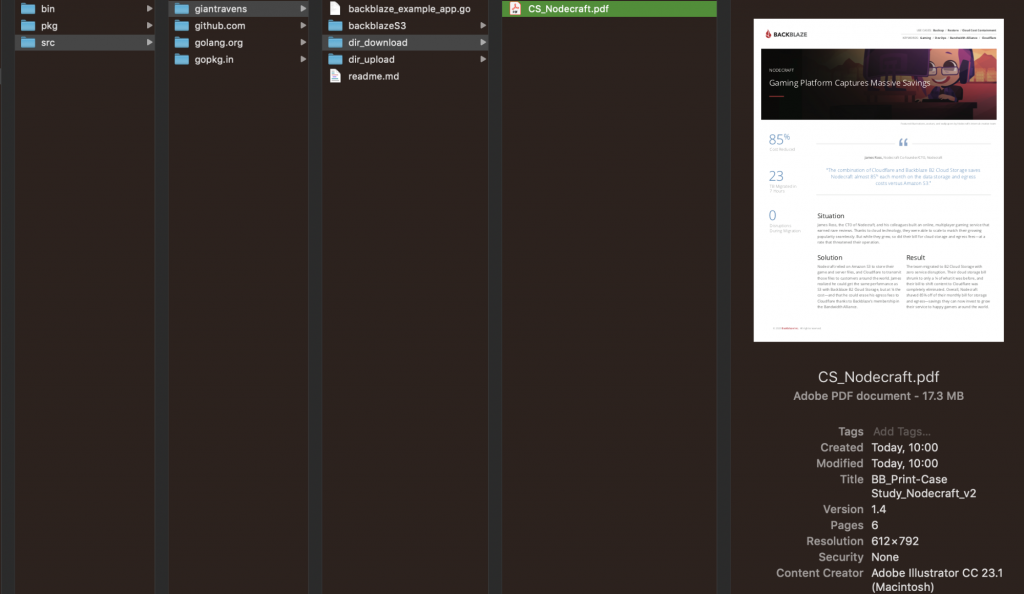


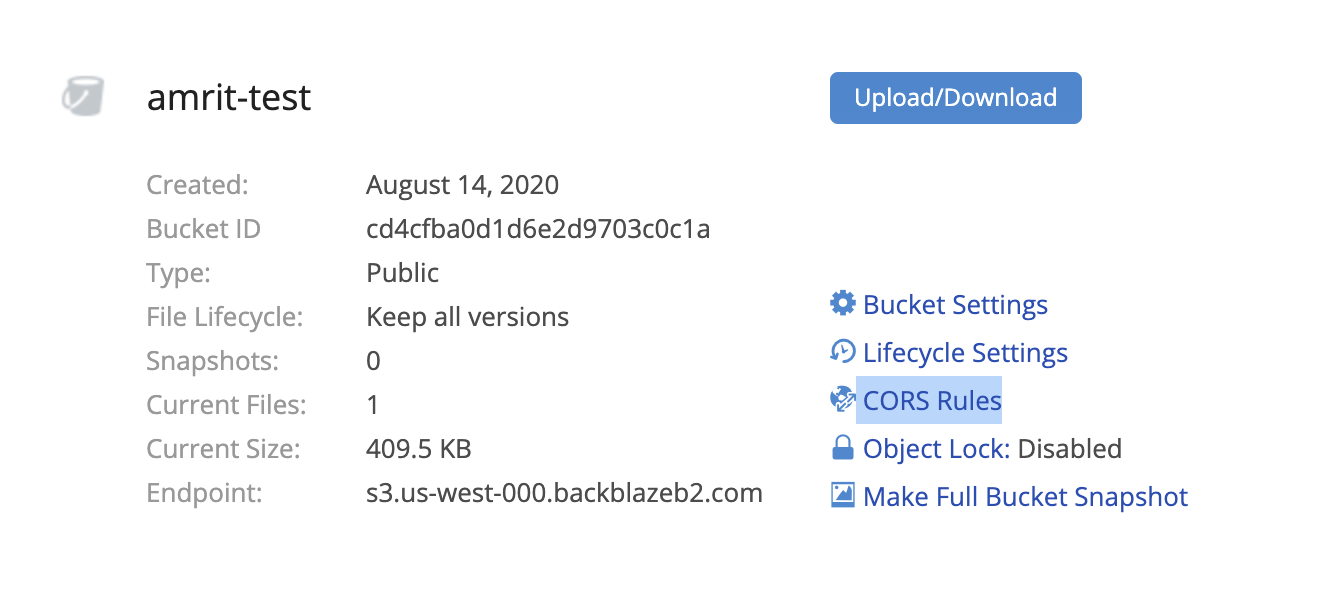
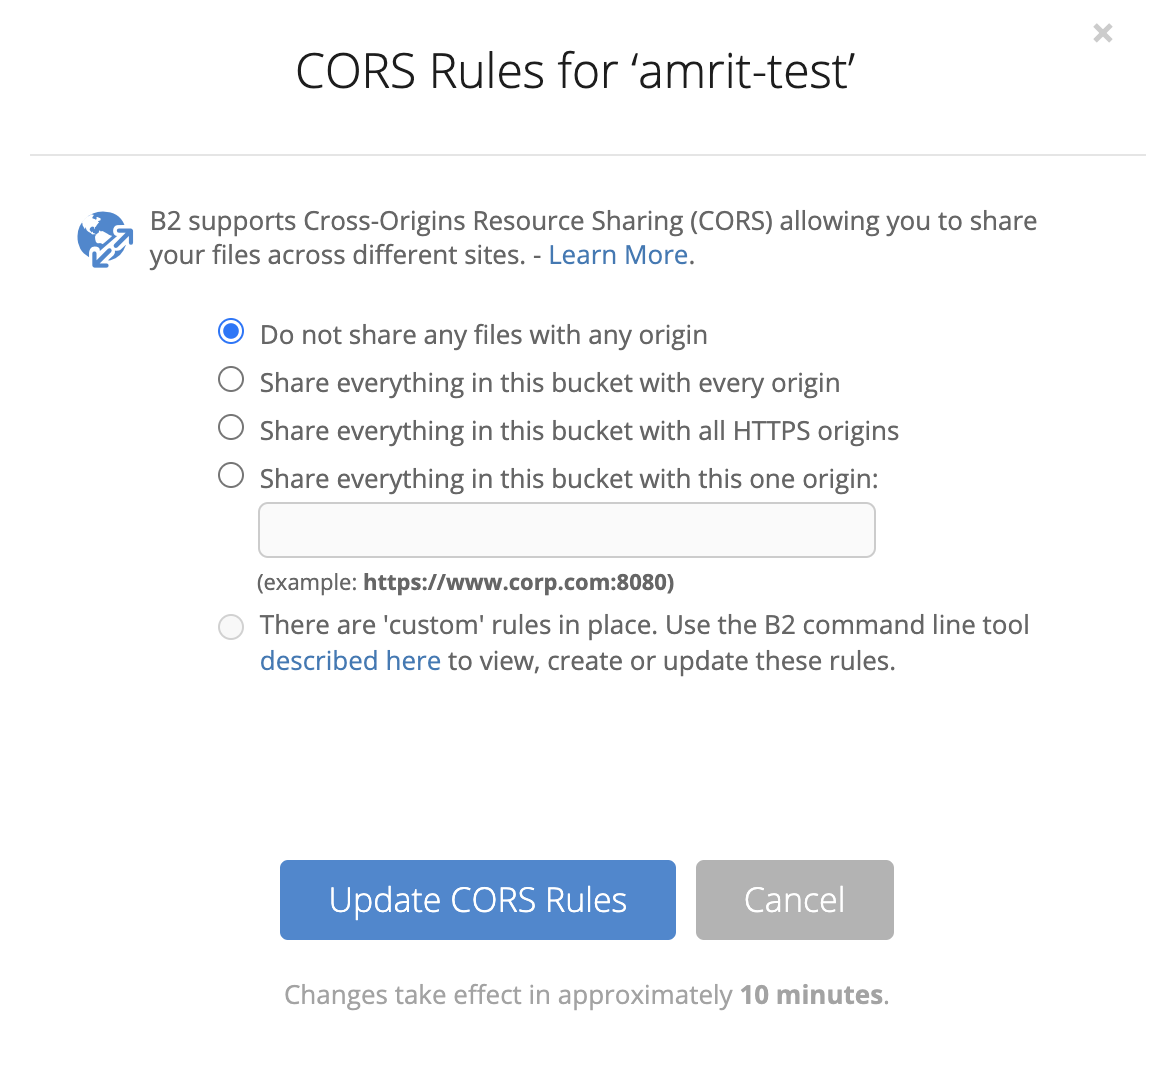
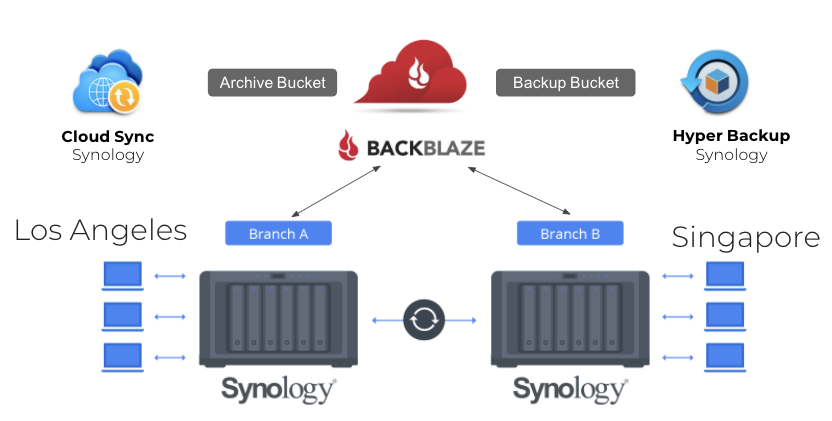
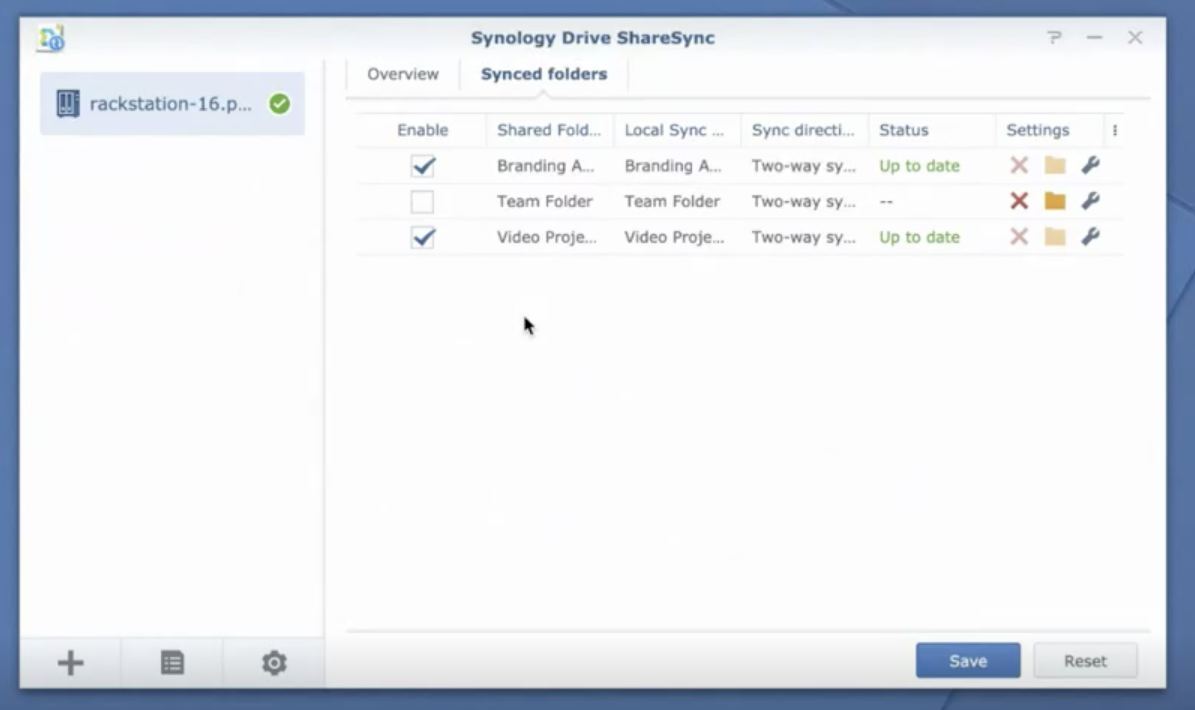
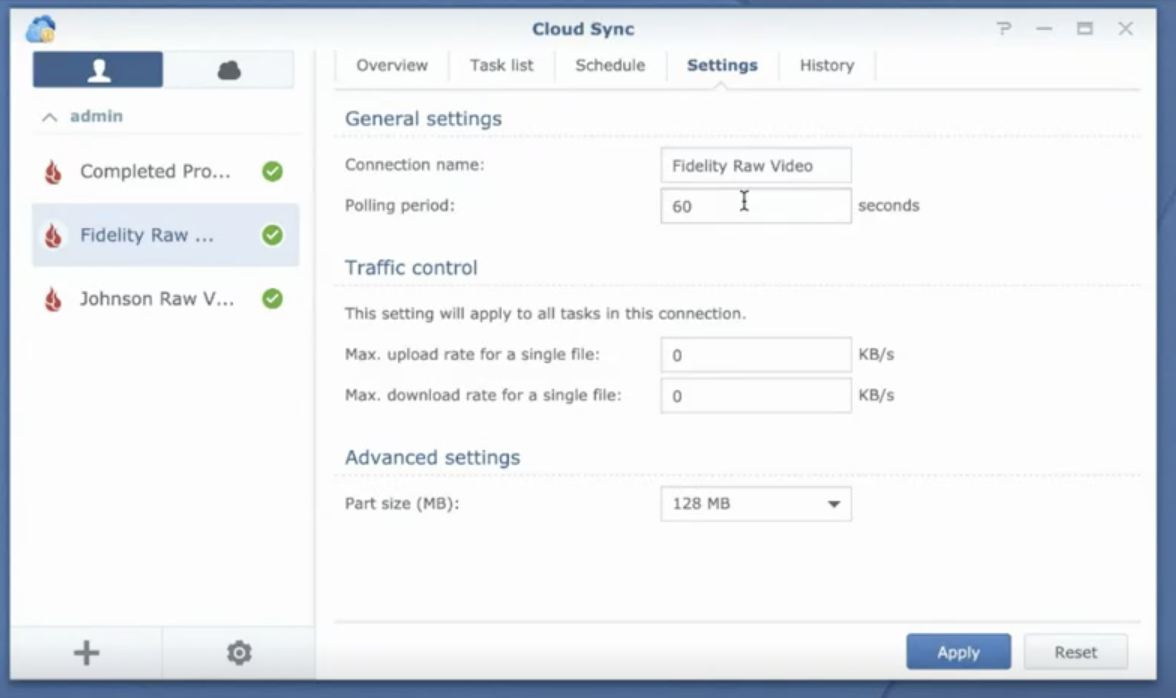
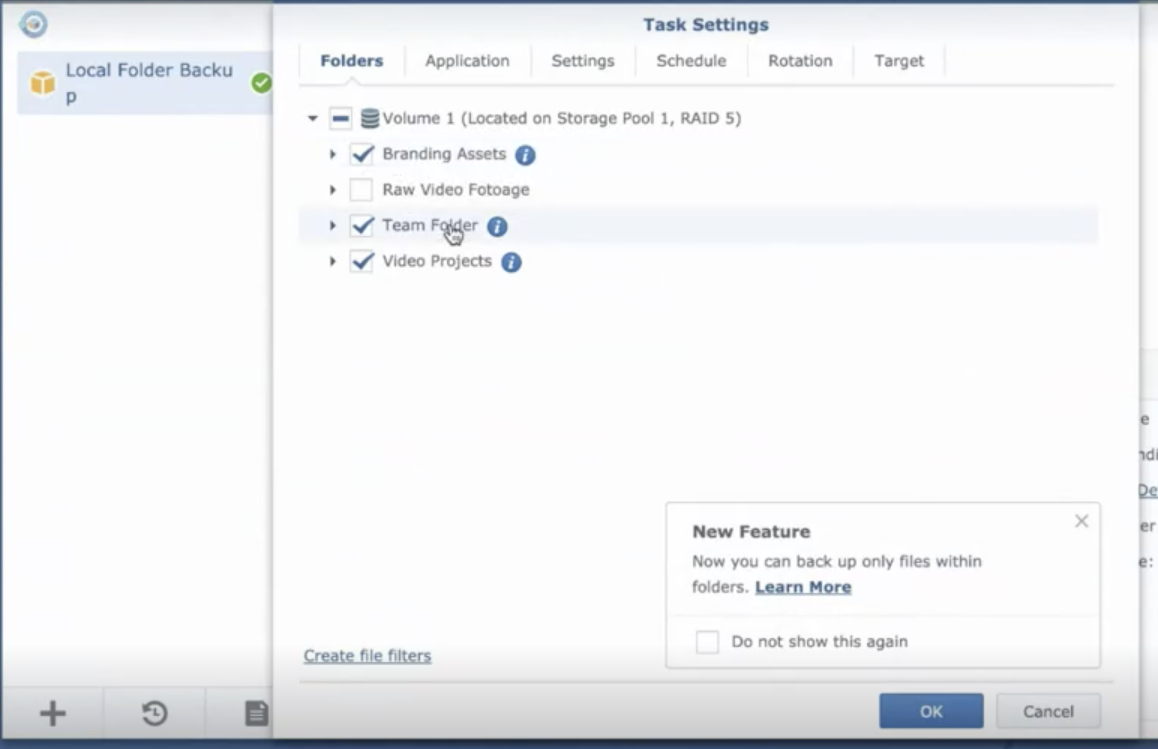
 product now supports a growing number of object enabled capabilities.