Tag Archives: Cloudflare Workers

D1: our quest to simplify databases

Post Syndicated from Nevi Shah original https://blog.cloudflare.com/whats-new-with-d1/

D1: our quest to simplify databases

D1: our quest to simplify databases

When we announced D1 in May of this year, we knew it would be the start of something new – our first SQL database with Cloudflare Workers. Prior to D1 we’ve announced storage options like KV (key-value store), Durable Objects (single location, strongly consistent data storage) and R2 (blob storage). But the question always remained “How can I store and query relational data without latency concerns and an easy API?”

The long awaited “Cloudflare Database” was the true missing piece to build your application entirely on Cloudflare’s global network, going from a blank canvas in VSCode to a full stack application in seconds. Compatible with the popular SQLite API, D1 empowers developers to build out their databases without getting bogged down by complexity and having to manage every underlying layer.

Since our launch announcement in May and private beta in June, we’ve made great strides in building out our vision of a serverless database. With D1 still in private beta but an open beta on the horizon, we’re excited to show and tell our journey of building D1 and what’s to come.

The D1 Experience

We knew from Cloudflare Workers feedback that using Wrangler as the mechanism to create and deploy applications is loved and preferred by many. That’s why when Wrangler 2.0 was announced this past May alongside D1, we took advantage of the new and improved CLI for every part of the experience from data creation to every update and iteration. Let’s take a quick look on how to get set up in a few easy steps.

Create your database

With the latest version of Wrangler installed, you can create an initialized empty database with a quick

npx wrangler d1 create my_database_name

To get your database up and running! Now it’s time to add your data.

Bootstrap it

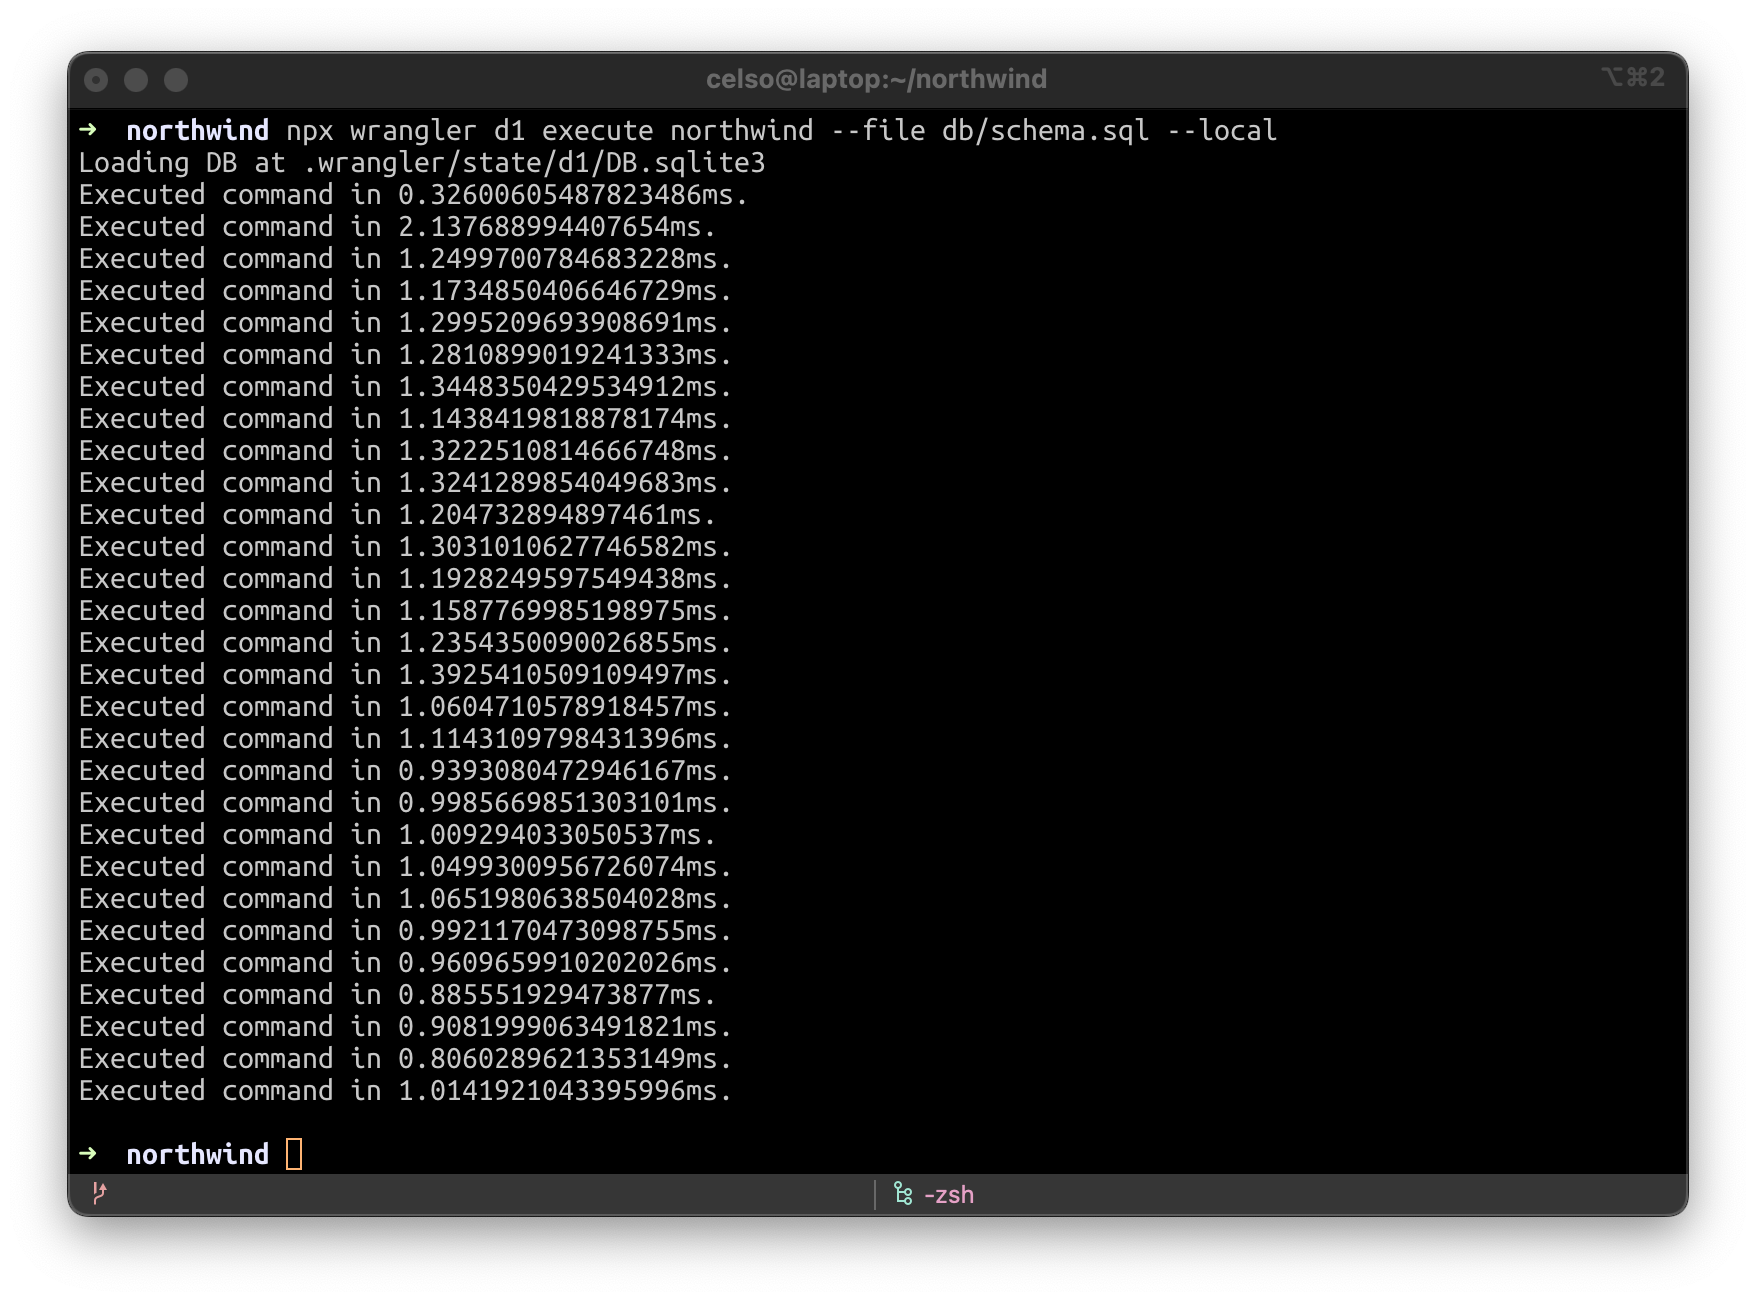
It wouldn’t be the “Cloudflare way” if you had to sit through an agonizingly long process to get set up. So we made it easy and painless to bring your existing data from an old database and bootstrap your new D1 database.  You can run

wrangler d1 execute my_database-name --file ./filename.sql

and pass through an existing SQLite .sql file of your choice. Your database is now ready for action.

Develop & Test Locally

With all the improvements we’ve made to Wrangler since version 2 launched a few months ago, we’re pleased to report that D1 has full remote & local wrangler dev support:

D1: our quest to simplify databases

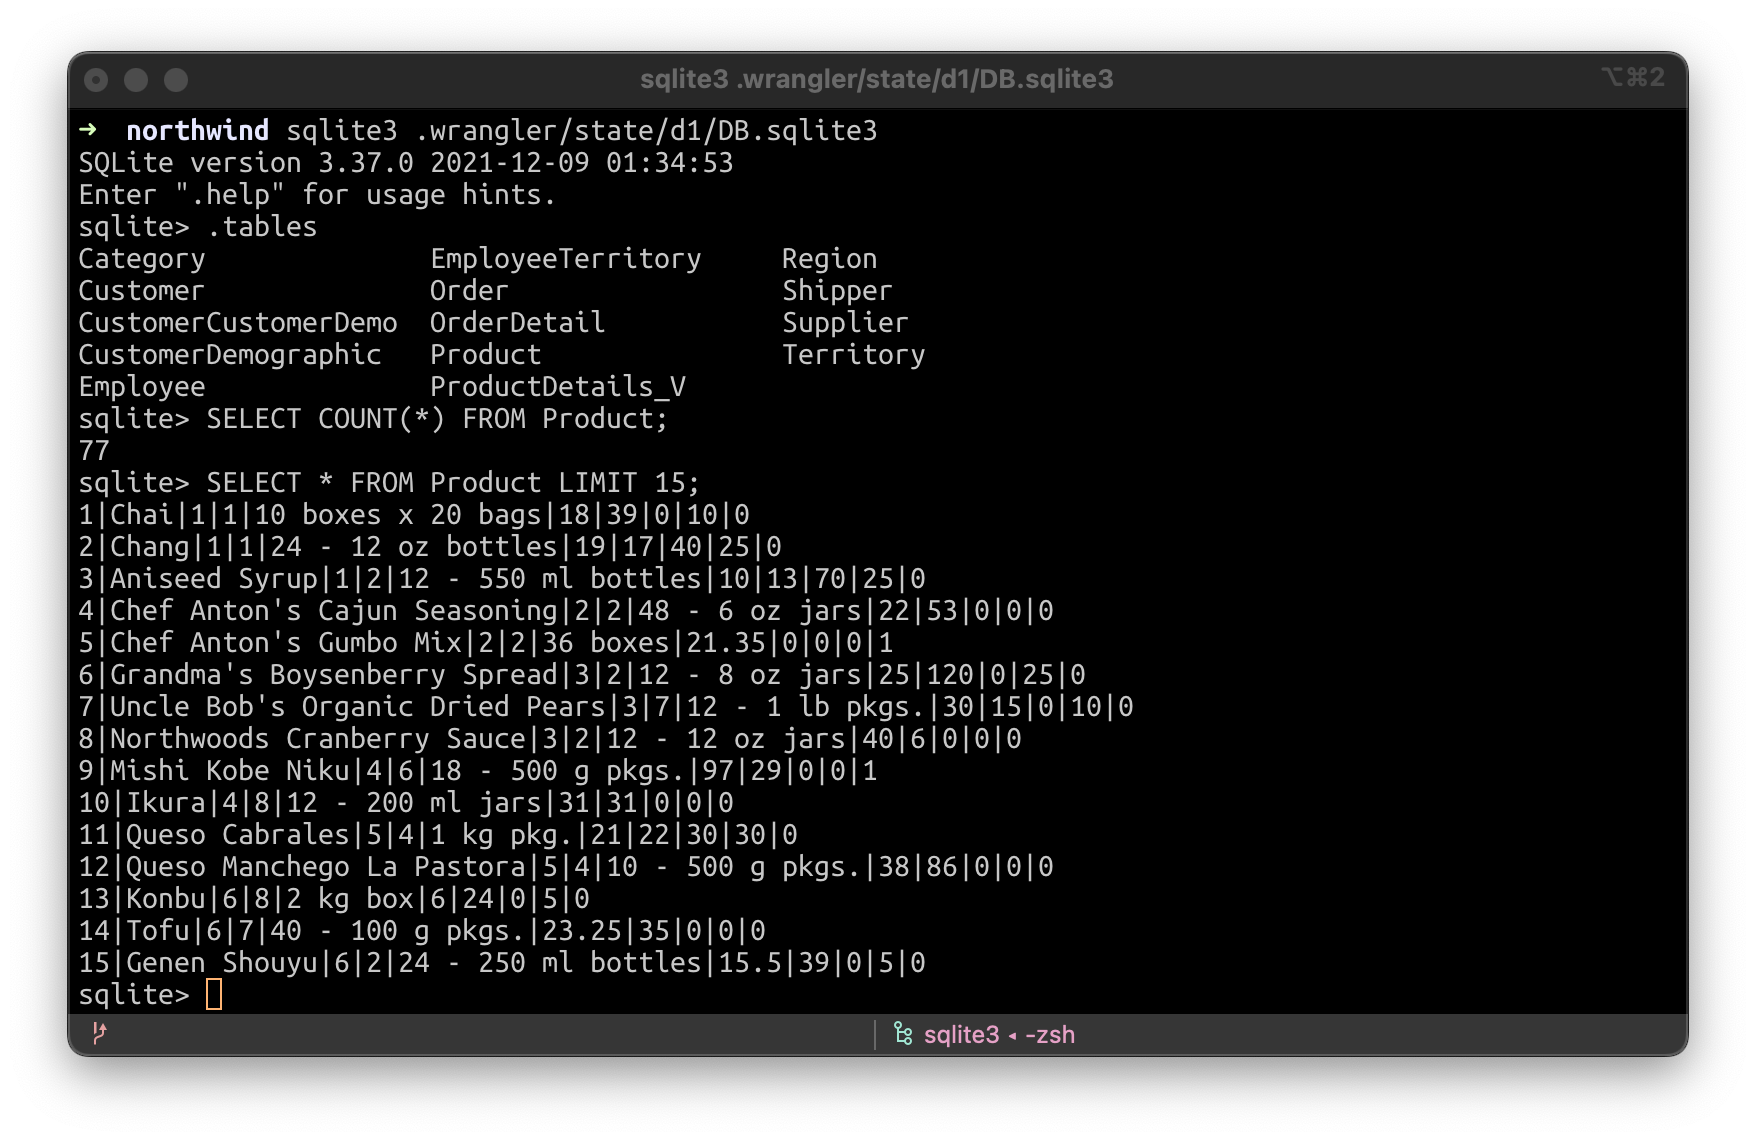
When running wrangler dev -–local -–persist, an SQLite file will be created inside .wrangler/state. You can then use a local GUI program for managing it, like SQLiteFlow (https://www.sqliteflow.com/) or Beekeeper (https://www.beekeeperstudio.io/).

Or you can simply use SQLite directly with the SQLite command line by running sqlite3 .wrangler/state/d1/DB.sqlite3:

D1: our quest to simplify databases

Automatic backups & one-click restore

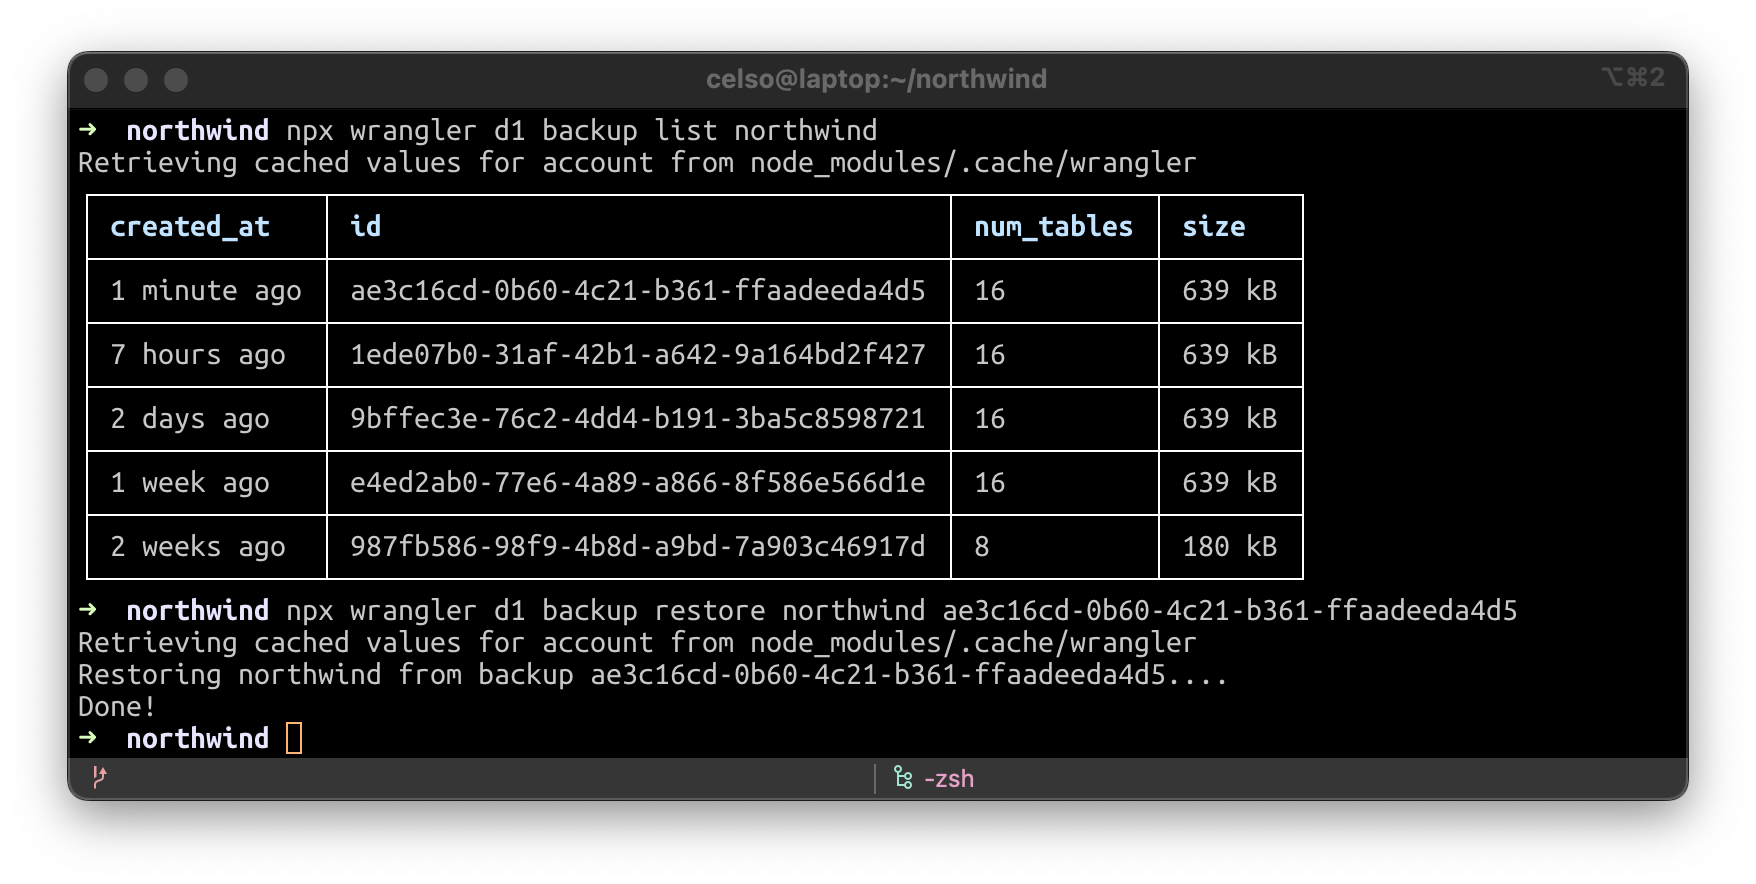
No matter how much you test your changes, sometimes things don’t always go according to plan. But with Wrangler you can create a backup of your data, view your list of backups or restore your database from an existing backup. In fact, during the beta, we’re taking backups of your data every hour automatically and storing them in R2, so you will have the option to rollback if needed.

D1: our quest to simplify databases

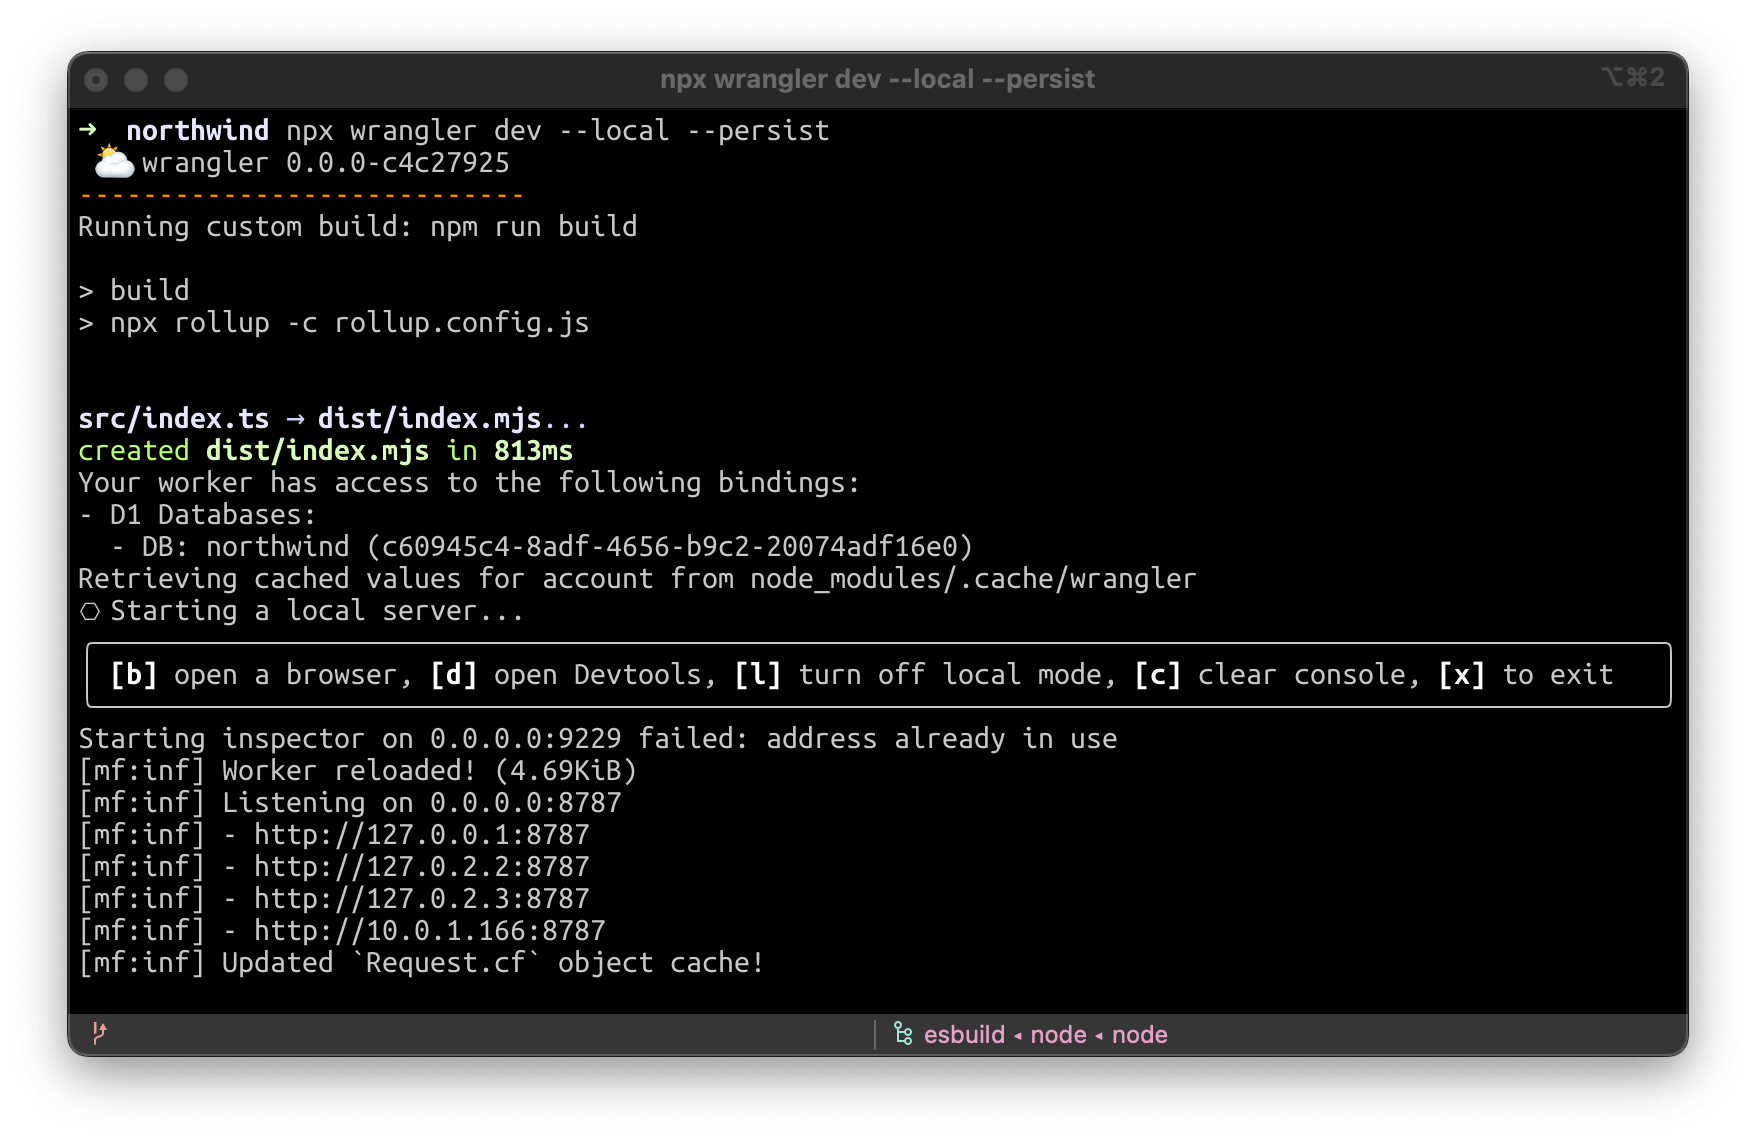
And the best part – if you want to use a production snapshot for local development or to reproduce a bug, simply copy it into the .wrangler/state directory and wrangler dev –-local –-persist will pick it up!

Let’s download a D1 backup to our local disk. It’s SQLite compatible.

D1: our quest to simplify databases

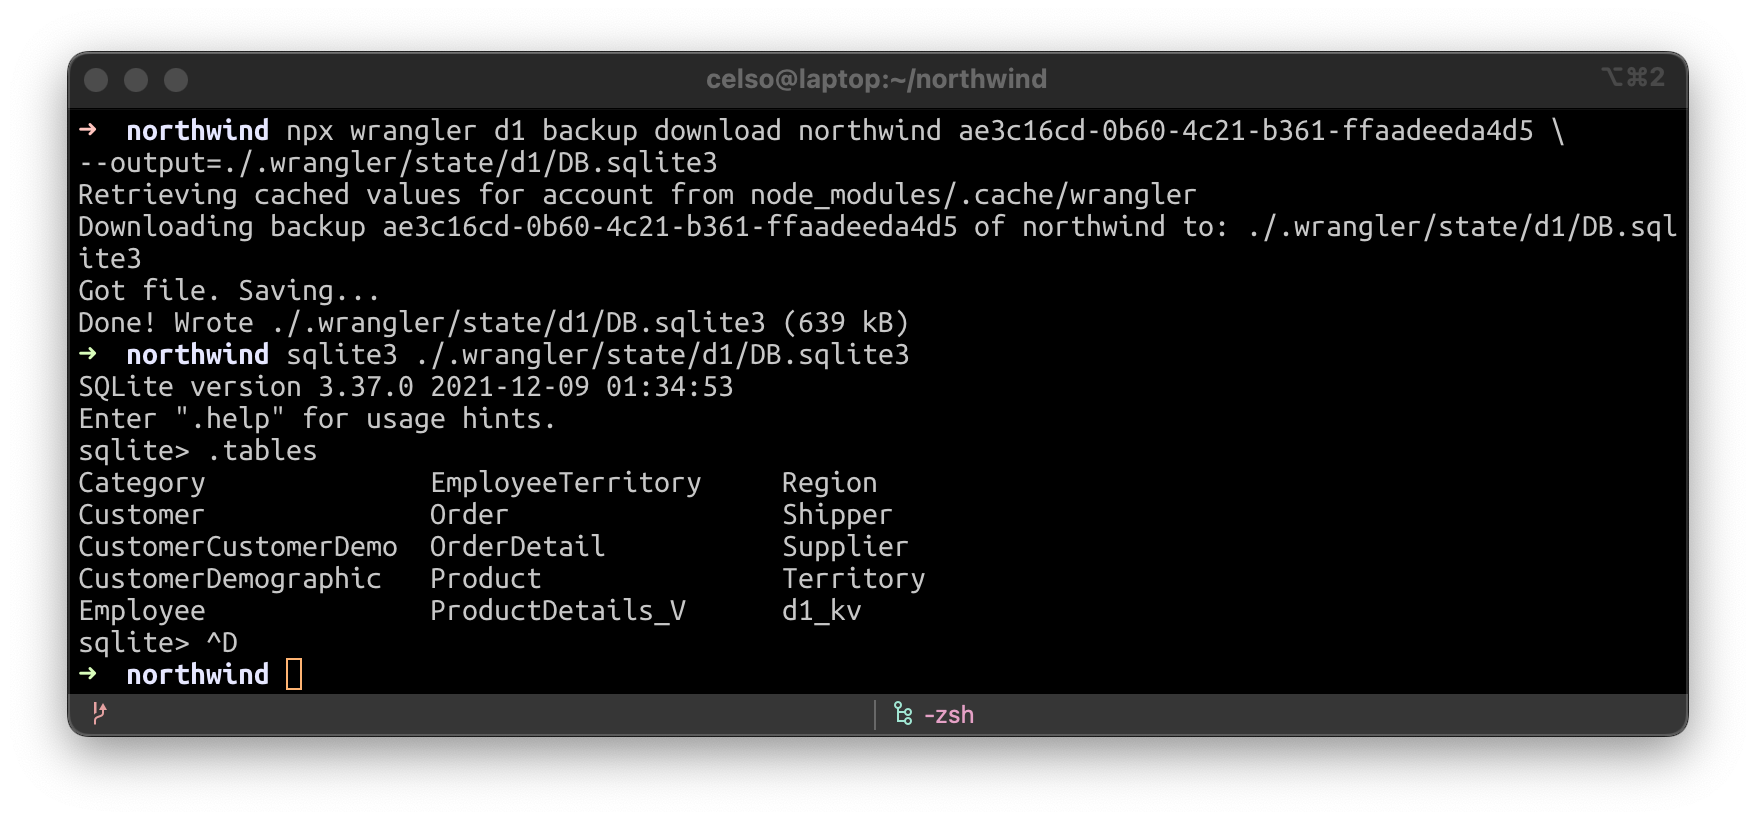
Now let’s run our D1 worker locally, from the backup.

D1: our quest to simplify databases

Create and Manage from the dashboard

However, we realize that CLIs are not everyone’s jam. In fact, we believe databases should be accessible to every kind of developer – even those without much database experience! D1 is available right from the Cloudflare dashboard giving you near total command parity with Wrangler in just a few clicks. Bootstrapping your database, creating tables, updating your database, viewing tables and triggering backups are all accessible right at your fingertips.

D1: our quest to simplify databases

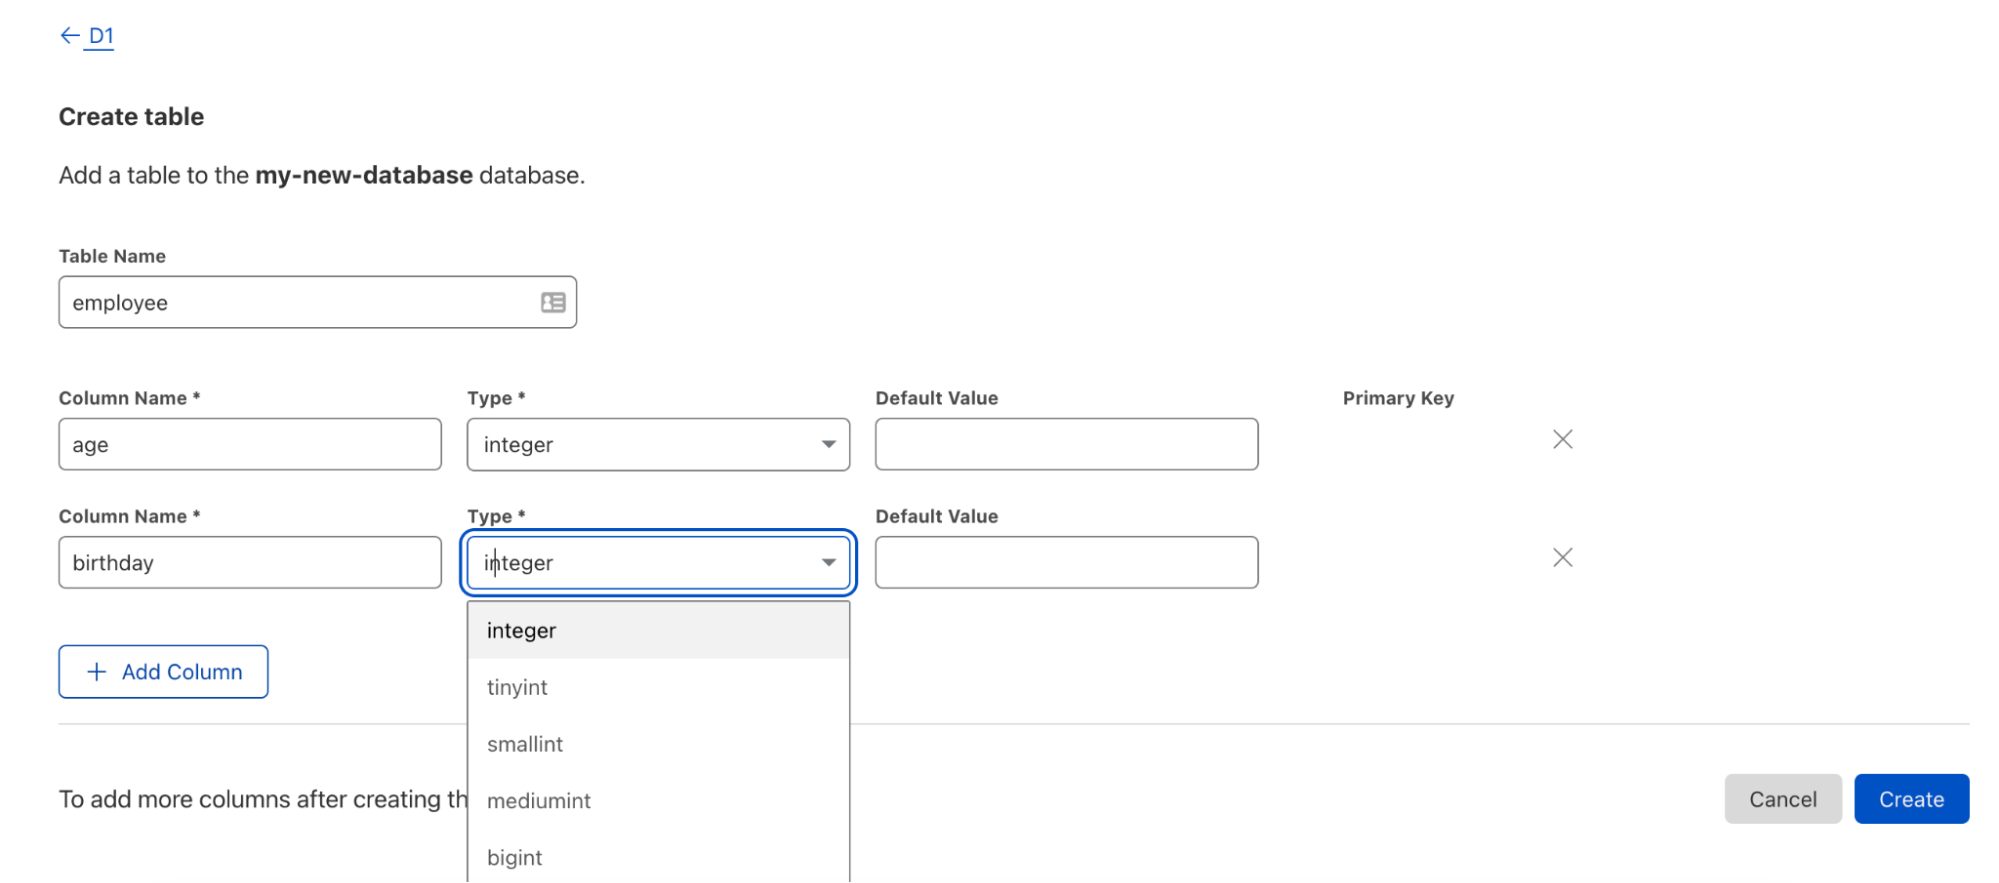
Changes made in the UI are instantly available to your Worker — no deploy required!

We’ve told you about some of the improvements we’ve landed since we first announced D1, but as always, we also wanted to give you a small taste (with some technical details) of what’s ahead. One really important functionality of a database is transactions — something D1 wouldn’t be complete without.

Sneak peek: how we’re bringing JavaScript transactions to D1

With D1, we strive to present a dramatically simplified interface to creating and querying relational data, which for the most part is a good thing. But simplification occasionally introduces drawbacks, where a use-case is no longer easily supported without introducing some new concepts. D1 transactions are one example.

Transactions are a unique challenge

You don’t need to specify where a Cloudflare Worker or a D1 database run—they simply run everywhere they need to. For Workers, that is as close as possible to the users that are hitting your site right this second. For D1 today, we don’t try to run a copy in every location worldwide, but dynamically manage the number and location of read-only replicas based on how many queries your database is getting, and from where. However, for queries that make changes to a database (which we generally call “writes” for short), they all have to travel back to the single Primary D1 instance to do their work, to ensure consistency.

But what if you need to do a series of updates at once? While you can send multiple SQL queries with .batch() (which does in fact use database transactions under the hood), it’s likely that, at some point, you’ll want to interleave database queries & JS code in a single unit of work.

This is exactly what database transactions were invented for, but if you try running BEGIN TRANSACTION in D1 you’ll get an error. Let’s talk about why that is.

Why native transactions don’t work
The problem arises from SQL statements and JavaScript code running in dramatically different places—your SQL executes inside your D1 database (primary for writes, nearest replica for reads), but your Worker is running near the user, which might be on the other side of the world. And because D1 is built on SQLite, only one write transaction can be open at once. Meaning that, if we permitted BEGIN TRANSACTION, any one Worker request, anywhere in the world, could effectively block your whole database! This is a quite dangerous thing to allow:

  • A Worker could start a transaction then crash due to a software bug, without calling ROLLBACK. The primary would be blocked, waiting for more commands from a Worker that would never come (until, probably, some timeout).
  • Even without bugs or crashes, transactions that require multiple round-trips between JavaScript and SQL could end up blocking your whole system for multiple seconds, dramatically limiting how high an application built with Workers & D1 could scale.

But allowing a developer to define transactions that mix both SQL and JavaScript makes building applications with Workers & D1 so much more flexible and powerful. We need a new solution (or, in our case, a new version of an old solution).

A way forward: stored procedures
Stored procedures are snippets of code that are uploaded to the database, to be executed directly next to the data. Which, at first blush, sounds exactly like what we want.

However, in practice, stored procedures in traditional databases are notoriously frustrating to work with, as anyone who’s developed a system making heavy use of them will tell you:

  • They’re often written in a different language to the rest of your application. They’re usually written in (a specific dialect of) SQL or an embedded language like Tcl/Perl/Python. And while it’s technically possible to write them in JavaScript (using an embedded V8 engine), they run in such a different environment to your application code it still requires significant context-switching to maintain them.
  • Having both application code and in-database code affects every part of the development lifecycle, from authoring, testing, deployment, rollbacks and debugging. But because stored procedures are usually introduced to solve a specific problem, not as a general purpose application layer, they’re often managed completely manually. You can end up with them being written once, added to the database, then never changed for fear of breaking something.

With D1, we can do better.

The point of a stored procedure was to execute directly next to the data—uploading the code and executing it inside the database was simply a means to that end. But we’re using Workers, a global JavaScript execution platform, can we use them to solve this problem?

It turns out, absolutely! But here we have a few options of exactly how to make it work, and we’re working with our private beta users to find the right API. In this section, I’d like to share with you our current leading proposal, and invite you all to give us your feedback.

When you connect a Worker project to a D1 database, you add the section like the following to your wrangler.toml:

[[ d1_databases ]]
# What binding name to use (e.g. env.DB):
binding = "DB"
# The name of the DB (used for wrangler d1 commands):
database_name = "my-d1-database"
# The D1's ID for deployment:
database_id = "48a4224e-...3b09"
# Which D1 to use for `wrangler dev`:
# (can be the same as the previous line)
preview_database_id = "48a4224e-...3b09"

# NEW: adding "procedures", pointing to a new JS file:
procedures = "./src/db/procedures.js"

That D1 Procedures file would contain the following (note the new db.transaction() API, that is only available within a file like this):

export default class Procedures {
  constructor(db, env, ctx) {
    this.db = db
  }

  // any methods you define here are available on env.DB.Procedures
  // inside your Worker
  async Checkout(cartId: number) {
    // Inside a Procedure, we have a new db.transaction() API
    const result = await this.db.transaction(async (txn) => {
      
      // Transaction has begun: we know the user can't add anything to
      // their cart while these actions are in progress.
      const [cart, user] = Helpers.loadCartAndUser(cartId)

      // We can update the DB first, knowing that if any of the later steps
      // fail, all these changes will be undone.
      await this.db
        .prepare(`UPDATE cart SET status = ?1 WHERE cart_id = ?2`)
        .bind('purchased', cartId)
        .run()
      const newBalance = user.balance - cart.total_cost
      await this.db
        .prepare(`UPDATE user SET balance = ?1 WHERE user_id = ?2`)
        // Note: the DB may have a CHECK to guarantee 'user.balance' can not
        // be negative. In that case, this statement may fail, an exception
        // will be thrown, and the transaction will be rolled back.
        .bind(newBalance, cart.user_id)
        .run()

      // Once all the DB changes have been applied, attempt the payment:
      const { ok, details } = await PaymentAPI.processPayment(
        user.payment_method_id,
        cart.total_cost
      )
      if (!ok) {
        // If we throw an Exception, the transaction will be rolled back
        // and result.error will be populated:
        // throw new PaymentFailedError(details)
        
        // Alternatively, we can do both of those steps explicitly
        await txn.rollback()
        // The transaction is rolled back, our DB is now as it was when we
        // started. We can either move on and try something new, or just exit.
        return { error: new PaymentFailedError(details) }
      }

      // This is implicitly called when the .transaction() block finishes,
      // but you can explicitly call it too (potentially committing multiple
      // times in a single db.transaction() block).
      await txn.commit()

      // Anything we return here will be returned by the 
      // db.transaction() block
      return {
        amount_charged: cart.total_cost,
        remaining_balance: newBalance,
      }
    })

    if (result.error) {
      // Our db.transaction block returned an error or threw an exception.
    }

    // We're still in the Procedure, but the Transaction is complete and
    // the DB is available for other writes. We can either do more work
    // here (start another transaction?) or return a response to our Worker.
    return result
  }
}

And in your Worker, your DB binding now has a “Procedures” property with your function names available:

const { error, amount_charged, remaining_balance } =
  await env.DB.Procedures.Checkout(params.cartId)

if (error) {
  // Something went wrong, `error` has details
} else {
  // Display `amount_charged` and `remaining_balance` to the user.
}

Multiple Procedures can be triggered at one time, but only one db.transaction() function can be active at once: any other write queries or other transaction blocks will be queued, but all read queries will continue to hit local replicas and run as normal. This API gives you the ability to ensure consistency when it’s essential but with the minimal impact on total overall performance worldwide.

Request for feedback

As with all our products, feedback from our users drives the roadmap and development. While the D1 API is in beta testing today, we’re still seeking feedback on the specifics. However, we’re pleased that it solves both the problems with transactions that are specific to D1 and the problems with stored procedures described earlier:

  • Code is executing as close as possible to the database, removing network latency while a transaction is open.
  • Any exceptions or cancellations of a transaction cause an instant rollback—there is no way to accidentally leave one open and block the whole D1 instance.
  • The code is in the same language as the rest of your Worker code, in the exact same dialect (e.g. same TypeScript config as it’s part of the same build).
  • It’s deployed seamlessly as part of your Worker. If two Workers bind to the same D1 instance but define different procedures, they’ll only see their own code. If you want to share code between projects or databases, extract a library as you would with any other shared code.
  • In local development and test, the procedure works just like it does in production, but without the network call, allowing seamless testing and debugging as if it was a local function.
  • Because procedures and the Worker that define them are treated as a single unit, rolling back to an earlier version never causes a skew between the code in the database and the code in the Worker.

The D1 ecosystem: contributions from the community

We’ve told you about what we’ve been up to and what’s ahead, but one of the unique things about this project is all the contributions from our users. One of our favorite parts of private betas is not only getting feedback and feature requests, but also seeing what ideas and projects come to fruition. While sometimes this means personal projects, with D1, we’re seeing some incredible contributions to the D1 ecosystem. Needless to say, the work on D1 hasn’t just been coming from within the D1 team, but also from the wider community and other developers at Cloudflare. Users have been showing off their D1 additions within our Discord private beta channel and giving others the opportunity to use them as well. We wanted to take a moment to highlight them.

workers-qb

Dealing with raw SQL syntax is powerful (and using the D1 .bind() API, safe against SQL injections) but it can be a little clumsy. On the other hand, most existing query builders assume direct access to the underlying DB, and so aren’t suitable to use with D1. So Cloudflare developer Gabriel Massadas designed a small, zero-dependency query builder called workers-qb:

import { D1QB } from 'workers-qb'
const qb = new D1QB(env.DB)

const fetched = await qb.fetchOne({
    tableName: "employees",
    fields: "count(*) as count",
    where: {
      conditions: "active = ?1",
      params: [true]
    },
})

Check out the project homepage for more information: https://workers-qb.massadas.com/.

D1 console

While you can interact with D1 through both Wrangler and the dashboard, Cloudflare Community champion, Isaac McFadyen created the very first D1 console where you can quickly execute a series of queries right through your terminal. With the D1 console, you don’t need to spend time writing the various Wrangler commands we’ve created – just execute your queries.

This includes all bells and whistles you would expect from a modern database console including multiline input, command history, validation for things D1 may not yet support, and ability to save your Cloudflare credentials for later use.

Check out the full project on GitHub or NPM for more information.

Miniflare test Integration

The Miniflare project, which powers Wrangler’s local development experience, also provides fully-fledged test environments for popular JavaScript test runners, Jest and Vitest. With this comes the concept of Isolated Storage, allowing each test to run independently, so that changes made in one don’t affect the others. Brendan Coll, creator of Miniflare, guided the D1 test implementation to give the same benefits:

import Worker from ‘../src/index.ts’
const { DB } = getMiniflareBindings();

beforeAll(async () => {
  // Your D1 starts completely empty, so first you must create tables
  // or restore from a schema.sql file.
  await DB.exec(`CREATE TABLE entries (id INTEGER PRIMARY KEY, value TEXT)`);
});

// Each describe block & each test gets its own view of the data.
describe(‘with an empty DB’, () => {
  it(‘should report 0 entries’, async () => {
    await Worker.fetch(...)
  })
  it(‘should allow new entries’, async () => {
    await Worker.fetch(...)
  })
])

// Use beforeAll & beforeEach inside describe blocks to set up particular DB states for a set of tests
describe(‘with two entries in the DB’, () => {
  beforeEach(async () => {
    await DB.prepare(`INSERT INTO entries (value) VALUES (?), (?)`)
            .bind(‘aaa’, ‘bbb’)
            .run()
  })
  // Now, all tests will run with a DB with those two values
  it(‘should report 2 entries’, async () => {
    await Worker.fetch(...)
  })
  it(‘should not allow duplicate entries’, async () => {
    await Worker.fetch(...)
  })
])

All the databases for tests are run in-memory, so these are lightning fast. And fast, reliable testing is a big part of building maintainable real-world apps, so we’re thrilled to extend that to D1.

Want access to the private beta?

Feeling inspired?

We love to see what our beta users build or want to build especially when our products are at an early stage. As we march toward an open beta, we’ll be looking specifically for your feedback. We are slowly letting more folks into the beta, but if you haven’t received your “golden ticket” yet with access, sign up here! Once you’ve been invited in, you’ll receive an official welcome email.

As always, happy building!

Build your next startup on Cloudflare with our comprehensive Startup Plan, v2.0

Post Syndicated from Jade Q. Wang original https://blog.cloudflare.com/startup-program-v2/

Build your next startup on Cloudflare with our comprehensive Startup Plan, v2.0

Build your next startup on Cloudflare with our comprehensive Startup Plan, v2.0

Starting a business is hard. And we know that the first few years of your business are crucial to your success.

Cloudflare’s Startup Plan is here to help.

Last year, we piloted a program to a select group of startups for free, with a selection of products that are very high leverage for young startups, early in their product development, like Workers, Stream, and Zero Trust.

Over the past year, startup founders repeatedly wrote into [email protected], and most of these emails followed one of 2 patterns:

  1. A startup would like to request additional products that are not a part of the startup plan, often Workers KV, Pages, Cloudflare for SaaS, R2, Argo, etc.
  2. A startup that is not a part of any accelerator program but would like to get on the startup plan.

Based on this feedback, we are thrilled to announce that today we will be increasing the scope of the program to also include popularly requested products! Beyond that, we’re also super excited to be broadening the eligibility criteria, so more startups can qualify for the plan.

What does the Cloudflare Startup Plan include?

There’s a lot of additional value that’s in the latest version of the plan. Here’s how things have evolved from v1.0:

Product Description v1.0 v2.0*
Content Delivery Network (CDN) Cloudflare’s CDN is a distributed network of servers that provides several advantages for a website. By caching website content, Cloudflare helps improve page load speeds, reduce bandwidth usage, and reduce CPU usage on the server.
Web Application Firewall (WAF) Cloudflare WAF protects a customer’s Internet properties from common vulnerabilities like SQL injection attacks, cross-site scripting, and cross-site forgery requests, with no changes to its existing infrastructure.
DNS Cloudflare DNS is an enterprise-grade authoritative DNS service that offers the fastest response time, unparalleled redundancy, and advanced security with built-in DDoS mitigation and DNSSEC.
Advanced DDoS Protection Cloudflare DDoS protection secures websites, applications, and entire networks while ensuring the performance of legitimate traffic is not compromised.
Page Rules Page Rules allows you to conditionally change zone settings such as security level or rocket loader settings. It is also how cache settings are configured for traffic passing through the zone.
Workers Cloudflare Workers allows developers to augment existing applications or create entirely new ones through a lightweight execution environment without configuring or maintaining infrastructure.
Stream Cloudflare Stream provides out-of-the-box video infrastructure that handles storage, encoding, and delivery. Using the Stream API, customers can build video functionality affordably and with minimal engineering effort.
Zero Trust Cloudflare Zero Trust replaces legacy security perimeters with our global edge, making the Internet faster and safer for teams around the world.
R2 Cloudflare R2 Storage allows developers to store large amounts of unstructured data without the costly egress bandwidth fees associated with typical cloud storage services.

Pages Cloudflare Pages allows frontend developers to quickly and easily build, collaborate on, and deploy websites.
Workers KV Workers KV is a global, low-latency, key-value data store. It supports high read volumes with low-latency, making it possible to build highly dynamic APIs and websites which respond as quickly as a cached static file would.
Workers Unbound Workers Unbound is a serverless platform for compute-intensive workloads, supporting up to 30s CPU time (GA), and 15 minute cron triggers (beta).
Cloudflare for SaaS Offers the benefits of Cloudflare’s SSL management to SaaS company’s customers. Allows SaaS customers to use their custom vanity domains while maintaining a branded customer experience, improved SEO rankings, and all the perks of dedicated certificates.

Advanced Certificate Manager (ACM) Advanced Certificate Manager is a flexible and customizable way to issue and manage certificates in Cloudflare. Customers use Advanced Certificate Manager when they want something more customizable than Universal SSL but still want the convenience of SSL certificate issuance and renewal.

Image Resizing Resize images for a variety of device types and connections from a single-source master image. Images can be manipulated by dimensions, compression ratios, and format (WebP conversion where supported). It is a feature of Speed→Optimization on the Dashboard.
Images Cloudflare Images lets you set up an image pipeline in minutes. Build a scalable image pipeline to store, resize, optimize and deliver images in a fast and secure manner.
Argo Smart Routing Argo Smart Routing improves Internet performance by intelligently routing end users through less congested and more reliable paths over the Internet using our network.
Spectrum DDoS protection, firewalling features and performance benefits for any TCP or UDP based application (such as gaming, FTP, email etc.)
Load Balancing Improve application performance and availability by steering traffic away from unhealthy origin servers and dynamically distributing it to the most available and responsive server pools.
Rate Limiting Protect your site or API from malicious traffic by blocking client IP addresses that hit a URL pattern and exceed a threshold you define.
Waiting Room Cloudflare Waiting Room allows organizations to route excess users to a custom-branded waiting room, helping preserve customer experience and protect origin servers from being overwhelmed with requests.
Area 1 Email Security Comprehensive email security solution to eliminate the risk from phishing, which is the root cause of damage in 95% of all cybersecurity incidents. Configuration with Google and Microsoft in 5 minutes.

*Product-specific usage limits apply

With the expanded product basket, the Startup Plan v2.0 provides four times the value of the original program. As an added bonus when new Cloudflare products are in beta, participants on the Startup Plan are welcome to share their use case and potentially receive early access.

How to join the Cloudflare Startup Program

Eligibility criteria for startups new to the program

To be eligible for the Startup Plan, your startup must be at an early stage (i.e. raised less than $3 million) and enrolled or recently graduated from a participating accelerator program.

If you are a founder in a participating accelerator program, navigate to the Cloudflare perk from your program’s vendor perk page and follow the instructions there. Those instructions will lead you to this plan page where you can select your program from the list.

If your accelerator program is not on the list, please email us at [email protected] and include the details of your perk manager. We’ll get in touch with them directly.

What if I’m already on the V1 Startup Plan? Can I get access to the products on the V2 plan?

Yes! Startups currently on the Startup Plan will automatically have the additional products added to your accounts in the coming weeks, no action required. This upgrade will apply for the remainder of the year that your company is on the Startup Plan.

If you have any questions about making the most of your plan, drop a line to [email protected] with any questions.

Special Eligibility: Referral Program, Alumni Program, Workers Launchpad

Over our years at Cloudflare, we have had the privilege of working with some remarkable technologists who have gone on to work on extraordinary projects after their time at Cloudflare. Moreover, there are startup founders who interface with teams at Cloudflare, whether through participation in the Cloudflare Community or because they were former coworkers elsewhere.

These startups are now also eligible:

  • Workers Launchpad funding program: If you are building on Cloudflare Workers, simultaneously apply for the Workers Launchpad funding program here, which will make you eligible for introductions to leading investors, additional mentorship opportunities, and other perks.
  • Referral Program: “Referred by (include details in comments)” is now an option in the Select Accelerator dropdown menu on the Startup Plan landing page. Please include the email address of your contact at Cloudflare in the comments field. Your account will be upgraded once your contact validates the referral.
  • Alumni Program: “Cloudflare Alumni” is now also an option in the Select Accelerator dropdown menu.

Questions about the program? Drop us a line at [email protected], and we’ll be in touch.

Going originless with Cloudflare Workers – Building a Todo app – Part 1: The API

Post Syndicated from Kabir Sikand original https://blog.cloudflare.com/workers-todo-part-1/

Going originless with Cloudflare Workers – Building a Todo app – Part 1: The API

Going originless with Cloudflare Workers – Building a Todo app – Part 1: The API

A few months ago we launched Custom Domains into an open beta. Custom Domains allow you to hook up your Workers to the Internet, without having to deal with DNS records or certificates – just enter a valid hostname and Cloudflare will do the rest! The beta’s over, and Custom Domains are now GA.

Custom Domains aren’t just about a seamless developer experience; they also allow you to build a globally distributed instantly scalable application on Cloudflare’s Developer Platform. That’s because Workers leveraging Custom Domains have no concept of an ‘Origin Server’. There’s no ‘home’ to phone to – and that also means your application can use the power of Cloudflare’s global network to run your application, well, everywhere. It’s truly serverless.

Let’s build “Todo”, but without the servers

Today we’ll start a series of posts outlining a simple todo list application. We’ll start with an API and hook it up to the Internet using Custom Domains.

With Custom Domains, you’re treating the whole network as the application server. Any time a request comes into a Cloudflare data center, Workers are triggered in that data center and connect to resources across the network as needed. Our developers don’t need to think about regions, or replication, or spinning up the right number of instances to handle unforeseen load. Instead, just deploy your Workers and Cloudflare will handle the rest.

For our todo application, we begin by building an API Gateway to perform routing, any authorization checks, and drop invalid requests. We then fan out to each individual use case in a separate Worker, so our teams can independently make updates or add features to each endpoint without a full redeploy of the whole application. Finally, each Worker has a D1 binding to be able to create, read, update, and delete records from the database. All of this happens on Cloudflare’s global network, so your API is truly available everywhere. The architecture will look something like this:

Going originless with Cloudflare Workers – Building a Todo app – Part 1: The API

Bootstrap the D1 Database

First off, we’re going to need a D1 database set up, with a schema for our todo application to run on. If you’re not familiar with D1, it’s Cloudflare’s serverless database offering – explained in more detail here. To get started, we use the wrangler d1 command to create a new database:

npx wrangler d1 create <todo | custom-database-name>

After executing this command, you will be asked to add a snippet of code to your wrangler.toml file that looks something like this:

[[ d1_databases ]]
binding = "db" # i.e. available in your Worker on env.db
database_name = "<todo | custom-database-name>"
database_id = "<UUID>"

Let’s save that for now, and we’ll put these into each of our private microservices in a few moments. Next, we’re going to create our database schema. It’s a simple todo application, so it’ll look something like this, with some seeded data:

db/schema.sql

DROP TABLE IF EXISTS todos;
CREATE TABLE todos (id INTEGER PRIMARY KEY, todo TEXT, todoStatus BOOLEAN NOT NULL CHECK (todoStatus IN (0, 1)));
INSERT INTO todos (todo, todoStatus) VALUES ("Fold my laundry", 0),("Get flowers for mum’s birthday", 0),("Find Nemo", 0),("Water the monstera", 1);

You can bootstrap your new D1 database by running:

npx wrangler d1 execute <todo | custom-database-name> --file=./schema.sql

Then validate your new data by running a query through Wrangler using the following command:

npx wrangler d1 execute <todo | custom-database-name> --command='SELECT * FROM todos';

Great! We’ve now got a database running entirely on Cloudflare’s global network.

Build the endpoint Workers

To talk to your database, we’ll spin up a series of private microservices for each endpoint in our application. We want to be able to create, read, update, delete, and list our todos. The full source code for each is available here. Below is code from a Worker that lists all our todos from D1.

list/src/list.js

export default {
   async fetch(request, env) {
     const { results } = await env.db.prepare(
       "SELECT * FROM todos"
     ).all();
     return Response.json(results);
   },
 };

The Worker ‘todo-list’ needs to be able to access D1 from the environment variable db. To do this, we’ll define the D1 binding in our wrangler.toml file. We also specify that workers_dev is false, preventing a preview from being generated via workers.dev (we want this to be a private microservice).

list/wrangler.toml

name = "todo-list"
main = "src/list.js"
compatibility_date = "2022-09-07"
workers_dev = false
usage_model = "unbound"

[[ d1_databases ]]
binding = "db" # i.e. available in your Worker on env.db
database_name = "<todo | custom-database-name>"
database_id = "UUID"

Finally, use wrangler publish to deploy this microservice.

todo/list on ∞main [!] 
› wrangler publish
 ⛅️ wrangler 0.0.0-893830aa
-----------------------------------------------------------------------
Retrieving cached values for account from ../../../node_modules/.cache/wrangler
Your worker has access to the following bindings:
- D1 Databases:
  - db: todo (UUID)
Total Upload: 4.71 KiB / gzip: 1.60 KiB
Uploaded todo-list (0.96 sec)
No publish targets for todo-list (0.00 sec)

Notice that wrangler mentions there are no ‘publish targets’ for todo-list. That’s because we haven’t hooked todo-list up to any HTTP endpoints. That’s fine! We’re going to use Service Bindings to route requests through a gateway worker, as described in the architecture diagram above.

Next, reuse these steps to create similar microservices for each of our create, read, update, and delete endpoints. The source code is available to follow along.

Tying it all together with an API Gateway

Each of our Workers are able to talk to the D1 database, but how can our application talk to our API? We’ll build out a simple API gateway to route incoming requests to the appropriate microservice. For the purposes of our application, we’re using a combination of URL pathname and request method to detect which endpoint is appropriate.

gateway/src/gateway.js

export default {
 async fetch(request, env) {
   try{
     const url = new URL(request.url)
     const idPattern = new URLPattern({ pathname: '/:id' })
     if (idPattern.test(request.url)) {
       switch (request.method){
         case 'GET':
           return await env.get.fetch(request.clone())
         case 'PATCH':
           return await env.update.fetch(request.clone())
         case 'DELETE':
           return await env.delete.fetch(request.clone())
         default:
           return new Response("Unsupported method for endpoint /:id", {status: 405})
       }
     } else if (url.pathname == '/') {
       switch (request.method){
         case 'GET':
           return await env.list.fetch(request.clone())
         case 'POST':
           return await env.create.fetch(request.clone())
         default:
           return new Response("Unsupported method for endpoint /", {status: 405})
       }
     }
     return new Response("Not found. Supported endpoints are /:id and /", {status: 404})
   } catch(e) {
     return new Response(e, {status: 500})
   }
 },
};

With our API gateway all set, we just need to expose our application to the Internet using a Custom Domain, and hook up our Service Bindings, so the gateway Worker can access each appropriate microservice. We’ll set this up in a wrangler.toml.

gateway/wrangler.toml

name = "todo-gateway"
main = "src/gateway.js"
compatibility_date = "2022-09-07"
workers_dev = false
usage_model = "unbound"
 
routes =  [
   {pattern="todos.radiobox.tv", custom_domain=true, zone_name="radiobox.tv"}
]
 
services = [
   {binding = "get",service = "todo-get"},
   {binding = "delete",service = "todo-delete"},
   {binding = "create",service = "todo-create"},
   {binding = "update",service = "todo-update"},
   {binding = "list",service = "todo-list"}
]

Next, use wrangler publish to deploy your application to the Cloudflare network. Seconds later, you’ll have a simple, functioning todo API built entirely on Cloudflare’s Developer Platform!

› wrangler publish
 ⛅️ wrangler 0.0.0-893830aa
-----------------------------------------------------------------------
Retrieving cached values for account from ../../../node_modules/.cache/wrangler
Your worker has access to the following bindings:
- Services:
  - get: todo-get
  - delete: todo-delete
  - create: todo-create
  - update: todo-update
  - list: todo-list
Total Upload: 1.21 KiB / gzip: 0.42 KiB
Uploaded todo-gateway (0.62 sec)
Published todo-gateway (0.51 sec)
  todos.radiobox.tv (custom domain - zone name: radiobox.tv)

Natively Global

Since it’s built natively on Cloudflare, you can also include Cloudflare’s security suite in front of the application. If we want to prevent SQL Injection attacks for this endpoint, we can enable the appropriate Managed WAF rules on our todos API endpoint. Alternatively, if we wanted to prevent global access to our API (only allowing privileged clients to access the application), we can simply put Cloudflare Access in front, with custom Access Rules.

Going originless with Cloudflare Workers – Building a Todo app – Part 1: The API

With Custom Domains on Workers, you’re able to easily create applications that are native to Cloudflare’s global network, instantly. Best of all, your developers don’t need to worry about maintaining DNS records or certificate renewal – Cloudflare handles it all on their behalf. We’d like to give a huge shout out to the 5,000+ developers who used Custom Domains during the open beta period, and those that gave feedback along the way to make this possible. Can’t wait to see what you build next! As always, if you have any questions or would like to get involved, please join us on Discord.

Tune in next time to see how we can build a frontend for our application. In the meantime, you can play around with the todos API we built today at todos.radiobox.tv.

The easiest way to build a modern SaaS application

Post Syndicated from Tanushree Sharma original https://blog.cloudflare.com/workers-for-platforms-ga/

The easiest way to build a modern SaaS application

The easiest way to build a modern SaaS application

The Software as a Service (SaaS) model has changed the way we work – 80% of businesses use at least one SaaS application. Instead of investing in building proprietary software or installing and maintaining on-prem licensed software, SaaS vendors provide businesses with out-of-the-box solutions.

SaaS has many benefits over the traditional software model: cost savings, continuous updates and scalability, to name a few. However, any managed solution comes with trade-offs. As a business, one of the biggest challenges in adopting SaaS tooling is loss of customization. Not every business uses software in the same way and as you grow as a SaaS company it’s not long until you get customers saying “if only I could do X”.

Enter Workers for Platforms – Cloudflare’s serverless functions offering for SaaS businesses. With Workers for Platforms, your customers can build custom logic to meet their requirements right into your application.

We’re excited to announce that Workers for Platforms is now in GA for all Enterprise customers! If you’re an existing customer, reach out to your Customer Success Manager (CSM) to get access. For new customers, fill out our contact form to get started.

The conundrum of customization

As a SaaS business invested in capturing the widest market, you want to build a universal solution that can be used by customers of different sizes, in various industries and regions. However, every one of your customers has a unique set of tools and vendors and best practices. A generalized platform doesn’t always meet their needs.

For SaaS companies, once you get in the business of creating customizations yourself, it can be hard to keep up with seemingly never ending requests. You want your engineering teams to focus on building out your core business instead of building and maintaining custom solutions for each of your customer’s use cases.

With Workers for Platforms, you can give your customers the ability to write code that customizes your software. This gives your customers the flexibility to meet their exact use case while also freeing up internal engineering time  – it’s a win-win!

How is this different from Workers?

Workers is Cloudflare’s serverless execution environment that runs your code on Cloudflare’s global network. Workers is lightning fast and scalable; running at data centers in 275+ cities globally and serving requests from as close as possible to the end user. Workers for Platforms extends the power of Workers to our customer’s developers!

So, what’s new?

Dispatch Worker: As a platform customer, you want to have full control over how end developer code fits in with your APIs. A Dispatch Worker is written by our platform customers to run their own logic before dispatching (aka routing) to Workers written by end developers. In addition to routing, it can be used to run authentication, create boilerplate functions and sanitize responses.

User Workers: User Workers are written by end developers, that is, our customers’ developers. End developers can deploy User Workers to script automated actions, create integrations or modify response payload to return custom content. Unlike self-managed Function-as-a-Service (FaaS) options, with Workers for Platforms, end developers don’t need to worry about setting up and maintaining their code on any 3rd party platform. All they need to do is upload their code and you – or rather Cloudflare – takes care of the rest.

Unlimited Scripts: Yes, you read that correctly! With hundreds-plus end developers, the existing 100 script limit for Workers won’t cut it for Workers for Platforms customers. Some of our Workers for Platforms customers even deploy a new script each time their end developers make a change to their code in order to maintain version control and to easily revert to a previous state if a bug is deployed.

Dynamic Dispatch Namespaces: If you’ve used Workers before, you may be familiar with a feature we released earlier this year, Service Bindings. Service Bindings are a way for two Workers to communicate with each other. They allow developers to break up their applications into modules that can be chained together. Service Bindings explicitly link two Workers together, and they’re meant for use cases where you know exactly which Workers need to communicate with each other.

Service Bindings don’t work in the Workers for Platforms model because User Workers are uploaded ad hoc. Dynamic Dispatch Namespaces is our solution to this! A Dispatch Namespace is composed of a collection of User Workers. With Dispatch Namespaces, a Dispatch Worker can be used to call any User Worker in a namespace (similar to how Service Bindings work) but without needing to explicitly pre-define the relationship.

Read more about how to use these features below!

How to use Workers for Platforms

The easiest way to build a modern SaaS application

Dispatch Workers

Dispatch Workers are the entry point for requests to Workers in a Dispatch Namespace. The Dispatch Worker can be used to run any functions ahead of User Workers. They can make a request to any User Workers in the Dispatch Namespace, and they ultimately handle the routing to User Workers.

Dispatch Workers are created the same way as a regular Worker, except they need a Dispatch Namespace binding in the project’s wrangler.toml configuration file.

[[dispatch_namespaces]]
binding = "dispatcher"
namespace = "api-prod"

In the example below, this Dispatch Worker reads the subdomain from the path and calls the appropriate User Worker. Alternatively you can use KV, D1 or your data store of choice to map identifying parameters from an incoming request to a User Worker.

export default {
 async fetch(request, env) {
   try {
       // parse the URL, read the subdomain
       let worker_name = new URL(request.url).host.split('.')[0]
       let user_worker = env.dispatcher.get(worker_name)
       return user_worker.fetch(request)
   } catch (e) {
       if (e.message == 'Error: Worker not found.') {
           // we tried to get a worker that doesn't exist in our dispatch namespace
           return new Response('', {status: 404})
       }
       // this could be any other exception from `fetch()` *or* an exception
       // thrown by the called worker (e.g. if the dispatched worker has
       // `throw MyException()`, you could check for that here).
       return new Response(e.message, {status: 500})
   }
 }

}

Uploading User Workers

User Workers must be uploaded to a Dispatch Namespace through the Cloudflare API (wrangler support coming soon!). This code snippet below uses a simple HTML form to take in a script and customer id and then uploads it to the Dispatch Namespace.

export default {
 async fetch(request: Request) {
   try {
     // on form submit
     if (request.method === "POST"){
       const str = JSON.stringify(await request.json())
       const upload_obj = JSON.parse(str)
       await upload(upload_obj.customerID, upload_obj.script)
   }
   //render form
     return new Response (html, {
       headers: {
         "Content-Type": "text/html"
       }
     })
   } catch (e) {
       // form error
       return new Response(e.message, {status: 500})
   }
 }
}

async function upload(customerID:string, script:string){
 const scriptName = customerID;
 const scriptContent = script;
 const accountId = "<ACCOUNT_ID>";
 const dispatchNamespace = "api-prod";
 const url = `https://api.cloudflare.com/client/v4/accounts/${accountId}/workers/dispatch/namespaces/${dispatchNamespace}/scripts/${scriptName}`;
 // construct and send request
 const response = await fetch(url, {
   method: "PUT",
   body: scriptContent,
   headers: {
     "Content-Type": "application/javascript",
     "X-Auth-Email": "<EMAIL>",
     "X-Auth-Key": "<API_KEY>"
   }
 });

 const result = (await response.json());
 if (response.status != 200) {
   throw new Error(`Upload error`);
 }
}

It’s that simple. With Dispatch Namespaces and Dispatch Workers, we’re giving you the building blocks to customize your SaaS applications. Along with the Platforms APIs, we’re also releasing a Workers for Platforms UI on the Cloudflare dashboard where you can view your Dispatch Namespaces, search scripts and view analytics for User Workers.

The easiest way to build a modern SaaS application

To view an end to end example, check out our Workers for Platforms example application.

Get started today!

We’re releasing Workers for Platforms to all Cloudflare Enterprise customers. If you’re interested, reach out to your Customer Success Manager (CSM) to get access. To get started, take a look at our Workers for Platforms starter project and developer documentation.

We also have plans to release this down to the Workers Paid plan. Stay tuned on the Cloudflare Discord (channel name: workers-for-platforms-beta) for updates.

What’s next?

We’ve heard lots of great feature requests from our early Workers for Platforms customers. Here’s a preview of what’s coming next on the roadmap:

  • Fine-grained controls over User Workers: custom script limits, allowlist/blocklist for fetch requests
  • GraphQL and Logs: Metrics for User Workers by tag
  • Plug and play Platform Development Kit
  • Tighter integration with Cloudflare for SaaS custom domains

If you have specific feature requests in mind, please reach out to your CSM or get in touch through the Discord!

R2 is now Generally Available

Post Syndicated from Aly Cabral original https://blog.cloudflare.com/r2-ga/

R2 is now Generally Available

R2 is now Generally Available

R2 gives developers object storage, without the egress fees. Before R2, cloud providers taught us to expect a data transfer tax every time we actually used the data we stored with them. Who stores data with the goal of never reading it? No one. Yet, every time you read data, the egress tax is applied. R2 gives developers the ability to access data freely, breaking the ecosystem lock-in that has long tied the hands of application builders.

In May 2022, we launched R2 into open beta. In just four short months we’ve been overwhelmed with over 12k developers (and rapidly growing) getting started with R2. Those developers came to us with a wide range of use cases from podcast applications to video platforms to ecommerce websites, and users like Vecteezy who was spending six figures in egress fees. We’ve learned quickly, gotten great feedback, and today we’re excited to announce R2 is now generally available.

We wouldn’t ask you to bet on tech we weren’t willing to bet on ourselves. While in open beta, we spent time moving our own products to R2. One such example, Cloudflare Images, proudly serving thousands of customers in production, is now powered by R2.

What can you expect from R2?

S3 Compatibility

R2 gives developers a familiar interface for object storage, the S3 API. WIth S3 Compatibility, you can easily migrate your applications and start taking advantage of what R2 has to offer right out of the gate.

Let’s take a look at some basic data operations in javascript. To try this out on your own, you’ll need to generate an Access Key.

// First we import our bindings as usual
import {
  S3Client,
  ListBucketsCommand,
} from "@aws-sdk/client-s3";

// Then we create a new client. Note that while R2 requires a region for S3 compatibility, only “auto” is supported
const S3 = new S3Client({
  region: "auto",
  endpoint: `https://${ACCOUNT_ID}.r2.cloudflarestorage.com`,
  credentials: {
    accessKeyId: ACCESS_KEY_ID, //  fill in your own
    secretAccessKey: SECRET_ACCESS_KEY, // fill in your own
  },
});

// And now we can use our client to list associated buckets just like we would with any other S3 compatible object storage
console.log(
  await S3.send(
    new ListBucketsCommand('')
  )
);

Regardless of the language, the S3 API offers familiarity. We have examples in Go, Java, PHP, and Ruby.

Region: Automatic

We don’t want to live in a world where developers are spending time looking into a crystal ball and predicting where application traffic might come from. Choosing a region as the first step in application development forces optimization decisions long before the first users show up.

While S3 compatibility requires you to specify a region, the only region we support is ‘auto’. Today, R2 automatically selects a bucket location in the closest available region to the create bucket request. If I create a bucket from my home in Austin, that bucket will live in the closest available R2 region to Austin.

In the future, R2 will use data access patterns to automatically optimize where data is stored for the best user experience.

Cloudflare Workers Integration

The Workers platform offers developers powerful compute across Cloudflare’s network. When you deploy on Workers, your code is deployed to Cloudflare’s 280+ locations across the globe, automatically. When paired with R2, Workers allows developers to add custom logic around their data without any performance overhead. Workers is built on isolates and not containers, and as a result you don’t have to deal with lengthy cold starts.

Let’s try creating a simple REST API for an R2 bucket! First, create your bucket and then add an R2 binding to your worker.

export default {
  async fetch(request, env) {
    const url = new URL(request.url);
    const key = url.pathname.slice(1); // we’ll derive a key from the url path

    switch (request.method) {
      // For writes, we capture the request body and write that out to our bucket under the associated key
      case 'PUT':
        await env.MY_BUCKET.put(key, request.body);
        return new Response(`Put ${key} successfully!`);

      // For reads, we’ll use our key to perform a lookup
      case 'GET':
        const object = await env.MY_BUCKET.get(key);

        // if we don’t find the given key we’ll return a 404 error
        if (object === null) {
          return new Response('Object Not Found', { status: 404 });
        }

        const headers = new Headers();
        object.writeHttpMetadata(headers);
        headers.set('etag', object.httpEtag);

        return new Response(object.body, {
          headers,
        });
    }
  },
};

Through this Workers API, we can add all sorts of useful logic to the hot path of a R2 request.

Presigned URLs

Sometimes you’ll want to give your users permissions to specific objects in R2 without requiring them to jump through hoops. Through pre-signed URLs you can delegate your permissions to your users for any unique combination of object and action. Mint a pre-signed URL to let a user upload a file or share a file without giving access to the entire bucket.

import {
  S3Client,
  PutObjectCommand
} from "@aws-sdk/client-s3";

import { getSignedUrl } from "@aws-sdk/s3-request-presigner";

const S3 = new S3Client({
  region: "auto",
  endpoint: `https://${ACCOUNT_ID}.r2.cloudflarestorage.com`,
  credentials: {
    accessKeyId: ACCESS_KEY_ID,
    secretAccessKey: SECRET_ACCESS_KEY,
  },
});

// With getSignedUrl we can produce a custom url with a one hour expiration which will allow our end user to upload their dog pic
console.log(
  await getSignedUrl(S3, new PutObjectCommand({Bucket: 'my-bucket-name', Key: 'dog.png'}), { expiresIn: 3600 })
)

Presigned URLs make it easy for developers to build applications that let end users safely access R2 directly.

Public buckets

Enabling public access for a R2 bucket allows you to expose that bucket to unauthenticated requests. While doing so on its own is of limited use, when those buckets are linked to a domain under your account on Cloudflare you can enable other Cloudflare features such as Access, Cache and bot management seamlessly on top of your data in R2.

Bottom line: public buckets help to bridge the gap between domain oriented Cloudflare features and the buckets you have in R2.

Transparent Pricing

R2 will never charge for egress. The pricing model depends on three factors alone: storage volume, Class A operations (writes, lists) and Class B operations (reads).

  • Storage is priced at $0.015 / GB, per month.
  • Class A operations cost $4.50 / million.
  • Class B operations cost $0.36 / million.

But before you’re ready to start paying for R2, we allow you to get up and running at absolutely no cost. The included usage is as follows:

  • 10 GB-months of stored data
  • 1,000,000 Class A operations, per month
  • 10,000,000 Class B operations, per month

What’s next?

Making R2 generally available is just the beginning of our object storage journey. We’re excited to share what we plan to build next.

Object Lifecycles

In the future R2 will allow developers to set policies on objects. For example, setting a policy that deletes an object 60 days after it was last accessed. Object Lifecycles pushes object management down to the object store.

Jurisdictional Restrictions

While we don’t have plans to support regions explicitly, we know that data locality is important for a good deal of compliance use cases. Jurisdictional restrictions will allow developers to set a jurisdiction like the ‘EU’ that would prevent guarantee data from leavingwould not leave the jurisdiction.

Live Migration without Downtime

For large datasets, migrations are live and ongoing, as it takes time to move data over. Cache reserve is an easy way to quickly migrate your assets into a managed R2 instance to reduce your egress costs at the touch of a button. In the future, we’ll be extending this mechanism so that you can migrate any of your existing S3 object storage buckets to R2.

We invite everyone to sign up and get started with R2 today. Join the growing community of developers building on Cloudflare. If you have any feedback or questions, find us on our Discord server here! We can’t wait to see what you build.

Building scheduling system with Workers and Durable Objects

Post Syndicated from Adam Janiš original https://blog.cloudflare.com/building-scheduling-system-with-workers-and-durable-objects/

Building scheduling system with Workers and Durable Objects

Building scheduling system with Workers and Durable Objects

We rely on technology to help us on a daily basis – if you are not good at keeping track of time, your calendar can remind you when it’s time to prepare for your next meeting. If you made a reservation at a really nice restaurant, you don’t want to miss it! You appreciate the app to remind you a day before your plans the next evening.

However, who tells the application when it’s the right time to send you a notification? For this, we generally rely on scheduled events. And when you are relying on them, you really want to make sure that they occur. Turns out, this can get difficult. The scheduler and storage backend need to be designed with scale in mind – otherwise you may hit limitations quickly.

Workers, Durable Objects, and Alarms are actually a perfect match for this type of workload. Thanks to the distributed architecture of Durable Objects and their storage, they are a reliable and scalable option. Each Durable Object has access to its own isolated storage and alarm scheduler, both being automatically replicated and failover in case of failures.

There are many use cases where having a reliable scheduler can come in handy: running a webhook service, sending emails to your customers a week after they sign up to keep them engaged, sending invoices reminders, and more!

Today, we’re going to show you how to build a scalable service that will schedule HTTP requests on a specific schedule or as one-off at a specific time as a way to guide you through any use case that requires scheduled events.

Building scheduling system with Workers and Durable Objects

Quick intro into the application stack

Before we dive in, here are some of the tools we’re going to be using today:

The application is going to have following components:

  • Scheduling system API to accept scheduled requests and manage Durable Objects
  • Unique Durable Object per scheduled request, each with
  • Storage – keeping the request metadata, such as URL, body, or headers.
  • Alarm – a timer (trigger) to wake Durable Object up.

While we will focus on building the application, the Cloudflare global network will take care of the rest – storing and replicating our data, and making sure to wake our Durable Objects up when the time’s right. Let’s build it!

Initialize new Workers project

Get started by generating a completely new Workers project using the wrangler init command, which makes creating new projects quick & easy.

wrangler init -y durable-objects-requests-scheduler

Building scheduling system with Workers and Durable Objects

For more information on how to install, authenticate, or update Wrangler, check out https://developers.cloudflare.com/workers/wrangler/get-started

Preparing TypeScript types

From my personal experience, at least a draft of TypeScript types significantly helps to be more productive down the road, so let’s prepare and describe our scheduled request in advance. Create a file types.ts in src directory and paste the following TypeScript definitions.

src/types.ts

export interface Env {
    DO_REQUEST: DurableObjectNamespace
}
 
export interface ScheduledRequest {
  url: string // URL of the request
  triggerAt?: number // optional, unix timestamp in milliseconds, defaults to `new Date()`
  requestInit?: RequestInit // optional, includes method, headers, body
}

A scheduled request Durable Object class & alarm

Based on our architecture design, each scheduled request will be saved into its own Durable Object, effectively separating storage and alarms from each other and allowing our scheduling system to scale horizontally – there is no limit to the number of Durable Objects we create.

In the end, the Durable Object class is a matter of a couple of lines. The code snippet below accepts and saves the request body to a persistent storage and sets the alarm timer. Workers runtime will wake up the Durable Object and call the alarm() method to process the request.

The alarm method reads the scheduled request data from the storage, then processes the request, and in the end reschedules itself in case it’s configured to be executed on a recurring schedule.

src/request-durable-object.ts

import { ScheduledRequest } from "./types";
 
export class RequestDurableObject {
  id: string|DurableObjectId
  storage: DurableObjectStorage
 
  constructor(state:DurableObjectState) {
    this.storage = state.storage
    this.id = state.id
  }
 
    async fetch(request:Request) {
    // read scheduled request from request body
    const scheduledRequest:ScheduledRequest = await request.json()
     
    // save scheduled request data to Durable Object storage, set the alarm, and return Durable Object id
    this.storage.put("request", scheduledRequest)
    this.storage.setAlarm(scheduledRequest.triggerAt || new Date())
    return new Response(JSON.stringify({
      id: this.id.toString()
    }), {
      headers: {
        "content-type": "application/json"
      }
    })
  }
 
  async alarm() {
    // read the scheduled request from Durable Object storage
    const scheduledRequest:ScheduledRequest|undefined = await this.storage.get("request")
 
    // call fetch on scheduled request URL with optional requestInit
    if (scheduledRequest) {
      await fetch(scheduledRequest.url, scheduledRequest.requestInit ? webhook.requestInit : undefined)
 
      // cleanup scheduled request once done
      this.storage.deleteAll()
    }
  }
}

Wrangler configuration

Once we have the Durable Object class, we need to create a Durable Object binding by instructing Wrangler where to find it and what the exported class name is.

wrangler.toml

name = "durable-objects-request-scheduler"
main = "src/index.ts"
compatibility_date = "2022-08-02"
 
# added Durable Objects configuration
[durable_objects]
bindings = [
  { name = "DO_REQUEST", class_name = "RequestDurableObject" },
]
 
[[migrations]]
tag = "v1"
new_classes = ["RequestDurableObject"]

Scheduling system API

The API Worker will accept POST HTTP methods only, and is expecting a JSON body with scheduled request data – what URL to call, optionally what method, headers, or body to send. Any other method than POST will return 405 – Method Not Allowed HTTP error.

HTTP POST /:scheduledRequestId? will create or override a scheduled request, where :scheduledRequestId is optional Durable Object ID returned from a scheduling system API before.

src/index.ts

import { Env } from "./types"
export { RequestDurableObject } from "./request-durable-object"
 
export default {
    async fetch(
        request: Request,
        env: Env
    ): Promise<Response> {
        if (request.method !== "POST") {
            return new Response("Method Not Allowed", {status: 405})
        }
 
        // parse the URL and get Durable Object ID from the URL
        const url = new URL(request.url)
        const idFromUrl = url.pathname.slice(1)
 
        // construct the Durable Object ID, use the ID from pathname or create a new unique id
        const doId = idFromUrl ? env.DO_REQUEST.idFromString(idFromUrl) : env.DO_REQUEST.newUniqueId()
 
        // get the Durable Object stub for our Durable Object instance
        const stub = env.DO_REQUEST.get(doId)
 
        // pass the request to Durable Object instance
        return stub.fetch(request)
    },
}

It’s good to mention that the script above does not implement any listing of scheduled or processed webhooks. Depending on how the scheduling system would be integrated, you can save each created Durable Object ID to your existing backend, or write your own registry – using one of the Workers storage options.

Starting a local development server and testing our application

We are almost done! Before we publish our scheduler system to the Cloudflare edge, let’s start Wrangler in a completely local mode to run a couple of tests against it and to see it in action – which will work even without an Internet connection!

wrangler dev --local
Building scheduling system with Workers and Durable Objects

The development server is listening on localhost:8787, which we will use for scheduling our first request. The JSON request payload should match the TypeScript schema we defined in the beginning – required URL, and optional triggerEverySeconds number or triggerAt unix timestamp. When only the required URL is passed, the request will be dispatched right away.

An example of request payload that will send a GET request to https://example.com every 30 seconds.

{
	"url":  "https://example.com",
	"triggerEverySeconds": 30,
}
> curl -X POST -d '{"url": "https://example.com", "triggerEverySeconds": 30}' http://localhost:8787
{"id":"000000018265a5ecaa5d3c0ab6a6997bf5638fdcb1a8364b269bd2169f022b0f"}
Building scheduling system with Workers and Durable Objects

From the wrangler logs we can see the scheduled request ID 000000018265a5ecaa5d3c0ab6a6997bf5638fdcb1a8364b269bd2169f022b0f is being triggered in 30s intervals.

Need to double the interval? No problem, just send a new POST request and pass the request ID as a pathname.

> curl -X POST -d '{"url": "https://example.com", "triggerEverySeconds": 60}' http://localhost:8787/000000018265a5ecaa5d3c0ab6a6997bf5638fdcb1a8364b269bd2169f022b0f
{"id":"000000018265a5ecaa5d3c0ab6a6997bf5638fdcb1a8364b269bd2169f022b0f"}

Every scheduled request gets a unique Durable Object ID with its own storage and alarm. As we demonstrated, the ID becomes handy when you need to change the settings of the scheduled request, or to deschedule them completely.

Publishing to the network

Following command will bundle our Workers application, export and bind Durable Objects, and deploy it to our workers.dev subdomain.

wrangler publish
Building scheduling system with Workers and Durable Objects

That’s it, we are live! 🎉 The URL of your deployment is shown in the Workers logs. In a reasonably short period of time we managed to write our own scheduling system that is ready to handle requests at scale.

You can check full source code in Workers templates repository, or experiment from your browser without installing any dependencies locally using the StackBlitz template.

What to see or build next

Running Zig with WASI on Cloudflare Workers

Post Syndicated from Daniel Harper original https://blog.cloudflare.com/running-zig-with-wasi-on-cloudflare-workers/

Running Zig with WASI on Cloudflare Workers

Running Zig with WASI on Cloudflare Workers

After the recent announcement regarding WASI support in Workers, I decided to see what it would take to get code written in Zig to run as a Worker, and it turned out to be trivial. This post documents the process I followed as a new user of Zig. It’s so exciting to see how Cloudflare Workers is a polyglot platform allowing you to write programs in the language you love, or the language you’re learning!

Hello, World!

I’m not a Zig expert by any means, and to keep things entirely honest I’ve only just started looking into the language, but we all have to start somewhere. So, if my Zig code isn’t perfect please bear with me. My goal was to build a real, small program using Zig and deploy it on Cloudflare Workers. And to see how fast I can go from a blank screen to production code.

My goal for this wasn’t ambitious, just read some text from stdin and print it to stdout with line numbers, like running cat -n. But it does show just how easy the Workers paradigm is. This Zig program works identically on the command-line on my laptop and as an HTTP API deployed on Cloudflare Workers.

Here’s my code. It reads a line from stdin and outputs the same line prefixed with a line number. It terminates when there’s no more input.

const std = @import("std");

pub fn main() anyerror!void {
	// setup allocator
	var gpa = std.heap.GeneralPurposeAllocator(.{}){};
	defer std.debug.assert(!gpa.deinit());
	const allocator = gpa.allocator();

	// setup streams
	const stdout = std.io.getStdOut().writer();
	const in = std.io.getStdIn();
	var reader = std.io.bufferedReader(in.reader()).reader();

	var counter: u32 = 1;

	// read input line by line
	while (try reader.readUntilDelimiterOrEofAlloc(allocator, '\n', std.math.maxInt(usize))) |line| {
    	    defer allocator.free(line);
    	    try stdout.print("{d}\t{s}\n", .{counter, line});
    	    counter = counter + 1;
	}
}

To build Zig code, you create a build.zig file that defines how to build your project. For this trivial case I just opted to build an executable from the sources

const std = @import("std");

pub fn build(b: *std.build.Builder) void {
	const target = b.standardTargetOptions(.{});
	const mode = b.standardReleaseOptions();

	const exe = b.addExecutable("print-with-line-numbers", "src/main.zig");
	exe.setTarget(target);
	exe.setBuildMode(mode);
	exe.install();
}

By running zig build the compiler will run and output a binary under zig-out/bin

$ zig build

$ ls zig-out/bin
print-with-line-numbers

$ echo "Hello\nWorld" | ./zig-out/bin/print-with-line-numbers
1    Hello
2    World

WASI

The next step is to get this running on Workers, but first I need to compile it into WASM with WASI support.

Thankfully, this comes out of the box with recent versions of Zig, so you can just tell the compiler to build your executable using the wasm32-wasi target, which will produce a file that can be run on any WASI-compatible WebAssembly runtime, such as wasmtime.

This same .wasm file can be run in wasmtime and deployed directly to Cloudflare Workers. This makes building, testing and deploying seamless.

$ zig build -Dtarget=wasm32-wasi

$ ls zig-out/bin
print-with-line-numbers.wasm

$ echo "Hello\nWorld" | wasmtime ./zig-out/bin/print-with-line-numbers.wasm
1    Hello
2    World

Zig on Workers

With our binary ready to go, the last piece is to get it running on Cloudflare Workers using wrangler2. That is as simple as publishing the .wasm file on workers.dev. If you don’t have a workers.dev account, you can follow the tutorial on our getting started guide that will get you from code to deployment within minutes!

In fact, once I signed up for my account, all I needed to do was complete the first two steps, install wrangler and login.

$ npx wrangler@wasm login
Attempting to login via OAuth...
Opening a link in your default browser: https://dash.cloudflare.com/oauth2/auth
Successfully logged in.

Then, I ran the following command to publish my worker:

$ npx wrangler@wasm publish --name print-with-line-numbers --compatibility-date=2022-07-07 zig-out/bin/print-with-line-numbers.wasm
Uploaded print-with-line-numbers (3.04 sec)
Published print-with-line-numbers (6.28 sec)
  print-with-line-numbers.workers.dev

With that step completed, the worker is ready to run and can be invoked by calling the URL printed from the output above.

echo "Hello\nWorld" | curl https://print-with-line-numbers.workers.dev -X POST --data-binary @-
1    Hello
2    World

Success!

Conclusion

What impressed me the most here was just how easy this process was.

First, I had a binary compiled for the architecture of my laptop, then I compiled the code into WebAssembly by just passing a flag to the compiler, and finally I had this running on workers without having to change any code.

Granted, this program was not very complicated and does not do anything other than read from STDIN and write to STDOUT, but it gives me confidence of what is possible, especially as technology like WASI matures.

Announcing support for WASI on Cloudflare Workers

Post Syndicated from Ben Yule original https://blog.cloudflare.com/announcing-wasi-on-workers/

Announcing support for WASI on Cloudflare Workers

Announcing support for WASI on Cloudflare Workers

Today, we are announcing experimental support for WASI (the WebAssembly System Interface) on Cloudflare Workers and support within wrangler2 to make it a joy to work with. We continue to be incredibly excited about the entire WebAssembly ecosystem and are eager to adopt the standards as they are developed.

A Quick Primer on WebAssembly

So what is WASI anyway? To understand WASI, and why we’re excited about it, it’s worth a quick recap of WebAssembly, and the ecosystem around it.

WebAssembly promised us a future in which code written in compiled languages could be compiled to a common binary format and run in a secure sandbox, at near native speeds. While WebAssembly was designed with the browser in mind, the model rapidly extended to server-side platforms such as Cloudflare Workers (which has supported WebAssembly since 2017).

WebAssembly was originally designed to run alongside Javascript, and requires developers to interface directly with Javascript in order to access the world outside the sandbox. To put it another way, WebAssembly does not provide any standard interface for I/O tasks such as interacting with files, accessing the network, or reading the system clock. This means if you want to respond to an event from the outside world, it’s up to the developer to handle that event in JavaScript, and directly call functions exported from the WebAssembly module. Similarly, if you want to perform I/O from within WebAssembly, you need to implement that logic in Javascript and import it into the WebAssembly module.

Custom toolchains such as Emscripten or libraries such as wasm-bindgen have emerged to make this easier, but they are language specific and add a tremendous amount of complexity and bloat. We’ve even built our own library, workers-rs, using wasm-bindgen that attempts to make writing applications in Rust feel native within a Worker – but this has proven not only difficult to maintain, but requires developers to write code that is Workers specific, and is not portable outside the Workers ecosystem.

We need more.

The WebAssembly System Interface (WASI)

WASI aims to provide a standard interface that any language compiling to WebAssembly can target. You can read the original post by Lin Clark here, which gives an excellent introduction – code cartoons and all. In a nutshell, Lin describes WebAssembly as an assembly language for a ‘conceptual machine’, whereas WASI is a systems interface for a ‘conceptual operating system.’

This standardization of the system interface has paved the way for existing toolchains to cross-compile existing codebases to the wasm32-wasi target. A tremendous amount of progress has already been made, specifically within Clang/LLVM via the wasi-sdk and Rust toolchains. These toolchains leverage a version of Libc, which provides POSIX standard API calls, that is built on top of WASI ‘system calls.’ There are even basic implementations in more fringe toolchains such as TinyGo and SwiftWasm.

Practically speaking, this means that you can now write applications that not only interoperate with any WebAssembly runtime implementing the standard, but also any POSIX compliant system! This means the exact same ‘Hello World!’ that runs on your local Linux/Mac/Windows WSL machine.

Show me the code

WASI sounds great, but does it actually make my life easier? You tell us. Let’s run through an example of how this would work in practice.

First, let’s generate a basic Rust “Hello, world!” application, compile, and run it.

$ cargo new hello_world
$ cd ./hello_world
$ cargo build --release
   Compiling hello_world v0.1.0 (/Users/benyule/hello_world)
    Finished release [optimized] target(s) in 0.28s
$ ./target/release/hello_world
Hello, world!

It doesn’t get much simpler than this. You’ll notice we only define a main() function followed by a println to stdout.

fn main() {
    println!("Hello, world!");
}

Now, let’s take the exact same program and compile against the wasm32-wasi target, and run it in an ‘off the shelf’ wasm runtime such as Wasmtime.

$ cargo build --target wasm32-wasi --release
$ wasmtime target/wasm32-wasi/release/hello_world.wasm

Hello, world!

Neat! The same code compiles and runs in multiple POSIX environments.

Finally, let’s take the binary we just generated for Wasmtime, but instead publish it to Workers using Wrangler2.

$ npx wrangler@wasm dev target/wasm32-wasi/release/hello_world.wasm
$ curl http://localhost:8787/

Hello, world!

Unsurprisingly, it works! The same code is compatible in multiple POSIX environments and the same binary is compatible across multiple WASM runtimes.

Running your CLI apps in the cloud

The attentive reader may notice that we played a small trick with the HTTP request made via cURL. In this example, we actually stream stdin and stdout to/frome the Worker using the HTTP request and response body respectively. This pattern enables some really interesting use cases, specifically, programs designed to run on the command line can be deployed as ‘services’ to the cloud.

‘Hexyl’ is an example that works completely out of the box. Here, we ‘cat’ a binary file on our local machine and ‘pipe’ the output to curl, which will then POST that output to our service and stream the result back. Following the steps we used to compile our ‘Hello World!’, we can compile hexyl.

$ git clone [email protected]:sharkdp/hexyl.git
$ cd ./hexyl
$ cargo build --target wasm32-wasi --release

And without further modification we were able to take a real-world program and create something we can now run or deploy. Again, let’s tell wrangler2 to preview hexyl, but this time give it some input.

$ npx wrangler@wasm dev target/wasm32-wasi/release/hexyl.wasm
$ echo "Hello, world\!" | curl -X POST --data-binary @- http://localhost:8787

┌────────┬─────────────────────────┬─────────────────────────┬────────┬────────┐
│00000000│ 48 65 6c 6c 6f 20 77 6f ┊ 72 6c 64 21 0a          │Hello wo┊rld!_   │
└────────┴─────────────────────────┴─────────────────────────┴────────┴────────┘

Give it a try yourself by hitting https://hexyl.examples.workers.dev.

echo "Hello world\!" | curl https://hexyl.examples.workers.dev/ -X POST --data-binary @- --output -

A more useful example, but requires a bit more work, would be to deploy a utility such as swc (swc.rs), to the cloud and use it as an on demand JavaScript/TypeScript transpilation service. Here, we have a few extra steps to ensure that the compiled output is as small as possible, but it otherwise runs out-of-the-box. Those steps are detailed in https://github.com/zebp/wasi-example-swc, but for now let’s gloss over that and interact with the hosted example.

$ echo "const x = (x, y) => x * y;" | curl -X POST --data-binary @- https://swc-wasi.examples.workers.dev/ --output -

var x=function(a,b){return a*b}

Finally, we can also do the same with C/C++, but requires a little more lifting to get our Makefile right. Here we show an example of compiling zstd and uploading it as a streaming compression service.

https://github.com/zebp/wasi-example-zstd

$ echo "Hello world\!" | curl https://zstd.examples.workers.dev/ -s -X POST --data-binary @- | file -

What if I want to use WASI from within a JavaScript Worker?

Wrangler can make it really easy to deploy code without having to worry about the Workers ecosystem, but in some cases you may actually want to invoke your WASI based WASM module from Javascript. This can be achieved with the following simple boilerplate. An updated README will be kept at https://github.com/cloudflare/workers-wasi.

import { WASI } from "@cloudflare/workers-wasi";
import demoWasm from "./demo.wasm";

export default {
  async fetch(request, _env, ctx) {
    // Creates a TransformStream we can use to pipe our stdout to our response body.
    const stdout = new TransformStream();
    const wasi = new WASI({
      args: [],
      stdin: request.body,
      stdout: stdout.writable,
    });

    // Instantiate our WASM with our demo module and our configured WASI import.
    const instance = new WebAssembly.Instance(demoWasm, {
      wasi_snapshot_preview1: wasi.wasiImport,
    });

    // Keep our worker alive until the WASM has finished executing.
    ctx.waitUntil(wasi.start(instance));

    // Finally, let's reply with the WASM's output.
    return new Response(stdout.readable);
  },
};

Now with our JavaScript boilerplate and wasm, we can easily deploy our worker with Wrangler’s WASM feature.

$ npx wrangler publish
Total Upload: 473.89 KiB / gzip: 163.79 KiB
Uploaded wasi-javascript (2.75 sec)
Published wasi-javascript (0.30 sec)
  wasi-javascript.zeb.workers.dev

Back to the future

For those of you who have been around for the better part of the past couple of decades, you may notice this looks very similar to RFC3875, better known as CGI (The Common Gateway Interface). While our example here certainly does not conform to the specification, you can imagine how this can be extended to turn the stdin of a basic ‘command line’ application into a full-blown http handler.

We are thrilled to learn where developers take this from here. Share what you build with us on Discord or Twitter!

Internship Experience: Software Development Intern

Post Syndicated from Ulysses Kee original https://blog.cloudflare.com/internship-experience-software-development-intern/

Internship Experience: Software Development Intern

Before we dive into my experience interning at Cloudflare, let me quickly introduce myself. I am currently a master’s student at the National University of Singapore (NUS) studying Computer Science. I am passionate about building software that improves people’s lives and making the Internet a better place for everyone. Back in December 2021, I joined Cloudflare as a Software Development Intern on the Partnerships team to help improve the experience that Partners have when using the platform. I was extremely excited about this opportunity and jumped at the prospect of working on serverless technology to build viable tools for our partners and customers. In this blog post, I detail my experience working at Cloudflare and the many highlights of my internship.

Interview Experience

The process began for me back when I was taking a software engineering module at NUS where one of my classmates had shared a job post for an internship at Cloudflare. I had known about Cloudflare’s DNS service prior and was really excited to learn more about the internship opportunity because I really resonated with the company’s mission to help build a better Internet.

I knew right away that this would be a great opportunity and submitted my application. Soon after, I heard back from the recruiting team and went through the interview process – the entire interview process was extremely accommodating and is definitely the most enjoyable interview experience I have had. Throughout the process, I was constantly asked about the kind of things I would like to work on and the relevance of the work that I would be doing. I felt that this thorough communication carried on throughout the internship and really was a cornerstone of my experience interning at Cloudflare.

My Internship

My internship began with onboarding and training, and then after, I had discussions with my mentor, Ayush Verma, on the projects we aimed to complete during the internship and the order of objectives. The main issues we wanted to address was the current manual process that our internal teams and partners go through when they want to duplicate the configuration settings on a zone, or when they want to compare one zone to other zones to ensure that there are no misconfigurations. As you can imagine, with the number of different configurations offered on the Cloudflare dashboard for customers, it could take significant time to copy over every setting and rule manually from one zone to another. Additionally, this process, when done manually, poses a potential threat for misconfigurations due to human error. Furthermore, as more and more customers onboard different zones onto Cloudflare, there needs to be a more automated and improved way for them to make these configuration setups.

Initially, we discussed using Terraform as Cloudflare already supports terraform automation. However, this approach would only cater towards customers and users that have more technical resources and, in true Cloudflare spirit, we wanted to keep it simple such that it could be used by any and everyone. Therefore, we decided to leverage the publicly available Cloudflare APIs and create a browser-based application that interacts with these APIs to display configurations and make changes easily from a simple UI.

With the end goal of simplifying the experience for our partners and customers in duplicating zone configurations, we decided to build a Zone Copier web application solely built on Cloudflare Workers. This tool would, in a click of a button, automatically copy over every setting that can be copied from one zone to another, significantly reducing the amount of time and effort required to make the changes.

Alongside the Zone Copier, we would have some auxiliary tools such as a Zone Viewer, and Zone Comparison, where a customer can easily have a full view of their configurations on a single webpage and be able to compare different zones that they use respectively. These other applications improve upon the existing methods through which Cloudflare users can view their zone configurations, and allow for the direct comparison between different zones.

Importantly, these applications are not to replace the Cloudflare Dashboard, but to complement it instead – for deeper dives into a single particular configuration setting, the Cloudflare Dashboard remains the way to go.

To begin building the web application, I spent the first few weeks diving into the publicly available APIs offered by Cloudflare as part of the v4 API to verify the outputs of each endpoint, and the type of data that would be sent as a response from a request. This took much longer than expected as certain endpoints provided different default responses for a zone that has either an empty setting – for example, not having any Firewall Rules created – or uses a nested structure for its relevant response. These different potential responses have to be examined so that when the web application calls the respective API endpoint, the responses are handled appropriately. This process was quite manual as each endpoint had to be verified individually to ensure the output would work seamlessly with the application.

Once I completed my research, I was able to start designing the web application. Building the web application was a very interesting experience as the stack rested solely on Workers, a serverless application platform. My prior experiences building web applications used servers that require the deployment of a server built using Express and Node.js, whereas for my internship project, I completely relied on a backend built using the itty-router library on Workers to interface with the publicly available Cloudflare APIs. I found this extremely exciting as building a serverless application required less overhead compared to setting up a server and deploying it, and using Workers itself has many other added benefits such as zero cold starts. This introduction to serverless technology and my experience deep-diving into the capabilities of Workers has really opened my eyes to the possibilities that Workers as a platform can offer. With Workers, you can deploy any application on Cloudflare’s global network like I did!

For the frontend of the web application, I used React and the Chakra-UI library to build the user interface for which the Zone Viewer, Zone Comparison, and Zone Copier, is based on. The routing between different pages was done using React Router and the application is deployed directly through Workers.

Here is a screenshot of the application:

Internship Experience: Software Development Intern

Presenting the prototype application

As developers will know, the best way to obtain feedback for the tool that you’re building is to directly have your customers use them and let you know what they think of your application and the kind of features they want to have built on top of it. Therefore, once we had a prototype version of the web application for the Zone Viewer and Zone Comparison complete, we presented the application to the Solutions Engineering team to hear their thoughts on the impact the tool would have on their work and additional features they would like to see built on the application. I found this process very enriching as they collectively mentioned how impactful the application would be for their work and the value add this project provides to them.

Some interesting feedback and feature requests I received were:

  1. The Zone Copier would definitely be very useful for our partners who have to replicate the configuration of one zone to another regularly, and it’s definitely going to help make sure there are less human errors in the process of configuring the setups.
  2. Besides duplicating configurations from zone-to-zone, could we use this to replicate the configurations from a best-in-class setup for different use cases and allow partners to deploy this with a few clicks?
  3. Can we use this tool to generate quarterly reports?
  4. The Zone Viewer would be very helpful for us when we produce documentation on a particular zone’s configuration as part of a POC report.
  5. The Zone Viewer will also give us much deeper insight to better understand the current zone configurations and provide recommendations to improve it.

It was also a very cool experience speaking to the broad Solutions Engineering team as I found that many were very technically inclined and had many valid suggestions for improving the architecture and development of the applications. A special thanks to Edwin Wong for setting up the sharing session with the internal team, and many thanks to Xin Meng, AQ Jiao, Yonggil Choi, Steve Molloy, Kyouhei Hayama, Claire Lim and Jamal Boutkabout for their great insight and suggestions!

Impact of Cloudflare outside of work

While Cloudflare is known for its impeccable transparency throughout the company, and the stellar products it provides in helping make the Internet better, I wanted to take this opportunity to talk about the other endeavors that the company has too.

Cloudflare is part of the Pledge 1%, where the company dedicates 1% of products and 1% of our time to give back to the local communities as well as all the communities we support online around the world.

I took part in one of these activities, where we spent a morning cleaning up parts of the East Coast Park beach, by picking up trash and litter that had been left behind by other park users. Here’s a picture of us from that morning:

Internship Experience: Software Development Intern

From day one, I have been thoroughly impressed by Cloudflare’s commitment to its culture and the effort everyone at Cloudflare puts in to make the company a great place to work and have a positive impact on the surrounding community.

In addition to giving back to the community, other aspects of company culture include having a good team spirit and safe working environment where you feel appreciated and taken care of. At Cloudflare, I have found that everyone is very understanding of work commitments. I faced a few challenges during the internship where I had to spend additional time on university related projects and work, and my manager has always been very supportive and understanding if I required additional time to complete parts of the internship project.

Concluding takeaways

My experience interning at Cloudflare has been extremely positive, and I have seen first hand how transparent the company is with not only its employees but also its customers, and it truly is a great place to work. Cloudflare’s collaborative culture allowed me to access members from different teams, to obtain their thoughts and assistance with certain issues that I faced from time to time. I would not have been able to produce an impactful project without the help of the different brilliant, and motivated, people I worked with across the span of the internship, and I am truly grateful for such a rewarding experience.

We are getting ready to open intern roles for this coming Fall, so we encourage you to visit our careers page frequently, to be up-to-date on all the opportunities we have within our teams.

Announcing our Spring Developer Challenge

Post Syndicated from Albert Zhao original https://blog.cloudflare.com/announcing-our-spring-developer-challenge/

Announcing our Spring Developer Challenge

Announcing our Spring Developer Challenge

After many announcements from Platform Week, we’re thrilled to make one more: our Spring Developer Challenge!

The theme for this challenge is building real-time, collaborative applications — one of the most exciting use-cases emerging in the Cloudflare ecosystem. This is an opportunity for developers to merge their ideas with our newly released features, earn recognition on our blog, and take home our best swag yet.

Here’s a list of our tools that will get you started:

  • Workers can either be powerful middleware connecting your app to different APIs and an origin — or it can be the entire application itself. We recommend using Worktop, a popular framework for Workers, if you need TypeScript support, routing, and well-organized submodules. Worktop can also complement your existing app even if it already uses a framework,  such as Svelte.
  • Cloudflare Pages makes it incredibly easy to deploy sites, which you can make into truly dynamic apps by putting a Worker in front or using the Pages Functions (beta).
  • Durable Objects are great for collaborative apps because you can use websockets while coordinating state at the edge, seen in this chat demo. To help scale any load, we also recommend Durable Object Groups.
  • Workers KV provides a global key-value data store that securely stores and quickly serves data across Cloudflare’s network. R2 allows you to store enormous amounts of data without trapping you with costly egress services.

Last year, our Developer Spotlight series highlighted how developers around the world built entire applications on Cloudflare. Our Discord server maintained that momentum with users demonstrating that any type of application can be built. Need a way to organize thousands of lines of JSON? JSON Hero, built with Remix and deployed with Workers, provides an incredibly readable UI for your JSON files. Trying to deploy a GraphQL server for your app that scales? helix-flare deploys a GraphQL server easily through Workers and uses Durable Objects to coordinate data.

We hope developers continue to explore the boundaries of what they can build on Cloudflare as our platform evolves. During our Summer Developer Challenge in 2021, we received over 1,200 submissions that revealed you can build almost any app imaginable with Workers, Pages, and the rest of the developer ecosystem. We sent out hundreds of swag boxes to participants, to show our appreciation. The ensuing unboxing videos on Twitter and YouTube thrilled our team.

This year’s Spring Developer Challenge is all about making real-time, collaborative apps such as chat rooms, games, web-based editing tools, or anything else in your imagination! Here are the rules:

  • You must be at least 18 years old to participate
  • You can work in teams of up to 10 people per submission
  • The deadline to submit your repo is May 24

Enter the challenge by going to this site.

As you build your app, join our Discord if you or your team need any help. We will be enthusiastically reviewing submissions, promoting them on Twitter, and sending out swag boxes.

If you’re new to Cloudflare or have an exciting idea as a developer, this is your opportunity to see how far our platform has evolved and get rewarded for it!

Send email using Workers with MailChannels

Post Syndicated from Erwin van der Koogh original https://blog.cloudflare.com/sending-email-from-workers-with-mailchannels/

Send email using Workers with MailChannels

Send email using Workers with MailChannels

Here at Cloudflare we often talk about HTTP and related protocols as we work to help build a better Internet. However, the Simple Mail Transfer Protocol (SMTP) — used to send emails — is still a massive part of the Internet too.

Even though SMTP is turning 40 years old this year, most businesses still rely on email to validate user accounts, send notifications, announce new features, and more.

Sending an email is simple from a technical standpoint, but getting an email actually delivered to an inbox can be extremely tricky. Because of the enormous amount of spam that is sent every single day, all major email providers are very wary of things like new domains and IP addresses that start sending emails.

That is why we are delighted to announce a partnership with MailChannels. MailChannels has created an email sending service specifically for Cloudflare Workers that removes all the friction associated with sending emails. To use their service, you do not need to validate a domain or create a separate account. MailChannels filters spam before sending out an email, so you can feel safe putting user-submitted content in an email and be confident that it won’t ruin your domain reputation with email providers. But the absolute best part? Thanks to our friends at MailChannels, it is completely free to send email.

In the words of their CEO Ken Simpson: “Cloudflare Workers and Pages are changing the game when it comes to ease of use and removing friction to get started. So when we sat down to see what friction we could remove from sending out emails, it turns out that with our incredible anti-spam and anti-phishing, the answer is “everything”. We can’t wait to see what applications the community is going to build on top of this.”

The only constraint currently is that the integration only works when the request comes from a Cloudflare IP address. So it won’t work yet when you are developing on your local machine or running a test on your build server.

First let’s walk you through how to send out your first email using a Worker.

export default {
  async fetch(request) {
    send_request = new Request('https://api.mailchannels.net/tx/v1/send', {
      method: 'POST',
      headers: {
        'content-type': 'application/json',
      },
      body: JSON.stringify({
        personalizations: [
          {
            to: [{ email: '[email protected]', name: 'Test Recipient' }],
          },
        ],
        from: {
          email: '[email protected]',
          name: 'Workers - MailChannels integration',
        },
        subject: 'Look! No servers',
        content: [
          {
            type: 'text/plain',
            value: 'And no email service accounts and all for free too!',
          },
        ],
      }),
    })
  },
}

That is all there is to it. You can modify the example to make it send whatever email you want.

The MailChannels integration makes it easy to send emails to and from anywhere with Workers. However, we also wanted to make it easier to send emails to yourself from a form on your website. This is perfect for quickly and painlessly setting up pages such as “Contact Us” forms, landing pages, and sales inquiries.

The Pages Plugin Framework that we announced earlier this week allows other people to email you without exposing your email address.

The only thing you need to do is copy and paste the following code snippet in your /functions/_middleware.ts file. Now, every form that has the data-static-form-name attribute will automatically be emailed to you.

import mailchannelsPlugin from "@cloudflare/pages-plugin-mailchannels";

export const onRequest = mailchannelsPlugin({
  personalizations: [
    {
      to: [{ name: "ACME Support", email: "[email protected]" }],
    },
  ],
  from: { name: "Enquiry", email: "[email protected]" },
  respondWith: () =>
    new Response(null, {
      status: 302,
      headers: { Location: "/thank-you" },
    }),
});

Here is an example of what such a form would look like. You can make the form as complex as you like, the only thing it needs is the data-static-form-name attribute. You can give it any name you like to be able to distinguish between different forms.

<!DOCTYPE html>
<html>
  <body>
    <h1>Contact</h1>
    <form data-static-form-name="contact">
      <div>
        <label>Name<input type="text" name="name" /></label>
      </div>
      <div>
        <label>Email<input type="email" name="email" /></label>
      </div>
      <div>
        <label>Message<textarea name="message"></textarea></label>
      </div>
      <button type="submit">Send!</button>
    </form>
  </body>
</html>

So as you can see there is no barrier left when it comes to sending out emails. You can copy and paste the above Worker or Pages code into your projects and immediately start to send email for free.

If you have any questions about using MailChannels in your Workers, or want to learn more about Workers in general, please join our Cloudflare Developer Discord server.

Route to Workers, automate your email processing

Post Syndicated from Joao Sousa Botto original https://blog.cloudflare.com/announcing-route-to-workers/

Route to Workers, automate your email processing

Route to Workers, automate your email processing

Cloudflare Email Routing has quickly grown to a few hundred thousand users, and we’re incredibly excited with the number of feature requests that reach our product team every week. We hear you, we love the feedback, and we want to give you all that you’ve been asking for. What we don’t like is making you wait, or making you feel like your needs are too unique to be addressed.

That’s why we’re taking a different approach – we’re giving you the power tools that you need to implement any logic you can dream of to process your emails in the fastest, most scalable way possible.

Today we’re announcing Route to Workers, for which we’ll start a closed beta soon. You can join the waitlist today.

How this works

When using Route to Workers your Email Routing rules can have a Worker process the messages reaching any of your custom Email addresses.

Route to Workers, automate your email processing

Even if you haven’t used Cloudflare Workers before, we are making onboarding as easy as can be. You can start creating Workers straight from the Email Routing dashboard, with just one click.

Route to Workers, automate your email processing

After clicking Create, you will be able to choose a starter that allows you to get up and running with minimal effort. Starters are templates that pre-populate your Worker with the code you would write for popular use cases such as creating a blocklist or allowlist, content based filtering, tagging messages, pinging you on Slack for urgent emails, etc.

Route to Workers, automate your email processing

You can then use the code editor to make your new Worker process emails in exactly the way you want it to – the options are endless.

Route to Workers, automate your email processing

And for those of you that prefer to jump right into writing their own code, you can go straight to the editor without using a starter. You can write Workers with a language you likely already know. Cloudflare built Workers to execute JavaScript and WebAssembly and has continuously added support for new languages.

The Workers you’ll use for processing emails are just regular Workers that listen to incoming events, implement some logic, and reply accordingly. You can use all the features that a normal Worker would.

The main difference being that instead of:

export default {
  async fetch(request, env, ctx) {
    handleRequest(request);
  }
}

You’ll have:

export default {
  async email(message, env, ctx) {
    handleEmail(message);
  }
}

The new `email` event will provide you with the “from”, “to” fields, the full headers, and the raw body of the message. You can then use them in any way that fits your use case, including calling other APIs and orchestrating complex decision workflows. In the end, you can decide what action to take, including rejecting or forwarding the email to one of your Email Routing destination addresses.

With these capabilities you can easily create logic that, for example, only accepts messages coming from one specific address and, when one matches the criteria, forwards to one or more of your verified destination addresses while also immediately alerting you on Slack. Code for such feature could be as simple as this:

export default {
   async email(message, env, ctx) {
       switch (message.to) {
           case "[email protected]":
               await fetch("https://webhook.slack/notification", {
                   body: `Got a marketing email from ${ message.from }, subject: ${ message.headers.get("subject") }`,
               });
               sendEmail(message, [
                   "marketing@corp",
                   "sales@corp",
               ]);
               break;

           default:
               message.reject("Unknown address");
       }
   },
};

Route to Workers enables everyone to programmatically process their emails and use them as triggers for any other action. We think this is pretty powerful.

Process up to 100,000 emails/day for free

The first 100,000 Worker requests (or Email Triggers) each day are free, and paid plans start at just $5 per 10 million requests. You will be able to keep track of your Email Workers usage right from the Email Routing dashboard.

Route to Workers, automate your email processing

Join the Waitlist

You can join the waitlist today by going to the Email section of your dashboard, navigating to the Email Workers tab, and clicking the Join Waitlist button.

Route to Workers, automate your email processing

We are expecting to start the closed beta in just a few weeks, and can’t wait to hear about what you’ll build with it!

As usual, if you have any questions or feedback about Email Routing, please come see us in the Cloudflare Community and the Cloudflare Discord.

Introducing Custom Domains for Workers

Post Syndicated from Kabir Sikand original https://blog.cloudflare.com/custom-domains-for-workers/

Introducing Custom Domains for Workers

Introducing Custom Domains for Workers

Today, we’re happy to announce Custom Domains for Workers. Custom Domains allow you to hook up a domain to your Worker, without having to fuss about certificates, origin servers or DNS – it just works. Let’s take a look at how we built Custom Domains and how you can use them.

The magic of Cloudflare DNS

Under the hood, we’re leveraging Cloudflare DNS to register your Worker as the origin for your domain. All you need to do is head to your Worker, go to the Triggers tab, and click Add Custom Domain. Cloudflare will handle creating the DNS record and issuing a certificate on your behalf. In seconds, your domain will point to your Worker, and all you need to worry about is writing your code. We’ll also help guide you through the process of creating these new records and replace any existing ones. We built this with a straightforward ethos in mind: we should be clear and transparent about actions we’re taking, and make it easy to understand.

We’ve made a few welcome changes when you’re using a Custom Domain on your Worker. First off, when you send a request to any path on that Custom Domain, your Worker will be triggered. No need to create a route with /* at the end.

Introducing Custom Domains for Workers

Second, your Custom Domain Worker is considered the ‘origin server’. That means, no need to `fetch(event.request)` once you’re in that Worker; instead, talk to any internal or external services you need to by creating request objects in your code, or talk to other Workers services using any of our available bindings. We’ve increased the limit of external requests you can make, when using our Unbound usage model, to 1,000. You can talk to any services you’d like to – things like payment, communication, analytics, or tracking services come to mind, not to mention your databases. If that’s not enough for your use case, feel free to reach out via Discord or support, and we’ll happily chat.

Introducing Custom Domains for Workers

Finally, what if you need to talk to your Worker from another one? Since these Workers act as an origin server, you can just send a normal request to the associated endpoint, and we’ll invoke that Worker – even if it’s on the same Cloudflare zone.

Introducing Custom Domains for Workers

Let’s build an example application

We’ll start by writing our application. I have an example that I’ve called api-gateway below. It checks the incoming request path, and delegates work to downstream Workers using Service Bindings. For any privileged endpoints, it performs an authorization check before executing that code:

export default {
 async fetch(request, environment) {
   const url = new URL(request.url);
   switch (url.pathname) {
     case '/login':
       return await environment.login.fetch(request);

     case '/logout':
       return await environment.logout.fetch(request);

     case '/admin': {
       // Check that the "Authorization" header is sent when authenticated.
       const authCheck = await environment.auth.fetch(request.clone());
       if (authCheck.status != 200) { return authCheck }
       // If the auth check passes, send the request to the /admin endpoint
       return await environment.admin.fetch(request);
     }

     case '/robots.txt':
       return new Response(null, { status: 204 });
   }
   return new Response('Not Found.', { status: 404 });
 }
}```

Now that I have a working application, I want to serve it on my Custom Domain. To hook this up, head over to Workers, Triggers, click ‘Add Custom Domain’, and type in your desired hostname. You’ll be guided through a simple workflow to generate your new Worker record, and your Worker will be the target.

Best of all, with Custom Domains you can reap the performance benefits of DNS-routable Workers; Cloudflare never has to look through a routing table to invoke your Worker. And, by leveraging Service Bindings, you can customize your routing to your heart’s content – using URL parameters, headers, request content, or query strings to appropriately invoke the right Worker at the right time.

We’re excited to see what you build with Custom Domains. Custom Domains are available in an Open Beta starting today. Support is built right into the Cloudflare Dashboard and API’s, and CLI support via Wrangler is coming soon.

Durable Objects Alarms — a wake-up call for your applications

Post Syndicated from Matt Alonso original https://blog.cloudflare.com/durable-objects-alarms/

Durable Objects Alarms — a wake-up call for your applications

Durable Objects Alarms — a wake-up call for your applications

Since we launched Durable Objects, developers have leveraged them as a novel building block for distributed applications.

Durable Objects provide globally unique instances of a JavaScript class a developer writes, accessed via a unique ID. The Durable Object associated with each ID implements some fundamental component of an application — a banking application might have a Durable Object representing each bank account, for example. The bank account object would then expose methods for incrementing a balance, transferring money or any other actions that the application needs to do on the bank account.

Durable Objects work well as a stateful backend for applications — while Workers can instantiate a new instance of your code in any of Cloudflare’s data centers in response to a request, Durable Objects guarantee that all requests for a given Durable Object will reach the same instance on Cloudflare’s network.

Each Durable Object is single-threaded and has access to a stateful storage API, making it easy to build consistent and highly-available distributed applications on top of them.

This system makes distributed systems’ development easier — we’ve seen some impressive applications launched atop Durable Objects, from collaborative whiteboarding tools to conflict-free replicated data type (CRDT) systems for coordinating distributed state launch.

However, up until now, there’s been a piece missing — how do you invoke a Durable Object when a client Worker is not making requests to it?

As with any distributed system, Durable Objects can become unavailable and stop running. Perhaps the machine you were running on was unplugged, or the datacenter burned down and is never coming back, or an individual object exceeded its memory limit and was reset. Before today, a subsequent request would reinitialize the Durable Object on another machine, but there was no way to programmatically wake up an Object.

Durable Objects Alarms are here to change that, unlocking new use cases for Durable Objects like queues and deferred processing.

What is a Durable Object Alarm?

Durable Object Alarms allow you, from within your Durable Object, to schedule the object to be woken up at a time in the future. When the alarm’s scheduled time comes, the Durable Object’s alarm() handler will be called. If this handler throws an exception, the alarm will be automatically retried using exponential backoff until it succeeds — alarms have guaranteed at-least-once execution.

How are Alarms different from Workers Cron Triggers?

Alarms are more fine-grained than Cron Triggers. While a Workers service can have up to three Cron Triggers configured at once, it can have an unlimited amount of Durable Objects, each of which can have a single alarm active at a time.

Alarms are directly scheduled from and invoke a function within your Durable Object. Cron Triggers, on the other hand, are not programmatic — they execute based on their schedules, which have to be configured via the Cloudflare Dashboard or centralized configuration APIs.

How do I use Alarms?

First, you’ll need to add the durable_object_alarms compatibility flag to your wrangler.toml.

compatibility_flags = ["durable_object_alarms"]

Next, implement an alarm() handler in your Durable Object that will be called when the alarm executes. From anywhere else in your Durable Object, call state.storage.setAlarm() and pass in a time for the alarm to run at. You can use state.storage.getAlarm() to retrieve the currently set alarm time.

In this example, we implemented an alarm handler that wakes the Durable Object up once every 10 seconds to batch requests to a single Durable Object, deferring processing until there is enough work in the queue for it to be worthwhile to process them.

export default {
  async fetch(request, env) {
    let id = env.BATCHER.idFromName("foo");
    return await env.BATCHER.get(id).fetch(request);
  },
};

const SECONDS = 1000;

export class Batcher {
  constructor(state, env) {
    this.state = state;
    this.storage = state.storage;
    this.state.blockConcurrencyWhile(async () => {
      let vals = await this.storage.list({ reverse: true, limit: 1 });
      this.count = vals.size == 0 ? 0 : parseInt(vals.keys().next().value);
    });
  }
  async fetch(request) {
    this.count++;

    // If there is no alarm currently set, set one for 10 seconds from now
    // Any further POSTs in the next 10 seconds will be part of this kh.
    let currentAlarm = await this.storage.getAlarm();
    if (currentAlarm == null) {
      this.storage.setAlarm(Date.now() + 10 * SECONDS);
    }

    // Add the request to the batch.
    await this.storage.put(this.count, await request.text());
    return new Response(JSON.stringify({ queued: this.count }), {
      headers: {
        "content-type": "application/json;charset=UTF-8",
      },
    });
  }
  async alarm() {
    let vals = await this.storage.list();
    await fetch("http://example.com/some-upstream-service", {
      method: "POST",
      body: Array.from(vals.values()),
    });
    await this.storage.deleteAll();
    this.count = 0;
  }
}

Once every 10 seconds, the alarm() handler will be called. In the event an unexpected error terminates the Durable Object, it will be re-instantiated on another machine, following a short delay, after which it can continue processing.

Under the hood, Alarms are implemented by making reads and writes to the storage layer. This means Alarm get and set operations follow the same rules as any other storage operation – writes are coalesced with other writes, and reads have a defined ordering. See our blog post on the caching layer we implemented for Durable Objects for more information.

Durable Objects Alarms guarantee fault-tolerance

Alarms are designed to have no single point of failure and to run entirely on our edge – every Cloudflare data center running Durable Objects is capable of running alarms, including migrating Durable Objects from unhealthy data centers to healthy ones as necessary to ensure that their Alarm executes. Single failures should resolve in under 30 seconds, while multiple failures may take slightly longer.

We achieve this by storing alarms in the same distributed datastore that backs the Durable Object storage API. This allows alarm reads and writes to behave identically to storage reads and writes and to be performed atomically with them, and ensures that alarms are replicated across multiple datacenters.

Within each data center capable of running Durable Objects, there are multiple processes responsible for tracking upcoming alarms and triggering them, providing fault tolerance and scalability within the data center. A single elected leader in each data center is responsible for detecting failure of other data centers and assigning responsibility of those alarms to healthy local processes in its own data center. In the event of leader failure, another leader will be elected and become responsible for executing Alarms in the data center. This allows us to guarantee at-least-once execution for all Alarms.

How do I get started?

Alarms are a great way to build new distributed primitives, like queues, atop Durable Objects. They also provide a method for guaranteeing work within a Durable Object will complete, without relying on a client request to “kick” the Object.

You can get started with Alarms now by enabling Durable Objects in the Cloudflare dashboard. For more info, check the developer docs or jump in our Discord.

Announcing Workers for Platforms: making every application on the Internet more programmable

Post Syndicated from Rita Kozlov original https://blog.cloudflare.com/workers-for-platforms/

Announcing Workers for Platforms: making every application on the Internet more programmable

Announcing Workers for Platforms: making every application on the Internet more programmable

As a business, whether a startup or Fortune 500 company, your number one priority is to make your customers happy and successful with your product. To your customers, however, success and happiness sometimes seems to be just one feature away.

If only you could customize X, we’ll be able to use your product” – the largest prospect in your pipeline. “If you just let us do Y,  we’ll expand our usage of your product by 10x” – your most strategic existing customer.

You want your product to be everything to everybody, but engineering can only keep up so quickly, so, what gives?

Today, we’re announcing Workers for Platforms, our tool suite to help make any product programmable, and help our customers deliver value to their customers and developers instantaneously.

A more programmable interface

One way to give your customers the ability to programmatically interact with your product is by providing them with APIs. That is a big part of why APIs are so prolific today — enabling code (whether your own, or that of a 3rd party) to engage with your applications is nothing short of revolutionary.

But there’s still a problem. While APIs can give developers the ability to interact with your application programmatically, developers are ultimately always limited by the abstractions exposed to them by the API. You, an application owner, have to have predicted how the customer would use your product, and then built out the API to support the use case. If there’s one thing I have learned as a product manager, it’s almost impossible to predict how customers will use a product. And if there’s a second thing I’ve learned, it’s that even with plentiful engineering resources, it’s also almost impossible to build all the functionality required to keep said customers happy.

There is another way, however.

Functions, in contrast to APIs, provide the lowest level primitives (rather than abstractions on top of them). This lets the developer define the right behavior from there — and they can even define their own APIs on top.

In this sense, functions and APIs are actually complementary to each other — you may even choose to call another API directly from your function. For example, if you’re handling an event in a messaging system, you could implement your own feature to send an email by calling an email API, or create a ticket in your ticketing system, etc.

This gets at why we’re so excited about Workers for Platforms: it enables you to expose a direct way for your customers’ developers to bring their own logic to any application. We think it’s going to unlock a wave of customer-led innovation on top of companies that adopt it, and has the potential to be as impactful to building applications on the web as the API has been.

A better experience for developers

While Workers for Platforms expose a more powerful paradigm for making product programmable, they also result in a better experience for you as a developer.

Today, as a developer, before you can even get started using APIs or webhooks, there’s a list of tedious tasks you have to deal with first. First, you have to set up somewhere to host your code, whether a server (or serverless function), and expose it via an external endpoint to be able. You have to deal with ops, custom tokens, figuring out the new authentication schema, all before you get started. Then you have to maintain that service, and make sure that it stays up to ensure that events are always processed properly.

Announcing Workers for Platforms: making every application on the Internet more programmable

With functions embedded directly into the products you’re using, you can just start writing the code.

Announcing Workers for Platforms: making every application on the Internet more programmable

Why hasn’t this model been embraced until now?

Allowing developers to program how events work seems obvious, but just because it’s obvious doesn’t mean it’s easy.

At Cloudflare, we encountered this very problem five years ago — we were onboarding larger and larger customers onto our network, each needing to dictate the fate of a request in their own way. While Page Rules offered a way to modify behavior by URL, customers wanted to control behavior based on cookie, header, geolocation, and more!

We realized our engineering team couldn’t keep up with every request, so we decided to allow customers to bend our product to their own needs.

As we looked for an approach to this problem, we looked for a solution that would meet the two following requirements:

  1. Performance requirement: it’s unacceptable for a CDN, which should make your site faster to introduce latency. How do we make this so fast you don’t even notice it’s there?
  2. Security requirement: how do we run untrusted code securely?

While these requirements are especially critical when you offer performance and security products, solving these challenges is critical when giving your customers the ability to program your product. If the function needs to run on the critical path to your user, introducing latency is equally unacceptable. And of course, no one wants to get breached just to have their users be able to program.

Creating a really fast and secure multi-tenant environment is no easy feat.

When we evaluated our options for solving this problem, we first turned to technologies that existed for solving this problem on the server — serverless functions already existed at time, but were powered by containers, which would introduce cold-start, which was, well, a non-starter. So we turned to the browser, or specifically Chrome, which was powered by V8, and decided to take the same approach, and run it on our servers.

And while the approach sounds simple (and perhaps in retrospect obvious, as these things tend to seem), running a large multi-tenant development platform at scale is no small effort. If a part of the purpose of allowing customers to program your offering is to free up engineering efforts to focus on building new features, the effort it takes to maintain and scale such a development platform may defeat the purpose.

What we realized recently was that we weren’t alone in trying to solve this problem.

Companies like Shopify, building their next generation programmable storefront, Oxygen, were trying to solve the same thing. They wanted to enable their customers to run custom storefronts, and be able to offer the best performance possible, while maintaining a secure, multi-tenant environment.

“Shopify is the Internet’s commerce infrastructure, with millions of merchants using the platform,” said Zach Koch, product director, custom storefronts, at Shopify. “Partnering with Cloudflare, we’re able to give developers the tools they need to build unique and performant storefronts. We are excited to work with Cloudflare to alleviate some complexities of building commerce experiences – like scalability and global availability – so that developers can instead focus on what makes their brand distinct.”

How can you build your next platform on Workers for Platforms?

Working with platforms like Shopify to help them address their developers’ needs, helped us realize another thing — developer experience is not one-size-fits-all. That is, while we’re building our platform for a broad set of developers, eCommerce developers might have a much more specialized set of needs, best solved by a tailored developer experience. And, while the underlying technology is the same, making platforms their experiences using the same high level concepts as our direct customers need doesn’t make sense.

Since no one knows your customers better than you, we want you, the platform provider,  to design the best experience for your users. Workers for Platforms exposes a new set of tools and APIs to integrate directly into the deployment flow you want to design (see what we did there?).

Tags API to manage your functions at scale

Using our APIs, whenever a developer wants to deploy a script on your platform, you can call our APIs to deploy a new Worker in the background. Unlike our traditional Workers offering, Workers for Platforms is designed to be used at scale, to manage hundreds of thousands to millions of Cloudflare Workers.

Depending on how you manage your deployment services, or users, we now also provide the option to use tags to manage groupings of scripts. For example, if a user deletes their account, and you would like to make sure all their Workers are cleaned up. With tags, you can now add any arbitrary tags (such as user ID) per script, to enable bulk actions.

Trace Workers

Where there’s smoke, there’s fire, and where there’s code, well, bugs are also bound to be. When giving developers the tools to write and deploy code, you must also give them the means to debug it.

Trace Workers allow you to collect any information about a request that was handled by a Worker, including any logs or exceptions, and pass them onto your customer. A Trace Worker is a Worker that will receive information about the execution of other Workers, and can forward it to a destination of your choosing, enabling use cases such as live logging or long term storage.

Here is a simple trace Worker that sends its trace data to an HTTP endpoint:

addEventListener("trace", event => {
  event.waitUntil(fetch("http://example.com/trace", {
    method: "POST",
    body: JSON.stringify(event.traces),
  }))
})

Here is an example of what the data in event.traces might look like:

[
  {
    "scriptName": "Example script",
    "outcome": "exception",
    "eventTimestamp": 1587058642005,
    "event": {
      "request": {
        "url": "https://example.com/some/requested/url",
        "method": "GET",
        "headers": [
          "cf-ray": "57d55f210d7b95f3",
          "x-custom-header-name": "my-header-value"
        ],
        "cf": {
          "colo": "SJC"
        }
      },
    },
    "logs": [
      {
        "message": ["string passed to console.log()"],
        "level": "log",
        "timestamp": 1587058642005
      }
    ],
    "exceptions": [
      {
        "name": "Error",
        "message": "Threw a sample exception",
        "timestamp": 1587058642005
      }
    ]
  }
]

Chaining multiple Workers together using Dynamic Dispatch

From working with a few of our early customers, another need we were hearing about often was the ability to run your own code, before running your customer’s code. Perhaps you want to run a layer of authentication, sanitize input or output, or even provide useful information downstream (like user or account IDs).

For this you may want to maintain your own Worker. However, when it’s done executing, you want to be able to call the next Worker, with your customer’s code.

Example:

let user_worker = dispatcher.get('customer-worker-123');
let response = await user_worker.fetch(request);

Custom domains, and more!

The features above are only the new Workers features we enabled for our customers as of this week, but our goal is to provide all the tools you need to build your platform. For example, you can use Workers for Platforms with Cloudflare for SaaS to create custom domains. (And stay tuned for the “and more!”).

How do I get access?

As is the case with any new product we release, we have no doubt we have so much to learn from our customers and their use cases. Since we want to support you, and make sure you’re set up for success, if you’re interested, we’d love to get to know you and your use case, and get you set up with all the tools you need. To get started, we ask that you fill out our form, and we’ll  get in touch with you.

In the meantime, you’re welcome to get started checking out our developer docs, or saying hi in our Discord.

Just getting started

We faced this problem ourselves five years ago — we needed to give our customers the ability to augment our offering in a way that worked for them, so we did just that when we launched Cloudflare Workers. Allowing our customers to program our global network to meet their needs has enabled us to support more customers on our development platform, while enabling our engineering team to focus on turning the most requested customizations into features.

We look forward to seeing both what your developers build on your platform (and we believe you, yourself will be surprised with the use cases developers come up with that you could never dream up yourself), and what your engineering team is able to tackle in parallel!

Workers visibility: announcing Logpush for Worker’s Trace Events

Post Syndicated from Tanushree Sharma original https://blog.cloudflare.com/logpush-for-workers/

Workers visibility: announcing Logpush for Worker’s Trace Events

Workers visibility: announcing Logpush for Worker’s Trace Events

Writing an application is like building a rocket. Countless hours in development and thousands of moving parts all come down to one moment – launch day. Picture the countdown: T minus 10 seconds. The entire team is making sure that things are running smoothly by monitoring dashboards that measure the health of every part of the system.

It’s every developer’s dream to get the level of visibility that NASA has in their mission control room, but for their own code. For flight directors and engineering directors alike, it’s important to have visibility into the systems that are built throughout development and after release. Today, we’re excited to announce Logpush for Worker’s Trace Events, making it easier than ever to gain visibility into applications built on Workers.

Workers Visibility Today

Today, we have lots of tools that are used to find out what’s happening in a Worker.

These tools are awesome for debugging, generalizing trends and monitoring Workers on third parties. They emphasize ease of use and make it effortless to get visibility quickly from your Workers.

As Workers have evolved, we’re now seeing more adoption from larger enterprises and platform companies who are using Workers as a foundation for their customers to develop on top of. When building complex and dynamic applications, customers, especially those building on Workers in the SaaS world need access to raw logs.

Bringing Trace Events to Logpush

Coming soon — we’re adding Workers execution logs to Logpush! Cloudflare Enterprise customers get access to Logpush for any of our available products, including CDN, WAF, Spectrum and many more. We’re excited to add Workers to this list.

Logpush for Worker’s Trace Events will include unstructured console.log() messages, exceptions, and metadata about requests/responses. Here is a sample Trace Event for a fetch request:

{"accountID":123456,"scriptName":"cloudflare-workers-script","outcome":"ok","duration":0.5,"CPUTime":4,"eventType":"fetch","event":{"request":{"url":"https://workersdevtest.com","method":"GET","headers":{"accept":"*/*","accept-encoding":"gzip","connection":"Keep-Alive"},"cf":{"clientTcpRtt":40,"tlsVersion":"TLSv1.2","httpProtocol":"HTTP/2","edgeRequestKeepAliveStatus":1,"country":"CA","asn":16591}},"subrequests":{"request":{"url":"https://example.com","method":"GET","headers":{"x-custom-header":"my-header-value"}},"logs":[{"message":["foo"],"level":"log","timestamp":1587491479166}],"exceptions":[]}}}

With this new dataset, our Enterprise customers will be able to send Workers logs to their preferred cloud storage destination such as GCS or R2 or to analysis platforms like Splunk or New Relic. Logpush handles batching and can scale no matter how much traffic your Worker gets.

This brings new ways to get transparency into Workers! You can pinpoint when a fetch request fails, find out which call is adding the most lag in your application, and track down specific log lines to debug the end user experience. Also, combine Workers logs with HTTP request logs to get a better picture of the full request lifecycle.

It also opens up doors for SaaS companies building on Workers. SaaS companies can get visibility into how their customer’s applications are performing and expose logs to their customer’s developers to make debugging and troubleshooting much easier.

Mission Control in the making

wrangler tail, Workers Analytics Engine (coming later this week!) and Logpush for Worker’s Trace Events are an elite trio to give visibility into every aspect of a Worker.

When you’re deep in the mix of development, wrangler tail is by your side to help you crush bugs and eliminate errors.  With Workers Analytics Engine, you can instrument business logic and query aggregates within seconds to populate dashboards for monitoring. Logpush for Trace Events is there for when you need to debug very specific cases and get an exact record of what happened.

Customers big and small are using Cloudlfare Workers for their next launch, and we’re building tools to make that happen successfully. We’re bringing Logpsush for Trace Events to our Enterprise customers very soon. Stay tuned for updates.

A new era for Cloudflare Pages builds

Post Syndicated from Nevi Shah original https://blog.cloudflare.com/cloudflare-pages-build-improvements/

A new era for Cloudflare Pages builds

A new era for Cloudflare Pages builds

Music is flowing through your headphones. Your hands are flying across the keyboard. You’re stringing together a masterpiece of code. The momentum is building up as you put on the finishing touches of your project. And at last, it’s ready for the world to see. Heart pounding with excitement and the feeling of victory, you push changes to the main branch…. only to end up waiting for the build to execute each step and spit out the build logs.

Starting afresh

Since the launch of Cloudflare Pages, there is no doubt that the build experience has been its biggest source of criticism. From the amount of waiting to inflexibility of CI workflow, Pages had a lot of opportunity for growth and improvement. With Pages, our North Star has always been designing a developer platform that fits right into your workflow and oozes simplicity. User pain points have been and always will be our priority, which is why today we are thrilled to share a list of exciting updates to our build times, logs and settings!

Over the last three quarters, we implemented a new build infrastructure that speeds up Pages builds, so you can iterate quickly and efficiently. In February, we soft released the Pages Fast Builds Beta, allowing you to opt in to this new infrastructure on a per-project basis. This not only allowed us to test our implementation, but also gave our community the opportunity to try it out and give us direct feedback in Discord. Today we are excited to announce the new build infrastructure is now generally available and automatically enabled for all existing and new projects!

Faster build times

As a developer, your time is extremely valuable, and we realize Pages builds were slow. It was obvious that creating an infrastructure that built projects faster and smarter was one of our top requirements.

Looking at a Pages build, there are four main steps: (1) initializing the build environment, (2) cloning your git repository, (3) building the application, and (4) deploying to Cloudflare’s global network. Each of these steps is a crucial part of the build process, and upon investigating areas suitable for optimization, we directed our efforts to cutting down on build initialization time.

In our old infrastructure, every time a build job was submitted, we created a new virtual machine to run that build, costing our users precious dev time. In our new infrastructure, we start jobs on machines that are ready and waiting to be used, taking a major chunk of time away from the build initialization step. This step previously ran for 2+ minutes, but with our new infrastructure update, projects are expected to see a build initialization time cut down to 2-3 SECONDS.

This means less time waiting and more time iterating on your code.

Fast and secure

In our old build infrastructure, because we spun up a new virtual machine (VM) for every build, it would take several minutes to boot up and initialize with the Pages build image needed to execute the build. Alternatively, one could reuse a collection of VMs, assigning a new build to the next available VM, but containers share a kernel with the host operating system, making them far less isolated, posing a huge security risk. This could allow a malicious actor to perform a “container escape” to break out of their sandbox. We wanted the best of both worlds: the speed of a container with the isolation of a virtual machine.

Enter gVisor, a container sandboxing technology that drastically limits the attack surface of a host. In the new infrastructure, each container running with gVisor is given its own independent application “kernel,” instead of directly sharing the kernel with its host. Then, to address the speed, we keep a cluster of virtual machines warm and ready to execute builds so that when a new Pages deployment is triggered, it takes just a few seconds for a new gVisor container to start up and begin executing meaningful work in a secure sandbox with near native performance.

Stream your build logs

After we solidified a fast and secure build, we wanted to enhance the user facing build experience. Because a build may not be successful every time, providing you with the tools you need to debug and access that information as fast as possible is crucial. While we have a long list of future improvements for a better logging experience, today we are starting by enabling you to stream your build logs.

Prior to today, with the aforementioned build steps required to complete a Pages build, you were required to wait until the build completed in order to view the resulting build logs. Easily addressable issues like incorrectly inputting the build command or specifying an environment variable would have required waiting for the entire build to finish before understanding the problem.

Today, we’re giving you the power to understand your build issues as soon as they happen. Spend less time waiting for your logs and start debugging the events of your builds within a second or less after they happen!

Control Branch Builds

Finally, the build experience does not just include the events during execution but everything leading up to the trigger of a build. For our final trick, we’re enabling our users to have full control of the precise branches they’d like to include and exclude for automatic deployments.

Before today, Pages submitted builds for every commit in both production and preview environments, which led to queued builds and even more waiting if you exceeded your concurrent build limit. We wanted to provide even more flexibility to control your CI workflow. Now you can configure your build settings to specify branches to build, as well as skip ad hoc commits.

Specify branches to build

While “unlimited staging” is one of Pages’ greatest advantages, depending on your setup, sometimes automatic deployments to the preview environment can cause extra noise.

In the Pages build configuration setting, you can specify automatic deployments to be turned off for the production environment, the preview environment, or specific preview branches. In a more extreme case, you can even pause all deployments so that any commit sent to your git source will not trigger a new Pages build.

Additionally, in your project’s settings, you can now configure the specific Preview branches you would like to include and exclude for automatic deployments. To make this configuration an even more powerful tool, you can use wildcard syntax to set rules for existing branches as well as any newly created preview branches.

A new era for Cloudflare Pages builds

Read more in our Pages docs on how to get started with configuring automatic deployments with Wildcard Syntax.

Using CI Skip

Sometimes commits need to be skipped on an ad hoc basis. A small update to copy or a set of changes within a small timespan don’t always require an entire site rebuild. That’s why we also implemented a CI Skip command for your commit message, signaling to Pages that the update should be skipped by our builder.

With both CI Skip and configured build rules, you can keep track of your site changes in Pages’ deployment history.

A new era for Cloudflare Pages builds

Where we’re going

We’re extremely excited to bring these updates to you today, but of course, this is only the beginning of improving our build experience. Over the next few quarters, we will be bringing more to the build experience to create a seamless developer journey from site inception to launch.

Incremental builds and caching

From beta testing, we noticed that our new infrastructure can be less impactful on larger projects that use heavier frameworks such as Gatsby. We believe that every user on our developer platform, regardless of their use case, has the right to fast builds. Up next, we will be implementing incremental builds to help Pages identify only the deltas between commits and rebuild only files that were directly updated. We will also be implementing other caching strategies such as caching external dependencies to save time on subsequent builds.

Build image updates

Because we’ve been using the same build image we launched Pages with back in 2021, we are going to make some major updates. Languages release new versions all the time, and we want to make sure we update and maintain the latest versions. An updated build image will mean faster builds, more security and of course supporting all the latest versions of languages and tools we provide. With new build image versions being released, we will allow users to opt in to the updated builds in order to maintain compatibility with all existing projects.

Productive error messaging

Lastly, while streaming build logs helps you to identify those easily addressable issues, the infamous “Internal error occurred” is sometimes a little more cryptic to decipher depending on the failure. While we recently published a “Debugging Cloudflare Pages” guide, in the future we’d like to provide the error feedback in a more productive manner, so you can easily identify the issue.

Have feedback?

As always, your feedback defines our roadmap. With all the updates we’ve made to our build experience, it’s important we hear from you! You can get in touch with our team directly through Discord. Navigate to our Pages specific section and check out our various channels specific to different parts of the product!

Join us at Cloudflare Connect!

Interested in learning more about building with Cloudflare Pages? If you’re based in the New York City area, join us on Thursday, May 12th for a series of workshops on how to build a full stack application on Pages! Follow along with a fully hands-on lab, featuring Pages in conjunction with other products like Workers, Images and Cloudflare Gateway, and hear directly from our product managers. Register now!

Cloudflare Relay Worker

Post Syndicated from Matt Boyle original https://blog.cloudflare.com/cloudflare-relay-worker/

Cloudflare Relay Worker

Cloudflare Relay Worker

Our Notification Center offers first class support for a variety of popular services (a list of which are available here). However, even with such extensive support, you may use a tool that isn’t on that list. In that case, it is possible to leverage Cloudflare Workers in combination with a generic webhook to deliver notifications to any service that accepts webhooks.

Today, we are excited to announce that we are open sourcing a Cloudflare Worker that will make it as easy as possible for you to transform our generic webhook response into any format you require. Here’s how to do it.

For this example, we are going to write a Cloudflare Worker that takes a generic webhook response, transforms it into the correct format and delivers it to Rocket Chat, a popular customer service messaging platform.  When Cloudflare sends you a generic webhook, it will have the following schema, where “text” and “data” will vary depending on the alert that has fired:

{
   "name": "Your custom webhook",
   "text": "The alert text",
   "data": {
       "some": "further",
       "info": [
           "about",
           "your",
           "alert",
           "in"
       ],
       "json": "format"
   },
   "ts": 123456789
}

Whereas Rocket Chat is looking for this format:

{
   "text": "Example message",
   "attachments": [
       {
           "title": "Rocket Chat",
           "title_link": "https://rocket.chat",
           "text": "Rocket.Chat, the best open source chat",
           "image_url": "/images/integration-attachment-example.png",
           "color": "#764FA5"
       }
   ]
}

Getting Started

Firstly, you’ll need to ensure you are ready to develop on the Cloudflare Workers platform. You can find more information on how to do that here. For the purpose of this example, we will assume you have a Cloudflare account and Wrangler, the Workers CLI, setup.

Next, let us see the steps to extend the notifications system in detail.

Step 1
Clone the webhook relay worker GitHub repository: git clone [email protected]:cloudflare/cf-webhook-relay.git

Step 2
Check the webhook payload format required by your communication tool. In this specific case, it would look like the Rocket Chat example payload shared above.

Step 3
Sign up for Rocket Chat and add a webhook integration to accept incoming webhook notifications.

Cloudflare Relay Worker

Step 4
Configure an encrypted wrangler secret for request authentication and the Rocket Chat URL for sending requests in your Worker: Environment variables · Cloudflare Workers docs (for this example, the secret is not encrypted.)

Cloudflare Relay Worker

Step 5
Modify your worker to accept POST webhook requests with the secret configured as a query param for authentication.

if (headers.get("cf-webhook-auth") !== WEBHOOK_SECRET) {
    return new Response(":(", {
        headers: {'content-type': 'text/plain'},
            status: 401
    })
}

Step 6
Convert the incoming request payload from the notification system (like in the example shared above) to the Rocket Chat format in the worker.

let incReq = await request.json()
let msg = incReq.text
let webhookName = incReq.name
let rocketBody = {
    "text": webhookName,
    "attachments": [
        {
            "title": "Cloudflare Webhook",
            "text": msg,
            "title_link": "https://cloudflare.com",
            "color": "#764FA5"
        }
    ]
}

Step 7
Configure the Worker to send POST requests to the Rocket Chat webhook with the converted payload.

const rocketReq = {
    headers: {
        'content-type': 'application/json',
    },
    method: 'POST',
    body: JSON.stringify(rocketBody),
}
const response = await fetch(
    ROCKET_CHAT_URL,
    rocketReq,
)
const res = await response.json()
console.log(res)
return new Response(":)", {
    headers: {'content-type': 'text/plain'},
})

Step 8
Set up deployment configuration in your wrangler.toml file and publish your Worker. You can now see the Worker in the Cloudflare dashboard.

Cloudflare Relay Worker

Step 9
You can manage and monitor the Worker with a variety of available tools.

Cloudflare Relay Worker

Step 10
Add the Worker URL as a generic webhook to the notification destinations in the Cloudflare dashboard: Configure webhooks · Cloudflare Fundamentals docs.

Cloudflare Relay Worker

Step 11
Create a notification with the destination as the configured generic webhook: Create a Notification · Cloudflare Fundamentals docs.

Cloudflare Relay Worker

Step 12
Tada! With your Cloudflare Worker running, you can now receive all notifications to Rocket Chat. We can configure in the same way for any communication tool.

Cloudflare Relay Worker

We know that a notification system is essential to proactively monitor any issues that may arise within a project. We are excited with this announcement to make notifications available to any communication service without having to worry too much about the system’s compatibility to them. We have lots of updates planned, like adding more alertable events to choose from and extending our support to a wide range of webhook services to receive them.

If you’re interested in building scalable services and solving interesting technical problems, we are hiring engineers on our team in Austin & Lisbon.

Happy Earth Day: Announcing Green Compute open beta

Post Syndicated from Kabir Sikand original https://blog.cloudflare.com/earth-day-2022-green-compute-open-beta/

Happy Earth Day: Announcing Green Compute open beta

Happy Earth Day: Announcing Green Compute open beta

At Cloudflare, we are on a mission to help build a better Internet. We continue to grow our network, and it is important for us to do so responsibly.

Since Earth Day 2021, some pieces of this effort have included:

And we are just getting started. We are working to make the Cloudflare network — and our customers’ websites, applications, and networks — as efficient as possible in terms of design, hardware, systems, and protocols. After all, we do not want to lose sight of our responsibilities to our home: our planet Earth.

Green Compute for Workers Cron Triggers

During Impact Week last year, we began testing Green Compute in a closed beta. Green Compute makes Workers Cron Triggers run only in facilities that are powered by renewable energy. We are hoping to incentivize more facilities to implement responsible climate and energy policies.

With Green Compute enabled, Workers Cron Triggers will run only on Cloudflare points of presence that are located in data centers that are powered by 100% renewable energy.

Based on carbon accounting and renewable energy standards like RE100, all Cloudflare operations are considered 100% powered by renewable energy because we purchase the same amount of renewable energy as the total energy we use globally.

However, the data centers we operate in are co-located with facilities owned by other companies. Although our renewable energy purchases cover the energy used by our equipment, all other energy consumed at that facility may or may not be renewable.

Renewable energy can be purchased in a number of ways, including:

  • Through on-site generation (wind turbines, solar panels)
  • Directly from renewable energy producers through contractual agreements called Power Purchase Agreements (PPA)
  • In the form of Renewable Energy Credits (RECs, IRECs, GoOs) from an energy credit market that helps offset energy use on-site
Happy Earth Day: Announcing Green Compute open beta

How to get started with Green Compute

Today, we are happy to announce that we are bringing this function to all our developers — Green Compute is now in open beta. To get started, head to your Workers App, click Change Setting under Compute Setting, and select Green Compute.

Happy Earth Day: Announcing Green Compute open beta

Now, any time you create a scheduled workload, you will see a leaf icon indicating that your schedules will be run in data centers powered by renewable energy sources. With just one click, you can help build a better Internet.

Next steps

  • Want to get more involved with the Cloudflare Developer community, help shape what we build next, or give feedback on Green Compute? Enter our Discord and join the conversation.
  • Learn more about how Cloudflare is helping build a better Internet via Cloudflare Impact.

Get updates on the health of your origin where you need them

Post Syndicated from Darius Jankauskas original https://blog.cloudflare.com/get-updates-on-the-health-of-your-origin-where-you-need-them/

Get updates on the health of your origin where you need them

Get updates on the health of your origin where you need them

We are thrilled to announce the availability of Health Checks in the Cloudflare Dashboard’s Notifications tab, available to all Pro, Business, and Enterprise customers. Now, you can get critical alerts on the health of your origin without checking your inbox! Keep reading to learn more about how this update streamlines notification management and unlocks countless ways to stay informed on the health of your servers.

Keeping your site reliable

We first announced Health Checks when we realized some customers were setting up Load Balancers for their origins to monitor the origins’ availability and responsiveness. The Health Checks product provides a similarly powerful interface to Load Balancing, offering users the ability to ensure their origins meet criteria such as reachability, responsiveness, correct HTTP status codes, and correct HTTP body content. Customers can also receive email alerts when a Health Check finds their origin is unhealthy based on their custom criteria. In building a more focused product, we’ve added a slimmer, monitoring-based configuration, Health Check Analytics, and made it available for all paid customers. Health Checks run in multiple locations within Cloudflare’s edge network, meaning customers can monitor site performance across geographic locations.

What’s new with Health Checks Notifications

Health Checks email alerts have allowed customers to respond quickly to incidents and guarantee minimum disruption for their users. As before, Health Checks users can still select up to 20 email recipients to notify if a Health Check finds their site to be unhealthy. And if email is the right tool for your team, we’re excited to share that we have jazzed up our notification emails and added details on which Health Check triggered the notification, as well as the status of the Health Check:

Get updates on the health of your origin where you need them
New Health Checks email format with Time, Health Status, and Health Check details

That being said, monitoring an inbox is not ideal for many customers needing to stay proactively informed. If email is not the communication channel your team typically relies upon, checking emails can at best be inconvenient and, at worst, allow critical updates to be missed. That’s where the Notifications dashboard comes in.

Users can now create Health Checks notifications within the Cloudflare Notifications dashboard. By integrating Health Checks with Cloudflare’s powerful Notification platform, we have unlocked myriad new ways to ensure customers receive critical updates for their origin health. One of the key benefits of Cloudflare’s Notifications is webhooks, which give customers the flexibility to sync notifications with various external services. Webhook responses contain JSON-encoded information, allowing users to ingest them into their internal or third-party systems.

For real-time updates, users can now use webhooks to send Health Check alerts directly to their preferred instant messaging platforms such as Slack, Google Chat, or Microsoft Teams, to name a few. Beyond instant messaging, customers can also use webhooks to send Health Checks notifications to their internal APIs or their Security Information and Event Management (SIEM) platforms, such as DataDog or Splunk, giving customers a single pane of glass for all Cloudflare activity, including notifications and event logs. For more on how to configure popular webhooks, check out our developer docs. Below, we’ll walk you through a couple of powerful webhook applications. But first, let’s highlight a couple of other ways the update to Health Checks notifications improves user experience.

By including Health Checks in the Notifications tab, users need only to access one page for a single source of truth where they can manage their account notifications.  For added ease of use, users can also migrate to Notification setup directly from the Health Check creation page as well.  From within a Health Check, users will also be able to see what Notifications are tied to it.

Additionally, configuring notifications for multiple Health Checks is now simplified. Instead of configuring notifications one Health Check at a time, users can now set up notifications for multiple or even all Health Checks from a single workflow.

Get updates on the health of your origin where you need them

Also, users can now access Health Checks notification history, and Enterprise customers can integrate Health Checks directly with PagerDuty. Last but certainly not least, as Cloudflare’s Notifications infrastructure grows in capabilities, Health Checks will be able to leverage all of these improvements. This guarantees Health Checks users the most timely and versatile notification capabilities that Cloudflare offers now and into the future.

Setting up a Health Checks webhook

To get notifications for health changes at an origin, we first need to set up a Health Check for it. In this example, we’ll monitor HTTP responses: leave the Type and adjacent fields to their defaults. We will also monitor HTTP response codes: add `200` as an expected code, which will cause any other HTTP response code to trigger an unhealthy status.

Get updates on the health of your origin where you need them

Creating the webhook notification policy

Once we’ve got our Health Check set up, we can create a webhook to link it to. Let’s start with a popular use case and send our Health Checks to a Slack channel. Before creating the webhook in the Cloudflare Notifications dashboard, we enable webhooks in our Slack workspace and retrieve the webhook URL of the Slack channel we want to send notifications to. Next, we navigate to our account’s Notifications tab to add the Slack webhook as a Destination, entering the name and URL of our webhook — the secret will populate automatically.

Get updates on the health of your origin where you need them
Webhook creation page with the following user input: Webhook name, Slack webhook url, and auto-populated Secret

Once we hit Save and Test, we will receive a message in the designated Slack channel verifying that our webhook is working.

Get updates on the health of your origin where you need them
Message sent in Slack via the configured webhook, verifying the webhook is working

This webhook can now be used for any notification type available in the Notifications dashboard. To have a Health Check notification sent to this Slack channel, simply add a new Health Check notification from the Notifications dashboard, selecting the Health Check(s) to tie to this webhook and the Slack webhook we just created. And, voilà! Anytime our Health Check detects a response status code other than 200 or goes from unhealthy to healthy, this Slack channel will be notified.

Get updates on the health of your origin where you need them
Health Check notification sent to Slack, indicating our server is online and Healthy.

Create an Origin Health Status Page

Let’s walk through another powerful webhooks implementation with Health Checks. Using the Health Check we configured in our last example, let’s create a simple status page using Cloudflare Workers and Durable Objects that stores an origin’s health, updates it upon receiving a webhook request, and displays a status page to visitors.

Writing our worker
You can find the code for this example in this GitHub repository, if you want to clone it and try it out.

We’ve got our Health Check set up, and we’re ready to write our worker and durable object. To get started, we first need to install wrangler, our CLI tool for testing and deploying more complex worker setups.

$ wrangler -V
wrangler 1.19.8

The examples in this blog were tested in this wrangler version.

Then, to speed up writing our worker, we will use a template to generate a project:

$ wrangler generate status-page [https://github.com/cloudflare/durable-objects-template](https://github.com/cloudflare/durable-objects-template)
$ cd status-page

The template has a Durable Object with the name Counter. We’ll rename that to Status, as it will store and update the current state of the page.

For that, we update wrangler.toml to use the correct name and type, and rename the Counter class in index.mjs.

name = "status-page"
# type = "javascript" is required to use the `[build]` section
type = "javascript"
workers_dev = true
account_id = "<Cloudflare account-id>"
route = ""
zone_id = ""
compatibility_date = "2022-02-11"
 
[build.upload]
# Upload the code directly from the src directory.
dir = "src"
# The "modules" upload format is required for all projects that export a Durable Objects class
format = "modules"
main = "./index.mjs"
 
[durable_objects]
bindings = [{name = "status", class_name = "Status"}]

Now, we’re ready to fill in our logic. We want to serve two different kinds of requests: one at /webhook that we will pass to the Notification system for updating the status, and another at / for a rendered status page.

First, let’s write the /webhook logic. We will receive a JSON object with a data and a text field. The `data` object contains the following fields:

time - The time when the Health Check status changed.
status - The status of the Health Check.
reason - The reason why the Health Check failed.
name - The Health Check name.
expected_codes - The status code the Health Check is expecting.
actual_code - The actual code received from the origin.
health_check_id - The id of the Health Check pushing the webhook notification. 

For the status page we are using the Health Check name, status, and reason (the reason a Health Check became unhealthy, if any) fields. The text field contains a user-friendly version of this data, but it is more complex to parse.

 async handleWebhook(request) {
  const json = await request.json();
 
  // Ignore webhook test notification upon creation
  if ((json.text || "").includes("Hello World!")) return;
 
  let healthCheckName = json.data?.name || "Unknown"
  let details = {
    status: json.data?.status || "Unknown",
    failureReason: json.data?.reason || "Unknown"
  }
  await this.state.storage.put(healthCheckName, details)
 }

Now that we can store status changes, we can use our state to render a status page:

 async statusHTML() {
  const statuses = await this.state.storage.list()
  let statHTML = ""
 
  for(let[hcName, details] of statuses) {
   const status = details.status || ""
   const failureReason = details.failureReason || ""
   let hc = `<p>HealthCheckName: ${hcName} </p>
         <p>Status: ${status} </p>
         <p>FailureReason: ${failureReason}</p> 
         <br/>`
   statHTML = statHTML + hc
  }
 
  return statHTML
 }
 
 async handleRoot() {
  // Default of healthy for before any notifications have been triggered
  const statuses = await this.statusHTML()
 
  return new Response(`
     <!DOCTYPE html>
     <head>
      <title>Status Page</title>
      <style>
       body {
        font-family: Courier New;
        padding-left: 10vw;
        padding-right: 10vw;
        padding-top: 5vh;
       }
      </style>
     </head>
     <body>
       <h1>Status of Production Servers</h1>
       <p>${statuses}</p>
     </body>
     `,
   {
    headers: {
     'Content-Type': "text/html"
    }
   })
 }

Then, we can direct requests to our two paths while also returning an error for invalid paths within our durable object with a fetch method:

async fetch(request) {
  const url = new URL(request.url)
  switch (url.pathname) {
   case "/webhook":
    await this.handleWebhook(request);
    return new Response()
   case "/":
    return await this.handleRoot();
   default:
    return new Response('Path not found', { status: 404 })
  }
 }

Finally, we can call that fetch method from our worker, allowing the external world to access our durable object.

export default {
 async fetch(request, env) {
  return await handleRequest(request, env);
 }
}
async function handleRequest(request, env) {
 let id = env.status.idFromName("A");
 let obj = env.status.get(id);
 
 return await obj.fetch(request);
}

Testing and deploying our worker

When we’re ready to deploy, it’s as simple as running the following command:

$ wrangler publish --new-class Status

To test the change, we create a webhook pointing to the path the worker was deployed to. On the Cloudflare account dashboard, navigate to Notifications > Destinations, and create a webhook.

Get updates on the health of your origin where you need them
Webhook creation page, with the following user input: name of webhook, destination URL, and optional secret is left blank.

Then, while still in the Notifications dashboard, create a Health Check notification tied to the status page webhook and Health Check.

Get updates on the health of your origin where you need them
Notification creation page, with the following user input: Notification name and the Webhook created in the previous step added.

Before getting any updates the status-page worker should look like this:

Get updates on the health of your origin where you need them
Status page without updates reads: “Status of Production Servers”

Webhooks get triggered when the Health Check status changes. To simulate the change of Health Check status we take the origin down, which will send an update to the worker through the webhook. This causes the status page to get updated.

Get updates on the health of your origin where you need them
Status page showing the name of the Health Check as “configuration-service”, Status as “Unhealthy”, and the failure reason as “TCP connection failed”. 

Next, we simulate a return to normal by changing the Health Check expected status back to 200. This will make the status page show the origin as healthy.

Get updates on the health of your origin where you need them
Status page showing the name of the Health Check as “configuration-service”, Status as “Healthy”, and the failure reason as “No failures”. 

If you add more Health Checks and tie them to the webhook durable object, you will see the data being added to your account.

Authenticating webhook requests

We already have a working status page! However, anyone possessing the webhook URL would be able to forge a request, pushing arbitrary data to an externally-visible dashboard. Obviously, that’s not ideal. Thankfully, webhooks provide the ability to authenticate these requests by supplying a secret. Let’s create a new webhook that will provide a secret on every request. We can generate a secret by generating a pseudo-random UUID with Python:

$ python3
>>> import uuid
>>> uuid.uuid4()
UUID('4de28cf2-4a1f-4abd-b62e-c8d69569a4d2')

Now we create a new webhook with the secret.

Get updates on the health of your origin where you need them
Webhook creation page, with the following user input: name of webhook, destination URL, and now with a secret added.

We also want to provide this secret to our worker. Wrangler has a command that lets us save the secret.

$ wrangler secret put WEBHOOK_SECRET
Enter the secret text you'd like assigned to the variable WEBHOOK_SECRET on the script named status-page:
4de28cf2-4a1f-4abd-b62e-c8d69569a4d2
🌀 Creating the secret for script name status-page
✨ Success! Uploaded secret WEBHOOK_SECRET.

Wrangler will prompt us for the secret, then provide it to our worker. Now we can check for the token upon every webhook notification, as the secret is provided by the header cf-webhook-auth. By checking the header’s value against our secret, we can authenticate incoming webhook notifications as genuine. To do that, we modify handleWebhook:

 async handleWebhook(request) {
  // ensure the request we receive is from the Webhook destination we created
  // by examining its secret value, and rejecting it if it's incorrect
  if((request.headers.get('cf-webhook-auth') != this.env.WEBHOOK_SECRET) {
    return
   }
  ...old code here
 }

This origin health status page is just one example of the versatility of webhooks, which allowed us to leverage Cloudflare Workers and Durable Objects to support a custom Health Checks application. From highly custom use cases such as this to more straightforward, out-of-the-box solutions, pairing webhooks and Health Checks empowers users to respond to critical origin health updates effectively by delivering that information where it will be most impactful.

Migrating to the Notifications Dashboard

The Notifications dashboard is now the centralized location for most Cloudflare services. In the interest of consistency and streamlined administration, we will soon be limiting Health Checks notification setup to the Notifications dashboard.  Many existing Health Checks customers have emails configured via our legacy alerting system. Over the next three months, we will support the legacy system, giving customers time to transition their Health Checks notifications to the Notifications dashboard. Customers can expect the following timeline for the phasing out of existing Health Checks notifications:

  • For now, customers subscribed to legacy emails will continue to receive them unchanged, so any parsing infrastructure will still work. From within a Health Check, you will see two options for configuring notifications–the legacy format and a deep link to the Notifications dashboard.
  • On May 24, 2022, we will disable the legacy method for the configuration of email notifications from the Health Checks dashboard.
  • On June 28, 2022, we will stop sending legacy emails, and adding new emails at the /healthchecks endpoint will no longer send email notifications.

We strongly encourage all our users to migrate existing Health Checks notifications to the Notifications dashboard within this timeframe to avoid lapses in alerts.