Tag Archives: Cloudflare Workers

Incremental adoption of micro-frontends with Cloudflare Workers

Post Syndicated from Peter Bacon Darwin original https://blog.cloudflare.com/fragment-piercing/

Incremental adoption of micro-frontends with Cloudflare Workers

Bring micro-frontend benefits to legacy Web applications

Incremental adoption of micro-frontends with Cloudflare Workers

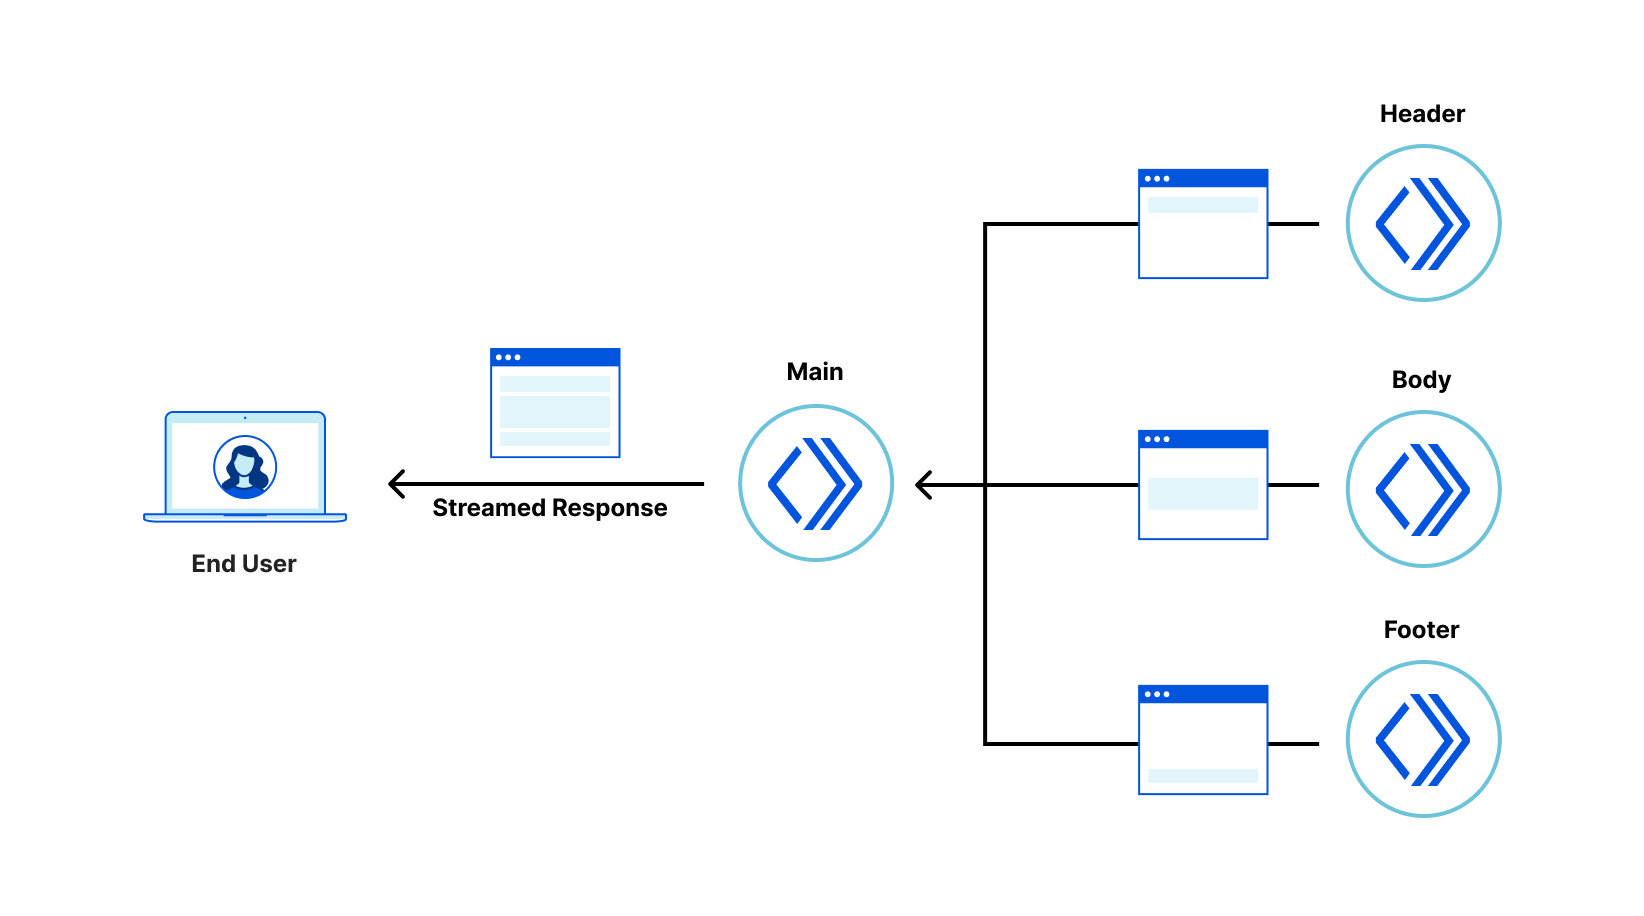
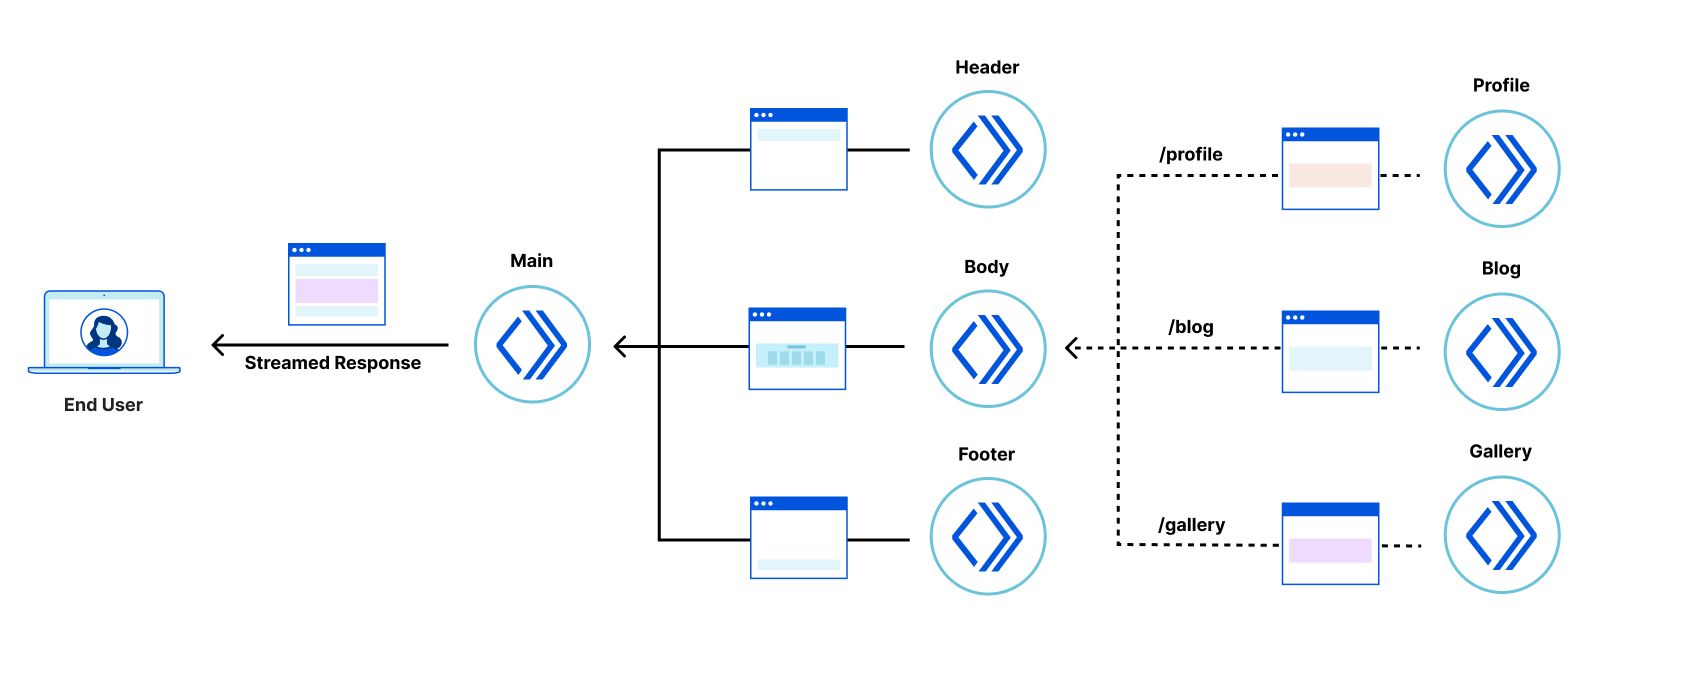
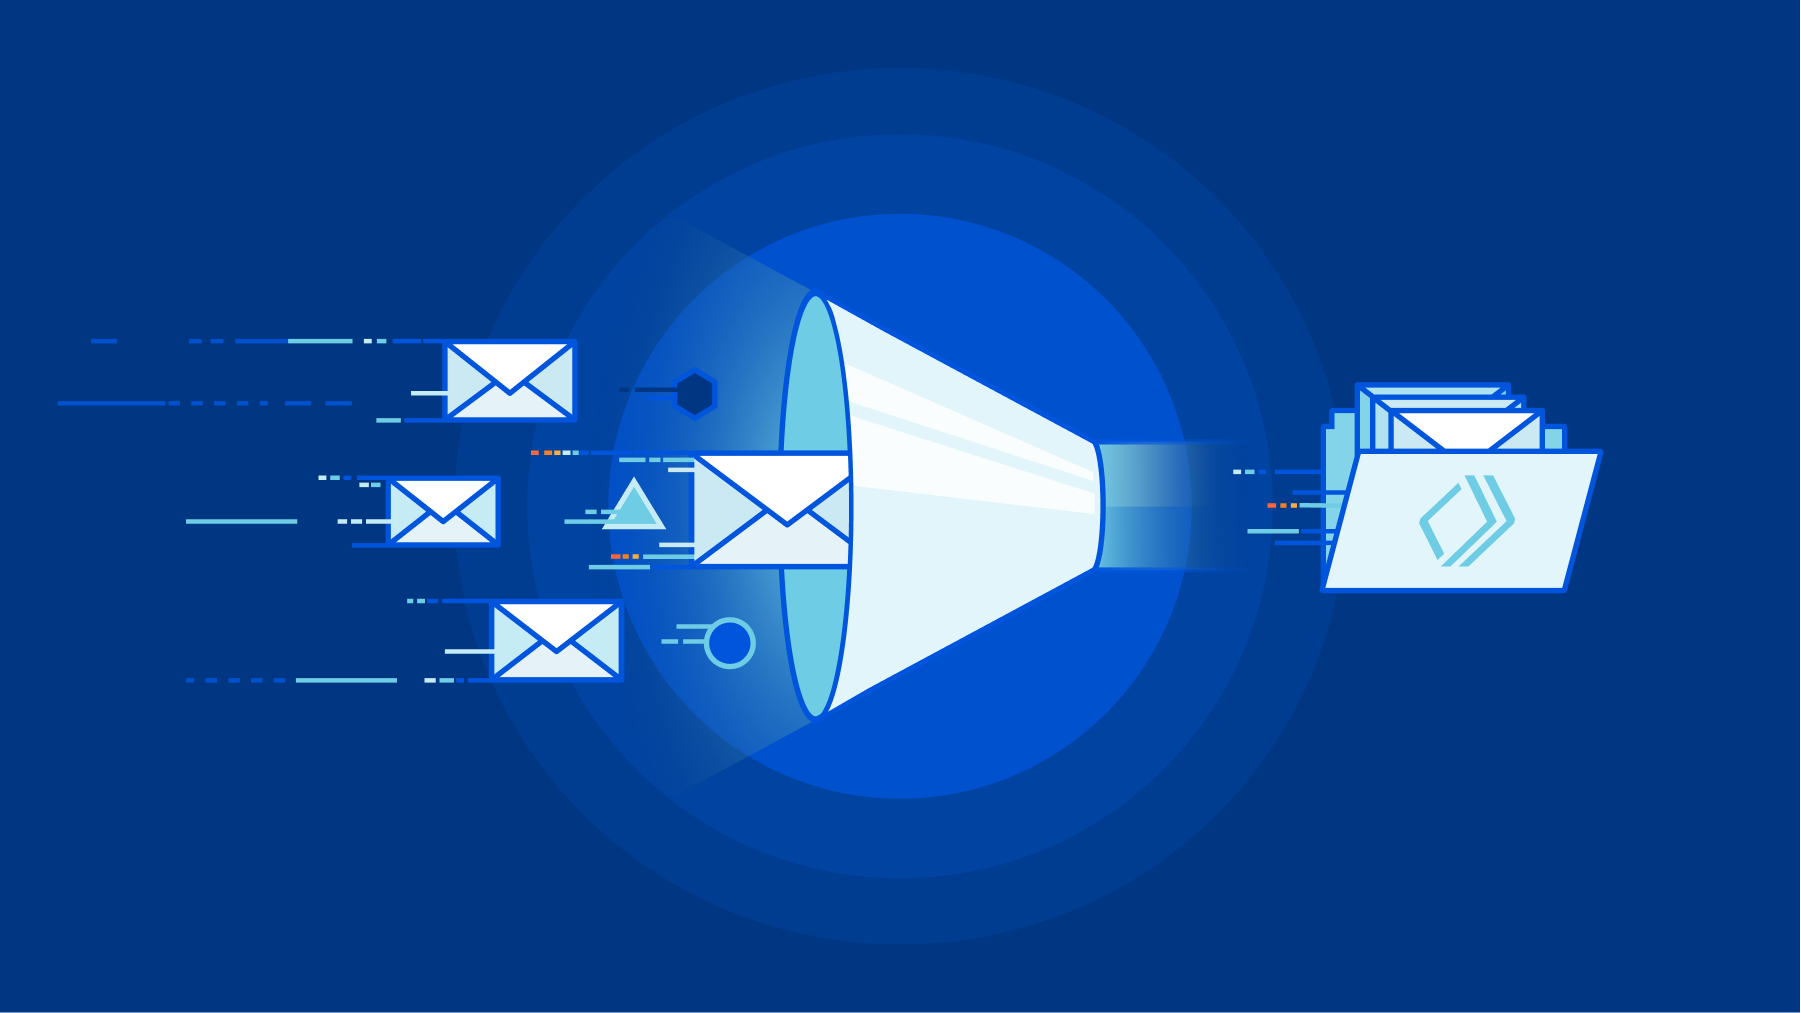
Recently, we wrote about a new fragment architecture for building Web applications that is fast, cost-effective, and scales to the largest projects, while enabling a fast iteration cycle. The approach uses multiple collaborating Cloudflare Workers to render and stream micro-frontends into an application that is interactive faster than traditional client-side approaches, leading to better user experience and SEO scores.

This approach is great if you are starting a new project or have the capacity to rewrite your current application from scratch. But in reality most projects are too large to be rebuilt from scratch and can adopt architectural changes only in an incremental way.

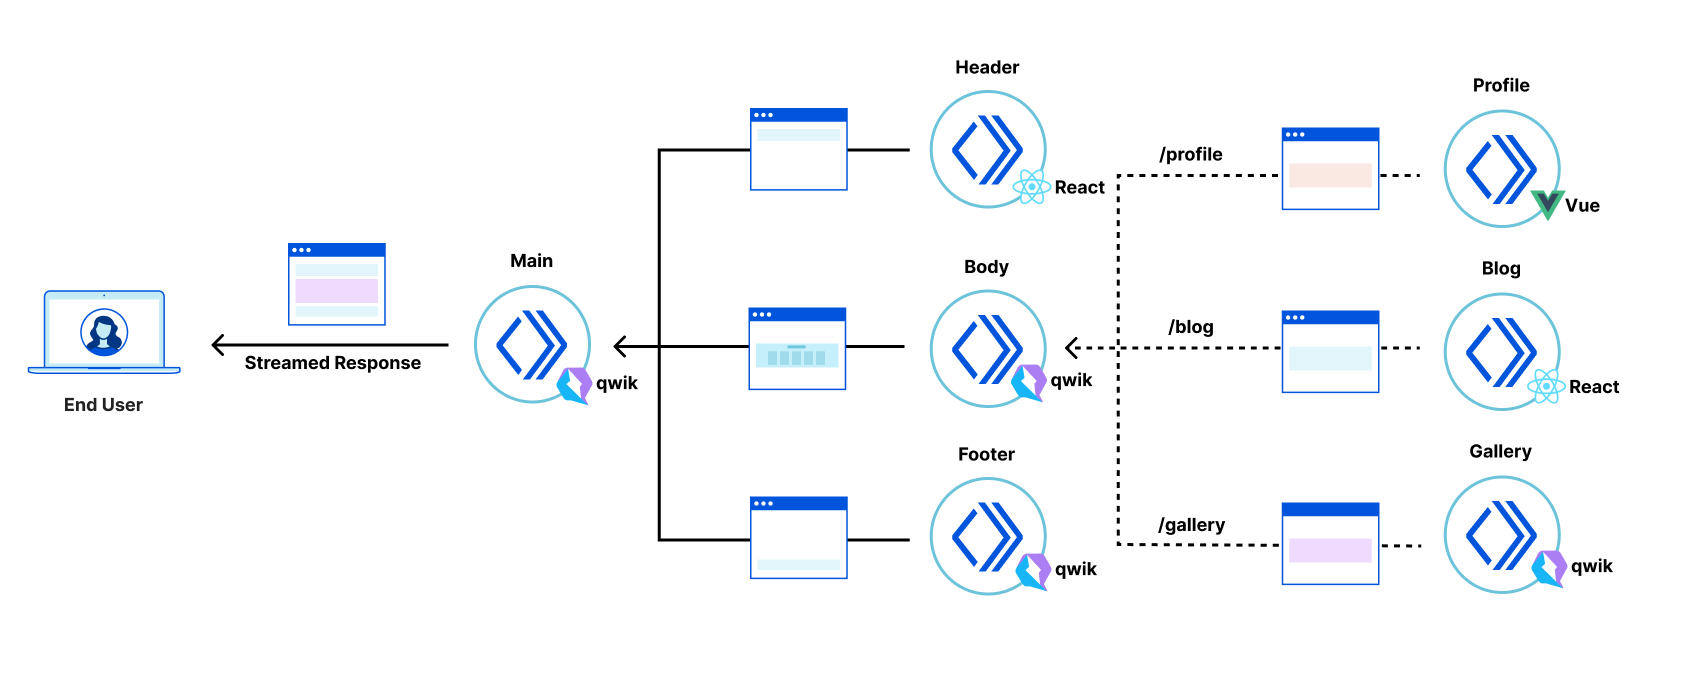
In this post we propose a way to replace only selected parts of a legacy client-side rendered application with server-side rendered fragments. The result is an application where the most important views are interactive sooner, can be developed independently, and receive all the benefits of the micro-frontend approach, while avoiding large rewrites of the legacy codebase. This approach is framework-agnostic; in this post we demonstrate fragments built with React, Qwik, and SolidJS.

The pain of large frontend applications

Many large frontend applications developed today fail to deliver good user experience. This is often caused by architectures that require large amounts of JavaScript to be downloaded, parsed and executed before users can interact with the application. Despite efforts to defer non-critical JavaScript code via lazy loading, and the use of server-side rendering, these large applications still take too long to become interactive and respond to the user’s inputs.

Furthermore, large monolithic applications can be complex to build and deploy. Multiple teams may be collaborating on a single codebase and the effort to coordinate testing and deployment of the project makes it hard to develop, deploy and iterate on individual features.

As outlined in our previous post, micro-frontends powered by Cloudflare Workers can solve these problems but converting an application monolith to a micro-frontend architecture can be difficult and expensive. It can take months, or even years, of engineering time before any benefits are perceived by users or developers.

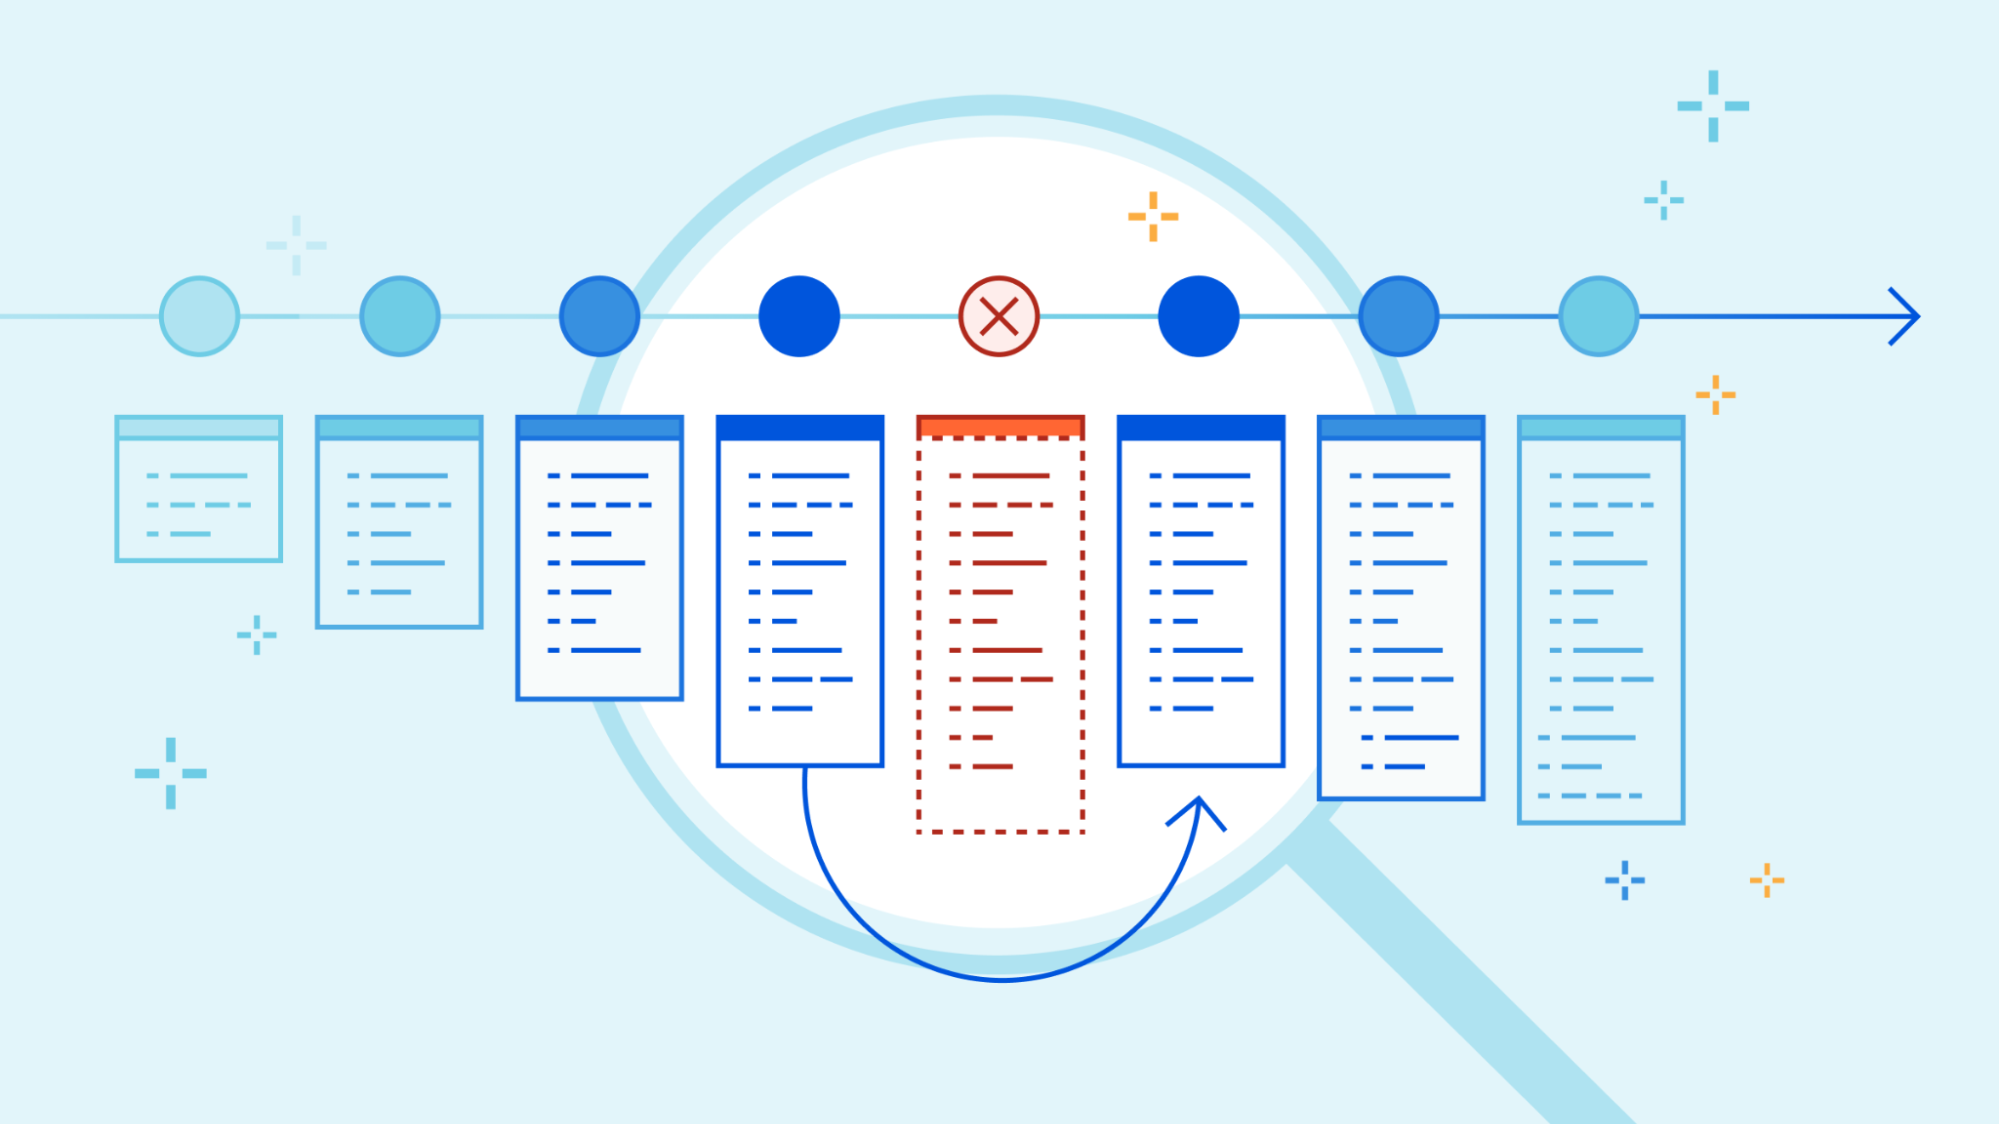
What we need is an approach where a project can incrementally adopt micro-frontends into the most impactful parts of the application incrementally, without needing to rewrite the whole application in one go.

Fragments to the rescue

The goal of a fragment based architecture is to significantly decrease loading and interaction latency for large web applications (as measured via Core Web Vitals) by breaking the application into micro-frontends that can be quickly rendered (and cached) in Cloudflare Workers. The challenge is how to integrate a micro-frontend fragment into a legacy client-side rendered application with minimal cost to the original project.

The technique we propose allows us to convert the most valuable parts of a legacy application’s UI, in isolation from the rest of the application.

It turns out that, in many applications, the most valuable parts of the UI are often nested within an application “shell” that provides header, footer, and navigational elements. Examples of these include a login form, product details panel in an e-commerce application, the inbox in an email client, etc.

Let’s take a login form as an example. If it takes our application several seconds to display the login form, the users will dread logging in, and we might lose them. We can however convert the login form into a server-side rendered fragment, which is displayed and interactive immediately, while the rest of the legacy application boots up in the background. Since the fragment is interactive early, the user can even submit their credentials before the legacy application has started and rendered the rest of the page.

Animation showing the login form being available before the main application

This approach enables engineering teams to deliver valuable improvements to users in just a fraction of the time and engineering cost compared to traditional approaches, which either sacrifice user experience improvements, or require a lengthy and high-risk rewrite of the entire application. It allows teams with monolithic single-page applications to adopt a micro-frontend architecture incrementally, target the improvements to the most valuable parts of the application, and therefore front-load the return on investment.

An interesting challenge in extracting parts of the UI into server-side rendered fragments is that, once displayed in the browser, we want the legacy application and the fragments to feel like a single application. The fragments should be neatly embedded within the legacy application shell, keeping the application accessible by correctly forming the DOM hierarchy, but we also want the server-side rendered fragments to be displayed and become interactive as quickly as possible — even before the legacy client-side rendered application shell comes into existence. How can we embed UI fragments into an application shell that doesn’t exist yet? We resolved this problem via a technique we devised, which we call “fragment piercing”.
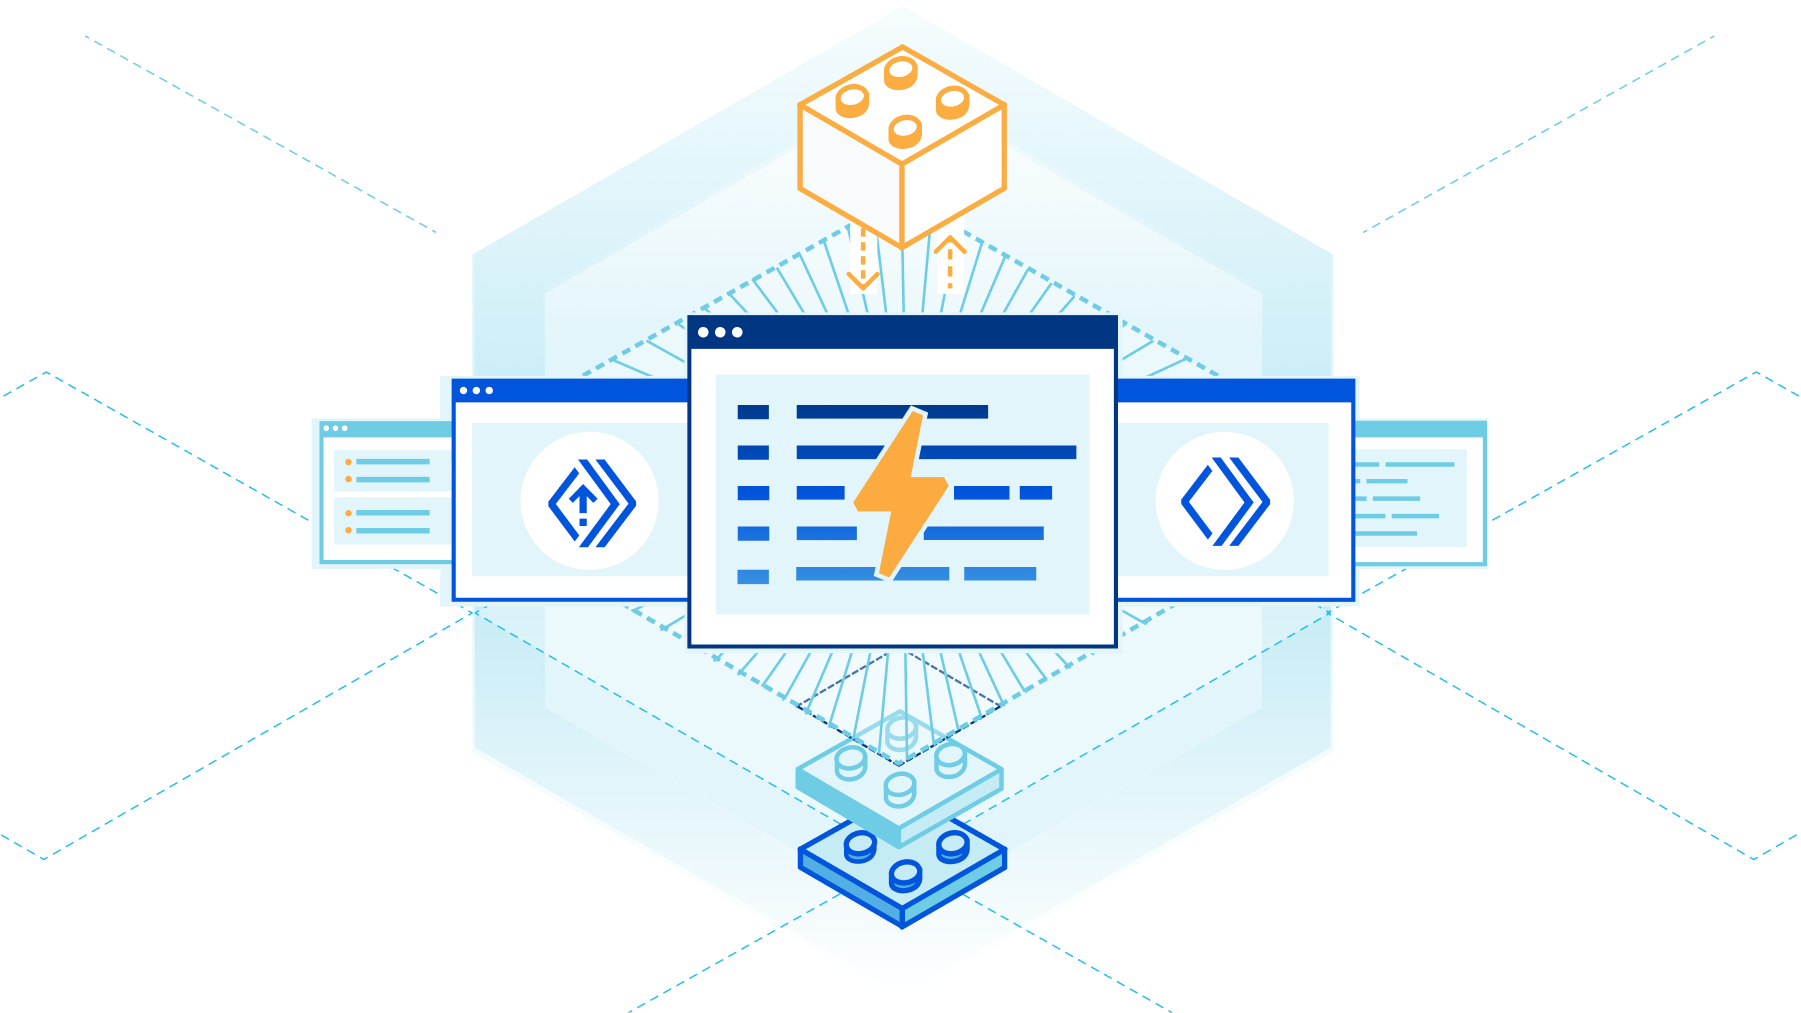
Fragment piercing

Fragment piercing combines HTML/DOM produced by server-side rendered micro-frontend fragments with HTML/DOM produced by a legacy client-side rendered application.

The micro-frontend fragments are rendered directly into the top level of the HTML response, and are designed to become immediately interactive. In the background, the legacy application is client-side rendered as a sibling of these fragments. When it is ready, the fragments are “pierced” into the legacy application – the DOM of each fragment is moved to its appropriate place within the DOM of the legacy application – without causing any visual side effects, or loss of client-side state, such as focus, form data, or text selection. Once “pierced”, a fragment can begin to communicate with the legacy application, effectively becoming an integrated part of it.

Here, you can see a “login” fragment and the empty legacy application “root” element at the top level of the DOM, before piercing.

<body>
  <div id="root"></div>
  <piercing-fragment-host fragment-id="login">
    <login q:container...>...</login>
  </piercing-fragment-host>
</body>

And here you can see that the fragment has been pierced into the “login-page” div in the rendered legacy application.

<body>
  <div id="root">
    <header>...</header>
    <main>
      <div class="login-page">
        <piercing-fragment-outlet fragment-id="login">
          <piercing-fragment-host fragment-id="login">
            <login  q:container...>...</login>
          </piercing-fragment-host>
        </piercing-fragment-outlet>
      </div>
    </main>
    <footer>...</footer>
  </div>
</body>

To keep the fragment from moving and causing a visible layout shift during this transition, we apply CSS styles that position the fragment in the same way before and after piercing.

At any time an application can be displaying any number of pierced fragments, or none at all. This technique is not limited only to the initial load of the legacy application. Fragments can also be added to and removed from an application, at any time. This allows fragments to be rendered in response to user interactions and client-side routing.

With fragment piercing, you can start to incrementally adopt micro-frontends, one fragment at a time. You decide on the granularity of fragments, and which parts of the application to turn into fragments. The fragments don’t all have to use the same Web framework, which can be useful when switching stacks, or during a post-acquisition integration of multiple applications.

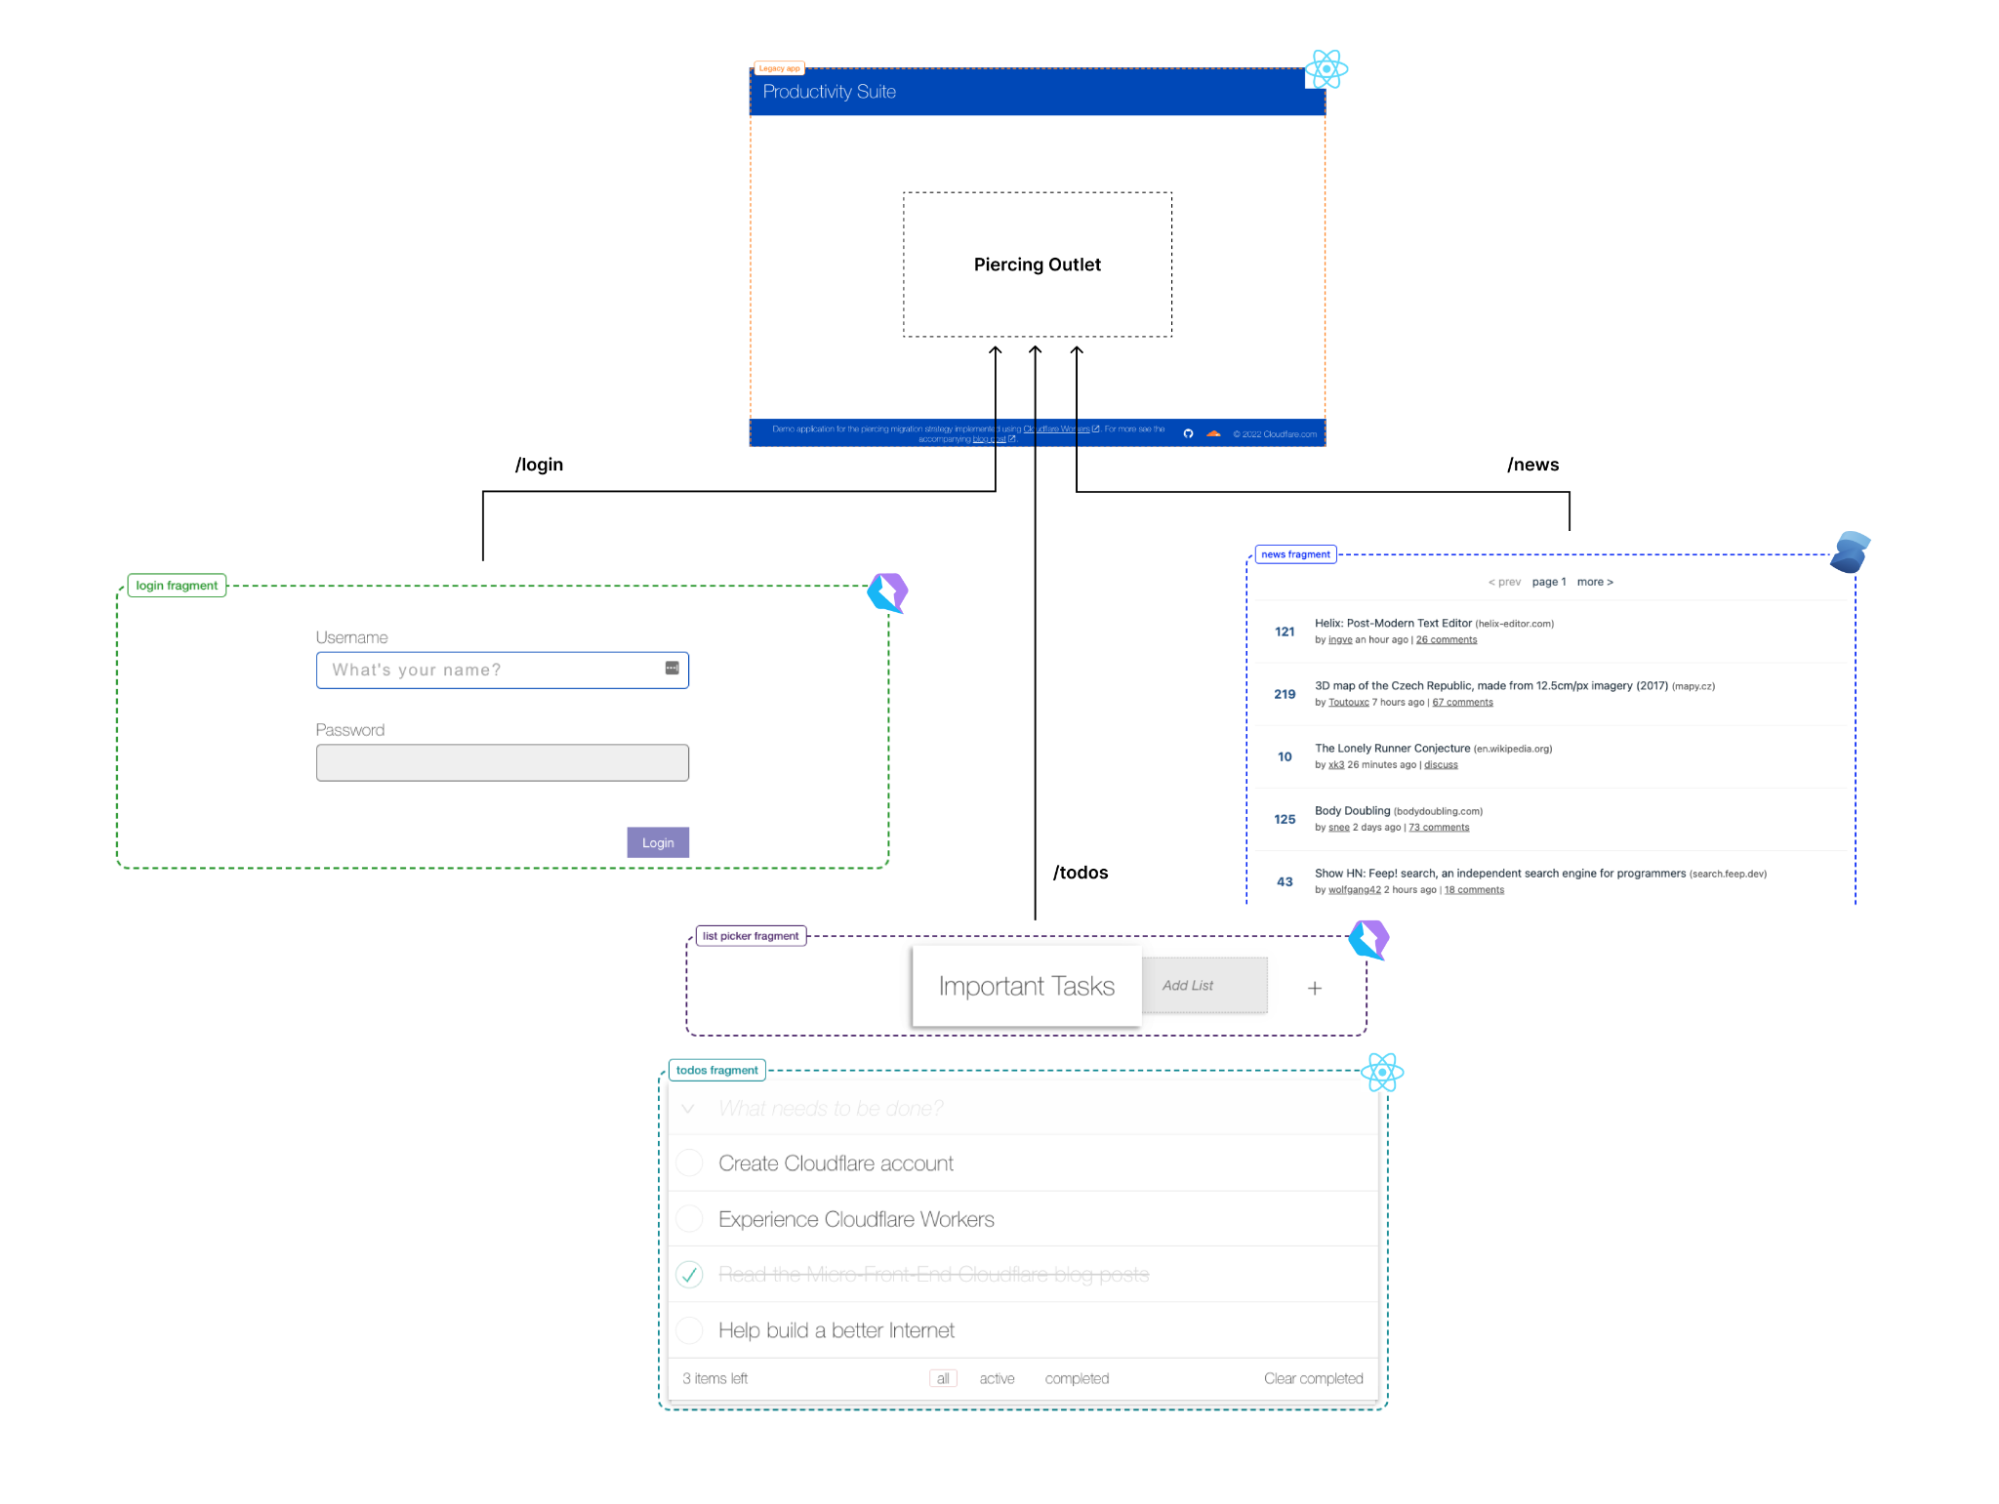
The “Productivity Suite” demo

As a demonstration of fragment piercing and incremental adoption we have developed a “productivity suite” demo application that allows users to manage to-do lists, read hacker news, etc. We implemented the shell of this application as a client-side rendered React application — a common tech choice in corporate applications. This is our “legacy application”. There are three routes in the application that have been updated to use micro-frontend fragments:

  • /login – a simple dummy login form with client-side validation, displayed when users are not authenticated (implemented in Qwik).
  • /todos – manages one or more todo lists, implemented as two collaborating fragments:
    • Todo list selector – a component for selecting/creating/deleting Todo lists (implemented in Qwik).
    • Todo list editor – a clone of the TodoMVC app (implemented in React).
  • /news – a clone of the HackerNews demo (implemented in SolidJS).

This demo showcases that different independent technologies can be used for both the legacy application and for each of the fragments.

Incremental adoption of micro-frontends with Cloudflare Workers
A visualization of the fragments that are pierced into the legacy application

The application is deployed at https://productivity-suite.web-experiments.workers.dev/.

To try it out, you first need to log in – simply use any username you like (no password needed). The user’s data is saved in a cookie, so you can log out and back in using the same username. After you’ve logged in, navigate through the various pages using the navigation bar at the top of the application. In particular, take a look at the “Todo Lists” and “News” pages to see the piercing in action.

At any point, try reloading the page to see that fragments are rendered instantly while the legacy application loads slowly in the background. Try interacting with the fragments even before the legacy application has appeared!

At the very top of the page there are controls to let you see the impact of fragment piercing in action.

Incremental adoption of micro-frontends with Cloudflare Workers
  • Use the “Legacy app bootstrap delay” slider to set the simulated delay before the legacy application starts.
  • Toggle “Piercing Enabled” to see what the user experience would be if the app did not use fragments.
  • Toggle “Show Seams” to see where each fragment is on the current page.

How it works

The application is composed of a number of building blocks.

Incremental adoption of micro-frontends with Cloudflare Workers
An overview of the collaborating Workers and legacy application host

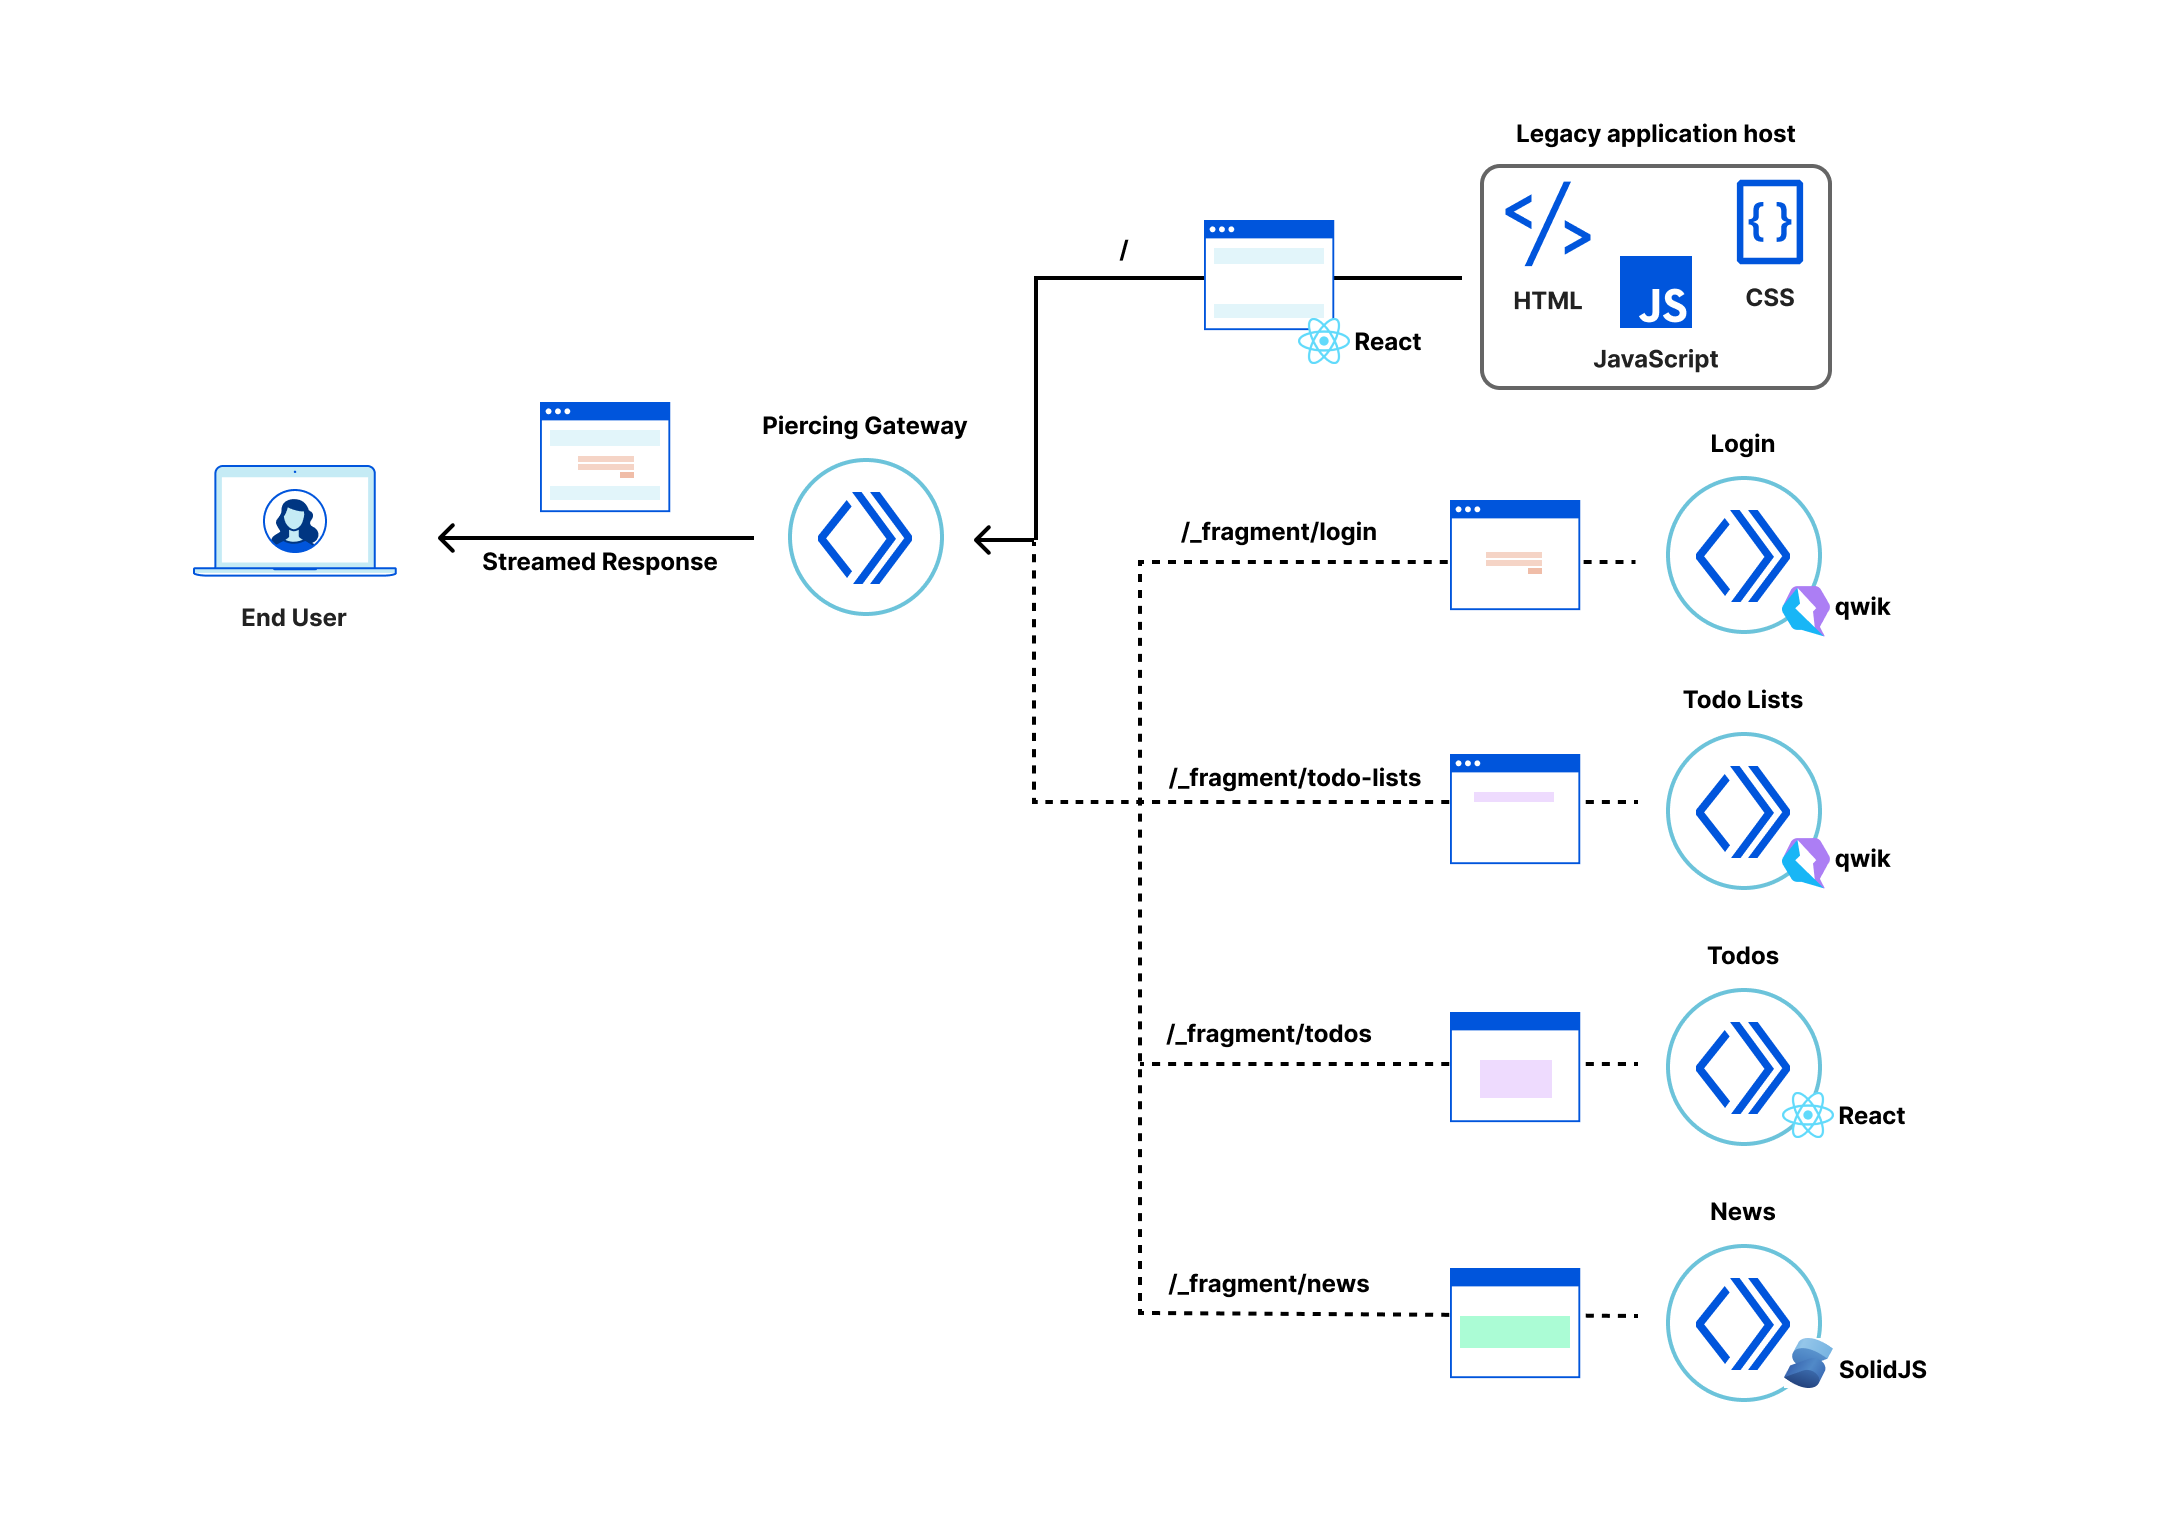
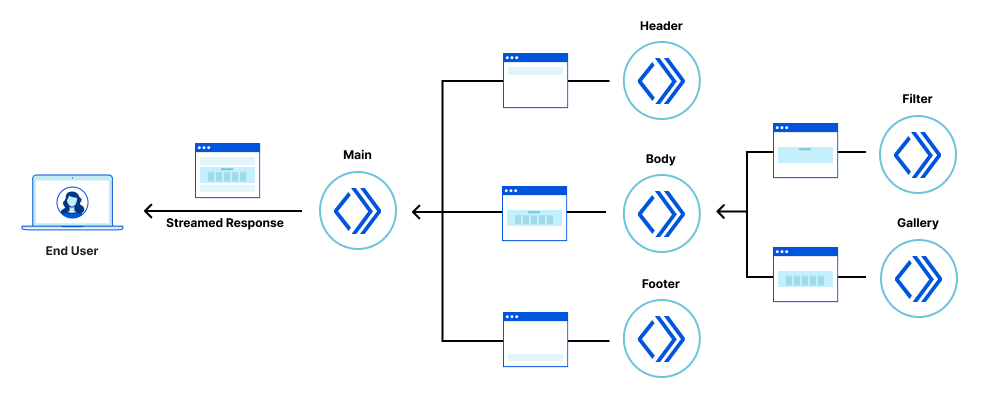
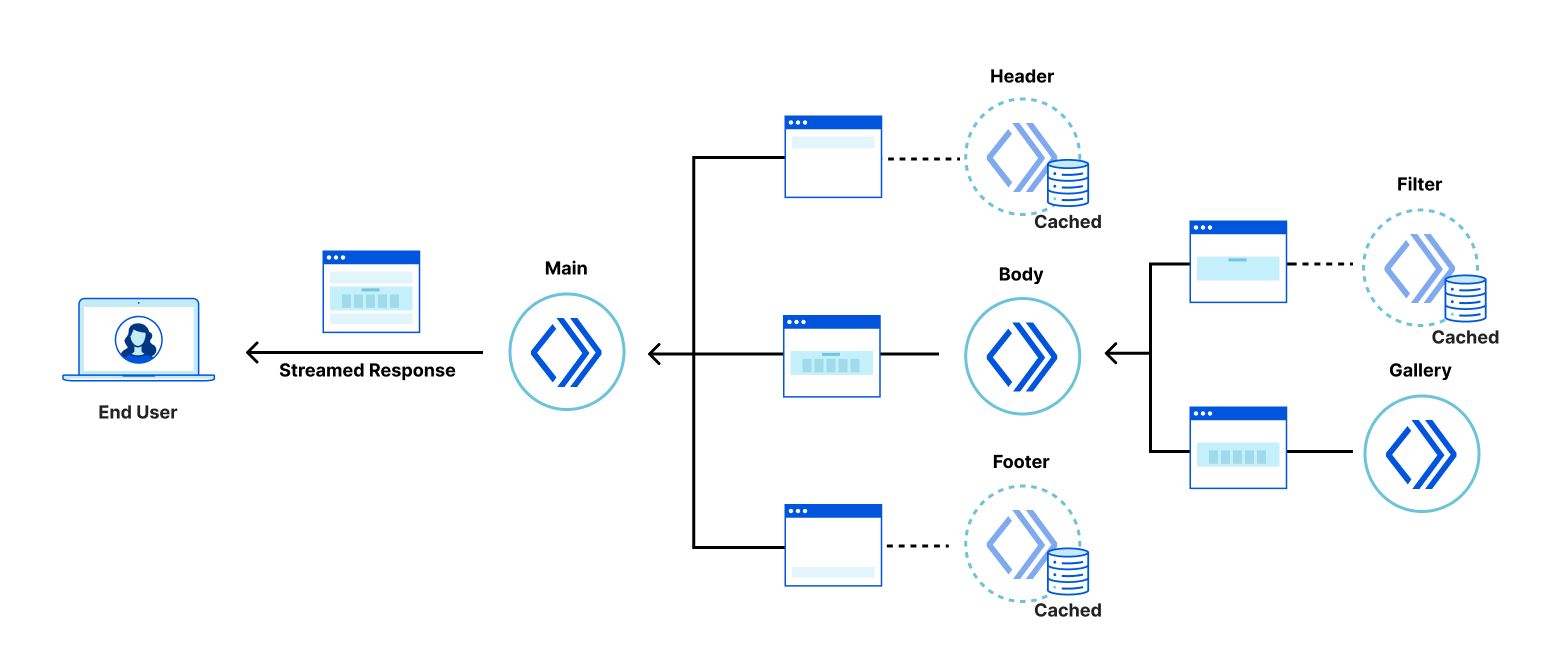
The Legacy application host in our demo serves the files that define the client-side React application (HTML, JavaScript and stylesheets). Applications built with other tech stacks would work just as well. The Fragment Workers host the micro-frontend fragments, as described in our previous fragment architecture post. And the Gateway Worker handles requests from the browser, selecting, fetching and combining response streams from the legacy application and micro-frontend fragments.

Once these pieces are all deployed, they work together to handle each request from the browser. Let’s look at what happens when you go to the `/login` route.

Incremental adoption of micro-frontends with Cloudflare Workers
The flow of requests when viewing the login page

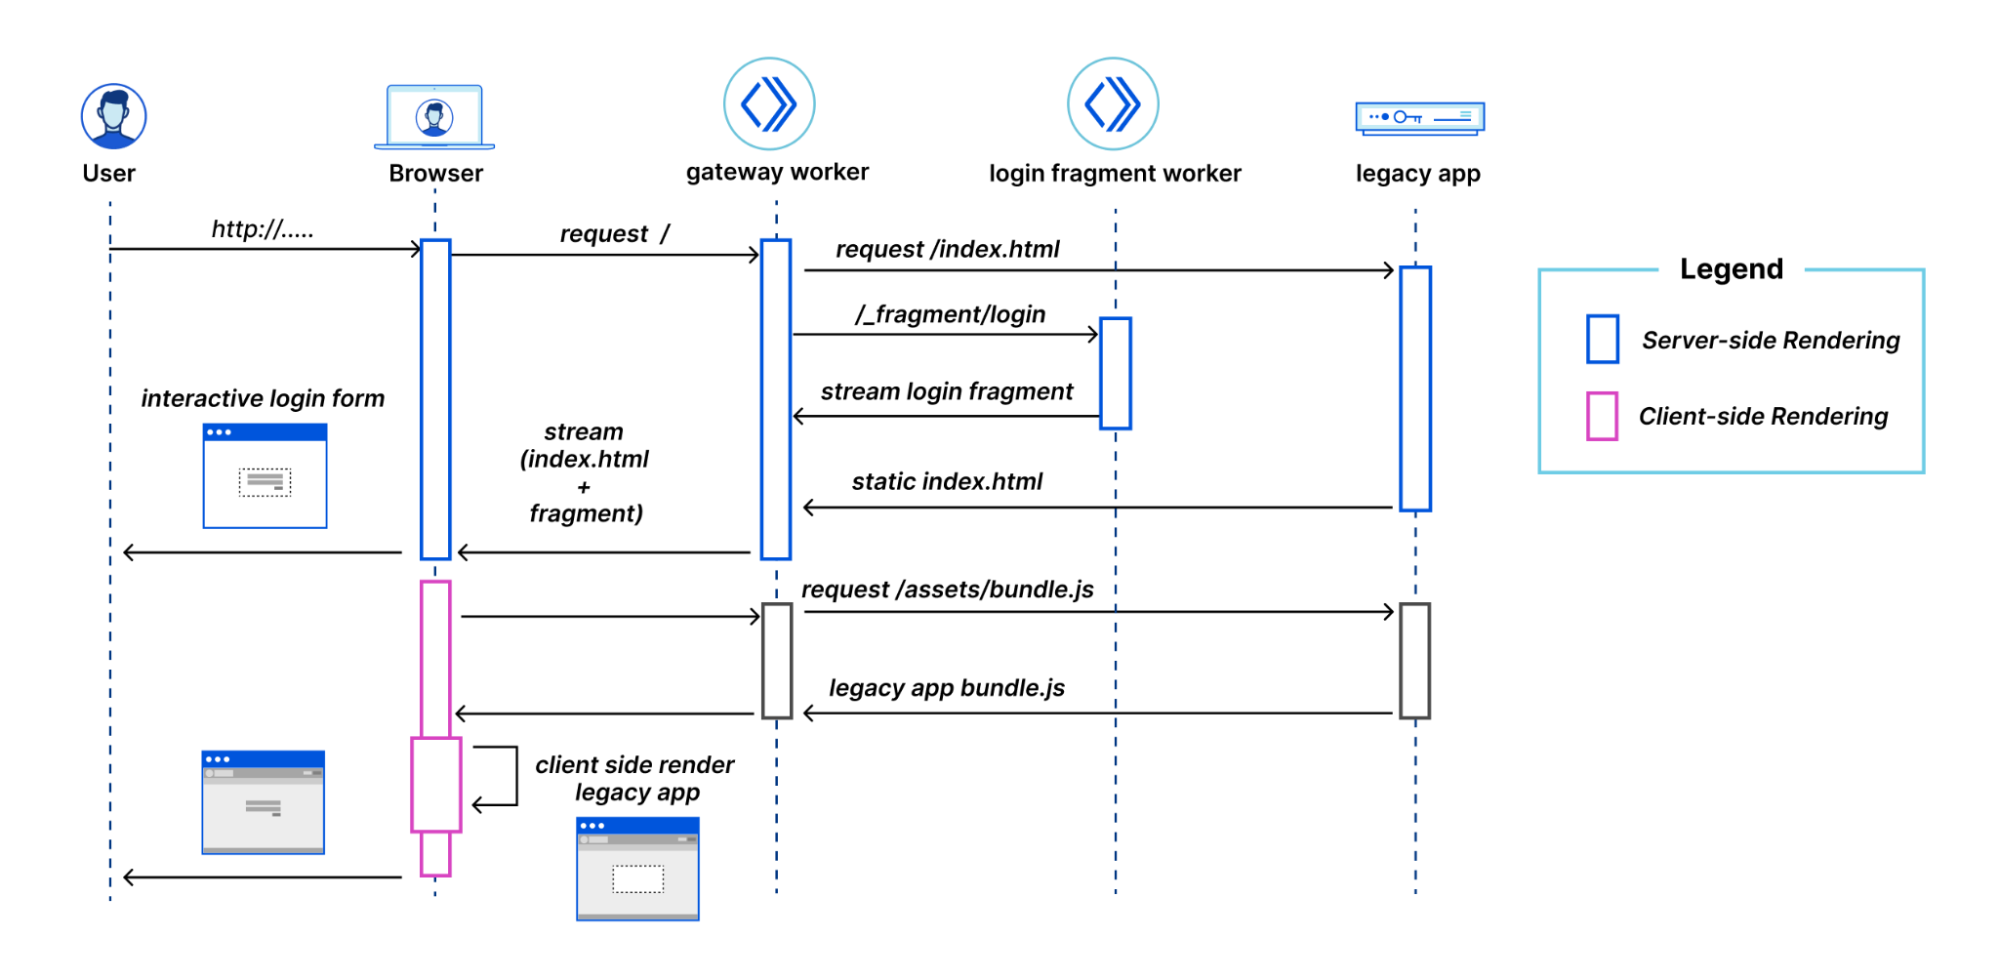
The user navigates to the application and the browser makes a request to the Gateway Worker to get the initial HTML. The Gateway Worker identifies that the browser is requesting the login page. It then makes two parallel sub-requests – one to fetch the index.html of the legacy application, and another to request the server-side rendered login fragment. It then combines these two responses into a single response stream containing the HTML that is delivered to the browser.

The browser displays the HTML response containing the empty root element for the legacy application, and the server-side rendered login fragment, which is immediately interactive for the user.

The browser then requests the legacy application’s JavaScript. This request is proxied by the Gateway Worker to the Legacy application host. Similarly, any other assets for the legacy application or fragments get routed through the Gateway Worker to the legacy application host or appropriate Fragment Worker.

Once the legacy application’s JavaScript has been downloaded and executed, rendering the shell of the application in the process, the fragment piercing kicks in, moving the fragment into the appropriate place in the legacy application, while preserving all of its UI state.

While focussed on the login fragment to explain fragment piercing, the same ideas apply to the other fragments implemented in the /todos and /news routes.

The piercing library

Despite being implemented using different Web frameworks, all the fragments are integrated into the legacy application in the same way using helpers from a “Piercing Library”. This library is a collection of server-side and client-side utilities that we developed, for the demo, to handle integrating the legacy application with micro-frontend fragments. The main features of the library are the PiercingGateway class, fragment host and fragment outlet custom elements, and the MessageBus class.

PiercingGateway

The PiercingGateway class can be used to instantiate a Gateway Worker that handles all requests for our application’s HTML, JavaScript and other assets. The `PiercingGateway` routes requests through to the appropriate Fragment Workers or to the host of the Legacy Application. It also combines the HTML response streams from these fragments with the response from the legacy application into a single HTML stream that is returned to the browser.

Implementing a Gateway Worker is straightforward using the Piercing Library. Create a new gateway instance of PiercingGateway, passing it the URL to the legacy application host and a function to determine whether piercing is enabled for the given request. Export the gateway as the default export from the Worker script so that the Workers runtime can wire up its fetch() handler.

const gateway = new PiercingGateway<Env>({
  // Configure the origin URL for the legacy application.
  getLegacyAppBaseUrl: (env) => env.APP_BASE_URL,
  shouldPiercingBeEnabled: (request) => ...,
});
...

export default gateway;

Fragments can be registered by calling the registerFragment() method so that the gateway can automatically route requests for a fragment’s HTML and assets to its Fragment Worker. For example, registering the login fragment would look like:

gateway.registerFragment({
  fragmentId: "login",
  prePiercingStyles: "...",
  shouldBeIncluded: async (request) => !(await isUserAuthenticated(request)),
});

Fragment host and outlet

Routing requests and combining HTML responses in the Gateway Worker is only half of what makes piercing possible. The other half needs to happen in the browser where the fragments need to be pierced into the legacy application using the technique we described earlier.

The fragment piercing in the browser is facilitated by a pair of custom elements, the fragment host (<piercing-fragment-host>) and the fragment outlet (<piercing-fragment-outlet>).

The Gateway Worker wraps the HTML for each fragment in a fragment host. In the browser, the fragment host manages the life-time of the fragment and is used when moving the fragment’s DOM into position in the legacy application.

<piercing-fragment-host fragment-id="login">
  <login q:container...>...</login>
</piercing-fragment-host>

In the legacy application, the developer marks where a fragment should appear when it is pierced by adding a fragment outlet. Our demo application’s Login route looks as follows:

export function Login() {
  …
  return (
    <div className="login-page" ref={ref}>
      <piercing-fragment-outlet fragment-id="login" />
    </div>
  );
}

When a fragment outlet is added to the DOM, it searches the current document for its associated fragment host. If found, the fragment host and its contents are moved inside the outlet. If the fragment host is not found, the outlet will make a request to the gateway worker to fetch the fragment HTML, which is then streamed directly into the fragment outlet, using the writable-dom library (a small but powerful library developed by the MarkoJS team).

This fallback mechanism enables client-side navigation to routes that contain new fragments. This way fragments can be rendered in the browser via both initial (hard) navigation and client-side (soft) navigation.

Message bus

Unless the fragments in our application are completely presentational or self-contained, they also need to communicate with the legacy application and other fragments. The MessageBus is a simple asynchronous, isomorphic, and framework-agnostic communication bus that the legacy application and each of the fragments can access.

In our demo application the login fragment needs to inform the legacy application when the user has authenticated. This message dispatch is implemented in the Qwik LoginForm component as follows:

const dispatchLoginEvent = $(() => {
  getBus(ref.value).dispatch("login", {
    username: state.username,
    password: state.password,
  });
  state.loading = true;
});

The legacy application can then listen for these messages like this:

useEffect(() => {
  return getBus().listen<LoginMessage>("login", async (user) => {
    setUser(user);
    await addUserDataIfMissing(user.username);
    await saveCurrentUser(user.username);
    getBus().dispatch("authentication", user);
    navigate("/", { replace: true, });
  });
}, []);

We settled on this message bus implementation because we needed a solution that was framework-agnostic, and worked well on both the server as well as client.

Give it a go!

With fragments, fragment piercing, and Cloudflare Workers, you can improve performance as well as the development cycle of legacy client-side rendered applications. These changes can be adopted incrementally, and you can even do so while implementing fragments with a Web framework for your choice.

The “Productivity Suite” application demonstrating these capabilities can be found at https://productivity-suite.web-experiments.workers.dev/.

All the code we have shown is open-source and published to Github: https://github.com/cloudflare/workers-web-experiments/tree/main/productivity-suite.

Feel free to clone the repository. It is easy to run locally and even deploy your own version (for free) to Cloudflare. We tried to make the code as reusable as possible. Most of the core logic is in the piercing library that you could try in your own projects. We’d be thrilled to receive feedback, suggestions, or hear about applications you’d like to use it for. Join our GitHub discussion or also reach us on our discord channel.

We believe that combining Cloudflare Workers with the latest ideas from frameworks will drive the next big steps forward in improved experiences for both users and developers in Web applications. Expect to see more demos, blog posts and collaborations as we continue to push the boundaries of what the Web can offer. And if you’d also like to be directly part of this journey, we are also happy to share that we are hiring!

Keep track of Workers’ code and configuration changes with Deployments

Post Syndicated from Kabir Sikand original https://blog.cloudflare.com/deployments-for-workers/

Keep track of Workers’ code and configuration changes with Deployments

Keep track of Workers’ code and configuration changes with Deployments

Today we’re happy to introduce Deployments for Workers. Deployments allow developers to keep track of changes to their Worker; not just the code, but the configuration and bindings as well. With deployments, developers now have access to a powerful audit log of changes to their production applications.

And tracking changes is just the beginning! Deployments provide a strong foundation to add: automated deployments, rollbacks, and integration with version control.

Today we’ll dive into the details of deployments, how you can use them, and what we’re thinking about next.

Deployments

Deployments are a powerful new way to track changes to your Workers. With them, you can track who’s making changes to your Workers, where those changes are coming from, and when those changes are being made.

Keep track of Workers’ code and configuration changes with Deployments

Cloudflare reports on deployments made from wrangler, API, dashboard, or Terraform anytime you make changes to your Worker’s code, edit resource bindings and environment variables, or modify configuration like name or usage model.

Keep track of Workers’ code and configuration changes with Deployments

We expose the source of your deployments, so you can track where changes are coming from. For example, if you have a CI job that’s responsible for changes, and you see a user made a change through the Cloudflare dashboard, it’s easy to flag that and dig into whether the deployment was a mistake.

Interacting with deployments

Cloudflare tracks the authors, sources, and timestamps of deployments. If you have a set of users responsible for deployment, or an API Token that’s associated with your CI tool, it’s easy to see which made recent deployments. Each deployment also includes a timestamp, so you can track when those changes were made.

Keep track of Workers’ code and configuration changes with Deployments

You can access all this deployment information in your Cloudflare dashboard, under your Worker’s Deployments tab. We also report on the active version right at the front of your Worker’s detail page. Wrangler will also report on deployment information. wrangler publish now reports the latest deployed version, and a new `wrangler deployments` command can be used to view a deployment history.

Keep track of Workers’ code and configuration changes with Deployments

To learn more about the details of deployments, head over to our Developer Documentation.

What’s next?

We’re excited to share deployments with our customers, available today in an open beta. As we mentioned up front, we’re just getting started with deployments. We’re also excited for more on-platform tooling like rollbacks, deploy status, deployment rules, and a view-only mode to historical deployments. Beyond that, we want to ensure deployments can be automated from commits to your repository, which means working on version control integrations to services like GitHub, Bitbucket, and Gitlab. We’d love to hear more about how you’re currently using Workers and how we can improve developer experience. If you’re interested, let’s chat.

If you’d like to join the conversation, head over to Cloudflare’s Developer Discord and give us a shout! We love hearing from our customers, and we’re excited to see what you build with Cloudflare.

How we built it: the technology behind Cloudflare Radar 2.0

Post Syndicated from Celso Martinho original https://blog.cloudflare.com/technology-behind-radar2/

How we built it: the technology behind Cloudflare Radar 2.0

How we built it: the technology behind Cloudflare Radar 2.0

Radar 2.0 was built on the learnings of Radar 1.0 and was launched last month during Cloudflare’s Birthday Week as a complete product revamp. We wanted to make it easier for our users to find insights and navigate our data, and overall provide a better and faster user experience.

How we built it: the technology behind Cloudflare Radar 2.0

We’re building a Supercloud. Cloudflare’s products now include hundreds of features in networking, security, access controls, computing, storage, and more.

This blog will explain how we built the new Radar from an engineering perspective. We wanted to do this to demonstrate that anyone could build a somewhat complex website that involves demanding requirements and multiple architectural layers, do it on top of our stack, and how easy it can be.

Hopefully, this will inspire other developers to switch from traditional software architectures and build their applications using modern, more efficient technologies.

High level architecture

The following diagram is a birds-eye view of the Radar 2.0 architecture. As you can see, it’s divided into three main layers:

  • The Core layer is where we keep our data lake, data exploration tools, and backend API.
  • The Cloudflare network layer is where we host and run Radar and serve the public APIs.
  • The Client layer is essentially everything else that runs in your browser. We call it the Radar Web app.
How we built it: the technology behind Cloudflare Radar 2.0

As you can see, there are Cloudflare products everywhere. They provide the foundational resources to host and securely run our code at scale, but also other building blocks necessary to run the application end to end.

By having these features readily available and tightly integrated into our ecosystem and tools, at the distance of a click and a few lines of code, engineering teams don’t have to reinvent the wheel constantly and can use their time on what is essential: their app logic.

Let’s dig in.

Cloudflare Pages

Radar 2.0 is deployed using Cloudflare Pages, our developer-focused website hosting platform. In the early days, you could only host static assets on Pages, which was helpful for many use cases, including integrating with static site generators like Hugo, Jekyll, or Gatsby. Still, it wouldn’t solve situations where your application needs some sort of server-side computing or advanced logic using a single deployment.

Luckily Pages recently added support to run custom Workers scripts. With Functions, you can now run server-side code and enable any kind of dynamic functionality you’d typically implement using a separate Worker.

Cloudflare Pages Functions also allow you to use Durable Objects, KV, R2, or D1, just like a regular Worker would. We provide excellent documentation on how to do this and more in our Developer Documentation. Furthermore, the team wrote a blog on how to build a full-stack application that describes all the steps in detail.

Radar 2.0 needs server-side functions for two reasons:

  • To render Radar and run the server side of Remix.
  • To implement and serve our frontend API.

Remix and Server-side Rendering

We use Remix with Cloudflare Pages on Radar 2.0.

Remix follows a server/client model and works under the premise that you can’t control the user’s network, so web apps must reduce the amount of Javascript, CSS, and JSON they send through the wire. To do this, they move some of the logic to the server.

In this case, the client browser will get pre-rendered DOM components and the result of pre-fetched API calls with just the right amount of JSON, Javascript, and CSS code, rightfully adjusted to the UI needs. Here’s the technical explanation with more detail.

Typically, Remix would need a Node.js server to do all of this, but guess what: It can also run on Cloudflare Workers and Pages.

Here’s the code to get the Remix server running on Workers, using Cloudflare Pages:

import { createPagesFunctionHandler } from "@remix-run/cloudflare-pages";
import * as build from "@remix-run/dev/server-build";

const handleRequest = createPagesFunctionHandler({
  build: {
    ...build,
    publicPath: "/build/",
    assetsBuildDirectory: "public/build",
  },
  mode: process.env.NODE_ENV,
  getLoadContext: (context) => ({
    ...context.env,
    CF: (context.request as any).cf as IncomingRequestCfProperties | undefined,
  }),
});

const handler: ExportedHandler<Env> = {
  fetch: async (req, env, ctx) => {
    const r = new Request(req);
    return handleRequest({
      env,
      params: {},
      request: r,
      waitUntil: ctx.waitUntil,
      next: () => {
        throw new Error("next() called in Worker");
      },
      functionPath: "",
      data: undefined,
    });
  },
};

In Remix, routes handle changes when a user interacts with the app and changes it (clicking on a menu option, for example). A Remix route can have a loader, an action and a default export. The loader handles API calls for fetching data (GET method). The action handles submissions to the server (POST, PUT, PATCH, DELETE methods) and returns the response. The default export handles the UI code in React that’s returned for that route. A route without a default export returns only data.

Because Remix runs both on the server and the client, it can get smart and know what can be pre-fetched and computed server-side and what must go through the network connection, optimizing everything for performance and responsiveness.

Here’s an example of a Radar route, simplified for readability, for the Outage Center page.

import type { MetaFunction } from "@remix-run/cloudflare";
import { useLoaderData } from "@remix-run/react";
import { type LoaderArgs } from "@remix-run/server-runtime";

export async function loader(args: LoaderArgs) {
  const ssr = await initialFetch(SSR_CHARTS, args);
  return { ssr, };
}

export default function Outages() {
  const { ssr } = useLoaderData<typeof loader>();

  return (
    <Page
      filters={["timerange"]}
      title={
        <>
          <Svg use="icon-outages" />
          {t("nav.main.outage-center")}
        </>
      }
    >
      <Grid columns={[1, 1, 1, 1]}>
        <Card.Article colspan={[1, 1, 1, 1]} rowspan={[1, 1, 1, 1]}>
          <Card.Section>
            <Components.InternetOutagesChoropleth ssr={ssr} />
          </Card.Section>
          <Divider />
          <Card.Section>
            <Components.InternetOutagesTable ssr={ssr} />
          </Card.Section>
        </Card.Article>
      </Grid>
    </Page>
  );
}

And here’s what it produces:

How we built it: the technology behind Cloudflare Radar 2.0

Remix and SSR can also help you with your Lighthouse scores and SEO. It can drastically improve metrics like Cumulative Layout Shift, First Contentful Paint and Largest Contentful Paint by reducing the number of fetches and information traveling from the server to the browser and pre-rendering the DOM.

Another project porting their app to Remix is Cloudflare TV. This is how their metrics looked before and after the changes.

How we built it: the technology behind Cloudflare Radar 2.0

Radar’s Desktop Lighthouse score is now nearly 100% on Performance, Accessibility, Best Practices, and SEO.

How we built it: the technology behind Cloudflare Radar 2.0

Another Cloudflare product that we use extensively on Radar 2.0 is Speed. In particular, we want to mention the Early Hints feature. Early Hints is a new web standard that defines a new HTTP 103 header the server can use to inform the browser which assets will likely be needed to render the web page while it’s still being requested, resulting in dramatic load times improvements.

How we built it: the technology behind Cloudflare Radar 2.0

You can use Cloudflare Pages with Early Hints.

APIs

Radar has two APIs. The backend which has direct access to our data sources, and the frontend, which is available on the Internet.

Backend API

The backend API was written using Python, Pandas and FastAPI and is protected by Cloudflare Access, JWT tokens and an authenticated origin pull (AOP) configuration. Using Python allows anyone on the team, engineers or data scientists, to collaborate easily and contribute to improving and expanding the API, which is great. Our data science team uses JupyterHub and Jupyter Notebooks as part of their data exploration workflows, which makes prototyping and reusing code, algorithms and models particularly easy and fast.

It then talks to the upstream frontend API via a Strawberry based GraphQL server. Using GraphQL makes it easy to create complex queries, giving internal users and analysts the flexibility they need when building reports from our vast collection of data.

Frontend API

We built Radar’s frontend API on top of Cloudflare Workers. This worker has two main functions:

  • It fetches data from the backend API using GraphQL, and then transforms it.
  • It provides a public REST API that anyone can use, including Radar.

Using a worker in front of our core API allows us to easily add and separate microservices, and also adds notable features like:

  • Cloudflare’s Cache API allows finer control over what to cache and for how long and supports POST requests and customizable cache control headers, which we use.
  • Stale responses using R2. When the backend API cannot serve a request for some reason, and there’s a stale response cached, it’ll be served directly from R2, giving end users a better experience.
  • CSV and JSON output formats. The CSV format is convenient and makes it easier for data scientists, analysts, and others to use the API and consume our API data directly from other tools.

Open sourcing our OpenAPI 3 schema generator and validator

One last feature on the frontend API is OpenAPI 3 support. We automatically generate an OpenAPI schema and validate user input with it. This is done through a custom library that we built on top of itty-router, which we also use. Today we’re open sourcing this work.

itty-router-openapi provides an easy and compact OpenAPI 3 schema generator and validator for Cloudflare Workers. Check our GitHub repository for more information and details on how to use it.

Developer’s Documentation

Today we’re also launching our developer’s documentation pages for the Radar API where you can find more information about our data license, basic concepts, how to get started and the available API methods. Cloudflare Radar’s API is free, allowing academics, data sleuths and other web enthusiasts to investigate Internet usage across the globe, based on data from our global network.

How we built it: the technology behind Cloudflare Radar 2.0

To facilitate using our API, we also put together a Colab Notebook template that you can play with, copy and expand to your use case.

How we built it: the technology behind Cloudflare Radar 2.0

The Radar App

The Radar App is the code that runs in your browser. We’ve talked about Remix, but what else do we use?

Radar relies on a lot of data visualizations. Things like charts and maps are essential to us. We decided to build our reusable library of visualization components on top of two other frameworks: visx, a “collection of expressive, low-level visualization primitives for React,” D3, a powerful JavaScript library for manipulating the DOM based on data, and MapLibre, an open-source map visualization stack.

Here’s one of our visualization components in action. We call it the “PewPew map”.

How we built it: the technology behind Cloudflare Radar 2.0

And here’s the Remix React code for it, whenever we need to use it in a page:

<Card.Section
    title={t("card.attacks.title")}
    description={t("card.attacks.description")}
  >
    <Flex gap={spacing.medium} align="center" justify="flex-end">
      <SegmentedControl
        label="Sort order:"
        name="attacksDirection"
        value={attacksDirection}
        options={[
          { label: t("common.source"), value: "ORIGIN" },
          { label: t("common.target"), value: "TARGET" },
        ]}
      onChange={({ target }: any) => setAttacksDirection(target.value)}
      />
    </Flex>

    <Components.AttacksCombinedChart
      ssr={ssr}
      height={400}
      direction={attacksDirection}
    />
  </Card.Section>

SVGs

Another change we made to Radar was switching our images and graphical assets to Scalable Vector Graphics. SVGs are great because they’re essentially a declarative graphics language. They’re XML text files with vectorial information. And so, they can be easily manipulated, transformed, stored, or indexed, and of course, they can be rendered at any size, producing beautiful, crisp results on any device and resolution.

SVGs are also extremely small and efficient in size compared to bitmap formats and support internationalization, making them easier to translate to other languages (localization), thus providing better accessibility.

Here’s an example of a Radar Bubble Chart, inspected, where you can see the SVG code and the <text/> strings embedded.

How we built it: the technology behind Cloudflare Radar 2.0

Cosmos

React Cosmos is a “sandbox for developing and testing UI components in isolation.” We wanted to use Cosmos with Radar 2.0 because it’s the perfect project for it:

  1. It has a lot of visual components; some are complex and have many configuration options and features.
  2. The components are highly reusable across multiple pages in different contexts with different data.
  3. We have a multidisciplinary team; everyone can send a pull request and add or change code in the frontend.

Cosmos acts as a component library where you can see our palette of ready-to-use visualizations and widgets, from simple buttons to complex charts, and you play with their options in real-time and see what happens. Anyone can do it, not only designers or engineers but also other project stakeholders. This effectively improves team communications and makes contributing and iterating quickly.

Here’s a screenshot of our Cosmos in action:

How we built it: the technology behind Cloudflare Radar 2.0

Continuous integration and development

Continuous integration is important for any team doing modern software. Cloudflare Pages provides multiple options to work with CI tools using direct uploads, out of the box. The team has put up documentation and examples on how to do that with GitHub Actions, CircleCI, and Travis, but you can use others.

In our case, we use BitBucket and TeamCity internally to build and deploy our releases. Our workflow automatically builds, tests, and deploys Radar 2.0 within minutes on an approved PR and follow-up merge.

Unit tests are done with Vitest and E2E tests with Playwright. Visual Regression testing is planned and Playwright can also help with that.

Furthermore, we have multiple environments to stage and test our releases before they go live to production. Our CI/CD setup makes it easy to switch from one environment to the other or quickly roll back any undesired deployment.

Again Cloudflare Pages makes it easy to do this using Preview deployments, aliases, or Branch build controls. The same is true for regular Workers using Environments.

How we built it: the technology behind Cloudflare Radar 2.0

Fast previews and notifications

Radar 1.0 wasn’t particularly fast doing CI/CD, we confess. We had a few episodes when a quick fix could take some good 30 minutes from committing the code to deployment, and we felt frustrated about it.

So we invested a lot in ensuring that the new CI would be fast, efficient, and furious.

One cool thing we ended up doing was fast preview links on any commit pushed to the code repository. Using a combination of intelligent caching during builds and doing asynchronous tests when the commit is outside the normal release branches, we were able to shorten the deployment time to seconds.

This is the notification we get in our chat when anyone pushes code to any branch:

How we built it: the technology behind Cloudflare Radar 2.0

Anyone can follow a thread for a specific branch in the chat and get notified on new changes when they happen.

Blazing-fast builds, preview links and notifications are game-changers. An engineer can go from an idea or a quick fix to showing the result on a link to a product manager or another team member. Anyone can quickly click the link to see the changes on a fully working end-to-end version of Radar.

Accessibility and localization

Cloudflare is committed to web accessibility. Recently we announced how we upgraded Cloudflare’s Dashboard to adhere to industry accessibility standards, but this premise is valid for all our properties. The same is true for localization. In 2020, we internationalized our Dashboard and added support for new languages and locales.

Accessibility and localization go hand in hand and are both important, but they are also different. The Web Content Accessibility Guidelines define many best practices around accessibility, including using color and contrast, tags, SVGs, shortcuts, gestures, and many others. The A11Y project page is an excellent resource for learning more.

Localization, though, also known as L10n, is more of a technical requirement when you start a new project. It’s about making sure you choose the right set of libraries and frameworks that will make it easier to add new translations without engineering dependencies or code rewrites.

We wanted Radar to perform well on both fronts. Our design system takes Cloudflare’s design and brand guidelines seriously and adds as many A11Y good practices as possible, and the app is fully aware of localization strings across its pages and UI components.

Adding a new language is as easy as translating a single JSON file. Here’s a snippet of the en-US.json file with the default American English strings:

{
  "abbr.asn": "Autonomous System Number",
  "actions.chart.download.csv": "Download chart data in CSV",
  "actions.chart.download.png": "Download chart in PNG Format",
  "actions.chart.download.svg": "Download chart in SVG Format",
  "actions.chart.download": "Download chart",
  "actions.chart.maximize": "Maximize chart",
  "actions.chart.minimize": "Minimize chart",
  "actions.chart.share": "Share chart",
  "actions.download.csv": "Download CSV",
  "actions.download.png": "Download PNG",
  "actions.download.svg": "Download SVG",
  "actions.share": "Share",
  "alert.beta.link": "Radar Classic",
  "alert.beta.message": "Radar 2.0 is currently in Beta. You can still use {link} during the transition period.",
  "card.about.cloudflare.p1": "Cloudflare, Inc. ({website} / {twitter}) is on a mission to help build a better Internet. Cloudflare's suite of products protects and accelerates any Internet application online without adding hardware, installing software, or changing a line of code. Internet properties powered by Cloudflare have all web traffic routed through its intelligent global network, which gets smarter with every request. As a result, they see significant improvement in performance and a decrease in spam and other attacks. Cloudflare was named to Entrepreneur Magazine's Top Company Cultures 2018 list and ranked among the World's Most Innovative Companies by Fast Company in 2019.",
  "card.about.cloudflare.p2": "Headquartered in San Francisco, CA, Cloudflare has offices in Austin, TX, Champaign, IL, New York, NY, San Jose, CA, Seattle, WA, Washington, D.C., Toronto, Dubai, Lisbon, London, Munich, Paris, Beijing, Singapore, Sydney, and Tokyo.",
  "card.about.cloudflare.title": "About Cloudflare",
...

You can expect us to release Radar in other languages soon.

Radar Reports and Jupyter notebooks

Radar Reports are documents that use data exploration and storytelling to analyze a particular theme in-depth. Some reports tend to get updates from time to time. Examples of Radar Reports are our quarterly DDoS Attack Trends, or the IPv6 adoption.

How we built it: the technology behind Cloudflare Radar 2.0

The source of these Reports is Jupyter Notebooks. Our Data Science team works on some use-case or themes with other stakeholders using our internal Jupyter Hub tool. After all the iteration and exploration are done, and the work is signed off, a notebook is produced.

A Jupyter Notebook is a JSON document containing text, source code, rich media such as images or charts, and other metadata. It is the de facto standard for presenting data science projects, and every data scientist uses it.

With Radar 1.0, converting a Jupyter Notebook to a Radar page was a lengthy and manual process implicating many engineering and design resources and causing much frustration to everyone involved. Even updating an already-published notebook would frequently cause trouble for us.

Radar 2.0 changed all of this. We now have a fully automated process that takes a Jupyter Notebook and, as long as it’s designed using a list of simple rules and internal guidelines, converts it automatically, hosts the resulting HTML and assets in an R2 bucket, and publishes it on the Reports page.

How we built it: the technology behind Cloudflare Radar 2.0

The conversion to HTML takes into account our design system and UI components, and the result is a beautiful document, usually long-form, perfectly matching Radar’s look and feel.

How we built it: the technology behind Cloudflare Radar 2.0

We will eventually open-source this tool so that anyone can use it.

More Cloudflare, less to worry about

We gave examples of using Cloudflare’s products and features to build your next-gen app without worrying too much about things that aren’t core to your business or logic. A few are missing, though.

Once the app is up and running, you must protect it from bad traffic and malicious actors. Cloudflare offers you DDoS, WAF, and Bot Management protection out of the box at a click’s distance.

For example, here are some of our security rules. This is traffic we don’t have to worry about in our app because Cloudflare detects it and acts on it according to our rules.

How we built it: the technology behind Cloudflare Radar 2.0

Another thing we don’t need to worry about is redirects from the old site to the new one. Cloudflare has a feature called Bulk Redirects, where you can easily create redirect lists directly on the dashboard.

How we built it: the technology behind Cloudflare Radar 2.0

It’s also important to mention that every time we talk about what you can do using our Dashboard, we’re, in fact, also saying you can do precisely the same using Cloudflare’s APIs. Our Dashboard is built entirely on top of them. And if you’re the infrastructure as code kind of person, we have you covered, too; you can use the Cloudflare Terraform provider.

Deploying and managing Workers, R2 buckets, or Pages sites is obviously scriptable too. Wrangler is the command-line tool to do this and more, and it goes the extra mile to allow you to run your full app locally, emulating our stack, on your computer, before deploying.

Final words

We hope you enjoyed this Radar team write-up and were inspired to build your next app on top of our Supercloud. We will continue improving and innovating on Radar 2.0 with new features, share our findings and open-sourcing our tools with you.

In the meantime, we opened a Radar room on our Developers Discord Server. Feel free to join it and ask us questions; the team is eager to receive feedback and discuss web technology with you.

You can also follow us on Twitter for more Radar updates.

Announcing the first Workers Launchpad cohort and growth of the program to $2 billion

Post Syndicated from Mia Wang original https://blog.cloudflare.com/launchpad-fall-22/

Announcing the first Workers Launchpad cohort and growth of the program to $2 billion

This post is also available in 简体中文, 日本語, 한국어, Deutsch, Français, Español.

Announcing the first Workers Launchpad cohort and growth of the program to $2 billion

During Birthday Week 2022, we announced a $1.25 billion funding program for startups building on our developer platform, Cloudflare Workers. This was done in partnership with 26 leading VC firms who have been investing in or seeking to invest in Workers-based startups.

Today, we’re excited to reveal the first cohort of Launchpad Startups as well as 14 additional VC partners, bringing the Launchpad to $2 billion in potential funding from 40 VC firms in total.

Who are our new VC partners?

We are excited to welcome 14 additional firms to the Workers Launchpad, which you can find included in the image below. They have worked with hundreds of companies that have grown to become leaders in their areas including Asana, Canva, Figma, Netlify, Vercel, Area 1 Security (which Cloudflare acquired in 2022), and many others. Notably, they also represent a diverse group of investors who support startups across North and South America, Europe, and Asia.

Announcing the first Workers Launchpad cohort and growth of the program to $2 billion

Many of these investors have seen the competitive advantages of building on Workers through their own portfolio companies firsthand and are looking forward to providing the capital and resources you need to build and scale your business.

Announcing the Fall 2022 cohort of Launchpad Startups!

We received hundreds of applications for the Fall cohort from startups representing more than 30 countries. We were blown away by the breadth of businesses that folks were building – some are creating tools to simplify developer workflows, while others are helping ecommerce businesses better reach and serve customers around the world. The common thread amongst all the Launchpad companies, however, is their usage of Cloudflare’s developer platform to build more secure, reliable, and feature-rich products faster than they otherwise could.

Introducing the Fall 2022 cohort

Announcing the first Workers Launchpad cohort and growth of the program to $2 billion

Our inaugural cohort of Launchpad startups features 25 diverse businesses. Here’s what they’re building, in their own words:

AIDEM Privacy first, sustainable, transparent digital advertising.
Apyfy The data privacy & security firewall.
Authdog Identity & access management streamlined.
Axiom Logging solved, at any scale.
BlocPal Unlocking accessible & affordable financial services for all.
COPILOT TRAVEL Next-generation infrastructure for global travel data.
Data Narratives Data superpowers for growth teams.
Drivly APIs to buy and sell cars online.
Endear Retail CRM for consumer brands.
flethy Design. Configure. Automate.
GPUX Serverless GPU inference.
Grafbase The easiest way to build and deploy GraphQL backends.
JEMPass Authentication made simple, seamless, secure.
Karambit.AI Stop software supply chain attacks.
KubeLT Simple and secure user identity for supercharging your user experience.
Narrative BI No-code analytics platform for growth teams.
Ninetailed Composable personalization and experimentation solution for digital builders.
Nostra.ai Predictive commerce edge delivery engine to boost conversion rates.
Patr Deploy and scale your applications in 60 seconds.
Quest.ai Generate front-end code from designs automatically.
qxip Polyglot monitoring and edge observability.
repeat.dev Create. Deploy. Repeat. The one-stop-shop for your webhooks & scheduled tasks.
Service Loom Start a service business in 3 minutes.
Targum Translating videos at the speed of social media using AI.
Touchless The fastest sites, with no code.

Is it too late to join the Launchpad?

Nope! We will select Launchpad Startups on a quarterly basis, so if you are building on Workers, interested in pitching VCs, and want to join our next cohort of Workers Founder, apply here! If you’re new to Workers and looking to begin building, check out our Startup Plan for a year of free Cloudflare services, Built with Workers, and join our Cloudflare Developer Discord community.

Cloudflare is not providing any funding or making any funding decisions, and there is no guarantee that any particular company will receive funding through the program. All funding decisions will be made by the venture capital firms that participate in the program. Cloudflare is not a registered broker-dealer, investment adviser, or other similar intermediary.

Spice up your sites on Cloudflare Pages with Pages Functions General Availability

Post Syndicated from Nevi Shah original https://blog.cloudflare.com/pages-function-goes-ga/

Spice up your sites on Cloudflare Pages with Pages Functions General Availability

Spice up your sites on Cloudflare Pages with Pages Functions General Availability

Before we launched Pages back in April 2021, we knew it would be the start of something magical – an experience that felt “just right”. We envisioned an experience so simple yet so smooth that any developer could ship a website in seconds and add more to it by using the rest of our Cloudflare ecosystem.

A few months later, when we announced that Pages was a full stack platform in November 2021, that vision became a reality. Creating a development platform for just static sites was not the end of our Pages story, and with Cloudflare Workers already a part of our ecosystem, we knew we were sitting on untapped potential. With the introduction of Pages Functions, we empowered developers to take any static site and easily add in dynamic content with the power of Cloudflare Workers.

In the last year since Functions has been in open beta, we dove into an exploration on what kinds of full stack capabilities developers are looking for on their projects – and set out to fine tune the Functions experience into what it is today.

We’re thrilled to announce that Pages Functions is now generally available!

Functions recap

Though called “Functions” in the context of Pages, these functions running on our Cloudflare network are Cloudflare Workers in “disguise”. Pages harnesses the power and scalability of Workers and specializes them to align with the Pages experience our users know and love.

With Functions you can dream up the possibilities of dynamic functionality to add to your site – integrate with storage solutions, connect to third party services, use server side rendering with your favorite full stack frameworks and more. As Pages Functions opens its doors to production traffic, let’s explore some of the exciting features we’ve improved and added on this release.

The experience

Deploy with Git

Love to code? We’ll handle the infrastructure, and leave you to it.

Simply write a JavaScript/Typescript Function and drop it into a functions directory by committing your code to your Git provider. Our lightning fast CI system will build your code and deploy it alongside your static assets.

Directly upload your Functions

Prefer to handle the build yourself? Have a special git provider not yet supported on Pages? No problem! After dropping your Function in your functions folder, you can build with your preferred CI tooling and then upload your project to Pages to be deployed.

Debug your Functions

While in beta, we learned that you and your teams value visibility above all. As on Cloudflare Workers, we’ve built a simple way for you to watch your functions as it processes requests – the faster you can understand an issue the faster you can react.

You can now easily view logs for your Functions by “tailing” your logs. For basic information like outcome and request IP, you can navigate to the Pages dashboard to obtain relevant logs.

For more specific filters, you can use

wrangler pages deployment tail

to receive a live feed of console and exception logs for each request your Function receives.

Spice up your sites on Cloudflare Pages with Pages Functions General Availability

Get real time Functions metrics

In the dashboard, Pages aggregates data for your Functions in the form of request successes/error metrics and invocation status. You can refer to your metrics dashboard not only to better understand your usage on a per-project basis but also to get a pulse check on the health of your Functions by catching success/error volumes.

Spice up your sites on Cloudflare Pages with Pages Functions General Availability

Quickly integrate with the Cloudflare ecosystem

Storage bindings

Want to go truly full stack? We know finding a storage solution that fits your needs and fits your ecosystem is not an easy task – but it doesn’t have to be!

With Functions, you can take advantage of our broad range of storage products including Workers KV, Durable Objects, R2, D1 and – very soon – Queues and Workers Analytics Engine! Simply create your namespace, bucket or database and add your binding in the Pages dashboard to get your full stack site up and running in just a few clicks.

From dropping in a quick comment system to rolling your own authentication to creating database-backed eCommerce sites, integrating with existing products in our developer platform unlocks an exponential set of use cases for your site.

Secret bindings

In addition to adding environment variables that are available to your project at both build-time and runtime, you can now also add “secrets” to your project. These are encrypted environment variables which cannot be viewed by any dashboard interfaces, and are a great home for sensitive data like API tokens or passwords.

Integrate with 3rd party services

Our goal with Pages is always to meet you where you are when it comes to the tools you love to use. During this beta period we also noticed some consistent patterns in how you were employing Functions to integrate with common third party services. Pages Plugins – our ready-made snippets of code – offers a plug and play experience for you to build the ecosystem of your choice around your application.

In essence, a Pages Plugin is a reusable – and customizable – chunk of runtime code that can be incorporated anywhere within your Pages application. It’s a “composable” Pages Function, granting Plugins the full power of Functions (i.e. Workers), including the ability to set up middleware, parameterized routes, and static assets.

With Pages Plugins you can integrate with a plethora of 3rd party applications – including officially supported Sentry, Honeycomb, Stytch, MailChannels and more.

Use your favorite full stack frameworks

In the spirit of meeting developers where they are at, this sentiment also comes in the form of Javascript frameworks. As a big supporter of not only widely adopted frameworks but up and coming frameworks, our team works with a plethora of framework authors to create opportunities for you to play with their new tech and deploy on Pages right out of the box.

Now compatible with Next.js 13 and more!

Recently, we announced our support for Next.js applications which opt in to the Edge Runtime. Today we’re excited to announce we are now compatible with Next.js 13. Next.js 13 brings some most-requested modern paradigms to the Next.js framework, including nested routing, React 18’s Server Components and streaming.

Have a different preference of framework? No problem.

Go full stack on Pages to take advantage of server side rendering (SSR) with one of many other officially supported frameworks like Remix, SvelteKit, QwikCity, SolidStart, Astro and Nuxt. You can check out our blog post on SSR support on Pages and how to get started with some of these frameworks.

Go fast in advanced mode

While Pages Functions are powered by Workers, we understand that at face-value they are not exactly the same. Nevertheless, for existing users who are perhaps using Workers and are keen on trying Cloudflare Pages, we’ve got a direct path to get you started quickly.

If you already have a single Worker and want an easy way to go full stack on Pages, you can use Pages Function’s “advanced mode”. Generate an ES module Worker called _worker.js in the output directory of your project and deploy!
This can be especially helpful if you’re a framework author or perhaps have a more complex use case that does not fit into our file-based router.

Scaling without limits

So today, as we announce Functions as generally available we are thrilled to allow your traffic to scale. During the Open Beta period, we imposed a daily limit of 100,000 free requests per day as a way to let you try out the feature. While 100,000 requests per day remains the free limit today, you can now pay to truly go unlimited.

Since Functions are just “special” Workers, with this announcement you will begin to see your Functions usage reflected on your bill under the Workers Paid subscription or via your Workers Enterprise contract. Like Workers, when on a paid plan, you have the option to choose between our two usage models – Bundled and Unbound – and will be billed accordingly.

Keeping Pages on brand as Cloudflare’s “gift to the Internet”, you will get unlimited free static asset requests and will be billed primarily on dynamic requests. You can read more about how billing with Functions works in our documentation.

Get started today

To start jamming, head over to the Pages Functions docs and check out our blog on some of the best frameworks to use to deploy your first full stack application. As you begin building out your projects be sure to let us know in the #functions channel under Pages of our Cloudflare Developers Discord. Happy building!

UPDATE Supercloud SET status = ‘open alpha’ WHERE product = ‘D1’;

Post Syndicated from Nevi Shah original https://blog.cloudflare.com/d1-open-alpha/

UPDATE Supercloud SET status = 'open alpha' WHERE product = 'D1';

UPDATE Supercloud SET status = 'open alpha' WHERE product = 'D1';

In May 2022, we announced our quest to simplify databases – building them, maintaining them, integrating them. Our goal is to empower you with the tools to run a database that is powerful, scalable, with world-beating performance without any hassle. And we first set our sights on reimagining the database development experience for every type of user – not just database experts.

Over the past couple of months, we’ve been working to create just that, while learning some very important lessons along the way. As it turns out, building a global relational database product on top of Workers pushes the boundaries of the developer platform to their absolute limit, and often beyond them, but in a way that’s absolutely thrilling to us at Cloudflare. It means that while our progress might seem slow from outside, every improvement, bug fix or stress test helps lay down a path for all of our customers to build the world’s most ambitious serverless application.

However, as we continue down the road to making D1 production ready, it wouldn’t be “the Cloudflare way” unless we stopped for feedback first – even though it’s not quite finished yet. In the spirit of Developer Week, there is no better time to introduce the D1 open alpha!

An “open alpha” is a new concept for us. You’ll likely hear the term “open beta” on various announcements at Cloudflare, and while it makes sense for many products here, it wasn’t quite right for D1. There are still some crucial pieces that are still in active development and testing, so before we release the fully-formed D1 as a public beta for you to start building real-world apps with, we want to make sure everybody can start to get a feel for the product on their hobby apps or side-projects.

What’s included in the alpha?

While a lot is still changing behind the scenes with D1, we’ve put a lot of thought into how you, as a developer, interact with it – even if you’re new to databases.

Using the D1 dashboard

In a few clicks you can get your D1 database up and running right from within your dashboard. In our D1 interface, you can create, maintain and view your database as you please. Changes made in the UI are instantly available to your Worker – no redeploy required!

UPDATE Supercloud SET status = 'open alpha' WHERE product = 'D1';

Use Wrangler

If you’re looking to get your hands a little dirty, you can also work with your database using our Wrangler CLI. Create your database and begin adding your data manually or bootstrap your database with one of two ways:

1.  Execute an SQL file

$ wrangler d1 execute my-database-name --file ./customers.sql

where your .sql file looks something like this:

customers.sql

DROP TABLE IF EXISTS Customers;
CREATE TABLE Customers (CustomerID INT, CompanyName TEXT, ContactName TEXT, PRIMARY KEY (`CustomerID`));
INSERT INTO Customers (CustomerID, CompanyName, ContactName) 
VALUES (1, 'Alfreds Futterkiste', 'Maria Anders'),(4, 'Around the Horn', 'Thomas Hardy'),(11, 'Bs Beverages', 'Victoria Ashworth'),(13, 'Bs Beverages', 'Random Name');

2. Create and run migrations

Migrations are a way to version your database changes. With D1, you can create a migration and then apply it to your database.

To create the migration, execute:

wrangler d1 migrations create <my-database-name> <short description of migration>

This will create an SQL file in a migrations folder where you can then go ahead and add your queries. Then apply the migrations to your database by executing:

wrangler d1 migrations apply <my-database-name>

Access D1 from within your Worker

You can attach your D1 to a Worker by adding the D1 binding to your wrangler.toml configuration file. Then interact with D1 by executing queries inside your Worker like so:

export default {
 async fetch(request, env) {
   const { pathname } = new URL(request.url);

   if (pathname === "/api/beverages") {
     const { results } = await env.DB.prepare(
       "SELECT * FROM Customers WHERE CompanyName = ?"
     )
       .bind("Bs Beverages")
       .all();
     return Response.json(results);
   }

   return new Response("Call /api/beverages to see Bs Beverages customers");
 },
};

Or access D1 from within your Pages Function

In this Alpha launch, D1 also supports integration with Cloudflare Pages! You can add a D1 binding inside the Pages dashboard, and write your queries inside a Pages Function to build a full-stack application! Check out the full documentation to get started with Pages and D1.

Community built tooling

During our private alpha period, the excitement behind D1 led to some valuable contributions to the D1 ecosystem and developer experience by members of the community. Here are some of our favorite projects to date:

d1-orm

An Object Relational Mapping (ORM) is a way for you to query and manipulate data by using JavaScript. Created by a Cloudflare Discord Community Champion, the d1-orm seeks to provide a strictly typed experience while using D1:

const users = new Model(
    // table name, primary keys, indexes etc
    tableDefinition,
    // column types, default values, nullable etc
    columnDefinitions
)

// TS helper for typed queries
type User = Infer<type of users>;

// ORM-style query builder
const user = await users.First({
    where: {
        id: 1,
    },
});

You can check out the full documentation, and provide feedback by making an issue on the GitHub repository.

workers-qb

This is a zero-dependency query builder that provides a simple standardized interface while keeping the benefits and speed of using raw queries over a traditional ORM. While not intended to provide ORM-like functionality, workers-qb makes it easier to interact with the database from code for direct SQL access:

const qb = new D1QB(env.DB)

const fetched = await qb.fetchOne({
  tableName: 'employees',
  fields: 'count(*) as count',
  where: {
    conditions: 'department = ?1',
    params: ['HQ'],
  },
})

You can read more about the query builder here.

d1-console

Instead of running the wrangler d1 execute command in your terminal every time you want to interact with your database, you can interact with D1 from within the d1-console. Created by a Discord Community Champion, this gives the benefit of executing multi-line queries, obtaining command history, and viewing a cleanly formatted table output.

UPDATE Supercloud SET status = 'open alpha' WHERE product = 'D1';

While this is a community project today, we plan to natively support a “D1 Console” in the future. For now, get started by checking out the d1-console package here.

D1 adapter for Kysely

Kysely is a type-safe and autocompletion-friendly typescript SQL query builder. With this adapter you can interact with D1 with the familiar Kysely interface:

// Create Kysely instance with kysely-d1
const db = new Kysely<Database>({ 
  dialect: new D1Dialect({ database: env.DB })
});
    
// Read row from D1 table
const result = await db
  .selectFrom('kv')
  .selectAll()
  .where('key', '=', key)
  .executeTakeFirst();

Check out the project here.

What’s still in testing?

The biggest pieces that have been disabled for this alpha release are replication and JavaScript transaction support. While we’ll be rolling out these changes gradually, we want to call out some limitations that exist today that we’re actively working on testing:

  • Database location: Each D1 database only runs a single instance. It’s created close to where you, as the developer, create the database, and does not currently move regions based on access patterns. Workers running elsewhere in the world will see higher latency as a result.
  • Concurrency limitations: Under high load, read and write queries may be queued rather than triggering new replicas to be created. As a result, the performance & throughput characteristics of the open alpha won’t be representative of the final product.
  • Availability limitations: Backups will block access to the DB while they’re running. In most cases this should only be a second or two, and any requests that arrive during the backup will be queued.

You can also check out a more detailed, up-to-date list on D1 alpha Limitations.

Request for feedback

While we can make all sorts of guesses and bets on the kind of databases you want to use D1 for, we are not the users – you are! We want developers from all backgrounds to preview the D1 tech at its early stages, and let us know where we need to improve to make it suitable for your production apps.

For general feedback about your experience and to interact with other folks in the alpha, join our #d1-open-alpha channel in the Cloudflare Developers Discord. We plan to make any important announcements and changes in this channel as well as on our monthly community calls.

To file more specific feature requests (no matter how wacky) and report any bugs, create a thread in the Cloudflare Community forum under the D1 category. We will be maintaining this forum as a way to plan for the months ahead!

Get started

Want to get started right away? Check out our D1 documentation to get started today. Build our classic Northwind Traders demo to explore the D1 experience and deploy your first D1 database!

Bringing authentication and identification to Workers through Mutual TLS

Post Syndicated from Dina Kozlov original https://blog.cloudflare.com/mutual-tls-for-workers/

Bringing authentication and identification to Workers through Mutual TLS

Bringing authentication and identification to Workers through Mutual TLS

We’re excited to announce that Workers will soon be able to send outbound requests through a mutually authenticated channel via mutual TLS authentication!

When making outbound requests from a Worker, TLS is always used on the server side, so that the client can validate that the information is being sent to the right destination. But in the same way, the server may want to authenticate the client to ensure that the request is coming from an authorized client. This two-way street of authentication is called Mutual TLS. In this blog, we’re going to talk through the importance of mutual TLS authentication, what it means to use mutual TLS within Workers, and how in a few months you’ll be able to use it to send information through an authenticated channel — adding a layer of security to your application!

mTLS between Cloudflare and an Origin

Mutual TLS authentication works by having a server validate the client certificate against a CA. If the validation passes then the server knows that it’s the right client and will let the request go through. If the validation fails or if a client certificate is not presented then the server can choose to drop the request.

Today, customers use mTLS to secure connections between Cloudflare and an origin — this is done through a product called Authenticated Origin Pull. Once a customer enables it, Cloudflare starts serving a client certificate on all outgoing requests. This is either a Cloudflare managed client certificate or it can be one uploaded by the customer. When enabled, Cloudflare will present this certificate when connecting to an origin. The origin should then check the client certificate to see if it’s the one that it expects to see. If it is then the request will go through. If it’s the wrong client certificate or is not included then the origin can choose to drop the request.

Doing this brings a big security boost because it allows the origin to only accept traffic from Cloudflare and drop any unexpected external traffic.

Digging up problems with dogfooding

Today, many Cloudflare services are built on Cloudflare Workers — it’s the secret sauce we use to continuously ship fast, reliable products to our customers. Internally, we might have one Cloudflare account that runs multiple services, with each service deployed on an individual Worker.

Whenever one service needs to talk to another, the fetch() function is used to request or send information. This can be object data that we send to upstream providers, it can be a read or write to a database, or service to service communication. In most regards, the information that’s going to the origin is sensitive and requires a layer of authentication. Without proper authentication, any client would be able to access the data, removing a layer of security.

Implementing service to service authentication

Today, there are a few ways that you can set up service to service authentication, if you’re building on Workers.

One way to set up service authentication is to use Authenticated Origin Pull. Authenticated Origin Pull allows customers to implement mutual TLS between Cloudflare and an origin by attaching a client certificate and private key to a domain or hostname, so that all outbound requests include a client certificate. The origin can then check this certificate to see whether the request came from Cloudflare. If there’s a valid certificate, then the origin can let the request through and if there’s an invalid certificate or no certificate then the origin can choose to drop the request. However, Authenticated Origin Pull has its limitations and isn’t ideal for some use-cases.

The first limitation is that an Authenticated Origin Pull certificate is tied to a publicly hosted hostname or domain. Some services that are built on Workers don’t necessarily need to be exposed to the public Internet. Therefore, tying it to a domain doesn’t really make sense.

The next limitation is that if you have multiple Workers services that are each writing to the same database, you may want to be able to distinguish them. What if at some point, you need to take the “write” power away from the Worker? Or, what if only Workers A and B are allowed to make writes but Worker C should only make “read” requests?

Today, if you use Authenticated Origin Pulls with Cloudflare’s client certificate then all requests will be accepted as valid. This is because for all outbound requests, we attach the same client certificate. So even though you’re restricting your traffic to “Cloudflare-Only”, there’s no Worker-level granularity.

Now, there’s another solution that you can use. You can make use of Access and set up Token Authentication by using a pre-shared key and configuring your Worker to allow or deny access based on the pre-shared key, presented in the header. While this does allow you to lock down authentication on a per-Worker or per-service basis, the feedback that we’ve gotten from our internal teams who have implemented this is that it’s 1) cumbersome to manage and 2) requires the two service to speak over HTTP, and 3) doesn’t expose the client’s identity. And so, with these limitations in mind, we’re excited to bring mutual TLS authentication to Workers — an easy, scalable way to manage authentication and identity for anyone building on Workers.

Coming soon: Mutual TLS for Workers

We’re excited to announce that in the next few months, we’re going to be bringing mutual TLS support to Workers. Customers will be able to upload client certificates to Cloudflare and attach them in the fetch() requests within a Worker. That way, you can have per-Worker or even per-request level of granularity when it comes to authentication and identification.

When sending out the subrequest, Cloudflare will present the client certificate and the receiving server will be able to check:

1) Is this client presenting a valid certificate?
2) Within Cloudflare, what service or Worker is this request coming from?

This is one of our most highly requested features, both from customers and from internal teams, and we’re excited to launch it and make it a no-brainer for any developer to use Cloudflare as their platform for anything they want to build!

Xata Workers: client-side database access without client-side secrets

Post Syndicated from Alexis Rico (Guest Blogger) original https://blog.cloudflare.com/xata-customer-story/

Xata Workers: client-side database access without client-side secrets

Xata Workers: client-side database access without client-side secrets

We’re excited to have Xata building their serverless functions product – Xata Workers – on top of Workers for Platforms. Xata Workers act as middleware to simplify database access and allow their developers to deploy functions that sit in front of their databases. Workers for Platforms opens up a whole suite of use cases for Xata developers all while providing the security, scalability and performance of Cloudflare Workers.

Now, handing it over to Alexis, a Senior Software Engineer at Xata to tell us more.

Introduction

In the last few years, there’s been a rise of Jamstack, and new ways of thinking about the cloud that some people call serverless or edge computing. Instead of maintaining dedicated servers to run a single service, these architectures split applications in smaller services or functions.

By simplifying the state and context of our applications, we can benefit from external providers deploying these functions in dozens of servers across the globe. This architecture benefits the developer and user experience alike. Developers don’t have to manage servers, and users don’t have to experience latency. Your application simply scales, even if you receive hundreds of thousands of unexpected visitors.

When it comes to databases though, we still struggle with the complexity of orchestrating replication, failover and high availability. Traditional databases are difficult to scale horizontally and usually require a lot of infrastructure maintenance or learning complex database optimization concepts.

At Xata we are building a modern data platform designed for scalable applications. It allows you to focus on your application logic, instead of having to worry about how the data is stored.

Making databases accessible to everyone

We started Xata with the mission of helping developers build their applications and forget about maintaining the underlying infrastructure.

With that mission in mind, we asked ourselves: how can we make databases accessible to everyone? How can we provide a delightful experience for a frontend engineer or designer using a database?

To begin with, we built an appealing web dashboard, that any developer — no matter their experience — can be comfortable using to work with their data.

Whether they’re defining or refining their schema, viewing or adding records, fine-tuning search results with query boosters, or getting code snippets to speed up development with our SDK. We believe that only the best user experience can provide the best development experience.

We identified a major challenge amongst our user base early on. Many front-end developers want to access their database from client-side code.

Allowing access to a database from client-side code comes with several security risks if not done properly. For example, someone could inspect the code, find the credentials, and if they weren’t scoped to a single operation, potentially query or modify other parts of the database. Unfortunately, this is a common reason for data leaks and security breaches.

It was a hard problem to solve, and after plenty of brainstorming, we agreed on two potential ways forward: implementing row-level access rules or writing API routes that talked to the database from server code.

Row-level access rules are a good way to solve this, but they would have required us to define our own opinionated language. For our users, it would have been hard to migrate away when they outgrow this solution. Instead, we preferred to focus on making serverless functions easier for our users.

Typically, serverless functions require you to either choose a full stack framework or manually write, compile, deploy and use them. This generally adds a lot of cognitive overhead even to choose the right solution. We wanted to simplify accessing the database from the frontend without sacrificing flexibility for developers. This is why we decided to build Xata Workers.

Xata Workers

A Xata Worker is a function that a developer can write in JavaScript or TypeScript as client-side code. Rather than being executed client-side, it will actually be executed on Cloudflare’s global network.

You can think of a Xata Worker as a getServerSideProps function in Next.js or a loader function in Remix. You write your server logic in a function and our tooling takes care of deploying and running it server-side for you (yes, it’s that easy).

The main difference with other alternatives is that Xata Workers are, by design, agnostic to a framework or hosting provider. You can use them to build any kind of application or website, and even upload it as static HTML in a service like GitHub Pages or S3. You don’t need a full stack web framework to use Xata Workers.

With our command line tool, we handle the build and deployment process. When the function is invoked, the Xata Worker actually makes a request to a serverless function over the network.

import { useQuery } from '@tanstack/react-query';
import { xataWorker } from '~/xata';

const listProducts = xataWorker('listProducts', async ({ xata }) => {
  return await xata.db.products.sort('popularity', 'desc').getMany();
});

export const Home = () => {
  const { data = [] } = useQuery(['products'], listProducts);

  return (
    <Grid>
      {data.map((product) => (
        <ProductCard key={product.id} product={product} />
      ))}
    </Grid>
  );
};

In the code snippet above, you can see a React component that connects to an e-commerce database with products on sale. Inside the UI component, with a popular client-side data fetching library, data is retrieved from the serverless function and for each product it renders another component in a grid.

As you can see a Xata Worker is a function that wraps any user-defined code and receives an instance of our SDK as a parameter. This instance has access to the database and, given that the code doesn’t run on the browser anymore, your secrets are not exposed for malicious usage.

When using a Xata Worker in TypeScript, our command line tool also generates custom types based on your schema. These types offer type-safety for your queries or mutations, and improve your developer experience by adding extra intellisense to your IDE.

Xata Workers: client-side database access without client-side secrets

A Xata Worker, like any other function, can receive additional parameters that pass application state, context or user tokens. The code you write in the function can either return an object that will be serialized over the network with a superset of JSON to support dates and other non-primitive data types, or a full response with a custom status code and headers.

Developers can write all their logic, including their own authentication and authorization. Unlike complex row level access control rules, you can easily express your logic without constraints and even unit test it with the rest of your code.

How we use Cloudflare

We are happy to join the Supercloud movement, Cloudflare has an excellent track record, and we are using Cloudflare Workers for Platforms to host our serverless functions. By using the Workers isolated execution contexts we reduce security risks of running untrusted code on our own while being close to our users, resulting in super low latency.

All of it, without having to deploy extra infrastructure to handle our user’s application load or ask them to configure how the serverless functions should be deployed. It really feels like magic! Now, let’s dive into the internals of how we use Cloudflare to run our Xata Workers.

For every workspace in Xata we create a Worker Namespace, a Workers for Platform concept to organize Workers and restrict the routing between them. We used Namespaces to group and encapsulate the different functions coming from all the databases built by a client or team.

When a user deploys a Xata Worker, we create a new Worker Script, and we upload the compiled code to its Namespace. Each script has a unique name with a compilation identifier so that the user can have multiple versions of the same function running at the same time.

During the compilation, we inject the database connection details and the database name. This way, the function can connect to the database without leaking secrets and restricting the scope of access to the database, all of it transparently for the developer.

When the client-side application runs a Xata Worker, it calls a Dispatcher function that processes the request and calls the correct Worker Script. The dispatcher function is also responsible for configuring the CORS headers and the log drain that can be used by the developer to debug their functions.

Xata Workers: client-side database access without client-side secrets

By using Cloudflare, we are also able to benefit from other products in the Workers ecosystem. For example, we can provide an easy way to cache the results of a query in Cloudflare’s global network. That way, we can serve the results for read-only queries directly from locations closer to the end users, without having to call the database again and again for every Worker invocation. For the developer, it’s only a matter of adding a “cache” parameter to their query with the number of milliseconds they want to cache the results in a KV Namespace.

import { xataWorker } from '~/xata';

const listProducts = xataWorker('listProducts', async ({ xata }) => {
  return await xata.db.products.sort('popularity', 'desc').getMany({
    cache: 15 * 60 * 1000 // TTL
  });
});

In development mode, we provide a command to run the functions locally and test them before deploying them to production. This enables rapid development workflows with real-time filesystem change monitoring and hot reloading of the workers code. Internally, we use the latest version of miniflare to emulate the Cloudflare Workers runtime, mimicking the real production environment.

Conclusion

Xata is now out of beta and available for everyone. We offer a generous free tier that allows you to build and deploy your applications and only pay to scale them when you actually need it.

You can sign up for free, create a database in seconds and enjoy features such as branching with zero downtime migrations, search and analytics, transactions, and many others. Check out our website to learn more!

Xata Workers are currently in private beta. If you are interested in trying them out, you can sign up for the waitlist and talk us through your use case. We are looking for developers that are willing to provide feedback and shape this new feature for our serverless data platform.

We are very proud of our collaboration with Cloudflare for this new feature. Processing data closer to where it’s being requested is the future of computing and we are excited to be part of this movement. We look forward to seeing what you build with Xata Workers.

Automate an isolated browser instance with just a few lines of code

Post Syndicated from Tanushree Sharma original https://blog.cloudflare.com/introducing-workers-browser-rendering-api/

Automate an isolated browser instance with just a few lines of code

Automate an isolated browser instance with just a few lines of code

If you’ve ever created a website that shows any kind of analytics, you’ve probably also thought about adding a “Save Image” or “Save as PDF” button to store and share results. This isn’t as easy as it seems (I can attest to this firsthand) and it’s not long before you go down a rabbit hole of trying 10 different libraries, hoping one will work.

This is why we’re excited to announce a private beta of the Workers Browser Rendering API, improving the browser automation experience for developers. With browser automation, you can programmatically do anything that a user can do when interacting with a browser.

The Workers Browser Rendering API, or just Rendering API for short, is our out-of-the-box solution for simplifying developer workflows, including capturing images or screenshots, by running browser automation in Workers.

Browser automation, everywhere

As with many of the best Cloudflare products, Rendering API was born out of an internal need. Many of our teams were setting up or wanted to set up their own tools to perform what sounds like an incredibly simple task: taking automated screenshots.

When gathering use cases, we realized that much of what our internal teams wanted would also be useful for our customers. Some notable ones are:

  • Taking screenshots for social sharing thumbnails or preview images
  • Emailed daily screenshots of dashboards (requested specifically by our SVP of Engineering)
  • Reporting bugs on websites and sending them directly to frontend teams

Not to mention use cases for other browser automation functions like:

Testing UI/UX Flows
End-to-end (E2E) testing is used to minimic user behaviour and can identify bugs that unit tests or integration tests have missed. And let’s be honest – no developer wants to manually check the user flow each time they make changes to their application. E2E tests can be especially useful to verify logic on your customer’s critical path like account creation, authentication or checkout.

Performance Tests
Application performance metrics, such as page load time, directly impact your user’s experience and your SEO rankings. To avoid performance regressions, you want to test impact on latency in conditions that are as close as possible to your production environment before you merge. By automating performance testing you can measure if your proposed changes will result in a degraded experience for your uses and make improvements accordingly.  

Unlocking a new building block

One of the most common browser automation frameworks is Puppeteer. It’s common to run Puppeteer in a containerization tool like Docker or in a serverless environment. Taking automated screenshots should be as easy as writing some code, hitting deploy and having it run when a particular event is triggered or on a regular schedule.

It should be, but it’s not.

Even on a serverless solution like AWS Lambda, running Puppeteer means packaging it, making sure dependencies are covered, uploading packages to S3 and deploying using Layers. Whether using Docker or something like Lambda, it’s clear that this is not easy to set up.

One of the pillars of Cloudflare’s development platform is to provide our developers with tools that are incredibly simple, yet powerful to build on. Rendering API is our out-of-the-box solution for running Puppeteer in Workers.

Screenshotting made simple

To start, the Rendering API will have support for navigating to a webpage and taking a screenshot, with more functions to follow. To use it, all you need to do is add our new browser binding to your project’s wrangler.toml file

wrangler.toml

bindings = [
 { name = "my_browser” type = "browser" }
]

From there, taking a screenshot and saving it to R2 is as simple as:

script.ts

import puppeteer from '@cloudflare/puppeteer'

export default {
    async fetch(request: Request, env: Env): Promise<Response> {
        const browser = await puppeteer.launch({
            browserBinding: env.MY_BROWSER
        })
        const page = await browser.newPage()

        await page.goto("https://example.com/")
        const img = await page.screenshot() as Buffer
        await browser.close()

        //upload to R2
        try {
            await env.MY_BUCKET.put("screenshot.jpg", img);
            return new Response(`Success!`);
        } catch (e) {
            return new Response('', { status: 400 })
        }
    }
}

Down the line, we have plans to add full Puppeteer support, including functions like page.type, page.click, page.evaluate!

What’s happening under the hood?

Remote browser isolation technology is an integral part of our Zero Trust product offering. Remote browser isolation lets users interact with a web browser that instead of running on the client’s device, runs in a remote environment. The Rendering API repurposes this under the hood!

Automate an isolated browser instance with just a few lines of code

We’ve wrapped the Puppeteer library so that it can be run directly from your own Worker. You can think of your Worker as the client. Each of Cloudflare’s data centers has a pool of warm browsers ready to go and when a Worker requests a browser, the browser is instantly returned and is connected to via a WebSocket. Once the WebSocket connection is established, our internal browser API Worker handles all communication to the browser session via the Chrome Devtools Protocol.

To ensure the security of your Worker, individual remote browsers are run as disposable instances – one instance per request, and never shared. They are secured using gVisor to protect against kernel level exploits. On top of that, the browser is running sandboxed processes with the lowest privilege level using a Linux seccomp profile.

The Rendering API should be used when you’re building and testing your applications.  To prevent abuse, Cloudflare Bot Management has baked in signals to indicate that a request is coming from a Worker running Puppeteer. As a Cloudflare Bot Management customer, this will automatically be added to your blocklist, with the option to explicitly opt in and allow it.

How can you get started?

We’re introducing the Workers Browser Rendering API in closed beta. If you’re interested, please tell us a bit about your use case and join the waitlist. We would love to hear what else you want to build using the Workers Browser Rendering API, let us know in the Workers channel on the Cloudflare Developers Discord!

Making static sites dynamic with Cloudflare D1

Post Syndicated from Kristian Freeman original https://blog.cloudflare.com/making-static-sites-dynamic-with-cloudflare-d1/

Making static sites dynamic with Cloudflare D1

Introduction

Making static sites dynamic with Cloudflare D1

There are many ways to store data in your applications. For example, in Cloudflare Workers applications, we have Workers KV for key-value storage and Durable Objects for real-time, coordinated storage without compromising on consistency. Outside the Cloudflare ecosystem, you can also plug in other tools like NoSQL and graph databases.

But sometimes, you want SQL. Indexes allow us to retrieve data quickly. Joins enable us to describe complex relationships between different tables. SQL declaratively describes how our application’s data is validated, created, and performantly queried.

D1 was released today in open alpha, and to celebrate, I want to share my experience building apps with D1: specifically, how to get started, and why I’m excited about D1 joining the long list of tools you can use to build apps on Cloudflare.

Making static sites dynamic with Cloudflare D1

D1 is remarkable because it’s an instant value-add to applications without needing new tools or stepping out of the Cloudflare ecosystem. Using wrangler, we can do local development on our Workers applications, and with the addition of D1 in wrangler, we can now develop proper stateful applications locally as well. Then, when it’s time to deploy the application, wrangler allows us to both access and execute commands to your D1 database, as well as your API itself.

What we’re building

In this blog post, I’ll show you how to use D1 to add comments to a static blog site. To do this, we’ll construct a new D1 database and build a simple JSON API that allows the creation and retrieval of comments.

As I mentioned, separating D1 from the app itself – an API and database that remains separate from the static site – allows us to abstract the static and dynamic pieces of our website from each other. It also makes it easier to deploy our application: we will deploy the frontend to Cloudflare Pages, and the D1-powered API to Cloudflare Workers.

Building a new application

First, we’ll add a basic API in Workers. Create a new directory and in it a new wrangler project inside it:

$ mkdir d1-example && d1-example
$ wrangler init

In this example, we’ll use Hono, an Express.js-style framework, to rapidly build our API. To use Hono in this project, install it using NPM:

$ npm install hono

Then, in src/index.ts, we’ll initialize a new Hono app, and define a few endpoints – GET /API/posts/:slug/comments, and POST /get/api/:slug/comments.

import { Hono } from 'hono'
import { cors } from 'hono/cors'

const app = new Hono()

app.get('/api/posts/:slug/comments', async c => {
  // do something
})

app.post('/api/posts/:slug/comments', async c => {
  // do something
})

export default app

Now we’ll create a D1 database. In Wrangler 2, there is support for the wrangler d1 subcommand, which allows you to create and query your D1 databases directly from the command line. So, for example, we can create a new database with a single command:

$ wrangler d1 create d1-example

With our created database, we can take the database name ID and associate it with a binding inside of wrangler.toml, wrangler’s configuration file. Bindings allow us to access Cloudflare resources, like D1 databases, KV namespaces, and R2 buckets, using a simple variable name in our code. Below, we’ll create the binding DB and use it to represent our new database:

[[ d1_databases ]]
binding = "DB" # i.e. available in your Worker on env.DB
database_name = "d1-example"
database_id = "4e1c28a9-90e4-41da-8b4b-6cf36e5abb29"

Note that this directive, the [[d1_databases]] field, currently requires a beta version of wrangler. You can install this for your project using the command npm install -D wrangler/beta.

With the database configured in our wrangler.toml, we can start interacting with it from the command line and inside our Workers function.

First, you can issue direct SQL commands using wrangler d1 execute:

$ wrangler d1 execute d1-example --command "SELECT name FROM sqlite_schema WHERE type ='table'"
Executing on d1-example:
┌─────────────────┐
│ name │
├─────────────────┤
│ sqlite_sequence │
└─────────────────┘

You can also pass a SQL file – perfect for initial data seeding in a single command. Create src/schema.sql, which will create a new comments table for our project:

drop table if exists comments;
create table comments (
  id integer primary key autoincrement,
  author text not null,
  body text not null,
  post_slug text not null
);
create index idx_comments_post_id on comments (post_slug);

-- Optionally, uncomment the below query to create data

-- insert into comments (author, body, post_slug)
-- values ("Kristian", "Great post!", "hello-world");

With the file created, execute the schema file against the D1 database by passing it with the flag --file:

$ wrangler d1 execute d1-example --file src/schema.sql

We’ve created a SQL database with just a few commands and seeded it with initial data. Now we can add a route to our Workers function to retrieve data from that database. Based on our wrangler.toml config, the D1 database is now accessible via the DB binding. In our code, we can use the binding to prepare SQL statements and execute them, for instance, to retrieve comments:

app.get('/api/posts/:slug/comments', async c => {
  const { slug } = c.req.param()
  const { results } = await c.env.DB.prepare(`
    select * from comments where post_slug = ?
  `).bind(slug).all()
  return c.json(results)
})

In this function, we accept a slug URL query parameter and set up a new SQL statement where we select all comments with a matching post_slug value to our query parameter. We can then return it as a simple JSON response.

So far, we’ve built read-only access to our data. But “inserting” values to SQL is, of course, possible as well. So let’s define another function that allows POST-ing to an endpoint to create a new comment:

app.post('/API/posts/:slug/comments', async c => {
  const { slug } = c.req.param()
  const { author, body } = await c.req.json<Comment>()

  if (!author) return c.text("Missing author value for new comment")
  if (!body) return c.text("Missing body value for new comment")

  const { success } = await c.env.DB.prepare(`
    insert into comments (author, body, post_slug) values (?, ?, ?)
  `).bind(author, body, slug).run()

  if (success) {
    c.status(201)
    return c.text("Created")
  } else {
    c.status(500)
    return c.text("Something went wrong")
  }
})

In this example, we built a comments API for powering a blog. To see the source for this D1-powered comments API, you can visit cloudflare/templates/worker-d1-api.

Making static sites dynamic with Cloudflare D1

Conclusion

One of the things most exciting about D1 is the opportunity to augment existing applications or websites with dynamic, relational data. As a former Ruby on Rails developer, one of the things I miss most about that framework in the world of JavaScript and serverless development tools is the ability to rapidly spin up full data-driven applications without needing to be an expert in managing database infrastructure. With D1 and its easy onramp to SQL-based data, we can build true data-driven applications without compromising on performance or developer experience.

This shift corresponds nicely with the advent of static sites in the last few years, using tools like Hugo or Gatsby. A blog built with a static site generator like Hugo is incredibly performant – it will build in seconds with small asset sizes.

But by trading a tool like WordPress for a static site generator, you lose the opportunity to add dynamic information to your site. Many developers have patched over this problem by adding more complexity to their build processes: fetching and retrieving data and generating pages using that data as part of the build.

This addition of complexity in the build process attempts to fix the lack of dynamism in applications, but it still isn’t genuinely dynamic. Instead of being able to retrieve and display new data as it’s created, the application rebuilds and redeploys whenever data changes so that it appears to be a live, dynamic representation of data. Your application can remain static, and the dynamic data will live geographically close to the users of your site, accessible via a queryable and expressive API.

Get started with Cloudflare Workers with ready-made templates

Post Syndicated from Gift Egwuenu original https://blog.cloudflare.com/cloudflare-workers-templates/

Get started with Cloudflare Workers with ready-made templates

Get started with Cloudflare Workers with ready-made templates

One of the things we prioritize at Cloudflare is enabling developers to build their applications on our developer platform with ease. We’re excited to share a collection of ready-made templates that’ll help you start building your next application on Workers. We want developers to get started as quickly as possible, so that they can focus on building and innovating and avoid spending so much time configuring and setting up their projects.

Introducing Cloudflare Workers Templates

Cloudflare Workers enables you to build applications with exceptional performance, reliability, and scale. We are excited to share a collection of templates that helps you get started quickly and give you an idea of what is possible to build on our developer platform.

We have made available a set of starter templates highlighting different use cases of Workers. We understand that you have different ideas you will love to build on top of Workers and you may have questions or wonder if it is possible. These sets of templates go beyond the convention ‘Hello, World’ starter. They’ll help shape your idea of what kind of applications you can build with Workers as well as other products in the Cloudflare Developer Ecosystem.

We are excited to introduce a new collection of starter templates workers.new/templates. This shortcut will serve you a collection of templates that you can immediately start using to build your next application.

Get started with Cloudflare Workers with ready-made templates
Cloudflare Workers Template Collection

How to use Cloudflare Workers templates

We created this collection of templates to support you in getting started with Workers. Some examples listed showcase a use-case with a combination of multiple Cloudflare developer platform products to build applications similar to ones you might use every day. We know that Workers are being used today for different use-cases, we want to showcase some of them to you.

We have templates for building an image sharing website with Pages Functions, direct creator upload to Cloudflare Stream, Durable Object-powered request scheduler and many more.

One example to highlight is a template that lets you accept payment for video content. It is powered by Pages Functions, Cloudflare Stream and Stripe Checkout.  This app shows how you can use Cloudflare Workers with external payment and authentication systems to create a logged-in experience, without ever having to manage a database or persist any state yourself.

Once a user has paid, Stripe Checkout redirects to a URL that verifies a token from Stripe, and generates a signed URL using Cloudflare Stream to view the video. This signed URL is only valid for a specified amount of time, and access can be restricted by country or IP address.

To use the template, you need to either click the deploy with Workers button or open the template with Stackblitz.

Get started with Cloudflare Workers with ready-made templates

The Deploy with Workers button will redirect you to a page where you can authorize GitHub to deploy a fork of the repository using GitHub actions while opening with StackBlitz creates a new fork of the template for you to start working with.

Get started with Cloudflare Workers with ready-made templates
Deploy to Workers Demo

These templates also comes bundled with additional features I would like to share with you:

Integrated Deploy with Workers Button

We added a deploy button to all templates listed in the templates repository and the collection website, so you can quickly get up to speed with your code. The deploy with Workers button lets you deploy your code in under five minutes, it uses a GitHub action powered with Cloudflare Workers to do this.

Get started with Cloudflare Workers with ready-made templates
GitHub Repository with Deploy to Workers Button

Support for Test Driven Development

As developers, we need to write tests for our code to ensure we’re shipping quality production grade software and also ensure that our code is bug-free. We support writing tests in Workers using the Wrangler unstable_dev API to write integration and end-to-end tests. We want to enable not just the developer experience but also nudge developers to follow best practices and prioritize TDD in development. We configured a number of templates to support integration tests against a local server, this will serve as a template to help you set up tests in your projects.

Here’s an example using Wrangler’s unstable_dev API and Vitest test framework to test the code written in an example ‘Hello worker’ starter template:

import { unstable_dev } from 'wrangler';
import { describe, expect, it, beforeAll, afterAll } from 'vitest';

describe('Worker', () => {
 let worker;

 beforeAll(async () => {
   worker = await unstable_dev('index.js', {}, { disableExperimentalWarning: true });
 });

 afterAll(async () => {
   await worker.stop();
 });

 it('should return Hello worker!', async () => {
   const resp = await worker.fetch();
   if (resp) {
     const text = await resp.text();
     expect(text).toMatchInlineSnapshot(`"Hello worker!"`);
   }
 });
});

Online IDE Integration with StackBlitz

We announced StackBlitz’s partnership with Cloudflare Workers during Platform Week early this year. We believe a developer’s experience should be of utmost priority because we want them to build with ease on our developer platform.

StackBlitz is an online development platform for building web applications. It is powered by WebContainers, the first WebAssembly-based operating system which boots Node.js environments in milliseconds, securely within your browser tab.

We made it even easier to get started with Workers with an integrated Open with StackBlitz button for each starter template, making it easier to create a fork of a template and the great thing is you only need a web browser to build your application.

Everything we’ve highlighted in this post, all leads to one thing – How can we create a better experience for developers getting started with Workers. We introduce these ready-made templates to make you more efficient, bring you a wholesome developer experience and help improve your time to deployment. We want you to spend less time getting started with building on the Workers developer platform, so what are you waiting for?

Next Steps

You can start building your own Worker today using the available templates provided in the templates collection to help you get started. If you would like to contribute your own templates to the collection, be sure to send in a pull request we’re more than happy to review and add to the growing collection. Share what you have built with us in the #builtwith channel on our Discord community. Make sure to follow us on Twitter or join our Discord Developers Community server.

Indexing millions of HTTP requests using Durable Objects

Post Syndicated from Cole MacKenzie original https://blog.cloudflare.com/r2-rayid-retrieval/

Indexing millions of HTTP requests using Durable Objects

Indexing millions of HTTP requests using Durable Objects

Our customers rely on their Cloudflare logs to troubleshoot problems and debug issues. One of the biggest challenges with logs is the cost of managing them, so earlier this year, we launched the ability to store and retrieve Cloudflare logs using R2.

In this post, I’ll explain how we built the R2 Log Retrieval API using Cloudflare Workers with a focus on Durable Objects and the Streams API. Using these, allows a customer to index and query millions of their Cloudflare logs stored in batches on R2.

Before we dive into the internals you might be wondering why one doesn’t just use a traditional database to index these logs? After all, databases are a well proven technology. Well, the reason is that individual developers or companies, both large and small, often don’t have the resources necessary to maintain such a database and the surrounding infrastructure to create this kind of setup.

Our approach instead relies on Durable Objects to maintain indexes of the data stored in R2, removing the complexity of managing and maintaining your own database. It was also super easy to add Durable Objects to our existing Workers code with just a few lines of config and some code. And R2 is very economical.

Indexing

Indexing data is often used to reduce the lookup time for a query by first pre-processing the data and computing an index – usually a file (or set of files) that have a known structure which can be used to perform lookups on the underlying data. This approach makes lookups quick as indexes typically contain the answer for a given query, or at the very least, tells you how to find it. For this project we are going to index records by the unique identifier called a RayID which our customers use to identify an HTTP request in their logs, but this solution can be modified to index any many other types of data.

When indexing RayIDs for logs stored in R2, we choose an index structure that is fairly straightforward and is commonly known as a forward-index. This type of index consists of a key-value mapping between a document’s name and a list of words contained in that document. The terms “document” and “words” are meant to be generic, and you get to define what a document and a word is.

In our case, a document is a batch of logs stored in R2 and the words are RayIDs contained within that document. For example, our index currently looks like this:

Indexing millions of HTTP requests using Durable Objects

Building an index using Durable Objects and the Streams API

In order to maintain the state of our index, we chose to use Durable Objects. Each Durable Object has its own transactional key-value storage. Therefore, to store our index, we assign each key to be the document (batch) name and the value being a JSON-array of RayIDs within that document. When extracting the RayIDs for a given batch, updating the index becomes as simple as storage.put(batchName, rayIds). Likewise, getting all the RayIDs for a document is just a call to storage.get(batchName).

When performing indexing, since the batches are stored using compression and often with a 30-100x compression ratio, reading an entire batch into memory can lead to out-of-memory (OOM) errors in our Worker. To get around this, we use the Streams API to avoid the OOM errors by processing the data in smaller chunks. There are two types of streams available: byte-oriented and value-oriented. Byte-oriented streams operate at the byte-level for things such as compressing and decompressing data, while the value-orientated streams work on first class values in JavaScript. Numbers, strings, undefined, null, objects, you name it. If it’s a valid JavaScript value, you can process it using a value-oriented stream. The Streams API also allows us to define our own JavaScript transformations for both byte- and value-oriented streams.

So, when our API receives a request to index a batch, our Worker streams the contents from R2 into a pipeline of TransformationStreams to decompress the data, decode the bytes into strings, split the data into records based on the newlines, and finally collect all the RayIDs. Once we’ve collected all the RayIDs, the data is then persisted in the index by making calls to the Durable Object, which in turn calls the aforementioned storage.put method to persist the data to the index. To illustrate what I mean, I include some code detailing the steps described above.

async function index(r2, bucket, key, storage) {
  const obj = await getObject(r2, bucket, key);

  const rawStream = obj.Body as ReadableStream;
  const index: Record<string, string[]> = {};

  const rayIdIndexingStream = new TransformStream({
    transform(chunk: string) {
      for (const match of chunk.matchAll(RAYID_FIELD_REGEX)) {
        const { rayid } = match.groups!;
        if (key in index) {
          index[key].push(rayid);
        } else {
          index[key] = [rayid];
        }
      }
    }
  });

  await collectStream(rawStream.pipeThrough(new DecompressionStream('gzip')).pipeThrough(textDecoderStream()).pipeThrough(readlineStream()).pipeThrough(rayIdIndexingStream));
  storage.put(index);
}

Searching for a RayID

Once a batch has been indexed, and the index is persisted to our Durable Object, we can then query it using a combination of the RayID and a batch name to check the presence of a RayID in that given batch. Assuming that a zone is producing a batch of logs at the rate of one batch per second this means that over 86,400 batches would be produced in a day! Over the course of a week, there would be far too many keys in our index for us to be able to iterate through them all in a timely manner. This is where the encoding of a RayID and the naming of each batch comes into play.

A RayID is currently, and I emphasize currently because this can change and has over time, a 16-byte hex encoded value where the first 36-bits encode a timestamp, and it looks something like: 764660d8ec5c2ab1. Note that the format of the RayID is likely to evolve in the near future, but for now we can use it to optimize retrieval.

Each batch produced by Logpush also happens to encode the time the batch was started and completed. Last but not least, upon analysis of our logging pipeline we found that 95% of RayIDs can be found in a batch produced within five minutes of the request completing. (Note that the encoded time sets a lower bound of the batch time we need to search).

Indexing millions of HTTP requests using Durable Objects
Encoding of a RayID
Indexing millions of HTTP requests using Durable Objects
Encoding of a batch name

For example: say we have a request that was made on November 3 at 16:00:00 UTC. We only need to check the batches under the prefix 20221103 and those batches that contain the time range of 16:00:00 to 16:05:00 UTC.

Indexing millions of HTTP requests using Durable Objects

By reducing the number of batches to just a small handful of possibilities for a given RayID, we can simply ask our index if any of those batches contains the RayID by iterating through all the batch names (keys).

async function lookup(r2, bucket, prefix, start, end, rayid, storage) {
  const keys = await listObjects(r2, bucket, prefix, start, end);
  for (const key of keys) {
    const haystack: string[] | undefined = await storage.get(key);
    if (haystack && haystack.includes(rayid)) {
      return key
    }
  }
  return undefined
}

If the RayID is found in a batch, we then stream the corresponding batch back from R2 using another TransformationStream pipeline to filter out any non-matching records from the final response. If no result was found, we return an error message saying we were unable to find the RayID.

Summary

To recap, we showed how we can use Durable Objects and their underlying storage to create and manage forward-indexes for performing efficient lookup on the RayID for potentially millions of records. All without needing to manage your own database or logging infrastructure or doing a full-scan of the data.

While this is just one possible use case for Durable Objects, we are just getting started. If you haven’t read it before, checkout How we built Instant Logs to see another application of Durable Objects to stream millions of logs in real-time to your Cloudflare Dashboard!

What’s next

We currently offer RayID lookups for the HTTP Requests, Firewall Events, and soon support for Workers Trace Events. This is just the beginning for our Log Retrieval API, and we are already looking to add the ability to index and query on more types of fields such as status codes and host names. We also plan to integrate this into the dashboard so that developers can quickly retrieve the logs they need without needing to craft the necessary API calls by hand.

Last but not least, we want to make our retrieval functionality even more powerful and are looking at adding more complex types of filters and queries that you can run against your logs.

As always, stay tuned to the blog for more updates to our developer documentation for instructions on how to get started with log retrieval. If you’re interested in joining the beta, please email [email protected].

Build applications of any size on Cloudflare with the Queues open beta

Post Syndicated from Rob Sutter original https://blog.cloudflare.com/cloudflare-queues-open-beta/

Build applications of any size on Cloudflare with the Queues open beta

Build applications of any size on Cloudflare with the Queues open beta

Message queues are a fundamental building block of cloud applications—and today the Cloudflare Queues open beta brings queues to every developer building for Region: Earth. Cloudflare Queues follows Cloudflare Workers and Cloudflare R2 in a long line of innovative services built for the Workers Developer Platform, enabling developers to build more complex applications without configuring networks, choosing regions, or estimating capacity. Best of all, like many other Cloudflare services, there are no egregious egress charges!

Build applications of any size on Cloudflare with the Queues open beta

If you’ve ever purchased something online and seen a message like “you will receive confirmation of your order shortly,” you’ve interacted with a queue. When you completed your order, your shopping cart and information were stored and the order was placed into a queue. At some later point, the order fulfillment service picks and packs your items and hands it off to the shipping service—again, via a queue. Your order may sit for only a minute, or much longer if an item is out of stock or a warehouse is busy, and queues enable all of this functionality.

Message queues are great at decoupling components of applications, like the checkout and order fulfillment services for an ecommerce site. Decoupled services are easier to reason about, deploy, and implement, allowing you to ship features that delight your customers without worrying about synchronizing complex deployments.

Queues also allow you to batch and buffer calls to downstream services and APIs. This post shows you how to enroll in the open beta, walks you through a practical example of using Queues to build a log sink, and tells you how we built Queues using other Cloudflare services. You’ll also learn a bit about the roadmap for the open beta.

Getting started

Enrolling in the open beta

Open the Cloudflare dashboard and navigate to the Workers section. Select Queues from the Workers navigation menu and choose Enable Queues Beta.

Review your order and choose Proceed to Payment Details.

Note: If you are not already subscribed to a Workers Paid Plan, one will be added to your order automatically.

Enter your payment details and choose Complete Purchase. That’s it – you’re enrolled in the open beta! Choose Return to Queues on the confirmation page to return to the Cloudflare Queues home page.

Creating your first queue

After enabling the open beta, open the Queues home page and choose Create Queue. Name your queue `my-first-queue` and choose Create queue. That’s all there is to it!

The dash displays a confirmation message along with a list of all the queues in your account.

Build applications of any size on Cloudflare with the Queues open beta

Note: As of the writing of this blog post each account is limited to ten queues. We intend to raise this limit as we build towards general availability.

Managing your queues with Wrangler

You can also manage your queues from the command line using Wrangler, the CLI for Cloudflare Workers. In this section, you build a simple but complete application implementing a log aggregator or sink to learn how to integrate Workers, Queues, and R2.

Setting up resources
To create this application, you need access to a Cloudflare Workers account with a subscription plan, access to the Queues open beta, and an R2 plan.

Install and authenticate Wrangler then run wrangler queues create log-sink from the command line to create a queue for your application.

Run wrangler queues list and note that Wrangler displays your new queue.

Note: The following screenshots use the jq utility to format the JSON output of wrangler commands. You do not need to install jq to complete this application.

Build applications of any size on Cloudflare with the Queues open beta

Finally, run wrangler r2 bucket create log-sink to create an R2 bucket to store your aggregated logs. After the bucket is created, run wrangler r2 bucket list to see your new bucket.

Build applications of any size on Cloudflare with the Queues open beta

Creating your Worker
Next, create a Workers application with two handlers: a fetch() handler to receive individual incoming log lines and a queue() handler to aggregate a batch of logs and write the batch to R2.

In an empty directory, run wrangler init to create a new Cloudflare Workers application. When prompted:

  • Choose “y” to create a new package.json
  • Choose “y” to use TypeScript
  • Choose “Fetch handler” to create a new Worker at src/index.ts
Build applications of any size on Cloudflare with the Queues open beta

Open wrangler.toml and replace the contents with the following:

wrangler.toml

name = "queues-open-beta"
main = "src/index.ts"
compatibility_date = "2022-11-03"
 
 
[[queues.producers]]
 queue = "log-sink"
 binding = "BUFFER"
 
[[queues.consumers]]
 queue = "log-sink"
 max_batch_size = 100
 max_batch_timeout = 30
 
[[r2_buckets]]
 bucket_name = "log-sink"
 binding = "LOG_BUCKET"

The [[queues.producers]] section creates a producer binding for the Worker at src/index.ts called BUFFER that refers to the log-sink queue. This Worker can place messages onto the log-sink queue by calling await env.BUFFER.send(log);

The [[queues.consumers]] section creates a consumer binding for the log-sink queue for your Worker. Once the log-sink queue has a batch ready to be processed (or consumed), the Workers runtime will look for the queue() event handler in src/index.ts and invoke it, passing the batch as an argument. The queue() function signature looks as follows:

async queue(batch: MessageBatch<Error>, env: Environment): Promise<void> {

The final binding in your wrangler.toml creates a binding for the log-sink R2 bucket that makes the bucket available to your Worker via env.LOG_BUCKET.

src/index.ts

Open src/index.ts and replace the contents with the following code:

export interface Env {
 BUFFER: Queue;
 LOG_BUCKET: R2Bucket;
}
 
export default {
 async fetch(request: Request, env: Environment): Promise<Response> {
   let log = await request.json();
   await env.BUFFER.send(log);
   return new Response("Success!");
 },
 async queue(batch: MessageBatch<Error>, env: Environment): Promise<void> {
   const logBatch = await JSON.stringify(batch.messages);
   await env.LOG_BUCKET.put(`logs/${Date.now()}.log.json`, logBatch);
 },
};

The export interface Env section exposes the two bindings you defined in wrangler.toml: a queue named BUFFER and an R2 bucket named LOG_BUCKET.

The fetch() handler transforms the request body into JSON, adds the body to the BUFFER queue, then returns an HTTP 200 response with the message Success!

The `queue()` handler receives a batch of messages that each contain log entries, iterates through concatenating each log into a string buffer, then writes that buffer to the LOG_BUCKET R2 bucket using the current timestamp as the filename.

Publishing and running your application
To publish your log sink application, run wrangler publish. Wrangler packages your application and its dependencies and deploys it to Cloudflare’s global network.

Build applications of any size on Cloudflare with the Queues open beta

Note that the output of wrangler publish includes the BUFFER queue binding, indicating that this Worker is a producer and can place messages onto the queue. The final line of output also indicates that this Worker is a consumer for the log-sink queue and can read and remove messages from the queue.

Use your favorite API client, like curl, httpie, or Postman, to send JSON log entries to the published URL for your Worker via HTTP POST requests. Navigate to your log-sink R2 bucket in the Cloudflare dashboard and note that the logs prefix is now populated with aggregated logs from your request.

Build applications of any size on Cloudflare with the Queues open beta

Download and open one of the logfiles to view the JSON array inside. That’s it – with fewer than 45 lines of code and config, you’ve built a log aggregator to ingest and store data in R2!

Build applications of any size on Cloudflare with the Queues open beta

Buffering R2 writes with Queues in the real world

In the previous example, you create a simple Workers application that buffers data into batches before writing the batches to R2. This reduces the number of calls to the downstream service, reducing load on the service and saving you money.

UUID.rocks, the fastest UUIDv4-as-a-service, wanted to confirm whether their API truly generates unique IDs on every request. With 80,000 requests per day, it wasn’t trivial to find out. They decided to write every generated UUID to R2 to compare IDs across the entire population. However, writing directly to R2 at the rate UUIDs are generated is inefficient and expensive.

To reduce writes and costs, UUID.rocks introduced Cloudflare Queues into their UUID generation workflow. Each time a UUID is requested, a Worker places the value of the UUID into a queue. Once enough messages have been received, the buffered batch of JSON objects is written to R2. This avoids invoking an R2 write on every API call, saving costs and making the data easier to process later.

The uuid-queue application consists of a single Worker with three event handlers:

  1. A fetch handler that receives a JSON object representing the generated UUID and writes it to a Cloudflare Queue.
  2. A queue handler that writes batches of JSON objects to R2 in CSV format.
  3. A scheduled handler that combines batches from the previous hour into a single file for future processing.

To view the source or deploy this application into your own account, visit the repository on GitHub.

How we built Cloudflare Queues

Like many of the Cloudflare services you use and love, we built Queues by composing other Cloudflare services like Workers and Durable Objects. This enabled us to rapidly solve two difficult challenges: securely invoking your Worker from our own service and maintaining a strongly consistent state at scale. Several recent Cloudflare innovations helped us overcome these challenges.

Securely invoking your Worker

In the Before Times (early 2022), invoking one Worker from another Worker meant a fresh HTTP call from inside your script. This was a brittle experience, requiring you to know your downstream endpoint at deployment time. Nested invocations ran as HTTP calls, passing all the way through the Cloudflare network a second time and adding latency to your request. It also meant security was on you – if you wanted to control how that second Worker was invoked, you had to create and implement your own authentication and authorization scheme.

Worker to Worker requests
During Platform Week in May 2022, Service Worker Bindings entered general availability. With Service Worker Bindings, your Worker code has a binding to another Worker in your account that you invoke directly, avoiding the network penalty of a nested HTTP call. This removes the performance and security barriers discussed previously, but it still requires that you hard-code your nested Worker at compile time. You can think of this setup as “static dispatch,” where your Worker has a static reference to another Worker where it can dispatch events.

Dynamic dispatch
As Service Worker Bindings entered general availability, we also launched a closed beta of Workers for Platforms, our tool suite to help make any product programmable. With Workers for Platforms, software as a service (SaaS) and platform providers can allow users to upload their own scripts and run them safely via Cloudflare Workers. User scripts are not known at compile time, but are dynamically dispatched at runtime.

Workers for Platforms entered general availability during GA week in September 2022, and is available for all customers to build with today.

With dynamic dispatch generally available, we now have the ability to discover and invoke Workers at runtime without the performance penalty of HTTP traffic over the network. We use dynamic dispatch to invoke your queue’s consumer Worker whenever a message or batch of messages is ready to be processed.

Consistent stateful data with Durable Objects

Another challenge we faced was storing messages durably without sacrificing performance. We took the design goal of ensuring that all messages were persisted to disk in multiple locations before we confirmed receipt of the message to the user. Again, we turned to an existing Cloudflare product—Durable Objects—which entered general availability nearly one year ago today.

Durable Objects are named instances of JavaScript classes that are guaranteed to be unique across Cloudflare’s entire network. Durable Objects process messages in-order and on a single-thread, allowing for coordination across messages and provide a strongly consistent storage API for key-value pairs. Offloading the hard problem of storing data durably in a distributed environment to Distributed Objects allowed us to reduce the time to build Queues and prepare it for open beta.

Open beta roadmap

Our open beta process empowers you to influence feature prioritization and delivery. We’ve set ambitious goals for ourselves on the path to general availability, most notably supporting unlimited throughput while maintaining 100% durability. We also have many other great features planned, like first-in first-out (FIFO) message processing and API compatibility layers to ease migrations, but we need your feedback to build what you need most, first.

Conclusion

Cloudflare Queues is a global message queue for the Workers developer. Building with Queues makes your applications more performant, resilient, and cost-effective—but we’re not done yet. Join the Open Beta today and share your feedback to help shape the Queues roadmap as we deliver application integration services for the next generation cloud.

Cloudflare Workers scale too well and broke our infrastructure, so we are rebuilding it on Workers

Post Syndicated from Jonathan Norris (Guest Blogger) original https://blog.cloudflare.com/devcycle-customer-story/

Cloudflare Workers scale too well and broke our infrastructure, so we are rebuilding it on Workers

Cloudflare Workers scale too well and broke our infrastructure, so we are rebuilding it on Workers

While scaling our new Feature Flagging product DevCycle, we’ve encountered an interesting challenge: our Cloudflare Workers-based infrastructure can handle way more instantaneous load than our traditional AWS infrastructure. This led us to rethink how we design our infrastructure to always use Cloudflare Workers for everything.

The origin of DevCycle

For almost 10 years, Taplytics has been a leading provider of no-code A/B testing and feature flagging solutions for product and marketing teams across a wide range of use cases for some of the largest consumer-facing companies in the world. So when we applied ourselves to build a new engineering-focused feature management product, DevCycle, we built upon our experience using Workers which have served over 140 billion requests for Taplytics customers.

The inspiration behind DevCycle is to build a focused feature management tool for engineering teams, empowering them to build their software more efficiently and deploy it faster. Helping engineering teams reach their goals, whether it be continuous deployment, lower change failure rate, or a faster recovery time. DevCycle is the culmination of our vision of how teams should use Feature Management to build high-quality software faster. We’ve used DevCycle to build DevCycle, enabling us to implement continuous deployment successfully.

DevCycle architecture

One of the first things we asked ourselves when ideating DevCycle was how we could get out of the business of managing 1000’s of vCPUs worth of AWS instances and move our core business logic closer to our end-user devices. Based on our experience with Cloudflare Workers at Taplytics we knew we wanted it to be a core part of our future infrastructure for DevCycle.

By using the global computing power of Workers and moving as much logic to the SDKs as possible with our local bucketing server-side SDKs, we were able to massively reduce or eliminate the latency of fetching feature flag configurations for our users. In addition, we used a shared WASM library across our Workers and local bucketing SDKs to dramatically reduce the amount of code we need to maintain per SDK, and increase the consistency of our platform. This architecture has also fundamentally changed our business’s cost structure to easily serve any customer of any scale.

The core architecture of DevCycle revolves around publishing and consuming JSON configuration files per project environment. The publishing side is managed in our AWS services, while Cloudflare manages the consumption of these config files at scale. This split in responsibilities allows for all high-scale requests to be managed by Cloudflare, while keeping our AWS services simple and low-scale.

Cloudflare Workers scale too well and broke our infrastructure, so we are rebuilding it on Workers

“Workers are breaking our events pipeline”

One of the primary challenges as a feature management platform is that we don’t have direct control over the load from our customers’ applications using our SDKs; our systems need the ability to scale instantly to match their load. For example, we have a couple of large customers whose mobile traffic is primarily driven by push notifications, which causes massive instantaneous spikes in traffic to our APIs in the range of 10x increases in load. As you can imagine, any traditional auto-scaled API service and the load balancer cannot manage that type of increase in load. Thus, our choices are to dramatically increase the minimum size of our cluster and load balancer to handle these unknown load spikes, accept that some requests will be rate-limited, or move to an architecture that can handle this load.

Cloudflare Workers scale too well and broke our infrastructure, so we are rebuilding it on Workers

Given that all our SDK API requests are already served with Workers, they have no problem scaling instantly to 10x+ their base load. Sadly we can’t say the same about the traditional parts of our infrastructure.

For each feature flag configuration request to a Worker, a corresponding events request is sent to our AWS events infrastructure. The events are received by our events API container in Kubernetes, where they are then published to Kafka and eventually ingested by Snowflake. While Cloudflare Workers have no problem handling instantaneous spikes in feature flag requests, the events system can’t keep up. Our cluster and events API containers need to be scaled up faster to prevent the existing instances from being overwhelmed. Even the load balancer has issues accepting the sudden increase. Cloudflare Workers just work too well in comparison to EC2 instances + EKS.

To solve this issue we are moving towards a new events Cloudflare Worker which will be able to handle the instantaneous events load from these requests and make use of the Kinesis Data Firehose to write events to our existing S3 bucket which is ingested by Snowflake. In the future, we look forward to testing out Cloudflare Queues writing to R2 once a Snowflake connector has been created. This architecture should allow us to ingest events at almost any scale and withstand instantaneous traffic spikes with a predictable and efficient cost structure.

Cloudflare Workers scale too well and broke our infrastructure, so we are rebuilding it on Workers

Building without a database next to your code

Workers provide many benefits, including fast response times, infinite scalability, serverless architecture, and excellent up-time performance. However, if you want to see all these benefits, you need to architect your Workers to assume that you don’t have direct access to a centralized SQL / NoSQL database (or D1) like you would with a traditional API service. For example, suppose you build your workers to require reaching out to a database to fetch and update user data every time a request is made to your Workers. In that case, your request latency will be tied to the geographic distance between your Worker and the database plus the latency of the database. In addition, your Workers will be able to scale significantly beyond the number of database connections you can support, and your uptime will be tied to the uptime of your external database. Therefore, when architecting your systems to use Workers, we advise relying primarily on data sent as part of the API request and cacheable data on Cloudflare’s global network.

Cloudflare provides multiple products and services to help with data on their global network:

  • KV: “global, low-latency, key-value data store.”
  • However, the lowest latency way of retrieving data from within a Worker is limited by a minimum 60-second TTL. So you’ll need to be ok with cached data that is 60 seconds stale.
  • Durable Objects: “provide low-latency coordination and consistent storage for the Workers platform through two features: global uniqueness and a transactional storage API.”
  • Ability to store user-level information closer to the end user.
  • Unfamiliar worker interface for accessing data for developers with SQL / NoSQL experience.
  • R2: “store large amounts of unstructured data.”
  • Ability to store arbitrarily large amounts of unstructured data using familiar S3 APIs.
  • Cloudflare’s cache can be used to provide low-latency access within workers.
  • D1: “serverless SQLite database”

Each of these tools that Cloudflare provides has made building APIs far more accessible than when Workers launched initially; however, each service has aspects which need to be accounted for when architecting your systems. Being an open platform, you can also access any publically available database you want from a Worker. For example, we are making use of Macrometa for our EdgeDB product built into our Workers to help customers access their user data.

The predictable cost structure of Workers

One of the greatest advantages of moving most of our workloads towards Cloudflare Workers is the predictable cost structure that can scale 1:1 with our request loads and can be easily mapped to usage-based billing for our customers. In addition, we no longer have to run excess EC2 instances to handle random spikes in load, just in case they happen.

Too many SaaS services have opaque billing based on max usage or other metrics that don’t relate directly to their costs. Moving from our legacy AWS architecture with high fixed costs like databases and caching layers to Workers has resulted in our infrastructure spending is directly tied to using our APIs and SDKs. For DevCycle, this architecture has been over ~5x more cost-efficient to operate.

The future of DevCycle and Cloudflare

With DevCycle we will continue to invest in leveraging serverless computing and moving our core business logic as close to our users as possible, either on Cloudflare’s global network or locally within our SDKs. We’re excited to integrate even more deeply with the Cloudflare developer platform as new services evolve. We already see future use cases for R2, Queues and Durable Objects and look forward to what’s coming next from Cloudflare.

The road to a more standards-compliant Workers API

Post Syndicated from James M Snell original https://blog.cloudflare.com/standards-compliant-workers-api/

The road to a more standards-compliant Workers API

The road to a more standards-compliant Workers API

Earlier this year, we announced our participation in a new W3C Community Group for the advancement of Web-interoperable API standards. Since then, this new WinterCG has been hard at work identifying the common API standards around which all JavaScript runtimes can build. Today I just want to give a peek at some work the WinterCG has been doing; and show off some of the improvements we have been making in the Workers runtime to increase alignment with Web Platform standards around event handling, task cancellation using AbortController, text encoding and decoding, URL parsing and pattern matching, and streams support.

The WinterCG Minimum Common Web Platform API

Right at the start of the WinterCG activity, the group took some time to evaluate and compare the various non-browser JavaScript runtimes such as Node.js, Deno, Bun, and Workers with the purpose of identifying the Web Platform APIs they all had in common. Following a very simple criteria, we looked at the standard APIs that were already implemented and supported by at least two of these runtimes and compiled those into a list that the WinterCG calls the “Minimum Common Web Platform API“. This list will serve as the basis for what the community group defines as the minimum set of Web Platform APIs that should be implemented consistently across runtimes that claim to be “Web-interoperable”.

The current list is straightforward:

AbortController ReadableStreamDefaultController
AbortSignal ReadableStreamDefaultReader
ByteLengthQueuingStrategy SubtleCrypto
CompressionStream TextDecoder
CountQueuingStrategy TextDecoderStream
Crypto TextEncoder
CryptoKey TextEncoderStream
DecompressionStream TransformStream
DOMException TransformStreamDefaultController
Event URL
EventTarget URLPattern
ReadableByteStreamController URLSearchParams
ReadableStream WritableStream
ReadableStreamBYOBReader WritableStreamDefaultController
ReadableStreamBYOBRequest  

In addition to these, the WinterCG also expects Web-interoperable runtimes to have implementations of the atob(), btoa(), queueMicrotask(), structuredClone(), setTimeout(), clearTimeout(), setInterval(), clearInterval(), console, and crypto.subtle APIs available on the global scope.

Today, we are happy to say that the Workers runtime has compliant or nearly compliant implementations of every one of these WinterCG Minimum Common Web Platform APIs. Some of these APIs intentionally diverge from the standards either due to backwards compatibility concerns, Workers-specific features, or performance optimizations. Other APIs diverge still because we are still in the process of updating them to align with the specifications.

Improving standards compliance in the Workers runtime

The Workers runtime has, from the beginning, had the mission to align its developer experience with JavaScript and Web Platform standards as much as possible. Over the past year we have worked hard to continue advancing that mission forward both by improving the standards-compliance of existing APIs such as Event, EventTarget, URL, and streams; and the introduction of new Web Platform APIs such as URLPattern, encoding streams, and compression streams.

Event and EventTarget

The Workers runtime has provided an implementation of the Event and EventTarget Web Platform APIs from the very beginning. These were, however, only limited implementations of what the WHATWG DOM specification defines. Specifically, Workers had only implemented the bare minimum of the Event API that it itself needed to operate.

Today, the Event and EventTarget implementations in Workers provide a more complete implementation.

Let’s look at the official definition of Event as defined by the WHATWG DOM standard:

[Exposed=*]
interface Event {
  constructor(DOMString type, optional EventInit eventInitDict = {});
 
  readonly attribute DOMString type;
  readonly attribute EventTarget? target;
  readonly attribute EventTarget? srcElement; // legacy
  readonly attribute EventTarget? currentTarget;
  sequence<EventTarget> composedPath();
 
  const unsigned short NONE = 0;
  const unsigned short CAPTURING_PHASE = 1;
  const unsigned short AT_TARGET = 2;
  const unsigned short BUBBLING_PHASE = 3;
  readonly attribute unsigned short eventPhase;
 
  undefined stopPropagation();
           attribute boolean cancelBubble; // legacy alias of .stopPropagation()
  undefined stopImmediatePropagation();
 
  readonly attribute boolean bubbles;
  readonly attribute boolean cancelable;
           attribute boolean returnValue;  // legacy
  undefined preventDefault();
  readonly attribute boolean defaultPrevented;
  readonly attribute boolean composed;
 
  [LegacyUnforgeable] readonly attribute boolean isTrusted;
  readonly attribute DOMHighResTimeStamp timeStamp;
 
  undefined initEvent(DOMString type, optional boolean bubbles = false, optional boolean cancelable = false); // legacy
};
 
dictionary EventInit {
  boolean bubbles = false;
  boolean cancelable = false;
  boolean composed = false;
};

Web Platform API specifications are always written in terms of a definition language called Web IDL. Every attribute defined in the interface is a property that is exposed on the object. Event objects, then, are supposed to have properties like type, target, srcElement, currentTarget, bubbles, cancelable, returnValue, defaultPrevented, composed, isTrusted, and timeStamp. They are also expected to have methods such as composedPath(), stopPropagation(), and stopImmediatePropagation(). Because most of these were not immediately needed by Workers, most were not provided originally.

Today, all standard, non-legacy properties and methods defined by the specification are available for use:

 const event = new Event('foo', {
    bubbles: false,
    cancelable: true,
    composed: true,
  });
 
  console.log(event.bubbles);
  console.log(event.cancelable);
  console.log(event.composed);
  
  addEventListener('foo', (event) => {
    console.log(event.eventPhase);  // 2 AT_TARGET
    console.log(event.currentTarget);
    console.log(event.composedPath());
  });
 
  dispatchEvent(event);

While we were at it, we also fixed a long standing bug in the implementation of Event that prevented user code from properly subclassing the Event object to create their own custom event types. This change is protected by a compatibility flag that is now enabled by default for all Workers using a compatibility date on or past 2022-01-31.

  class MyEvent extends Event {
    constructor() {
      super('my-event')
    }
 
    get type() { return super.type.toUpperCase() }
  }
 
  const myEvent = new MyEvent();
  // Previously, this would print "my-event" instead of "MY-EVENT" as expected.
  console.log(myEvent.type);

The EventTarget implementation has also been updated to support once handlers (event handlers that are triggered at-most once then automatically unregistered), cancelable handlers (using AbortSignal), and event listener objects, all in line with the standard.

Using a one-time event handler

  addEventListener('foo', (event) => {
    console.log('printed only once');
  }, {
    once: true
  });
 
  dispatchEvent(new Event('foo'));
  dispatchEvent(new Event('foo'));

Once handlers are key for preventing memory leaks in your applications when you know that a particular event is only ever going to be emitted once, or whenever you only care about handling it once. The stored reference to the function or object that is handling the event is removed immediately upon the first invocation, allowing the memory to be garbage collected.

Using a cancelable event handler

  const ac = new AbortController();
 
  addEventListener('foo', (event) => {
    console.log('not printed at all');
  }, {
    signal: ac.signal
  });
 
  ac.abort();
 
  dispatchEvent(new Event('foo'));

Using an event listener object

While passing a function to addEventListener() is the most common case, the standard actually allows an event listener to be an object with a handleEvent() method as well.

  const listener = {
    handleEvent(event) {
      console.log(event.type);
    }
  };
 
  addEventListener('foo', listener);
  addEventListener('bar', listener);
 
  dispatchEvent(new Event('foo'));
  dispatchEvent(new Event('bar'));

AbortController and AbortSignal

As illustrated in the cancelable event example above, we have also introduced an implementation of the AbortController and AbortSignal APIs into Workers. These provide a standard, and interoperable way of signaling cancellation of several kinds of tasks.

The AbortController/AbortSignal pattern is straightforward: An AbortSignal is just a type of EventTarget that will emit a single “abort” event when it is triggered:

  const ac = new AbortController();
 
  ac.signal.addEventListener('abort', (event) => {
    console.log(event.reason);  // 'just because'
  }, { once: true });
 
  ac.abort('just because');

The AbortController is used to actually trigger the abort event, optionally with a reason argument that is passed on to the event. The reason is typically an Error object but can be any JavaScript value.

The AbortSignal can only be triggered once, so the “abort” event should only ever be emitted once.

It is also possible to create AbortSignals that timeout after a specified period of time:

const signal = AbortSignal.timeout(10);

Or an AbortSignal that is pre-emptively triggered immediately on creation (these will never actually emit the “abort” event):

const signal = AbortSignal.abort('for reasons');

Currently, within Workers, AbortSignal and AbortController has been integrated with the EventTarget, fetch(), and streams APIs in alignment with the relevant standard specifications for each.

Using AbortSignal to cancel a fetch()

  const ac = new AbortController();
 
  const res = fetch('https://example.org', {
    signal: ac.signal
  });
 
  ac.abort(new Error('canceled'))
 
  try {
    await res;
  } catch (err) {
    console.log(err);
  }

TextEncoderStream and TextDecoderStream

The Workers runtime has long provided basic implementations of the TextEncoder and TextDecoder APIs. Initially, these were limited to only supporting encoding and decoding of UTF-8 text. The standard definition of TextDecoder, however, defines a much broader range of text encodings that are now fully supported by the Workers implementation. Per the standard, TextEncoder currently only supports UTF-8.

  const win1251decoder = new TextDecoder("windows-1251");
  const bytes = new Uint8Array([
    207, 240, 232, 226, 229, 242, 44, 32, 236, 232, 240, 33,
  ]);
  console.log(win1251decoder.decode(bytes)); // Привет, мир!

In addition to supporting the full range of encodings defined by the standard, Workers also now provides implementations of the TextEncoderStream and TextDecoderStream, which provide TransformStream implementations that apply encoding and decoding to streaming data:

  const { writable, readable } = new TextDecoderStream("windows-1251");
 
  const writer = writable.getWriter();
  writer.write(new Uint8Array([
    207, 240, 232, 226, 229, 242, 44, 32, 236, 232, 240, 33,
  ]));
 
  const reader = readable.getReader();
  const res = await reader.read();
  console.log(res.value); // Привет, мир!

Using the encoding streams requires the use of the transformstream_enable_standard_constructor compatibility flag.

CompressionStream and DecompressionStream

Streaming compression and decompression is also now supported in the runtime using the standard CompressionStream and DecompressionStream APIs.

const ds = new DecompressionStream('gzip');
const decompressedStream = blob.stream().pipeThrough(ds);

const cs = new CompressionStream('gzip');
const compressedStream = blob.stream().pipeThrough(cs);

These are TransformStream implementations that fully conform to the standard definitions. Use of the compression streams does not require a compatibility flag to enable.

URL and URLPattern

Similar to Event, there has been an implementation of the Web Platform standard URL API available within Workers from nearly the beginning. But also like Event, the implementation was not entirely compatible with the standard.

The incompatibilities were subtle, for instance, in the original implementation, the URL string “https://a//b//c//” would be parsed incorrectly as “https://a/b/c” (note that the extra empty path segments are removed) whereas the standard parsing algorithm would produce “https://a//b//c/” as a result. Such inconsistent results were causing interoperability issues with JavaScript written to run across multiple JavaScript runtimes and needed to be fixed.

A new implementation of the URL parsing algorithm has been provided, and as of October 31, 2022 it has been enabled by default for all newly deployed Workers. Older Workers can begin using the new implementation by updating their compatibility dates to 2022-10-31 or by enabling the url_standard compatibility flag.

Along with the updated URL implementation, Workers now provides an implementation of the standard URLPattern API.

URLPattern provides a regular-expression-like syntax for matching a URL string against a pattern. For instance, consider this example taken from the MDN documentation for URLPattern:

  // Matching a pathname
  let pattern1 = new URLPattern('https://example.com/books/:id')
  // same as
  let pattern2 = new URLPattern(
    '/books/:id',
    'https://example.com',
  );
  // or
  let pattern3 = new URLPattern({
    protocol: 'https',
    hostname: 'example.com',
    pathname: '/books/:id',
  });
  // or
  let pattern4 = new URLPattern({
    pathname: '/books/:id',
    baseURL: 'https://example.com',
  });

ReadableStream, WritableStream, and TransformStream

Last, but absolutely not least, our most significant effort over the past year has been providing new standards compliant implementations of the ReadableStream, WritableStream, and TransformStream APIs.

The Workers runtime has always provided an implementation of these objects but they were never fully conformant to the standard. User code was not capable of creating custom ReadableStream and WritableStream instances, and TransformStreams were limited to simple identity pass-throughs of bytes. The implementations have been updated now to near complete compliance with the standard (near complete because we still have a few edge cases and features we are working on).

The new streams implementation will be enabled by default in all new Workers as of November 30, 2022, or can be enabled earlier using the streams_enable_constructors and transformstream_enable_standard_constructor compatibility flags.

Creating a custom ReadableStream

async function handleRequest(request) {
  const enc = new TextEncoder();

  const rs = new ReadableStream({
    pull(controller) {
      controller.enqueue(enc.encode('hello world'));
      controller.close();
    }
  });

  return new Response(rs);
}

The new implementation supports both “regular” and “bytes” ReadableStream types, supports BYOB readers, and includes performance optimizations for both tee() and pipeThrough().

Creating a custom WritableStream

  const ws = new WritableStream({
    write(chunk) {
      console.log(chunk);  // "hello world"
    }
  });
 
  const writer = ws.getWriter();
  writer.write("hello world");

WritableStreams are fairly simple objects that can accept any JavaScript value written to them.

Creating a custom TransformStream

  const { readable, writable } = new TransformStream({
    transform(chunk, controller) {
      controller.enqueue(chunk.toUpperCase());
    }
  });
 
  const writer = writable.getWriter();
  const reader = readable.getReader();
 
  writer.write("hello world");
 
  const res = await reader.read();
  console.log(res.value);  // "HELLO WORLD"

It has always been possible in Workers to call new TransformStream() (with no arguments) to create a limited version of a TransformStream that only accepts bytes and only acts as a pass-through, passing the bytes written to the writer on to the reader without any modification.

That original implementation is now available within Workers using the IdentityTransformStream class.

  const { readable, writable } = new IdentityTransformStream();
 
  const writer = writable.getWriter();
  const reader = readable.getReader();
 
  const enc = new TextEncoder();
  const dec = new TextDecoder();
 
  writer.write(enc.encode("hello world"));
 
  const res = await reader.read();
  console.log(dec.decode(res.value));  // "hello world"

If your code is using new TransformStream() today as this kind of pass-through, the new implementation will continue to work except for one very important difference: the old, non-standard implementation of new TransformStream() supported BYOB reads on the readable side (i.e. readable.getReader({ mode: 'byob' })). The new implementation (enabled via a compatibility flag and becoming the default on November 30 ) does not support BYOB reads as required by the stream standard.

What’s next

It is clear that we have made a lot of progress in improving the standards compliance of the Workers runtime over the past year, but there is far more to do. Next we will be turning our attention to the implementation of the fetch() and WebSockets APIs, as well as actively seeking closer alignment with other runtimes through collaboration in the Web-interoperable Runtimes Community Group.

If you are interested in helping drive the implementation of Web Platform APIs forward, and advancing interoperability between JavaScript runtime environments, the Workers Runtime team at Cloudflare is hiring! Reach out, or see our open positions here.

And here’s another one: the Next.js Edge Runtime becomes the fourth full-stack framework supported by Cloudflare Pages

Post Syndicated from Greg Brimble original https://blog.cloudflare.com/next-on-pages/

And here's another one: the Next.js Edge Runtime becomes the fourth full-stack framework supported by Cloudflare Pages

And here's another one: the Next.js Edge Runtime becomes the fourth full-stack framework supported by Cloudflare Pages

You can now deploy Next.js applications which opt in to the Edge Runtime on Cloudflare Pages. Next.js is the fourth full-stack web framework that the Pages platform officially supports, and it is one of the most popular in the ‘Jamstack-y’ space.

Cloudflare Pages started its journey as a platform for static websites, but with last year’s addition of Pages Functions powered by Cloudflare Workers, the platform has progressed to support an even more diverse range of use cases. Pages Functions allows developers to sprinkle in small pieces of server-side code with its simple file-based routing, or, as we’ve seen with the adoption from other frameworks (namely SvelteKit, Remix and Qwik), Pages Functions can be used to power your entire full-stack app. The folks behind Remix previously talked about the advantages of adopting open standards, and we’ve seen this again with Next.js’ Edge Runtime.

Next.js’ Edge Runtime

Next.js’ Edge Runtime is an experimental mode that developers can opt into which results in a different type of application being built. Previously, Next.js applications which relied on server-side rendering (SSR) functionality had to be deployed on a Node.js server. Running a Node.js server has significant overhead, and our Cloudflare Workers platform was fundamentally built on a different technology, V8.

However, when Next.js introduced the Edge Runtime mode in June 2022, we saw the opportunity to bring this widely used framework to our platform. We’re very excited that this is being developed in coordination with the WinterCG standards to ensure interoperability across the various web platforms and to ensure that developers have the choice on where they run their business, without fearing any significant vendor lock-in.

It’s important to note that some existing Next.js apps built for Node.js won’t immediately work on Pages. If your application relies on any Node.js built-ins or long-running processes, then Pages may not support your app with today’s announcement as we’re working on expanding our support for Node.js.

However, we see the migration to the Edge Runtime as an effort that’s worthy of investment, to run your applications, well, on the edge! These applications are cheaper to run, respond faster to users and have the latest features that full-stack frameworks offer. We’re seeing increased interest in third-party npm packages and libraries that support standardized runtimes, and in combination with Cloudflare’s data products (e.g. KV, Durable Objects and D1), we’re confident that the edge is going to be the first place that people will want to deploy applications going forward.

Deploy your Next.js app to Cloudflare Pages

Let’s walk through an example, creating a new Next.js application that opts into this Edge Runtime and deploying it to Cloudflare Pages.

npx create-next-app@latest my-app

This will create a new Next.js app in the my-app folder. The default template comes with a traditional Node.js powered API route, so let’s update that to instead use the Edge Runtime.

// pages/api/hello.js

// Next.js Edge API Routes: https://nextjs.org/docs/api-routes/edge-api-routes

export const config = {
  runtime: 'experimental-edge',
}

export default async function (req) {
  return new Response(
    JSON.stringify({ name: 'John Doe' }),
    {
      status: 200,
      headers: {
        'Content-Type': 'application/json'
      }
    }
  )
}

Thanks to the Edge Runtime adopting the Web API standards, if you’ve ever written a Cloudflare Worker before, this might look familiar.

Next, we can update the global next.config.js configuration file to use the Edge Runtime. This will enable us to use the getServerSideProps() API and server-side render (SSR) our webpages.

// next.config.js

/** @type {import('next').NextConfig} */
const nextConfig = {
  experimental: {
    runtime: 'experimental-edge',
  },
  reactStrictMode: true,
  swcMinify: true,
}
module.exports = nextConfig

Finally, we’re ready to deploy the project. Publish it to a GitHub or GitLab repository, create a new Pages project, and select “Next.js” from the list of framework presets. This will configure your project to use the @cloudflare/next-on-pages CLI which builds and transforms your project into something we can deploy on Pages. Navigate to the project settings and add an environment variable, NODE_VERSION set to 14 or greater, as well as the following compatibility flags: streams_enable_constructors and transformstream_enable_standard_constructor. You should now be able to deploy your Next.js application. If you want to read more, you can find a detailed guide in our documentation.

How it runs on Cloudflare Pages

Compatibility Dates and Compatibility Flags

Cloudflare Workers has solved the versioning problem by introducing compatibility dates and compatibility flags. While it has been in beta, Pages Functions has always defaulted to using the oldest version of the Workers runtime. We’ve now introduced controls to allow developers to set these dates and flags on their Pages projects environments.

And here's another one: the Next.js Edge Runtime becomes the fourth full-stack framework supported by Cloudflare Pages

By keeping this date recent, you are able to opt in to the latest features and bug fixes that the Cloudflare Workers runtime offers, but equally, you’re completely free to keep the date on whatever works for you today, and we’ll continue to support the functionality at that point in time, forever. We also allow you to set these dates for your production and preview environments independently which will let you test these changes out safely in a preview deployment before rolling it out in production.

We’ve been working on adding more support for the Streams API to the Workers Runtime, and some of this functionality is gated behind the flags we added to the project earlier. These flags are currently scheduled to graduate and become on-by-default on a future compatibility date, 2022-11-30.

The @cloudflare/next-on-pages CLI

Vercel introduced the Build Output API in July 2022 as a “zero configuration” directory structure which the Vercel platform inherently understands and can deploy. We’ve decided to hook into this same API as a way to build Next.js projects consistently that we can understand and deploy.

The open-source @cloudflare/next-on-pages CLI runs npx vercel build behind the scenes, which produces a .vercel/output directory. This directory conforms to the Build Output API, and of particular interest, contains a config.json, static folder and folder of functions. The @cloudflare/next-on-pages CLI then parses this config.json manifest, and combines all the functions into a single Pages Functions ‘advanced mode’ _worker.js.

At this point, the build is finished. Pages then automatically picks up this _worker.js and deploys it with Pages Functions atop the static directory.

Although currently just an implementation detail, we opted to use this Build Output API for a number of reasons. We’re also exploring other similar functionality natively on the Pages platform. We already have one “magical” directory, the functions directory which we use for the file-based routing of Pages Functions. It’s possible that we offer other fixed directory structures which would reduce the need for configuration of any projects using frameworks which adopt the API. Let us know in Discord if you have any thoughts or preferences on what you would like to see!

Additionally, if more full-stack frameworks do adopt Vercel’s Build Output API, we may have automatic support for them running on Pages with this CLI. We’ve only been experimenting with Next.js here so far (and SvelteKit, Remix and Qwik all have their own way of building their projects on Pages at the moment), but it’s possible that in the future we may converge on a standard approach which could be shared between frameworks and platforms. We’re excited to see how this might transpire. Again, let us know if you have thoughts!

Experimental webpack minification

As part of the compilation from .vercel/output/functions to an _worker.js, the @cloudflare/next-on-pages CLI can perform an experimental minification to give you more space for your application to run on Workers. Right now, most accounts are limited to a maximum script size of 1MB (although this can be raised in some circumstances—get in touch!). You can ordinarily fit quite a lot of code in this, but one thing notable about Next.js’ build process at the moment is that it creates webpack-compiled, fully-formed and fully-isolated functions scripts in each of the directories in .vercel/output/functions. This means that each function ends up looking something like this:

let _ENTRIES = {};
(() => {
  // webpackBootstrap
})();

(self["webpackChunk_N_E"] = self["webpackChunk_N_E"] || []).push([100], {

  123: (() => {
    // webpack chunk #123
  }),
  234: (() => {
    // webpack chunk #234
  }),
  345: (() => {
    // webpack chunk #345
  }),

  // …lots of webpack chunks…

}, () => {
  // webpackRuntimeModules
}]);

export default {
  async fetch(request, env, ctx) {
    return _ENTRIES['some_function'].default.call(request);
  }
}

The script contains everything that’s needed to deploy this function, and most of the logic exists in these webpack chunks, but that means that each function has a lot of code shared with its siblings. Quickly, you’ll reach the 1MB limit, if you naively deployed all these functions together.

Our @cloudflare/next-on-pages --experimental-minify CLI argument deals with this problem by analyzing webpack chunks which are re-used in multiple places in this .vercel/output/functions directory and extracts out that code to a common place. This allows our compiler (esbuild) to efficiently combine this code, without duplicating it in all of these places. This process is experimental for the time being, while we look to make this as efficient as possible, without introducing any bugs as a result. Please file an issue on GitHub if you notice any difference in behavior when using --experimental-minify.

What’s next?

Pages Functions has been in beta for almost a year, and we’re very excited to say that general availability is just around the corner. We’re polishing off the last of the remaining features which includes analytics, logging, and billing. In fact, for billing, we recently made the announcement of how you’ll be able to use the Workers Paid plan to remove the request limits of the Pages Functions beta from November 15.

Finally, we’re also looking at how we can bring Wasm support to Pages Functions which will unlock ever more use-cases for your full-stack applications. Stay tuned for more information on how we’ll be offering this soon.

Try creating a Next.js Edge Runtime application and deploying it to Cloudflare Pages with the example above or by following the guide in our documentation. Let us know if you have any questions or face any issues in Discord or on GitHub, and please report any quirks of the --experimental-minify argument. As always, we’re excited to see what you build!

Cloudflare Workers and micro-frontends: made for one another

Post Syndicated from Peter Bacon Darwin original https://blog.cloudflare.com/better-micro-frontends/

Cloudflare Workers and micro-frontends: made for one another

To help developers build better web applications we researched and devised a fragments architecture to build micro-frontends using Cloudflare Workers that is lightning fast, cost-effective to develop and operate, and scales to the needs of the largest enterprise teams without compromising release velocity or user experience.

Here we share a technical overview and a proof of concept of this architecture.

Why micro-frontends?

One of the challenges of modern frontend web development is that applications are getting bigger and more complex. This is especially true for enterprise web applications supporting e-commerce, banking, insurance, travel, and other industries, where a unified user interface provides access to a large amount of functionality. In such projects it is common for many teams to collaborate to build a single web application. These monolithic web applications, usually built with JavaScript technologies like React, Angular, or Vue, span thousands, or even millions of lines of code.

When a monolithic JavaScript architecture is used with applications of this scale, the result is a slow and fragile user experience with low Lighthouse scores. Furthermore, collaborating development teams often struggle to maintain and evolve their parts of the application, as their fates are tied with fates of all the other teams, so the mistakes and tech debt of one team often impacts all.

Drawing on ideas from microservices, the frontend community has started to advocate for micro-frontends to enable teams to develop and deploy their features independently of other teams. Each micro-frontend is a self-contained mini-application, that can be developed and released independently, and is responsible for rendering a “fragment” of the page. The application then combines these fragments together so that from the user’s perspective it feels like a single application.

Cloudflare Workers and micro-frontends: made for one another
An application consisting of multiple micro-frontends

Fragments could represent vertical application features, like “account management” or “checkout”, or horizontal features, like “header” or “navigation bar”.

Client-side micro-frontends

A common approach to micro-frontends is to rely upon client-side code to lazy load and stitch fragments together (e.g. via Module Federation). Client-side micro-frontend applications suffer from a number of problems.

Common code must either be duplicated or published as a shared library. Shared libraries are problematic themselves. It is not possible to tree-shake unused library code at build time resulting in more code than necessary being downloaded to the browser and coordinating between teams when shared libraries need to be updated can be complex and awkward.

Also, the top-level container application must bootstrap before the micro-frontends can even be requested, and they also need to boot before they become interactive. If they are nested, then you may end up getting a waterfall of requests to get micro-frontends leading to further runtime delays.

These problems can result in a sluggish application startup experience for the user.

Server-side rendering could be used with client-side micro-frontends to improve how quickly a browser displays the application but implementing this can significantly increase the complexity of development, deployment and operation. Furthermore, most server-side rendering approaches still suffer from a hydration delay before the user can fully interact with the application.

Addressing these challenges was the main motivation for exploring an alternative solution, which relies on the distributed, low latency properties provided by Cloudflare Workers.

Micro-frontends on Cloudflare Workers

Cloudflare Workers is a compute platform that offers a highly scalable, low latency JavaScript execution environment that is available in over 275 locations around the globe. In our exploration we used Cloudflare Workers to host and render micro-frontends from anywhere on our global network.

Fragments architecture

In this architecture the application consists of a tree of “fragments” each deployed to Cloudflare Workers that collaborate to server-side render the overall response. The browser makes a request to a “root fragment”, which will communicate with “child fragments” to generate the final response. Since Cloudflare Workers can communicate with each other with almost no overhead, applications can be server-side rendered quickly by child fragments, all working in parallel to render their own HTML, streaming their results to the parent fragment, which combines them into the final response stream delivered to the browser.

Cloudflare Workers and micro-frontends: made for one another
A high-level overview of a fragments architecture

We have built an example of a “Cloud Gallery” application to show how this can work in practice. It is deployed to Cloudflare Workers at  https://cloud-gallery.web-experiments.workers.dev/

The demo application is a simple filtered gallery of cloud images built using our fragments architecture. Try selecting a tag in the type-ahead to filter the images listed in the gallery. Then change the delay on the stream of cloud images to see how the type-ahead filtering can be interactive before the page finishes loading.

Multiple Cloudflare Workers

The application is composed of a tree of six collaborating but independently deployable Cloudflare Workers, each rendering their own fragment of the screen and providing their own client-side logic, and assets such as CSS stylesheets and images.

Cloudflare Workers and micro-frontends: made for one another
Architectural overview of the Cloud Gallery app

The “main” fragment acts as the root of the application. The “header” fragment has a slider to configure an artificial delay to the display of gallery images. The “body” fragment contains the “filter” fragment and “gallery” fragments. Finally, the “footer” fragment just shows some static content.

The full source code of the demo app is available on GitHub.

Benefits and features

This architecture of multiple collaborating server-side rendered fragments, deployed to Cloudflare Workers has some interesting features.

Encapsulation

Fragments are entirely encapsulated, so they can control what they own and what they make available to other fragments.

Fragments can be developed and deployed independently

Updating one of the fragments is as simple as redeploying that fragment. The next request to the main application will use the new fragment. Also, fragments can host their own assets (client-side JavaScript, images, etc.), which are streamed through their parent fragment to the browser.

Server-only code is not sent to the browser

As well as reducing the cost of downloading unnecessary code to the browser, security sensitive code that is only needed for server-side rendering the fragment is never exposed to other fragments and is not downloaded to the browser. Also, features can be safely hidden behind feature flags in a fragment, allowing more flexibility with rolling out new behavior safely.

Composability

Fragments are fully composable – any fragment can contain other fragments. The resulting tree structure gives you more flexibility in how you architect and deploy your application. This helps larger projects to scale their development and deployment. Also, fine-grain control over how fragments are composed, could allow fragments that are expensive to server-side render to be cached individually.

Fantastic Lighthouse scores

Streaming server-rendered HTML results in great user experiences and Lighthouse scores, which in practice means happier users and higher chance of conversions for your business.

Cloudflare Workers and micro-frontends: made for one another
Lighthouse scores for the Cloud Gallery app

Each fragment can parallelize requests to its child fragments and pipe the resulting HTML streams into its own single streamed server-side rendered response. Not only can this reduce the time to render the whole page but streaming each fragment through to the browser reduces the time to the first byte of each fragment.

Eager interactivity

One of the powers of a fragments architecture is that fragments can become interactive even while the rest of the application (including other fragments) is still being streamed down to the browser.

In our demo, the “filter” fragment is immediately interactive as soon as it is rendered, even if the image HTML for the “gallery” fragment is still loading.

To make it easier to see this, we added a slider to the top of the “header” that can simulate a network or database delay that slows down the HTML stream which renders the “gallery” images. Even when the “gallery” fragment is still loading, the type-ahead input, in the “filter” fragment, is already fully interactive.

Just think of all the frustration that this eager interactivity could avoid for web application users with unreliable Internet connection.

Under the hood

As discussed already this architecture relies upon deploying this application as many cooperating Cloudflare Workers. Let’s look into some details of how this works in practice.

We experimented with various technologies, and while this approach can be used with many frontend libraries and frameworks, we found the Qwik framework to be a particularly good fit, because of its HTML-first focus and low JavaScript overhead, which avoids any hydration problems.

Implementing a fragment

Each fragment is a server-side rendered Qwik application deployed to its own Cloudflare Worker. This means that you can even browse to these fragments directly. For example, the “header” fragment is deployed to https://cloud-gallery-header.web-experiments.workers.dev/.

Cloudflare Workers and micro-frontends: made for one another
A screenshot of the self-hosted “header” fragment

The header fragment is defined as a Header component using Qwik. This component is rendered in a Cloudflare Worker via a fetch() handler:

export default {
  fetch(request: Request, env: Record<string, unknown>): Promise<Response> {
    return renderResponse(request, env, <Header />, manifest, "header");
  },
};

cloud-gallery/header/src/entry.ssr.tsx

The renderResponse() function is a helper we wrote that server-side renders the fragment and streams it into the body of a Response that we return from the fetch() handler.

The header fragment serves its own JavaScript and image assets from its Cloudflare Worker. We configure Wrangler to upload these assets to Cloudflare and serve them from our network.

Implementing fragment composition

Fragments that contain child fragments have additional responsibilities:

  • Request and inject child fragments when rendering their own HTML.
  • Proxy requests for child fragment assets through to the appropriate fragment.

Injecting child fragments

The position of a child fragment inside its parent can be specified by a FragmentPlaceholder helper component that we have developed. For example, the “body” fragment has the “filter” and “gallery” fragments.

<div class="content">
  <FragmentPlaceholder name="filter" />
  <FragmentPlaceholder name="gallery" />
</div>

cloud-gallery/body/src/root.tsx

The FragmentPlaceholder component is responsible for making a request for the fragment and piping the fragment stream into the output stream.

Proxying asset requests

As mentioned earlier, fragments can host their own assets, especially client-side JavaScript files. When a request for an asset arrives at the parent fragment, it needs to know which child fragment should receive the request.

In our demo we use a convention that such asset paths will be prefixed with /_fragment/<fragment-name>. For example, the header logo image path is /_fragment/header/cf-logo.png. We developed a tryGetFragmentAsset() helper which can be added to the parent fragment’s fetch() handler to deal with this:

export default {
  async fetch(
    request: Request,
    env: Record<string, unknown>
  ): Promise<Response> {
    // Proxy requests for assets hosted by a fragment.
    const asset = await tryGetFragmentAsset(env, request);
    if (asset !== null) {
      return asset;
    }
    // Otherwise server-side render the template injecting child fragments.
    return renderResponse(request, env, <Root />, manifest, "div");
  },
};

cloud-gallery/body/src/entry.ssr.tsx

Fragment asset paths

If a fragment hosts its own assets, then we need to ensure that any HTML it renders uses the special _fragment/<fragment-name> path prefix mentioned above when referring to these assets. We have implemented a strategy for this in the helpers we developed.

The FragmentPlaceholder component adds a base searchParam to the fragment request to tell it what this prefix should be. The renderResponse() helper extracts this prefix and provides it to the Qwik server-side renderer. This ensures that any request for client-side JavaScript has the correct prefix. Fragments can apply a hook that we developed called useFragmentRoot(). This allows components to gather the prefix from a FragmentContext context.

For example, since the “header” fragment hosts the Cloudflare and GitHub logos as assets, it must call the useFragmentRoot() hook:

export const Header = component$(() => {
  useStylesScoped$(HeaderCSS);
  useFragmentRoot();

  return (...);
});

cloud-gallery/header/src/root.tsx

The FragmentContext value can then be accessed in components that need to apply the prefix. For example, the Image component:

export const Image = component$((props: Record<string, string | number>) => {
  const { base } = useContext(FragmentContext);
  return <img {...props} src={base + props.src} />;
});

cloud-gallery/helpers/src/image/image.tsx

Service-binding fragments

Cloudflare Workers provide a mechanism called service bindings to make requests between Cloudflare Workers efficiently that avoids network requests. In the demo we use this mechanism to make the requests from parent fragments to their child fragments with almost no performance overhead, while still allowing the fragments to be independently deployed.

Comparison to current solutions

This fragments architecture has three properties that distinguish it from other current solutions.

Unlike monoliths, or client-side micro-frontends, fragments are developed and deployed as independent server-side rendered applications that are composed together on the server-side. This significantly improves rendering speed, and lowers interaction latency in the browser.

Unlike server-side rendered micro-frontends with Node.js or cloud functions, Cloudflare Workers is a globally distributed compute platform with a region-less deployment model. It has incredibly low latency, and a near-zero communication overhead between fragments.

Unlike solutions based on module federation, a fragment’s client-side JavaScript is very specific to the fragment it is supporting. This means that it is small enough that we don’t need to have shared library code, eliminating the version skew issues and coordination problems when updating shared libraries.

Future possibilities

This demo is just a proof of concept, so there are still areas to investigate. Here are some of the features we’d like to explore in the future.

Caching

Each micro-frontend fragment can be cached independently of the others based on how static its content is. When requesting the full page, the fragments only need to run server-side rendering for micro-frontends that have changed.

Cloudflare Workers and micro-frontends: made for one another
An application where the output of some fragments are cached

With per-fragment caching you can return the HTML response to the browser faster, and avoid incurring compute costs in re-rendering content unnecessarily.

Fragment routing and client-side navigation

Our demo application used micro-frontend fragments to compose a single page. We could however use this approach to implement page routing as well. When server-side rendering, the main fragment could insert the appropriate “page” fragment based on the visited URL. When navigating, client-side, within the app, the main fragment would remain the same while the displayed “page” fragment would change.

Cloudflare Workers and micro-frontends: made for one another
An application where each route is delegated to a different fragment

This approach combines the best of server-side and client-side routing with the power of fragments.

Using other frontend frameworks

Although the Cloud Gallery application uses Qwik to implement all fragments, it is possible to use other frameworks as well. If really necessary, it’s even possible to mix and match frameworks.

To achieve good results, the framework of choice should be capable of server-side rendering, and should have a small client-side JavaScript footprint. HTML streaming capabilities, while not required, can significantly improve performance of large applications.

Cloudflare Workers and micro-frontends: made for one another
An application using different frontend frameworks

Incremental migration strategies

Adopting a new architecture, compute platform, and deployment model is a lot to take in all at once, and for existing large applications is prohibitively risky and expensive. To make this  fragment-based architecture available to legacy projects, an incremental adoption strategy is a key.

Developers could test the waters by migrating just a single piece of the user-interface within their legacy application to a fragment, integrating with minimal changes to the legacy application. Over time, more of the application could then be moved over, one fragment at a time.

Convention over configuration

As you can see in the Cloud Gallery demo application, setting up a fragment-based micro-frontend requires quite a bit of configuration. A lot of this configuration is very mechanical and could be abstracted away via conventions and better tooling. Following productivity-focused precedence found in Ruby on Rails, and filesystem based routing meta-frameworks, we could make a lot of this configuration disappear.

Try it yourself!

There is still so much to dig into! Web applications have come a long way in recent years and their growth is hard to overstate. Traditional implementations of micro-frontends have had only mixed success in helping developers scale development and deployment of large applications. Cloudflare Workers, however, unlock new possibilities which can help us tackle many of the existing challenges and help us build better web applications.

Thanks to the generous free plan offered by Cloudflare Workers, you can check out the Gallery Demo code and deploy it yourself.

If all of these sounds interesting to you, and you would like to work with us on improving the developer experience for Cloudflare Workers, we are also happy to share that we are hiring!

The world’s leading venture capitalist firms commit $1.25 BILLION to back startups built on Cloudflare Workers

Post Syndicated from Mia Wang original https://blog.cloudflare.com/workers-launchpad/

The world’s leading venture capitalist firms commit $1.25 BILLION to back startups built on Cloudflare Workers

The world’s leading venture capitalist firms commit $1.25 BILLION to back startups built on Cloudflare Workers

From our earliest days, Cloudflare has stood for helping build a better Internet that’s accessible to all. It’s core to our mission that anyone who wants to start building on the Internet should be able to do so easily, and without the barriers of prohibitively expensive or difficult to use infrastructure.

Nowhere is this philosophy more important – and more impactful to the Internet – than with our developer platform, Cloudflare Workers. Workers is, quite simply, where developers and entrepreneurs start on Day 1. It’s a full developer platform that includes cloud storage; website hosting; SQL databases; and of course, the industry’s leading serverless product. The platform’s ease-of-use and accessible pricing (all the way down to free) are critical in advancing our mission. For startups, this translates into fast, easy deployment and iteration, that scales seamlessly with predictable, transparent and cost-effective pricing. Building a great business from scratch is hard enough – we ought to know! – and so we’re aiming to take all the complexity out of your application infrastructure.

Announcing the Workers Launchpad funding program

Today, we’re taking things a step further and making it easier for startups to build the business of their dreams. We’re announcing a $1.25 billion Workers Launchpad funding program in partnership with some of the world’s leading venture capital firms. Any startup built on Workers can apply. As is the case with the Workers Platform itself, we’ve tried to make applying dead simple: it should take you less than five minutes to submit your application through the Workers Launchpad portal.

How does it work? The only requirement for being eligible for the funding program is that you’ve built your core infrastructure on Workers. If you’re new to Cloudflare and Cloudflare Workers, check out our Startup Plan to get started. We hope these resources will be helpful to all startups and help level the playing field, no matter where in the world you might be.

Once you submit your application, it will be reviewed by our Launchpad team, several of whom are former entrepreneurs and venture capital folks themselves. They’ll match promising applicants with our VC partners who have the most expertise in your space (more on them below). Every quarter, we’ll announce the winners of our Launchpad program. Winners, our “Workers Founders”, will be guaranteed the opportunity to pitch the VC partner(s) that we’ve determined would be a good match for your business. It’s a win-win all around. VCs get the opportunity to invest in businesses they know are being built on a forward-looking, world-class, development platform. Entrepreneurs get connected to world-class VCs. And for the first class of winners, we’ll have a few added perks that we describe in more detail below.

Who are the VCs that you might get a chance to pitch to?

When we approached our friends in the venture community with our vision for the Workers Launchpad, we received incredibly positive feedback and excitement. Many have seen firsthand the competitive advantages of building on Workers through their own portfolio companies. Moreover, Cloudflare is home to one of the largest developer communities on Earth with approximately 20% of the world’s websites on our network. As such, we can play a unique role in matching great entrepreneurs with great VCs to further not only the Workers platform, but also the Internet ecosystem, for everyone.

We’re honored to announce a world-class group of VC Launch Partners supporting this program and the ecosystem of Workers-based startups:

The world’s leading venture capitalist firms commit $1.25 BILLION to back startups built on Cloudflare Workers

More on why we’re doing this

So why are we doing this? The simple answer is we’re proud of our Workers Developer Platform and think that everyone should be using it. Entrepreneurs who develop on Workers can ship faster; more easily and cost-effectively; and in a way that future proofs your infrastructure:

Speed. Development velocity isn’t just a convenience for an entrepreneur. It’s a massive competitive advantage. In fact, development velocity is one of Cloudflare’s competitive advantages – we’re able to develop quickly because we build on Workers. When you develop on Workers, you don’t need to spend time configuring DNS records, maintaining certificates, scaling up clusters, or building complex deployment pipelines. Focus on developing your application, and Cloudflare will handle the rest.

Ease of use. Startup teams and founders are some of the busiest people on earth. You shouldn’t have to think about – or make complicated decisions about – IT infrastructure. Questions like: “Which availability zone should I choose?”, or “Will I be able to scale up my infrastructure in time for our next viral marketing campaign?” shouldn’t have to cross your mind! And on the Workers Platform, they don’t. The code you and your team writes automatically deploys quickly and consistently across Cloudflare’s global network in 275+ cities in over 100 countries. Cloudflare securely and scalably connects your users to your applications, regardless of where those applications are hosted or how many users suddenly sign up for your product. Developers can easily manage globally distributed applications with a programmable network that easily connects to whatever services they need to talk to.

Future-proofing your infrastructure and your wallet. Cloudflare’s massive global network – that’s distributed across 275+ cities in over 100 countries – is able to scale with your business, no matter how large it grows to become. We also help you remain compliant with local laws and regulations as you expand around the world, with capabilities like Workers’ Jurisdictional Restrictions for Durable Objects. You can sleep soundly at night instead of worrying about how to level up your infrastructure in the midst of shifting regulations, and equally importantly, knowing that you will not wake up to any surprise bills. Many of us have had the experience of being charged unexpected and / or exorbitant fees from our cloud providers. For example, providers will often make it easy and free to onboard your application or data, but charge exorbitant rates when you want to move them out (i.e. egress fees). Cloudflare will never charge for egress. Our pricing is simple, and we constantly aim to be the low-cost provider, no matter how large your business grows to be.

The world’s leading venture capitalist firms commit $1.25 BILLION to back startups built on Cloudflare Workers

Dogfooding our own product

We’re excited about Workers not only because we’ve built our own infrastructure on it, but also because we’re seeing the incredible things others have built on it. In fact, we acquired a company built entirely on Workers at the end of last year, an Isareli start-up named Zaraz, which secures and accelerates third party web tools. Workers allowed Zaraz to replace the multiple network requests of each tool running on a website with one single request, effectively streamlining a messy web of extensions into a single lightweight application. This acquisition opened our eyes to the power of the global community that’s built on our platform, and left us motivated to help startups built on Workers find the funding, mentorship, and support needed to grow.

But wait, there’s more!

To make it even easier for startups to take advantage of all the benefits that Workers has to offer, applicants to the Workers Launchpad program who have raised less than $3 million in total external funding will automatically have the option to receive Cloudflare’s Startup Plan. This plan includes all the elements of Cloudflare’s Pro and Business Plans ($2,400 annual value) plus higher tiers of our Stream video product, our Teams Zero Trust security suite and the Workers platform. To make sure the full range of our developer platform is accessible to startups, we recently more than tripled the number of products available in this plan, which now includes email security, R2, Pages, KV, and many others.

Furthermore, all startups that apply by October 31, 2022, will be eligible to be selected for the Winter 2022 class of Workers Founders, which will unlock additional support, mentorship, and marketing opportunities. Being selected as a Workers Founder will get you a chance to practice your pitch with investors, engage with leaders from Cloudflare, and get advice on how to build a successful business from topics like recruiting to marketing, sales, and beyond during a virtual Workers Founders Bootcamp Week. The program will culminate in a virtual Demo Day, so you can show the world what you’ve been building. We’re leaning in to help promising entrepreneurs join us in our mission to help build a better Internet.

Helping make the Internet better for all

Accessibility and ease of use are core to everything we do at Cloudflare. We will always make our products and platforms so easy to use that even the smallest business or hobbyist can easily use them. We hope the Workers Launchpad funding program encourages entrepreneurs from all around the world, and from all backgrounds, to start building on Workers, and makes it easier for you to find the funding you need to build the business of your dreams.

Head to the Workers Launchpad page to apply and join the Cloudflare Developer Discord to engage with the Workers community. If you’re a VC that is interested in supporting the program, reach out to [email protected].

Cloudflare is not providing any funding or making any funding decisions, and there is no guarantee that any particular company will receive funding through the program. All funding decisions will be made by the venture capital firms that participate in the program. Cloudflare is not a registered broker-dealer, investment adviser, or other similar intermediary.

Introducing workerd: the Open Source Workers runtime

Post Syndicated from Kenton Varda original https://blog.cloudflare.com/workerd-open-source-workers-runtime/

Introducing workerd: the Open Source Workers runtime

Introducing workerd: the Open Source Workers runtime

Today I’m proud to introduce the first beta release of workerd, the JavaScript/Wasm runtime based on the same code that powers Cloudflare Workers. workerd is Open Source under the Apache License version 2.0.

workerd shares most of its code with the runtime that powers Cloudflare Workers, but with some changes designed to make it more portable to other environments. The name “workerd” (pronounced “worker dee”) comes from the Unix tradition of naming servers with a “-d” suffix standing for “daemon”. The name is not capitalized because it is a program name, which are traditionally lower-case in Unix-like environments.

What it’s for

Self-hosting Workers

workerd can be used to self-host applications that you’d otherwise run on Cloudflare Workers. It is intended to be a production-ready web server for this purpose. workerd has been designed to be unopinionated about hosting environments, so that it should fit nicely into whatever server/VM/container hosting and orchestration system you prefer. It’s just a web server.

Workers has always been based on standardized APIs, so that code is not locked into Cloudflare, and we work closely with other runtimes to promote compatibility. workerd provides another option to ensure that applications built on Workers can run anywhere, by leveraging the same underlying code to get exact, “bug-for-bug” compatibility.

Local development and testing

workerd is also designed to facilitate realistic local testing of Workers. Up until now, this has been achieved using Miniflare, which simulated the Workers API within a Node.js environment. Miniflare has worked well, but in a number of cases its behavior did not exactly match Workers running on Cloudflare. With the release of workerd, Miniflare and the Wrangler CLI tool will now be able to provide a more accurate simulation by leveraging the same runtime code we use in production.

Programmable proxies

workerd can act as an application host, a proxy, or both. It supports both forward and reverse proxy modes. In all cases, JavaScript code can be used to intercept and process requests and responses before forwarding them on. Traditional web servers and proxies have used bespoke configuration languages with quirks that are hard to master. Programming proxies in JavaScript instead provides more power while making the configuration easier to write and understand.

What it is

workerd is not just another way to run JavaScript and Wasm. Our runtime is uniquely designed in a number of ways.

Server-first

Many non-browser JavaScript and Wasm runtimes are designed to be general-purpose: you can use them to build command-line apps, local GUI apps, servers, or anything in between. workerd is not. It specifically focuses on servers, in particular (for now, at least) HTTP servers.

This means in particular that workerd-based applications are event-driven at the top level. Applications do not open listen sockets and accept connections from them; instead, the runtime pushes events to the application. It may seem like a minor difference, but this basic change in perspective directly enables many of the features below.

Web standard APIs

Wherever possible, Workers (and workerd in particular) offers the same standard APIs found in web browsers, such as Fetch, URL, WebCrypto, and others. This means that code built on workerd is more likely to be portable to browsers as well as to other standards-based runtimes. When Workers launched five years ago, it was unusual for a non-browser to offer web APIs, but we are pleased to see that the broader JavaScript ecosystem is now converging on them.

Nanoservices

workerd is a nanoservice runtime. What does that mean?

Microservices have become popular over the last decade as a way to split monolithic servers into smaller components that could be maintained and deployed independently. For example, a company that offers several web applications with a common user authentication flow might have a separate team that maintains the authentication logic. In a monolithic model, the authentication logic might have been offered to the application teams as a library. However, this could be frustrating for the maintainers of that logic, as making any change might require waiting for every application team to deploy an update to their respective server. By splitting the authentication logic into a separate server that all the others talk to, the authentication team is able to deploy changes on their own schedule.

However, microservices have a cost. What was previously a fast library call instead now requires communicating over a network. In addition to added overhead, this communication requires configuration and administration to ensure security and reliability. These costs become greater as the codebase is split into more and more services. Eventually, the costs outweigh the benefits.

Nanoservices are a new model that achieve the benefits of independent deployment with overhead closer to that of library calls. With workerd, many Workers can be configured to run in the same process. Each Worker runs in a separate “isolate”, which gives the appearance of running independently of the others: each isolate loads separate code and has its own global scope. However, when one Worker explicitly sends a request to another Worker, the destination Worker actually runs in the same thread with zero latency. So, it performs more like a function call.

With nanoservices, teams can now break their code into many more independently-deployed pieces without worrying about the overhead.

(Some in the industry prefer to call nanoservices “functions”, implying that each individual function making up an application could be its own service. I feel, however, that this puts too much emphasis on syntax rather than logical functionality. That said, it is the same concept.)

To really make nanoservices work well, we had to minimize the baseline overhead of each service. This required designing workerd very differently from most other runtimes, so that common resources could be shared between services as much as possible. First, as mentioned, we run many nanoservices within a single process, to share basic process overhead and minimize context switching costs. A second big architectural difference between workerd and other runtimes is how it handles built-in APIs. Many runtimes implement significant portions of their built-in APIs in JavaScript, which must then be loaded separately into each isolate. workerd does not; all the APIs are implemented in native code, so that all isolates may share the same copy of that code. These design choices would be difficult to retrofit into another runtime, and indeed these needs are exactly why we chose to build a custom runtime for Workers from the start.

Homogeneous deployment

In a typical microservices model, you might deploy different microservices to containers running across a cluster of machines, connected over a local network. You might manually choose how many containers to dedicate to each service, or you might configure some form of auto-scaling based on resource usage.

workerd offers an alternative model: Every machine runs every service.

workerd’s nanoservices are much lighter-weight than typical containers. As a result, it’s entirely reasonable to run a very large number of them – hundreds, maybe thousands – on a single server. This in turn means that you can simply deploy every service to every machine in your fleet.

Homogeneous deployment means that you don’t have to worry about scaling individual services. Instead, you can simply load balance requests across the entire cluster, and scale the cluster as needed. Overall, this can greatly reduce the amount of administration work needed.

Cloudflare itself has used the homogeneous model on our network since the beginning. Every one of Cloudflare’s edge servers runs our entire software stack, so any server can answer any kind of request on its own. We’ve found it works incredibly well. This is why services on Cloudflare – including ones that use Workers – are able to go from no traffic at all to millions of requests per second instantly without trouble.

Capability bindings: cleaner configuration and SSRF safety

workerd takes a different approach to most runtimes – indeed, to most software development platforms – in how an application accesses external resources.

Most development platforms start from assuming that the application can talk to the whole world. It is up to the application to figure out exactly what it wants to talk to, and name it in some global namespace, such as using a URL. So, an application server that wants to talk to the authentication microservice might use code like this:

// Traditional approach without capability bindings.
fetch("https://auth-service.internal-network.example.com/api", {
  method: "POST",
  body: JSON.stringify(authRequest),
  headers: { "Authorization": env.AUTH_SERVICE_TOKEN }
});

In workerd, we do things differently. An application starts out with no ability to talk to the rest of the world, and must be configured with specific capability bindings that provide it access to specific external resources. So, an application which needs to be able to talk to the authentication service would be configured with a binding called authService, and the code would look something like this:

// Capability-based approach. Hostname doesn't matter; all
// requests to AUTH_SERVICE.fetch() go to the auth service.
env.AUTH_SERVICE.fetch("https://auth/api", {
 method: "POST",
 body: JSON.stringify(authRequest),
});

This may at first appear to be a trivial difference. In both cases, we have to use configuration to control access to external services. In the traditional approach, we’d provide access tokens (and probably the service’s hostname) as environment variables. In the new approach, the environment goes a bit further to provide a full-fledged object. Is this just syntax sugar?

It turns out, this slight change has huge advantages:

First, we can now restrict the global fetch() function to accept only publicly-routable URLs. This makes applications totally immune to SSRF attacks! You cannot trick an application into accessing an internal service unintentionally if the code to access internal services is explicitly different. (In fact, the global fetch() is itself backed by a binding, which can be configured. workerd defaults to connecting it to the public internet, but you can also override it to permit private addresses if you want, or to route to a specific proxy service, or to be blocked entirely.)

With that done, we now have an interesting property: All internal services which an application uses must be configurable. This means:

  • You can easily see a complete list of the internal services an application talks to, without reading all the code.
  • You can always replace these services with mocks for testing purposes.
  • You can always configure an application to authenticate itself differently (e.g. client certificates) or use a different back end, without changing code.

The receiving end of a binding benefits, too. Take the authentication service example, above. The auth service may be another Worker running in workerd as a nanoservice. In this case, the auth service does not need to be bound to any actual network address. Instead, it may be made available strictly to other Workers through their bindings. In this case, the authentication service doesn’t necessarily need to verify that a request received came from an allowed client – because only allowed clients are able to send requests to it in the first place.

Overall, capability bindings allow simpler code that is secure by default, more composable, easier to test, and easier to understand and maintain.

Always backwards compatible

Cloudflare Workers has a hard rule against ever breaking a live Worker running in production. This same dedication to backwards compatibility extends to workerd.

workerd shares Workers’ compatibility date system to manage breaking changes. Every Worker must be configured with a “compatibility date”. The runtime then ensures that the API behaves exactly as it did on that date. At your leisure, you may check the documentation to see if new breaking changes are introduced at a future date, and update your code for them. Most such changes are minor and most code won’t require any changes. However, you are never obliged to update. Old dates will continue to be supported by newer versions of workerd. It is always safe to update workerd itself without updating your code.

What it’s not

To avoid misleading or disappointing anyone, I need to take a moment to call out what workerd is not.

workerd is not a Secure Sandbox

It’s important to note that workerd is not, on its own, a secure way to run possibly-malicious code. If you wish to run code you don’t trust using workerd, you must enclose it in an additional sandboxing layer, such as a virtual machine configured for sandboxing.

workerd itself is designed such that a Worker should not be able to access any external resources to which it hasn’t been granted a capability. However, a complete sandbox solution not only must be designed to restrict access, but also must account for the possibility of bugs – both in software and in hardware. workerd on its own is not sufficient to protect against hardware bugs like Spectre, nor can it adequately defend against the possibility of vulnerabilities in V8 or in workerd’s own code.

The Cloudflare Workers service uses the same code found in workerd, but adds many additional layers of security on top to harden against such bugs. I described some of these in a past blog post. However, these measures are closely tied to our particular environment. For example, we rely on build automation to push V8 patches to production immediately upon becoming available; we separate customers according to risk profile; we rely on non-portable kernel features and assumptions about the host system to enforce security and resource limits. All of this is very specific to our environment, and cannot be packaged up in a reusable way.

workerd is not an independent project

workerd is the core of Cloudflare Workers, a fast-moving project developed by a dedicated team at Cloudflare. We are not throwing code over the wall to forget about, nor are we expecting volunteers to do our jobs for us. workerd’s GitHub repository will be the canonical source used by Cloudflare Workers and our team will be doing much of their work directly in this repository. Just like V8 is developed primarily by the Chrome team for use in Chrome, workerd will be developed primarily by the Cloudflare Workers team for use in Cloudflare Workers.

This means we cannot promise that external contributions will sit on a level playing field with internal ones. Code reviews take time, and work that is needed for Cloudflare Workers will take priority. We also cannot promise we will accept every feature contribution. Even if the code is already written, reviews and maintenance have a cost. Within Cloudflare, we have a product management team who carefully evaluates what features we should and shouldn’t offer, and plenty of ideas generated internally ultimately don’t make the cut.

If you want to contribute a big new feature to workerd, your best bet is to talk to us before you write code, by raising an issue on GitHub early to get input. That way, you can find out if we’re likely to accept a PR before you write it. We also might be able to give hints on how best to implement.

It’s also important to note that while workerd’s internal interfaces may sometimes appear clean and reusable, we cannot make any guarantee that those interfaces won’t completely change on a whim. If you are trying to build on top of workerd internals, you will need to be prepared either to accept a fair amount of churn, or pin to a specific version.

workerd is not an off-the-shelf edge compute platform

As hinted above, the full Cloudflare Workers service involves a lot of technology beyond workerd itself, including additional security, deployment mechanisms, orchestration, and so much more. workerd itself is a portion of our runtime codebase, which is itself a small (albeit critical) piece of the overall Cloudflare Workers service.

We are pleased, though, that this means it is possible for us to release this code under a permissive Open Source license.

Try the Beta

As of this blog post, workerd is in beta. If you want to try it out,

Cloudflare Queues: globally distributed queues without the egress fees

Post Syndicated from Ashcon Partovi original https://blog.cloudflare.com/introducing-cloudflare-queues/

Cloudflare Queues: globally distributed queues without the egress fees

Cloudflare Queues: globally distributed queues without the egress fees

Developers continue to build more complex applications on Cloudflare’s Developer Platform. We started with Workers, which brought compute, then introduced KV, Durable Objects, R2, and soon D1, which enabled persistence. Now, as we enable developers to build larger, more sophisticated, and more reliable applications, it’s time to unlock another foundational building block: messaging.

Thus, we’re excited to announce the private beta of Cloudflare Queues, a global message queuing service that allows applications to reliably send and receive messages using Cloudflare Workers. It offers at-least once message delivery, supports batching of messages, and charges no bandwidth egress fees. Let’s queue up the details.

What is a Queue?

Queues enable developers to send and receive messages with a guarantee of delivery. Think of it like the postal service for the Internet. You give it a message, then it handles all the hard work to ensure the message gets delivered in a timely manner. Unlike the real postal service, where it’s possible for a message to get lost, Queues provide a guarantee that each message is delivered at-least once; no matter what. This lets you focus on your application, rather than worry about the chaos of transactions, retries, and backoffs to prevent data loss.

Queues also allow you to scale your application to process large volumes of data. Imagine a million people send you a package in the mail, at the same time. Instead of a million postal workers suddenly showing up at your front door, you would want them to aggregate your mail into batches, then ask you when you’re ready to receive each batch. This lets you decouple and spread load among services that have different throughput characteristics.

How does it work?

Queues are integrated into the fabric of the Cloudflare Workers runtime, with simple APIs that make it easy to send and receive messages. First, you’ll want to send messages to the Queue. You can do this by defining a Worker, referred to as a “producer,” which has a binding to the Queue.

In the example below, a Worker catches JavaScript exceptions and sends them to a Queue. You might notice that any object can be sent to the Queue, including an error. That’s because messages are encoded using the standard structuredClone() algorithm.

export default {
  async fetch(request: Request, env: Environment) {
     try {
       return await doRequest(request);
     } catch (error) {
       await env.ERROR_QUEUE.send(error);
       return new Response(error.stack, { status: 500 });
     }
  }
}

Second, you’ll want to process messages in the Queue. You can do this by defining a Worker, referred to as the “consumer,” which will receive messages from the Queue. To facilitate this, there is a new type of event handler, named “queue,” which receives the messages sent to the consumer.

This Worker is configured to receive messages from the previous example. It appends the stack trace of each Error to a log file, then saves it to an R2 bucket.

export default {
  async queue(batch: MessageBatch<Error>, env: Environment) {
     let logs = "";
     for (const message of batch.messages) {
        logs += message.body.stack;
     }
     await env.ERROR_BUCKET.put(`errors/${Date.now()}.log`, logs);
  }
}

Configuration is also easy. You can change the message batch size, message retries, delivery wait time, and dead-letter queue. Here’s a snippet of the wrangler.toml configuration when deploying with wrangler, our command-line interface

name = "my-producer"
[queues]
producers = [{ queue = "errors", binding = "ERROR_QUEUE" }]
# ---
name = "my-consumer"
[queues]
consumers = [{ queue = "errors", max_batch_size = 100, max_retries = 3 }]

Above are two different wrangler.tomls, one for a producer and another for a consumer. It is also possible for a producer and consumer to be implemented by the same Worker. To see the full list of options and examples, see the documentation.

What can you build with it?

You can use Cloudflare Queues to defer tasks and guarantee they get processed, decouple load among different services, batch events and process them together, and send messages from Worker to Worker.

To demonstrate, we’ve put together a demo application that you can run on your local machine using wrangler. It shows how Queues can batch messages and handle failures in your code, here’s a preview of it in action:

In addition to batching, here are other examples of what you can build with Queues:

  • Off-load tasks from the critical path of a Workers request.
  • Guarantee messages get delivered to a service that talks HTTP.
  • Transform, filter, and fan-out messages to multiple Queues.

Cloudflare Queues gives you the flexibility to decide where to route messages. Instead of static configuration files that define routing keys and patterns, you can use JavaScript to define custom logic for how you filter and fan-out to multiple Queues. In the next example, you can distribute work to different Queues based on the attributes of a user.

export default {
  async queue(batch: MessageBatch, env: Environment) {
    for (const message of batch.messages) {
      const user = message.body;
      if (isEUResident(user)) {
        await env.EU_QUEUE.send(user);
      }
      if (isForgotten(user)) {
        await env.DELETION_QUEUE.send(user);
      }
    }
  }
}

We will also support integrations with Cloudflare products, like R2. For example, you might configure an R2 bucket to send lifecycle events to a Queue or archive messages to a R2 bucket for long-term storage.

How much does it cost?

Cloudflare Queues has a simple, transparent pricing model that’s easy to predict. It costs $0.40 per million operations, which is defined for every 64 KB chunk of data that is written, read, or deleted. There are also no egregious bandwidth fees for data in or out — unlike Amazon’s SQS or Google’s Pub/Sub.

To effectively deliver a message, it usually takes three operations: one write, one read, and one acknowledgement. You can estimate your usage by considering the cost of messages delivered, which is $1.20 per million. (calculated as 3 x \$0.40)

When can I try it?

You can register to join the waitlist as we work towards a beta launch. You’ll have an opportunity to try it out, for free. Once it’s ready, we’ll launch an open beta for everyone to try.

In the meantime, you can read the documentation to view our code samples, see which features will be supported, and learn what you can build. If you’re in our developer Discord, you stay up-to-date by joining the #queues-beta channel. If you’re an Enterprise customer, reach out to your account team to schedule a session with our Product team.

We’re excited to see what you build with Cloudflare Queues. Let the queuing begin!