Tag Archives: Development

Introducing the enhanced command line interface in Amazon Q Developer

Post Syndicated from Brian Beach original https://aws.amazon.com/blogs/devops/introducing-the-enhanced-command-line-interface-in-amazon-q-developer/

Earlier today, Amazon Q Developer announced an enhanced CLI agent within the Amazon Q command line interface (CLI). With this announcement, Q Developer brings the latest agentic experience to the CLI that provide a more dynamic, interactive coding experience that works with you, and iteratively makes changes based on your feedback. Amazon Q Developer can now use the information in your CLI environment to help you read and write files locally, query AWS resources write code, or automatically debug issues.

Introduction

As a developer, I appreciate my Integrated Development Environment (IDE) along with the integrated linters and auto-completion features that help streamline my workflow. The addition of AI assistants, like Amazon Q Developer, have changed the way I work in profound ways. I can discuss best practices with Q Developer in chat, or ask it to refactor a complex method in seconds. I am increasingly using the Amazon Q Developer agents to develop new features, write documentation, generate unit tests, and automate code reviews. These powerful agent capabilities have further transformed how I approach my daily development tasks.

However, as a developer, I spend as much time at the command-line interface (CLI) as I do in the IDE, maybe even more. Tools like the Amazon Web Services (AWS) CLI, Git, package managers, and linters have revolutionized the way I manage infrastructure, automate repetitive tasks, and collaborate with my team. Tools like Docker and Kubernetes have transformed the way I develop and deploy my applications. Looking at the extensions tab in my IDE, I have extensions installed for Maven, Docker, and Vue, but I rarely use them, preferring the flexibility and power of the CLI.

Amazon Q Developer has been available in the CLI for over a year now, and it has become an indispensable part of my daily development routine. The assistant’s ability to provide intelligent command completions that can list my Git branches, Amazon S3 buckets, etc. has saved me countless hours. The chat feature allows me to engage in natural language conversations with Amazon Q Developer, asking it to help me learn how to accomplish specific tasks, while the translate capability seamlessly converts my plain-language prompts into the corresponding shell commands.

While Amazon Q Developer’s CLI capabilities are helpful, I miss the power of the agents I have access to in my IDE. Earlier today, Amazon Q Developer announced an enhanced CLI agent within the Amazon Q CLI. Amazon Q Developer, and the new agent is powered by Amazon Bedrock, as a result, the CLI has the power of Claude 3.7 Sonnet step-by-step reasoning. In addition, the new CLI agent can make use of tools installed on my system including compilers, package managers, and the AWS CLI. Finally, the enhanced CLI supports multi-turn conversations allowing dynamic, back-and-forth conversations with the agent. This enables me to get more work done, faster, without ever leaving the comfort of my preferred command-line environment.

Rather than being constrained by the features and workflows of an IDE, the CLI agent gives me direct access to the underlying tools and commands I need to get my work done. Let’s look at an example.

Walkthrough

To see how the CLI agent capabilities work, I’ll walk you through an example. I’m preparing for an internal developer community summit happening in April. I need an application to manage the call for content. The Call for Content application allows community members to propose topics for the summit. I’m going to use the Amazon Q Developer CLI to build the application.

I already have the CLI installed, so I’ll run q chat to begin a new conversation with the agent. Then I will ask Q Developer to “scaffold a new application named call-for-content using React and Vite, and then commit it to Git.” As you can see in the following video, the agent understands my intent, and carries out the work needed to build the application. In the past, the Q Developer CLI would provide instructions for me to execute. In this new enhanced version, the CLI agent uses the tools installed on my laptop to complete each step for me. I should note that I have disabled confirmations, but Q Developer can prompt me before each action so I can verify it.

Animated screen recording of a terminal window showing Amazon Q Developer CLI in action. The terminal displays a welcome message 'Hi, I'm Amazon Q. Ask me anything.' The flow of events in the recording is captured in the next image.

The agent is working quickly in that video. So quickly that is hard to keep up. So I broke it down, step-by-step in the following image. The agent begins by calling npm create to create the new app, followed by npm install to add all the dependencies. It then runs a series of git commands to create a new repository, add my files, and commit the changes including a descriptive commit message.

Terminal screenshot showing a sequence of commands executed by Amazon Q Developer to create a new React application. The sequence includes: creating a new Vite React project called 'call-for-content', installing dependencies with npm install, initializing a Git repository, adding files to Git, and making an initial commit. Each command is preceded by 'Execute shell command' and shows the exact command to be run in green text.

Notice that agent is not simply generating files. It is running the same commands that I would have run on my own. However, the CLI agent is doing it much faster, and more accurately than I could have done. The enhanced Amazon Q Developer CLI can use tools, including other command line tools installed on my system, to complete its work. Once Q Developer is done, it provides me a summary of the work it has completed, and suggests next steps. In the following image, you can see that Q Developer is suggesting I run the development server to preview the changes. That is a great suggestion, so I ask Q Developer to start the server and confirm that everything is working.

Split screen view showing two panels. On the left, a terminal displays a summary of completed actions including project creation, dependency installation, and Git initialization, along with instructions for starting the development server. On the right, the default Vite+React application page showing the Vite and React logos, a counter set to 0, and instructions to edit src/App.jsx to test Hot Module Replacement.

With the application template running, I’m ready to start building the Call for Content application. The CLI agent supports multi-turn conversations, so I can pick up where we left off. I simply explain my requirements at the command line, and agent begins to generate code. This is what Amazon Q Developer does best. In this example, it needs to update the App.jsx and App.css files.

Terminal screenshot showing Amazon Q Developer processing a request to create a form application. The sequence shows: a prompt requesting a form with specific fields, followed by status messages indicating updates to App.jsx (completed in 0.1s) and App.css (completed in 0.2s), and ending with a Vite server startup message showing the local development server running at http://localhost:5173.

Notice that the agent can read and write files on my local system in addition to running commands as we saw in the prior example. So, as Q Developer generates code, the agent can put it in the correct place in my local file system. Once it is done, the agent starts the development server using npm run dev. I asked it to start the server last time, so it correctly guesses that I will want to check the progress. Just like last time, the agent provides another summary of the changes it made. Personally, I appreciate these periodic summaries. They help me build confidence in the work that Q Developer is doing. I’m not happy with the color of the title. I could ask Q Developer to update it, but I will simply update the file myself. Note that I can edit files on my own while using the CLI. the agent will read files before editing them to check if I have made any changes manually.

Split screen view showing development results. Left panel contains terminal output describing the form's features including field validations and counters. Right panel shows the rendered web form with fields for Name, Email, Talk Title (with 0/100 character counter), Abstract (with 0/100 word counter), Talk Level dropdown defaulted to '100 - Introductory', and a blue 'Submit Talk Proposal' button at the bottom.

The application is looking great! However, it is currently writing it’s output to the console. I never told the agent what to do with the data. I would like the application to write to a DynamoDB table. In fact, I created one already. However, I cannot remember which region the table is in. In the following image, I ask the agent to figure it out for me. Let’s see how it responds.

Terminal window showing a sequence of AWS DynamoDB commands. The initial prompt asks to update an app to write to a DynamoDB table named 'call-for-content'. The sequence shows three 'Execute shell command' operations: first checking the table in us-east-1 region, then in us-west-2 region, followed by installing AWS SDK dependencies. The final line shows successful creation of a new DynamoDB service file.

As you can see in the prior image, the agent is able to think about my vague request, and figure out what to do. It starts by looking in us-east-1. When it can not find the table, it moves to us-west-2 and tries again. The table was in us-west-2, but if it were not, the agent would have continued searching. Q Developer understands how to list and describe AWS resources. Once the agent found the table, it uses npm to install the DynamoDB SDK, and then updates the application files. Note that the agent actually updated multiple files, but I kept the image simple.

With just a few simple prompts, I was able to use the enhanced CLI agent to collaborate with Q Developer throughout the entire development process. I’ll keep working on the application to add authentication, etc. However, I assume you have a good understanding of how the Q Developer CLI works and are eager to get started. So, let’s stop here.

Conclusion

Amazon Q Developer’s new CLI agent has completely transformed the way I approach software development. By bringing the power of an advanced AI assistant directly into my preferred command-line environment, I can now accomplish complex tasks faster than ever before. Q Developer’s natural language understanding and contextual awareness, combined with the CLI agent’s ability to reason and use a wide range of development tools, make it an indispensable part of my daily workflow. Finally, support for multi-turn conversations, enable me to collaborate with, and work along side the agent to get more work done, faster.

If you’re a developer who spends a significant amount of time in the CLI, I highly recommend trying out the Amazon Q Developer’s CLI agent. You can follow the Amazon Q Developer User Guide to install the CLI and start leveraging the new agent capabilities right away, for free. I’m confident it will change the way you work, just as it has for me. Give it a try and let me know what you think!
Accessing Amazon Q Developer using Microsoft Entra ID and VS Code to accelerate development

Post Syndicated from Mangesh Budkule original https://aws.amazon.com/blogs/devops/accessing-amazon-q-developer-using-microsoft-entra-id-and-vs-code-to-accelerate-development/

Overview

In this blog post, I’ll explain how to use a Microsoft Entra ID and Visual Studio Code editor to access Amazon Q developer service and speed up your development. Additionally, I’ll explain how to minimize the time spent on repetitive tasks and quickly integrate users from external identity sources so they can immediately use and explore Amazon Web Services (AWS).Generative AI on AWS holds great ability for businesses seeking to unlock new opportunities and drive innovation. AWS offers a robust suite of tools and capabilities that can revolutionize software development, generate valuable insights, and deliver enhanced customer value. AWS is committed to simplifying generative AI for businesses through services like Amazon Q, Amazon Bedrock, Amazon SageMaker, Data foundation & AI infrastructure.

Amazon Q Developer is a generative AI-powered assistant that helps developers and IT professionals with all of their tasks across the software development lifecycle. Amazon Q Developer assists with coding, testing, and upgrading to troubleshooting, performing security scanning and fixes, optimizing AWS resources, and creating data engineering pipelines.

A common request from Amazon Q Developer customers is to allow developer sign-ins using established identity providers (IdP) such as Entra ID. Amazon Q Developer offers authentication support through AWS Builder ID or AWS IAM Identity Center. AWS Builder ID is a personal profile for builders. IAM Identity Center is ideal for an enterprise developer working with Amazon Q and employed by organizations with an AWS account. When using the Amazon Q Developer Pro tier, the developer should authenticate with the IAM Identity Center. See the documentation, Understanding tiers of service for Amazon Q Developer for more information.

How it works

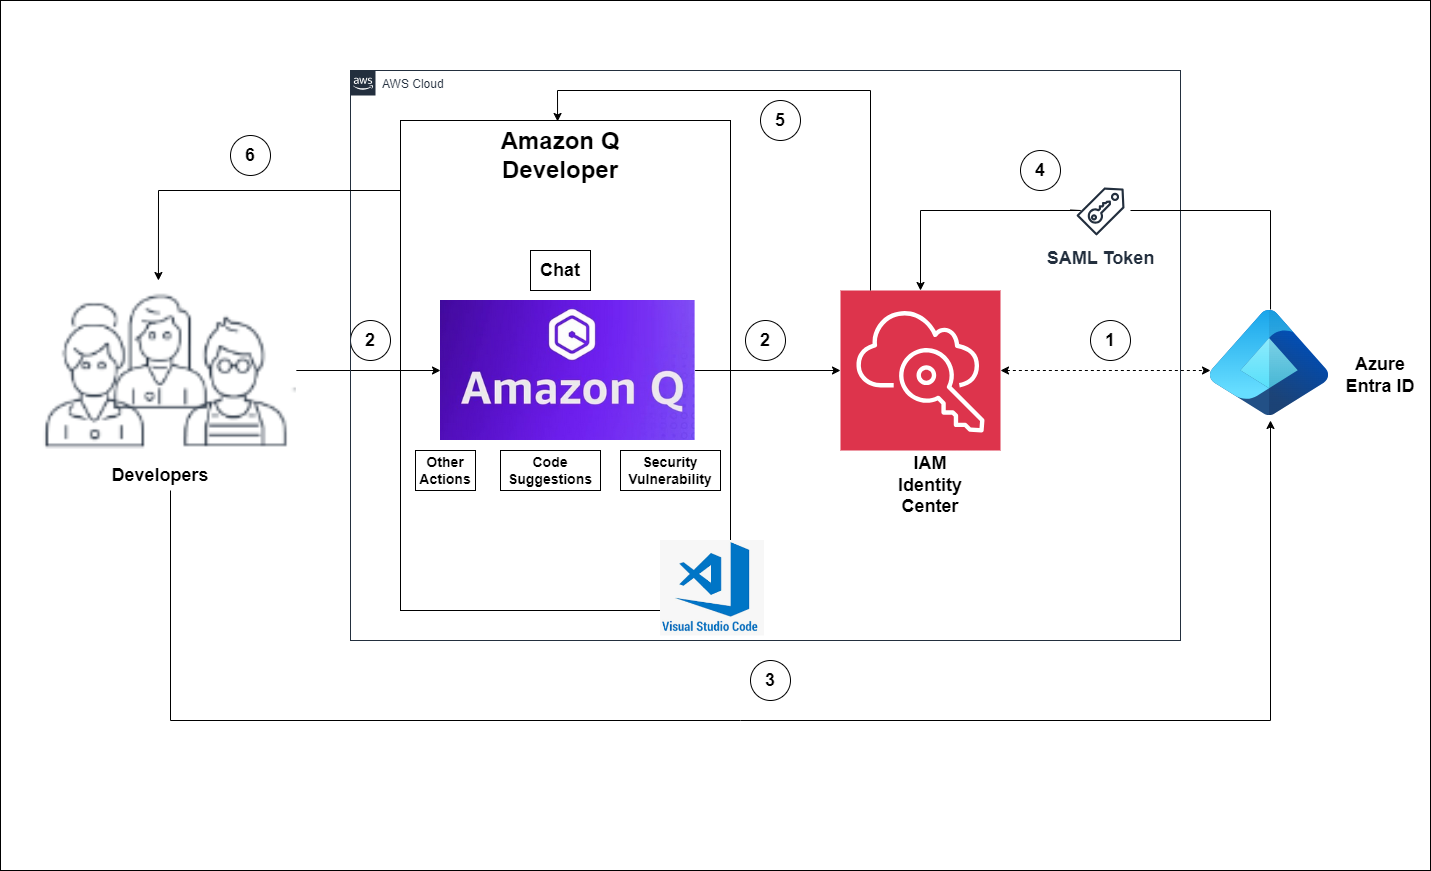
The flow for accessing Amazon Q Developer through the IAM Identity Center involves the authentication of Entra ID users using Security Assertion Markup Language (SAML) 2.0 authentication (Figure 1).

The diagram explains you the flow for accessing Amazon Q Developer through the IAM Identity Center involves the authentication of Entra ID users using SAML 2.0 authentication.

Figure 1 – Solution Overview

The flow for accessing Amazon Q Developer through the IAM Identity Center involves the authentication of Entra ID users using SAML 2.0 authentication. (Figure 1).

  1. IAM Identity Center synchronizes users and groups information from Entra ID into IAM Identity Center using the System for Cross-domain Identity Management (SCIM) v2.0 protocol.
  2. Developers with an Entra ID account connect to Amazon Q Developer through IAM Identity Center using the VS Code IDE.
  3. If a developer isn’t already authenticated, they will be redirected to the Entra ID account login. The developer will sign in using their Entra ID credentials.
  4. If the sign-in is successful, Entra ID processes the request and sends a SAML response containing the developer identity and authentication status to IAM Identity Center.
  5. If the SAML response is valid and the developer is authenticated, IAM Identity Center grants access to Amazon Q Developer.
  6. The developer can now securely access and use Amazon Q Developer.

Prerequisites

In order to perform the following procedure, make sure the following are in place.

Walkthrough

Configure Entra ID and AWS IAM Identity Center integration

In this section, I will show how you can create a SAML base connection between Entra ID and AWS Identity Center so you can access AWS generative AI services using your Entra ID.

Note: You need to switch the console between Entra ID portal and AWS IAM Identity center. I recommend to open new browser tabs for each console.

Step 1 – Prepare your Microsoft tenant

Perform the below steps in the Entra identity provider section.

Entra ID configuration.

  1. Sign in to the Microsoft Entra admin center with a minimum permission set of a Cloud Application Administrator.
  2. Navigate to Identity > Applications > Enterprise applications, and then choose New application.
  3. On the Browse Microsoft Entra Gallery page, enter AWS IAM Identity Center in the search box.
  4. Select AWS IAM Identity Center from the results area.
  5. Choose Create.

Now you have created AWS IAM Identity Center application, set up single sign-on to enable users to sign into their applications using their Entra ID credentials. Select the Single sign-on tab from the left navigation plane and select Setup single sign on.

Step 2 – Collect required service provider metadata from IAM Identity Center

In this step, you will launch the Change identity source wizard from within the IAM Identity Center console and retrieve the metadata file and the AWS specific sign-in URL. You will need this to enter when configuring the connection with Entra ID in the next step.

IAM Identity Center.

You need to enable this in order to configure SSO.

  1. Navigate to Services –> Security, Identity, & Compliance –> AWS IAM Identity Center.
  2. Choose Enable (Figure 2).

    This diagram illustrates , how you can enable AWS IAM Identity Center

    Figure 2 – Get started with AWS IAM Identity Center

  3. In the left navigation pane, choose Settings.
  4. On the Settings page, find Identity source, select Actions pull-down menu, and select Change identity source.
  5. On the Change identity source page, choose External identity provider (Figure 3).
    This diagram illustrates how to choose an External identity provider in the Source account when using AWS Identity Center.

    Figure 3 – Select External identity provider

  6. On the Configure external identity provider page, under Service provider metadata, select Download metadata file (XML file).
  7. In the same section, locate the AWS access portal sign-in URL value and copy it. You will need to enter this value when prompted in the next step (Figure 4).

    The diagram illustrates the sources for downloading and copying the metadata URLs of service providers.

    Figure 4 – Copy provider metadata URLs

Leave this page open, and move to the next step to configure the AWS IAM Identity Center enterprise application in Entra ID. Later, you will return to this page to complete the process.

Step 3 – Configure the AWS IAM Identity Center enterprise application in Entra ID

This procedure establishes one-half of the SAML connection on the Microsoft side using the values from the metadata file and Sign-On URL you obtained in the previous step.

  1. In the Microsoft Entra admin center console, navigate to Identity > Applications > Enterprise applications and then choose AWS IAM Identity Center.
  2. On the left, choose Single sign-on.
  3. On the Set up Single sign on with SAML page, choose Upload metadata file, choose the folder icon, select the service provider metadata file that you downloaded in the previous step 2.6, and then choose Add.
  4. On the Basic SAML Configuration page, verify that both the Identifier and Reply URL values now point to endpoints in AWS that start with https://<REGION>.signin.aws.amazon.com/platform/saml/.
  5. Under Sign on URL (Optional), paste in the AWS access portal sign-in URL value you copied in the previous step (Step 2.7), choose Save, and then choose X to close the window.
  6. If prompted to test single sign-on with AWS IAM Identity Center, choose No I’ll test later. You will do this verification in a later step.
  7. On the Set up Single Sign-On with SAML page, in the SAML Certificates section, next to Federation Metadata XML, choose Download to save the metadata file to your system. You will need to upload this file when prompted in the next step.

Step 4 – Configure the Entra ID external IdP in AWS IAM Identity Center

Next you will return to the Change identity source wizard in the IAM Identity Center console to complete the second-half of the SAML connection in AWS.

  1. Return to the browser session you left open in the IAM Identity Center console.
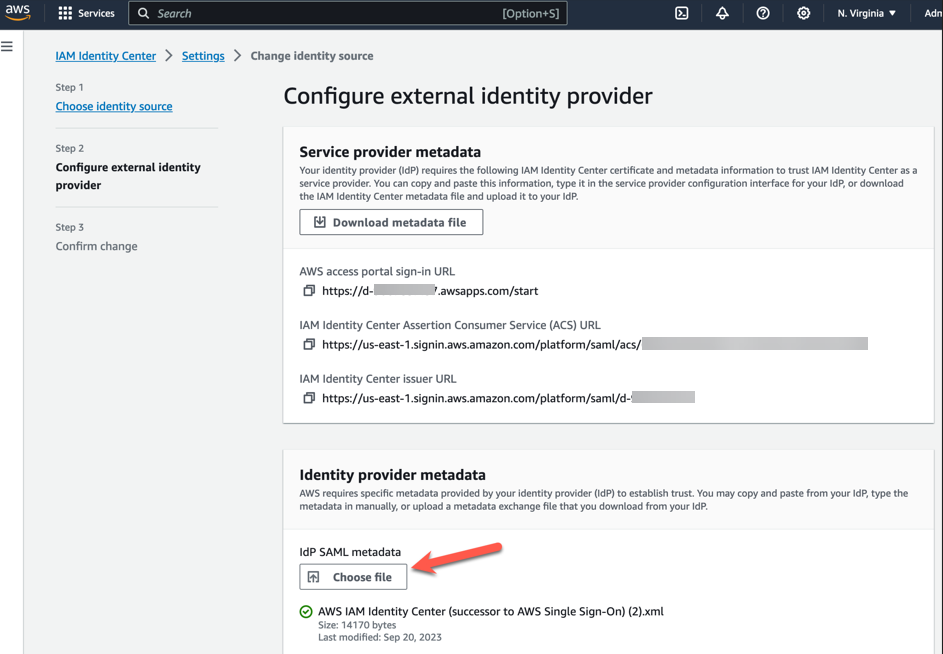
  2. On the Configure external identity provider page, in the Identity provider metadata section, under IdP SAML metadata, choose the Choose file button, and select the identity provider metadata file that you downloaded from Microsoft Entra ID in the previous step, and then choose Open (Figure 5).

    This diagram illustrate AWS IAM Identity center metadata

    Figure 5 – AWS IAM Identity center metadata

  3. Choose Next
  4. After you read the disclaimer and are ready to proceed, enter ACCEPT
  5. Choose Change identity source to apply your changes (Figure 6).

    The diagram illustrates AWS IAM Identity center metadata change request acceptance.

    Figure 6 – AWS IAM Identity center metadata

  6. Confirm the changes (Figure 7).

    The diagram illustrates AWS IAM Identity center metadata configuration changes progress information.

    Figure 7 – AWS IAM Identity center metadata configuration changes progress console.

Step 5 – Configure and test your SCIM synchronization

In this step, you will set up automatic provisioning (synchronization) of user and group information from Microsoft Entra ID into IAM Identity Center using the SCIM v2.0 protocol. You configure this connection in Microsoft Entra ID using your SCIM endpoint for AWS IAM Identity Center and a bearer token that is created automatically by AWS IAM Identity Center.

To enable automatic provisioning of Entra ID users to IAM Identity Center, follow these steps using the IAM Identity Center application in Entra ID. For testing purposes, you can create a new user (TestUser) in Entra ID with details like First Name, Last Name, Email ID, Department, and more. Once you’ve configured SCIM synchronization, you can verify that this user and their relevant attributes were successfully synced to AWS IAM Identity Center.

In this procedure, you will use the IAM Identity Center console to enable automatic provisioning of users and groups coming from Entra ID into IAM Identity Center.

  1. Open the IAM Identity Center console and Choose Setting in the left navigation pane.
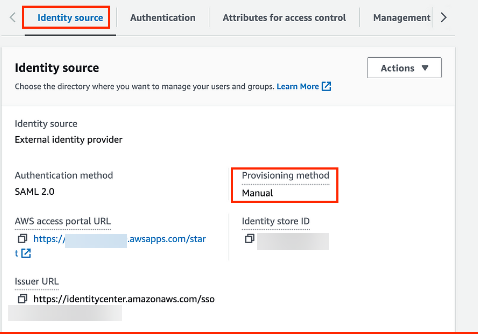
  2. On the Settings page, under the Identity source tab, notice that Provisioning method is set to Manual (Figure 8).

    This diagram illustrates provisioning method configuration details

    Figure 8 – AWS IAM Identity center console with provisioning method configuration details

  3. Locate the Automatic provisioning information box, and then choose Enable. This immediately enables automatic provisioning in IAM Identity Center and displays the necessary SCIM endpoint and access token information.
  4. In the Inbound automatic provisioning dialog box, copy each of the values for the following options. You will need to paste these in the next step when you configure provisioning in Entra ID.
  5. SCIM endpoint – For example, https://scim.us-east-2.amazonaws.com/11111111111-2222-3333-4444-555555555555/scim/v2/
  6. Access token – Choose Show token to copy the value (Figure 9).
    The diagram illustrates SCIM endpoint URL and Access token information.

    Figure 9 – AWS IAM Identity center automatic provisioning info

  7. Choose Close.
  8. Under the Identity source tab, notice that Provisioning method is now set to SCIM.

Step 6 – Configure automatic provisioning in Entra ID

Now that you have your test user in place and have enabled SCIM in IAM Identity Center, you can proceed with configuring the SCIM synchronization settings in Entra ID.

  1. In the Microsoft Entra admin center console, navigate to Identity > Applications > Enterprise applications and then choose AWS IAM Identity Center.
  2. Choose Provisioning, under Manage, choose Provisioning
  3. In Provisioning Mode select
  4. For Admin Credentials, in Tenant URL paste in the SCIM endpoint URL value you copied earlier. In Secret Token, paste in the Access token value (Figure 10).

    The diagram illustrates Azure Enterprise AWS IAM Identity center application provisioning configuration tab

    Figure 10 – Azure Enterprise AWS IAM Identity center application provisioning configuration tab

  5. Choose Test Connection. You should see a message indicating that the tested credentials were successfully authorized to enable provisioning (Figure 11).

    This diagram illustrates AWS IAM Identity center application provisioning testing status

    Figure 11 – Azure Enterprise AWS IAM Identity center application provisioning testing status

  6. Choose Save.
  7. Under Manage, choose Users and groups, and then choose Add user/group.
  8. On the Add Assignment page, under Users, choose None Selected.
  9. Select TestUser, and then choose Select.
  10. On the Add Assignment page, choose
  11. Choose Overview, and then choose Start provisioning (Figure 12).
    The diagram shows the process of manually initiating provisioning through the Azure AWS IAM Identity center application.

    Figure 12 – AWS IAM Identity center application Start provisioning tab

    Note : The default provisioning interval is set to 40 minutes. Our users (Figure 13) are successfully provisioned and are now available in the AWS IAM Identity Center console.

In this section, you will verify that TestUser user was successfully provisioned and that all attributes are displayed in IAM Identity Center (Figure 13).

This diagram shows the user console of AWS IAM Identity center application.

Figure 13 – AWS IAM Identity center application user console example

Preview (opens in a new tab)

In the Identity source in IDC section, enable Identity-aware console sessions (Figure 14). This enables AWS IAM Identity Center user and session IDs to be included in users’ AWS console sessions when they sign in. For example, Amazon Q Developer Pro uses identity-aware console sessions to personalize the service experience.

The diagram illustrates how you can enable Identity aware console sessions

Figure 14 – Enable Identity aware console sessions

I have completed Entra ID and AWS Identity Center configuration. You can see Entra ID identity synced successfully with AWS IAM identity center.

Step 7 – Set up AWS Toolkit with IAM Identity Center

To use Amazon Q Developer, you will now set up the AWS Toolkit within integrated development environments (IDE) to establish authentication with the IAM Identity Center.

AWS Toolkit for Visual Studio Code is an open-source plug-in for VS Code that makes it easier for developers by providing an integrated experience to create, debug, and deploy applications on AWS. Getting started with Amazon Q Developer in VS Code is simple.

  1. Open the AWS Toolkit for Visual Studio Code extension in your VS Code IDE. Install AWS Toolkit for VS Code, which is available as a download from the VS Code Marketplace.
  2. From the AWS Toolkit for Visual Studio Code extension in the VS Code Marketplace, choose Install to begin the installation process.
  3. When prompted, choose to restart VS Code to complete the installation process.

Step 8 – Setup Amazon Q Developer service with VS Code using AWS IAM identity center.

After installing the Amazon Q extension or plugin, authenticate through IAM Identity Center or AWS Builder ID.

After your identity has been subscribed to Amazon Q Developer Pro, complete the following steps to authenticate.

  1. Install the Amazon Q IDE extension or plugin in your Visual Studio Code.
  2. Choose the Amazon Q icon from the sidebar in your IDE
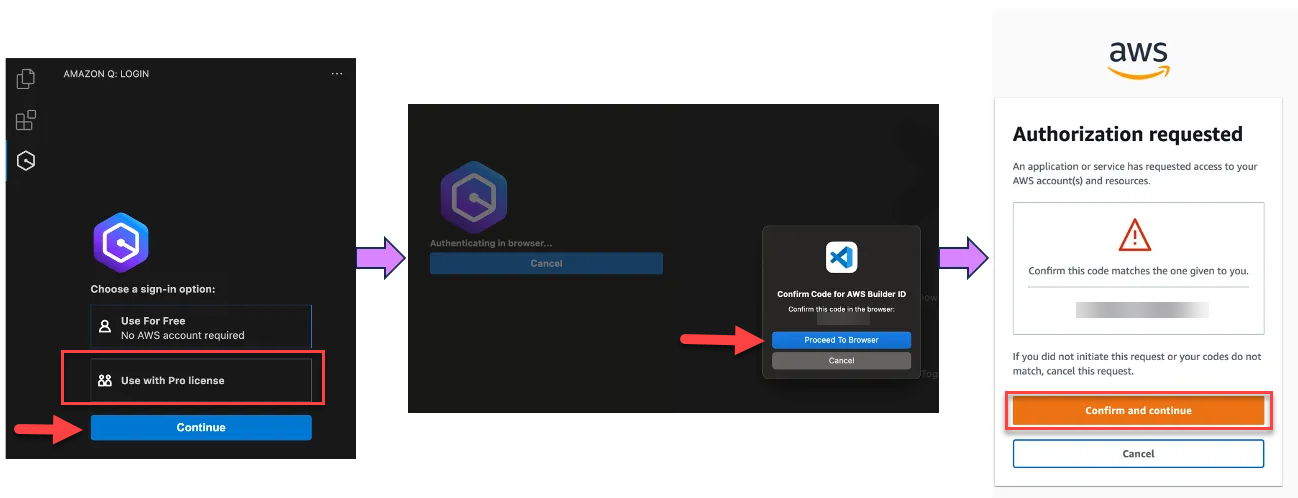
  3. Choose Use with Pro license and select Continue (Figure 15).

    The diagram illustrates how you can use Visual Studio code IDE with Amazon Q Developer extension.

    Figure 15 – Visual Studio code Amazon Q Developer extension

  4. Enter the IAM Identity Center URL you previously copied into the Start URL
  5. Set the appropriate region, example us-east-1, and select Continue
  6. Click Copy Code and Proceed to copy the code from the resulting pop-up.
  7. When prompted by the Do you want Code to open the external website? pop-up, select Open
  8. Paste the code copied in Step 6 and select Next
  9. Enter your Entra ID credentials and select Sign in
  10. Select Allow Access to AWS IDE Extensions for VSCode to access Amazon Q Developer (Figure 16).

    The diagram illustrates how can you provide VS code IDE permission to access Amazon Q service.

    Figure 16 – Allow VS Code to access Amazon Q Developer

  11. When the connection is complete, a notification indicates that it is safe to close your browser. Close the browser tab and return to your IDE.
  12. You are now all set to use Amazon Q Developer from within IDE, authenticated with your Entra ID credentials.

Step 9 – Test configuration examples

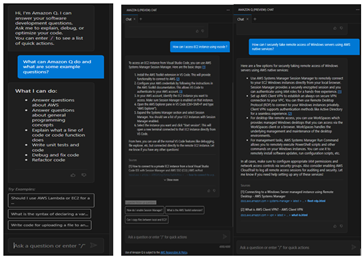
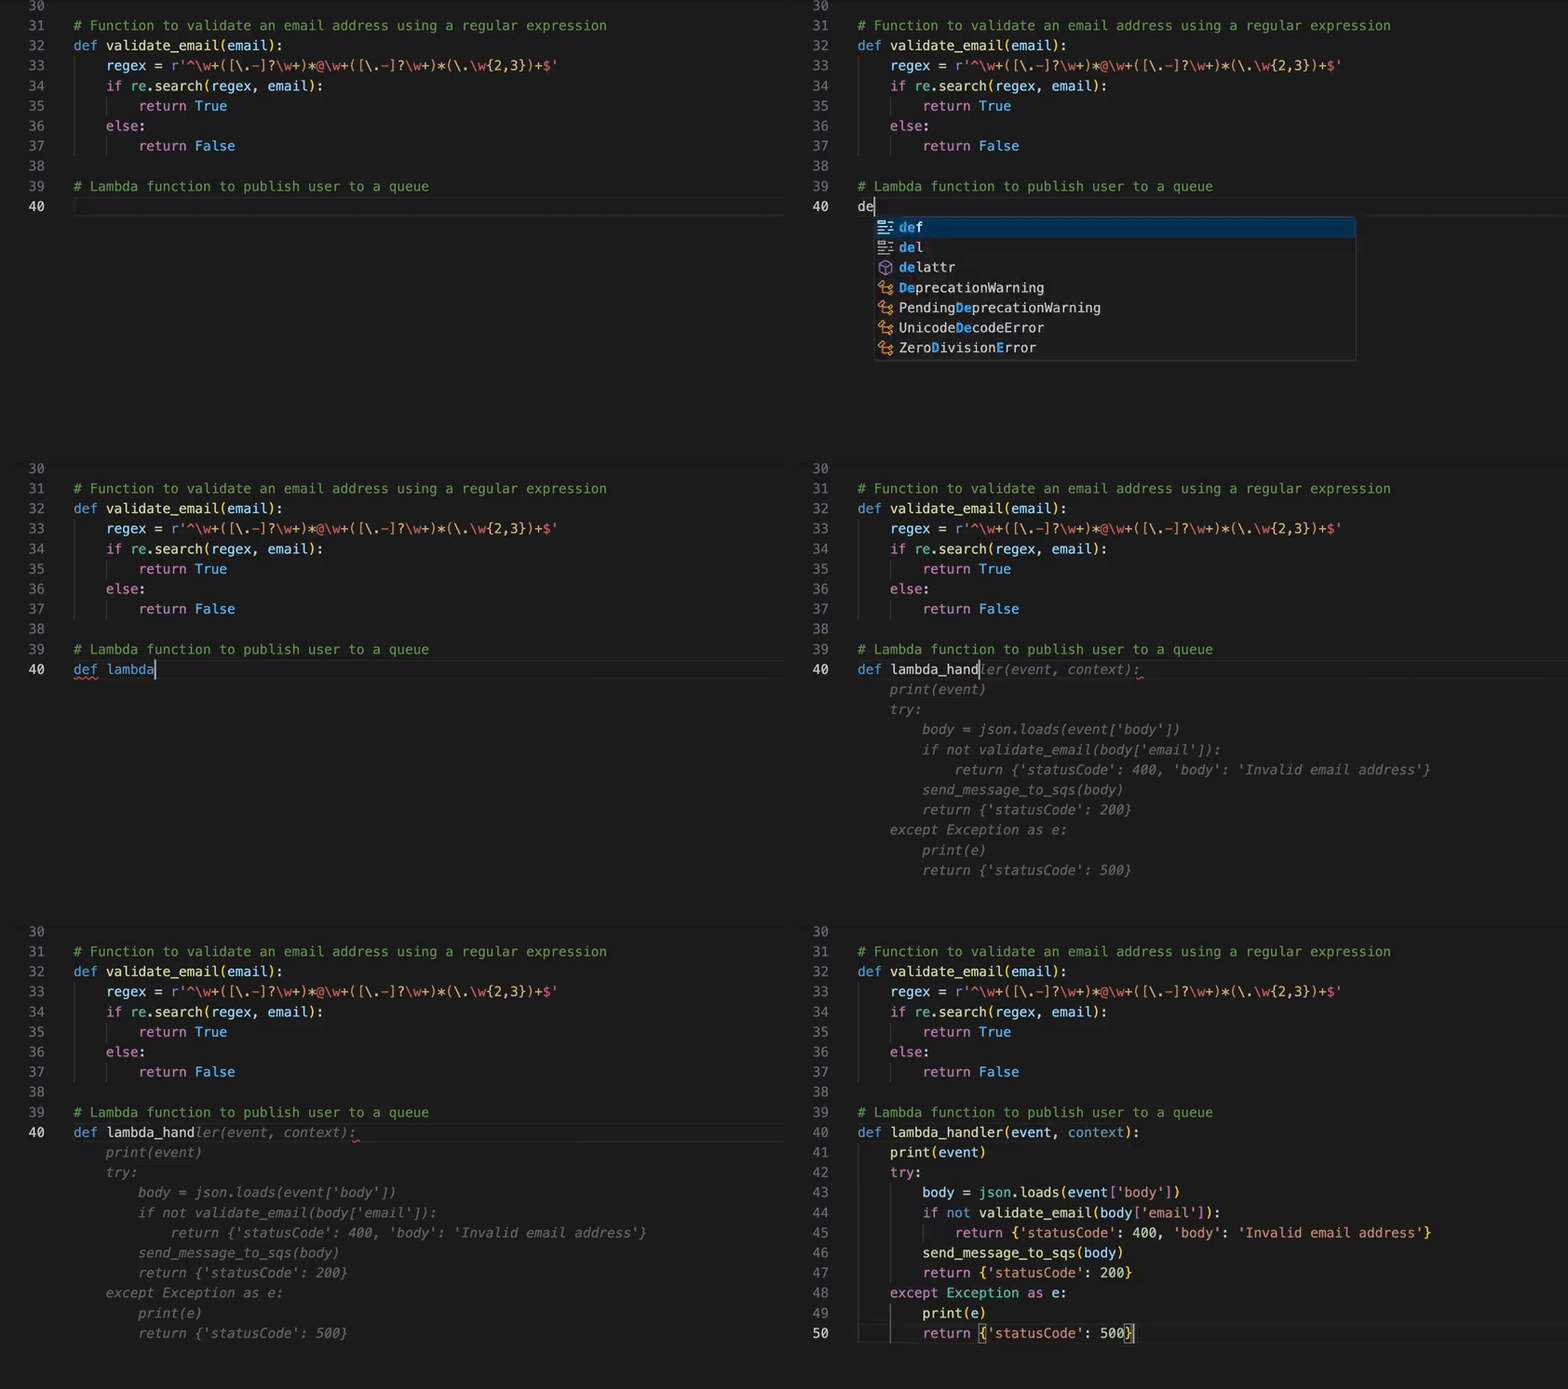
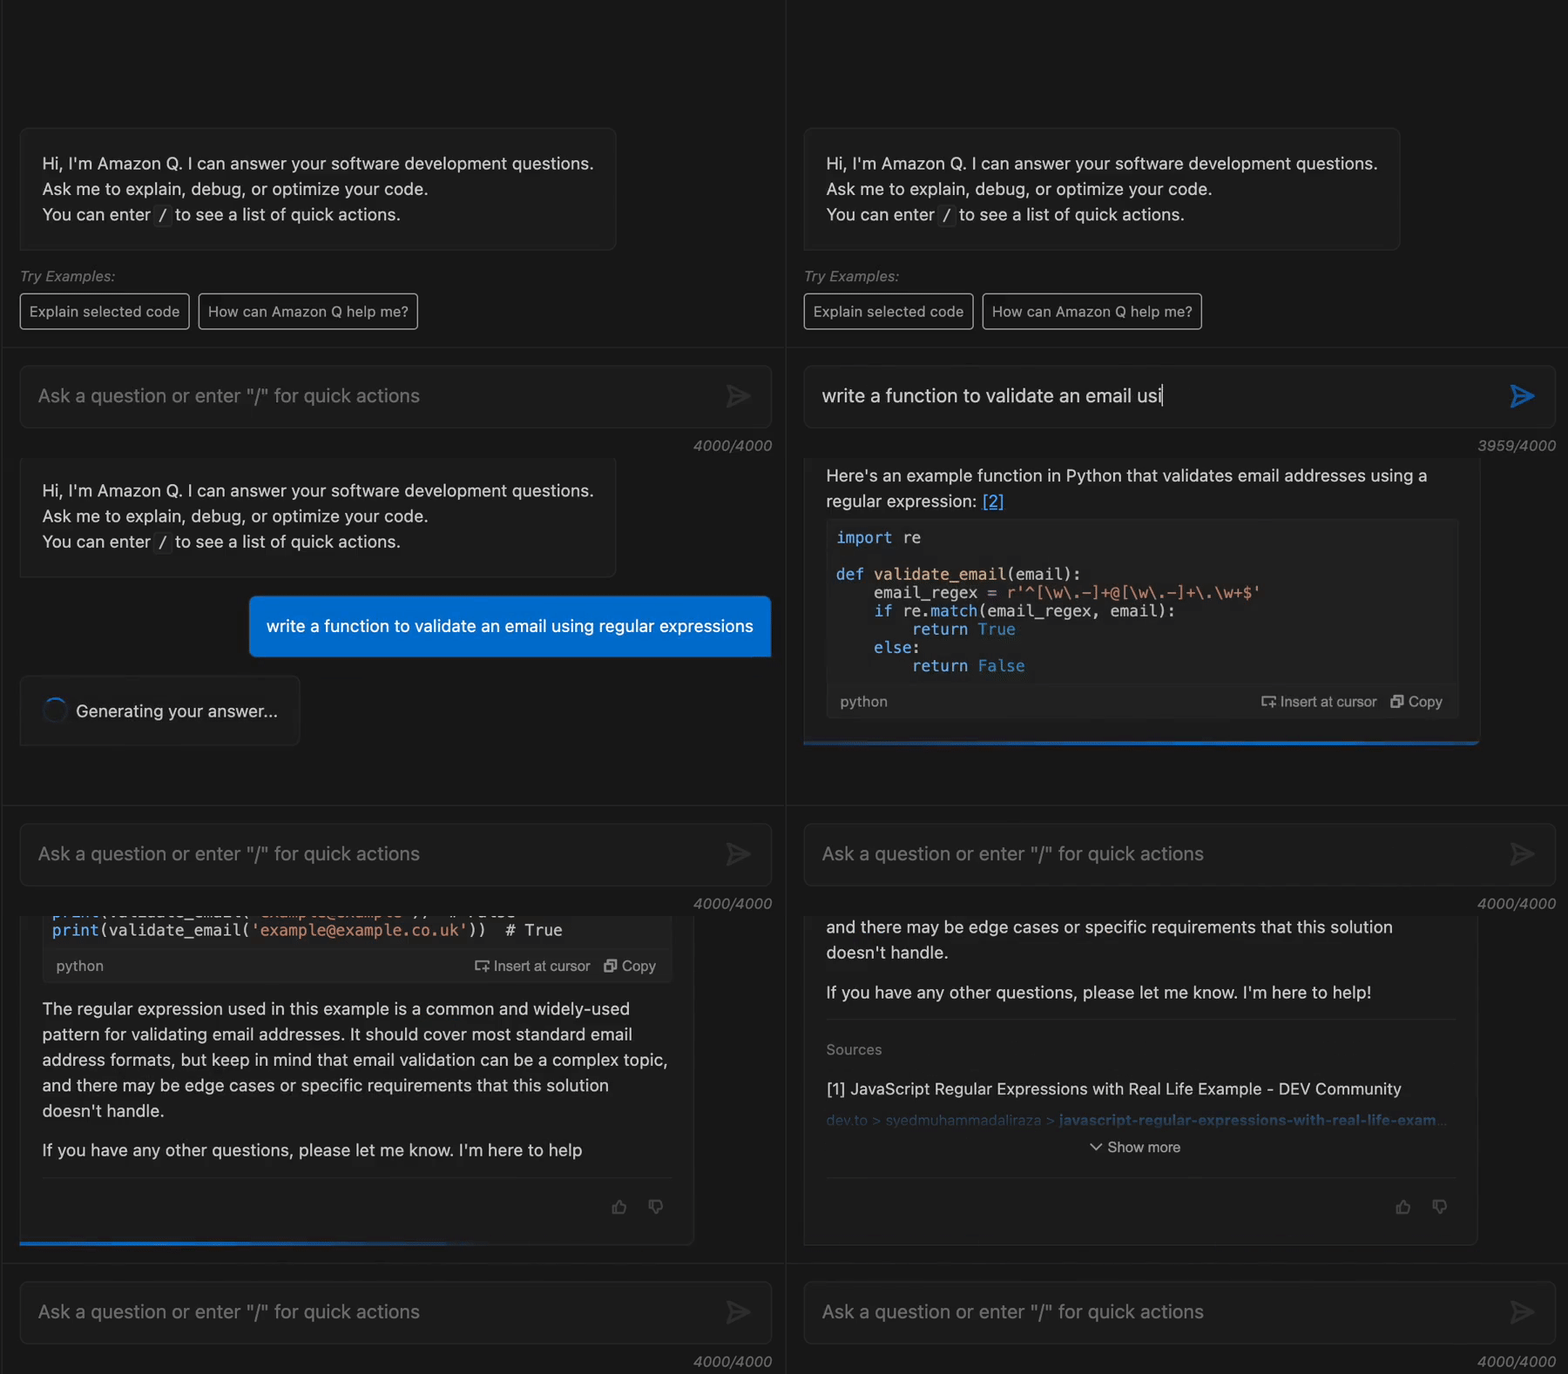
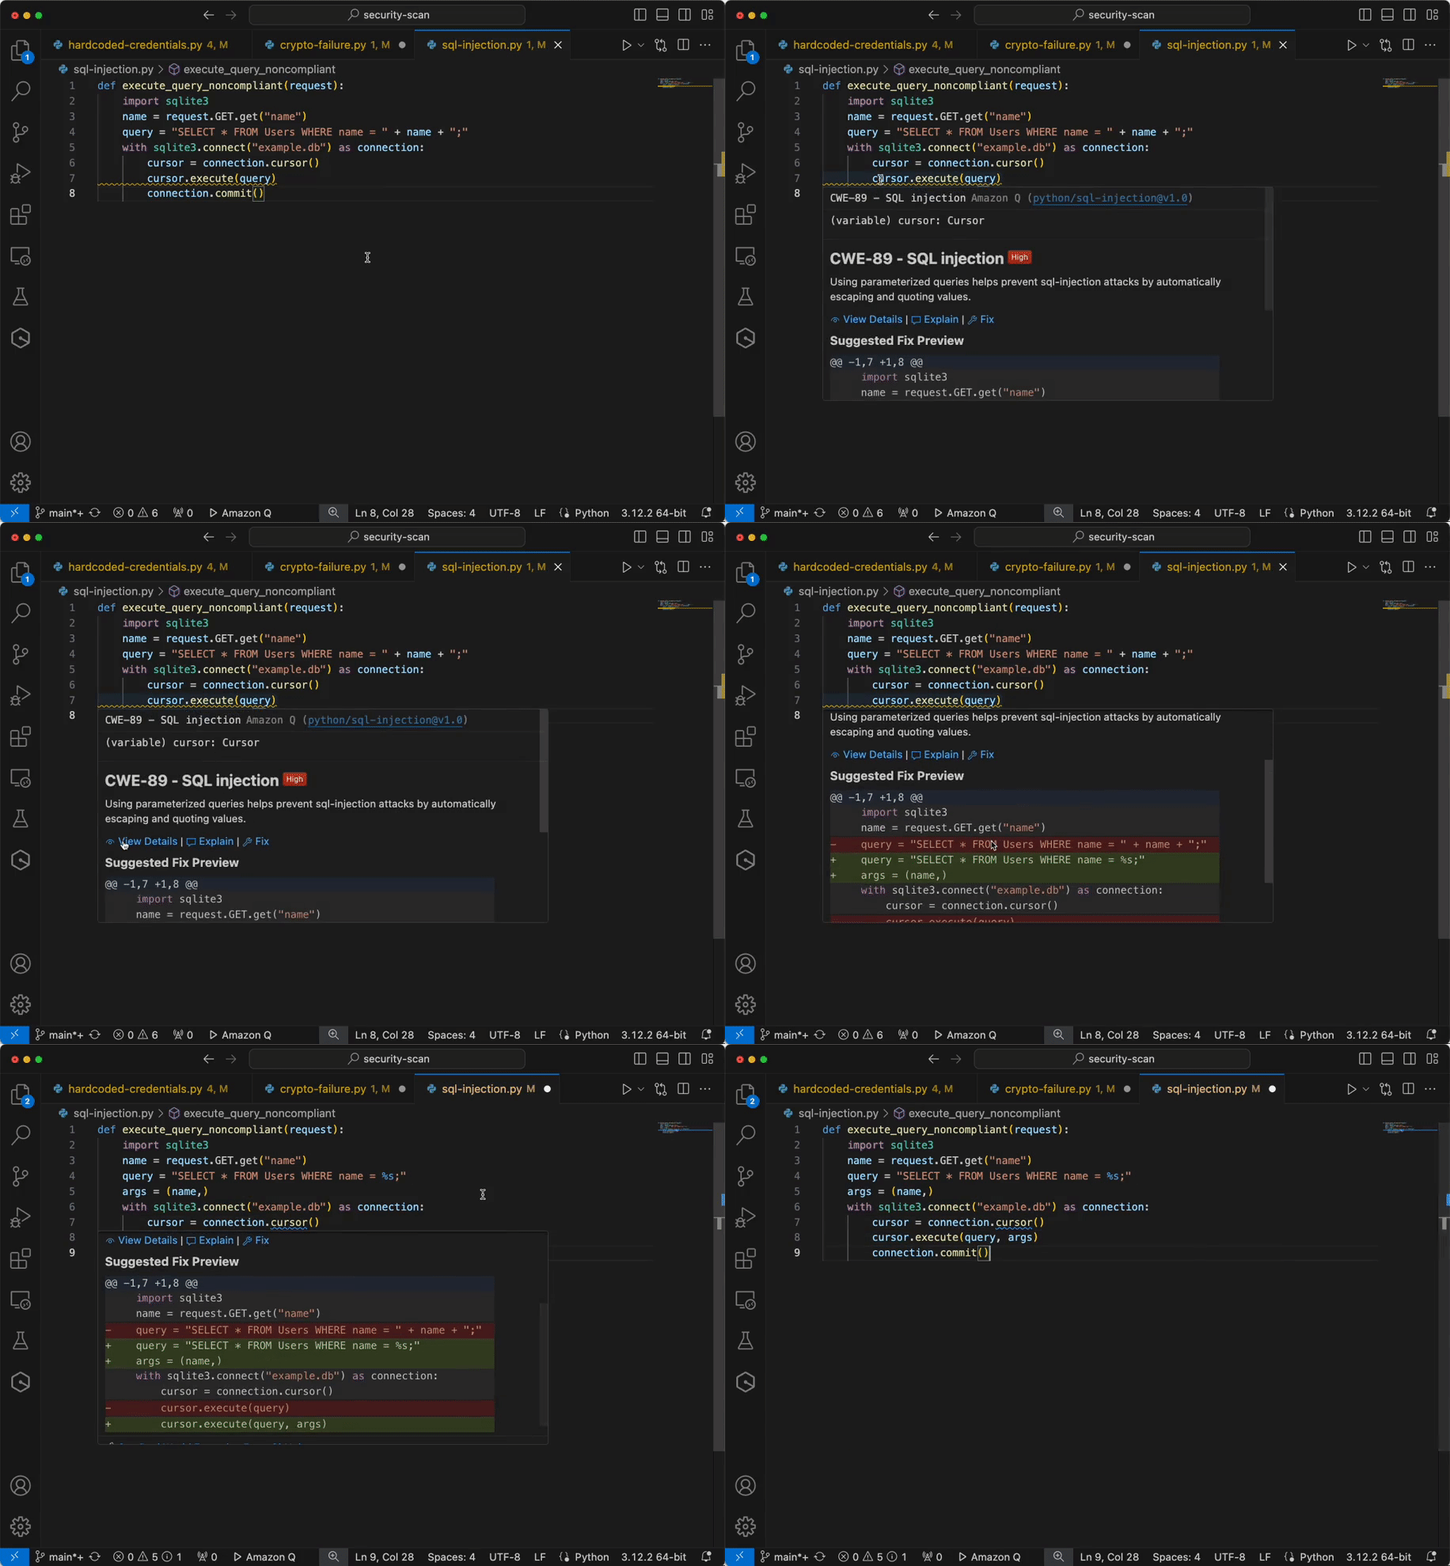
Now you have configured IAM identity Center access with VS code now you can chat, get inline code suggestions, check for security vulnerabilities with Amazon Q Developer to learn about, build, and operate AWS applications. I have mentioned a few examples of Amazon Q Suggestions, Code suggestions, Security Vulnerabilities during development for your reference (Figures 17 ,18 ,19 ,20).

The diagram illustrates how to seek assistance from Amazon Q.

Figure 17 – Amazon Q suggestion examples

Example of developers get the recommendations using Amazon Q developer.

This diagram shows an example of Amazon Q Developer.

Figure 18 – Amazon Q Developer example

This diagram show the example of software development using AWS Amazon Q

Figure 19 – Generate code, explain code, and get answers to questions about software development.

Example of integrating secure coding practices early in the software development lifecycle using Amazon Q developer.

This diagram shows the example of how to Analyze and fix security vulnerabilities in your project example using Amazon Q

Figure 20 – Analyze and fix security vulnerabilities in your project example

Cleanup

Configuring AWS and Azure services from this blog will provision resources which incur cost. It is a best practice to delete configurations and resources that you are no longer using so that you do not incur unintended charges.

 Conclusion

In this blog post, you learned how to integrate AWS IAM Identity Center and Entra ID IdP for accessing Amazon Q Developer service using VS Code IDE, which speeds up development. Next, you set up the AWS Toolkit to establish a secure connection to AWS using Entra ID credentials, granting you access to the Amazon Q Developer Professional Tier. Using SCIM automatic provisioning for user provisioning and access assignment saves time and speeds up onboarding, allowing for immediate use of AWS services using you own identity. Using Amazon Q, developers get the recommendations and information within their working environment in the IDE, enabling them to integrate secure coding practices early in the software development lifecycle. Developers can proactively scan their existing code using Amazon Q and remediate the security vulnerabilities found in the code.

To learn more about the AWS services

AWS Toolkit for Visual Studio Code

What is IAM Identity Center?

Configure SAML and SCIM with Microsoft Entra ID and IAM Identity Center

How to use Amazon CodeWhisperer using Okta as an external IdP

Mangesh Budkule

Mangesh Budkule is a Sr. Microsoft Specialist Solution architect at AWS with 20 years of experience in the technology industry. Using his passion to bridge the gap between technology and business, he works with our customers to provide architectural guidance and technical assistance on AWS Services, improving the value of their solutions to achieve their business outcomes.