Earlier today, Amazon Q Developer announced an enhanced CLI agent within the Amazon Q command line interface (CLI). With this announcement, Q Developer brings the latest agentic experience to the CLI that provide a more dynamic, interactive coding experience that works with you, and iteratively makes changes based on your feedback. Amazon Q Developer can now use the information in your CLI environment to help you read and write files locally, query AWS resources write code, or automatically debug issues.
Introduction
As a developer, I appreciate my Integrated Development Environment (IDE) along with the integrated linters and auto-completion features that help streamline my workflow. The addition of AI assistants, like Amazon Q Developer, have changed the way I work in profound ways. I can discuss best practices with Q Developer in chat, or ask it to refactor a complex method in seconds. I am increasingly using the Amazon Q Developer agents to develop new features, write documentation, generate unit tests, and automate code reviews. These powerful agent capabilities have further transformed how I approach my daily development tasks.
However, as a developer, I spend as much time at the command-line interface (CLI) as I do in the IDE, maybe even more. Tools like the Amazon Web Services (AWS) CLI, Git, package managers, and linters have revolutionized the way I manage infrastructure, automate repetitive tasks, and collaborate with my team. Tools like Docker and Kubernetes have transformed the way I develop and deploy my applications. Looking at the extensions tab in my IDE, I have extensions installed for Maven, Docker, and Vue, but I rarely use them, preferring the flexibility and power of the CLI.
Amazon Q Developer has been available in the CLI for over a year now, and it has become an indispensable part of my daily development routine. The assistant’s ability to provide intelligent command completions that can list my Git branches, Amazon S3 buckets, etc. has saved me countless hours. The chat feature allows me to engage in natural language conversations with Amazon Q Developer, asking it to help me learn how to accomplish specific tasks, while the translate capability seamlessly converts my plain-language prompts into the corresponding shell commands.
While Amazon Q Developer’s CLI capabilities are helpful, I miss the power of the agents I have access to in my IDE. Earlier today, Amazon Q Developer announced an enhanced CLI agent within the Amazon Q CLI. Amazon Q Developer, and the new agent is powered by Amazon Bedrock, as a result, the CLI has the power of Claude 3.7 Sonnet step-by-step reasoning. In addition, the new CLI agent can make use of tools installed on my system including compilers, package managers, and the AWS CLI. Finally, the enhanced CLI supports multi-turn conversations allowing dynamic, back-and-forth conversations with the agent. This enables me to get more work done, faster, without ever leaving the comfort of my preferred command-line environment.
Rather than being constrained by the features and workflows of an IDE, the CLI agent gives me direct access to the underlying tools and commands I need to get my work done. Let’s look at an example.
Walkthrough
To see how the CLI agent capabilities work, I’ll walk you through an example. I’m preparing for an internal developer community summit happening in April. I need an application to manage the call for content. The Call for Content application allows community members to propose topics for the summit. I’m going to use the Amazon Q Developer CLI to build the application.
I already have the CLI installed, so I’ll run q chat to begin a new conversation with the agent. Then I will ask Q Developer to “scaffold a new application named call-for-content using React and Vite, and then commit it to Git.” As you can see in the following video, the agent understands my intent, and carries out the work needed to build the application. In the past, the Q Developer CLI would provide instructions for me to execute. In this new enhanced version, the CLI agent uses the tools installed on my laptop to complete each step for me. I should note that I have disabled confirmations, but Q Developer can prompt me before each action so I can verify it.
The agent is working quickly in that video. So quickly that is hard to keep up. So I broke it down, step-by-step in the following image. The agent begins by calling npm create to create the new app, followed by npm install to add all the dependencies. It then runs a series of git commands to create a new repository, add my files, and commit the changes including a descriptive commit message.
Notice that agent is not simply generating files. It is running the same commands that I would have run on my own. However, the CLI agent is doing it much faster, and more accurately than I could have done. The enhanced Amazon Q Developer CLI can use tools, including other command line tools installed on my system, to complete its work. Once Q Developer is done, it provides me a summary of the work it has completed, and suggests next steps. In the following image, you can see that Q Developer is suggesting I run the development server to preview the changes. That is a great suggestion, so I ask Q Developer to start the server and confirm that everything is working.
With the application template running, I’m ready to start building the Call for Content application. The CLI agent supports multi-turn conversations, so I can pick up where we left off. I simply explain my requirements at the command line, and agent begins to generate code. This is what Amazon Q Developer does best. In this example, it needs to update the App.jsx and App.css files.
Notice that the agent can read and write files on my local system in addition to running commands as we saw in the prior example. So, as Q Developer generates code, the agent can put it in the correct place in my local file system. Once it is done, the agent starts the development server using npm run dev. I asked it to start the server last time, so it correctly guesses that I will want to check the progress. Just like last time, the agent provides another summary of the changes it made. Personally, I appreciate these periodic summaries. They help me build confidence in the work that Q Developer is doing. I’m not happy with the color of the title. I could ask Q Developer to update it, but I will simply update the file myself. Note that I can edit files on my own while using the CLI. the agent will read files before editing them to check if I have made any changes manually.
The application is looking great! However, it is currently writing it’s output to the console. I never told the agent what to do with the data. I would like the application to write to a DynamoDB table. In fact, I created one already. However, I cannot remember which region the table is in. In the following image, I ask the agent to figure it out for me. Let’s see how it responds.
As you can see in the prior image, the agent is able to think about my vague request, and figure out what to do. It starts by looking in us-east-1. When it can not find the table, it moves to us-west-2 and tries again. The table was in us-west-2, but if it were not, the agent would have continued searching. Q Developer understands how to list and describe AWS resources. Once the agent found the table, it uses npm to install the DynamoDB SDK, and then updates the application files. Note that the agent actually updated multiple files, but I kept the image simple.
With just a few simple prompts, I was able to use the enhanced CLI agent to collaborate with Q Developer throughout the entire development process. I’ll keep working on the application to add authentication, etc. However, I assume you have a good understanding of how the Q Developer CLI works and are eager to get started. So, let’s stop here.
Conclusion
Amazon Q Developer’s new CLI agent has completely transformed the way I approach software development. By bringing the power of an advanced AI assistant directly into my preferred command-line environment, I can now accomplish complex tasks faster than ever before. Q Developer’s natural language understanding and contextual awareness, combined with the CLI agent’s ability to reason and use a wide range of development tools, make it an indispensable part of my daily workflow. Finally, support for multi-turn conversations, enable me to collaborate with, and work along side the agent to get more work done, faster.
If you’re a developer who spends a significant amount of time in the CLI, I highly recommend trying out the Amazon Q Developer’s CLI agent. You can follow the Amazon Q Developer User Guide to install the CLI and start leveraging the new agent capabilities right away, for free. I’m confident it will change the way you work, just as it has for me. Give it a try and let me know what you think!
The command line is used by over thirty million engineers to write, build, run, debug, and deploy software. However, despite how critical it is to the software development process, the command line is notoriously hard to use. Its output is terse, its interface is from the 1970s, and it offers no hints about the ‘right way’ to use it. With tens of thousands of command line applications (called command-line interfaces or CLIs), it’s almost impossible to remember the correct input syntax. The command line’s lack of input validation also means typos can cause unnecessary errors, security risks, and even production outages. It’s no wonder that most software engineers find the command line an error-prone and often frustrating experience.
Announcing Amazon CodeWhisperer for command line Amazon CodeWhisperer for command line is a new set of capabilities and integrations for AI-powered productivity tool, Amazon CodeWhisperer, that makes software developers more productive in the command line. CodeWhisperer for command line modernizes the command line with features such personalized code completions, inline documentation, and AI natural-language-to-code translation. You don’t need to change the tools you use to start benefiting from CodeWhisperer for command line: it integrates directly with your existing tools, such as iTerm2 or the VS Code embedded terminal.
IDE-style completions for 500+ CLIs CodeWhisperer for command line adds IDE-style completions for hundreds of popular CLIs like as Git, npm, Docker, MongoDB Atlas, and the AWS CLI. These typeahead completions increase your productivity by reducing the time spent typing repetitive or boilerplate commands. Inline documentation helps you understand CLI functionality without context-switching to the browser and interrupting your workflow.
Previously, typing a CLI command like git and hitting tab either wouldn’t show you any completions or would show an incomplete list of completions in a clunky interface without descriptions. Now, you can type git and see all the git subcommands, options, and arguments with descriptions, ordered by usage recency. You can also type cd to see a list of all your directories, npm install to see a list of all the node packages available to install, or aws to see a list of all the AWS CLI subcommands.
Natural language-to-bash translation CLI completions are great for tasks where you already know how to do something and just want to move faster. But what do you do when you’re trying to solve a problem and you’re not 100% sure how? Enter: cw ai!
The cw ai command lets you write a natural language instruction and CodeWhisperer will translate it to an instantly executable shell code snippet. For instance, imagine you want to copy a file from your local machine to Amazon Simple Storage Service (Amazon S3). You would write “copy all files in my current directory to s3” and CodeWhisperer will output aws s3 cp . s3://$BUCKET_NAME --recursive — now all you need to do is choose an S3 bucket. Natural language to bash translation is perfect for those workflows you occasionally have to do, but always forget the correct bash syntax like reversing a git commit, finding strings inside files with grep, or compressing files with tar. And just like with CLI completions, cw ai translator works great with the AWS CLI.
Get started CodeWhisperer for command line is available on macOS for all major shells (bash, zsh, and fish) and major terminal emulators such as Terminal, iTerm2, Hyper, and the built-in terminals in Visual Studio Code and JetBrains.
Load testing is a foundational pillar of building resilient applications. Today, load testing practices across many organizations are often based on desktop tools, where someone must manually run the performance tests and validate the results before a software release can be promoted to production. This leads to increased time to market for new features and products. Load testing applications in automated CI/CD pipelines provides the following benefits:
Early and automated feedback on performance thresholds based on clearly defined benchmarks.
Consistent and reliable load testing process for every feature release.
Reduced overall time to market due to eliminated manual load testing effort.
Improved overall resiliency of the production environment.
The ability to rapidly identify and document bottlenecks and scaling limits of the production environment.
The AWS Cloud Development Kit (AWS CDK) is an open-source software development framework to define cloud infrastructure in code and provision it through AWS CloudFormation. AWS CDK Pipelines is a construct library module for continuous delivery of AWS CDK applications, powered by AWS CodePipeline. AWS CDK Pipelines can automatically build, test, and deploy the new version of your CDK app whenever the new source code is checked in.
Distributed Load Testing is an AWS Solution that automates software applications testing at scale to help you identify potential performance issues before their release. It creates and simulates thousands of users generating transactional records at a constant pace without the need to provision servers or instances.
Prerequisites
To deploy and test this solution, you will need:
AWS Command Line Interface (AWS CLI): This tutorial assumes that you have configured the AWS CLI on your workstation. Alternatively, you can use also use AWS CloudShell.
AWS CDK V2: This tutorial assumes that you have installed AWS CDK V2 on your workstation or in the CloudShell environment.
Solution Overview
In this solution, we create a CI/CD pipeline using AWS CDK Pipelines and use it to deploy a sample RESTful CDK application in two environments; development and production. We load test the application using AWS Distributed Load Testing Solution in the development environment. Based on the load test result, we either fail the pipeline or proceed to production deployment. You may consider running the load test in a dedicated testing environment that mimics the production environment.
For demonstration purposes, we use the following metrics to validate the load test results.
Average Response Time – the average response time, in seconds, for all the requests generated by the test. In this blog post we define the threshold for average response time to 1 second.
Error Count – the total number of errors. In this blog post, we define the threshold for for total number of errors to 1.
For your application, you may consider using additional metrics from the Distributed Load Testing solution documentation to validate your load test.
The AWS Lambda (Lambda) function in the architecture contains a 500 millisecond sleep statement to add latency to the API response.
Typescript code for starting the load test and validating the test results. This code is executed in the ‘Load Test’ step of the ‘Development Deployment’ stage. It starts a load test against the sample restful application endpoint and waits for the test to finish. For demonstration purposes, the load test is started with the following parameters:
Concurrency: 1
Task Count: 1
Ramp up time: 0 secs
Hold for: 30 sec
End point to test: endpoint for the sample RESTful application.
For the purposes of this blog, we deploy the CI/CD pipeline, the RESTful application and the AWS Distributed Load Testing solution into the same AWS account. In your environment, you may consider deploying these stacks into separate AWS accounts based on your security and governance requirements.
To deploy the solution components
Follow the instructions in the the AWS Distributed Load Testing solution Automated Deployment guide to deploy the solution. Note down the value of the CloudFormation output parameter ‘DLTApiEndpoint’. We will need this in the next steps. Proceed to the next step once you are able to login to the User Interface of the solution.
Deploy the CloudFormation stack for the CI/CD pipeline. This step will also commit the AWS CDK code for the sample RESTful application stack and start the application deployment.
cd pipeline && cdk bootstrap && cdk deploy --require-approval never
Follow the below steps to view the load test results:
Open the AWS CodePipeline console.
Click on the pipeline named “blog-pipeline”.
Observe that one of the stages (named ‘LoadTest’) in the CI/CD pipeline (that was provisioned by the CloudFormation stack in the previous step) executes a load test against the application Development environment.
Click on the details of the ‘LoadTest’ step to view the test results. Notice that the load test succeeded.
Change the response time threshold
In this step, we will modify the response time threshold from 1 second to 200 milliseconds in order to introduce a load test failure. Remember from the steps earlier that the Lambda function code has a 500 millisecond sleep statement to add latency to the API response time.
From the AWS Console and then go to CodeCommit. The source for the pipeline is a CodeCommit repository named “blog-repo”.
Click on the “blog-repo” repository, and then browse to the “pipeline” folder. Click on file ‘loadTestEnvVariables.json’ and then ‘Edit’.
Set the response time threshold to 200 milliseconds by changing attribute ‘AVG_RT_THRESHOLD’ value to ‘.2’. Click on the commit button. This will start will start the CI/CD pipeline.
Go to CodePipeline from the AWS console and click on the ‘blog-pipeline’.
Observe the ‘LoadTest’ step in ‘Development-Deploy’ stage will fail in about five minutes, and the pipeline will not proceed to the ‘Production-Deploy’ stage.
Click on the details of the ‘LoadTest’ step to view the test results. Notice that the load test failed.
Log into the Distributed Load Testing Service console. You will see two tests named ‘sampleScenario’. Click on each of them to see the test result details.
Cleanup
Delete the CloudFormation stack that deployed the sample application.
From the AWS Console, go to CloudFormation and delete the stacks ‘Production-Deploy-Application’ and ‘Development-Deploy-Application’.
Delete the CI/CD pipeline.
cd pipeline && cdk destroy
Delete the Distributed Load Testing Service CloudFormation stack.
From CloudFormation console, delete the stack for Distributed Load Testing service that you created earlier.
Conclusion
In the post above, we demonstrated how to automatically load test your applications in a CI/CD pipeline using AWS CDK Pipelines and AWS Distributed Load Testing solution. We defined the performance bench marks for our application as configuration. We then used these benchmarks to automatically validate the application performance prior to production deployment. Based on the load test results, we either proceeded to production deployment or failed the pipeline.
Amazon Redshift Serverless makes it simple to run and scale analytics without having to manage the instance type, instance size, lifecycle management, pausing, resuming, and so on. It automatically provisions and intelligently scales data warehouse compute capacity to deliver fast performance for even the most demanding and unpredictable workloads, and you pay only for what you use. Just load your data and start querying right away in the Amazon Redshift Query Editor or in your favorite business intelligence (BI) tool and continue to enjoy the best price performance and familiar SQL features in an easy-to-use, zero administration environment.
Redshift Serverless separates compute and storage and introduces two abstractions:
Workgroup – A workgroup is a collection of compute resources. It groups together compute resources like RPUs, VPC subnet groups, and security groups.
Namespace – A namespace is a collection of database objects and users. It groups together data objects, such as databases, schemas, tables, users, or AWS Key Management Service (AWS KMS) keys for encrypting data.
Some organizations want to automate the creation of workgroups and namespaces for automated infrastructure management and consistent configuration across environments, and provide end-to-end self-service capabilities. You can automate the workgroup and namespace management operations using the Redshift Serverless API, the AWS Command Line Interface (AWS CLI), or AWS CloudFormation, which we demonstrate in this post.
Solution overview
In the following sections, we discuss the automation approaches for various tasks involved in Redshift Serverless data warehouse management using AWS CloudFormation (for more information, see RedshiftServerless resource type reference) and the AWS CLI (see redshift-serverless).
The following are some of the key use cases and appropriate automation approaches to use with AWS CloudFormation:
Enable end-to-end self-service from infrastructure setup to querying
Automate data consumer onboarding for data provisioned through AWS Data Exchange
Accelerate workload isolation by creating endpoints
Create a new data warehouse with consistent configuration across environments
The following are some of the main use cases and approaches for the AWS CLI:
Automate maintenance operations:
Backup and limits
Modify RPU configurations
Manage limits
Automate migration from provisioned to serverless
Prerequisites
To run the operations described in this post, make sure that this user or role has AWS Identity Access and Management (IAM) arn:aws:iam::aws:policy/AWSCloudFormationFullAccess, and either the administrator permission arn:aws:iam::aws:policy/AdministratorAccess or the full Amazon Redshift permission arn:aws:iam::aws:policy/AmazonRedshiftFullAccess policy attached. Refer to Security and connections in Amazon Redshift Serverless for further details.
You should have at least three subnets, and they must span across three Availability Zones.It is not enough if just 3 subnets created in same availability zone. To create a new VPC and subnets, use the following CloudFormation template to deploy in your AWS account.
Create a Redshift Serverless namespace and workgroup using AWS CloudFormation
AWS CloudFormation helps you model and set up your AWS resources so that you can spend less time on infrastructure setup and more time focusing on your applications that run in AWS. You create a template that describes all the AWS resources that you want, and AWS CloudFormation takes care of provisioning and configuring those resources based on the given input parameters.
To create the namespace and workgroup for a Redshift Serverless data warehouse using AWS CloudFormation, complete the following steps:
Choose Launch Stack to launch AWS CloudFormation in your AWS account with a template:
For Stack name, enter a meaningful name for the stack, for example, rsserverless.
Enter the parameters detailed in the following table.
Parameters
Default
Allowed Values
Description
Namespace
.
N/A
The name of the namespace of your choice to be created.
Database Name
dev
N/A
The name of the first database in the Redshift Serverless environment.
Admin User Name
admin
N/A
The administrator’s user name for the Redshift Serverless namespace being create.
Admin User Password
.
N/A
The password associated with the admin user.
Associate IAM Role
.
Comma-delimited list of ARNs of IAM roles
Associate an IAM role to your Redshift Serverless namespace (optional).
Log Export List
userlog, connectionlog, useractivitylog
userlog, connectionlog, useractivitylog
Provide comma-separated values from the list. For example, userlog, connectionlog, useractivitylog. If left blank, LogExport is turned off.
Workgroup
.
N/A
The workgroup name of your choice to be created.
Base RPU
128
Minimum value of 32 and maximum value of 512
The base RPU for the Redshift Serverless workgroup.
Publicly accessible
false
true, false
Indicates if the Redshift Serverless instance is publicly accessible.
Subnet Ids
.
N/A
You must have at least three subnets, and they must span across three Availability Zones.
Security Group Id
.
N/A
The list of security group IDs in your VPC.
Enhanced VPC Routing
false
true, false
The value that specifies whether to enable enhanced VPC routing, which forces Redshift Serverless to route traffic through your VPC.
Pass the parameters provided to the AWS::RedshiftServerless::Namespace and AWS::RedshiftServerless::Workgroup resource types:
Perform namespace and workgroup management operations using the AWS CLI
The AWS CLI is a unified tool to manage your AWS services. With just one tool to download and configure, you can control multiple AWS services from the command line and automate them through scripts.
Regardless of whether your snapshot was made from a provisioned cluster or serverless workgroup, it can be restored into a new serverless workgroup. Restoring a snapshot replaces the namespace and workgroup with the contents of the snapshot.
Use the following command to restore from a snapshot:
Redshift Serverless creates recovery points of your namespace that are available for 24 hours. To keep your recovery point longer than 24 hours, convert it to a snapshot.
To find the recovery points associated to your namespace, run the following command:
To keep costs predictable for Redshift Serverless, you can set the maximum RPU hours used per day, per week, or per month. In addition, you can take action when the limit is reached. Actions include: write a log entry to a system table, receive an alert, or turn off user queries.
Use the following command to first get the workgroup ARN:
You have now learned how to automate management operations on Redshift Serverless namespaces and workgroups using AWS CloudFormation and the AWS CLI. To automate creation and management of Amazon Redshift provisioned clusters, refer to Automate Amazon Redshift Cluster management operations using AWS CloudFormation.
About the Authors
Ranjan Burman is a Analytics Specialist Solutions Architect at AWS. He specializes in Amazon Redshift and helps customers build scalable analytical solutions. He has more than 15 years of experience in different database and data warehousing technologies. He is passionate about automating and solving customer problems with the use of cloud solutions.
Satesh Sonti is a Sr. Analytics Specialist Solutions Architect based out of Atlanta, specialized in building enterprise data platforms, data warehousing, and analytics solutions. He has over 16 years of experience in building data assets and leading complex data platform programs for banking and insurance clients across the globe.
Urvish Shah is a Senior Database Engineer at Amazon Redshift. He has more than a decade of experience working on databases, data warehousing and in analytics space. Outside of work, he enjoys cooking, travelling and spending time with his daughter.
Blazor can run your client-side C# code directly in the browser, using WebAssembly. It is a .NET running on WebAssembly, and you can reuse code and libraries from the server-side parts of your application.
Overview of solution
In this post, you will deploy a Blazor WebAssembly Application from git repository to AWS Amplify. We will use .NET 6. to create a Blazor WebAssembly on local machine using AWS Command Line Interface (AWS CLI), use GitHub as a git repository, and deploy the application to Amplify.
Follow this post on: Windows 10, Windows 11/Ubuntu 20.04 LTS/macOS 10.15 “Catalina”, macOS 11.0 “Big Sur”, or macOS 12.0 “Monterey”.
Walkthrough
We will walk through the following steps:
Create Blazor WebAssembly application on our local machine using AWS CLI
Test /run the application locally
Create a new repository on Github
Create a local repository
Setup Amplify
Test /run the application on AWS
Prerequisites
For this walkthrough, you should have the following prerequisites:
Let’s start creating a Blazor WebAssembly application on our local machine using CLI:
Open the command line interface
Create a directory for your application running the following command:
mkdir BlazorWebApp
Change to the application directory running the following command:
cd BlazorWebApp
Create the Blazor WebAssembly Application running the following command:
dotnet new blazorwasm
Run the application:
dotnet run
Copy the URL after “Now listening on:”, and paste it on your browser. Example: http://localhost:5152 (port might be different in your CLI)
After testing your application, go back to the terminal and press <ctrl> + c to stop the application.
Create a gitignore for your project running the following command:
dotnet new gitignore
Create a file called “amplify.yml” in the root directory of your application. The name must be exactly “amplify.yml”. This file contains the commands to build your application used by AWS CodeBuild.
Copy and paste the following code to the file amplify.yml.
Log in to the Github website and create a new repository:
Type a name for your repository, choose private, and add a read.me file as shown in the following screenshot:
Create a local repository for your application:
On the root folder of your application enter the following commands. Make sure that you have configured git CLI with email and user
git add --all
 git commit -m “first commit”
 git branch -M main
 git remote add origin https://github.com/perinei/blazorToAmplify.git
 (replace red text with your repo)
 for ssh authentication use:
 git remote add origin [email protected]: perinei/blazorToAmplify.git
 git push -u origin main
Setup Amplify:
Log in to the AWS account
Go to AWS Amplify Service
On the left panel, choose All apps
Select New app as per the following screen
Select Host Web App from the dropdown list
Choose Github
Select Continue. If you are still logged in on your Github account, then the page will automatically authenticate you, otherwise select the Authenticate Button
Choose your repository: in my case, perinei/bazortoamplify
Branch: main
Select next
Give your app a name
amplify.yml will be automatically detected and will be used to build the application on AWS
Select Next to review the configuration
Select Save and Deploy
Amplify will provision, build, deploy, and verify the application
When the process is complete, select the URL of your application and test the application.
Congratulations! Your Blazor WebAssembly is running on Amplify.
Cleaning up
To avoid incurring future charges, delete the resources. On Amplify, choose your app name on the left panel, select action, and then delete app.
Conclusion
Congratulations, you deployed your first Blazor Webassembly Application to AWS Amplify.
In this blog post you learned how to easily build a full CI/CD pipeline for a Blazor WebAssembly using the AWS amplify. It was only necessary to specify the repository and the commands build the application on the file amplify.yml that should be include on the root folder of repository. You can also easily add a custom domain to your application. Visit Set up custom domains on AWS Amplify Hosting
AWS can help you to migrate .NET applications to the Cloud. Visit .NET on AWS.
The .NET on AWS YouTube playlist is the place to get the latest .NET on AWS videos, including AWS re:Invent sessions.
Developing and deploying applications rapidly to users requires a working pipeline that accepts the user code (usually via a Git repository). AWS CodeArtifact was announced in 2020. It’s a secure and scalable artifact management product that easily integrates with other AWS products and services. CodeArtifact allows you to publish, store, and view packages, list package dependencies, and share your application’s packages.
In this post, I will show how we can build a simple DevOps pipeline for a sample JAVA application (JAR file) to be built with Maven.
Solution Overview
We utilize the following AWS services/Tools/Frameworks to set up our continuous integration, continuous deployment (CI/CD) pipeline:
The following diagram illustrates the pipeline architecture and flow:
Our pipeline is built on CodePipeline with CodeCommit as the source (CodePipeline Source Stage). This triggers the pipeline via a CloudWatch Events rule. Then the code is fetched from the CodeCommit repository branch (main) and sent to the next pipeline phase. This CodeBuild phase is specifically for compiling, packaging, and publishing the code to CodeArtifact by utilizing a package manager—in this case Maven.
After Maven publishes the code to CodeArtifact, the pipeline asks for a manual approval to be directly approved in the pipeline. It can also optionally trigger an email alert via Amazon Simple Notification Service (Amazon SNS). After approval, the pipeline moves to another CodeBuild phase. This downloads the latest packaged JAR file from a CodeArtifact repository and deploys to the AWS Lambda function.
After the Git repository is cloned, the directory structure is shown as in the following screenshot :
Let’s study the files and code to understand how the pipeline is built.
The directory java-events is a sample Java Maven project. Find numerous sample applications on GitHub. For this post, we use the sample application java-events.
To add your own application code, place the pom.xml and settings.xml files in the root directory for the AWS CDK project.
Let’s study the code in the file lib/cdk-pipeline-codeartifact-new-stack.ts of the stack CdkPipelineCodeartifactStack. This is the heart of the AWS CDK code that builds the whole pipeline. The stack does the following:
Creates a CodeCommit repository called ca-pipeline-repository.
References a CloudFormation template (lib/ca-template.yaml) in the AWS CDK code via the module @aws-cdk/cloudformation-include.
Creates a CodeArtifact domain called cdkpipelines-codeartifact.
Creates a CodeArtifact repository called cdkpipelines-codeartifact-repository.
Creates a CodeBuild project called JarBuild_CodeArtifact. This CodeBuild phase does all of the code compiling, packaging, and publishing to CodeArtifact into a repository called cdkpipelines-codeartifact-repository.
Creates a CodeBuild project called JarDeploy_Lambda_Function. This phase fetches the latest artifact from CodeArtifact created in the previous step (cdkpipelines-codeartifact-repository) and deploys to the Lambda function.
Finally, creates a pipeline with four phases:
Source as CodeCommit (ca-pipeline-repository).
CodeBuild project JarBuild_CodeArtifact.
A Manual approval Stage.
CodeBuild project JarDeploy_Lambda_Function.
CodeArtifact shows the domain-specific and repository-specific connection settings to mention/add in the application’s pom.xml and settings.xml files as below:
Deploy the Pipeline
The AWS CDK code requires the following packages in order to build the CI/CD pipeline:
After the AWS CDK code is deployed, view the final output on the stack’s detail page on the AWS CloudFormation :
How the pipeline works with artifact versions (using SNAPSHOTS)
In this demo, I publish SNAPSHOT to the repository. As per the documentation here and here, a SNAPSHOT refers to the most recent code along a branch. It’s a development version preceding the final release version. Identify a snapshot version of a Maven package by the suffix SNAPSHOT appended to the package version.
The application settings are defined in the pom.xml file. For this post, we define the following:
The version to be used, called 1.0-SNAPSHOT.
The specific packaging, called jar.
The specific project display name, called JavaEvents.
The specific group ID, called JavaEvents.
The screenshot below shows the pom.xml settings we utilised in the application:
You can’t republish a package asset that already exists with different content, as per the documentation here.
When a Maven snapshot is published, its previous version is preserved in a new version called a build. Each time a Maven snapshot is published, a new build version is created.
When a Maven snapshot is published, its status is set to Published, and the status of the build containing the previous version is set to Unlisted. If you request a snapshot, the version with status Published is returned. This is always the most recent Maven snapshot version.
For example, the image below shows the state when the pipeline is run for the FIRST RUN. The latest version has the status Published and previous builds are marked Unlisted.
For all subsequent pipeline runs, multiple Unlisted versions will occur every time the pipeline is run, as all previous versions of a snapshot are maintained in its build versions.
Fetching the Latest Code
Retrieve the snapshot from the repository in order to deploy the code to an AWS Lambda Function. I have used AWS CLI to list and fetch the latest asset of package version 1.0-SNAPSHOT.
Notice that I’m referring the last code by using variable $ListLatestArtifact. This always fetches the latest code, and demooutput is the outfile of the AWS CLI command where the content (code) is saved.
Testing the Pipeline
Now clone the CodeCommit repository that we created with the following code:
Enter the following code to push the code to the CodeCommit repository:
cp -rp cdk-pipeline-codeartifact-new /* ca-pipeline-repository
 cd ca-pipeline-repository
 git checkout -b main
 git add .
 git commit -m “testing the pipeline”
 git push origin main
Once the code is pushed to Git repository, the pipeline is automatically triggered by Amazon CloudWatch events.
The following screenshots shows the second phase (AWS CodeBuild Phase – JarBuild_CodeArtifact) of the pipeline, wherein the asset is successfully compiled and published to the CodeArtifact repository by Maven:
The following screenshots show the last phase (AWS CodeBuild Phase – Deploy-to-Lambda) of the pipeline, wherein the latest asset is successfully pulled and deployed to AWS Lambda Function.
Asset JavaEvents-1.0-20210618.131629-5.jar is the latest snapshot code for the package version 1.0-SNAPSHOT. This is the same asset version code that will be deployed to AWS Lambda Function, as seen in the screenshots below:
The following screenshot of the pipeline shows a successful run. The code was fetched and deployed to the existing Lambda function (codeartifact-test-function).
Cleanup
To clean up, You can either delete the entire stack through the AWS CloudFormation console or use AWS CDK command like below –
cdk destroy
For more information on the AWS CDK commands, please check the here or sample here.
Summary
In this post, I demonstrated how to build a CI/CD pipeline for your serverless application with AWS CodePipeline by utilizing AWS CDK with AWS CodeArtifact. Please check the documentation here for an in-depth explanation regarding other package managers and the getting started guide.
One of the primary advantages of working in the cloud is achieving agility in product development. You can adopt practices like continuous integration and continuous delivery (CI/CD) and GitOps to increase your ability to release code at quicker iterations. Development models like these demand agility from security teams as well. This means your security team has to provide the tooling and visibility to developers for them to fix security vulnerabilities as quickly as possible.
Vulnerabilities in cloud-native applications can be roughly classified into infrastructure misconfigurations and application vulnerabilities. In this post, we focus on enabling developers to scan vulnerable data around Python open-source packages using the Snyk Command Line Interface (CLI).
The world of package dependencies
Traditionally, code scanning is performed by the security team; they either ship the code to the scanning instance, or in some cases ship it to the vendor for vulnerability scanning. After the vendor finishes the scan, the results are provided to the security team and forwarded to the developer. The end-to-end process of organizing the repositories, sending the code to security team for scanning, getting results back, and remediating them is counterproductive to the agility of working in the cloud.
Let’s take an example of package A, which uses package B and C. To scan package A, you scan package B and C as well. Similar to package A having dependencies on B and C, packages B and C can have their individual dependencies too. So the dependencies for each package get complex and cumbersome to scan over time. The ideal method is to scan all the dependencies in one go, without having manual intervention to understand the dependencies between packages.
Building on the foundation of GitOps and Gitflow
GitOps was introduced in 2017 by Weaveworks as a DevOps model to implement continuous deployment for cloud-native applications. It focuses on the developer ability to ship code faster. Because security is a non-negotiable piece of any application, this solution includes security as part of the deployment process. We define the Snyk scanner as declarative and immutable AWS Cloud Development Kit (AWS CDK) code, which instructs new Python code committed to the repository to be scanned.
Another continuous delivery practice that we base this solution on is Gitflow. Gitflow is a strict branching model that enables project release by enforcing a framework for managing Git projects. As a brief introduction on Gitflow, typically you have a main branch, which is the code sent to production, and you have a development branch where new code is committed. After the code in development branch passes all tests, it’s merged to the main branch, thereby becoming the code in production. In this solution, we aim to provide this scanning capability in all your branches, providing security observability through your entire Gitflow.
AWS services used in this solution
We use the following AWS services as part of this solution:
AWS CDK – The AWS CDK is an open-source software development framework to define your cloud application resources using familiar programming languages. In this solution, we use Python to write our AWS CDK code.
AWS CodeBuild – CodeBuild is a fully managed build service in the cloud. CodeBuild compiles your source code, runs unit tests, and produces artifacts that are ready to deploy. CodeBuild eliminates the need to provision, manage, and scale your own build servers.
AWS CodeCommit – CodeCommit is a fully managed source control service that hosts secure Git-based repositories. It makes it easy for teams to collaborate on code in a secure and highly scalable ecosystem. CodeCommit eliminates the need to operate your own source control system or worry about scaling its infrastructure. You can use CodeCommit to securely store anything from source code to binaries, and it works seamlessly with your existing Git tools.
AWS CodePipeline – CodePipeline is a continuous delivery service you can use to model, visualize, and automate the steps required to release your software. You can quickly model and configure the different stages of a software release process. CodePipeline automates the steps required to release your software changes continuously.
Amazon EventBridge – EventBridge rules deliver a near-real-time stream of system events that describe changes in AWS resources. With simple rules that you can quickly set up, you can match events and route them to one or more target functions or streams.
AWS Systems Manager Parameter Store – Parameter Store, a capability of AWS Systems Manager, provides secure, hierarchical storage for configuration data management and secrets management. You can store data such as passwords, database strings, Amazon Machine Image (AMI) IDs, and license codes as parameter values.
Prerequisites
Before you get started, make sure you have the following prerequisites:
An AWS account (use a Region that supports CodeCommit, CodeBuild, Parameter Store, and CodePipeline)
An existing CodeCommit repository you want to test on
Architecture overview
After you complete the steps in this post, you will have a working pipeline that scans your Python code for open-source vulnerabilities.
We use the Snyk CLI, which is available to customers on all plans, including the Free Tier, and provides the ability to programmatically scan repositories for vulnerabilities in open-source dependencies as well as base image recommendations for container images. The following reference architecture represents a general workflow of how Snyk performs the scan in an automated manner. The design uses DevSecOps principles of automation, event-driven triggers, and keeping humans out of the loop for its run.
As developers keep working on their code, they continue to commit their code to the CodeCommit repository. Upon each commit, a CodeCommit API call is generated, which is then captured using the EventBridge rule. You can customize this event rule for a specific event or feature branch you want to trigger the pipeline for.
When the developer commits code to the specified branch, that EventBridge event rule triggers a CodePipeline pipeline. This pipeline has a build stage using CodeBuild. This stage interacts with the Snyk CLI, and uses the token stored in Parameter Store. The Snyk CLI uses this token as authentication and starts scanning the latest code committed to the repository. When the scan is complete, you can review the results on the Snyk console.
This code is built for Python pip packages. You can edit the buildspec.yml to incorporate for any other language that Snyk supports.
The following diagram illustrates our architecture.
Code overview
The code in this post is written using the AWS CDK in Python. If you’re not familiar with the AWS CDK, we recommend reading Getting started with AWS CDK before you customize and deploy the code.
This AWS CDK construct uses the Snyk CLI within the CodeBuild job in the pipeline to scan the Python packages for open-source package vulnerabilities. The construct uses CodePipeline to create a two-stage pipeline: one source, and one build (the Snyk scan stage). The construct takes the input of the CodeCommit repository you want to scan, the Snyk organization ID, and Snyk auth token.
For the deployment, we use the AWS CDK construct in the codebase cdk_snyk_construct/cdk_snyk_construct_stack.py in the AWS CDK stack cdk-snyk-stack. The construct requires the following parameters:
ARN of the CodeCommit repo you want to scan
Name of the repository branch you want to be monitored
Parameter Store name of the Snyk organization ID
Parameter Store name for the Snyk auth token
Set up the organization ID and auth token before deploying the stack. Because these are confidential and sensitive data, you should deploy them as a separate stack or manual process. In this solution, the parameters have been stored as a SecureString parameter type and encrypted using the AWS-managed KMS key.
You create the organization ID and auth token on the Snyk console. On the Settings page, choose General in the navigation page to add these parameters.
You can retrieve the names of the parameters on the Systems Manager console by navigating to Parameter Store and finding the name on the Overview tab.
Create a requirements.txt file in the CodeCommit repository
We now create a repository in CodeCommit to store the code. For simplicity, we primarily store the requirements.txt file in our repository. In Python, a requirements file stores the packages that are used. Having clearly defined packages and versions makes it easier for development, especially in virtual environments.
To create a CodeCommit repository, run the following AWS Command Line Interface (AWS CLI) command in your AWS accounts:
aws codecommit create-repository --repository-name snyk-repo \ --repository-description "Repository for Snyk to scan Python packages"
Now let’s create a branch called main in the repository using the following command:
aws codecommit create-branch --repository-name snyk-repo \ --branch-name main
After you create the repository, commit a file named requirements.txt with the following content. The following packages are pinned to a particular version that they have a vulnerability with. This file is our hypothetical vulnerable set of packages that have been committed into your development code.
When you store the Snyk auth token and organization ID in Parameter Store, note the parameter names—you need to pass them as parameters during the deployment step.
Now clone the CDK code from the GitHub repository with the command below:
After the stack deployment is complete, you can see a new pipeline in your AWS account, which is configured to be triggered every time a commit occurs on the main branch.
You can view the results of the scan on the Snyk console. After the pipeline runs, log in to snyk.io and you should see a project named as per your repository (see the following screenshot).
Choose the repo name to get a detailed view of the vulnerabilities found. Depending on what packages you put in your requirements.txt, your report will differ from the following screenshot.
To fix the vulnerability identified, you can change the version of these packages in the requirements.txt file. The edited requirements file should look like the following:
After you update the requirements.txt file in your repository, push your changes back to the CodeCommit repository you created earlier on the main branch. The push starts the pipeline again.
After the commit is performed to the targeted branch, you don’t see the vulnerability reported on the Snyk dashboard because the pinned version 5.4 doesn’t contain that vulnerability.
Clean up
To avoid accruing further cost for the resources deployed in this solution, run cdk destroy to remove all the AWS resources you deployed through CDK.
As the CodeCommit repository was created using AWS CLI, the following command deletes the CodeCommit repository:
In this post, we provided a solution so developers can self- remediate vulnerabilities in their code by monitoring it through Snyk. This solution provides observability, agility, and security for your Python application by following DevOps principles.
A similar architecture has been used at NFL to shift-left the security of their code. According to the shift-left design principle, security should be moved closer to the developers to identify and remediate security issues earlier in the development cycle. NFL has implemented a similar architecture which made the total process, from committing code on the branch to remediating 15 times faster than their previous code scanning setup.
Here’s what NFL has to say about their experience:
“NFL used Snyk to scan Python packages for a service launch. Traditionally it would have taken 10days to scan the packages through our existing process but with Snyk we were able to follow DevSecOps principles and get the scans completed, and reviewed within matter of days. This simplified our time to market while maintaining visibility into our security posture.” – Joe Steinke (Director, Data Solution Architect)
Amazon Elasticsearch Service (Amazon ES) supports multiple instance types based on your use case. In 2021, AWS announced general purpose (M6g), compute optimized (C6g), and memory optimized (R6g, R6gd) instance types for Amazon ES version 7.9 or later powered by AWS Graviton2 processors, which delivers a major leap in capabilities and better price/performance improvement over previous generation instances.
Graviton2 instances are built using custom silicon designed by Amazon. These instances are Amazon-designed hardware and software innovations that enable the delivery of efficient, flexible, and secure cloud services with isolated multi-tenancy, private networking, and fast local storage. You can launch Graviton2 instances via the Amazon ES console, the AWS Command Line Interface (AWS CLI), AWS API, AWS CloudFormation, or the AWS Cloud Development Kit (AWS CDK). You can change your existing Amazon ES instance types to Graviton2 using a blue/green deployment process, which minimizes downtime and maintains the original environment in the event of unsuccessful deployments.
In this post, we review prerequisites and considerations to upgrade your existing Amazon ES instances to Graviton2 with minimal downtime.
Why move to Graviton2?
The following are some of the reasons you should move to Graviton2:
You can enjoy up to 38% improvement in indexing throughput compared to the corresponding x86-based counterparts
The Graviton2 instance family provides up to 50% reduction in indexing latency, and up to 30% improvement in query performance when compared to the current generation (M5, C5, R5)
Amazon ES Graviton2 instances provide up to 44% price/performance improvement over previous generation instances
Graviton2 instances include support for all recently launched features like encryption at rest and in flight, role-based access control, cross-cluster search, Auto-Tune, Trace Analytics, Kibana Reporting, and UltraWarm
Solution overview
For this post, let’s consider a use case in which we have an Amazon ES cluster running version 7.4 with three data nodes and two primary nodes.
As a general best practice, we recommend testing the process in a non-production environment followed by validation tests to make sure everything is configured and operating as per your expectations before making changes to the production environment. We also recommend creating a snapshot of your cluster before performing upgrades or modifying the instance type to minimize the risk of data loss.
In this post, we walk you through the following steps:
Upgrade the Amazon ES cluster (if needed):
Determine if the current cluster version meets the minimum required version (7.9 or later) for moving to Graviton2.
Upgrade the Amazon ES domain to the required minimum version.
Modify the instance type of your cluster nodes.
Confirm that your applications work correctly with the upgraded cluster.
Roll back to the previous instance types if compatibility issues are discovered.
Upgrade Amazon ES versions
To take advantage of Graviton2-based Amazon ES instances, your cluster must be running Amazon ES version 7.9 and above and service software R20210331 or later (as of this post). For the latest updates of this information, see Supported instance types in Amazon Elasticsearch Service. For upgrade considerations, compatibilities, and instructions, see Upgrading Elasticsearch.
For our use case, our cluster is running version 7.4. We can confirm the version via the AWS CLI or Amazon ES console, as in the following screenshot.
To upgrade your domain, choose Upgrade domain on the Actions menu. You can then choose what version to upgrade to, or verify your cluster can be upgraded. The upgrade process takes some time depending on the size of your cluster.
If you prefer to use the AWS CLI, you can perform the same steps. To get a list of all valid upgrade targets for a current version using the AWS CLI, use the describe-elasticsearch-domain command.
The following describe-elasticsearch-domain example provides configuration details for a given domain:
aws es describe-elasticsearch-domain \
    --domain-name demo
At the time of writing, you can’t mix x86 and Graviton2-based Amazon ES instances with the primary and data nodes. As such, both data nodes and primary nodes are modified at the same time. To modify your nodes, complete the following steps:
On the Amazon ES console, go to the domain you want to upgrade.
Choose Edit domain.
In the Data nodes section, for Instance type, change your data nodes to Graviton 2 instance types. In our case, we upgrade from r5.large.elasticsearch to r6g.large.elasticsearch.
In the Dedicated master nodes section, for Instance type, change your dedicated primary nodes to Graviton 2 instance types. In our case, we upgrade from r5.large.elasticsearch to r6g.large.elasticsearch.
Choose Submit.
The cluster goes into a processing state. During this time, you can monitor the Cluster health tab to see your number of nodes increase. In our case, our cluster has two dedicated primary nodes and three data nodes (five total).
During deployment, Amazon ES performs a blue/green deployment. This ensures any errors encountered during modification can be rolled back. You can continue to use the cluster during this time, however there may be a brief service interruption when the cluster switches to the new dedicated primary nodes. During blue/green deployment, you’re charged for both instance types, and then only the new instance type going forward.
After the modification finishes successfully, you can verify both the primary and data nodes are using Graviton2 instances.
Validate and confirm the application works correctly
You can now validate Amazon ES is performing as expected with your application. You can check the Cluster health tab for metrics related to cluster performance and observe if you’re not seeing the expected performance.
Perform rollback
In the rare scenario in which issues are discovered with the Graviton2-based Amazon ES cluster, such as application compatibility or data issues, you can perform the same steps to change the cluster back to the original node type.
Summary
This post shared a step-by-step guide to migrate your Amazon ES cluster to Graviton2-based nodes, as well as some key considerations when modifying your cluster. We also talked about how to upgrade your cluster to the latest version of Amazon ES to take advantage of Graviton 2, as well as other features such as UltraWarm and cold storage. As always, make sure you fully test compatibility with your application and these newer versions of Amazon ES, and per best practices, always perform upgrades in a lower environment before making these changes in a production environment.
Zachariah Elliott works as a Solutions Architect focusing on EdTech at AWS. He is passionate about helping customers build Well-Architected solutions on AWS. He is also part of the IoT Subject Matter Expert community at AWS and loves helping customers develop unique IoT-based solutions.
Pranusha Manchala is a Solutions Architect at AWS who works with education companies. She has worked with many EdTech customers and provided them with architectural guidance for building highly scalable and cost-optimized applications on AWS. She found her interests in machine learning and started to dive deep into this technology. She enjoys cooking, baking, and outdoor activities in her free time.
With AWS SSO, you can centrally manage access and user permissions to all of your accounts in AWS Organizations. You can assign user permissions based on common job functions, customize them to meet your specific security requirements, and assign the permissions to users or groups in the specific accounts where they need access. You can create, read, update, and delete permission sets in one place to have consistent role policies across your entire organization. You can then provide access by assigning permission sets to multiple users and groups in multiple accounts all in a single operation.
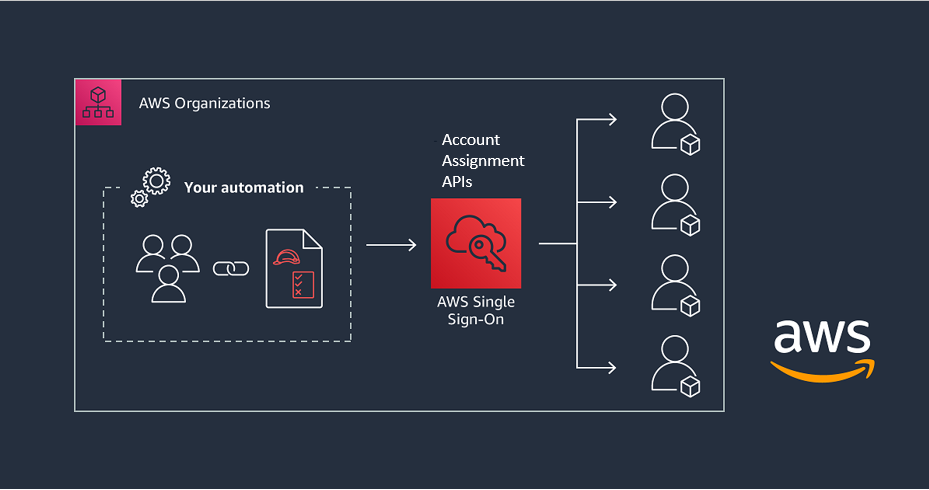
AWS SSO recently added new account assignment APIs and AWS CloudFormation support to automate access assignment across AWS Organizations accounts. This release addressed feedback from our customers with multi-account environments who wanted to adopt AWS SSO, but faced challenges related to managing AWS account permissions. To automate the previously manual process and save your administration time, you can now use the new AWS SSO account assignment APIs, or AWS CloudFormation templates, to programmatically manage AWS account permission sets in multi-account environments.
With AWS SSO account assignment APIs, you can now build your automation that will assign access for your users and groups to AWS accounts. You can also gain insights into who has access to which permission sets in which accounts across your entire AWS Organizations structure. With the account assignment APIs, your automation system can programmatically retrieve permission sets for audit and governance purposes, as shown in Figure 1.
Figure 1: Automating multi-account access with the AWS SSO API and AWS CloudFormation
Overview
In this walkthrough, we’ll illustrate how to create permission sets, assign permission sets to users and groups in AWS SSO, and grant access for users and groups to multiple AWS accounts by using the AWS Command Line Interface (AWS CLI) and AWS CloudFormation.
To grant user permissions to AWS resources with AWS SSO, you use permission sets. A permission set is a collection of AWS Identity and Access Management (IAM) policies. Permission sets can contain up to 10 AWS managed policies and a single custom policy stored in AWS SSO.
A policy is an object that defines a user’s permissions. Policies contain statements that represent individual access controls (allow or deny) for various tasks. This determines what tasks users can or cannot perform within the AWS account. AWS evaluates these policies when an IAM principal (a user or role) makes a request.
When you provision a permission set in the AWS account, AWS SSO creates a corresponding IAM role on that account, with a trust policy that allows users to assume the role through AWS SSO. With AWS SSO, you can assign more than one permission set to a user in the specific AWS account. Users who have multiple permission sets must choose one when they sign in through the user portal or the AWS CLI. Users will see these as IAM roles.
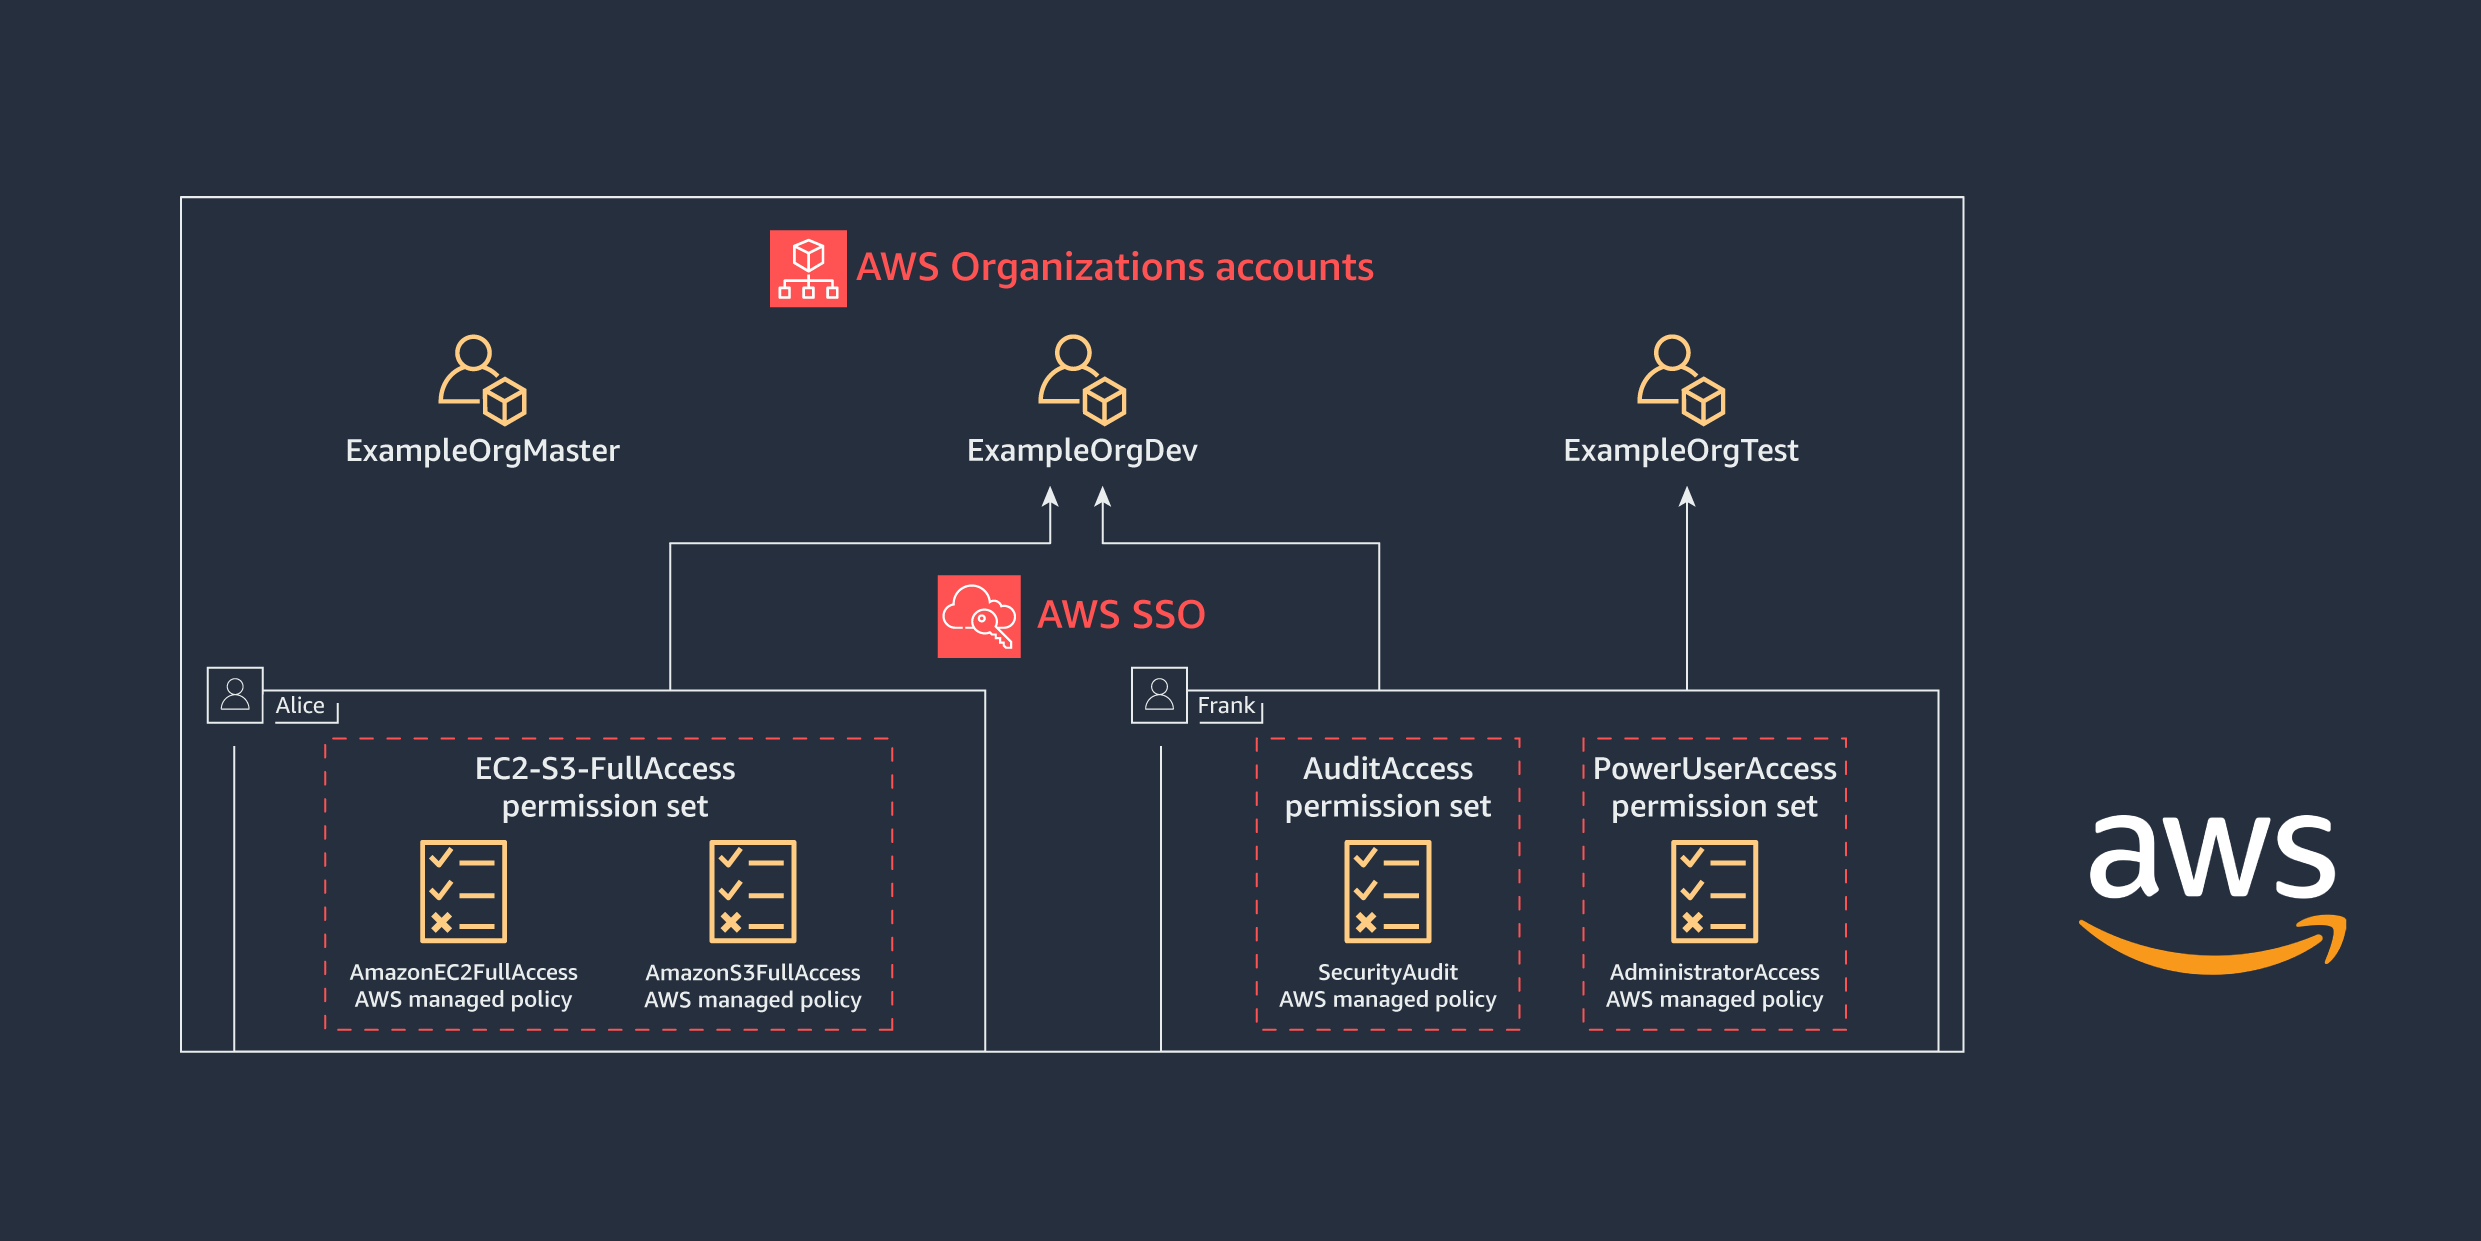
Assume you have a company, Example.com, which has three AWS accounts: an organization management account (ExampleOrgMaster), a development account (ExampleOrgDev), and a test account (ExampleOrgTest). Example.com uses AWS Organizations to manage these accounts and has already enabled AWS SSO.
Example.com has the IT security lead, Frank Infosec, who needs PowerUserAccess to the test account (ExampleOrgTest) and SecurityAudit access to the development account (ExampleOrgDev). Alice Developer, the developer, needs full access to Amazon Elastic Compute Cloud (Amazon EC2) and Amazon Simple Storage Service (Amazon S3) through the development account (ExampleOrgDev). We’ll show you how to assign and audit the access for Alice and Frank centrally with AWS SSO, using the AWS CLI.
The flow includes the following steps:
Create three permission sets:
PowerUserAccess, with the PowerUserAccess policy attached.
AuditAccess, with the SecurityAudit policy attached.
EC2-S3-FullAccess, with the AmazonEC2FullAccess and AmazonS3FullAccess policies attached.
Assign permission sets to the AWS account and AWS SSO users:
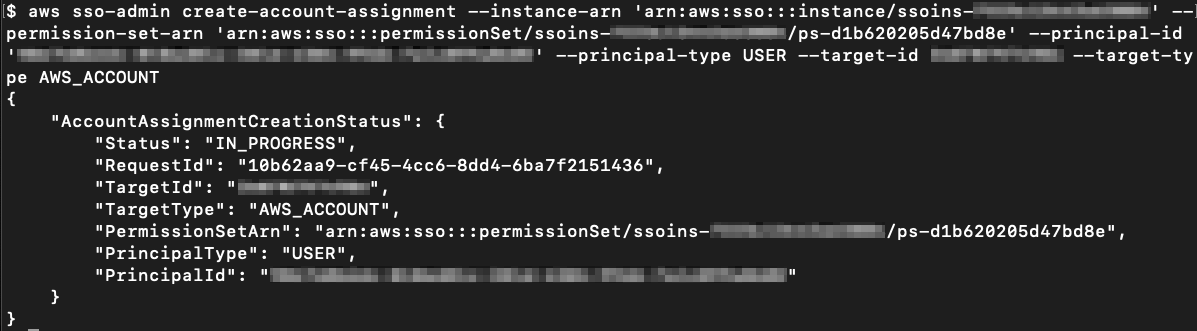
Assign the PowerUserAccess and AuditAccess permission sets to Frank Infosec, to provide the required access to the ExampleOrgDev and ExampleOrgTest accounts.
Assign the EC2-S3-FullAccess permission set to Alice Developer, to provide the required permissions to the ExampleOrgDev account.
Retrieve the assigned permissions by using Account Entitlement APIs for audit and governance purposes.
Figure 2: AWS Organizations accounts access for Alice and Frank
To help simplify administration of access permissions, we recommend that you assign access directly to groups rather than to individual users. With groups, you can grant or deny permissions to groups of users, rather than having to apply those permissions to each individual. For simplicity, in this blog you’ll assign permissions directly to the users.
Prerequisites
Before you start this walkthrough, complete these steps:
Sign in to the AWS Organizations management account AWS Management Console with AWS SSO administrator credentials. To learn more about AWS Organizations and the management account, see AWS Organizations FAQs.
In order to call the AWS SSO account assignment API by using the AWS CLI, you need to install and configure AWS CLI v2. For more information about AWS CLI installation and configuration, see Installing the AWS CLI and Configuring the AWS CLI.
Step 1: Create permission sets
In this step, you learn how to create EC2-S3FullAccess, AuditAccess, and PowerUserAccess permission sets in AWS SSO from the AWS CLI.
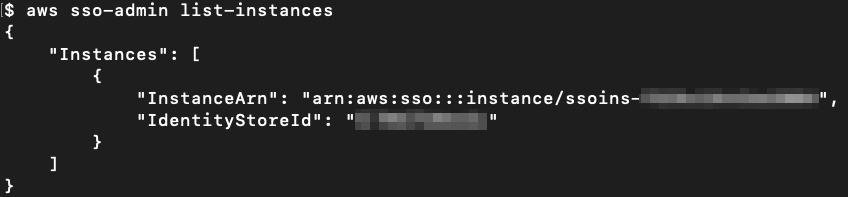
Before you create the permission sets, run the following command to get the Amazon Resource Name (ARN) of the AWS SSO instance and the Identity Store ID, which you will need later in the process when you create and assign permission sets to AWS accounts and users or groups.
aws sso-admin list-instances
Figure 3 shows the results of running the command.
Figure 3: AWS SSO list instances
Next, create the permission set for the security team (Frank) and dev team (Alice), as follows.
Permission set for Alice Developer (EC2-S3-FullAccess)
Run the following command to create the EC2-S3-FullAccess permission set for Alice, as shown in Figure 4.
aws sso-admin create-permission-set --instance-arn '<Instance ARN>' --name 'EC2-S3-FullAccess' --description 'EC2 and S3 access for developers'
Figure 4: Creating the permission set EC2-S3-FullAccess
Permission set for Frank Infosec (AuditAccess)
Run the following command to create the AuditAccess permission set for Frank, as shown in Figure 5.
aws sso-admin create-permission-set --instance-arn '<Instance ARN>' --name 'AuditAccess' --description 'Audit Access for security team on ExampleOrgDev account'
Figure 5: Creating the permission set AuditAccess
Permission set for Frank Infosec (PowerUserAccess)
Run the following command to create the PowerUserAccess permission set for Frank, as shown in Figure 6.
aws sso-admin create-permission-set --instance-arn '<Instance ARN>' --name 'PowerUserAccess' --description 'Power User Access for security team on ExampleOrgDev account'
Figure 6: Creating the permission set PowerUserAccess
Copy the permission set ARN from these responses, which you will need when you attach the managed policies.
Step 2: Assign policies to permission sets
In this step, you learn how to assign managed policies to the permission sets that you created in step 1.
Attach policies to the EC2-S3-FullAccess permission set
Run the following command to attach the amazonec2fullacess AWS managed policy to the EC2-S3-FullAccess permission set, as shown in Figure 7.
Figure 9: Attaching the AWS managed policy SecurityAudit to the AuditAccess permission set
Attach a policy to the PowerUserAccess permission set
The following command is similar to the previous command; it attaches the PowerUserAccess managed policy to the PowerUserAccess permission set, as shown in Figure 10.
Figure 10: Attaching AWS managed policy PowerUserAccess to the PowerUserAccess permission set
In the next step, you assign users (Frank Infosec and Alice Developer) to their respective permission sets and assign permission sets to accounts.
Step 3: Assign permission sets to users and groups and grant access to AWS accounts
In this step, you assign the AWS SSO permission sets you created to users and groups and AWS accounts, to grant the required access for these users and groups on respective AWS accounts.
To assign access to an AWS account for a user or group, using a permission set you already created, you need the following:
The principal ID (the ID for the user or group)
The AWS account ID to which you need to assign this permission set
To obtain a user’s or group’s principal ID (UserID or GroupID), you need to use the AWS SSO Identity Store API. The AWS SSO Identity Store service enables you to retrieve all of your identities (users and groups) from AWS SSO. See AWS SSO Identity Store API for more details.
Use the first two commands shown here to get the principal ID for the two users, Alice (Alice’s user name is [email protected]) and Frank (Frank’s user name is [email protected]).
Alice’s user ID
Run the following command to get Alice’s user ID, as shown in Figure 11.
aws identitystore list-users --identity-store-id '<Identity Store ID>' --filter AttributePath='UserName',AttributeValue='[email protected]'
Figure 11: Retrieving Alice’s user ID
Frank’s user ID
Run the following command to get Frank’s user ID, as shown in Figure 12.
aws identitystore list-users --identity-store-id '<Identity Store ID>'--filter AttributePath='UserName',AttributeValue='[email protected]'
Figure 12: Retrieving Frank’s user ID
Note: To get the principal ID for a group, use the following command.
aws identitystore list-groups --identity-store-id '<Identity Store ID>' --filter AttributePath='DisplayName',AttributeValue='<Group Name>'
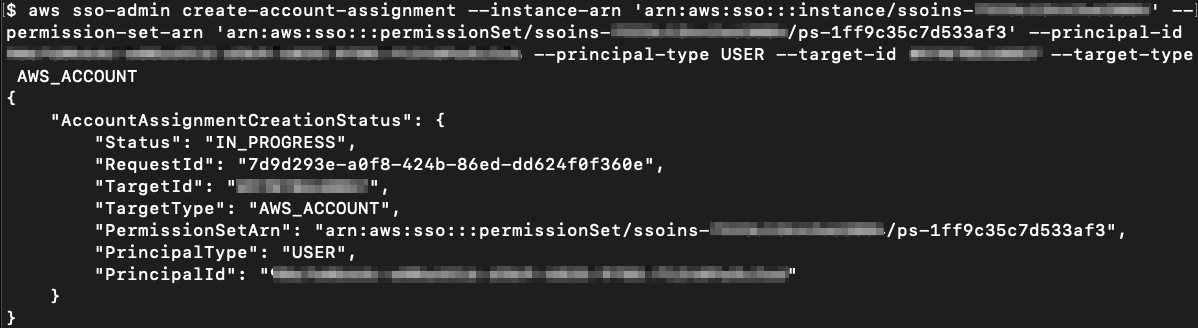
Assign the EC2-S3-FullAccess permission set to Alice in the ExampleOrgDev account
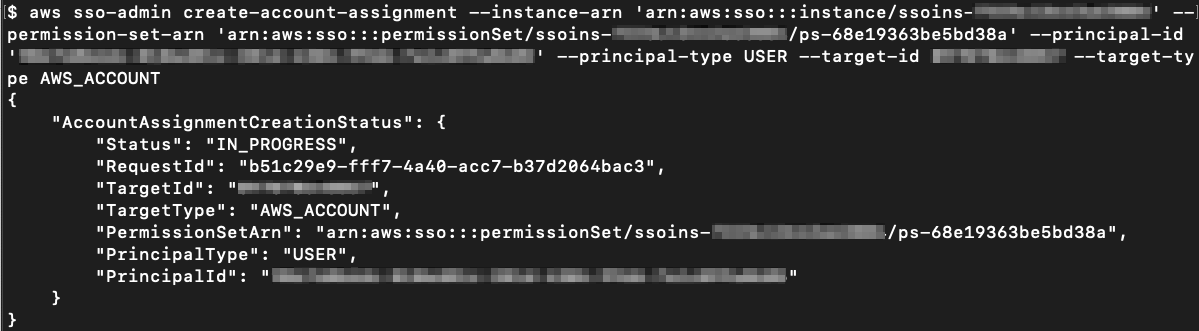
Run the following command to assign Alice access to the ExampleOrgDev account using the EC2-S3-FullAccess permission set. This will give Alice full access to Amazon EC2 and S3 services in the ExampleOrgDev account.
Note: When you call the CreateAccountAssignment API, AWS SSO automatically provisions the specified permission set on the account in the form of an IAM policy attached to the AWS SSO–created IAM role. This role is immutable: it’s fully managed by the AWS SSO, and it cannot be deleted or changed by the user even if the user has full administrative rights on the account. If the permission set is subsequently updated, the corresponding IAM policies attached to roles in your accounts won’t be updated automatically. In this case, you will need to call ProvisionPermissionSet to propagate these updates.
Figure 16: View the permission sets (AuditAccess and EC2-S3-FullAccess) assigned to the ExampleOrgDev account
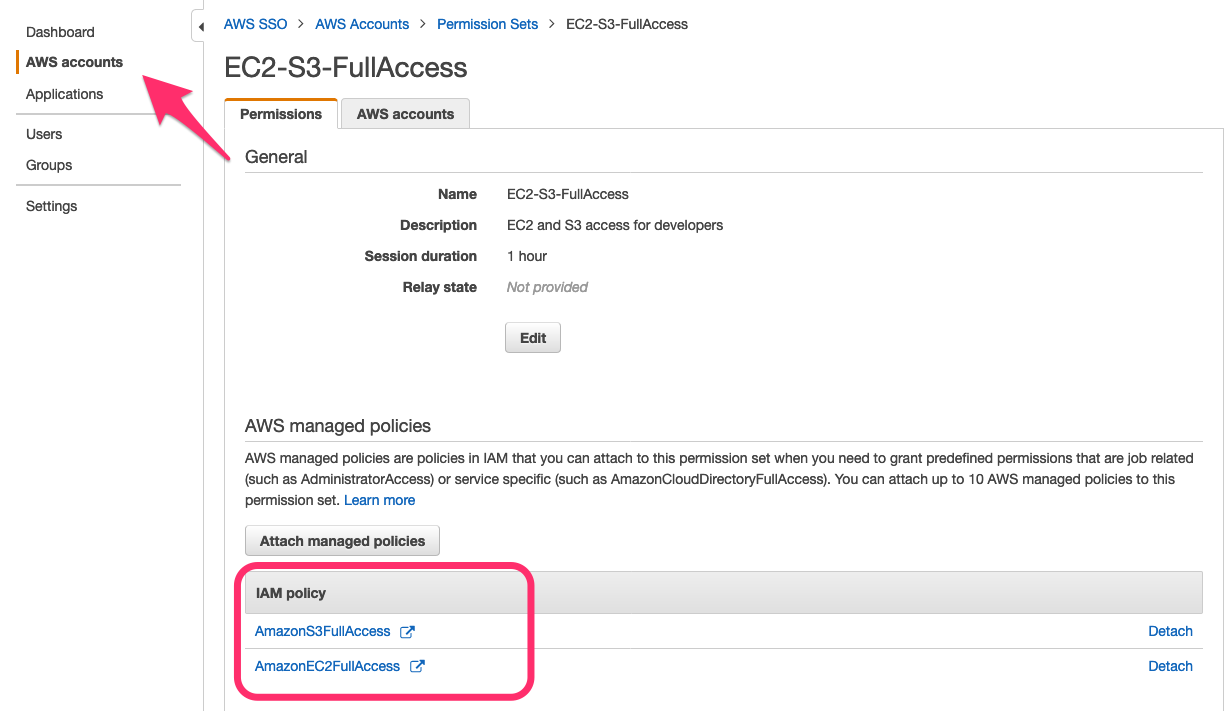
To review the created resources in the AWS Management Console, navigate to the AWS SSO console. In the list of permission sets on the AWS accounts tab, choose the EC2-S3-FullAccess permission set. Under AWS managed policies, the policies attached to the permission set are listed, as shown in Figure 17.
Figure 17: Review the permission set in the AWS SSO console
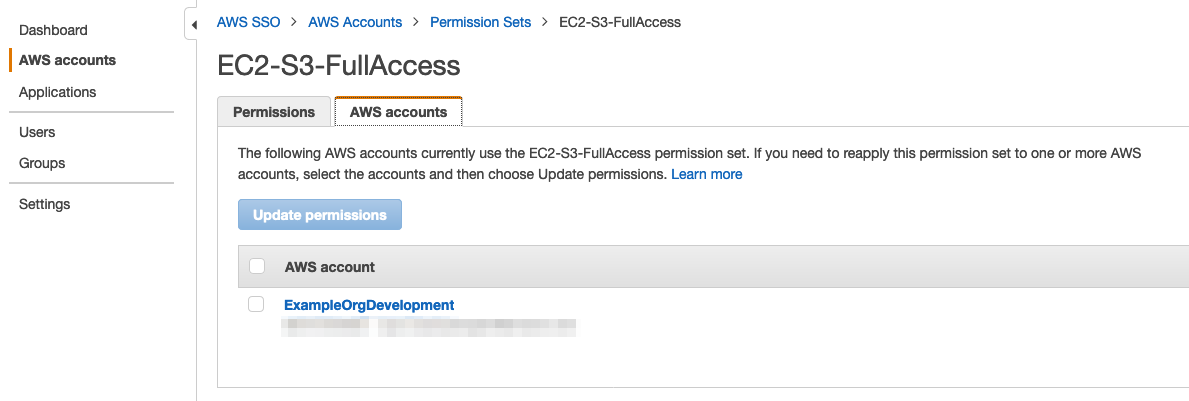
To see the AWS accounts, where the EC2-S3-FullAccess permission set is currently provisioned, navigate to the AWS accounts tab, as shown in Figure 18.
Figure 18: Review permission set account assignment in the AWS SSO console
Step 4: Audit access
In this step, you learn how to audit access assigned to your users and group by using the AWS SSO account assignment API. In this example, you’ll start from a permission set, review the permissions (AWS-managed policies or a custom policy) attached to the permission set, get the users and groups associated with the permission set, and see which AWS accounts the permission set is provisioned to.
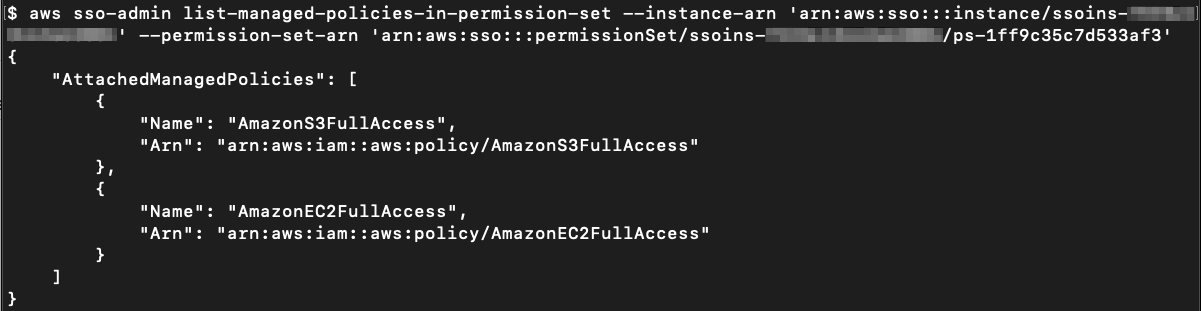
List the IAM managed policies for the permission set
Run the following command to list the IAM managed policies that are attached to a specified permission set, as shown in Figure 19.
aws sso-admin list-managed-policies-in-permission-set --instance-arn '<Instance ARN>' --permission-set-arn '<Permission Set ARN>'
Figure 19: View the managed policies attached to the permission set
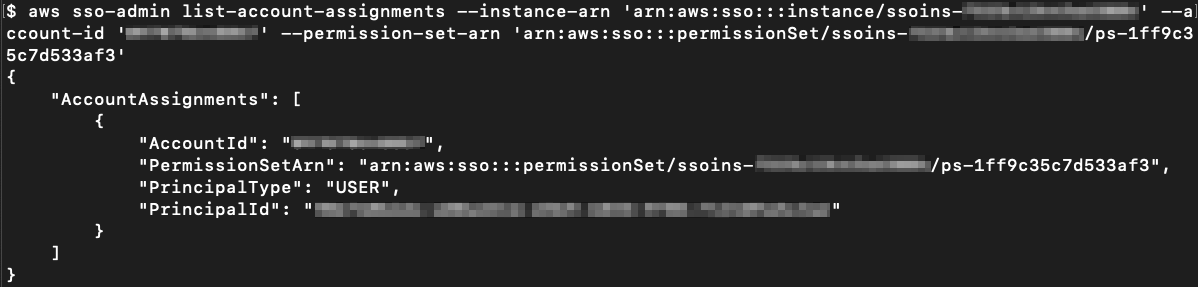
List the assignee of the AWS account with the permission set
Run the following command to list the assignee (the user or group with the respective principal ID) of the specified AWS account with the specified permission set, as shown in Figure 20.
Figure 20: View the permission set and the user or group attached to the AWS account
List the accounts to which the permission set is provisioned
Run the following command to list the accounts that are associated with a specific permission set, as shown in Figure 21.
aws sso-admin list-accounts-for-provisioned-permission-set --instance-arn '<Instance ARN>' --permission-set-arn '<Permission Set ARN>'
Figure 21: View AWS accounts to which the permission set is provisioned
In this section of the post, we’ve illustrated how to create a permission set, assign a managed policy to the permission set, and grant access for AWS SSO users or groups to AWS accounts by using this permission set. In the next section, we’ll show you how to do the same using AWS CloudFormation.
Use the AWS SSO API through AWS CloudFormation
In this section, you learn how to use CloudFormation templates to automate the creation of permission sets, attach managed policies, and use permission sets to assign access for a particular user or group to AWS accounts.
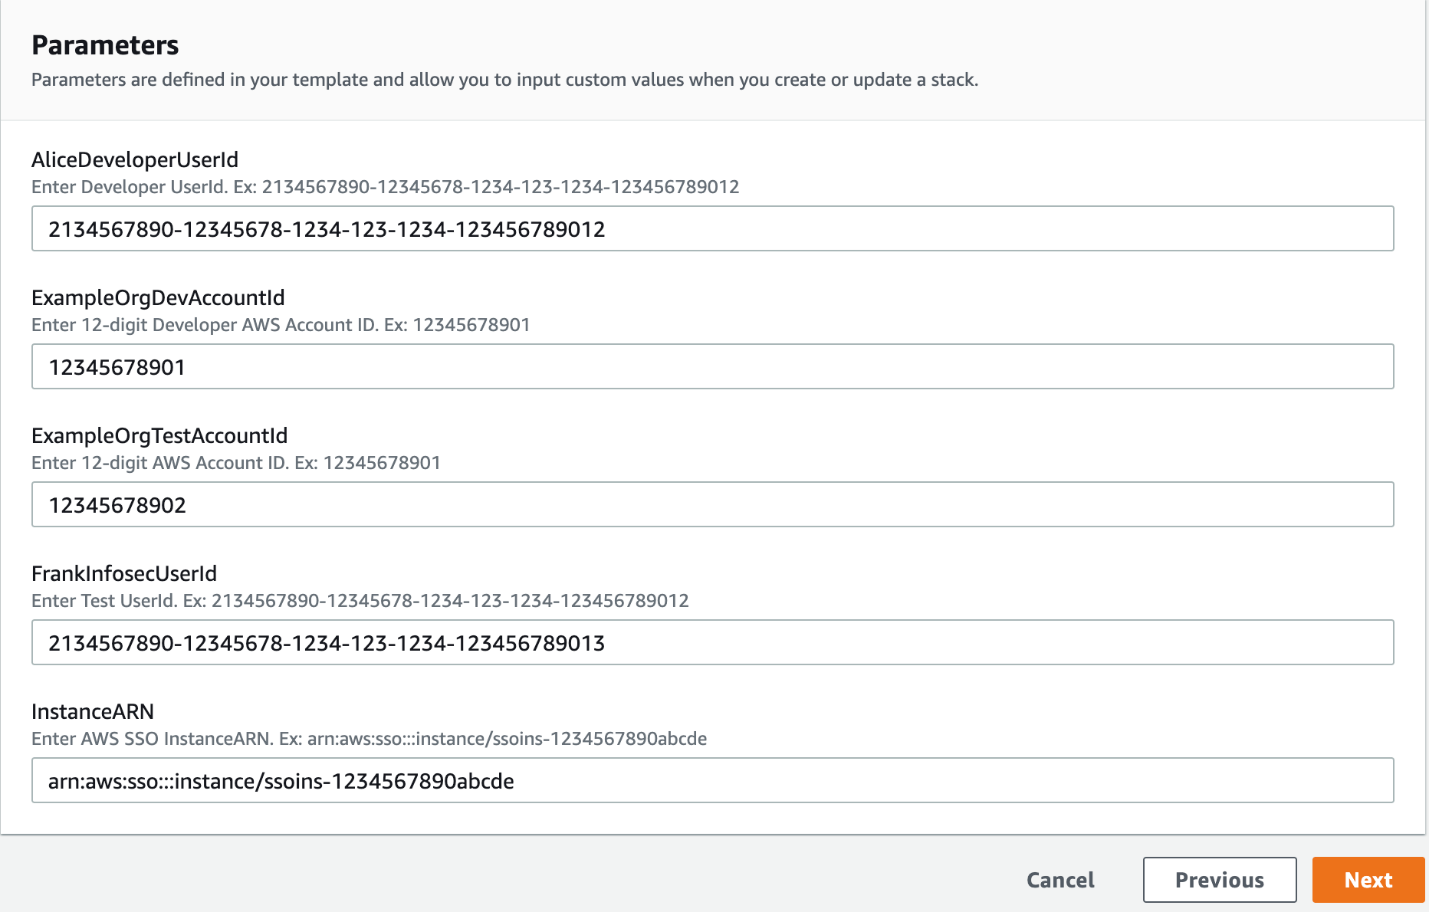
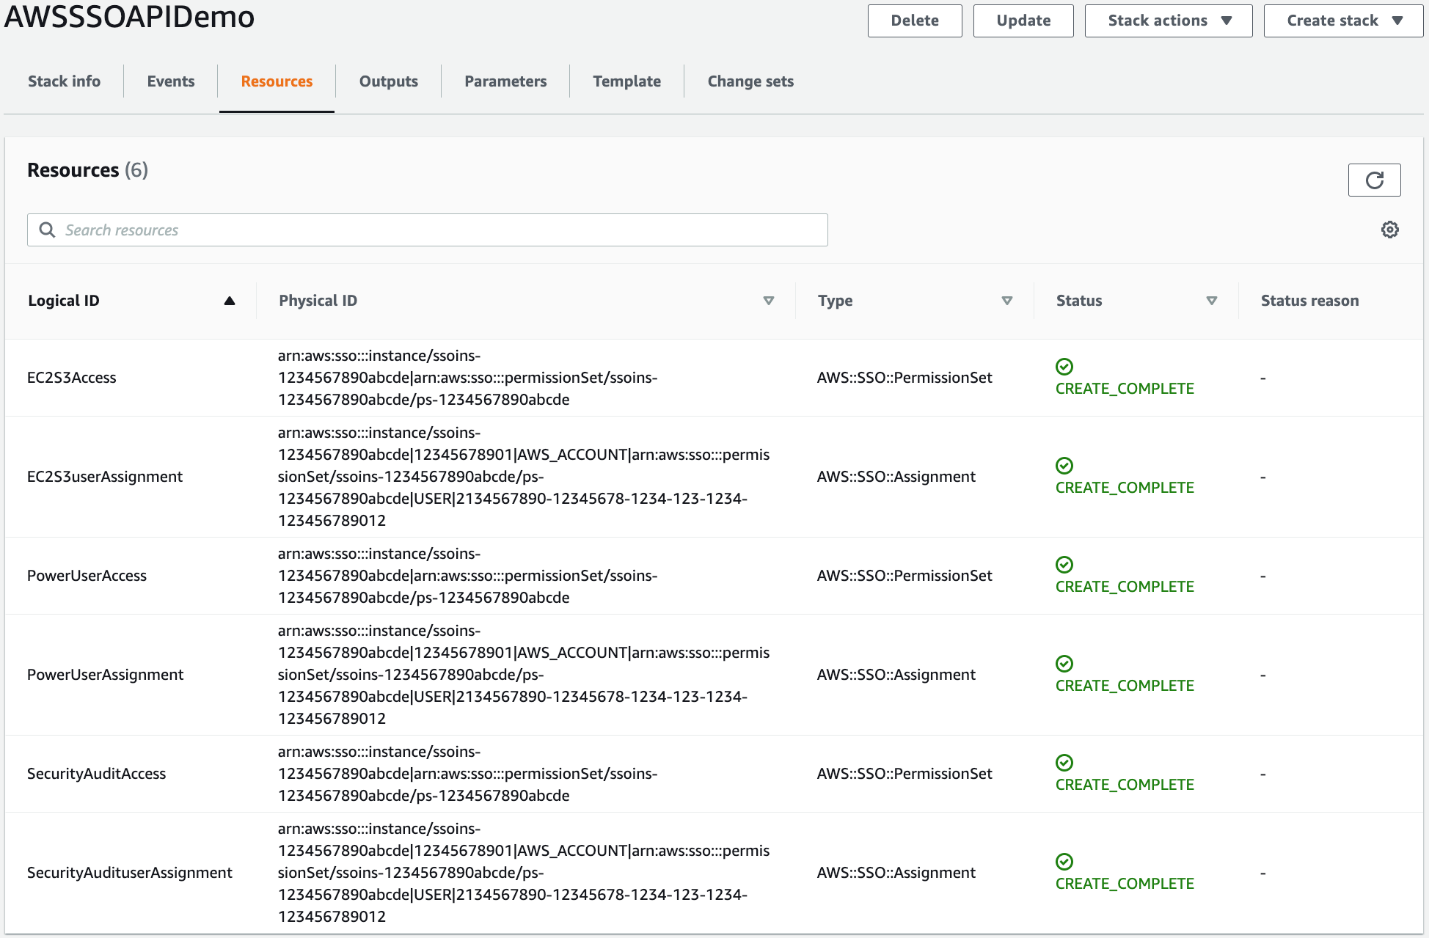
Sign in to your AWS Management Console and create a CloudFormation stack by using the following CloudFormation template. For more information on how to create a CloudFormation stack, see Creating a stack on the AWS CloudFormation console.
//start of Template//
{
    "AWSTemplateFormatVersion": "2010-09-09",

    "Description": "AWS CloudFormation template to automate multi-account access with AWS Single Sign-On (Entitlement APIs): Create permission sets, assign access for AWS SSO users and groups to AWS accounts using permission sets. Before you use this template, we assume you have enabled AWS SSO for your AWS Organization, added the AWS accounts to which you want to grant AWS SSO access to your organization, signed in to the AWS Management Console with your AWS Organizations management account credentials, and have the required permissions to use the AWS SSO console.",

    "Parameters": {
      "InstanceARN" : {
        "Type" : "String",
        "AllowedPattern": "arn:aws:sso:::instance/(sso)?ins-[a-zA-Z0-9-.]{16}",
        "Description" : "Enter AWS SSO InstanceARN. Ex: arn:aws:sso:::instance/ssoins-xxxxxxxxxxxxxxxx",
        "ConstraintDescription": "must be the name of an existing AWS SSO InstanceARN associated with the management account."
      },
      "ExampleOrgDevAccountId" : {
        "Type" : "String",
        "AllowedPattern": "\\d{12}",
        "Description" : "Enter 12-digit Developer AWS Account ID. Ex: 123456789012"
        },
      "ExampleOrgTestAccountId" : {
        "Type" : "String",
        "AllowedPattern": "\\d{12}",
        "Description" : "Enter 12-digit AWS Account ID. Ex: 123456789012"
        },
      "AliceDeveloperUserId" : {
        "Type" : "String",
        "AllowedPattern": "^([0-9a-f]{10}-|)[A-Fa-f0-9]{8}-[A-Fa-f0-9]{4}-[A-Fa-f0-9]{4}-[A-Fa-f0-9]{4}-[A-Fa-f0-9]{12}$",
        "Description" : "Enter Developer UserId. Ex: 926703446b-f10fac16-ab5b-45c3-86c1-xxxxxxxxxxxx"
        },
        "FrankInfosecUserId" : {
            "Type" : "String",
            "AllowedPattern": "^([0-9a-f]{10}-|)[A-Fa-f0-9]{8}-[A-Fa-f0-9]{4}-[A-Fa-f0-9]{4}-[A-Fa-f0-9]{4}-[A-Fa-f0-9]{12}$",
            "Description" : "Enter Test UserId. Ex: 926703446b-f10fac16-ab5b-45c3-86c1-xxxxxxxxxxxx"
            }
    },
    "Resources": {
        "EC2S3Access": {
            "Type" : "AWS::SSO::PermissionSet",
            "Properties" : {
                "Description" : "EC2 and S3 access for developers",
                "InstanceArn" : {
                    "Ref": "InstanceARN"
                },
                "ManagedPolicies" : ["arn:aws:iam::aws:policy/amazonec2fullaccess","arn:aws:iam::aws:policy/amazons3fullaccess"],
                "Name" : "EC2-S3-FullAccess",
                "Tags" : [ {
                    "Key": "Name",
                    "Value": "EC2S3Access"
                 } ]
              }
        },
        "SecurityAuditAccess": {
            "Type" : "AWS::SSO::PermissionSet",
            "Properties" : {
                "Description" : "Audit Access for Infosec team",
                "InstanceArn" : {
                    "Ref": "InstanceARN"
                },
                "ManagedPolicies" : [ "arn:aws:iam::aws:policy/SecurityAudit" ],
                "Name" : "AuditAccess",
                "Tags" : [ {
                    "Key": "Name",
                    "Value": "SecurityAuditAccess"
                 } ]
              }
        },
        "PowerUserAccess": {
            "Type" : "AWS::SSO::PermissionSet",
            "Properties" : {
                "Description" : "Power User Access for Infosec team",
                "InstanceArn" : {
                    "Ref": "InstanceARN"
                },
                "ManagedPolicies" : [ "arn:aws:iam::aws:policy/PowerUserAccess"],
                "Name" : "PowerUserAccess",
                "Tags" : [ {
                    "Key": "Name",
                    "Value": "PowerUserAccess"
                 } ]
              }
        },
        "EC2S3userAssignment": {
            "Type" : "AWS::SSO::Assignment",
            "Properties" : {
                "InstanceArn" : {
                    "Ref": "InstanceARN"
                },
                "PermissionSetArn" : {
                    "Fn::GetAtt": [
                        "EC2S3Access",
                        "PermissionSetArn"
                     ]
                },
                "PrincipalId" : {
                    "Ref": "AliceDeveloperUserId"
                },
                "PrincipalType" : "USER",
                "TargetId" : {
                    "Ref": "ExampleOrgDevAccountId"
                },
                "TargetType" : "AWS_ACCOUNT"
              }
          },
          "SecurityAudituserAssignment": {
            "Type" : "AWS::SSO::Assignment",
            "Properties" : {
                "InstanceArn" : {
                    "Ref": "InstanceARN"
                },
                "PermissionSetArn" : {
                    "Fn::GetAtt": [
                        "SecurityAuditAccess",
                        "PermissionSetArn"
                     ]
                },
                "PrincipalId" : {
                    "Ref": "FrankInfosecUserId"
                },
                "PrincipalType" : "USER",
                "TargetId" : {
                    "Ref": "ExampleOrgDevAccountId"
                },
                "TargetType" : "AWS_ACCOUNT"
              }
          },
          "PowerUserAssignment": {
            "Type" : "AWS::SSO::Assignment",
            "Properties" : {
                "InstanceArn" : {
                    "Ref": "InstanceARN"
                },
                "PermissionSetArn" : {
                    "Fn::GetAtt": [
                        "PowerUserAccess",
                        "PermissionSetArn"
                     ]
                },
                "PrincipalId" : {
                    "Ref": "FrankInfosecUserId"
                },
                "PrincipalType" : "USER",
                "TargetId" : {
                    "Ref": "ExampleOrgTestAccountId"
                },
                "TargetType" : "AWS_ACCOUNT"
              }
          }
    }
}
//End of Template//
When you create the stack, provide the following information for setting the example permission sets for Frank Infosec and Alice Developer, as shown in Figure 22:
The Alice Developer and Frank Infosec user IDs
The ExampleOrgDev and ExampleOrgTest account IDs
The AWS SSO instance ARN
Then launch the CloudFormation stack.
Figure 22: User inputs to launch the CloudFormation template
AWS CloudFormation creates the resources that are shown in Figure 23.
Figure 23: Resources created from the CloudFormation stack
Cleanup
To delete the resources you created by using the AWS CLI, use these commands.
Run the following command to delete the account assignment.
To delete the resource that you created by using the CloudFormation template, go to the AWS CloudFormation console. Select the appropriate stack you created, and then choose delete. Deleting the CloudFormation stack cleans up the resources that were created.
Summary
In this blog post, we showed how to use the AWS SSO account assignment API to automate the deployment of permission sets, how to add managed policies to permission sets, and how to assign access for AWS users and groups to AWS accounts by using specified permission sets.
If you have feedback about this post, submit comments in the Comments section below. If you have questions about this post, start a new thread on the AWS SSO forum or contact AWS Support.
Want more AWS Security how-to content, news, and feature announcements? Follow us on Twitter.
Enterprises often need to standardize their infrastructure as code (IaC) for governance, compliance, and quality control reasons. You also need to manage and centrally publish updates to your IaC libraries. In this post, we demonstrate how to use the AWS Cloud Development Kit (AWS CDK) to define patterns for IaC and publish them for consumption in controlled releases using AWS CodeArtifact.
AWS CDK is an open-source software development framework to model and provision cloud application resources in programming languages such as TypeScript, JavaScript, Python, Java, and C#/.Net. The basic building blocks of AWS CDK are called constructs, which map to one or more AWS resources, and can be composed of other constructs. Constructs allow high-level abstractions to be defined as patterns. You can synthesize constructs into AWS CloudFormation templates and deploy them into an AWS account.
AWS CodeArtifact is a fully managed service for managing the lifecycle of software artifacts. You can use CodeArtifact to securely store, publish, and share software artifacts. Software artifacts are stored in repositories, which are aggregated into a domain. A CodeArtifact domain allows organizational policies to be applied across multiple repositories. You can use CodeArtifact with common build tools and package managers such as NuGet, Maven, Gradle, npm, yarn, pip, and twine.
Solution overview
In this solution, we complete the following steps:
Create two AWS CDK pattern constructs in Typescript: one for traditional three-tier web applications and a second for serverless web applications.
Publish the pattern constructs to CodeArtifact as npm packages. npm is the package manager for Node.js.
Consume the pattern construct npm packages from CodeArtifact and use them to provision the AWS infrastructure.
We provide more information about the pattern constructs in the following sections. The source code mentioned in this blog is available in GitHub.
Note: The code provided in this blog post is for demonstration purposes only. You must ensure that it meets your security and production readiness requirements.
Both constructs are written in Typescript and published to CodeArtifact as npm packages. A semantic versioning scheme is used to version the construct packages. After a package gets published to CodeArtifact, teams can consume them for deploying AWS resources. The following diagram illustrates this architecture.
Prerequisites
Before getting started, complete the following steps:
Clone the code from the GitHub repository for the traditional and serverless web application constructs:
git clone https://github.com/aws-samples/aws-cdk-developing-application-patterns-blog.git
cd aws-cdk-developing-application-patterns-blog
Configure AWS Identity and Access Management (IAM) permissions by attaching IAM policies to the user, group, or role implementing this solution. The following policy files are in the iam folder in the root of the cloned repo:
BlogPublishArtifacts.json – The IAM policy to configure CodeArtifact and publish packages to it.
BlogConsumeTraditional.json – The IAM policy to consume the traditional three-tier web application construct from CodeArtifact and deploy it to an AWS account.
PublishArtifacts.json – The IAM policy to consume the serverless construct from CodeArtifact and deploy it to an AWS account.
Configuring CodeArtifact
In this step, we configure CodeArtifact for publishing the pattern constructs as npm packages. The following AWS resources are created:
A CodeArtifact domain named blog-domain
Two CodeArtifact repositories:
blog-npm-store – For configuring the upstream NPM repository.
blog-repository – For publishing custom packages.
Deploy the CodeArtifact resources with the following code:
cd prerequisites/
rm -rf package-lock.json node_modules
npm install
cdk deploy --require-approval never
cd ..
Log in to the blog-repository. This step is needed for publishing and consuming the npm packages. See the following code:
Publish the construct npm package to the CodeArtifact repository:
npm publish
Follow the previously mentioned steps for building and publishing a traditional (classic Load Balancer plus Amazon EC2) web app by running these commands in the traditional directory.
If the publishing is successful, you see messages like the following screenshots. The following screenshot shows the traditional infrastructure.
The following screenshot shows the message for the serverless infrastructure.
We just published version 1.0.1 of both the traditional and serverless web app constructs. To release a new version, we can simply update the version attribute in the package.json file in the traditional or serverless folder and repeat the last two steps.
The following code snippet is for the traditional construct:
Consuming the pattern constructs from CodeArtifact
In this step, we demonstrate how the pattern constructs published in the previous steps can be consumed and used to provision AWS infrastructure.
From the root of the GitHub package, change the directory to the examples directory containing code for consuming traditional or serverless constructs.To consume the traditional construct, use the following code:
cd examples/traditional
To consume the serverless construct, use the following code:
cd examples/serverless
Open the package.json file in either directory and note that the packages and versions we consume are listed in the dependencies section, along with their version. The following code shows the traditional web app construct dependencies:
As an optional step, if you need to override the default Lambda function code, build the npm project. The following commands build the Lambda function source code:
cd ../override-serverless
npm run build
cd -
Bootstrap the project with the following code:
cdk bootstrap
This step is applicable for serverless applications only. It creates the Amazon Simple Storage Service (Amazon S3) staging bucket where the Lambda function code and artifacts are stored.
Deploy the construct:
cdk deploy --require-approval never
If the deployment is successful, you see messages similar to the following screenshots. The following screenshot shows the traditional stack output, with the URL of the Load Balancer endpoint.
The following screenshot shows the serverless stack output, with the URL of the API Gateway endpoint.
You can test the endpoint for both constructs using a web browser or the following curl command:
curl <endpoint output>
The traditional web app endpoint returns a response similar to the following:
Optionally, upgrade to a new version of pattern construct. Let’s assume that a new version of the serverless construct, version 1.0.2, has been published, and we want to upgrade our AWS infrastructure to this version. To do this, edit the package.json file and change the traditional-infrastructure or serverless-infrastructure package version in the dependencies section to 1.0.2. See the following code example:
Delete the CodeArtifact resources by deleting the CloudFormation stack that was deployed via AWS CDK:
cd prerequisites
cdk destroy –force
Conclusion
In this post, we demonstrated how to publish AWS CDK pattern constructs to CodeArtifact as npm packages. We also showed how teams can consume the published pattern constructs and use them to provision their AWS infrastructure.
This mechanism allows your infrastructure for AWS services to be provisioned from the configuration that has been vetted for quality control and security and governance checks. It also provides control over when new versions of the pattern constructs are released, and when the teams consuming the constructs can upgrade to the newly released versions.
About the Authors
Usman Umar is a Sr. Applications Architect at AWS Professional Services. He is passionate about developing innovative ways to solve hard technical problems for the customers. In his free time, he likes going on biking trails, doing car modifications, and spending time with his family.
Krishnakumar Rengarajan is a DevOps Consultant with AWS Professional Services. He enjoys working with customers and focuses on building and delivering automated solutions that enables customers on their AWS cloud journeys.
In this post, we discuss and build a managed continuous integration and continuous deployment (CI/CD) pipeline that uses AWS CloudFormation Guard to automate and simplify pre-deployment compliance checks of your AWS CloudFormation templates. This enables your teams to define a single source of truth for what constitutes valid infrastructure definitions, to be compliant with your company guidelines and streamline AWS resources’ deployment lifecycle.
We use the following AWS services and open-source tools to set up the pipeline:
Download CloudFormation Guard release from GitHub.
Run a validation check of the CloudFormation template.
If the validation is successful, pass the control over to CloudFormation and deploy the stack. If the validation fails, stop the build job and print a summary to the build job log.
The following diagram illustrates this workflow.
Architecture Diagram of CI/CD Pipeline with CloudFormation Guard
Prerequisites
For this walkthrough, complete the following prerequisites:
The following screenshot shows a potential CodeCommit repository structure.
Creating a CodeBuild project
Our CodeBuild project orchestrates around CloudFormation Guard and runs validation checks of our CloudFormation templates as a phase of the CI process.
On the CodeBuild console, choose Build projects.
Choose Create build projects.
For Project name, enter your project name.
For Description, enter a description.
Create CodeBuild Project
For Source provider, choose AWS CodeCommit.
For Repository, choose the CodeCommit repository you created in the previous step.
Define the source for your CodeBuild Project
To setup CodeBuild environment we will use managed image based on Ubuntu 18.04
For Environment Image, select Managed image.
For Operating system, choose Ubuntu.
For Service role¸ select New service role.
For Role name, enter your service role name.
Setup the environment, the OS image and other settings for the CodeBuild
Leave the default settings for additional configuration, buildspec, batch configuration, artifacts, and logs.
You can also use CodeBuild with custom build environments to help you optimize billing and improve the build time.
Creating IAM roles and policies
Our CI/CD pipeline needs two AWS Identity and Access Management (IAM) roles to run properly: one role for CodePipeline to work with other resources and services, and one role for AWS CloudFormation to run the deployments that passed the validation check in the CodeBuild phase.
Creating permission policies
Create your permission policies first. The following code is the policy in JSON format for CodePipeline:
Create your role for AWS CloudFormation with the following CLI command:
aws iam create-role --role-name CF-Cfn-Guard-Demo-Role --assume-role-policy-document file://RoleTrustPolicy_CloudFormation.json
Capture the role name for the next step.
Finally, attach the permissions policies created in the previous step to the IAM roles you created:
aws iam attach-role-policy --role-name CodePipeline-Cfn-Guard-Demo-Role --policy-arn "arn:aws:iam::<AWS Account Id >:policy/CodePipeline-Cfn-Guard-Demo"
aws iam attach-role-policy --role-name CF-Cfn-Guard-Demo-Role --policy-arn "arn:aws:iam::<AWS Account Id>:policy/CloudFormation-Cfn-Guard-Demo"
Creating a pipeline
We can now create our pipeline to assemble all the components into one managed, continuous mechanism.
On the CodePipeline console, choose Pipelines.
Choose Create new pipeline.
For Pipeline name, enter a name.
For Service role, select Existing service role.
For Role ARN, choose the service role you created in the previous step.
Choose Next.
Setting Up CodePipeline environment
In the Source section, for Source provider, choose AWS CodeCommit.
For Repository name¸ enter your repository name.
For Branch name, choose master.
For Change detection options, select Amazon CloudWatch Events.
Choose Next.
Adding CodeCommit to CodePipeline
In the Build section, for Build provider, choose AWS CodeBuild.
For Project name, choose the CodeBuild project you created.
For Build type, select Single build.
Choose Next.
Adding Build Project to Pipeline Stage
Now we will create a deploy stage in our CodePipeline to deploy CloudFormation templates that passed the CloudFormation Guard inspection in the CI stage.
In the Deploy section, for Deploy provider, choose AWS CloudFormation.
For Action mode¸ choose Create or update stack.
For Stack name, choose any stack name.
For Artifact name, choose BuildArtifact.
For File name, enter the CloudFormation template name in your CodeCommit repository (In case of our demo it is cfn_template_file_example.yaml).
For Role name, choose the role you created earlier for CloudFormation.
Adding deploy stage to CodePipeline
22. In the next step review your selections for the pipeline to be created. The stages and action providers in each stage are shown in the order that they will be created. Click Create pipeline. Our CodePipeline is ready.
Validating the CI/CD pipeline operation
Our CodePipeline has two basic flows and outcomes. If the CloudFormation template complies with our CloudFormation Guard rule set file, the resources in the template deploy successfully (in our use case, we deploy an EC2 instance with an encrypted EBS volume).
CloudFormation Console
If our CloudFormation template doesn’t comply with the policies specified in our CloudFormation Guard rule set file, our CodePipeline stops at the CodeBuild step and you see an error in the build job log indicating the resources that are non-compliant:
[EBSVolume] failed because [Encrypted] is [false] and the permitted value is [true] [EC2Instance] failed because [t3.2xlarge] is not in [t2.micro,t3.nano,t3.micro] for [InstanceType] Number of failures: 2
Note: To demonstrate the above functionality I changed my CloudFormation template to use unencrypted EBS volume and switched the EC2 instance type to t3.2xlarge which do not adhere to the rules that we specified in the Guard rule set file
Cleaning up
To avoid incurring future charges, delete the resources that we have created during the walkthrough:
CloudFormation stack resources that were deployed by the CodePipeline
CodePipeline that we have created
CodeBuild project
CodeCommit repository
Conclusion
In this post, we covered how to integrate CloudFormation Guard into CodePipeline and fully automate pre-deployment compliance checks of your CloudFormation templates. This allows your teams to have an end-to-end automated CI/CD pipeline with minimal operational overhead and stay compliant with your organizational infrastructure policies.
Organizations are increasingly providing access to corporate resources from employee laptops and are required to apply the correct permissions to these computing devices to make sure that secrets and sensitive data are adequately protected. The combination of Amazon Web Services (AWS) long-term credentials and a YubiKey security token for multi-factor authentication (MFA) is an option for providing secure programmatic access to AWS for organizations that aren’t yet ready or able to use identity federation. For example, a user should be able to list AWS Identity and Access Management (IAM) roles with their default programmatic access, but would be required to provide MFA to assume an IAM role.
In this blog post, we show you how to use a YubiKey token for MFA with the AWS Command Line Interface (AWS CLI) to create temporary credentials with the permissions that developers need to perform tasks. The user will configure the long-term credentials and then temporarily assume a role with broader permissions by using MFA when needed. MFA adds extra security, because it requires users to provide second-factor authentication from an AWS-supported MFA mechanism in addition to static security credentials such as their user name and password.
The goal for any organization is to move to the recommended best practices for allowing individual programmatic access that include using temporary security credentials that aren’t stored with the user, but are generated dynamically and provided to the user when requested, such as identity federation due to the temporary nature of those credentials. If your organization uses AWS Single Sign-On (AWS SSO) along with an identity provider (IdP) such as Okta, Azure Active Directory (AD), or AWS Managed Microsoft AD, you can then use the instructions from this earlier blog post to leverage the AWS CLI v2 native integration with AWS SSO and take advantage of the multi-factor authentication support of your IdP.
Overview
This post describes the configuration of IAM users and roles and initialization of the YubiKey token as an MFA device by an administrator, and then how developers can use the YubiKey device to retrieve temporary credentials and assume a role with elevated permissions within the AWS CLI.
The overall process flow looks like this:
Create an IAM user with programmatic access, MFA, and a policy that allows you to assume a more privileged IAM role. The user will retrieve a Time-based One-time Password (TOTP) token code by using a YubiKey as MFA.
Assume the more privileged role, which is restricted by an MFA conditional, by using the TOTP token code.
Figure 1 shows the steps of the process.
Figure 1: A visual overview of the steps to assume roles with elevated permissions by using a YubiKey for MFA
Prerequisites
To get started you need:
An AWS account.
A YubiKey (available on Amazon.com). YubiKey 4 and 5 series are compatible, because they support the required OATH application.
Note: The Yubico Security Keys (the blue tokens) aren’t supported, because they lack the OATH application. If you already have a corporate YubiKey device, this capability might have been disabled.
AWS CLI v2 doesn’t yet support Universal 2nd factor (U2F) MFA. As a workaround, we use a YubiKey as a virtual device MFA.
OATH (Initiative for Open Authentication) is an organization that specifies two open authentication standards: TOTP and HMAC-based One-time Password (HOTP). For this solution, we use the TOTP standard.
Getting started
Initializing YubiKey for MFA
The following steps show you, as cloud administrator, how to initialize the YubiKey as a virtual MFA device and configure an IAM user that can assume a role with elevated permissions, on the condition that the user is using an MFA device. In this example, your developers will assume a role with permissions to access Amazon Elastic Compute Cloud (Amazon EC2).
To configure the IAM user and initialize the YubiKey device as MFA
Create a role with elevated permissions that your developers can assume.
Sign in to the AWS IAM console, and in the right-hand pane, choose Roles. Then choose Create role.
Figure 3: Select the type of trusted entity and provide the account ID
Search for the AmazonEC2FullAccess policy, and select the check box next to it. Choose Next:Tags, and add relevant tags if needed. Choose Next:Review.
Name the role developer-ec2-mfa, and then choose Create role.
Go back to the role you just created. Change the maximum session duration value to limit how long the developer’s session can be valid after assuming the role. For this example, we set the duration to 1 hour (3,600 seconds) by using a custom value. Limit this duration to abide by your organization’s recommended authentication time.
Take note of the Amazon Resource Name (ARN) for the new role as shown on the summary page.
Figure 4: Summary page of the new role
Create a new IAM policy that provides a limited scope of actions for users when they use their long-term credentials.
Navigate to the AWS IAM console, and in the navigation pane, choose Policies. Choose Create policy.
Figure 5: Create a policy in the IAM console
Because we’ve already written the policy in JSON, you don’t need to use the Visual Editor, so you can choose the JSON tab and paste the content of the following JSON policy document (remember to replace the placeholder for the role ARN).Following the least privilege approach, add only the Amazon Resource Names (ARNs) of the role or roles with required elevated permissions that the developer will be able to assume. In this case, use the developer-ec2-mfa ARN for the role that you created previously.
Note: The condition “aws:MultiFactorAuthPresent”: “true” requires that the user who assumes the role has been authenticated with an AWS MFA device.
Choose Review policy.
Name the policy yubi-policy-mfa-level-one. Choose Create policy.
Create a new IAM group that lets you specify permissions for multiple users and makes it easier to manage the permissions for those users.
Navigate to the IAM console, and in the navigation pane, choose Groups. Choose Create New Group.
Figure 6: Create a group in the IAM console
Enter developers-mfa as the group name. Choose Next Step.
On the Attach Policy screen, in the filter box, search for the policy yubi-policy-mfa-level-one that you created in the previous step. Make sure you select the check box next to the policy, and then choose Next Step.
Figure 7: Attach the policy to the IAM group
Review the group information, and then choose Create Group.
Create a user in IAM for the developer using the AWS CLI.
Navigate to the IAM console and in the navigation pane, choose Users. Choose Add user.
On the Add user screen, enter the name for your user. In this example, our developer is named JohnDoe. For Access type, select the check box next to Programmatic access. Choose Next: Permissions.
Figure 8: Create an IAM user with programmatic access
For permissions, select Add user to group, and select the developers-mfa group. Choose Next: Tags.
Add the relevant tags if needed, and then choose Next: Review.
Review the user configuration, and then choose Create user.
Make sure you save the access key ID and secret access key to share with your user. Choose Close.
Assign an MFA device to the user.
Go back to the Users section of the IAM console. Choose the IAM user that you created previously, and go to the Security credentials tab. For Assigned MFA device, choose Manage.
Figure 9: Assign MFA device to the IAM user
Select Virtual MFA device, because the AWS CLI doesn’t yet support U2F MFA. Choose Continue.
Figure 10: Select the Virtual MFA device type
Instead of using the QR code, choose Show secret key.
Note: The secret key is a randomly generated string shared between IAM and the physical YubiKey. It is used to generate a one-time password using a hash function with the current timestamp.
Figure 11: Retrieve the secret key on the virtual MFA device configuration page
Copy the secret key to use in the next step as the MFA_SECRET to configure the MFA device.
To obtain the TOTP token codes from the YubiKey to synchronize the key with the IAM user, do the following.
Insert the YubiKey token in your USB port, and verify that the OATH application is enabled for your YubiKey by running the following command and looking for Enabled USB interfaces: OTP+FIDO+CCID in the output.
$ ykman info

Device type: YubiKey 5 NFC
Serial number: 123456789
Firmware version: 5.2.4
Form factor: Keychain (USB-A)
Enabled USB interfaces: OTP+FIDO+CCID
NFC interface is enabled.

Applications USB NFC
OTP Enabled Enabled
FIDO U2F Enabled Enabled
OpenPGP Enabled Enabled
PIV Enabled Enabled
OATH Enabled Enabled
FIDO2 Enabled Enabled
For each MFA device, you need to generate a unique identifier that will be used during the process. We recommend that you create this identifier based on the ARN of the IAM user, by using the following template.
arn:aws:iam::<ACCOUNT_ID>:mfa/<IAM_USERNAME>
Add a new credential to your YubiKey based on the MFA device ARN. Use the MFA_SECRET that you copied in the previous step (step 5).
Obtain two TOTP token codes by using the following command (remember to replace the placeholder for the <MFA device ARN>). Wait up to 30 seconds for the device to generate the second token code (you will be prompted to touch the token).
ykman oath code <MFA device ARN>
After obtaining each of the TOTP token codes, go back to the IAM console where you were setting up the virtual MFA device, and enter the code in the MFA code box. After entering the two MFA codes, choose Assign MFA.
Figure 12: Enter the two consecutive YubiKey codes in the virtual MFA device configuration page
You can then provide the following information to your developer:
The YubiKey device along with the generated MFA device ARN
The ARNs for the roles that will be assumed
The long-term AWS credentials
Assuming a role with the YubiKey as MFA
The following steps show how you, as a developer, can retrieve temporary credentials using the YubiKey device as MFA, and assume a role with wider permissions. You can do this after the YubiKey device, one or more role ARNs, and long-term credentials have been shared with you by the cloud administrator.
To assume a role with broader permissions by using YubiKey
As part of the prerequisites, you should have the AWS CLI v2 already installed. Now configure the default profile with the long-term credentials provided by your cloud administrator, by using the following command.
$ aws configure

AWS Access Key ID [None]: <Enter your AWS access key>
AWS Secret Access Key [None]: <Enter your AWS secret access key>
Default region name [None]: <Enter your AWS default region>
Default output format [None]: <Enter your output default format>
Obtain a TOTP code from YubiKey (you will be prompted to touch the token). Submit your request immediately after generating the codes. If you generate the codes and then wait too long to submit the request, the code won’t be valid anymore.
Using the MFA token code you obtained by using the YubiKey, assume the relevant role that will provide access to larger permissions. In our example, the ARN is for the role developer-ec2-mfa that was provided by the IAM administrator. Enter a role session name that will uniquely identify a session when the same role is assumed by different principals.
Note: The user should only have access to sts:AssumeRole for a specific set of roles. Here we chose the session duration of one hour. You can edit the session duration so the developer can authenticate for the duration of a workday (the default value is 1 hour and can be up to 12 hours). Limit this duration to abide by your organization’s recommended authentication time.
Edit a new AWS CLI profile named johndoe-developer-role as seen following. Copy the access key and secret key that were retrieved as temporary credentials from the get-session-token command. Then set the additional parameter aws_session_token, which was returned along with the temporary credentials. Edit your CLI with the information for the new role.
Attempt to make a call to relevant services that are allowed by the newly assumed role. Here’s an example using the Amazon EC2 API to describe the EC2 instances.
The developer now has access to the larger permissions set through the assumed role for the next hour.
Summary
In this post, we introduced the capability to further secure long-term AWS credentials with a YubiKey for MFA, for organizations that are still using long-term credentials. These credentials are stored in the ~/.aws/credentials file. If an unauthorized user was able to retrieve these long-term credentials, they wouldn’t be able to use them, because the user needs to have the physical MFA in order to assume a role with broader permissions. The steps in this blog post can be converted to a script that your developers can use repeatedly to simplify the process.
In general, we recommend that all customers move away from using IAM users and static credentials and instead use IAM roles and temporary credentials wherever possible. An easy way to get started down that road is by using AWS SSO for identity federation.
If you have feedback about this post, submit comments in the Comments section below. If you have questions about this post, start a new thread on the AWS IAM forum or contact AWS Support.
Want more AWS Security how-to content, news, and feature announcements? Follow us on Twitter.
The collective thoughts of the interwebz
Manage Consent
To provide the best experiences, we use technologies like cookies to store and/or access device information. Consenting to these technologies will allow us to process data such as browsing behavior or unique IDs on this site. Not consenting or withdrawing consent, may adversely affect certain features and functions.
Functional
Always active
The technical storage or access is strictly necessary for the legitimate purpose of enabling the use of a specific service explicitly requested by the subscriber or user, or for the sole purpose of carrying out the transmission of a communication over an electronic communications network.
Preferences
The technical storage or access is necessary for the legitimate purpose of storing preferences that are not requested by the subscriber or user.
Statistics
The technical storage or access that is used exclusively for statistical purposes.The technical storage or access that is used exclusively for anonymous statistical purposes. Without a subpoena, voluntary compliance on the part of your Internet Service Provider, or additional records from a third party, information stored or retrieved for this purpose alone cannot usually be used to identify you.
Marketing
The technical storage or access is required to create user profiles to send advertising, or to track the user on a website or across several websites for similar marketing purposes.


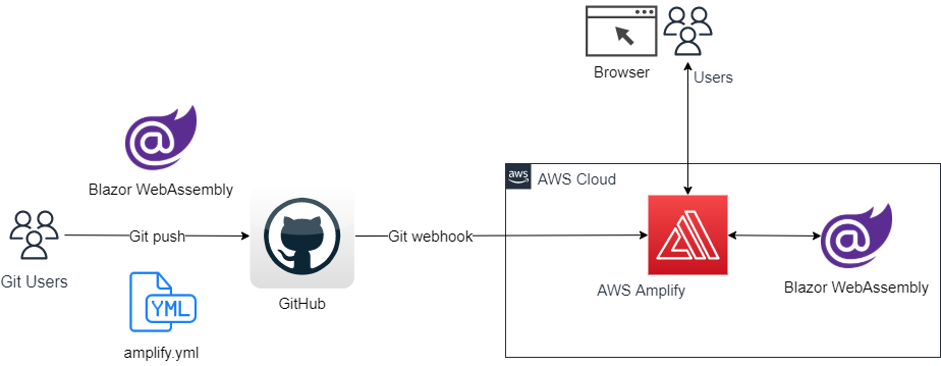
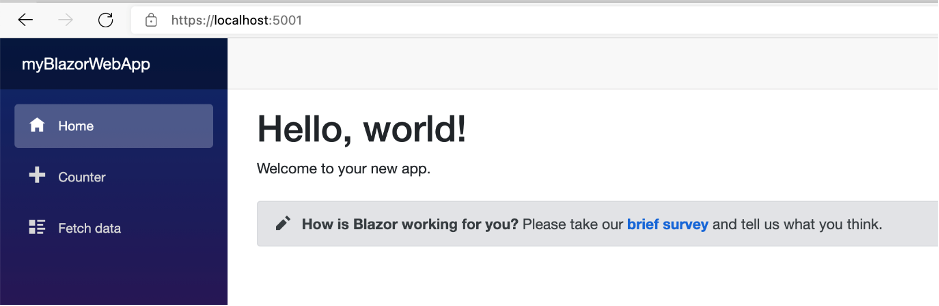

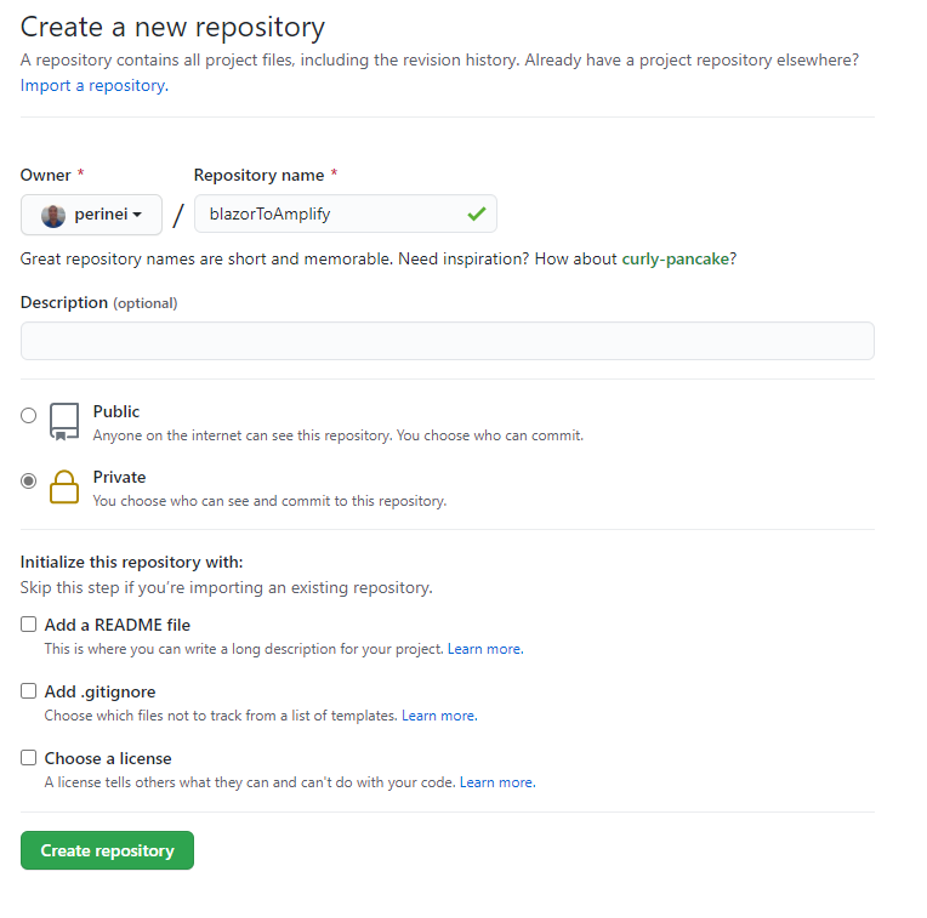

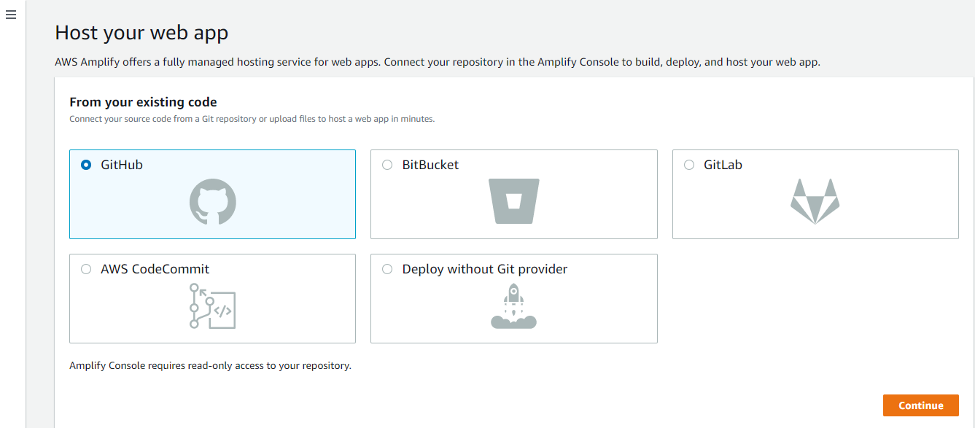
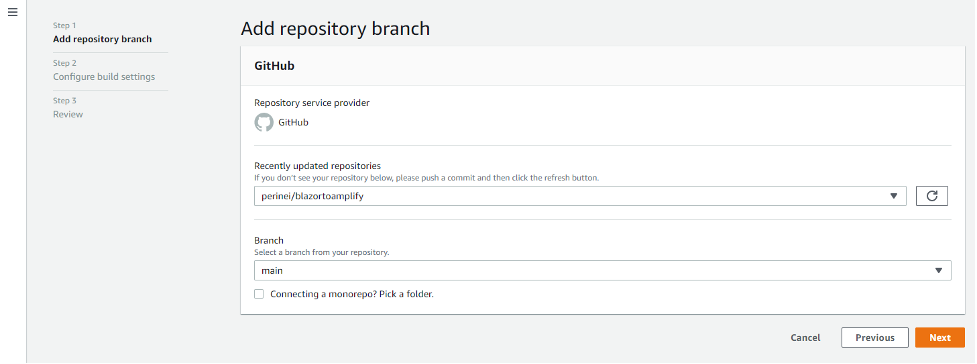

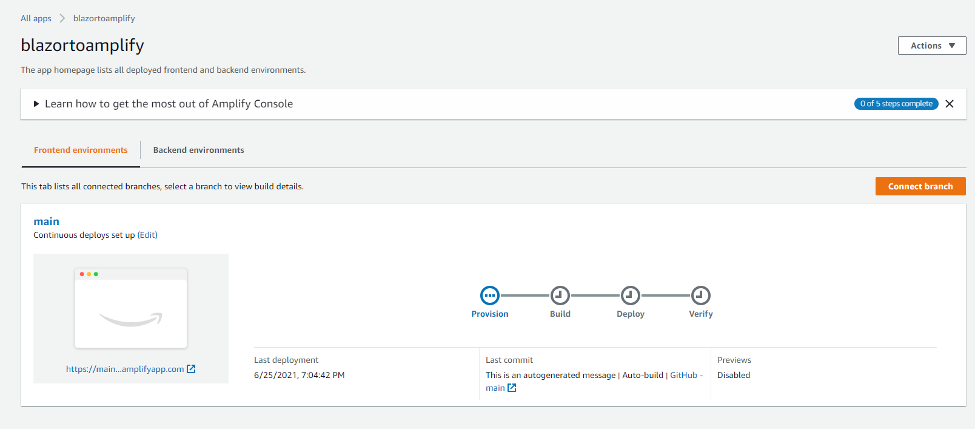
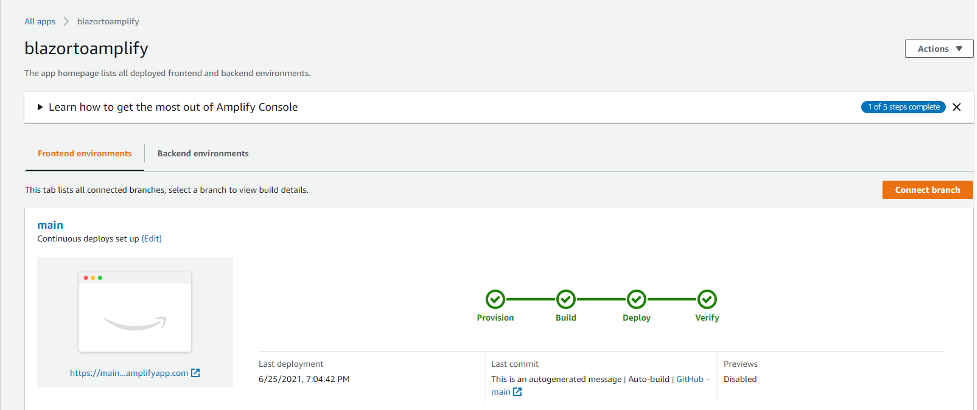
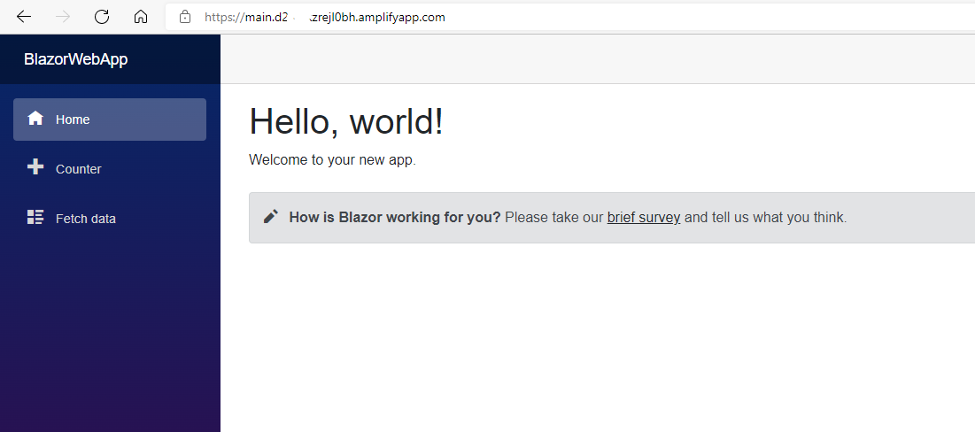


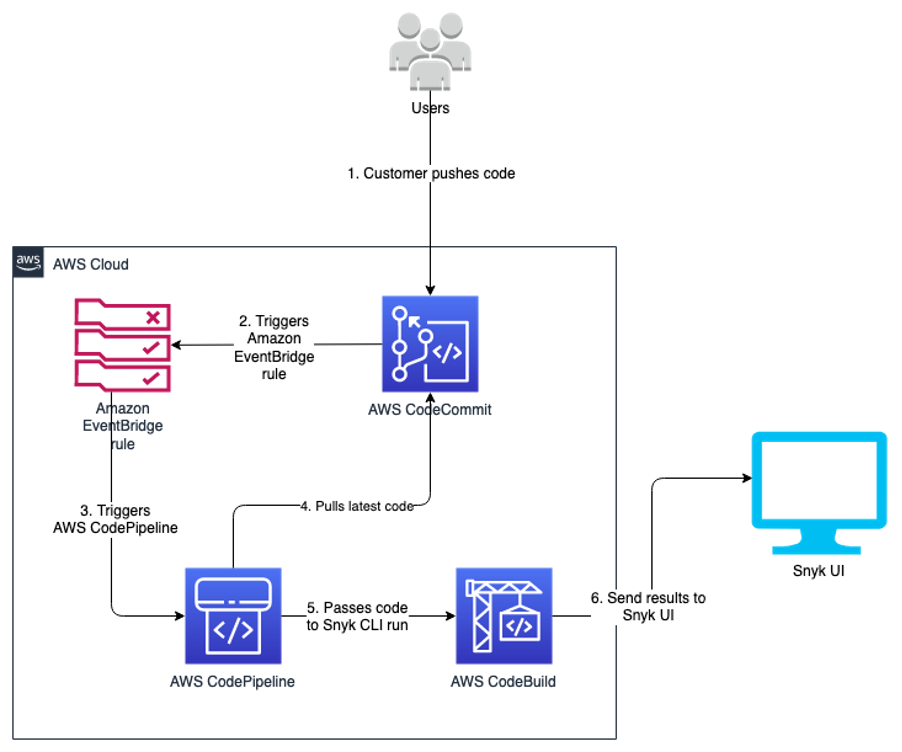
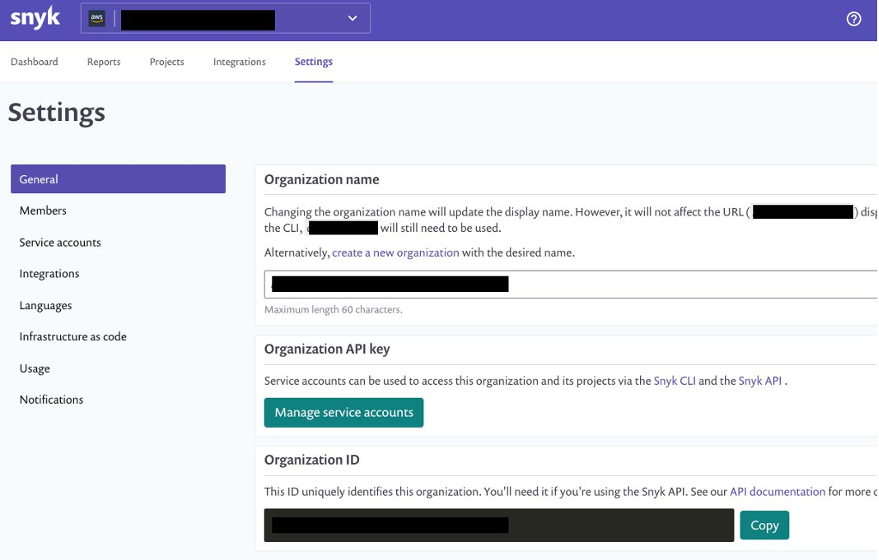
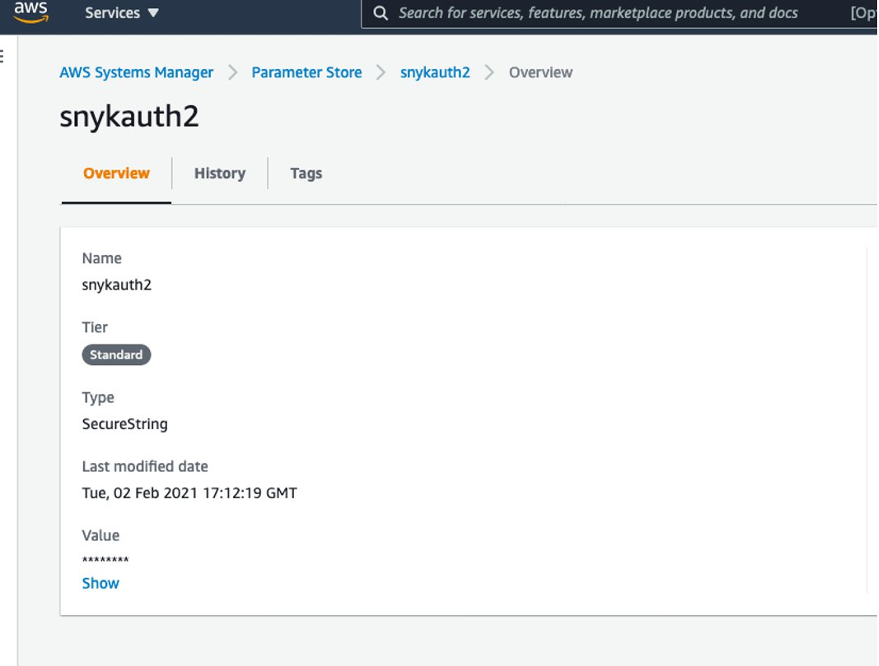
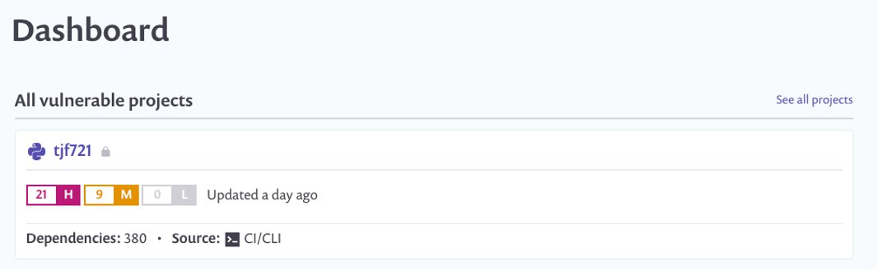
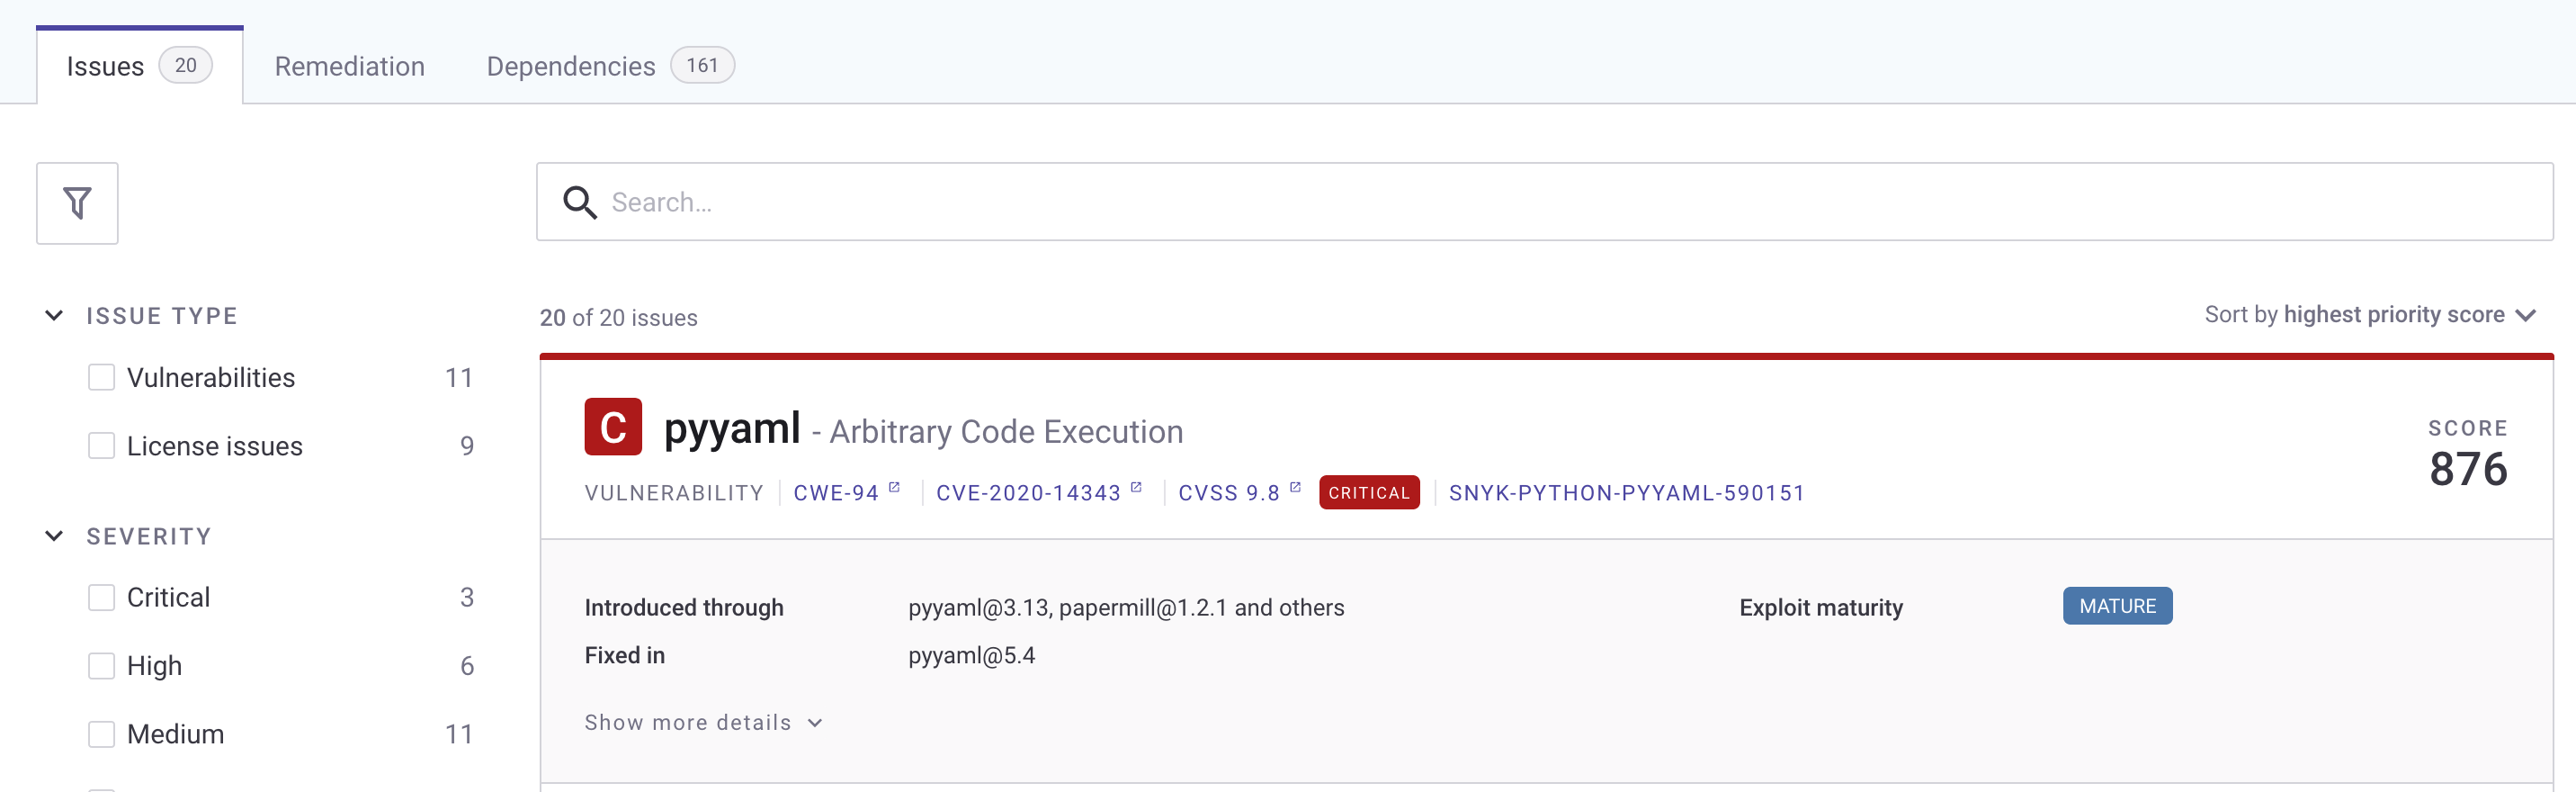


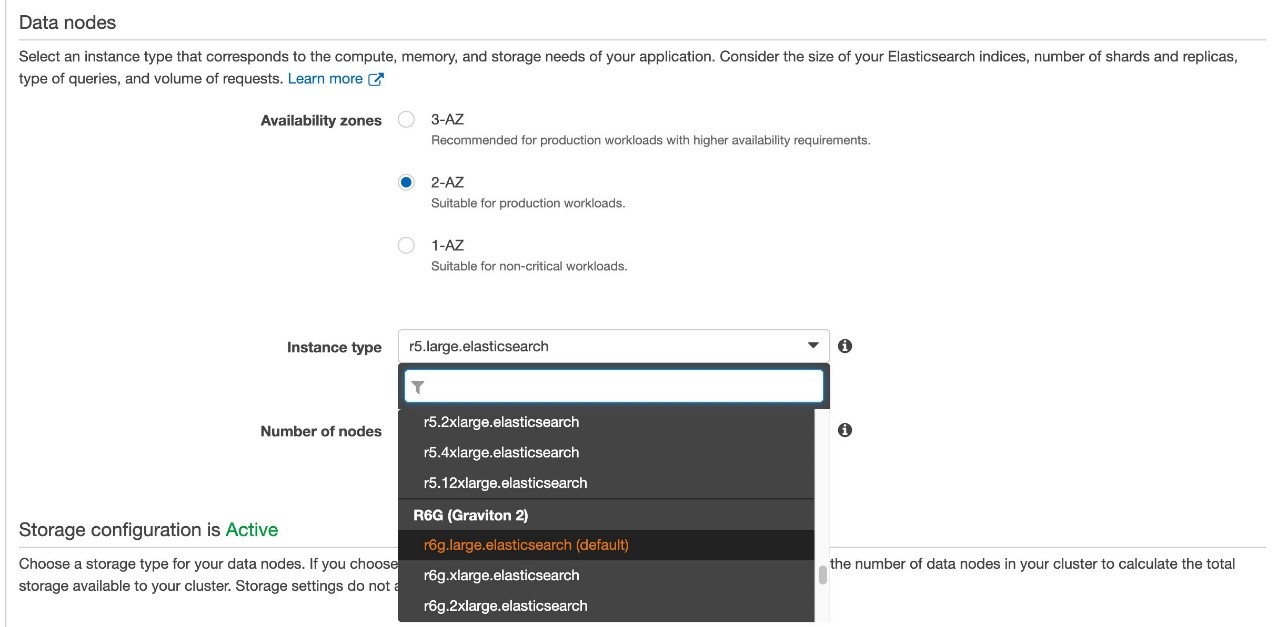


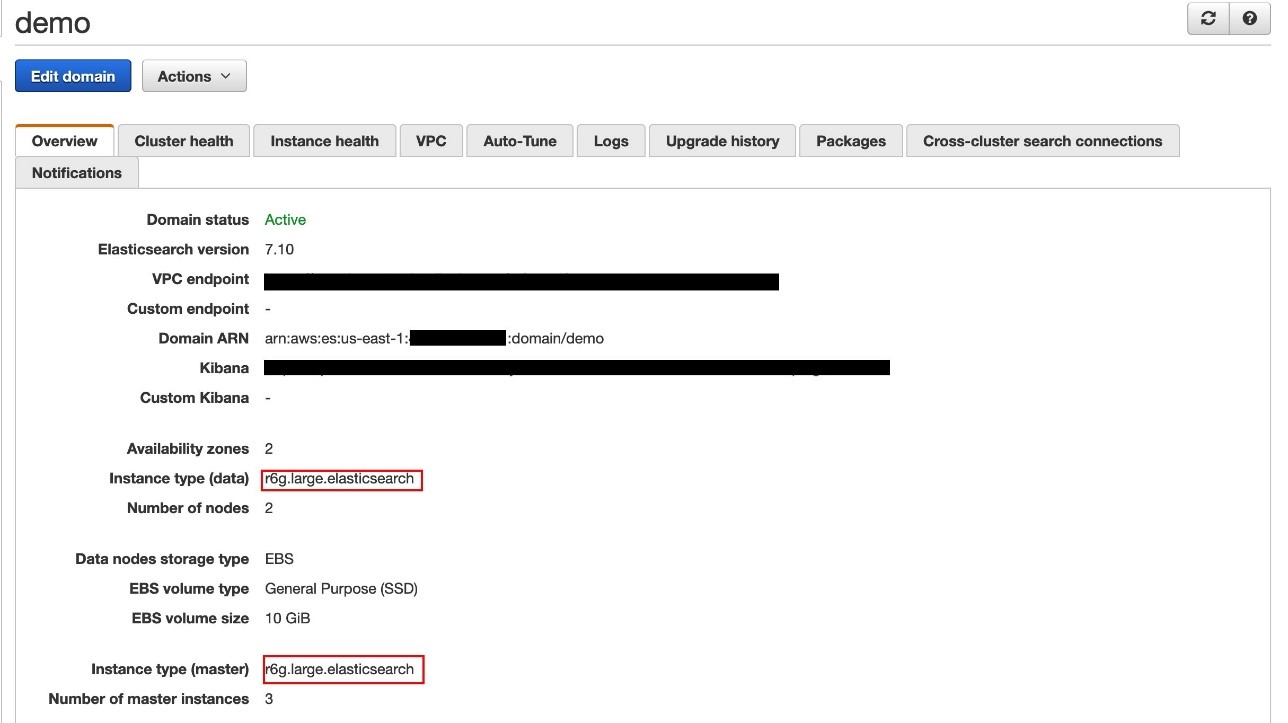
 Zachariah Elliott works as a Solutions Architect focusing on EdTech at AWS. He is passionate about helping customers build Well-Architected solutions on AWS. He is also part of the IoT Subject Matter Expert community at AWS and loves helping customers develop unique IoT-based solutions.
 Pranusha Manchala is a Solutions Architect at AWS who works with education companies. She has worked with many EdTech customers and provided them with architectural guidance for building highly scalable and cost-optimized applications on AWS. She found her interests in machine learning and started to dive deep into this technology. She enjoys cooking, baking, and outdoor activities in her free time.