Post Syndicated from Ashwin Mohan original https://github.blog/engineering/platform-security/finding-leaked-passwords-with-ai-how-we-built-copilot-secret-scanning/
In October 2024, we announced the general availability of Copilot secret scanning, leveraging AI to detect generic passwords in users’ codebases. This post describes how Copilot secret scanning works under the hood, the challenges we ran into when developing it, and the framework we use for testing and iteration.
What is Copilot secret scanning?
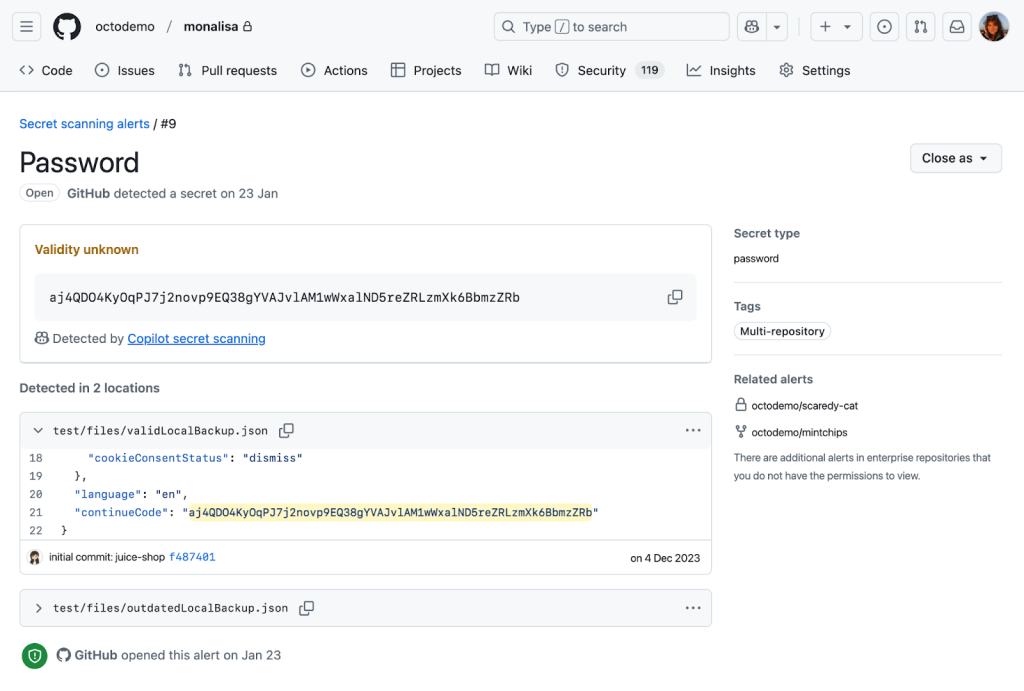
Copilot secret scanning is a feature of GitHub Secret Protection, which protects millions of repositories on GitHub by detecting hundreds of pattern types through our partner program. The precision of these detections is paramount for security teams and developers when dealing with security alerts. Historically, our detection approach has relied on regular expressions, which is an effective method for identifying secrets with strict, provider-minted formats. However, this method struggles with the nuanced and varied structures of generic passwords, often generating excessive noise for security teams and developers.
We now detect generic passwords with GitHub Copilot, using AI to analyze context—such as the usage and location of a potential secret—to limit noise and deliver relevant alerts that are critical to the health and security of your repositories.
Getting to the point where we were confident in our password precision was a journey over many test cases, prompt iterations, and model changes. Let’s dive in to explore what we learned along the way and find out where we’re going.
The private preview highlighted a problem early on: unconventional file types and structures
At the core of Copilot secret scanning lies a request to a large language model (LLM), expressed through an LLM prompt consisting of:
- General information about the type of vulnerability, in this case passwords.
- The source code location and contents of the file where we believe the vulnerability may exist.
- A strict JSON format specification for the model output, to allow for automated processing.
Our first iteration of the prompt used the few-shot prompting technique, which provides the LLM with example inputs and outputs to demonstrate how to perform the task. We wanted a resource-effective model to run the detections at scale and landed on GPT-3.5-Turbo. In parallel, we developed a basic offline evaluation framework, including manually curated test cases with both positive and negative findings, to help us validate that our approach was sound before deploying it to customers.
We deployed this first iteration to our private preview participants and immediately noticed a problem. While it worked reasonably well at identifying credentials in our offline evaluation, it would fail spectacularly in some customer repositories. The model had difficulty interpreting file types and structures not typically seen in the conventional coding languages and patterns that LLMs train on.
This experience revealed the complexity of the problem and the limiting nature of LLMs. We had to reevaluate our approach.
The road to public preview: Improving offline evaluation and prompting
In response to these initial results, we enhanced the offline evaluation framework in a few key ways. First, we added reports from private preview participants to increase the diversity of our test cases. Next, we enhanced the framework so that we could visually identify and analyze deviations resulting from model or prompt changes. This allowed us to better see the impact of customizing different steps in our prompting strategy. Finally, we leveraged the GitHub Code Security team’s evaluation processes to create a data collection pipeline, and used GPT-4 to create our own test cases based on learnings from existing secret scanning alerts in open source repositories.
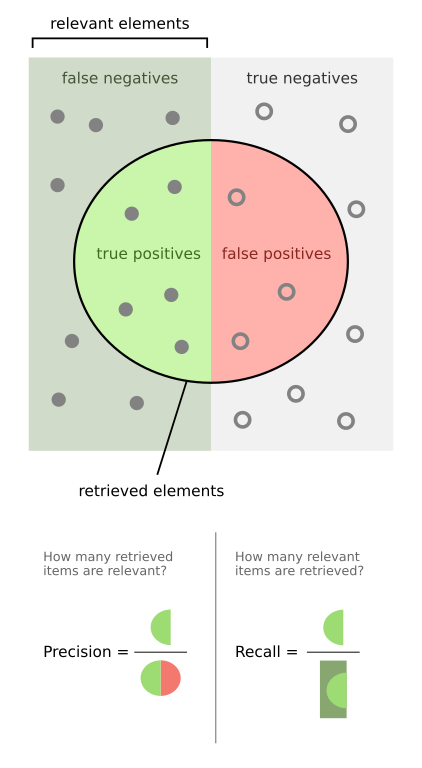
This improved offline evaluation and gave us the breadth needed to measure both precision and recall. Precision is the ability to find secrets more accurately, with concerns to the false positive rate, while recall is the ability to find secrets more reliably, with concerns to the false negative rate.
From here, we ran a series of experiments to evaluate detection quality:
- What if we tried a different model?
- What if we ran the prompt multiple times and somehow combined the responses?
- What if we ran two different prompts on two different models in sequence?
- How do we better handle the nondeterministic nature of LLM responses?
More specifically, we started experimenting with a few different mechanisms to improve our detection with the LLM.
We tried voting (asking the model the same question many times), which allowed for more deterministic responses but had no material impact on our precision.
We also tried using a larger model (GPT-4) trained on a larger set of parameters as a confirming scanner, to validate the accuracy of candidates found by GPT-3.5-Turbo. This helped improve precision without reducing our recall, but was also more resource intensive.
We also tried a few different prompting strategies, such as Fill-in-the-Middle, Zero-Shot, and Chain-of-Thought. We ended up collaborating with our colleagues at Microsoft and used their MetaReflection technique, a novel offline reinforcement learning technique that allows experiential learnings from past trials to come up with a hybrid Chain of Thought (CoT) and few-shot prompt that improves precision with a small penalty in recall.
We ultimately ended up using a combination of all these techniques and moved Copilot secret scanning into public preview, opening it widely to all GitHub Secret Protection customers. This brings us to our next hurdle: scale.
Scaling out capacity for a public preview
Secret scanning not only scans incoming Git pushes, but also your entire Git history on all branches. With each new customer, the necessary resources increase linearly. Rather than simply expanding LLM capacity, we focused on striking the most effective balance between value and cost to ensure optimal performance and efficiency. Before tackling how we managed the resources, we tried to find ways to reduce resource usage itself by:
- Identifying and excluding a class of changes from scanning (such as media files or language files that contain “test,” “mock,” or “spec” in the filepath), because we expected they would never contain credentials or they would be incomprehensible to the model.
- Experimenting with newer models, such as GPT-4-Turbo and GPT-4o-mini, that were expected to be less resource intensive without compromising on performance and latency.
- Experimenting with different context windows to find one that reduced resources without significantly increasing latency for the LLM to respond to our queries.
- Making improvements to how we tokenize the content we want to scan, including retaining some memory of previous tokenizations while processing new parts of a file.
While some of these efforts proved fruitful, such as limiting the content we scanned, other efforts were less effective. For example, breaking down content into smaller pieces didn’t have much of an impact, while using a more powerful model did.
Ultimately, the most impactful change came from creating a workload-aware request management system that allowed us to maximize and equitably share LLM capacity against the variety of different workloads we run during scans.
In building the system, we noticed a fundamental problem that needed addressing in our capacity management: assigning specific rate limits to individual workloads (such as scanning incoming Git commits or scanning the full history) was suboptimal. As each workload was tied to specific traffic patterns—Git commits, for example, tend to correlate with working hours, while full history scanning correlates with discrete events like a security manager or administrator enabling the feature on a new organization—it was easy to land in a situation where an individual workload could run into rate limits within its operational context, leaving additional resources available elsewhere unused.
We drew significant inspiration from existing solutions in this space, such as Doorman, GitHub’s own Freno, and various other weighted, fair-priority, queue-related algorithms. We came up with an algorithm that allows us to set a range of limits for each workload, preventing the workload from completely overwhelming the LLM, while allowing it to tap into resources from other workloads going unused at the moment. This strategy was so effective at maximizing utilization that we ended up using it within Copilot Autofix and security campaigns as well.
Mirror testing our way to general availability
Achieving confidence in detection quality was crucial for moving Copilot secret scanning to general availability. We implemented a mirror testing framework that ran our prompt and filtering changes against a subset of repositories that participated in our public preview. Rescanning these repositories with our latest improvements allowed us to assess the change in real alert volumes and false positive resolutions, without impacting users.
We found a huge drop in detections and false positives with very few missing real passwords. In some cases, we saw a 94% reduction in false positives across organizations! This before-and-after comparison indicated that all the different changes we made during private and public preview led to increased precision without sacrificing recall, and that we were ready to provide a reliable and efficient detection mechanism to all GitHub Secret Protection customers.
Lessons for the future
Copilot secret scanning is now detecting passwords on nearly 35% of all GitHub Secret Protection repositories. We’re continuing to monitor performance and apply lessons learned as we leverage the tooling we created along the way:
- A focus on precision: Security and development teams need accurate and actionable alerts without the noise—this is always our primary goal.
- Including diverse test cases: We continue to incorporate examples based on learnings from customer feedback into our test bed as we refine our detection capabilities.
- Effective resource management: We always need to balance scalability with performance.
- Collaborative innovation: Partnering with other GitHub and Microsoft teams helps us push the boundaries of what Copilot can achieve.
These learnings are also shared across Copilot Autofix, which continues to expand coverage for code scanning alerts and helps development teams remediate code scanning alerts quickly.
Since our general availability launch, enablement for Copilot secret scanning has been included in security configurations, allowing you to control which repositories are detecting secrets across your organizations or enterprise. We’re dedicated to continuous improvement through ongoing monitoring, mirror testing, and approach refinement based on customer feedback and detection trends. Copilot secret scanning serves as a critical component for robust application security and will evolve to meet the dynamic needs of our users.
Copilot secret scanning is a feature of GitHub Secret Protection, which offers enterprise-ready solutions for preventing accidental secret exposure in your repositories. GitHub Secret Protection is available to purchase starting April 1, 2025.
The post Finding leaked passwords with AI: How we built Copilot secret scanning appeared first on The GitHub Blog.


