Post Syndicated from Patrik Uytterhoeven original https://blog.zabbix.com/monitoring-failed-jobs-in-netbackup-with-zabbix/28539/
Monitoring backup solutions can be an arduous task – especially since many backup tools don’t provide APIs and simply are not easy to work with. One such solution – NetBackup – provides its own set of challenges, but fortunately we have Zabbix, with its low-level discovery (LLD) features and the possibility to leverage user parameters to extend Zabbix agent.
Table of Contents
How does LLD work ?
For those not familiar with LLD, Zabbix is able to create items, triggers, graphs, and other entities based on LLD rules. JSON is used to detect those entities by Zabbix.
https://www.zabbix.com/documentation/current/en/manual/discovery/low_level_discovery/custom_rules
If we create a script that returns this information to Zabbix, then we can automatically create items based on the received low-level discovery macros and their values. In this example from the Zabbix website, Zabbix will map {#FSNAME} to one of the detected logical volumes.
[
{ "{#FSNAME}":"/",                           "{#FSTYPE}":"rootfs"   },
{ "{#FSNAME}":"/sys",                        "{#FSTYPE}":"sysfs"    },
{ "{#FSNAME}":"/proc",                       "{#FSTYPE}":"proc"     },
{ "{#FSNAME}":"/dev",                        "{#FSTYPE}":"devtmpfs" },
{ "{#FSNAME}":"/dev/pts",                    "{#FSTYPE}":"devpts"   },
{ "{#FSNAME}":"/lib/init/rw",                "{#FSTYPE}":"tmpfs"    },
{ "{#FSNAME}":"/dev/shm",                    "{#FSTYPE}":"tmpfs"    },
{ "{#FSNAME}":"/home",                       "{#FSTYPE}":"ext3"     },
{ "{#FSNAME}":"/tmp",                        "{#FSTYPE}":"ext3"     },
{ "{#FSNAME}":"/usr",                        "{#FSTYPE}":"ext3"     },
{ "{#FSNAME}":"/var",                        "{#FSTYPE}":"ext3"     },
{ "{#FSNAME}":"/sys/fs/fuse/connections",    "{#FSTYPE}":"fusectl"  }
]
Zabbix can automatically create items with this information. If we then create another script where we sent the values for each of the volumes, then we can return for example the free space for the “/” volume as a value and do this for all other volumes as well.
With this knowledge, we can create a solution to monitor our backups. We will further optimize this approach because we don’t want to rely on multiple scripts, such as a script that sends us a list of failed backups, another script that returns the status codes, etc. We will use the dependent item feature, which allows us to simply create one master item to collect all the values and then process them further in Zabbix.
Monitoring with Python and user parameters
To format our data in JSON, we need to extract it first from the API. For this, we can create a script with the user parameters in our Zabbix agent. The Python script we will use for this can be copied to “/etc/zabbix” or another place that is accessible by the Zabbix user on our system.
https://github.com/Trikke76/Zabbix/blob/master/Netbackup/netbackup-failed-jobs-zabbix.py
Don’t forget to adapt the script and update settings like user name, password, URL, and page limit!
# NetBackup API configuration
BASE_URL = "https://<netbackup-url>:1556/netbackup"
USERNAME = ""
PASSWORD = ""
PAGELIMIT = "100" # adapt to your needs

The page limit will limit the search to the last 100 lines

If you want you can also adapt how many days we have to look back in history standard is 7 days

# Set the time range for job retrieval (last 7 days)
end_time = datetime.utcnow()
start_time = end_time - timedelta(hours=168)
The script will collect errors in backups and the resulting output will display a list of failed backups over the last 100 jobs:
{
  "data": [
    {
      "{#JOBID}": 257086,
      "JOBTYPE": "DBBACKUP",
      "STATUSCODE": 11,
      "STATE": "DONE",
      "POLICYNAME": "NBU-Catalog",
      "CLIENTNAME": "NetBackup-server",
      "STARTTIME": "2024-07-29T12:46:34.000Z",
      "ENDTIME": "2024-07-29T12:47:53.000Z",
      "ELAPSEDTIME": "PT1M19S",
      "KILOBYTESTRANSFERRED": 0
    }
  ]
}
This data is perfect for our LLD rules in Zabbix. Once we have copied our script to the server, we have to define our Zabbix user parameter. You can download an example here:
https://github.com/Trikke76/Zabbix/blob/master/Netbackup/Userparameter-netbackup.conf
Copy this file to your Zabbix agent in the config folder, usually somewhere in:
“/etc/zabbix/zabbix_agent2.d/” or “/etc/zabbix/zabbix_agentd.d/” depending if you use Zabbix agent or Zabbix agent 2.
Don’t forgot to modify the file permissions so that only the agent can read it, and restart Zabbix agent. Also, make sure that the user parameter points are at the correct location of the Python script. The last thing we have to do now is create or import our Zabbix template:
https://github.com/Trikke76/Zabbix/blob/master/Netbackup/Templates_Netbackup.yaml
How does it work?
The first thing we have to do is create a master item that collects the data from our script.
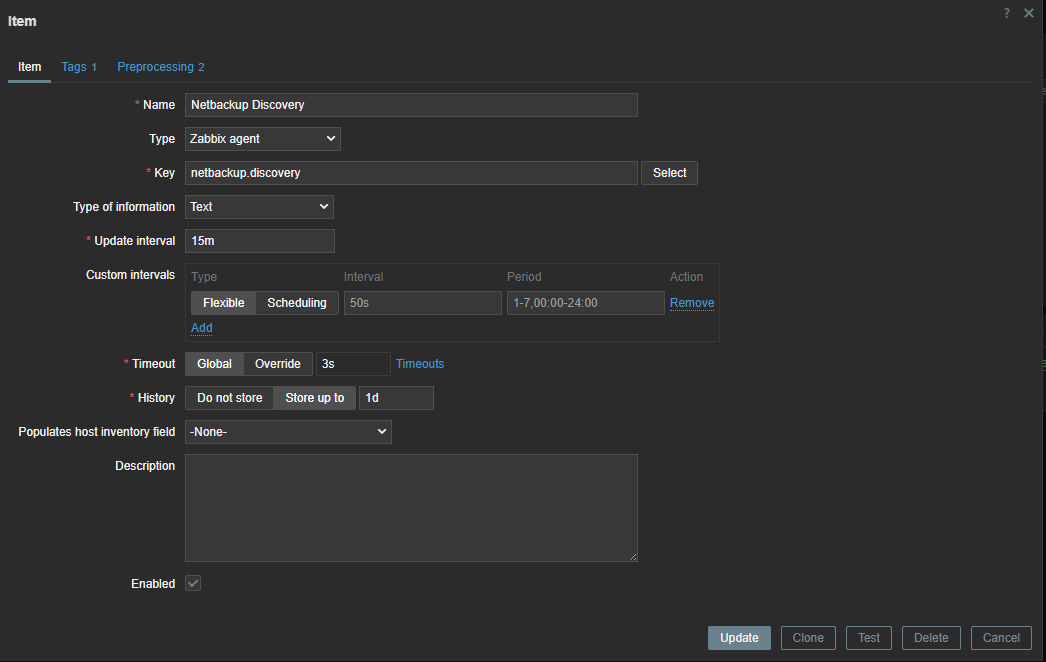
Since the error check is executed every 15 minutes, we can use throttling pre-processing to discard duplicate data, since most of the time there will be no errors in our backups.
Also, if our script fails to connect to the API, our data collection will fail. Therefore, we can use custom on fail pre-processing and set a custom, more human-readable error message.

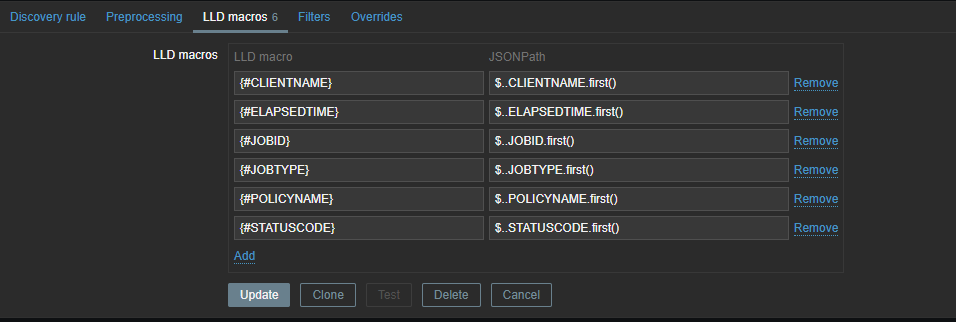
Now we have to create a discovery rule in Zabbix based on this data. In this discovery rule we will extract the required data and map it to custom LLD macros.
Those macros can be used later in our items. As you can see, we use .first() at the end of our JSONPATH expression – otherwise, we would get all our matching data between the [ ], as our data comes in a list. By making use of .first() we filter out all other data we don’t need.
To create our LLD items, we need to create an item prototype so that items can be generated when they are detected. Our item will be a dependent item, so it will get its data from the master item.
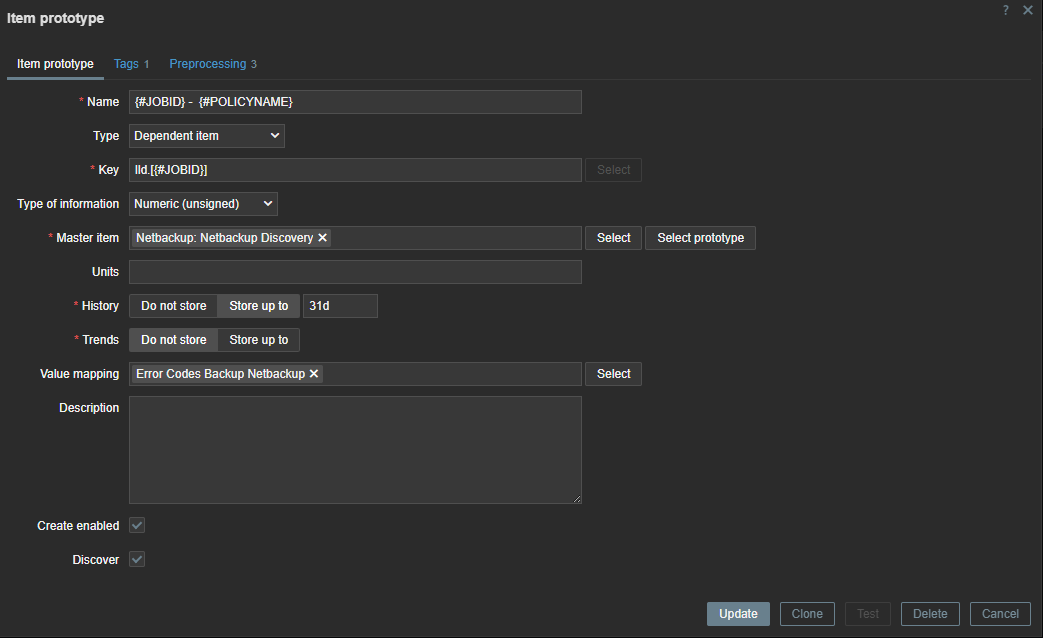
In our item prototype we can make use of the Zabbix LLD macros we created before. To extract the data we need, we have to add a preprocessing rule first to extract the data we want from our master item.
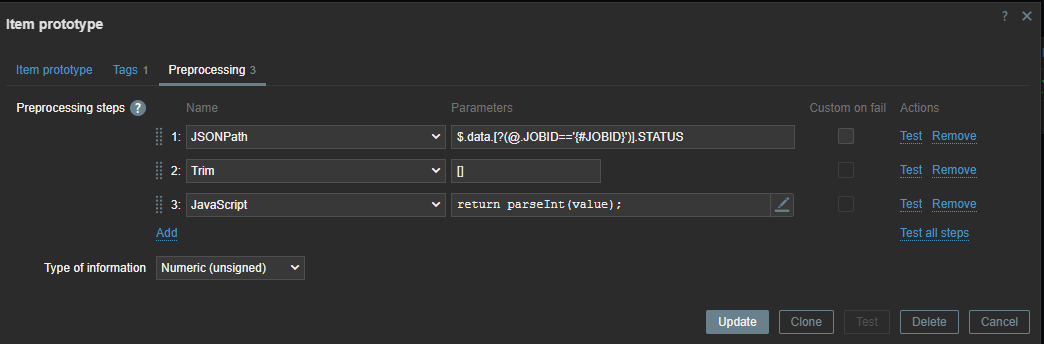
First line will look for the “JOBID” and will use the LLD macro we created before. Remember we used .last() ? If we had not done this our ID here would have been a list [ ] instead of just the ID number.
We also have to remove the [ ] – this we can do with trim. Since our data is returned as text we also add some JS to convert our data to an Integer. This allows us to create triggers based on the error code we have received.
Monitoring with an http item
There is another way to do the same thing in Zabbix without writing those complex python scripts. Since Zabbix 4.0 we have “HTTP agent” item type. This allows us to connect to the API and retrieve the required data from the API. Combined with LLD and dependent items this becomes a very powerful way to collect metrics.
First thing we have to do is create a master item to retrieve the data from the API. This item is of the type “HTTP agent” and we have to fill in the URL of the API endpoint. To authenticate we have to pass information like the authentication token in the headers. For this you need to create a token first in NetBackup. As you can see I used a macro {$BEARER.TOKEN} – this is so we can make it secret.
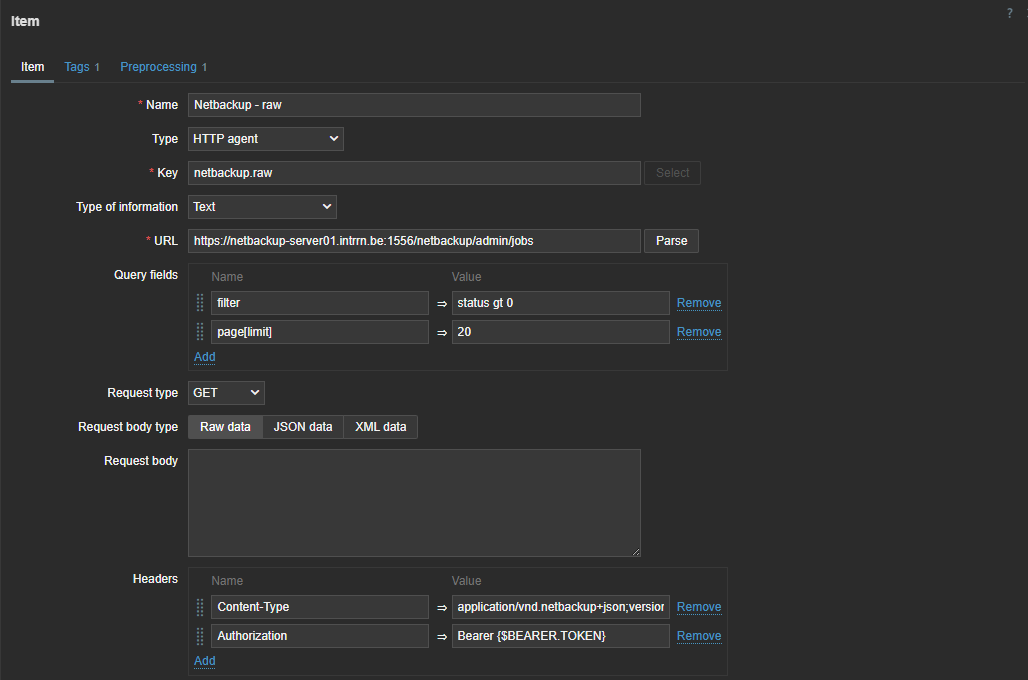
So next step is to add our secret token. Let’s create our macro in the template under the Macros section. Here we can choose to keep it hidden for everyone. An even more secure way to store sensitive information like authentication tokens would be using a secret vault.

The data we get back from our API is a bit different from what we have seen in the output of the Python script we defined previously, but not by much.
{
  "data": [
    {
      "type": "job",
      "id": "260136",
      "attributes": {
          "jobId": 260136,
          "parentJobId": 0,
          "jobType": "DBBACKUP",
          "policyType": "NBU_CATALOG",
          "policyName": "NBU-Catalog",
          "scheduleType": "DIFFERENTIAL_INCREMENTAL_BACKUP",
          "scheduleName": "-",
      …
With this knowledge and what we know from our first try with Python, we can now make a dependent discovery rule.
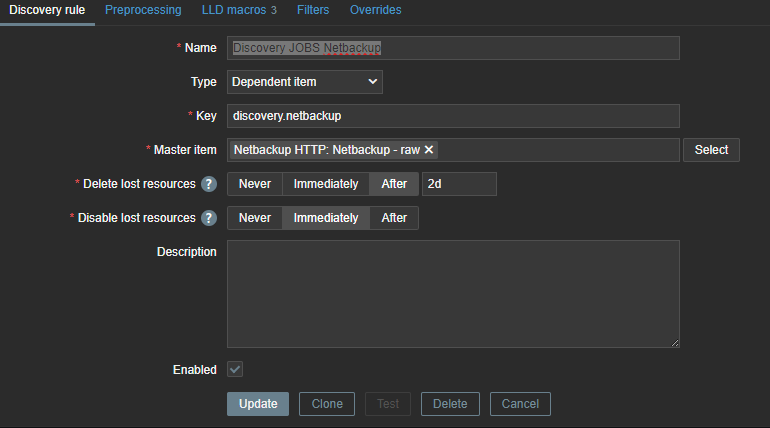
The same logic applies again – we need to map our data to LLD macros so that we can use them later in our LLD items and triggers.
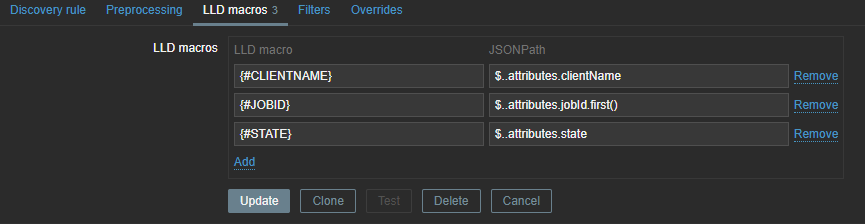
These LLD macros can later be used in our item prototypes and triggers. We only need JOBID and STATE, but you can create some extra mappings in case you like to use the extra information later. With our JSON path we will once again extract the data from our master item.
The next step is to create the LLD item prototype. Here we can use the macros we extracted earlier.

The item is dependent on our master item, so without any pre-processing the data will be exactly the same as in our master item. Therefore, we can add some rules to get the data we need.
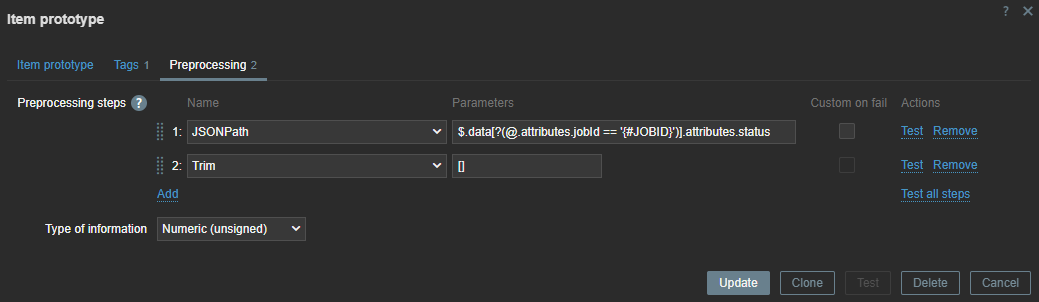
Here, we use the JSON path to extract the data. With our LLD macros we can extract the data dynamically for every item we have discovered. With Trim, we remove the [ ] that comes around our data.
If there are backup errors, the end result will look something like this:

The steps can look a bit abstract, so the best thing to do is to try and perform everything step-by-step and use the Test button in Zabbix to test every step before you continue.
Websites like https://jsonpath.com/ and https://jsonformatter.org/ can also be helpful to beautify your data and do some testing with your JSONPath pre-processing.
If you want to test the template, feel free to download it from my github:
https://github.com/Trikke76/Zabbix/blob/master/Netbackup/Templates_Netbackup_HTTP.yaml
In conclusion
That’s it! If you’ve set up everything correctly, you should now get a list of failed jobs collected from NetBackup. Once the failed jobs are gone, Zabbix will disable the related entities and clean them up after some time.
If you need help optimizing your Zabbix environment, or you need a support contract, some consultancy, or training, feel free to contact [email protected] or visit us at https://www.open-future.be.
We are always available to help!
The post Monitoring Failed Jobs in NetBackup with Zabbix appeared first on Zabbix Blog.


