Tag Archives: dependent items

What’s Up, Home? – Let’s hit the road!

Post Syndicated from Janne Pikkarainen original https://blog.zabbix.com/whats-up-home-lets-hit-the-road/25693/

Can you monitor how much you drive your car, even if your car wouldn’t have any way to report back to Zabbix? Of course, you can! By day, I am a Lead Site Reliability Engineer in a global cyber security company. By night, I monitor my home with Zabbix & Grafana and do some weird experiments with them. Welcome to my blog about the project.

Some forewords: Now that our baby girl is over six months old, she has developed some kind of sleeping pattern. It means she goes to bed very early in the evening, around 6pm. Or, I go to the bedroom with her and wait for her to sleep steadily before I exit the bedroom without her noticing. It means I have lots of time to think, and also to play around with apps like iPhone Shortcuts. I have previously done a few Siri & Zabbix experiments and this will be one more.

I did do this shortcut only two days ago and have not actually driven yet, but I verified that the shortcut itself works when I go into my car and start it up. Also, as I don’t want to give out the exact location where we live, for this blog post I faked our car to be located in Santa Claus Village, Rovaniemi.

Let’s get started.

What are you planning?

Even though I already know very well how much I drive — there’s the odometer in our car, a fuel app in my iPhone shows how many liters per month I refuel, and so on, this data is still something that would contribute to my dear single pane of glass, like your company probably wants to have.

My Siri Shortcut is simple: whenever I go to my car and my iPhone connects to car Bluetooth, it’s a clear data point that I’m probably going somewhere, so the shortcut gets my current location and saves its coordinates to a text file in my iCloud.

Next, just like in my previous Siri examples, a Zabbix Agent on my MacBook keeps an eye on this text file, very much like in my FlightGear integration example, Zabbix will then populate the coordinates in Zabbix inventory for my car host. This way, I can project the car location to the Geomap widget.

Let’s create the shortcut

Here’s the shortcut in all its simplicity.

About that Append to Text File… why appending instead of overwriting, I’ll tell you a story some other day.

Why Desktop Directory? I’ll tell you a story some other day.

Next up, Zabbix

On the Zabbix side of the house, the story is like so many times in my posts: read the text file, and using dependent items create the longitude and latitude items.

Wait! You saved it on your Desktop but now it’s in /tmp? I’ll tell you a story about this kludge some other day… or immediately after this caption.

It was easier to get macOS Zabbix Agent to get to read /tmp instead of your home directory, as the security is in the way, so a cronjob syncs the file once per minute to /tmp. Not only that but because in iOS Shortcuts the Append to a text file was the only way I got the shortcut to run without it asking for permission to run, my cronjob is actually like this:

* * * * * /usr/bin/tail -n1 /Users/jaba/Desktop/car_location.txt >/tmp/car_location.txt

Beautiful? No, but due to reasons I had to do this, and at least it works.

Anyway, then the longitude/latitude-dependent items just use some regular expressions.

Beautiful? No, but it works.

Does it work?

Of course, it does! See for yourself.

Here’s the latest data…

… and here’s the Geomap.

But wait! How does this track your kilometers?

Heh, you got me. It does not. One easy way would be to use Get distance block in iOS Shortcuts. It actually works — you get to choose that yes I will be driving, give me the kilometers. Whenever I do that, I would need a text file containing just one line (which would contain the old location), and getting to that point without your iPhone asking anything ever is not so simple, so for now I gave up.

So, the next part of this will be to use some API and make my Zabbix calculate the distances. That would be cooler anyway, but I’ll find time for that next time. Anyway, from now on Zabbix will know the locations where I have started our car, so the data will be collected from today. I know there are limitations in this implementation, such as that if I start the car and just drive to some place and back without ever stopping the engine, that won’t really give me any results, but this is better than nothing.

I have been working at Forcepoint since 2014 and as you know by now, I have this never-ending drive for monitoring. — Janne Pikkarainen

This post was originally published on the author’s page.

What’s Up, Home? – Catching the Northern Lights

Post Syndicated from Janne Pikkarainen original https://blog.zabbix.com/whats-up-home-catching-the-northern-lights/24836/

Can you monitor Northern Lights with Zabbix? Of course, you can! By day, I am a monitoring tech lead in a global cyber security company. By night, I monitor my home with Zabbix & Grafana and do some weird experiments with them. Welcome to my blog about this project.

Christmas is coming, and (at least if you believe Hollywood movies) part of that magic would be staring at the sky and marvel the Northern Lights. Well, in practice you probably won’t see them, as even if the Northern Lights would be up there, a thick layer of clouds will probably prevent you from seeing them. Or then you live in an area with so many street lights that you don’t see the sky properly.

We have tried to watch them several times with my wife, but our attempts all over the years and all the seasons have failed so far. But, for the sake of the Christmas spirit, let’s imagine you could actually see the lights.

Getting the data

There are probably actual APIs for getting the data — at first, I went to NASA’s open data site but then quickly gave up; there’s so much data that I would not have an actual idea how to start parsing this beautiful sky flames phenomenon.

Admitting my lameness, I next came up with plan B. The Finnish Institute of meteorology has this page for space weather & Northern Lights predictions. Sorry, the page is all in Finnish, so likely it looks like an alien language to you. Anyway, there’s this snippet that shows the probability of Northern Lights tonight (“Tänä yönä”), tomorrow (“Huomenna” and the day after tomorrow (“Ylihuomenna”).

Is that some kind of advanced form of encryption? No, that’s just the Finnish language for you.
Making it work

But how to parse that? Well, of course, with Zabbix, that is easy with the HTTP Agent item type. It allows you to grab website content and then perform all the advanced processing for the data you would expect from Zabbix item preprocessing.

Then, using dependent items — one for tonight, one for tomorrow, one for the day after tomorrow — and item preprocessing we can extract the interesting bits.

And see, it works!

I also created a (still boring-looking) dashboard, which shows me the current values.

The problem I now have is that I don’t know all the values the page could contain — when I created this blog post, the chances of seeing the Northern Lights were small (“pieni”) or smallish (“pienehkö”). Well, I keep checking my dashboard from now on! For now, I could create triggers that would alert me if the values would be something else than “pieni” or “pienehkö”, but did not have time for that yet.

I have been working at Forcepoint since 2014 and I bring many Nordic values to the company, even though I’m not lucky with the Northern Lights. — Janne Pikkarainen

This post was originally published on the author’s LinkedIn account.

What’s Up, Home? – Have a Nice Flight!

Post Syndicated from Janne Pikkarainen original https://blog.zabbix.com/whats-up-home-have-a-nice-flight/24755/

Can you monitor the FlightGear flight simulator with Zabbix? Of course, you can! By day, I am a monitoring tech lead in a global cyber security company. By night, I monitor my home with Zabbix & Grafana and do some weird experiments with them. Welcome to my blog about this project.

FlightGear is an awesome free, open-source flight simulator. I am not a pilot, not even a good virtual pilot, in fact, probably the virtual cabin crew would be chanting “BRACE! BRACE! BRACE! HEAD DOWN! STAY DOWN!” to my virtual passengers. Anyway, learning to fly would be awesome.

But what good would be virtual flying without any monitoring? Most people, they wouldn’t care about monitoring. For me, that’s everything I care about with this experiment.

FlightGear Properties

FlightGear can expose all kinds of flight-related data in many different ways; XML logging and via its built-in HTTP server, for example. This time I used its HTTP server, and cherry-picked only a few values (aircraft latitude, longitude, altitude, and speed), as the complete property list is LONG, and I do not understand most of it.

Anyway, you get the FlightGear HTTP server up and running by launching it like

fgfs –httpd=5480

… where 5480 is the port number where HTTP server will be listening on.

You will then have a property browser available on http://localhost:5480/json/ which is from where I found the values I wanted to harvest for my little experiment to see if this thing would fly.

Adding items to Zabbix

To get these values monitored, I added two new master items to Zabbix: one for velocities and one for the position. Then, dependent items are using those master items.

My latitude/longitude items also do populate the Zabbix inventory latitude/longitude fields for my aircraft.

Does it fly?

Yes, it does. I can now have data about my virtual flight.

And thanks to inventory fields, I can show the location of my virtual aircraft on Zabbix geomap.

If you are a flight simulator enthusiast, feel free to use this technique and possibly gather all the values from FlightGear property browser by using low-level discovery. For my little test, I did not bother.

I have been working at Forcepoint since 2014 and have learnt that proper monitoring makes sure your projects do takeoff without too much pain. — Janne Pikkarainen

This post was originally published on the author’s LinkedIn account.

Zabbix meets television – Clever use of Zabbix features by Wolfgang Alper / Zabbix Summit Online 2021

Post Syndicated from Wolfgang Alper original https://blog.zabbix.com/zabbix-meets-television-clever-use-of-zabbix-features-by-wolfgang-alper-zabbix-summit-online-2021/19181/

TV broadcasting infrastructures have seen many great paradigm shifts over the years. From TV to live streaming – the underlying architecture consists of many moving parts supplied by different vendors and solutions. Any potential problems can cause critical downtimes, which are simply not acceptable. Let’s look at how Zabbix fits right into such a dynamic and ever-changing environment.

The full recording of the speech is available on the official Zabbix Youtube channel.

In this post, I will talk about how Zabbix is used in ZDF – Zweites Deutsche Fernsehen (Second German Television). I will specifically focus on the most unique and interesting use cases, and I hope that you will be able to use this knowledge in your next project.

ZDF – Some history

Before we move on with our unique use cases, I would like to introduce you to the history of ZDF. This will help you understand the scope and the potential complexity and scale of the underlying systems and company policies.

  • In 1961, the federal states established a central non-profit television broadcaster – Zweites Deutsches Fernsehen
  • In 1963 on April 1, ZDF officially went on air and had reached 61 percent of television viewers
  • On the Internet, a selection of programs is offered via live stream or video-on-demand through the ZDFmediathek, which has been in existence since 2001
  • Since February 2013, ZDF has been broadcasting its programs around the clock as an internet live stream
  • As of today, ZDF is one of the largest public broadcasters in Europe with permanent bureaus worldwide and is also present on various platforms like Youtube, Facebook, etc.

Here we can see that over the years, ZDF has made some major leaps – from a television broadcaster with the majority percentage of viewers to offering on-demand video service and moving to 24/7 internet live streams. ZDF has also scaled up its presence along with multiple different digital platforms as well as its physical presence all over the globe.

Integrating Zabbix with an external infrastructure monitoring system

In our first use case, we will cover integrating Zabbix with an external infrastructure monitoring system. As opposed to monitoring IT metrics like hard drive space, memory usage, or CPU loads – this external system is responsible for monitoring devices like power generators, transmission stations, and other similar components. The idea was to pass the states of these components to Zabbix. This way, Zabbix would serve as a central “Umbrella” monitoring system.

In addition, the components that are monitored by the external system have states and severities, but the severities are not static and can vary depending on the monitored component. What this means is that each component could generate problems of varying severities. We had to figure out a way to assign the correct severities to each of the external components. Our approach was split into multiple steps:

  • Use Zabbix built-in HTTP check to get LLD discovery data
    • The external monitoring system provides an API, which we can use to obtain the necessary LLD information by using the HTTP checks
    • Zabbix-sender was used for testing since the HTTP items support receiving data from it
  • Use Zabbix built-in HTTP check as a collector to obtain the component status metrics
  • Define item prototypes as dependant items to extract data from collector item
  • Create “smart “trigger prototypes to respect severity information from the LLD data

The JSON below is an example of the LLD data that we are receiving from the external monitoring systems. In addition to component names, descriptions, and categories, we are also providing the severity information. The severities that have a value of -1 are not used, while other severities are cross-checked with the status value retrieved from the returned metrics:

{
"{#NAME}": "generator-secondary",
"{#DISPLAYNAME}": "Secondary power generator",
"{#DESCRIPTION}": "Secondary emergency power generator",
"{#CATEGORY}": "Powersupply",
"{#PRIORITY.INFORMATION}": -1,
"{#PRIORITY.WARNING}": -1,
"{#PRIORITY.AVERAGE}": -1,
"{#PRIORITY.HIGH}": 1,
"{#PRIORITY.DISASTER}": 2
}

Below we can see the returned metrics – the component name and its current status. For example, status = 1 value references the {#PRIORITY.HIGH} from the LLD JSON data.

"generator-primary": {
"status": 0,
"message": "Generator is healthy."
},
"generator-secondary": {
"status": 1,
"message": "Generator is not working properly."
},

We can see that the first generator returns status = 0, which means that the generator is healthy and there are no problems, while the secondary generator is currently not working properly – status = 1 and should generate a problem with severity High.

Below we can see how the item prototypes are created for each of the components – one item prototype collects the message information, while the other collects the current status of the component. We use JSONPath preprocessing to obtain these values from our master item.

As for the trigger prototypes – we have defined a trigger prototype for each of the trigger severities. The trigger prototypes will then create triggers depending on the information contained in the LLD macros for a given component.

As you can see, the trigger expressions are also quite simple – each trigger simply checks if the last received component status matches the specific trigger threshold status value.

The resulting metrics provide us both the status value and the component status message. As we can see, the triggers are also generating problems with dynamic severities.

Improving the solution with LLD overrides

The solution works – but we can do better! You might have already guessed the underlying issue with this approach: our LLD rule creates triggers for every severity, even if it isn’t used. The threshold value for these unused triggers will use value -1, which we will never receive, so the unused triggers will always stay in the OK state. Effectively – we have created 5 trigger definitions, while in our example, we require only 2 triggers.

How can we resolve this? Thankfully, Zabbix provides just the right tool for the job – LLD Overrides! We have created 5 overrides on our discovery rule – one for each severity:

In the override conditions, we will specify that if the value contained in the priority LLD macros is equal to -1, we will not be discovering the trigger of the specific severity.

The final result looks much cleaner – now we have only two trigger definitions instead of five. 


This is a good example of how we can use LLD together with master items obtaining data from external APIs and also improve the LLD logic by using LLD overrides.

“Sphinx” application monitoring using Graylog REST API

For our second example, we will be monitoring the Sphinx application by using the Graylog REST API. Graylog is a log management tool that we use for log collection – it is not used for any kind of alerting. We also have an application called Sphinx, which consists of three components – a Web component, an App component, and a WCF Gateway component. Our goal here is to:

  • Use Zabbix for evaluating error messages related to Sphinx from Graylog
  • Monitor the number of errors in user-defined time intervals for different components and alert when a threshold is exceeded
  • Analyze the incoming error message and prepare them for a user-friendly output sorted by error types

The main challenges posed by this use-case are:

  • How to obtain Sphinx component information from Graylog
  • How to handle certificate problems (DH_KEY_TOO_SMALL / Diffie-Hellman key) due to an outdated version of the installed Graylog server
  • How to sort the error messages coming in “Free form” without explicit error types

Collecting the data from Graylog

Since the Graylog application used in the current scenario was outdated, we had to work around the certificate issues by using the Zabbix external check item type. Once again, we will be using master and dependent item logic – we will create three master items (one for each component) and retrieve the component data. All additional information will be retrieved by the dependent items as to not cause extra performance impact by flooding the Graylog API endpoint. The data itself was parsed and sorted by using Javascript preprocessing. The dependent item prototypes are used here to create the items for the obtained stats and the data used for visualizing each error type on a user-friendly dashboard.

Let’s take a look at the detailed workflow for this use case:

  • An External check for scanning the Graylog stream Sphinx App Raw
  • A dependent item which analyzes and filters the raw data by using preprocessing Sphinx App Raw Filtered
  • This dependent item is used as a master item for our LLD Sphinx App Error LLD
  • The same dependent item is also used as a master item for our item prototypes – Sphinx App Error count and Sphinx App Error List

Effectively this means that we perform only a single call to the Graylog API, and all of the heavy lifting is done by the dependent item in the middle of our workflow.
The following workflow is used to obtain the information only about the App component – remember, we have two other components where this will have to be implemented – Web and Gateway.

In total, we will have three master items for each of the APP components:

They will use the following shell script to execute the REST API call to the Graylog API:

graylog2zabbix.sh[{$GRAYLOG_USERNAME},{$GRAYLOG_PASSWORD},{HOST.CONN},{$GRAYLOG_PORT},search/universal/relative?
query=name%3Asphinx-app%20AND%20stage%3Aproduction%20AND%20level%3A(ERROR%20OR
%20FATAL)&range=1800&limit=50&filter=streams%3A60000a8c1c09f9862279966e&fields=name%2Clevel
%2Cmessage&decorate=true]

The data that we obtain this way is extremely hard to work with without any additional processing. It very much looks like a set of regular log entries – this complicates the execution of any kind of logic in reaction to receiving this kind of data:

For this reason, we have created a dependent item, which uses preprocessing to filter and sort this data. The dependent item preprocessing is responsible for:

  • Analyzing the error messages
  • Defining the error type
  • Sorting the raw data so that we can work with it more easily

We have defined two preprocessing steps to process this data. We have the JSONPath preprocessing step to select the message from the response and a Javascript preprocessing script that does the heavy lifting. You can see the Javascript script below. It uses Regex and performs data preparation and sorting. In the last line, you can see that the data is transformed back into JSON, so we can work with it down the line by using the JSONpath preprocessing steps for our dependent items.

Below we can see the result. The data stream has been sorted and arranged by error types, which you can see on the left-hand side. All of the logged messages are now children that belong to one of these error types.

We have also created  3 LLD rules – one for each component. These LLD rules create items for each error type for each component. To achieve this, there is also some additional JSONPath and Javascript preprocessing done on the LLD rule itself:

The end result is a dashboard that uses the collected information to display the error count per component. Attached to the graph, we can see some additional details regarding the log messages related to the detected errors.

Monitoring of TV broadcast trucks

I would like to finish up this bost by talking about a completely different use case – monitoring of TV broadcast trucks!

In comparison to the previous use cases – the goals and challenges here are quite unique. We are interested in a completely different set of metrics and have to utilize a different approach to obtain them. Our goals are:

  • Monitor several metrics from different systems used in the TV broadcast truck
  • Monitor the communication availability and quality between the broadcast truck and the transmitting station
  • Only monitor the broadcast truck when it is in use

One of the main challenges for this use case is avoiding false alarms. How can we avoid false positives if a broadcast truck can be put into operation at any time without notifying the monitoring team? The end goal is to monitor the truck when it’s in use and stop monitoring it when it’s not in use.

  • Each broadcast truck is represented by a host in Zabbix – this way, we can easily put it into maintenance
  • A control host is used to monitor the connection states of all broadcasting trucks
  • We decided on creating a middleware application that would be able to implement start/stop monitoring logic
    • This was achieved by switching the maintenance on/off by using the Zabbix API
  • A specific application in the broadcasting truck then tells Zabbix how long to monitor it and when to enable the maintenance for the said truck

Below we can see the truck monitoring workflow. The truck control host gets the status for each truck to decide when to start monitoring the truck. The middleware then starts/stops the monitoring of a truck by using Zabbix API to control the maintenance periods for the trucks. Once a truck is in service, it also passes the monitoring duration to the middleware, so the middleware can decide when the monitoring of a specific truck should be turned off.

Next, let’s look at the truck control workflow from the Zabbix side.

  • Each broadcast truck is represented by a single trigger on the control host
    • The trigger actions forward the information that the truck maintenance period should be disabled to the middleware
  • Middleware uses the Zabbix API to disable the maintenance for the specific truck
  • The truck is now monitored
  • The truck forwards the Monitoring duration to the middleware
  • Once the monitoring duration is over, the middleware enables the maintenance for the specific truck

Finally, the trucks are displayed on a map which can be placed on our dashboards. The map displays if the truck is maintenance (not active) and if it has any problems. This way, we can easily monitor our broadcast truck fleet.

From gathering data from external systems to performing complex data transformations with preprocessing and monitoring our whole fleet of broadcast trucks – I hope you found these use cases useful and were able to learn a thing or two about the flexibility of different Zabbix features!

The post Zabbix meets television – Clever use of Zabbix features by Wolfgang Alper / Zabbix Summit Online 2021 appeared first on Zabbix Blog.

Handy Tips #17: Master and dependent items for bulk metric collection

Post Syndicated from Arturs Lontons original https://blog.zabbix.com/handy-tips-17-master-and-dependent-items-for-bulk-metric-collection/18291/

Collect metrics in bulk and reduce monitoring performance overhead with master and dependent items.

Data collection efficiency is an important aspect of monitoring. We need to ensure that our monitoring approach has a minimal impact both on the monitoring system and the system that is being monitored.

Improve your metric collection efficiency and reduce the performance overhead with master and dependent items:

  • Dependent items can extract data from a master item by using preprocessing
  • Combine multiple preprocessing steps for best results

  • Up to 3 dependency levels are supported
  • Up to 29999 dependent items for a single master item

Check out the video to learn how to define master and dependent items

How to define master and dependent items:


  1. Navigate to ConfigurationHosts and create a new host representing your API endpoint
  2. Input the Host name, Host group, and add an arbitrary interface
  3. Click the Add button
  4. In ConfigurationHosts Click on the Items button next to the host
  5. Click the Create item button
  6. Select the Type HTTP agent and populate the URL with your API endpoint address
  7. Select the Type of informationText
  8. Click the Add button
  9. Create another item of type Dependent item
  10. Define item Key and item Name with arbitrary values
  11. Open the Preprocessing tab
  12. Use a preprocessing step (ex. JSONPath) to extract the required value from the master item
  13. Click the Add button
  14. Navigate to MonitoringLatest data and filter by your host
  15. Observe the collected metrics

Tips and best practices:
  • Dependent items don’t have their own update intervals
  • Dependent item values get updated as soon as the master item receives a new value
  • Deleting a master item will also delete the items that depend on it
  • Item of any type can be used as a master item

“ICMP Rings” for better Dependencies

Post Syndicated from Olger Diekstra original https://blog.zabbix.com/icmp-rings-for-better-dependencies/15157/

When you have devices spread across different locations and monitor these with a single Zabbix instance, you’ll encounter a challenge managing the various latencies to each location, especially when these locations span the world. Ping times can vary wildly from 10ms to 500ms and more depending on the internet connections.

Flexible latency threshold with User macros

Setting the max latency for all devices at 500ms isn’t really a good option, and overriding the {$ICMP_RESPONSE_TIME_WARN} for each individual device doesn’t scale well.

There is a better way though.

First move the {$ICMP_RESPONSE_TIME_WARN} macro from the “Template Module ICMP Ping” into a global macro (with the default value of 0.15, which is 150ms) and remove the macro from the template.

You can find global variables in the “Administration->General” menu. Click on the “GUI” dropdown and select “Macros”.


Then create templates for each location and set a custom {$ICMP_RESPONSE_TIME_WARN} macro (overriding the global macro) based on what was best for that particular location.
Lastly, add all devices for a location to the template for that location.

Now when a new device is added to a location, all that is needed is to add it to the correct template. An added benefit is that when the latency changes, changing the macro in the affected template changes the response time for every device that relies on that template.


Defining dependencies

Because networks often work as a tree structure, using dependencies can help suppress alerts for devices downstream. However, Zabbix’s dependency structure isn’t very intelligent. If an upstream device is checked just before an issue occurs, then a downstream device might hit
the 3 failed checks before the upstream device does, and alert. This can lead to many alerts even though Zabbix might suppress most of these alerts on the dashboard once it detects the upstream device is offline too.

Every network is different and this approach may need some tweaking for your network, but in our case, each remote location has a firewall that Zabbix pings, a switch that connects to that firewall, hosts that connect to the switch, and in some cases VM’s that reside on a host.
Each firewall has an external and internal interface that we monitor separately (if the internal interface is down, but the external interface up, that means something happened to the connected switch), and we monitor each.

So, we created a concept of “ICMP rings”.

The four rings

Zabbix pings the external interface of a remote firewall every 60s (default ICMP update interval). We’ll call this “Ring 0”. The internal Firewall interface is dependent on the external interface, This internal interface sits in “Ring 1”. Usually, the next device is a switch, which is dependent on the internal firewall, This switch lives in “Ring 2”. Hosts that we want to monitor on the remote network are dependent on the switch, and therefore live in “Ring 3”. We also have remote VM’s which exist on a remote host, and these live in “Ring 4”.
In each ring we increase the update interval time.


This means the further downstream a device is, the longer it takes to detect an outage.

But the upshot is that we won’t get alert storms any more.

First move the {$ICMP_UPDATE_INTERVAL} macro from the “Template Module ICMP Ping” to a global macro (with a value of 1m) and created templates called:

ICMP_Ring1_FW
ICMP_Ring2_SW
ICMP_Ring3_Hosts
ICMP_Ring4_VMs

Each Ring template has a macro {$ICMP_UPDATE_INTERVAL} set (overriding the global macro) with the below values for each ring.

ring 0 = 60s
ring 1 = 80s
ring 2 = 107s
ring 3 = 143s
ring 4 = 191s

These are not random. In order to always have an upstream device alert before a downstream device you need to take the update interval time (seconds) of the upstream ring, multiply it by its intervals+1, and then divide it by three (and round it off).
The resulting update interval will ensure an upstream device always alerts before a downstream device. The downside of this approach is that the further downstream a device is, the longer it takes to detect a problem.
(This could be mitigated by using a Zabbix proxy, but we’re working with a single instance).


🤔  How did I get to this formula? That’s pretty simple. Consider a firewall and switch, where the switch is dependent on the firewall. Now lets assume seconds after the firewall is checked (and found responsive), the link goes down. Seconds later the switch is checked, and found unresponsive. Strike one for the switch. Now the firewall is checked again, and is now unresponsive too. Strike one for the firewall. Next the switch is checked again, and its strike two. By the time the firewall hits strike 3, the switch is already well and truly alerting.

To allow the firewall to be checked 3 times we need to check the switch 4 times. We could simply increase the interval for every subsequent ring, but that’s not as efficient (we’d be adding 60s every time we increase the interval).

Rather, we can work with the seconds. 4 x 60 seconds equals 240 seconds. Divide that by 3 intervals (for the next ring) and that results in 80 seconds. If we check the switch every 80ms, that totals to 240s. We could add 1 or 2 seconds margin, to ensure the firewall has some extra time, but every second we add, we also need to add to subsequent downstream rings. Which means the time we need to detect issues becomes longer and longer.


ℹ  A tip on managing dependencies.

In Zabbix version 5.0 The url https://zabbix/triggers.php isn’t available via the menu, but it allows you to filter triggers, for instance all ICMP unavailable triggers, and see what each is dependent on. We use host groups to set locations for devices, and combining a location host group with an ICMP unavailable trigger allows to quickly review whether dependencies are (correctly) set, and if so to what. In later versions this link will not work, since it now requires a context in the URL.

Low-Level Discovery with Dependent items

Post Syndicated from Brian van Baekel original https://blog.zabbix.com/low-level-discovery-with-dependent-items/13634/

The low-level discovery was introduced in Zabbix 2.0 and still belongs to one of the all-time favorites. Before LLD was available, adding items was all manual work. For example adding new disks, new interfaces, network ports on switches and everything else was all manual labor. And then LLD came around and suddenly we were able to ‘discover’ entities, and based on those discovered entities we can add new items, triggers, and such automatically.

Contents

  • Low-Level Discovery setup
  • Dependent items
  • Combing Low-Level Discovery and Dependent items
  • Conclusion

For a video guide, check out the Zabbix YouTube here: Zabbix: Low Level Discovery with Dependent items – YouTube

Low-Level Discovery setup

Let’s go over the idea of Low-Level Discovery first.

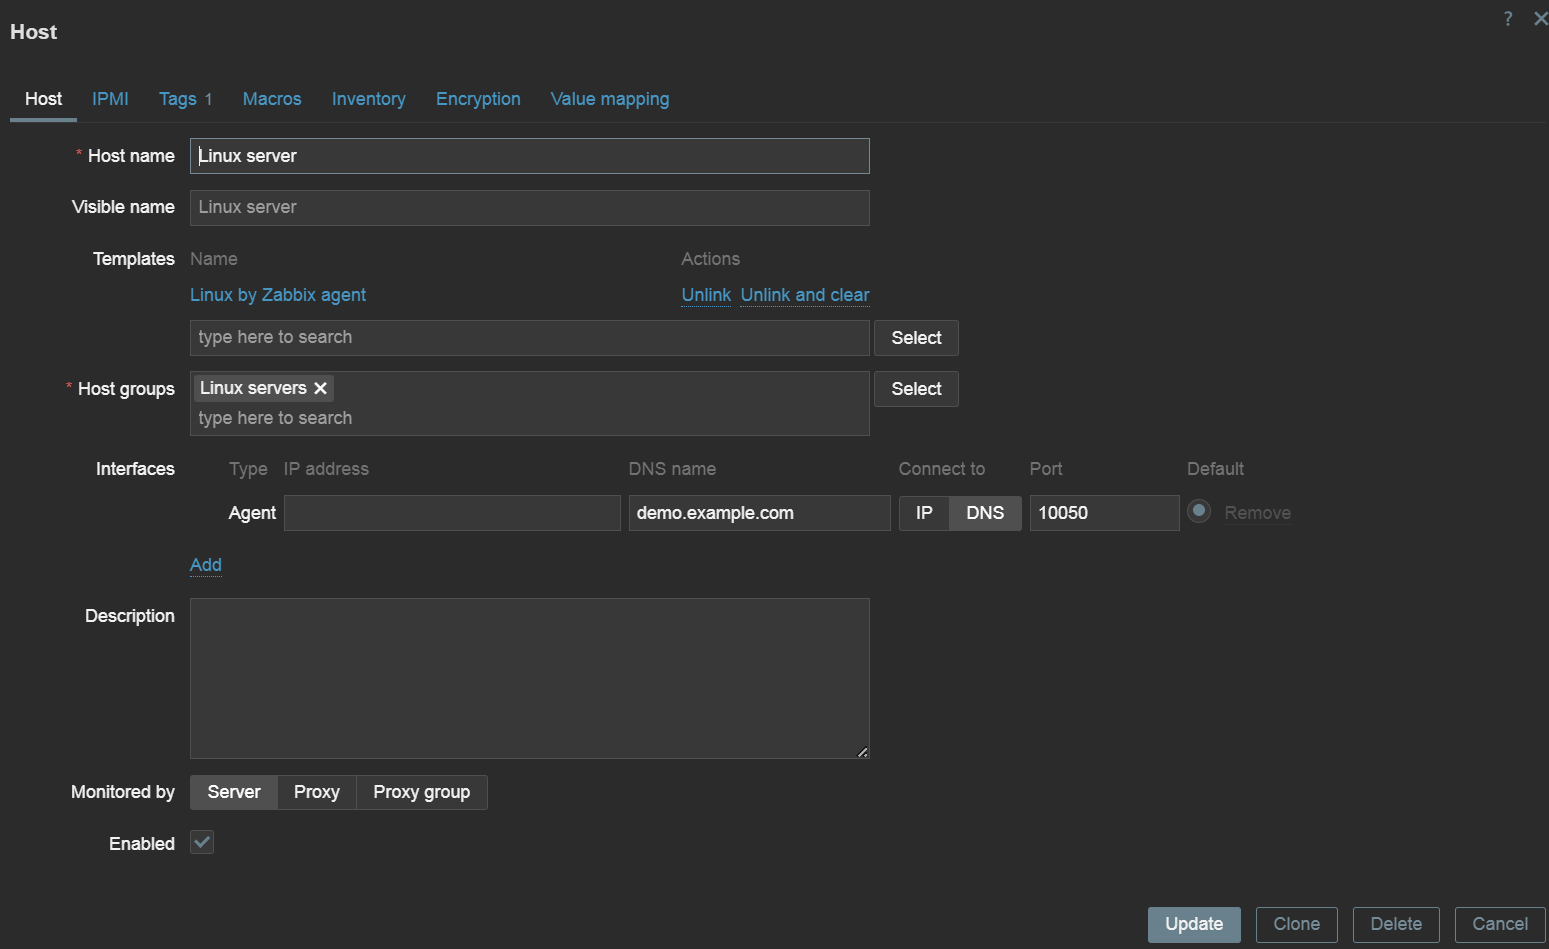
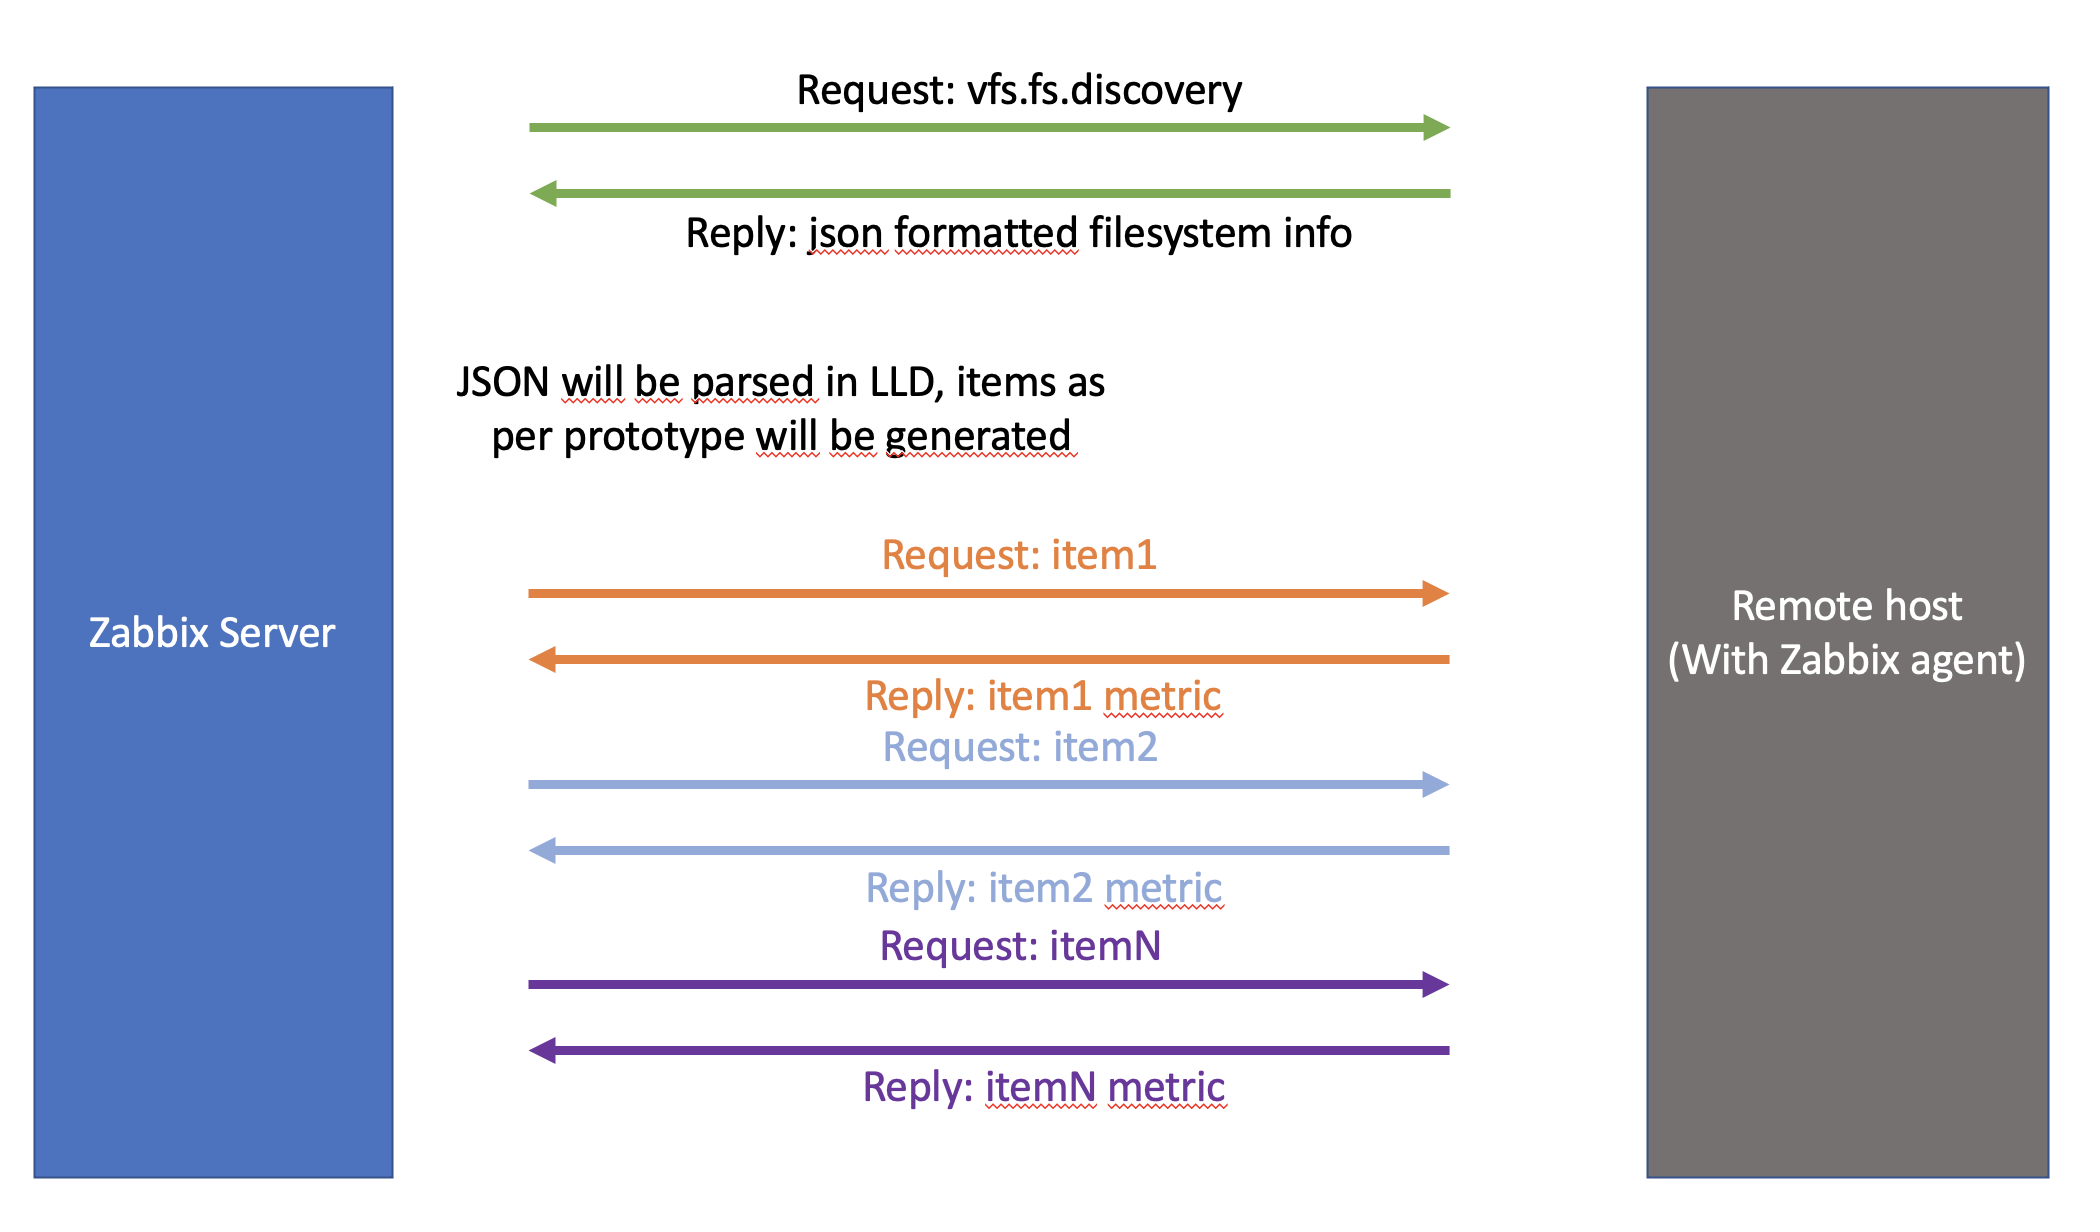
For the sake of clarity, we will stick with the default Zabbix agent item. Of course, as we will discover it’s only the format that matters for Zabbix to consider a response as LLD information. Let’s use built-in agent key: vfs.fs.discovery. Once we force the Zabbix agent to execute this item, it will reply with something like this:

[{"{#FSNAME}":"/sys","{#FSTYPE}":"sysfs"},{"{#FSNAME}":"/proc","{#FSTYPE}":"proc"},{"{#FSNAME}":"/dev","{#FSTYPE}":"devtmpfs"},{"{#FSNAME}":"/sys/kernel/security","{#FSTYPE}":"securityfs"},{"{#FSNAME}":"/dev/shm","{#FSTYPE}":"tmpfs"},{"{#FSNAME}":"/dev/pts","{#FSTYPE}":"devpts"},{"{#FSNAME}":"/run","{#FSTYPE}":"tmpfs"},{"{#FSNAME}":"/sys/fs/cgroup","{#FSTYPE}":"tmpfs"},{"{#FSNAME}":"/sys/fs/cgroup/systemd","{#FSTYPE}":"cgroup"},{"{#FSNAME}":"/sys/fs/pstore","{#FSTYPE}":"pstore"},{"{#FSNAME}":"/sys/firmware/efi/efivars","{#FSTYPE}":"efivarfs"},{"{#FSNAME}":"/sys/fs/bpf","{#FSTYPE}":"bpf"},{"{#FSNAME}":"/sys/fs/cgroup/net_cls,net_prio","{#FSTYPE}":"cgroup"},{"{#FSNAME}":"/sys/fs/cgroup/devices","{#FSTYPE}":"cgroup"},{"{#FSNAME}":"/sys/fs/cgroup/hugetlb","{#FSTYPE}":"cgroup"},{"{#FSNAME}":"/sys/fs/cgroup/memory","{#FSTYPE}":"cgroup"},{"{#FSNAME}":"/sys/fs/cgroup/rdma","{#FSTYPE}":"cgroup"},{"{#FSNAME}":"/sys/fs/cgroup/freezer","{#FSTYPE}":"cgroup"},{"{#FSNAME}":"/sys/fs/cgroup/cpu,cpuacct","{#FSTYPE}":"cgroup"},{"{#FSNAME}":"/sys/fs/cgroup/cpuset","{#FSTYPE}":"cgroup"},{"{#FSNAME}":"/sys/fs/cgroup/perf_event","{#FSTYPE}":"cgroup"},{"{#FSNAME}":"/sys/fs/cgroup/blkio","{#FSTYPE}":"cgroup"},{"{#FSNAME}":"/sys/fs/cgroup/pids","{#FSTYPE}":"cgroup"},{"{#FSNAME}":"/sys/kernel/tracing","{#FSTYPE}":"tracefs"},{"{#FSNAME}":"/sys/kernel/config","{#FSTYPE}":"configfs"},{"{#FSNAME}":"/","{#FSTYPE}":"xfs"},{"{#FSNAME}":"/sys/fs/selinux","{#FSTYPE}":"selinuxfs"},{"{#FSNAME}":"/proc/sys/fs/binfmt_misc","{#FSTYPE}":"autofs"},{"{#FSNAME}":"/dev/hugepages","{#FSTYPE}":"hugetlbfs"},{"{#FSNAME}":"/dev/mqueue","{#FSTYPE}":"mqueue"},{"{#FSNAME}":"/sys/kernel/debug","{#FSTYPE}":"debugfs"},{"{#FSNAME}":"/sys/fs/fuse/connections","{#FSTYPE}":"fusectl"},{"{#FSNAME}":"/boot","{#FSTYPE}":"ext4"},{"{#FSNAME}":"/boot/efi","{#FSTYPE}":"vfat"},{"{#FSNAME}":"/home","{#FSTYPE}":"xfs"},{"{#FSNAME}":"/run/user/0","{#FSTYPE}":"tmpfs"}]

When we put this in a more readable format (truncated) it will look like this:

[
{
"{#FSNAME}":"/sys",
"{#FSTYPE}":"sysfs"
},
{
"{#FSNAME}":"/proc",
"{#FSTYPE}":"proc"
},
{
"{#FSNAME}":"/dev",
"{#FSTYPE}":"devtmpfs"
},
{
"{#FSNAME}":"/sys/kernel/config",
"{#FSTYPE}":"configfs"
},
{
"{#FSNAME}":"/",
"{#FSTYPE}":"xfs"
},
{
"{#FSNAME}":"/boot",
"{#FSTYPE}":"ext4"
},
{
"{#FSNAME}":"/home",
"{#FSTYPE}":"xfs"
}
]

In this format it suddenly becomes clear, we have the {#FSNAME} macro, with the name of a filesystem, combined with the type, captured in {#FSTYPE}.

Perfect! We feed this information into Zabbix, and LLD magic will happen.
Based on the Item prototypes, new items per {#FSNAME} will be added, and monitoring will start on those items.

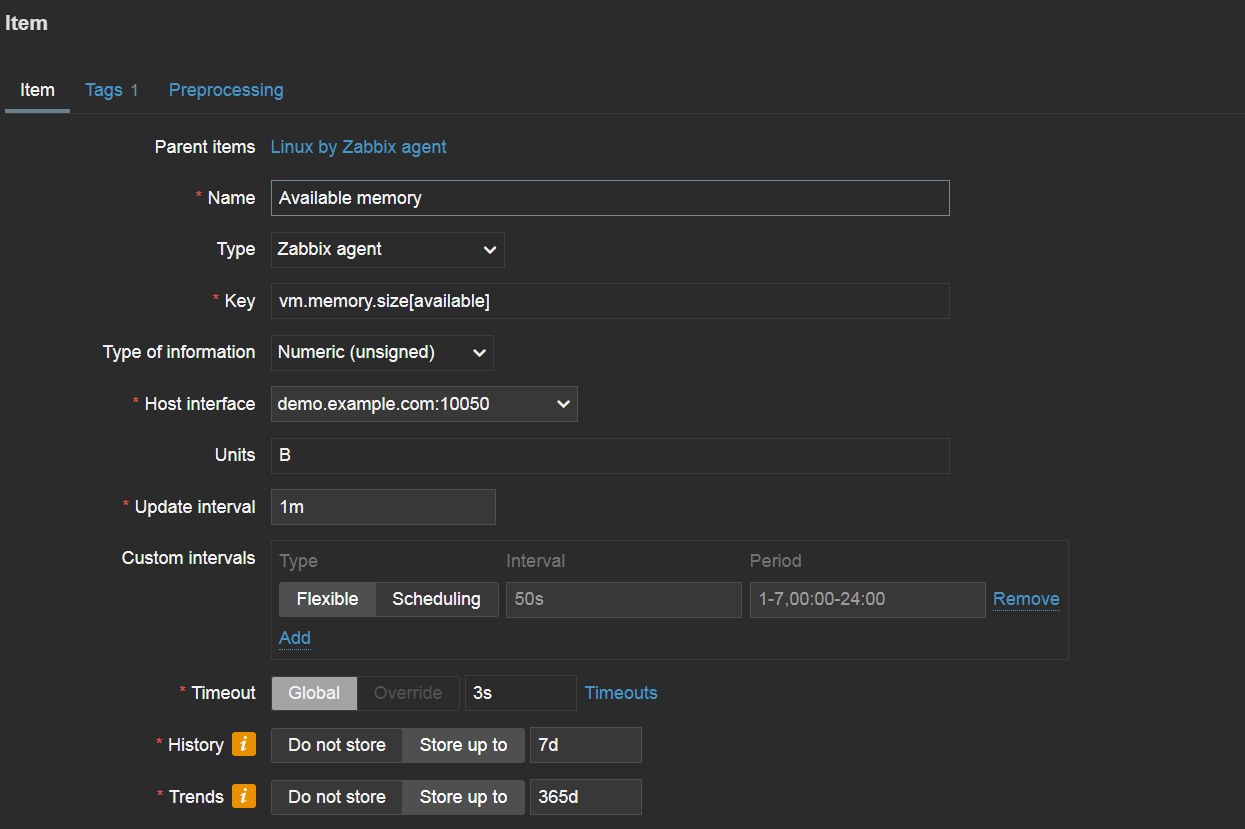
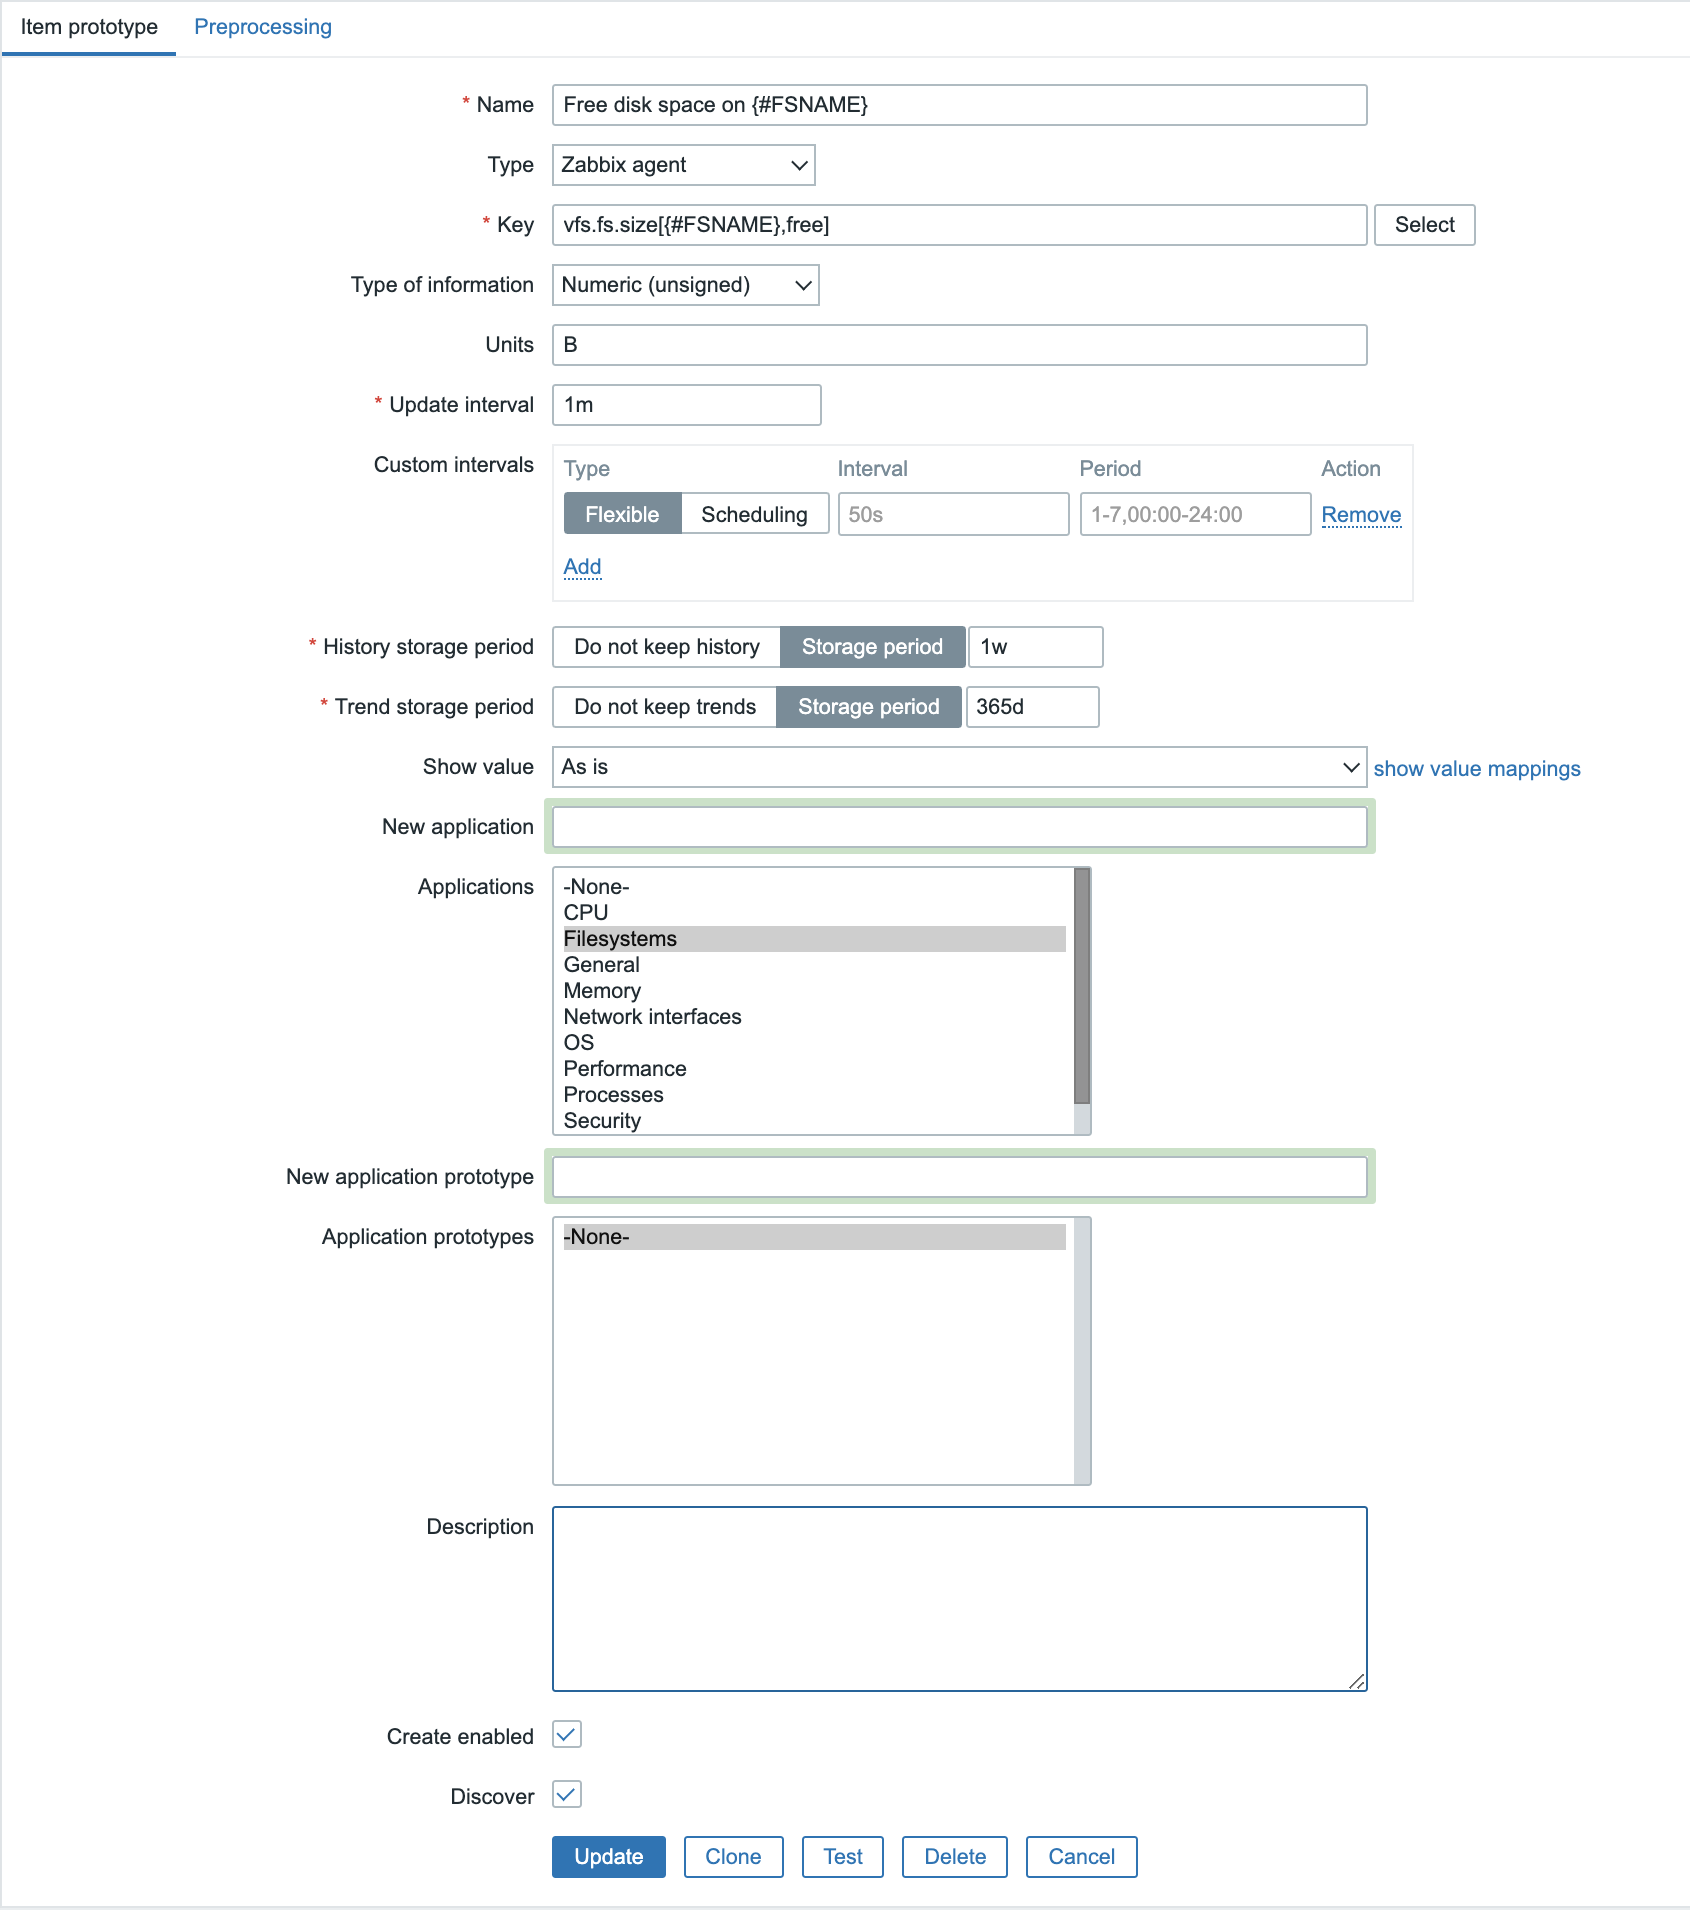
Looking at the Item prototypes, they look a lot like normal items:

So, we have one item prototype that is responsible for providing the LLD information, and then the created ‘normal’ items to query the filesystem statistics. As you can imagine, with just 5 filesystems and 1 metric per filesystem, queried once per minute, no problem. But what if we have 50 filesystems, 7 metrics per filesystem and they get queried every 10 seconds… That’s a lot of queries against the host! Not only does that add load to the Zabbix server, but obviously also to the monitored host. It works, but is it ideal? It certainly isn’t!

So we’ve basically just setup this:

Dependent items

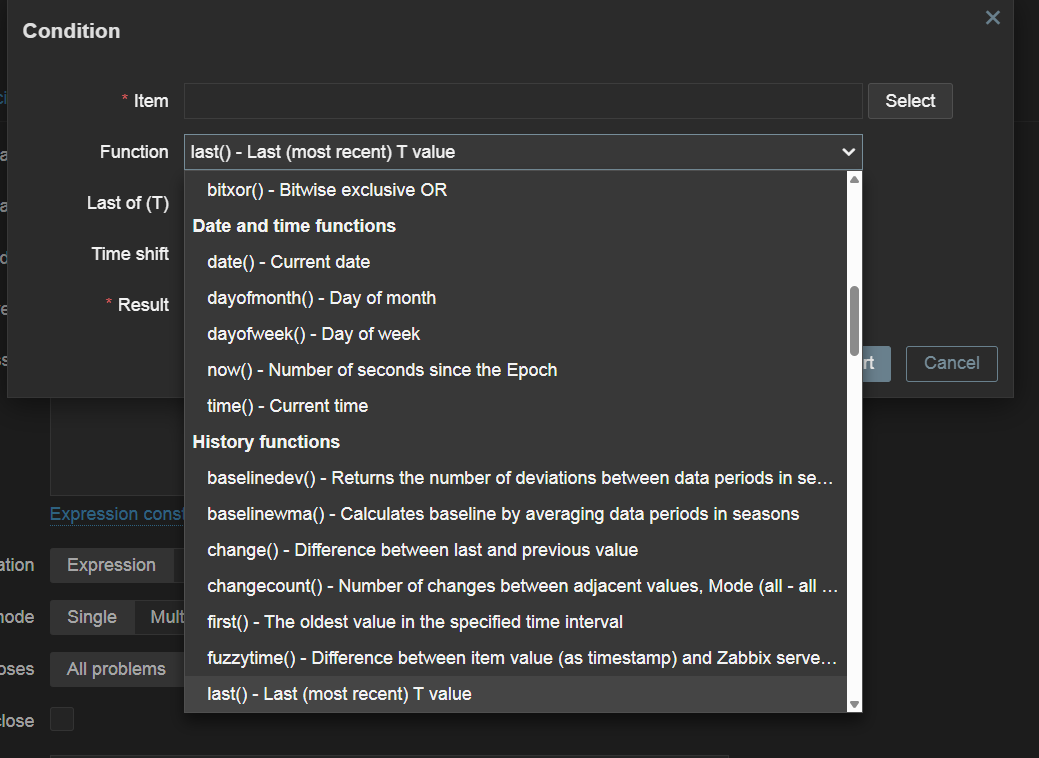
But then Zabbix introduced dependent items. Let’s take a quick look at dependent items and what they are

We have one master item that gathers all information (in bulk) and propagates that information to all the dependent items. On those dependent items we just do the cherry picking and filtering of the relevant metrics. Let’s put this to work and see how that goes.

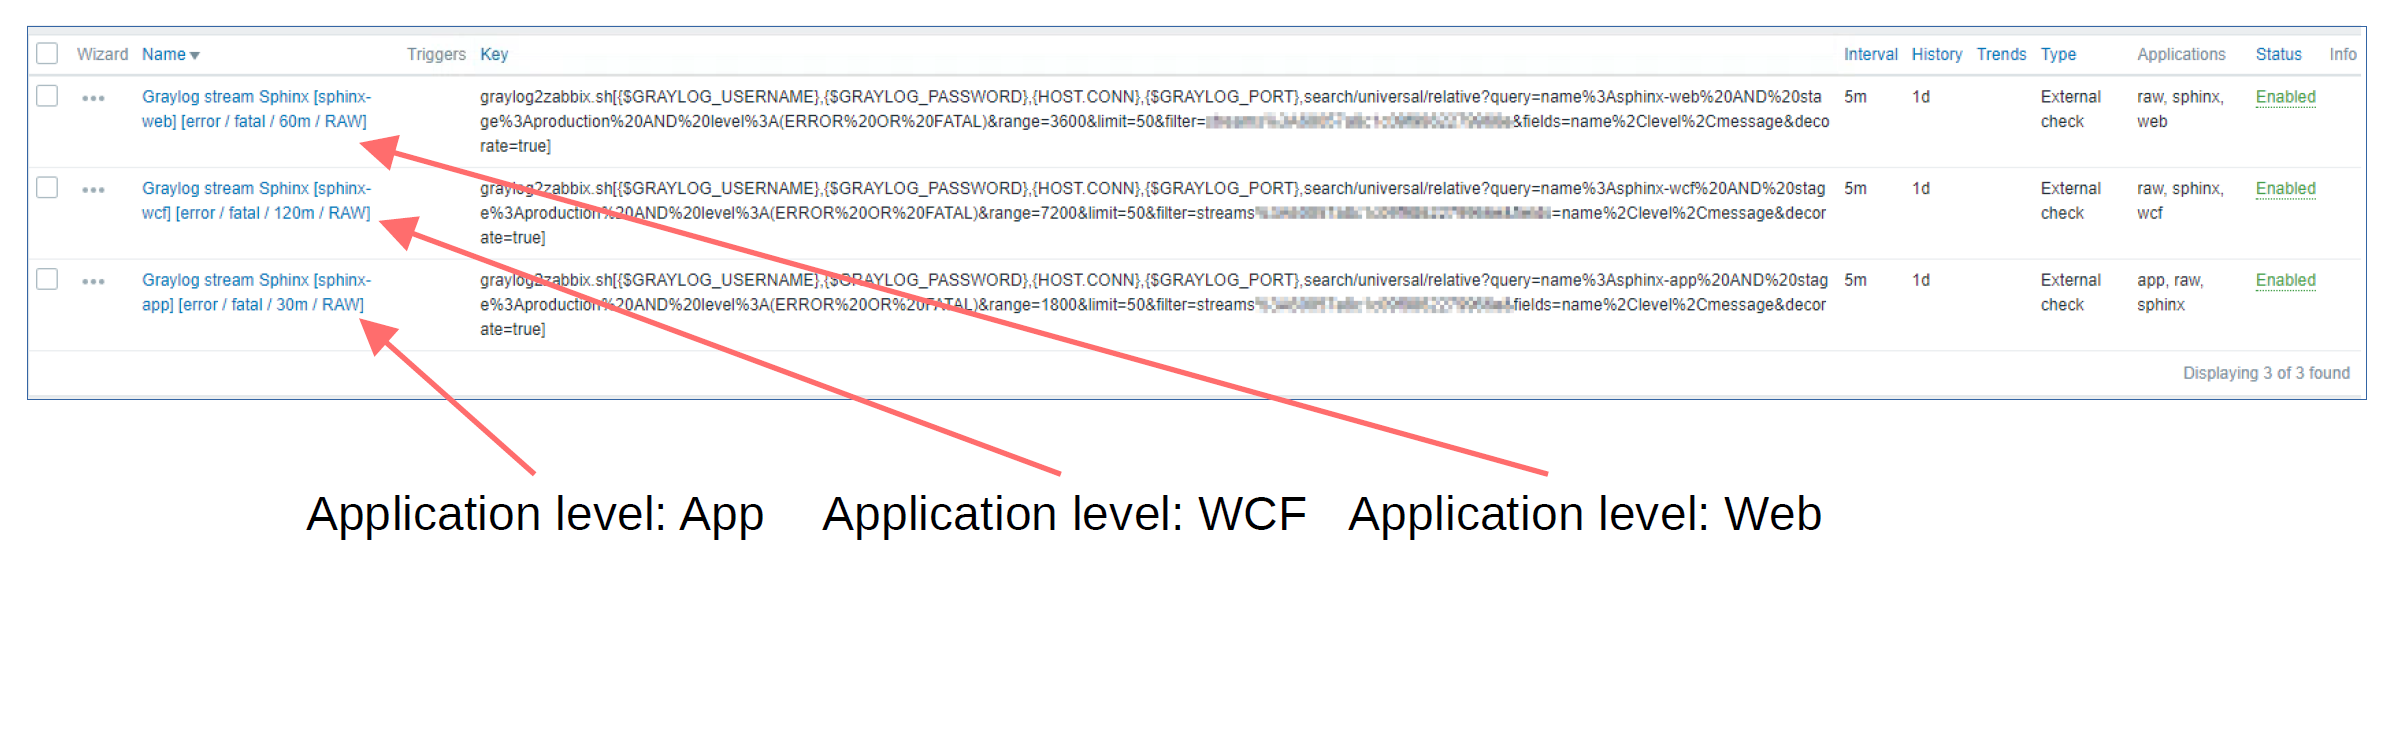
So we create an item, with, in this case, the http agent type, which will collect the following information regarding the server status in a single request:

ServerVersion: Apache/2.4.37 (centos)
ServerMPM: event
Server Built: Nov  4 2020 03:20:37
CurrentTime: Monday, 08-Mar-2021 14:35:20 CET
RestartTime: Monday, 08-Mar-2021 11:04:09 CET
ParentServerConfigGeneration: 1
ParentServerMPMGeneration: 0
ServerUptimeSeconds: 12671
ServerUptime: 3 hours 31 minutes 11 seconds
Load1: 0.01
Load5: 0.03
Load15: 0.00
Total Accesses: 1182
Total kBytes: 10829
Total Duration: 95552
CPUUser: 5.01
CPUSystem: 7.34
CPUChildrenUser: 0
CPUChildrenSystem: 0
CPULoad: .0974667
Uptime: 12671
ReqPerSec: .0932839
BytesPerSec: 875.14
BytesPerReq: 9381.47
DurationPerReq: 80.8393
BusyWorkers: 1
IdleWorkers: 99
Processes: 4
Stopping: 0
BusyWorkers: 1
IdleWorkers: 99
ConnsTotal: 4
ConnsAsyncWriting: 0
ConnsAsyncKeepAlive: 0
ConnsAsyncClosing: 0
Scoreboard: _________________________________________________________________________________________W__________............................................................................................................................................................................................................................................................................................................


Now, we create some dependent items, that depend on that first item (which we will call the Master item). Every time the Master item receives information, the complete reply will be pushed to the dependent items, without any altering of that data. So the master and dependent items are identical when no preprocessing is applied. That’s why on the dependent items we apply preprocessing to filter relevant information, for example, the BusyWorkers:

Perfect. So querying a host once, getting all the metrics in bulk, and then parsing it in Zabbix using preprocessing. Say bye to excessive load on the monitored host… (and due to preprocessing processes within Zabbix, no problem on the Zabbix server side).

Combining Low-Level Discovery and Dependent items

Ok, and what if we combine these to concepts? LLD with Dependent items? Wouldn’t that be the ultimate goal? Automatically creating new items without putting extra load to the monitored host? Let’s get this going!

To stick with the first example of LLD, we will discover filesystems, but now without the vfs.fs.discovery key, but the newly introduced vfs.fs.get key. Once we force the agent to execute this key, we will see this reply:

[{"fsname":"/dev","fstype":"devtmpfs","bytes":{"total":1940963328,"free":1940963328,"used":0,"pfree":100.000000,"pused":0.000000},"inodes":{"total":473868,"free":473487,"used":381,"pfree":99.919598,"pused":0.080402}},{"fsname":"/dev/shm","fstype":"tmpfs","bytes":{"total":1958469632,"free":1958469632,"used":0,"pfree":100.000000,"pused":0.000000},"inodes":{"total":478142,"free":478141,"used":1,"pfree":99.999791,"pused":0.000209}},{"fsname":"/run","fstype":"tmpfs","bytes":{"total":1958469632,"free":1892040704,"used":66428928,"pfree":96.608121,"pused":3.391879},"inodes":{"total":478142,"free":477519,"used":623,"pfree":99.869704,"pused":0.130296}},{"fsname":"/sys/fs/cgroup","fstype":"tmpfs","bytes":{"total":1958469632,"free":1958469632,"used":0,"pfree":100.000000,"pused":0.000000},"inodes":{"total":478142,"free":478125,"used":17,"pfree":99.996445,"pused":0.003555}},{"fsname":"/","fstype":"xfs","bytes":{"total":95516360704,"free":55329644544,"used":40186716160,"pfree":57.926877,"pused":42.073123},"inodes":{"total":46661632,"free":46535047,"used":126585,"pfree":99.728717,"pused":0.271283}},{"fsname":"/boot","fstype":"ext4","bytes":{"total":1023303680,"free":705544192,"used":247296000,"pfree":74.046435,"pused":25.953565},"inodes":{"total":65536,"free":65497,"used":39,"pfree":99.940491,"pused":0.059509}},{"fsname":"/home","fstype":"xfs","bytes":{"total":5358223360,"free":5286903808,"used":71319552,"pfree":98.668970,"pused":1.331030},"inodes":{"total":2621440,"free":2621428,"used":12,"pfree":99.999542,"pused":0.000458}},{"fsname":"/run/user/0","fstype":"tmpfs","bytes":{"total":391692288,"free":391692288,"used":0,"pfree":100.000000,"pused":0.000000},"inodes":{"total":478142,"free":478137,"used":5,"pfree":99.998954,"pused":0.001046}}]

And if we format it to be more readable, it will look like this (truncated):

[
  {
    "fsname":"/",
    "fstype":"xfs",
    "bytes":{
      "total":95516360704,
      "free":55329644544,
      "used":40186716160,
      "pfree":57.926877,
      "pused":42.073123
    },
    "inodes":{
      "total":46661632,
      "free":46535047,
      "used":126585,
      "pfree":99.728717,
      "pused":0.271283
    }
  },
  {
    "fsname":"/home",
    "fstype":"xfs",
    "bytes":{
      "total":5358223360,
      "free":5286903808,
      "used":71319552,
      "pfree":98.668970,
      "pused":1.331030
    },
    "inodes":{
      "total":2621440,
      "free":2621428,
      "used":12,
      "pfree":99.999542,
      "pused":0.000458
    }
  }
]

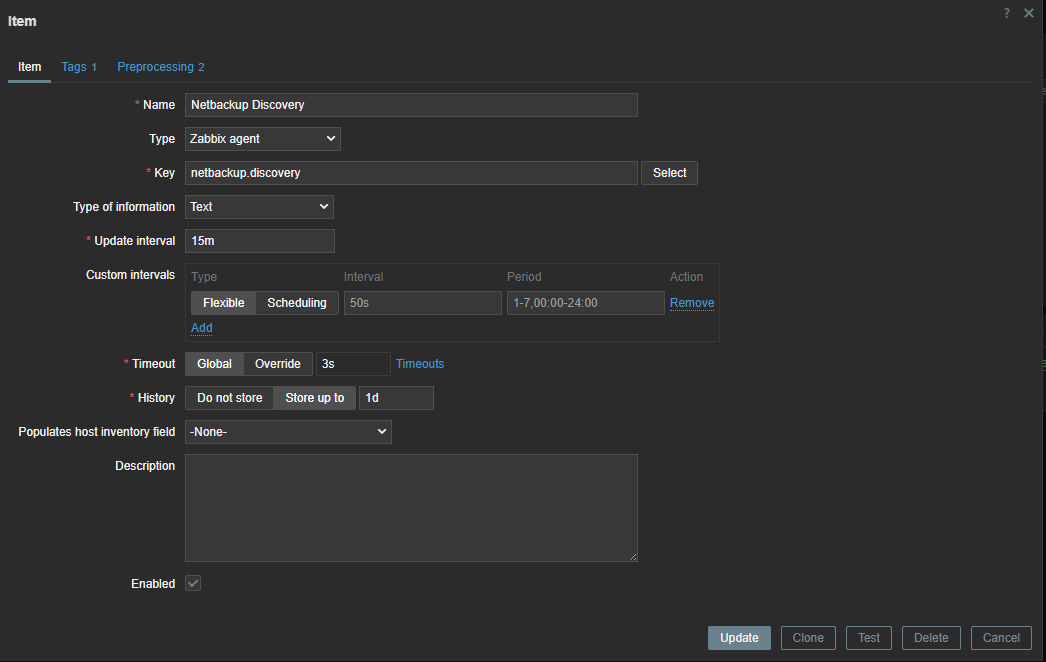
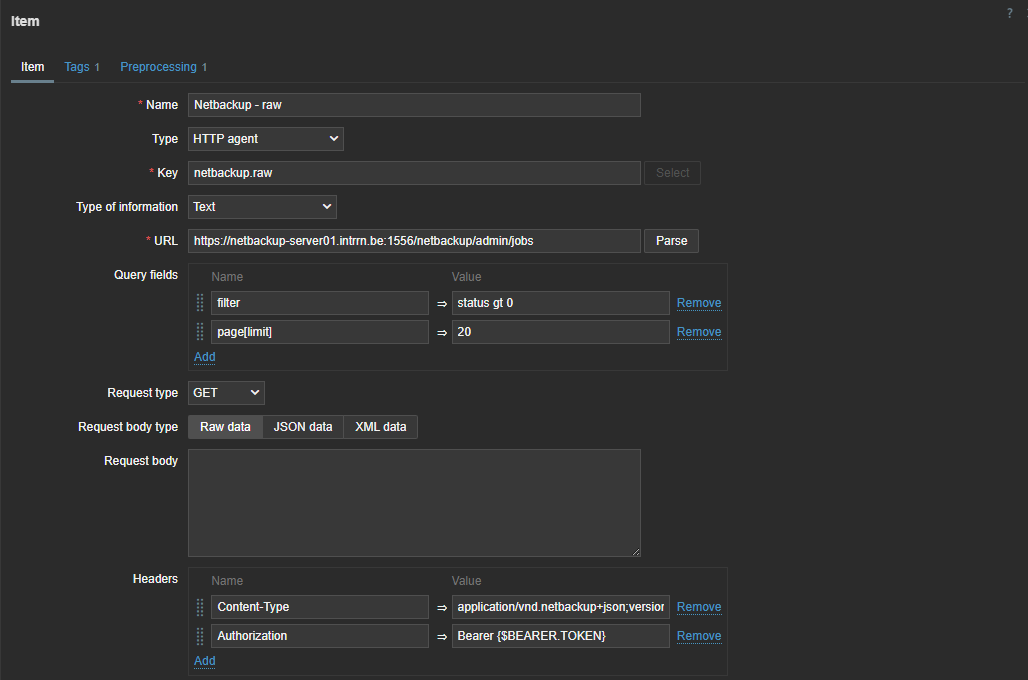
Per filesystem, we get the original information FSNAME and FSTYPE, but also the statistics of these filesystems… bulk metrics! So, we create a normal item (Which will serve as the master item) getting out all those metrics in a single query:

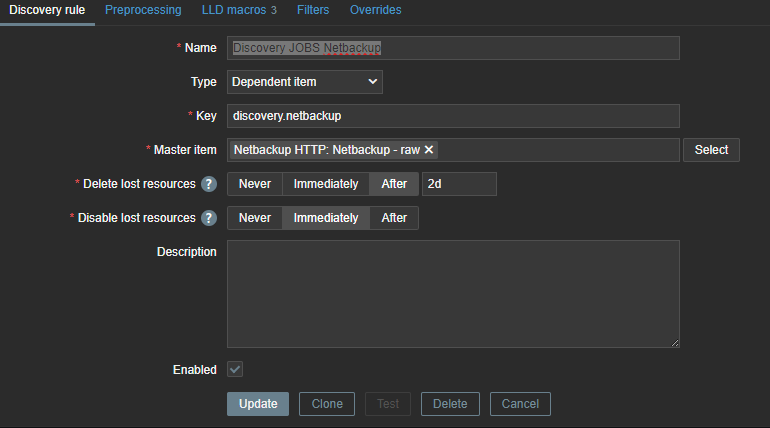
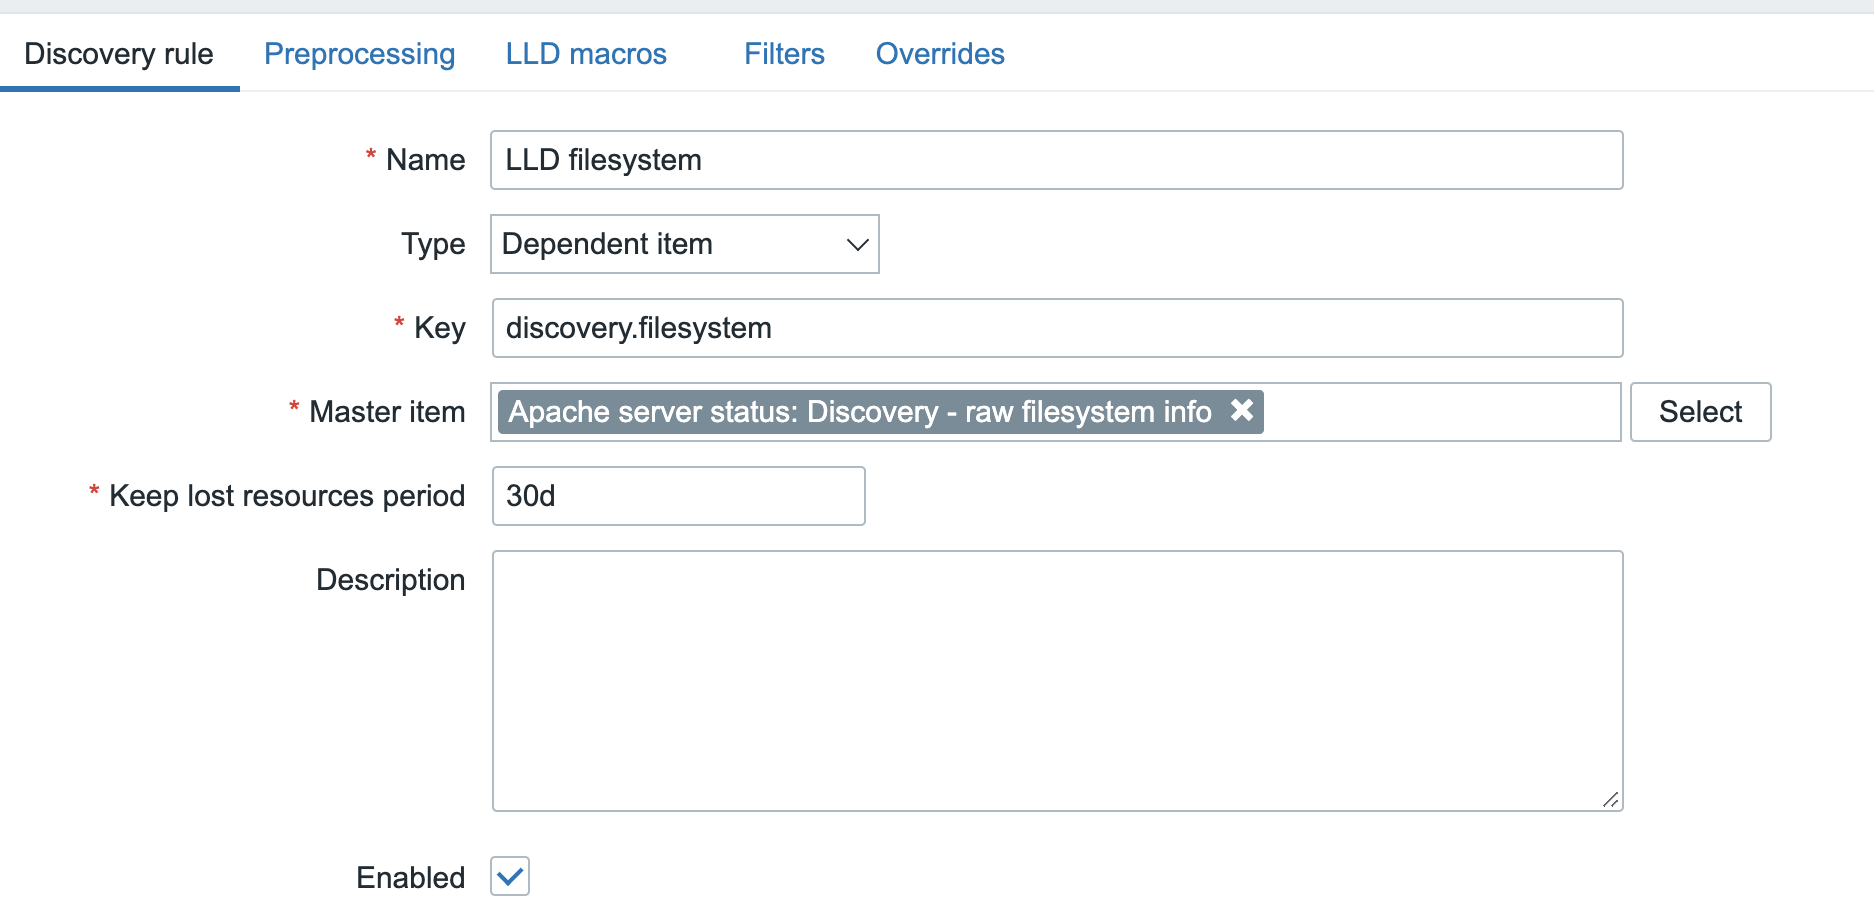
Once we’ve got this data in Zabbix, we feed it into the LLD rule, giving this LLD rule the dependent LLD type:

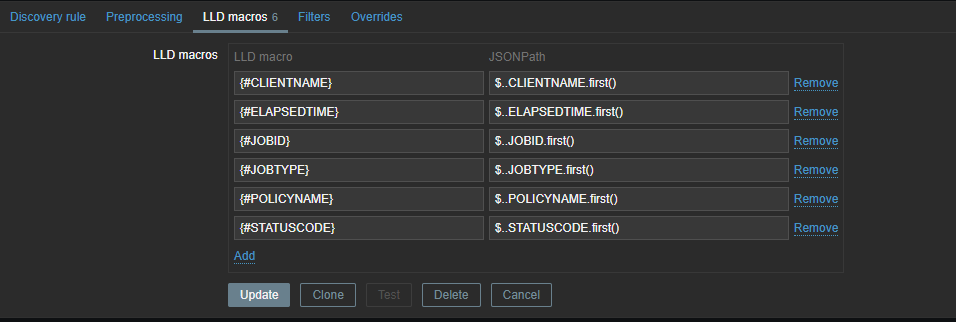
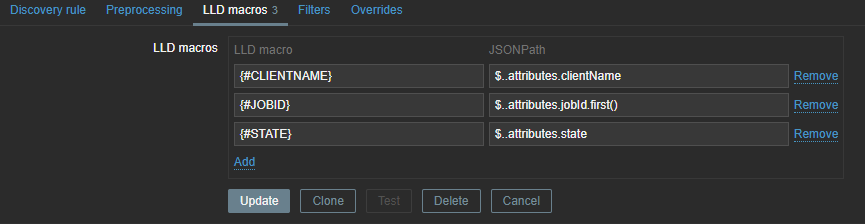
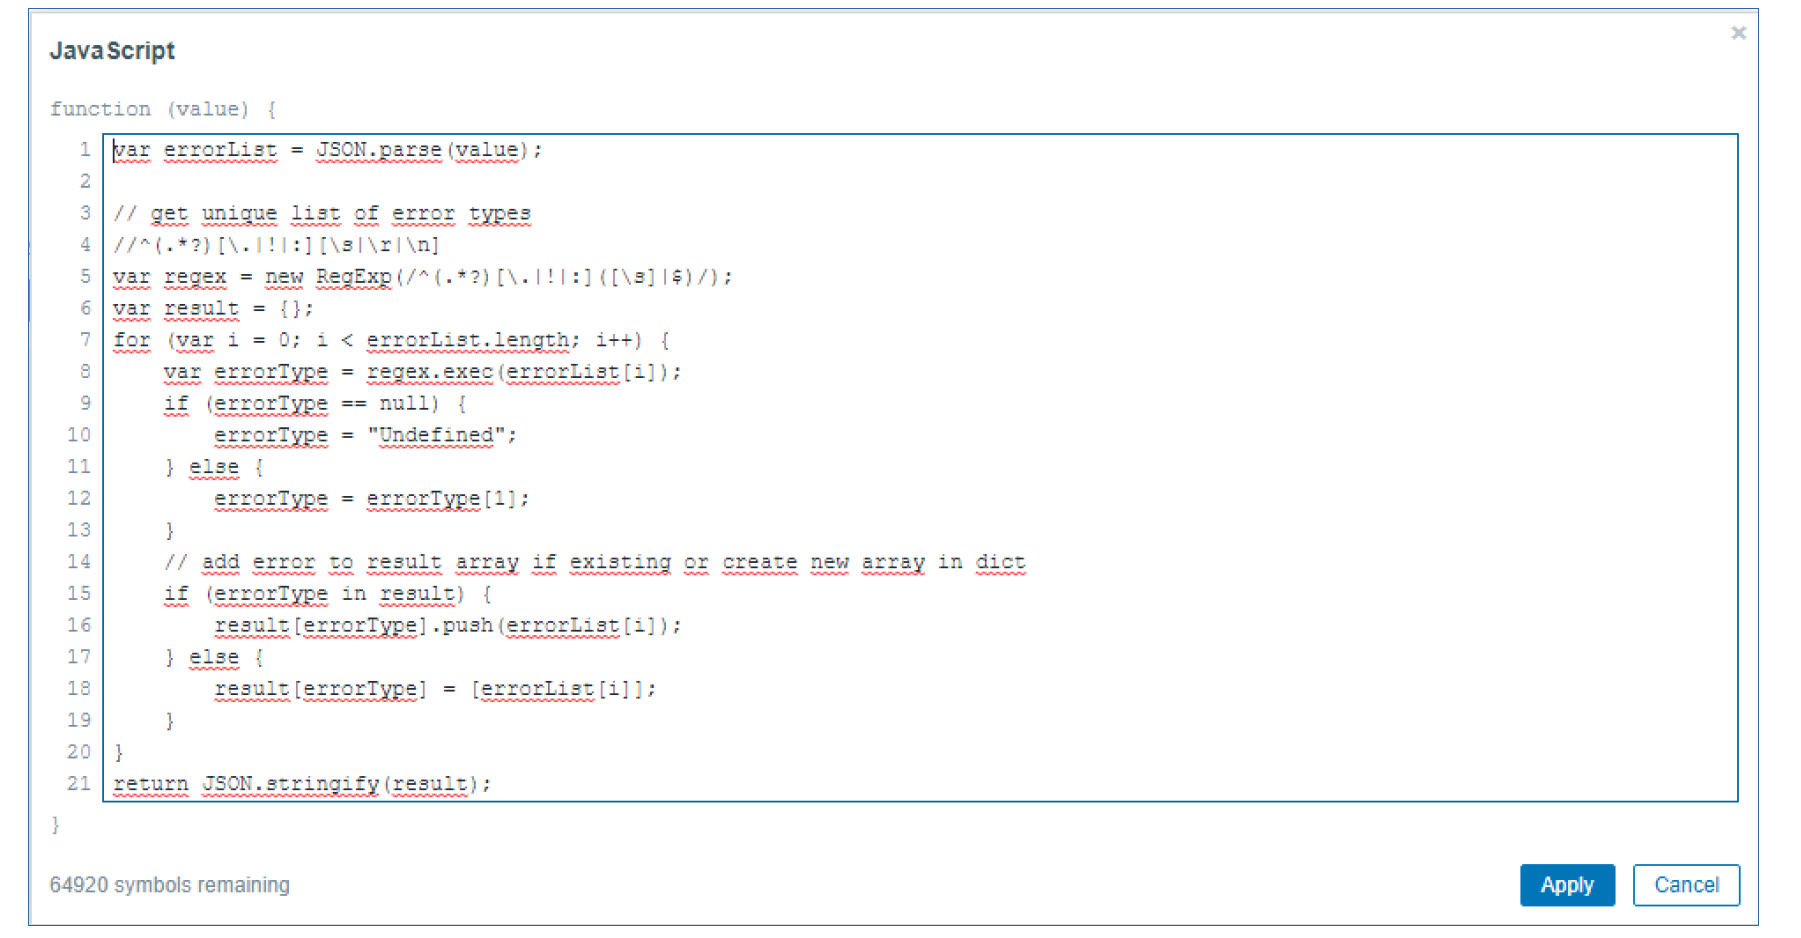
Of course there are no ready to use LLD macros in this data, but since it is in JSON format, it shouldn’t be too hard to create the LLD macros with the ‘LLD macros’ option in the frontend and the relevant JSONPath expression:

Note: Technically we do not need to create the {#FSTYPE} macro to get this working!

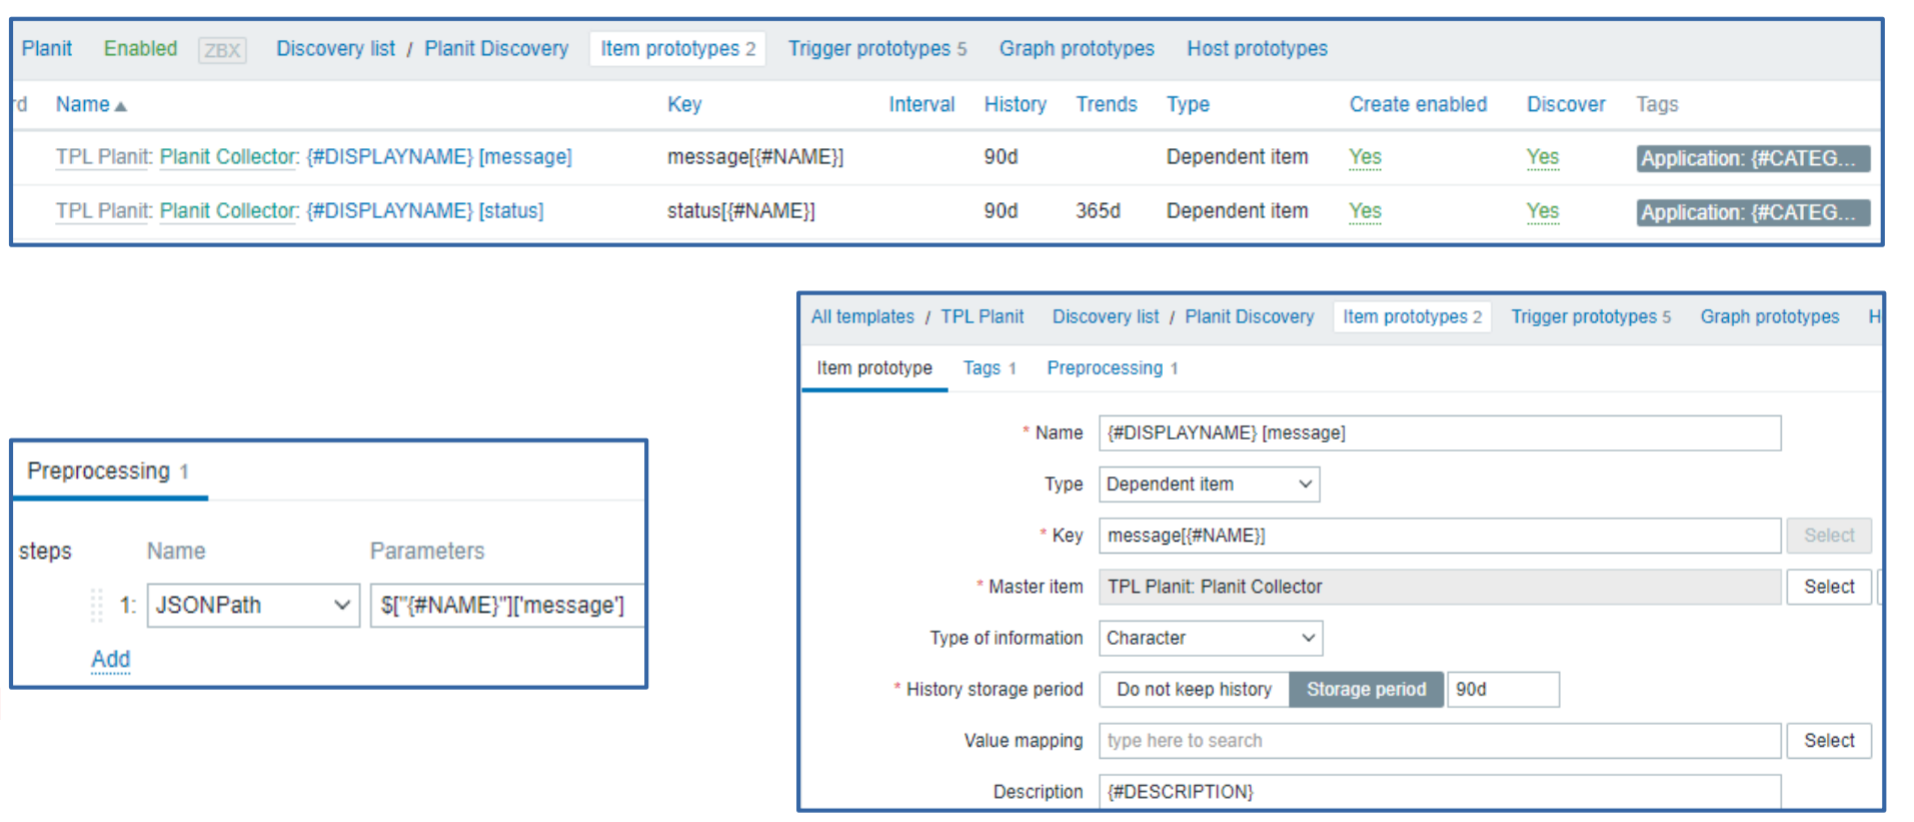
Once this is done, we should be ready to create the item prototypes for this LLD rule. The data is there, macros are available, nothing is going to stop us now!

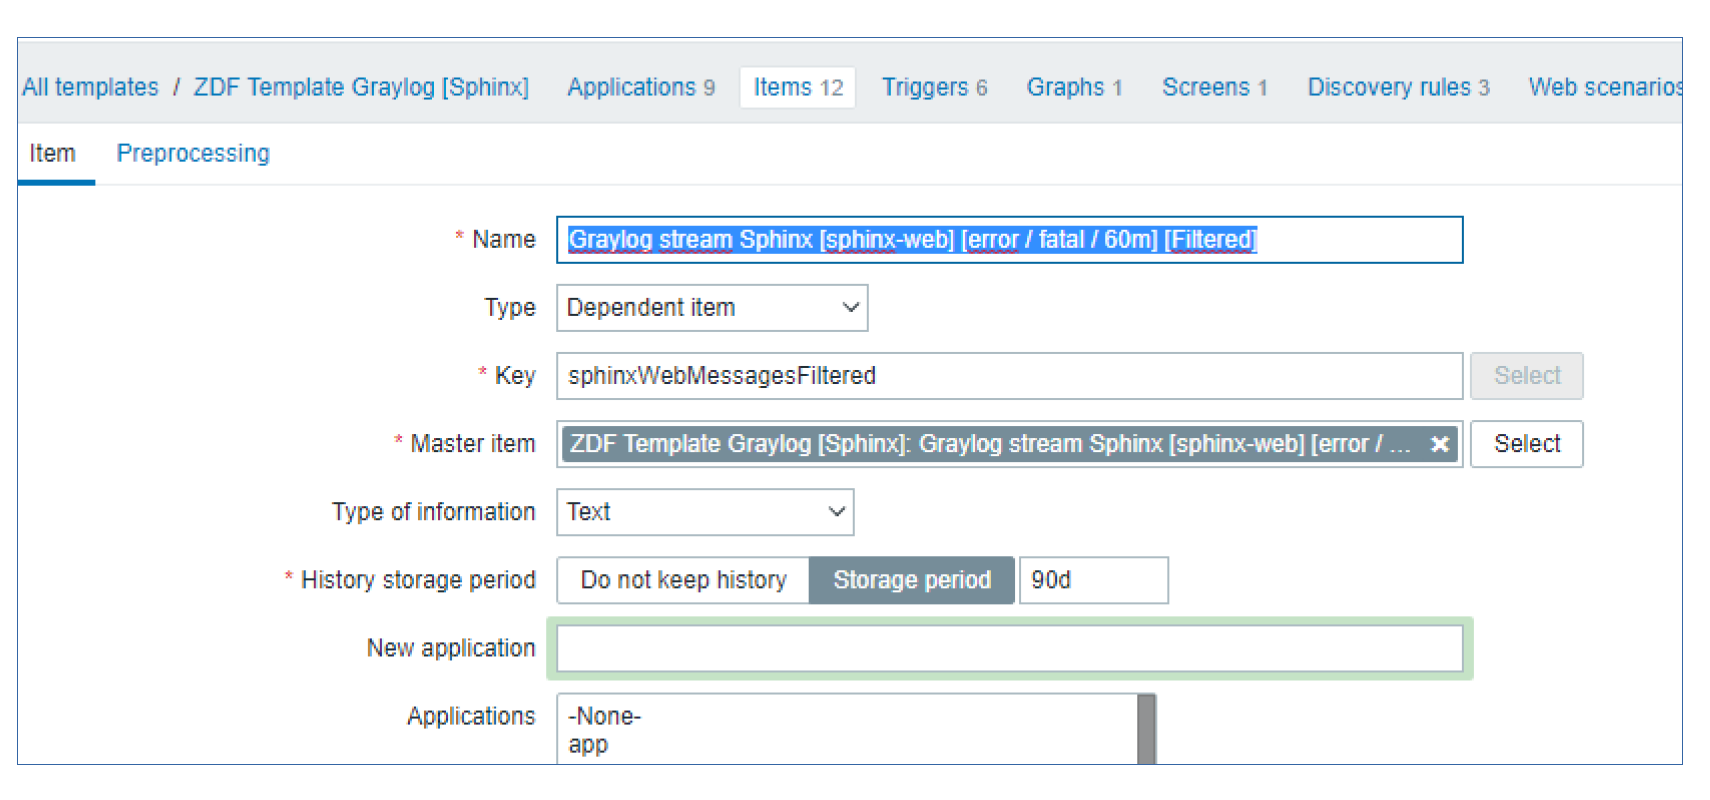
Let’s move on to item prototypes. But of course, we do not want to poll that remote host again per discovered filesystem. That means we will make this item prototype of the dependent item type as well, pointing it back to the master item we’ve created.

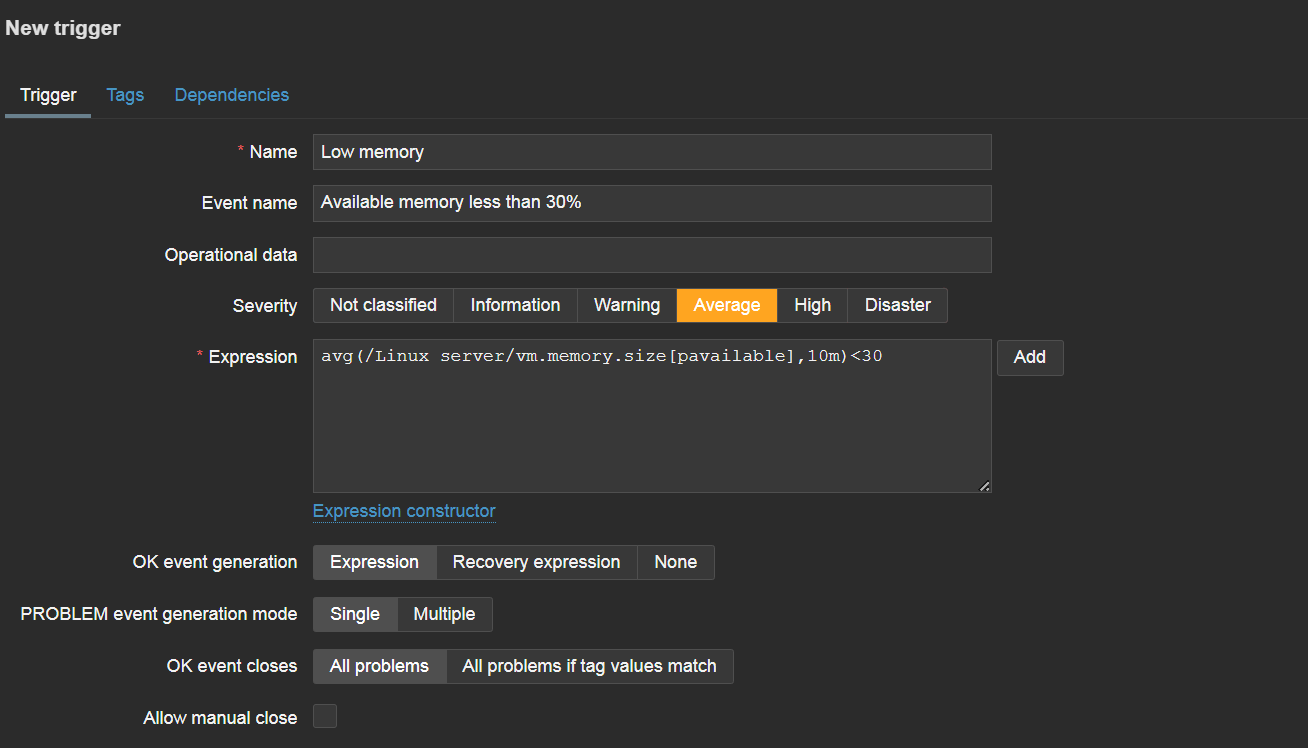
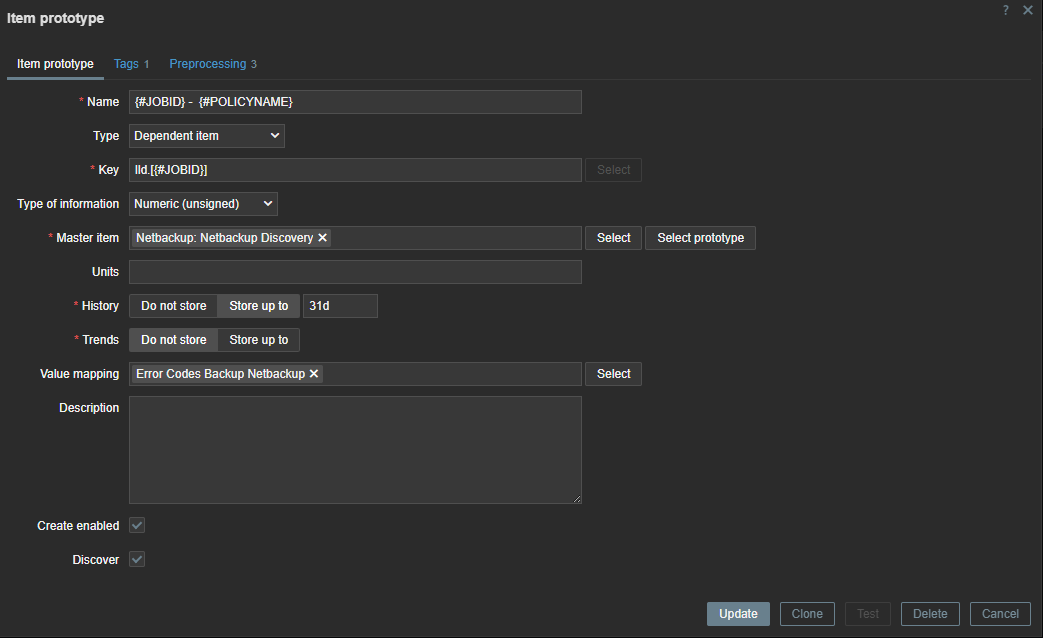
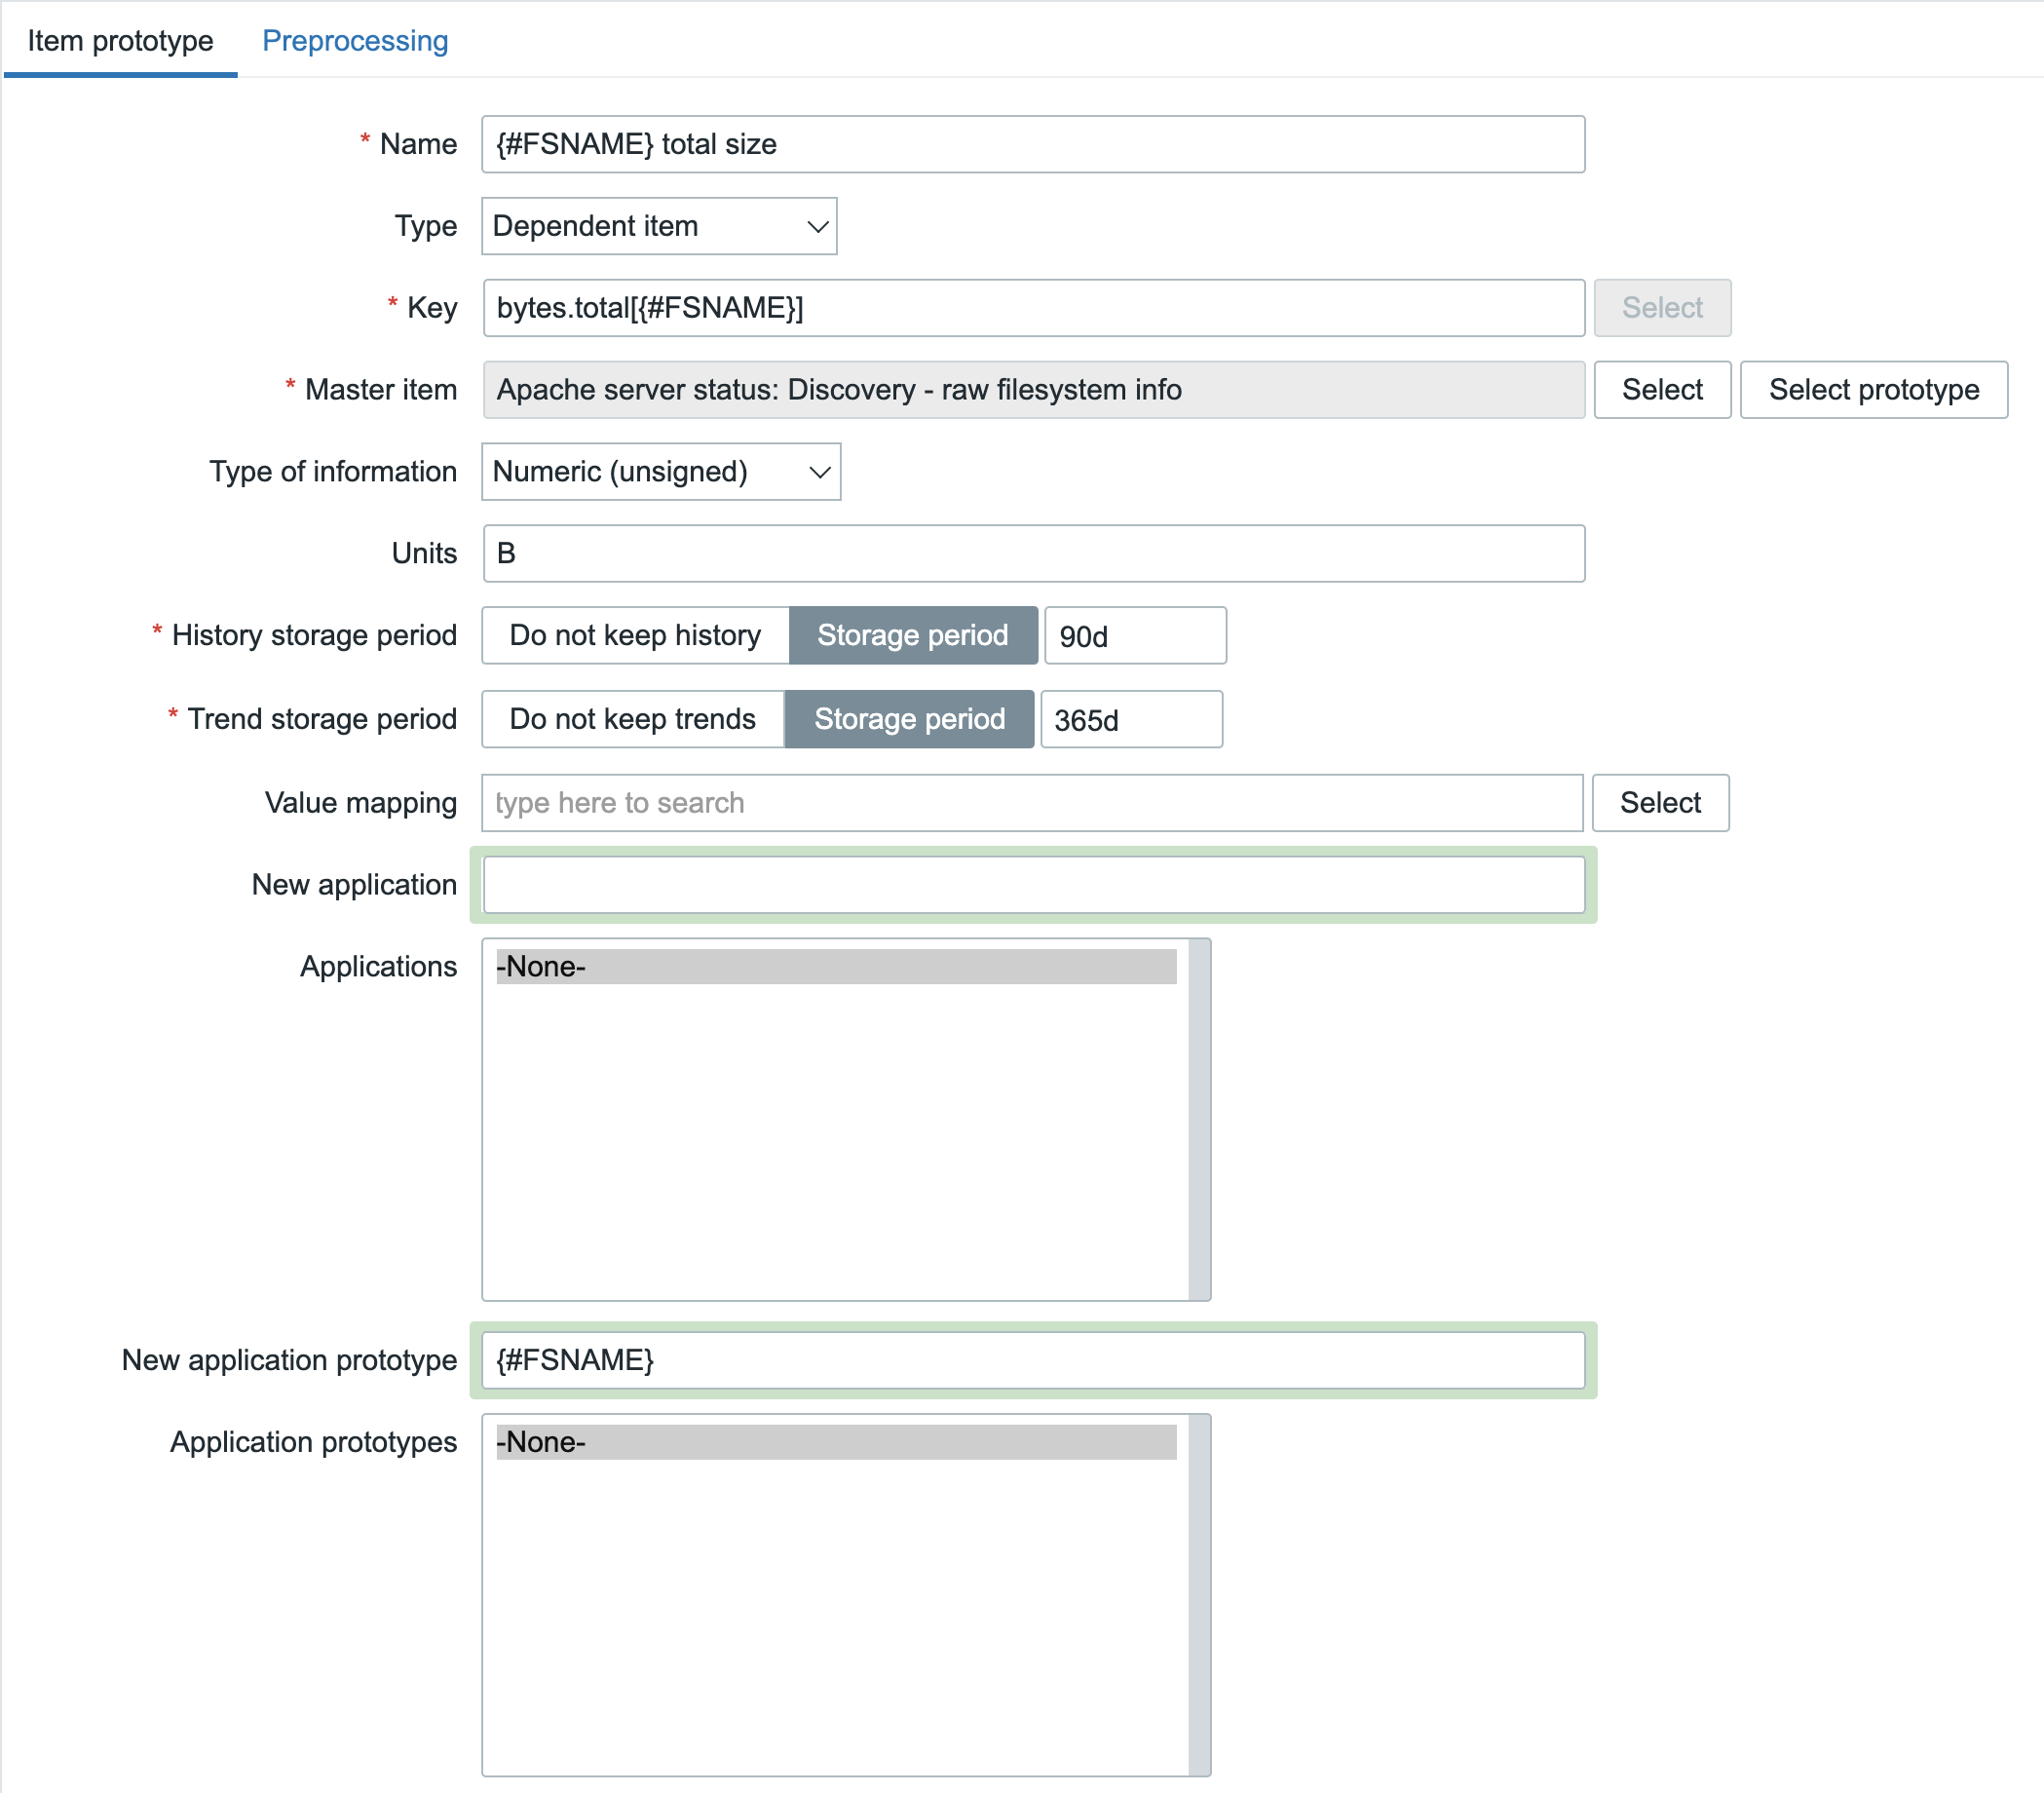
For the first item prototype, we want to obtain the total size per filesystem:

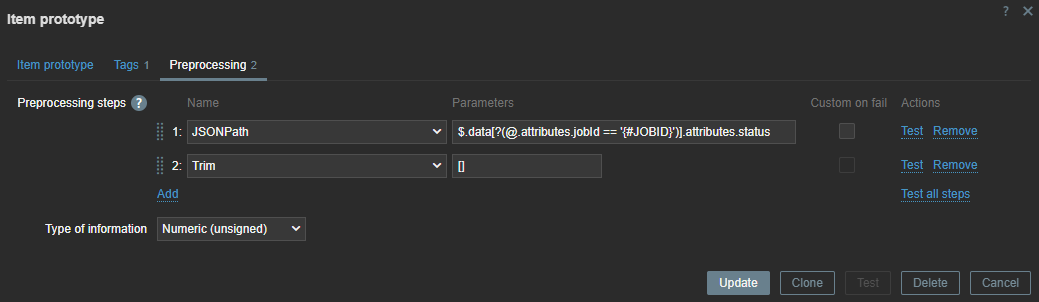
But, as I mentioned earlier: a dependent item without any preprocessing is identical to the master item and of course that would be wrong in this case. We just want to see the total bytes per filesystem and not all the collected statistics. In the configuration above we already know what to get out, so the Type of information and Units are filled already. What is not visible on that screenshot is the preprocessing rule that we need. Here the ‘JSONPath’ preprocessing step comes in handy since we receive JSON data. We would like to get out this part for our item (truncated):

[
  {
    "fsname":"/",
    "fstype":"xfs",
    "bytes":{
      "total":95516360704,
      "free":55329644544,
       "used":40186716160,
      "pfree":57.926877,
      "pused":42.073123

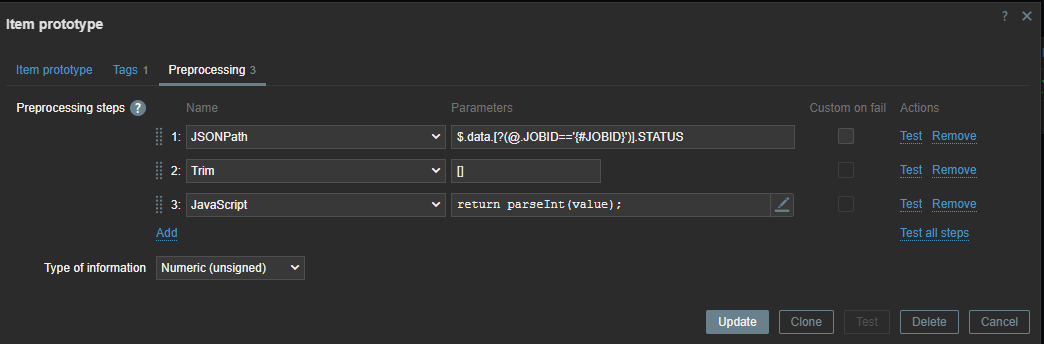
So, if we try to get this information out using JSONPath, it should look like: $.bytes.total.first() but this will match on any filesystem, so we need to configure it a bit more specific like: $[?(@.fsname==’/’)].bytes.total.first() 

As you can see, the JSONPath is a bit more complex here. We are forcing it to match on @.fsname==’/’ and from that entity, get out the bytes.total. Now, to make it even more complex we shouldn’t configure the filesystem hardcoded in the JSONPath since we’re working with Item prototypes. It should be the LLD Macro {#FSNAME} instead!

Now we save this item prototype, grab a cup of coffee (or just force a config_cache_reload on the server) and just wait for the magic to happen.

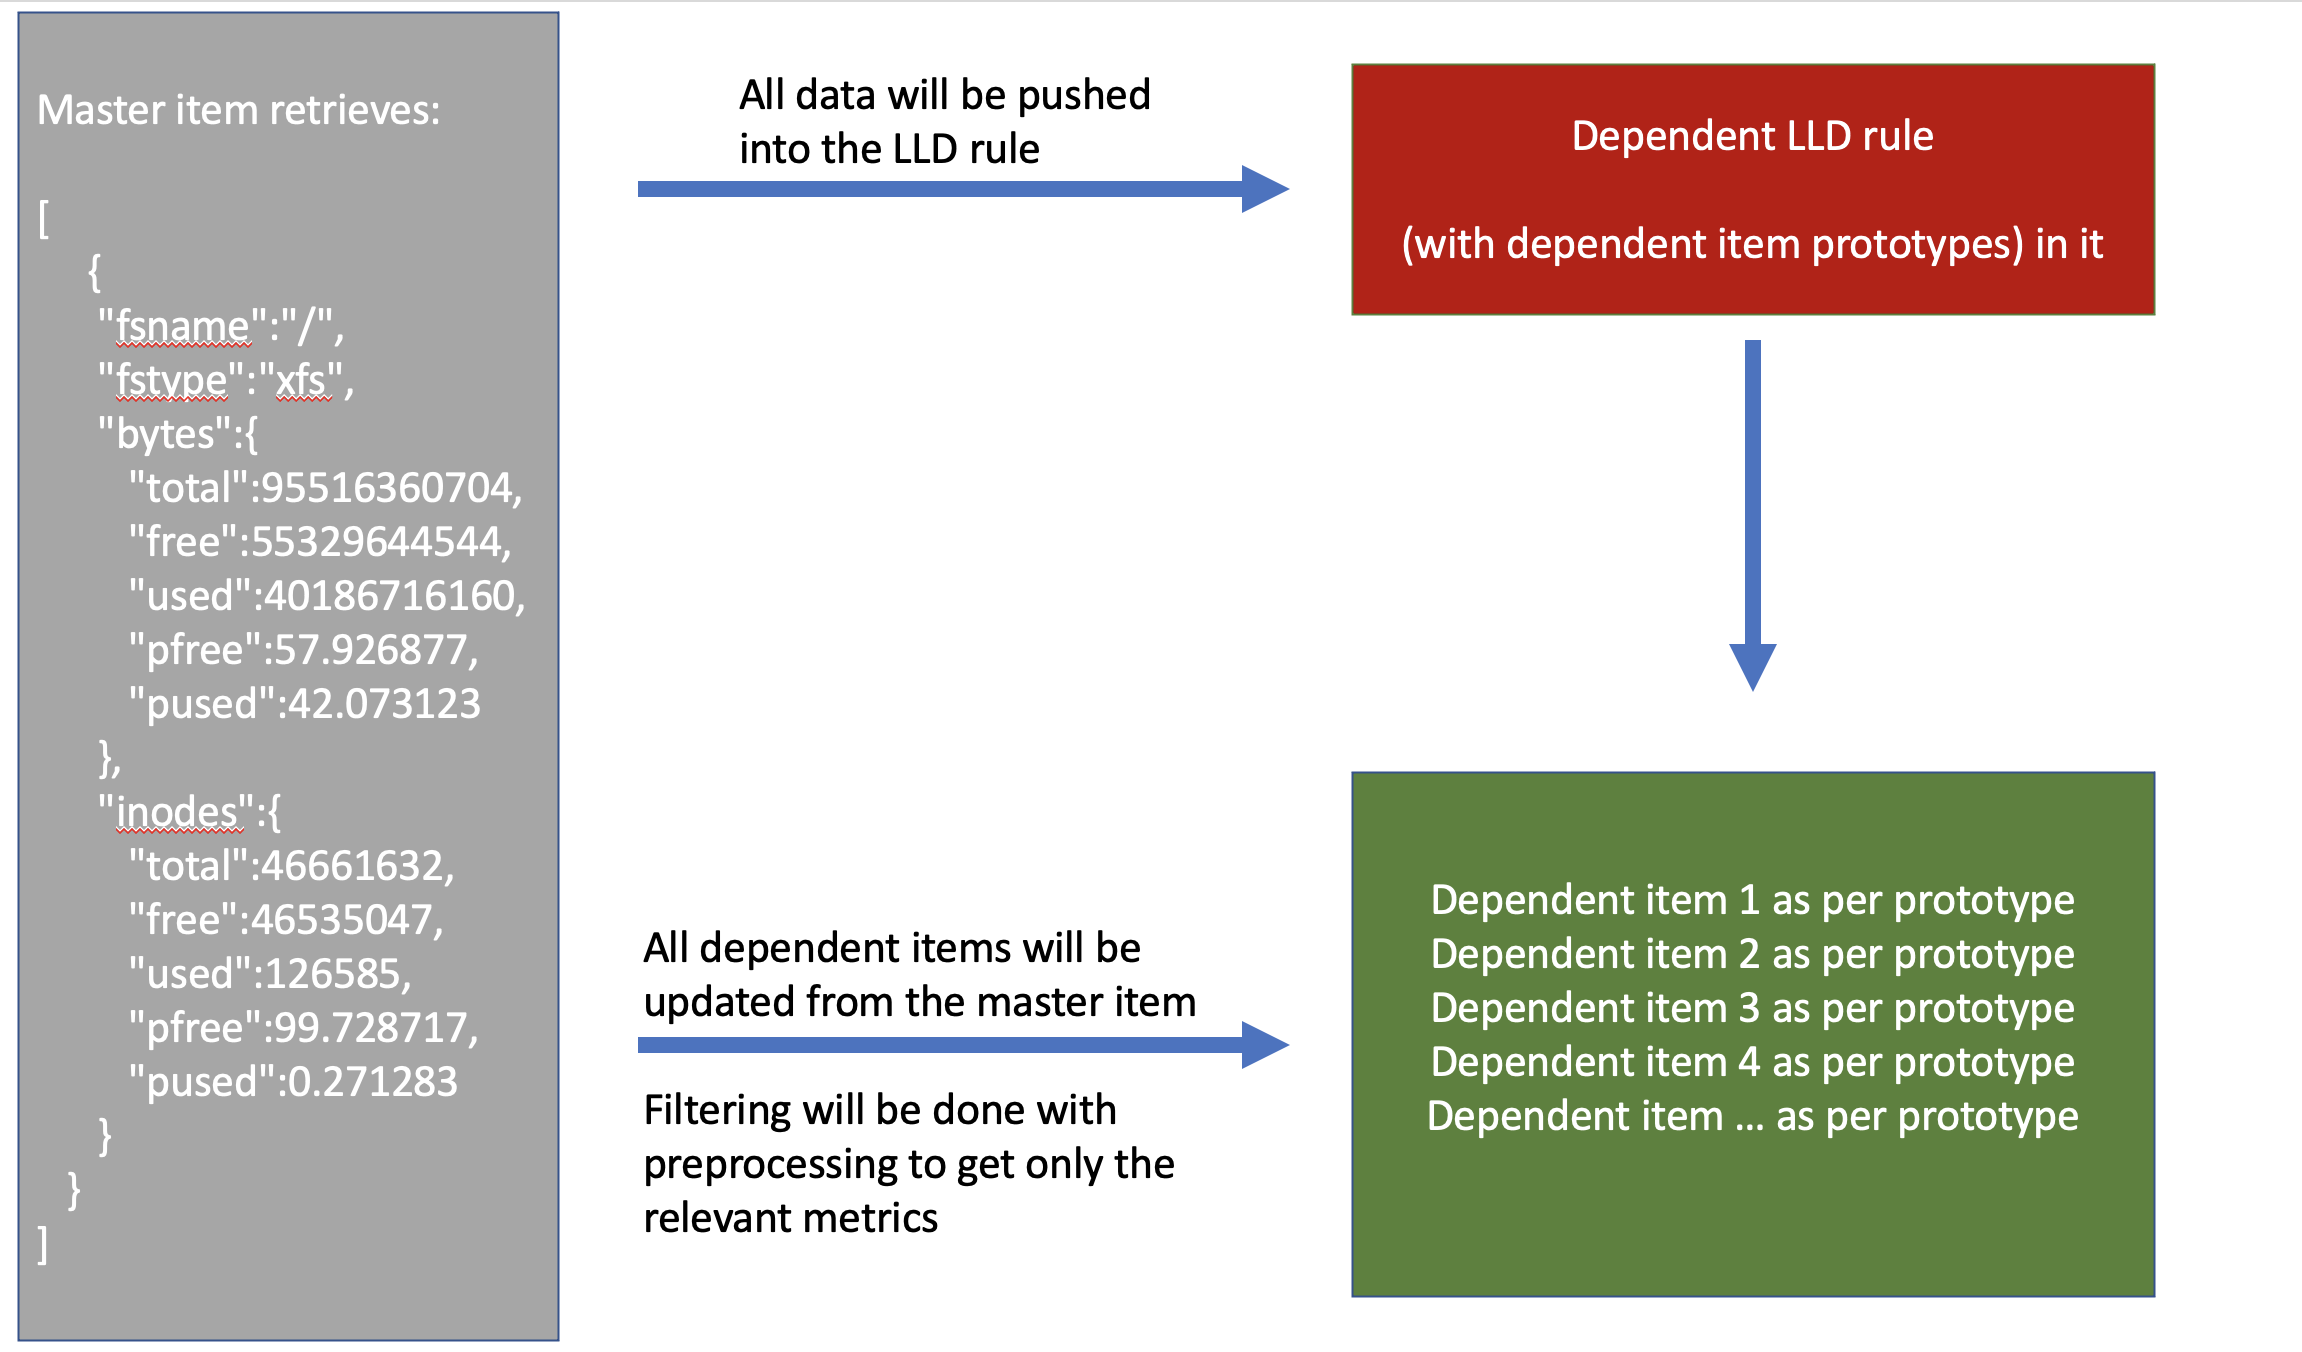
We’ve now built this setup:


So the master item will get values (i.e. obtain bulk data every minute) and push it into the LLD rule. From there, as per item prototypes, items will be created and those are populated from the master item as well, filtering out only the relevant metrics using Preprocessing.

So far, so good, but we have one small problem to solve: We want to get metrics every minute or so, but since all those metrics will get pushed into the LLD rule, we might be adding unnecessary extra load due to the high frequency. Luckily, solving that problem is no too hard. Navigate to the discovery rule, go to the ‘Preprocessing tab’ and select ‘Discard unchanged with heartbeat’ parameter: 1h or even larger interval!

This is insane! With just one poll/query to a host, we will utilize the power of LLD and dependent items, getting all metrics without adding minimal extra load on that host.
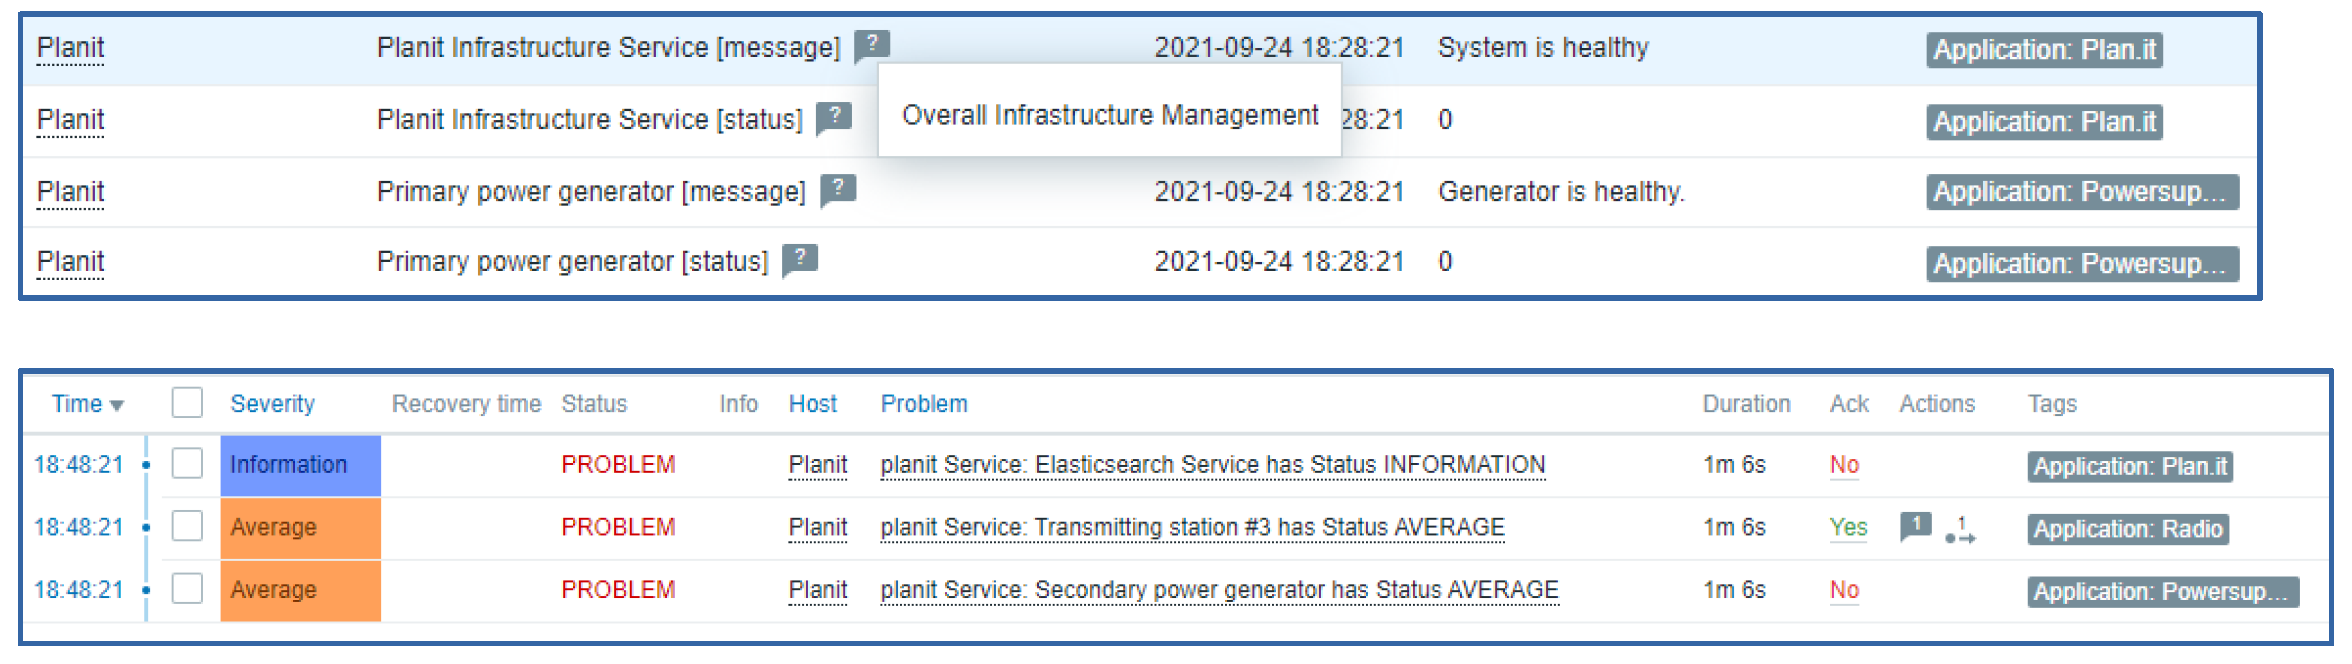
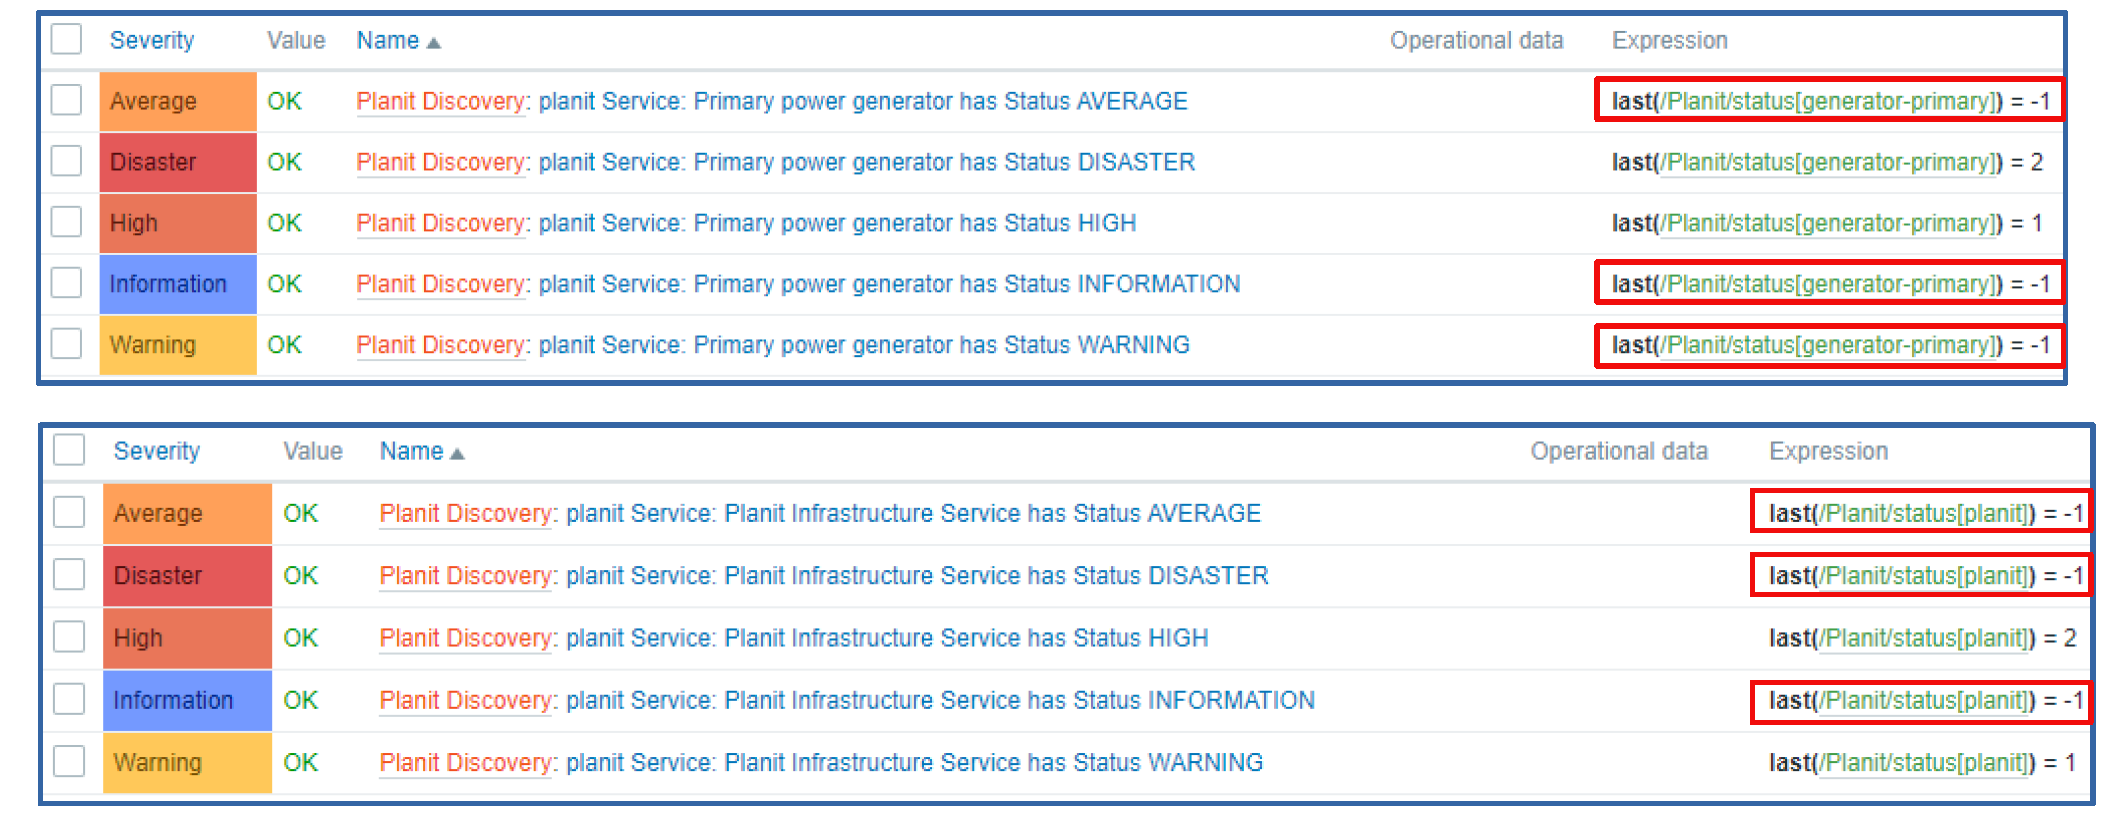
 

Conclusion

That’s it. If you’ve setup everything correctly, you should now get out quite a few filesystem metrics without adding any extra performance overhead on the host by performing unnecessary data requests.

Of course, if you need help optimizing your Zabbix environment, support contracts, consultancy, or training, we from Opensource ICT Solutions are always available to assist you in every possible way, worldwide, 24×7.

Thanks for reading this blog post, see you in the next one.