Tag Archives: Hugo

The Hugo evolution: Engineering Grab’s unified, one-click data ingestion platform with Apache Flink

Post Syndicated from Grab Tech original https://engineering.grab.com/one-click-data-ingestion-platform-with-apache-flink

Introduction

Data drives every decision we make at Grab. As our operations scale, so does our need for robust, real-time data ingestion and processing frameworks. Enter Hugo: our self-service data platform that has long empowered teams to seamlessly route data into our Data Lake. Today, Hugo is evolving. We have taken previously siloed onboarding workflows and transformed them into one seamless, unified journey to truly democratize data ingestion and maximize efficiency.

In this blog, we’ll share how Hugo turns complex engineering hurdles into a frictionless, self-service reality. By moving away from siloed workflows, we’ve achieved a unified pipeline experience where one-click RDS CDC and self-service Kafka ingestion are the new standard.

Background
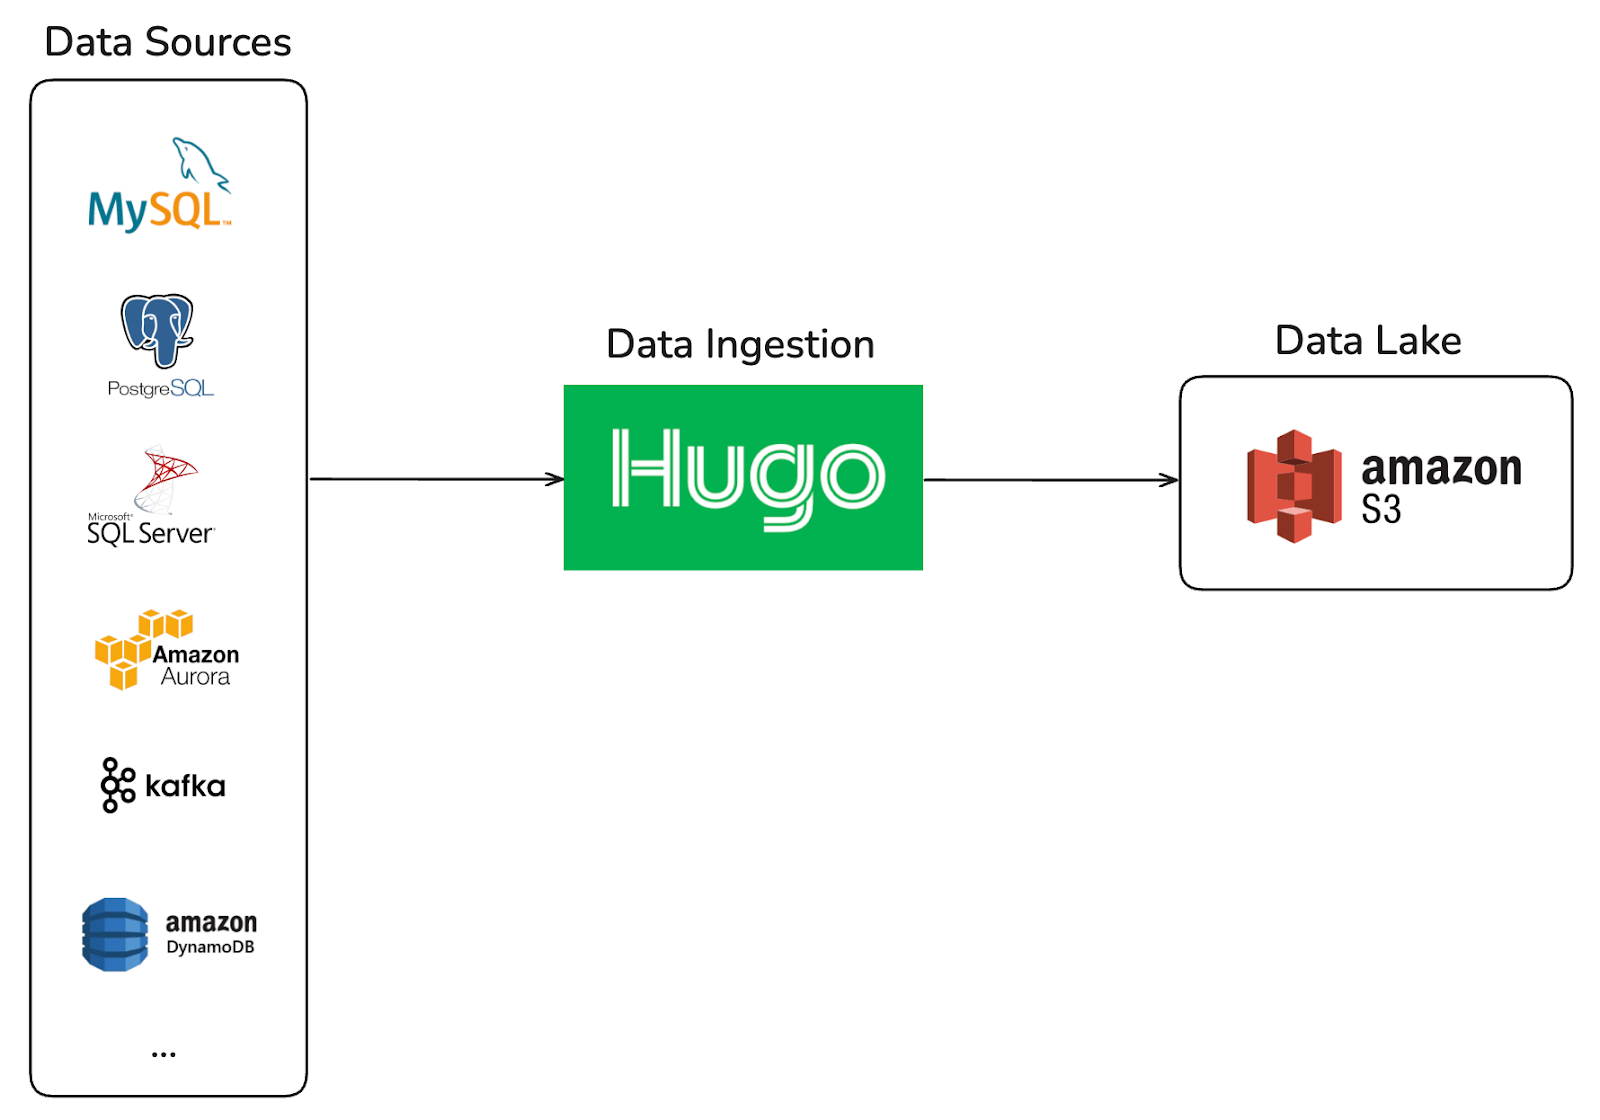
Figure 1. Hugo – Ingests data from every source into Grab’s data lake.

Hugo was originally designed as a self-service platform for batch-oriented data ingestion into the Data Lake, built on a single computation engine, Spark. It provided a centralized and streamlined onboarding experience for data sources such as MySQL, Aurora, PostgreSQL, and DynamoDB.

As the organization’s data platform evolved toward near real-time ingestion, Hugo expanded to support streaming pipelines from Kafka and MySQL binlog. This evolution introduced a more distributed architecture, where ingestion workflows spanned multiple systems, including Kafka Connect, Sprinkler (an in-house Go-based S3 writer), and Hugo.

The siloed past: A multi-platform hurdle

While powerful, the expanded architecture introduced significant onboarding friction. Creating a single data pipeline now requires users to coordinate across multiple platforms, each with its own configuration model and operational semantics. As a result, the onboarding journey became fragmented and difficult to navigate, especially for new users.

The common challenge during onboarding was helping users understand how configurations mapped across systems.

For MySQL CDC pipelines, users often asked, “I’ve already configured Kafka Connect, what values do I need to provide in Hugo?” after setting up a Kafka Connect job. This revealed a gap in abstraction between systems, requiring users to manually translate concepts and configurations across different platforms.

For Kafka pipelines, users frequently struggled with schema evolution in the data lake. Common questions included: “How should I update the data lake schema?” and “I’ve already updated the Protobuf schema for this Kafka topic, why isn’t the latest schema reflected in the data lake?” These issues highlighted unclear expectations around schema propagation and synchronization across the pipeline.

This multi-step, cross-system dependency increased cognitive load, slowed down onboarding, and created coordination overhead between platform teams and users.

The Hugo evolution: A unified ingestion platform

Hugo’s new, deeply automated ingestion framework, built with a custom automation layer and Apache Flink, has unified workflows and retired Sprinkler and Kafka Connect. This evolution converted manual, artisanal work into a streamlined, self-service experience, with custom automation serving as the “intelligent chassis” for the entire user journey.

The Hugo ingestion architecture: Engineering a unified flow

One-click MySQL CDC pipelines

The transition to a unified modernized pipeline powered by Flink CDC shifts the data ingestion architecture from a fragmented, high-maintenance toolchain into a single, end-to-end orchestrated platform. By reading the database binlog directly and embedding the lifecycle within a centralized control plane, the modernized approach drastically reduces operational overhead, eliminates data mismatch risks, and cuts onboarding times from days to minutes. Below are the core advantages of adopting Flink:

  • Minimal operational overhead: It reduces the footprint from 4 disparate components (Kafka Connect, topics, Sprinkler app, and Spark) to just 2 core components managed via a single control plane.
  • Eliminated schema risk: It replaces brittle, manually coded Go DTOs, which caused frequent schema deviations, with automated schema detection and dynamic validation.
  • Streamlined architecture: It eliminates the intermediary Kafka hop. Flink reads the MySQL binlog directly and pushes straight to a queryable Hive table via an integrated Spark compaction process.
  • Instant onboarding: It shifts deployment from a multi-team, ticket-heavy process taking days to a single-engineer, self-service setup completed in minutes.
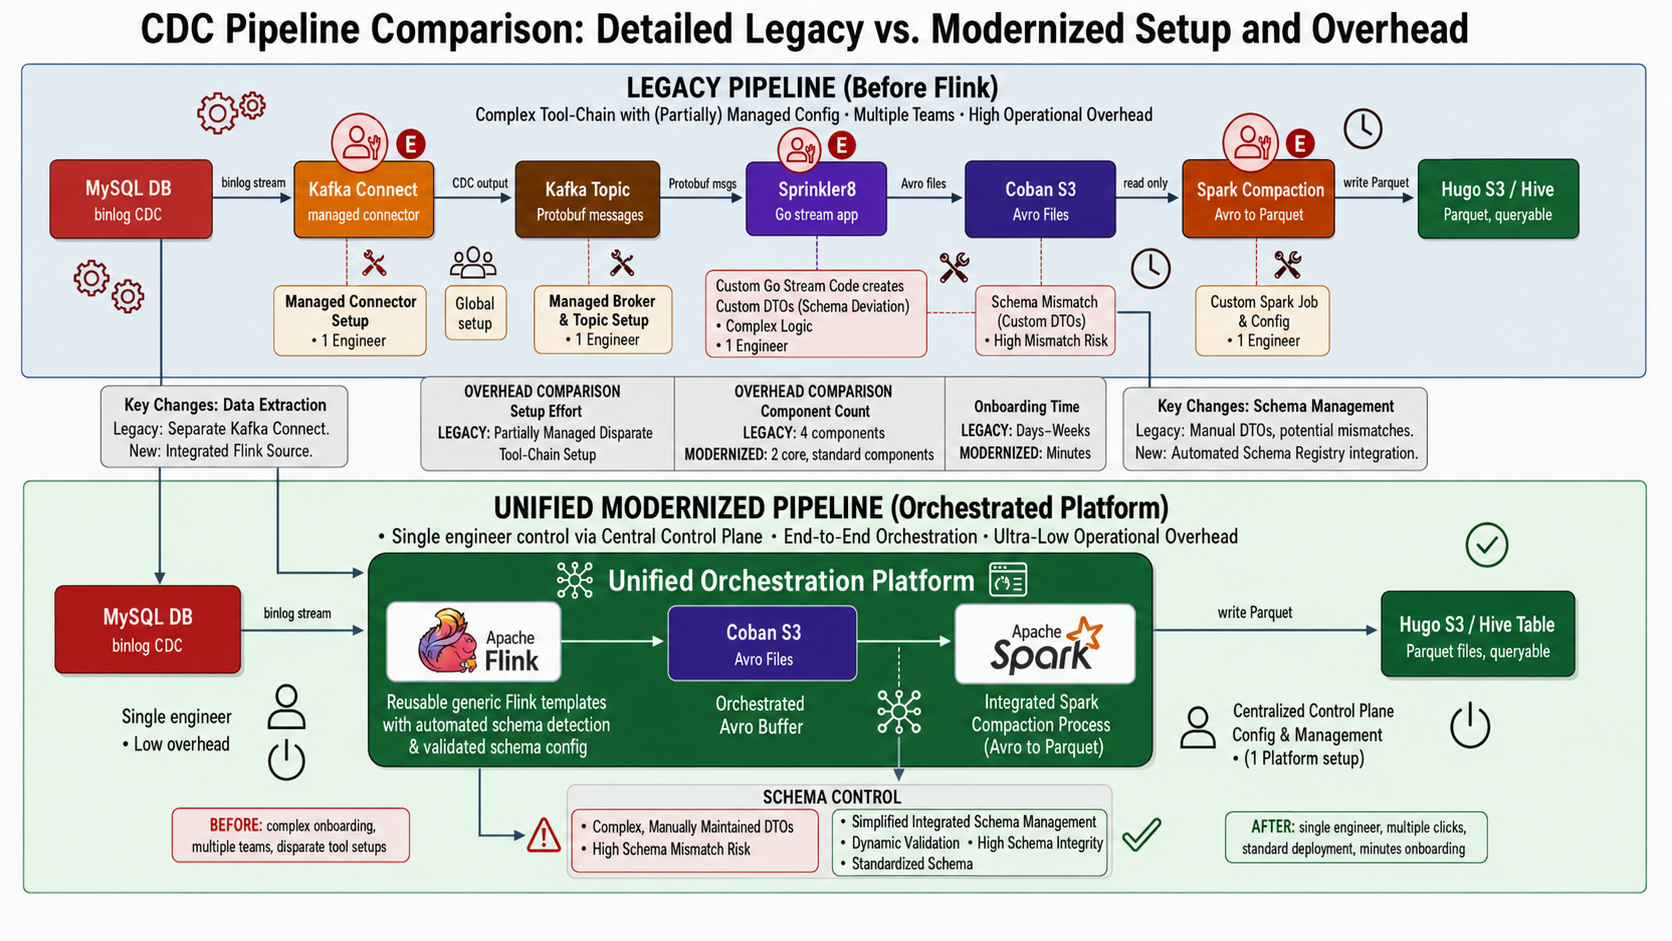
Figure 2. Data ingestion with MySQL CDC to data lake

Self-service Kafka ingestion

The most significant architectural shift in the self-service Kafka ingestion pipeline is the move from manual, fragile schema handling to an automated, resilient system. This comparison highlights the operational pain points eliminated by adopting Flink’s approach.

Legacy Sprinkler approach (manual and static)

  • Static registration and hardcoding: It required manual registration of streams within the Go monorepo and relied on hardcoded mappings in entities.go to convert Protobuf to Avro.
  • Custom dependencies: Avro schema was generated indirectly from custom DTO structs, not directly from the Protobuf definition.
  • Manual schema evolution: Any field change required a multi-step manual process: updating .pb.go and entity files, followed by a manual pipeline rebuild.

New Flink approach (automated and dynamic)

  • Dynamic runtime fetching: Flink pipelines dynamically retrieve the Protobuf schema from Confluent Schema Registry on startup, removing the need for hardcoding and manual stream registration.
  • Reduced operational overhead for schema changes: Schema updates are propagated through the CI pipeline to the Schema Registry, removing the need for hardcoded mapping changes. The Flink pipeline can detect updated schemas and resume from the latest checkpoint after restart, though manual restart intervention is still required.
  • Click-to-query: Engineers can now ingest streaming data from Kafka topics into queryable Hive tables through a few clicks in the Hugo UI. Hugo automatically orchestrates the multi-stage background work, from Flink consumption and S3 writing to Spark compaction, ensuring data is query-optimized and ready for immediate use.
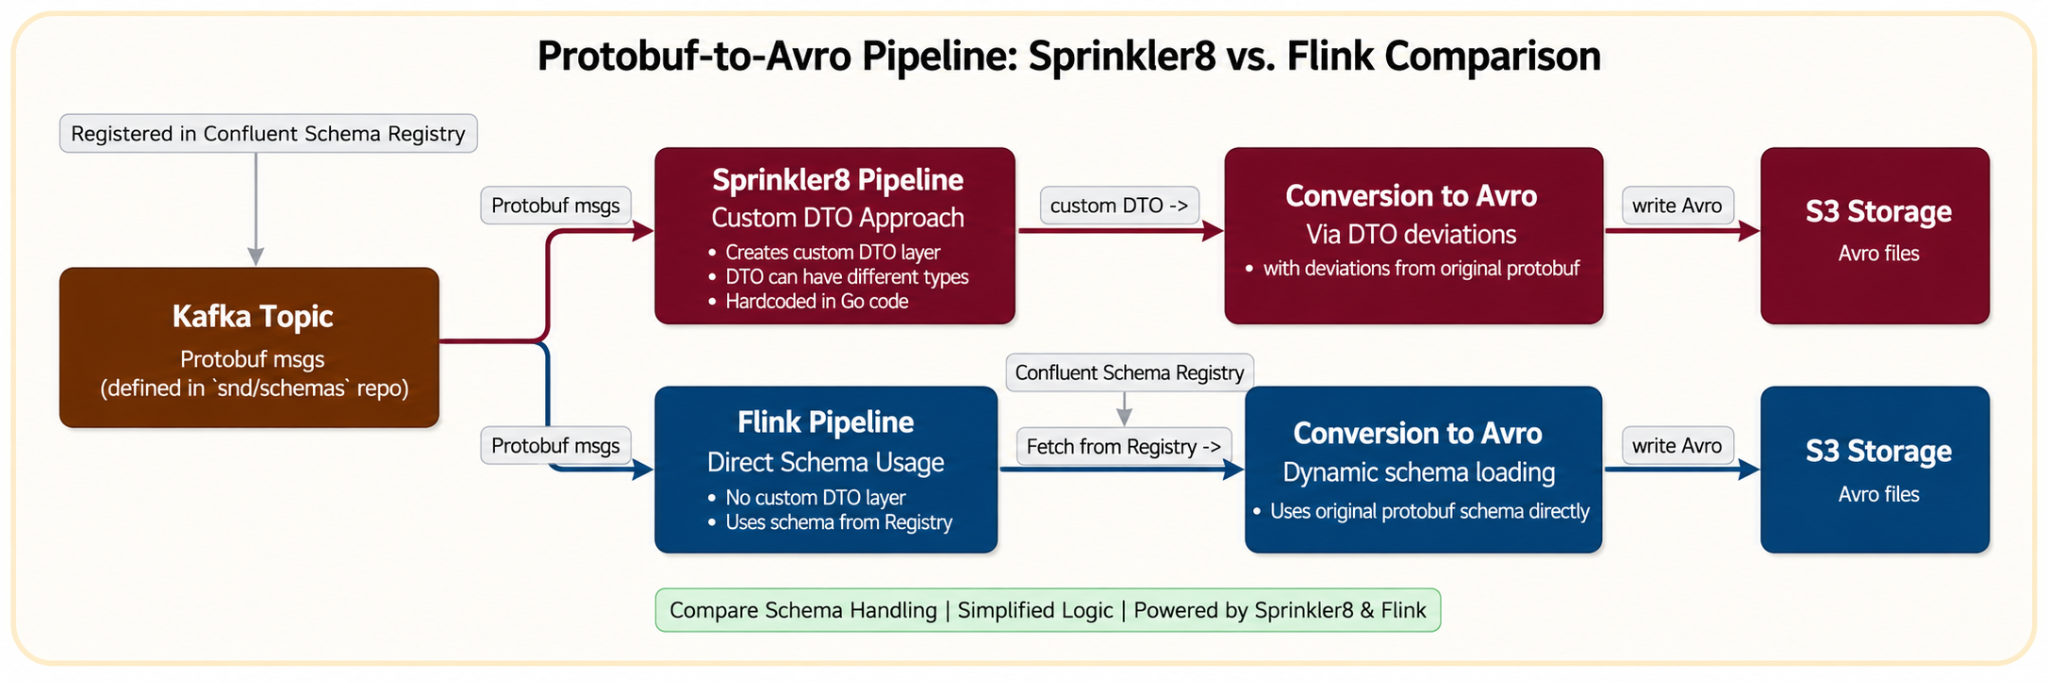
Figure 3. Data ingestion with Kafka to Datalake.

Impact

The platform’s new onboarding workflow has significantly reduced a previously multi-day process to mere minutes, enabling faster iteration and improving overall onboarding efficiency. This dramatic change has fundamentally altered how our teams interact with data.

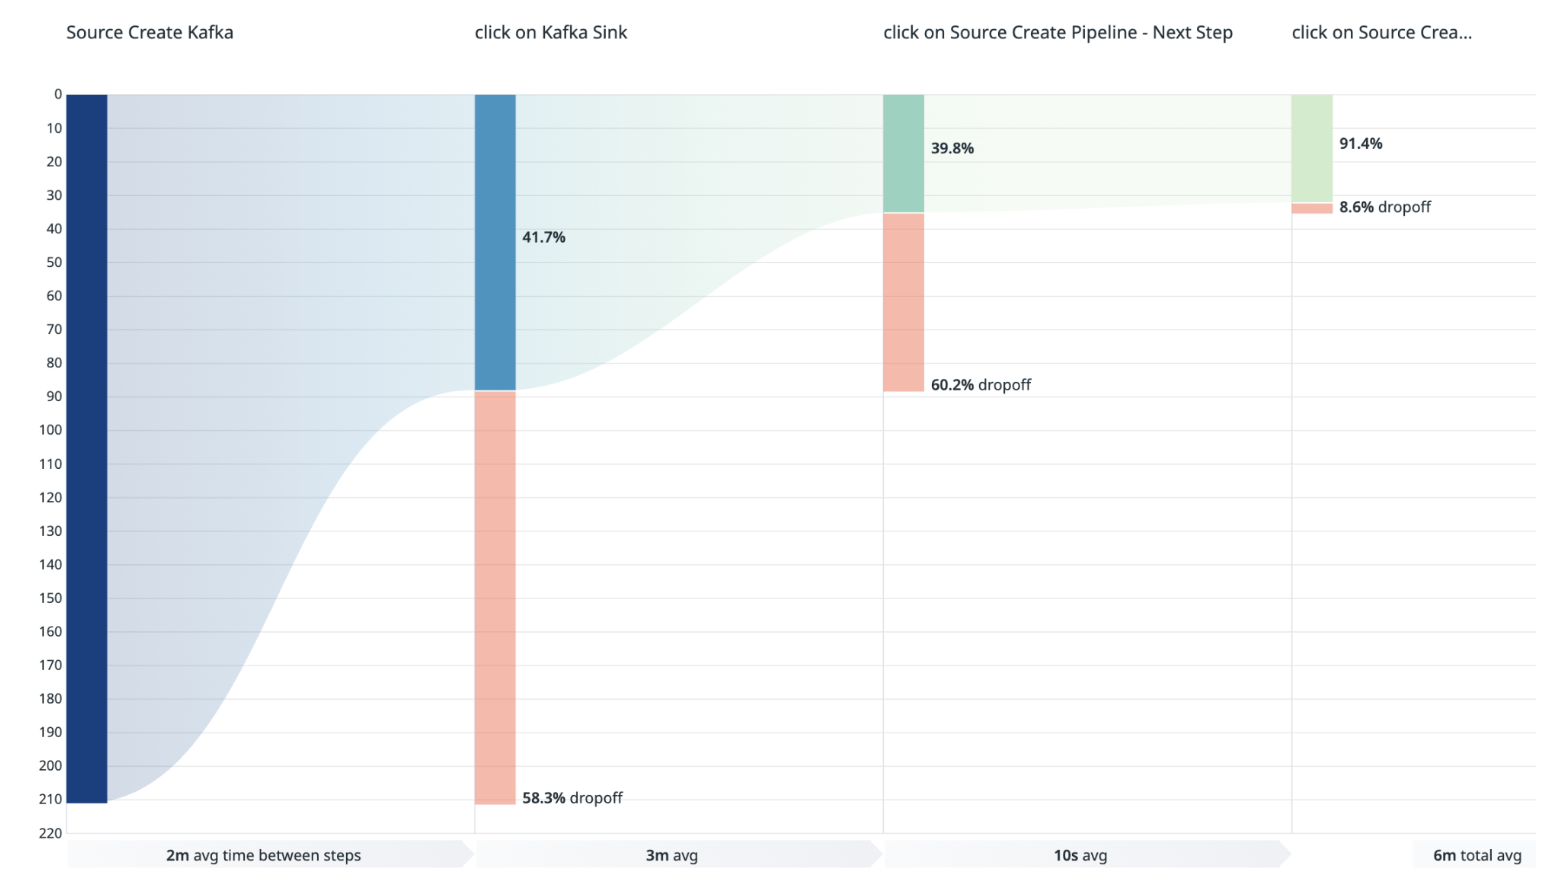
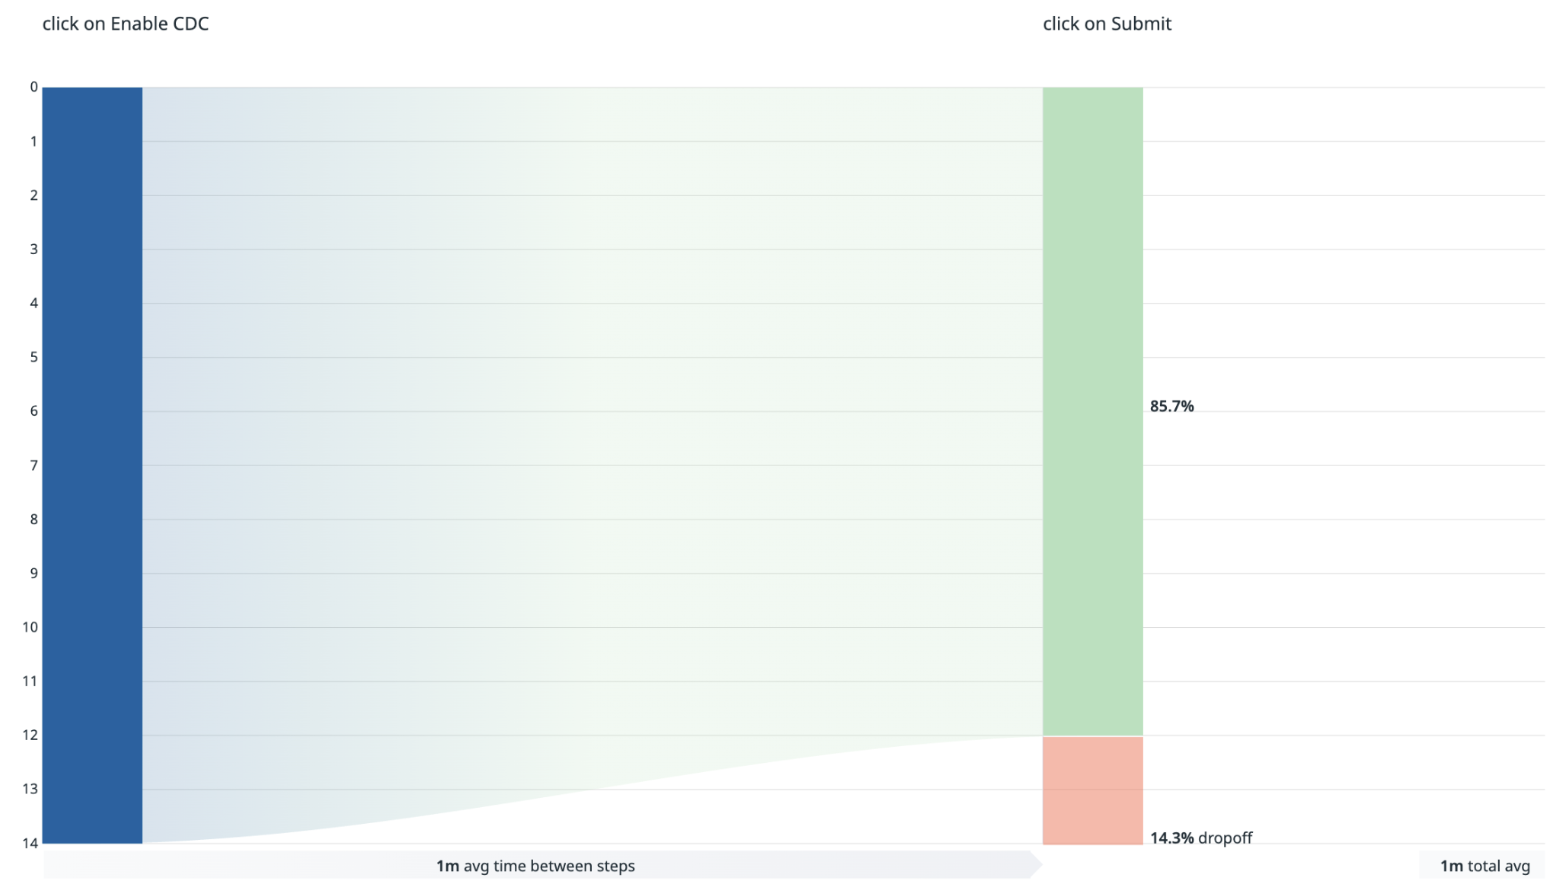
Figure 4. Kafka Flink.
Figure 5. CDC Flink.

The onboarding workflow is intentionally designed with early validation guardrails to proactively surface prerequisite and governance-related issues before pipeline creation proceeds.

  • For Kafka sources, user drop-offs between the “Create Kafka Source” and “Kafka Sink” stages are primarily driven by validation checks such as topic ownership verification and topic activity requirements, for example topics with zero message volume. Additional drop-offs between the “Kafka Sink” and “Create Source Pipeline” stages typically occur when the proposed output table name already exists in the data lake, preventing duplicate table creation.
  • For MySQL sources, drop-offs are mainly associated with unmet database onboarding prerequisites, including credential setup, binlog user configuration, binlog format requirements, and binlog expiration settings.

In addition, the streamlined self-service experience encourages exploratory usage, allowing teams to familiarize themselves with the onboarding workflow and platform capabilities before fully committing to pipeline creation.

Summary

The new architecture engineered a custom automation layer that successfully retired the reliance on Kafka Connect and Sprinkler for the data lake, turning artisanal work into a streamlined, one-click experience. This transformation provides a direct boost to developer productivity.

The key impact metrics are:

  • Onboarding time reduction: The time required to set up data pipelines has been dramatically reduced and is now measured in minutes.
    • Kafka pipelines: approximately 6 minutes.
    • MySQL CDC pipelines: approximately 3 minutes.
  • Adoption: Since the release, the number of new Kafka and CDC pipelines onboarded in the last year is more than the total number of pipelines onboarded in the previous five years.

What’s next

These enhancements are just one step in our broader vision for optimized and self-service data ingestion. Currently, Flink is the default only for Kafka source pipelines. Flink onboarding for MySQL CDC pipelines is impact- and cost-driven. Our strategic roadmap includes:

  • Next-generation formats: We are investigating the adoption of Apache Iceberg as the data lake table format to further improve pipeline SLA and costs, and improve performance.
  • Seamless schema evolution: Schema changes still require some manual effort from pipeline owners, including manually restarting Flink pipelines. In Hugo, we aim to make schema evolution a zero-touch experience by automatically detecting changes, validating compatibility, and updating tables without disruption.

Join us

Grab is Southeast Asia’s leading superapp, serving over 900 cities across eight countries (Cambodia, Indonesia, Malaysia, Myanmar, the Philippines, Singapore, Thailand, and Vietnam). Through a single platform, millions of users access mobility, delivery, and digital financial services, including ride-hailing, food delivery, payments, lending, and digital banking via GXS Bank and GXBank. Founded in 2012, Grab’s mission is to drive Southeast Asia forward by creating economic empowerment for everyone while delivering sustainable financial performance and positive social impact.

Powered by technology and driven by heart, our mission is to drive Southeast Asia forward by creating economic empowerment for everyone. If this mission speaks to you, join our team today!

Agile website delivery with Hugo and AWS Amplify

Post Syndicated from Nigel Harris original https://aws.amazon.com/blogs/devops/agile-website-delivery-with-hugo-and-aws-amplify/

In this post, we show how you can rapidly configure and deploy a website using Hugo (an AWS Cloud9 integrated development environment (IDE) for content editing), AWS CodeCommit for source code control, and AWS Amplify to implement a source code-controlled, automated deployment process.

When hosting a website on AWS, you can choose from several options. One popular option is to use Amazon Simple Storage Service (Amazon S3) to host a static website. If you prefer full access to the infrastructure hosting your website, you can use the NGINX Quick Start to quickly deploy web server infrastructure using AWS CloudFormation.

Static website generators such as Hugo and MkDocs accelerate the website content generation process, and can be a valuable tool when trying to rapidly deliver technical documentation or similar content. Typically, the content creation process requires programming in HTML and CSS.

Hugo is written in Go and available under the Apache 2.0 license. It provides several themes (collections of layouts) that accelerate website creation by drastically reducing the need to focus on format. You can author content in Markdown and output in multiple languages and formats (including ebook formats). Excellent examples of public websites built using Hugo include Digital.gov and Kubernetes.io.


Solution overview

This solution illustrates how to provision a hosted, source code-controlled Hugo generated website using CodeCommit and Amplify Console. The provisioned website is configured with a custom subdomain and an SSL certificate. We use an AWS Cloud9 IDE to enable content creation in the cloud.


Setting up an AWS Cloud9 IDE

Start by provisioning an AWS Cloud9 IDE. AWS Cloud9 environments run using Amazon Elastic Compute Cloud (Amazon EC2). You need to provision your AWS Cloud9 environment into an existing public subnet in an Amazon Virtual Private Cloud (Amazon VPC) within your AWS account. You can complete this in the following steps:

1. Access your AWS account using with an identity with administrative privileges. If you don’t have an AWS account, you can create one.

2. Create a new AWS Cloud9 environment using the wizard on the AWS Cloud9 console.

3. Enter a name for your desktop and an optional description.

4. Choose Next step.

Naming your Cloud 9 environment

5. In the Environment settings section, for Environment type, select Create a new EC2 instance for environment (direct access).

6. For Instance type, select your preferred instance type (the default, t2.micro, works for this use case)

7. Under Network settings, for Network (VPC), choose a VPC that you wish to deploy your AWS Cloud9 instance into. You may wish to use your default VPC, which is suitable for the purpose of this tutorial.

8. Choose a public subnet from this VPC for deployment.

Cloud9 Settings

9. Leave all other settings unchanged and choose Next step.
10. Review your choices and choose Create environment.

Environment creation takes a few minutes to complete. When the environment is ready, you receive access to the AWS Cloud9 IDE in your browser. We return to it shortly to develop content for your Hugo website.

Your Cloud9 Desktop

Configuring a source code repository to track content changes

Static website generators enable rapid changes to website content and layout. Source control management (SCM) systems provide a revision history for your code, and allow you to revert to previous versions of a project when unintended changes are introduced. SCM systems become increasingly important as the velocity of change and the number of team members introducing change increases.

You now create a source code repository to track changes to your content. You use CodeCommit, a fully-managed source control service that hosts secure Git-based repositories.

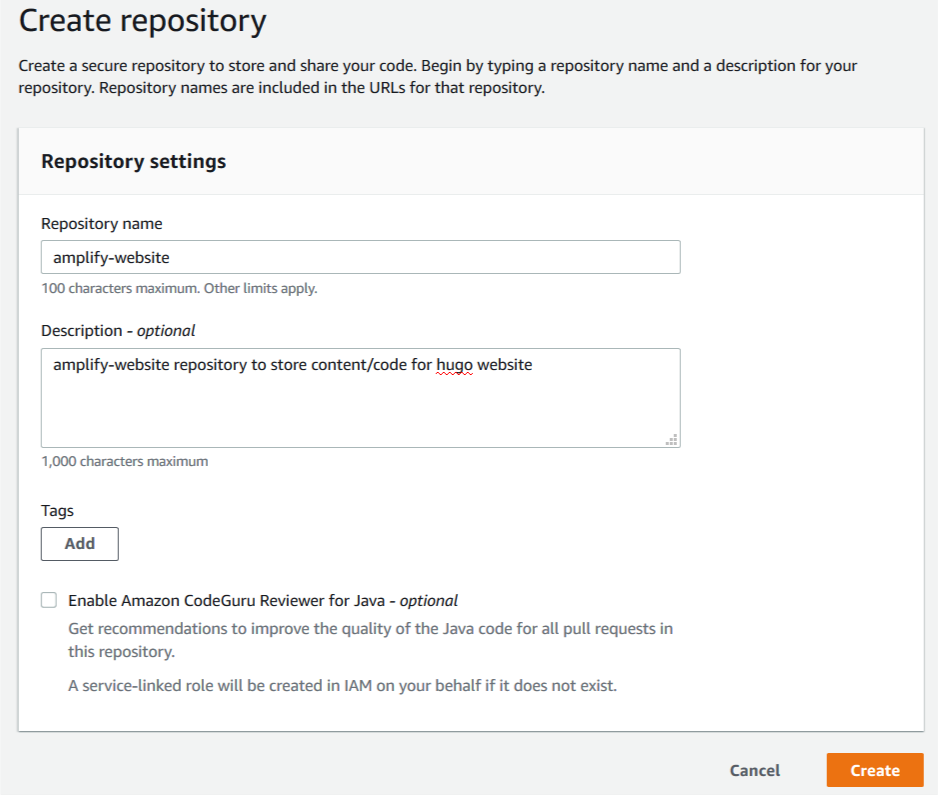
1. In a new browser, sign in to the CodeCommit Console and create a new repository.

2. For Repository name, enter amplify-website.

3. For Description, enter an appropriate description.

4. Choose Create.

Create repository

Repository creation takes just a few moments.

5. In the Connection steps section, choose the appropriate method to connect to your repository based on how you accessed your AWS account.

For this post, I signed in to my AWS account using federated access, so I choose the HTTPS Git Remote CodeCommit (HTTPS-GRC) tab. This is the recommended connection method for this sign-in type. You can also configure a connection to your repository using SSH or Git credentials over HTTPS. SSH and Git credentials over HTTPS are appropriate methods if you have signed in to your AWS account as an AWS Identity and Access Management (IAM) user. The Amazon CodeCommit console provides additional information regarding each of these connection types, including links to supporting documentation.

Connect to Repo


Configuring and deploying an example website

You’re now ready to configure and deploy your website.

1. Return to the browser with your AWS Cloud9 IDE and place your cursor in the lower terminal pane of the IDE.

The terminal pane provides Bash shell access on the EC2 instance running AWS Cloud9.

You now create a Hugo website. The website design is based on Hugo-theme-learn. Themes are collections of Hugo layouts that take all the hassle out of building your website. Learn is a multilingual-ready theme authored by Mathieu Cornic, designed for building technical documentation websites.

Hugo provides a variety of themes on their website. Many of the themes include bundled example website content that you can easily adapt by following the accompanying theme documentation.

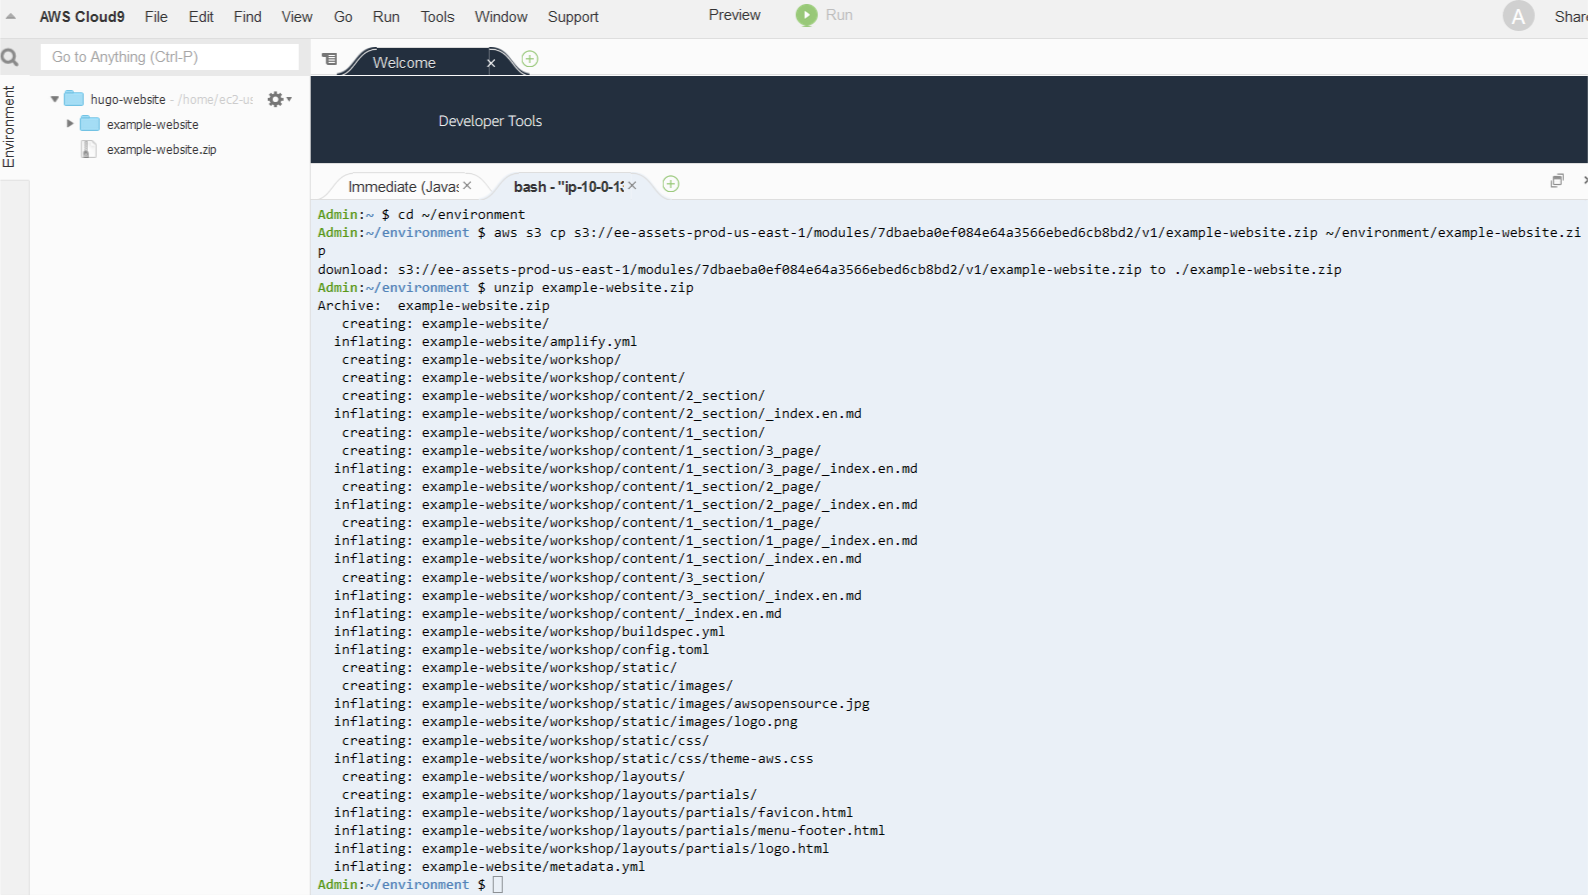
2. Enter the following code to download an existing example website stored as a .zip file, extract it, and commit the contents into CodeCommit from your AWS Cloud9 IDE:

cd ~/environment
aws s3 cp s3://ee-assets-prod-us-east-1/modules/3c5ba9cb6ff44465b96993d210f67147/v1/example-website.zip ~/environment/example-website.zip
unzip example-website.zip
rm example-website.zip

The following screenshot shows your output.

example website copy commands


Next, we run commands to create a directory to host your website and copy files into place from the example website to get started. We then create a new default branch called main (formerly referred to as the master branch), local to our AWS Cloud9 instance. We then copy files into place from the example website. After adding and committing them locally, we push all our changes to the remote Amazon Codecommit repository.

3. Enter the following code:

mkdir ~/environment/amplify-website/
cd ~/environment/amplify-website/
git init
git remote add origin codecommit::us-east-1://amplify-website
git remote -v
git checkout -b main
cp -rp ~/environment/example-website/* ~/environment/amplify-website/
git add *
git commit -am "first commit"
git push -u origin main

Deployment and hosting is achieved by using Amplify Console, a static web hosting service that accelerates your application release cycle by providing a simple CI/CD workflow for building and deploying static web applications.

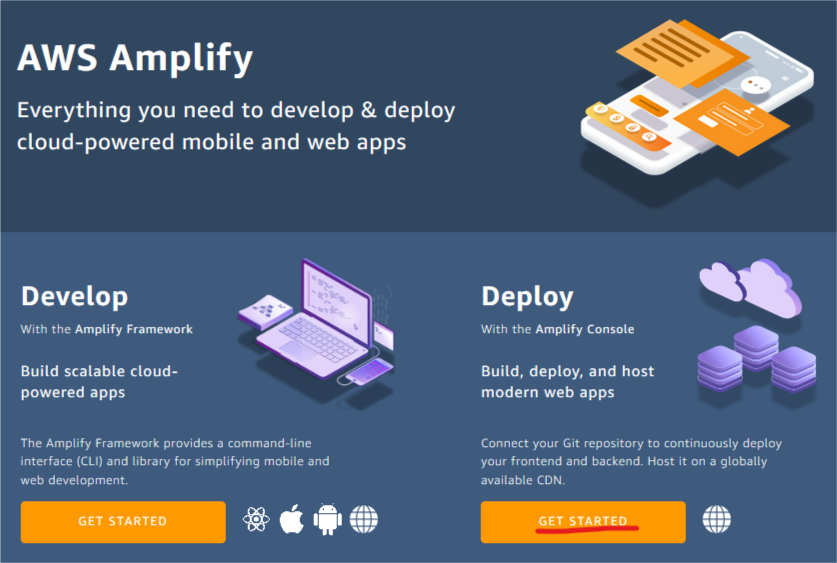
4. On the Amplify console, under Deploy, choose Get Started.

Amplify banner

5. On the Get started with the Amplify Console page, select AWS CodeCommit as your source code repository.

6. Choose Continue.

Amplify get started page

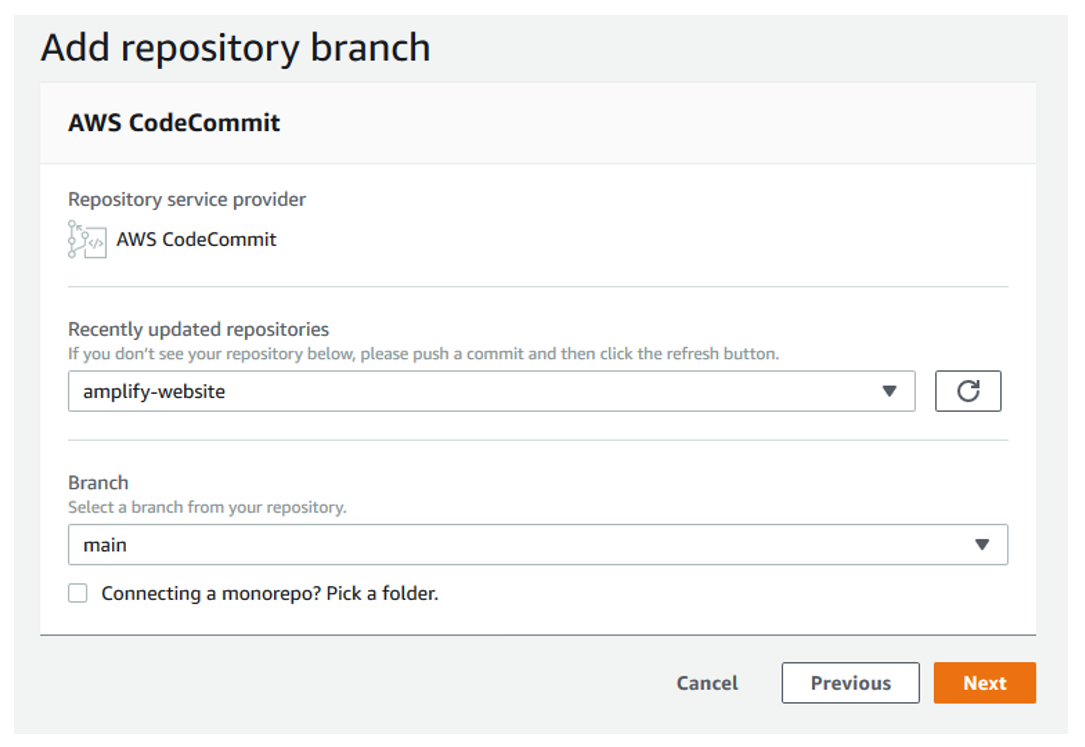
7. On the Add repository branch page, for Recently updated repositories, choose your repository.

8. For Branch, choose main.

9. Choose Next.

add branch

On the Configure build settings page, Amplify automatically uses the amplify.yml file for build settings for your deployment. You committed this into your source code repository in the previous step. The amplify.yml file is detected from the root of your website directory structure.

10. Choose Next.

Amplify configure build settings

11. On the review page, choose Save and deploy.

Amplify builds and deploys your Amplify website within minutes, and shows you its progress. When deployment is complete, you can access the website to see the sample content.

amplify website

The following screenshot shows your example website.

sample website


Promoting changes to the website

We can now update the line of text in the home page and commit and publish this change.

1. Return to the browser with your AWS Cloud9 IDE and place your cursor in the lower terminal pane of the IDE.

2. On the navigation pane, choose the file ~/environment/amplify-website/workshop/content/_index.en.md.

The contents of the file open under a new tab in the upper pane.

3. Change the string First Line of Text to First Update to Website.

content change

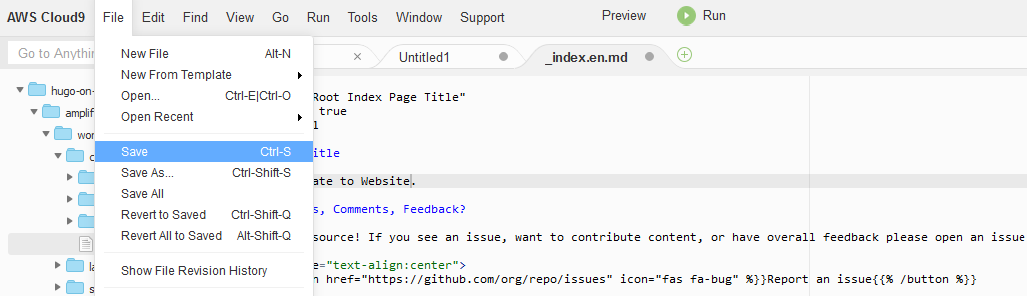
4. From the File menu, choose Save to save the changes you have made to the _index.en.md file.

save content changes

5. Commit the changes and push to CodeCommit by running the following command in the lower terminal pane in AWS Cloud9:

git add *; git commit -am "homepage update"; git push origin main

The output in your AWS Cloud9 terminal should appear similar to the following screenshot.

commit output

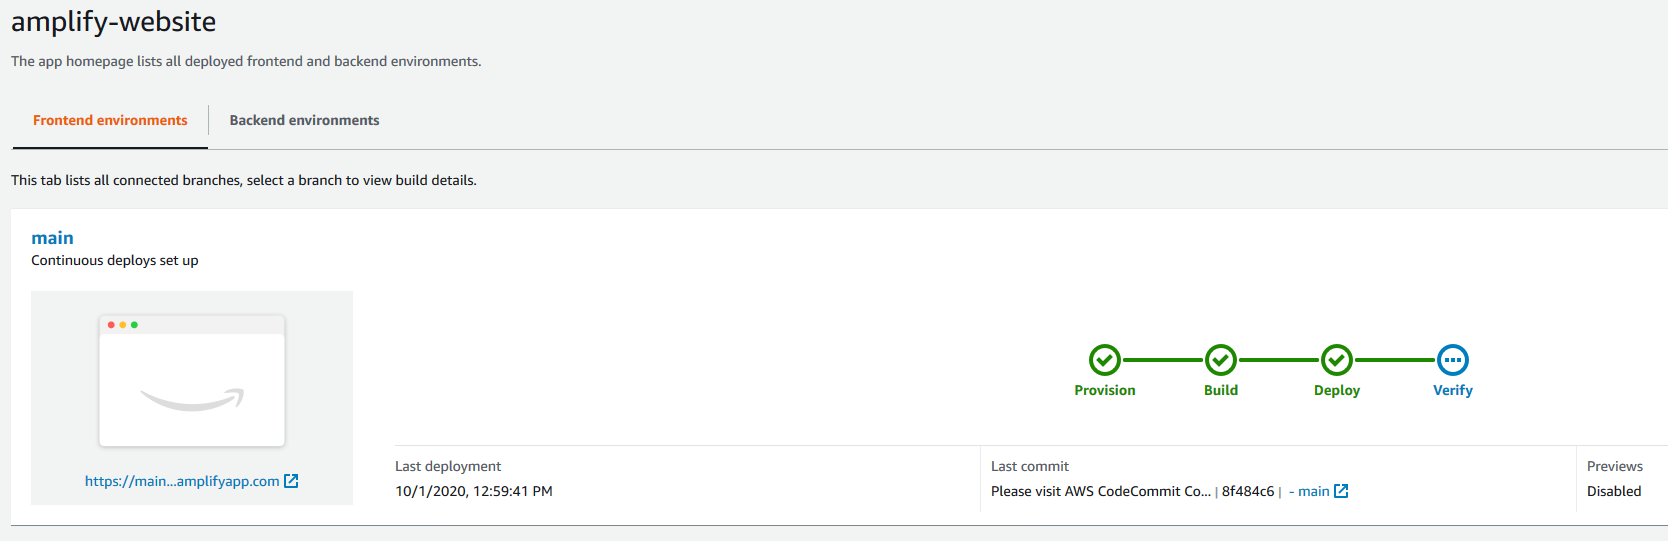
6. Return to the Amplify Console and observe how the committed change in CodeCommit is automatically detected. Amplify runs deployment steps to push your changes to the website.

amplify deploy changes

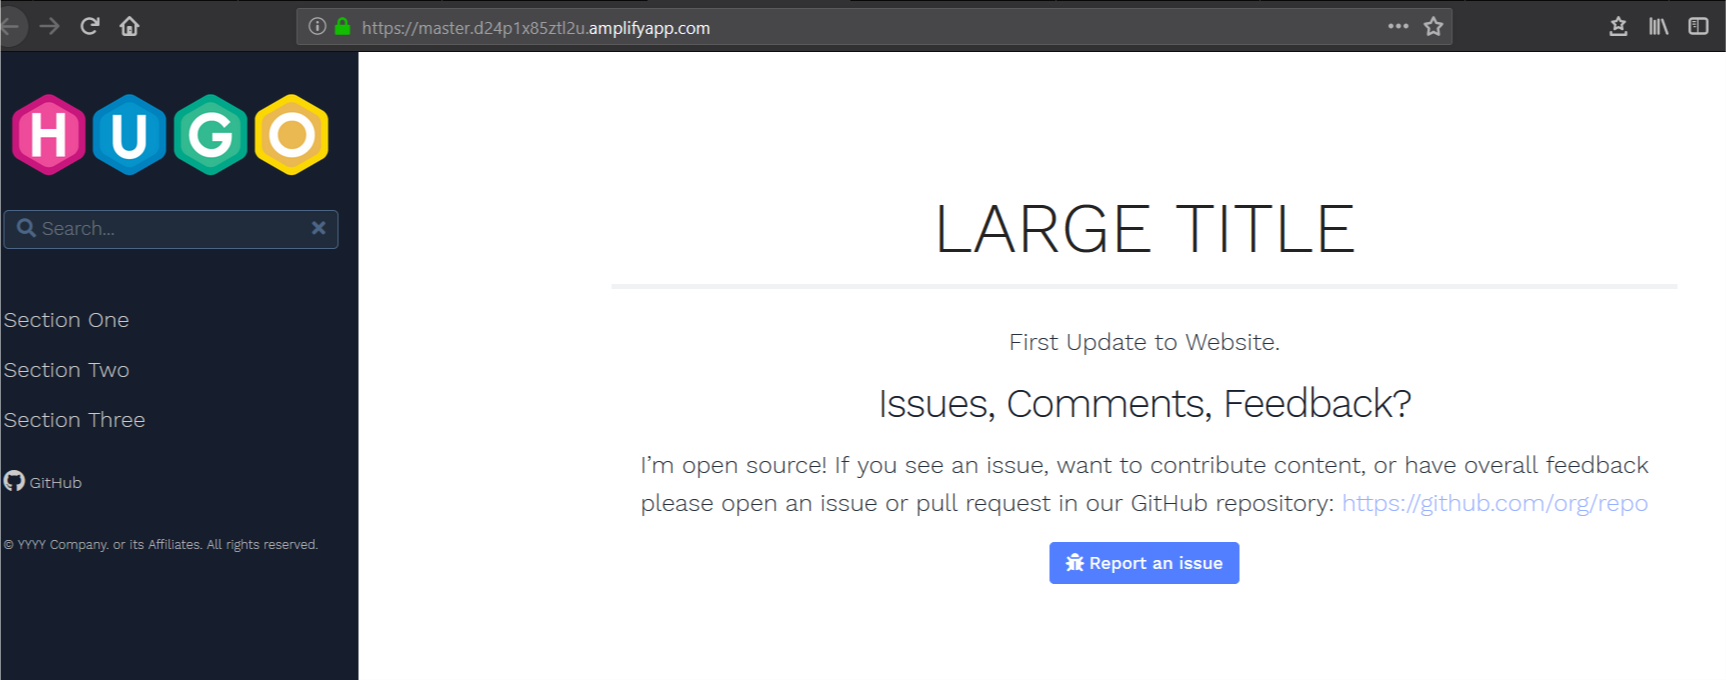
7. Access the URL of your website after this update is complete to verify that the first line of text on your home page has changed.

updated website

You can repeat this process to make source-code controlled, automated changes to your website.

Adding a custom domain

Adding a custom domain to your Amplify configuration makes it easier for clients to access your content. You can register new domains using Amazon Route 53 or, if you have an existing domain registered outside of AWS, you can integrate it with Route 53 and Amplify. For our use case, the domain www.hugoonamplify.com is a registered a domain name using a third-party registrar (NameCheap). You can manage DNS configurations for domains registered outside of AWS using Route 53.

Start by configuring a public hosted zone in Route 53.

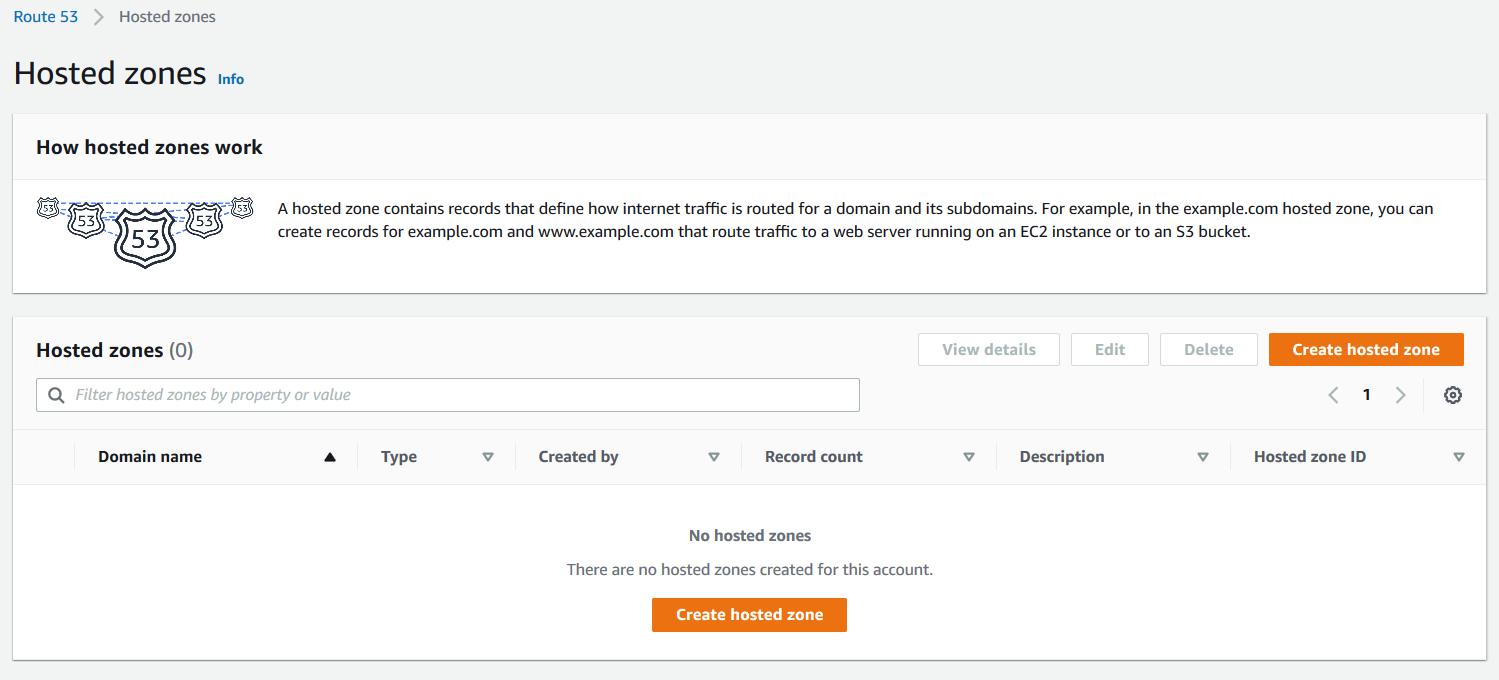
1. On the Route 53 console, choose Hosted zones.

2. Choose Create hosted zone.

hosted zones

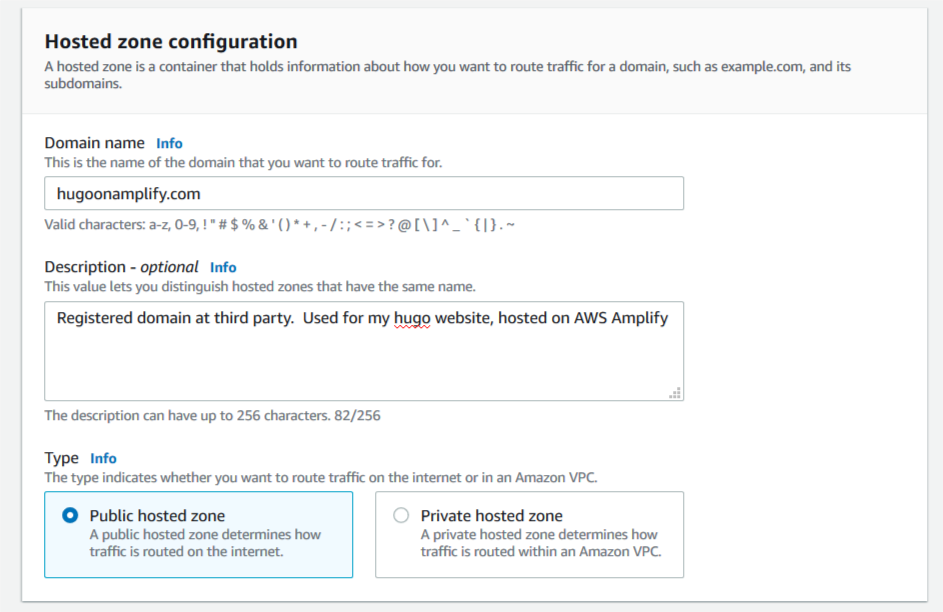
3. For Domain name, enter hugoonamplify.com.

4. For Description, enter an appropriate description.

5. For Type, select Public hosted zone.

hosted zones configuration

6. Choose Create hosted zone.

7. Save the addresses of the name servers that respond to client DNS lookup requests for the custom domain.

create hosted zone

8. In a separate browser, access the console of your DNS registrar.

9. Configure a custom DNS name servers setting on the console of the third-party domain name registrar.

This configuration specifies the Route 53 assigned name servers as authoritative DNS for our custom domain. For this use case, propagation of this change may take up to 48 hours.

namecheap console

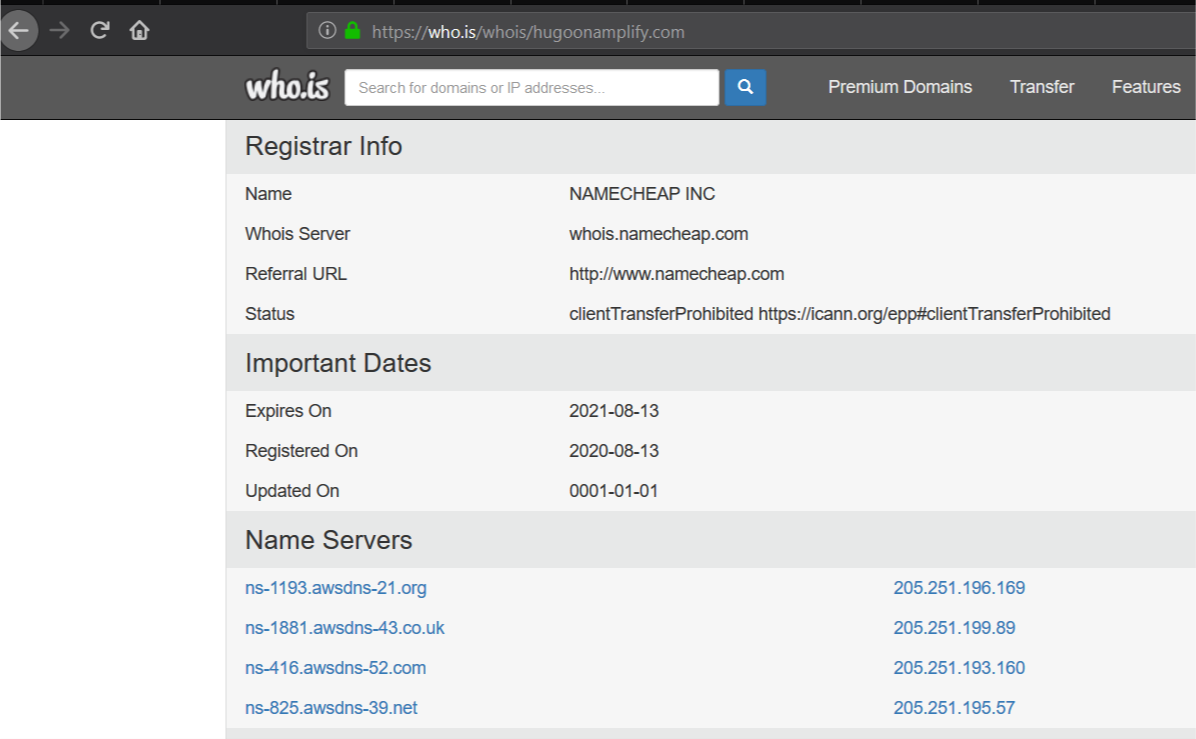
10. Use https://who.is to verify that the AWS name servers are listed correctly for your custom domain to internet clients.

whois lookup

You can now set up your custom domain in Amplify. Amplify helps you configure DNS and set up SSL for your desired custom domain.

domain management

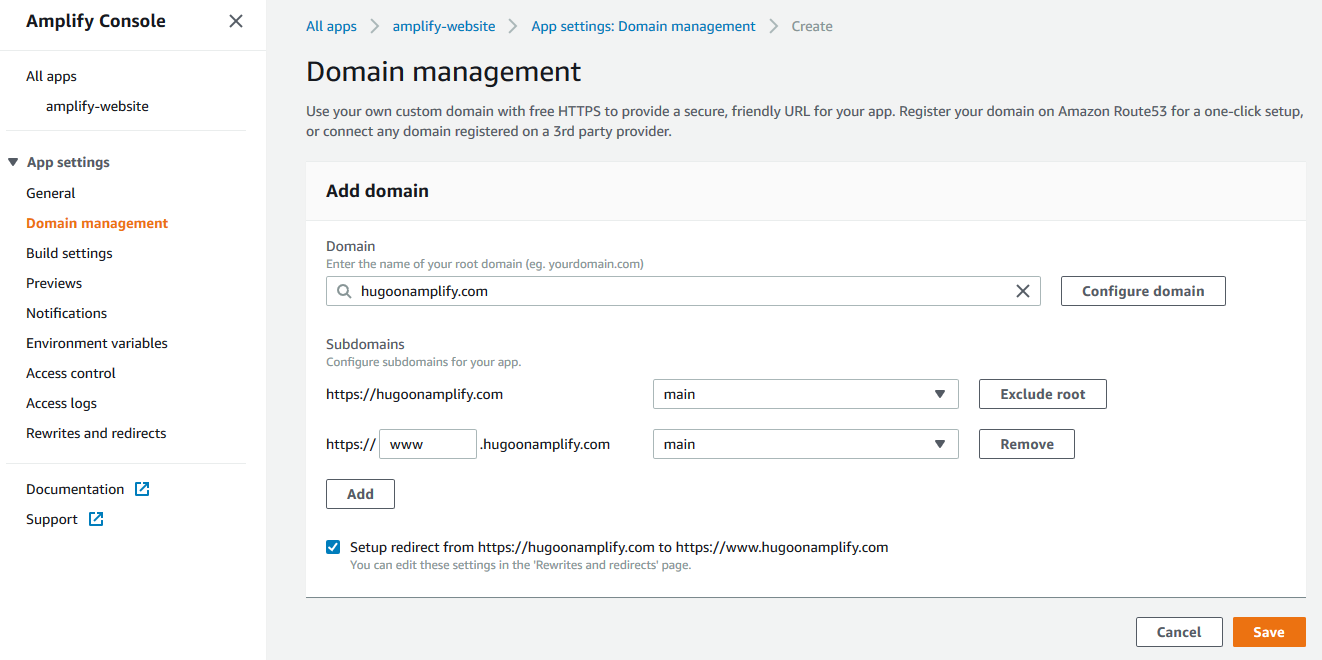
11. On the Amplify Console, under App settings, choose Domain management.

12. Choose Add domain.

13. For Domain, enter your custom domain name (hugoonamplify.com).

14. Choose Configure domain.

15. For Subdomain, I only want to set up www and choose to exclude the root of my custom domain.

16. Choose Save.

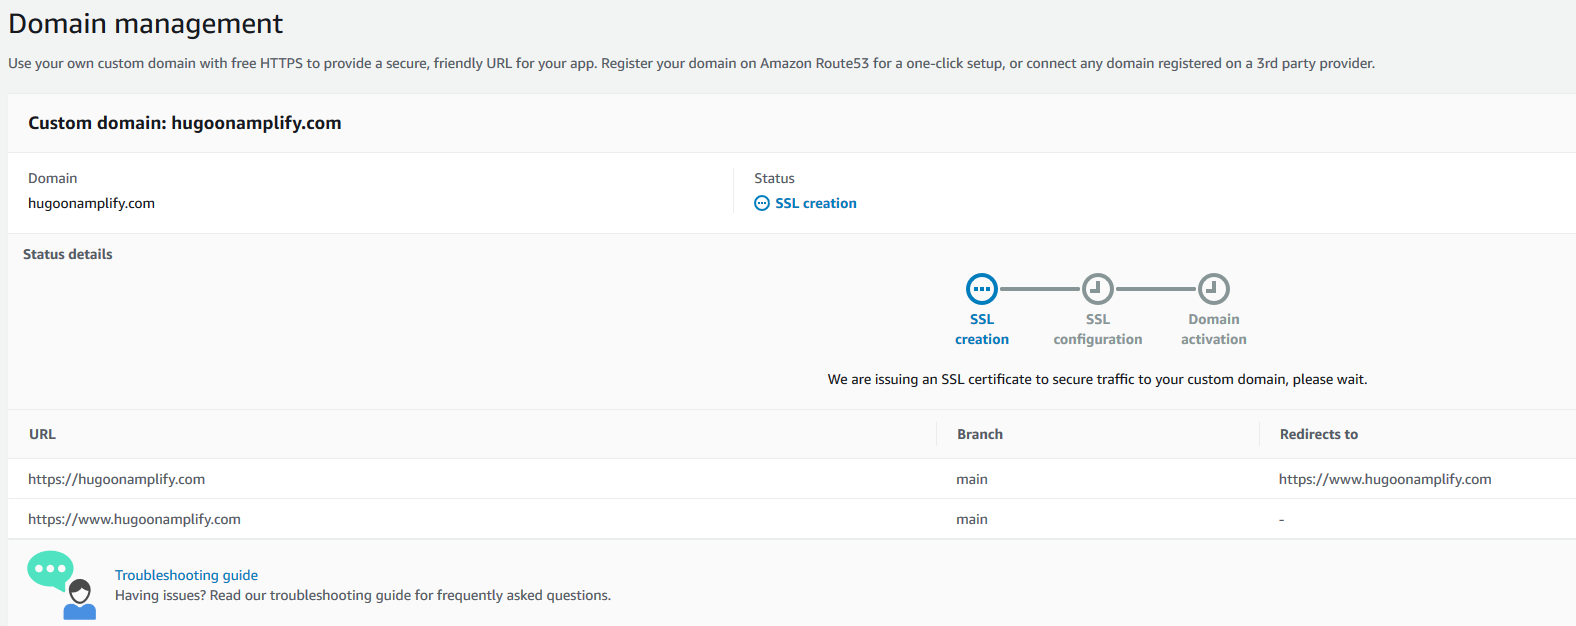
Amplify begins the process of creating the SSL certificates. Amplify sends a notification that it’s issuing an SSL certificate to secure traffic to the custom domain.

ssl domain management

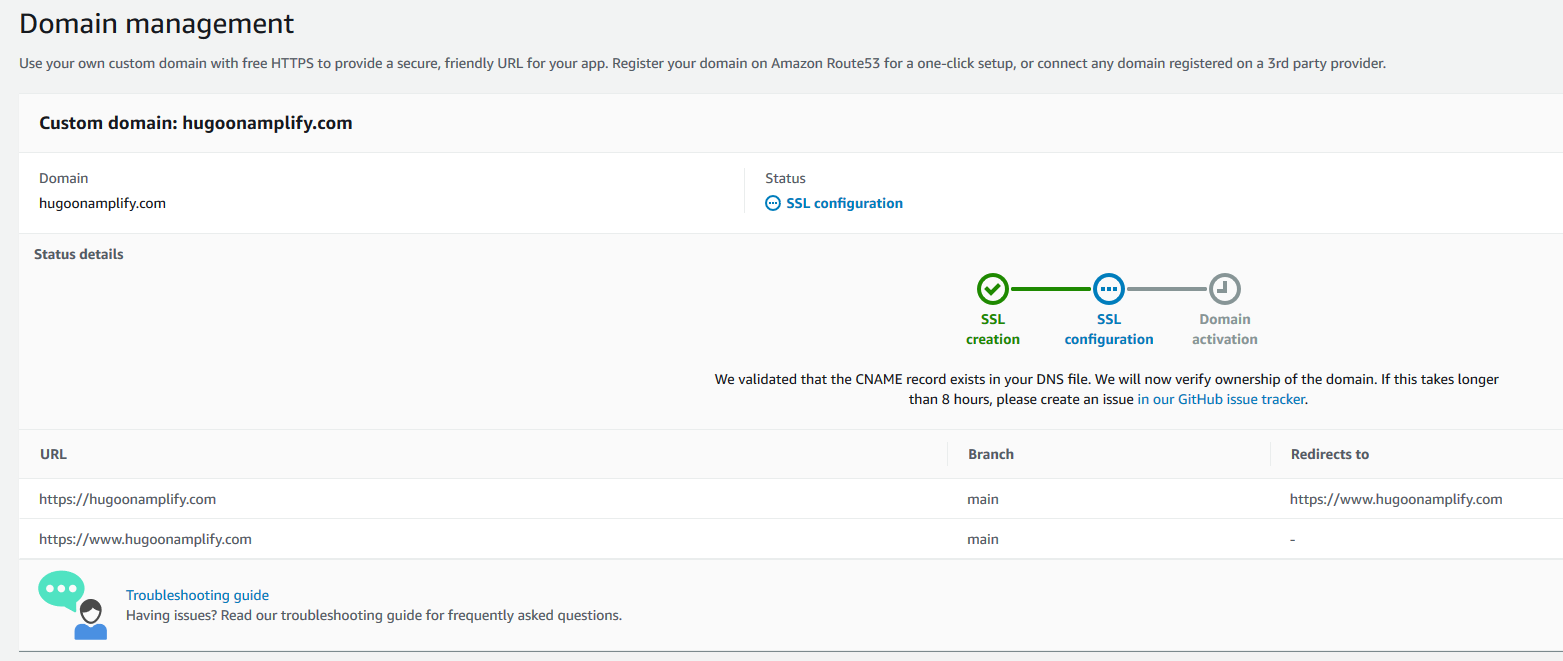
After a few moments, it proceeds to SSL configuration and indicates that ownership of domain is in progress.

ssl domain management configuration

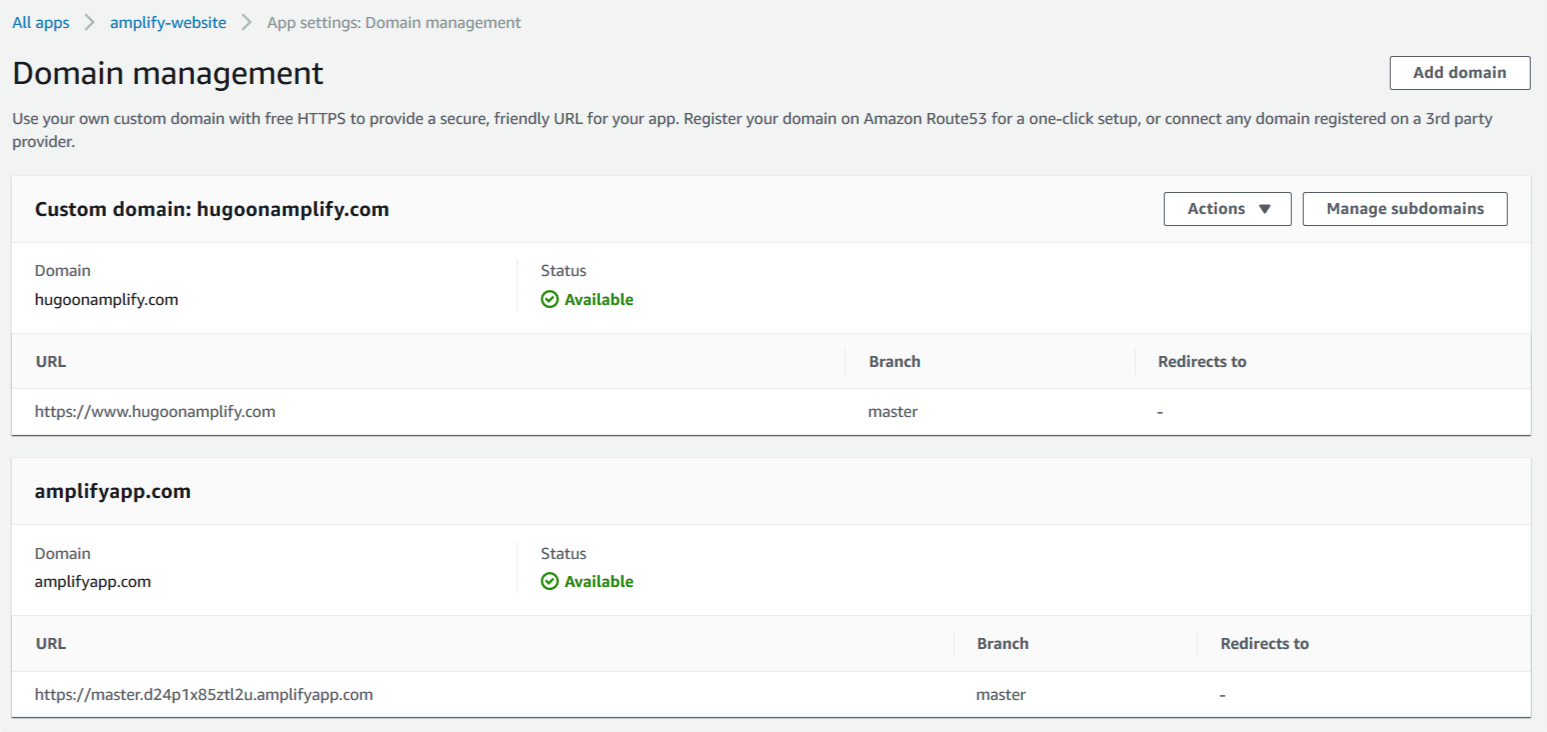
Amplify verifies domain ownership by creating a sample CNAME record in your hosted zone file. When ownership is verified, the domain is propagated onto an Amazon CloudFront distribution managed by the Amplify service, and domain activation is complete.

ssl domain management configured

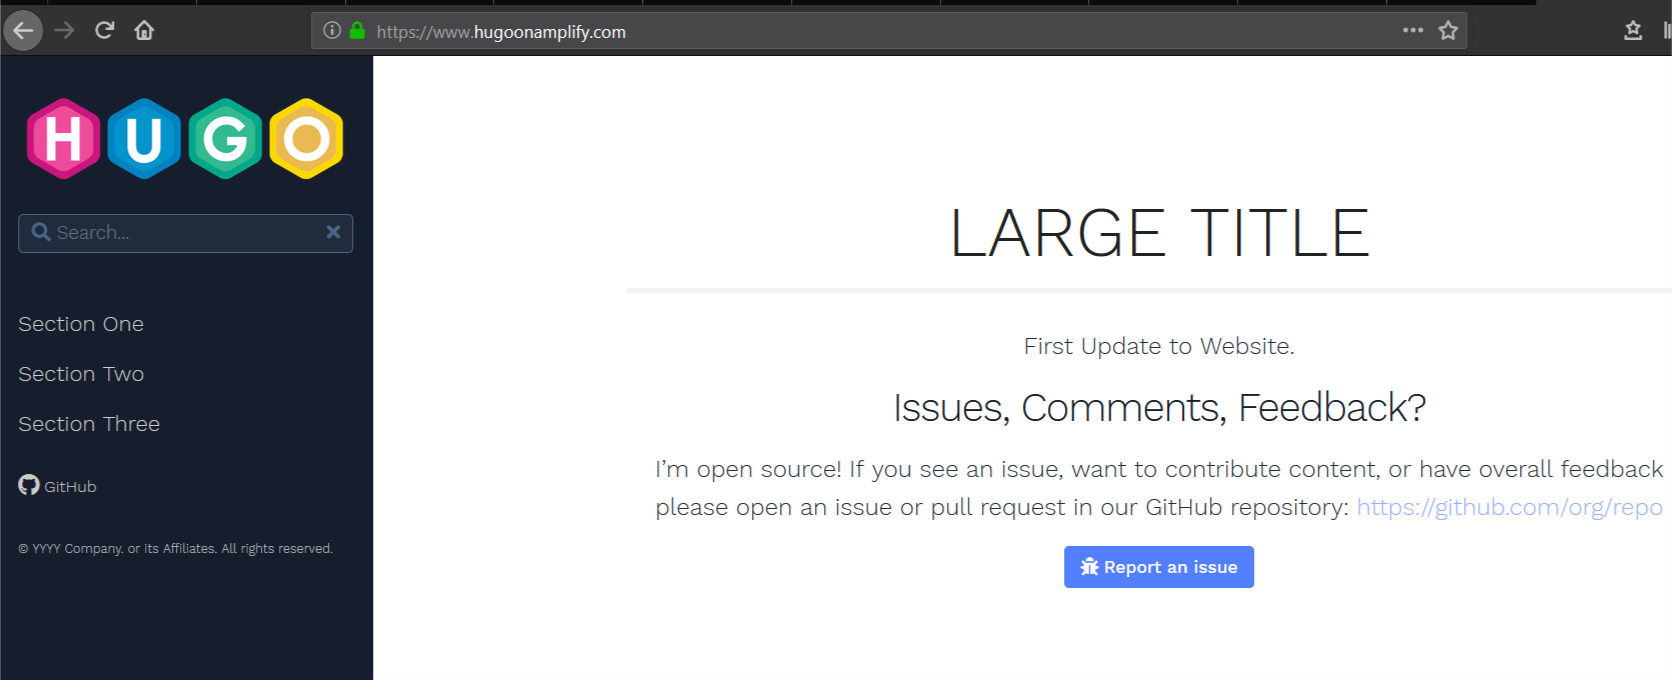
Clients can now access the website using the custom domain name www.hugoonaplify.com.

access website via custom domain


Establishing a subdomain for development

You can create a development website in Amplify that is aligned to a development code branch in CodeCommit that enables testing changes prior to production release.

1. Access the AWS Cloud9 IDE and use the terminal to enter the following commands to create a development branch and push changes to CodeCommit using the current content from the main branch with a single content change:

git checkout -b development
git branch
git remote -v
git add *; git commit -am "first development commit";
git push -u origin development

2. Open and edit the file ~/environment/amplify-website/workshop/content/_index.en.md and change the string Update to Website to something else.

Alternatively, run the following Unix sed command from the terminal in AWS Cloud9 to make that content change:

sed -i 's/Update to Website/Update to Development/g' ~/environment/amplify-website/workshop/content/_index.en.md

3. Commit and push your change with the following code:

git add *; git commit -am "second development commit"; git push -u origin development

You now configure a subdomain in Amplify to allow developers to review changes.

4. Return to the amplify-website app.

5. Choose Connect branch.

connect branch

6. For Branch, choose the development branch you created and committed code into.

7. Choose Next.

add development branch

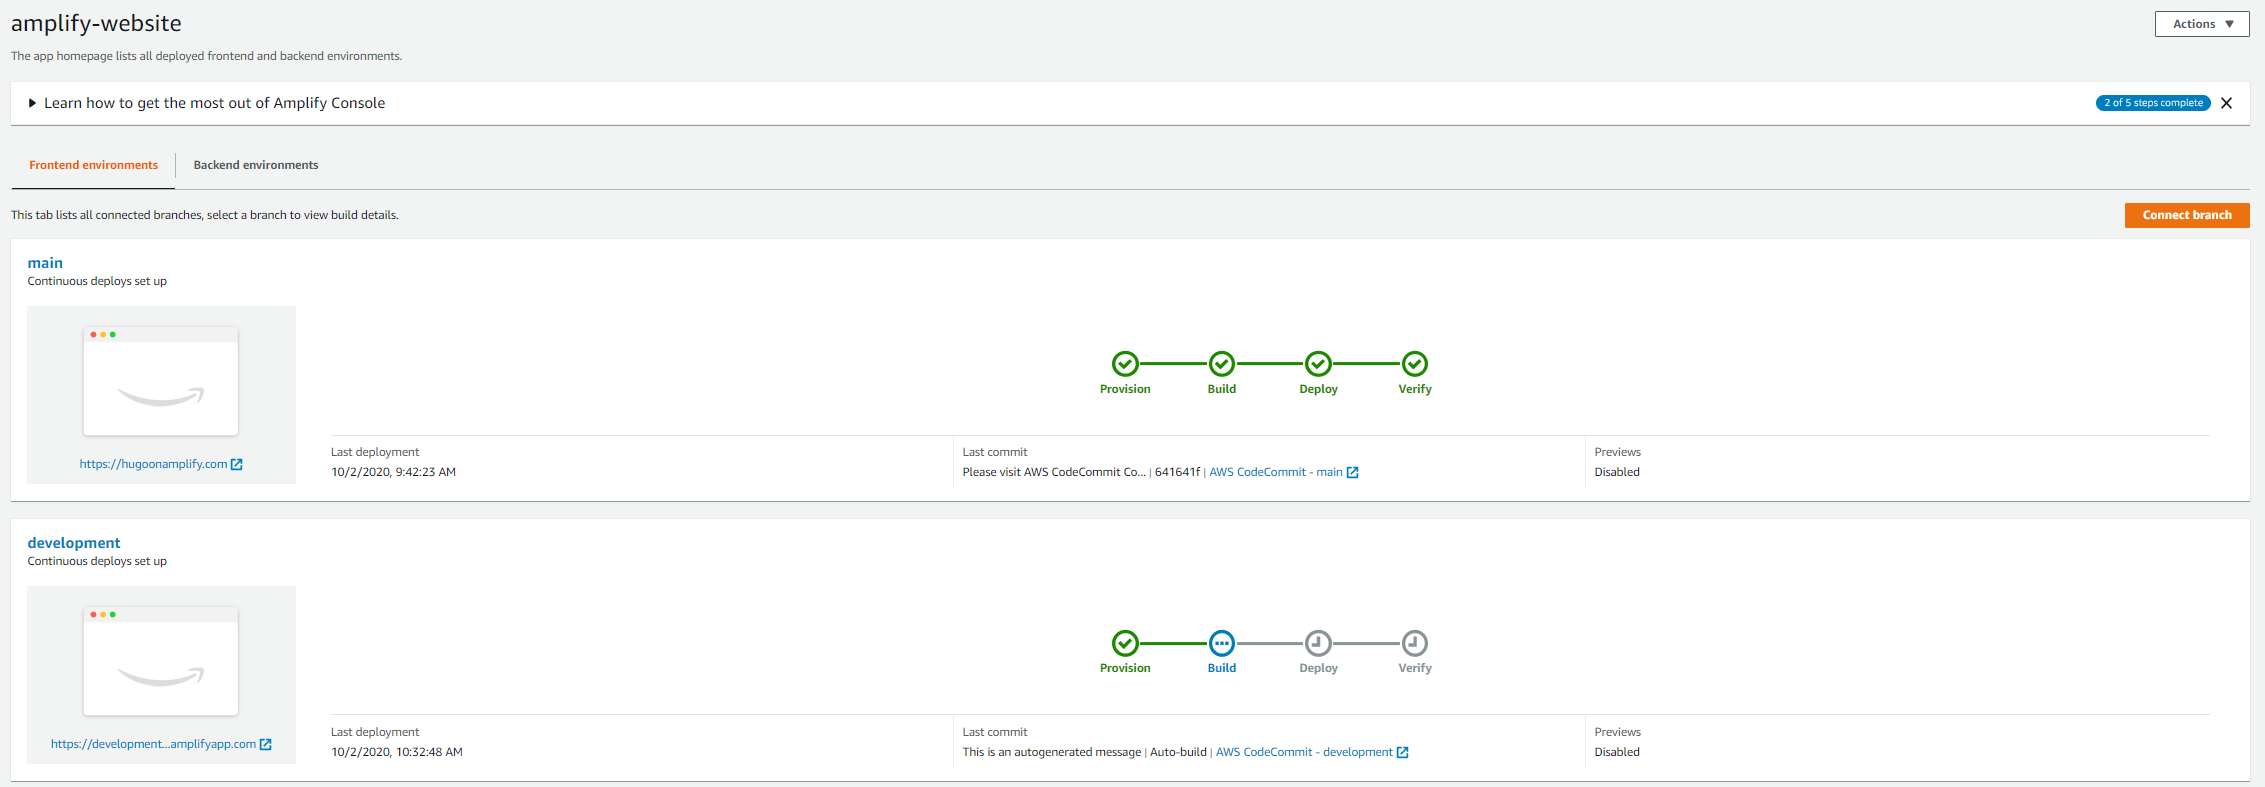
Amplify builds a second website based on the contents of the development branch. You can see the instance of your website matched to the development code branch on Amplify Console.

amplify two branches

8. Access the domain management menu item in your Amplify application to add a friendly subdomain.

9. Edit the domain and add a subdomain item with a name of your choice (for example, dev).

10. Associate it to the development branch containing the committed code and content changes.

11. Choose Add.

add dev domain

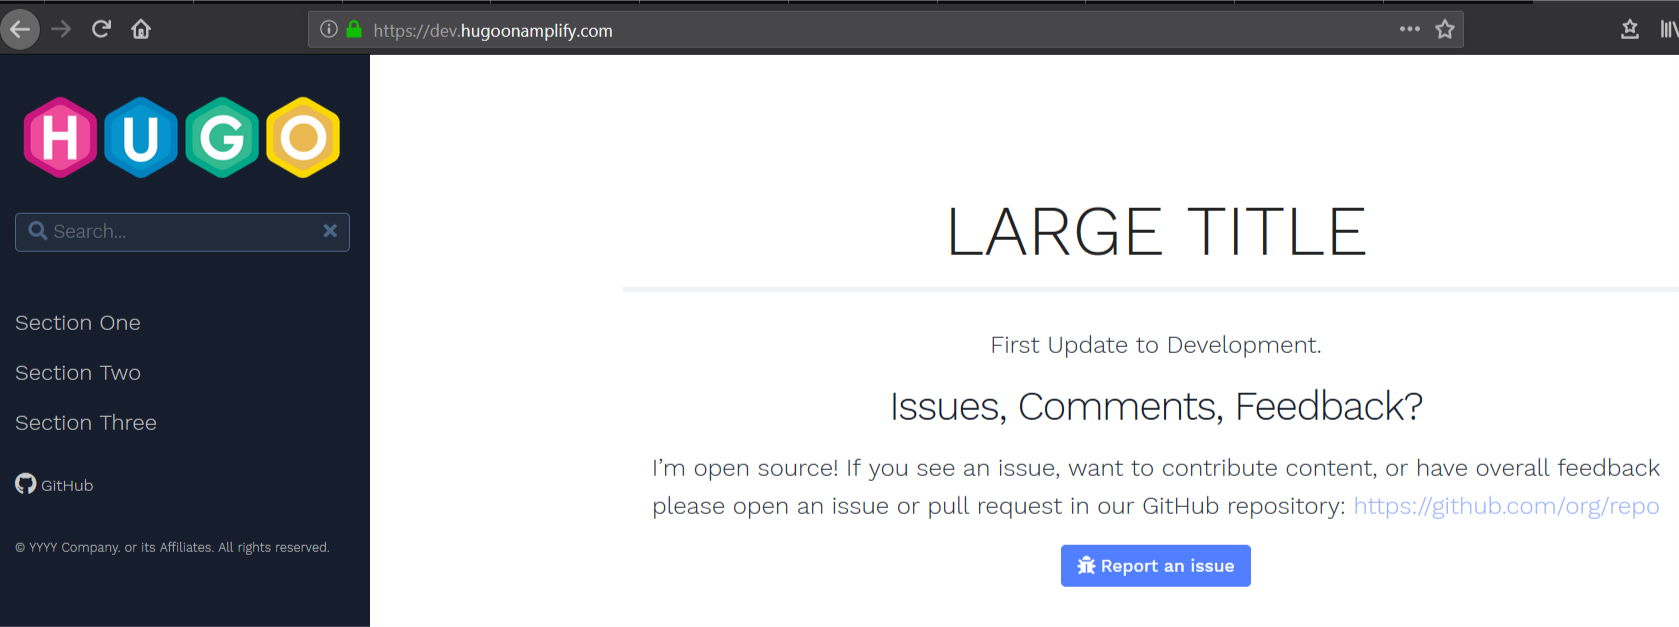
You can access the subdomain to verify the changes.

verify domain

Controlling access to development

You may wish to restrict access to new content as it’s deployed into the development website.

1. On Amplify Console, choose your application.

2. Choose Access control.

3. Under Access control settings, choose your preferred settings.

You have the option to restrict access globally or on a branch-by-branch basis. For this use case, we create a simple password protection for a user named developer on the development branch and site.

access control settings


Cleaning up

Unless you plan to keep the website you have constructed, you can quickly clean up provisioned assets and avoid any unnecessary costs.

1. On Amplify Console, select the app you created.

2. From the Actions drop-down menu, choose Delete app.

3. In the pop-up window, confirm the deletion.

4. On the CodeCommit dashboard, select the repository you created.

5. Choose Delete.

6. In the pop-up window, confirm the deletion.

7. On the AWS Cloud9 dashboard, select the IDE you created.

8. Choose Delete.

9. In the pop-up window, confirm the deletion.


Conclusion

Hugo is a powerful tool that enables accelerated delivery of content in a variety of formats including image portfolios, online resume presentation, blogging, and technical documentation. Amplify Console provides a convenient, easy-to-use, static web hosting service that can greatly accelerate delivery of static content.

When combining Hugo with Amplify Console, you can rapidly deploy websites in minutes with features such as friendly URLS, environments matched to code branches, and encryption (SSL). Visit gohugo.io to find out more about Hugo. For more information about how Amplify Console can help you rapidly deploy Hugo and other modern web applications, see the AWS Amplify Console User Guide.

Nigel Harris

Nigel Harris

Nigel Harris is an Enterprise Solutions Architect at Amazon Web Services. He works with AWS customers to provide guidance and technical assistance on AWS architectures.