Tag Archives: Identity & Compliance

How to clone an AWS CloudHSM cluster across Regions

Post Syndicated from Desiree Brunner original https://aws.amazon.com/blogs/security/how-to-clone-an-aws-cloudhsm-cluster-across-regions-2/

Important: As of January 1, 2025, Client SDK 3 tools (CMU and KMU) are no longer supported. This guide has been updated to use Client SDK 5 commands exclusively. Ensure you’re using the latest Client SDK 5 version (5.17 or later) for the most recent features and security improvements.

You can use AWS CloudHSM to generate, store, import, export, and manage your cryptographic keys. It also permits hash functions to compute message digests and hash-based message authentication codes (HMACs) and supports cryptographically signing data and verifying signatures. To help ensure redundancy of data and simplification of the disaster recovery process, AWS recommends you to clone your CloudHSM cluster into a different AWS Region. By doing this, you can synchronize keys, including non-exportable keys, across Regions. Non-exportable keys can only be synchronized to cloned clusters. Non-exportable keys are keys that can never leave the CloudHSM device in plaintext. They reside on the CloudHSM device and are encrypted for security purposes.

In this post, I show you how to set up one cluster in Region 1 and how to use the CopyBackupToRegion feature to clone the cluster and hardware security modules (HSMs) to a virtual private cloud (VPC) in Region 2.

Note: This post doesn’t include instructions on how to set up a cross-Region VPC to synchronize HSMs across the two cloned clusters. If you need to set up a cross-Region VPC, see Building a Scalable and Secure Multi-VPC AWS Network Infrastructure.

Solution overview

You clone a cluster to another Region in a two-step process:

  1. Copy a backup to the destination Region
  2. Create a new cluster from this backup

To complete this solution, you can use either the AWS Command Line Interface (AWS CLI) or the CloudHSM API. For this post, I show you how to use the AWS CLI to copy the cluster backup from Region 1 to Region 2 and then launch a new cluster from that copied backup.
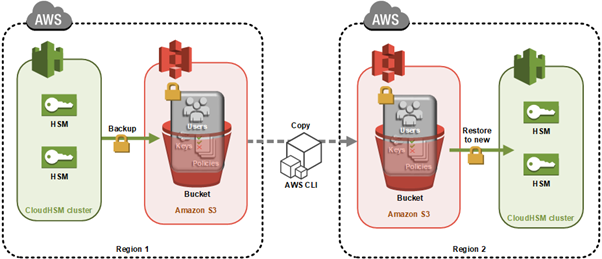
Figure 1 illustrates the process described in this post.

Figure 1: Architecture diagram

Figure 1: Architecture diagram

Here’s how the process works:

  1. CloudHSM creates a backup of the cluster and stores it in an Amazon Simple Storage Service (Amazon S3) bucket owned by the CloudHSM service.
  2. You use the AWS CLI API command to copy the backup to another Region.
  3. When the backup is completed, you use that backup to then create a new cluster and HSMs.
Note: Backups can’t be copied across partitions like the AWS GovCloud Regions, China Region and AWS European Sovereign Cloud.

As with all cluster backups, when you copy the backup to a new Region, it’s stored in an S3 bucket owned by a CloudHSM account. CloudHSM manages the security and storage of cluster backups for you. This means the backup in both Regions will also have the durability of Amazon S3, which has 99.999999999% durability. The backup in Region 2 will be encrypted and secured in the same way as your backup in Region 1. You can read more about the encryption process of your CloudHSM backups in AWS CloudHSM cluster backups.
Any HSMs created in this cloned cluster will have the same users and keys as the original cluster at the time the backup was taken. From this point on, you must manually keep the cloned clusters in sync. Specifically:

  • If you create users after creating your new cluster from the backup, you must create them on both clusters manually.
  • If you change the password for a user in one cluster, you must change the password on the cloned clusters to match.
  • If you create more keys in one cluster, you must sync them to at least one HSM in the cloned cluster. After you sync the key from cluster 1 to cluster 2, the CloudHSM automated cluster synchronization will take care of syncing the keys in the second cluster.

Prerequisites

Before starting, ensure you have the following in place:

Note: Syncing keys across clusters in more than one Region will only work if all clusters are created from the same backup. This is because synchronization requires the same secret key—called a masking key—to be present on the source and destination HSM. The masking key is specific to each cluster. It can’t be exported, and can’t be used for any purpose other than synchronizing keys across HSMs in a cluster.

Step 1: Create your first cluster in Region 1

The first step in cloning your CloudHSM cluster is to create the initial cluster—which will serve as the foundation for your cross-Region deployment—in your source Region.

Create the cluster

Replace <SUBNET_ID_1> with one of your private subnets. Make a note of the cluster ID to use later:
aws cloudhsmv2 create-cluster --hsm-type hsm2m.medium --subnet-ids <SUBNET_ID_1>

Launch the EC2 client

Launch an Amazon Elastic Compute Cloud (Amazon EC2) instance in your public subnet. See Step 1 of Get started with Amazon EC2 for detailed steps.

Create the first HSM

Replace <CLUSTER_ID> with the ID you recorded earlier and <AVAILABILITY_ZONE> with the Availability Zone matching your private subnet (for example, us-east-1a):
aws cloudhsmv2 create-hsm --cluster-id <CLUSTER_ID> --availability-zone <AVAILABILITY_ZONE>

Initialize the cluster

Before you initialize the cluster, create a self-signed certificate and use it to sign the cluster’s certificate signing request (CSR). Once you have the signed certificate, initialize the cluster:

aws cloudhsmv2 initialize-cluster \
    --cluster-id <CLUSTER_ID> \
    --signed-cert file://<CLUSTER_ID>_CustomerHsmCertificate.crt \
    --trust-anchor file://customerCA.crt

Important: Copy the certificate used to sign your cluster’s CSR to to maintain a secure connection.

After the command completes, the cluster transitions to the Initialized state. Copy the certificate used to sign your cluster’s CSR to /opt/cloudhsm/etc so that the CloudHSM client can verify the cluster’s identity when you configure it in the next step:

sudo cp _CustomerHsmCertificate.crt /opt/cloudhsm/etc/
sudo cp customerCA.crt /opt/cloudhsm/etc/

Install the CloudHSM Client SDK 5

Download and install the latest CloudHSM Client SDK 5 (version 5.17 or later):
For example, for Amazon Linux 2023:

wget https://s3.amazonaws.com/cloudhsmv2-software/CloudHsmClient/Amzn2023/cloudhsm-cli-latest.amzn2023.x86_64.rpm
sudo yum install -y ./cloudhsm-cli-latest.amzn2023.x86_64.rpm

Configure the client

Configure the CloudHSM client with your HSM’s elastic network interface (ENI IP) address:
configure-cli -a <HSM_IP>

Activate the cluster

To activate the cluster, run the CloudHSM CLI in interactive mode.

cloudhsm-cli interactive

You can run user list to see the admin user, which is not yet activated.

aws-cloudhsm > user list
{
  "error_code": 0,
  "data": {
    "users": [
      {
        "username": "admin",
        "role": "unactivated-admin",
        "locked": "false",
        "mfa": [],
        "cluster-coverage": "full"
      },
      {
        "username": "app_user",
        "role": "internal(APPLIANCE_USER)",
        "locked": "false",
        "mfa": [],
        "cluster-coverage": "full"
      }
    ]
  }
}

Use the cluster activate command to set the initial admin password.

aws-cloudhsm > cluster activate
Enter password:<NewPassword>
Confirm password:<NewPassword>
{
  "error_code": 0,
  "data": "Cluster activation successful"
}

When completed, sign out using the command quit, then sign back in with the new password, using the command login --username admin --role admin.

After doing this, you can create the first crypto user (CU). You create the user by running the command: user create --username <USERNAME> --role crypto-user. For more information, see HSM user types for CloudHSM CLI. Crypto users are permitted to create and share keys on the CloudHSM.

When completed, sign out using the command quit.

Step 2: Create keys in Region 1

Create a non-exportable AES-256 key:

aws-cloudhsm > key generate-symmetric aes \
    --label aes-example \
    --key-length-bytes 32 \
    --attributes extractable=false

Make note of the key reference returned in the output, because you’ll need it for synchronization later.

Step 3: Trigger a backup of your cluster

To trigger a backup for Region 2:

  1. Add another HSM to your cluster in Region 1 (can be done using the AWS Management Console or AWS CLI)
  2. The backup will contain:
    • All users (crypto officers (COs), crypto users (CUs), and appliance users)
    • All key material on the HSMs
    • All configurations and policies
Note: The user portion is critical because keys can only be synced across clusters to the same user.

Record the backup ID to use later. You can find this in the CloudHSM console under Backups, or using the following command:

aws cloudhsmv2 describe-backups --cluster-id

To avoid unnecessary charges, you can delete the additional HSM after the backup is created.

Step 4: Copy your backup Between Regions

Before you can transfer the backup to your destination Region, you need to configure the appropriate IAM permissions to allow the copy operation.

IAM permissions

Ensure proper permissions are configured for your IAM role or user. You need CloudHSM administrator privileges. Here’s an example permissions policy:

{
   "Version": "2012-10-17",
   "Statement": {
      "Effect": "Allow",
      "Action": [
         "cloudhsm:*",
         "ec2:CreateNetworkInterface",
         "ec2:DescribeNetworkInterfaces",
         "ec2:DescribeNetworkInterfaceAttribute",
         "ec2:DetachNetworkInterface",
         "ec2:DeleteNetworkInterface",
         "ec2:CreateSecurityGroup",
         "ec2:AuthorizeSecurityGroupIngress",
         "ec2:AuthorizeSecurityGroupEgress",
         "ec2:RevokeSecurityGroupEgress",
         "ec2:DescribeSecurityGroups",
         "ec2:DeleteSecurityGroup",
         "ec2:CreateTags",
         "ec2:DescribeVpcs",
         "ec2:DescribeSubnets",
         "iam:CreateServiceLinkedRole"
      ],
      "Resource": "*"
   }
}

Copy the backup

To copy your backup from Region 1 to Region 2, you need:

  • The destination Region
  • The source cluster ID and backup ID (you can use either or both) found in the CloudHSM console

If you specify only the cluster ID, the most recent backup will be chosen. For a specific backup, use the backup ID.

aws cloudhsmv2 copy-backup-to-region \
    --destination-region <DESTINATION_REGION> \
    --backup-id <BACKUP_ID>

Example response:

{
    "DestinationBackup": {
        "SourceBackup": "backup-4kuraxsqetz",
        "SourceCluster": "cluster-kzlczlspnho",
        "CreateTimestamp": 1531742400,
        "SourceRegion": "us-east-1"
    }
}

After copying, you will see a new backup ID in your console. Use this to create your new cluster in Region 2:

aws cloudhsmv2 create-cluster \
    --hsm-type hsm2m.medium \
    --subnet-ids <SUBNET_ID_REGION_2> \
    --source-backup-id <BACKUP_ID_REGION_2> \

Certificate transfer

Copy the cluster certificate from the original cluster to the new Region:

  1. Open two terminal sessions (one for each HSM)
  2. Copy the certificate content from cluster 1
  3. Create and paste into a new file in cluster 2

The certificate is required for encrypted connections between your client and HSM instances.

Security group configuration

Add the cloned cluster’s Security Group to your EC2 client instance:

  1. Select the Security Group for your EC2 client in the EC2 console
  2. Choose “Add rules”
  3. Add a rule allowing traffic from the cluster’s Security Group ID on port 2225

Then retrieve the ENI IP address of the HSM in Region 2 using the following command, and make a note of the output—you will use it in the next step to configure cross-Region connectivity:

aws cloudhsmv2 describe-clusters \
    --filters clusterIds=<cluster_ID_region_2> \
    --region <region_2> \
    --query 'Clusters.Hsms.EniIp' \
    --output text

Step 5: Configure cross-Region connectivity

To enable the CloudHSM CLI to communicate with both clusters simultaneously, add the Region 2 cluster to your existing client configuration using the ENI IP address you retrieved in the previous step:

Step 6: Synchronize keys between clusters

To synchronize keys between your source and destination clusters, you first need to verify which users and keys exist before replicating them.

configure-cli add-cluster \
    --cluster-id <cluster_ID_region_2> \
    --endpoint <hsm_eni_ip_region_2> \
    --region <region_2>

The CloudHSM CLI will now communicate with both clusters simultaneously using the certificates already configured during the initial setup, enabling key synchronization using the masking key shared between cloned clusters.

List users and keys

First, verify users and list available keys:
# List all users
cloudhsm-cli user list

# List keys for specific user
cloudhsm-cli key list --username

Replicate keys

To replicate a key from Region 1 to Region 2:

cloudhsm-cli key replicate \
    --filter key-reference=<key_ref> \
    --source-cluster-id <source_cluster_ID> \
    --destination-cluster-id <destination_cluster_ID>

Verify the key replication by listing keys again:

cloudhsm-cli key list --username <username>

The output should show identical key references on both clusters. Repeat this process for any additional keys that you want to synchronize.

Points to remember

After cloning a cluster to a backup cluster, remember these important points:

  • Always manually update users across clusters after the initial backup
  • Use key replication for any keys created after the initial backup
  • Keep your Client SDK 5 tools updated for the latest features and security improvements
  • The January 1, 2025, end-of-support date for Client SDK 3 tools (CMU and KMU) means you should migrate to Client SDK 5 as soon as possible

Client SDK 5 supports ARM64 architecture on the following Linux distributions:

  • Amazon Linux 2023
  • Amazon Linux 2
  • Red Hat Enterprise Linux (RHEL) 8 (8.3+)
  • Red Hat Enterprise Linux (RHEL) 9 (9.2+)
  • Red Hat Enterprise Linux (RHEL) 10 (10.0+)
  • Ubuntu 22.04 LTS
  • Ubuntu 24.04 LTS
  • Debian 12
  • USE Linux Enterprise Server 15

Conclusion

You now have a fault-tolerant AWS CloudHSM environment with synchronized keys across Regions using the latest tools and best practices. By implementing this cross-Region cluster configuration, you gain improved disaster recovery capabilities, reduced risk of data loss, and enhanced business continuity for your cryptographic operations. This approach helps ensure that your critical cryptographic keys remain available even in the event of a Regional outage, providing the resilience that enterprise workloads demand.

If you have feedback about this post, submit comments in the Comments section below. For questions about this post, start a new thread on the AWS re:Post.

Desiree Brunner

Desiree Brunner

Desiree is a Security Specialist Solutions Architect working with regulated customers as part of the AWS EMEA Security & Compliance team. She builds on her background in DevOps and platform engineering to support her customers in designing secure, compliant cloud environments. Passionate about mental health and knowledge sharing, she regularly speaks at AWS events and supports teams on their cloud security journey.

Rickard Löfström

Rickard Löfström

Rickard guides enterprises in building secure cloud environments as a Specialist Solutions Architect in the AWS EMEA Security & Compliance team. He advises customers on implementing AWS security services, focusing on identity management, data protection, and infrastructure security controls. He enjoys translating complex security requirements into technical solutions that enable organizations to meet their security objectives while maintaining operational efficiency.

Secure AI agent access patterns to AWS resources using Model Context Protocol

Post Syndicated from Riggs Goodman III original https://aws.amazon.com/blogs/security/secure-ai-agent-access-patterns-to-aws-resources-using-model-context-protocol/

AI agents and coding assistants interact with AWS resources through the Model Context Protocol (MCP). Unlike traditional applications with deterministic code paths, agents reason dynamically, choosing different tools or accessing different data depending on context. You must assume an agent can do anything within its granted entitlements, whether OAuth scopes, API keys, or AWS Identity and Access Management (IAM) permissions, and design your controls accordingly. Agents operate at machine speed, so the impact of misconfigured permissions scales quickly.

This blog post focuses on IAM as the authorization layer for AWS resource access and presents three security principles for building deterministic IAM controls for these non-deterministic AI systems. The principles apply whether you’re using AI coding assistants like Kiro and Claude Code, or deploying agents on hosting environments like Amazon Bedrock AgentCore. We cover deployment patterns, then explore each principle with concrete IAM policy examples and implementation guidance.

This post specifically addresses securing the MCP access path, where agents interact with AWS resources through MCP servers. AI coding assistants and agents can also access AWS service APIs directly through general-purpose tools like bash or shell execution, bypassing MCP servers entirely. For this reason, we recommend architecting agents to use MCP servers rather than direct service access where possible. MCP servers provide a layer of abstraction that enables the differentiation controls in principle 3 and creates additional monitoring capabilities through AWS CloudTrail. When agents bypass MCP, the differentiation mechanisms in principle 3 don’t apply, and principles 1 and 2 become your primary controls. We discuss this scope boundary in principle 3.

MCP deployment patterns

Your deployment pattern determines which security principles and implementation approaches apply. Three dimensions define this pattern, including where the agent runs, what type of MCP server offers the tools, and your level of control over the agent code. No matter how you connect to it, the MCP server needs AWS credentials to interact with AWS resources.

Where agents run

Agents access AWS resources from three locations: developer machines (where you control the infrastructure), hosting environments (where you control the infrastructure or significant aspects of it), and third-party agent platforms (where you do not control the infrastructure). This post focuses on the first two patterns. Each has a different credential model and different organizational control options.

AI coding assistants and local agents

AI coding assistants (Kiro, Claude Code) or local agent applications represent the first deployment pattern. These assistants run locally on developer machines and connect to MCP servers or use AWS Command Line Interface (AWS CLI) commands to access AWS resources. In this pattern, credentials come from the developer’s local environment. When a developer configures an MCP server in their mcp.json file, they specify which AWS credentials to use. Options include a named profile, which can use credential helpers and the credential provider chain for short-lived credentials, environment variables, or explicit credential configuration. This means the developer controls which IAM principal the agent uses to access AWS. This creates a governance challenge. Without additional controls, developers often use their developer admin credentials, shared development roles, or even production roles for agent access. Developer credentials often carry broad permissions designed for interactive use, where human judgment serves as a safeguard. When an agent inherits these permissions, it operates without that judgment at machine speed. Principle 1 explores this risk in detail.

Agents on hosting environments

Agents deployed on hosting environments represent the second deployment pattern. These agents run on infrastructure you manage, not on developer machines. This changes the credential management model. Using Amazon Bedrock AgentCore as an example, when an agent runs on AgentCore Runtime, it uses an execution IAM role that you configure when creating the runtime. The execution role’s permissions apply to all operations the agent performs and cannot be scoped down per-invocation at the runtime configuration level. For more granular control, agents can call AWS Security Token Service (AWS STS) AssumeRole or AssumeRoleWithWebIdentity (collectively referred to as AssumeRole in this post). This obtains temporary credentials with session policies that further restrict permissions beyond the role’s base permissions. Agents built with frameworks like Strands can also initialize individual MCP clients with different credential sets by calling AssumeRole and passing the resulting credentials to each client connection. This enables per-tool credential isolation within a single agent process. The same pattern applies to agents deployed on Amazon Elastic Compute Cloud (Amazon EC2) or Amazon Elastic Kubernetes Service (Amazon EKS).

With this centralized execution model, you can implement organizational controls. You define the available IAM roles through infrastructure configuration instead of relying on developer choice. However, you must design these roles carefully to prevent overly permissive access and implement session policies for tool-specific restrictions.

What type of MCP server

MCP servers come in two types, provider-managed and self-managed. AWS-managed servers are operated by AWS on your behalf. Self-managed servers are servers that you install and run yourself. The server type affects your operational overhead, available features, and how you implement security controls.

AWS offers fully managed MCP servers, including the AWS MCP Server, Amazon EKS MCP Server, and Amazon ECS MCP Server. These AWS-managed servers run on AWS infrastructure and require no installation or maintenance on your part. AWS-managed MCP servers automatically add IAM context keys (aws:ViaAWSMCPService and aws:CalledViaAWSMCP) to every downstream AWS service call. You can write IAM policies that check these keys to distinguish between AI-driven actions and human-initiated actions without any additional configuration.

Self-managed MCP servers include AWS-provided servers from the AWS MCP GitHub repository that you install and run yourself. They also include custom MCP servers that you build from scratch. With self-managed servers, you control the deployment location (local machine, Amazon EC2, Amazon EKS), the configuration, and the maintenance. These servers can be used with either AI coding assistants running locally or agents deployed on hosting environments. The key difference for security controls is that self-managed servers don’t automatically add IAM context keys for differentiation. You must configure the MCP server to add session tags when assuming IAM roles if you require differentiation between AI-driven and human-initiated actions. This requires modifying your MCP server code to call AWS STS AssumeRole with tags attached. You then write IAM policies that check for these tags using the aws:PrincipalTag condition key. Self-managed servers can also be extended to implement dynamic authorization flows, such as mapping inbound OAuth tokens to outbound IAM role assumptions, giving you control over the full authorization chain. Additionally, with AWS-managed MCP servers, AWS injects context keys at the service layer, so callers cannot spoof them. With self-managed servers, the entity calling AssumeRole sets the session tags, so you must trust that your MCP server code hasn’t been modified.

The responsibility model differs between server types. With AWS-managed MCP servers, AWS is responsible for server infrastructure, patching, and context key injection. You’re responsible for IAM policy design and credential configuration. With self-managed MCP servers, you’re additionally responsible for server patching, dependency and library supply chain security, session tag implementation, and verifying server integrity. This connects to the supply chain risk described in principle 1. While self-managed servers require more operational overhead to implement and maintain, they give you flexibility and control.

Level of client control

A third dimension shapes your security implementation, whether you control the agent and MCP client code (code-controlled) or are limited to configuring pre-built tools without modifying their runtime behavior (configuration-bound). This determines which security mechanisms are available to you at runtime.

In configuration-bound scenarios, you use an AI coding assistant such as Kiro or Claude Code and configure credentials in your mcp.json file. You select which IAM role or profile the agent uses, but you cannot modify the agent’s runtime behavior. The agent calls AWS APIs using whatever credentials you configured ahead of time, and you cannot inject session policies or tags into those calls programmatically. Your security controls must be in place before the agent runs. You select narrowly scoped roles at configuration time, and your organization enforces guardrails through permission boundaries and service control policies (SCPs). These mechanisms restrict what the agent can do regardless of which role the developer selects.

In code-controlled scenarios, you build or deploy a custom agent on Amazon Bedrock AgentCore, Amazon EC2, Amazon EKS, or your local machine, or you build and run a custom MCP server. Because you control the runtime code, you can implement credential management programmatically. For custom agents, this means calling AssumeRole with session policies scoped to each tool invocation, attaching session tags for differentiation, and obtaining temporary credentials with the minimum permissions each operation requires. For custom MCP servers, you can inject session policies into every AWS API call the server makes, applying a consistent set of restrictions across all operations. Both approaches give you runtime IAM controls that are not available in config-bound scenarios.

Deployment pattern summary

The following table summarizes how these dimensions combine.

Source type MCP server type Client control Credential source Differentiation mechanism Example use case
AI coding assistant AWS-managed MCP Config-bound Local (AWS CLI, env vars, ) Automatic context keys Kiro calling AWS-managed MCP server
AI coding assistant Self-managed MCP (local or remote) Config-bound Local (AWS CLI, env vars, ) Manual session tags or session policies Kiro calling local AWS MCP server
Agent on hosting environment AWS-managed MCP Code-controlled Execution role or AssumeRole Automatic context keys Amazon Bedrock AgentCore agent calling AWS-managed MCP server
Agent on hosting environment Self-managed MCP (remote) Code-controlled Execution role or AssumeRole Manual session tags or session policies Agent calling AWS MCP server deployed on Amazon Bedrock AgentCore

Your deployment pattern and level of client control determine which of the following security principles apply and how you implement them.

Three security principles for agent access

With this understanding of deployment patterns, let’s explore the three security principles that apply across all patterns.

  • Principle 1 – Assume all granted permissions could be used: Design permissions based on the acceptable scope of impact, not intended functionality alone.
  • Principle 2 – Provide organizational guidance on role usage: Enforce permission design through role governance, session policies, permission boundaries, and organizational policies.
  • Principle 3 – Differentiate AI-driven from human-initiated actions: Apply different IAM rules based on whether the action comes from an agent or a human.

Security principle 1: Assume all granted permissions could be used

The first security principle is fundamental. Any permission you grant to an agent can be exercised, regardless of your intended use case. If you give an agent s3:DeleteObject permission with a tool that can call the API, you must assume it can delete any Amazon Simple Storage Service (Amazon S3) object it has access to. This can happen in ways you cannot predict or fully prevent through code review alone. This non-deterministic behavior requires a shift in your approach to IAM permissions.

Traditional applications follow deterministic code paths. You can review the source code, identify every API call, and grant the permissions needed. AI agents operate differently. They make decisions at runtime based on reasoning, context, and learned patterns. You cannot predict which AWS APIs or tools an agent will call or which resources it will access. Static analysis of agent code tells you what tools are available, but not which tools will be invoked or how they’ll be used.

This creates a challenge when developers configure agents to use AWS credentials. Developers commonly use existing IAM roles, such as the role their traditional application uses or their local admin role for the AWS CLI. These roles were designed assuming predictable behavior and human judgment. Your local admin role has s3:* permissions because you exercise judgment on what to delete and when. You understand the context, recognize production resources, and can assess the impact of your actions.

An agent with that same role operates at machine speed without human judgment. It can delete production data through hallucination or be directed through prompt injection to perform unintended actions. It can also make a logical error in its reasoning that leads to unintended operations. The speed and scale at which agents operate increases the potential scope of these issues. An agent can make thousands of API calls in seconds, so the impact of misconfigured permissions scales quickly.

Consider the following scenarios with overly permissive access.

  • Hallucination: The agent misinterprets a user request and performs the wrong action. An agent designed to clean up temporary files might hallucinate that production data is temporary and delete it.
  • Prompt injection: An outside party crafts unexpected input that influences the agent’s reasoning. An agent designed to query Amazon DynamoDB tables could be directed to call dynamodb:PutItem or dynamodb:DeleteItem on resources outside its intended scope.
  • Logic errors: The agent’s reasoning leads to an incorrect conclusion. An agent analyzing S3 storage costs might conclude that frequently accessed production data is unused and delete it to save costs.
  • Tool poisoning: A compromised MCP server or dependency performs unintended operations using the agent’s credentials. An agent with broad S3 and DynamoDB permissions connects to an MCP server whose dependency has been modified to exfiltrate data. The compromised tool reads sensitive objects and writes them to an attacker-controlled location, all within the agent’s granted permissions.

This security principle reframes how you approach IAM permissions for agents. Instead of asking what does the agent need to do?, ask what is the scope of impact if the agent acts outside its intended use case? Design permissions based on the acceptable scope of access, not only on intended functionality. If an agent needs to read S3 objects, grant s3:GetObject, not s3:*. If it needs to write to specific paths, use resource-level conditions to restrict access to those paths. Consider what tools the agent has access to and what API calls those tools can make. Design permissions that limit what the agent is allowed to perform based on organizational policy. This doesn’t mean agents can’t have write or delete permissions. It means you and your organization must consider what resources those permissions apply to and what safeguards are in place.

Beyond IAM policies, consider implementing data perimeters as an additional layer of defense. Data perimeters use VPC endpoint policies, resource control policies (RCPs), resource policies, and service control policies (SCPs) to restrict access based on identity, resource, and network boundaries. For agents, data perimeters help verify that even if IAM permissions are broader than intended, access is limited to trusted resources from expected networks. For more information, see Building a data perimeter on AWS.

Practical implementation guidance:

  • Apply least privilege rigorously: If an agent needs read access, grant read permissions. If it needs write access, grant write to specific resources, not all resources of that type.
  • Use resource-level restrictions: Employ IAM policy conditions to limit permissions to specific buckets, paths, tables, or other resources. Don’t grant blanket permissions across all resources.
  • Consider read-only alternatives: Evaluate whether the agent’s task can be accomplished with read-only access. Many analysis and reporting tasks don’t require write or delete permissions.
  • Implement comprehensive monitoring: Set up Amazon CloudWatch alarms for unexpected agent actions, unusual access patterns, or operations on sensitive resources. Monitor for sensitive operations like deletions or modifications to production resources.
  • Conduct regular permission audits: As agents gain new tools and capabilities, developers often add permissions incrementally without removing unused ones. An agent that started with read-only access can gradually accumulate write and delete permissions across multiple services. Review agent IAM roles and policies regularly to identify and remove permissions that are no longer needed.
  • Verify MCP server integrity: Verify the provenance and integrity of MCP servers before granting them access to AWS credentials. Maintain an organizational registry of approved MCP servers and their expected behavior, and monitor for unauthorized server deployments that might have assumed execution roles. For more on agentic application risks, see the OWASP Top 10 for Agentic Applications.

Security principle 1 establishes the foundation. Understand the scope of every permission you grant. The next two security principles build on this foundation.

Security principle 2: Provide organizational guidance on role usage

The second security principle addresses organizational governance. Principle 1 requires that you design permissions based on acceptable scope of impact. Principle 2 addresses how your organization enforces that design through role governance, session policies, permission boundaries, and organizational policies.

When developers adopt AI coding assistants and configure MCP servers, they choose which credentials to use. Without organizational controls, developers often use existing roles (such as personal admin roles, shared development roles, or production roles) that were designed for human use with far more permissions than agents need. For agents deployed on hosting environments, you configure execution roles, but the same question applies. What permissions should those roles have, and how do you enforce consistency across deployments? The answer depends on your level of client control.

When you control the agent code

When you build or deploy custom agents on Amazon Bedrock AgentCore, Amazon EC2, Amazon EKS, or locally, you control the runtime code and can implement dynamic credential management. This is the strongest enforcement model because you can scope permissions per tool invocation at runtime. The same applies if you build or modify a custom MCP server. Because you control the server code, you can inject session policies into every AWS API call the server makes.

The IAM role defines the permission ceiling for the agent across all its tools. Instead of creating a separate role for every tool or MCP server, you use session policies to scope down the role’s permissions per operation. When the agent invokes a specific tool, it calls AssumeRole with a session policy that restricts permissions to just what that tool requires. The effective permissions are the intersection of the role’s policies and the session policy. Session policies restrict permissions but never expand them. If a role grants broad permissions but you attach the ReadOnlyAccess managed policy as a session policy, the agent can only perform read operations. You can also use inline session policies for resource-specific restrictions, such as limiting access to specific S3 buckets or DynamoDB tables.

The following example shows how to implement session policies in agent code.

import boto3

# Uses the execution IAM role as part of AgentCore Runtime
sts = boto3.client('sts')

# Assume role with ReadOnlyAccess managed policy as session policy
response = sts.assume_role(
    RoleArn='arn:aws:iam::111122223333:role/AgentDataRole',
    RoleSessionName='agent-data-reader',
    PolicyArns=[
        {'arn': 'arn:aws:iam::aws:policy/ReadOnlyAccess'}
    ],
    DurationSeconds=3600
)

# Use the temporary credentials
credentials = response['Credentials']
s3 = boto3.client(
    's3',
    aws_access_key_id=credentials['AccessKeyId'],
    aws_secret_access_key=credentials['SecretAccessKey'],
    aws_session_token=credentials['SessionToken']
)

For agents on hosting environments like Amazon Bedrock AgentCore, the execution role serves two purposes. It’s the trust anchor that lets the agent call AssumeRole for tool-specific credentials, and it can supply baseline permissions that all operations need, such as writing logs to CloudWatch. For tool-specific operations that access customer resources, use AssumeRole with session policies to obtain scoped temporary credentials rather than using the execution role’s permissions directly. This centralized execution model simplifies enforcing consistent session policies across all agent deployments. Agents can also attach tags when assuming roles for differentiation purposes (covered in Security principle 3).

When you’re configuration bound

When you use an AI coding assistant like Kiro or Claude Code with off-the-shelf MCP servers, you configure credentials in your mcp.json file but cannot modify the agent’s runtime behavior. Your security controls must be established before the agent runs.

Your first control is role selection. As described in the preceding deployment patterns section, AI coding assistants use credentials from the developer’s local environment. Create agent-specific IAM roles with narrower permissions than equivalent human roles, and direct developers to use them. For self-managed MCP servers running locally, the developer specifies the role through environment variables in the mcp.json configuration.

{
  "mcpServers": {
    "awslabs.aws-pricing-mcp-server": {
      "command": "uvx",
      "args": ["awslabs.aws-pricing-mcp-server@latest"],
      "env": {
        "AWS_PROFILE": "agent-dev-role",
        "AWS_REGION": "us-east-1"
      }
    }
  }
}

For AWS-managed MCP servers, the developer connects through the mcp-proxy-for-aws proxy and specifies the role through the profile parameter.

{
  "mcpServers": {
    "aws-mcp": {
      "command": "uvx",
      "args": [
        "mcp-proxy-for-aws@latest",
        "https://aws-mcp.us-east-1.api.aws/mcp",
        "--profile", "agent-dev-role",
        "--metadata", "AWS_REGION=us-east-1"
      ]
    }
  }
}

Only role selection depends on developer compliance. IAM permission boundaries provide organizational enforcement without requiring code changes or developer cooperation. A permission boundary is a managed policy that your security team attaches to an IAM role to set the maximum permissions that role can grant. The effective permissions are the intersection of the role’s identity-based policies and the permission boundary. Permission boundaries are most effective on agent-specific roles that your organization creates for agent use. They ensure those roles cannot exceed their intended permissions even if misconfigured. If a developer configures their existing role in mcp.json instead, a permission boundary on that role restricts all use of the role, not just agent use. For AWS-managed MCP servers, principle 3’s context keys address this gap. They let you write IAM policies that restrict actions only when they come through an MCP server, leaving the developer’s direct use of the same role unaffected. For self-managed MCP servers, modifying the server code to AssumeRole into an organization-defined role provides a similar override, and session tags can be attached during that AssumeRole for differentiation (see principle 3). For multi-account environments, SCPs in AWS Organizations provide guardrails at the account or organizational unit level. SCPs set the maximum permissions for all principals in an account, giving your central governance team control over agent permissions across your organization.

Organizational governance at scale

Whether your agents are config-bound or code-controlled, you need organizational mechanisms to enforce consistent governance across teams and accounts.

Tag IAM roles intended for agent use with a consistent identifier, such as a tag key of Usage with a value of Agent. This lets your governance team inventory all agent roles across accounts, identify roles that don’t have permission boundaries, and distinguish agent roles from human roles in audit reports. You can also use tag-based conditions in SCPs to enforce that only properly tagged roles are used for agent operations. For AWS-managed MCP servers, the automatic context keys (principle 3) provide this identification without requiring role tags, but tagging remains useful for role inventory and audit purposes.

Use CloudTrail to monitor all API calls made by agent sessions and set up CloudWatch alarms for sensitive operations like resource deletion or permission changes. Principle 3 covers how to filter and analyze agent activity using context keys (AWS-managed MCP) and session tags (self-managed MCP).

For multi-account environments, combine SCPs with permission boundaries and resource control policies (RCPs) for layered enforcement. SCPs set the maximum permissions for principals within your organization at the account or organizational unit level, while permission boundaries constrain individual roles. RCPs enforce controls at the resource level regardless of the caller’s organizational membership, protecting resources even from cross-account access. Verify that the AWS services you use support MCP context keys in RCP evaluation. This layered approach gives your central governance team control over agent permissions across your organization, even when individual teams manage their own accounts and roles. Conduct quarterly reviews of agent roles and session policies to identify permissions that are no longer needed as agent capabilities evolve.

Practical implementation guidance:

  • For code controlled agents: Implement session policies for every tool invocation. Use AssumeRole with the minimum permissions each operation requires rather than relying on the execution role’s base permissions.
  • For config-bound agents: Create agent-specific IAM roles with narrower permissions than human roles or configure self-managed MCP servers to AssumeRole into an organization-defined role. Have your security team attach permission boundaries to agent-specific roles to enforce maximum permissions regardless of developer role selection.
  • At the organization level: Tag agent roles consistently, enforce guardrails through SCPs, and monitor agent activity through CloudTrail. Conduct quarterly reviews to remove unused permissions.

Security principle 2 gives you organizational control over agent permissions through mechanisms matched to your level of client control. Session policies and dynamic credential scoping enforce permissions at runtime for code-controlled agents. Permission boundaries and SCPs enforce permissions at the organizational level for config-bound agents. The next principle adds a complementary layer of governance at the resource level based on whether a human or agent is performing the action.

Security principle 3: Differentiate AI-driven from human-initiated actions

The third security principle adds an additional level of control on top of principle 2. Where principle 2 governs what permissions an agent has, this principle governs what the agent can do with those permissions based on whether the action is AI-driven or human-initiated.

This principle is essential for two reasons. For AWS-managed MCP servers, you cannot modify the server code to inject session policies or call AssumeRole with scoped credentials. The developer’s credentials flow through as-is. Context keys are your primary mechanism to restrict agent actions differently from human-initiated actions on the same role. For self-managed MCP servers where principle 2’s session policies are already in place, differentiation adds a second layer of defense at the resource level. Even if the session policy is broader than intended, differentiation policies can deny specific dangerous operations when performed through an agent.

For example, you can allow both humans and agents to read Amazon S3 objects, but deny delete operations when accessed through agents. Without a differentiation mechanism, IAM policies can’t distinguish between AI-driven actions and human-initiated actions. If a developer has s3:DeleteObject permission and uses an agent with their credentials, the agent also has s3:DeleteObject permission with no way to restrict it.

Differentiation gives you granular governance. Allow human-initiated actions with broad permissions while restricting agent actions to narrower permissions. Apply different rules based on context and implement progressive restrictions. Allow read operations for everyone, require approval for AI-driven write operations, and deny delete operations for agent actions entirely. Maintain audit trails showing which actions were AI-driven versus human-initiated, essential for compliance and security investigations.

When agents bypass MCP servers

Differentiation through condition keys and session tags applies when the agent accesses AWS through an MCP server. AI coding assistants like Kiro and Claude Code have access to general-purpose tools, including bash, shell, and code execution. When an agent uses a bash tool to run an AWS CLI command like aws s3 rm s3://my-bucket/my-object or executes a Python script that calls boto3 directly, the request goes straight to AWS using the developer’s existing credentials. The request bypasses MCP servers entirely. The aws:ViaAWSMCPService condition key isn’t set, session tags from MCP server AssumeRole calls aren’t applied, and IAM policies conditioned on these values don’t evaluate.

This means a deny policy like “Condition": {"Bool": {"aws:ViaAWSMCPService": “true"}} blocks the agent when it calls Amazon S3 through a managed MCP server, but doesn’t block the same agent when it runs the equivalent AWS CLI command through a bash tool. The agent has two paths to the same AWS API, and differentiation controls govern one path.

The condition keys work as designed, differentiating MCP-mediated access from direct access. This is a scope boundary. Differentiation controls secure the MCP access path. For the direct access path, principles 1 and 2 are your controls. Least privilege on the underlying IAM role (principle 1) and organizational guardrails like permission boundaries and SCPs (principle 2) apply regardless of how the agent reaches AWS. If the role doesn’t have s3:DeleteObject permission, the agent can’t delete objects through a bash tool or through an MCP server.

Restricting which tools an agent can access is a complementary control outside the scope of IAM. You can use agent frameworks and hosting environments such as Amazon Bedrock AgentCore to limit the set of available tools, removing general-purpose execution capabilities for agents that interact with AWS exclusively through MCP servers. When you combine tool restriction with the IAM controls in this post, you close the gap between the MCP access path and the direct access path.

AWS-managed MCP servers: Automatic context keys

AWS-managed MCP servers, including the AWS MCP Server, Amazon EKS MCP Server, and Amazon ECS MCP Server, offer differentiation by default. They automatically add IAM context keys to every downstream AWS service call. These context keys are aws:ViaAWSMCPService, a boolean set to true when the request comes through any AWS-managed MCP server. The second key is aws:CalledViaAWSMCP, a string containing the MCP server name like aws-mcp.amazonaws.com, eks-mcp.amazonaws.com, or ecs-mcp.amazonaws.com. No configuration is required on your part. You only need to write IAM policies that check for these keys to apply different rules for agent actions.

The following IAM policy denies delete operations when accessed through any AWS-managed MCP server.

{
  "Version": "2012-10-17",
  "Statement": [{
    "Sid": "AllowS3ReadOperations",
    "Effect": "Allow",
    "Action": [
      "s3:GetObject",
      "s3:ListBucket"
    ],
    "Resource": "*"
  }, {
    "Sid": "DenyDeleteWhenAccessedViaMCP",
    "Effect": "Deny",
    "Action": [
      "s3:DeleteObject",
      "s3:DeleteBucket"
    ],
    "Resource": "*",
    "Condition": {
      "Bool": {
        "aws:ViaAWSMCPService": "true"
      }
    }
  }]
}

When a request doesn’t come through an AWS-managed MCP server, the aws:ViaAWSMCPService condition key isn’t present in the request context. The Deny statement only applies when the key is explicitly set to true, so human-initiated actions are unaffected by this policy.

You can also restrict operations to specific MCP servers. With this policy, you can run EKS operations only when accessed through the EKS MCP server, not through the AWS API MCP server.

{
  "Version": "2012-10-17",
  "Statement": [{
    "Sid": "AllowEKSOperationsViaEKSMCP",
    "Effect": "Allow",
    "Action": "eks:*",
    "Resource": "*",
    "Condition": {
      "StringEquals": {
        "aws:CalledViaAWSMCP": "eks-mcp.amazonaws.com"
      }
    }
  }, {
    "Sid": "DenyEKSOperationsViaOtherMCP",
    "Effect": "Deny",
    "Action": "eks:*",
    "Resource": "*",
    "Condition": {
      "Bool": {
        "aws:ViaAWSMCPService": "true"
      },
      "StringNotEquals": {
        "aws:CalledViaAWSMCP": "eks-mcp.amazonaws.com"
      }
    }
  }]
}

Self-managed MCP servers: Manual session tags

Self-managed MCP servers, whether AWS-provided servers from the AWS MCP GitHub repository or custom servers you build yourself, don’t automatically add IAM context keys. To implement differentiation with self-managed servers, you must configure the MCP server to add session tags when assuming IAM roles. This requires modifying your MCP server to call AWS STS AssumeRole with tags attached. The tags remain active for the duration of the assumed role session and can be referenced in IAM policies using the aws:PrincipalTag condition key. This approach gives you flexibility and control over the session tag configuration. To maintain consistency, verify that all MCP server instances add the appropriate tags.

The following example shows how to configure your MCP server to add session tags.

import boto3

sts = boto3.client('sts')

response = sts.assume_role(
    RoleArn='arn:aws:iam::111122223333:role/MCPServerRole',
    RoleSessionName='mcp-server-session',
    Tags=[
        {'Key': 'AccessType', 'Value': 'AI'},
        {'Key': 'Source', 'Value': 'AgentRuntime'},
        {'Key': 'MCPServer', 'Value': 'org-data-server'}
    ]
)

# Use the temporary credentials from response['Credentials']
credentials = response['Credentials']

After your MCP server has added session tags, you can write IAM policies that check for these tags to differentiate agent actions.

{
  "Version": "2012-10-17",
  "Statement": [{
    "Sid": "AllowS3ReadOperations",
    "Effect": "Allow",
    "Action": [
      "s3:GetObject",
      "s3:ListBucket"
    ],
    "Resource": "*"
  }, {
    "Sid": "DenyDeleteWhenAccessedViaAI",
    "Effect": "Deny",
    "Action": [
      "s3:DeleteObject",
      "s3:DeleteBucket"
    ],
    "Resource": "*",
    "Condition": {
      "StringEquals": {
        "aws:PrincipalTag/AccessType": "AI"
      }
    }
  }]
}

Session tags and session policies are both passed to AssumeRole, but serve different purposes. Session policies (covered in security principle 2) constrain what permissions the agent has. Session tags (covered here in security principle 3) mark the session as AI-driven, enabling IAM policies to differentiate between agent and human actions. You can use both in the same AssumeRole call for defense-in-depth. The session policy constrains what the agent can do. The session tags let IAM policies apply different rules based on the actor type.

The following example uses both session policies and session tags together.

import boto3

sts = boto3.client('sts')

# Assume role with both managed session policy and tags
response = sts.assume_role(
    RoleArn='arn:aws:iam::111122223333:role/AgentDataRole',
    RoleSessionName='agent-data-reader',
    PolicyArns=[                              # Principle 2: Constrains permissions
        {'arn': 'arn:aws:iam::aws:policy/ReadOnlyAccess'}
    ],
    Tags=[                                    # Principle 3: Enables differentiation
        {'Key': 'AccessType', 'Value': 'AI'},
        {'Key': 'Source', 'Value': 'AgentRuntime'},
        {'Key': 'MCPServer', 'Value': 'org-data-server'}
    ],
    DurationSeconds=3600
)

CloudTrail logging and audit trails

Both differentiation mechanisms generate CloudTrail logs for audit trails. For AWS-managed MCP servers, downstream AWS API calls include the MCP service identifier in the invokedBy, sourceIPAddress, and userAgent fields. You can filter on these fields to isolate agent activity. MCP-originated downstream calls are classified as data events, so you must enable data event logging on your CloudTrail trail to capture them.

{
  "eventVersion": "1.11",
  "userIdentity": {
    "type": "AssumedRole",
    "principalId": "AROAEXAMPLE:developer-session",
    "arn": "arn:aws:sts::111122223333:assumed-role/DeveloperRole/developer-session",
    "accountId": "111122223333",
    "sessionContext": {
      "sessionIssuer": {
        "type": "Role",
        "principalId": "AROAEXAMPLE",
        "arn": "arn:aws:iam::111122223333:role/DeveloperRole",
        "accountId": "111122223333",
        "userName": "DeveloperRole"
      }
    },
    "invokedBy": "aws-mcp.amazonaws.com"
  },
  "eventSource": "s3.amazonaws.com",
  "eventName": "GetObject",
  "sourceIPAddress": "aws-mcp.amazonaws.com",
  "userAgent": "aws-mcp.amazonaws.com",
  "eventType": "AwsApiCall",
  "managementEvent": false,
  "eventCategory": "Data"
}

For self-managed MCP servers with session tags, the tags appear in the requestParameters.principalTags field of the AssumeRole CloudTrail event. You can correlate the session name from the AssumeRole event to downstream API calls to trace agent activity.

{
  "eventSource": "sts.amazonaws.com",
  "eventName": "AssumeRole",
  "requestParameters": {
    "roleArn": "arn:aws:iam::111122223333:role/MCPServerRole",
    "roleSessionName": "mcp-server-session",
    "principalTags": {
      "AccessType": "AI",
      "Source": "AgentRuntime",
      "MCPServer": "org-data-server"
    }
  }
}

With these logs, you can query CloudTrail to find all AI-driven actions and analyze patterns of agent behavior. You can also identify unexpected or unauthorized operations and maintain compliance audit trails. Set up CloudWatch alarms to detect agent actions on sensitive resources or unusual patterns that indicate unintended access or misconfiguration.

Things to consider

When deciding between AWS-managed and self-managed MCP servers, consider the trade-offs. AWS-managed MCP servers offer the most straightforward path. Context keys are added automatically with no configuration on your part. Self-managed MCP servers require modifying code to add session tags. However, they give you complete control over the tags and let you implement custom functionality not available in AWS-managed servers. Organizations can use both approaches, AWS-managed servers for standard AWS operations and self-managed servers for specialized use cases.

Practical implementation guidance:

  • Assess direct access paths: Evaluate whether your agents have access to general-purpose tools (bash, shell, code execution) that can bypass MCP servers. If they do, rely on principles 1 and 2 for those paths and consider restricting tool availability where possible.
  • Choose a differentiation mechanism: Select based on your MCP server type (for managed, use context keys, for self-managed, use session tags).
  • For AWS-managed MCP: Write IAM policies that check aws:ViaAWSMCPService and aws:CalledViaAWSMCP condition keys. No MCP server configuration needed.
  • For self managed MCP: Modify MCP server code to add session tags when assuming roles. Verify consistent tag application across all instances.
  • Update IAM policies: Add differentiation conditions to existing policies. Test in non-production first to verify behavior.
  • Monitor CloudTrail logs: Verify differentiation is working by checking for context keys or session tags in CloudTrail events.
  • Set up alerts: Configure CloudWatch alarms for AI-driven sensitive operations or policy violations.
  • Perform regular audits: Review IAM policies quarterly to verify differentiation conditions remain correct as agent capabilities evolve.

Conclusion

Securing AI agent access to AWS resources requires building deterministic IAM controls for non-deterministic AI systems. The three security principles give you a defense-in-depth framework that adapts to your deployment pattern and level of client control.

Your implementation path depends on your situation. Start with principle 1. Audit current agent permissions and default to read-only access where possible. Next, implement principle 2. For config-bound scenarios, establish permission boundaries and select agent-specific roles. For code-controlled scenarios, implement dynamic session policies scoped to each tool invocation. Finally, add principle 3 differentiation based on your MCP server type. Use automatic context keys with AWS-managed MCP servers, or configure session tags with self-managed servers.

By applying these three security principles, you can use AI agents while maintaining the governance and compliance controls your organization requires.
Riggs Goodman III

Riggs Goodman III

Riggs is a Principal Solution Architect at AWS. His current focus is on AI security, providing technical guidance, architecture patterns, and leadership for customers and partners to build AI workloads on AWS. Internally, Riggs focuses on driving overall technical strategy and innovation across AWS service teams to address customer and partner challenges.

Exploring common centralized and decentralized approaches to secrets management

Post Syndicated from Brendan Paul original https://aws.amazon.com/blogs/security/exploring-common-centralized-and-decentralized-approaches-to-secrets-management/

One of the most common questions about secrets management strategies on Amazon Web Services (AWS) is whether an organization should centralize its secrets. Though this question is often focused on whether secrets should be centrally stored, there are four aspects of centralizing the secrets management process that need to be considered: creation, storage, rotation, and monitoring. In this post, we discuss the advantages and tradeoffs of centralizing or decentralizing each of these aspects of secrets management.

Centralized creation of secrets

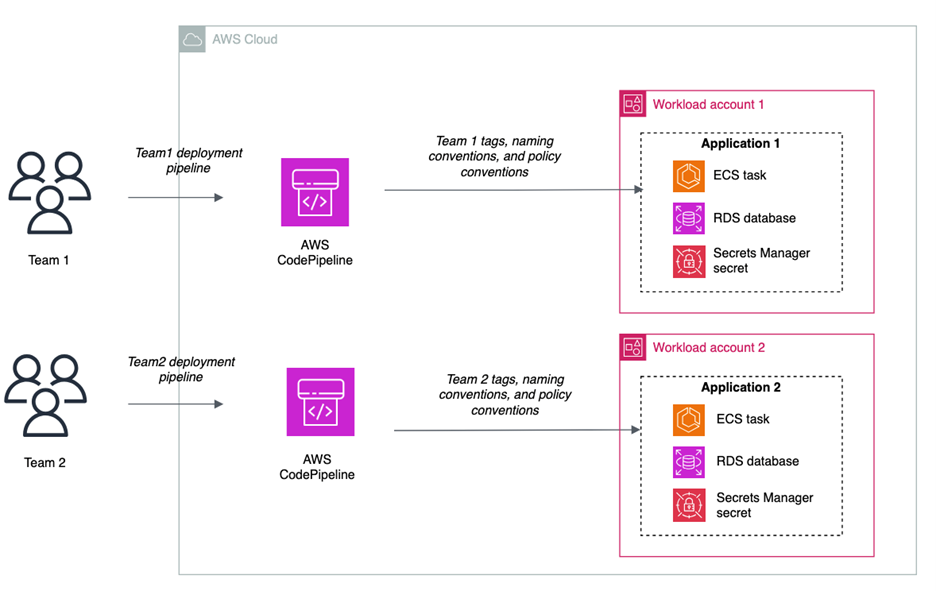
When deciding whether to centralize secrets creation, you should consider how you already deploy infrastructure in the cloud. Modern DevOps practices have driven some organizations toward developer portals and internal developer platforms that use golden paths for infrastructure deployment. By using tools that use golden paths, developers can deploy infrastructure in a self-service model through infrastructure as code (IaC) while adhering to organizational standards.

A central function maintains these golden paths, such as a platform engineering team. Examples of services that can be used to maintain and define golden paths might include AWS services such as AWS Service Catalog or popular open source projects such as Backstage.io. Using this approach, developers can focus on application code while platform engineers focus on infrastructure deployment, security controls, and developer tooling. An example of a golden path might be a templatized implementation for a microservice that writes to a database.

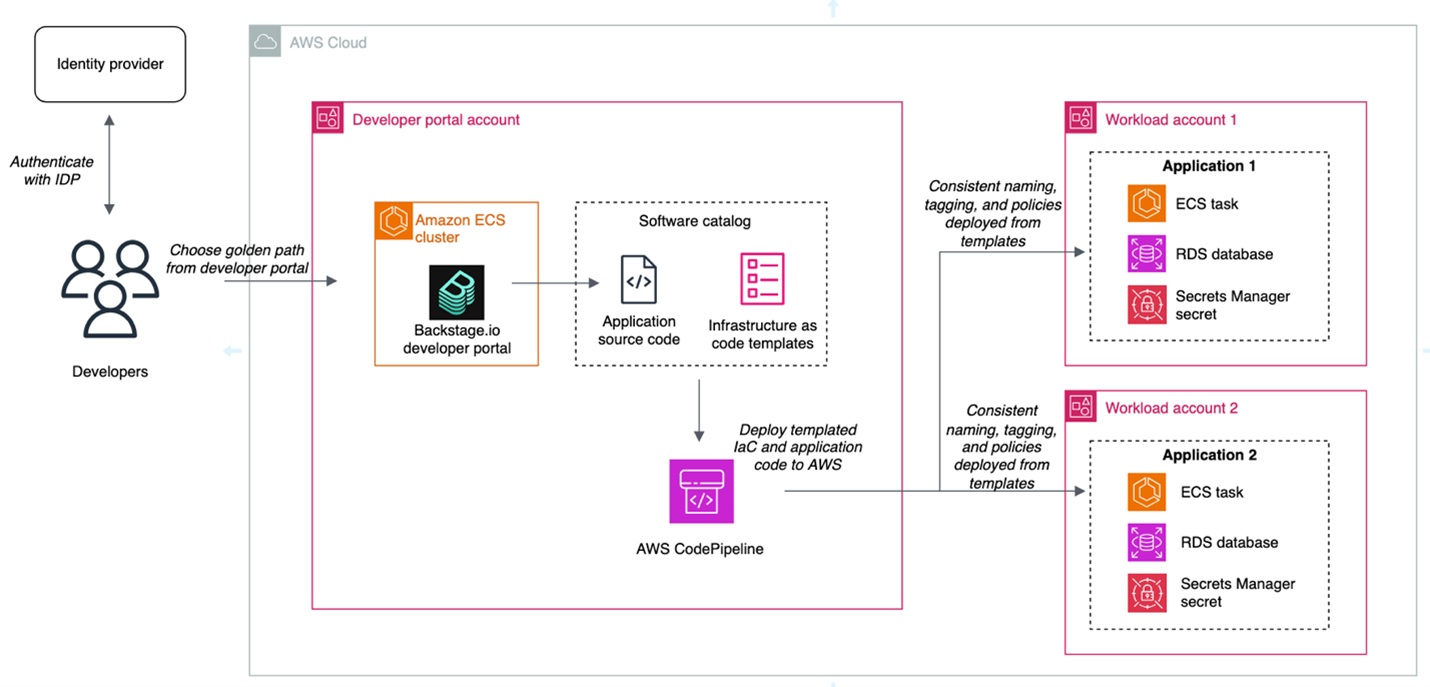
For example, a golden path could define that a service or application must be built using the AWS Cloud Development Kit (AWS CDK), running on Amazon Elastic Container Service (Amazon ECS), and use AWS Secrets Manager to retrieve database credentials. The platform team could also build checks to help ensure that the secret’s resource policy only allows access to the role being used by the microservice and is encrypted with a customer managed key. This pattern abstracts deployments away from developers and facilitates resource deployment across accounts. This is one example of a centralized creation pattern, shown in Figure 1.

Figure 1: Architecture diagram highlighting the developer portal deployment pattern for centralized creation

Figure 1: Architecture diagram highlighting the developer portal deployment pattern for centralized creation

The advantages of this approach are:

  • Consistent naming tagging, and access control: When secrets are created centrally, you can enforce a standard naming convention based on the account, workload, service, or data classification. This simplifies implementing scalable patterns like attribute-based access control (ABAC).
  • Least privilege checks in CI/CD pipelines: When you create secrets within the confines of IaC pipelines, you can use APIs such as the AWS IAM Access Analyzer check-no-new-access API. Deployment pipelines can be templatized, so individual teams can take advantage of organizational standards while still owning deployment pipelines.
  • Create mechanisms for collaboration between platform engineering and security teams: Often, the shift towards golden paths and service catalogs is driven by a desire for a better developer experience and reduced operational overhead. A byproduct of this move is that security teams can partner with platform engineering teams to build security by default into these paths.

The tradeoffs of this approach are:

  • It takes time and effort to make this shift. You might not have the resources to invest in full-time platform engineering or DevOps teams. To centrally provision software and infrastructure like this, you must maintain libraries of golden paths that are appropriate for the use cases of your organization. Depending on the size of your organization, this might not be feasible.
  • Golden paths must keep up with the features of the services they support: If you’re using this pattern, and the service you’re relying on releases a new feature, your developers must wait for the features to be added to the affected golden paths.

If you want to learn more about the internal developer platform pattern, check out the re:Invent 2024 talk Elevating the developer experience with Backstage on AWS.

Decentralized creation of secrets

In a decentralized model, application teams own the IaC templates and deployment mechanisms in their own accounts. Here, each team is operating independently, which can make it more difficult to enforce standards as code. We’ll refer to this pattern, shown in Figure 2, as a decentralized creation pattern.

Figure 2: Decentralized creation of secrets

Figure 2: Decentralized creation of secrets

The advantages of this approach are:

  • Speed: Developers can move quickly and have more autonomy because they own the creation process. Individual teams don’t have a dependency on a central function.
  • Flexibility: You can still use features such as the IAM Access Analyzer check-no-new-access API, but it’s up to each team to implement this in their pipeline.

The tradeoffs of this approach are:

  • Lack of standardization: It can become more difficult to enforce naming and tagging conventions, because it’s not templatized and applied through central creation mechanisms. Access controls and resource policies might not be consistent across teams.
  • Developer attention: Developers must manage more of the underlying infrastructure and deployment pipelines.

Centralized storage of secrets

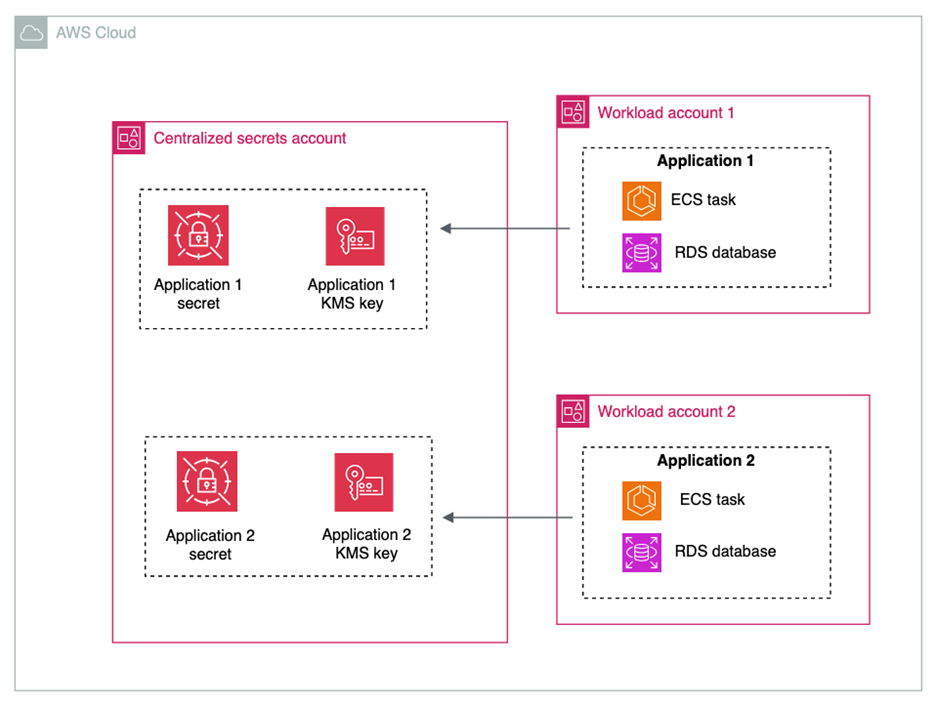
Some customers choose to store their secrets in a central account, and others choose to store secrets in the accounts in which their workloads live. Figure 3 shows the architecture for centralized storage of secrets.

Figure 3: Centralized storage of secrets

Figure 3: Centralized storage of secrets

The advantages of centralizing the storage of secrets are:

  • Simplified monitoring and observability: Monitoring secrets can be simplified by keeping them in a single account and with a centralized team controlling them.

Some tradeoffs of centralizing the storage of secrets are:

  • Additional operational overhead: When sharing secrets across accounts, you must configure resource policies on each secret that is shared.
  • Additional cost of AWS KMS Customer Managed Keys: You must use AWS Key Management Service (AWS KMS) customer managed keys when sharing secrets across accounts. While this gives you an additional layer of access control over secret access, it will increase cost under the AWS KMS pricing. It will also add another policy that needs to be created and maintained.
  • High concentration of sensitive data: Having secrets in a central account can increase the number of resources affected in the event of inadvertent access or misconfiguration.
  • Account quotas: Before deciding on a centralized secret account, review the AWS service quotas to ensure you won’t hit quotas in your production environment.
  • Service managed secrets: When services such as Amazon Relational Database Service (Amazon RDS) or Amazon Redshift manage secrets on your behalf, these secrets are placed in the same account as the resource with which the secret is associated. To maintain a centralized storage of secrets while using service managed secrets, the resources would also have to be centralized.

Though there are advantages to centralizing secrets for monitoring and observability, many customers already rely on services such as AWS Security Hub, IAM Access Analyzer, AWS Config, and Amazon CloudWatch for cross-account observability. These services make it easier to create centralized views of secrets in a multi-account environment.

Decentralized storage of secrets

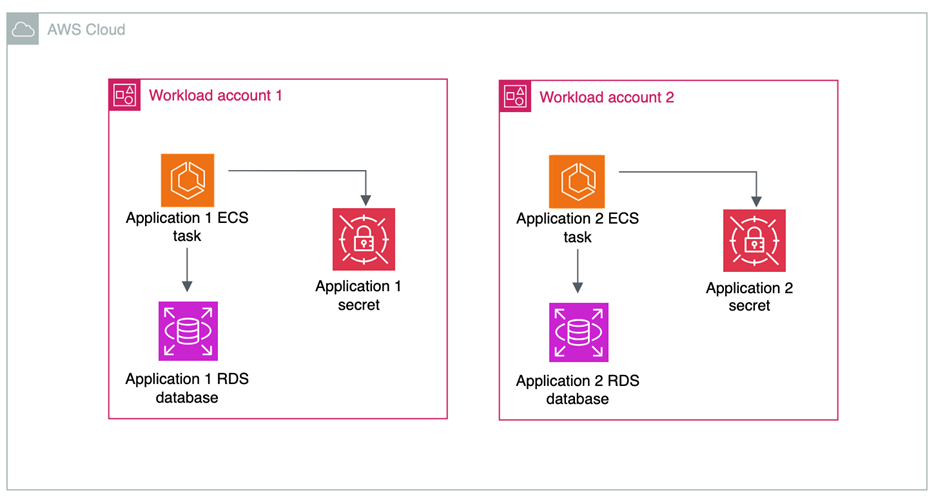
In a decentralized approach to storage, shown in in Figure 4, secrets live in the same accounts as the workload that needs access to them.

Figure 4: Decentralized storage of secrets

Figure 4: Decentralized storage of secrets

The advantages of decentralizing the storage of secrets are:

  • Account boundaries and logical segmentation: Account boundaries provide a natural segmentation between workloads in AWS. When operating in a distributed multi-account environment, you cannot access secrets from another account by default, and all cross-account access must be allowed by both a resource policy in the source account and an IAM policy in the destination account. You can use resource control polices to prevent the sharing of secrets across accounts.
  • AWS KMS key choice: If your secrets aren’t shared across accounts, then you have the choice to use AWS KMS customer managed keys or AWS managed keys to encrypt your secrets.
  • Delegate permissions management to application owners: When secrets are stored in accounts with the applications that need to consume them, application owners define fine-grained permissions in secrets resource policies.

There are a few tradeoffs to consider for this architecture:

  • Auditing and monitoring require cross-account deployments: Tools that are used to monitor the compliance and status of secrets need to operate across multiple accounts and present information in a single place. This is simplified by AWS native tools, which are described later in this post.
  • Automated remediation workflows: You can have detective controls in place to alert on any misconfiguration or security risks related to your secrets. For example, you can surface an alert when a secret is shared outside of your organizational boundary through a resource policy. These workflows can be more complex in a multi-account environment. However, we have samples that can help, such as the Automated Security Response on AWS solution.

Centralized rotation

Like the creation and storage of secrets, organizations take different approaches to centralizing the lifecycle management and rotation of secrets.

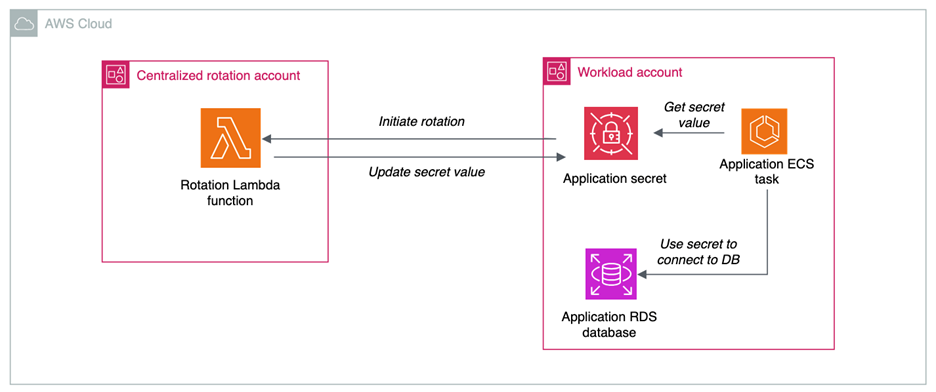
When you centralize lifecycle management, as shown in Figure 5, a central team manages and owns AWS Lambda functions for rotation. The advantages of centralizing the lifecycle management of secrets are:

  • Developers can reuse rotation functions: In this pattern, a centralized team maintains a common library of rotation functions for different use cases. An example of this can be seen in this AWS re:Inforce session. Using this method, application teams don’t have to build their own custom rotation functions and can benefit from common architectural decisions regarding databases and third-party software as a service (SaaS) applications.
  • Logging: When storing and accessing rotation function logs, the centralized pattern can simplify managing logs from a single place.
Figure 5: Centralized rotation of secrets

Figure 5: Centralized rotation of secrets

There are some tradeoffs in centralizing the lifecycle management and rotation of secrets:

  • Additional cross-account access scenarios: When centralizing lifecycle management, the Lambda functions in central accounts require permissions to create, update, delete and read secrets in the application accounts. This increases the operational overhead required to enable secret rotation.
  • Service quotas: When you centralize a function at scale, service quotas can come into play. Check the Lambda service quotas to verify that you won’t hit quotas in your production environments.

Decentralized rotation

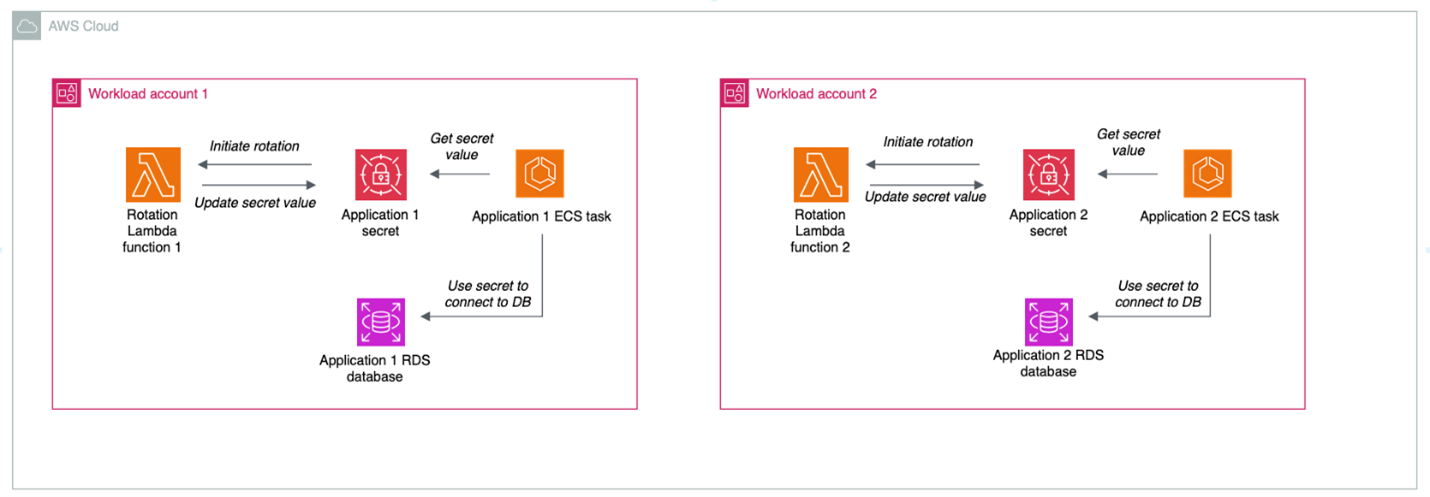
Decentralizing the lifecycle management of secrets is a more common choice, where the rotation functions live in the same account as the associated secret, as shown in Figure 6.

Figure 6: Decentralized rotation of secrets

Figure 6: Decentralized rotation of secrets

The advantages of decentralizing the lifecycle management of secrets are:

  • Templatization and customization: Developers can reuse rotation templates, but tweak the functions as needed to meet their needs and use cases
  • No cross-account access: Decentralized rotation of secrets happens all in one account and doesn’t require cross-account access.

The primary tradeoff of decentralizing rotation is that you will need to provide either centralized or federated access to logs for rotation functions in different accounts. By default, Lambda automatically captures logs for all function invocations and sends them to CloudWatch Logs. CloudWatch Logs offers a few different ways that you can centralize your logs, with the tradeoffs of each described in the documentation.

Centralized auditing and monitoring of secrets

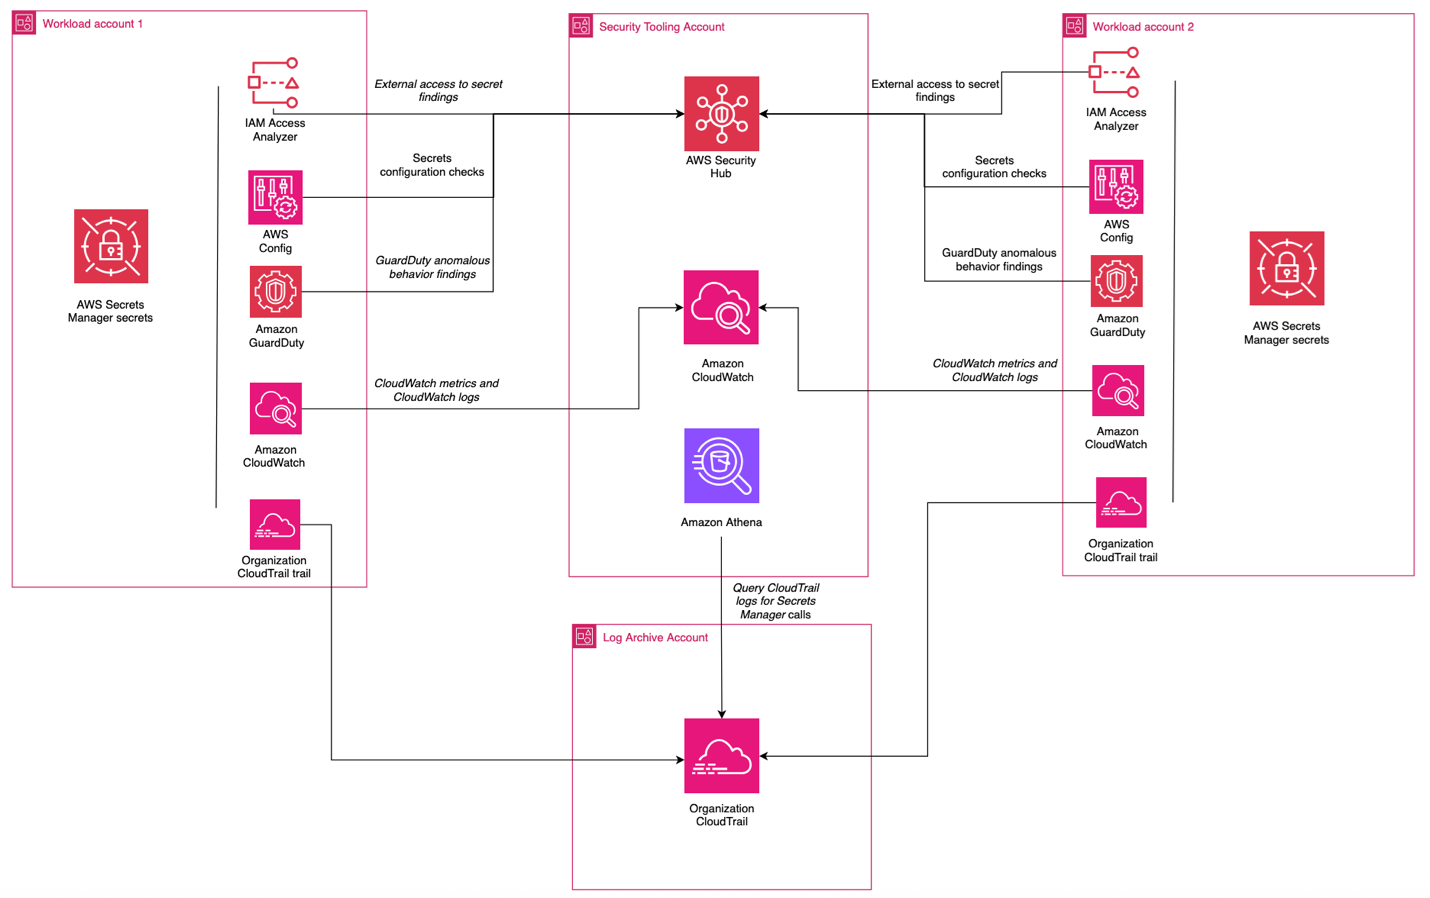
Regardless of the model chosen for creation, storage, and rotation of secrets, centralize the compliance and auditing aspect when operating in a multi-account environment. You can use AWS Security Hub CSPM through its integration with AWS Organizations to centralize:

In this scenario, shown in Figure 7, centralized functions get visibility across the organization and individual teams can view their posture at an account level with no need to look at the state of the entire organization.

Use AWS CloudTrail organizational trails to send all API calls for Secrets Manager to a centralized delegated admin account.

Figure 7: Centralized monitoring and auditing

Figure 7: Centralized monitoring and auditing

Decentralized auditing and monitoring of secrets

For organizations that don’t require centralized auditing and monitoring of secrets, you can configure access so that individual teams can determine which logs are collected, alerts are enabled, and checks are in place in relation to your secrets. The advantages of this approach are:

  • Flexibility: Development teams have the freedom to choose what monitoring, auditing, and logging tools work best for them.
  • Reduced dependencies: Development teams don’t have to rely on centralized functions for alerting and monitoring capabilities.

The tradeoffs of this approach are:

  • Operational overhead: This can create redundant work for teams looking to accomplish similar goals.
  • Difficulty aggregating logs in cross-account investigations: If logs, alerts, and monitoring capabilities are decentralized, it can increase the difficulty of investigating events that affect multiple accounts.

Putting it all together

Most organizations choose a combination of these approaches to meet their needs. An example is a financial services company that has a central security team, operates across hundreds of AWS accounts, and has hundreds of applications that are isolated at the account level. This customer could:

  • Centralize the creation process, enforcing organizational standards for naming, tagging, and access control
  • Decentralize storage of secrets, using the AWS account as a natural boundary for access and storing the secret in the account where the workload is operating, delegating control to application owners
  • Decentralize lifecycle management so that application owners can manage their own rotation functions
  • Centralize auditing, using tools like AWS Config, Security Hub, and IAM Access Analyzer to give the central security team insight into the posture of their secrets while letting application owners retain control

Conclusion

In this post, we’ve examined the architectural decisions organizations face when implementing secrets management on AWS: creation, storage, rotation, and monitoring. Each approach—whether centralized or decentralized—offers distinct advantages and tradeoffs that should align with your organization’s security requirements, operational model, and scale. The important points include:

  • Choose your secrets management architecture based on your organization’s specific requirements and capabilities. There’s no one solution that will fit every situation.
  • Use automation and IaC to enforce consistent security controls, regardless of your approach.
  • Implement comprehensive monitoring and auditing capabilities through AWS services to maintain visibility across your environment.

Resources

To learn more about AWS Secrets Manager, check out some of these resources:

Brendan Paul
Brendan Paul

Brendan is a Senior Security Solutions Architect at AWS and has been at AWS for more than 6 years. He spends most of his time at work helping customers solve problems in the data protection and workload identity domains. Outside of work, he’s pursuing his master’s degree in data science from UC Berkeley.
Eduardo Patroncinio
Eduardo Patroncinio

Eduardo is a distinguished Principal Solutions Architect on the AWS Strategic Accounts team, bringing unparalleled expertise to the forefront of cloud technology. With an impressive career spanning more than 25 years, Eduardo has been a driving force in designing and delivering innovative customer solutions within the dynamic realms of cloud and service management.

How to secure an enterprise scale ACM Private CA hierarchy for automotive and manufacturing

Post Syndicated from Anthony Pasquariello original https://aws.amazon.com/blogs/security/how-to-secure-an-enterprise-scale-acm-private-ca-hierarchy-for-automotive-and-manufacturing/

In this post, we show how you can use the AWS Certificate Manager Private Certificate Authority (ACM Private CA) to help follow security best practices when you build a CA hierarchy. This blog post walks through certificate authority (CA) lifecycle management topics, including an architecture overview, centralized security, separation of duties, certificate issuance auditing, and certificate sharing by means of templates. These topics provide best practices surrounding your ACM Private CA hierarchy so that you can build the right CA hierarchy for your organization.

With ACM Private CA, you can create private certificate authority hierarchies, including root and subordinate CAs, without the upfront investment and ongoing maintenance costs of operating your own private CA. You can issue certificates for authenticating internal users, computers, applications, services, servers or other devices, and code signing.

This post includes the following Amazon Web Services (AWS) services:

Solution overview

In this blog post, you’ll see an example automotive manufacturing company and their supplier companies. Each will have associated AWS accounts, which we will call Manufacturer Account(s) and Supplier Account(s), respectively.

Automotive manufacturing companies usually have modules that come from different suppliers. Modules, in the automotive context, are embedded systems that control electrical systems in the vehicle. These modules might be interconnected throughout the in-vehicle network or provide connectivity external to the vehicle, for example, for navigation or sending telemetry to off-board systems.

The architecture needs to allow the Manufacturer to retain control of their CA hierarchy, while giving their external Suppliers limited access to sign the certificates on these modules with the Manufacturer’s CA hierarchy. The architecture we provide here gives you the basic information you need to cover the following objectives:

  1. Creation of accounts that logically separate CAs in a hierarchy
  2. IAM role creation for specific personas to manage the CA lifecycle
  3. Auditing the CA hierarchy by using audit reports
  4. Cross-account sharing by using AWS RAM with certificate template scoping

Architecture overview

Figure 1 shows the solution architecture.

Figure 1: Multi-account certificate authority hierarchy using ACM Private CA

Figure 1: Multi-account certificate authority hierarchy using ACM Private CA

The Manufacturer has two categories of AWS accounts:

  1. A dedicated account to hold the Manufacturer’s root CA
  2. An account to hold their subordinate CA

Note: The diagram shows two subordinate CAs in the Manufacturer account. However, depending on your security needs, you can have a subordinate CA per account per supplier.

Additionally, each Supplier has one AWS account. These accounts will have the Manufacturer’s subordinate CA shared by using AWS RAM. The Manufacturer will have a subordinate CA for each Supplier.

Logically separate accounts

In order to minimize the scope of impact and scope users to actions within their duties, it’s critical that you logically separate AWS accounts based on workload within the CA hierarchy. The following section shows a recommendation for how to do that.

AWS account that holds the root CA

You, the Manufacturer, should place the ACM Private root CA within its own dedicated AWS account to segment and tightly control access to the root CA. This limits access at the account level and only uses the dedicated account for a single purpose: holding the root CA for your organization. This account will only have access from IAM principals that maintain the CA hierarchy through a federation service like AWS Single Sign-On (AWS SSO) or direct federation to IAM through an existing identity provider. This account also has AWS CloudTrail enabled and configured for business-specific alerting, including actions like creation, updating, or deletion of the root CA.

AWS account that holds the subordinate CAs

You, the Manufacturer, will have a dedicated account where the entire CA hierarchy below the root will be located. You should have a separate subordinate CA for each Supplier, and in some cases a separate subordinate CA for each hardware module the Supplier is building. The subordinate CAs can issue certificates for specific hardware modules within the Supplier account.

This Manufacturer account shares each subordinate CA to the respective Supplier’s AWS account by using AWS RAM. This provides joint control to the shared subordinate CA, creating isolation between individual Suppliers. AWS RAM allows Suppliers to control certificate issuance and revocation if this is allowed by the Manufacturer. Each Supplier is only shared certificate provisioning access through AWS RAM configuration, which means that you can tightly monitor and revoke access through AWS RAM. Given this sharing through AWS RAM, the Suppliers don’t have access to modify or delete the CA hierarchy itself and can only provision certificates from it.

Supplier AWS account(s)

These AWS accounts are owned by each respective Supplier. For example, you might partner with radio, navigation system, and telemetry suppliers. Each Supplier would have their own AWS account, which they control. The Supplier accepts an invitation from the manufacturer through AWS RAM, sharing the subordinate CA. The subordinate is allowed to take only certain actions, based on how the Manufacturer configured the share (more on this later in the post).

Separation of duties by means of IAM role creation

In order to follow least privilege best practices when you create a CA hierarchy with ACM Private CA, you must create IAM roles that are specific to each job function. The recommended method is to separate administrator and certificate issuer roles.

For this automotive manufacturing use case, we recommend the following roles:

  1. Manufacturer IAM roles:
    • A CA admin role with CA disable permission
    • A CA admin role with CA delete permission
  2. Supplier certificate issuer IAM role:

Manufacturer IAM role overview

In this flow, one IAM role is able to disable the CA, and a second principal can delete the CA. This enables two-person control for this highly privileged action—meaning that you need a two-person quorum to rotate the CA certificate.

Day-to-day CA admin policy (with CA disable)

{
    "Version": "2012-10-17",
    "Statement": [
        {
            "Effect": "Allow",
            "Action": [
                "acm-pca:ImportCertificateAuthorityCertificate",
                "acm-pca:DeletePolicy",
                "acm-pca:PutPolicy",
                "acm-pca:TagCertificateAuthority",
                "acm-pca:ListTags",
                "acm-pca:GetCertificate",
                "acm-pca:CreateCertificateAuthority",
                "acm-pca:ListCertificateAuthorities",
                "acm-pca:UntagCertificateAuthority",
                "acm-pca:GetCertificateAuthorityCertificate",
                "acm-pca:RevokeCertificate",
                "acm-pca:UpdateCertificateAuthority",
                "acm-pca:GetPolicy",
                "acm-pca:IssueCertificate",
                "acm-pca:DescribeCertificateAuthorityAuditReport",
                "acm-pca:CreateCertificateAuthorityAuditReport",
                "acm-pca:RestoreCertificateAuthority",
                "acm-pca:GetCertificateAuthorityCsr",
                "acm-pca:DeletePermission",
                "acm-pca:DescribeCertificateAuthority",
                "acm-pca:CreatePermission",
                "acm-pca:ListPermissions"
            ],
            "Resource": “*”
        },
        {
            "Effect": "Deny",
            "Action": [
                "acm-pca:DeleteCertificateAuthority"
            ],
            "Resource": <Enter Root CA ARN Here>
        }
    ]
}

Privileged CA admin policy (with CA delete)

{
    "Version": "2012-10-17",
    "Statement": [
        {
            "Effect": "Allow",
            "Action": [
                "acm-pca:ImportCertificateAuthorityCertificate",
                "acm-pca:DeletePolicy",
                "acm-pca:PutPolicy",
                "acm-pca:TagCertificateAuthority",
                "acm-pca:ListTags",
                "acm-pca:GetCertificate",
                "acm-pca:UntagCertificateAuthority",
                "acm-pca:GetCertificateAuthorityCertificate",
                "acm-pca:RevokeCertificate",
                "acm-pca:GetPolicy",
    "acm-pca:CreateCertificateAuthority",
                "acm-pca:ListCertificateAuthorities",
                "acm-pca:DescribeCertificateAuthorityAuditReport",
                "acm-pca:CreateCertificateAuthorityAuditReport",
                "acm-pca:RestoreCertificateAuthority",
                "acm-pca:GetCertificateAuthorityCsr",
                "acm-pca:DeletePermission",
    "acm-pca:IssueCertificate",
                "acm-pca:DescribeCertificateAuthority",
                "acm-pca:CreatePermission",
                "acm-pca:ListPermissions",
                "acm-pca:DeleteCertificateAuthority"
            ],
            "Resource": “*”
        },
        {
            "Effect": "Deny",
            "Action": [
                "acm-pca:UpdateCertificateAuthority"
            ],
            "Resource": <Enter Root CA ARN Here>
        }
    ]
}

We recommend that you, the Manufacturer, create a two-person process for highly privileged events like CA certificate rotation ceremonies. The preceding policies serve two purposes. First, they allow you to designate separation of management duties between day-to-day CA admin tasks and infrequent root CA rotation ceremonies. The day-to-day CA admin policy allows all ACM Private CA actions except the ability to delete the root CA. This is because the day-to-day CA admin should not be deleting the root CA. Meanwhile, the privileged CA admin policy has the ability to call DeleteCertificateAuthority. However, in order to call DeleteCertificateAuthority, you first need to have the day-to-day CA admin role disable the root CA.

This means that both roles listed here are necessary to perform a root CA deletion for a rotation or replacement ceremony. This arrangement creates a way to control the deletion of the CA resource by requiring two separate actors to disable and delete. It’s crucial that the two roles are assumed by two different people at the identity provider. Having one person assume both of these roles negates the increased security created by each role.

You might also consider enforcing tagging of CAs at the organization level so that each new CA has relevant tags. The blog post Securing resource tags used for authorization using a service control policy in AWS Organizations illustrates in detail how to secure tags using service control policies (SCPs), so that only authorized users can modify tags.

Supplier IAM role overview

Your Suppliers should also follow least privilege when creating IAM roles within their own accounts. However, as we’ll see in the Cross-account sharing by using AWS RAM section, even if the Suppliers don’t follow best practices, the Manufacturer’s ACM Private CA hierarchy is still isolated and secure.

That being said, here are common IAM roles that your Suppliers should create within their own accounts:

  1. Developers who provision certificates for development and QA workloads
  2. Developers who provision certificates for production

These certificate issuing roles give the Supplier the ability to issue end-entity certificates from the CA hierarchy. In this use case, the Supplier needs two different levels of permissions: non-production certificates and production certificates. To simplify the roles within IAM, the Supplier decided to use ABAC. These ABAC policies allow operations when the principal’s tag matches the resource tag. Because the Supplier has many similar policies, each with a different set of users, they use ABAC to create a single IAM policy that uses principal tags rather than creating multiple slightly different IAM policies.

Certificate issuing policy that uses ABAC

{
	"Version": "2012-10-17",
	"Statement": [
	{
		"Effect": "Allow",
		"Action": [
			"acm-pca:IssueCertificate",
			"acm-pca:ListTags",
			"acm-pca:GetCertificate",
			"acm-pca:ListCertificateAuthorities"
		],
		"Resource": "*",
		"Condition": {
			"StringEquals": {
				"aws:ResourceTag/access-project": "${aws:PrincipalTag/access-project}",
				"aws:ResourceTag/access-team": "${aws:PrincipalTag/access-team}"
			}
		}
	}
}

This single policy enables all personas to be scoped to least privilege access. If you look at the Condition portion of the IAM policy, you can see the power of ABAC. This condition verifies that the PrincipalTag matches the ResourceTag. The Supplier is federating into IAM roles through AWS SSO and tagging the Supplier’s principals within its selected identity providers.

Because you as the Manufacturer have tagged the subordinate CAs that are shared with the Supplier, the Supplier can use identity provider (IdP) attributes as tags to simplify the Supplier’s IAM strategy. In this example, the Supplier configures each relevant user in the IdP with the attribute (tag) key: access-team. This tag matches the tagging strategy used by the Manufacturer. Here’s the mapping for each persona within the use case:

  • Dev environment:
    • access-team: DevTeam
  • Production environment:
    • access-team: ProdTeam

You can choose to add or remove tags depending on your use case, and the preceding scenario serves as a simple example. This offloads the need to create new IAM policies as the number of subordinate CAs grow. If you decide to use ABAC, make sure that you require both principal tagging and resource tagging upon creation of each, because these tags become your authorization mechanism.

CA lifecycle: Audit report published by the Manufacturer

In terms of auditing and monitoring, we recommend that the Manufacturer have a mechanism to track how many certificates were issued for a specific Supplier or module. Within the Manufacturer accounts, you can generate audit reports through the console or CLI. This allows you, the manufacturer, to gather metrics on certificate issuance and revocation. Following is an example of a certificate issuance.

Figure 2: Audit report output for certificate issuance

Figure 2: Audit report output for certificate issuance

For more information on generating an audit report, see Using audit reports with your private CA.

Cross-account sharing by using AWS RAM

With AWS RAM, you can share CAs with another account. We recommend that you, as a Manufacturer, use AWS RAM to share CAs with Suppliers so that they can issue certificates without administrator access to the CA. This arrangement allows you as the Manufacturer to more easily limit and revoke access if you change Suppliers. The Suppliers can create certificates through the ACM console or through the CLI, API, or AWS CloudFormation. Manufacturers are only sharing the ability to create, manage, bind, and export certificates from the CA hierarchy. The CA hierarchy itself is contained within the Manufacturers’ accounts, and not within the Suppliers’ accounts. By using AWS RAM, the Suppliers don’t have any administrator access to the CA hierarchy. From a cost perspective, you can centrally control and monitor the costs of your private CA hierarchy without having to deal with cost-sharing across Suppliers.

Refer to How to use AWS RAM to share your ACM Private CA cross-account for a full walkthrough on how to use RAM with ACM Private CA.

Certificate templates with AWS RAM managed permissions

AWS RAM has the ability to create managed permissions in order to define the actions that can be performed on shared resources. For each shareable resource type, you can use AWS RAM managed permissions to define which permissions to grant to whom for shared resource types that support additional managed permissions. This means that when you use AWS RAM to share a resource (in this case ACM Private CA), you can now specify which IAM actions can take place on that resource. AWS RAM managed permissions integrate with the following ACM Private CA certificate templates:

  • Permission 1: BlankEndEntityCertificate_APICSRPassthrough
  • Permission 2: EndEntityClientAuthCertificate
  • Permission 3: EndEntityServerAuthCertificate
  • Permission 4: subordinatesubordinateCACertificate_PathLen0
  • Permission 5: RevokeCertificate

These five certificate templates allow a Manufacturer to scope its Suppliers to the certificate template provisioning level. This means that you can limit which certificate templates can be issued by the Suppliers.

Let’s assume you have a Supplier that is supplying a module that has infotainment media capability, and you, the manufacturer, want the Supplier to provision the end-entity client certificate but you don’t want them to be able to revoke that certificate. You can use AWS RAM managed permissions to scope that Supplier’s shared private CA to allow the EndEntityClientAuthCertificate issuance template, which implicitly denies RevokeCertificate template actions. This further scopes down what the Supplier is authorized to issue on the shared CA, gives the responsibility for revoking infotainment device certificates to the Manufacturer, but still allows the Supplier to load devices with a certificate upon creation.

Example of creating a resource share in AWS RAM by using the AWS CLI

This walkthrough shows you the general process of sharing a private CA by using AWS RAM and then accepting that shared resource in the partner account.

  1. Create your shared resource in AWS RAM from the Manufacturer subordinate CA account. Notice that in the example that follows, we selected one of the certificate templates within the managed permissions option. This limits the shared CA so that it can only issue certain types of certificate templates.

    Note: Replace the <variable> placeholders with your own values.

    aws ram create-resource-share
    		--name Shared_Private_CA
    		--resource-arns arn:aws:acm-pca:<region:111122223333>:certificate-authority/<xxxx-xxxx-xxxx-xxxx-example>
    		--permission-arns "arn:aws:ram::aws:permission/<AWSRAMBlankEndEntityCertificateAPICSRPassthroughIssuanceCertificateAuthority>"
    		--principals <444455556666>

  2. From the Supplier account, the Supplier administrator will accept the resource. Follow How to use AWS RAM to share your ACM Private CA cross-account to complete the shared resource acceptance and issue an end entity certificate.

Conclusion

In this blog post, you learned about the various considerations for building a secure public key infrastructure (PKI) hierarchy by using ACM Private CA through an example customer’s prescriptive setup. You learned how you can use AWS RAM to share CAs across accounts easily and securely. You also learned about sharing specific CAs through the ability to define permissions to specific principals across accounts, allowing for granular control of permissions on principals that might act on those resources.

The main takeaways of this post are how to create least privileged roles within IAM in order to scope down the activities of each persona and limit the potential scope of impact for your organization’s private CA hierarchy. Although these best practices are specific to manufacturer business requirements, you can alter them based on your business needs. With the managed permissions in AWS RAM, you can further scope down the actions that principals can perform with your CA by limiting the certificate templates allowed on that CA when you share it. Using all of these tools, you can help your PKI hierarchy to have a high level of security. To learn more, see the other ACM Private CA posts on the AWS Security Blog.

 
If you have feedback about this post, submit comments in the Comments section below. If you have questions about this post, contact AWS Support.

Want more AWS Security news? Follow us on Twitter.

Anthony Pasquariello

Anthony Pasquariello

Anthony is a Senior Solutions Architect at AWS based in New York City. He specializes in modernization and security for our advanced enterprise customers. Anthony enjoys writing and speaking about all things cloud. He’s pursuing an MBA, and received his MS and BS in Electrical & Computer Engineering.

Omar Zoma

Omar Zoma

Omar is a senior AWS Security Solutions Architect that lives in metro Detroit. Omar is passionate about helping customers solve cloud and vehicle security problems at a global scale. In his free time, Omar trains hundreds of students a year in security and cloud through universities and training programs.