Post Syndicated from Brendan Paul original https://aws.amazon.com/blogs/security/exploring-common-centralized-and-decentralized-approaches-to-secrets-management/
One of the most common questions about secrets management strategies on Amazon Web Services (AWS) is whether an organization should centralize its secrets. Though this question is often focused on whether secrets should be centrally stored, there are four aspects of centralizing the secrets management process that need to be considered: creation, storage, rotation, and monitoring. In this post, we discuss the advantages and tradeoffs of centralizing or decentralizing each of these aspects of secrets management.
Centralized creation of secrets
When deciding whether to centralize secrets creation, you should consider how you already deploy infrastructure in the cloud. Modern DevOps practices have driven some organizations toward developer portals and internal developer platforms that use golden paths for infrastructure deployment. By using tools that use golden paths, developers can deploy infrastructure in a self-service model through infrastructure as code (IaC) while adhering to organizational standards.
A central function maintains these golden paths, such as a platform engineering team. Examples of services that can be used to maintain and define golden paths might include AWS services such as AWS Service Catalog or popular open source projects such as Backstage.io. Using this approach, developers can focus on application code while platform engineers focus on infrastructure deployment, security controls, and developer tooling. An example of a golden path might be a templatized implementation for a microservice that writes to a database.
For example, a golden path could define that a service or application must be built using the AWS Cloud Development Kit (AWS CDK), running on Amazon Elastic Container Service (Amazon ECS), and use AWS Secrets Manager to retrieve database credentials. The platform team could also build checks to help ensure that the secret’s resource policy only allows access to the role being used by the microservice and is encrypted with a customer managed key. This pattern abstracts deployments away from developers and facilitates resource deployment across accounts. This is one example of a centralized creation pattern, shown in Figure 1.
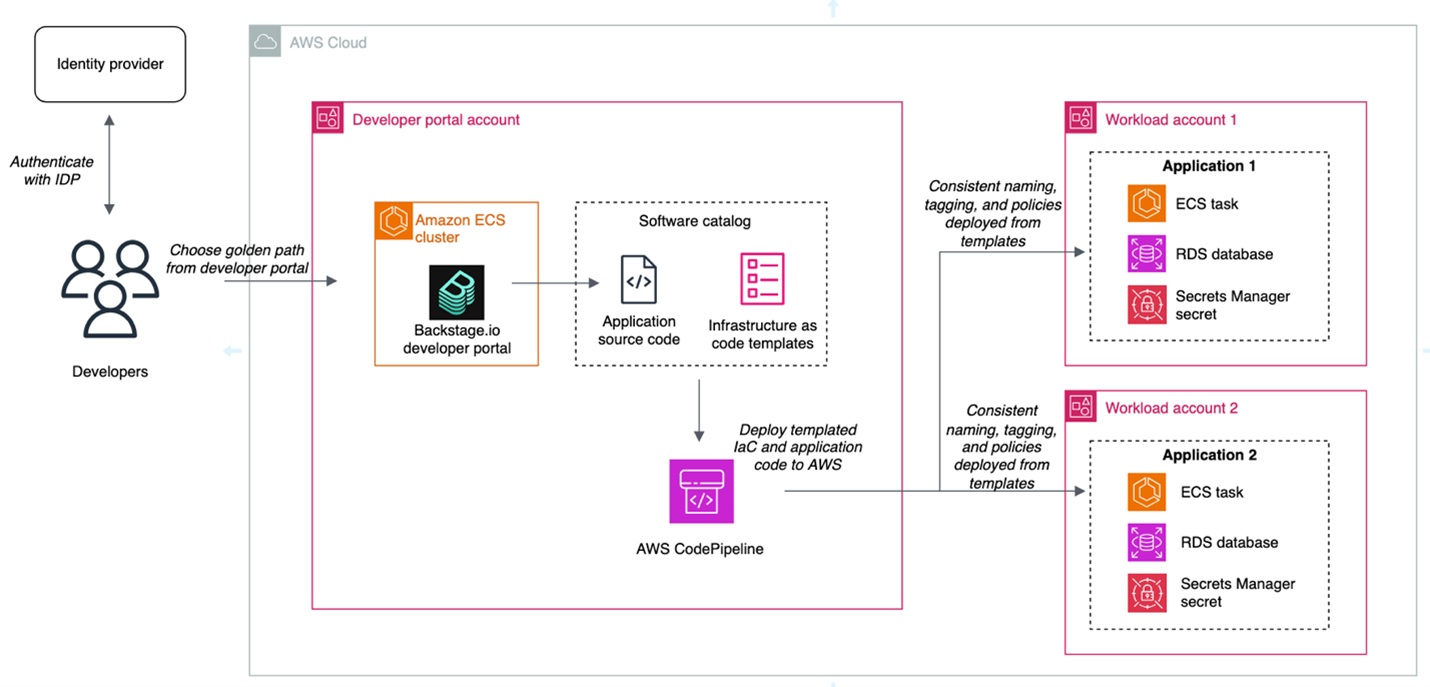
Figure 1: Architecture diagram highlighting the developer portal deployment pattern for centralized creation
The advantages of this approach are:
- Consistent naming tagging, and access control: When secrets are created centrally, you can enforce a standard naming convention based on the account, workload, service, or data classification. This simplifies implementing scalable patterns like attribute-based access control (ABAC).
- Least privilege checks in CI/CD pipelines: When you create secrets within the confines of IaC pipelines, you can use APIs such as the AWS IAM Access Analyzer check-no-new-access API. Deployment pipelines can be templatized, so individual teams can take advantage of organizational standards while still owning deployment pipelines.
- Create mechanisms for collaboration between platform engineering and security teams: Often, the shift towards golden paths and service catalogs is driven by a desire for a better developer experience and reduced operational overhead. A byproduct of this move is that security teams can partner with platform engineering teams to build security by default into these paths.
The tradeoffs of this approach are:
- It takes time and effort to make this shift. You might not have the resources to invest in full-time platform engineering or DevOps teams. To centrally provision software and infrastructure like this, you must maintain libraries of golden paths that are appropriate for the use cases of your organization. Depending on the size of your organization, this might not be feasible.
- Golden paths must keep up with the features of the services they support: If you’re using this pattern, and the service you’re relying on releases a new feature, your developers must wait for the features to be added to the affected golden paths.
If you want to learn more about the internal developer platform pattern, check out the re:Invent 2024 talk Elevating the developer experience with Backstage on AWS.
Decentralized creation of secrets
In a decentralized model, application teams own the IaC templates and deployment mechanisms in their own accounts. Here, each team is operating independently, which can make it more difficult to enforce standards as code. We’ll refer to this pattern, shown in Figure 2, as a decentralized creation pattern.
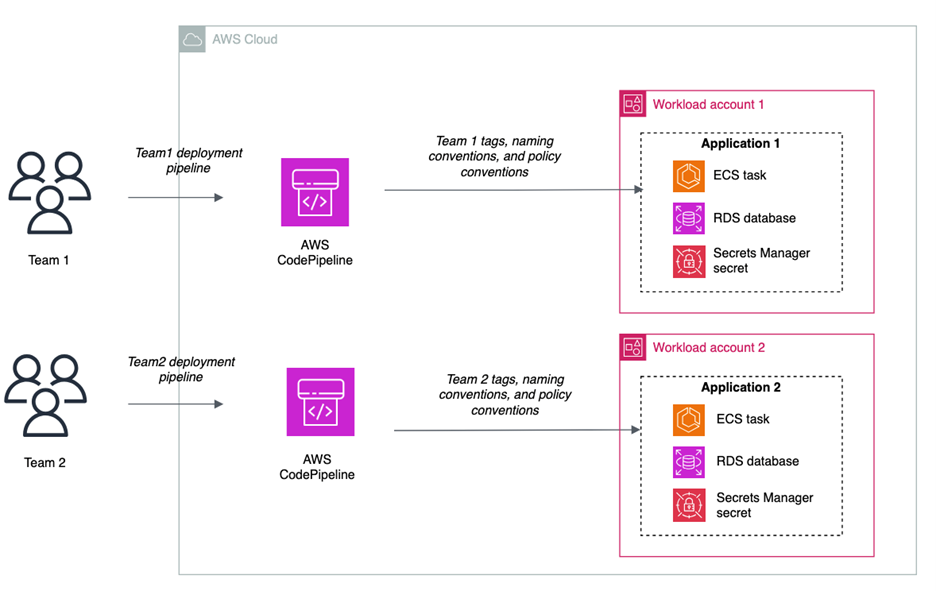
Figure 2: Decentralized creation of secrets
The advantages of this approach are:
- Speed: Developers can move quickly and have more autonomy because they own the creation process. Individual teams don’t have a dependency on a central function.
- Flexibility: You can still use features such as the IAM Access Analyzer check-no-new-access API, but it’s up to each team to implement this in their pipeline.
The tradeoffs of this approach are:
- Lack of standardization: It can become more difficult to enforce naming and tagging conventions, because it’s not templatized and applied through central creation mechanisms. Access controls and resource policies might not be consistent across teams.
- Developer attention: Developers must manage more of the underlying infrastructure and deployment pipelines.
Centralized storage of secrets
Some customers choose to store their secrets in a central account, and others choose to store secrets in the accounts in which their workloads live. Figure 3 shows the architecture for centralized storage of secrets.
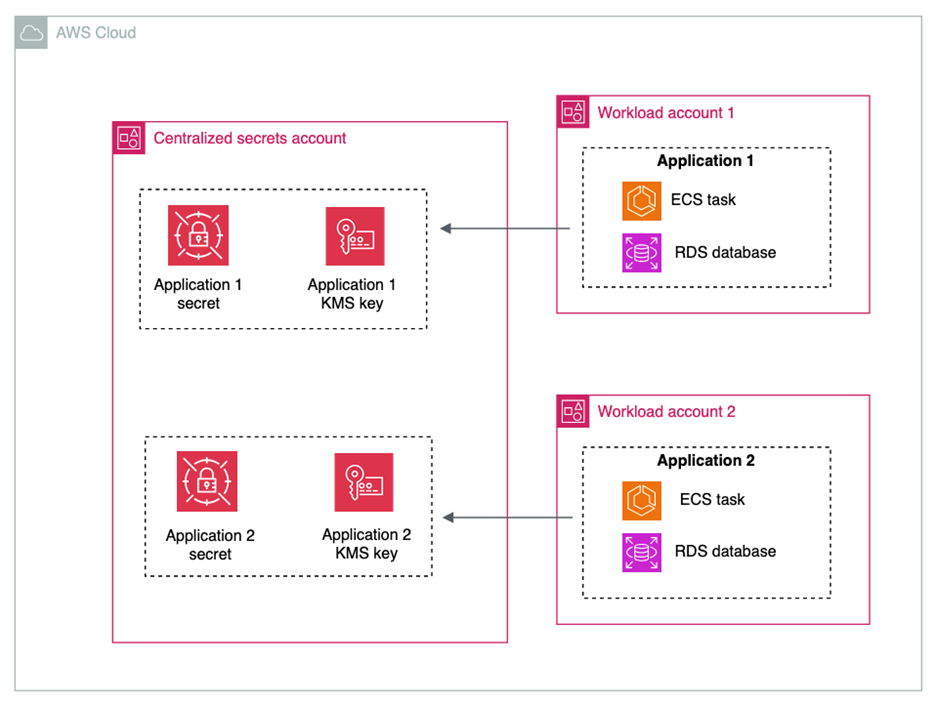
Figure 3: Centralized storage of secrets
The advantages of centralizing the storage of secrets are:
- Simplified monitoring and observability: Monitoring secrets can be simplified by keeping them in a single account and with a centralized team controlling them.
Some tradeoffs of centralizing the storage of secrets are:
- Additional operational overhead: When sharing secrets across accounts, you must configure resource policies on each secret that is shared.
- Additional cost of AWS KMS Customer Managed Keys: You must use AWS Key Management Service (AWS KMS) customer managed keys when sharing secrets across accounts. While this gives you an additional layer of access control over secret access, it will increase cost under the AWS KMS pricing. It will also add another policy that needs to be created and maintained.
- High concentration of sensitive data: Having secrets in a central account can increase the number of resources affected in the event of inadvertent access or misconfiguration.
- Account quotas: Before deciding on a centralized secret account, review the AWS service quotas to ensure you won’t hit quotas in your production environment.
- Service managed secrets: When services such as Amazon Relational Database Service (Amazon RDS) or Amazon Redshift manage secrets on your behalf, these secrets are placed in the same account as the resource with which the secret is associated. To maintain a centralized storage of secrets while using service managed secrets, the resources would also have to be centralized.
Though there are advantages to centralizing secrets for monitoring and observability, many customers already rely on services such as AWS Security Hub, IAM Access Analyzer, AWS Config, and Amazon CloudWatch for cross-account observability. These services make it easier to create centralized views of secrets in a multi-account environment.
Decentralized storage of secrets
In a decentralized approach to storage, shown in in Figure 4, secrets live in the same accounts as the workload that needs access to them.
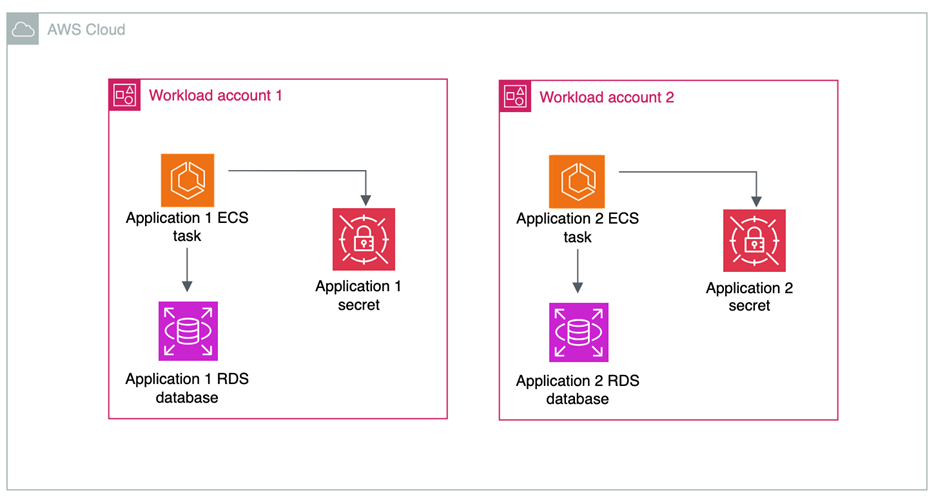
Figure 4: Decentralized storage of secrets
The advantages of decentralizing the storage of secrets are:
- Account boundaries and logical segmentation: Account boundaries provide a natural segmentation between workloads in AWS. When operating in a distributed multi-account environment, you cannot access secrets from another account by default, and all cross-account access must be allowed by both a resource policy in the source account and an IAM policy in the destination account. You can use resource control polices to prevent the sharing of secrets across accounts.
- AWS KMS key choice: If your secrets aren’t shared across accounts, then you have the choice to use AWS KMS customer managed keys or AWS managed keys to encrypt your secrets.
- Delegate permissions management to application owners: When secrets are stored in accounts with the applications that need to consume them, application owners define fine-grained permissions in secrets resource policies.
There are a few tradeoffs to consider for this architecture:
- Auditing and monitoring require cross-account deployments: Tools that are used to monitor the compliance and status of secrets need to operate across multiple accounts and present information in a single place. This is simplified by AWS native tools, which are described later in this post.
- Automated remediation workflows: You can have detective controls in place to alert on any misconfiguration or security risks related to your secrets. For example, you can surface an alert when a secret is shared outside of your organizational boundary through a resource policy. These workflows can be more complex in a multi-account environment. However, we have samples that can help, such as the Automated Security Response on AWS solution.
Centralized rotation
Like the creation and storage of secrets, organizations take different approaches to centralizing the lifecycle management and rotation of secrets.
When you centralize lifecycle management, as shown in Figure 5, a central team manages and owns AWS Lambda functions for rotation. The advantages of centralizing the lifecycle management of secrets are:
- Developers can reuse rotation functions: In this pattern, a centralized team maintains a common library of rotation functions for different use cases. An example of this can be seen in this AWS re:Inforce session. Using this method, application teams don’t have to build their own custom rotation functions and can benefit from common architectural decisions regarding databases and third-party software as a service (SaaS) applications.
- Logging: When storing and accessing rotation function logs, the centralized pattern can simplify managing logs from a single place.

Figure 5: Centralized rotation of secrets
There are some tradeoffs in centralizing the lifecycle management and rotation of secrets:
- Additional cross-account access scenarios: When centralizing lifecycle management, the Lambda functions in central accounts require permissions to create, update, delete and read secrets in the application accounts. This increases the operational overhead required to enable secret rotation.
- Service quotas: When you centralize a function at scale, service quotas can come into play. Check the Lambda service quotas to verify that you won’t hit quotas in your production environments.
Decentralized rotation
Decentralizing the lifecycle management of secrets is a more common choice, where the rotation functions live in the same account as the associated secret, as shown in Figure 6.
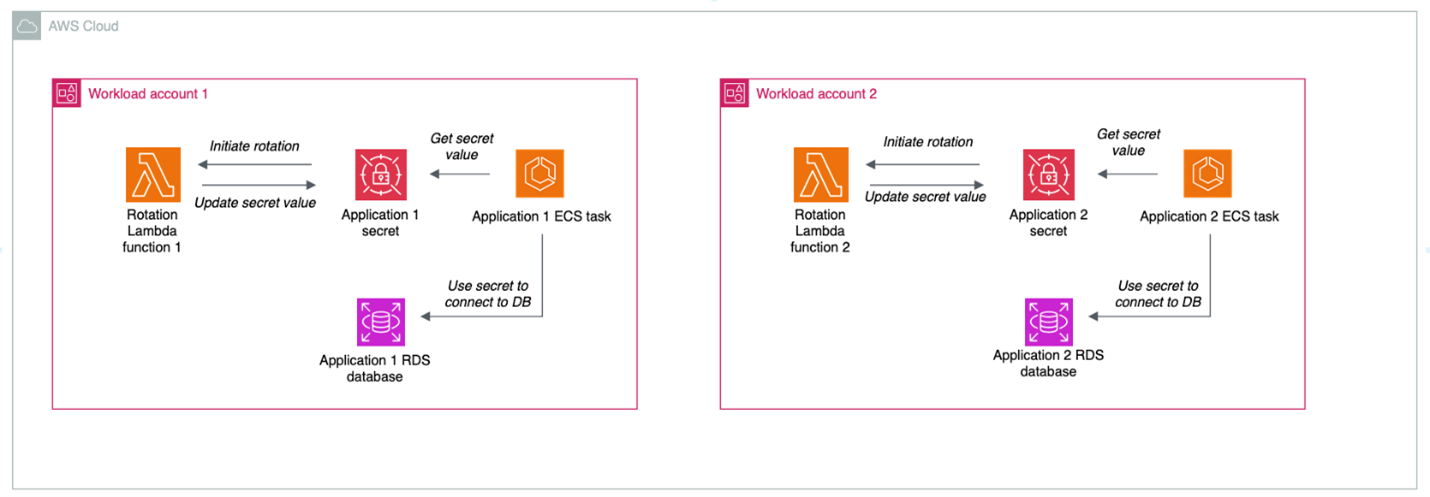
Figure 6: Decentralized rotation of secrets
The advantages of decentralizing the lifecycle management of secrets are:
- Templatization and customization: Developers can reuse rotation templates, but tweak the functions as needed to meet their needs and use cases
- No cross-account access: Decentralized rotation of secrets happens all in one account and doesn’t require cross-account access.
The primary tradeoff of decentralizing rotation is that you will need to provide either centralized or federated access to logs for rotation functions in different accounts. By default, Lambda automatically captures logs for all function invocations and sends them to CloudWatch Logs. CloudWatch Logs offers a few different ways that you can centralize your logs, with the tradeoffs of each described in the documentation.
Centralized auditing and monitoring of secrets
Regardless of the model chosen for creation, storage, and rotation of secrets, centralize the compliance and auditing aspect when operating in a multi-account environment. You can use AWS Security Hub CSPM through its integration with AWS Organizations to centralize:
- AWS Foundational Security Best Practices findings associated with Secrets Manager
- IAM Access Analyzer findings related to external access to secrets manager secrets
- AWS Config findings related to Secrets Manager secrets,
- Amazon GuardDuty anomalous behavior findings for secrets
In this scenario, shown in Figure 7, centralized functions get visibility across the organization and individual teams can view their posture at an account level with no need to look at the state of the entire organization.
Use AWS CloudTrail organizational trails to send all API calls for Secrets Manager to a centralized delegated admin account.
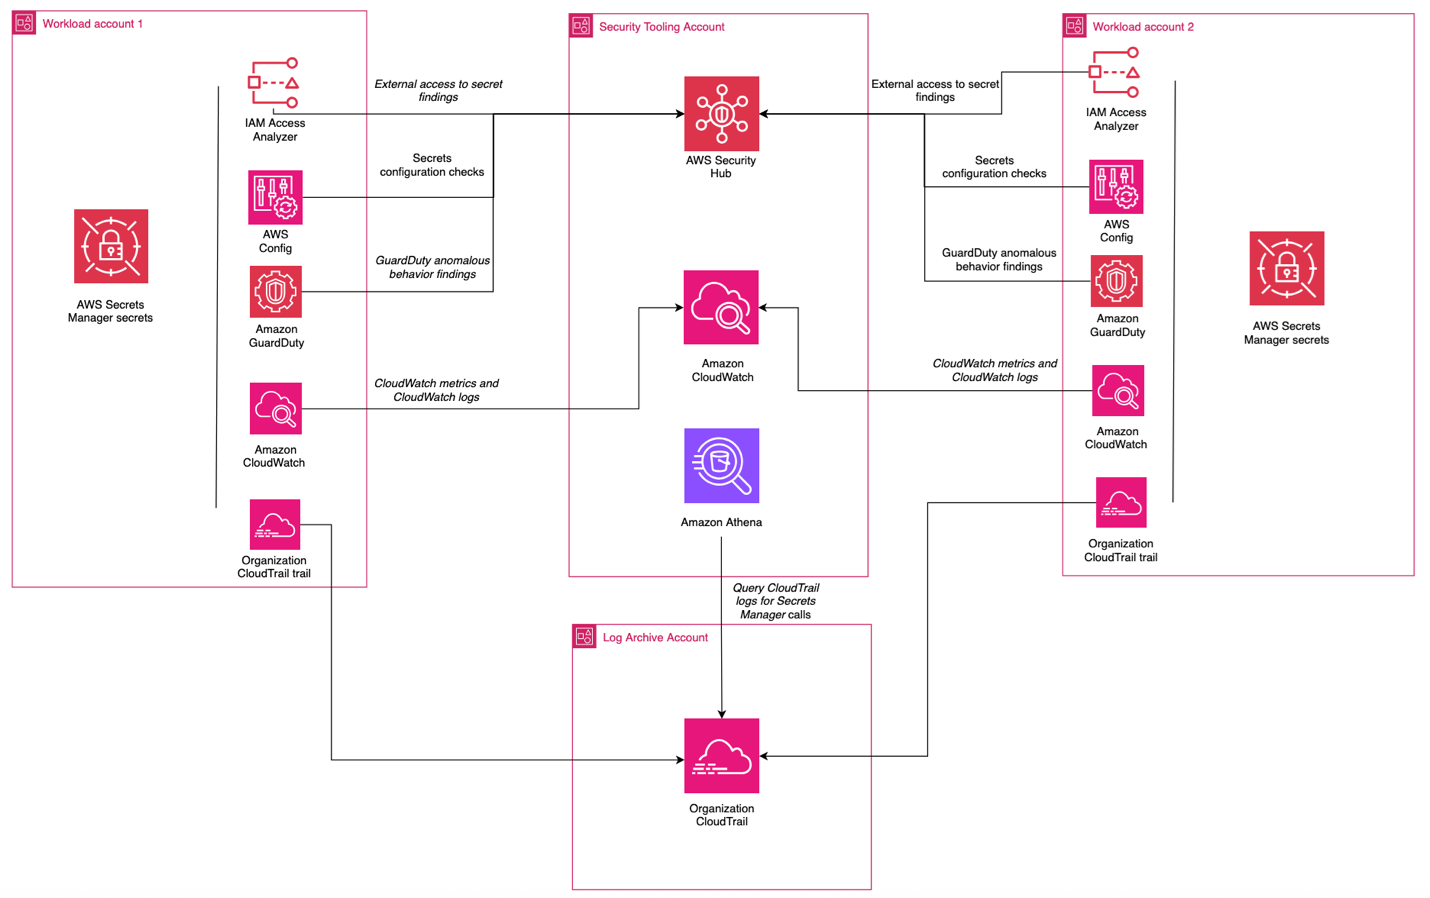
Figure 7: Centralized monitoring and auditing
Decentralized auditing and monitoring of secrets
For organizations that don’t require centralized auditing and monitoring of secrets, you can configure access so that individual teams can determine which logs are collected, alerts are enabled, and checks are in place in relation to your secrets. The advantages of this approach are:
- Flexibility: Development teams have the freedom to choose what monitoring, auditing, and logging tools work best for them.
- Reduced dependencies: Development teams don’t have to rely on centralized functions for alerting and monitoring capabilities.
The tradeoffs of this approach are:
- Operational overhead: This can create redundant work for teams looking to accomplish similar goals.
- Difficulty aggregating logs in cross-account investigations: If logs, alerts, and monitoring capabilities are decentralized, it can increase the difficulty of investigating events that affect multiple accounts.
Putting it all together
Most organizations choose a combination of these approaches to meet their needs. An example is a financial services company that has a central security team, operates across hundreds of AWS accounts, and has hundreds of applications that are isolated at the account level. This customer could:
- Centralize the creation process, enforcing organizational standards for naming, tagging, and access control
- Decentralize storage of secrets, using the AWS account as a natural boundary for access and storing the secret in the account where the workload is operating, delegating control to application owners
- Decentralize lifecycle management so that application owners can manage their own rotation functions
- Centralize auditing, using tools like AWS Config, Security Hub, and IAM Access Analyzer to give the central security team insight into the posture of their secrets while letting application owners retain control
Conclusion
In this post, we’ve examined the architectural decisions organizations face when implementing secrets management on AWS: creation, storage, rotation, and monitoring. Each approach—whether centralized or decentralized—offers distinct advantages and tradeoffs that should align with your organization’s security requirements, operational model, and scale. The important points include:
- Choose your secrets management architecture based on your organization’s specific requirements and capabilities. There’s no one solution that will fit every situation.
- Use automation and IaC to enforce consistent security controls, regardless of your approach.
- Implement comprehensive monitoring and auditing capabilities through AWS services to maintain visibility across your environment.
Resources
To learn more about AWS Secrets Manager, check out some of these resources:


