Tag Archives: micro-frontends

Integrating Turnstile with the Cloudflare WAF to challenge fetch requests

Post Syndicated from Adam Martinetti http://blog.cloudflare.com/author/adam-martinetti/ original https://blog.cloudflare.com/integrating-turnstile-with-the-cloudflare-waf-to-challenge-fetch-requests


Two months ago, we made Cloudflare Turnstile generally available — giving website owners everywhere an easy way to fend off bots, without ever issuing a CAPTCHA. Turnstile allows any website owner to embed a frustration-free Cloudflare challenge on their website with a simple code snippet, making it easy to help ensure that only human traffic makes it through. In addition to protecting a website’s frontend, Turnstile also empowers web administrators to harden browser-initiated (AJAX) API calls running under the hood. These APIs are commonly used by dynamic single-page web apps, like those created with React, Angular, Vue.js.

Today, we’re excited to announce that we have integrated Turnstile with the Cloudflare Web Application Firewall (WAF). This means that web admins can add the Turnstile code snippet to their websites, and then configure the Cloudflare WAF to manage these requests. This is completely customizable using WAF Rules; for instance, you can allow a user authenticated by Turnstile to interact with all of an application’s API endpoints without facing any further challenges, or you can configure certain sensitive endpoints, like Login, to always issue a challenge.

Challenging fetch requests in the Cloudflare WAF

Millions of websites protected by Cloudflare’s WAF leverage our JS Challenge, Managed Challenge, and Interactive Challenge to stop bots while letting humans through. For each of these challenges, Cloudflare intercepts the matching request and responds with an HTML page rendered by the browser, where the user completes a basic task to demonstrate that they’re human. When a user successfully completes a challenge, they receive a cf_clearance cookie, which tells Cloudflare that a user has successfully passed a challenge, the type of challenge, and when it was completed. A clearance cookie can’t be shared between users, and is only valid for the time set by the Cloudflare customer in their Security Settings dashboard.

This process works well, except when a browser receives a challenge on a fetch request and the browser has not previously passed a challenge. On a fetch request, or an XML HTTP Request (XHR), the browser expects to get back simple text (in JSON or XML formats) and cannot render the HTML necessary to run a challenge.

As an example, let’s imagine a pizzeria owner who built an online ordering form in React with a payment page that submits data to an API endpoint that processes payments. When a user views the web form to add their credit card details they can pass a Managed Challenge, but when the user submits their credit card details by making a fetch request, the browser won’t execute the code necessary for a challenge to run. The pizzeria owner’s only option for handling suspicious (but potentially legitimate) requests is to block them, which runs the risk of false positives that could cause the restaurant to lose a sale.

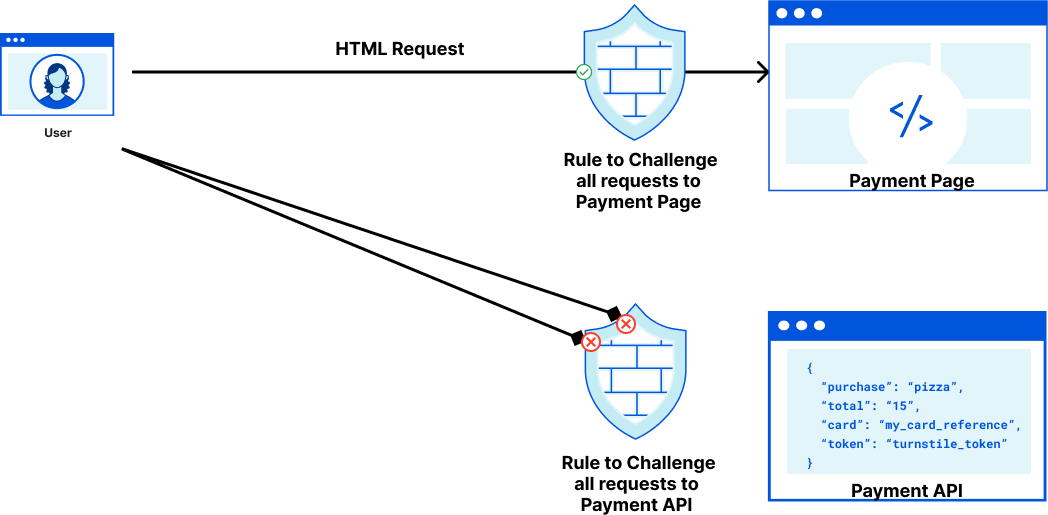
This is where Turnstile can help. Turnstile allows anyone on the Internet to embed a Cloudflare challenge anywhere on their website. Before today, the output of Turnstile was only a one-time use token. To enable customers to issue challenges for these fetch requests, Turnstile can now issue a clearance cookie for the domain that it’s embedded on. Customers can issue their challenge within the HTML page before a fetch request, pre-clearing the visitor to interact with the Payment API.

Turnstile Pre-Clearance mode

Returning to our pizzeria example, the three big advantages of using Pre-Clearance to integrate Turnstile with the Cloudflare WAF are:

  1. Improved user experience: Turnstile’s embedded challenge can run in the background while the visitor is entering their payment details.
  2. Blocking more requests at the edge: Because Turnstile now issues a clearance cookie for the domain that it’s embedded on, our pizzeria owner can use a Custom Rule to issue a Managed Challenge for every request to the payment API. This ensures that automated attacks attempting to target the payment API directly are stopped by Cloudflare before they can reach the API.
  3. (Optional) Securing the action and the user: No backend code changes are necessary to get the benefit of Pre-Clearance. However, further Turnstile integration will increase security for the integrated API. The pizzeria owner can adjust their payment form to validate the received Turnstile token, ensuring that every payment attempt is individually validated by Turnstile to protect their payment endpoint from session hijacking.

A Turnstile widget with Pre-Clearance enabled will still issue turnstile tokens, which gives customers the flexibility to decide if an endpoint is critical enough to require a security check on every request to it, or just once a session. Clearance cookies issued by a Turnstile widget are automatically applied to the Cloudflare zone the Turnstile widget is embedded on, with no configuration necessary. The clearance time the token is valid for is still controlled by the zone specific “Challenge Passage” time.

Implementing Turnstile with Pre-Clearance

Let’s make this concrete by walking through a basic implementation. Before we start, we’ve set up a simple demo application where we emulate a frontend talking to a backend on a /your-api endpoint.

To this end, we have the following code:

<!DOCTYPE html>
<html lang="en">
<head>
   <title>Turnstile Pre-Clearance Demo </title>
</head>
<body>
  <main class="pre-clearance-demo">
    <h2>Pre-clearance Demo</h2>
    <button id="fetchBtn">Fetch Data</button>
    <div id="response"></div>
</main>


<script>
  const button = document.getElementById('fetchBtn');
  const responseDiv = document.getElementById('response');
  button.addEventListener('click', async () => {
  try {
    let result = await fetch('/your-api');
    if (result.ok) {
      let data = await result.json();
      responseDiv.textContent = JSON.stringify(data);
    } else {
      responseDiv.textContent = 'Error fetching data';
    }
  } catch (error) {
    responseDiv.textContent = 'Network error';
  }
});
</script>

We’ve created a button. Upon clicking, Cloudflare makes a fetch() request to the /your-api endpoint, showing the result in the response container.

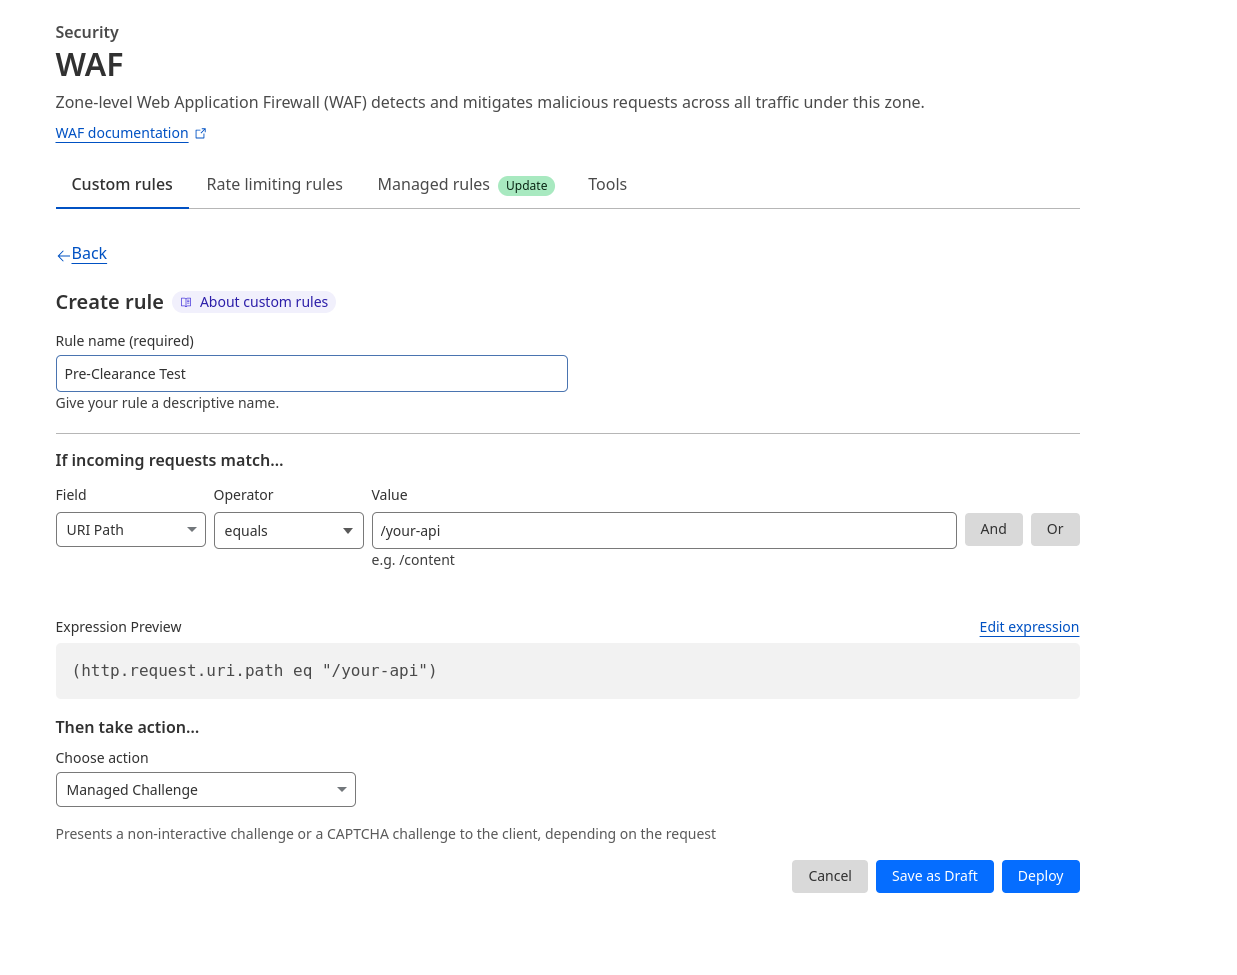
Now let’s consider that we have a Cloudflare WAF rule set up that protects the /your-api endpoint with a Managed Challenge.

Due to this rule, the app that we just wrote is going to fail for the reason described earlier (the browser is expecting a JSON response, but instead receives the challenge page as HTML).

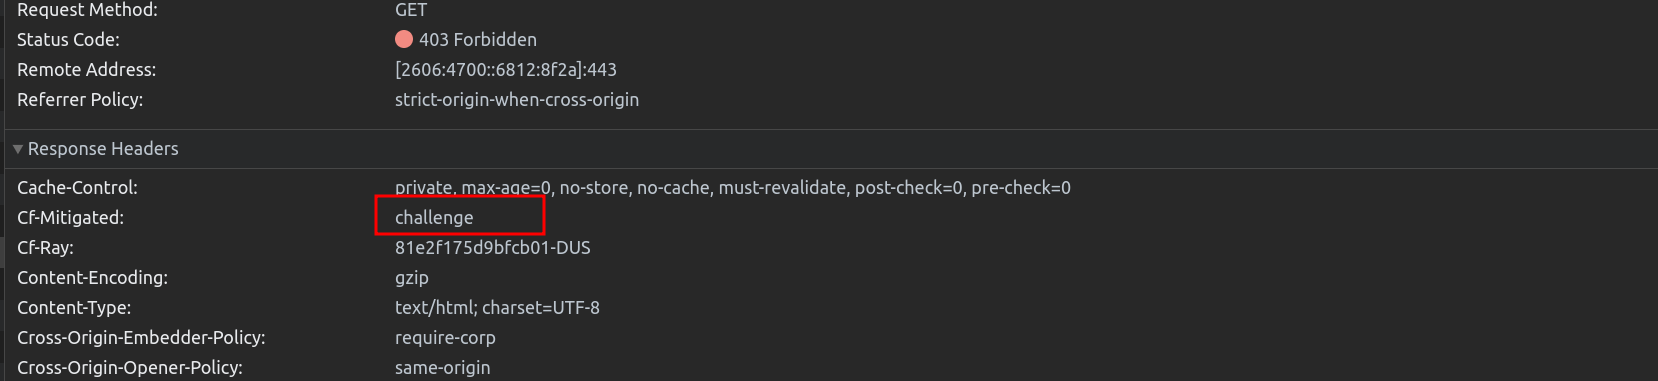
If we inspect the Network Tab, we can see that the request to /your-api has been given a 403 response.

Upon inspection, the Cf-Mitigated header shows that the response was challenged by Cloudflare’s firewall, as the visitor has not solved a challenge before.

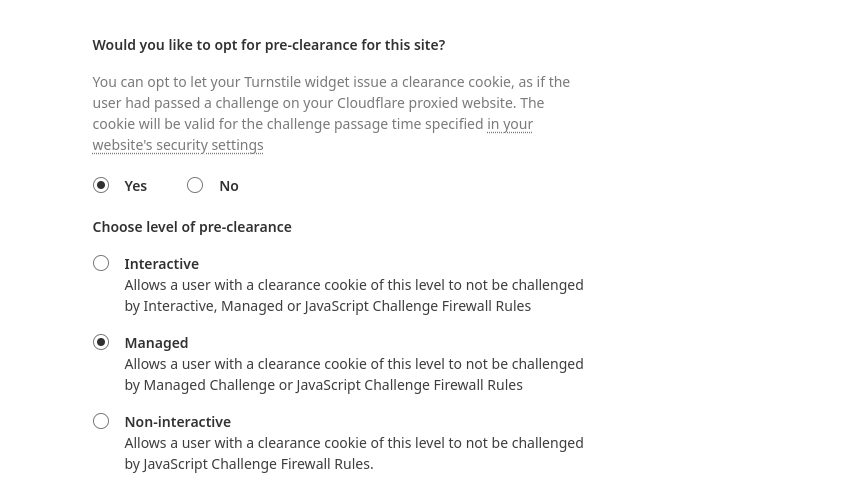
To address this problem in our app, we set up a Turnstile Widget in Pre-Clearance mode for the Turnstile sitekey that we want to use.

In our application, we override the fetch() function to invoke Turnstile once a Cf-Mitigated response has been received.

<script>
turnstileLoad = function () {
  // Save a reference to the original fetch function
  const originalFetch = window.fetch;

  // A simple modal to contain Cloudflare Turnstile
  const overlay = document.createElement('div');
  overlay.style.position = 'fixed';
  overlay.style.top = '0';
  overlay.style.left = '0';
  overlay.style.right = '0';
  overlay.style.bottom = '0';
  overlay.style.backgroundColor = 'rgba(0, 0, 0, 0.7)';
  overlay.style.border = '1px solid grey';
  overlay.style.zIndex = '10000';
  overlay.style.display = 'none';
  overlay.innerHTML =       '<p style="color: white; text-align: center; margin-top: 50vh;">One more step before you proceed...</p><div style=”display: flex; flex-wrap: nowrap; align-items: center; justify-content: center;” id="turnstile_widget"></div>';
  document.body.appendChild(overlay);

  // Override the native fetch function
  window.fetch = async function (...args) {
      let response = await originalFetch(...args);

      //If the original request was challenged...
      if (response.headers.has('cf-mitigated') && response.headers.get('cf-mitigated') === 'challenge') {
          //The request has been challenged...
          overlay.style.display = 'block';

          await new Promise((resolve, reject) => {
              turnstile.render('#turnstile_widget', {
                  'sitekey': ‘YOUR_TURNSTILE_SITEKEY',
                  'error-callback': function (e) {
                      overlay.style.display = 'none';
                      reject(e);
                  },
                  'callback': function (token, preClearanceObtained) {
                      if (preClearanceObtained) {
                          //The visitor successfully solved the challenge on the page. 
                          overlay.style.display = 'none';
                          resolve();
                      } else {
                          reject(e);
                      }
                  },
              });
          });

          // Replay the original fetch request, this time it will have the cf_clearance Cookie
          response = await originalFetch(...args);
      }
      return response;
  };
};
</script>
<script src="https://challenges.cloudflare.com/turnstile/v0/api.js?onload=turnstileLoad" async defer></script>

There is a lot going on in the snippet above: First, we create a hidden overlay element and override the browser’s fetch() function. The fetch() function is changed to introspect the Cf-Mitigated header for ‘challenge’. If a challenge is issued, the initial result will be unsuccessful; instead, a Turnstile overlay (with Pre-Clearance enabled) will appear in our web application. Once the Turnstile challenge has been completed we will retry the previous request after Turnstile has obtained the cf_clearance cookie to get through the Cloudflare WAF.

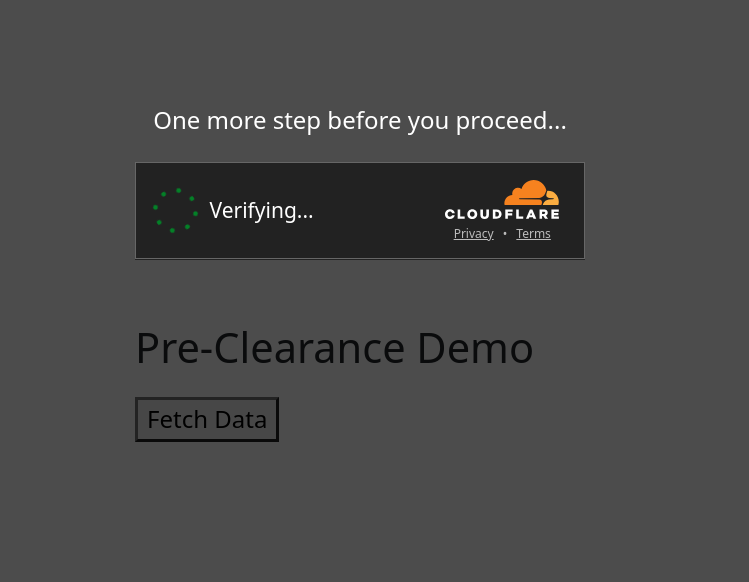
Upon solving the Turnstile widget, the overlay disappears, and the requested API result is shown successfully:

Pre-Clearance is available to all Cloudflare customers

Every Cloudflare user with a free plan or above can use Turnstile in managed mode free for an unlimited number of requests. If you’re a Cloudflare user looking to improve your security and user experience for your critical API endpoints, head over to our dashboard and create a Turnstile widget with Pre-Clearance today.

Incremental adoption of micro-frontends with Cloudflare Workers

Post Syndicated from Peter Bacon Darwin original https://blog.cloudflare.com/fragment-piercing/

Incremental adoption of micro-frontends with Cloudflare Workers

Bring micro-frontend benefits to legacy Web applications

Incremental adoption of micro-frontends with Cloudflare Workers

Recently, we wrote about a new fragment architecture for building Web applications that is fast, cost-effective, and scales to the largest projects, while enabling a fast iteration cycle. The approach uses multiple collaborating Cloudflare Workers to render and stream micro-frontends into an application that is interactive faster than traditional client-side approaches, leading to better user experience and SEO scores.

This approach is great if you are starting a new project or have the capacity to rewrite your current application from scratch. But in reality most projects are too large to be rebuilt from scratch and can adopt architectural changes only in an incremental way.

In this post we propose a way to replace only selected parts of a legacy client-side rendered application with server-side rendered fragments. The result is an application where the most important views are interactive sooner, can be developed independently, and receive all the benefits of the micro-frontend approach, while avoiding large rewrites of the legacy codebase. This approach is framework-agnostic; in this post we demonstrate fragments built with React, Qwik, and SolidJS.

The pain of large frontend applications

Many large frontend applications developed today fail to deliver good user experience. This is often caused by architectures that require large amounts of JavaScript to be downloaded, parsed and executed before users can interact with the application. Despite efforts to defer non-critical JavaScript code via lazy loading, and the use of server-side rendering, these large applications still take too long to become interactive and respond to the user’s inputs.

Furthermore, large monolithic applications can be complex to build and deploy. Multiple teams may be collaborating on a single codebase and the effort to coordinate testing and deployment of the project makes it hard to develop, deploy and iterate on individual features.

As outlined in our previous post, micro-frontends powered by Cloudflare Workers can solve these problems but converting an application monolith to a micro-frontend architecture can be difficult and expensive. It can take months, or even years, of engineering time before any benefits are perceived by users or developers.

What we need is an approach where a project can incrementally adopt micro-frontends into the most impactful parts of the application incrementally, without needing to rewrite the whole application in one go.

Fragments to the rescue

The goal of a fragment based architecture is to significantly decrease loading and interaction latency for large web applications (as measured via Core Web Vitals) by breaking the application into micro-frontends that can be quickly rendered (and cached) in Cloudflare Workers. The challenge is how to integrate a micro-frontend fragment into a legacy client-side rendered application with minimal cost to the original project.

The technique we propose allows us to convert the most valuable parts of a legacy application’s UI, in isolation from the rest of the application.

It turns out that, in many applications, the most valuable parts of the UI are often nested within an application “shell” that provides header, footer, and navigational elements. Examples of these include a login form, product details panel in an e-commerce application, the inbox in an email client, etc.

Let’s take a login form as an example. If it takes our application several seconds to display the login form, the users will dread logging in, and we might lose them. We can however convert the login form into a server-side rendered fragment, which is displayed and interactive immediately, while the rest of the legacy application boots up in the background. Since the fragment is interactive early, the user can even submit their credentials before the legacy application has started and rendered the rest of the page.

Animation showing the login form being available before the main application

This approach enables engineering teams to deliver valuable improvements to users in just a fraction of the time and engineering cost compared to traditional approaches, which either sacrifice user experience improvements, or require a lengthy and high-risk rewrite of the entire application. It allows teams with monolithic single-page applications to adopt a micro-frontend architecture incrementally, target the improvements to the most valuable parts of the application, and therefore front-load the return on investment.

An interesting challenge in extracting parts of the UI into server-side rendered fragments is that, once displayed in the browser, we want the legacy application and the fragments to feel like a single application. The fragments should be neatly embedded within the legacy application shell, keeping the application accessible by correctly forming the DOM hierarchy, but we also want the server-side rendered fragments to be displayed and become interactive as quickly as possible — even before the legacy client-side rendered application shell comes into existence. How can we embed UI fragments into an application shell that doesn’t exist yet? We resolved this problem via a technique we devised, which we call “fragment piercing”.

Fragment piercing

Fragment piercing combines HTML/DOM produced by server-side rendered micro-frontend fragments with HTML/DOM produced by a legacy client-side rendered application.

The micro-frontend fragments are rendered directly into the top level of the HTML response, and are designed to become immediately interactive. In the background, the legacy application is client-side rendered as a sibling of these fragments. When it is ready, the fragments are “pierced” into the legacy application – the DOM of each fragment is moved to its appropriate place within the DOM of the legacy application – without causing any visual side effects, or loss of client-side state, such as focus, form data, or text selection. Once “pierced”, a fragment can begin to communicate with the legacy application, effectively becoming an integrated part of it.

Here, you can see a “login” fragment and the empty legacy application “root” element at the top level of the DOM, before piercing.

<body>
  <div id="root"></div>
  <piercing-fragment-host fragment-id="login">
    <login q:container...>...</login>
  </piercing-fragment-host>
</body>

And here you can see that the fragment has been pierced into the “login-page” div in the rendered legacy application.

<body>
  <div id="root">
    <header>...</header>
    <main>
      <div class="login-page">
        <piercing-fragment-outlet fragment-id="login">
          <piercing-fragment-host fragment-id="login">
            <login  q:container...>...</login>
          </piercing-fragment-host>
        </piercing-fragment-outlet>
      </div>
    </main>
    <footer>...</footer>
  </div>
</body>

To keep the fragment from moving and causing a visible layout shift during this transition, we apply CSS styles that position the fragment in the same way before and after piercing.

At any time an application can be displaying any number of pierced fragments, or none at all. This technique is not limited only to the initial load of the legacy application. Fragments can also be added to and removed from an application, at any time. This allows fragments to be rendered in response to user interactions and client-side routing.

With fragment piercing, you can start to incrementally adopt micro-frontends, one fragment at a time. You decide on the granularity of fragments, and which parts of the application to turn into fragments. The fragments don’t all have to use the same Web framework, which can be useful when switching stacks, or during a post-acquisition integration of multiple applications.

The “Productivity Suite” demo

As a demonstration of fragment piercing and incremental adoption we have developed a “productivity suite” demo application that allows users to manage to-do lists, read hacker news, etc. We implemented the shell of this application as a client-side rendered React application — a common tech choice in corporate applications. This is our “legacy application”. There are three routes in the application that have been updated to use micro-frontend fragments:

  • /login – a simple dummy login form with client-side validation, displayed when users are not authenticated (implemented in Qwik).
  • /todos – manages one or more todo lists, implemented as two collaborating fragments:
    • Todo list selector – a component for selecting/creating/deleting Todo lists (implemented in Qwik).
    • Todo list editor – a clone of the TodoMVC app (implemented in React).
  • /news – a clone of the HackerNews demo (implemented in SolidJS).

This demo showcases that different independent technologies can be used for both the legacy application and for each of the fragments.

Incremental adoption of micro-frontends with Cloudflare Workers
A visualization of the fragments that are pierced into the legacy application

The application is deployed at https://productivity-suite.web-experiments.workers.dev/.

To try it out, you first need to log in – simply use any username you like (no password needed). The user’s data is saved in a cookie, so you can log out and back in using the same username. After you’ve logged in, navigate through the various pages using the navigation bar at the top of the application. In particular, take a look at the “Todo Lists” and “News” pages to see the piercing in action.

At any point, try reloading the page to see that fragments are rendered instantly while the legacy application loads slowly in the background. Try interacting with the fragments even before the legacy application has appeared!

At the very top of the page there are controls to let you see the impact of fragment piercing in action.

Incremental adoption of micro-frontends with Cloudflare Workers
  • Use the “Legacy app bootstrap delay” slider to set the simulated delay before the legacy application starts.
  • Toggle “Piercing Enabled” to see what the user experience would be if the app did not use fragments.
  • Toggle “Show Seams” to see where each fragment is on the current page.

How it works

The application is composed of a number of building blocks.

Incremental adoption of micro-frontends with Cloudflare Workers
An overview of the collaborating Workers and legacy application host

The Legacy application host in our demo serves the files that define the client-side React application (HTML, JavaScript and stylesheets). Applications built with other tech stacks would work just as well. The Fragment Workers host the micro-frontend fragments, as described in our previous fragment architecture post. And the Gateway Worker handles requests from the browser, selecting, fetching and combining response streams from the legacy application and micro-frontend fragments.

Once these pieces are all deployed, they work together to handle each request from the browser. Let’s look at what happens when you go to the `/login` route.

Incremental adoption of micro-frontends with Cloudflare Workers
The flow of requests when viewing the login page

The user navigates to the application and the browser makes a request to the Gateway Worker to get the initial HTML. The Gateway Worker identifies that the browser is requesting the login page. It then makes two parallel sub-requests – one to fetch the index.html of the legacy application, and another to request the server-side rendered login fragment. It then combines these two responses into a single response stream containing the HTML that is delivered to the browser.

The browser displays the HTML response containing the empty root element for the legacy application, and the server-side rendered login fragment, which is immediately interactive for the user.

The browser then requests the legacy application’s JavaScript. This request is proxied by the Gateway Worker to the Legacy application host. Similarly, any other assets for the legacy application or fragments get routed through the Gateway Worker to the legacy application host or appropriate Fragment Worker.

Once the legacy application’s JavaScript has been downloaded and executed, rendering the shell of the application in the process, the fragment piercing kicks in, moving the fragment into the appropriate place in the legacy application, while preserving all of its UI state.

While focussed on the login fragment to explain fragment piercing, the same ideas apply to the other fragments implemented in the /todos and /news routes.

The piercing library

Despite being implemented using different Web frameworks, all the fragments are integrated into the legacy application in the same way using helpers from a “Piercing Library”. This library is a collection of server-side and client-side utilities that we developed, for the demo, to handle integrating the legacy application with micro-frontend fragments. The main features of the library are the PiercingGateway class, fragment host and fragment outlet custom elements, and the MessageBus class.

PiercingGateway

The PiercingGateway class can be used to instantiate a Gateway Worker that handles all requests for our application’s HTML, JavaScript and other assets. The `PiercingGateway` routes requests through to the appropriate Fragment Workers or to the host of the Legacy Application. It also combines the HTML response streams from these fragments with the response from the legacy application into a single HTML stream that is returned to the browser.

Implementing a Gateway Worker is straightforward using the Piercing Library. Create a new gateway instance of PiercingGateway, passing it the URL to the legacy application host and a function to determine whether piercing is enabled for the given request. Export the gateway as the default export from the Worker script so that the Workers runtime can wire up its fetch() handler.

const gateway = new PiercingGateway<Env>({
  // Configure the origin URL for the legacy application.
  getLegacyAppBaseUrl: (env) => env.APP_BASE_URL,
  shouldPiercingBeEnabled: (request) => ...,
});
...

export default gateway;

Fragments can be registered by calling the registerFragment() method so that the gateway can automatically route requests for a fragment’s HTML and assets to its Fragment Worker. For example, registering the login fragment would look like:

gateway.registerFragment({
  fragmentId: "login",
  prePiercingStyles: "...",
  shouldBeIncluded: async (request) => !(await isUserAuthenticated(request)),
});

Fragment host and outlet

Routing requests and combining HTML responses in the Gateway Worker is only half of what makes piercing possible. The other half needs to happen in the browser where the fragments need to be pierced into the legacy application using the technique we described earlier.

The fragment piercing in the browser is facilitated by a pair of custom elements, the fragment host (<piercing-fragment-host>) and the fragment outlet (<piercing-fragment-outlet>).

The Gateway Worker wraps the HTML for each fragment in a fragment host. In the browser, the fragment host manages the life-time of the fragment and is used when moving the fragment’s DOM into position in the legacy application.

<piercing-fragment-host fragment-id="login">
  <login q:container...>...</login>
</piercing-fragment-host>

In the legacy application, the developer marks where a fragment should appear when it is pierced by adding a fragment outlet. Our demo application’s Login route looks as follows:

export function Login() {
  …
  return (
    <div className="login-page" ref={ref}>
      <piercing-fragment-outlet fragment-id="login" />
    </div>
  );
}

When a fragment outlet is added to the DOM, it searches the current document for its associated fragment host. If found, the fragment host and its contents are moved inside the outlet. If the fragment host is not found, the outlet will make a request to the gateway worker to fetch the fragment HTML, which is then streamed directly into the fragment outlet, using the writable-dom library (a small but powerful library developed by the MarkoJS team).

This fallback mechanism enables client-side navigation to routes that contain new fragments. This way fragments can be rendered in the browser via both initial (hard) navigation and client-side (soft) navigation.

Message bus

Unless the fragments in our application are completely presentational or self-contained, they also need to communicate with the legacy application and other fragments. The MessageBus is a simple asynchronous, isomorphic, and framework-agnostic communication bus that the legacy application and each of the fragments can access.

In our demo application the login fragment needs to inform the legacy application when the user has authenticated. This message dispatch is implemented in the Qwik LoginForm component as follows:

const dispatchLoginEvent = $(() => {
  getBus(ref.value).dispatch("login", {
    username: state.username,
    password: state.password,
  });
  state.loading = true;
});

The legacy application can then listen for these messages like this:

useEffect(() => {
  return getBus().listen<LoginMessage>("login", async (user) => {
    setUser(user);
    await addUserDataIfMissing(user.username);
    await saveCurrentUser(user.username);
    getBus().dispatch("authentication", user);
    navigate("/", { replace: true, });
  });
}, []);

We settled on this message bus implementation because we needed a solution that was framework-agnostic, and worked well on both the server as well as client.

Give it a go!

With fragments, fragment piercing, and Cloudflare Workers, you can improve performance as well as the development cycle of legacy client-side rendered applications. These changes can be adopted incrementally, and you can even do so while implementing fragments with a Web framework for your choice.

The “Productivity Suite” application demonstrating these capabilities can be found at https://productivity-suite.web-experiments.workers.dev/.

All the code we have shown is open-source and published to Github: https://github.com/cloudflare/workers-web-experiments/tree/main/productivity-suite.

Feel free to clone the repository. It is easy to run locally and even deploy your own version (for free) to Cloudflare. We tried to make the code as reusable as possible. Most of the core logic is in the piercing library that you could try in your own projects. We’d be thrilled to receive feedback, suggestions, or hear about applications you’d like to use it for. Join our GitHub discussion or also reach us on our discord channel.

We believe that combining Cloudflare Workers with the latest ideas from frameworks will drive the next big steps forward in improved experiences for both users and developers in Web applications. Expect to see more demos, blog posts and collaborations as we continue to push the boundaries of what the Web can offer. And if you’d also like to be directly part of this journey, we are also happy to share that we are hiring!

Cloudflare Workers and micro-frontends: made for one another

Post Syndicated from Peter Bacon Darwin original https://blog.cloudflare.com/better-micro-frontends/

Cloudflare Workers and micro-frontends: made for one another

To help developers build better web applications we researched and devised a fragments architecture to build micro-frontends using Cloudflare Workers that is lightning fast, cost-effective to develop and operate, and scales to the needs of the largest enterprise teams without compromising release velocity or user experience.

Here we share a technical overview and a proof of concept of this architecture.

Why micro-frontends?

One of the challenges of modern frontend web development is that applications are getting bigger and more complex. This is especially true for enterprise web applications supporting e-commerce, banking, insurance, travel, and other industries, where a unified user interface provides access to a large amount of functionality. In such projects it is common for many teams to collaborate to build a single web application. These monolithic web applications, usually built with JavaScript technologies like React, Angular, or Vue, span thousands, or even millions of lines of code.

When a monolithic JavaScript architecture is used with applications of this scale, the result is a slow and fragile user experience with low Lighthouse scores. Furthermore, collaborating development teams often struggle to maintain and evolve their parts of the application, as their fates are tied with fates of all the other teams, so the mistakes and tech debt of one team often impacts all.

Drawing on ideas from microservices, the frontend community has started to advocate for micro-frontends to enable teams to develop and deploy their features independently of other teams. Each micro-frontend is a self-contained mini-application, that can be developed and released independently, and is responsible for rendering a “fragment” of the page. The application then combines these fragments together so that from the user’s perspective it feels like a single application.

Cloudflare Workers and micro-frontends: made for one another
An application consisting of multiple micro-frontends

Fragments could represent vertical application features, like “account management” or “checkout”, or horizontal features, like “header” or “navigation bar”.

Client-side micro-frontends

A common approach to micro-frontends is to rely upon client-side code to lazy load and stitch fragments together (e.g. via Module Federation). Client-side micro-frontend applications suffer from a number of problems.

Common code must either be duplicated or published as a shared library. Shared libraries are problematic themselves. It is not possible to tree-shake unused library code at build time resulting in more code than necessary being downloaded to the browser and coordinating between teams when shared libraries need to be updated can be complex and awkward.

Also, the top-level container application must bootstrap before the micro-frontends can even be requested, and they also need to boot before they become interactive. If they are nested, then you may end up getting a waterfall of requests to get micro-frontends leading to further runtime delays.

These problems can result in a sluggish application startup experience for the user.

Server-side rendering could be used with client-side micro-frontends to improve how quickly a browser displays the application but implementing this can significantly increase the complexity of development, deployment and operation. Furthermore, most server-side rendering approaches still suffer from a hydration delay before the user can fully interact with the application.

Addressing these challenges was the main motivation for exploring an alternative solution, which relies on the distributed, low latency properties provided by Cloudflare Workers.

Micro-frontends on Cloudflare Workers

Cloudflare Workers is a compute platform that offers a highly scalable, low latency JavaScript execution environment that is available in over 275 locations around the globe. In our exploration we used Cloudflare Workers to host and render micro-frontends from anywhere on our global network.

Fragments architecture

In this architecture the application consists of a tree of “fragments” each deployed to Cloudflare Workers that collaborate to server-side render the overall response. The browser makes a request to a “root fragment”, which will communicate with “child fragments” to generate the final response. Since Cloudflare Workers can communicate with each other with almost no overhead, applications can be server-side rendered quickly by child fragments, all working in parallel to render their own HTML, streaming their results to the parent fragment, which combines them into the final response stream delivered to the browser.

Cloudflare Workers and micro-frontends: made for one another
A high-level overview of a fragments architecture

We have built an example of a “Cloud Gallery” application to show how this can work in practice. It is deployed to Cloudflare Workers at  https://cloud-gallery.web-experiments.workers.dev/

The demo application is a simple filtered gallery of cloud images built using our fragments architecture. Try selecting a tag in the type-ahead to filter the images listed in the gallery. Then change the delay on the stream of cloud images to see how the type-ahead filtering can be interactive before the page finishes loading.

Multiple Cloudflare Workers

The application is composed of a tree of six collaborating but independently deployable Cloudflare Workers, each rendering their own fragment of the screen and providing their own client-side logic, and assets such as CSS stylesheets and images.

Cloudflare Workers and micro-frontends: made for one another
Architectural overview of the Cloud Gallery app

The “main” fragment acts as the root of the application. The “header” fragment has a slider to configure an artificial delay to the display of gallery images. The “body” fragment contains the “filter” fragment and “gallery” fragments. Finally, the “footer” fragment just shows some static content.

The full source code of the demo app is available on GitHub.

Benefits and features

This architecture of multiple collaborating server-side rendered fragments, deployed to Cloudflare Workers has some interesting features.

Encapsulation

Fragments are entirely encapsulated, so they can control what they own and what they make available to other fragments.

Fragments can be developed and deployed independently

Updating one of the fragments is as simple as redeploying that fragment. The next request to the main application will use the new fragment. Also, fragments can host their own assets (client-side JavaScript, images, etc.), which are streamed through their parent fragment to the browser.

Server-only code is not sent to the browser

As well as reducing the cost of downloading unnecessary code to the browser, security sensitive code that is only needed for server-side rendering the fragment is never exposed to other fragments and is not downloaded to the browser. Also, features can be safely hidden behind feature flags in a fragment, allowing more flexibility with rolling out new behavior safely.

Composability

Fragments are fully composable – any fragment can contain other fragments. The resulting tree structure gives you more flexibility in how you architect and deploy your application. This helps larger projects to scale their development and deployment. Also, fine-grain control over how fragments are composed, could allow fragments that are expensive to server-side render to be cached individually.

Fantastic Lighthouse scores

Streaming server-rendered HTML results in great user experiences and Lighthouse scores, which in practice means happier users and higher chance of conversions for your business.

Cloudflare Workers and micro-frontends: made for one another
Lighthouse scores for the Cloud Gallery app

Each fragment can parallelize requests to its child fragments and pipe the resulting HTML streams into its own single streamed server-side rendered response. Not only can this reduce the time to render the whole page but streaming each fragment through to the browser reduces the time to the first byte of each fragment.

Eager interactivity

One of the powers of a fragments architecture is that fragments can become interactive even while the rest of the application (including other fragments) is still being streamed down to the browser.

In our demo, the “filter” fragment is immediately interactive as soon as it is rendered, even if the image HTML for the “gallery” fragment is still loading.

To make it easier to see this, we added a slider to the top of the “header” that can simulate a network or database delay that slows down the HTML stream which renders the “gallery” images. Even when the “gallery” fragment is still loading, the type-ahead input, in the “filter” fragment, is already fully interactive.

Just think of all the frustration that this eager interactivity could avoid for web application users with unreliable Internet connection.

Under the hood

As discussed already this architecture relies upon deploying this application as many cooperating Cloudflare Workers. Let’s look into some details of how this works in practice.

We experimented with various technologies, and while this approach can be used with many frontend libraries and frameworks, we found the Qwik framework to be a particularly good fit, because of its HTML-first focus and low JavaScript overhead, which avoids any hydration problems.

Implementing a fragment

Each fragment is a server-side rendered Qwik application deployed to its own Cloudflare Worker. This means that you can even browse to these fragments directly. For example, the “header” fragment is deployed to https://cloud-gallery-header.web-experiments.workers.dev/.

Cloudflare Workers and micro-frontends: made for one another
A screenshot of the self-hosted “header” fragment

The header fragment is defined as a Header component using Qwik. This component is rendered in a Cloudflare Worker via a fetch() handler:

export default {
  fetch(request: Request, env: Record<string, unknown>): Promise<Response> {
    return renderResponse(request, env, <Header />, manifest, "header");
  },
};

cloud-gallery/header/src/entry.ssr.tsx

The renderResponse() function is a helper we wrote that server-side renders the fragment and streams it into the body of a Response that we return from the fetch() handler.

The header fragment serves its own JavaScript and image assets from its Cloudflare Worker. We configure Wrangler to upload these assets to Cloudflare and serve them from our network.

Implementing fragment composition

Fragments that contain child fragments have additional responsibilities:

  • Request and inject child fragments when rendering their own HTML.
  • Proxy requests for child fragment assets through to the appropriate fragment.

Injecting child fragments

The position of a child fragment inside its parent can be specified by a FragmentPlaceholder helper component that we have developed. For example, the “body” fragment has the “filter” and “gallery” fragments.

<div class="content">
  <FragmentPlaceholder name="filter" />
  <FragmentPlaceholder name="gallery" />
</div>

cloud-gallery/body/src/root.tsx

The FragmentPlaceholder component is responsible for making a request for the fragment and piping the fragment stream into the output stream.

Proxying asset requests

As mentioned earlier, fragments can host their own assets, especially client-side JavaScript files. When a request for an asset arrives at the parent fragment, it needs to know which child fragment should receive the request.

In our demo we use a convention that such asset paths will be prefixed with /_fragment/<fragment-name>. For example, the header logo image path is /_fragment/header/cf-logo.png. We developed a tryGetFragmentAsset() helper which can be added to the parent fragment’s fetch() handler to deal with this:

export default {
  async fetch(
    request: Request,
    env: Record<string, unknown>
  ): Promise<Response> {
    // Proxy requests for assets hosted by a fragment.
    const asset = await tryGetFragmentAsset(env, request);
    if (asset !== null) {
      return asset;
    }
    // Otherwise server-side render the template injecting child fragments.
    return renderResponse(request, env, <Root />, manifest, "div");
  },
};

cloud-gallery/body/src/entry.ssr.tsx

Fragment asset paths

If a fragment hosts its own assets, then we need to ensure that any HTML it renders uses the special _fragment/<fragment-name> path prefix mentioned above when referring to these assets. We have implemented a strategy for this in the helpers we developed.

The FragmentPlaceholder component adds a base searchParam to the fragment request to tell it what this prefix should be. The renderResponse() helper extracts this prefix and provides it to the Qwik server-side renderer. This ensures that any request for client-side JavaScript has the correct prefix. Fragments can apply a hook that we developed called useFragmentRoot(). This allows components to gather the prefix from a FragmentContext context.

For example, since the “header” fragment hosts the Cloudflare and GitHub logos as assets, it must call the useFragmentRoot() hook:

export const Header = component$(() => {
  useStylesScoped$(HeaderCSS);
  useFragmentRoot();

  return (...);
});

cloud-gallery/header/src/root.tsx

The FragmentContext value can then be accessed in components that need to apply the prefix. For example, the Image component:

export const Image = component$((props: Record<string, string | number>) => {
  const { base } = useContext(FragmentContext);
  return <img {...props} src={base + props.src} />;
});

cloud-gallery/helpers/src/image/image.tsx

Service-binding fragments

Cloudflare Workers provide a mechanism called service bindings to make requests between Cloudflare Workers efficiently that avoids network requests. In the demo we use this mechanism to make the requests from parent fragments to their child fragments with almost no performance overhead, while still allowing the fragments to be independently deployed.

Comparison to current solutions

This fragments architecture has three properties that distinguish it from other current solutions.

Unlike monoliths, or client-side micro-frontends, fragments are developed and deployed as independent server-side rendered applications that are composed together on the server-side. This significantly improves rendering speed, and lowers interaction latency in the browser.

Unlike server-side rendered micro-frontends with Node.js or cloud functions, Cloudflare Workers is a globally distributed compute platform with a region-less deployment model. It has incredibly low latency, and a near-zero communication overhead between fragments.

Unlike solutions based on module federation, a fragment’s client-side JavaScript is very specific to the fragment it is supporting. This means that it is small enough that we don’t need to have shared library code, eliminating the version skew issues and coordination problems when updating shared libraries.

Future possibilities

This demo is just a proof of concept, so there are still areas to investigate. Here are some of the features we’d like to explore in the future.

Caching

Each micro-frontend fragment can be cached independently of the others based on how static its content is. When requesting the full page, the fragments only need to run server-side rendering for micro-frontends that have changed.

Cloudflare Workers and micro-frontends: made for one another
An application where the output of some fragments are cached

With per-fragment caching you can return the HTML response to the browser faster, and avoid incurring compute costs in re-rendering content unnecessarily.

Fragment routing and client-side navigation

Our demo application used micro-frontend fragments to compose a single page. We could however use this approach to implement page routing as well. When server-side rendering, the main fragment could insert the appropriate “page” fragment based on the visited URL. When navigating, client-side, within the app, the main fragment would remain the same while the displayed “page” fragment would change.

Cloudflare Workers and micro-frontends: made for one another
An application where each route is delegated to a different fragment

This approach combines the best of server-side and client-side routing with the power of fragments.

Using other frontend frameworks

Although the Cloud Gallery application uses Qwik to implement all fragments, it is possible to use other frameworks as well. If really necessary, it’s even possible to mix and match frameworks.

To achieve good results, the framework of choice should be capable of server-side rendering, and should have a small client-side JavaScript footprint. HTML streaming capabilities, while not required, can significantly improve performance of large applications.

Cloudflare Workers and micro-frontends: made for one another
An application using different frontend frameworks

Incremental migration strategies

Adopting a new architecture, compute platform, and deployment model is a lot to take in all at once, and for existing large applications is prohibitively risky and expensive. To make this  fragment-based architecture available to legacy projects, an incremental adoption strategy is a key.

Developers could test the waters by migrating just a single piece of the user-interface within their legacy application to a fragment, integrating with minimal changes to the legacy application. Over time, more of the application could then be moved over, one fragment at a time.

Convention over configuration

As you can see in the Cloud Gallery demo application, setting up a fragment-based micro-frontend requires quite a bit of configuration. A lot of this configuration is very mechanical and could be abstracted away via conventions and better tooling. Following productivity-focused precedence found in Ruby on Rails, and filesystem based routing meta-frameworks, we could make a lot of this configuration disappear.

Try it yourself!

There is still so much to dig into! Web applications have come a long way in recent years and their growth is hard to overstate. Traditional implementations of micro-frontends have had only mixed success in helping developers scale development and deployment of large applications. Cloudflare Workers, however, unlock new possibilities which can help us tackle many of the existing challenges and help us build better web applications.

Thanks to the generous free plan offered by Cloudflare Workers, you can check out the Gallery Demo code and deploy it yourself.

If all of these sounds interesting to you, and you would like to work with us on improving the developer experience for Cloudflare Workers, we are also happy to share that we are hiring!

How We Build Micro Frontends With Lattice

Post Syndicated from Netflix Technology Blog original https://netflixtechblog.com/how-we-build-micro-frontends-with-lattice-22b8635f77ea

Written by Michael Possumato, Nick Tomlin, Jordan Andree, Andrew Shim, and Rahul Pilani.

As we continue to grow here at Netflix, the needs of Revenue and Growth Engineering are rapidly evolving; and our tools must also evolve just as rapidly. The Revenue and Growth Tools (RGT) team decided to set off on a journey to build tools in an abstract manner to have solutions readily available within our organization. We identified common design patterns and architectures scattered across various tools which were all duplicating efforts in some way or another.

We needed to consolidate these tools in a way that scaled with the teams we served. It needed to have the agility of a micro frontend and the extensibility of a framework to empower our stakeholders to extend our tools. We would abstract parts of which anyone can then customize, or extend, to meet their specific business or technical requirements. The end result is Lattice: RGT’s pluggable framework for micro frontends.

A Different Approach to Our Tools

A UI composed of other dependencies is nothing new; it’s something all modern web applications do today. The traditional approach of bundling dependencies at build time lacks the flexibility we need to empower our stakeholders. We want external dependencies to be resolved on-demand from any number of sources, from another application to an engineer’s laptop.

This led us to the following high level objectives:

  • Low Friction Adoption: Encourage reuse of existing front end code and avoid creating new packages that encapsulate UI functionality. Applications can be difficult to manage when functionality must be shared across packages. We would leverage an approach that enabled applications to extend their core functionality using common, and familiar, React paradigms.
  • Weak Dependencies: Host applications could reference modules over https to a remote bundle hosted internally within Netflix. These bundles could be owned by teams outside of RGT built by already adopted standards such as with Webpack Module Federation or native JavaScript Modules.
  • Highly Aligned, Loosely Coupled: fully align with the standard frameworks and libraries used within Netflix. Plugins should be focused on delivering their core functionality without unnecessary boilerplate and have the freedom to implement without cumbersome API wrappers.
  • Metadata Driven: Plugin modules are defined from a configuration which could be injected at any point in the application lifecycle. The framework must be flexible enough to register, and unregister, plugins such that the extensions only apply when necessary.
  • Rapid Development: Reduce the development cycle by avoiding unnecessary builds and deployments. Plugins would be developed in a manner in which all of the context is available to them ahead of time via TypeScript declarations. By designing to rigid interfaces defined by a host application, both the plugin and host can be developed in parallel.

A Theoretical Example

Example Developer Dashboard Application with Embedded Lattice Plugins

Let’s take the above example — it renders and controls its own header and content areas to expose specific functionality to users. Upon release, we receive feedback that it would be nice if we could include information presented from other tools within this application. Using our new framework, Lattice, we are able to embed the existing functionality from the other applications.

A Lattice Plugin Host (which we’ll dive into later) allows us to extend the existing application by referencing two external plugins, Workflows and Spinnaker. In our example, we need to define two areas that can be extended — the application content for portal components and configurable routing.

The sequence of events in order to accomplish the above rendering process would be handled by three components — our new framework Lattice and the two plugins:

Dispatch Cycle within Lattice

First, Lattice will load both plugins asynchronously.

Next, the framework will dispatch events as they flow through the application.

In our example, Workflows will register its routes and Spinnaker will add its overlays.

An Implementation with React

In order to accomplish the above scenario, the Host Application needs to include the Lattice library and add a new PluginHost with a configuration referencing the external plugins. This host requires information about the specific application and the configuration indicating which plugins to load:

Enhancing a React Application with a Lattice Plugin Host

We’ve mocked this implementation in the example above with a useFetchPluginConfiguration hook to retrieve the metadata from an external service. Owners can then choose to add or remove plugins dynamically, outside of the application source code.

Allowing plugins access to the routing can be done using hooks defined by the Lattice framework. The usePluggableState hook will retrieve the default application routes and pass them through the Lattice framework. If any plugin responds to this AppRoutes identifier, they can choose to inject their specific routes:

Extending Existing Application State with Lattice Hooks

Plugins can inject any React element into the page with the<Pluggable /> component as illustrated below. This will allow plugins to render within this AppContent area:

Rendering Custom Children with Lattice Pluggable

The final example application snippet has been included below:

Under the Hood

Lattice is a tiny framework that provides an abstraction layer for React web applications to leverage.

Using Lattice, developers can focus on their core product, and simply wrap areas of their application that are customizable by external plugins. Developers can also extend components to use external state by using Lattice hooks.

Lattice Plugin Modules are JavaScript functions implemented by remote applications. These functions act as the “glue” between the host application and the remote component(s) being shared. Modules declare which components within their application should be exposed and how they should be rendered based on information the host provides.

A Lattice Pluggable Component allows a host application to expose a mount point through a standard React component that plugins can manipulate or override with their own content.

Lattice Custom Hooks are used to manipulate state using a state reducer pattern. These hooks allow host applications to maintain their own initial state, and modify accordingly, while also allowing plugins the opportunity to inject their own data.

Lattice Plugins

Lattice Functionality within a Host Application

The core of Lattice provides the ability to asynchronously load remote modules via Webpack Module Federation, Native ES Modules, or a custom implementation defined outside of the framework. The host application provides Lattice with basic application context and a configuration which defines the remote plugin modules to load. Once loaded, references to these plugins are stored internally within a React Context instance.

Exposing Functionality to Lattice as a Federated Module

Plugin modules can then provide new functionality, or change existing functionality, to the host application. Standard identifiers are used that all Lattice-enabled applications should implement to allow plugins to universally work across different applications. Most extensions will choose to extend existing application functionality, which will not be universal, and requires knowledge of the host’s design.

Lattice requires constant identifier values (aka “magic strings”) to understand what is being rendered. The Lattice Plugin Host will dispatch this identifier through all of the plugins which have been registered and loaded. Plugin responses are composed together, and the final returned value is what gets rendered in the component tree. Through this model, plugins can decide to extend, change, or simply ignore the event. Think of this process as an approach similar to that of Redux or Express Middleware functions.

Lattice can also be used to extend existing application functionality. In order to accomplish this, Plugins must be aware of the host identifiers and data shapes used in the host application lifecycle. While this might sound like an impossible task to maintain, we encourage host applications to publish a TypeScript declarations project which is shared between the host and plugins. Think of us as having a DefinitelyTyped repository for all of the Netflix internal tools that embrace extending via Lattice.

Using this approach, we are able to provide developers with a highly aligned, loosely coupled development environment shared between host applications and plugins. Plugins can be developed in a silo, simply adhering to the interface which has been declared.

The Possibilities are Endless

While our original approach was to extend core functionality within an application, we have found that we are able to leverage Lattice in other ways. The concept of writing a simple if statement has been replaced; we take a step back, and consider which domain in our organization should be responsible for said logic and consider moving the logic into their respective plugin.

We have also found that we can easily model more fine-grained areas within an application. For example, we can render individual form components using Lattice identifiers and have plugins be responsible for the specific UI elements. This empowers us to build these generic tools backed by metadata models and a default out-of-box experience which others can choose to override.

Most importantly, we are able to easily, and quickly, respond to conflicting requirements by simply implementing different plugins.

What’s Next?

We are only getting started with Lattice and currently gauging interest internally from other teams. By dogfooding our approach within RGT, we can work out the kinks, squash some bugs, and build a robust process for building micro frontends with Lattice. The developer experience is crucial for Lattice to be successful. Empowering developers with the ability to understand the lifecycle of Lattice events within an application, verify functionality prior to deployments, versioning, developing end-to-end test suites, and general best practices are some nuggets critical to our success.


How We Build Micro Frontends With Lattice was originally published in Netflix TechBlog on Medium, where people are continuing the conversation by highlighting and responding to this story.