Post Syndicated from Kedasha Kerr original https://github.blog/2023-07-25-how-to-build-a-gpt-3-app-with-nextjs-react-and-github-copilot/
At the beginning of the year, I started working out with a trainer who wanted me to start tracking my food, but I’ve always been super against tracking my meals because it just doesn’t work for me. Instead of tracking my meals however, I decided to build an application that automagically tells me the nutritional information of any recipe. But to do that I needed some pretty complex natural language parsing capabilities so I figured this would be a great opportunity for me to play around with OpenAI and get to use GitHub Copilot a little bit more to help me build the app quickly.
GitHub Copilot is a great example of a product that takes advantage of Large Language Models (LLM) to solve problems for people and improve their productivity. In this blog,I’ll take you through how I created my own application that finds the nutritional information for any recipe using OpenAI’s GPT-3.5-turbo model, GitHub Copilot, Next.js, React, and Material UI.
Let’s dig right into the tutorial.
1. Create a repository and install dependencies
To get started, let’s create a new repository from the GitHub Codespaces Next.js template to get up and running quickly. Go to this repository, and make a copy. To do so, click on the green “Use this template” button then select “Create a new repository” and name your repository whatever you like. I called mine “mealmetrics-copilot.”

Now, clone the repository to your local machine, and open up the repository in your preferred code editor. I’m using VS Code.
Open up your terminal and cd into the project so we can install a few needed dependencies. In your terminal run the following command:
npm i express openai dotenv @material-ui/core @material-ui/icons
Then, install the following as a dev dependency:
npm i --save-dev nodemon
Once everything installs successfully, we’re ready to start building the server, but first, let’s grab our api key from OpenAI.
2. Getting your OpenAI API key
Go to OpenAI’s developer login page and create a new account or sign in if you already have one. Once you’ve logged in, click your name in the upper right hand corner and select “view API keys.” Click the “Create a new secret key” button. From there you can name your apikey, click the green button to generate the key and then copy the apikey and save it in a secure location (such as a password manager).

Save your apikey in a .env file in vscode at the root of the project and add .env to the gitignore file.

3. Install GitHub Copilot extension
We’ll be using GitHub Copilot as our assistant to build this application. If you’re not familiar with GitHub Copilot, read this blog post to learn more.
In your code editor of choice, go to your extensions panel and search for GitHub Copilot—I’m using VSCode and this is what that looks like.

Click the install button then click the login button to authenticate your access. Once that’s done, you’ll be ready to get started and follow along!
4. Building the server
Now that we have our apikey, have installed dependencies, and have GitHub Copilot in our code editor, let’s dig into building the application!
The first thing we’re going to do is build a simple server with Express.js (if you prefer to use Fastify, NestJS, Koa or something else, feel free to use them!).
In the pages folder, create a folder called api and then a file called server.js. This is where we’ll add our prompting information for GitHub Copilot. Let’s add our first prompt as a comment in the server.js file that says the following:
Create a server with the following specifications:

1. import express and dotenv node modules
3. create the server with express and name it app
4. use port 8080 as default port
5. enable body parser to accept json data
6. state which port the server is listening to and log it to the console
Hit the enter key and GitHub Copilot will start generating suggestions to build the server. To accept the suggestions, hit the tab key. Take a look at this video to see what accepting suggestions look like.
We can update the package.json file to include the script devserver: "nodemon pages/api/server.js then run the command in our terminal using npm run devserver. You’ll see that the server has started!

After we build the simple server, let’s move on to making this a bit more complex by building the controller for our app.
Let’s create a new file in the api folder called generateInfo.js and add the following comment in the file:
Create a controller with the following specifications:

1. import the Configuration class and the OpenAIApi class from the openai npm module
2. create a new configuration object that includes the api key and uses the Configuration class from the openai module
3. create a new instance of the OpenAIApi class and pass in the configuration object
4. create an async function called generateInfo that accepts a request and response object as parameters
5. use try to make a request to the OpenAI completetion api and return the response
6. use catch to catch any errors and return the error include a message to the user
7. export the generateInfo function as a module
As you’ll notice, I’m being very explicit in my instructions to GitHub Copilot. One thing to always remember when working with LLMs is that the magic is in the prompt—the clearer you are in your instructions, the better the results you’ll get.
Hit enter on your keyboard and then hit tab to accept the recommendations that GitHub Copilot provides. In the image below, you’ll notice that Copilot’s suggestions are gray.

Accept the suggestion by hitting tab on your keyboard and let’s do some cleaning up.
Remember, GitHub Copilot is our assistant, so we still need to ensure that the suggestions it provides meet our requirements.
Since we’re building a gpt-3 application, we’ll be using the completion API from OpenAI and the gpt-3.5-turbo model to generate nutritional information for us.
If you look at the suggestion above, we were provided with the davinci engine and parameters that are not needed for this project—we also need the messages parameter to send requests with the 3.5-turbo model.
We also want to add the recipe prompt, create a function called recipe that represents the recipe a user inputs and also update the completion object sent to OpenAI. The keys we’ll be using are max_tokens, prompt, model, temperature and n. Learn more about these parameters by reading OpenAI’s api docs.
Let’s also update the error message to include 401 just in case our api key is invalid. So, let’s make these updates.
1. Add recipe prompt
Create a new folder called data at the root of your project, then create a file called prompt.json. This will contain a part of the recipe prompt that we’ll send to OpenAI. Add the following script to the prompt.json file:
{
"recipePrompt": "I want you to act as a Nutrition Facts Generator. I will provide you with a recipe and your role is to generate nutrition facts for that recipe. You should use your knowledge of nutrition science, nutrition facts labels and other relevant information to generate nutritional information for the recipe. Add each nutrition fact to a new line. I want you to only reply with the nutrition fact. Do not provide any other information. My first request is: "
}
Then import the recipePrompt to the generateInfo.js file and update the main function to grab the recipe submitted by the user.
// add the prompt to the top of the file
const { recipePrompt } = require('../../data/recipe.json');

// update this function to include the recipe before the try
const generateInfo = async(req, res) => {
const { recipe } = req.body
}
2. Update the completion function and response
Now, let’s update the try to look a bit more like what we want.
model: "gpt-3.5-turbo",
messages: [{ role: "user", content: `${recipePrompt}${recipe}` }],
max_tokens: 200,
temperature: 0,
n: 1,
And let’s also update the response that we receive.
const response = completion.data.choices[0].message.content;

return res.status(200).json({
success: true,
data: response,
});
3. Update the error message
Finally, let’s update the catch to have more explicit error messages.
catch (error) {
if (error.response.status === 401) {
return res.status(401).json({
error: "Please provide a valid API key.",
});
}
return res.status(500).json({
error:
"An error occurred while generating recipe information. Please try again later.",
});
}
Once we’ve updated everything, our controller function should look like this:
const { Configuration, OpenAIApi } = require("openai");
const { recipePrompt } = require("../../data/recipe.json");

const config = new Configuration({
apiKey: process.env.OPENAI_API_KEY,
});

const openai = new OpenAIApi(config);

const generateInfo = async (req, res) => {
const { recipe } = req.body;

try {
const completion = await openai.createChatCompletion({
model: "gpt-3.5-turbo",
messages: [{ role: "user", content: `${recipePrompt}${recipe}` }],
max_tokens: 200,
temperature: 0,
n: 1,
});
const response = completion.data.choices[0].message.content;

return res.status(200).json({
success: true,
data: response,
});
} catch (error) {
console.log(error);
if (error.response.status === 401) {
return res.status(401).json({
error: "Please provide a valid API key.",
});
}
return res.status(500).json({
error:
"An error occurred while generating recipe information. Please try again later.",
});
}
};

module.exports = { generateInfo };
Now, let’s create the router and test this out in Postman. Create a new file called router.js and start typing to allow GitHub Copilot to assist you while typing.
As you can see, GitHub Copilot offered suggestions while I was typing and I hit the tab button to accept the suggestions. Add the newly created router to the server.js file and test the route in postman. Add the following to your server.js file.
app.use('/openai', require('./router'));
Now, let’s test the route in postman with a POST request—make sure your server is still running!
Go to the URL below and add any recipe to the body of the request:
URL: http://localhost:8080/openai/generateinfo

RECIPE:
{
"recipe": "1 cup of all purpose flour, sifted 1 1/2 teaspoon baking powder 1/4 teaspoon salt 2 Tablespoon granulated sugar 1/2 Tablespoon unsalted butter, room temperature Approximately 1/3 cup water"
}
You should receive a successful response that looks like this:
{
"success": true,
"data": "\n\nCalories: 112 \nTotal Fat: 2.3g \nSaturated Fat: 1.3g \nTrans Fat: 0g \nCholesterol: 5.4mg \nSodium: 175.8mg \nTotal Carbohydrates: 21.6g \nDietary Fiber: 0.8g \nSugars: 6.5g \nProtein: 2.6g"
}
Here is the data that we submitted to OpenAI that generated that successful response:
data: '{"model":"text-davinci-003","prompt":"I want you to act as a Nutrition Facts Generator. I will provide you with a recipe and your role is to generate nutrition facts for that recipe. You should use your knowledge of nutrition science, nutrition facts labels and other relevant information to generate nutritional information for the recipe. Add each nutrition fact to a new line. I want you to only reply with the nutrition fact. Do not provide any other information. My first request is: 1 cup of all purpose flour, sifted 1 1/2 teaspoon baking powder 1/4 teaspoon salt 2 Tablespoon granulated sugar 1/2 Tablespoon unsalted butter, room temperature Approximately 1/3 cup water","max_tokens":200,"temperature":0.5,"n":1}',
As you can see, both the prompt script and the recipe entered in the request body was sent to OpenAI, which generated the nutritional data for this Jamaican fried dumpling recipe.
Now, let’s create the frontend of the application to display the info on the web.
5. Building the frontend app
We’ll be using React for the frontend. Delete all the code in the index.js file that currently exists in the project. Then, in a comment, instruct GitHub Copilot to build a simple text area.
Create a text area with the following specifications:
1. a H1 with the text "Find Nutrition Facts for any recipe"
2. a text area for users to upload recipe
3. a button for users to submit the entered recipe
4. a section at the bottom to display nutrition facts
5. Get the data from this link: http://localhost:8080/openai/generateinfo
6. Name the component RecipeInfo
GitHub Copilot quickly generated the code for us.

Let’s hit tab to accept the suggestion and run npm run dev in your terminal to see the app on the web. When you go to localhost:3000, you’ll see the following displayed on the web.

Admittedly, it’s not the most beautiful thing, but we were able to spin this up very quickly.
In less than one minute we completed a functional frontend mvp of our application with GitHub Copilot.
Let’s enter the recipe we have into the text box and see the response that we get back.

And we have our first error—which is not surprising since we didn’t validate the code that was provided. Let’s look into the console and see if we have any additional details.

Seems it’s a CORS issue—classic. Let’s ask GitHub Copilot how to resolve this.
Add the following questions as a comment anywhere in your file:
q: how do I resolve the CORS error?
q: how do I add Access-Control-Allow-Origin to the header?
The question and response should look something like this:

We can also ask GitHub Copilot Chat how to resolve CORS errors and it gives us a seamless response.

Let’s install the cors middleware and add it to the server.js file.
const cors = require("cors");

// Allow cross-origin requests (CORS)
app.use(cors());
Then, let’s update our router.js file.
router.options("/generateInfo", (req, res) => {
res.setHeader("Access-Control-Allow-Origin", "*");
res.setHeader("Access-Control-Allow-Headers", "*");
res.setHeader("Access-Control-Allow-Methods", "*");
res.sendStatus(200);
});
Now, let’s try fetching nutritional data again and see what happens.

And we have another error. Progress!
This time there’s no need to debug with GitHub Copilot since we’re being told that the data being returned is an object with the keys success and data. Let’s change the name of the response function to recipeInfo and update the nutrition state to receive recipeInfo.data.
const recipeInfo = await response.json();
setNutrition(recipeInfo.data);
Let’s try sending the recipe again and hope for a successful response.

Success!
We just created a GPT-3 app in record time with GitHub Copilot, React, Next.js, and OpenAI. Now that we have the data that we need, let’s make the application more beautiful with Material UI.
6. Styling the app with Material UI
In this section, we’ll be using a GitHub Copilot X feature in technical preview for individuals and in public beta for organizations – Copilot Chat–to improve the appearance of our application. You must have GitHub Copilot access to be on the Copilot Chat’s waitlist which is currently open. Sign up today if you haven’t yet!
Let’s ask GitHub Copilot chat how we can implement material-ui into the application:

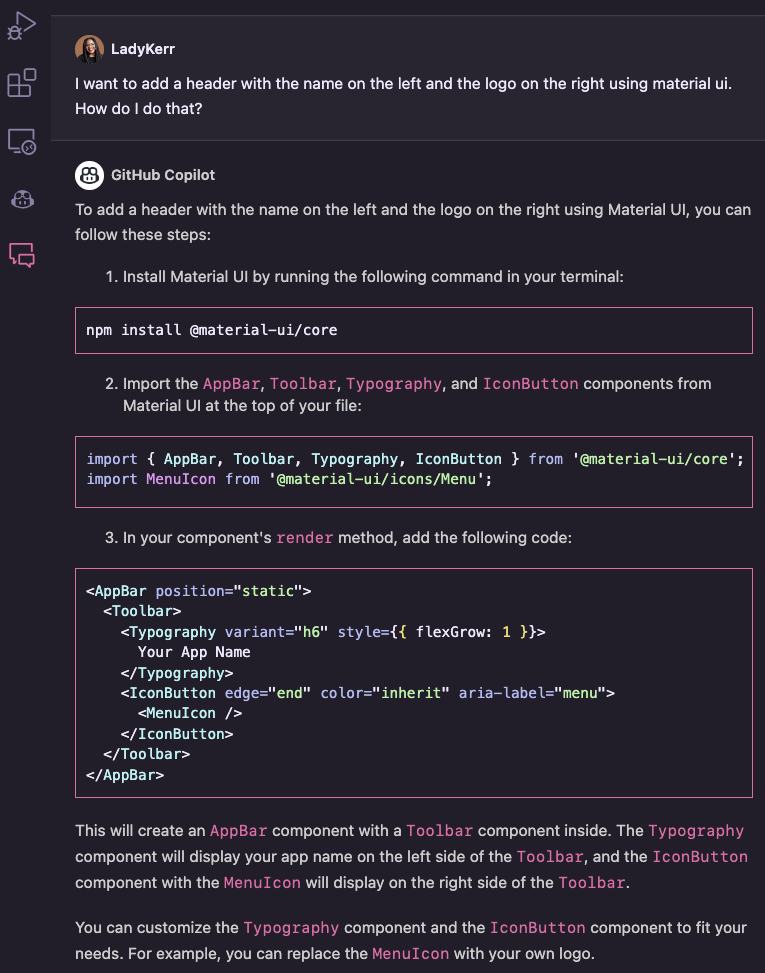
Let’s go ahead and implement the suggestions and see what happens, and also ask GitHub Copilot chat to implement a header for us.

After we implement the header, new text area and center the content, this is what the app is looking like.

Ok, we’re getting somewhere.
Let’s make a few more updates with the assistance of GitHub Copilot Chat. I’ve included the prompt/questions I asked:
- Make the text area larger and implement Material UI
update the component to use material ui with the content centered and the buttoned positioned below the text area. use Grid from material ui and any other components needed.
- Add the paper component from Material UI to elevate the look and feel of the app
add the Paper component from material ui to the text area highlighted
- Add a second button that clears the text area + facts after a recipe is submitted
add a button to the app to clear the text in the textarea
- Add a loader while waiting for the data to load
add a loader to the highlighted code that checks if the data is loading. If the data is loading, then display the text "Nutrition Facts" and loader, if there is an error, display the error message otherwise, display nothing
- Add a theme with custom primary and secondary colors
how do I create a custom theme with material ui and where do I create the custom theme?
- Prevent the text area from going over the paper component from Material UI
in the highlihghted code how do I prevent the text area line from going over the paper component?
- Add a new component—footer
Create a footer component with the following specifications:
1. The footer must be fixed at the bottom of the page
2. Use the Paper component from Material UI
3. Use the Typography component from Material UI
3. The text must say "Made with ❤ by LadyKerr & GitHub Copilot" and "Powered by OpenAI"
4. The text "GitHub Copilot" must be a link to https://copilot.github.com/ that opens in a new tab with alt text " GitHub Copilot"
5. The text "OpenAI" must be a link to https://openai.com/ that opens in a new tab with alt text "openai api"
Ask GitHub Copilot chat to make the changes above and, once it’s done, your application should be looking and functioning like this:

Now, let’s create a new component that splits each nutrition fact onto a new line. Create a new file called NutritionFacts.js in the components folder, and write the following as a comment so GitHub Copilot can get to work.
Create a component with the following specifications:
1. the component must split the received string data at /n/n or /n and return a Typography component for each string
2. the component must set a unique key for each Typography component
3. the component must return a div with the Typography components
4. the component must return null if the data is not a string
5. Name the component NutritionFacts
6. Use the Paper Component from Material UI
7. Add text above the data that says "Here are the nutrition facts for your recipe:"
From this prompt, GitHub Copilot generated the following code.
import React from "react";
import { Typography, Paper } from "@material-ui/core";

const NutritionFacts = ({ data }) => {
if (typeof data !== "string") {
return null;
}
const nutritionFacts = data.split(/\n\n|\n/);
return (

Here are the nutrition facts for your recipe:

{nutritionFacts.map((fact, index) => (
{fact}
))}
);
};

export default NutritionFacts;
Brilliant! Let’s import this component into our main index.js file and test the application to see if each fact was split on to a new line as expected.

And it did. Our app is functioning as expected.
Now, let’s move the code for the header into a new file in the components folder called Header.js. Once everything is updated, the final application looks like this and returns the nutritional data for any recipe.

So, there we have it!
We just built an application using GitHub Copilot, OpenAI, React, Next.js, and GitHub Copilot Chat. The next step would be to deploy the application on GitHub Pages and deploy your server on a service like Azure.
You can see the full code here—feel free to clone or fork the project and make it your own. This was a fun little project to build and I hope you learned something new and feel inspired to create your own GPT-3 app!
Learn more about prompting GitHub Copilot by reading How to use GitHub Copilot: Prompts, tips and use cases and A Developer’s Guide to Prompt Engineering and LLMs.
Until next time, happy coding!