Post Syndicated from Jonathan Nguyen original https://aws.amazon.com/blogs/security/export-historical-security-hub-findings-to-an-s3-bucket-to-enable-complex-analytics/
AWS Security Hub is a cloud security posture management service that you can use to perform security best practice checks, aggregate alerts, and automate remediation. Security Hub has out-of-the-box integrations with many AWS services and over 60 partner products. Security Hub centralizes findings across your AWS accounts and supported AWS Regions into a single delegated administrator account in your aggregation Region of choice, creating a single pane of glass to consolidate and view individual security findings.
Because there are a large number of possible integrations across accounts and Regions, your delegated administrator account in the aggregation Region might have hundreds of thousands of Security Hub findings. To perform complex analytics or machine learning across the existing (historical) findings that are maintained in Security Hub, you can export findings to an Amazon Simple Storage Service (Amazon S3) bucket. To export new findings that have recently been created, you can implement the solution in the aws-security-hub-findings-export GitHub repository. However, Security Hub has data export API rate quotas, which can make exporting a large number of findings challenging.
In this blog post, we provide an example solution to export your historical Security Hub findings to an S3 bucket in your account, even if you have a large number of findings. We walk you through the components of the solution and show you how to use the solution after deployment.
Prerequisites
To deploy the solution, complete the following prerequisites:
- Enable Security Hub.
- If you want to export Security Hub findings for multiple accounts, designate a Security Hub administrator account.
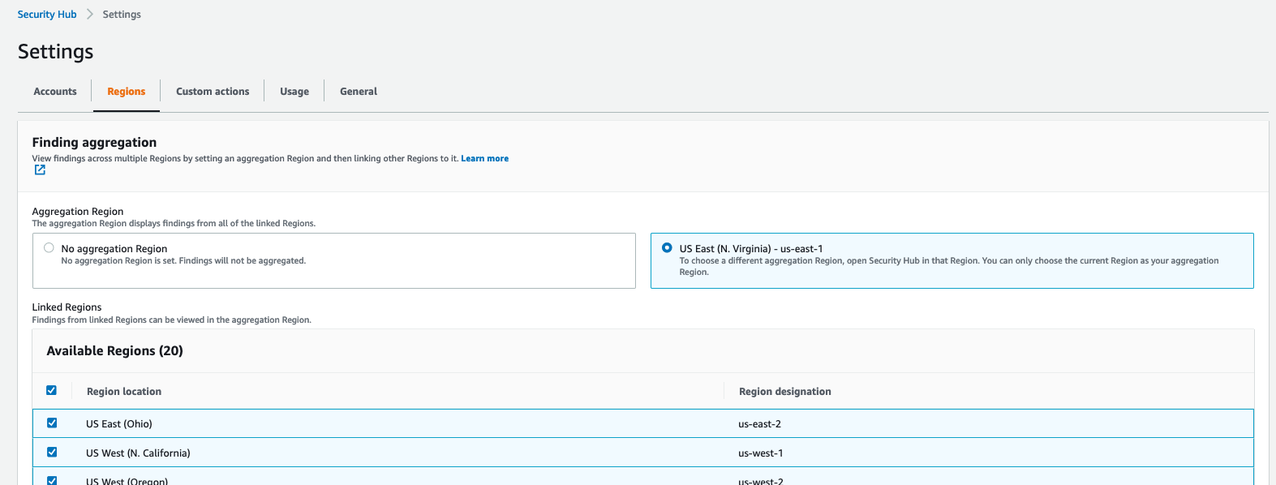
- If you want to export Security Hub findings across multiple Regions, enable cross-Region aggregation.
Solution overview and architecture
In this solution, you use the following AWS services and features:
- Security Hub export orchestration
- AWS Step Functions helps you orchestrate automation and long-running jobs, which are integral to this solution. You need the ability to run a workflow for hours due to the Security Hub API rate limits and number of findings and objects.
- AWS Lambda functions handle the logic for exporting and storing findings in an efficient and cost-effective manner. You can customize Lambda functions to most use cases.
- Storage of exported findings
- Amazon Simple Storage Service (Amazon S3) helps you share the exported findings and use them in a standardized format for multiple use cases across AWS services.
- Job status tracking
- Amazon EventBridge tracks changes in the status of the Step Functions workflow. The solution can run for over 100 hours; by using EventBridge, you don’t have to manually check the status.
- Amazon Simple Notification Service (Amazon SNS) sends you notifications when the long-running jobs are complete or when they might have issues.
- AWS Systems Manager Parameter Store provides a quick way to track overall status by maintaining a numeric count of successfully exported findings that you can compare with the number of findings shown in the Security Hub dashboard.
Figure 1 shows the architecture for the solution, deployed in the Security Hub delegated administrator account in the aggregation Region. The figure shows multiple Security Hub member accounts to illustrate how you can export findings for an entire AWS Organizations organization from a single delegated administrator account.
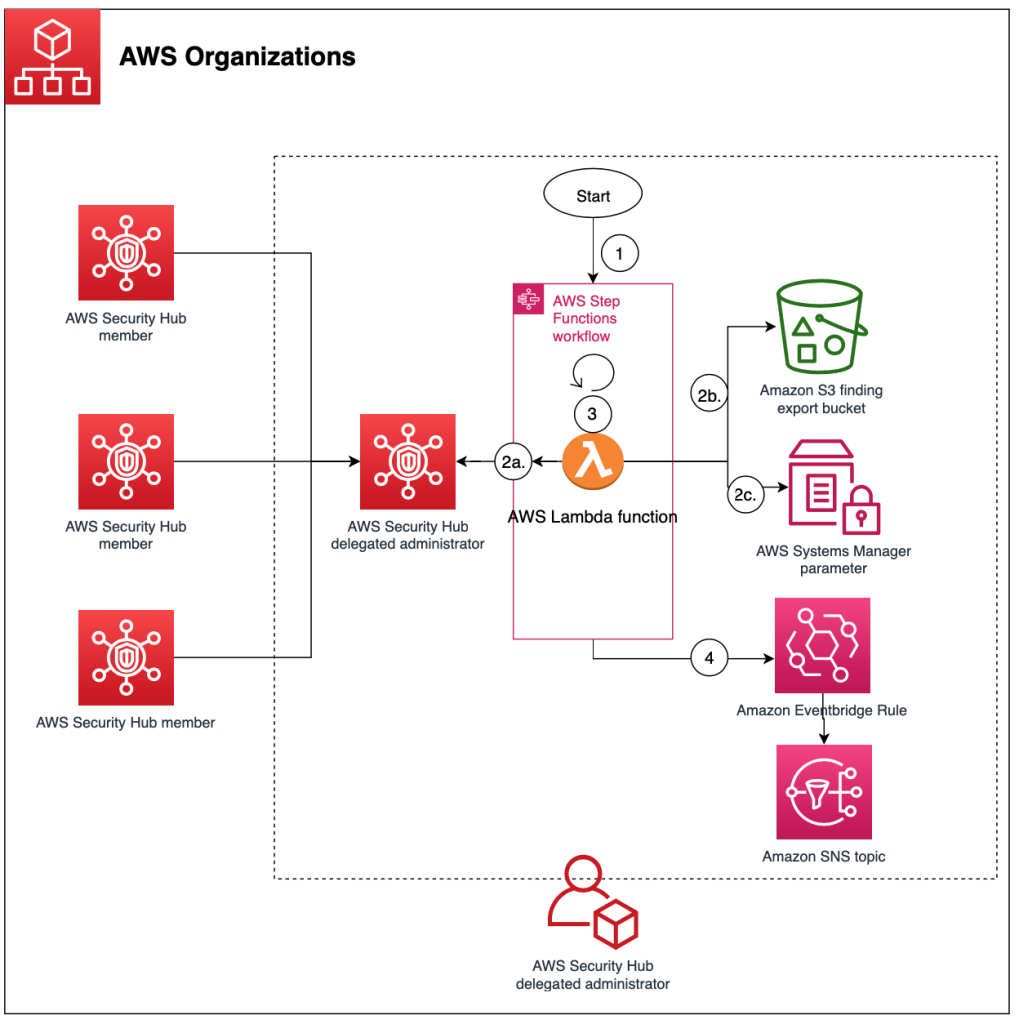
Figure 1: High-level overview of process and resources deployed in the Security Hub account
As shown in Figure 1, the workflow after deployment is as follows:
- The Step Functions workflow for the Security Hub export is invoked.
- The Step Functions workflow invokes a single Lambda function that does the following:
- Retrieves Security Hub findings that have an Active status and puts them in a temporary file.
- Pushes the file as an object to Amazon S3.
- Adds the global count of exported findings from the Step Functions workflow to a Systems Manager parameter for validation and tracking purposes.
- Repeats steps b–c for about 10 minutes to get the most findings while preventing the Lambda function from timing out.
- If a nextToken is present, pushes the nextToken to the output of the Step Functions.
Note: If the number of items in the output is smaller than the number of items returned by the API call, then the return output includes a nextToken, which can be passed to a subsequent command to retrieve the next set of items.
- The Step Functions workflow goes through a Choice state as follows:
- If a Security Hub nextToken is present, Step Functions invokes the Lambda function again.
- If a Security Hub nextToken isn’t present, Step Functions ends the workflow successfully.
- An EventBridge rule tracks changes in the status of the Step Functions workflow and sends events to an SNS topic. Subscribers to the SNS topic receive a notification when the status of the Step Functions workflow changes.
Deploy the solution
You can deploy the solution through either the AWS Management Console or the AWS Cloud Development Kit (AWS CDK).
To deploy the solution (console)
- In your delegated administrator Security Hub account, launch the AWS CloudFormation template by choosing the following Launch Stack button. It will take about 10 minutes for the CloudFormation stack to complete.

Note: The stack will launch in the US East (N. Virginia) Region (us-east-1). If you are using cross-Region aggregation, deploy the solution into the Region where Security Hub findings are consolidated. You can download the CloudFormation template for the solution, modify it, and deploy it to your selected Region.
To deploy the solution (AWS CDK)
- Download the code from our aws-security-hub-findings-historical-export GitHub repository, where you can also contribute to the sample code. The CDK initializes your environment and uploads the Lambda assets to Amazon S3. Then, you deploy the solution to your account.
- While you are authenticated in the security tooling account, run the following commands in your terminal. Make sure to replace <AWS_ACCOUNT> with the account number, and replace <REGION> with the AWS Region where you want to deploy the solution.
cdk bootstrap aws://<AWS_ACCOUNT>/<REGION>
 cdk deploy SechubHistoricalPullStack
Solution walkthrough and validation
Now that you’ve successfully deployed the solution, you can see each aspect of the automation workflow in action.
Before you start the workflow, you need to subscribe to the SNS topic so that you’re notified of status changes within the Step Functions workflow. For this example, you will use email notification.
To subscribe to the SNS topic
- Open the Amazon SNS console.
- Go to Topics and choose the Security_Hub_Export_Status topic.
- Choose Create subscription.
- For Protocol, choose Email.
- For Endpoint, enter the email address where you want to receive notifications.
- Choose Create subscription.
- After you create the subscription, go to your email and confirm the subscription.
You’re now subscribed to the SNS topic, so any time that the Step Functions status changes, you will receive a notification. Let’s walk through how to run the export solution.
To run the export solution
- Open the Amazon Step Functions console.
- In the left navigation pane, choose State machines.
- Choose the new state machine named sec_hub_finding_export.
- Choose Start execution.
- On the Start execution page, for Name – optional and Input – optional, leave the default values and then choose Start execution.

Figure 2: Example input values for execution of the Step Functions workflow
- This will start the Step Functions workflow and redirect you to the Graph view. If successful, you will see that the overall Execution status and each step have a status of Successful.
- For long-running jobs, you can view the CloudWatch log group associated with the Lambda function to view the logs.
- To track the number of Security Hub findings that have been exported, open the Systems Manager console, choose Parameter Store, and then select the /sechubexport/findingcount parameter. Under Value, you will see the total number of Security Hub findings that have been exported, as shown in Figure 3.
Figure 3: Systems Manager Parameter Store value for the number of Security Hub findings exported


Depending on the number of Security Hub findings, this process can take some time. This is primarily due to the GetFindings quota of 3 requests per second. Each GetFindings request can return a maximum of 100 findings, so this means that you can get up to 300 findings per second. On average, the solution can export about 1 million findings per hour. If you have a large number of findings, you can start the finding export process and wait for the SNS topic to notify you when the process is complete.
How to customize the solution
The solution provides a general framework to help you export your historical Security Hub findings. There are many ways that you can customize this solution based on your needs. The following are some enhancements that you can consider.
Change the Security Hub finding filter
The solution currently pulls all findings with RecordState: ACTIVE, which pulls the active Security Hub findings in the AWS account. You can update the Lambda function code, specifically the finding_filter JSON value within the create_filter function, to pull findings for your use case. For example, to get all active Security Hub findings from the AWS Foundational Security Best Practices standard, update the Lambda function code as follows.
Export more than 100 million Security Hub findings
The example solution can export about 100 million Security Hub findings. This number is primarily determined by the speed at which findings can be exported, due to the following factors:
If you want to export more than 100 million Security Hub findings, do one of the following:
- Use nested Step Functions workflows. For instructions, see Start Workflow Executions from a Task State.
- Implement a pattern by using a Lambda function to start a new execution of your state machine to split ongoing work across multiple workflow executions. For more information, see the tutorial Continuing Ongoing Work as a New Execution.
Note: If you implement either of these solutions, make sure that the nextToken also gets passed to the new Step Functions execution by updating the Lambda function code to parse and pass the nextToken received in the last request.
Speed up the export
One way to increase the export bandwidth, and reduce the overall execution time, is to run the export job in parallel across the individual Security Hub member accounts rather than from the single delegated administrator account.
You could use CloudFormation StackSets to deploy this solution in each Security Hub member account and send the findings to a centralized S3 bucket. You would need to modify the solution to allow an S3 bucket to be provided as an input, and all the Lambda function Identity and Access Management (IAM) roles would need cross-account access to the S3 bucket and corresponding AWS Key Management Service (AWS KMS) key. You would also need to make updates in each member account to iterate through the various Regions in which the Security Hub findings exist.
Next steps
The solution in this post is designed to assist in the retrieval and export of all existing findings currently in Security Hub. After you successfully run this solution to export historical findings, you can continuously export new Security Hub findings by using the sample solution in the aws-security-hub-findings-export GitHub repository.
Now that you’ve exported the Security Hub findings, you can set up and run custom complex reporting or queries against the S3 bucket by using Amazon Athena and AWS Glue. Additionally, you can run machine learning and analytics capabilities by using services like Amazon SageMaker or Amazon Lookout for Metrics.
Conclusion
In this post, you deployed a solution to export the existing Security Hub findings in your account to a central S3 bucket, so that you can apply complex analytics and machine learning to those findings. We walked you through how to use the solution and apply it to some example use cases after you successfully exported existing findings across your AWS environment. Now your security team can use the data in the S3 bucket for predictive analytics and determine if there are Security Hub findings and specific resources that might need to be prioritized for review due to a deviation from normal behavior. Additionally, you can use this solution to enable more complex analytics on multiple fields by querying large and complex datasets with AWS Athena.
If you have feedback about this post, submit comments in the Comments section below. If you have questions about this post, start a thread on AWS Security Hub re:Post.
Want more AWS Security news? Follow us on Twitter.