Working with customers, our security teams detected an increase of data encryption events in S3 that used an encryption method known as server-side encryption using client-provided keys (SSE-C). While this is a feature used by many customers, we detected a pattern where a large number of S3 CopyObject operations using SSE-C began to overwrite objects, which has the effect of re-encrypting customer data with a new encryption key. Our analysis uncovered that this was being done by malicious actors who had obtained valid customer credentials, and were using them to re-encrypt objects.
It’s important to note that these actions do not take advantage of a vulnerability within an AWS service—but rather require valid credentials that an unauthorized user uses in an unintended way. Although these actions occur in the customer domain of the shared responsibility model, AWS recommends steps that customers can use to prevent or reduce the impact of such activity.
Using active defense tools, we have implemented automatic mitigations that will help to prevent this type of unauthorized activity in many cases. These mitigations have already prevented a high percentage of attempts from succeeding, without customers taking steps to protect themselves. However, the threat actors used valid credentials, and it is difficult for AWS to reliably distinguish valid usage from malicious use. Therefore, we recommend that customers follow best practices to mitigate risk.
We recommend that customers implement these four security best practices to protect against the unauthorized use of SSE-C:
Block the use of SSE-C unless required by an application
Implement data recovery procedures
Monitor AWS resources for unexpected access patterns
Implement short-term credentials
I. Block the use of SSE-C encryption
If your applications don’t use SSE-C as an encryption method, you can block the use of SSE-C with a resource policy applied to an S3 bucket, or by a resource control policy (RCP) applied to an organization in AWS Organizations.
Resource policies for S3 buckets are commonly referred to as bucket policies and allow customers to specify permissions for individual buckets in S3. A bucket policy can be applied using the S3 PutBucketPolicy API operation, the AWS Command Line Interface (CLI), or through the AWS Management Console. Learn more about how bucket policies work in the S3 documentation. The following example shows a bucket policy that blocks SSE-C request for a bucket called your-bucket-name>.
RCPs allow customers to specify the maximum available permissions that apply to resources across an entire organization in AWS Organizations. An RCP can be applied by using the AWS Organizations UpdatePolicy API operation, the AWS Command Line Interface (CLI), or through the AWS Management Console. Learn more about how RCPs work in the AWS Organizations documentation. The following example shows an RCP that blocks SSE-C requests for buckets in the organization.
Without data protection mechanisms in place, data recovery times can be longer. As a data protection best practice, we recommend that you protect against data being overwritten and that you maintain a second copy of critical data.
Enable S3 Versioning to keep multiple versions of an object in a bucket, so that you can restore objects that are accidentally deleted or overwritten. It is important to note that versioning may increase storage costs, especially for applications that frequently overwrite objects in a bucket. In this case, consider implementing S3 Lifecycle policies to manage older versions and control storage costs.
Additionally, copy or take backups of critical data to a different bucket and perhaps to a different AWS account or AWS Region. To do this, you can use S3 replication to automatically copy objects between buckets. These buckets can reside in the same or in different AWS accounts, as well as in the same or in different AWS Regions. S3 replication also offers an SLA for customers that have more stringent RPO (Recovery Point Objective) and RTO (Recovery Time Objective) requirements. Alternatively, you can use AWS Backup for S3, which is a managed service that automates periodic backup of S3 buckets.
III. Monitor AWS resources for unexpected access patterns
Without monitoring, unauthorized actions on S3 buckets may go unnoticed. We recommend that you use tools such as AWS CloudTrail or S3 server access logs to monitor access to your data.
You can use AWS CloudTrail to log events across AWS services (including Amazon S3) and even combine logs into a single account to make them available to your security teams to access and monitor. You can also create CloudWatch alarms based on specific S3 metrics or logs to alert on unusual activity. These alerts can help you identify anomalous behavior quickly. You can also set up automation that uses Amazon EventBridge and AWS Lambda to automatically take corrective measures. See this topic in the S3 documentation for an example implementation of a setup used to scan all buckets across an organization and apply S3 Block Public Access.
IV. Implement short-term credentials
The most effective approach to mitigating the risk of compromised credentials is to never create long-term credentials in the first place. Credentials that do not exist cannot be exposed or stolen, and AWS provides a rich set of capabilities that alleviate the need to ever store credentials in source code or in configuration files.
All of these technologies rely on the AWS Security Token Service (AWS STS) to issue temporary security credentials that can control access to AWS resources without distributing or embedding long-term AWS security credentials within an application, whether in code or in configuration files.
Summary
Detecting unintended encryption techniques like this in your environment requires vigilance and support. In this post, we highlighted the most common indicators to look for. As your security teams work to constantly protect your environment, know that a number of teams at AWS—including the AWS Customer Incident Response Team (CIRT), Amazon Threat Intelligence, and services teams like the Amazon S3 team—are working diligently to innovate, collaborate, and share insights to help protect your valuable data.
In this post, we provided an update on this recent threat to customer data and highlighted four security best practices that customers can use to protect against the risk of bad actors using SSE-C to encrypt data by using lost or stolen AWS credentials.
As threat actor tactics evolve, our commitment to customer security remains unwavering. Together, we are building a more secure cloud environment, allowing you to innovate with confidence.
If you ever suspect unauthorized activity, please don’t hesitate to contact AWS Support immediately.
November 14, 2023: We’ve updated this post to use IAM Identity Center and follow updated IAM best practices.
In this post, we discuss the concept of folders in Amazon Simple Storage Service (Amazon S3) and how to use policies to restrict access to these folders. The idea is that by properly managing permissions, you can allow federated users to have full access to their respective folders and no access to the rest of the folders.
Overview
Imagine you have a team of developers named Adele, Bob, and David. Each of them has a dedicated folder in a shared S3 bucket, and they should only have access to their respective folders. These users are authenticated through AWS IAM Identity Center (successor to AWS Single Sign-On).
In this post, you’ll focus on David. You’ll walk through the process of setting up these permissions for David using IAM Identity Center and Amazon S3. Before you get started, let’s first discuss what is meant by folders in Amazon S3, because it’s not as straightforward as it might seem. To learn how to create a policy with folder-level permissions, you’ll walk through a scenario similar to what many people have done on existing files shares, where every IAM Identity Center user has access to only their own home folder. With folder-level permissions, you can granularly control who has access to which objects in a specific bucket.
You’ll be shown a policy that grants IAM Identity Center users access to the same Amazon S3 bucket so that they can use the AWS Management Console to store their information. The policy allows users in the company to upload or download files from their department’s folder, but not to access any other department’s folder in the bucket.
After the policy is explained, you’ll see how to create an individual policy for each IAM Identity Center user.
Throughout the rest of this post, you will use a policy, which will be associated with an IAM Identity Center user named David. Also, you must have already created an S3 bucket.
Note: S3 buckets have a global namespace and you must change the bucket name to a unique name.
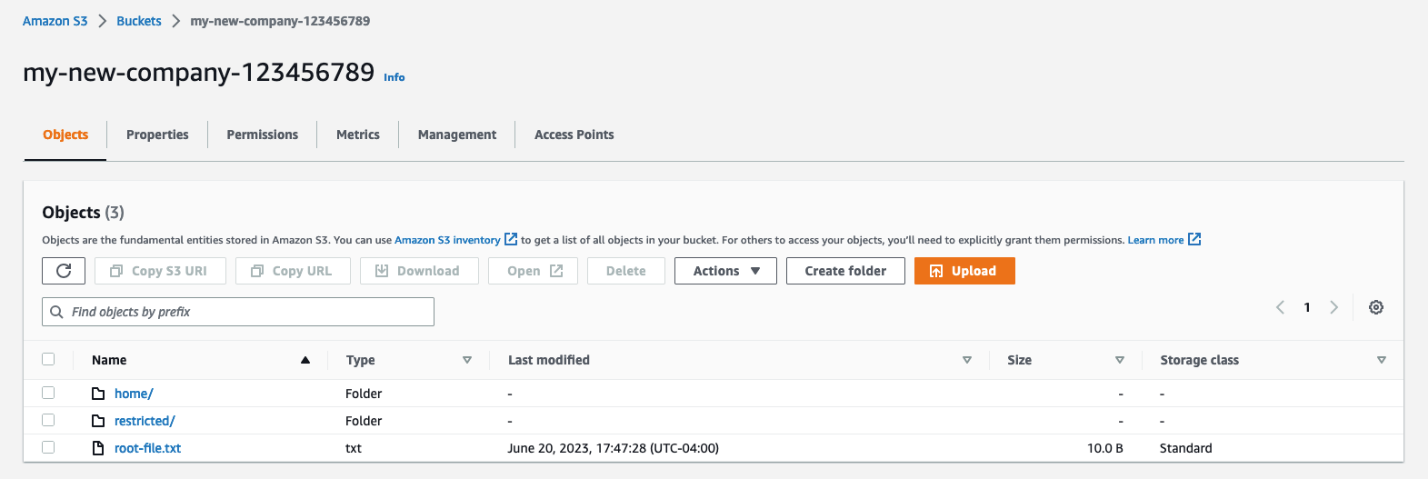
For this blog post, you will need an S3 bucket with the following structure (the example bucket name for the rest of the blog is “my-new-company-123456789”):
Figure 1: Screenshot of the root of the my-new-company-123456789 bucket
Your S3 bucket structure should have two folders, home and confidential, with a file root-file.txt in the main bucket directory. Inside confidential you will have no items or folders. Inside home there should be three sub-folders: Adele, Bob, and David.
Figure 2: Screenshot of the home/ directory of the my-new-company-123456789 bucket
A brief lesson about Amazon S3 objects
Before explaining the policy, it’s important to review how Amazon S3 objects are named. This brief description isn’t comprehensive, but will help you understand how the policy works. If you already know about Amazon S3 objects and prefixes, skip ahead to Creating David in Identity Center.
Amazon S3 stores data in a flat structure; you create a bucket, and the bucket stores objects. S3 doesn’t have a hierarchy of sub-buckets or folders; however, tools like the console can emulate a folder hierarchy to present folders in a bucket by using the names of objects (also known as keys). When you create a folder in S3, S3 creates a 0-byte object with a key that references the folder name that you provided. For example, if you create a folder named photos in your bucket, the S3 console creates a 0-byte object with the key photos/. The console creates this object to support the idea of folders. The S3 console treats all objects that have a forward slash (/) character as the last (trailing) character in the key name as a folder (for example, examplekeyname/)
To give you an example, for an object that’s named home/common/shared.txt, the console will show the shared.txt file in the common folder in the home folder. The names of these folders (such as home/ or home/common/) are called prefixes, and prefixes like these are what you use to specify David’s department folder in his policy. By the way, the slash (/) in a prefix like home/ isn’t a reserved character — you could name an object (using the Amazon S3 API) with prefixes such as home:common:shared.txt or home-common-shared.txt. However, the convention is to use a slash as the delimiter, and the Amazon S3 console (but not S3 itself) treats the slash as a special character for showing objects in folders. For more information on organizing objects in the S3 console using folders, see Organizing objects in the Amazon S3 console by using folders.
Creating David in Identity Center
IAM Identity Center helps you securely create or connect your workforce identities and manage their access centrally across AWS accounts and applications. Identity Center is the recommended approach for workforce authentication and authorization on AWS for organizations of any size and type. Using Identity Center, you can create and manage user identities in AWS, or connect your existing identity source, including Microsoft Active Directory, Okta, Ping Identity, JumpCloud, Google Workspace, and Azure Active Directory (Azure AD). For further reading on IAM Identity Center, see the Identity Center getting started page.
Begin by setting up David as an IAM Identity Center user. To start, open the AWS Management Console and go to IAM Identity Center and create a user.
Note: The following steps are for Identity Center without System for Cross-domain Identity Management (SCIM) turned on, the add user option won’t be available if SCIM is turned on.
From the left pane of the Identity Center console, select Users, and then choose Add user.
Figure 3: Screenshot of IAM Identity Center Users page.
Enter David as the Username, enter an email address that you have access to as you will need this later to confirm your user, and then enter a First name, Last name, and Display name.
Leave the rest as default and choose Add user.
Select Users from the left navigation pane and verify you’ve created the user David.
Figure 4: Screenshot of adding users to group in Identity Center.
Now that you’re verified the user David has been created, use the left pane to navigate to Permission sets, then choose Create permission set.
Figure 5: Screenshot of permission sets in Identity Center.
Select Custom permission set as your Permission set type, then choose Next.
Figure 6: Screenshot of permission set types in Identity Center.
David’s policy
This is David’s complete policy, which will be associated with an IAM Identity Center federated user named David by using the console. This policy grants David full console access to only his folder (/home/David) and no one else’s. While you could grant each user access to their own bucket, keep in mind that an AWS account can have up to 100 buckets by default. By creating home folders and granting the appropriate permissions, you can instead allow thousands of users to share a single bucket.
Now, copy and paste the preceding IAM Policy into the inline policy editor. In this case, you use the JSON editor. For information on creating policies, see Creating IAM policies.
Figure 7: Screenshot of the inline policy inside the permissions set in Identity Center.
Give your permission set a name and a description, then leave the rest at the default settings and choose Next.
Verify that you modify the policies to have the bucket name you created earlier.
After your permission set has been created, navigate to AWS accounts on the left navigation pane, then select Assign users or groups.
Figure 8: Screenshot of the AWS accounts in Identity Center.
Select the user David and choose Next.
Figure 9: Screenshot of the AWS accounts in Identity Center.
Select the permission set you created earlier, choose Next, leave the rest at the default settings and choose Submit.
Figure 10: Screenshot of the permission sets in Identity Center.
You’ve now created and attached the permissions required for David to view his S3 bucket folder, but not to view the objects in other users’ folders. You can verify this by signing in as David through the AWS access portal.
Figure 11: Screenshot of the settings summary in Identity Center.
Navigate to the dashboard in IAM Identity Center and go to the Settings summary, then choose the AWS access portal URL.
Figure 12: Screenshot of David signing into the console via the Identity Center dashboard URL.
Sign in as the user David with the one-time password you received earlier when creating David.
Figure 13: Second screenshot of David signing into the console through the Identity Center dashboard URL.
Open the Amazon S3 console.
Search for the bucket you created earlier.
Figure 14: Screenshot of my-new-company-123456789 bucket in the AWS console.
Navigate to David’s folder and verify that you have read and write access to the folder. If you navigate to other users’ folders, you’ll find that you don’t have access to the objects inside their folders.
David’s policy consists of four blocks; let’s look at each individually.
Before you begin identifying the specific folders David can have access to, you must give him two permissions that are required for Amazon S3 console access: ListAllMyBuckets and GetBucketLocation.
The ListAllMyBuckets action grants David permission to list all the buckets in the AWS account, which is required for navigating to buckets in the Amazon S3 console (and as an aside, you currently can’t selectively filter out certain buckets, so users must have permission to list all buckets for console access). The console also does a GetBucketLocation call when users initially navigate to the Amazon S3 console, which is why David also requires permission for that action. Without these two actions, David will get an access denied error in the console.
Block 2: Allow listing objects in root and home folders
Although David should have access to only his home folder, he requires additional permissions so that he can navigate to his folder in the Amazon S3 console. David needs permission to list objects at the root level of the my-new-company-123456789 bucket and to the home/ folder. The following policy grants these permissions to David:
Without the ListBucket permission, David can’t navigate to his folder because he won’t have permissions to view the contents of the root and home folders. When David tries to use the console to view the contents of the my-new-company-123456789 bucket, the console will return an access denied error. Although this policy grants David permission to list all objects in the root and home folders, he won’t be able to view the contents of any files or folders except his own (you specify these permissions in the next block).
This block includes conditions, which let you limit under what conditions a request to AWS is valid. In this case, David can list objects in the my-new-company-123456789 bucket only when he requests objects without a prefix (objects at the root level) and objects with the home/ prefix (objects in the home folder). If David tries to navigate to other folders, such as confidential/, David is denied access. Additionally, David needs permissions to list prefix home/David to be able to use the search functionality of the console instead of scrolling down the list of users’ folders.
To set these root and home folder permissions, I used two conditions: s3:prefix and s3:delimiter. The s3:prefix condition specifies the folders that David has ListBucket permissions for. For example, David can list the following files and folders in the my-new-company-123456789 bucket:
But David cannot list files or subfolders in the confidential/, home/Adele, or home/Bob folders.
Although the s3:delimiter condition isn’t required for console access, it’s still a good practice to include it in case David makes requests by using the API. As previously noted, the delimiter is a character—such as a slash (/)—that identifies the folder that an object is in. The delimiter is useful when you want to list objects as if they were in a file system. For example, let’s assume the my-new-company-123456789 bucket stored thousands of objects. If David includes the delimiter in his requests, he can limit the number of returned objects to just the names of files and subfolders in the folder he specified. Without the delimiter, in addition to every file in the folder he specified, David would get a list of all files in any subfolders.
Block 3: Allow listing objects in David’s folder
In addition to the root and home folders, David requires access to all objects in the home/David/ folder and any subfolders that he might create. Here’s a policy that allows this:
In the condition above, you use a StringLike expression in combination with the asterisk (*) to represent an object in David’s folder, where the asterisk acts as a wildcard. That way, David can list files and folders in his folder (home/David/). You couldn’t include this condition in the previous block (AllowRootAndHomeListingOfCompanyBucket) because it used the StringEquals expression, which would interpret the asterisk (*) as an asterisk, not as a wildcard.
In the next section, the AllowAllS3ActionsInUserFolder block, you’ll see that the Resource element specifies my-new-company/home/David/*, which looks like the condition that I specified in this section. You might think that you can similarly use the Resource element to specify David’s folder in this block. However, the ListBucket action is a bucket-level operation, meaning the Resource element for the ListBucket action applies only to bucket names and doesn’t take folder names into account. So, to limit actions at the object level (files and folders), you must use conditions.
Block 4: Allow all Amazon S3 actions in David’s folder
Finally, you specify David’s actions (such as read, write, and delete permissions) and limit them to just his home folder, as shown in the following policy:
For the Action element, you specified s3:*, which means David has permission to do all Amazon S3 actions. In the Resource element, you specified David’s folder with an asterisk (*) (a wildcard) so that David can perform actions on the folder and inside the folder. For example, David has permission to change his folder’s storage class. David also has permission to upload files, delete files, and create subfolders in his folder (perform actions in the folder).
An easier way to manage policies with policy variables
In David’s folder-level policy you specified David’s home folder. If you wanted a similar policy for users like Bob and Adele, you’d have to create separate policies that specify their home folders. Instead of creating individual policies for each IAM Identity Center user, you can use policy variables and create a single policy that applies to multiple users (a group policy). Policy variables act as placeholders. When you make a request to a service in AWS, the placeholder is replaced by a value from the request when the policy is evaluated.
For example, you can use the previous policy and replace David’s user name with a variable that uses the requester’s user name through attributes and PrincipalTag as shown in the following policy (copy this policy to use in the procedure that follows):
To implement this policy with variables, begin by opening the IAM Identity Center console using the main AWS admin account (ensuring you’re not signed in as David).
Select Settings on the left-hand side, then select the Attributes for access control tab.
Figure 15: Screenshot of Settings inside Identity Center.
Create a new attribute for access control, entering userName as the Key and ${path:userName} as the Value, then choose Save changes. This will add a session tag to your Identity Center user and allow you to use that tag in an IAM policy.
Figure 16: Screenshot of managing attributes inside Identity Center settings.
To edit David’s permissions, go back to the IAM Identity Center console and select Permission sets.
Figure 17: Screenshot of permission sets inside Identity Center with Davids-Permissions selected.
Select David’s permission set that you created previously.
Select Inline policy and then choose Edit to update David’s policy by replacing it with the modified policy that you copied at the beginning of this section, which will resolve to David’s username.
Figure 18: Screenshot of David’s policy inside his permission set inside Identity Center.
You can validate that this is set up correctly by signing in to David’s user through the Identity Center dashboard as you did before and verifying you have access to the David folder and not the Bob or Adele folder.
Figure 19: Screenshot of David’s S3 folder with access to a .jpg file inside.
Whenever a user makes a request to AWS, the variable is replaced by the user name of whoever made the request. For example, when David makes a request, ${aws:PrincipalTag/userName} resolves to David; when Adele makes the request, ${aws:PrincipalTag/userName} resolves to Adele.
It’s important to note that, if this is the route you use to grant access, you must control and limit who can set this username tag on an IAM principal. Anyone who can set this tag can effectively read/write to any of these bucket prefixes. It’s important that you limit access and protect the bucket prefixes and who can set the tags. For more information, see What is ABAC for AWS, and the Attribute-based access control User Guide.
Conclusion
By using Amazon S3 folders, you can follow the principle of least privilege and verify that the right users have access to what they need, and only to what they need.
See the following example policy that only allows API access to the buckets, and only allows for adding, deleting, restoring, and listing objects inside the folders:
Updated on July 6, 2023: This post has been updated to reflect the current guidance around the usage of S3 ACL and to include S3 Access Points and the Block Public Access for accounts and S3 buckets.
Updated on April 27, 2023: Amazon S3 now automatically enables S3 Block Public Access and disables S3 access control lists (ACLs) for all new S3 buckets in all AWS Regions.
Updated on January 8, 2019: Based on customer feedback, we updated the third paragraph in the “What about S3 ACLs?” section to clarify permission management.
In this post, we will discuss Amazon S3 Bucket Policies and IAM Policies and its different use cases. This post will assist you in distinguishing between the usage of IAM policies and S3 bucket policies. We will also discuss how these policies integrate with some default S3 bucket security settings like automatically enabling S3 Block Public Access and disabling S3 access control lists (ACLs).
IAM policies vs. S3 bucket policies
AWS access is managed by setting IAM policies and linking them to IAM identities (users, groups of users, or roles) or AWS resources. A policy is an object in AWS that when associated with an identity or resource, defines their permissions. IAM policies specify what actions are allowed or denied on what AWS resources (e.g. user Alice can read objects from the “Production” bucket but can’t write objects in the “Dev” bucket whereas user Bob can have full access to S3).
S3 bucket policies, on the other hand, are resource-based policies that you can use to grant access permissions to your Amazon S3 buckets and the objects in it. S3 bucket policies can allow or deny requests based on the elements in the policy.(e.g. allow user Alice to PUT but not DELETE objects in the bucket).
Note: You attach S3 bucket policies at the bucket level (i.e. you can’t attach a bucket policy to an S3 object), but the permissions specified in the bucket policy apply to all the objects in the bucket. You can also specify permissions at the object level by putting an object as the resource in the Bucket policy.
IAM policies and S3 bucket policies are both used for access control and they’re both written in JSON using the AWS access policy language. Let’s look at an example policy of each type:
Sample S3 Bucket Policy
This S3 bucket policy enables any IAM principal (user or role) in account 111122223333 to use the Amazon S3 GET Bucket (List Objects) operation.
Note that the S3 bucket policy includes a “Principal” element, which lists the principals that bucket policy controls access for. The “Principal” element is unnecessary in an IAM policy, because the principal is by default the entity that the IAM policy is attached to.
S3 bucket policies (as the name would imply) only control access to S3 resources for the bucket they’re attached to, whereas IAM policies can specify nearly any AWS action. One of the neat things about AWS is that you can actually apply both IAM policies and S3 bucket policies simultaneously, with the ultimate authorization being the least-privilege union of all the permissions (more on this in the section below titled “How does authorization work with multiple access control mechanisms?”).
When to use IAM policies vs. S3 policies
Use IAM policies if:
You need to control access to AWS services other than S3. IAM policies will be easier to manage since you can centrally manage all of your permissions in IAM, instead of spreading them between IAM and S3.
You have numerous S3 buckets each with different permissions requirements. IAM policies will be easier to manage since you don’t have to define a large number of S3 bucket policies and can instead rely on fewer, more detailed IAM policies.
You prefer to keep access control policies in the IAM environment.
Your IAM policies bump up against the size limit (up to 2 kb for users, 5 kb for groups, and 10 kb for roles). S3 supports bucket policies of up 20 kb.
You prefer to keep access control policies in the S3 environment.
You want to apply common security controls to all principals who interact with S3 buckets, such as restricting the IP addresses or VPC a bucket can be accessed from.
If you’re still unsure of which to use, consider which audit question is most important to you:
If you’re more interested in “What can this user do in AWS?” then IAM policies are probably the way to go. You can easily answer this by looking up an IAM user and then examining their IAM policies to see what rights they have.
If you’re more interested in “Who can access this S3 bucket?” then S3 bucket policies will likely suit you better. You can easily answer this by looking up a bucket and examining the bucket policy.
Whichever method you choose, we recommend staying as consistent as possible. Auditing permissions becomes more challenging as the number of IAM policies and S3 bucket policies grows.
What about S3 ACLs?
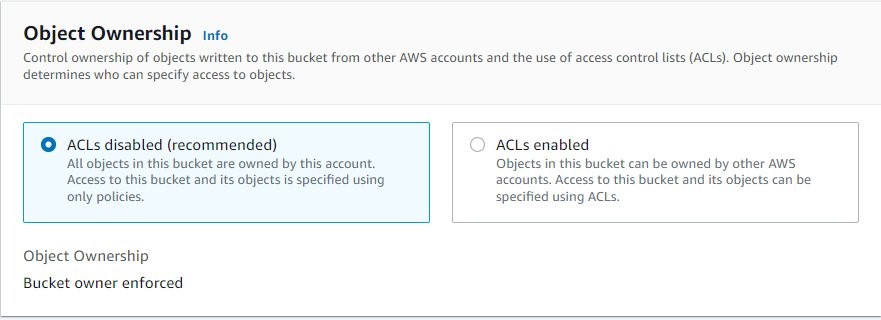
An S3 ACL is a sub-resource that’s attached to every S3 bucket and object. It defines which AWS accounts or groups are granted access and the type of access. You can attach S3 ACLs to both buckets and individual objects within a bucket to manage permissions for those objects. As a general rule, AWS recommends using S3 bucket policies or IAM policies for access control. S3 ACLs is a legacy access control mechanism that predates IAM. By default, Object Ownership is set to the Bucket owner enforced setting and all ACLs are disabled, as can be seen below.
A majority of modern use cases in Amazon S3 no longer require the use of ACLs, and we recommend that you keep ACLs disabled by applying the Bucket owner enforced setting. This approach simplifies permissions management: you can use policies to more easily control access to every object in your bucket, regardless of who uploaded the objects in your bucket. When ACLs are disabled, the bucket owner owns all the objects in the bucket and manages access to data exclusively using access management policies.
S3 bucket policies and IAM policies define object-level permissions by providing those objects in the Resource element in your policy statements. The statement will apply to those objects in the bucket. Consolidating object-specific permissions into one policy (as opposed to multiple S3 ACLs) makes it simpler for you to determine effective permissions for your users and roles.
You can disable ACLs on both newly created and already existing buckets. For newly created buckets, ACLs are disabled by default. In the case of an existing bucket that already has objects in it, after you disable ACLs, the object and bucket ACLs are no longer part of an access evaluation, and access is granted or denied on the basis of policies.
S3 Access Points and S3 Access
In some cases customers have use cases with complex entitlement: Amazon s3 is used to store shared datasets where data is aggregated and accessed by different applications, individuals or teams for different use cases. Managing access to this shared bucket requires a single bucket policy that controls access for dozens to hundreds of applications with different permission levels. As an application set grows, the bucket policy becomes more complex, time consuming to manage, and needs to be audited to make sure that changes don’t have an unexpected impact on another application.
These customers need additional policy space for access to their data, and that buckets. To support these use cases, Amazon S3 provides a feature called Amazon S3 Access Points. Amazon S3 access points simplify data access for any AWS service or customer application that stores data in S3.
Access points are named network endpoints that are attached to buckets that you can use to perform S3 object operations, such as GetObject and PutObject. Each access point has distinct permissions and network controls that S3 applies for any request that is made through that access point. Each access point enforces a customized access point policy that works in conjunction with the bucket policy that is attached to the underlying bucket.
Amazon S3 access points support AWS Identity and Access Management (IAM) resource policies that allow you to control the use of the access point by resource, user, or other conditions. For an application or user to be able to access objects through an access point, both the access point and the underlying bucket must permit the request.
Note that Adding an S3 access point to a bucket doesn’t change the bucket’s ehaviour when the bucket is accessed directly through the bucket’s name or Amazon Resource Name (ARN). All existing operations against the bucket will continue to work as before. Restrictions that you include in an access point policy apply only to requests made through that access point.
Sample Access point policy
This access point policy grants the IAM user Alice permissions to GET and PUT objects through the access point ‘my-access-point’ in account 111122223333.
Public access is granted to buckets and objects through access control lists (ACLs), bucket policies, access point policies, or all. In order to ensure that public access to this bucket and its objects is blocked, you can turn on Block all public on both the bucket level or the account level.
The Amazon S3 Block Public Access feature provides settings for access points, buckets, and accounts to help you manage public access to Amazon S3 resources. By default, new buckets, access points, and objects don’t allow public access. However, users can modify bucket policies, access point policies, or object permissions to allow public access. S3 Block Public Access settings override these policies and permissions so that you can limit public access to these resources.
With S3 Block Public Access, account administrators and bucket owners can easily set up centralized controls to limit public access to their Amazon S3 resources that are enforced regardless of how the resources are created.
If you apply a setting to an account, it applies to all buckets and access points that are owned by that account. Similarly, if you apply a setting to a bucket, it applies to all access points associated with that bucket.
Block Public Access for buckets
These settings apply only to this bucket and its access points. AWS recommends that you turn on Block all public access, but before applying any of these settings, ensure that your applications will work correctly without public access. If you require some level of public access to this bucket or objects within, you can customize the individual settings below to suit your specific storage use cases.
You can use the S3 console, AWS CLI, AWS SDKs, and REST API to grant public access to one or more buckets. This setting is on by default at the account creation, as can be seen below (using the S3 console).
Turning off this session will create a warning in the account, as AWS recommends this setting to be turned un unless public access is required for specific and verified use cases such as static website hosting.
This setting can also be turned on for existing buckets. In the AWS Management Console this is done by opening the Amazon S3 console at https://console.aws.amazon.com/s3/, choosing the name of the bucket you want, choosing the Permissions tab. And Choosing Edit to change the public access settings for the bucket.
Block Public Access for accounts
In order to ensure that public access to all your S3 buckets and objects is blocked, turn on Block all public access. These settings apply account-wide for all current and future buckets and access points. AWS recommends that you turn on Block all public access, but before applying any of these settings, ensure that your applications will work correctly without public access. If you require some level of public access to your buckets or objects, you can customize the individual settings below to suit your specific storage use cases.
You can use the S3 console, AWS CLI, AWS SDKs, and REST API to configure block public access settings for all the buckets in your account. This setting can be turned on in the AWS Management Console by opening the Amazon S3 console at https://console.aws.amazon.com/s3/, and clicking Block Public Access setting for this account on the left panel. And Choosing Edit to change the public access settings for the bucket.
When working with AWS organizations, you can prevent people from modifying the Block Public Access on the account level by adding a Service control policy (SCP) that denies editing this. An example of such a SCP can be seen below:
How does authorization work with multiple access control mechanisms?
Whenever an AWS principal issues a request to S3, the authorization decision depends on the union of all the IAM policies, S3 bucket policies, and S3 ACLs that apply as well as if Block Public Access is enabled on either the account, bucket or access point.
In accordance with the principle of least-privilege, decisions default to DENY and an explicit DENY always trumps an ALLOW. For example, if an IAM policy grants access to an object, the S3 bucket policies denies access to that object, and there is no S3 ACL, then access will be denied. Similarly, if no method specifies an ALLOW, then the request will be denied by default. Only if no method specifies a DENY and one or more methods specify an ALLOW will the request be allowed.
When Amazon S3 receives a request to access a bucket or an object, it determines whether the bucket or the bucket owner’s account has a block public access setting applied. If the request was made through an access point, Amazon S3 also checks for block public access settings for the access point. If there is an existing block public access setting that prohibits the requested access, Amazon S3 rejects the request.
This diagram illustrates the authorization process.
We hope that this post clarifies some of the confusion around the various ways you can control access to your S3 environment.
Using IAM Access Analyzer for S3 to review bucket access
Another interesting feature that can be used is IAM Access Analyzer for S3 to review bucket access. You can use IAM Access Analyzer for S3 to review buckets with bucket ACLs, bucket policies, or access point policies that grant public access. IAM Access Analyzer for S3 alerts you to buckets that are configured to allow access to anyone on the internet or other AWS accounts, including AWS accounts outside of your organization. For each public or shared bucket, you receive findings that report the source and level of public or shared access.
In IAM Access Analyzer for S3, you can block all public access to a bucket with a single click. You can also drill down into bucket-level permission settings to configure granular levels of access. For specific and verified use cases that require public or shared access, you can acknowledge and record your intent for the bucket to remain public or shared by archiving the findings for the bucket.
Customers have an increasing need to collect, store, and process data within their AWS environments for application modernization, reporting, and predictive analytics. AWS Well-Architected security pillar, general data privacy and compliance regulations require that you appropriately identify and secure sensitive information. Knowing where your data is allows you to implement the appropriate security controls which help support meeting a range of objectives including compliance & data privacy.
With Amazon Macie, you can detect sensitive information stored in your organization’s Amazon Simple Storage Service (Amazon S3) storage. Macie provides sensitive data findings and additional metadata to help you protect your data in Amazon S3.
If you have many accounts with a lot of S3 buckets and data, you might find it complex, expensive, and time consuming to discover sensitive data in each bucket and account, and to evaluate the large number of findings. As your applications continue to scale you want to have confidence that you continue to understand where the data is in your environment.
To help discover sensitive data across your entire S3 storage, you can now use a new feature in Macie—automated sensitive data discovery—to automatically build sensitive data profiles on S3 buckets and uncover the presence of sensitive data. The new feature continually and cost-efficiently samples data across your S3 storage. This reduces the data scanning needed to locate sensitive data so that you can focus your time, effort, and resources on additional investigation and remediation if sensitive data is found. This broad visibility can help you develop scalable, repeatable processes for ongoing and proactive protection of data.
In this blog post, we show you how to set up Macie automated sensitive data discovery in your AWS environment and walk you through the insights that it generates. We also share some common patterns on how you can use the findings to improve your data security posture.
Prerequisites
To get started, you’ll need the following prerequisites:
Activate Amazon Macie in your accounts for the AWS Regions of your choosing. Macie is a regional service, so it scans S3 buckets only in the Regions where it’s turned on.
Set up a delegated Macie administrator account, also referred to as the Macie admin account, for these Regions. A Macie admin account has visibility into the S3 buckets of member accounts. It also allows you to restrict access to automated sensitive data discovery results to the appropriate teams, without providing access into the management account.
To set up the delegated Macie administrator to centrally manage multiple Macie accounts, do one of the following:
Configure a S3 bucket for sensitive data results in the Macie admin account to access the results and allow for long-term storage and retention.
Activate automated sensitive data discovery in the delegated Macie administrator account
In this section, we walk you through how to activate automated sensitive data discovery in Macie.
For new Macie admin accounts, automated sensitive data discovery is turned on by default. For existing Macie accounts, you need to activate automated sensitive data discovery in the existing Macie admin accounts.
To activate automated sensitive data discovery in the existing Macie admin accounts
For Status, choose Enable, and then edit the following sections according to your needs:
S3 buckets – By default, Macie selects and inspects samples of objects across all S3 buckets in your organization. For example, you might want to exclude an S3 bucket that stores AWS CloudTrail logs.
Managed data identifiers – You can select managed data identifiers to include or exclude during automated sensitivity data discovery. By default, Macie inspects and samples objects by using a set of managed data identifiers that AWS recommends. This includes most of the managed data identifiers that AWS supports, but excludes some that can potentially cause a high volume of alerts in buckets where you might not expect them. If you know specific data types that could exist within your environment, you can add those managed data identifiers specifically. If you want Macie to exclude detections that aren’t sensitive in your deployment, you can exclude them. For more details, see the Macie administrator user guide.
Custom data identifiers – You can select custom data identifiers to include or exclude during automated sensitive data discovery.
Allow lists – You can select allow lists to define specific text or a text pattern that you want Macie to exclude from automated sensitive data discovery.
Figure 1: Settings page for Macie automated sensitive data discovery
Note: When you make changes to the inclusion or exclusion of managed or custom data identifiers for S3 buckets managed by the Macie admin account, those changes apply only to new S3 objects that are discovered. The changes do not apply to detections for existing S3 objects that were previously scanned with automated sensitive data discovery.
How Macie samples data and assigns scores
Macie automated sensitive data discovery analyzes objects in the S3 buckets in your accounts where Macie is turned on. It organizes objects with similar S3 metadata, such as bucket names, object-key prefixes, file-type extensions, and storage class, into groups that are likely to have similar content. It then selects small, but representative, samples from each identified group of objects and scans them to detect the presence of sensitive data. Macie has a feedback loop that uses the results of previously scanned samples to prioritize the next set of samples to inspect.
This systematic exploration of your S3 storage can help identify the presence of unknown sensitive data for a fraction of the cost of targeted sensitive data discovery jobs. A single sample might not be conclusive, so Macie continues sampling to build a security-relevant, interactive map of your S3 buckets. It automatically detects new buckets in your accounts, and keeps track of the previously scanned objects that get deleted from existing buckets to make sure that your map stays up to date.
Review data sensitivity scoring
When you first activate automated sensitive data discovery, Macie assigns each of your S3 buckets a sensitivity score of 50. Then, Macie begins to continually select and scan a sample of objects in your S3 buckets across each member account. Based on the results, Macie adjusts the sensitivity score for each bucket, assigning new scores that range from 1–99. Macie increases the score if sensitive data is found, and decreases the score if sensitive data isn’t found.
Macie calculates this score based on the amount of data inspected, number of sensitive data types discovered, number of occurrences of each sensitive data type, and the nature of the sensitive data. The score can help you identify potential security risks, but it does not indicate the criticality that a given bucket, and its contents, might have for your organization.
Figure 2 shows an example Summary page for the delegated Macie administrator. This page summarizes the results of automated sensitive data discovery for the delegated administrator account and each member account.
From the Summary page, you can choose statistics, such as Publicly accessible or Sensitive, to investigate. When you choose a statistic, you will be redirected to the S3 buckets page that displays a filtered view based on the selected data.
On the S3 buckets page shown in Figure 3, Macie displays a heat map of consolidated information, grouped by account, on whether a bucket is sensitive, not sensitive, or not analyzed yet. Each square in the heat map represents an S3 bucket. In the figure, account 111122223333 has 79 buckets, including 4 buckets with sensitive data findings, 34 buckets that were scanned with no sensitive data found, and 41 buckets that are pending scanning.
Figure 3: Heat map of automated sensitive data discovery in Macie
For more information about an S3 bucket, select one of the squares in the heat map. This will show you the sensitivity score and other details, such as types of sensitive data, names of sensitive objects, and profiling statistics.
The following table summarizes Macie sensitivity score categories and how to interpret the heat map.
Data sensitivity score
Data sensitivity status
Data sensitivity heat map
-1
Unable to analyze
Macie was unable to analyze a S3 object(s) due to a permission issue.
1-49
Not sensitive
A darker shade of blue, and a lower sensitivity score, indicates that a greater proportion of objects in the bucket were scanned and fewer occurrences of sensitive data were found.
A score closer to 1 indicates that Macie scanned most of the objects in the bucket and did not find occurrences of objects with sensitive data.
A score closer to 49 indicates that Macie scanned a smaller proportion of objects in the bucket and did not find occurrences of objects with sensitive data.
50
Not analyzed
White shading indicates that Macie hasn’t analyzed objects yet.
51-99
Sensitive
A darker shade of red, and a higher sensitivity score, indicates that a greater proportion of objects in the bucket were scanned and more occurrences of sensitive data were found.
A score closer to 99 indicates that Macie scanned a greater proportion of objects in the bucket, and found several occurrences of objects with sensitive data.
A score closer to 51 indicates that Macie scanned a smaller proportion of objects and found some occurrences of objects with sensitive data.
100
Maximum score
A solid shade of red. Macie doesn’t assign this score, but you can manually assign it.
Common use cases for Macie automated sensitive data discovery
In this section, we discuss how you can use automated sensitive data discovery in Macie to implement the following common patterns:
Activate continuous monitoring for broad visibility into the presence of sensitive data in your S3 buckets, including existing buckets where sensitive data was not found before.
Manually identify and prioritize a subset of S3 buckets so that you can conduct a full scan based on the sensitivity score.
Build automation that scans S3 buckets by using the sensitivity score and takes actions, such as sending notifications or performing remediation, so that buckets with sensitive data have proper guardrails.
Continuous monitoring of S3 buckets for sensitive data
The dynamic nature of applications and the speed of innovation increases the type and amount of data generated, stored, and processed over time. While development teams work on developing new features for your applications, security teams help the application teams understand where they should take action to protect data.
Discovering sensitive data is an ongoing activity that requires a continuous search for sensitive data in S3 buckets in each account that the Macie admin accounts manage. Macie continually searches for sensitive data and updates the information found on the Summary and S3 buckets pages in the Macie admin accounts.
To help you gain visibility across your S3 storage at an affordable cost, automated sensitive data discovery establishes a baseline profile of the sensitivity of each bucket, while analyzing only a fraction of S3 data for each account in a given month. After you activate this feature in the Macie admin accounts, Macie starts constructing an S3 bucket baseline within 48 hours.
Macie continues to refine bucket profiles and prioritizes those that it has the least information on. For example, Macie might prioritize buckets that were recently created in the monitored accounts or existing buckets from a member account that recently joined your organization. This provides continual visibility that achieves greater fidelity over time while scanning data at a predictable monthly rate.
Automated discovery uses the results of the automated data inspection to create a profile for each bucket. It also tracks previously scanned objects to make sure that each bucket profile is up to date. This means that if a previously scanned object is removed, Macie updates the profile of the bucket to make sure that you have the most current information.
You can also include or exclude specific managed and custom data identifiers from specific S3 buckets or from each S3 bucket that the Macie admin accounts manages. For example, to make sure that the sensitivity score is as accurate as possible, you can exclude specific data identifiers on select S3 buckets where you expect those identifiers.
Let’s walk through an example of how to exclude specific data identifiers on an S3 bucket. Imagine that your company has an S3 bucket where data scientists store a test dataset of fictitious names and addresses. The appropriate teams have verified that the test dataset isn’t sensitive and can be used to create test data models. You want to exclude name and address detections for this bucket while keeping these detections for the rest of your S3 storage.
To exclude the name and address identifiers, navigate to the specific S3 bucket, choose the identifiers to exclude (in this case, NAME and ADDRESS), and choose Exclude from score, as shown in Figure 4. Macie automatically excludes these identifiers from the sensitivity score for that S3 bucket only, for existing and new objects.
Figure 4: Macie S3 bucket list view with sensitivity scores and detections
Note: When you change the included or excluded managed or custom data identifiers for an S3 bucket, Macie automatically updates existing detections and sensitivity scores. Macie also applies these changes to new S3 objects that it scans with automated sensitive data discovery.
You can prioritize S3 buckets that need additional review by manually assigning them a maximum sensitivity score. When you select Assign maximum score on an S3 bucket, Macie sets the score to 100, regardless of the sensitive data detections that it found through automated sensitive data discovery. Automated sensitive data discovery continues to scan the bucket and create sensitive data detections unless you select Exclude from automated discovery.
You might want to assign maximum scores for S3 buckets that are publicly accessible, shared across multiple internal or external customers, or part of an environment where sensitive data shouldn’t be present. By assigning a maximum score to an S3 bucket, you can help ensure that your security and privacy teams regularly review high-priority buckets. You can decide whether to assign maximum scores based on your organization’s use cases and security policies.
Identify a subset of S3 buckets to conduct a full scan based on the sensitivity score
You can use sensitivity scores to prioritize specific S3 buckets for full Macie scanning jobs. By running full scanning jobs on specific buckets, you can focus your efforts on buckets where sensitive data could have the greatest impact on your organization. Because full scanning occurs on only a subset of your buckets, this strategy can help lower your overall costs for Macie.
To create a Macie job that scans S3 buckets based on the sensitivity score
If you leave the To field blank, Macie returns a list of buckets with a score greater than or equal to the value in the From field.
Note: Sensitivity scores can vary based on the objects analyzed and whether you have the settings configured for Assign maximum score, Automatically discover sensitive data, or both.
After you add the filter, you will see the S3 bucket results for the Sensitivity values that you entered, grouped by account. To view the buckets in list view, choose the list view icon (). To view the buckets in group view, choose the group view icon ().
Note: You can’t create Macie scan jobs from group view. To run Macie scan jobs, switch to list view.
Make sure that you are in list view, select the specific S3 buckets that you want to scan based on the Sensitivity score, and then choose Create Jobs.
Figure 5: List view of sensitivity scores for S3 buckets
Review the S3 buckets that you selected. To exclude specific buckets, choose Remove for each bucket. After you review your selection, choose Next.
Select managed data identifiers, custom data identifiers, allow lists, and general settings according to your needs.
Confirm the Macie job details and choose Submit to start scanning the S3 buckets based on the sensitivity score. When this job is complete, you will receive findings on sensitive data discovered from the job.
When you are considering whether to run a scheduled job or a one-time job, remember that S3 bucket sensitivity scores can change based on new objects, managed or custom identifiers, and allow lists used by Macie automated sensitive data discovery. If you run a scheduled job on buckets that meet certain sensitivity score criteria, the configurations for the job are immutable in order to support data privacy and protection audits or investigations. If a new bucket meets the sensitivity score criteria, you need to create a new scheduled job to include that bucket.
Use automation to scan S3 buckets by sensitivity score and take actions based on findings
You can use the GetResourceProfile API to query specific S3 buckets and return sensitivity profiling information. With the information returned from the API, you can develop custom automation to take specific actions on buckets based on their sensitivity scores. For example, you can use Amazon EventBridge and AWS Lambda functions to create Macie jobs based on the sensitivity scores of the S3 buckets managed by Macie, as shown in the following architecture.
Figure 6: Example architecture for automated jobs based on sensitivity scores
This architecture has the following steps:
An EventBridge rule runs periodically to invoke a Lambda function that invokes the GetResourceProfile API for S3 buckets managed by the Macie admin accounts.
The Lambda function takes the following actions:
Creates a list of S3 buckets with maximum sensitivity scores, or with automated sensitivity profiling scores that exceed a threshold value, and then stores the results in an Amazon DynamoDB table.
Creates a Macie job by using items in the DynamoDB table to conduct a one-time scan with 100% sampling depth of those S3 buckets. Upon job submission, you can add a last-scanned date to the table for tracking purposes, to help avoid the creation of multiple one-time jobs on the same bucket.
The delegated Macie administrator job starts scan jobs for S3 buckets in member accounts.
After you conduct your Macie scans either manually or with automation, you can implement semi- or fully automated response and remediation actions based on the sensitive data findings. The following are examples of automated response and remediation actions that you can take:
In this blog post, we showed you how to turn on Macie automated sensitive data discovery in your AWS environment and how to use the findings to continually manage your data security posture. This new feature can help you prioritize your remediation efforts and identify buckets on which to run full scans for sensitive data discovery. We also shared a design pattern to build automation by using Macie APIs for automated remediation of Macie findings.
If you have feedback about this post, submit comments in the Comments section below. If you have questions about this post, start a new thread on Amazon Macie re:Post.
Want more AWS Security news? Follow us on Twitter.
AWS Security Hub is a cloud security posture management service that you can use to perform security best practice checks, aggregate alerts, and automate remediation. Security Hub has out-of-the-box integrations with many AWS services and over 60 partner products. Security Hub centralizes findings across your AWS accounts and supported AWS Regions into a single delegated administrator account in your aggregation Region of choice, creating a single pane of glass to consolidate and view individual security findings.
Because there are a large number of possible integrations across accounts and Regions, your delegated administrator account in the aggregation Region might have hundreds of thousands of Security Hub findings. To perform complex analytics or machine learning across the existing (historical) findings that are maintained in Security Hub, you can export findings to an Amazon Simple Storage Service (Amazon S3) bucket. To export new findings that have recently been created, you can implement the solution in the aws-security-hub-findings-export GitHub repository. However, Security Hub has data export API rate quotas, which can make exporting a large number of findings challenging.
In this blog post, we provide an example solution to export your historical Security Hub findings to an S3 bucket in your account, even if you have a large number of findings. We walk you through the components of the solution and show you how to use the solution after deployment.
Prerequisites
To deploy the solution, complete the following prerequisites:
If you want to export Security Hub findings across multiple Regions, enable cross-Region aggregation.
Solution overview and architecture
In this solution, you use the following AWS services and features:
Security Hub export orchestration
AWS Step Functions helps you orchestrate automation and long-running jobs, which are integral to this solution. You need the ability to run a workflow for hours due to the Security Hub API rate limits and number of findings and objects.
AWS Lambda functions handle the logic for exporting and storing findings in an efficient and cost-effective manner. You can customize Lambda functions to most use cases.
Amazon EventBridge tracks changes in the status of the Step Functions workflow. The solution can run for over 100 hours; by using EventBridge, you don’t have to manually check the status.
AWS Systems ManagerParameter Store provides a quick way to track overall status by maintaining a numeric count of successfully exported findings that you can compare with the number of findings shown in the Security Hub dashboard.
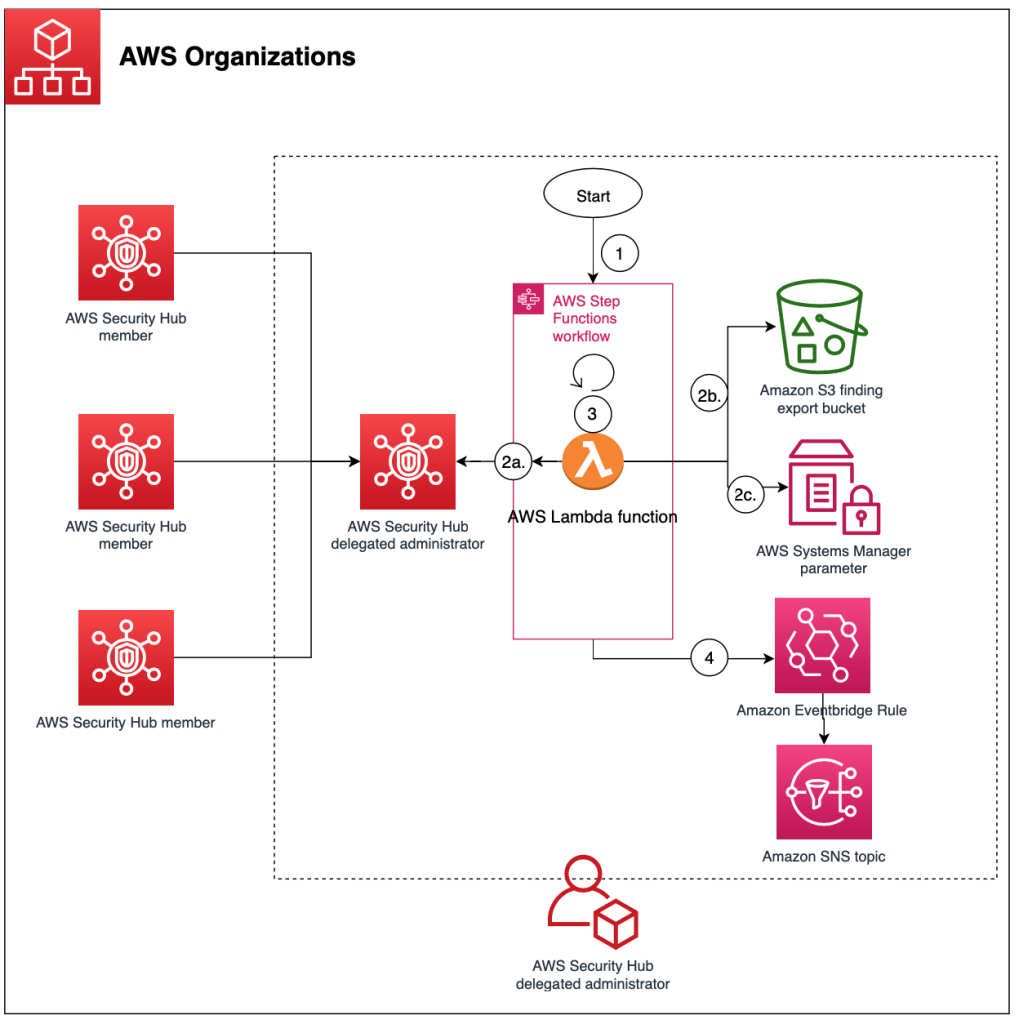
Figure 1 shows the architecture for the solution, deployed in the Security Hub delegated administrator account in the aggregation Region. The figure shows multiple Security Hub member accounts to illustrate how you can export findings for an entire AWS Organizations organization from a single delegated administrator account.
Figure 1: High-level overview of process and resources deployed in the Security Hub account
As shown in Figure 1, the workflow after deployment is as follows:
The Step Functions workflow for the Security Hub export is invoked.
The Step Functions workflow invokes a single Lambda function that does the following:
Retrieves Security Hub findings that have an Active status and puts them in a temporary file.
Pushes the file as an object to Amazon S3.
Adds the global count of exported findings from the Step Functions workflow to a Systems Manager parameter for validation and tracking purposes.
Repeats steps b–c for about 10 minutes to get the most findings while preventing the Lambda function from timing out.
If a nextToken is present, pushes the nextToken to the output of the Step Functions.
Note: If the number of items in the output is smaller than the number of items returned by the API call, then the return output includes a nextToken, which can be passed to a subsequent command to retrieve the next set of items.
The Step Functions workflow goes through a Choice state as follows:
If a Security Hub nextToken is present, Step Functions invokes the Lambda function again.
If a Security Hub nextToken isn’t present, Step Functions ends the workflow successfully.
An EventBridge rule tracks changes in the status of the Step Functions workflow and sends events to an SNS topic. Subscribers to the SNS topic receive a notification when the status of the Step Functions workflow changes.
In your delegated administrator Security Hub account, launch the AWS CloudFormation template by choosing the following Launch Stack button. It will take about 10 minutes for the CloudFormation stack to complete.
Note: The stack will launch in the US East (N. Virginia) Region (us-east-1). If you are using cross-Region aggregation, deploy the solution into the Region where Security Hub findings are consolidated. You can download the CloudFormation template for the solution, modify it, and deploy it to your selected Region.
To deploy the solution (AWS CDK)
Download the code from our aws-security-hub-findings-historical-export GitHub repository, where you can also contribute to the sample code. The CDK initializes your environment and uploads the Lambda assets to Amazon S3. Then, you deploy the solution to your account.
While you are authenticated in the security tooling account, run the following commands in your terminal. Make sure to replace <AWS_ACCOUNT> with the account number, and replace <REGION> with the AWS Region where you want to deploy the solution. cdk bootstrap aws://<AWS_ACCOUNT>/<REGION> cdk deploy SechubHistoricalPullStack
Solution walkthrough and validation
Now that you’ve successfully deployed the solution, you can see each aspect of the automation workflow in action.
Before you start the workflow, you need to subscribe to the SNS topic so that you’re notified of status changes within the Step Functions workflow. For this example, you will use email notification.
Go to Topics and choose the Security_Hub_Export_Status topic.
Choose Create subscription.
For Protocol, choose Email.
For Endpoint, enter the email address where you want to receive notifications.
Choose Create subscription.
After you create the subscription, go to your email and confirm the subscription.
You’re now subscribed to the SNS topic, so any time that the Step Functions status changes, you will receive a notification. Let’s walk through how to run the export solution.
In the left navigation pane, choose State machines.
Choose the new state machine named sec_hub_finding_export.
Choose Start execution.
On the Start execution page, for Name – optional and Input – optional, leave the default values and then choose Start execution.
Figure 2: Example input values for execution of the Step Functions workflow
This will start the Step Functions workflow and redirect you to the Graph view. If successful, you will see that the overall Execution status and each step have a status of Successful.
For long-running jobs, you can view the CloudWatch log group associated with the Lambda function to view the logs.
To track the number of Security Hub findings that have been exported, open the Systems Manager console, choose Parameter Store, and then select the /sechubexport/findingcount parameter. Under Value, you will see the total number of Security Hub findings that have been exported, as shown in Figure 3.
Figure 3: Systems Manager Parameter Store value for the number of Security Hub findings exported
Depending on the number of Security Hub findings, this process can take some time. This is primarily due to the GetFindings quota of 3 requests per second. Each GetFindings request can return a maximum of 100 findings, so this means that you can get up to 300 findings per second. On average, the solution can export about 1 million findings per hour. If you have a large number of findings, you can start the finding export process and wait for the SNS topic to notify you when the process is complete.
How to customize the solution
The solution provides a general framework to help you export your historical Security Hub findings. There are many ways that you can customize this solution based on your needs. The following are some enhancements that you can consider.
Change the Security Hub finding filter
The solution currently pulls all findings with RecordState: ACTIVE, which pulls the active Security Hub findings in the AWS account. You can update the Lambda function code, specifically the finding_filter JSON value within the create_filter function, to pull findings for your use case. For example, to get all active Security Hub findings from the AWS Foundational Security Best Practices standard, update the Lambda function code as follows.
Export more than 100 million Security Hub findings
The example solution can export about 100 million Security Hub findings. This number is primarily determined by the speed at which findings can be exported, due to the following factors:
Implement a pattern by using a Lambda function to start a new execution of your state machine to split ongoing work across multiple workflow executions. For more information, see the tutorial Continuing Ongoing Work as a New Execution.
Note: If you implement either of these solutions, make sure that the nextToken also gets passed to the new Step Functions execution by updating the Lambda function code to parse and pass the nextToken received in the last request.
Speed up the export
One way to increase the export bandwidth, and reduce the overall execution time, is to run the export job in parallel across the individual Security Hub member accounts rather than from the single delegated administrator account.
You could use CloudFormation StackSets to deploy this solution in each Security Hub member account and send the findings to a centralized S3 bucket. You would need to modify the solution to allow an S3 bucket to be provided as an input, and all the Lambda function Identity and Access Management (IAM) roles would need cross-account access to the S3 bucket and corresponding AWS Key Management Service (AWS KMS) key. You would also need to make updates in each member account to iterate through the various Regions in which the Security Hub findings exist.
Next steps
The solution in this post is designed to assist in the retrieval and export of all existing findings currently in Security Hub. After you successfully run this solution to export historical findings, you can continuously export new Security Hub findings by using the sample solution in the aws-security-hub-findings-export GitHub repository.
In this post, you deployed a solution to export the existing Security Hub findings in your account to a central S3 bucket, so that you can apply complex analytics and machine learning to those findings. We walked you through how to use the solution and apply it to some example use cases after you successfully exported existing findings across your AWS environment. Now your security team can use the data in the S3 bucket for predictive analytics and determine if there are Security Hub findings and specific resources that might need to be prioritized for review due to a deviation from normal behavior. Additionally, you can use this solution to enable more complex analytics on multiple fields by querying large and complex datasets with AWS Athena.
If you have feedback about this post, submit comments in the Comments section below. If you have questions about this post, start a thread on AWS Security Hub re:Post.
Want more AWS Security news? Follow us on Twitter.
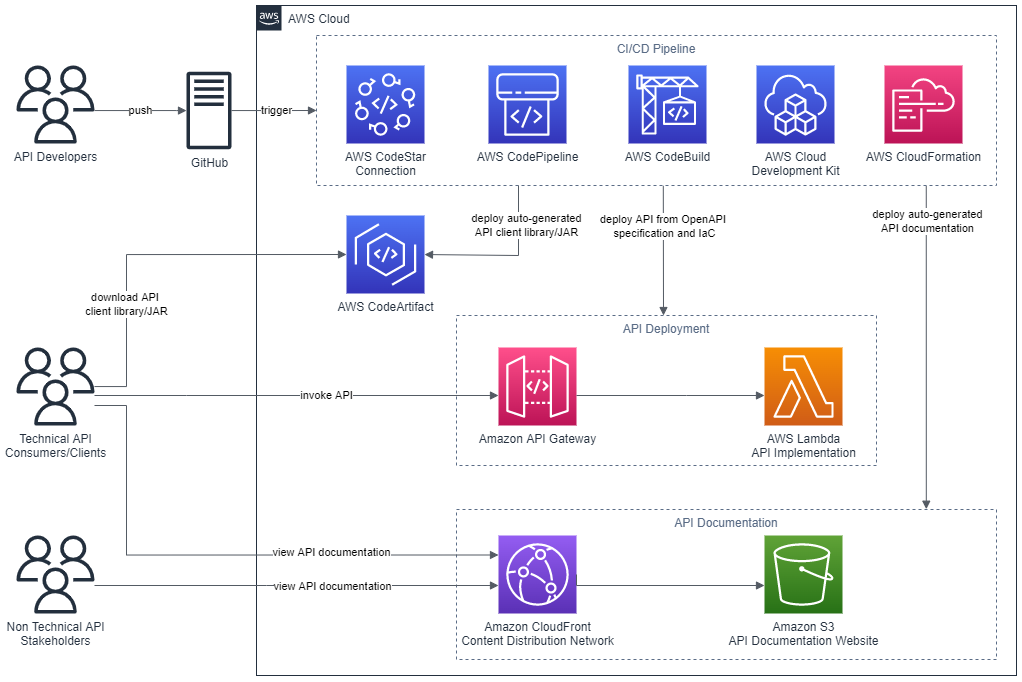
Deploy a RESTful API stage to Amazon API Gateway from an OpenAPI specification.
Build and deploy an AWS Lambda function that contains the API functionality.
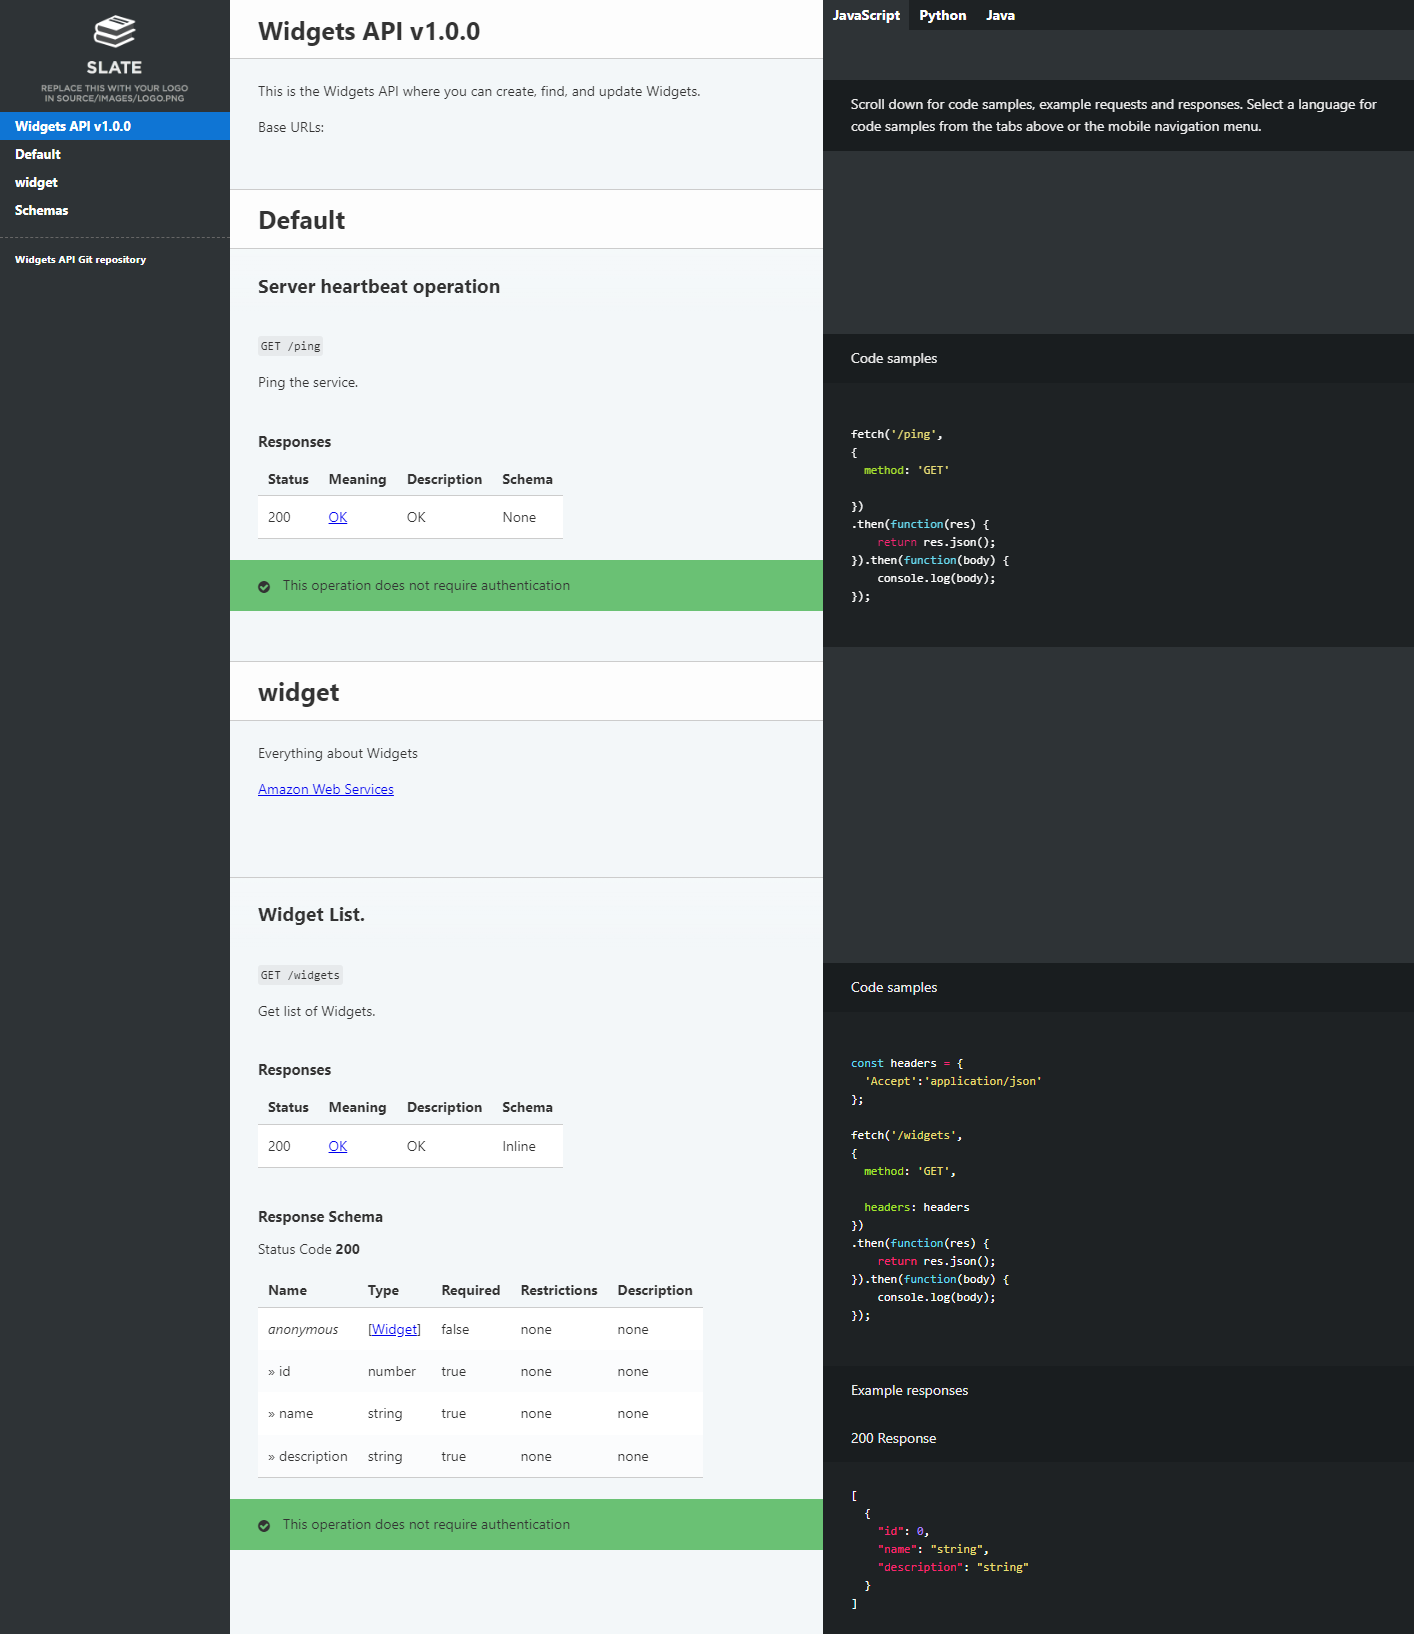
Auto-generate API documentation and publish it to an Amazon Simple Storage Service (Amazon S3)-hosted website served by the Amazon CloudFront content delivery network (CDN) service. This provides technical and non-technical stakeholders with versioned, current, and accessible API documentation.
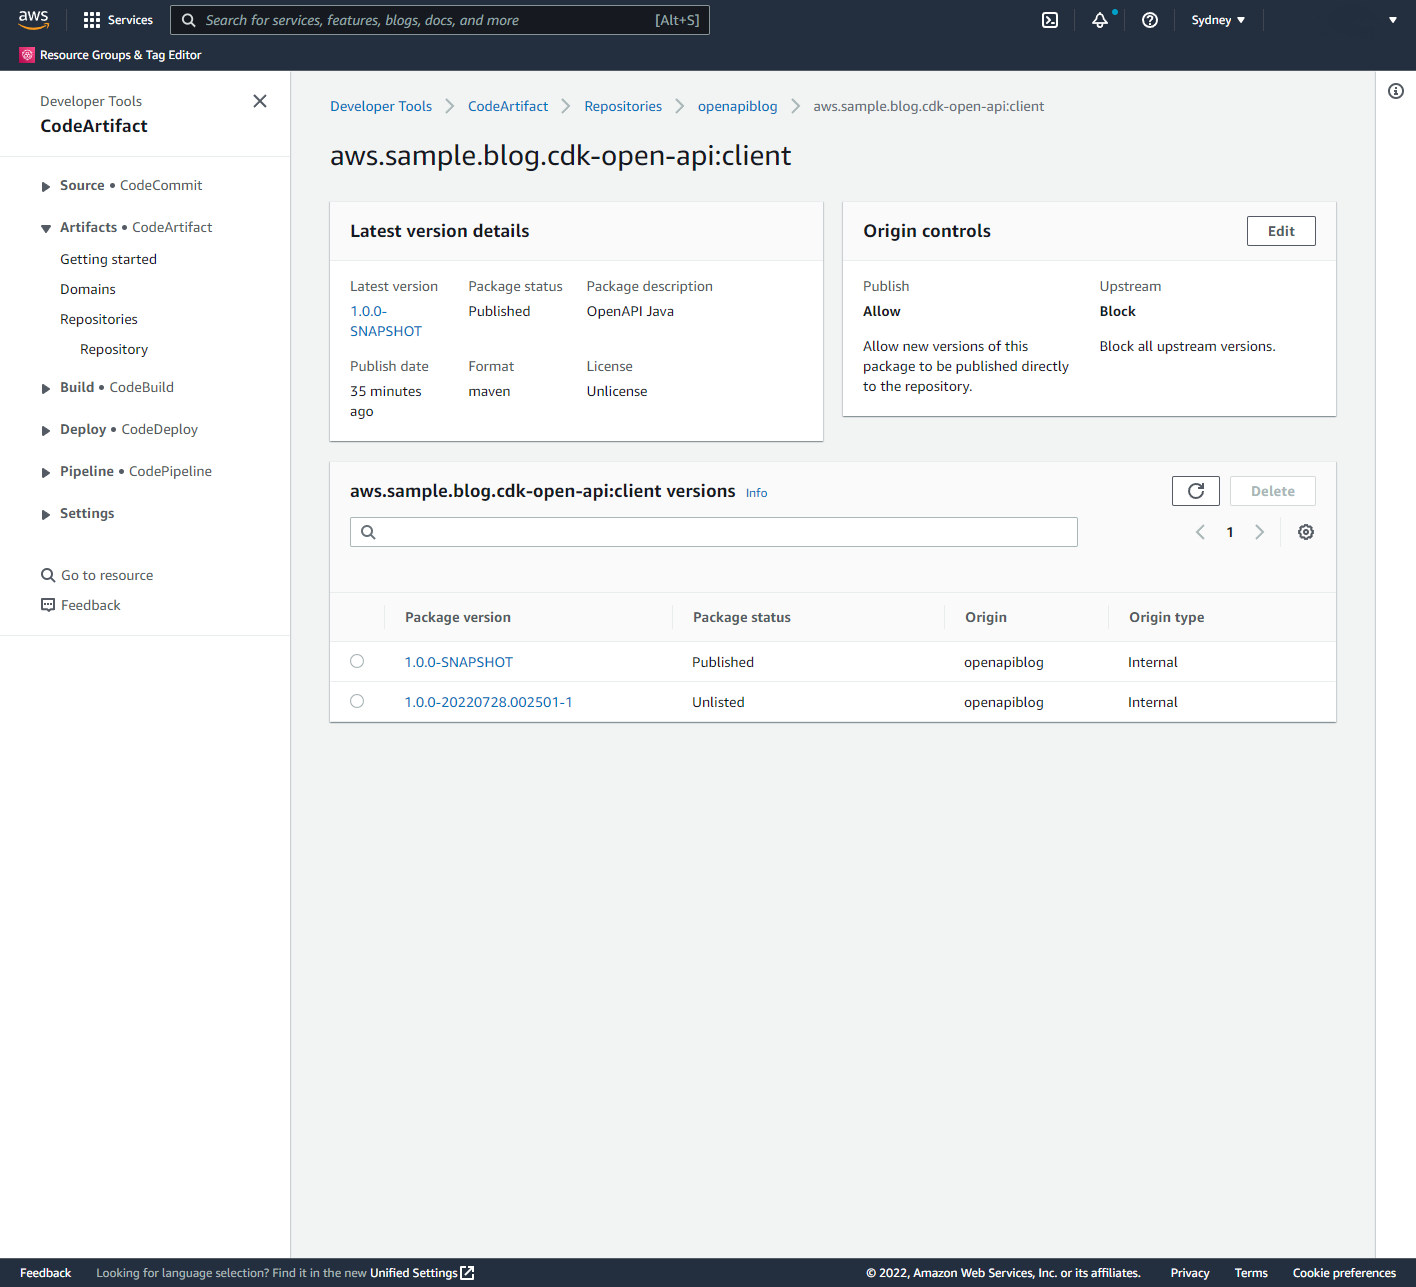
Auto-generate client libraries for invoking the API and deploy them to AWS CodeArtifact, which is a fully-managed artifact repository service. This allows API client development teams to integrate with different versions of the API in different environments.
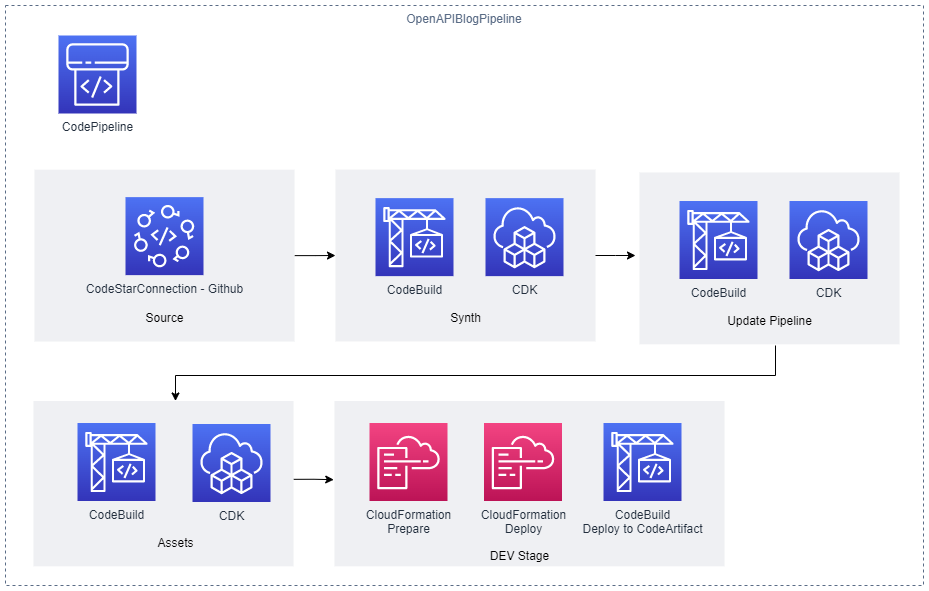
The diagram shown in the following figure depicts the architecture of the AWS services and resources described in this post.
Figure 1 – Architecture
The code that accompanies this post, written in Java, is available here.
Background
APIs must be understood by all stakeholders and parties within an enterprise including business areas, management, enterprise architecture, and other teams wishing to consume the API. Unfortunately, API definitions are often hidden in code and lack up-to-date documentation. Therefore, they remain inaccessible for the majority of the API’s stakeholders. Furthermore, it’s often challenging to determine what version of an API is present in different environments at any one time.
This post describes some solutions to these issues by demonstrating how to continuously deliver up-to-date and accessible API documentation, API client libraries, and API deployments.
AWS CDK
The AWS CDK is a software development framework for defining cloud IaC and is available in multiple languages including TypeScript, JavaScript, Python, Java, C#/.Net, and Go. The AWS CDK Developer Guide provides best practices for using the CDK.
This post uses the CDK to define IaC in Java which is synthesized to a cloud assembly. The cloud assembly includes one to many templates and assets that are deployed via an AWS CodePipeline pipeline. A unit of deployment in the CDK is called a Stack.
OpenAPI specifications describe the capabilities of an API and are both human and machine-readable. They consist of definitions of API components which include resources, endpoints, operation parameters, authentication methods, and contact information.
Project composition
The API project that accompanies this post consists of three directories:
app
api
cdk
app directory
This directory contains the code for the Lambda function which is invoked when the Widget API is invoked via API Gateway. The code has been developed in Java as an Apache Maven project.
The Quarkus framework has been used to define a WidgetResource class (see src/main/java/aws/sample/blog/cdkopenapi/app/WidgetResources.java ) that contains the methods that align with HTTP Methods of the Widget API. api directory
The api directory contains the OpenAPI specification file ( openapi.yaml ). This file is used as the source for:
The api directory also contains the following files:
openapi-generator-config.yaml : This file contains configuration settings for the OpenAPI Generator framework, which is described in the section CI/CD Pipeline.
maven-settings.xml: This file is used support the deployment of the generated SDKs or libraries (Apache Maven artifacts) for the API and is described in the CI/CD Pipeline section of this post.
This directory contains a sub directory called docker . The docker directory contains a Dockerfile which defines the commands for building a Docker image:
FROM ruby:2.6.5-alpine

RUN apk update \
 && apk upgrade --no-cache \
 && apk add --no-cache --repository http://dl-cdn.alpinelinux.org/alpine/v3.14/main/ nodejs=14.20.0-r0 npm \
 && apk add git \
 && apk add --no-cache build-base

# Install Widdershins node packages and ruby gem bundler
RUN npm install -g widdershins \
 && gem install bundler

# working directory
WORKDIR /openapi

# Clone and install the Slate framework
RUN git clone https://github.com/slatedocs/slate
RUN cd slate \
 && bundle install
The Docker image incorporates two open source projects, the NodeJS Widdershins library and the Ruby Slate-framework. These are used together to auto-generate the documentation for the API from the OpenAPI specification. This Dockerfile is referenced and built by the ApiStack class, which is described in the CDK Stacks section of this post.
cdk directory
This directory contains an Apache Maven Project developed in Java for provisioning the CDK stacks for the Widget API.
Under the src/main/java folder, the package aws.sample.blog.cdkopenapi.cdk contains the files and classes that define the application’s CDK stacks and also the entry point (main method) for invoking the stacks from the CDK Toolkit CLI:
CdkApp.java: This file contains the CdkApp class which provides the main method that is invoked from the AWS CDK Toolkit to build and deploy the application stacks.
ApiStack.java: This file contains the ApiStack class which defines the OpenApiBlogAPI stack and is described in the CDK Stacks section of this post.
PipelineStack.java: This file contains the PipelineStack class which defines the OpenAPIBlogPipeline stack and is described in the CDK Stacks section of this post.
ApiStackStage.java: This file contains the ApiStackStage class which defines a CDK stage. As detailed in the CI/CD Pipeline section of this post, a DEV stage, containing the OpenApiBlogAPI stack resources for a DEV environment, is deployed from the OpenApiBlogPipeline pipeline.
The ApiStack class defines multiple resources including:
Widget API Lambda function: This is bundled by the CDK in a Docker container using the Java 11 runtime image.
Widget REST API on API Gateway: The REST API is created from an Inline API Definition which is passed as an S3 CDK Asset. This asset includes a reference to the Widget API OpenAPI specification located under the api folder (see api/openapi.yaml ) and builds upon the SpecRestApi construct and API Gateway’s support for OpenApi.
API documentation Docker Image Asset: This is the Docker image that contains the open source frameworks (Widdershins and Slate) that are leveraged to generate the API documentation.
CDK Asset bundling functionality that leverages the API documentation Docker image to auto-generate documentation for the API.
An S3 Bucket for holding the API documentation website.
An origin access identity (OAI) which allows CloudFront to securely serve the S3 Bucket API documentation content.
The CDK, by default, auto-assigns an ID for each defined resource but in this case the generated ID is being overridden with “APILambda”. The reason for this is that inside of the Widget API OpenAPI specification (see api/openapi.yaml ), there is a reference to the Lambda function by name (“APILambda”) so that the function can be integrated as a proxy for each listed API path and method combination. The OpenAPI specification includes this name as a variable to derive the Amazon Resource Name (ARN) for the Lambda function:
The PipelineStack class defines a CDK CodePipline construct which is a higher level construct and pattern. Therefore, the construct doesn’t just map directly to a single CloudFormation resource, but provisions multiple resources to fulfil the requirements of the pattern. The post, CDK Pipelines: Continuous delivery for AWS CDK applications, provides more detail on creating pipelines with the CDK.
The diagram in the following figure shows the multiple CodePipeline stages and actions created by the CDK CodePipeline construct that is defined in the PipelineStack class.
Figure 2 – CI/CD Pipeline
The stages defined include the following:
Source stage: The pipeline is passed the source code contents from this stage.
Synth stage: This stage consists of a Synth Action that synthesizes the CloudFormation templates for the application’s CDK stacks and compiles and builds the project Lambda API function.
Update Pipeline stage: This stage checks the OpenAPIBlogPipeline stack and reinitiates the pipeline when changes to its definition have been deployed.
Assets stage: The application’s CDK stacks produce multiple file assets (for example, zipped Lambda code) which are published to Amazon S3. Docker image assets are published to a managed CDK framework Amazon Elastic Container Registry (Amazon ECR) repository.
DEV stage: The API’s CDK stack ( OpenApiBlogAPI ) is deployed to a hypothetical development environment in this stage. A post stage deployment action is also defined in this stage. Through the use of a CDK ShellStep construct, a Bash script is executed that deploys a generated client Java Archive (JAR) for the Widget API to CodeArtifact. The script employs the OpenAPI Generator project for this purpose:
To run this project, you must install the AWS CLI v2, the AWS CDK Toolkit CLI, a Java/JDK 11 runtime, Apache Maven, Docker, and a Git client. Furthermore, the AWS CLI must be configured for a user who has administrator access to an AWS Account. This is required to bootstrap the CDK in your AWS account (if not already completed) and provision the required AWS resources.
To build and run the project, perform the following steps:
Commit and push your changes back to your GitHub repository:
git push origin main
Change into the cdk directory and bootstrap the CDK in your AWS account if you haven’t already done so (enter “Y” when prompted):
cd cdk
cdk bootstrap
Deploy the CDK pipeline stack (enter “Y” when prompted):
cdk deploy OpenAPIBlogPipeline
Once the stack deployment completes successfully, the pipeline OpenAPIBlogPipeline will start running. This will build and deploy the API and its associated resources. If you open the Console and navigate to AWS CodePipeline, then you’ll see a pipeline in progress for the API.
Once the pipeline has completed executing, navigate to AWS CloudFormation to get the output values for the DEV-OpenAPIBlog stack deployment:
Select the DEV-OpenAPIBlog stack entry and then select the Outputs column. Record the REST_URL value for the key that begins with OpenAPIBlogRestAPIEndpoint .
Record the CLOUDFRONT_URL value for the key OpenAPIBlogCloudFrontURL .
The API ping method at https://<REST_URL>/ping can now be invoked using your browser or an API development tool like Postman. Other API other methods, as defined by the OpenApi specification, are also available for invocation (For example, GET https://<REST_URL>/widgets).
To view the generated API documentation, open a browser at https://< CLOUDFRONT_URL>.
The following figure shows the API documentation website that has been auto-generated from the API’s OpenAPI specification. The documentation includes code snippets for using the API from multiple programming languages.
Figure 3 – Auto-generated API documentation
To view the generated API client code artifact, open the Console and navigate to AWS CodeArtifact. The following figure shows the generated API client artifact that has been published to CodeArtifact.
Figure 4 – API client artifact in CodeArtifact
Cleaning up
From the command change to the cdk directory and remove the API stack in the DEV stage (enter “Y” when prompted):
cd cdk
cdk destroy OpenAPIBlogPipeline/DEV/OpenAPIBlogAPI
Once this has completed, delete the pipeline stack:
cdk destroy OpenAPIBlogPipeline
Delete the S3 bucket created to support pipeline operations. Open the Console and navigate to Amazon S3. Delete buckets with the prefix openapiblogpipeline .
Conclusion
This post demonstrates the use of the AWS CDK to deploy a RESTful API defined by the OpenAPI/Swagger specification. Furthermore, this post describes how to use the AWS CDK to auto-generate API documentation, publish this documentation to a web site hosted on Amazon S3, auto-generate API client libraries or SDKs, and publish these artifacts to an Apache Maven repository hosted on CodeArtifact.
The solution described in this post can be improved by:
Building and pushing the API documentation Docker image to Amazon ECR, and then using this image in CodePipeline API pipelines.
Creating stages for different environments such as TEST, PREPROD, and PROD.
Adding integration testing actions to make sure that the API Deployment is working correctly.
With more than 100 trillion objects in Amazon Simple Storage Service (Amazon S3) and an almost unimaginably broad set of use cases, securing data stored in Amazon S3 is important for every organization. So, we’ve curated the top 10 controls for securing your data in S3. By default, all S3 buckets are private and can be accessed only by users who are explicitly granted access through ACLs, S3 bucket policies, and identity-based policies. In this post, we review the latest S3 features and Amazon Web Services (AWS) services that you can use to help secure your data in S3, including organization-wide preventative controls such as AWS Organizations service control policies (SCPs). We also provide recommendations for S3 detective controls, such as Amazon GuardDuty for S3, AWS CloudTrail object-level logging, AWS Security Hub S3 controls, and CloudTrail configuration specific to S3 data events. In addition, we provide data protection options and considerations for encrypting data in S3. Finally, we review backup and recovery recommendations for data stored in S3. Given the broad set of use cases that S3 supports, you should determine the priority of controls applied in accordance with your specific use case and associated details.
Block public S3 buckets at the organization level
Designate AWS accounts for public S3 use and prevent all other S3 buckets from inadvertently becoming public by enabling S3 Block Public Access. Use Organizations SCPs to confirm that the S3 Block Public Access setting cannot be changed. S3 Block Public Access provides a level of protection that works at the account level and also on individual buckets, including those that you create in the future. You have the ability to block existing public access—whether it was specified by an ACL or a policy—and to establish that public access isn’t granted to newly created items. This allows only designated AWS accounts to have public S3 buckets while blocking all other AWS accounts. To learn more about Organizations SCPs, see Service control policies.
Use bucket policies to verify all access granted is restricted and specific
Check that the access granted in the Amazon S3 bucket policy is restricted to specific AWS principals, federated users, service principals, IP addresses, or VPCs that you provide. A bucket policy that allows a wildcard identity such as Principal “*” can potentially be accessed by anyone. A bucket policy that allows a wildcard action “*” can potentially allow a user to perform any action in the bucket. For more information, see Using bucket policies.
Ensure that any identity-based policies don’t use wildcard actions
Identity policies are policies assigned to AWS Identity and Access Management (IAM) users and roles and should follow the principle of least privilege to help prevent inadvertent access or changes to resources. Establishing least privilege identity policies includes defining specific actions such as S3:GetObject or S3:PutObject instead of S3:*. In addition, you can use predefined AWS-wide condition keys and S3‐specific condition keys to specify additional controls on specific actions. An example of an AWS-wide condition key commonly used for S3 is IpAddress: { aws:SourceIP: “10.10.10.10”}, where you can specify your organization’s internal IP space for specific actions in S3. See IAM.1 in Monitor S3 using Security Hub and CloudWatch Logs for detecting policies with wildcard actions and wildcard resources are present in your accounts with Security Hub.
Consider splitting read, write, and delete access. Allow only write access to users or services that generate and write data to S3 but don’t need to read or delete objects. Define an S3 lifecycle policy to remove objects on a schedule instead of through manual intervention— see Managing your storage lifecycle. This allows you to remove delete actions from your identity-based policies. Verify your policies with the IAM policy simulator. Use IAM Access Analyzer to help you identify, review, and design S3 bucket policies or IAM policies that grant access to your S3 resources from outside of your AWS account.
Enable S3 protection in GuardDuty to detect suspicious activities
In 2020, GuardDuty announced coverage for S3. Turning this on enables GuardDuty to continuously monitor and profile S3 data access events (data plane operations) and S3 configuration (control plane APIs) to detect suspicious activities. Activities such as requests coming from unusual geolocations, disabling of preventative controls, and API call patterns consistent with an attempt to discover misconfigured bucket permissions. To achieve this, GuardDuty uses a combination of anomaly detection, machine learning, and continuously updated threat intelligence. To learn more, including how to enable GuardDuty for S3, see Amazon S3 protection in Amazon GuardDuty.
Use Macie to scan for sensitive data outside of designated areas
In May of 2020, AWS re-launched Amazon Macie. Macie is a fully managed service that helps you discover and protect your sensitive data by using machine learning to automatically review and classify your data in S3. Enabling Macie organization wide is a straightforward and cost-efficient method for you to get a central, continuously updated view of your entire organization’s S3 environment and monitor your adherence to security best practices through a central console. Macie continually evaluates all buckets for encryption and access control, alerting you of buckets that are public, unencrypted, or shared or replicated outside of your organization. Macie evaluates sensitive data using a fully-managed list of common sensitive data types and custom data types you create, and then issues findings for any object where sensitive data is found.
Encrypt your data in S3
There are four options for encrypting data in S3, including client-side and server-side options. With server-side encryption, S3 encrypts your data at the object level as it writes it to disks in AWS data centers and decrypts it when you access it. As long as you authenticate your request and you have access permissions, there is no difference in the way you access encrypted or unencrypted objects.
The first two options use AWS Key Management Service (AWS KMS). AWS KMS lets you create and manage cryptographic keys and control their use across a wide range of AWS services and their applications. There are options for managing which encryption key AWS uses to encrypt your S3 data.
Server-side encryption with Amazon S3-managed encryption keys (SSE-S3). When you use SSE-S3, each object is encrypted with a unique key that’s managed by AWS. This option enables you to encrypt your data by checking a box with no additional steps. The encryption and decryption are handled for you transparently. SSE-S3 is a convenient and cost-effective option.
Server-side encryption with customer master keys (CMKs) stored in AWS KMS (SSE-KMS), is similar to SSE-S3, but with some additional benefits and costs compared to SSE-S3. There are separate permissions for the use of a CMK that provide added protection against unauthorized access of your objects in S3. SSE-KMS also provides you with an audit trail that shows when your CMK was used and by whom. SSE-KMS gives you control of the key access policy, which might provide you with more granular control depending on your use case.
In server-side encryption with customer-provided keys (SSE-C), you manage the encryption keys and S3 manages the encryption as it writes to disks and decryption when you access your objects. This option is useful if you need to provide and manage your own encryption keys. Keep in mind that you are responsible for the creation, storage, and tracking of the keys used to encrypt each object and AWS has no ability to recover customer-provided keys if they’re lost. The major thing to account for with SSE-C is that you must provide the customer-managed key every-time you PUT or GET an object.
Client-side encryption is another option to encrypt your data in S3. You can use a CMK stored in AWS KMS or use a master key that you store within your application. Client-side encryption means that you encrypt the data before you send it to AWS and that you decrypt it after you retrieve it from AWS. AWS doesn’t manage your keys and isn’t responsible for encryption or decryption. Usually, client-side encryption needs to be deeply embedded into your application to work.
Protect data in S3 from accidental deletion using S3 Versioning and S3 Object Lock
Amazon S3 is designed for durability of 99.999999999 percent of objects across multiple Availability Zones, is resilient against events that impact an entire zone, and designed for 99.99 percent availability over a given year. In many cases, when it comes to strategies to back up your data in S3, it’s about protecting buckets and objects from accidental deletion, in which case S3 Versioning can be used to preserve, retrieve, and restore every version of every object stored in your buckets. S3 Versioning lets you keep multiple versions of an object in the same bucket and can help you recover objects from accidental deletion or overwrite. Keep in mind this feature has costs associated. You may consider S3 Versioning in selective scenarios such as S3 buckets that store critical backup data or sensitive data.
With S3 Versioning enabled on your S3 buckets, you can optionally add another layer of security by configuring a bucket to enable multi-factor authentication (MFA) delete. With this configuration, the bucket owner must include two forms of authentication in any request to delete a version or to change the versioning state of the bucket.
S3 Object Lock is a feature that helps you mitigate data loss by storing objects using a write-once-read-many (WORM) model. By using Object Lock, you can prevent an object from being overwritten or deleted for a fixed time or indefinitely. Keep in mind that there are specific use cases for Object Lock, including scenarios where it is imperative that data is not changed or deleted after it has been written.
Enable logging for S3 using CloudTrail and S3 server access logging
Amazon S3 is integrated with CloudTrail. CloudTrail captures a subset of API calls, including calls from the S3 console and code calls to the S3 APIs. In addition, you can enable CloudTrail data events for all your buckets or for a list of specific buckets. Keep in mind that a very active S3 bucket can generate a large amount of log data and increase CloudTrail costs. If this is concern around cost then consider enabling this additional logging only for S3 buckets with critical data.
Server access logging provides detailed records of the requests that are made to a bucket. Server access logs can assist you in security and access audits.
Backup your data in S3
Although S3 stores your data across multiple geographically diverse Availability Zones by default, your compliance requirements might dictate that you store data at even greater distances. Cross-region replication (CRR) allows you to replicate data between distant AWS Regions to help satisfy these requirements. CRR enables automatic, asynchronous copying of objects across buckets in different AWS Regions. For more information on object replication, see Replicating objects. Keep in mind that this feature has costs associated, you might consider CCR in selective scenarios such as S3 buckets that store critical backup data or sensitive data.
Monitor S3 using Security Hub and CloudWatch Logs
Security Hub provides you with a comprehensive view of your security state in AWS and helps you check your environment against security industry standards and best practices. Security Hub collects security data from across AWS accounts, services, and supported third-party partner products and helps you analyze your security trends and identify the highest priority security issues.
The AWS Foundational Security Best Practices standard is a set of controls that detect when your deployed accounts and resources deviate from security best practices, and provides clear remediation steps. The controls contain best practices from across multiple AWS services, including S3. We recommend you enable the AWS Foundational Security Best Practices as it includes the following detective controls for S3 and IAM:
IAM.1: IAM policies should not allow full “*” administrative privileges. S3.1: Block Public Access setting should be enabled S3.2: S3 buckets should prohibit public read access S3.3: S3 buckets should prohibit public write access S3.4: S3 buckets should have server-side encryption enabled S3.5: S3 buckets should require requests to use Secure Socket layer S3.6: Amazon S3 permissions granted to other AWS accounts in bucket policies should be restricted S3.8: S3 Block Public Access setting should be enabled at the bucket level
If there is a specific S3 API activity not covered above that you’d like to be alerted on, you can use CloudTrail Logs together with Amazon CloudWatch for S3 to do so. CloudTrail integration with CloudWatch Logs delivers S3 bucket-level API activity captured by CloudTrail to a CloudWatch log stream in the CloudWatch log group that you specify. You create CloudWatch alarms for monitoring specific API activity and receive email notifications when the specific API activity occurs.
Conclusion
By using the ten practices described in this blog post, you can build strong protection mechanisms for your data in Amazon S3, including least privilege access, encryption of data at rest, blocking public access, logging, monitoring, and configuration checks.
Depending on your use case, you should consider additional protection mechanisms. For example, there are security-related controls available for large shared datasets in S3 such as Access Points, which you can use to decompose one large bucket policy into separate, discrete access point policies for each application that needs to access the shared data set. To learn more about S3 security, see Amazon S3 Security documentation.
Now that you’ve reviewed the top 10 security best practices to make your data in S3 more secure, make sure you have these controls set up in your AWS accounts—and go build securely!
If you have feedback about this post, submit comments in the Comments section below. If you have questions about this post, start a new thread on the Amazon S3 forum or contact AWS Support.
Want more AWS Security how-to content, news, and feature announcements? Follow us on Twitter.
In this post, we are introducing Netflix Drive, a Cloud drive for media assets and providing a high level overview of some of its features and interfaces. We intend this to be a first post in a series of posts covering Netflix Drive. In the future posts, we will do an architectural deep dive into the several components of Netflix Drive.
Netflix, and particularly Studio applications (and Studio in the Cloud) produce petabytes of data backed by billions of media assets. Several artists and workflows that may be globally distributed, work on different projects, and each of these projects produce content that forms a part of the large corpus of assets.
Here is an example of globally distributed production where several artists and workflows work in conjunction to create and share assets for one or many projects.
Fig 1: Globally distributed production with artists working on different assets from different parts of the world
There are workflows in which these artists may want to view a subset of these assets from this large dataset, for example, pertaining to a specific project. These artists may want to create personal workspaces and work on generating intermediate assets. To support such use cases, access control at the user workspace and project workspace granularity is extremely important for presenting a globally consistent view of pertinent data to these artists.
Netflix Drive aims to solve this problem of exposing different namespaces and attaching appropriate access control to help build a scalable, performant, globally distributed platform for storing and retrieving pertinent assets.
Netflix Drive is envisioned to be a Cloud Drive for Studio and Media applications and lends itself to be a generic paved path solution for all content in Netflix.
It exposes a file/folder interface for applications to save their data and an API interface for control operations. Netflix Drive relies on a data store that will be the persistent storage layer for assets, and a metadata store which will provide a relevant mapping from the file system hierarchy to the data store entities. The major pieces, as shown in Fig. 2, are the file system interface, the API interface, and the metadata and data stores. We will delve into these in the following sections.
Fig 2: Netflix Drive components
File interface for Netflix Drive
Creative applications such as Nuke, Maya, Adobe Photoshop store and retrieve content using files and folders. Netflix Drive relies on FUSE (File System In User Space) to provide POSIX files and folders interface to such applications. A FUSE based POSIX interface provides feature customization elasticity, deployment configuration flexibility as well as a standard and seamless file/folder interface. A similar user space abstraction is available for Windows (WinFSP) and MacOS (MacFUSE)
The operations that originate from user, application and system actions on files and folders translate to a well defined set of function and system calls which are forwarded by the Linux Virtual File System Layer (or a pass-through/filter driver in Windows) to the FUSE layer in user space. The resulting metadata and data operations will be implemented by appropriate metadata and data adapters in Netflix Drive.
Fig 3: POSIX interface of Netflix Drive
The POSIX files and folders interface for Netflix Drive is designed as a layered system with the FUSE implementation hooks forming the top layer. This layer will provide entry points for all of the relevant VFS calls that will be implemented. Netflix Drive contains an abstraction layer below FUSE which allows different metadata and data stores to be plugged into the architecture by having their corresponding adapters implement the interface. We will discuss more about the layered architecture in the section below.
API Interface for Netflix Drive
Along with exposing a file interface which will be a hub of all abstractions, Netflix Drive also exposes API and Polled Task interfaces to allow applications and workflow tools to trigger control operations in Netflix Drive.
For example, applications can explicitly use REST endpoints to publish files stored in Netflix Drive to cloud, and later use a REST endpoint to retrieve a subset of the published files from cloud. The API interface can also be used to track the transfers of large files and allows other applications to be built on top of Netflix Drive.
Fig 4: Control interface of Netflix Drive
The Polled Task interface allows studio and media workflow orchestrators to post or dispatch tasks to Netflix Drive instances on disparate workstations or containers. This allows Netflix Drive to be bootstrapped with an empty namespace when the workstation comes up and dynamically project a specific set of assets relevant to the artists’ work sessions or workflow stages. Further these assets can be projected into a namespace of the artist’s or application’s choosing.
Alternatively, workstations/containers can be launched with the assets of interest prefetched at startup. These allow artists and applications to obtain a workstation which already contains relevant files and optionally add and delete asset trees during the work session. For example, artists perform transformative work on files, and use Netflix Drive to store/fetch intermediate results as well as the final copy which can be transformed back into a media asset.
Bootstrapping Netflix Drive
Given the two different modes in which applications can interact with Netflix Drive, now let us discuss how Netflix Drive is bootstrapped.
On startup, Netflix Drive expects a manifest that contains information about the data store, metadata store, and credentials (tied to a user login) to form an instance of namespace hierarchy. A Netflix Drive mount point may contain multiple Netflix Drive namespaces.
A dynamic instance allowsNetflix Drive to show a user-selected and user-accessible subset of data from a large corpus of assets. A user instance allows it to act like a Cloud Drive, where users can work on content which is automatically synced in the background periodically to Cloud. On restart on a new machine, the same files and folders will be prefetched from the cloud. We will cover the different namespaces of Netflix Drive in more detail in a subsequent blog post.
Here is an example of a typical bootstrap manifest file.
A sample manifest file.
The manifest is a persistent artifact which renders a user workstation its Netflix Drive personality. It survives instance failures and is able to recreate the same stateful interface on any newly deployed instance.
Metadata and Data Store Abstractions
In order to allow a variety of different metadata stores and data stores to be easily plugged into the architecture, Netflix Drive exposes abstract interfaces for both metadata and data stores. Here is a high level diagram explaining the different layers of abstractions in Netflix Drive
Fig 5: Layered architecture of Netflix Drive
Metadata Store Characteristics
Each file in Netflix Drive would have one or many corresponding metadata nodes, corresponding to different versions of the file. The file system hierarchy would be modeled as a tree in the metadata store where the root node is the top level folder for the application.
Each metadata node will contain several attributes, such as checksum of the file, location of the data, user permissions to access data, file metadata such as size, modification time, etc. A metadata node may also provide support for extended attributes which can be used to model ACLs, symbolic links, or other expressive file system constructs.
Metadata Store may also expose the concept of workspaces, where each user/application can have several workspaces, and can share workspaces with other users/applications. These are higher level constructs that are very useful to Studio applications.
Data Store Characteristics
Netflix Drive relies on a data store that allows streaming bytes into files/objects persisted on the storage media. The data store should expose APIs that allow Netflix Drive to perform I/O operations. The transfer mechanism for transport of bytes is a function of the data store.
In the first manifestation, Netflix Drive is using an object store (such as Amazon S3) as a data store. In order to expose file store-like properties, there were some changes needed in the object store. Each file can be stored as one or more objects. For Studio applications, file sizes may exceed the maximum object size for Cloud Storage, and so, the data store service should have the ability to store multiple parts of a file as separate objects. It is the responsibility of the data store service to tie these objects to a single file and inform the metadata store of the single unique Id for these several object parts. This Data store internally implements the chunking of file into several parts, encrypting of the content, and life cycle management of the data.
Multi-tiered architecture
Netflix Drive allows multiple data stores to be a part of the same installation via its bootstrap manifest.
Fig 6: Multiple data stores of Netflix Drive
Some studio applications such as encoding and transcoding have different I/O characteristics than a typical cloud drive.
Most of the data produced by these applications is ephemeral in nature, and is read often initially. The final encoded copy needs to be persisted and the ephemeral data can be deleted. To serve such applications, Netflix Drive can persist the ephemeral data in storage tiers which are closer to the application that allow lower read latencies and better economies for read request, since cloud storage reads incur an egress cost. Finally, once the encoded copy is prepared, this copy can be persisted by Netflix Drive to a persistent storage tier in the cloud. A single data store may also choose to archive some subset of content stored in cheaper alternatives.
Security
Studio applications require strict adherence to security models where only users or applications with specific permissions should be allowed to access specific assets. Security is one of the cornerstones of Netflix Drive design. Netflix Drive dynamic namespace design allows an artist or workflow to access only a small subset of the assets based on the workspace information and access control and is one of the benefits of using Netflix Drive in Studio workflows. Netflix Drive encapsulates the authentication and authorization models in its metadata store. These are translated into POSIX ACLs in Netflix Drive. In the future, Netflix Drive can allow more expressive ACLs by leveraging extended attributes associated with Metadata nodes corresponding to an asset.
Netflix Drive is currently being used by several Studio teams as the paved path solution for working with assets and is integrated with several media suite applications. As of today, Netflix Drive can be installed on CentOS, MacOS and Windows. In the future blog posts, we will cover implementation details, learnings, performance analysis of Netflix Drive, and some of the applications and workflows built on top of Netflix Drive.
If you are passionate about building Storage and Infrastructure solutions for Netflix Data Platform, we are always looking for talented engineers and managers. Please check out our job listings
Netflix Drive was originally published in Netflix TechBlog on Medium, where people are continuing the conversation by highlighting and responding to this story.
The collective thoughts of the interwebz
Manage Consent
To provide the best experiences, we use technologies like cookies to store and/or access device information. Consenting to these technologies will allow us to process data such as browsing behavior or unique IDs on this site. Not consenting or withdrawing consent, may adversely affect certain features and functions.
Functional
Always active
The technical storage or access is strictly necessary for the legitimate purpose of enabling the use of a specific service explicitly requested by the subscriber or user, or for the sole purpose of carrying out the transmission of a communication over an electronic communications network.
Preferences
The technical storage or access is necessary for the legitimate purpose of storing preferences that are not requested by the subscriber or user.
Statistics
The technical storage or access that is used exclusively for statistical purposes.The technical storage or access that is used exclusively for anonymous statistical purposes. Without a subpoena, voluntary compliance on the part of your Internet Service Provider, or additional records from a third party, information stored or retrieved for this purpose alone cannot usually be used to identify you.
Marketing
The technical storage or access is required to create user profiles to send advertising, or to track the user on a website or across several websites for similar marketing purposes.