Tag Archives: SSD 101

SSD 101: How to Upgrade Your Computer With an SSD

Post Syndicated from Andy Klein original https://www.backblaze.com/blog/ssd-upgrade-guide/

A decorative image showing an a hard drive and a solid state drive.
Editor’s note: Since it was published in 2019, this post has been updated in 2021 and 2023 with the latest information to help you take advantage of SSDs.

Solid-state drives (SSDs) have become the norm for most laptops and desktops, replacing the older hard disk drives (HDDs) that had been in use for decades previously. If your computer still relies on an HDD, it might be time to consider upgrading to an SSD for improved performance.

Upgrading to an SSD can give your computer a significant speed and responsiveness boost, especially if your machine is more than a few years old. However, before taking the plunge, it’s essential to weigh practical considerations. Let’s take a closer look at SSDs and the factors you should consider.

What Is an SSD?

An SSD is a type of data storage device used in computers and other electronic devices. Unlike traditional HDDs, which use spinning disks and mechanical read/write heads to store and retrieve data, SSDs rely on NAND-based flash memory to store information. This flash memory is similar to the kind used in USB drives and memory cards, but it’s optimized for higher performance and reliability.

Refresher: What Is NAND?

NAND stands for “Not And.” It’s a type of logic gate used in digital circuits, specifically in memory and storage devices. In the context of NAND-based flash memory used in SSDs, the term NAND refers to the electronic structure of the memory cells that store data. The name NAND comes from its logical operation, which is the complement of the AND operation. NAND flash memory is a type of non-volatile storage, meaning it retains data even when the power is turned off, which makes it well-suited for use with things like SSDs and other data storage devices. That’s different from the regular RAM in your computer, which is reset when you turn off or restart the computer.

Compared to HDDs, SSDs are more shock resistant (due to their lack of moving parts) and are less likely to be affected by magnetic fields. They also offer faster data access times, quicker boot-up and application load times, and better overall responsiveness. 

A photo of the internal hardware of a 2.5"SSD. Captions indicate where the cache, controller, and memory are, and that it is shock resistant up to 1500g.

For more about the differences between HDDs and SSDs, check out Hard Disk Drive vs. Solid State Drive: What’s the Diff? or our two-part series, HDD vs. SSD: What Does the Future for Storage Hold?.

Why Upgrade to an SSD?

Because of their speed and efficiency, SSDs have become the preferred choice for many computing applications, ranging from laptops and desktops to servers and data centers. They are especially useful in situations where speed and reliability are crucial, such as in gaming, content creation, and tasks involving large data transfers. Despite typically offering less storage capacity compared to HDDs of similar cost, SSD performance benefits often outweigh the storage trade-off, making them a popular choice.

Depending on the task at hand, SSDs can be up to 10 times faster than their HDD counterparts. Replacing your hard drive with an SSD is one of the best things you can do to dramatically improve the performance of your older computer.

A photo of a Samsung 2.5" SSD.
Samsung 870 QVO SATA III 2.5″ SSD 1TB.

Without any moving parts, SSDs operate more quietly, more efficiently, and with fewer breakable things than hard drives that have spinning platters. Read and write speeds for SSDs are much better than hard drives, resulting in noticeably faster operations.

For you, that means less time waiting for stuff to happen. An SSD is worth looking into if you’re frequently seeing a spinning wheel cursor on your computer screen. Modern operating systems rely more on virtual memory management, utilizing temporary swap files that are written to the disk. A faster SSD minimizes the performance impact caused by this process.

If you have just one drive in your laptop or desktop, you could replace an HDD or small SSD with a 1TB SSD for less than $40. For those dealing with substantial amounts of data, concentrating on replacing the drive that houses your operating system and applications can yield a significant speed boost. Put your working data on additional internal or external hard drives, and you’re ready to tackle a mountain of photos, videos, or supersized databases. Just be sure to implement a backup plan to make sure you keep a copy of that data safe on additional local drives, network attached drives, or in the cloud.

Are There Any Reasons Not to Upgrade to an SSD?

If SSDs are so much better than hard drives, why aren’t all drives SSDs? The two biggest reasons are cost and capacity. SSDs are more expensive than hard drives. A 1TB SSD or HDD now cost about the same, $30–$50, with HDDs being slightly less, maybe around $25. 

That’s not much of a difference, but as drive capacity gets larger, the cost differential gets increasingly larger. For example, an 8TB HDD drive runs $120–$180, while 8TB SSDs start at around $350. In short, while upgrading the 1TB internal hard drive on your computer to an SSD is cost effective, the same may not be true for replacing larger capacity drives, like those used in external drives, unless the increased speed is worth the increased cost.

Whether your computer can use an SSD is another question. It all depends on the computer’s age and how it was designed. Let’s take a look at that question next.

How Do You Upgrade to an SSD?

Does your computer use a regular off-the-shelf SATA HDD? If so, you can upgrade it with an SSD. 

SSDs are compatible with both Macs and PCs. All current Mac laptops come with SSDs. Both iMacs and Mac Pros come with SSDs as well. Around 2010, Apple started moving to only SSD storage on most of its devices. That said, some Mac desktop computers continued to offer the option of both SSD and HDD storage until 2020, a setup they called a Fusion Drive

Note that as of November 2021, Apple does not offer any Macs with a Fusion Drive. Basically, if you bought your device before 2010 or you have a desktop computer from 2021 or earlier, there’s a chance you may be using an HDD.

Determine Your Disk Type in a Mac

To determine what kind of drive your Mac uses, click on the Apple menu and select About This Mac. 

Avoid the pitfall of selecting the Storage tab in the top menu. What you’ll find is that the default name of your drive is “Macintosh HD” which is confusing, given that they’re referring to the internal storage of the computer as a hard drive when (in most cases), your drive is an SSD. While you can find information about your drive on this screen, we prefer the method that provides maximum clarity. 

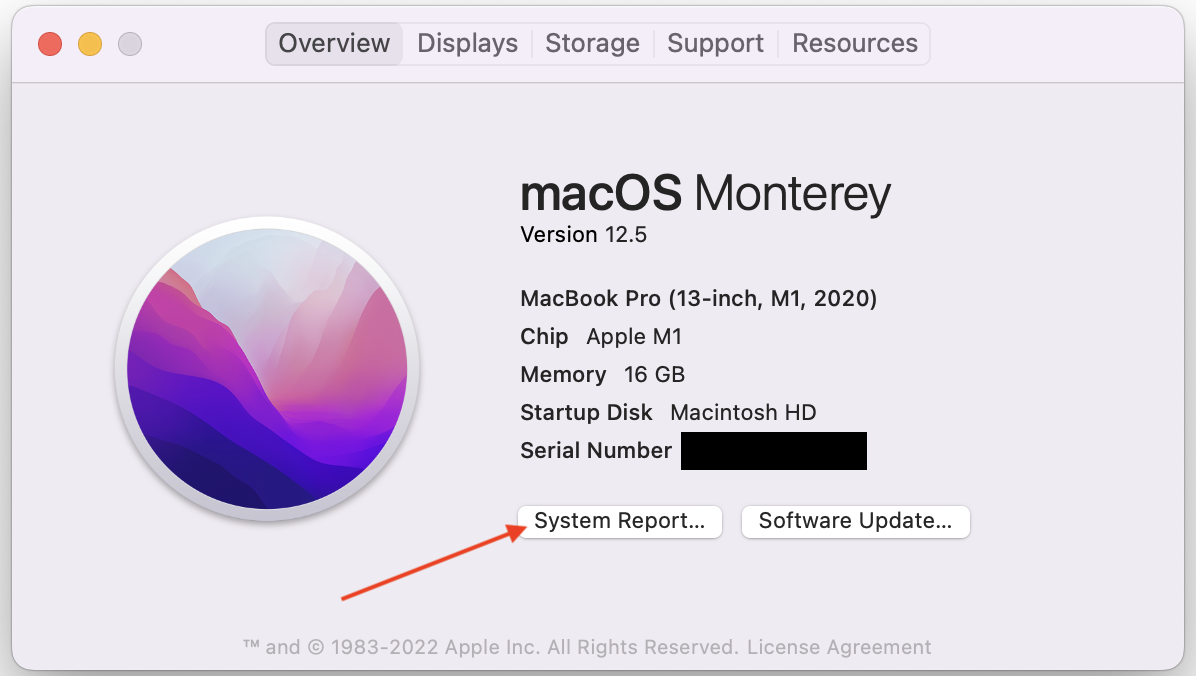
So, on the Overview screen, click System Report. Bonus: You’ll also see what type of processor you have and your macOS version (which will be useful later).

A screenshot of the about this Mac overview tab.

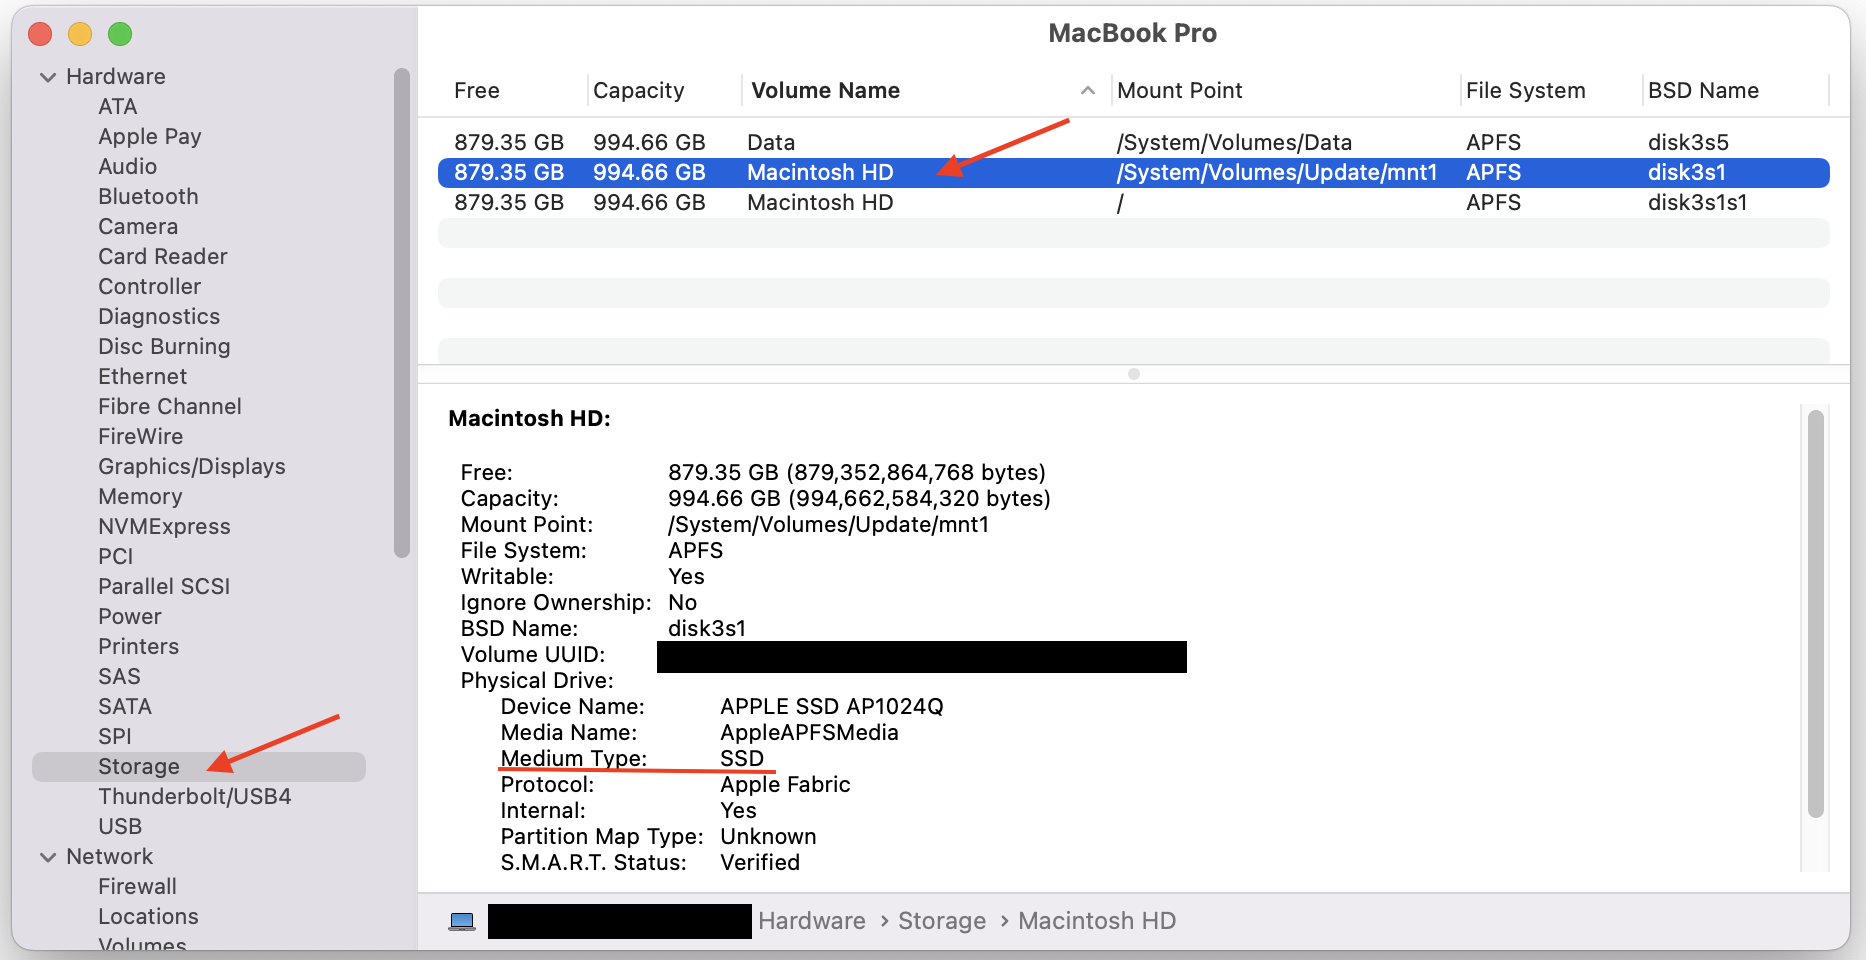
Once there, select the Storage tab, then the volume name you want to identify. You should see a line called Medium Type, which will tell you what kind of drive you have. 

A screenshot of the storage tab under the Mac System Report screen.

Determine Your Disk Type in a PC

To determine your disk type in a Windows PC, first open the Task Manager in Windows:

  1. Right-click the Start button and click Run. In the Run Command window, type dfrgui and click OK.
A screenshot of the run screen in a Windows computer.
  1. On the next screen, the type of drive will be listed under the Media Type column.
A screenshot of a Windows computer Optimize Drives window.

Can I Upgrade to a Better SSD?

Even if your computer already has an SSD, you may be able to upgrade it with a larger, faster SSD model. Besides SATA-based hard drive replacements, some later model PCs can be upgraded with M.2 SSDs, which look more like RAM chips than hard drives. 

Some Apple laptops made before 2016 that already shipped with SSDs can be upgraded with larger ones. However, you will need to upgrade to a Mac-specific SSD. Check Other World Computing and Transcend to find ones designed to work. Apple laptop models made after 2016 have SSDs soldered to the motherboard, so you’re stuck with what you have.

A photo of an M.2 SSD.
M.2 SSD.

How to Install an SSD

If you’re comfortable tinkering with your computer’s guts, upgrading it with an SSD is a pretty common do-it-yourself project. Many companies offer hassle-free plug-and-play SSD replacements. Check out Amazon or NewEgg and you’ll have an embarrassment of riches. The choice is yours: Samsung, SanDisk, Crucial, and Toshiba are all popular SSD makers. There are many others, too.

However, if computer hardware isn’t your forte, it might not be worth the effort to learn from scratch. SSD upgrades are such a common aftermarket improvement most independent computer repair and service specialists will take on the task if you’re willing to pay them. Some throw in a data transfer if you’re lucky, or a skilled negotiator. Ask your friends and colleagues for recommendations. You can also hit up services like Angi to find someone.

If you are DIY inclined, YouTube has tons of walkthroughs like this one for desktop PCs, this one for laptops, and this one aimed at Mac users.

A photo of an HDD/SSD ot 3.5" drive bay adapter.
HDD/SSD to 3.5″ drive bay adapter.

Many SSDs replace 2.5 inch HDDs. Those are the same drives you find in laptop computers and even small desktop models. Have a desktop computer that uses a 3.5 inch hard drive? You may need to use a 2.5 inch to 3.5 inch mounting adapter.

A Word on SSD Compatibility

Beyond the drive size, it’s a good idea to check to see if the SSD you want to buy is compatible with your laptop or desktop, especially if your system is older than a couple of years. Here are articles from Tom’s Hardware and ShareUs which can help with that.

How to Migrate to an SSD

Buying a replacement SSD is the first step. Moving your data onto the SSD is the next step. To achieve this, you need two essential components: cloning software and an external drive case, sled, or enclosure. These tools enable you to connect your SSD to your computer through its USB port or another data transfer interface.

Cloning software creates an exact replica of your internal hard drive’s data. Once this data is successfully migrated to the SSD, you can then insert the new drive into your computer. I prefer to clone a hard drive onto an SSD whenever possible. When executed correctly, a cloned SSD retains its bootable capabilities, providing a true plug-and-play experience. Just copying files between the two drives instead may not copy all the data you need to get the computer to boot with the new drive.

How to Clone a Hard Drive to an SSD

When you buy a new SSD or even a fresh hard drive, it’s unlikely that the operating system you need will be pre-installed. Cloning your existing hard drive fixes that. However, there are instances where this may not be feasible. For example, maybe you’ve installed the SSD in a computer that previously had a bad hard drive. If so, you can do what’s called a clean install and start fresh. Different operating system providers offer distinct guidelines for this procedure. Here’s a link to Microsoft’s clean install procedure, and Apple’s clean install instructions.

As we said at the outset, SSDs tend to come at a higher cost per gigabyte compared to traditional hard drives. You may not be able to afford as large an SSD as your current drive, so make sure your data will fit on your new drive. If it won’t, you might have to pare down first. Additionally, it’s wise to leave some room for expansion. The last thing you want to do is immediately max out your new, fast drive.

Now that you’ve successfully cloned your drive and integrated the SSD into your system, what do you do with the old drive? If it’s still functional, repurposing the external drive chassis utilized during migration is a practical option. It can continue to serve as a standalone external drive or become part of a disk array, such as a network attached storage (NAS) device. You can use it for local back up—something we strongly recommend doing—in addition to using cloud back up like Backblaze. Or, just use it for extra storage needs, like for your photos or music.

Make Sure to Back Up

SSD upgrades are commonplace, but that doesn’t mean things don’t go wrong that can stop you dead in your tracks. If your computer is working fine before the SSD upgrade, make sure you have a complete backup of your computer to restore from in the event something goes wrong.

More Questions About SSDs?

You might enjoy reading other posts in our SSD 101 series.

The post SSD 101: How to Upgrade Your Computer With an SSD appeared first on Backblaze Blog | Cloud Storage & Cloud Backup.

Guide to How to Wipe a Mac or Macbook Clean

Post Syndicated from Stephanie Doyle original https://www.backblaze.com/blog/how-to-wipe-a-mac-hard-drive/

A decorative image showing two computers next to a cloud with the Backblaze logo.
This post was originally published in 2016. We’re sharing an update to this post to provide the latest information on how to wipe your Mac.

You’re about to upgrade your Mac. Maybe you want to sell it or trade it in, and maybe you’re just throwing it out—either way, you likely still have plenty of personal data on your old computer. Getting rid of that data isn’t straightforward, and it is important. Sure, you could live out the famous printer destruction scene from the movie “Office Space” and smash the computer to pieces. As satisfying as that might be, there are better ways to wipe your Mac clean. 

While there used to be two separate processes for wiping your Mac clean based on whether your computer had a hard disk drive (HDD) or a solid state drive (SSD), instructions for how to wipe your Mac are now based on your Mac’s processing chip—a Mac or an Intel-based chip. 

Do You Need to Know What Type of Drive You Have?

Around 2010, Apple started moving to only SSD storage in many of its devices. That said, some Mac desktop computers continued to offer the option of both SSD and HDD storage until 2020, a setup they called a Fusion Drive. The Fusion Drive is not to be confused with flash storage, a term that refers to the internal storage that holds your readily available and most accessed data at lower power settings. 

Note that as of November 2021, Apple does not offer any Macs with a Fusion Drive. Basically, if you bought your device before 2010 or you have a desktop computer from 2021 or earlier, there’s a chance you may be using an HDD. 

The good news here is twofold. First, it’s pretty simple to figure out what kind of drive you have, and we’ll detail those steps below (just in case you’re one of those HDD holdouts). Second, Mac’s Help Center directions to wipe your Mac are bifurcated not around your drive type, but around what internal performance chip you’re using (Mac or Intel). Over the years, updates to the Mac operating system (macOS, or OS for general purposes) have made it much easier to wipe your Mac clean, but if you have an older OS, you may have to follow slightly different instructions. 

HDDs and SSDs: What’s The Difference?

There are good reasons that Apple switched to using mostly SSDs, and good reasons they kept HDDs around for as long as they did as well. If you want to know more about the differences in drive types, check out Hard Disk Drive (HDD) vs. Solid State Drive (SSD): What’s the Difference?

So, What Kind of Drive Do You Have?

To determine what kind of hard drive your Mac uses, click on the Apple menu and select About This Mac. 

Avoid the pitfall of selecting the Storage tab in the top menu. What you’ll find is that the default name of your drive is “Macintosh HD” which is confusing, given that they’re referring to the internal storage of the computer as a hard drive when (in most cases), your hard drive is an SSD. While you can find information about your drive on this screen, we prefer the method that provides maximum clarity. 

So, on the Overview screen, click System Report. Bonus: You’ll also see what type of processor you have and your macOS version (which will be useful later). 

A screenshot of the Mac System Report, Overview tab.

Once there, select the Storage tab, then the volume name you want to identify. You should see a line called Medium Type, which will tell you what kind of drive you have. 

A screenshot of the Mac System report > Storage screen.

Identify Your Processing Chip

In November 2020, Apple launched its first Macs equipped with M1 chips, replacing the Intel-based processors of the past. The evolution of the M-series Apple chips has been notable largely for performance enhancements, but given that (at the time of publishing) this was only three years ago, there’s a good chance that many users will have an Intel processor. 

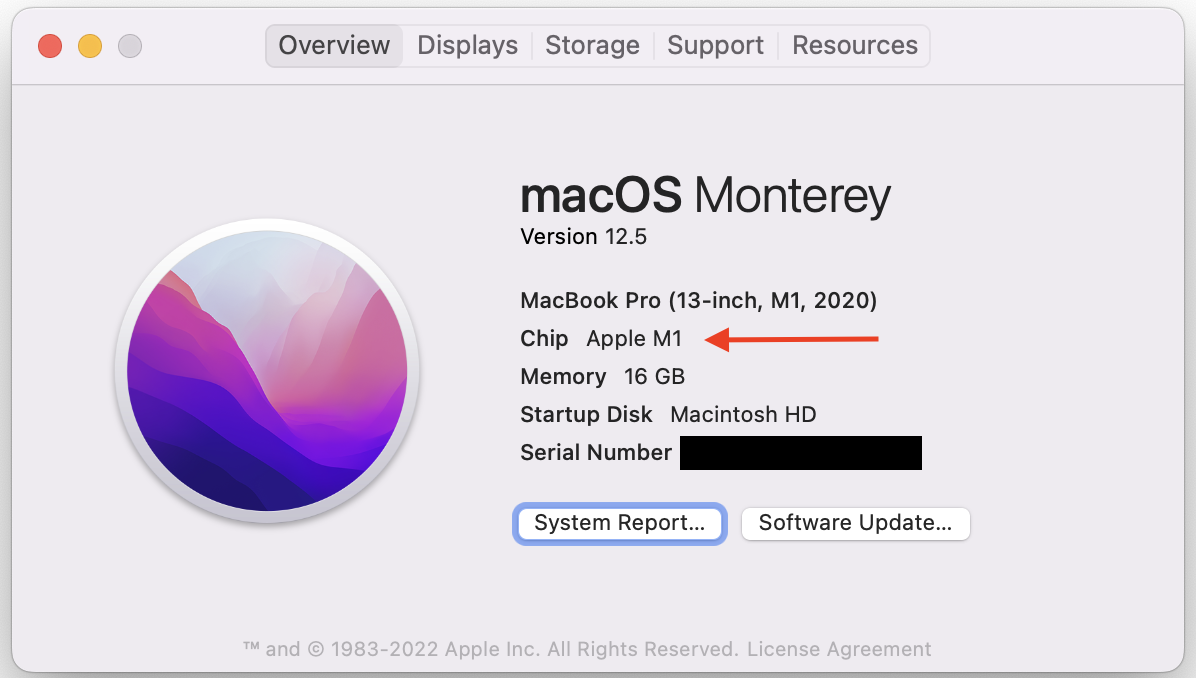
To see what kind of chip you have, follow the same instructions as above—go to your Apple menu and select About This Mac. If you have an M-series chip, you’ll see that listed as marked in the screenshot below.

A screenshot of the Mac System report > overview page.

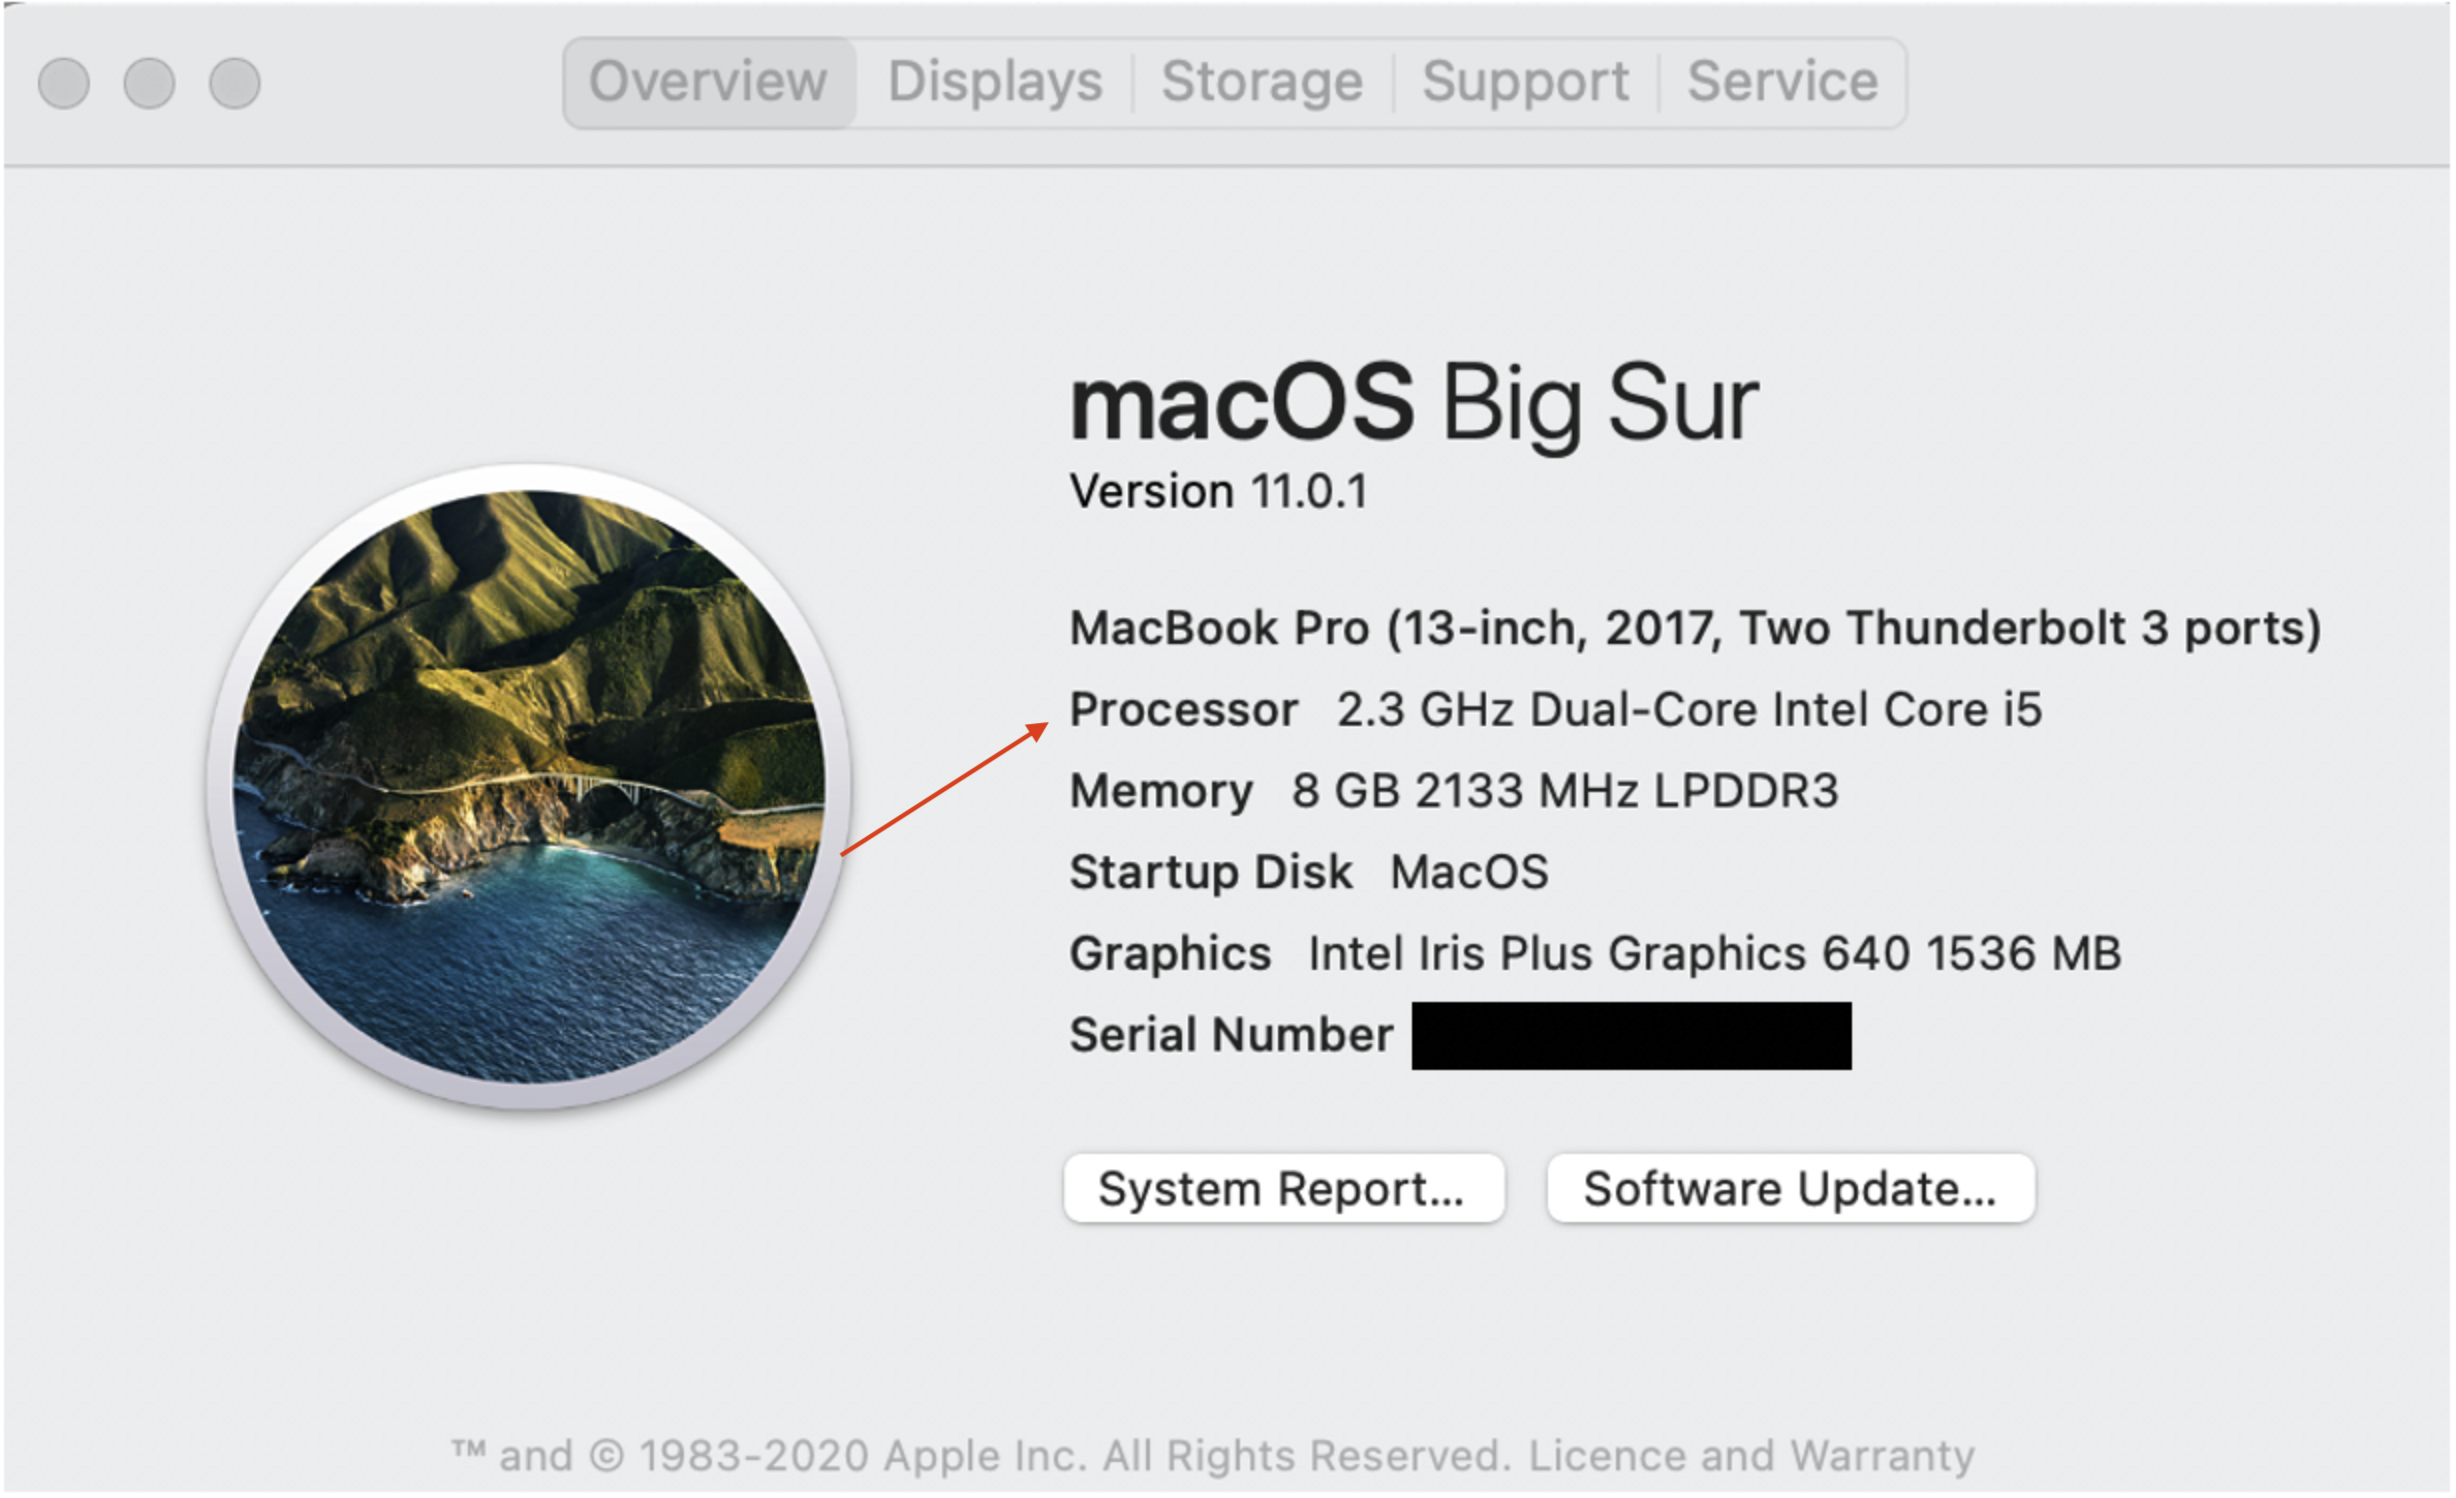
If you have an Intel-based Mac, you will see Processor, followed by the name of an Intel processor.

A screenshot of the Mac System Report > Overview pane on an Intel-based Mac.

Now You Need to Know Your Mac OS

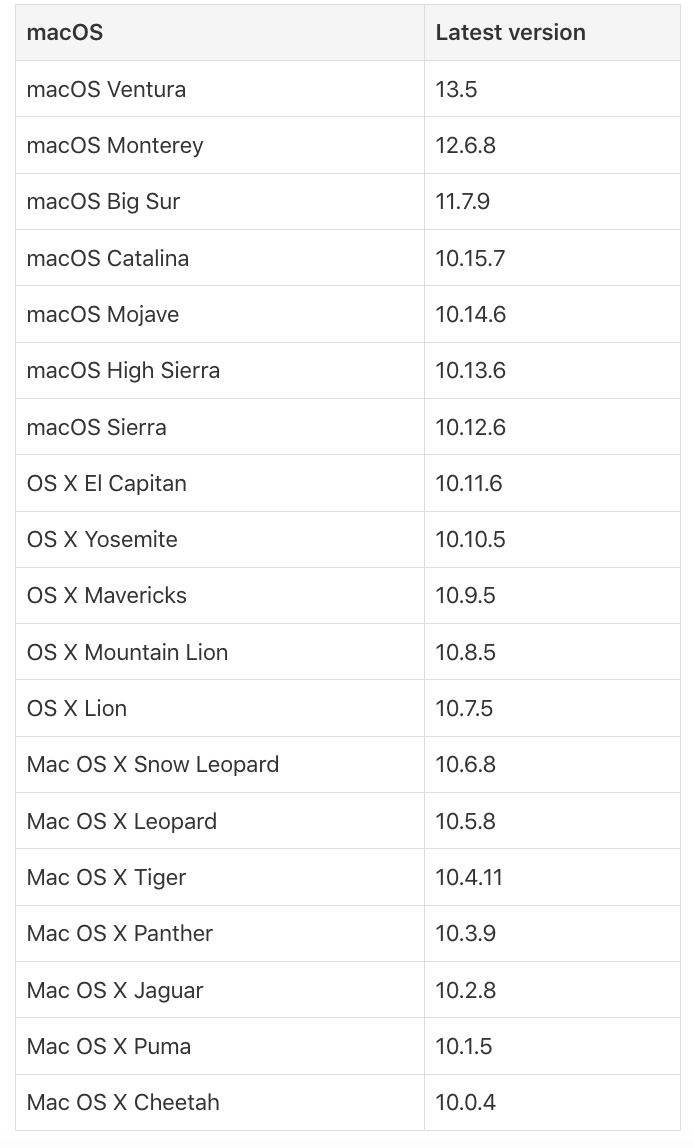
Great news! If you’re running Mac OS Monterey or later, it’s super easy to erase your Mac. Of course, you’ll have seen your current OS in our favorite About This Mac screen, but below is a list of all OS releases you can compare against, as well as the Apple Help article on the topic. 

A screenshot of a table describing existing Mac operating systems and their most recent versions.

One Last Thing Before You Get Started—And It’s Crucial

Before you get started, you’ll want to make sure any important data on your hard drive has been backed up. The Apple OS has a built-in backup capability called Time Machine backup software. 

While Time Machine is a good start, it doesn’t fulfill the requirements of a 3-2-1 backup strategy. And (as we all know) Apple devices work best with other Apple devices—so if you want to point your Time Machine backups to a non-Apple network device, you’ll have some creative setup to do. Ideally, you’d pair Time Machine with a product like Backblaze Personal Backup for maximum flexibility and cyber resilience. Note that even though backup runs on a schedule, we recommend hitting the manual backup button before you wipe your Mac to ensure you’ve got the most recent information. 

How to Wipe Your Mac…Can Be Slightly Different Based on Your Computer

Once you’ve verified your data is backed up, roll up your sleeves and get to work. The key here is macOS Recovery—a part of the Mac operating system since OS 10.7 Lion. You can use the apps in macOS Recovery on a Mac with an Apple processing chip to repair your internal storage device, reinstall macOS, restore your files from a Time Machine backup, set the security policy for different volumes, transfer files between two Mac computers, start up in safe mode, and more.

Okay, so now that you know your operating system, processing chip, and drive type, we can get to the actual how-to of how to wipe your Mac. The steps will be slightly different based on each of the above variables. Let’s dig in. 

Wipe a Mac With an Apple Chip and a Recent macOS Update

Assuming you’re rocking a recent macOS update, then you’re going to wipe your Mac using the Erase All Content and Settings function. (You might also see this called the Erase Assistant in Apple’s Help articles.) This will delete all your data, iCloud and Apple logins, Apple wallet information, Bluetooth pairings, fingerprint sensor profiles, and Find My Mac settings, as well as resetting your Mac to factory settings. Here’s how you find it. 

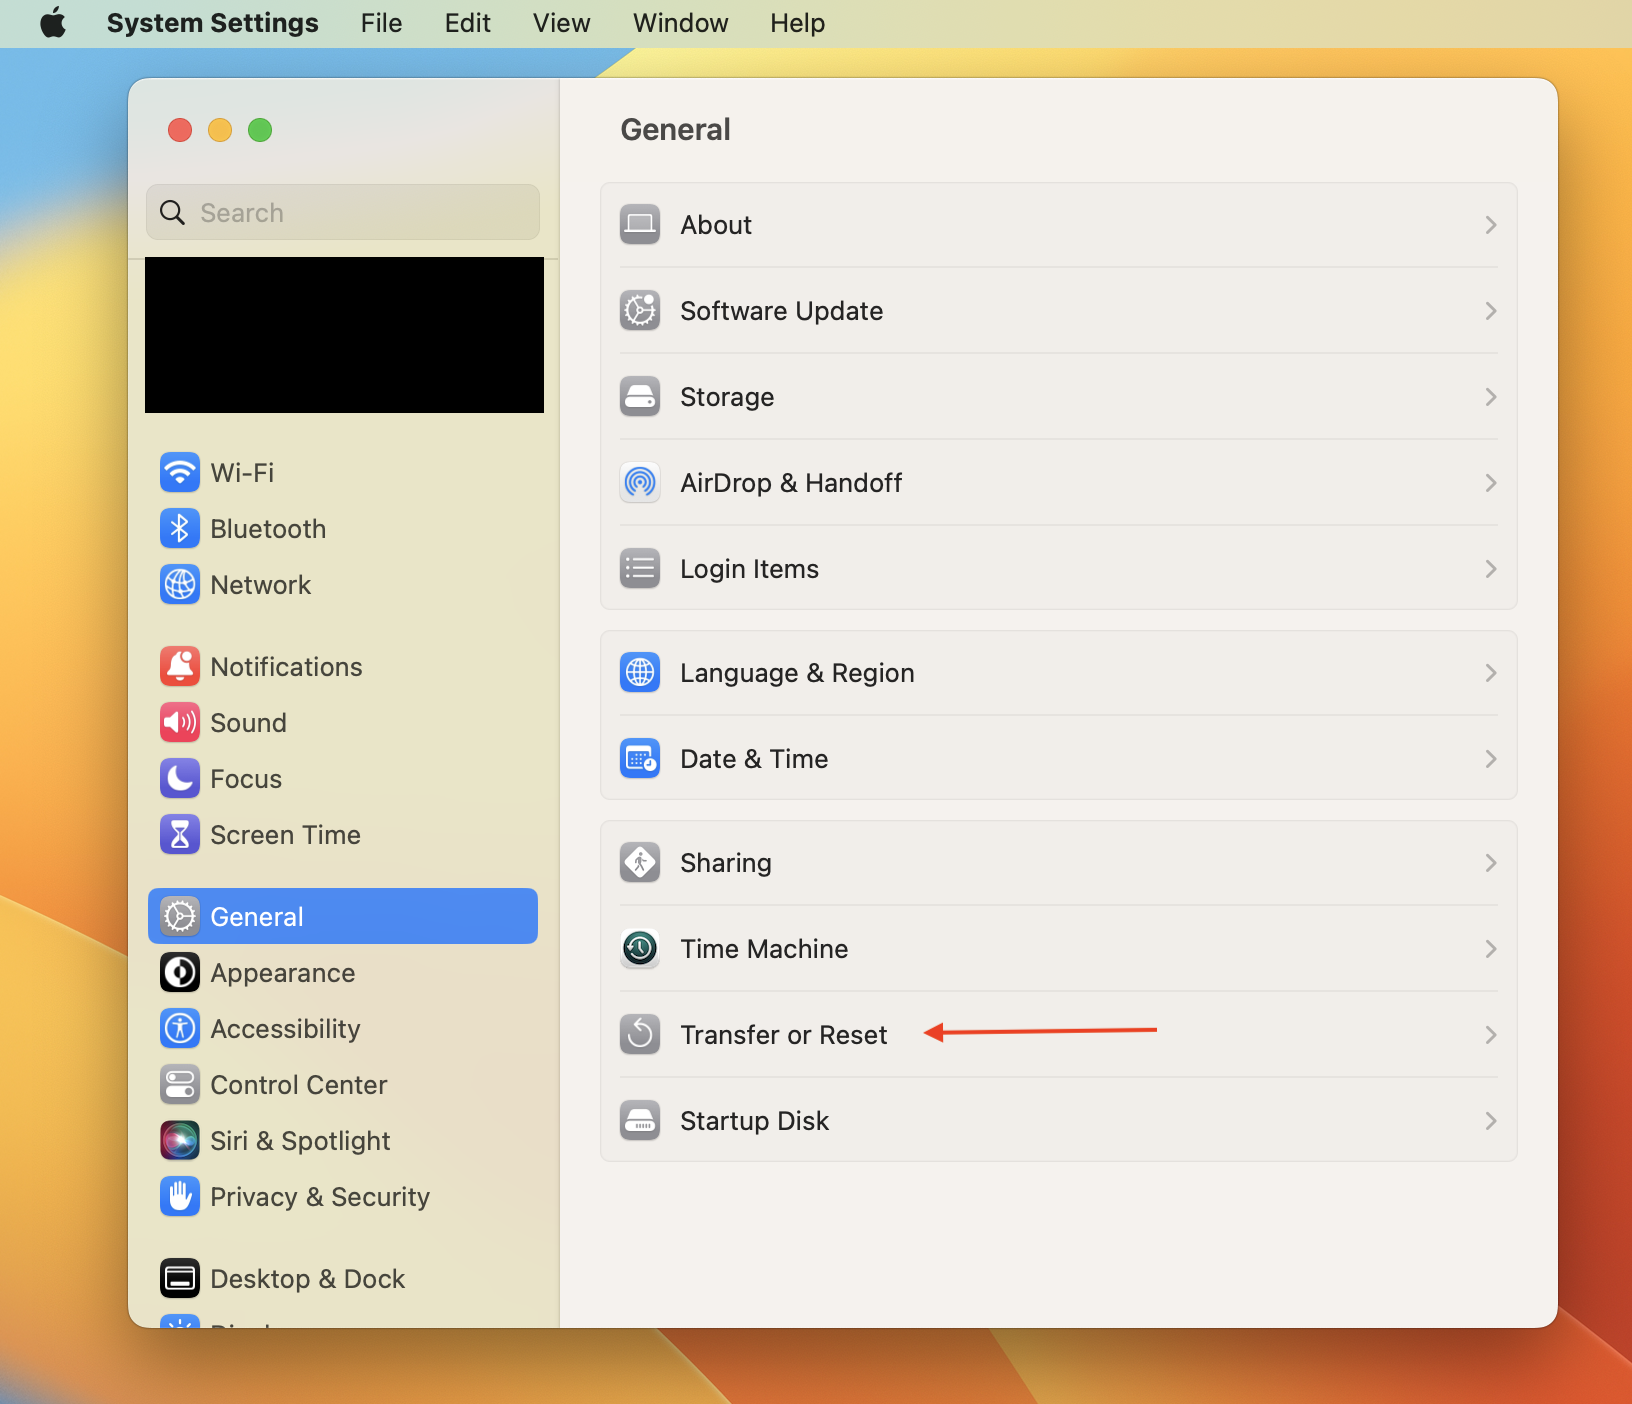
If you have macOS Ventura: 

  1. Select the Apple menu.
  2. Choose System Settings. 
  3. Click General in the sidebar. 
  4. Click Transfer or Reset on the right. 
  5. Click Erase all Content and Settings. 
A screenshot of the Mac System Settings > General screen in a computer running Mac operating system Ventura.

If you have macOS Monterey:

  1. Select the Apple Menu. 
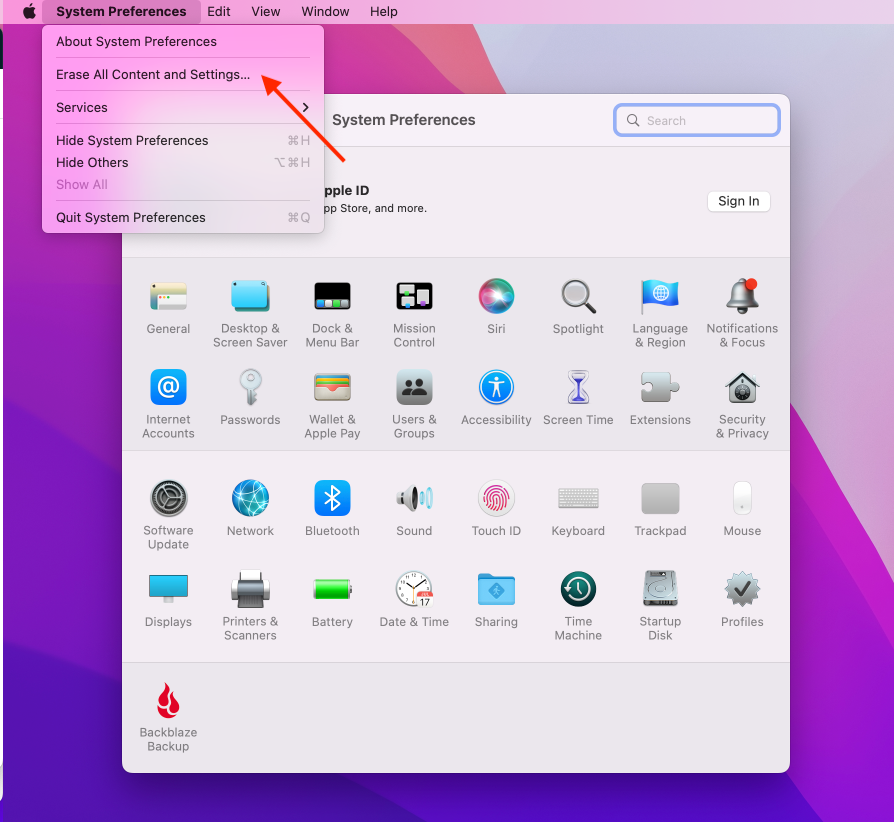
  2. Choose System Preferences. 
  3. Once the System Preferences window is open, select the dropdown menu in your top navigation bar. Then, select Erase All Content and Settings.
A screenshot of Mac System Preferences > Erase All Content And Settings in a computer running Mac operating system Monterey.

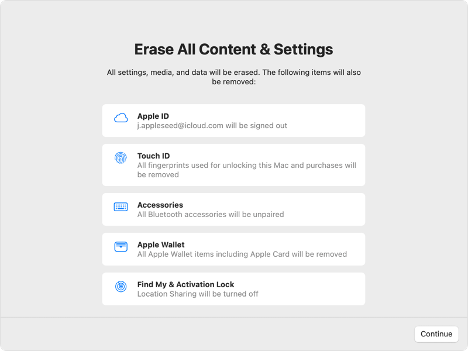
After you’ve done that, then the steps will be the same for each process. Here’s what to expect. 

  1. You’ll be prompted to log in with your administrator credentials. 
  2. Next, you will be reminded to back up via Time Machine. Remember that if you choose this option, you’ll want to back up to an external device or cloud storage—because, of course, you’re about to get rid of all the data on this computer. 
  3. Click Continue to allow all your settings, data, accounts, etc. to be removed. 
A screenshot of the Erase All Content and Settings assistant.
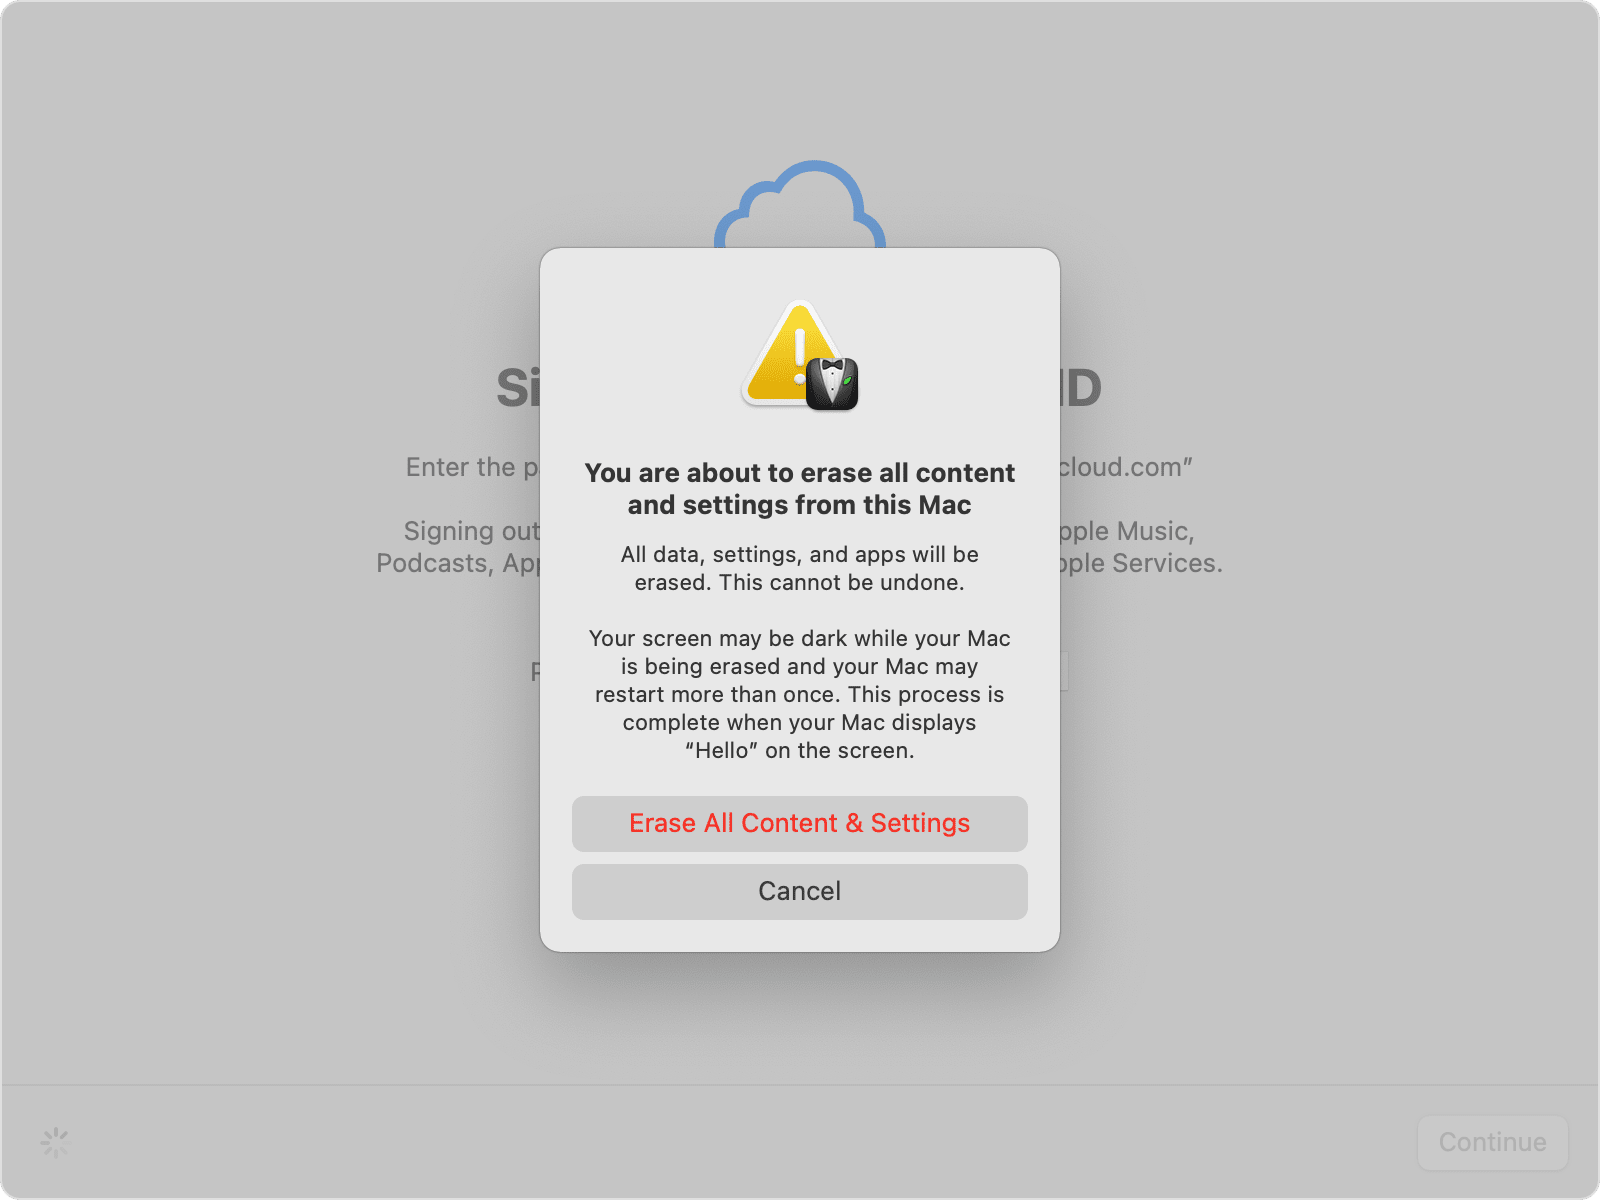
  1. If you’re asked to sign out of Apple ID, enter your Apple password and hit Continue. 
  2. Click Erase all Content & Settings to confirm. 
A screenshot of the confirmation screen to erase all content and settings.
  1. Your Mac will automatically restart. If you have an accessory like a Bluetooth keyboard, you’ll be prompted to reconnect that device. 
  2. Select a WiFi network or attach a network cable. 
  3. After joining a network, your Mac activates. Click Restart. 
  4. After your device has restarted, a setup assistant will launch (just like when you first got your Mac). 

It’ll be pretty clear if you don’t meet the conditions to erase your drive using this method because you won’t see Erase All Content and Settings on the System Settings we showed you above. So, here are instructions for the other methods. 

How to Wipe a Mac With an Apple Chip Using Disk Utility

Disk Utility is exactly what it sounds like: a Mac system application that helps you to manage your various storage volumes. You’d use it to manage storage if you have additional storage volumes, like a network attached storage (NAS) device or external hard drive; to set up a partition on your drive; to create a disk image (basically, a backup); or to simply give your disks a check up if they’re acting funky. 

You can access Disk Utility at any time by selecting Finder > Go > Utilities, but you can also trigger Disk Utility on startup as outlined below. 

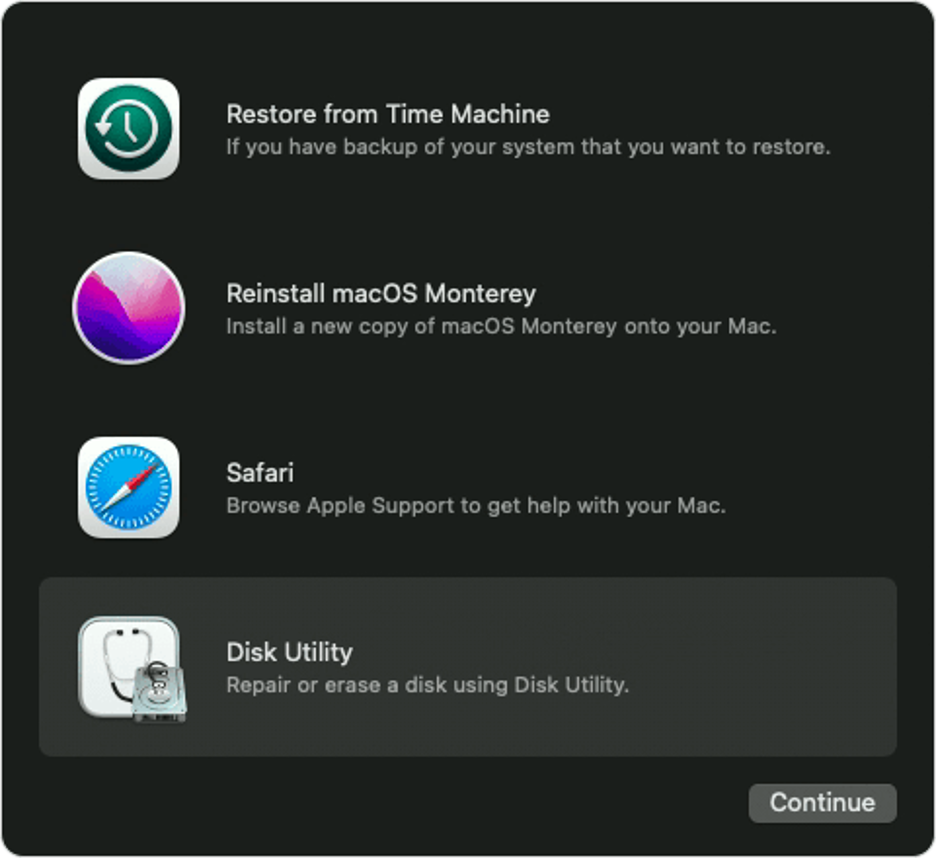
  1. Turn on your Mac and continue to press and hold the power button until the startup options window comes up. Click Options, then click Continue.
  2. You may be prompted to login with either your administrative password or your Apple ID.
  3. When the Utilities window appears, select Disk Utility and hit Continue.
A screenshot of the Utilities > Disk Utility on a Mac computer.
  1. If you’d previously added other drives to your startup disk, click the delete volume button (–) to erase them. 
  2. Then, choose Macintosh HD in the sidebar. 
  3. Click the Erase button, then select a file system format and enter a name for it. For Macs with an M1 chip, your option for a file system format is only APFS.
  4. Click Erase or, if it’s an option, Erase Volume Group. You may be asked for your Apple ID at this point. 
  5. You’ll be prompted to confirm your choice, then your computer will restart. 
  6. Just as in the other steps, when the computer restarts, it will attempt to activate by connecting to WiFi or asking you to attach a network cable. 
  7. After it activates, select Exit to Recovery Utilities. 

Once it’s done, the Mac’s hard drive will be clean as a whistle and ready for its next adventure: a fresh installation of the macOS, being donated to a relative or a local charity, or just sent to an e-waste facility. Of course, you can still drill a hole in your disk or smash it with a sledgehammer if it makes you happy, but now you know how to wipe the data from your old computer with much less ruckus.

How To Wipe a Mac With an Intel Processor Using Disk Utility

Last but not least, let’s talk about how to wipe an Intel-based Mac. (Fusion Drives fall into this category as well.) 

  1. Starting with your Mac turned off, press the power button, then immediately hold down the command (⌘) and R keys and wait until the Apple logo appears. This will launch macOS Recovery. 
  2. You may be prompted to log in with an administrator account password. 
  3. When the Recovery window appears, select Disk Utility.
  4. In the sidebar, choose Macintosh HD.
  5. Click the Erase button, then select a file system format and enter a name for it. Your options for a file system format include Apple File System (APFS), which is the file system used by macOS 10.13 or later, and macOS Extended, which is the file system used by macOS 10.12 or earlier.
  6. Click Erase or Erase Volume Group. You may be prompted to provide your Apple ID. 
  7. If you previously used Disk Utility to add other storage volumes, you can erase them individually using the process above. 
  8. When you’ve deleted all your drives, quit Disk Utility to return to the utilities window. You may also choose to restart your computer at this point. 

Securely Erasing Drives: Questions and Considerations

Some of you drive experts out there might remember that there is some nuance to security when it comes to erasing drives, and that there are differences in erasing HDDs versus SSDs. Without detouring into the nuances of why and how that’s the case, just know that on Fusion Drives or Intel-based Macs, you may see additional Security Options you can enable when erasing HDDs. 

There are four options in the “Security Options” slider. “Fastest” is quick but insecure—data could potentially be rebuilt using a file recovery app. Moving that slider to the right introduces progressively more secure erasing. Disk Utility’s most secure level erases the information used to access the files on your disk, then writes zeros across the disk surface seven times to help remove any trace of what was there. This setting conforms to the DoD 5220.22-M specification. Bear in mind that the more secure method you select, the longer it will take. The most secure methods can add hours to the process. For peace of mind, we suggest choosing the most secure option to erase your hard drive. You can always start the process in the evening and let it run overnight.

After the process is complete, restart your Mac and see if you can find any data. A quick inspection is not foolproof, but it can provide some peace of mind that the process finished without an interruption. 

Securely Erasing SSDs and Why Not To

If your Mac comes equipped with an SSD, Apple’s Disk Utility software won’t actually let you zero the drive. Sounds strange, right? Apple’s online Knowledge Base explains that secure erase options are not available in Disk Utility for SSDs.

Fortunately, you are not restricted to using the standard erasure option to protect yourself. Instead, you can use FileVault, a capability built into the operating system.

FileVault Keeps Your Data Safe

FileVault is an excellent option to protect all of the data on a Mac SSD with encryption. FileVault is whole-disk encryption for the Mac. With FileVault engaged, you need a password to access the information on your hard drive. Even without it, your data is encrypted and it would be very difficult for anybody else to access.

Before you use FileVault, there is a crucial downside. If you lose your password or the encryption key, your data may be gone for good! 

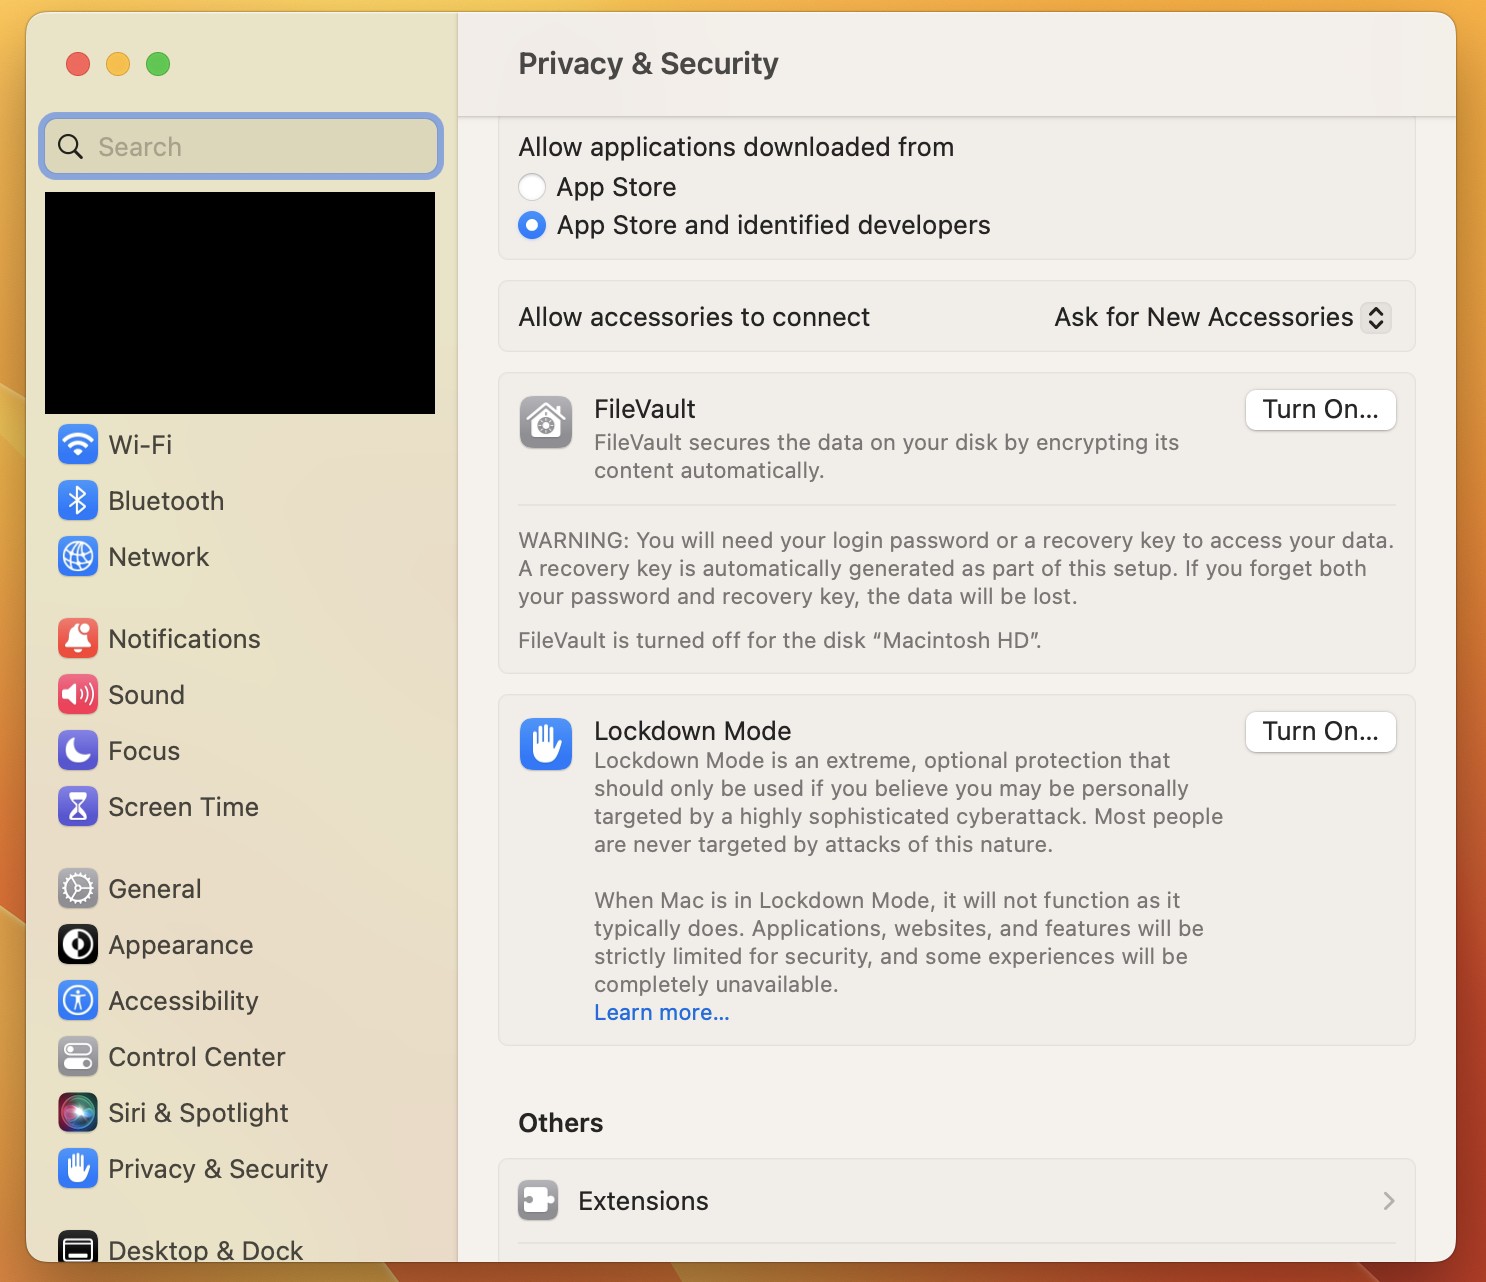
When you first set up a new Mac, you’re given the option of turning FileVault on. If you don’t do it then, you can turn on FileVault at any time by clicking on your Mac’s System Preferences, clicking on Security & Privacy, and clicking on the FileVault tab. Be warned, however, that the initial encryption process can take hours, as will decryption if you ever need to turn FileVault off.

A screenshot of the System Settings > Privacy and Security on a Mac computer.

With FileVault turned on, you can restart your Mac into its Recovery System following the directions above and erase your hard drive using Disk Utility, once you’ve unlocked it (by selecting the disk, clicking the File menu, and clicking Unlock). That deletes the FileVault key, which means any data on the drive is useless.

Nowadays, most Macs manage disk encryption through the T2 chip and its Secure Enclave, which is entirely separate from the main computer itself. This is why FileVault has no CPU overhead—it’s all handled by the T2 chip. Although FileVault doesn’t impact the performance of most modern Macs, we’d suggest only using it if your Mac has an SSD, not a conventional HDD.

Securely Erasing Free Space on Your SSD

If you don’t want to take Apple’s word for it, if you’re not using FileVault, or if you just want to, there is a way to securely erase free space on your SSD. It’s a little more involved, but it works. Before we get into the nitty-gritty, let me state for the record that this really isn’t necessary to do, which is why Apple’s made it so hard to do.

To delete all data from an SSD on an Apple computer, use Apple’s Terminal app. Terminal provides you with command line interface (CLI) access to the OS X operating system. Terminal lives in the Utilities folder, but you can access Terminal from the Mac’s Recovery System. Once your Mac has booted into the Recovery partition, click the Utilities menu and launch Terminal.

From a Terminal command line, type the following:

diskutil secureErase freespace VALUE /Volumes/DRIVE

That tells your Mac to securely erase the free space on your SSD. You’ll need to change VALUE to a number between 0 and 4. Zero is a single-pass run of zeroes, 1 is a single-pass run of random numbers, 2 is a seven-pass erase, 3 is a 35-pass erase. Finally, level 4 is a three-pass erase with random fills plus a final zero fill. DRIVE should be changed to the name of your hard drive. To run a seven-pass erase of your SSD drive in JohnB-MacBook, you would enter the following:

diskutil secureErase freespace 2 /Volumes/JohnB-MacBook

If you used a space in the name of your Mac’s hard drive, you need to insert a leading backslash (/) before the space. For example, to run a 35-pass erase on a hard drive called Macintosh HD, enter the following:

diskutil secureErase freespace 3 /Volumes/Macintosh\ HD

If you’re like the majority of computer users, you’ve never opened your Terminal application—and that’s probably a good thing. If you’re providing the proper instructions, a CLI lets you directly edit the guts of your computer. If you’re not providing the proper instructions, things will just error out, and likely you won’t know why. All this to say: Apple has made specific choices about designing products for folks who aren’t computer experts. Sometimes it limits how customizable you can get on your device (i.e. it’s super hard to zero out an SSD), but usually it’s for good reason—in this case, it’s to preserve the health of your drive in the long term. 

When Erasing Is Not Enough: How To Destroy a Drive

If you absolutely, positively must be sure that all the data on a drive is irretrievable, see this Scientific American article (with contributions by Gleb Budman, Backblaze CEO), How to Destroy a Hard Drive—Permanently.

Since you’re interested in SSDs, you might enjoy reading other posts in our SSD 101 series. And if you’d like to learn how to securely erase a Windows PC HDD or SSD, take a look at our guide here.

The post Guide to How to Wipe a Mac or Macbook Clean appeared first on Backblaze Blog | Cloud Storage & Cloud Backup.
SSD 101: How Reliable are SSDs?

Post Syndicated from original https://backblazeprod.wpenginepowered.com/blog/how-reliable-are-ssds/

A decorative image showing an illustration of an SSD drive that exposes the interior. A headline reads How Reliable Are SSDs?
This article has been updated since it was originally published in 2023.

Solid state drives (SSDs) continue to grow in popularity, and no wonder. Compared to hard disk drives (HDDs), they are faster, smaller, more power efficient, and sturdier since they have no moving parts to jostle around. And, they are becoming available in larger and larger capacities while their cost comes down.

But are they really as dependable as they claim to be? SSDs still have vulnerabilities, and storage tech that lasts thousands of years isn’t commercially viable (yet!). 

In this post we’re going to consider the issue of SSD reliability. We’ll take a closer look at:

  • SSD tech.
  • SSD storage memory.
  • Reliability factors.
  • Signs of SSD failure.

So, how reliable is an SSD? Let’s dig in.

But First, Back It Up

Of course, as a data storage and backup company, you know what we’re going to say right off: No matter how you store your data, you should always back it up. Even if your data is stored on a brand new SSD, it won’t do you any good if your computer is stolen, destroyed by a flood, or lost in a fire or other act of nature. We recommend using a 3-2-1 backup strategy to safeguard your data.

SSD Tech

Almost all types of today’s SSDs use NAND flash memory. NAND isn’t an acronym like a lot of computer terms. Instead, it’s a name that’s derived from its logic gate, the basic building block of its memory cells, called “NOT AND.” (For the curious, a NAND gate is a logic gate that produces an output that is false only if all its inputs are true.)

A diagram of the interior motherboard of an SSD identifying the cache, controller, and NAND Flash Memory.

Flash (the term following NAND) refers to a non-volatile solid state memory that retains data even when the power source is removed. 

NAND storage has specific properties that affect how long it will last. NAND flash memory works by storing data in individual memory cells organized in a grid-like array. When data (a 1 or a 0) is written to a NAND cell (also known as programming), the data must be erased before new data can be written to that same cell. When writing and erasing a NAND cell, electrons are sent through an insulator and back, and the insulator starts to wear. Eventually, the insulator wears to the point where it may have difficulty keeping the electrons in their correct (programmed) location, which makes it increasingly more difficult to determine if the electrons are where they should be and to indicate the correct value (1 or 0) of the cell.

This means that flash type memory cells can only be reliably programmed and erased a given number of times. This is measured in programmed/erase cycles, more commonly known as P/E cycles.

P/E cycles are an important measurement of SSD reliability, but there are other factors that are important to consider as well including TBW (terabytes written) and MTBF (mean time between failures). Here are a few definitions to help keep everything straight:

Programmed/Erase Cycles (P/E Cycles)

A P/E cycle in solid state storage involves writing data to a NAND flash memory cell then erasing that data, so it is ready to be rewritten. The endurance of an SSD, measured in P/E cycles, varies depending on the technology, but typically falls somewhere between 500 and 100,000 P/E cycles. 

Terabytes Written (TBW)

Terabytes written is the total amount of data that can be written to an SSD before it is likely to fail. For example, here are the TBW warranties for the popular Samsung V-NAND SSD 870 EVO:

  • 250GB model: 150TBW
  • 500GB model: 300TBW
  • 1TB model: 600TBW
  • 2TB model: 1,200TBW
  • 4TB model: 2,400TBW

All of these models are warrantied for five years or TBW, whichever comes first.

Mean Time Between Failures (MTBF)

MTBF is a metric used to gauge the reliability of a hardware component throughout its anticipated lifespan. For most components, the measure is typically in thousands or even tens of thousands of hours between failures. For example, an HDD may have a mean time between failures of 300,000 hours, while an SSD might have 1.5 million hours.

Manufacturers provide these specifications for their products. They can help you understand your drives’ expected lifespan as well as its suitability for specific applications.

Be careful when reviewing the specifications though, as they don’t guarantee your particular SSD will last for that specific duration. Rather, they indicate that, based on a sample set of the SSD model, errors are anticipated to occur at a certain rate. A 1.2 million hour MTBF means that, assuming the drive is used at an average of eight hours a day, a sample size of 1,000 SSDs would be expected to have one failure every 150 days, or about twice a year.

Today, many SSDs come with a utility which monitors the life expectancy of the drive. Their recommendations are based on monitoring the SMART attributes of the drive. As we discussed in a previous post, there is little consistency between the different SSD manufacturers in what attributes they monitor and how they calculate drive life expectancy. Therefore, it is important that you read the manual for your particular SSD if you are interested in using this information to decide when to replace your SSD.

SSD Storage Memory

There are currently five different NAND flash cell technologies based on the number of bits stored per cell, which we’ll discuss below. Generally, as the number of bits stored per cell increases, the cost per bit decreases, but endurance and performance may decrease as well.

SLC (Single Level Cell): One Bit Per Cell

SLC was the first type of NAND flash storage developed. It stores one bit per cell. SLC storage is fast and wear is minimal. On the downside, it’s not space-efficient; that is, the physical size of the SSD form factor used.

MLC (Multi-Level Cell): Two Bits Per Cell

MLC stores two bits per cell. This basically doubled the amount of storage and lowered the cost for a given form factor. But MLC is slower as it has to distinguish between the two bits in a given cell.

TLC (Triple Level Cell): Three Bits Per Cell

The trend continued with TLC where three bits are stored per cell. This advancement had two interesting consequences. First, the unit cost started to be appealing to most audiences. While still two to three times as expensive as a comparable hard drive, a TLC-based SSD was affordable. Second, the TLC technology hastened the introduction of caching within the SSD, as the unaided read/write speeds had dipped to near those of a hard drive.

QLC (Quad Level Cell): Four Bits Per Cell

QLC is the current “standard.” It stores four bits per cell. This increases storage density yet again, lowers the price even more, and, with caching improvements, continues to deliver superior speed. On the downside, the drive can wear out sooner, especially as it fills up.

3D NAND

In the previous technologies the cells are side by side in a single, two-dimensional layer—this design is described as planar. In 3D NAND, the cells are stacked three-dimensionally. This improves storage density and speed, but increases the manufacturing cost and lowers endurance over time.

In general SLC and MLC are faster and last longer, but are limited to the amount of space. TLC and QLC technologies can store data at a lower cost, but may be slower. However, the difference in speed is probably negligible for the average consumer, and is sometimes made up for by things like dynamic caching. The 3D NAND technology is a great choice, but be prepared to pay more.

SSD Reliability Factors to Consider

Compared to HDDs, SSDs are sturdier. Since they don’t have moving parts like actuator arms and spinning platters, they can withstand accidental drops and other shocks, vibration, extreme temperatures, and magnetic fields better than HDDs. Add to that their small size and lower power consumption, and the idea of replacing HDDs with SSDs could be worth the time and effort.

That’s not exactly the whole story though. There are different performance and reliability criteria you should use depending on whether the SSD will be used in a home desktop computer, a data center, or an exploration vehicle on Mars. And SSD manufacturers are increasingly marketing SSDs for specific workloads such as write-intensive, read-intensive, or mixed-use. What that means is that you can select the optimal level of SSD endurance and capacity for a particular use case. 

For instance, an enterprise user with a high-transaction database might opt for a drive that can withstand a higher number of writes at the expense of capacity. Or, a user operating a database that doesn’t get frequent writes might choose a lower performance drive with a higher capacity. By doing this, the manufacturers are hiding the complexity embedded in the technology like storage NAND (SLC, MLC, etc), caching, and so on. That said, it does make it easier to match your requirements to the best type of SSD.

Signs of SSD Failure

You’ve likely encountered the dreaded clicking sound that emanates from a dying HDD. An SSD has no moving parts, so you won’t get an audible warning that an SSD is about to fail, but there are usually other signs of when that’s going to happen. If you start to notice any of them, take action by replacing that drive with a new one. Indicators that your SSD is nearing its end of life include:

1) Errors Involving Bad Blocks

Much like bad sectors on HDDs, there are bad blocks on SSDs. If you have a bad block, the computer will typically try to read or save a file, but it takes an unusually long time and ends in failure, so the system eventually gives up and sends an error message.

2) Files Cannot Be Read or Written

There are two ways in which a bad block can affect your files. First, the system detects the bad block while writing data to the drive, and thus refuses to write data, or second, the system detects the bad block after the data has been written, and thus refuses to read that data.

3) The File System Needs Repair

Getting an error message like this on your screen can happen simply because the computer was not shut down properly, but it also could be a sign of an SSD developing bad blocks or other problems.

4) Crashing During Boot

A crash during the computer boot is a sign that your drive could be developing a problem. You should make sure you have a current backup of all your data before it gets worse and the drive fails completely.

5) The Drive Becomes Read-Only

Your drive might refuse to write any more data to disk and can only read data. Fortunately, you can still get your data off the disk, and you should.

So, How Reliable Is an SSD?

Let’s break down the reliability of SSDs into three, more specific questions:

Question 1: How long can we reasonably expect an SSD to last?

Answer: An SSD should ideally last as long as its manufacturer expects it to last (generally five years), provided that the use of the drive is not excessive for the technology it employs (e.g. using a QLC in an application with a high number of writes). Consult the manufacturer’s recommendations to ensure that how you’re using the SSD matches its best use.

Here at Backblaze we use SSDs for many different applications. The one use case we have rigorous reliability data for is as boot drives in our storage servers. This cohort of drives does more than boot these servers; they also write, store, read, and delete log files of various types recorded by the storage servers on a daily basis. The latest Drive Stats SSD Edition illuminates the reliability of the drive models we use for this purpose.

Question 2: Do SSDs fail faster than HDDs?

Answer: There are many variables in comparing the reliability of HDDs and SSDs, the primary one being how they are used. In the SSD Drive Stats report noted above, we compared SSD and HDD boot drives as they performed the same function in the same types of systems, storage servers. While it seems in the first three years or so the different drives are similar in their failure curves, the curves separate after four years, with the HDDs failing at a higher rate. So far the SSDs have maintained a 1% or less Annualized Failure Rate (AFR) through the first four years.

SSD users are far more likely to replace their storage drive because they’re ready to upgrade to a newer technology, higher capacity, or faster drive, than having to replace the drive due to a short lifespan. Under normal use we can expect an SSD to last years. If you replace your computer every three years, as most users do, then you probably needn’t worry about whether your SSD will last as long as your computer. What’s important is whether the SSD will be sufficiently reliable that you won’t lose your data during its lifetime.

Question 3: Are SSDs good for long-term storage?

Answer: SSDs, like hard drives, are meant to be used. An external drive stuffed into a closet for a couple of years is never a good thing, and it doesn’t matter whether it is an SSD or HDD inside. The evidence of whether an SSD will fare better than a HDD in such a circumstance is anecdotal at best. Still, it is better to use an external drive as a backup of your computer as part of your backup plan—just don’t make it your only backup.

Summary

It’s good to understand how the different SSD technologies affect their reliability, and whether it’s worth it to spend extra money for SLC over MLC or QLC. However, unless you’re using an SSD in a specialized application with more writes than reads as we described above, just selecting a good quality SSD from a reputable manufacturer should be enough to make you feel confident that your SSD will have a useful life span.

Keep an eye out for any signs of failure or bad sectors, and, of course, be sure to have a solid backup plan no matter what type of drive you’re using.

FAQs

1. How do you measure SSD reliability?

There are a number of metrics that can help you understand SSD reliability, including programmed/erase (P/E) cycles, terabytes written (TBW), and mean time between failures (MBTF). These metrics alone won’t be able to tell you how long a given SSD will last, but they can help you understand roughly where your SSD is in its lifecycle. Check the manufacturer’s warranty and endurance rating in TBW. Higher values indicate better durability.

2. What are programmed/erase (P/E) cycles?

A solid-state storage programmed/erase (P/E) cycle is a sequence of events in which data is written to a solid-state NAND flash memory cell, then erased, and then rewritten. How many P/E cycles a SSD can endure varies with the technology used, somewhere between 500 to 100,000 P/E cycles.

3. What SSD should I buy?

The ideal SSD to buy depends on your specific needs. Consider factors like capacity, speed, and budget. For most users, a mid-range SSD from a reputable brand offers a good balance of performance and affordability. SSD manufacturers are increasingly marketing SSDs for specific workloads such as write-intensive, read-intensive, or mixed-use. What that means is that you can select the optimal level of SSD endurance and capacity for a particular use case. For instance, an enterprise user with a high-transaction database might opt for a drive that can withstand a higher number of writes at the expense of capacity. Or, a user operating a database that doesn’t get frequent writes might choose a lower performance drive with a higher capacity.

4. How do I know my SSD is going to fail?

SSDs will eventually fail, but there usually are advance warnings of when that’s going to happen. Some warning signs include errors involving bad blocks, being unable to read or write files, getting error messages that the file system needs repair, crashes during boot, or when your drive becomes read-only. When this happens, make sure you have a good backup.

5. How long can I expect an SSD to last?

An SSD should ideally last as long as its manufacturer expects it to last (generally five years), provided that the use of the drive is not excessive for the technology it employs. Consult the manufacturer’s recommendations to ensure that how you’re using the SSD matches its best use.

6. Do SSDs fail faster than HDDs?

There are many variables in comparing the reliability of HDDs and SSDs, the primary one being how they are used. SSD users are far more likely to replace their storage drive because they’re ready to upgrade to a newer technology, higher capacity, or faster drive, than having to replace the drive due to a short lifespan. Under normal use we can expect an SSD to last years. If you replace your computer every three years, as most users do, then you probably needn’t worry about whether your SSD will last as long as your computer. What’s important is whether the SSD will be sufficiently reliable that you won’t lose your data during its lifetime.

7. Are SSDs good for long-term storage?

SSDs, like hard drives, are meant to be used. An external drive stuffed into a closet for a couple of years is never a good thing, and it doesn’t matter whether it is an SSD or HDD inside. The evidence of whether an SSD will fare better than a HDD in such a circumstance is anecdotal at best. Still, it is better to use an external drive as a backup of your computer as part of your backup plan—just don’t make it your only backup.

The post SSD 101: How Reliable are SSDs? appeared first on Backblaze Blog | Cloud Storage & Cloud Backup.