Mac admins have always understood the value of prioritizing Mac-native software to ensure performance and compatibility across their environments. With an integrated approach to data protection and device management from Backblaze and Kandji, you can now eliminate manual installations and deploy Backblaze with zero-touch across your entire Mac fleet, ensuring critical data is protected.
Simplifying Mac backup for remote and on-site IT teams
Whether your team is in the office or scattered across the globe, Backblaze’s cloud-based solution ensures your data is accessible and easily managed from anywhere.
Backblaze and Kandji’s solutions have already proven their value in Apple-focused IT environments.
Companies like Foojee, a managed IT provider specializing in Apple devices, rely on Kandji to deploy and manage those devices and Backblaze to protect their data. “We are always looking at best-of-breed apps for our customers, and we have never felt more proud of our product offering,” said Lucas Acosta, CEO of Foojee. “The three biggest benefits we have realized from Backblaze and Kandji are our time savings on our Help Desk, the increased security, and the increased reliability.”
This partnership builds on that success, enabling organizations to:
Deploy Backblaze effortlessly with Kandji: Automate installation and configuration of Backblaze on managed devices with Kandji’s workflows.
Enhance data security: Keep critical data protected with Backblaze’s secure, cloud-based backup service.
Scale with ease: Both platforms support organizations of any size, from startups to enterprises.
Reduce IT overhead: Streamline both device management and data protection with a unified platform.
Join the conversation
Interested in learning more? Join us on LinkedIn Live! Tune in for an in-depth discussion on how Backblaze and Kandji are helping organizations simplify and secure their Mac device management and data protection. Don’t miss out—save your spot today.
Get started
Interested in getting started? Contact our Sales team today to explore how Backblaze and Kandji can streamline your device management and data protection.
Mac usage has steadily increased in recent years, particularly in business. In the fourth quarter of 2023, Apple shipped 16.1 percent of all personal computer units in the United States, per Gartner. Moreover, IDC anticipates the number of Macs sold to business users worldwide will increase by 20% between 2023 and 2024. IDC also reports that 76% of IT decision makers believe Macs are more secure than other computers.
With this surge of Macs in the workplace and increased focus on security, IT administrators increasingly require mobile device management (MDM) to protect, secure, and manage these remote devices.
Today, we’re digging into all things Mac MDM, including best practices for implementing MDM in your enterprise and why it’s so important to seek out Mac-native tools to do so.
What is mobile device management (MDM)?
MDM enables you to securely manage and control Apple devices—such as iPhones, iPads, Macs, and Apple TVs—remotely. With MDM, IT administrators can configure devices, deploy apps, enforce security policies, manage updates, and track device inventory all from a centralized platform. For IT teams, the main purpose of MDM is to improve their management and control over their fleet of devices, especially devices that aren’t on-premises like those for remote workers.
How MDM works in practice
Device enrollment: A device is enrolled via automated device enrollment (ADE), a third-party MDM tool like Jamf, Kandji, or Munki, manual setup, QR code, or a URL.
Device configuration: MDM pushes settings (Wi-Fi, VPN, email), security policies (passcode, encryption), and apps to the device.
Ongoing management: MDM continuously monitors the device’s compliance with organizational policies and can enforce restrictions or trigger actions (like updating software, changing user permissions, etc.) when needed.
Device retirement: When a device is retired or a user leaves, the MDM can deprovision the device, sometimes wiping or restoring it to factory settings.
MDM solutions provide a centralized, scalable, and secure way to manage devices in an enterprise setting. This ensures consistency, enhances security, and simplifies IT administration.
What are some advantages of MDM for Macs?
Using MDM for Macs in an enterprise environment offers several advantages, particularly in terms of security, efficiency, and scalability. Here are some key benefits:
Enhanced security: Mac MDM tools frequently make use of the built-in Apple management framework, and one of the most significant benefits of MDMs are their robust security features. With features such as location tracking, remote data wiping, encryption enforcement, and strong authentication methods, MDM solutions protect businesses from cyber threats and unauthorized access. They allow you to enforce security settings like passcodes, encryption (FileVault), and password complexity requirements across all Macs. They also allow you to implement web security policies, blocking access to harmful sites, restricting app installations, controlling software updates, and preventing malicious downloads.
Centralized device management: You can automate enrollment and configure devices remotely, setting up Wi-Fi, VPN, email, and other necessary system preferences without user intervention. This functionality enables touchless deployment, allowing you to ship laptops directly to employees and enroll them remotely, without your IT team ever having to touch the machine. Mac admins can also assign custom configuration profiles to different user groups (e.g., for different departments), allowing flexible yet consistent policy enforcement.
Self-service: As you scale, it becomes increasingly important to limit rights on employee machines, depending on the department and the level of access they need. With MDM, you can populate a self-service portal where employees can access the software they need to do their jobs, including licensed and paid apps.
Streamlined app deployment and management: You can easily deploy apps from the Mac App Store or distribute custom internal apps, and then centralize automatic updates for those applications.
Efficient patch and update management: MDMs can schedule and enforce macOS updates, reducing vulnerabilities by ensuring all devices are running the latest versions. Automated and remote updates reduce the need for manual interventions and device downtime.
Bring Your Own Device (BYOD) support: MDM supports BYOD environments by providing a separation between personal and work data on the same machine, making it flexible for both company-owned and personal devices.
Challenges with Mac MDM
One of the challenges of managing Apple devices at scale is keeping the Mac operating system (macOS) updated across your fleet of machines. Apple has made changes to how that works over the years. As a Mac admin in a corporate environment, you have to balance conflicting demands—you need to make sure your fleet of machines is up to date and in compliance, but you also need to do so in a way that isn’t disruptive to end users, minimizes downtime, and avoids sudden unexpected reboots.
To answer this challenge, the open-source community has come together with solutions. Third-party, open source scripting can be leveraged within your MDM to allow you more flexibility and control over macOS updates, allowing you to expand user options for updates while at the same time setting deadlines for those updates to happen.
Another challenge of using MDM solutions is navigating the increasingly restrictive permissions introduced by Apple. Starting with macOS 10.14 and in updates since then, Apple added security to parts of the computer it considers sensitive or critical. While these restrictions enhance user privacy and security, they can limit IT administrators’ control over devices. Applications that require sensitive access to these parts of the system, like backup clients or anti-virus software, now require additional permissions.
Silently installing these types of apps now requires an additional component, a custom policy configuration that grants full disk access. This will be different depending on the MDM you’re using, but Jamf, for example, offers the Privacy Preferences Policy Control (PPPC) Utility to help you create configuration profiles.
Best practices for Mac MDM
Managing Macs in an enterprise environment can be a complex task that can have a big impact. One of the biggest benefits of MDM is reducing IT workload. Centralized and automated management reduces the time and effort needed to configure and manage each Mac manually, allowing you to focus on more strategic tasks.
But, effective MDM requires some other building blocks to be in place before you can realize all of those advantages. Here are some best practices for Mac MDM:
Choose the right MDM solution
Find the right partner: Integrate with an MDM solution like Jamf, Kandji, or Munki for streamlined device enrollment and management.
Update processes: Ensure that the MDM solution supports both Apple’s Device Enrollment Program (DEP) and Volume Purchase Program (VPP) to automate setup and app deployment, and ensure all devices are enrolled in the MDM system as soon as they are set up.
Enforce security policies
Passcode and encryption: Ensure all devices require strong passcodes and are encrypted with FileVault (for Mac) and native iOS encryption.
Multi-factor authentication (MFA): Enforce MFA for accessing corporate services and apps.
Remote lock/wipe: Enable the ability to lock or wipe devices remotely in case of theft or loss.
App management
Volume purchasing: Use Apple’s VPP to distribute apps and content centrally.
App whitelisting and blacklisting: Control which apps users can install on their devices, blocking potentially harmful or non-compliant apps.
App updates: Automate app updates to ensure security patches and features are deployed quickly.
User and group profiles
User profiles: Use custom profiles to set different policies for various roles within the organization (e.g., executives, developers, sales).
Configuration profiles: Set up policies for Wi-Fi, VPN, email, and other settings automatically based on user or group membership.
Data protection
Content filtering: Implement web content filtering and secure browsing rules.
Data loss prevention (DLP): Apply DLP policies to prevent sensitive corporate data from being shared through unapproved channels.
Automatic updates: Automate macOS updates and ensure compliance with the latest patches and versions.
Version control: Use MDM to control which versions of macOS and iOS are allowed in the organization to prevent untested or unsupported versions from being installed.
Monitor device compliance
Compliance uniformity: Set compliance rules for security (e.g., passcode policies, encryption) and regularly monitor devices for adherence.
Compliance monitoring: Use reporting and analytics tools built into your MDM solution to track compliance, app usage, and device health.
By following these best practices, you can efficiently manage and secure Mac devices within your organization while minimizing risks and ensuring a seamless experience for employees.
The importance of Mac-native apps
Mac-native apps provide a seamless and optimized experience that takes full advantage of the macOS ecosystem. Native apps are specifically designed to integrate with macOS, ensuring smoother performance, faster responsiveness, and a more intuitive user experience compared to non-native or cross-platform applications.
This integration often means that the apps are more efficient, utilize fewer system resources, and can easily interface with built-in macOS features such as Spotlight, Siri, and Notification Center. For IT administrators managing multiple Macs, the consistency of Mac-native apps helps minimize compatibility issues and ensures a uniform experience across all devices.
In addition, Mac-native apps typically offer better security and reliability, which is crucial for IT administrators overseeing corporate environments. Apple has a strict set of guidelines for app development, especially for apps available through the App Store. These guidelines emphasize security practices such as sandboxing, code-signing, and integration with macOS security features like Gatekeeper and XProtect.
This gives IT administrators confidence that Mac-native apps are less likely to pose security risks, reducing the chances of malware or vulnerabilities being introduced into the organization’s systems. Moreover, since native apps are built to work within Apple’s framework, they are generally more stable, reducing the risk of crashes or bugs that could disrupt workflows.
Furthermore, Mac-native apps support better integration with management and automation tools that are vital for IT administrators. These apps can be more easily deployed, managed, and updated through Apple MDMs.
Finally, native apps can often integrate with Apple’s scripting languages and automation tools like AppleScript and Automator, providing IT teams with more powerful options for customizing workflows, optimizing processes, and enhancing productivity across the organization. This level of control is essential for IT administrators looking to streamline their management tasks and ensure a high level of efficiency.
Having MDMs built native for Macs is critical for the success of IT management. That holds true for all software running on Macs, including backup software like Backblaze Computer Backup—you have to update permissions less frequently, you have access to more robust build possibilities, and it runs seamlessly in the background.
Are you using a Mac MDM tool?
Do you have a favorite MDM tool? Let us know in the comments. We love to hear how they’re working for you.
There’s a lot that goes into building a user-friendly, robust backup utility. When Backblaze set out to create one back in 2007, our goal was to make sure that users of all skill levels would have automatic, nearly continuous backups that could be restored on command. There were plenty of design decisions to be made, and one of the biggest was whether to implement our client in native code.
You might have seen us talk about this on our website and elsewhere, and we felt it was high time to dive into what that decision meant for our development, how it affected the way the Backblaze client works, and why we think it was an important decision and inflection point for Backblaze Computer Backup and our customers.
What is native code?
Each kind of computer central processing unit (CPU), such as Intel/AMD or Apple Silicon, has its own “machine language,” which is the set of instructions the CPU can understand and follow. These instructions are encoded in binary, and aren’t something people can read or write without great effort. When folks talk about using native code, they’re typically talking about a computer program that’s written in machine language, so a computer’s CPU can “natively” understand what the program needs the CPU to do.
Compiled languages
To use a compiled language, developers write instructions into source code that’s easy for humans to read and edit. Then, they use a program aptly called a compiler to convert the source code into machine language for a particular kind of CPU. Examples of compiled languages are assembly (ASM), C, C++, Rust, Go, Swift, and Haskell.
Interpreted languages
Like with compiled languages, developers write programs in interpreted languages by writing instructions into source code files. But instead of converting those instructions into machine language, another program called an interpreter reads the source code and follows the instructions it contains without converting them to machine language. Common interpreted languages are things like Python, Ruby, BASIC, and PHP.
There is a bit of a slippery slope between a compiled vs. interpreted language. For example, some modern Java implementations mix an interpreter and a compiler. But, the difference when it comes to programming is about picking a language that’s suitable to a task’s requirements.
When and how do you use which type of code language(s)?
Well, pretty much anything anyone does on computers these days will take a combination of code languages. In some ways, the whole challenge of working with computers is bridging how humans communicate vs. how computers can process things.
If you were using a metaphor for the above, a compiled code language would represent someone who was raised to natively speak two languages, and could fluently curse in both languages.
By contrast, interpreted language is like this: You’ve moved to a country where you’re not fluent in the language, but someone needs a thorough dressing-down. An interpreted language would let you write in your native language, take your words and literally translate the idiom you were intending to use—then the computer would take your literal translation, and, executing the program, would be supplied with a dictionary to then give you an effective, similarly meaningful, insult. If you didn’t have your translator, your attempt at offense (in this metaphor, a program!), would likely fail because no one can understand you.
To wit: While they mean similar things, “when pigs fly,” and “quand les poules auront des dents,” do not literally translate.
What are the benefits of using native code in a backup application?
Using native code in a backup application is, in our opinion, better for several reasons.
Permissions
When you’re writing in native code, you’re plugging in your program at a lower level than most applications. That gives you access to the kinds of APIs the native operating system (OS) uses. Because you’re in that level of integration with the operating system, it means that users have to update permissions less frequently, have access to more robust build possibilities for your client, and their backup client can seamlessly run in the background.
Efficiency: Build once, run everywhere
By building our backup client lower in the chain of command, so to speak, it allows us to use the same work for different situations, and there are some interpreted languages that have been built for this purpose, like Java VM. Using those solutions, however, would sacrifice some of the other benefits we’re outlining in this article.
Being fully in control of our common code, we can do this without interpreted language and still have the other advantages listed here. So, we can use the same base code for both our Mac and Windows clients, but then add modifications to the code on top of each to refine the clients. There may be slight differences between the operating system (OS) environments, but coding at the level of a compiled language like C++ means that we can adjust for those differences effectively.
Performance
Running native code typically results in better performance. That’s because there are fewer steps (for your computer) between understanding a program and running a program.
Backup programs run all the time in the background, and have to keep track of a lot of information. Backblaze’s native code does that using half to a tenth of the computing resources that a backup program written in an interpreted language would use. So, Backblaze won’t slow down or interrupt the other activities you’re doing with your computer.
Reducing software bloat and size of software
Also, since you don’t have to install interpreters (you know, your insult dictionary), native code applications are usually leaner and more performant on the system.
Eliminating risky third-party dependencies
Since they’re software, computer language interpreters have bugs and get new features, so they’re frequently updated. Sometimes an updated interpreter won’t run programs written for an older version of the language, or will cause a program to behave differently in an unexpected (read: “buggy”) way. Also, vendors have even changed licensing terms and started charging money for interpreters that had been free. Backblaze’s native code doesn’t have those problems.
Platform-standard user interface
Operating system vendors like Microsoft and Apple strongly encourage developers to write programs that use a platform-standard user interface “look-and-feel.” Programs that do that help users feel comfortable, minimize surprises, and support accessibility features like text-to-speech.
The most effective way to ensure a program’s user interface matches a platform’s standard look-and-feel is to use features built into the operating system, and those are typically only available to native code like Backblaze’s client.
What are the challenges of using native code in a backup application?
Nothing is perfect. What are the downsides to this approach?
Industry preference moving towards interpreted language/web apps
Has anyone else noticed that the world of development has changed recently? (No need to qualify that statement—it will be true tomorrow, tomorrow, and tomorrow again.)
As with any industry, tech’s (and developers’) favorite strategies for creating things and solving problems have changed over time.
There are various players in this space, including platforms (Mac, Windows, Linux), software (Adobe, Office), applications (Slack, the latest mobile game, your headphone utility client), and frankly, many things that skirt the boundaries of the above buckets. Executing any program, and particularly third-party applications, is a negotiation between operating systems’ publishers and the program/application’s developers.
Over time, those who sell computers and manage OSes have grown to prefer the lightweight development of application ecosystems. It lets them have more control over their platforms, and it gives developers a shorter time to deployment—as long as they play within the sandbox the OS has made available. OS publishers are attempting to anticipate the needs of program and app developers, but there are some types of utilities—and backup is one of them—that justifiably break standard rules. Giving access to all your files by default, for example, isn’t something you’d do for a social media application. However, in order to get a full and complete backup, a program does justifiably require that level of access.
Limited dev libraries
Given the preference of developers to move to web applications and interpreted languages (for good reason in some cases), many OSes are releasing less detailed support and/or technical documentation for some of their deeper-level tools. If you’re implementing in native code in today’s environment, you need both historical knowledge and ingenuity in house. Which leads us to our next point…
Expertise
We’re on board with the evolution of development—innovation is at the heart of our company—but for aspects of our backup client, we need developers with a deep understanding of compiled code languages and our supported ecosystems. And luckily, in any sufficiently large tech company, you’ll find folks specializing in different code languages and parts of the tech stack. That means we can spend more time nurturing and developing our internal talent rather than seeking it externally.
Hybrid approaches?
Hey, we’ve spent a whole article telling you why native code matters. But, many folks agree that the future requires a hybrid approach, largely because of that gray area between compiled and interpreted languages we mentioned above. You can certainly see that in our style as well—our Mac client uses a combination of Objective C, SwiftUI and C++, for example.
The now and future Backblaze
The core functionality of our client depends on native code for very good design reasons, and they’re ultimately all about making things easier for our end users.
Overall, our design ideas are all centered on what it means to use Backblaze every day, regardless of an end user’s skill level. We want things to be simpler, and sometimes the questions we need to answer (how do I make sure the Backblaze client backs everything up?) are actually a tad more complicated upfront (the Backblaze client needs system permissions—and that means implementing it in native code), in that they require forethought and an investment of time and resources. But, we also prioritize the kind of thinking we can use over and over—so, even if we spend a little more time building native code, it’s an investment that has longevity. Put another way: Build once, run everywhere.
Editor’s Note: This post was originally published in 2016 and has since been updated in 2022 and 2023 with the latest information on RAM vs. storage.
Memory is a finite resource when it comes to both humans and computers—it’s one of the most common causes of computer issues. And if you’ve ever left the house without your keys, you know memory is one of the most common human problems, too.
If you’re unclear about the different types of memory in your computer, it makes pinpointing the cause of computer problems that much harder. You might hear folks use the terms memory and storage interchangeably, but there are some important differences. Understanding how both components work can help you understand what kind of computer you need, diagnose problems you’re having, and know when it’s time to consider upgrades.
The Difference Between RAM and Storage
Random access memory (RAM) and storage are both forms of computer memory, but they serve different functions.
What Is RAM?
RAM is volatile memory used by the computer’s processor to store and quickly access data that is actively being used or processed. Volatile memory maintains data only while the device is powered on. RAM takes the form of computer chips—integrated circuits—that are either soldered directly onto the main logic board of your computer or installed in memory modules that go in sockets on your computer’s logic board.
You can think of it like a desk—it’s where your computer gets work done. When you double-click on an app, open a document, or do much of anything, part of your “desk” is covered and can’t be used by anything else. As you open more files, it is like covering your desk with more and more items. Using a desk with a handful of files is easy, but a desk that is covered with a bunch of stuff gets difficult to use.
What Is Computer Storage?
On the other hand, storage is used for long-term data retention, like a hard disk drive (HDD) or solid state drive (SSD). Compared with RAM, this type of storage is non-volatile, which means it retains information even when a device is powered off. You can think of storage like a filing cabinet—a place next to your desk where you can retrieve information as needed.
RAM vs. Storage: How Do They Compare?
Speed and Performance
Two of the primary differences between RAM and storage are speed and performance. RAM is significantly faster than storage. Data stored in RAM can be written and accessed almost instantly, so it’s very fast—milliseconds fast. DDR4 RAM, one of the newer types of RAM technology, is capable of a peak transfer rate of 25.6GB/s! RAM has a very fast path to the computer’s central processing unit (CPU), the brain of the computer that does most of the work.
Storage, as it’s slower in comparison, is responsible for holding the operating system (OS), applications, and user data for the long term—it should still be fast, but it doesn’t need to be as fast as RAM.
That said, computer storage is getting faster thanks to the popularity of SSDs. SSDs are much faster than hard drives since they use integrated circuits instead of mechanical platters that have to be read sequentially, like HDDs. SSDs use a special type of memory circuitry called non-volatile RAM (NVRAM) to store data, so those shorter term memory access points stay in place even when the computer is turned off.
Even though SSDs are faster than HDDs, they’re still slower than RAM. There are two reasons for that difference in speed. First, the memory chips in SSDs are slower than those in RAM. Second, there is a bottleneck created by the interface that connects the storage device to the computer. RAM, in comparison, has a much faster interface.
Capacity and Size
RAM is typically smaller in capacity compared to storage. It is measured in gigabytes (GB) or terabytes (TB), whereas storage capacities can reach multiple terabytes or even petabytes. The smaller size of RAM is intentional, as it is designed to store only the data currently in use, ensuring quick access for the processor.
Volatility and Persistence
Another key difference is the volatility of RAM and the persistence of storage. RAM is volatile, meaning it loses its data when the power is turned off or the system is rebooted. This makes it ideal for quick data access and manipulation, but unsuitable for long-term storage. Storage is non-volatile or persistent, meaning it retains data even when the power is off, making it suitable for holding files, applications, and the operating system over extended periods.
How Much RAM Do I Have?
Understanding how much RAM you have might be one of your first steps for diagnosing computer performance issues.
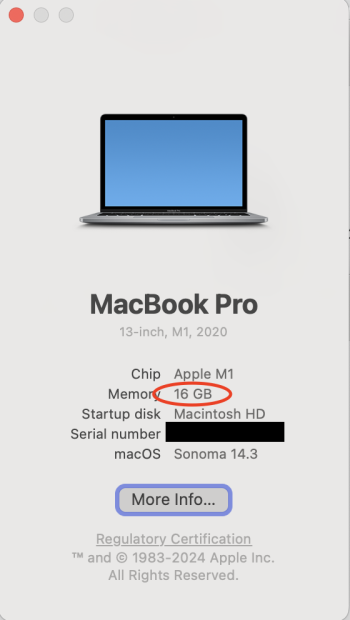
Use the following steps to confirm how much RAM your computer has installed. We’ll start with an Apple computer. Click on the Applemenu and then click About This Mac. In the screenshot below, we can see that the computer has 16GB of RAM.
How much RAM on macOS (Apple menu > About This Mac).
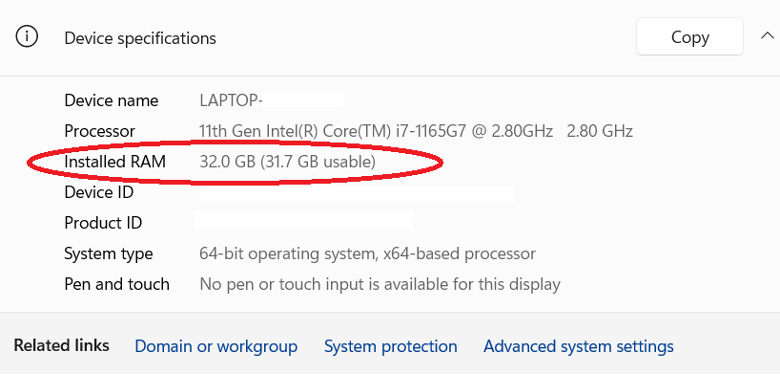
With a Windows 11 computer, use the following steps to see how much RAM you have installed. Open the Control Panel by clicking the Windows button and typing “control panel,” then click System and Security, and then click System. Look for the line “Installed RAM.” In the screenshot below, you can see that the computer has 32GB of RAM installed.
How much RAM on Windows 11 (Control Panel > System and Security > System).
How Much Computer Storage Do I Have?
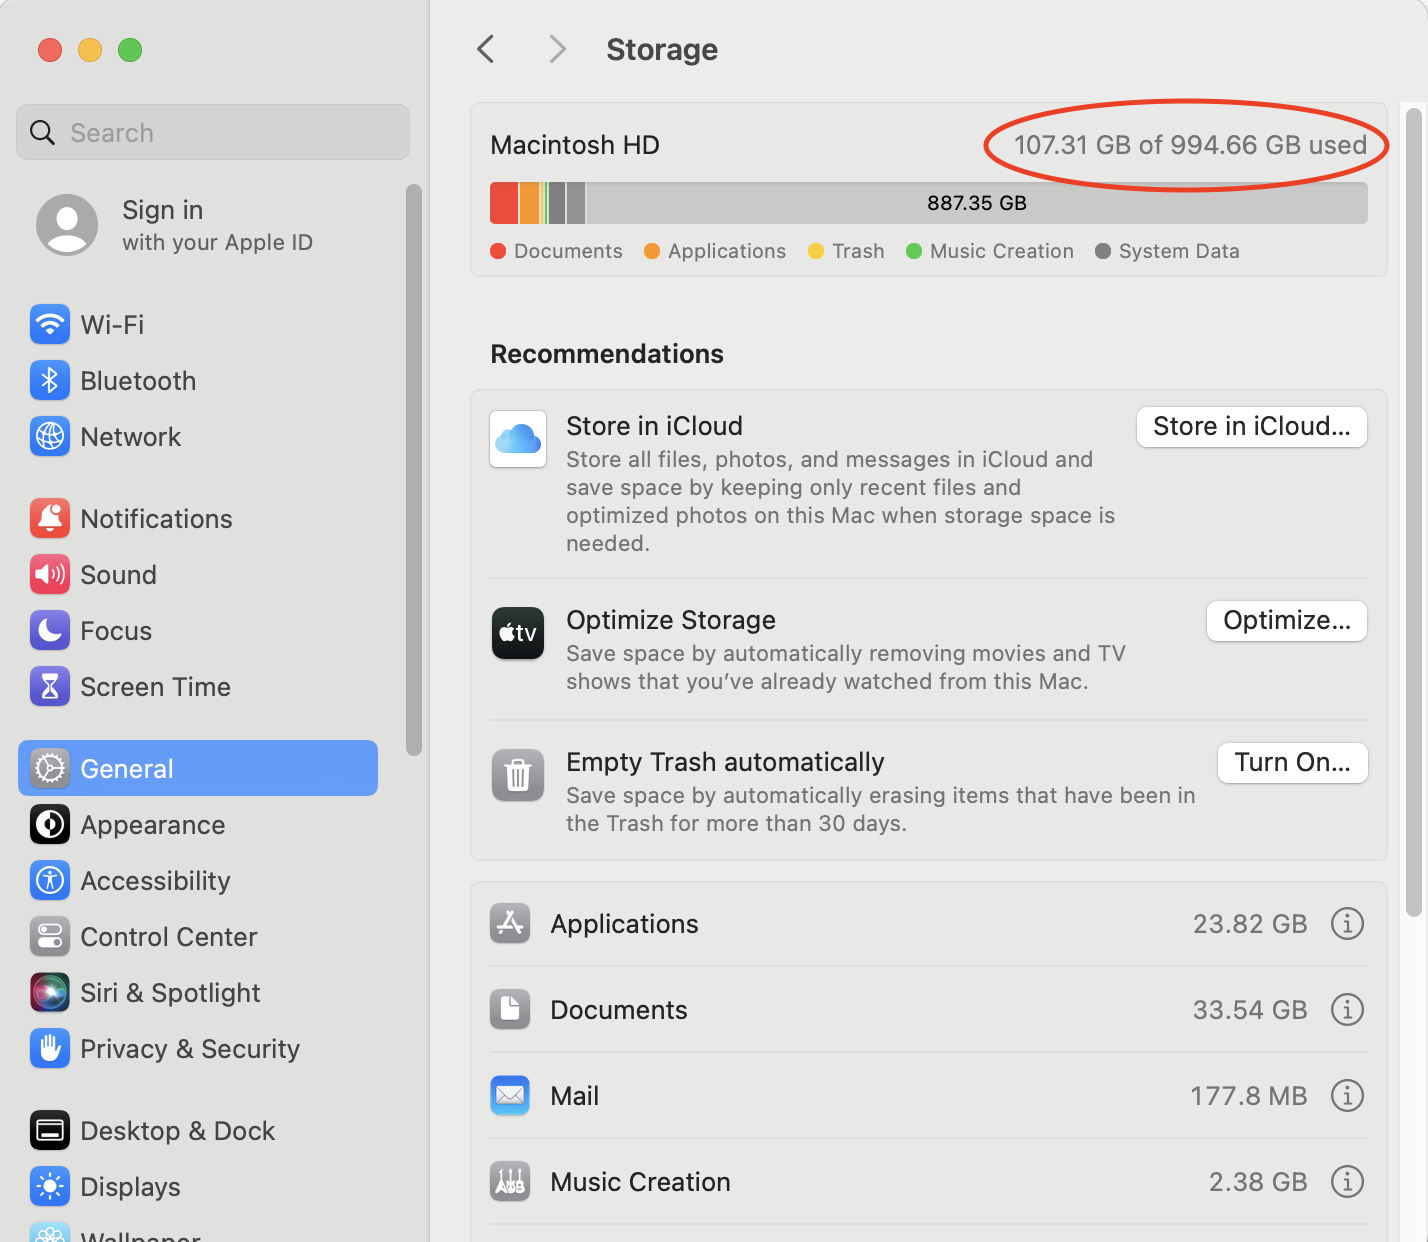
To view how much free storage space you have available on a Mac computer, use these steps. Click on the Apple menu, then System Settings, select General, and then open Storage. In the screenshot below, we’ve circled where your available storage is displayed.
Disk space on Mac OS (Apple Menu > System Settings > General > Storage).
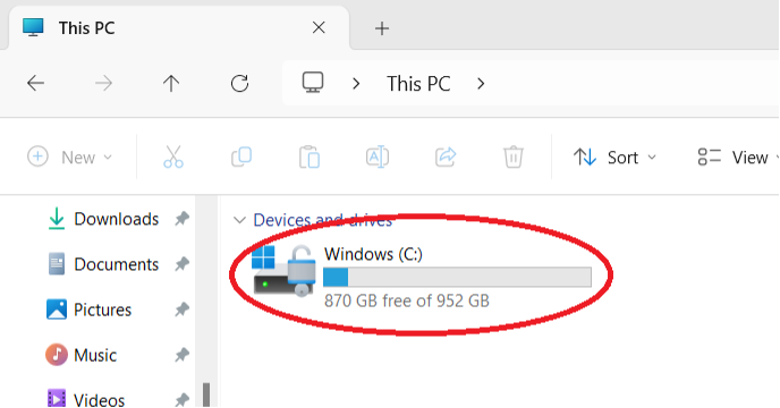
With a Windows 11 computer, it is also easy to view how much available storage space you have. Click the Windows button and type in “file explorer.” When File Explorer opens, click on This PC from the list of options in the left-hand pane. In the screenshot below, we’ve circled where your available storage is displayed (in this case, 200GB).
Disk Space on Windows 10 (File Explorer > This PC).
How RAM and Storage Affect Your Computer’s Performance
RAM
For most general-purpose uses of computers—email, writing documents, surfing the web, or watching Netflix—the RAM that comes with our computer is enough. If you own your computer for a long enough time, you might need to add a bit more to keep up with memory demands from newer apps and OSes. Specifically, more RAM makes it possible for you to use more apps, documents, and larger files at the same time.
People that work with very large files like large databases, videos, and images can benefit significantly from having more RAM. If you regularly use large files, it is worth checking to see if your computer’s RAM is upgradeable.
Adding More RAM to Your Computer
In some situations, adding more RAM is worth the expense. For example, editing videos and high-resolution images takes a lot of memory. In addition, high-end audio recording and editing as well as some scientific work require significant RAM.
However, not all computers allow you to upgrade RAM. For example, the Chromebook typically has a fixed amount of RAM, and you cannot install more. So, when you’re buying a new computer—particularly if you plan on using that computer for more than five years, make sure to 1) understand how much RAM your computer has, and, 2) if you can upgrade the computer’s RAM.
When your computer’s RAM is filled up, your computer has to get creative to keep working. Specifically, your computer starts to temporarily use your hard drive or SSD as “virtual memory.” If you have relatively fast storage like an SSD, virtual memory will be fast. On the other hand, using a traditional hard drive will be fairly slow.
Storage
Besides RAM, the most serious bottleneck to improving performance in your computer can be your storage. Even with plenty of RAM installed, computers need to read and write information from the storage system (i.e., the HDD or the SSD).
Hard drives come in different speeds and sizes. For laptops and desktops, the most common RPM rates are between 5400–7200RPM. In some cases, you might even decide to use a 10,000RPM drive. Faster drives cost more, are louder, have greater cooling needs, and use more power, but they may be a good option.
Today, SSDs are becoming increasingly popular for computer storage. This type of computer storage is popular because it is faster, cooler, and takes up less space than traditional hard drives. They’re also less susceptible to magnetic fields and physical jolts, which makes them great for laptops.
As a user’s disk storage needs increase, typically they will look to larger drives to store more data. The first step might be to replace an existing drive with a larger, faster drive. Or you might decide to install a second drive. One approach is to use different drives for different purposes. For example, use an SSD for the operating system, and then store your business videos on a larger SSD.
If more storage space is needed, you can also use an external drive, most often using USB or Thunderbolt to connect to the computer. This can be a single drive or multiple drives and might use a data storage virtualization technology such as RAID to protect the data.
If you have really large amounts of data, or simply wish to make it easy to share data with others in your location or elsewhere, you might consider network-attached storage (NAS). A NAS device can hold multiple drives, typically uses a data virtualization technology like RAID, and is accessible to anyone on your local network and—if you wish—on the internet, as well. NAS devices can offer a great deal of storage and other services that typically have been offered only by dedicated network servers in the past.
Back Up Early and Often
As a cloud storage company, we’d be remiss not to mention that you should back up your computer. No matter how you configure your computer’s storage, remember that technology can fail (we know a thing or two about that). You always want a backup so you can restore everything easily. The best backup strategy shouldn’t be dependent on any single device, either. Your backup strategy should always include three copies of your data on two different mediums with one off-site.
FAQs About Differences Between RAM and Storage
What is the difference between internal storage and RAM and internal storage?
Internal storage is a method of data storage that writes data to a disk, holding onto that data until it’s erased. Think of it as your computer’s brain. RAM is a method of communicating data between your device’s CPU and its internal storage. Think of it as your brain’s short-term memory and ability to multi-task. The data the RAM receives is volatile, so it will only last until it’s no longer needed, usually when you turn off the power or reset the computer.
Is it better to have more RAM or more storage?
If you’re looking for better PC performance, you can upgrade either RAM or storage for a boost in performance. More RAM will make it easier for your computer to perform multiple tasks at once, while upgrading your storage will improve battery life, make it faster to open applications and files, and give you more space for photos and applications. This is especially true if you’re switching your storage from a hard disk drive (HDD) to a solid state drive (SSD).
Does RAM give you more storage?
More RAM does not provide you with more free space. If your computer is giving you notifications that you’re getting close to running out of storage or you’ve already started having to delete files to make room for new ones, you should upgrade the internal storage, not the RAM.
Is memory and storage the same?
Memory and storage are also not the same thing, even though the words are often used interchangeably. Memory is another term for RAM.
Editor’s note: Since it was published in 2019, this post has been updated in 2021 and 2023 with the latest information to help you take advantage of SSDs.
Solid-state drives (SSDs) have become the norm for most laptops and desktops, replacing the older hard disk drives (HDDs) that had been in use for decades previously. If your computer still relies on an HDD, it might be time to consider upgrading to an SSD for improved performance.
Upgrading to an SSD can give your computer a significant speed and responsiveness boost, especially if your machine is more than a few years old. However, before taking the plunge, it’s essential to weigh practical considerations. Let’s take a closer look at SSDs and the factors you should consider.
What Is an SSD?
An SSD is a type of data storage device used in computers and other electronic devices. Unlike traditional HDDs, which use spinning disks and mechanical read/write heads to store and retrieve data, SSDs rely on NAND-based flash memory to store information. This flash memory is similar to the kind used in USB drives and memory cards, but it’s optimized for higher performance and reliability.
Refresher: What Is NAND?
NAND stands for “Not And.” It’s a type of logic gate used in digital circuits, specifically in memory and storage devices. In the context of NAND-based flash memory used in SSDs, the term NAND refers to the electronic structure of the memory cells that store data. The name NAND comes from its logical operation, which is the complement of the AND operation. NAND flash memory is a type of non-volatile storage, meaning it retains data even when the power is turned off, which makes it well-suited for use with things like SSDs and other data storage devices. That’s different from the regular RAM in your computer, which is reset when you turn off or restart the computer.
Compared to HDDs, SSDs are more shock resistant (due to their lack of moving parts) and are less likely to be affected by magnetic fields. They also offer faster data access times, quicker boot-up and application load times, and better overall responsiveness.
Because of their speed and efficiency, SSDs have become the preferred choice for many computing applications, ranging from laptops and desktops to servers and data centers. They are especially useful in situations where speed and reliability are crucial, such as in gaming, content creation, and tasks involving large data transfers. Despite typically offering less storage capacity compared to HDDs of similar cost, SSD performance benefits often outweigh the storage trade-off, making them a popular choice.
Depending on the task at hand, SSDs can be up to 10 times faster than their HDD counterparts. Replacing your hard drive with an SSD is one of the best things you can do to dramatically improve the performance of your older computer.
Samsung 870 QVO SATA III 2.5″ SSD 1TB.
Without any moving parts, SSDs operate more quietly, more efficiently, and with fewer breakable things than hard drives that have spinning platters. Read and write speeds for SSDs are much better than hard drives, resulting in noticeably faster operations.
For you, that means less time waiting for stuff to happen. An SSD is worth looking into if you’re frequently seeing a spinning wheel cursor on your computer screen. Modern operating systems rely more on virtual memory management, utilizing temporary swap files that are written to the disk. A faster SSD minimizes the performance impact caused by this process.
If you have just one drive in your laptop or desktop, you could replace an HDD or small SSD with a 1TB SSD for less than $40. For those dealing with substantial amounts of data, concentrating on replacing the drive that houses your operating system and applications can yield a significant speed boost. Put your working data on additional internal or external hard drives, and you’re ready to tackle a mountain of photos, videos, or supersized databases. Just be sure to implement a backup plan to make sure you keep a copy of that data safe on additional local drives, network attached drives, or in the cloud.
Are There Any Reasons Not to Upgrade to an SSD?
If SSDs are so much better than hard drives, why aren’t all drives SSDs? The two biggest reasons are cost and capacity. SSDs are more expensive than hard drives. A 1TB SSD or HDD now cost about the same, $30–$50, with HDDs being slightly less, maybe around $25.
That’s not much of a difference, but as drive capacity gets larger, the cost differential gets increasingly larger. For example, an 8TB HDD drive runs $120–$180, while 8TB SSDs start at around $350. In short, while upgrading the 1TB internal hard drive on your computer to an SSD is cost effective, the same may not be true for replacing larger capacity drives, like those used in external drives, unless the increased speed is worth the increased cost.
Whether your computer can use an SSD is another question. It all depends on the computer’s age and how it was designed. Let’s take a look at that question next.
How Do You Upgrade to an SSD?
Does your computer use a regular off-the-shelf SATA HDD? If so, you can upgrade it with an SSD.
SSDs are compatible with both Macs and PCs. All current Mac laptops come with SSDs. Both iMacs and Mac Pros come with SSDs as well. Around 2010, Apple started moving to only SSD storage on most of its devices. That said, some Mac desktop computers continued to offer the option of both SSD and HDD storage until 2020, a setup they called a Fusion Drive.
Note that as of November 2021, Apple does not offer any Macs with a Fusion Drive. Basically, if you bought your device before 2010 or you have a desktop computer from 2021 or earlier, there’s a chance you may be using an HDD.
Determine Your Disk Type in a Mac
To determine what kind of drive your Mac uses, click on the Apple menu and select About This Mac.
Avoid the pitfall of selecting the Storage tab in the top menu. What you’ll find is that the default name of your drive is “Macintosh HD” which is confusing, given that they’re referring to the internal storage of the computer as a hard drive when (in most cases), your drive is an SSD. While you can find information about your drive on this screen, we prefer the method that provides maximum clarity.
So, on the Overview screen, click System Report. Bonus: You’ll also see what type of processor you have and your macOS version (which will be useful later).
Once there, select the Storage tab, then the volume name you want to identify. You should see a line called Medium Type, which will tell you what kind of drive you have.
Determine Your Disk Type in a PC
To determine your disk type in a Windows PC, first open the Task Manager in Windows:
Right-click the Start button and click Run. In the Run Command window, type dfrgui and click OK.
On the next screen, the type of drive will be listed under the Media Type column.
Can I Upgrade to a Better SSD?
Even if your computer already has an SSD, you may be able to upgrade it with a larger, faster SSD model. Besides SATA-based hard drive replacements, some later model PCs can be upgraded with M.2 SSDs, which look more like RAM chips than hard drives.
Some Apple laptops made before 2016 that already shipped with SSDs can be upgraded with larger ones. However, you will need to upgrade to a Mac-specific SSD. Check Other World Computing and Transcend to find ones designed to work. Apple laptop models made after 2016 have SSDs soldered to the motherboard, so you’re stuck with what you have.
M.2 SSD.
How to Install an SSD
If you’re comfortable tinkering with your computer’s guts, upgrading it with an SSD is a pretty common do-it-yourself project. Many companies offer hassle-free plug-and-play SSD replacements. Check out Amazon or NewEgg and you’ll have an embarrassment of riches. The choice is yours: Samsung, SanDisk, Crucial, and Toshiba are all popular SSD makers. There are many others, too.
However, if computer hardware isn’t your forte, it might not be worth the effort to learn from scratch. SSD upgrades are such a common aftermarket improvement most independent computer repair and service specialists will take on the task if you’re willing to pay them. Some throw in a data transfer if you’re lucky, or a skilled negotiator. Ask your friends and colleagues for recommendations. You can also hit up services like Angi to find someone.
If you are DIY inclined, YouTube has tons of walkthroughs like this one for desktop PCs, this one for laptops, and this one aimed at Mac users.
HDD/SSD to 3.5″ drive bay adapter.
Many SSDs replace 2.5 inch HDDs. Those are the same drives you find in laptop computers and even small desktop models. Have a desktop computer that uses a 3.5 inch hard drive? You may need to use a 2.5 inch to 3.5 inch mounting adapter.
A Word on SSD Compatibility
Beyond the drive size, it’s a good idea to check to see if the SSD you want to buy is compatible with your laptop or desktop, especially if your system is older than a couple of years. Here are articles from Tom’s Hardware and ShareUs which can help with that.
How to Migrate to an SSD
Buying a replacement SSD is the first step. Moving your data onto the SSD is the next step. To achieve this, you need two essential components: cloning software and an external drive case, sled, or enclosure. These tools enable you to connect your SSD to your computer through its USB port or another data transfer interface.
Cloning software creates an exact replica of your internal hard drive’s data. Once this data is successfully migrated to the SSD, you can then insert the new drive into your computer. I prefer to clone a hard drive onto an SSD whenever possible. When executed correctly, a cloned SSD retains its bootable capabilities, providing a true plug-and-play experience. Just copying files between the two drives instead may not copy all the data you need to get the computer to boot with the new drive.
How to Clone a Hard Drive to an SSD
When you buy a new SSD or even a fresh hard drive, it’s unlikely that the operating system you need will be pre-installed. Cloning your existing hard drive fixes that. However, there are instances where this may not be feasible. For example, maybe you’ve installed the SSD in a computer that previously had a bad hard drive. If so, you can do what’s called a clean install and start fresh. Different operating system providers offer distinct guidelines for this procedure. Here’s a link to Microsoft’s clean install procedure, and Apple’s clean install instructions.
As we said at the outset, SSDs tend to come at a higher cost per gigabyte compared to traditional hard drives. You may not be able to afford as large an SSD as your current drive, so make sure your data will fit on your new drive. If it won’t, you might have to pare down first. Additionally, it’s wise to leave some room for expansion. The last thing you want to do is immediately max out your new, fast drive.
Now that you’ve successfully cloned your drive and integrated the SSD into your system, what do you do with the old drive? If it’s still functional, repurposing the external drive chassis utilized during migration is a practical option. It can continue to serve as a standalone external drive or become part of a disk array, such as a network attached storage (NAS) device. You can use it for local back up—something we strongly recommend doing—in addition to using cloud back up like Backblaze. Or, just use it for extra storage needs, like for your photos or music.
Make Sure to Back Up
SSD upgrades are commonplace, but that doesn’t mean things don’t go wrong that can stop you dead in your tracks. If your computer is working fine before the SSD upgrade, make sure you have a complete backup of your computer to restore from in the event something goes wrong.
More Questions About SSDs?
You might enjoy reading other posts in our SSD 101 series.
This post has been updated since it was originally published.
Your faithful Mac has served you well for years, but it’s time to upgrade. Whether you’re selling it, giving it to a friend, donating it, or recycling it, you first need to make sure all of your personal data is wiped clean.
In this guide, we’ll take you through the process step-by-step, from backing up your files to encrypting your data, so you can make sure your private information stays private.
Before you do anything else, back up
Once you wipe your Mac, you won’t be able to access the data from your drive. Before you get started, you’ll want to make sure any important data on your hard drive has been backed up. Apple has a built-in backup utility called Time Machine backup software.
While Time Machine is a good start, it doesn’t fulfill all of the requirements of a 3-2-1 backup strategy: When you set up Time Machine backups, you choose a backup disk (an external drive or network attached storage (NAS) device) that you can save your backups to. Under the 3-2-1 backup rule (three backups, on two media types, with one off-site), that means you’d still need an off-site copy of your data, preferably saved in the cloud. Ideally, you’d pair Time Machine with a product like Backblaze Computer Backup for maximum flexibility. Note that even though backups run nearly continuously with Backblaze Computer Backup, we recommend hitting the manual backup button before you wipe your Mac to ensure you’ve got the most recent information.
Mac operating systems (OSes) and processing chips: Figuring out what you have
The process for wiping your Mac depends on a couple things:
What OS version you’re rocking
What kind of processing chip you have
Fortunately, Apple has only made it easier to wipe your computer as the years and operating systems have rolled out. If you’re using macOS Monterey or later with an Apple-based processor chip, it’s very simple—you have the option to wipe your Mac from the System Settings.
What macOS do I have?
You can see your current OS in the About This Mac screen (from the Apple menu in the upper-left corner of your screen, choose About This Mac), and below is a list of all OS releases you can compare against. You can also check out the Apple Help article on the topic.
What kind of processing chip do I have in my Mac?
The second variable you need to know is what kind of processing chip you have in your Mac—an Apple-based chip (Apple M-series) or an Intel chip.
In November 2020, Apple launched its first Macs equipped with M1 chips, replacing the Intel-based processors of the past. The evolution of the M-series Apple chips has been notable largely for performance enhancements, but given that (at the time of publishing) this was four years ago, there’s a good chance that many users will have an Intel processor.
To see what kind of chip you have, follow the same instructions as above—go to your Apple menu and select About This Mac. If you have an M-series chip, you’ll see that listed as marked in the screenshot below.
If you have an Intel-based Mac, you will see Processor, followed by the name of an Intel processor.
How to wipe your Mac
Okay, so now that you know your operating system and processing chip, we can get to the actual how-to of how to wipe your Mac. The steps will be slightly different based on each of the above variables. Let’s dig in.
Wipe a Mac with an Apple chip and a recent macOS update
If you have macOS Monterey or later with an Apple chip, then you’re going to wipe your Mac using the Erase All Content and Settings function. (You might also see this called the Erase Assistant in Apple’s Help articles.) This will delete all your data, including iCloud and Apple logins, Apple wallet information, Bluetooth pairings, fingerprint sensor profiles, and Find My Mac settings, as well as resetting your Mac to factory settings. Here’s how you find it.
If you have macOS Ventura or Sonoma:
Select the Apple menu.
Choose System Settings.
Click General in the sidebar.
Click Transfer or Reset on the right.
If you have macOS Monterey:
Select the Apple Menu.
Choose System Preferences.
Once the System Preferences window is open, select the dropdown menu in your top navigation bar. Then, select Erase All Content and Settings.
Once you’ve reached this point, then the steps will be the same for each process. Here’s what to expect.
You’ll be prompted to log in with your administrator credentials.
Next, you will be reminded to back up via Time Machine. Remember that if you choose this option, you’ll want to back up to an external device—because, of course, you’re about to get rid of all the data stored on this computer.
Click Continue to allow all your settings, data, accounts, etc. to be removed.
If you’re asked to sign out of Apple ID, enter your Apple password and hit Continue.
Click Erase all Content & Settings to confirm.
Your Mac will automatically restart. If you have an accessory like a Bluetooth keyboard, you’ll be prompted to reconnect that device.
Select a WiFi network or attach a network cable.
After joining a network, your Mac activates. Click Restart.
After your device has restarted, a setup assistant will launch (just like when you first got your Mac).
It’ll be pretty clear if you don’t meet the conditions to erase your drive using this method because you won’t see Erase All Content and Settings on the System Settings we showed you above. So, here are instructions for the other methods.
How to wipe a Mac with an Apple chip using Disk Utility
Disk Utility is exactly what it sounds like: a Mac system application that helps you to manage your various storage volumes. You’d use it to manage storage if you have additional storage volumes, like a NAS or external hard drive; to set up a partition on your drive; to create a disk image (basically, a backup); or to simply give your disks a check up if they’re acting funky.
You can access Disk Utility at any time by selecting Finder > Go > Utilities, but you can also trigger Disk Utility on startup as outlined below.
Turn on your Mac and continue to press and hold the power button until the startup options window comes up. Click Options, then click Continue.
You may be prompted to log in with either your administrative password or your Apple ID.
When the Utilities window appears, select Disk Utility and hit Continue.
If you’d previously added other drives to your startup disk, click the delete volume button (–) to erase them.
Then, choose Macintosh HD in the sidebar.
Click the Erase button, then select a file system format and enter a name for it. For Macs with an M1 chip, your option for a file system format is only Apple File System (APFS).
Click Erase or, if it’s an option, Erase Volume Group. You may be asked for your Apple ID at this point.
You’ll be prompted to confirm your choice, then your computer will restart.
Just as in the other steps, when the computer restarts, it will attempt to activate by connecting to WiFi or asking you to attach a network cable.
After it activates, select Exit to Recovery Utilities.
Once it’s done, the Mac’s hard drive will be clean as a whistle and ready for its next adventure: a fresh installation of the macOS, being donated to a relative or a local charity, or just sent to an e-waste facility. Of course, you can still drill a hole in your disk or smash it with a sledgehammer if it makes you happy, but now you know how to wipe the data from your old computer with much less ruckus.
How to wipe a Mac with an Intel Processor using Disk Utility
Last but not least, let’s talk about how to wipe an Intel-based Mac.
Starting with your Mac turned off, press the power button, then immediately hold down the command (⌘) and R keys and wait until the Apple logo appears. This will launch macOS Recovery.
You may be prompted to log in with an administrator account password.
When the Recovery window appears, select Disk Utility.
In the sidebar, choose Macintosh HD.
Click the Erase button, then select a file system format and enter a name for it. Your options for a file system format include APFS, which is the file system used by macOS 10.13 or later, and macOS Extended, which is the file system used by macOS 10.12 or earlier.
Click Erase or Erase Volume Group. You may be prompted to provide your Apple ID.
If you previously used Disk Utility to add other storage volumes, you can erase them individually using the process above.
When you’ve deleted all your drives, quit Disk Utility to return to the utilities window. You may also choose to restart your computer at this point.
Do you still need to know what kind of drive you have?
Wiping your Mac used to depend on what kind of drive you had—a hard disk drive (HDD) or solid state drive (SSD). As we’ve outlined above, today, the process depends on your OS and the type of chip you have. But some of you may have very old Macs you want to get rid of. Here we’ll talk a bit about HDDs vs SSDs and the impact that has on how you erase your computer.
Around 2010, Apple started moving to only SSD storage in many of its devices. That said, some Mac desktop computers continued to offer the option of both SSD and HDD storage until 2020, a setup they called a Fusion Drive. The Fusion Drive is not to be confused with flash storage, a term that refers to the internal storage that holds your readily available and most accessed data at lower power settings.
Note that as of November 2021, Apple does not offer any Macs with a Fusion Drive. Basically, if you bought your device before 2010 or you have a desktop computer from 2021 or earlier, there’s a chance you may be using an HDD.
To determine what kind of drive your Mac uses, click on the Apple menu and select About This Mac.
Avoid the pitfall of selecting the Storage tab in the top menu. What you’ll find is that the default name of your drive is “Macintosh HD” which is confusing, given that they’re referring to the internal storage of the computer as a hard drive when (in most cases), your drive is an SSD. While you can find information about your drive on this screen, we prefer the method that provides maximum clarity.
So, on the Overview screen, click System Report. Bonus: You’ll also see what type of processor you have and your macOS version (which will be useful later).
Once there, select the Storage tab, then the volume name you want to identify. You should see a line called Medium Type, which will tell you what kind of drive you have.
Securely erasing drives: Questions and considerations
Some of you drive experts out there might remember that there is some nuance to security when it comes to erasing drives, and that there are differences in erasing HDDs versus SSDs. Without detouring into why and how that’s the case, just know that on Fusion Drives or Intel-based Macs, you may see additional security options you can enable when erasing HDDs.
There are four options in the “Security Options” slider. “Fastest” is quick but insecure—data could potentially be rebuilt using a file recovery app. Moving that slider to the right introduces progressively more secure erasing. Disk Utility’s most secure level erases the information used to access the files on your disk, then writes zeros across the disk surface seven times to help remove any trace of what was there. This setting conforms to the DoD 5220.22-M specification. Bear in mind that the more secure method you select, the longer it will take. The most secure methods can add hours to the process. For peace of mind, we suggest choosing the most secure option to erase your hard drive. You can always start the process in the evening and let it run overnight.
After the process is complete, restart your Mac and see if you can find any data. A quick inspection is not foolproof, but it can provide some peace of mind that the process finished without an interruption.
Securely erasing SSDs and why not to
If your Mac comes equipped with an SSD, Apple’s Disk Utility software won’t actually let you zero the drive. Sounds strange, right? Apple’s online Knowledge Base explains that secure erase options are not available in Disk Utility for SSDs.
Fortunately, you are not restricted to using the standard erasure option to protect yourself. Instead, you can use FileVault, a capability built into the operating system.
Encrypting your computer with FileVault
FileVault is an excellent option to protect all of the data on a Mac SSD with encryption. FileVault is whole-disk encryption for the Mac. With FileVault engaged, you need a password to access the information on your hard drive. Even without it, your data is encrypted and it would be very difficult for anybody else to access.
Before you use FileVault, there is a crucial downside. If you lose your password or the encryption key, your data may be gone for good!
When you first set up a new Mac, you’re given the option of turning FileVault on. If you don’t do it then, you can turn on FileVault at any time by clicking on your Mac’s System Preferences, clicking on Security & Privacy, and selecting the FileVault tab. Be warned, however, that the initial encryption process can take hours, as will decryption if you ever need to turn FileVault off.
With FileVault turned on, you can restart your Mac into its Recovery System following the directions above and erase your hard drive using Disk Utility, once you’ve unlocked it (by selecting the disk, clicking the File menu, and clicking Unlock). That deletes the FileVault key, which means any data on the drive is useless.
Nowadays, most Macs manage disk encryption through the T2 chip and its Secure Enclave, which is entirely separate from the main computer itself. This is why FileVault has no CPU overhead—it’s all handled by the T2 chip. Although FileVault doesn’t impact the performance of most modern Macs, we’d suggest only using it if your Mac has an SSD, not a conventional HDD.
Securely erasing free space on your SSD
If you don’t want to take Apple’s word for it, if you’re not using FileVault, or if you just want to, there is a way to securely erase free space on your SSD. It’s a little more involved, but it works. Before we get into the nitty-gritty, let me state for the record that this really isn’t necessary to do, which is why Apple’s made it so hard to do.
To delete all data from an SSD on an Apple computer, use Apple’s Terminal app. Terminal provides you with command line interface (CLI) access to the OS X operating system. Terminal lives in the Utilities folder, but you can access Terminal from the Mac’s Recovery System. Once your Mac has booted into the Recovery partition, click the Utilities menu and launch Terminal.
From a Terminal command line, type the following:
diskutil secureErase freespace VALUE /Volumes/DRIVE
That tells your Mac to securely erase the free space on your SSD. You’ll need to change value to a number between 0 and 4. Zero is a single-pass run of zeroes, 1 is a single-pass run of random numbers, 2 is a seven-pass erase, 3 is a 35-pass erase. Finally, level 4 is a three-pass erase with random fills plus a final zero fill. drive should be changed to the name of your hard drive. To run a seven-pass erase of your SSD drive in JohnB-MacBook, you would enter the following:
Note that while Mac’s Terminal typically uses forward slashes ( / ), if you have a space in the name of your hard drive, you’ll see a backslash ( \ ) to indicate that break in syntax. (So “Macintosh HD” becomes /Macintosh\ HD.) For example, to run a 35-pass erase on a hard drive called Macintosh HD, enter the following:
diskutil secureErase freespace 3 /Volumes/Macintosh\ HD
If you’re like the majority of computer users, you’ve never opened your Terminal application—and that’s probably a good thing. If you’re providing the proper instructions, a CLI lets you directly edit the guts of your computer. If you’re not providing the proper instructions, things will just error out, and likely you won’t know why.
In conclusion, in most cases, it’s simple to wipe your Mac hard drive
All this to say: Apple has made specific choices about designing products for folks who aren’t computer experts, and in most cases, you won’t need to break out the CLI knowledge to securely erase your hard drive. While Mac sometimes limits how customizable you can get on your device (i.e. it’s super hard to zero out an SSD), it’s usually for good reason—in this case, it’s to preserve the health of your drive in the long term. So, if you personally are planning to reuse the device you’re wiping, or if you’re not being targeted in a real-life James Bond movie, in most instances, it’s a less-than-ten step process to securely wipe your Mac and send it on to a new, shiny future.
FAQ
1. How do I wipe a Mac computer?
Wiping all data from your Mac depends on what macOS you’re using and what kind of processing chip you have. For Macs using macOS Monterey or later, you can use the Erase All Content and Settings function. This will delete all your data, including iCloud and Apple logins, Apple wallet information, Bluetooth pairings, fingerprint sensor profiles, and Find My Mac settings, as well as resetting your Mac to factory settings.
2. How do I wipe a Mac with an Intel processing chip?
To wipe a Mac with an Intel processing chip, you need to use Disk Utility, a Mac system application that helps you to manage your various storage volumes. You can access Disk Utility by selecting Finder > Go > Utilities. Choose Macintosh HD in the sidebar, click the Erase button, then select a file system format and enter a name for it. Your options for a file system format include Apple File System (APFS), which is the file system used by macOS 10.13 or later, and macOS Extended, which is the file system used by macOS 10.12 or earlier. Then click Erase or, if it’s an option, Erase Volume Group.
3. How do I encrypt data on my Mac?
FileVault is an excellent option to protect all of the data on a Mac SSD with encryption. FileVault is whole-disk encryption for the Mac. With FileVault engaged, you need a password to access the information on your hard drive. Even without it, your data is encrypted and it would be very difficult for anybody else to access.
To provide the best experiences, we use technologies like cookies to store and/or access device information. Consenting to these technologies will allow us to process data such as browsing behavior or unique IDs on this site. Not consenting or withdrawing consent, may adversely affect certain features and functions.
Functional
Always active
The technical storage or access is strictly necessary for the legitimate purpose of enabling the use of a specific service explicitly requested by the subscriber or user, or for the sole purpose of carrying out the transmission of a communication over an electronic communications network.
Preferences
The technical storage or access is necessary for the legitimate purpose of storing preferences that are not requested by the subscriber or user.
Statistics
The technical storage or access that is used exclusively for statistical purposes.The technical storage or access that is used exclusively for anonymous statistical purposes. Without a subpoena, voluntary compliance on the part of your Internet Service Provider, or additional records from a third party, information stored or retrieved for this purpose alone cannot usually be used to identify you.
Marketing
The technical storage or access is required to create user profiles to send advertising, or to track the user on a website or across several websites for similar marketing purposes.