Enabling the Cloudflare WAF and Cloudflare Specials ruleset protects against exploitation of unpatched CVEs: CVE-2021-26855, CVE-2021-26857, CVE-2021-26858, and CVE-2021-27065.
Cloudflare has deployed managed rules protecting customers against a series of remotely exploitable vulnerabilities that were recently found in Microsoft Exchange Server. Web Application Firewall customers with the Cloudflare Specials ruleset enabled are automatically protected against CVE-2021-26855, CVE-2021-26857, CVE-2021-26858, and CVE-2021-27065.
If you are running Exchange Server 2013, 2016, or 2019, and do not have the Cloudflare Specials ruleset enabled, we strongly recommend that you do so. You should also follow Microsoft’s urgent recommendation to patch your on-premise systems immediately. These vulnerabilities are actively being exploited in the wild by attackers to exfiltrate email inbox content and move laterally within organizations’ IT systems.
Edge Mitigation
If you are running the Cloudflare WAF and have enabled the Cloudflare Specials ruleset, there is nothing else you need to do. We have taken the unusual step of immediately deploying these rules in “Block” mode given active attempted exploitation.
If you wish to disable the rules for any reason, e.g., you are experiencing a false positive mitigation, you can do so by following these instructions:
Login to the Cloudflare Dashboard and click on the Cloudflare Firewall tab and then Managed Rules.
Click on the “Advanced” link at the bottom of the Cloudflare Managed Ruleset card and search for rule ID 100179. Select any appropriate action or disable the rule.
The attacks observed in the wild take advantage of multiple CVEs that can result in exfiltration of email inboxes and remote code execution when chained together. Security researchers at Volexity have published a detailed analysis of the zero-day vulnerabilities.
Briefly, attackers are:
First exploiting a server-side request forgery (SSRF) vulnerability documented as CVE-2021-26855 to send arbitrary HTTP requests and authenticate as the Microsoft Exchange server.
Using this SYSTEM-level authentication to send SOAP payloads that are insecurely deserialized by the Unified Messaging Service, as documented in CVE-2021-26857. An example of the malicious SOAP payload can be found in the Volexity post linked above.
Additionally taking advantage of CVE-2021-26858 and CVE-2021-27065 to upload arbitrary files such as webshells that allow further exploitation of the system along with a base to move laterally to other systems and networks. These file writes require authentication but this can be bypassed using CVE-2021-26855.
All 4 of the CVEs listed above are blocked by the recently deployed Cloudflare Specials rules: 100179 and 100181. Additionally, existing rule ID 100173, also enabled to Block by default, partially mitigates the vulnerability by blocking the upload of certain scripts.
Additional Recommendations
Organizations can deploy additional protections against this type of attack by adopting a Zero Trust model and making the Exchange server available only to trusted connections. The CVE guidance recommends deploying a VPN or other solutions to block attempts to reach public endpoints. In addition to the edge mitigations from the Cloudflare WAF, your team can protect your Exchange server by using Cloudflare for Teams to block all unauthorized requests.
The Managed Rules team was recently given the task of allowing Enterprise users to debug Firewall Rules by viewing the part of a request that matched the rule. This makes it easier to determine what specific attacks a rule is stopping or why a request was a false positive, and what possible refinements of a rule could improve it.
The fundamental problem, though, was how to securely store this debugging data as it may contain sensitive data such as personally identifiable information from submissions, cookies, and other parts of the request. We needed to store this data in such a way that only the user who is allowed to access it can do so. Even Cloudflare shouldn’t be able to see the data, following our philosophy that any personally identifiable information that passes through our network is a toxic asset.
This means we needed to encrypt the data in such a way that we can allow the user to decrypt it, but not Cloudflare. This means public key encryption.
Now we needed to decide on which encryption algorithm to use. We came up with some questions to help us evaluate which one to use:
What requirements do we have for the algorithm?
What language do we implement it in?
How do we make this as secure as possible for users?
Here’s how we made those decisions.
Algorithm Requirements
While we knew we needed to use public key encryption, we also needed to keep an eye on performance. This led us to select Hybrid Public Key Encryption (HPKE) early on as it has a best-of-both-worlds approach to using symmetric as well as public-key cryptography to increase performance. While these best-of-both-worlds schemes aren’t new [1][2][3], HPKE aims to provide a single, future-proof, robust, interoperable combination of a general key encapsulation mechanism and a symmetric encryption algorithm.
HPKE is an emerging standard developed by the Crypto Forum Research Group (CFRG), the research body that supports the development of Internet standards at the IETF. The CFRG produces specifications called RFCs (such as RFC 7748 for elliptic curves) that are then used in higher level protocols including two we talked about previously: ODoH and ECH. Cloudflare has long been a supporter of Internet standards, so HPKE was a natural choice to use for this feature. Additionally, HPKE was co-authored by one of our colleagues at Cloudflare.
How HPKE Works
HPKE combines an asymmetric algorithm such as elliptic curve Diffie-Hellman and a symmetric cipher such as AES. One of the upsides of HPKE is that the algorithms aren’t dictated to the implementer, but making a combination that’s provably secure and meets the developer’s intuitive notions of security is important. All too often developers reach for a scheme without carefully understanding what it does, resulting in security vulnerabilities.
HPKE solves these problems by providing a high level of security in a generic manner and providing necessary hooks to tie messages to the context in which they are generated. This is the application of decades of research into the correct security notions and schemes.
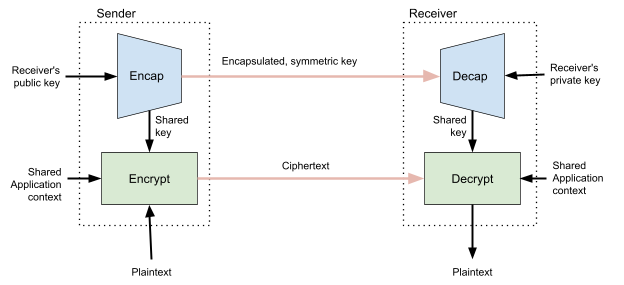
HPKE is built in stages. First it turns a Diffie-Hellman key agreement into a Key Encapsulation Mechanism. A key encapsulation mechanism has two algorithms: Encap and Decap. The Encap algorithm creates a symmetric secret and wraps it in a public key, so that only the holder of the private key can unwrap it. An attacker with the encapsulation cannot recover the random key. Decap takes the encapsulation and the private key associated to the public key, and computes the same random key. This translation gives HPKE the flexibility to work almost unchanged with any kind of public key encryption or key agreement algorithm.
HPKE mixes this key with an optional info argument, as well as information relating to the cryptographic parameters used by each side. This ensures that attackers cannot modify messages’ meaning by taking them out of context. A postcard marked “So happy to see you again soon” is ominous from the dentist and endearing from one’s grandmother.
The specification for HPKE is open and available on the IETF website. It is on its way to becoming an RFC after passing multiple rounds of review and analysis by cryptography experts at the CFRG. HPKE is already gaining adoption in IETF protocols like ODoH, ECH, and the new Messaging Layer Security (MLS) protocol. HPKE is also designed with the post-quantum future since it is built to work with any KEM, including all the NIST finalists for post-quantum public-key encryption.
Implementation Language
Once we had an encryption scheme selected, we needed to settle on an implementation. HPKE is still fairly new, so the libraries aren’t quite mature yet. There is a reference implementation, and we’re in the process of developing an implementation in Go as part of CIRCL. However, in the absence of a clear “go to” that is widely known to be the best, we decided to go with an implementation leveraging the same language already powering much of the Firewall code running at the Cloudflare edge – Rust.
Aside from this, the language benefits from features like native primitives, and crucially the ability to easily compile to WebAssembly (WASM).
As we mentioned in a previous blog post, customers are able to generate a key pair and decrypt payloads either from the dashboard UI or from a CLI. Instead of writing and maintaining two different codebases for these, we opted to reuse the same implementation across the edge component that encrypts the payloads and the UI and CLI that decrypt them. To achieve this we compile our library to target WASM so it can be used in the dashboard UI code that runs in the browser. While this approach may yield a slightly larger JavaScript bundle size and relatively small computational overhead, we found it preferable to spending a significant amount of time securely re-implementing HPKE using JavaScript WebCrypto primitives.
The HPKE implementation we decided on comes with the caveat of not yet being formally audited, so we performed our own internal security review. We analyzed the cryptography primitives being used and the corresponding libraries. Between the composition of said primitives and secure programming practices like correctly zeroing memory and safe usage of random number generators, we found no security issues.
Making It Secure For Users
To encrypt on behalf of users, we need them to provide us with a public key. To make this as easy as possible, we built a CLI tool along with the ability to do it right in the browser. Either option allows the user to generate a public/private key pair without needing to talk to Cloudflare servers at all.
In our API, we specifically do not accept the private key of the key pair — we don’t want it! We don’t need and don’t want to be able to decrypt the data we’re storing.
For the dashboard, once the user provides the private key for decryption, the key is held in a temporary JavaScript variable and used for the in-browser decryption. This allows the user to not constantly have to provide the key while browsing the Firewall event logs. The private key is also not persisted in any way in the browser, so any action that refreshes the page such as refreshing or navigating away will require the user to provide the key again. We believe this is an acceptable usability compromise for better security.
How Payload Extraction Works
After deciding how to encrypt the data, we just had to figure out the rest of the feature: what data to encrypt, how to store and transmit it, and how to allow users to decrypt it.
When an HTTP request reaches the L7 Firewall, it is evaluated against a set of rulesets. Each of these rulesets contain several rules written in the wirefilter syntax.
An example of one such rule would be:
http.request.version eq "HTTP/1.1"
and
(
    http.request.uri.path matches "\n+."
    or
    http.request.uri.query matches "\x00+."
)
This expression evaluates to a boolean “true” for HTTP/1.1 requests that either contain one or more newlines followed by a character in the request path or one or more NULL bytes followed by a character in the query string.
Say we had the following request that would match the rule above:
GET /cms/%0Aadmin?action=%00post HTTP/1.1
Host: example.com
If matched data logging is enabled, the rules that match would be executed again in a special context that tags all fields that are accessed during execution. We do this second execution because this tagging adds a noticeable computational overhead, and since the vast majority of requests don’t trigger a rule at all we would be unnecessarily adding overhead to each request. Requests that do match any rules will only match a few rules as well, so we don’t need to re-execute a large portion of the ruleset.
You may notice that although http.request.uri.query matches "\x00+." evaluates to true for this request, it won’t be executed, because the expression short-circuits with the first or condition that also matches. This results in only http.request.version and http.request.uri.path being tagged as accessed:
Having gathered the fields that were accessed, the Firewall engine does some post-processing; removing fields that are a subset of others (e.g., the query string and the full URI), or truncating fields that are beyond a certain character length.
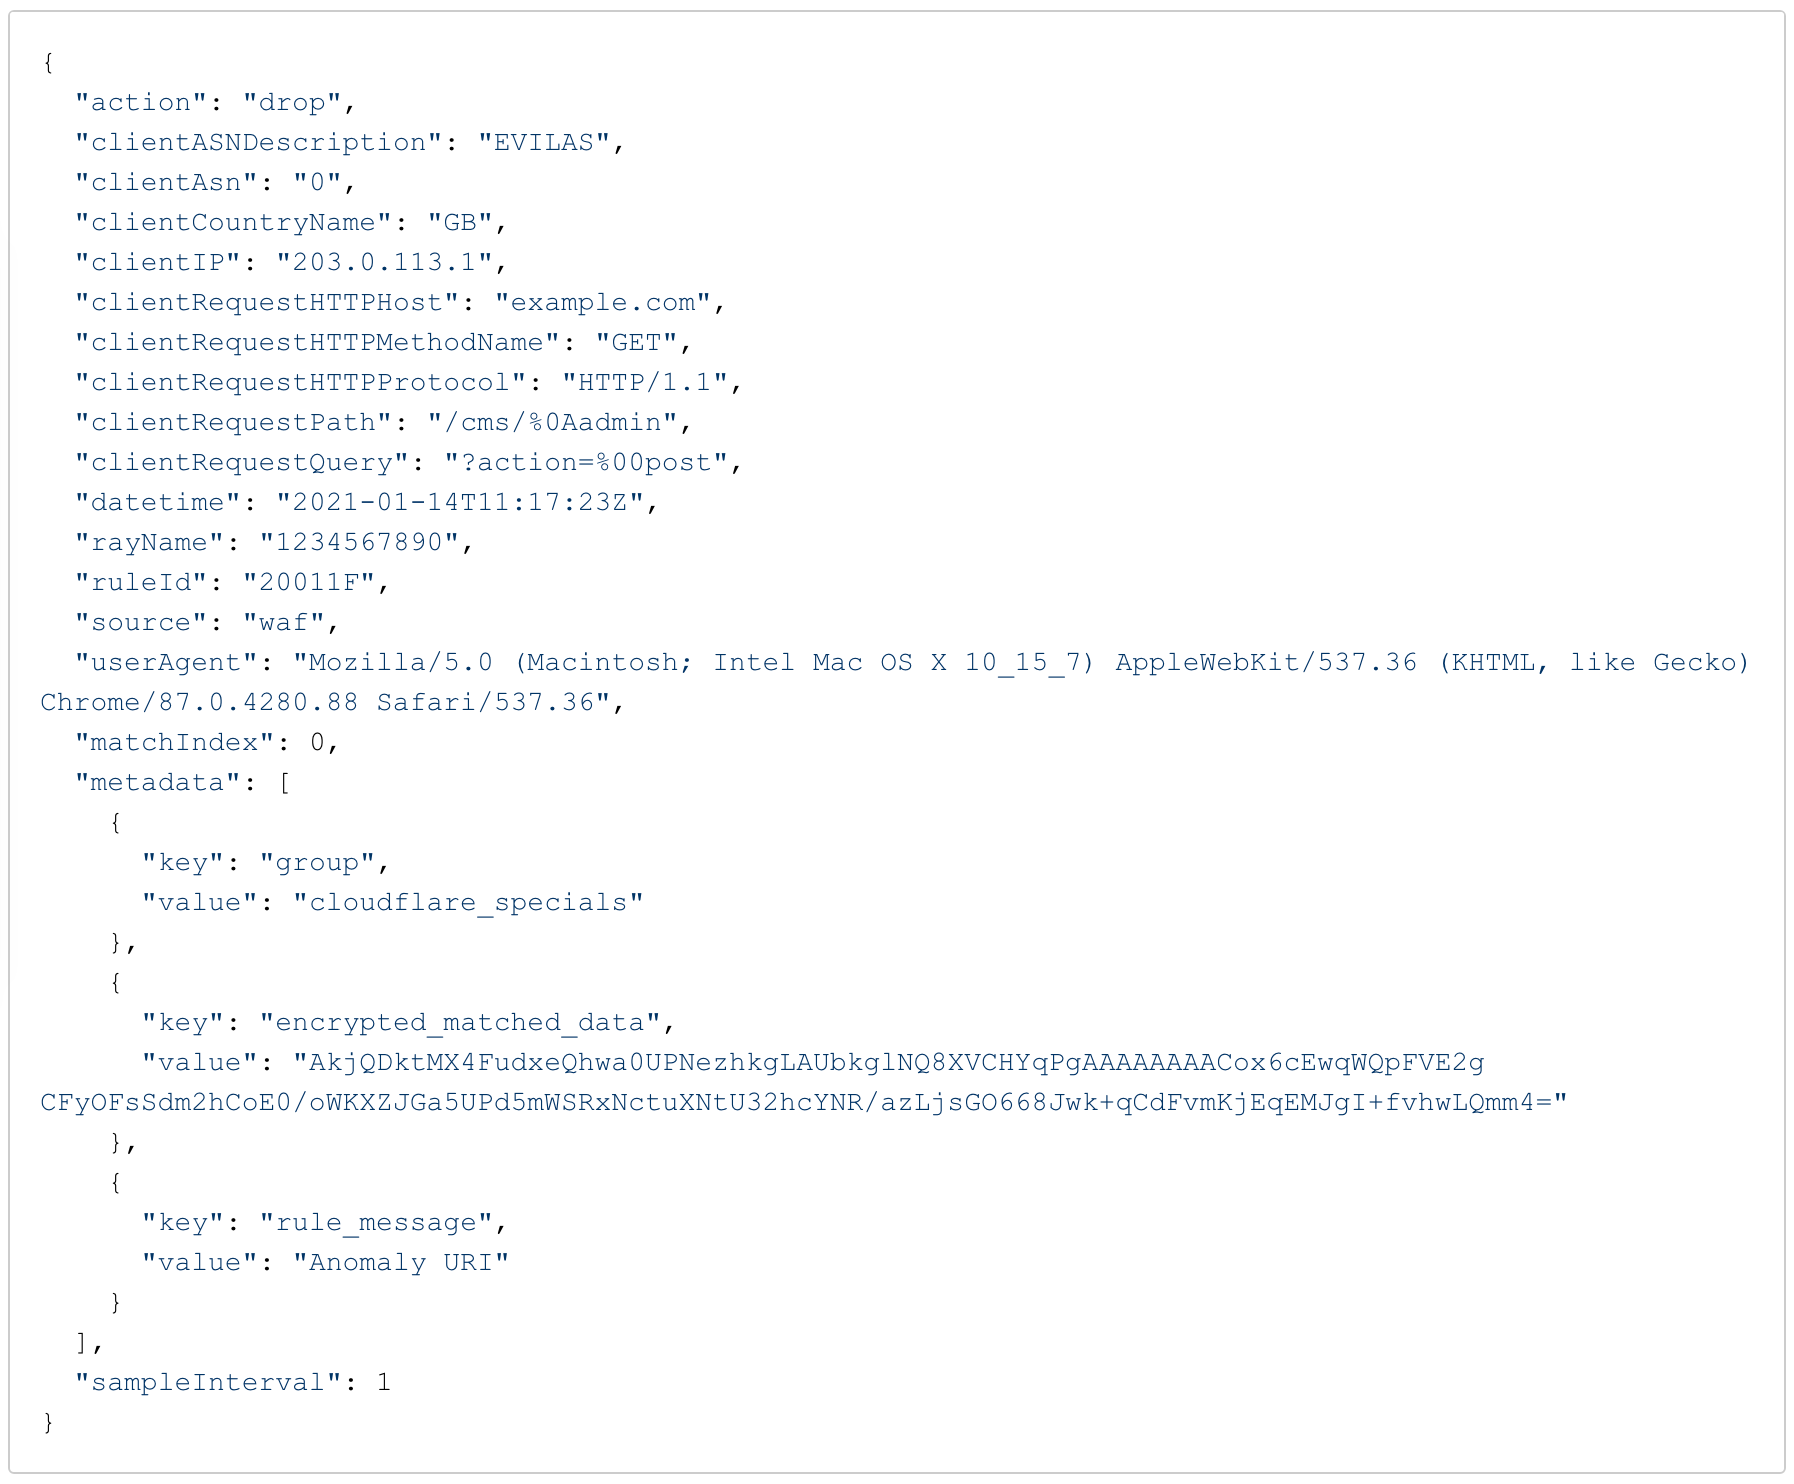
Finally, these get serialized as JSON, encrypted with the customer’s public key, serialized again as a set of bytes, and prefixed with a version number should we need to change/update it in the future. To simplify consumption of these blobs, our APIs display a base64 encoded version of the bytes:
Now that we have encrypted the data at the edge and persisted it in ClickHouse, we need to allow users to decrypt it. As part of the setup of turning this feature on, users generated a key-pair: the public key which was used to encrypt the payloads and a private key which is used to decrypt them. Decryption is done completely offline via either the command line using cloudflare/matched-data-cli:
Since our CLI tool is open-source and HPKE is interoperable, it can also be used in other tooling as part of a user’s logging pipeline, for example in security information and event management (SIEM) software.
Conclusion
This was a team effort with help from our Research and Security teams throughout the process. We relied on them for recommendations on how best to evaluate the algorithms as well as vetting the libraries we wanted to use.
We’re very pleased with how HPKE has worked out for us from an ease-of-implementation and performance standpoint. It was also an easy choice for us to make due to its impending standardization and best-of-both-worlds approach to security.
I love building products that solve real problems for our customers. These days I don’t get to do so as much directly with our Engineering teams. Instead, about half my time is spent with customers listening to and learning from their security challenges, while the other half of my time is spent with other Cloudflare Product Managers (PMs) helping them solve these customer challenges as simply and elegantly as possible. While I miss the deeply technical engineering discussions, I am proud to have the opportunity to look back every year on all that we’ve shipped across our application security teams.
Taking the time to reflect on what we’ve delivered also helps to reinforce my belief in the Cloudflare approach to shipping product: release early, stay close to customers for feedback, and iterate quickly to deliver incremental value. To borrow a term from the investment world, this approach brings the benefits of compounded returns to our customers: we put new products that solve real-world problems into their hands as quickly as possible, and then reinvest the proceeds of our shared learnings immediately back into the product.
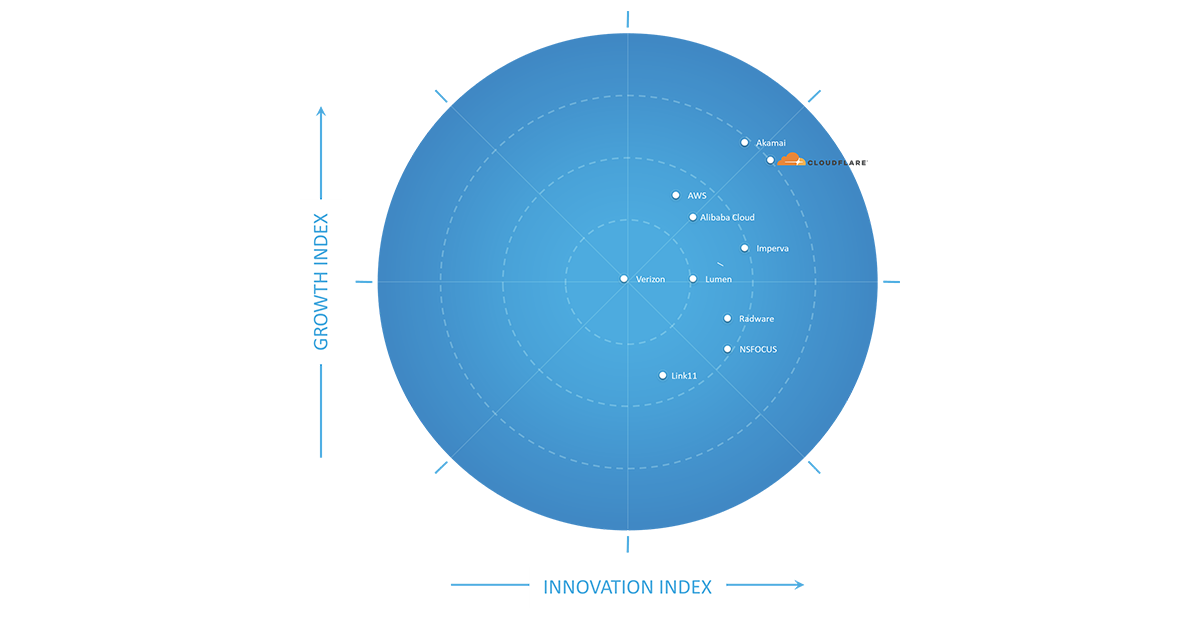
It is these sustained investments that allow us to release a flurry of small improvements over the course of a year, and be recognized by leading industry analyst firms for the capabilities we’ve accumulated and distributed to our customers. Today we’re excited to announce that Frost & Sullivan has named Cloudflare the Innovation Leader in their Frost Radar™: Global Holistic Web Protection Market Report. Frost & Sullivan’s view that this market “will gradually absorb the markets formed around legacy and point solutions” is consistent with our view of the world, and we’re leading the way in “the consolidation of standalone WAF, DDoS mitigation, and Bot Risk Management solutions” they believe is “poised to happen before 2025”.
We are honored to receive this recognition, based on the analysis of 10 providers’ competitive strengths and opportunities as assessed by Frost & Sullivan. The rest of this post explains some of the capabilities that we shipped in 2020 across our Web Application Firewall (WAF), Bot Management, and Distributed Denial-of-Service product lines—the scope of Frost & Sullivan’s report. Get a copy of the Frost & Sullivan Frost Radar report to see why Cloudflare was named the Innovation Leader here.
2020 Web Security Themes and Roundup
Before jumping into specific product and feature launches, I want to briefly explain how we think about building and delivering our web security capabilities. The most important “product” by far that’s been built at Cloudflare over the past 10 years is the massive global network that moves bits securely around the world, as close to the speed of light as possible. Building our features atop this network allows us to reject the legacy tradeoff of performance or security. And equipping customers with the ability to program and extend the network with Cloudflare Workers and Firewall Rules allows us to focus on quickly delivering useful security primitives such as functions, operators, and ML-trained data—then later packaging them up in streamlined user interfaces.
We talk internally about building up the “toolbox” of security controls so customers can express their desired security posture, and that’s how we think about many of the releases over the past year that are discussed below. We begin by providing the saw, hammer, and nails, and let expert builders construct whatever defenses they see fit. By watching how these tools are put to use and observing the results of billions of attempts to evade the erected defenses, we learn how to improve and package them together as a whole for those less inclined to build from components. Most recently we did this with API Shield, providing a guided template to create “positive security” models within Firewall Rules using existing primitives plus new data structures for strong authentication such as Cloudflare-managed client SSL/TLS certificates. Each new tool added to the toolbox increases the value of the existing tools. Each new web request—good or bad—improves the models that our threat intelligence and Bot Management capabilities depend upon.
Web application firewall (WAF) usability at scale
Last year we spoke with many customers about our plan to decouple configuration from the zone/domain model and allow rules to be set for arbitrary paths and groups of services across an account. In 4Q2020 we put this granular control in the hands of a few developers and some of our most sophisticated enterprise customers, and we’re currently collecting and incorporating feedback before defaulting the capabilities on for new customers.
Rules are great, especially with increased flexibility, but without data structures and request enrichment at the edge (such as the Bot Management techniques described below) they cannot act on anything beyond static properties of the request. In 3Q2020 we released our IP Lists capabilities and customers have been steadily uploading their home-grown and third-party subscription lists. These lists can be referenced anywhere in a customer’s account as named variables and then combined with all other attributes of the request, even Bot Management scores, e.g., http.request.uri.path contains “/login” and (not ip.src in $pingdom_probes and cf.bot_management.score < 30) is a Firewall Rule filter that blocks all bots except Pingdom from accessing the login endpoint.
Built predominantly in 4Q2020 and currently being tested in the Firewall Rules engine is a brand new implementation of our Rate Limiting engine. By moving this matching and enforcement logic from a standalone tool to a component within a performant, memory-safe, expressive engine built in Rust, we have increased the utility of existing functions. Additional examples of improving this library of capabilities include the work completed in 1Q2020 to add HMAC functions and regex-based HTTP header and body inspection to the engine.
Bots and machine learning (ML)
In addition to making edge data sets accessible for request evaluation, we continued to invest heavily within our Bot Management team to provide actionable data so that our customers could decide what (if any) automated traffic they wanted to allow to interact with their applications. Our highest priority for Bot research and development has always been efficacy, and last year was no different. A significant portion of our engineering effort was dedicated to our detection engines — both updating and iterating on existing systems or creating entirely new detection engines from scratch.
In 1Q2020 we completed a total rewrite of our Machine Learning engine, and are continually focused on improving the efficacy of our ML engines. To do this, we draw on one of our major competitive advantages: the massive amount of data flowing through Cloudflare’s network. The early 2020 upgrade to our ML model nearly doubled the number of features we use to evaluate and score requests. And to help customers better understand why requests are flagged as bots, we have recently complemented the bot likelihood score in our logs with attribution to the specific engine that generated the score.
Also in 1Q2020, we upgraded our behavioral analysis engine to incorporate more features and increase overall accuracy. This engine conducts histogram-based outlier scoring and is now fully deployed to nearly all Bot Management zones.
In 2Q2020, we developed a lightweight JavaScript element that further advanced our browser fingerprinting capabilities and aids in detection. Specifically, we now silently challenge browsers and detect if a browser is misrepresenting its User Agent. This technique will be incorporated into our ML models and combined with our heuristics engine for more accurate browser fingerprinting. This feature is entirely optional and can be enabled or disabled by customers through our UI and API. Customers with extremely performance sensitive zones or traffic types that are unsuitable for JavaScript (such as API or some mobile app traffic) can still be accurately scored by our Bot Management engine.
In addition to detection, we also spent (and will continue to spend) engineering effort on mitigation. Our entire JavaScript and CAPTCHA challenge platform was rewritten in the last year and deployed to our customer zones in a staged fashion in the second half of 2020. Our new platform is faster and more robust at detecting automated systems attempting to solve the challenges. More importantly, this platform allows us to further invest in new challenge types and modes as we enter 2021.
The biggest and most well received feature released in 2020 was our dedicated Bot Management analytics, released in 3Q2020. We now present informative graphs that double as diagnostic tools. Customers have found that analytics are far more than interesting charts and statistics: in the case of Bot Management, analytics are essential to spotting and subsequently eliminating false positives.
Last but definitely not least, we announced the deprecation of the __cfduid cookie in 4Q2020 which was used primarily to detect bots but caused confusion for some customers including questions about whether they needed to display a cookie banner because of what we do.
To get a sense of the Bot Attack trends we saw in the first half of 2020, take a read through this blog post. And if you’re curious about how our ML models and heuristic engines work to keep your properties safe, this deep dive by Alex Bocharov, Machine Learning Tech Lead on the Bots team, is an excellent guide.
API and IoT security and protection
At the beginning of 4Q2020, we released a product called API Shield that was purpose built to secure, protect, and accelerate API traffic — and will eventually provide much of the common functionality expected in traditional API Gateways. The UI for API Shield was built on top of Firewall Rules for maximum flexibility, and will serve as the jump-off point for configuring additional API security features we have planned this year.
As part of API Shield, every customer now gets a fully managed, domain-scoped private CA generated for each of their zones, and we plan to continue working closely with the SSL/TLS team to expand CA management options based on feedback. Since the release, we’ve seen great adoption from in particular IoT companies focused on locking down their APIs using short-lived client certificates distributed out to devices. Customers can also now upload OpenAPI schemas to be matched against incoming requests from these devices, with bad requests being dropped at the edge rather than passed on to origin infrastructure.
Another capability we released in 4Q2020 was support for gRPC-based API traffic. Since that release, customers have expressed significant interest in using Cloudflare as a secure API gateway between easy-to-use customer-facing JSON endpoints and internal-facing gRPC or GraphQL endpoints. Like most customer challenges at Cloudflare, early adopters are looking to solve these use cases initially with Cloudflare Workers, but we’re keeping an eye on whether there are aspects for which we’ll want to provide first-class feature support.
Distributed Denial-of-Service (DDoS) protections for web applications and APIs
The application-layer security of a web application or API is of minimal importance if the service itself is not available due to a persistent DDoS attack at L3-L7. While mitigating such attacks has long been one of Cloudflare’s strengths, attack methodologies evolve and we continued to invest heavily in 2020 to drop attacks more quickly, more efficiently, and more precisely; as a result, automatic mitigation techniques are applied immediately and most malicious traffic is blocked in less than 3 seconds.
Early in 2020 we responded to a persistent increase in smaller, more localized attacks by fine-tuning a system that can autonomously detect attacks on any server in any datacenter. In the month prior to us first posting about this tool, it mitigated almost 300,000 network-layer attacks, roughly 55 times greater than the tool we previously relied upon. This new tool, dubbed “dosd”, leverages Linux’s eXpress Data Path (XDP) and allows our system to quickly — and automatically — deploy rules eBPF rules that run on each packet received. We further enhanced our edge mitigation capabilities in 3Q2020 by developing and releasing a protection layer that can operate even in environments where we only see one side of the TCP flow. These network layer protections help protect our customers who leverage both Magic Transit to protect their IP ranges and our WAF to protect their applications and APIs.
To document and provide visibility into these attacks, we released a GraphQL-backed interface in 1Q2020 called Network Analytics. Network Analytics extends the visibility of attacks against our customers’ services from L7 to L3, and includes detailed attack logs containing data such as top source and destination IPs and ports, ASNs, data centers, countries, bit rates, protocol and TCP flag distributions. A litany of improvements made to this graphical rendering engine over the course of 2020 have benefitted all analytics tools using the same front-end. In 4Q2020, Network Analytics was extended to provide traffic and attack insights into Cloudflare Spectrum-protected applications, which are terminated at L4 (TCP/UDP).
2020 was a tough year around the world. Throughout what has also been, and continues to be, a period of heightened cyberattacks and breaches, we feel proud that our teams were able to release a steady flow of new and improved capabilities across several critical security product areas reviewed by Frost & Sullivan. These releases culminated in far greater protections for customers at the end of the year than the beginning, and a recognition for our sustained efforts.
We are pleased to have been named the Innovation Leader in their Frost Radar™: Global Holistic Web Protection Market Report, which “addresses organizations’ demand for consolidated, single pane of glass solutions, which not only reduce the security gaps of legacy products but also provide simplified management capabilities”.
As we look towards 2021 we plan to continue releasing early and often, listening to feedback from our customers, and delivering incremental value along the way. If you have ideas on what additional capabilities you’d like to use to protect your applications and networks, we’d love to hear them below in the comments.
The Cloudflare Web Application Firewall (WAF) blocks more than 72B malicious requests per day from reaching our customers’ applications. Typically, our users can easily confirm these requests were not legitimate by checking the URL, the query parameters, or other metadata that Cloudflare provides as part of the security event log in the dashboard.
Sometimes investigating a WAF event requires a bit more research and a trial and error approach, as the WAF may have matched against a field that is not logged by default.
Not logging all parts of a request is intentional: HTTP headers and payloads often contain sensitive data, including personally identifiable information, which we consider a toxic asset. Request headers may contain cookies and POST payloads may contain username and password pairs submitted during a login attempt among other sensitive data.
We recognize that providing clear visibility in any security event is a core feature of a firewall, as this allows users to better fine tune their rules. To accomplish this, while ensuring end-user privacy, we built encrypted WAF matched payload logging. This feature will log only the specific component of the request the WAF has deemed malicious — and it is encrypted using a customer-provided key to ensure that no Cloudflare employee can examine the data*. Additionally, the crypto uses an exciting new standard — developed in part by Cloudflare — called Hybrid Public Key Encryption (HPKE).
*All Cloudflare logs are encrypted at rest. This feature implements a second layer of encryption for the specific matched fields so that only the customer can decrypt it.
Encrypting Matched Payloads
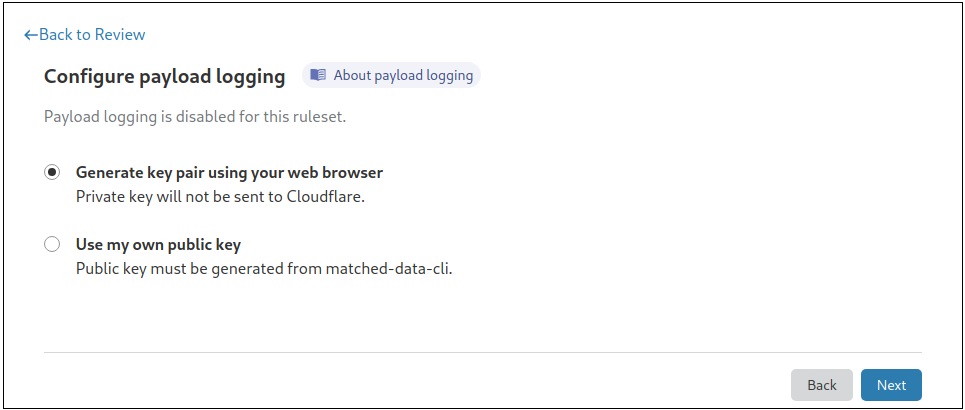
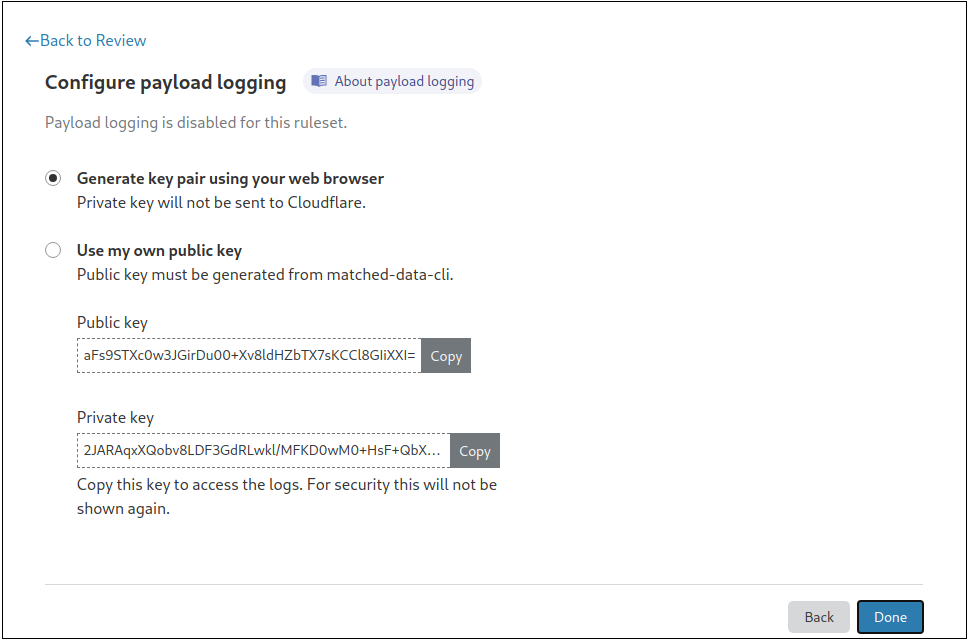
To turn on this feature, you need to provide a public key, or generate a private-public key pair directly from the dashboard. Your data will then be encrypted using Hybrid Public Key Encryption (HPKE), which offers a great combination of both performance and security.
To simplify this process, we have built an easy-to-use command line utility to generate the key pair:
Cloudflare does not store the private key and it is our customers’ responsibility to ensure it is stored safely. Lost keys, and the data encrypted with them, cannot be recovered but customers can rotate keys to be used with future payloads.
Once encrypted, payloads will be available in the logs as encrypted base64 blobs within the metadata field:
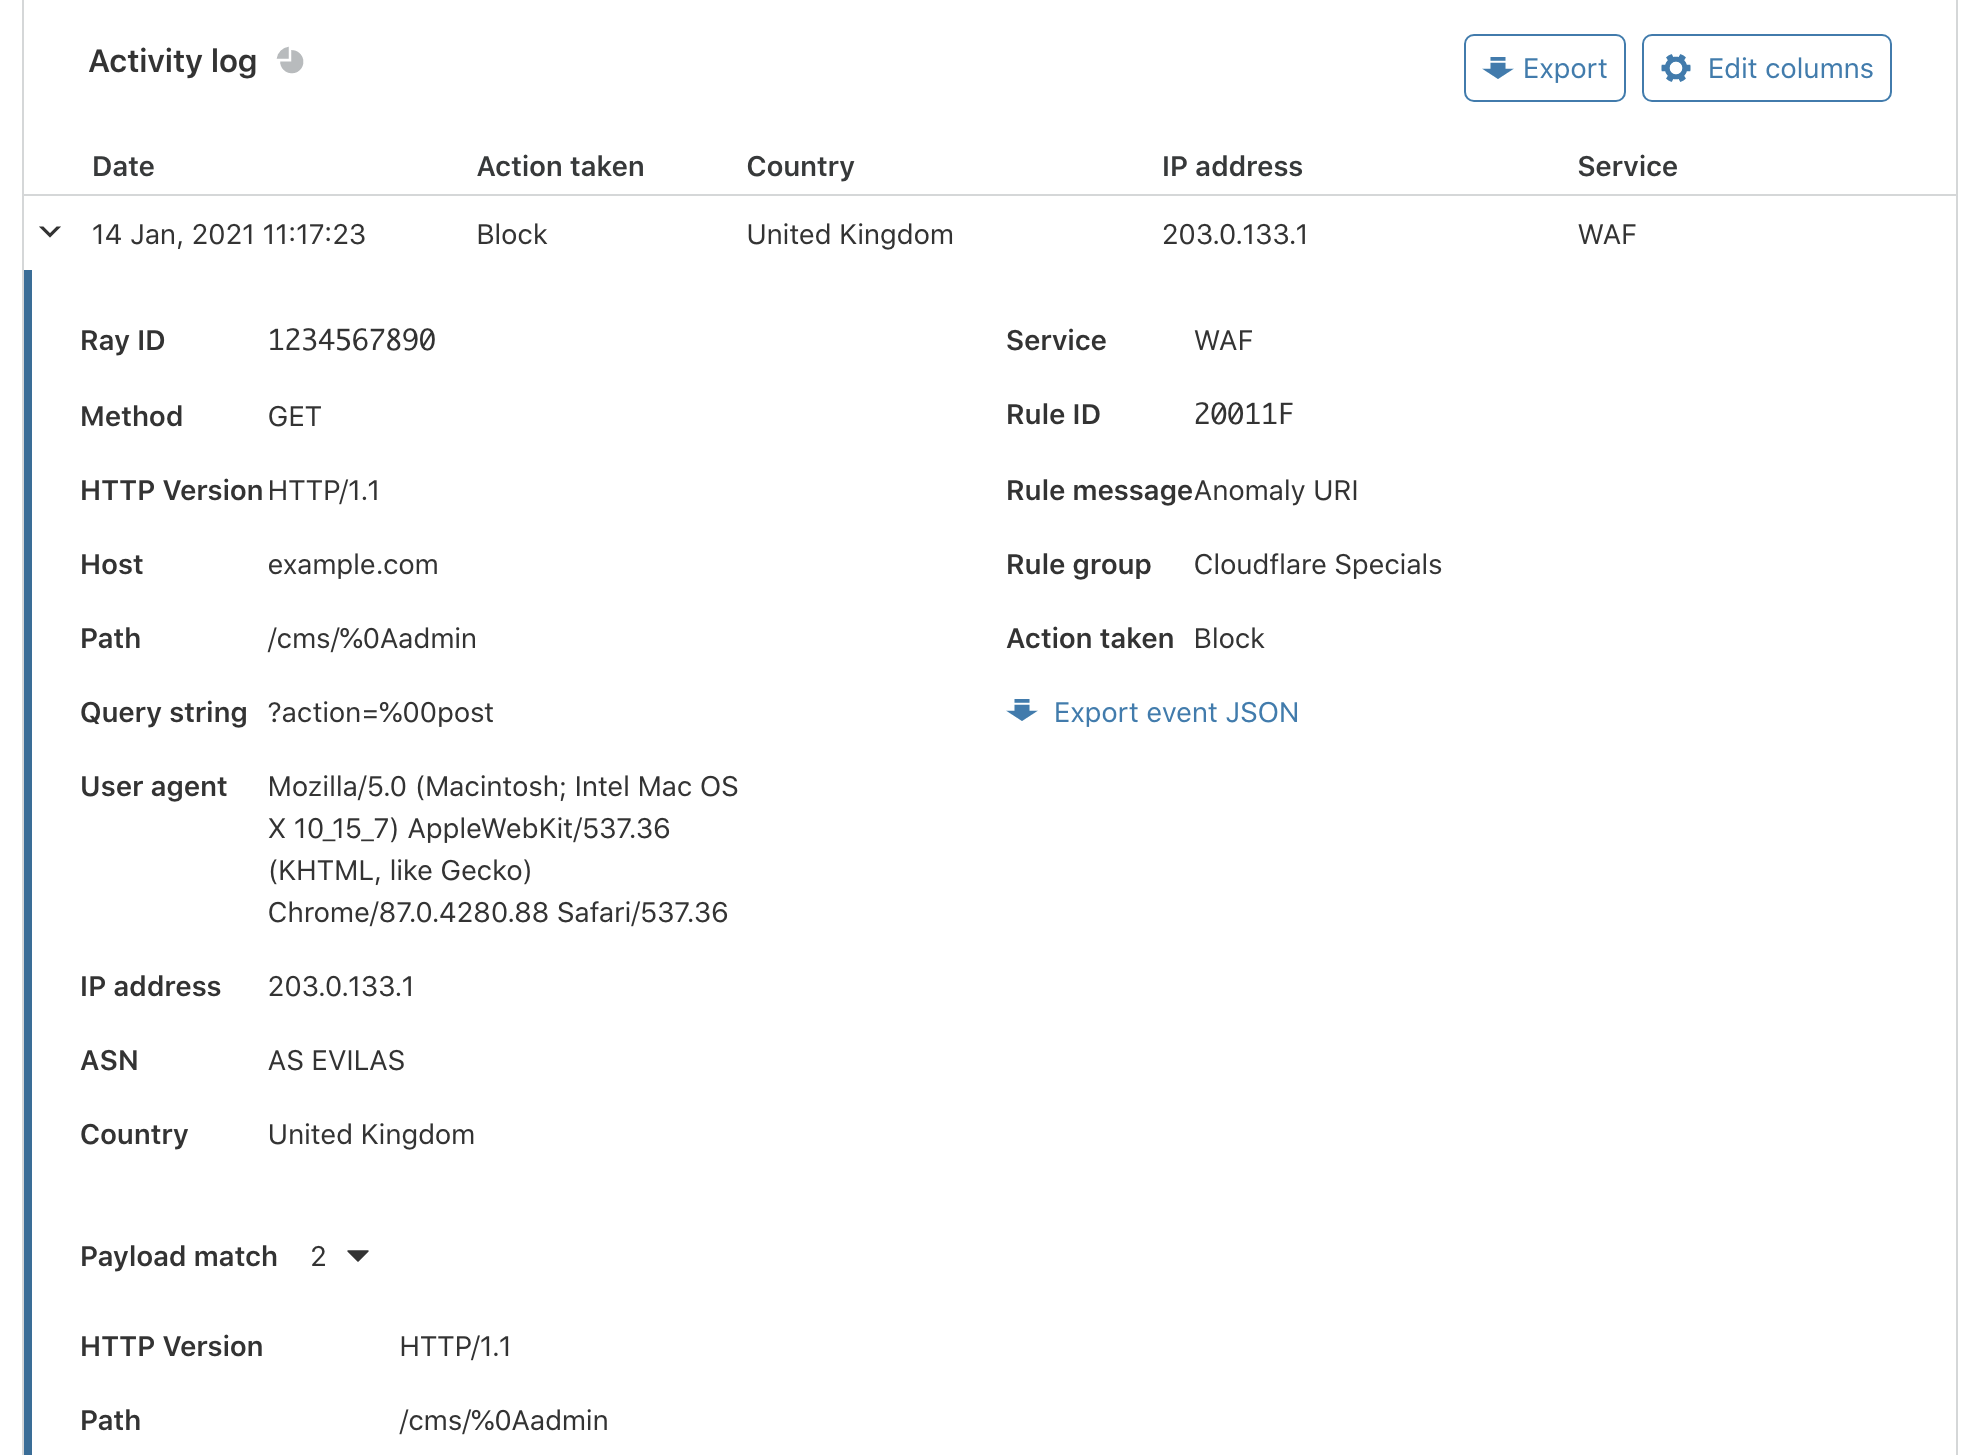
Decrypting payloads can be done via the dashboard from the Security Events log, or by using the command line utility, as shown below. If done via the dashboard, the browser will decrypt the payload locally (i.e., client side) and will not send the private key to Cloudflare.
In the example above, the WAF matched against the REQUEST_HEADERS:REFERER field. Any other fields the WAF matched on would be similarly logged.
Better Logging with User Privacy in Mind
In the coming months, this feature will be available on our dashboard to our Enterprise customers. Enterprise customers who would like this feature enabled sooner should reach out to their account team. Only application owners who also have access to the Cloudflare dashboard as Super Administrators will be able to configure encrypted matched payload logging. Those who do not have access to the private key, including Cloudflare staff, are not able to decrypt the logs.
We are also excited for this feature to be one of our first to use Hybrid Public Key Encryption, and for Cloudflare to use this emerging standard developed by the Crypto Forum Research Group (CFRG), the research body that supports the development of Internet standards at the IETF. And stay tuned, we will publish a deep dive post with the technical details soon!
At Cloudflare, we’re constantly working on improving the performance of our edge — and that was exactly what my internship this summer entailed. I’m excited to share some improvements we’ve made to our popular Firewall Rules product over the past few months.
Firewall Rules lets customers filter the traffic hitting their site. It’s built using our engine, Wirefilter, which takes powerful boolean expressions written by customers and matches incoming requests against them. Customers can then choose how to respond to traffic which matches these rules. We will discuss some in-depth optimizations we have recently made to Wirefilter, so you may wish to get familiar with how it works if you haven’t already.
Minimizing CPU usage
As a new member of the Firewall team, I quickly learned that performance is important — even in our security products. We look for opportunities to make our customers’ Internet properties faster where it’s safe to do so, maximizing both security and performance.
Our engine is already heavily used, powering all of Firewall Rules. But we have bigger plans. More and more products like our Web Application Firewall (WAF) will be running behind our Wirefilter-based engine, and it will become responsible for eating up a sizable chunk of our total CPU usage before long.
How to measure performance?
Measuring performance is a notoriously tricky task, and as you can probably imagine trying to do this in a highly distributed environment (aka Cloudflare’s edge) does not help. We’ve been surprised in the past by optimizations that look good on paper, but, when tested out in production, just don’t seem to do much.
Our solution? Performance measurement as a service — an isolated and reproducible benchmark for our Firewall engine and a framework for engineers to easily request runs and view results. It’s worth noting that we took a lot of inspiration from the fantastic Rust Compiler benchmarks to build this.
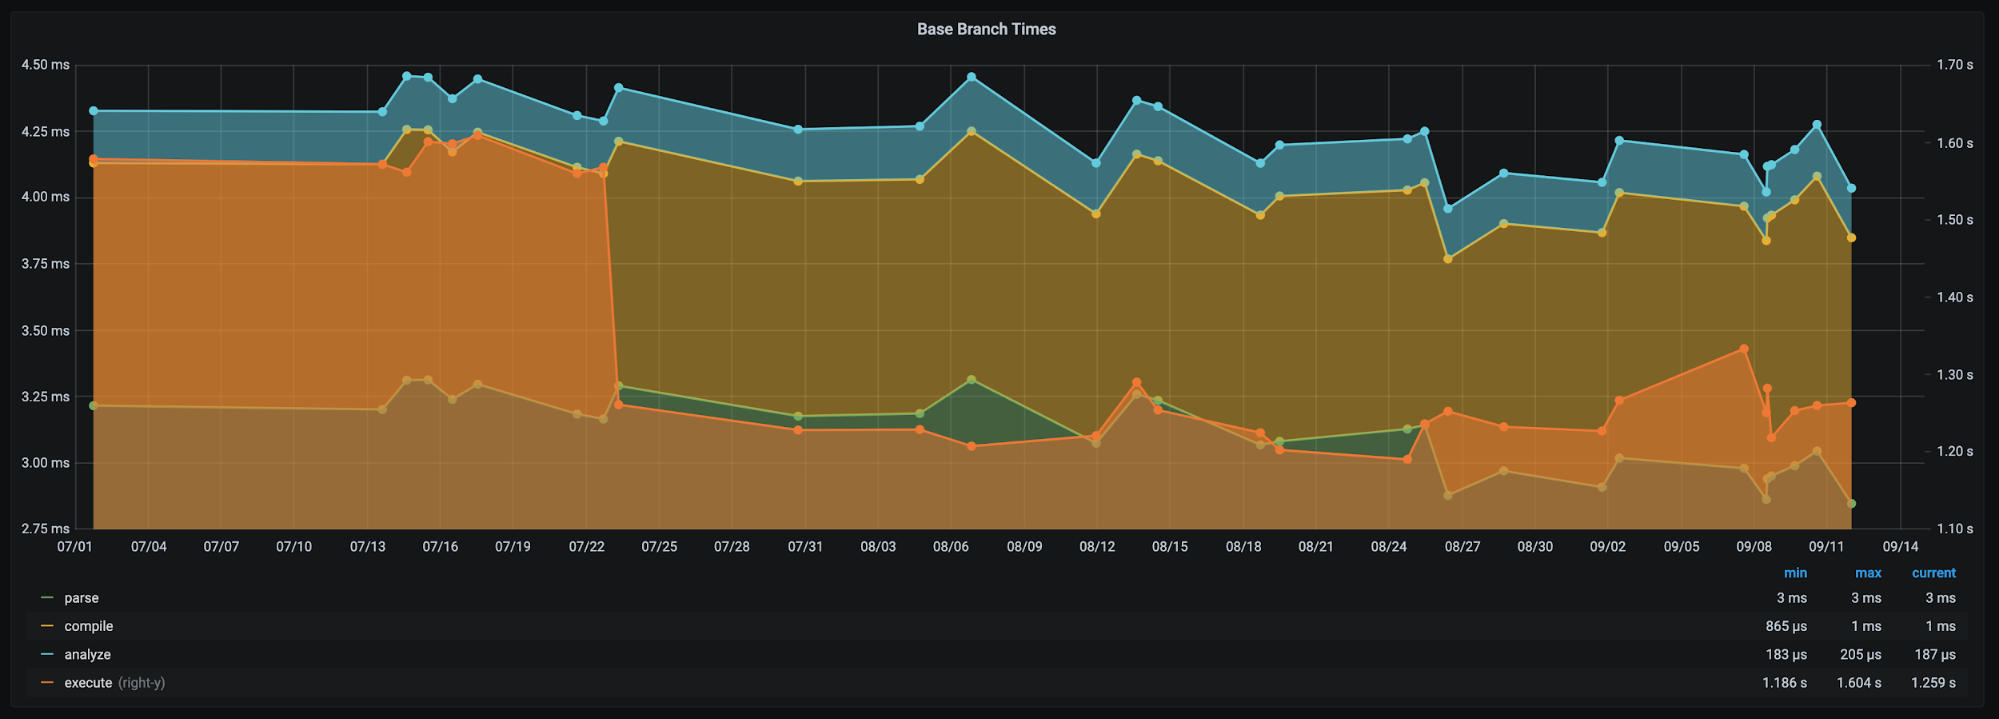
Our benchmarking framework, showing how performance during different stages of processing Wirefilter expressions has changed over time [1].
What to measure?
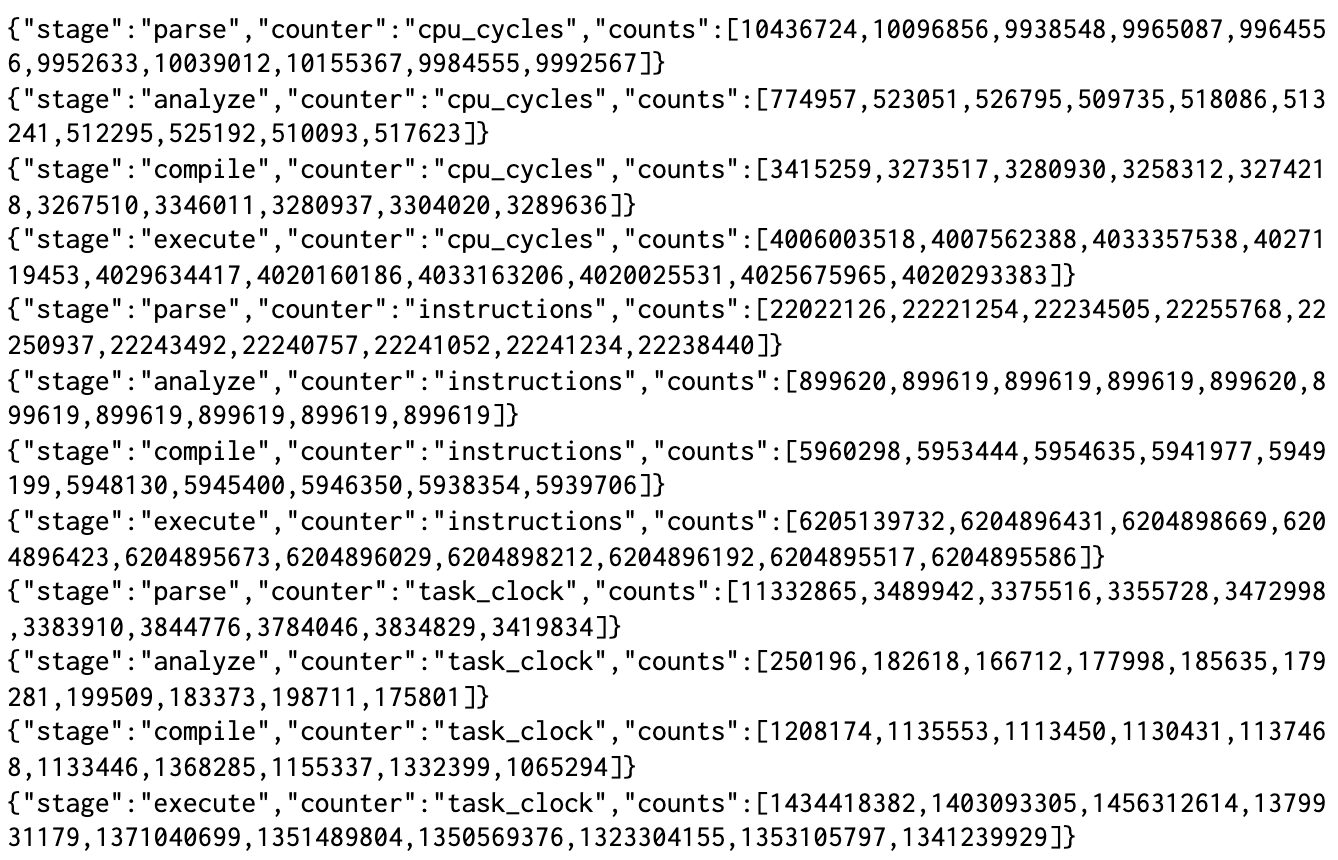
Our next challenge was to find some meaningful performance metrics. Some experimentation quickly uncovered that time was far too volatile a measure for meaningful comparisons, so we turned to hardware counters [2]. It’s not hard to find tools to measure these (perf and VTune are two such examples), although they (mostly) don’t allow control over which parts of the program are recorded. In our case, we wished to individually record measurements for different stages of filter processing — parsing, compilation, analysis, and execution.
Once again we took inspiration from the Rust compiler, and its self-profiling options, using the perf_event_open API to record counters from inside our binary. We then output something like the following, which our framework can easily ingest and store for later visualization.
Output of our benchmarks in JSON Lines format, showing a list of recordings for each combination of hardware counter and Wirefilter processing stage. We’ve used 10 repeats here for readability, but we use around 20, in addition to 5 warmup rounds, within our framework.
Whilst we mainly focussed on metrics relating to CPU usage, we also use a combination of getrusage and clear_refs to find the maximum resident set size (RSS). This is useful to understand the memory impact of particular algorithms in addition to CPU.
But the challenge was not over. Cloudflare’s standard CI agents use virtualization and sandboxing for security and convenience, but this makes accessing hardware counters virtually impossible. Running our benchmarks on a dedicated machine gave us access to these counters, and ensured more reproducible results.
Speeding up the speed test
Our benchmarks were designed from the outset to take an important place in our development process. For instance, we now perform a full benchmark run before releasing each new version to detect performance regressions.
But with our benchmarks in place, it quickly became clear that we had a problem. Our benchmarks simply weren’t fast enough — at least if we wanted to complete them in less than a few hours! The problem was we have a very large number of filters. Since our engine would never usually execute requests against this many filters at once it was proving incredibly costly. We came up with a few tricks to cut this down…
Deduplication. It turns out that only around a third of filters are structurally unique (something that is easy to check as Wirefilter can helpfully serialize to JSON). We managed to cut down a great deal of time by ignoring duplicate filters in our benchmarks.
Sampling.Still, we had too many filters and random sampling presented an easy solution. A more subtle challenge was to make sure that the random sample was always the same to maintain reproducibility.
Partitioning.We worried that deduplication and sampling would cause us to miss important cases that are useful to optimize. By first partitioning filters by Wirefilter language feature, we can ensure we’re getting a good range of filters. It also helpfully gives us more detail about where specifically the impact of a performance change is.
Most of these are trade-offs, but very necessary ones which allow us to run continual benchmarks without development speed grinding to a halt. At the time of writing, we’ve managed to get a benchmark run down to around 20 minutes using these ideas.
Optimizing our engine
With a benchmarking framework in place, we were ready to begin testing optimizations. But how do you optimize an interpreter like Wirefilter? Just-in-time (JIT) compilation, selective inlining and replication were some ideas floating around in the word of interpreters that seemed attractive. After all, we previously wrote about the cost of dynamic dispatch in Wirefilter. All of these techniques aim to reduce that effect.
However, running some real filters through a profiler tells a different story. Most execution time, around 65%, is spent not resolving dynamic dispatch calls but instead performing operations like comparison and searches. Filters currently in production tend to be pretty light on functions, but throw in a few more of these and even less time would be spent on dynamic dispatch. We suspect that even a fair chunk of the remaining 35% is actually spent reading the memory of request fields.
Function
CPU time
`matches` operator
0.6%
`in` operator
1.1%
`eq` operator
11.8%
`contains` operator
51.5%
Everything else
35.0%
Breakdown of CPU time while executing a typical production filter.
An adventure in substring searching
By now, you shouldn’t be surprised that the contains operator was one of the first in line for optimization. If you’ve ever written a Firewall Rule, you’re probably already familiar with what it does — it checks whether a substring is present in the field you are matching against. For example, the following expression would match when the host is “example.com” or “www.example.net”, but not when it is “cloudflare.com”. In string searching algorithms, this is commonly referred to as finding a ‘needle’ (“example”) within a ‘haystack’ (“example.com”).
http.host contains “example”
How does this work under the hood? Ordinarily, we may have used Rust’s `String::contains` function but Wirefilter also allows raw byte expressions that don’t necessarily conform to UTF-8.
Sounds good, right? It was, and it was working pretty well, although we’d noticed that rewriting `contains` filters using regular expressions could bizarrely often make them faster.
http.host matches “example”
Regular expressions are great, but since they’re far more powerful than the `contains` operator, they shouldn’t be faster than a specialized algorithm in simple cases like this one.
Something was definitely up. It turns out that Rust’s regex library comes equipped with a whole host of specialized matchers for what it deems to be simple expressions like this. The obvious question was whether we could therefore simply use the regex library. Interestingly, you may not have realized that the popular ripgrep tool does just that when searching for fixed-string patterns.
However, our use case is a little different. Since we’re building an interpreter (and we’re using dynamic dispatch in any case), we would prefer to dispatch to a specialized case for `contains` expressions, rather than matching on some enum deep within the regex crate when the filter is executed. What’s more, there are some prettycoolthings being done to perform substring searching that leverages SIMD instruction sets. So we wired up our engine to some previous work by Wojciech Muła and the results were fantastic.
Benchmark
Improvement
Expressions using `contains` operator
72.3%
‘Simple’ expressions
0.0%
All expressions
31.6%
Improvements in instruction count using Wojciech Muła’s sse4-strstr library over the memmem crate with Wirefilter.
I encourage you to read more on “Algorithm 1”, which we used, but it works something like this (I’ve changed the order a little to help make it clearer). It’s worth reading up on SIMD instructions if you’re unfamiliar with them — they’re the essence behind what makes this algorithm fast.
We fill one SIMD register with the first byte of the needle being searched for, simply repeated over and over.
We load as much of our haystack as we can into another SIMD register and perform a bitwise equality operation with our previous register.
Now, any position in the resultant register that is 0 cannot be the start of the match since it doesn’t start with the same byte of the needle.
We now repeat this process with the last byte of the needle, offsetting the haystack, to rule out any positions that don’t end with the same byte as the needle.
Bitwise ANDing these two results together, we (hopefully) have now drastically reduced our potential matches.
Each of the remaining potential matches can be checked manually using a memcmp operation. If we find a match, then we’re done.
If not, we continue with the next part of our haystack and repeat until we’ve checked the entire thing.
When it goes wrong
You may be wondering what happens if our haystack doesn’t fit neatly into registers. In the original algorithm, nothing. It simply continues reading into the oblivion after the end of the haystack until the last register is full, and uses a bitmask to ignore potential false-positives from this additional region of memory.
As we mentioned, security is our priority when it comes to optimizations, so we could never deploy something with this kind of behaviour. We ended up porting Muła’s library to Rust (we’ve also open-sourced the crate!) and performed an overlapping registers modification found in ARM’s blog.
It’s best illustrated by example — notice the difference between how we would fill registers on an imaginary SIMD instruction-set with 4-byte registers.
Before modification
How registers are filled in the original implementation for the haystack “abcdefghij”, red squares indicate out of bounds memory.
After modification
How registers are filled with the overlapping modification for the same haystack, notice how ‘g’ and ‘h’ each appear in two registers.
In our case, repeating some bytes within two different registers will never change the final outcome, so this modification is allowed as-is. However, in reality, we found it was better to use a bitmask to exclude repeated parts of the final register and minimize the number of memcmp calls.
What if the haystack is too small to even fill a single register? In this case, we can’t use our overlapping trick since there’s nothing to overlap with. Our solution is straightforward: while we were primarily targeting AVX2, which can store 32-bytes in a lane, we can easily move down to another instruction set with smaller registers that the haystack can fit into. In reality, we don’t currently go any smaller than SSE2. Beyond this, we instead use an implementation of the Rabin-Karp searching algorithm which appears to perform well.
Instruction set
Register size
AVX2
32 bytes
SSE2
16 bytes
SWAR (u64)
8 bytes
SWAR (u32)
4 bytes
…
…
Register sizes in different SIMD instruction sets [3]. We did not consider AVX512 since support for this is not widespread enough.
Is it always fast?
Choosing the first and last bytes of the needle to rule out potential matches is a great idea. It means that when it does come to performing a memcmp, we can ignore these, as we know they already match. Unfortunately, as Muła points out, this also makes the algorithm susceptible to a worst-case attack in some instances.
Let’s give an expression that a customer might write to illustrate this.
http.request.uri.path contains “/wp-admin/”
If we try to search for this within a very long sequence of ‘/’s, we will find a potential match in every position and make lots of calls to memcmp — essentially performing a slow bruteforce substring search.
Clearly we need to choose different bytes from the needle. But which ones should we choose? For each choice, an adversary can always find a slightly different, but equally troublesome, worst case. We instead use randomness to throw off our would-be adversary, picking the first byte of the needle as before, but then choosing another random byte to use.
Our new version is unsurprisingly slower than Muła’s, yet it still exhibits a great improvement over both the memmem and regex crates. Performance, but without sacrificing safety.
Benchmark
Improvement
sse4-strstr (original)
sliceslice (our version)
Expressions using `contains` operator
72.3%
49.1%
‘Simple’ expressions
0.0%
0.1%
All expressions
31.6%
24.0%
Improvements in instruction count of using sse4-strstr and sliceslice over the memmem crate with Wirefilter.
What’s next?
This is only a small taste of the performance work we’ve been doing, and we have much more yet to come. Nevertheless, none of this would have been possible without the support of my manager Richard and my mentor Elie, who contributed a lot of these ideas. I’ve learned so much over the past few months, but most of all that Cloudflare is an amazing place to be an intern!
[1] Since our benchmarks are not run within a production environment, results in this post do not represent traffic on our edge.
[2] We found instruction counts to be a particularly stable measure, and CPU cycles a particularly unstable one.
[3] Note that SWAR is technically not an instruction set, but instead uses regular registers like vector registers.
In this post, I show you how to use recent enhancements in AWS WAF to manage a multi-layer web application security enforcement policy. These enhancements will help you to maintain and deploy web application firewall configurations across deployment stages and across different types of applications.
In part 1 of this post I describe the technologies and methods that you can use to build and manage defense in depth for your network. In part 2, I will show you how to use those tools to build your defense in depth using AWS Managed Rules as the starting point and how it can be used for optimal effectiveness
Managing policies for multiple environments can be done with minimal administrative overhead and can now be part of a deployment pipeline where you programmatically enforce policies for broad edge network policy enforcements and protect production workloads without compromising on development speed or safety.
Building robust security policy enforcement relies on a layered approach and the same applies to securing your web applications. Having edge policies, application policies, and even private or internal policy enforcement layers adds to the visibility of communication requests as well as unified policy enforcement.
Using a layered AWS WAF deployment, such as is deployed by the procedure that follows, gives you greater flexibility in the amount of rules you can use and the option to standardize edge policies and production policies. This lets you test and develop new applications without comprising the production environments.
Note: If you’re using CloudFront and hosting the origin in us-east-1, you only need to maintain one stack. If your origin is in another region, you need to deploy a stack in us-east-1 for CloudFront web ACLs and another in the region where your application load balancer is. That scenario isn’t covered in the following procedure. None of the underlying infrastructure would be deployed with the example AWS CloudFromation templates provided. Only the AWS WAF configurations would be deployed using the example templates.
Solution overview
The following diagram illustrates the traffic flow where traffic comes in via CloudFront and serves the traffic to the backend load balancers. Both CloudFront and the load balancers support AWS WAF. This is where dedicated web security policies can be enforced to build out a defense-in-depth, multi layered policy enforcement.
Figure 1: Defense in depth deployment on AWS WAF
Creating AWS Managed Rule web ACLs
During this process we create two web ACLs that are designed for policy enforcement for two dedicated layers. The process won’t deploy the required infrastructure, such as the CloudFront distribution or application load balancers. This example template deploys a single stack in us-east-1 where the CloudFront origin load balancer is located.
Open the AWS Management Console and select the region where the origin application load balancer is deployed. The Amazon-CloudFront-Application-Load-Balancer-AMR.yml template that you downloaded deploys both web ACLs for CloudFront and the application load balancer.
In the Create stack window, select Template is ready and Upload a template file.
Under Upload a template file, select Choose file and select the Amazon-CloudFront-Application-Load-Balancer-AMR.yml example AWS CloudFormation template you downloaded earlier.
Choose Next.
Figure 5: Prepare and choose a template
Add stack details.
Enter a name for the stack in Stack name.
Enter a name for the Edge Network AWS WAF WebACL and for the Public Layer AWS WAF WebACL.
Set a rate-limit for HTTP GET requests in HTTP Get Flood Protection (this rate is applied per IP address over a 5 minute period).
Set a rate limit for HTTP POST requests in HTTP Post Flood Protection.
Use the Login URL to apply the limit to a targeted login page. If you want to rate-limit all HTTP POST requests, leave the login URL section blank.
Figure 6: Set stack details
By default, all the rules within the rule-sets are in action override (count mode). This does not include the rate based rules. If you want to deploy selected rules in a block, remove them from the pre-populated list by highlighting and deleting them. It’s best practice to evaluate firewall rules before changing them from count to block mode. Choose Next to move to the next step.
Figure 7: Default managed rules options
Here you can add tags to apply to the resources in the stack that these rules will be deployed to. Tagging is a recommended best practice as it enables you to add metadata information to resources during the creation. For more information on tagging please see the Tagging AWS resources documentation. Then choose Next. On the following page choose Create stack.
Figure 8: Add tags
Wait until the stack has been deployed. When deployment is complete, the status of the stack will change to CREATE_COMPLETE.
Figure 9: Stack deployment status
Associating the web ACLs to resources
During this process we associate the two newly created web ACLs to the corresponding infrastructure resources. In this example, it would be the CloudFront distribution and its origin load balancer which should have been created prior.
To associate the web ACLs to resources
In the console search for and select WAF & Shield.
Figure 10: Select WAF & Shield
Select Web ACLs from the list on the left.
Figure 11: Select Web ACLs
Select Global (CloudFront) from the drop down list at the top of the page. Choose the Edge-Network-Layer-WebACL name that you created in step 6 of the previous procedure (Creating AWS Managed Rule web ACLs).
Figure 12: Select the web ACL
Next select Associated AWS and then choose Add AWS resources.
Figure 13: Add AWS resources
Select the CloudFront distribution you want to protect. Choose Add.
Figure 14: Select the CloudFront distribution to protect
Select the region the application load balancer is deployed in—this example is us-east-1—and then repeat the same association process as in steps by selecting Web ACLs and now associating the Application Load Balancer similar to steps 3 and 4 above. However, this time, select the application load balancer that serves as the CloudFront Distribution origin. Select US East (N. Virginia) from the drop-down list at the top of the page. Choose the Public-Application-Layer-WebACL name that you created in step 6 of the previous procedure (Creating AWS Managed Rule web ACLs).
Figure 15: Application layer Web ACL association
Conclusion
Using AWS WAF to manage a multi-layer web application security enforcement policy you are able to build defense in depth stack for each specific web application. The configuration will help you to maintain and deploy web application firewall configurations across deployment stages and across different types of applications. Now with AWS Managed Rules this has enabled customers to make use of prebuild rule sets that can easily be deployed to create a layered defense that will fit into customers web application deployment pipelines. For customers that would like to centrally manage and control WAF in their AWS Organization, consider AWS Firewall Manager.
If you have feedback about this post, submit comments in the Comments section below. If you have questions about this post, start a new thread on the AWS WAF forum or contact AWS Support.
Want more AWS Security how-to content, news, and feature announcements? Follow us on Twitter.
In this post, I discuss how you can use recent enhancements in AWS WAF to manage a multi-layer web application security enforcement policy. These enhancements will help you to maintain and deploy web application firewall configurations across deployment stages and across different types of applications.
The post is in two parts. This first part describes AWS Managed Rules for AWS WAF and how it can be used to provide defense in depth. The second part shows how to apply AWS Managed Rules for WAF.
AWS Managed Rules for AWS WAF is a service that provides groups of rules created by Amazon Web Services (AWS) or by an AWS technology partner. By using AWS Managed Rules, you can reduce the administrative overhead of configuring rules for AWS WAF. You still need a comprehensive strategy for web application policy enforcement to help you make the best use of AWS Managed Rules for your web applications.
By using a layered policy enforcement strategy, you can create policy enforcement that’s specific to each part of your applications. This helps you avoid having to maintain and manage monolithic AWS WAF configurations for each of your applications. When you can separate policies for the edge network and for the application layer network, replicating separate policies across larger workloads becomes modular. This makes your application security more agile and lets you protect public-facing web applications without writing new rules or including rules that aren’t relevant to your web application.
Policy enforcement becomes even less of an administrative burden when you use AWS Firewall Manager to enforce policies across all accounts. This helps ensure organizations have robust policy enforcement measures across multiple accounts, with increased application layer visibility.
The new AWS WAF JSON document-style configuration enables traditional code review processes. You can now easily manage AWS WAF configurations on multiple layers of your web applications. This has also enabled partners to create more dynamic and robust rules that they can deliver on AWS WAF, which ultimately helps those customers manage their web application security policies.
AWS WAF enhancements
AWS WAF uses web ACL capacity units (WCU) to calculate and control the operating resources that are used to run your rules, rule groups, and web ACLs.
You can use JSON key-value pair document-based configuration to more easily integrate AWS WAF into the development practices of your organization. As noted in the prior paragraph, using document-style configuration removes the need to use multiple API calls to create objects in the correct order before you can create and deploy a web ACL to protect your web applications.
Using this method lets firewall changes be implemented with normal development and operations best practices because it will be infrastructure as code. This enables version control and code review before deploying updates to your production environment.
Solution overview
The following diagram illustrates the layers and functions of a defense-in-depth solution. The text that follows describes each layer.
Figure 1: Solution overview diagram
Edge network layer policy enforcement
The edge network is the first layer of policy enforcement and should be used for broad security policy enforcement. This is the ideal place for rules such as AWS Managed Rules Core rule set (CRS), geographical location blocks, IP reputational lists, anonymous IP lists, and basic rate limits enforcement. By limiting known bad traffic at the edge network, the CRS limits the exposure of the application layer to known bad IP address ranges, malicious requests, bad bots, and request floods. This provides broad protection to the inner application layer against malicious activity, which can be applied regardless of the web application being served at the application layer.
Combining Amazon CloudFront with the distributed denial of service (DDoS) mitigation capabilities of AWS Shield is supported by AWS WAF for your outer layer of web application security enforcement.
It’s a common misconception that CloudFront is only a content delivery platform, but it also has robust transparent reverse proxy capabilities. CloudFront can help protect your environment from a broad range of web application risks. For example, you can use CloudFront to ensure that HTTP requests conform to standards on the far outer layer of your web application environment while serving content closer to the user.
Application layer policy enforcement
The next level of enforcement should be an application load balancer in a public subnet with another web ACL at the CloudFront origin. This policy enforcement layer is where you create a regional web ACL for the CloudFront origin. In addition, this layer is where you apply application-specific rules. For example, if you have a web application that uses a LAMP stack, it would be best to use AWS Managed Rules for SQL Injection, Linux, and PHP as an enforcement layer.
Note: IP-based enforcement is not effective on this part of the environment. Consider making use of an origin custom header on the CloudFront distribution. Then using this custom header to create a BLOCK rule within this web ACL to deny any request without the origin custom header as the first rule in your web ACL list. This rule needs to be created manually and will not be configured by the supplied templates.
(Optional) Third-party web application firewall layer policy enforcement
AWS WAF enforces policies on inbound requests and doesn’t have outbound inspection capabilities. If you need to enforce policies based on outbound responses, you can use Amazon Machine Image (AMI) based web application firewalls, which are available via the AWS Marketplace.
Using an instance-based web application firewall is used here because most of the heavy lifting of computational expenditure is done on the AWS WAF enforcement layers. The third-party layer is where you can enforce policies that require requests to be stateful.
Using an AMI from AWS Marketplace also gives you access to capabilities such as higher visibility, threat intelligence, and robust firewall rules. This adds an additional layer of security enhancement to your environment.
(Optional) Private layer policy enforcement
When working with a traditional three-tier web architecture, you can add an additional layer of enforcement on the private layer, which can be used for the web front ends. This stage is where you would deploy an application load balancer in a private subnet serving your web front ends. This load balancer is there for any computational expensive regex-based rule enforcement that you don’t want to enforce on the instances-based WAF. This also gives you another layer of visibility before requests reaches the web front ends themselves. This example can be seen in Figure 2 below as a reference.
If the application load balancer isn’t located in us-east-1, you can use the Amazon-CloudFront-EdgeLayer-AMR.yml template to deploy the stack in us-east-1 to support the web ACL on CloudFront and then deploy ApplicationLayer-Load-Balancer-AMR.yml in the region the original application load balancer was deployed for its web ACL.
All CloudFormation templates are available on the Github project page and a summary of each can be found in the main readme.md file.
Note: All the individual rules in each rule set is set to ACTION OVERRIDE for initial deployment. If any of the rule actions in the group are set to block or allow, this override changes the behavior so that matching rules are only counted. You may change the setting to NO ACTION OVERRIDE after a period of evaluation to avoid disrupting production workloads with potential false positives.
Edge network and application load balancer origin using AWS Managed Rules for AWS WAF
When considering some of the web application best practices on AWS for resiliency and security, the recommendation is to use CloudFront where possible, because it can terminate TLS/SSL connections and serve cached content close to the end user. CloudFront has advanced mitigation capabilities such as SYN cookies and a massively distributed network separate from the traditional Amazon Elastic Compute Cloud (Amazon EC2) networking space. CloudFront also supports AWS WAF rate limits, IP blacklists, and broad security policies, which can be enforced at the edge network layer.
In the example Amazon-CloudFront-Application-Load-Balancer-AMR.yml template, we place a rate-limit for HTTP GET and HTTP POST methods. This is dependent upon expected traffic request rates. You can review Amazon CloudWatch metrics for your CloudFront distribution or application load balancer to determine the baseline for your rate limit based on the maximum expected requests per minute.
Note: The size constraint rules aren’t recommended for protecting APIs or web applications with large HTTP POSTs or long cookies. Evaluate the possible effects of size constraint rules thoroughly before setting them to block requests.
There is also an AWS Managed Rule for known bad inputs which is based on threat intelligence gathered by the AWS Threat Research Team. Finally, there is an admin protection rule set that drops requests to known management login pages. It’s not advised that web applications have front door access to admin controls.
At the origin, it’s a good idea to use an application load balancer that also supports AWS WAF. This is where you want to apply application-specific web policies. For example, this is where you would apply rules to protect against a SQL injection attack if your web application uses a SQL database.
In the example AWS CloudFormation template Amazon-CloudFront-Application-Load-Balancer-AMR.yml, for the origin application load balancer, we use AWS Managed Rules for SQL injections, Linux rule set, Unix rule set, PHP rule set, and the WordPress rule set to cover most eventualities customers could be using on their web applications.
Using AWS Managed WAF Rules on public and private application load balancers
Some customers have reasons to not use CloudFront and will use two application load balancers. One load balancer for the public facing environment for web front ends and an internal load balancer for the application backends.
The following figure shows a deployment that uses two load balancers. A public load balancer works with the edge network WAF to connect to a web front end in a private subnet and an internal load balancer connects to the backend application.
Figure 2: Diagram of stacked load balancers
In this use case, we can still use the same structure of edge network and application layer network, now only using load balancers. Using a three-tier web application approach to deploy web applications there will be an external facing and an internal application load balancer where you can deploy the same style of policy enforcement, but only on load balancers.
Note: To deploy something similar to this example, you can use the template EdgeLayerALB-PrivateLayerALB-AMR.yml in the relevant regions where the load balancers have been deployed.
Alarms and logging
After deploying these AWS CloudFormation templates you should consider setting CloudWatch alarms on certain metrics for the HTTP GET and HTTP POST flood rules as well as the reputation and anonymous IP lists. Customers that are familiar with developing may also opt to use Lambda responders to use CloudWatch Events to trigger and update to the rule change from COUNT to BLOCK. Also enabling full logging for each web ACL will give you higher visibility into each request and will make potential investigations easier.
Conclusion
Using the new enhancements of AWS WAF makes it easier to manage a multi-layer web application security enforcement policy by using AWS WAF to maintain and deploy web application firewall configurations across their different deployment stages, as well as across different types of applications. By making use of partner or AWS Managed Rules, administrative overhead can be significantly reduced, and with AWS Firewall Manager, customers can enforce these policies across all of an organization’s accounts. Part 2 of this post will show you one example of how this can be done.
If you have feedback about this post, submit comments in the Comments section below. If you have questions about this post, start a new thread on the AWS WAF forum or contact AWS Support.
Want more AWS Security how-to content, news, and feature announcements? Follow us on Twitter.
The collective thoughts of the interwebz
Manage Consent
To provide the best experiences, we use technologies like cookies to store and/or access device information. Consenting to these technologies will allow us to process data such as browsing behavior or unique IDs on this site. Not consenting or withdrawing consent, may adversely affect certain features and functions.
Functional
Always active
The technical storage or access is strictly necessary for the legitimate purpose of enabling the use of a specific service explicitly requested by the subscriber or user, or for the sole purpose of carrying out the transmission of a communication over an electronic communications network.
Preferences
The technical storage or access is necessary for the legitimate purpose of storing preferences that are not requested by the subscriber or user.
Statistics
The technical storage or access that is used exclusively for statistical purposes.The technical storage or access that is used exclusively for anonymous statistical purposes. Without a subpoena, voluntary compliance on the part of your Internet Service Provider, or additional records from a third party, information stored or retrieved for this purpose alone cannot usually be used to identify you.
Marketing
The technical storage or access is required to create user profiles to send advertising, or to track the user on a website or across several websites for similar marketing purposes.