Post Syndicated from Mahesh Biradar original https://aws.amazon.com/blogs/devops/integrating-aws-device-farm-with-ci-cd-pipeline-to-run-cross-browser-selenium-tests/
Continuously building, testing, and deploying your web application helps you release new features sooner and with fewer bugs. In this blog, you will create a continuous integration and continuous delivery (CI/CD) pipeline for a web app using AWS CodeStar services and AWS Device Farm’s desktop browser testing service. AWS CodeStar is a suite of services that help you quickly develop and build your web apps on AWS.
AWS Device Farm’s desktop browser testing service helps developers improve the quality of their web apps by executing their Selenium tests on different desktop browsers hosted in AWS. For each test executed on the service, Device Farm generates action logs, web driver logs, video recordings, to help you quickly identify issues with your app. The service offers pay-as-you-go pricing so you only pay for the time your tests are executing on the browsers with no upfront commitments or additional costs. Furthermore, Device Farm provides a default concurrency of 50 Selenium sessions so you can run your tests in parallel and speed up the execution of your test suites.
After you’ve completed the steps in this blog, you’ll have a working pipeline that will build your web app on every code commit and test it on different versions of desktop browsers hosted in AWS.
Solution overview
In this solution, you use AWS CodeStar to create a sample web application and a CI/CD pipeline. The following diagram illustrates our solution architecture.
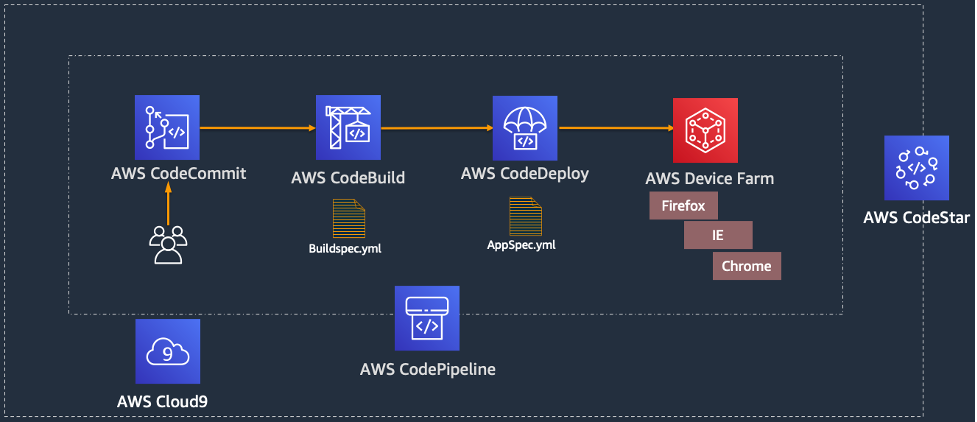
Figure 1: Deployment pipeline architecture
Prerequisites
Before you deploy the solution, complete the following prerequisite steps:
- On the AWS Management Console, search for AWS CodeStar.
- Choose Getting Started.
- Choose Create Project.
- Choose a sample project.
For this post, we choose a Python web app deployed on Amazon Elastic Compute Cloud (Amazon EC2) servers.
- For Templates, select Python (Django).
- Choose Next.
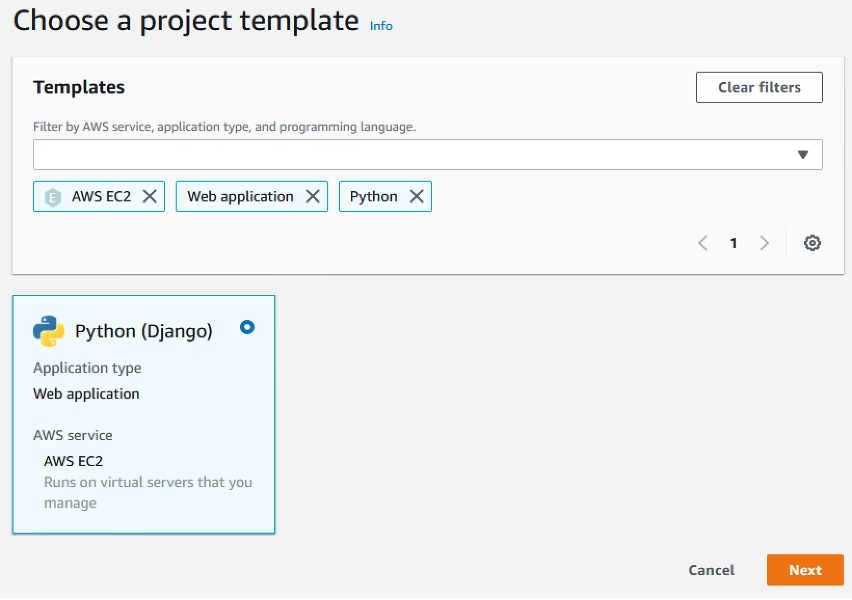
Figure 2: Choose a template in CodeStar
- For Project name, enter Demo CICD Selenium.
- Leave the remaining settings at their default.
You can choose from a list of existing key pairs. If you don’t have a key pair, you can create one.
- Choose Next.
- Choose Create project.
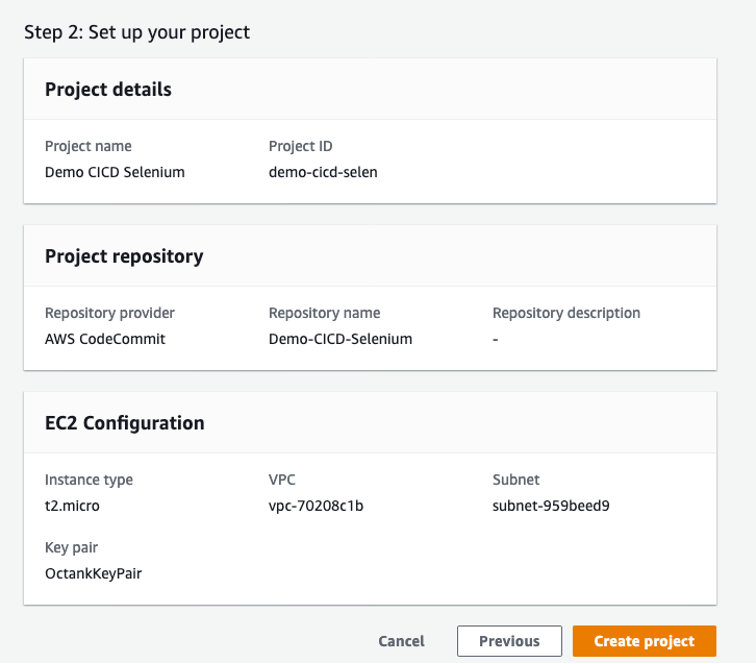
Figure 3: Verify the project configuration
AWS CodeStar creates project resources for you as listed in the following table.
| Service | Resource Created |
| AWS CodePipeline project | demo-cicd-selen-Pipeline |
| AWS CodeCommit repository | Demo-CICD-Selenium |
| AWS CodeBuild project | demo-cicd-selen |
| AWS CodeDeploy application | demo-cicd-selen |
| AWS CodeDeploy deployment group | demo-cicd-selen-Env |
| Amazon EC2 server | Tag: Environment = demo-cicd-selen-WebApp |
| IAM role | AWSCodeStarServiceRole, CodeStarWorker* |
Your EC2 instance needs to have access to run AWS Device Farm to run the Selenium test scripts. You can use service roles to achieve that.
- Attach policy AWSDeviceFarmFullAccess to the IAM role CodeStarWorker-demo-cicd-selen-WebApp.
You’re now ready to create an AWS Cloud9 environment.
Check the Pipelines tab of your AWS CodeStar project; it should show success.
- On the IDE tab, under Cloud 9 environments, choose Create environment.
- For Environment name, enter Demo-CICD-Selenium.
- Choose Create environment.
- Wait for the environment to be complete and then choose Open IDE.
- In the IDE, follow the instructions to set up your Git and make sure it’s up to date with your repo.
The following screenshot shows the verification that the environment is set up.

Figure 4: Verify AWS Cloud9 setup
You can now verify the deployment.
- On the Amazon EC2 console, choose Instances.
- Choose demo-cicd-selen-WebApp.
- Locate its public IP and choose open address.
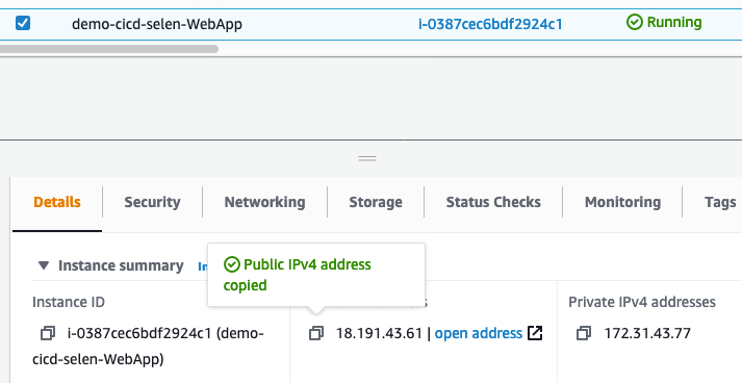
Figure 5: Locating IP address of the instance
A webpage should open. If it doesn’t, check your VPN and firewall settings.
Now that you have a working pipeline, let’s move on to creating a Device Farm project for browser testing.
Creating a Device Farm project
To create your browser testing project, complete the following steps:
- On the Device Farm console, choose Desktop browser testing project.
- Choose Create a new project.
- For Project name, enter Demo cicd selenium.
- Choose Create project.
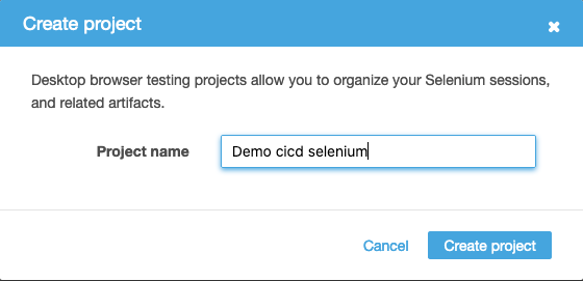
Figure 6: Creating AWS Device Farm project
Note down the project ARN; we use this in the Selenium script for the remote web driver.
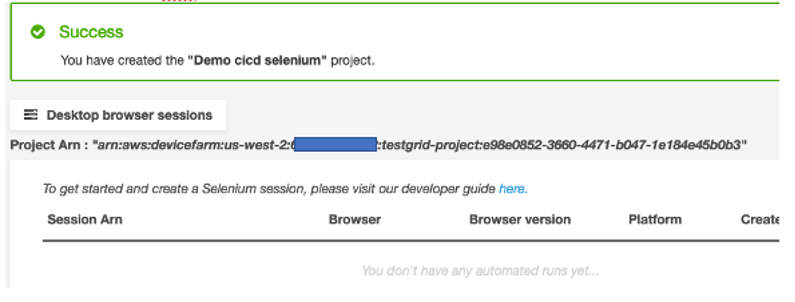
Figure 7: Project ARN for AWS Device Farm project
Testing the solution
This solution uses the following script to run browser testing. We call this script in the validate service lifecycle hook of the CodeDeploy project.
- Open your AWS Cloud9 IDE (which you made as a prerequisite).
- Create a folder tests under the project root directory.
- Add the sample Selenium script browser-test-sel.py under tests folder with the following content (replace <sample_url> with the url of your web application refer pre-requisite step 18):
import boto3
from selenium import webdriver
from selenium.webdriver.common.keys import Keys

devicefarm_client = boto3.client("devicefarm", region_name="us-west-2")
testgrid_url_response = devicefarm_client.create_test_grid_url(
    projectArn="arn:aws:devicefarm:us-west-2:<your project ARN>",
    expiresInSeconds=300)

driver = webdriver.Remote(testgrid_url_response["url"],
                          webdriver.DesiredCapabilities.FIREFOX)
try:
    driver.implicitly_wait(30)
    driver.maximize_window()
    driver.get("<sample_url>")
    if driver.find_element_by_id("Layer_1"):
        print("graphics generated in full screen")
    assert driver.find_element_by_id("Layer_1")
    driver.set_window_position(0, 0) and driver.set_window_size(1000, 400)
    driver.get("<sample_url>")
    tower = driver.find_element_by_id("tower1")
    if tower.is_displayed():
        print("graphics generated after resizing")
    else:
        print("graphics not generated at this window size")
       # this is where you can fail the script with error if you expect the graphics to load. And pipeline will terminate
except Exception as e:
    print(e)
finally:
    driver.quit()
This script launches a website (in Firefox) created by you in the prerequisite step using the AWS CodeStar template and verifies if a graphic element is loaded.
The following screenshot shows a full-screen application with graphics loaded.
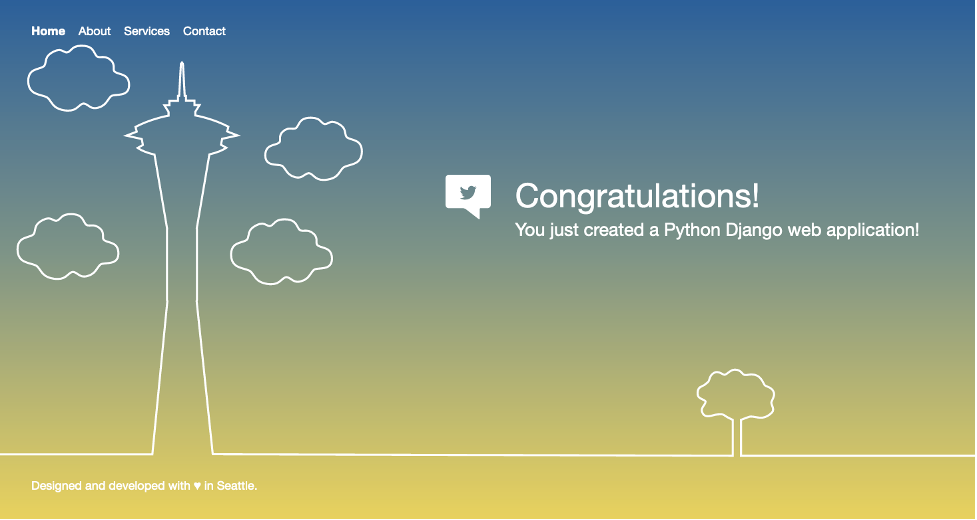
Figure 8: Full screen application with graphics loaded
The following screenshot shows the resized window with no graphics loaded.
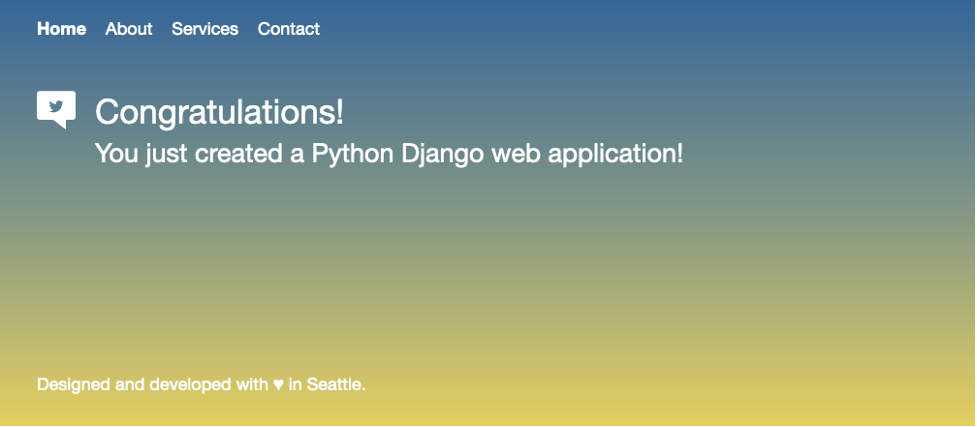
Figure 9: Resized window application with No graphics loaded
- Create the file validate_service in the scripts folder under the root directory with the following content:
#!/bin/bash
if [ "$DEPLOYMENT_GROUP_NAME" == "demo-cicd-selen-Env" ]
then
cd /home/ec2-user
source environment/bin/activate
python tests/browser-test-sel.py
fi
This script is part of CodeDeploy scripts and determines whether to stop the pipeline or continue based on the output from the browser testing script from the preceding step.
- Modify the file appspec.yml under the root directory, add the tests files and ValidateService hook , the file should look like following:
version: 0.0
os: linux
files:
 - source: /ec2django/
   destination: /home/ec2-user/ec2django
 - source: /helloworld/
   destination: /home/ec2-user/helloworld
 - source: /manage.py
   destination: /home/ec2-user
 - source: /supervisord.conf
   destination: /home/ec2-user
 - source: /requirements.txt
   destination: /home/ec2-user
 - source: /requirements/
   destination: /home/ec2-user/requirements
 - source: /tests/
   destination: /home/ec2-user/tests

permissions:
  - object: /home/ec2-user/manage.py
    owner: ec2-user
    mode: 644
    type:
      - file
  - object: /home/ec2-user/supervisord.conf
    owner: ec2-user
    mode: 644
    type:
      - file
hooks:
  AfterInstall:
    - location: scripts/install_dependencies
      timeout: 300
      runas: root
    - location: scripts/codestar_remote_access
      timeout: 300
      runas: root
    - location: scripts/start_server
      timeout: 300
      runas: root

  ApplicationStop:
    - location: scripts/stop_server
      timeout: 300
      runas: root

  ValidateService:
    - location: scripts/validate_service
      timeout: 600
      runas: root
This file is used by AWS CodeDeploy service to perform the deployment and validation steps.
- Modify the artifacts section in the buildspec.yml file. The section should look like the following:
artifacts:
  files:
    - 'template.yml'
    - 'ec2django/**/*'
    - 'helloworld/**/*'
    - 'scripts/**/*'
    - 'tests/**/*'
    - 'appspec.yml'
    - 'manage.py'
    - 'requirements/**/*'
    - 'requirements.txt'
    - 'supervisord.conf'
    - 'template-configuration.json'
This file is used by AWS CodeBuild service to package the code
- Modify the file Common.txt in the requirements folder under the root directory, the file should look like the following:
- Save All the changes, your folder structure should look like the following:
── README.md
├── appspec.yml*
├── buildspec.yml*
├── db.sqlite3
├── ec2django
├── helloworld
├── manage.py
├── requirements
│   ├── common.txt*
│   ├── dev.txt
│   ├── prod.txt
├── requirements.txt
├── scripts
│   ├── codestar_remote_access
│   ├── install_dependencies
│   ├── start_server
│   ├── stop_server
│   └── validate_service**
├── supervisord.conf
├── template-configuration.json
├── template.yml
├── tests
│   └── browser-test-sel.py**

**newly added files
*modified file
Running the tests
The Device Farm desktop browsing project is now integrated with your pipeline. All you need to do now is commit the code, and CodePipeline takes care of the rest.
- On Cloud9 terminal, go to project root directory.
- Run git add . to stage all changed files for commit.
- Run git commit -m “<commit message>” to commit the changes.
- Run git push to push the changes to repository, this should trigger the Pipeline.
- Check the Pipelines tab of your AWS CodeStar project; it should show success.
- Go to AWS Device Farm console and click on Desktop browser testing projects.
- Click on your Project Demo cicd selenium.
You can verify the running of your Selenium test cases using the recorded run steps shown on the Device Farm console, the video of the run, and the logs, all of which can be downloaded on the Device Farm console, or using the AWS SDK and AWS Command Line Interface (AWS CLI).
The following screenshot shows the project run details on the console.
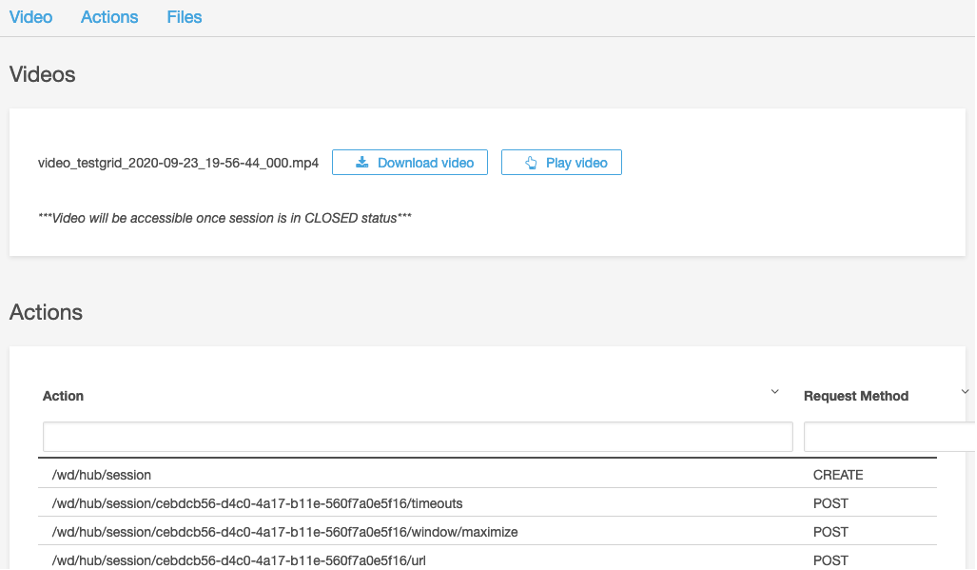
Figure 10: Viewing AWS Device Farm project run details
To Test the Selenium script locally you can run the following commands.
1. Create a Python virtual environment for your Django project. This virtual environment allows you to isolate this project and install any packages you need without affecting the system Python installation. At the terminal, go to project root directory and type the following command:
$ python3 -m venv ./venv
2. Activate the virtual environment:
$ source ./venv/bin/activate
3. Install development Python dependencies for this project:
$ pip install -r requirements/dev.txt
4. Run Selenium Script:
$ python tests/browser-test-sel.py
Testing the failure scenario (optional)
To test the failure scenario, you can modify the sample script browser-test-sel.py at the else statement.
The following code shows the lines to change:
else:
print("graphics was not generated at this form size")
# this is where you can fail the script with error if you expect the graphics to load. And pipeline will terminate
The following is the updated code:
else:
exit(1)
# this is where you can fail the script with error if you expect the graphics to load. And pipeline will terminate
Commit the change, and the pipeline should fail and stop the deployment.
Conclusion
Integrating Device Farm with CI/CD pipelines allows you to control deployment based on browser testing results. Failing the Selenium test on validation failures can stop and roll back the deployment, and a successful testing can continue the pipeline to deploy the solution to the final stage. Device Farm offers a one-stop solution for testing your native and web applications on desktop browsers and real mobile devices.
 |
Mahesh Biradar is a Solutions Architect at AWS. He is a DevOps enthusiast and enjoys helping customers implement cost-effective architectures that scale.. |