Tag Archives: AWS Device Farm

Run Maestro tests on real Android devices using AWS Device Farm

Post Syndicated from Ronald Teijeira Fernandez original https://aws.amazon.com/blogs/devops/run-maestro-tests-on-real-android-devices-using-aws-device-farm/

ManoMano is a European online marketplace for home improvement and gardening products. Their mobile engineering team builds a React Native application that serves millions of customers across Europe. To verify app quality across a wide range of Android devices, ManoMano adopted Maestro for end-to-end (E2E) testing and needed a way to run these tests at scale on real hardware. This post shares how they solved that challenge using AWS Device Farm.

In this post, you learn how to run Maestro mobile UI tests on real Android devices using AWS Device Farm. Maestro is a mobile UI testing framework that uses a declarative YAML syntax to describe test flows. By using the custom test environment in AWS Device Farm, you can install and run Maestro flows on real physical devices in the cloud.

This post is for mobile developers and Quality Assurance (QA) engineers who use Maestro for E2E testing and want to scale their test suites across real Android devices with different brands, screen sizes, and OS versions.

Many teams that adopt React Native prefer Maestro for its YAML-based simplicity and reliable mobile testing capabilities. With the custom test environment feature in AWS Device Farm, you can run any framework that operates over Android Debug Bridge (ADB), including Maestro. This post shows you how to set it up end to end.

Solution overview

AWS Device Farm is a fully managed app testing service that you can use to test your Android and iOS apps on physical devices in the AWS Cloud. It provides officially supported frameworks (Appium, Espresso, and XCTest) with all dependencies and setup pre-configured. It also offers custom test environments that give you full control over the test host. This means you can install and run any framework that operates over ADB, including Maestro. The custom environment provides the following capabilities:

  • An Amazon Linux 2023 host machine with ADB pre-installed, fully cleaned up and not reused between runs.
  • ADB connectivity to the physical device under test.
  • The ability to install additional tooling through shell commands in the test spec from your test package, downloaded from the internet or accessed through private sources within your virtual private cloud (VPC).
  • Live log and video streaming during test execution.
  • Full artifact collection (logs, screenshots, and other test output) from specified directories.

With these capabilities, you can install the Maestro CLI and, if needed, its primary dependency (for example, Java 21) on the test host. You then run your YAML-based test flows against the connected device, the same way you run them locally.
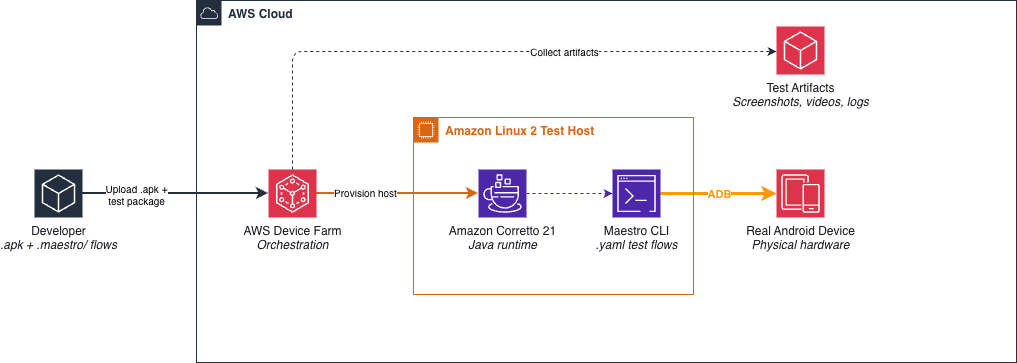
Architecture of the Maestro on AWS Device Farm solution, showing an Amazon Linux 2 test host connecting to a real Android device over ADB to run Maestro flows

Figure 1: Solution architecture

How it works

The solution uses the following workflow:

  1. AWS Device Farm provisions a real Android device and an Amazon Linux 2023 test host with ADB access to the device.
  2. During the install phase, the test spec downloads and installs Amazon Corretto 21 (Java) and the Maestro CLI on the test host.
  3. During the test phase, Maestro connects to the device through ADB and runs your .yaml test flows.
  4. Maestro writes screenshots, video recordings, and test results to the $DEVICEFARM_LOG_DIR directory.
  5. AWS Device Farm collects all artifacts and makes them available for download after the run completes.

Note: This approach currently supports Android devices only. As of 2026, Maestro iOS support is optimized for simulators and does not work with the real physical iOS devices that AWS Device Farm provides (as indicated in the Maestro documentation).

Prerequisites

To complete this walkthrough, you must have the following:

  • An AWS account with access to AWS Device Farm
  • An Android .apk file built for testing (a release build with animations disabled is recommended for stability)
  • Maestro test flows written in YAML (for more information, see Getting started in the Maestro documentation)
  • Familiarity with the AWS Device Farm Console
  • The Maestro driver APKs (dev.mobile.maestro) for uploading as Extra Apps in AWS Device Farm. After running Maestro locally at least once on a connected device, you can extract the installed APKs using adb shell pm path dev.mobile.maestro.

Walkthrough

Complete the following steps to configure and run Maestro tests on AWS Device Farm.

Step 1: Prepare your Android application package

Build your React Native (or native Android) application as an .apk file. Use a release build or a dedicated test build with animations disabled to reduce test flakiness.

Step 2: Package your Maestro test flows

AWS Device Farm expects a test package in .zip format. Use this zip file as a carrier for your Maestro .yaml flows. The following example shows a typical test directory structure:

.maestro/
├── login_flow.yaml
├── checkout_flow.yaml
└── search_flow.yaml

Run the following command to package the directory into a zip file:

zip -r maestro-tests.zip .maestro/

Upload this zip file to AWS Device Farm as your test package. AWS Device Farm extracts it to $DEVICEFARM_TEST_PACKAGE_PATH, which makes your flows accessible during test execution.

Step 3: Configure the test run

In the AWS Device Farm Console, create a test run with the following configuration:

  1. For Choose your application, upload your .apk file.
  2. For Test framework, select Appium Node.js. This selection determines the expected format of the test package you upload. Appium Node.js accepts a generic zip file containing your test scripts and binaries, which makes it suitable for packaging Maestro flows and the Maestro CLI. Other framework options (such as Instrumentation) require framework-specific package formats like compiled jar files.
  3. For Test package, select the zip file that contains your .maestro directory.
  4. For Test spec, replace the default testspec.yml with the custom configuration in Step 4.
  5. For Devices, select a curated device pool or specific Android devices.
  6. For Extra Apps (located under Additional configuration and then Install other apps), upload the Maestro driver APKs (dev.mobile.maestro). AWS Device Farm installs these on the device before the test begins to help you maintain compatibility with restrictive Android skins.
  7. Review your configuration and choose Confirm and start.

Step 4: Configure the test specification

The following test spec instructs AWS Device Farm to download Amazon Corretto 21, install the Maestro CLI, and run your test flows.

In the following code, replace {YOUR_APP_ID} with your application package ID (for example, com.example.myapp). You can find this in your application’s AndroidManifest.xml or by running adb shell pm list packages | grep <your-app-keyword>.

version: 0.1
# Use the Amazon Linux 2023 host environment
android_test_host: amazon_linux_2023

phases:
  install:
    commands:
      # Set locale (important if your app uses special characters)
      - export LANG=en_US.UTF-8
      - export LC_ALL=en_US.UTF-8
      - export LANGUAGE=en_US.UTF-8
      - locale

      # Install Amazon Corretto 21 (required by Maestro)
      - echo "Downloading Amazon Corretto 21..."
      - curl -L -o /tmp/java21.tar.gz https://corretto.aws/downloads/latest/amazon-corretto-21-x64-linux-jdk.tar.gz
      - mkdir -p /tmp/java21
      - tar -xzf /tmp/java21.tar.gz -C /tmp/java21 --strip-components=1
      - export JAVA_HOME=/tmp/java21
      - export PATH=$JAVA_HOME/bin:$PATH
      - java -version

      # Install Maestro CLI
      - curl -Ls "https://get.maestro.mobile.dev" | bash
      - export PATH="$PATH:$HOME/.maestro/bin"

  pre_test:
    commands:
      # Grant background permissions to Maestro driver (for MIUI devices)
      - adb shell appops set dev.mobile.maestro RUN_IN_BACKGROUND allow 2>/dev/null || true
      - adb shell appops set dev.mobile.maestro START_ACTIVITIES_FROM_BACKGROUND allow 2>/dev/null || true
      - maestro --version

  test:
    commands:
      # Run Maestro test flows
      - maestro test -e APP_ID={YOUR_APP_ID} "$DEVICEFARM_TEST_PACKAGE_PATH/.maestro" --test-output-dir=$DEVICEFARM_LOG_DIR/maestro-results

  post_test:
    commands:
      - echo "E2E tests completed"

artifacts:
  # Collect all Maestro output (screenshots, videos, logs)
  - $DEVICEFARM_LOG_DIR

For more information, see Custom test environments in AWS Device Farm.

Key environment variables

The test spec uses the following AWS Device Farm environment variables:

  • $DEVICEFARM_TEST_PACKAGE_PATH: The path where AWS Device Farm extracts your uploaded test package (zip file).
  • $DEVICEFARM_LOG_DIR: The default directory for storing artifacts. AWS Device Farm collects files from this directory after the run.
  • $DEVICEFARM_APP_PATH: The path to your uploaded .apk file on the test host.
  • $DEVICEFARM_DEVICE_NAME: The unique device identifier (UDID) of the device under test.
  • $DEVICEFARM_DEVICE_OS_VERSION: The Android OS version running on the device.

Reviewing test results

After the test run completes, AWS Device Farm displays results organized into three suites:

  • Setup suite: Contains the output from the install and pre_test phases, including Amazon Corretto and Maestro installation.
  • Tests suite: Contains the output from the maestro test command, with pass/fail status for each flow.
  • Teardown suite: Contains the post_test phase output and device cleanup.
AWS Device Farm test run results page organized into Setup, Tests, and Teardown suites

Figure 2: AWS Device Farm test run results showing the Setup, Tests, and Teardown suites

In the Test Specification Log, you can view the live console output. The following example shows typical output during a test run:

[DEVICEFARM] Setting up your device. This usually takes 2-3 minutes.
[DEVICEFARM] ########### Start executing testspec ###########

[DEVICEFARM] ########### Entering phase install ###########

[DeviceFarm] echo "Downloading Amazon Corretto 21..."
Downloading Amazon Corretto 21...
[DeviceFarm] java -version
openjdk version "21.0.11" 2026-04-21 LTS
OpenJDK Runtime Environment Corretto-21.0.11.10.1 (build 21.0.11+10-LTS)
[DeviceFarm] curl -Ls "https://get.maestro.mobile.dev" | bash
Installation was successful!

[DEVICEFARM] ########### Entering phase test ###########

[DeviceFarm] maestro test -e APP_ID=com.manomano "$DEVICEFARM_TEST_PACKAGE_PATH/.maestro" --test-output-dir=$DEVICEFARM_LOG_DIR/maestro-results

Waiting for flows to complete...
[Passed] login_flow (1m 12s)
[Passed] checkout_flow (2m 29s)
[Passed] search_flow (0m 47s)

3/3 Flows Passed

[DEVICEFARM] ########### Finish executing testspec ###########
[DEVICEFARM] Tearing down your device.

To download detailed results, including screenshots and video recordings, open the Files tab and choose Customer Artifacts. For more information, see Downloading artifacts in a custom test environment.

Handling MIUI device installation prompts

Maestro requires a driver app to be installed on the device under test. On devices with restrictive Android skins (such as Xiaomi MIUI and Oppo ColorOS, which are common in the AWS Device Farm device pool), the operating system blocks USB installations. Installation proceeds only after a user accepts a security prompt, as displayed in Figure 3.
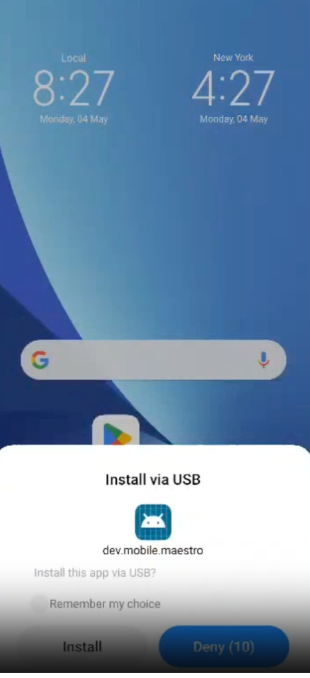
MIUI security dialog on an Android device prompting the user to accept a driver app installation

Figure 3: MIUI installation permission dialog

The way to address this scenario is by pre-installing the Maestro driver APKs as Extra Apps in the AWS Device Farm Console. When you upload the Maestro APKs alongside your application, AWS Device Farm installs them on the device before the test begins. You can then grant the necessary background permissions through ADB using appops commands in the pre_test phase:

adb shell appops set dev.mobile.maestro RUN_IN_BACKGROUND allow
adb shell appops set dev.mobile.maestro START_ACTIVITIES_FROM_BACKGROUND allow

These commands tell the OS to trust the Maestro driver app, allowing it to run in the background and start activities without user interaction. This approach removes the need for the UI watcher script and helps make sure that Maestro can start driving your application when the test begins.

Best practices

The following recommendations are based on the AWS Device Farm best practices for custom test environments:

  • Use environment variables instead of absolute paths: AWS Device Farm provides $DEVICEFARM_TEST_PACKAGE_PATH, $DEVICEFARM_LOG_DIR, and other variables that help maintain consistent behavior across test hosts.
  • Direct artifacts to $DEVICEFARM_LOG_DIR: Use the --test-output-dir flag to write Maestro output to this directory. AWS Device Farm collects artifacts stored here automatically.
  • Verify non-zero exit codes on failure: Maestro returns a non-zero exit code when tests fail, which AWS Device Farm uses to mark the run as failed. Verify this behavior with your Maestro version.
  • Do not log sensitive data: Test spec logs are available as downloadable artifacts. Do not echo API keys or secrets in your commands.
  • Disable animations in your test build: Animations are a common source of test flakiness. Disable them at build time or add ADB commands in the pre_test phase.
  • Use Maestro tags for selective test runs: Use --include-tags or --exclude-tags to run subsets of your test suite, such as smoke tests compared with full regression.

Automate with CI/CD

You can automate this workflow by integrating AWS Device Farm into your continuous integration and continuous delivery (CI/CD) pipeline with the AWS Command Line Interface (AWS CLI) or AWS SDKs. The following are the key API operations:

  • CreateUpload: Upload your .apk and test package zip file.
  • ScheduleRun: Start a test run with your test spec, app, and device pool.
  • GetRun: Poll for run completion and retrieve the result status.
  • ListArtifacts: Download test artifacts such as screenshots, videos, and logs.

For GitHub Actions, use the official GitHub Action, which handles uploading your application and test package, scheduling the run, polling for completion, and downloading artifacts. For AWS CodePipeline, see AWS Device Farm test action reference. For other CI/CD tools or services, use the AWS CLI or AWS SDKs with the AWS Device Farm API.

Cost considerations

AWS Device Farm pricing offers two models for automated testing:

  • Pay per device minute: You pay per minute of device usage. A typical Maestro test run takes 5–15 minutes per device, depending on the number of flows.
  • Unlimited testing (flat rate): A monthly flat fee per device slot gives you unlimited testing on one device at a time. This model is cost-effective for teams that run frequent test suites.

The install phase (downloading Java and Maestro) adds approximately 1–2 minutes to each run. To optimize costs, run critical smoke tests on every commit and full regression suites on release branches only. For current pricing details, see the AWS Device Farm pricing page.

Troubleshooting

The following list describes common issues and their solutions.

  • Maestro times out waiting for the app: Verify that your .apk is a release build or that the app starts quickly. Increase the launch timeout by using the appLaunchTimeout parameter in your flow YAML file.
  • Tests fail on MIUI or Xiaomi devices only: Verify that the Maestro driver APKs are uploaded as Extra Apps in AWS Device Farm and that the appops commands in the pre_test phase grant RUN_IN_BACKGROUND and START_ACTIVITIES_FROM_BACKGROUND permissions.
  • Java not found during Maestro run: Verify that the export PATH commands in the install phase are correct. Environment variables that are set in one phase persist to subsequent phases.
  • Artifacts do not appear after the run: Verify that --test-output-dir points to $DEVICEFARM_LOG_DIR or a subdirectory. AWS Device Farm collects only files in paths that are listed under the artifacts section.
  • Test marked as passed despite flow failures: Verify that your Maestro version returns a non-zero exit code on failure. Some older versions might not exit with a non-zero code by default.

Cleaning up

To avoid incurring future charges, delete the following resources that you created during this walkthrough:

  1. In the AWS Device Farm Console, delete the test run and any associated uploads that you no longer need.
  2. If you created a device pool specifically for this walkthrough, delete it from your AWS Device Farm project.
  3. AWS Device Farm does not incur charges when no test runs are active. No additional cleanup is required unless you are using the unlimited testing plan.

Conclusion

By integrating Maestro with the AWS Device Farm custom test environment, ManoMano transformed their mobile testing strategy. They moved from manual validation on a handful of devices to automated end-to-end testing across real physical hardware on every release. This approach delivers:

  • Broader device coverage: Tests run on devices from different manufacturers with varying screen sizes and OS versions, catching device-specific rendering issues and permission dialogs that emulators miss.
  • Faster feedback cycles: Automated test runs complete in minutes rather than the hours required for manual testing across multiple devices.
  • Consistent reliability: Pre-installing the Maestro driver APKs and granting background permissions through ADB eliminates flakiness caused by restrictive Android skins like MIUI.
  • CI/CD integration: Tests run automatically on every pull request using the official AWS Device Farm GitHub Action, preventing regressions from reaching production.

The key enabler is the AWS Device Farm custom test environment. With it, you can run any framework that operates over ADB, without being limited to officially supported test frameworks. This means you can combine the YAML-based test authoring in Maestro with a managed fleet of real devices and extend the pattern to other ADB-compatible tools as your testing needs evolve.

In this post, you learned how to configure the custom test environment, package your Maestro flows, handle manufacturer-specific restrictions, and automate the workflow in your CI/CD pipeline. To get started, create an AWS Device Farm project and try running your existing Maestro flows by following the steps in this post.


About the authors

Ronald Teijeira Fernández

Ronald Teijeira Fernández

Ronald is a Senior Solutions Architect at Amazon Web Services, helping Public Sector customers in Iberia accelerate cloud adoption and maturity. He specializes in development and security, and is an active member of the Next Generation Development Experience and Security Technical Field Communities, where he enables and supports both the community and customers through technical content and guidance.

Jose Maria Elias

Jose Maria Elias

Jose is a Senior Engineering Manager at ManoMano, where he leads the Foundations team responsible for the core architecture of both web and mobile platforms. Recognizing the critical importance of app quality, he focuses on driving mobile testing automation strategies. He specializes in architecting scalable E2E testing pipelines, currently utilizing the Maestro framework and AWS Device Farm to validate mobile applications across diverse device ecosystems.

Build Next-Generation Microservices with .NET 5 and gRPC on AWS

Post Syndicated from Matt Cline original https://aws.amazon.com/blogs/devops/next-generation-microservices-dotnet-grpc/

Modern architectures use multiple microservices in conjunction to drive customer experiences. At re:Invent 2015, AWS senior project manager Rob Brigham described Amazon’s architecture of many single-purpose microservices – including ones that render the “Buy” button, calculate tax at checkout, and hundreds more.

Microservices commonly communicate with JSON over HTTP/1.1. These technologies are ubiquitous and human-readable, but they aren’t optimized for communication between dozens or hundreds of microservices.

Next-generation Web technologies, including gRPC and HTTP/2, significantly improve communication speed and efficiency between microservices. AWS offers the most compelling experience for builders implementing microservices. Moreover, the addition of HTTP/2 and gRPC support in Application Load Balancer (ALB) provides an end-to-end solution for next-generation microservices. ALBs can inspect and route gRPC calls, enabling features like health checks, access logs, and gRPC-specific metrics.

This post demonstrates .NET microservices communicating with gRPC via Application Load Balancers. The microservices run on AWS Graviton2 instances, utilizing a custom-built 64-bit Arm processor to deliver up to 40% better price/performance than x86.

Architecture Overview

Modern Tacos is a new restaurant offering delivery. Customers place orders via mobile app, then they receive real-time status updates as their order is prepared and delivered.

The tutorial includes two microservices: “Submit Order” and “Track Order”. The Submit Order service receives orders from the app, then it calls the Track Order service to initiate order tracking. The Track Order service provides streaming updates to the app as the order is prepared and delivered.

Each microservice is deployed in an Amazon EC2 Auto Scaling group. Each group is behind an ALB that routes gRPC traffic to instances in the group.

Shows the communication flow of gRPC traffic from users through an ALB to EC2 instances.
This architecture is simplified to focus on ALB and gRPC functionality. Microservices are often deployed in
containers for elastic scaling, improved reliability, and efficient resource utilization. ALB, gRPC, and .NET all work equally effectively in these architectures.

Comparing gRPC and JSON for microservices

Microservices typically communicate by sending JSON data over HTTP. As a text-based format, JSON is readable, flexible, and widely compatible. However, JSON also has significant weaknesses as a data interchange format. JSON’s flexibility makes enforcing a strict API specification difficult — clients can send arbitrary or invalid data, so developers must write rigorous data validation code. Additionally, performance can suffer at scale due to JSON’s relatively high bandwidth and parsing requirements. These factors also impact performance in constrained environments, such as smartphones and IoT devices. gRPC addresses all of these issues.

gRPC is an open-source framework designed to efficiently connect services. Instead of JSON, gRPC sends messages via a compact binary format called Protocol Buffers, or protobuf. Although protobuf messages are not human-readable, they utilize less network bandwidth and are faster to encode and decode. Operating at scale, these small differences multiply to a significant performance gain.

gRPC APIs define a strict contract that is automatically enforced for all messages. Based on this contract, gRPC implementations generate client and server code libraries in multiple programming languages. This allows developers to use higher-level constructs to call services, rather than programming against “raw” HTTP requests.

gRPC also benefits from being built on HTTP/2, a major revision of the HTTP protocol. In addition to the foundational performance and efficiency improvements from HTTP/2, gRPC utilizes the new protocol to support bi-directional streaming data. Implementing real-time streaming prior to gRPC typically required a completely separate protocol (such as WebSockets) that might not be supported by every client.

gRPC for .NET developers

Several recent updates have made gRPC more useful to .NET developers. .NET 5 includes significant performance improvements to gRPC, and AWS has broad support for .NET 5. In May 2021, the .NET team announced their focus on a gRPC implementation written entirely in C#, called “grpc-dotnet”, which follows C# conventions very closely.

Instead of working with JSON, dynamic objects, or strings, C# developers calling a gRPC service use a strongly-typed client, automatically generated from the protobuf specification. This obviates much of the boilerplate validation required by JSON APIs, and it enables developers to use rich data structures. Additionally, the generated code enables full IntelliSense support in Visual Studio.

For example, the “Submit Order” microservice executes this code in order to call the “Track Order” microservice:

using var channel = GrpcChannel.ForAddress("https://track-order.example.com");

var trackOrderClient = new TrackOrder.Protos.TrackOrder.TrackOrderClient(channel);

var reply = await trackOrderClient.StartTrackingOrderAsync(new TrackOrder.Protos.Order
{
    DeliverTo = "Address",
    LastUpdated = Timestamp.FromDateTime(DateTime.UtcNow),
    OrderId = order.OrderId,
    PlacedOn = order.PlacedOn,
    Status = TrackOrder.Protos.OrderStatus.Placed
});

This code calls the StartTrackingOrderAsync method on the Track Order client, which looks just like a local method call. The method intakes a data structure that supports rich data types like DateTime and enumerations, instead of the loosely-typed JSON. The methods and data structures are defined by the Track Order service’s protobuf specification, and the .NET gRPC tools automatically generate the client and data structure classes without requiring any developer effort.

Configuring ALB for gRPC

To make gRPC calls to targets behind an ALB, create a load balancer target group and select gRPC as the protocol version. You can do this through the AWS Management Console, AWS Command Line Interface (CLI), AWS CloudFormation, or AWS Cloud Development Kit (CDK).

Screenshot of the AWS Management Console, showing how to configure a load balancer's target group for gRPC communication.

This CDK code creates a gRPC target group:

var targetGroup = new ApplicationTargetGroup(this, "TargetGroup", new ApplicationTargetGroupProps
{
    Protocol = ApplicationProtocol.HTTPS,
    ProtocolVersion = ApplicationProtocolVersion.GRPC,
    Vpc = vpc,
    Targets = new IApplicationLoadBalancerTarget {...}
});

gRPC requests work with target groups utilizing HTTP/2, but the gRPC protocol enables additional features including health checks, request count metrics, access logs that differentiate gRPC requests, and gRPC-specific response headers. gRPC also works with native ALB features like stickiness, multiple load balancing algorithms, and TLS termination.

Deploy the Tutorial

The sample provisions AWS resources via the AWS Cloud Development Kit (CDK). The CDK code is provided in C# so that .NET developers can use a familiar language.

The solution deployment steps include:

  • Configuring a domain name in Route 53.
  • Deploying the microservices.
  • Running the mobile app on AWS Device Farm.

The source code is available on GitHub.

Prerequisites

For this tutorial, you should have these prerequisites:

Configure the environment variables needed by the CDK. In the sample commands below, replace AWS_ACCOUNT_ID with your numeric AWS account ID. Replace AWS_REGION with the name of the region where you will deploy the sample, such as us-east-1 or us-west-2.

If you’re using a *nix shell such as Bash, run these commands:

export CDK_DEFAULT_ACCOUNT=AWS_ACCOUNT_ID
export CDK_DEFAULT_REGION=AWS_REGION

If you’re using PowerShell, run these commands:

$Env:CDK_DEFAULT_ACCOUNT="AWS_ACCOUNT_ID"
$Env:CDK_DEFAULT_REGION="AWS_REGION"
Set-DefaultAWSRegion -Region AWS_REGION

Throughout this tutorial, replace RED TEXT with the appropriate value.

Save the directory path where you cloned the GitHub repository. In the sample commands below, replace EXAMPLE_DIRECTORY with this path.

In your terminal or PowerShell, run these commands:

cd EXAMPLE_DIRECTORY/src/ModernTacoShop/Common/cdk
cdk bootstrap --context domain-name=PARENT_DOMAIN_NAME
cdk deploy --context domain-name=PARENT_DOMAIN_NAME

The CDK output includes the name of the S3 bucket that will store deployment packages. Save the name of this bucket. In the sample commands below, replace SHARED_BUCKET_NAME with this name.

Deploy the Track Order microservice

Compile the Track Order microservice for the Arm microarchitecture utilized by AWS Graviton2 processors. The TrackOrder.csproj file includes a target that automatically packages the compiled microservice into a ZIP file. You will upload this ZIP file to S3 for use by CodeDeploy. Next, you will utilize the CDK to deploy the microservice’s AWS infrastructure, and then install the microservice on the EC2 instance via CodeDeploy.

The CDK stack deploys these resources:

  • An Amazon EC2 Auto Scaling group.
  • An Application Load Balancer (ALB) using gRPC, targeting the Auto Scaling group and configured with microservice health checks.
  • A subdomain for the microservice, targeting the ALB.
  • A DynamoDB table used by the microservice.
  • CodeDeploy infrastructure to deploy the microservice to the Auto Scaling group.

If you’re using the AWS CLI, run these commands:

cd EXAMPLE_DIRECTORY/src/ModernTacoShop/TrackOrder/src/
dotnet publish --runtime linux-arm64 --self-contained
aws s3 cp ./bin/TrackOrder.zip s3://SHARED_BUCKET_NAME
etag=$(aws s3api head-object --bucket SHARED_BUCKET_NAME \
    --key TrackOrder.zip --query ETag --output text)
cd ../cdk
cdk deploy

The CDK output includes the name of the CodeDeploy deployment group. Use this name to run the next command:

aws deploy create-deployment --application-name ModernTacoShop-TrackOrder \
    --deployment-group-name TRACK_ORDER_DEPLOYMENT_GROUP_NAME \
    --s3-location bucket=SHARED_BUCKET_NAME,bundleType=zip,key=TrackOrder.zip,etag=$etag \
    --file-exists-behavior OVERWRITE

If you’re using PowerShell, run these commands:

cd EXAMPLE_DIRECTORY/src/ModernTacoShop/TrackOrder/src/
dotnet publish --runtime linux-arm64 --self-contained
Write-S3Object -BucketName SHARED_BUCKET_NAME `
    -Key TrackOrder.zip `
    -File ./bin/TrackOrder.zip
Get-S3ObjectMetadata -BucketName SHARED_BUCKET_NAME `
    -Key TrackOrder.zip `
    -Select ETag `
    -OutVariable etag
cd ../cdk
cdk deploy

The CDK output includes the name of the CodeDeploy deployment group. Use this name to run the next command:

New-CDDeployment -ApplicationName ModernTacoShop-TrackOrder `
    -DeploymentGroupName TRACK_ORDER_DEPLOYMENT_GROUP_NAME `
    -S3Location_Bucket SHARED_BUCKET_NAME `
    -S3Location_BundleType zip `
    -S3Location_Key TrackOrder.zip `
    -S3Location_ETag $etag[0] `
    -RevisionType S3 `
    -FileExistsBehavior OVERWRITE

Deploy the Submit Order microservice

The steps to deploy the Submit Order microservice are identical to the Track Order microservice. See that section for details.

If you’re using the AWS CLI, run these commands:

cd EXAMPLE_DIRECTORY/src/ModernTacoShop/SubmitOrder/src/
dotnet publish --runtime linux-arm64 --self-contained
aws s3 cp ./bin/SubmitOrder.zip s3://SHARED_BUCKET_NAME
etag=$(aws s3api head-object --bucket SHARED_BUCKET_NAME \
    --key SubmitOrder.zip --query ETag --output text)
cd ../cdk
cdk deploy

The CDK output includes the name of the CodeDeploy deployment group. Use this name to run the next command:

aws deploy create-deployment --application-name ModernTacoShop-SubmitOrder \
    --deployment-group-name SUBMIT_ORDER_DEPLOYMENT_GROUP_NAME \
    --s3-location bucket=SHARED_BUCKET_NAME,bundleType=zip,key=SubmitOrder.zip,etag=$etag \
    --file-exists-behavior OVERWRITE

If you’re using PowerShell, run these commands:

cd EXAMPLE_DIRECTORY/src/ModernTacoShop/SubmitOrder/src/
dotnet publish --runtime linux-arm64 --self-contained
Write-S3Object -BucketName SHARED_BUCKET_NAME `
    -Key SubmitOrder.zip `
    -File ./bin/SubmitOrder.zip
Get-S3ObjectMetadata -BucketName SHARED_BUCKET_NAME `
    -Key SubmitOrder.zip `
    -Select ETag `
    -OutVariable etag
cd ../cdk
cdk deploy

The CDK output includes the name of the CodeDeploy deployment group. Use this name to run the next command:

New-CDDeployment -ApplicationName ModernTacoShop-SubmitOrder `
    -DeploymentGroupName SUBMIT_ORDER_DEPLOYMENT_GROUP_NAME `
    -S3Location_Bucket SHARED_BUCKET_NAME `
    -S3Location_BundleType zip `
    -S3Location_Key SubmitOrder.zip `
    -S3Location_ETag $etag[0] `
    -RevisionType S3 `
    -FileExistsBehavior OVERWRITE

Data flow diagram

Architecture diagram showing the complete data flow of the sample gRPC microservices application.
  1. The app submits an order via gRPC.
  2. The Submit Order ALB routes the gRPC call to an instance.
  3. The Submit Order instance stores order data.
  4. The Submit Order instance calls the Track Order service via gRPC.
  5. The Track Order ALB routes the gRPC call to an instance.
  6. The Track Order instance stores tracking data.
  7. The app calls the Track Order service, which streams the order’s location during delivery.

Test the microservices

Once the CodeDeploy deployments have completed, test both microservices.

First, check the load balancers’ status. Go to Target Groups in the AWS Management Console, which will list one target group for each microservice. Click each target group, then click “Targets” in the lower details pane. Every EC2 instance in the target group should have a “healthy” status.

Next, verify each microservice via gRPCurl. This tool lets you invoke gRPC services from the command line. Install gRPCurl using the instructions, and then test each microservice:

grpcurl submit-order.PARENT_DOMAIN_NAME:443 modern_taco_shop.SubmitOrder/HealthCheck
grpcurl track-order.PARENT_DOMAIN_NAME:443 modern_taco_shop.TrackOrder/HealthCheck

If a service is healthy, it will return an empty JSON object.

Run the mobile app

You will run a pre-compiled version of the app on AWS Device Farm, which lets you test on a real device without managing any infrastructure. Alternatively, compile your own version via the AndroidApp.FrontEnd project within the solution located at EXAMPLE_DIRECTORY/src/ModernTacoShop/AndroidApp/AndroidApp.sln.

Go to Device Farm in the AWS Management Console. Under “Mobile device testing projects”, click “Create a new project”. Enter “ModernTacoShop” as the project name, and click “Create Project”. In the ModernTacoShop project, click the “Remote access” tab, then click “Start a new session”. Under “Choose a device”, select the Google Pixel 3a running OS version 10, and click “Confirm and start session”.

Screenshot of the AWS Device Farm showing a Google Pixel 3a.

Once the session begins, click “Upload” in the “Install applications” section. Unzip and upload the APK file located at EXAMPLE_DIRECTORY/src/ModernTacoShop/AndroidApp/com.example.modern_tacos.grpc_tacos.apk.zip, or upload an APK that you created.

Screenshot of the gRPC microservices demo Android app, showing the map that displays streaming location data.

Screenshot of the gRPC microservices demo Android app, on the order preparation screen.

Once the app has uploaded, drag up from the bottom of the device screen in order to reach the “All apps” screen. Click the ModernTacos app to launch it.

Once the app launches, enter the parent domain name in the “Domain Name” field. Click the “+” and “-“ buttons next to each type of taco in order to create your order, then click “Submit Order”. The order status will initially display as “Preparing”, and will switch to “InTransit” after about 30 seconds. The Track Order service will stream a random route to the app, updating with new position data every 5 seconds. After approximately 2 minutes, the order status will change to “Delivered” and the streaming updates will stop.

Once you’ve run a successful test, click “Stop session” in the console.

Cleaning up

To avoid incurring charges, use the cdk destroy command to delete the stacks in the reverse order that you deployed them.

You can also delete the resources via CloudFormation in the AWS Management Console.

In addition to deleting the stacks, you must delete the Route 53 hosted zone and the Device Farm project.

Conclusion

This post demonstrated multiple next-generation technologies for microservices, including end-to-end HTTP/2 and gRPC communication over Application Load Balancer, AWS Graviton2 processors, and .NET 5. These technologies enable builders to create microservices applications with new levels of performance and efficiency.

Matt Cline

Matt Cline

Matt Cline is a Solutions Architect at Amazon Web Services, supporting customers in his home city of Pittsburgh PA. With a background as a full-stack developer and architect, Matt is passionate about helping customers deliver top-quality applications on AWS. Outside of work, Matt builds (and occasionally finishes) scale models and enjoys running a tabletop role-playing game for his friends.

Ulili Nhaga

Ulili Nhaga

Ulili Nhaga is a Cloud Application Architect at Amazon Web Services in San Diego, California. He helps customers modernize, architect, and build highly scalable cloud-native applications on AWS. Outside of work, Ulili loves playing soccer, cycling, Brazilian BBQ, and enjoying time on the beach.

Integrating AWS Device Farm with your CI/CD pipeline to run cross-browser Selenium tests

Post Syndicated from Mahesh Biradar original https://aws.amazon.com/blogs/devops/integrating-aws-device-farm-with-ci-cd-pipeline-to-run-cross-browser-selenium-tests/

Continuously building, testing, and deploying your web application helps you release new features sooner and with fewer bugs. In this blog, you will create a continuous integration and continuous delivery (CI/CD) pipeline for a web app using AWS CodeStar services and AWS Device Farm’s desktop browser testing service.  AWS CodeStar is a suite of services that help you quickly develop and build your web apps on AWS.

AWS Device Farm’s desktop browser testing service helps developers improve the quality of their web apps by executing their Selenium tests on different desktop browsers hosted in AWS. For each test executed on the service, Device Farm generates action logs, web driver logs, video recordings, to help you quickly identify issues with your app. The service offers pay-as-you-go pricing so you only pay for the time your tests are executing on the browsers with no upfront commitments or additional costs. Furthermore, Device Farm provides a default concurrency of 50 Selenium sessions so you can run your tests in parallel and speed up the execution of your test suites.

After you’ve completed the steps in this blog, you’ll have a working pipeline that will build your web app on every code commit and test it on different versions of desktop browsers hosted in AWS.

Solution overview

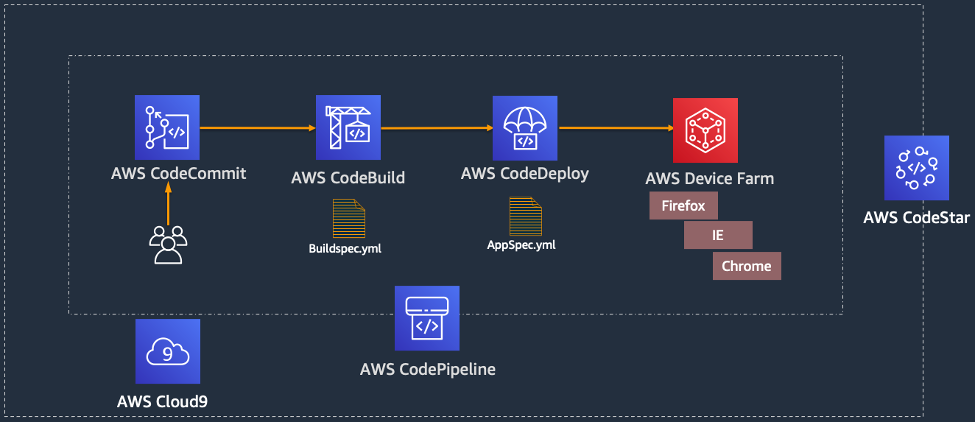
In this solution, you use AWS CodeStar to create a sample web application and a CI/CD pipeline. The following diagram illustrates our solution architecture.

Figure 1: Deployment pipeline architecture

Figure 1: Deployment pipeline architecture

Prerequisites

Before you deploy the solution, complete the following prerequisite steps:

  1. On the AWS Management Console, search for AWS CodeStar.
  2. Choose Getting Started.
  3. Choose Create Project.
  4. Choose a sample project.

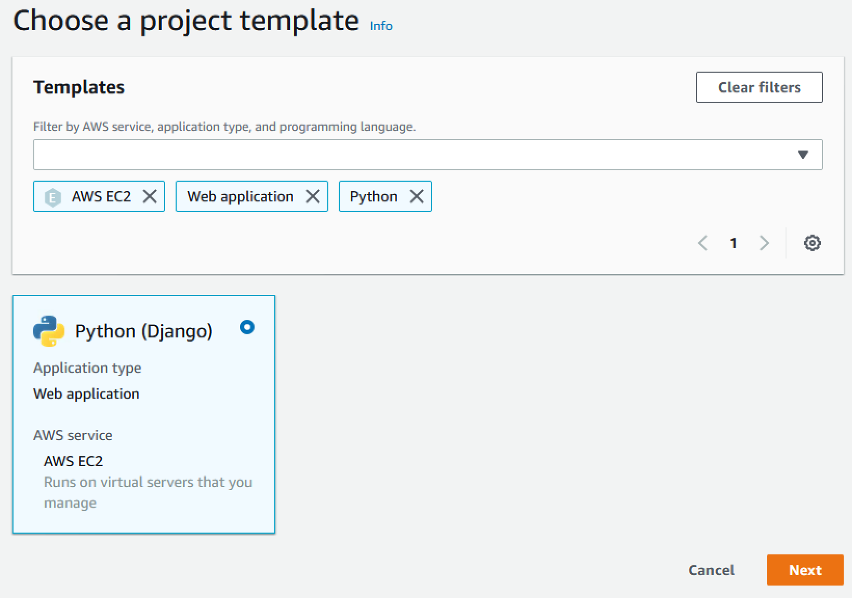
For this post, we choose a Python web app deployed on Amazon Elastic Compute Cloud (Amazon EC2) servers.

  1. For Templates, select Python (Django).
  2. Choose Next.
Figure 2: Choose a template in CodeStar

Figure 2: Choose a template in CodeStar

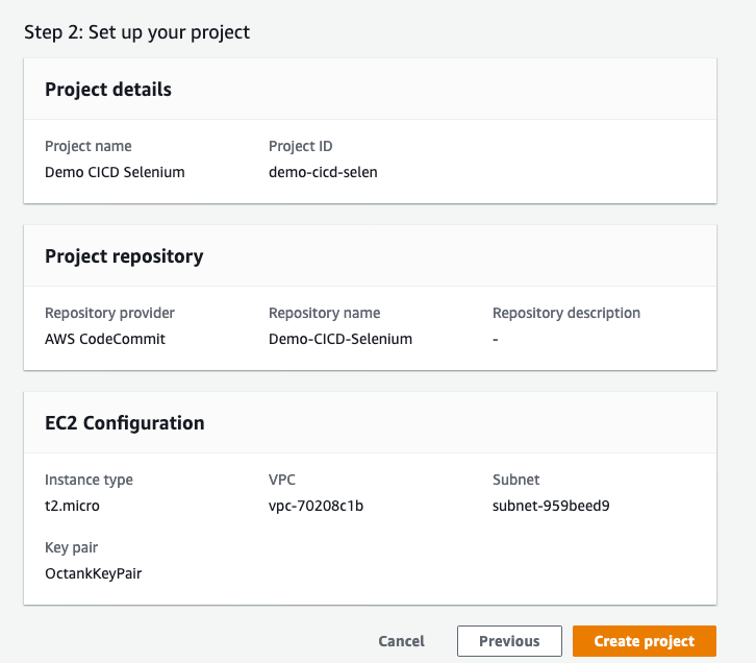
  1. For Project name, enter Demo CICD Selenium.
  2. Leave the remaining settings at their default.

You can choose from a list of existing key pairs. If you don’t have a key pair, you can create one.

  1. Choose Next.
  2. Choose Create project.
 Figure 3: Verify the project configuration

Figure 3: Verify the project configuration

AWS CodeStar creates project resources for you as listed in the following table.

Service Resource Created
AWS CodePipeline project demo-cicd-selen-Pipeline
AWS CodeCommit repository Demo-CICD-Selenium
AWS CodeBuild project demo-cicd-selen
AWS CodeDeploy application demo-cicd-selen
AWS CodeDeploy deployment group demo-cicd-selen-Env
Amazon EC2 server Tag: Environment = demo-cicd-selen-WebApp
IAM role AWSCodeStarServiceRole, CodeStarWorker*

Your EC2 instance needs to have access to run AWS Device Farm to run the Selenium test scripts. You can use service roles to achieve that.

  1. Attach policy AWSDeviceFarmFullAccess to the IAM role CodeStarWorker-demo-cicd-selen-WebApp.

You’re now ready to create an AWS Cloud9 environment.

Check the Pipelines tab of your AWS CodeStar project; it should show success.

  1. On the IDE tab, under Cloud 9 environments, choose Create environment.
  2. For Environment name, enter Demo-CICD-Selenium.
  3. Choose Create environment.
  4. Wait for the environment to be complete and then choose Open IDE.
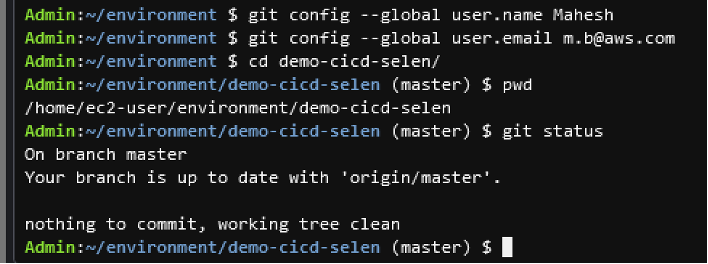
  5. In the IDE, follow the instructions to set up your Git and make sure it’s up to date with your repo.

The following screenshot shows the verification that the environment is set up.

Figure 4: Verify AWS Cloud9 setup

Figure 4: Verify AWS Cloud9 setup

You can now verify the deployment.

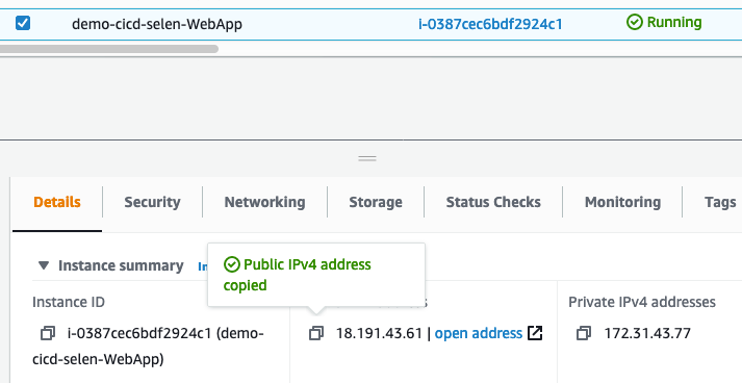
  1. On the Amazon EC2 console, choose Instances.
  2. Choose demo-cicd-selen-WebApp.
  3. Locate its public IP and choose open address.
Figure 5: Locating IP address of the instance

Figure 5: Locating IP address of the instance


A webpage should open. If it doesn’t, check your VPN and firewall settings.

Now that you have a working pipeline, let’s move on to creating a Device Farm project for browser testing.

Creating a Device Farm project

To create your browser testing project, complete the following steps:

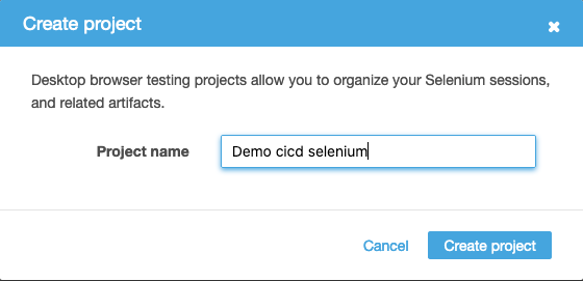
  1. On the Device Farm console, choose Desktop browser testing project.
  2. Choose Create a new project.
  3. For Project name, enter Demo cicd selenium.
  4. Choose Create project.
Figure 6: Creating AWS Device Farm project

Figure 6: Creating AWS Device Farm project


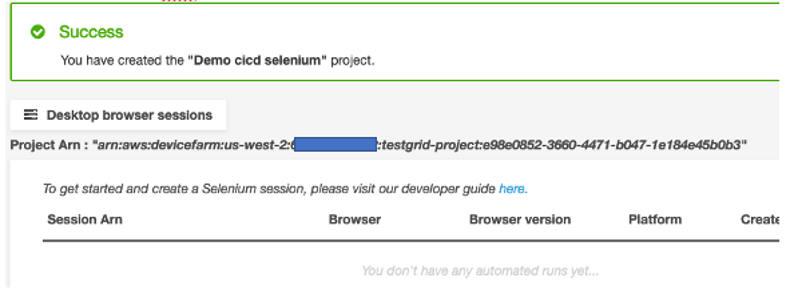
Note down the project ARN; we use this in the Selenium script for the remote web driver.

Figure 7: Project ARN for AWS Device Farm project

Figure 7: Project ARN for AWS Device Farm project


Testing the solution

This solution uses the following script to run browser testing. We call this script in the validate service lifecycle hook of the CodeDeploy project.

  1. Open your AWS Cloud9 IDE (which you made as a prerequisite).
  2. Create a folder tests under the project root directory.
  3. Add the sample Selenium script browser-test-sel.py under tests folder with the following content (replace <sample_url> with the url of your web application refer pre-requisite step 18):
import boto3
from selenium import webdriver
from selenium.webdriver.common.keys import Keys

devicefarm_client = boto3.client("devicefarm", region_name="us-west-2")
testgrid_url_response = devicefarm_client.create_test_grid_url(
    projectArn="arn:aws:devicefarm:us-west-2:<your project ARN>",
    expiresInSeconds=300)

driver = webdriver.Remote(testgrid_url_response["url"],
                          webdriver.DesiredCapabilities.FIREFOX)
try:
    driver.implicitly_wait(30)
    driver.maximize_window()
    driver.get("<sample_url>")
    if driver.find_element_by_id("Layer_1"):
        print("graphics generated in full screen")
    assert driver.find_element_by_id("Layer_1")
    driver.set_window_position(0, 0) and driver.set_window_size(1000, 400)
    driver.get("<sample_url>")
    tower = driver.find_element_by_id("tower1")
    if tower.is_displayed():
        print("graphics generated after resizing")
    else:
        print("graphics not generated at this window size")
       # this is where you can fail the script with error if you expect the graphics to load. And pipeline will terminate
except Exception as e:
    print(e)
finally:
    driver.quit()

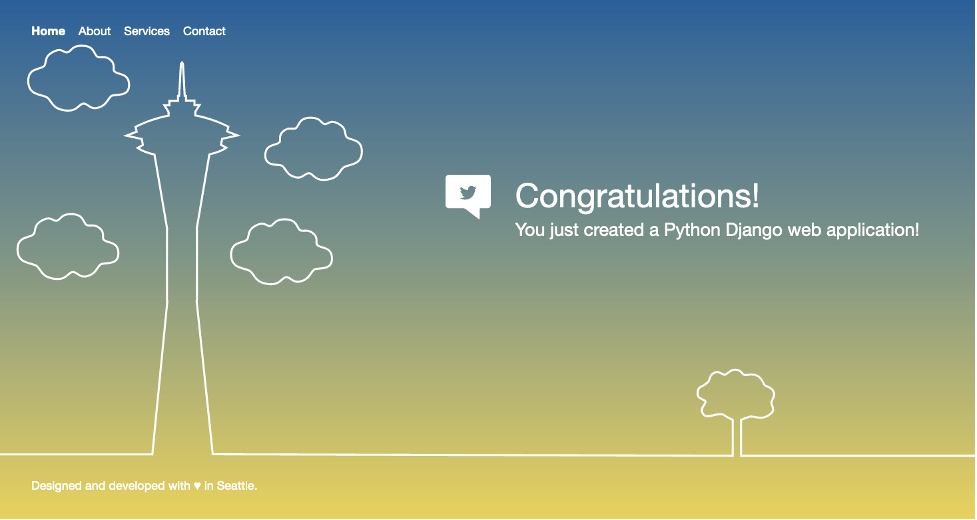
This script launches a website (in Firefox) created by you in the prerequisite step using the AWS CodeStar template and verifies if a graphic element is loaded.

The following screenshot shows a full-screen application with graphics loaded.

Figure 8: Full screen application with graphics loaded

Figure 8: Full screen application with graphics loaded


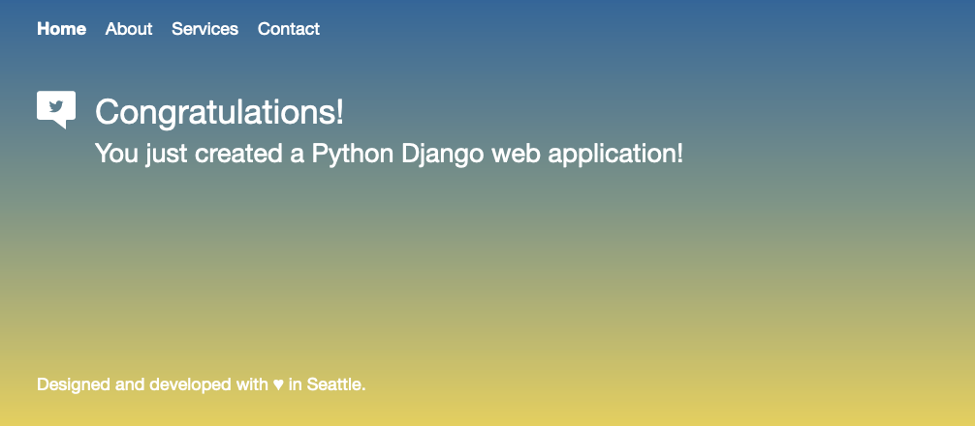
The following screenshot shows the resized window with no graphics loaded.

Figure 9: Resized window application with No graphics loaded

Figure 9: Resized window application with No graphics loaded

  1. Create the file validate_service in the scripts folder under the root directory with the following content:
#!/bin/bash
if [ "$DEPLOYMENT_GROUP_NAME" == "demo-cicd-selen-Env" ]
then
cd /home/ec2-user
source environment/bin/activate
python tests/browser-test-sel.py
fi

This script is part of CodeDeploy scripts and determines whether to stop the pipeline or continue based on the output from the browser testing script from the preceding step.

  1. Modify the file appspec.yml under the root directory, add the tests files and ValidateService hook , the file should look like following:
version: 0.0
os: linux
files:
 - source: /ec2django/
   destination: /home/ec2-user/ec2django
 - source: /helloworld/
   destination: /home/ec2-user/helloworld
 - source: /manage.py
   destination: /home/ec2-user
 - source: /supervisord.conf
   destination: /home/ec2-user
 - source: /requirements.txt
   destination: /home/ec2-user
 - source: /requirements/
   destination: /home/ec2-user/requirements
 - source: /tests/
   destination: /home/ec2-user/tests

permissions:
  - object: /home/ec2-user/manage.py
    owner: ec2-user
    mode: 644
    type:
      - file
  - object: /home/ec2-user/supervisord.conf
    owner: ec2-user
    mode: 644
    type:
      - file
hooks:
  AfterInstall:
    - location: scripts/install_dependencies
      timeout: 300
      runas: root
    - location: scripts/codestar_remote_access
      timeout: 300
      runas: root
    - location: scripts/start_server
      timeout: 300
      runas: root

  ApplicationStop:
    - location: scripts/stop_server
      timeout: 300
      runas: root

  ValidateService:
    - location: scripts/validate_service
      timeout: 600
      runas: root

This file is used by AWS CodeDeploy service to perform the deployment and validation steps.

  1. Modify the artifacts section in the buildspec.yml file. The section should look like the following:
artifacts:
  files:
    - 'template.yml'
    - 'ec2django/**/*'
    - 'helloworld/**/*'
    - 'scripts/**/*'
    - 'tests/**/*'
    - 'appspec.yml'
    - 'manage.py'
    - 'requirements/**/*'
    - 'requirements.txt'
    - 'supervisord.conf'
    - 'template-configuration.json'

This file is used by AWS CodeBuild service to package the code

  1. Modify the file Common.txt in the requirements folder under the root directory, the file should look like the following:
# dependencies common to all environments 
Django=2.1.15 
selenium==3.141.0 
boto3 >= 1.10.44
pytest

  1. Save All the changes, your folder structure should look like the following:
── README.md
├── appspec.yml*
├── buildspec.yml*
├── db.sqlite3
├── ec2django
├── helloworld
├── manage.py
├── requirements
│   ├── common.txt*
│   ├── dev.txt
│   ├── prod.txt
├── requirements.txt
├── scripts
│   ├── codestar_remote_access
│   ├── install_dependencies
│   ├── start_server
│   ├── stop_server
│   └── validate_service**
├── supervisord.conf
├── template-configuration.json
├── template.yml
├── tests
│   └── browser-test-sel.py**

**newly added files
*modified file

Running the tests

The Device Farm desktop browsing project is now integrated with your pipeline. All you need to do now is commit the code, and CodePipeline takes care of the rest.

  1. On Cloud9 terminal, go to project root directory.
  2. Run git add . to stage all changed files for commit.
  3. Run git commit -m “<commit message>” to commit the changes.
  4. Run git push to push the changes to repository, this should trigger the Pipeline.
  5. Check the Pipelines tab of your AWS CodeStar project; it should show success.
  6. Go to AWS Device Farm console and click on Desktop browser testing projects.
  7. Click on your Project Demo cicd selenium.

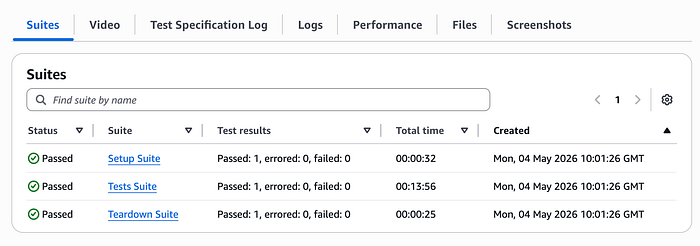
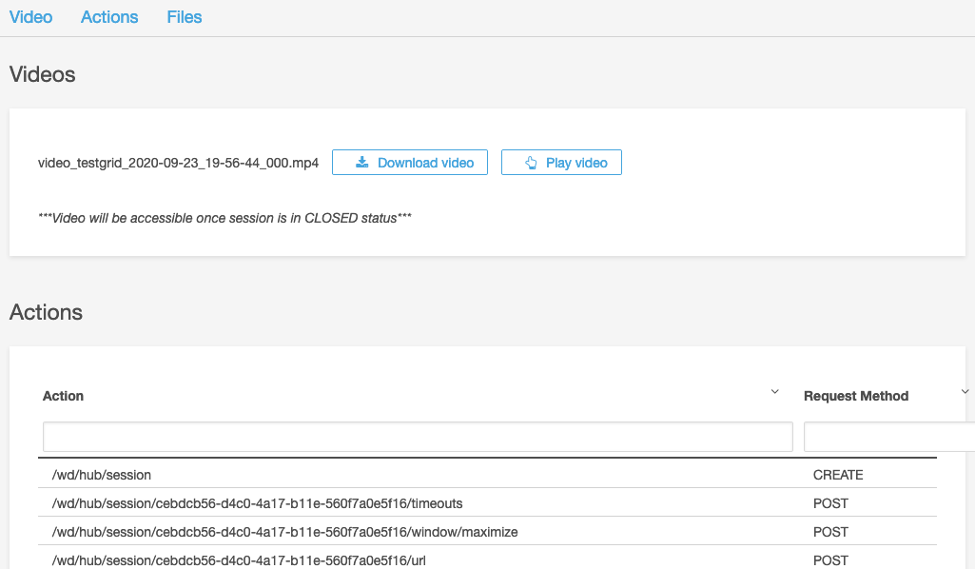
You can verify the running of your Selenium test cases using the recorded run steps shown on the Device Farm console, the video of the run, and the logs, all of which can be downloaded on the Device Farm console, or using the AWS SDK and AWS Command Line Interface (AWS CLI).

The following screenshot shows the project run details on the console.

Figure 10: Viewing AWS Device Farm project run details

Figure 10: Viewing AWS Device Farm project run details


To Test the Selenium script locally you can run the following commands.

1. Create a Python virtual environment for your Django project. This virtual environment allows you to isolate this project and install any packages you need without affecting the system Python installation. At the terminal, go to project root directory and type the following command:

$ python3 -m venv ./venv

2. Activate the virtual environment:

$ source ./venv/bin/activate

3. Install development Python dependencies for this project:

$ pip install -r requirements/dev.txt

4. Run Selenium Script:

$ python tests/browser-test-sel.py

Testing the failure scenario (optional)

To test the failure scenario, you can modify the sample script browser-test-sel.py at the else statement.

The following code shows the lines to change:

else:
print("graphics was not generated at this form size")
# this is where you can fail the script with error if you expect the graphics to load. And pipeline will terminate

The following is the updated code:

else:
exit(1)
# this is where you can fail the script with error if you expect the graphics to load. And pipeline will terminate

Commit the change, and the pipeline should fail and stop the deployment.

Conclusion

Integrating Device Farm with CI/CD pipelines allows you to control deployment based on browser testing results. Failing the Selenium test on validation failures can stop and roll back the deployment, and a successful testing can continue the pipeline to deploy the solution to the final stage. Device Farm offers a one-stop solution for testing your native and web applications on desktop browsers and real mobile devices.

Mahesh Biradar is a Solutions Architect at AWS. He is a DevOps enthusiast and enjoys helping customers implement cost-effective architectures that scale..