Post Syndicated from Mahesh Biradar original https://aws.amazon.com/blogs/devops/integrating-with-github-actions-amazon-codeguru-in-your-devsecops-pipeline/
Many organizations have adopted DevOps practices to streamline and automate software delivery and IT operations. A DevOps model can be adopted without sacrificing security by using automated compliance policies, fine-grained controls, and configuration management techniques. However, one of the key challenges customers face is analyzing code and detecting any vulnerabilities in the code pipeline due to a lack of access to the right tool. Amazon CodeGuru addresses this challenge by using machine learning and automated reasoning to identify critical issues and hard-to-find bugs during application development and deployment, thus improving code quality.
We discussed how you can build a CI/CD pipeline to deploy a web application in our previous post “Integrating with GitHub Actions – CI/CD pipeline to deploy a Web App to Amazon EC2”. In this post, we will use that pipeline to include security checks and integrate it with Amazon CodeGuru Reviewer to analyze and detect potential security vulnerabilities in the code before deploying it.
Amazon CodeGuru Reviewer helps you improve code security and provides recommendations based on common vulnerabilities (OWASP Top 10) and AWS security best practices. CodeGuru analyzes Java and Python code and provides recommendations for remediation. CodeGuru Reviewer detects a deviation from best practices when using AWS APIs and SDKs, and also identifies concurrency issues, resource leaks, security vulnerabilities and validates input parameters. For every workflow run, CodeGuru Reviewer’s GitHub Action copies your code and build artifacts into an S3 bucket and calls CodeGuru Reviewer APIs to analyze the artifacts and provide recommendations. Refer to the code detector library here for more information about CodeGuru Reviewer’s security and code quality detectors.
With GitHub Actions, developers can easily integrate CodeGuru Reviewer into their CI workflows, conducting code quality and security analysis. They can view CodeGuru Reviewer recommendations directly within the GitHub user interface to quickly identify and fix code issues and security vulnerabilities. Any pull request or push to the master branch will trigger a scan of the changed lines of code, and scheduled pipeline runs will trigger a full scan of the entire repository, ensuring comprehensive analysis and continuous improvement.
Solution overview
The solution comprises of the following components:
- GitHub Actions – Workflow Orchestration tool that will host the Pipeline.
- AWS CodeDeploy – AWS service to manage deployment on Amazon EC2 Autoscaling Group.
- AWS Auto Scaling – AWS service to help maintain application availability and elasticity by automatically adding or removing Amazon EC2 instances.
- Amazon EC2 – Destination Compute server for the application deployment.
- Amazon CodeGuru – AWS Service to detect security vulnerabilities and automate code reviews.
- AWS CloudFormation – AWS infrastructure as code (IaC) service used to orchestrate the infrastructure creation on AWS.
- AWS Identity and Access Management (IAM) OIDC identity provider – Federated authentication service to establish trust between GitHub and AWS to allow GitHub Actions to deploy on AWS without maintaining AWS Secrets and credentials.
- Amazon Simple Storage Service (Amazon S3) – Amazon S3 to store deployment and code scan artifacts.
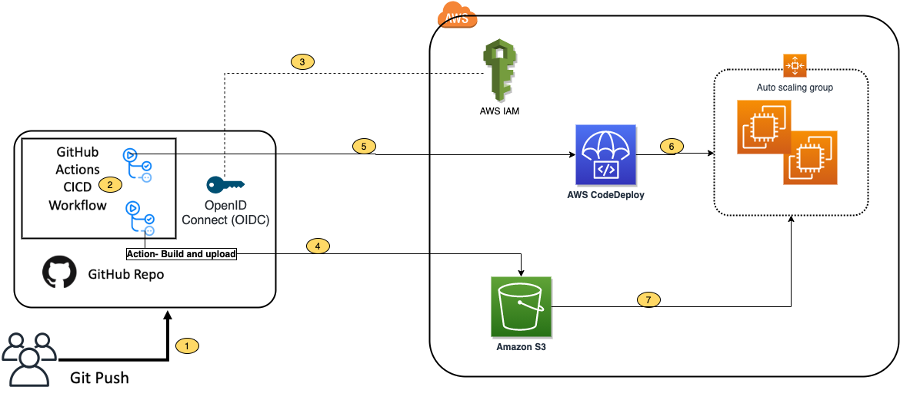
The following diagram illustrates the architecture:

Figure 1. Architecture Diagram of the proposed solution in the blog
- Developer commits code changes from their local repository to the GitHub repository. In this post, the GitHub action is triggered manually, but this can be automated.
- GitHub action triggers the build stage.
- GitHub’s Open ID Connector (OIDC) uses the tokens to authenticate to AWS and access resources.
- GitHub action uploads the deployment artifacts to Amazon S3.
- GitHub action invokes Amazon CodeGuru.
- The source code gets uploaded into an S3 bucket when the CodeGuru scan starts.
- GitHub action invokes CodeDeploy.
- CodeDeploy triggers the deployment to Amazon EC2 instances in an Autoscaling group.
- CodeDeploy downloads the artifacts from Amazon S3 and deploys to Amazon EC2 instances.
Prerequisites
This blog post is a continuation of our previous post – Integrating with GitHub Actions – CI/CD pipeline to deploy a Web App to Amazon EC2. You will need to setup your pipeline by following instructions in that blog.
After completing the steps, you should have a local repository with the below directory structure, and one completed Actions run.

Figure 2. Directory structure
To enable automated deployment upon git push, you will need to make a change to your .github/workflow/deploy.yml file. Specifically, you can activate the automation by modifying the following line of code in the deploy.yml file:
From:
To:
Solution walkthrough
The following steps provide a high-level overview of the walkthrough:
- Create an S3 bucket for the Amazon CodeGuru Reviewer.
- Update the IAM role to include permissions for Amazon CodeGuru.
- Associate the repository in Amazon CodeGuru.
- Add Vulnerable code.
- Update GitHub Actions Job to run the Amazon CodeGuru Scan.
- Push the code to the repository.
- Verify the pipeline.
- Check the Amazon CodeGuru recommendations in the GitHub user interface.
1. Create an S3 bucket for the Amazon CodeGuru Reviewer
-
- When you run a CodeGuru scan, your code is first uploaded to an S3 bucket in your AWS account.
Note that CodeGuru Reviewer expects the S3 bucket name to begin with codeguru-reviewer-.
-
- You can create this bucket using the bucket policy outlined in this CloudFormation template (JSON or YAML) or by following these instructions.
2. Update the IAM role to add permissions for Amazon CodeGuru
- Locate the role created in the pre-requisite section, named “CodeDeployRoleforGitHub”.
- Next, create an inline policy by following these steps. Give it a name, such as “codegurupolicy” and add the following permissions to the policy.
3. Associate the repository in Amazon CodeGuru
- Follow the instructions here to associate your repo – https://docs.aws.amazon.com/codeguru/latest/reviewer-ug/create-github-association.html

Figure 3. Associate the repository
At this point, you will have completed your initial full analysis run. However, since this is a simple “helloWorld” program, you may not receive any recommendations. In the following steps, you will incorporate vulnerable code and trigger the analysis again, allowing CodeGuru to identify and provide recommendations for potential issues.
4. Add Vulnerable code
- Create a file application.conf
at /aws-codedeploy-github-actions-deployment/spring-boot-hello-world-example
- Add the following content in application.conf file.
5. Update GitHub Actions Job to run Amazon CodeGuru Scan
- You will need to add a new job definition in the GitHub Actions’ yaml file. This new section should be inserted between the Build and Deploy sections for optimal workflow.
- Additionally, you will need to adjust the dependency in the deploy section to reflect the new flow: Build -> CodeScan -> Deploy.
- Review sample GitHub actions code for running security scan on Amazon CodeGuru Reviewer.
- Refer to the complete file provided below for your reference. It is important to note that you will need to replace the following environment variables with your specific values.
- S3bucket_CodeGuru
- AWS_REGION
- S3BUCKET
6. Push the code to the repository:
- Remember to save all the files that you have modified.
- To ensure that you are in your git repository folder, you can run the command:
- The command should return the remote branch address, which should be similar to the following:
- To push your code to the remote branch, run the following commands:
Your code has been pushed to the repository and will trigger the workflow as per the configuration in GitHub Actions.
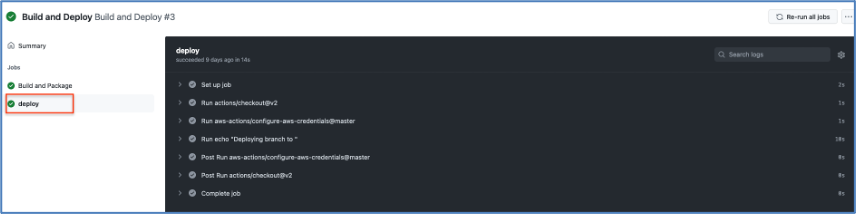
7. Verify the pipeline
- Your pipeline is set up to fail upon the detection of a critical vulnerability. You can also suppress recommendations from CodeGuru Reviewer if you think it is not relevant for setup. In this example, as there are two critical vulnerabilities, the pipeline will not proceed to the next step.
- To view the status of the pipeline, navigate to the Actions tab on your GitHub console. You can refer to the following image for guidance.

Figure 4. GitHub Actions pipeline
- To view the details of the error, you can expand the “codescan” job in the GitHub Actions console. This will provide you with more information about the specific vulnerabilities that caused the pipeline to fail and help you to address them accordingly.

Figure 5. Codescan actions logs
8. Check the Amazon CodeGuru recommendations in the GitHub user interface
Once you have run the CodeGuru Reviewer Action, any security findings and recommendations will be displayed on the Security tab within the GitHub user interface. This will provide you with a clear and convenient way to view and address any issues that were identified during the analysis.

Figure 6. Security tab with results
Clean up
To avoid incurring future charges, you should clean up the resources that you created.
- Empty the Amazon S3 bucket.
- Delete the CloudFormation stack (CodeDeployStack) from the AWS console.
- Delete codeguru Amazon S3 bucket.
- Disassociate the GitHub repository in CodeGuru Reviewer.
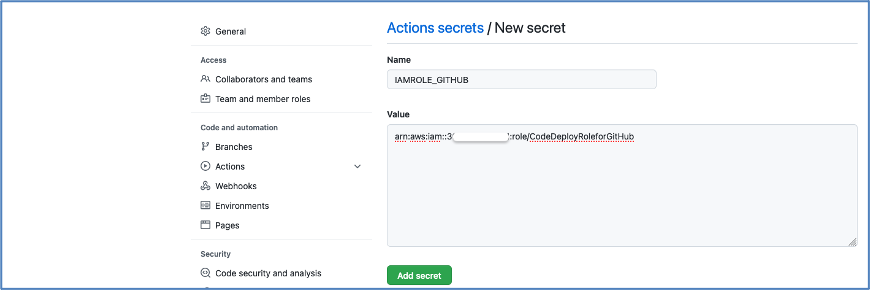
- Delete the GitHub Secret (‘IAMROLE_GITHUB’)
- Go to the repository settings on GitHub Page.
- Select Secrets under Actions.
- Select IAMROLE_GITHUB, and delete it.
Conclusion
Amazon CodeGuru is a valuable tool for software development teams looking to improve the quality and efficiency of their code. With its advanced AI capabilities, CodeGuru automates the manual parts of code review and helps identify performance, cost, security, and maintainability issues. CodeGuru also integrates with popular development tools and provides customizable recommendations, making it easy to use within existing workflows. By using Amazon CodeGuru, teams can improve code quality, increase development speed, lower costs, and enhance security, ultimately leading to better software and a more successful overall development process.
In this post, we explained how to integrate Amazon CodeGuru Reviewer into your code build pipeline using GitHub actions. This integration serves as a quality gate by performing code analysis and identifying challenges in your code. Now you can access the CodeGuru Reviewer recommendations directly within the GitHub user interface for guidance on resolving identified issues.
About the author: