Tag Archives: Test Automation

Terraform CI/CD and testing on AWS with the new Terraform Test Framework

Post Syndicated from Kevon Mayers original https://aws.amazon.com/blogs/devops/terraform-ci-cd-and-testing-on-aws-with-the-new-terraform-test-framework/

Image of HashiCorp Terraform logo and Amazon Web Services (AWS) Logo. Underneath the AWS Logo are the service logos for AWS CodeCommit, AWS CodeBuild, AWS CodePipeline, and Amazon S3. Graphic created by Kevon Mayers

Graphic created by Kevon Mayers

 Introduction

Organizations often use Terraform Modules to orchestrate complex resource provisioning and provide a simple interface for developers to enter the required parameters to deploy the desired infrastructure. Modules enable code reuse and provide a method for organizations to standardize deployment of common workloads such as a three-tier web application, a cloud networking environment, or a data analytics pipeline. When building Terraform modules, it is common for the module author to start with manual testing. Manual testing is performed using commands such as terraform validate for syntax validation, terraform plan to preview the execution plan, and terraform apply followed by manual inspection of resource configuration in the AWS Management Console. Manual testing is prone to human error, not scalable, and can result in unintended issues. Because modules are used by multiple teams in the organization, it is important to ensure that any changes to the modules are extensively tested before the release. In this blog post, we will show you how to validate Terraform modules and how to automate the process using a Continuous Integration/Continuous Deployment (CI/CD) pipeline.

Terraform Test

Terraform test is a new testing framework for module authors to perform unit and integration tests for Terraform modules. Terraform test can create infrastructure as declared in the module, run validation against the infrastructure, and destroy the test resources regardless if the test passes or fails. Terraform test will also provide warnings if there are any resources that cannot be destroyed. Terraform test uses the same HashiCorp Configuration Language (HCL) syntax used to write Terraform modules. This reduces the burden for modules authors to learn other tools or programming languages. Module authors run the tests using the command terraform test which is available on Terraform CLI version 1.6 or higher.

Module authors create test files with the extension *.tftest.hcl. These test files are placed in the root of the Terraform module or in a dedicated tests directory. The following elements are typically present in a Terraform tests file:

  • Provider block: optional, used to override the provider configuration, such as selecting AWS region where the tests run.
  • Variables block: the input variables passed into the module during the test, used to supply non-default values or to override default values for variables.
  • Run block: used to run a specific test scenario. There can be multiple run blocks per test file, Terraform executes run blocks in order. In each run block you specify the command Terraform (plan or apply), and the test assertions. Module authors can specify the conditions such as: length(var.items) != 0. A full list of condition expressions can be found in the HashiCorp documentation.

Terraform tests are performed in sequential order and at the end of the Terraform test execution, any failed assertions are displayed.

Basic test to validate resource creation

Now that we understand the basic anatomy of a Terraform tests file, let’s create basic tests to validate the functionality of the following Terraform configuration. This Terraform configuration will create an AWS CodeCommit repository with prefix name repo-.

# main.tf

variable "repository_name" {
  type = string
}
resource "aws_codecommit_repository" "test" {
  repository_name = format("repo-%s", var.repository_name)
  description     = "Test repository."
}

Now we create a Terraform test file in the tests directory. See the following directory structure as an example:

├── main.tf 
└── tests 
└── basic.tftest.hcl

For this first test, we will not perform any assertion except for validating that Terraform execution plan runs successfully. In the tests file, we create a variable block to set the value for the variable repository_name. We also added the run block with command = plan to instruct Terraform test to run Terraform plan. The completed test should look like the following:

# basic.tftest.hcl

variables {
  repository_name = "MyRepo"
}

run "test_resource_creation" {
  command = plan
}

Now we will run this test locally. First ensure that you are authenticated into an AWS account, and run the terraform init command in the root directory of the Terraform module. After the provider is initialized, start the test using the terraform test command.

❯ terraform test
tests/basic.tftest.hcl... in progress
run "test_resource_creation"... pass
tests/basic.tftest.hcl... tearing down
tests/basic.tftest.hcl... pass

Our first test is complete, we have validated that the Terraform configuration is valid and the resource can be provisioned successfully. Next, let’s learn how to perform inspection of the resource state.

Create resource and validate resource name

Re-using the previous test file, we add the assertion block to checks if the CodeCommit repository name starts with a string repo- and provide error message if the condition fails. For the assertion, we use the startswith function. See the following example:

# basic.tftest.hcl

variables {
  repository_name = "MyRepo"
}

run "test_resource_creation" {
  command = plan

  assert {
    condition = startswith(aws_codecommit_repository.test.repository_name, "repo-")
    error_message = "CodeCommit repository name ${var.repository_name} did not start with the expected value of ‘repo-****’."
  }
}

Now, let’s assume that another module author made changes to the module by modifying the prefix from repo- to my-repo-. Here is the modified Terraform module.

# main.tf

variable "repository_name" {
  type = string
}
resource "aws_codecommit_repository" "test" {
  repository_name = format("my-repo-%s", var.repository_name)
  description = "Test repository."
}

We can catch this mistake by running the the terraform test command again.

❯ terraform test
tests/basic.tftest.hcl... in progress
run "test_resource_creation"... fail
╷
│ Error: Test assertion failed
│
│ on tests/basic.tftest.hcl line 9, in run "test_resource_creation":
│ 9: condition = startswith(aws_codecommit_repository.test.repository_name, "repo-")
│ ├────────────────
│ │ aws_codecommit_repository.test.repository_name is "my-repo-MyRepo"
│
│ CodeCommit repository name MyRepo did not start with the expected value 'repo-***'.
╵
tests/basic.tftest.hcl... tearing down
tests/basic.tftest.hcl... fail

Failure! 0 passed, 1 failed.

We have successfully created a unit test using assertions that validates the resource name matches the expected value. For more examples of using assertions see the Terraform Tests Docs. Before we proceed to the next section, don’t forget to fix the repository name in the module (revert the name back to repo- instead of my-repo-) and re-run your Terraform test.

Testing variable input validation

When developing Terraform modules, it is common to use variable validation as a contract test to validate any dependencies / restrictions. For example, AWS CodeCommit limits the repository name to 100 characters. A module author can use the length function to check the length of the input variable value. We are going to use Terraform test to ensure that the variable validation works effectively. First, we modify the module to use variable validation.

# main.tf

variable "repository_name" {
  type = string
  validation {
    condition = length(var.repository_name) <= 100
    error_message = "The repository name must be less than or equal to 100 characters."
  }
}

resource "aws_codecommit_repository" "test" {
  repository_name = format("repo-%s", var.repository_name)
  description = "Test repository."
}

By default, when variable validation fails during the execution of Terraform test, the Terraform test also fails. To simulate this, create a new test file and insert the repository_name variable with a value longer than 100 characters.

# var_validation.tftest.hcl

variables {
  repository_name = “this_is_a_repository_name_longer_than_100_characters_7rfD86rGwuqhF3TH9d3Y99r7vq6JZBZJkhw5h4eGEawBntZmvy”
}

run “test_invalid_var” {
  command = plan
}

Notice on this new test file, we also set the command to Terraform plan, why is that? Because variable validation runs prior to Terraform apply, thus we can save time and cost by skipping the entire resource provisioning. If we run this Terraform test, it will fail as expected.

❯ terraform test
tests/basic.tftest.hcl… in progress
run “test_resource_creation”… pass
tests/basic.tftest.hcl… tearing down
tests/basic.tftest.hcl… pass
tests/var_validation.tftest.hcl… in progress
run “test_invalid_var”… fail
╷
│ Error: Invalid value for variable
│
│ on main.tf line 1:
│ 1: variable “repository_name” {
│ ├────────────────
│ │ var.repository_name is “this_is_a_repository_name_longer_than_100_characters_7rfD86rGwuqhF3TH9d3Y99r7vq6JZBZJkhw5h4eGEawBntZmvy”
│
│ The repository name must be less than or equal to 100 characters.
│
│ This was checked by the validation rule at main.tf:3,3-13.
╵
tests/var_validation.tftest.hcl… tearing down
tests/var_validation.tftest.hcl… fail

Failure! 1 passed, 1 failed.

For other module authors who might iterate on the module, we need to ensure that the validation condition is correct and will catch any problems with input values. In other words, we expect the validation condition to fail with the wrong input. This is especially important when we want to incorporate the contract test in a CI/CD pipeline. To prevent our test from failing due introducing an intentional error in the test, we can use the expect_failures attribute. Here is the modified test file:

# var_validation.tftest.hcl

variables {
  repository_name = “this_is_a_repository_name_longer_than_100_characters_7rfD86rGwuqhF3TH9d3Y99r7vq6JZBZJkhw5h4eGEawBntZmvy”
}

run “test_invalid_var” {
  command = plan

  expect_failures = [
    var.repository_name
  ]
}

Now if we run the Terraform test, we will get a successful result.

❯ terraform test
tests/basic.tftest.hcl… in progress
run “test_resource_creation”… pass
tests/basic.tftest.hcl… tearing down
tests/basic.tftest.hcl… pass
tests/var_validation.tftest.hcl… in progress
run “test_invalid_var”… pass
tests/var_validation.tftest.hcl… tearing down
tests/var_validation.tftest.hcl… pass

Success! 2 passed, 0 failed.

As you can see, the expect_failures attribute is used to test negative paths (the inputs that would cause failures when passed into a module). Assertions tend to focus on positive paths (the ideal inputs). For an additional example of a test that validates functionality of a completed module with multiple interconnected resources, see this example in the Terraform CI/CD and Testing on AWS Workshop.

Orchestrating supporting resources

In practice, end-users utilize Terraform modules in conjunction with other supporting resources. For example, a CodeCommit repository is usually encrypted using an AWS Key Management Service (KMS) key. The KMS key is provided by end-users to the module using a variable called kms_key_id. To simulate this test, we need to orchestrate the creation of the KMS key outside of the module. In this section we will learn how to do that. First, update the Terraform module to add the optional variable for the KMS key.

# main.tf

variable "repository_name" {
  type = string
  validation {
    condition = length(var.repository_name) <= 100
    error_message = "The repository name must be less than or equal to 100 characters."
  }
}

variable "kms_key_id" {
  type = string
  default = ""
}

resource "aws_codecommit_repository" "test" {
  repository_name = format("repo-%s", var.repository_name)
  description = "Test repository."
  kms_key_id = var.kms_key_id != "" ? var.kms_key_id : null
}

In a Terraform test, you can instruct the run block to execute another helper module. The helper module is used by the test to create the supporting resources. We will create a sub-directory called setup under the tests directory with a single kms.tf file. We also create a new test file for KMS scenario. See the updated directory structure:

├── main.tf
└── tests
├── setup
│ └── kms.tf
├── basic.tftest.hcl
├── var_validation.tftest.hcl
└── with_kms.tftest.hcl

The kms.tf file is a helper module to create a KMS key and provide its ARN as the output value.

# kms.tf

resource "aws_kms_key" "test" {
  description = "test KMS key for CodeCommit repo"
  deletion_window_in_days = 7
}

output "kms_key_id" {
  value = aws_kms_key.test.arn
}

The new test will use two separate run blocks. The first run block (setup) executes the helper module to generate a KMS key. This is done by assigning the command apply which will run terraform apply to generate the KMS key. The second run block (codecommit_with_kms) will then use the KMS key ARN output of the first run as the input variable passed to the main module.

# with_kms.tftest.hcl

run "setup" {
  command = apply
  module {
    source = "./tests/setup"
  }
}

run "codecommit_with_kms" {
  command = apply

  variables {
    repository_name = "MyRepo"
    kms_key_id = run.setup.kms_key_id
  }

  assert {
    condition = aws_codecommit_repository.test.kms_key_id != null
    error_message = "KMS key ID attribute value is null"
  }
}

Go ahead and run the Terraform init, followed by Terraform test. You should get the successful result like below.

❯ terraform test
tests/basic.tftest.hcl... in progress
run "test_resource_creation"... pass
tests/basic.tftest.hcl... tearing down
tests/basic.tftest.hcl... pass
tests/var_validation.tftest.hcl... in progress
run "test_invalid_var"... pass
tests/var_validation.tftest.hcl... tearing down
tests/var_validation.tftest.hcl... pass
tests/with_kms.tftest.hcl... in progress
run "create_kms_key"... pass
run "codecommit_with_kms"... pass
tests/with_kms.tftest.hcl... tearing down
tests/with_kms.tftest.hcl... pass

Success! 4 passed, 0 failed.

We have learned how to run Terraform test and develop various test scenarios. In the next section we will see how to incorporate all the tests into a CI/CD pipeline.

Terraform Tests in CI/CD Pipelines

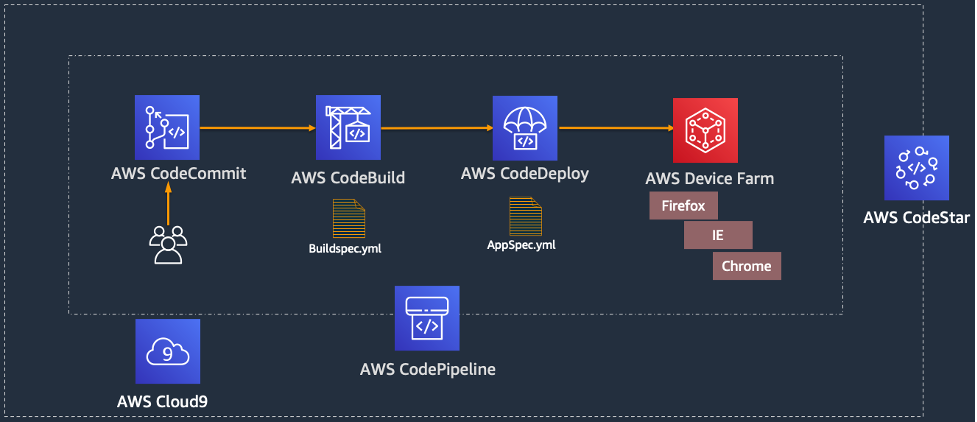
Now that we have seen how Terraform Test works locally, let’s see how the Terraform test can be leveraged to create a Terraform module validation pipeline on AWS. The following AWS services are used:

  • AWS CodeCommit – a secure, highly scalable, fully managed source control service that hosts private Git repositories.
  • AWS CodeBuild – a fully managed continuous integration service that compiles source code, runs tests, and produces ready-to-deploy software packages.
  • AWS CodePipeline – a fully managed continuous delivery service that helps you automate your release pipelines for fast and reliable application and infrastructure updates.
  • Amazon Simple Storage Service (Amazon S3) – an object storage service offering industry-leading scalability, data availability, security, and performance.
Terraform module validation pipeline Architecture. Multiple interconnected AWS services such as AWS CodeCommit, CodeBuild, CodePipeline, and Amazon S3 used to build a Terraform module validation pipeline.

Terraform module validation pipeline

In the above architecture for a Terraform module validation pipeline, the following takes place:

  • A developer pushes Terraform module configuration files to a git repository (AWS CodeCommit).
  • AWS CodePipeline begins running the pipeline. The pipeline clones the git repo and stores the artifacts to an Amazon S3 bucket.
  • An AWS CodeBuild project configures a compute/build environment with Checkov installed from an image fetched from Docker Hub. CodePipeline passes the artifacts (Terraform module) and CodeBuild executes Checkov to run static analysis of the Terraform configuration files.
  • Another CodeBuild project configured with Terraform from an image fetched from Docker Hub. CodePipeline passes the artifacts (repo contents) and CodeBuild runs Terraform command to execute the tests.

CodeBuild uses a buildspec file to declare the build commands and relevant settings. Here is an example of the buildspec files for both CodeBuild Projects:

# Checkov
version: 0.1
phases:
  pre_build:
    commands:
      - echo pre_build starting

  build:
    commands:
      - echo build starting
      - echo starting checkov
      - ls
      - checkov -d .
      - echo saving checkov output
      - checkov -s -d ./ > checkov.result.txt

In the above buildspec, Checkov is run against the root directory of the cloned CodeCommit repository. This directory contains the configuration files for the Terraform module. Checkov also saves the output to a file named checkov.result.txt for further review or handling if needed. If Checkov fails, the pipeline will fail.

# Terraform Test
version: 0.1
phases:
  pre_build:
    commands:
      - terraform init
      - terraform validate

  build:
    commands:
      - terraform test

In the above buildspec, the terraform init and terraform validate commands are used to initialize Terraform, then check if the configuration is valid. Finally, the terraform test command is used to run the configured tests. If any of the Terraform tests fails, the pipeline will fail.

For a full example of the CI/CD pipeline configuration, please refer to the Terraform CI/CD and Testing on AWS workshop. The module validation pipeline mentioned above is meant as a starting point. In a production environment, you might want to customize it further by adding Checkov allow-list rules, linting, checks for Terraform docs, or pre-requisites such as building the code used in AWS Lambda.

Choosing various testing strategies

At this point you may be wondering when you should use Terraform tests or other tools such as Preconditions and Postconditions, Check blocks or policy as code. The answer depends on your test type and use-cases. Terraform test is suitable for unit tests, such as validating resources are created according to the naming specification. Variable validations and Pre/Post conditions are useful for contract tests of Terraform modules, for example by providing error warning when input variables value do not meet the specification. As shown in the previous section, you can also use Terraform test to ensure your contract tests are running properly. Terraform test is also suitable for integration tests where you need to create supporting resources to properly test the module functionality. Lastly, Check blocks are suitable for end to end tests where you want to validate the infrastructure state after all resources are generated, for example to test if a website is running after an S3 bucket configured for static web hosting is created.

When developing Terraform modules, you can run Terraform test in command = plan mode for unit and contract tests. This allows the unit and contract tests to run quicker and cheaper since there are no resources created. You should also consider the time and cost to execute Terraform test for complex / large Terraform configurations, especially if you have multiple test scenarios. Terraform test maintains one or many state files within the memory for each test file. Consider how to re-use the module’s state when appropriate. Terraform test also provides test mocking, which allows you to test your module without creating the real infrastructure.

Conclusion

In this post, you learned how to use Terraform test and develop various test scenarios. You also learned how to incorporate Terraform test in a CI/CD pipeline. Lastly, we also discussed various testing strategies for Terraform configurations and modules. For more information about Terraform test, we recommend the Terraform test documentation and tutorial. To get hands on practice building a Terraform module validation pipeline and Terraform deployment pipeline, check out the Terraform CI/CD and Testing on AWS Workshop.

Authors

Kevon Mayers

Kevon Mayers is a Solutions Architect at AWS. Kevon is a Terraform Contributor and has led multiple Terraform initiatives within AWS. Prior to joining AWS he was working as a DevOps Engineer and Developer, and before that was working with the GRAMMYs/The Recording Academy as a Studio Manager, Music Producer, and Audio Engineer. He also owns a professional production company, MM Productions.

Welly Siauw

Welly Siauw is a Principal Partner Solution Architect at Amazon Web Services (AWS). He spends his day working with customers and partners, solving architectural challenges. He is passionate about service integration and orchestration, serverless and artificial intelligence (AI) and machine learning (ML). He has authored several AWS blog posts and actively leads AWS Immersion Days and Activation Days. Welly spends his free time tinkering with espresso machines and outdoor hiking.

Integrating AWS Device Farm with your CI/CD pipeline to run cross-browser Selenium tests

Post Syndicated from Mahesh Biradar original https://aws.amazon.com/blogs/devops/integrating-aws-device-farm-with-ci-cd-pipeline-to-run-cross-browser-selenium-tests/

Continuously building, testing, and deploying your web application helps you release new features sooner and with fewer bugs. In this blog, you will create a continuous integration and continuous delivery (CI/CD) pipeline for a web app using AWS CodeStar services and AWS Device Farm’s desktop browser testing service.  AWS CodeStar is a suite of services that help you quickly develop and build your web apps on AWS.

AWS Device Farm’s desktop browser testing service helps developers improve the quality of their web apps by executing their Selenium tests on different desktop browsers hosted in AWS. For each test executed on the service, Device Farm generates action logs, web driver logs, video recordings, to help you quickly identify issues with your app. The service offers pay-as-you-go pricing so you only pay for the time your tests are executing on the browsers with no upfront commitments or additional costs. Furthermore, Device Farm provides a default concurrency of 50 Selenium sessions so you can run your tests in parallel and speed up the execution of your test suites.

After you’ve completed the steps in this blog, you’ll have a working pipeline that will build your web app on every code commit and test it on different versions of desktop browsers hosted in AWS.

Solution overview

In this solution, you use AWS CodeStar to create a sample web application and a CI/CD pipeline. The following diagram illustrates our solution architecture.

Figure 1: Deployment pipeline architecture

Figure 1: Deployment pipeline architecture

Prerequisites

Before you deploy the solution, complete the following prerequisite steps:

  1. On the AWS Management Console, search for AWS CodeStar.
  2. Choose Getting Started.
  3. Choose Create Project.
  4. Choose a sample project.

For this post, we choose a Python web app deployed on Amazon Elastic Compute Cloud (Amazon EC2) servers.

  1. For Templates, select Python (Django).
  2. Choose Next.
Figure 2: Choose a template in CodeStar

Figure 2: Choose a template in CodeStar

  1. For Project name, enter Demo CICD Selenium.
  2. Leave the remaining settings at their default.

You can choose from a list of existing key pairs. If you don’t have a key pair, you can create one.

  1. Choose Next.
  2. Choose Create project.
 Figure 3: Verify the project configuration

Figure 3: Verify the project configuration

AWS CodeStar creates project resources for you as listed in the following table.

Service Resource Created
AWS CodePipeline project demo-cicd-selen-Pipeline
AWS CodeCommit repository Demo-CICD-Selenium
AWS CodeBuild project demo-cicd-selen
AWS CodeDeploy application demo-cicd-selen
AWS CodeDeploy deployment group demo-cicd-selen-Env
Amazon EC2 server Tag: Environment = demo-cicd-selen-WebApp
IAM role AWSCodeStarServiceRole, CodeStarWorker*

Your EC2 instance needs to have access to run AWS Device Farm to run the Selenium test scripts. You can use service roles to achieve that.

  1. Attach policy AWSDeviceFarmFullAccess to the IAM role CodeStarWorker-demo-cicd-selen-WebApp.

You’re now ready to create an AWS Cloud9 environment.

Check the Pipelines tab of your AWS CodeStar project; it should show success.

  1. On the IDE tab, under Cloud 9 environments, choose Create environment.
  2. For Environment name, enter Demo-CICD-Selenium.
  3. Choose Create environment.
  4. Wait for the environment to be complete and then choose Open IDE.
  5. In the IDE, follow the instructions to set up your Git and make sure it’s up to date with your repo.

The following screenshot shows the verification that the environment is set up.

Figure 4: Verify AWS Cloud9 setup

Figure 4: Verify AWS Cloud9 setup

You can now verify the deployment.

  1. On the Amazon EC2 console, choose Instances.
  2. Choose demo-cicd-selen-WebApp.
  3. Locate its public IP and choose open address.
Figure 5: Locating IP address of the instance

Figure 5: Locating IP address of the instance


A webpage should open. If it doesn’t, check your VPN and firewall settings.

Now that you have a working pipeline, let’s move on to creating a Device Farm project for browser testing.

Creating a Device Farm project

To create your browser testing project, complete the following steps:

  1. On the Device Farm console, choose Desktop browser testing project.
  2. Choose Create a new project.
  3. For Project name, enter Demo cicd selenium.
  4. Choose Create project.
Figure 6: Creating AWS Device Farm project

Figure 6: Creating AWS Device Farm project


Note down the project ARN; we use this in the Selenium script for the remote web driver.

Figure 7: Project ARN for AWS Device Farm project

Figure 7: Project ARN for AWS Device Farm project


Testing the solution

This solution uses the following script to run browser testing. We call this script in the validate service lifecycle hook of the CodeDeploy project.

  1. Open your AWS Cloud9 IDE (which you made as a prerequisite).
  2. Create a folder tests under the project root directory.
  3. Add the sample Selenium script browser-test-sel.py under tests folder with the following content (replace <sample_url> with the url of your web application refer pre-requisite step 18):
import boto3
from selenium import webdriver
from selenium.webdriver.common.keys import Keys

devicefarm_client = boto3.client("devicefarm", region_name="us-west-2")
testgrid_url_response = devicefarm_client.create_test_grid_url(
    projectArn="arn:aws:devicefarm:us-west-2:<your project ARN>",
    expiresInSeconds=300)

driver = webdriver.Remote(testgrid_url_response["url"],
                          webdriver.DesiredCapabilities.FIREFOX)
try:
    driver.implicitly_wait(30)
    driver.maximize_window()
    driver.get("<sample_url>")
    if driver.find_element_by_id("Layer_1"):
        print("graphics generated in full screen")
    assert driver.find_element_by_id("Layer_1")
    driver.set_window_position(0, 0) and driver.set_window_size(1000, 400)
    driver.get("<sample_url>")
    tower = driver.find_element_by_id("tower1")
    if tower.is_displayed():
        print("graphics generated after resizing")
    else:
        print("graphics not generated at this window size")
       # this is where you can fail the script with error if you expect the graphics to load. And pipeline will terminate
except Exception as e:
    print(e)
finally:
    driver.quit()

This script launches a website (in Firefox) created by you in the prerequisite step using the AWS CodeStar template and verifies if a graphic element is loaded.

The following screenshot shows a full-screen application with graphics loaded.

Figure 8: Full screen application with graphics loaded

Figure 8: Full screen application with graphics loaded


The following screenshot shows the resized window with no graphics loaded.

Figure 9: Resized window application with No graphics loaded

Figure 9: Resized window application with No graphics loaded

  1. Create the file validate_service in the scripts folder under the root directory with the following content:
#!/bin/bash
if [ "$DEPLOYMENT_GROUP_NAME" == "demo-cicd-selen-Env" ]
then
cd /home/ec2-user
source environment/bin/activate
python tests/browser-test-sel.py
fi

This script is part of CodeDeploy scripts and determines whether to stop the pipeline or continue based on the output from the browser testing script from the preceding step.

  1. Modify the file appspec.yml under the root directory, add the tests files and ValidateService hook , the file should look like following:
version: 0.0
os: linux
files:
 - source: /ec2django/
   destination: /home/ec2-user/ec2django
 - source: /helloworld/
   destination: /home/ec2-user/helloworld
 - source: /manage.py
   destination: /home/ec2-user
 - source: /supervisord.conf
   destination: /home/ec2-user
 - source: /requirements.txt
   destination: /home/ec2-user
 - source: /requirements/
   destination: /home/ec2-user/requirements
 - source: /tests/
   destination: /home/ec2-user/tests

permissions:
  - object: /home/ec2-user/manage.py
    owner: ec2-user
    mode: 644
    type:
      - file
  - object: /home/ec2-user/supervisord.conf
    owner: ec2-user
    mode: 644
    type:
      - file
hooks:
  AfterInstall:
    - location: scripts/install_dependencies
      timeout: 300
      runas: root
    - location: scripts/codestar_remote_access
      timeout: 300
      runas: root
    - location: scripts/start_server
      timeout: 300
      runas: root

  ApplicationStop:
    - location: scripts/stop_server
      timeout: 300
      runas: root

  ValidateService:
    - location: scripts/validate_service
      timeout: 600
      runas: root

This file is used by AWS CodeDeploy service to perform the deployment and validation steps.

  1. Modify the artifacts section in the buildspec.yml file. The section should look like the following:
artifacts:
  files:
    - 'template.yml'
    - 'ec2django/**/*'
    - 'helloworld/**/*'
    - 'scripts/**/*'
    - 'tests/**/*'
    - 'appspec.yml'
    - 'manage.py'
    - 'requirements/**/*'
    - 'requirements.txt'
    - 'supervisord.conf'
    - 'template-configuration.json'

This file is used by AWS CodeBuild service to package the code

  1. Modify the file Common.txt in the requirements folder under the root directory, the file should look like the following:
# dependencies common to all environments 
Django=2.1.15 
selenium==3.141.0 
boto3 >= 1.10.44
pytest

  1. Save All the changes, your folder structure should look like the following:
── README.md
├── appspec.yml*
├── buildspec.yml*
├── db.sqlite3
├── ec2django
├── helloworld
├── manage.py
├── requirements
│   ├── common.txt*
│   ├── dev.txt
│   ├── prod.txt
├── requirements.txt
├── scripts
│   ├── codestar_remote_access
│   ├── install_dependencies
│   ├── start_server
│   ├── stop_server
│   └── validate_service**
├── supervisord.conf
├── template-configuration.json
├── template.yml
├── tests
│   └── browser-test-sel.py**

**newly added files
*modified file

Running the tests

The Device Farm desktop browsing project is now integrated with your pipeline. All you need to do now is commit the code, and CodePipeline takes care of the rest.

  1. On Cloud9 terminal, go to project root directory.
  2. Run git add . to stage all changed files for commit.
  3. Run git commit -m “<commit message>” to commit the changes.
  4. Run git push to push the changes to repository, this should trigger the Pipeline.
  5. Check the Pipelines tab of your AWS CodeStar project; it should show success.
  6. Go to AWS Device Farm console and click on Desktop browser testing projects.
  7. Click on your Project Demo cicd selenium.

You can verify the running of your Selenium test cases using the recorded run steps shown on the Device Farm console, the video of the run, and the logs, all of which can be downloaded on the Device Farm console, or using the AWS SDK and AWS Command Line Interface (AWS CLI).

The following screenshot shows the project run details on the console.

Figure 10: Viewing AWS Device Farm project run details

Figure 10: Viewing AWS Device Farm project run details


To Test the Selenium script locally you can run the following commands.

1. Create a Python virtual environment for your Django project. This virtual environment allows you to isolate this project and install any packages you need without affecting the system Python installation. At the terminal, go to project root directory and type the following command:

$ python3 -m venv ./venv

2. Activate the virtual environment:

$ source ./venv/bin/activate

3. Install development Python dependencies for this project:

$ pip install -r requirements/dev.txt

4. Run Selenium Script:

$ python tests/browser-test-sel.py

Testing the failure scenario (optional)

To test the failure scenario, you can modify the sample script browser-test-sel.py at the else statement.

The following code shows the lines to change:

else:
print("graphics was not generated at this form size")
# this is where you can fail the script with error if you expect the graphics to load. And pipeline will terminate

The following is the updated code:

else:
exit(1)
# this is where you can fail the script with error if you expect the graphics to load. And pipeline will terminate

Commit the change, and the pipeline should fail and stop the deployment.

Conclusion

Integrating Device Farm with CI/CD pipelines allows you to control deployment based on browser testing results. Failing the Selenium test on validation failures can stop and roll back the deployment, and a successful testing can continue the pipeline to deploy the solution to the final stage. Device Farm offers a one-stop solution for testing your native and web applications on desktop browsers and real mobile devices.

Mahesh Biradar is a Solutions Architect at AWS. He is a DevOps enthusiast and enjoys helping customers implement cost-effective architectures that scale..