Post Syndicated from Ahmed Adekunle original https://aws.amazon.com/blogs/security/streamline-security-response-at-scale-with-aws-security-hub-automation/
A new version of AWS Security Hub, is now generally available, introducing new ways for organizations to manage and respond to security findings. The enhanced Security Hub helps you improve your organization’s security posture and simplify cloud security operations by centralizing security management across your Amazon Web Services (AWS) environment. The new Security Hub transforms how organizations handle security findings through advanced automation capabilities with real-time risk analytics, automated correlation, and enriched context that you can use to prioritize critical issues and reduce response times. Automation also helps ensure consistent response procedures and helps you meet compliance requirements.
AWS Security Hub CSPM (cloud security posture management) is now an integral part of the detection engines for Security Hub. Security Hub provides centralized visibility across multiple AWS security services to give you a unified view of your cloud environment, including risk-based prioritization views, attack path visualization, and trend analytics that help you understand security patterns over time.
This is the third post in our series on the new Security Hub capabilities. In our first post, we discussed how Security Hub unifies findings across AWS services to streamline risk management. In the second post, we shared the steps to conduct a successful Security Hub proof of concept (PoC).
In this post, we explore how you can enhance your security operations using AWS Security Hub automation rules and response automation.
We walk through the setup and configuration of automation rules, share best practices for creating effective response workflows, and provide real-world examples of how these tools can be used to automate remediation, escalate high-severity findings, and support compliance requirements.
Security Hub automation enables automatic response to security findings to help ensure critical findings reach the right teams quickly, so that they can reduce manual effort and response time for common security incidents while maintaining consistent remediation processes.
Note: Automation rules evaluate new and updated findings that Security Hub generates or ingests after you create them, not historical findings. These automation capabilities help ensure critical findings reach the right teams quickly.
Why automation matters in cloud security
Organizations often operate across hundreds of AWS accounts, multiple AWS Regions, and diverse services—each producing findings that must be triaged, investigated, and acted upon. Without automation, security teams face high volumes of alerts, duplication of effort, and the risk of delayed responses to critical issues.
Manual processes can’t keep pace with cloud operations; automation helps solve this by changing your security operations in three ways. Automation filters and prioritizes findings based on your criteria, showing your team only relevant alerts. When issues are detected, automated responses trigger immediately—no manual intervention needed.
If you’re managing multiple AWS accounts, automation applies consistent policies and workflows across your environment through centralized management, shifting your security team from chasing alerts to proactively managing risk before issues escalate.
Designing routing strategies for security findings
With Security Hub configured, you’re ready to design a routing strategy for your findings and notifications. When designing your routing strategy, ask whether your existing Security Hub configuration meets your security requirements. Consider whether Security Hub automations can help you meet security framework requirements like NIST 800-53 and identify KPIs and metrics to measure whether your routing strategy works.
Security Hub automation rules and automated responses can help you meet the preceding requirements, however it’s important to understand how your compliance teams, incident responders, security operations personnel, and other security stakeholders operate on a day-to-day basis. For example, do teams use the AWS Management Console for AWS Security Hub regularly? Or do you need to send most findings downstream to an IT systems management (ITSM) tool (such as Jira or ServiceNow) or third-party security orchestration, automation, and response (SOAR) platforms for incident tracking, workflow management, and remediation?
Next, create and maintain an inventory of critical applications. This helps you adjust finding severity based on business context and your incident response playbooks.
Consider the scenario where Security Hub identifies a medium-severity vulnerability on an Elastic Compute Cloud instance. In isolation, this might not trigger immediate action. When you add business context—such as strategic objectives or business criticality—you might discover that this instance hosts a critical payment processing application, revealing the true risk. By implementing Security Hub automation rules with enriched context, this finding can be upgraded to critical severity and automatically routed to ServiceNow for immediate tracking. In addition, by using Security Hub automation with Amazon EventBridge, you can trigger an AWS Systems Manager Automation document to isolate the EC2 instance for security forensics work to then be carried out.
Because Security Hub offers OCSF format and schema, you can use the extensive schema elements that OCSF offers you to target findings for automation and help your organization meet security strategy requirements.
Example use cases
Security Hub automation supports many use cases. Talk with your teams to understand which fit your needs and security objectives. The following are some examples of how you can use security hub automation:
Automated finding remediation
Use automated finding remediation to automatically fix security issues as they’re detected.
Supporting patterns:
- Direct remediation: Trigger AWS Lambda functions to fix misconfigurations
- Resource tagging: Add tags to non-compliant resources for tracking
- Configuration correction: Update resource configurations to match security policies
- Permission adjustment: Modify AWS Identity and Access Management (IAM) policies to remove excessive permissions
Example:
- IF finding.type = “Software and Configuration Checks/Industry and Regulatory Standards/CIS AWS Foundations Benchmark”
- AND finding.title CONTAINS “S3 buckets should have server-side encryption enabled”
- THEN invoke Lambda function “enable-s3-encryption”
Security finding workflow integration
Integrate findings into your workflow by routing them to the appropriate teams and systems.
Supporting patterns:
- Ticket creation: Generate JIRA or ServiceNow tickets for manual review
- Team assignment: Route findings to specific teams based on resource ownership
- Severity-based routing: Direct critical findings to incident response, others to regular queues
- Compliance tracking: Send compliance-related findings to GRC systems
Example:
- IF finding.severity = “CRITICAL” AND finding.productName = “Amazon GuardDuty”
- THEN send to SNS topic “security-incident-response-team”
- ELSE IF finding.productFields.resourceOwner = “payments-team”
- THEN send to SNS topic “payments-security-review”
Automated finding enrichment
Use finding enrichment to add context to findings to improve triage efficiency.
Supporting patterns:
- Resource context addition: Add business context, owner information, and data classification
- Historical analysis: Add information about previous similar findings
- Risk scoring: Calculate custom risk scores based on asset value and threat context
- Vulnerability correlation: Link findings to known Common Vulnerabilities and Exposures (CVEs) or threat intelligence
Example:
- IF finding.type CONTAINS “Vulnerability/CVE”
- THEN invoke Lambda function “enrich-with-threat-intelligence”
Custom security controls
Use custom security controls to meet organization-specific security requirements.
Supporting patterns:
- Custom policy enforcement: Check for compliance with internal standards
- Business-specific rules: Apply rules based on business unit or application type
- Compensating controls: Implement alternatives when primary controls can’t be applied
- Temporary exceptions: Handle approved deviations from security standards
Example:
- IF finding.resourceType = “AWS::EC2::Instance” AND
- finding.resourceTags.Environment = “Production” AND
- finding.title CONTAINS “vulnerable software version”
- THEN invoke Lambda function “enforce-patching-policy”
Compliance reporting and evidence collection
Streamline compliance documentation and evidence gathering.
Supporting patterns:
- Evidence capture: Store compliance evidence in designated S3 buckets
- Audit trail creation: Document remediation actions for auditors
- Compliance dashboarding: Update compliance status metrics
- Regulatory mapping: Tag findings with relevant compliance frameworks
Example:
- IF finding.complianceStandards CONTAINS “PCI-DSS”
- THEN invoke Lambda function “capture-pci-compliance-evidence”
- AND send to SNS topic “compliance-team-notifications”
Set up Security Hub automation
In this section, you’ll walk through enabling up Security Hub and related services and creating automation rules.
Step 1: Enable Security Hub and integrated services
As the first step, follow the instructions in Enable Security Hub.
Note: Security Hub is powered by Amazon GuardDuty, Amazon Inspector, AWS Security Hub CSPM, and Amazon Macie, and these services also need to be enabled to get value from Security Hub.
Step 2: Create automation rules to update finding details and third-party integration
After Security Hub collects findings you can create automation rules to update and route the findings to the appropriate teams. The steps to create automation rules that update finding details or to a set up a third-party integration—such as Jira or ServiceNow—based on criteria you define can be found in Creating automation rules in Security Hub.
With automation rules, Security Hub evaluates findings against the defined rule and then makes the appropriate finding update or calls the APIs to send findings to Jira or ServiceNow. Security Hub sends a copy of every finding to Amazon EventBridge so that you can also implement your own automated response (if needed) for use cases outside of using Security Hub automation rules.
In addition to sending a copy of every finding to EventBridge, Security Hub classifies and enriches security findings according to business context, then delivers them to the appropriate downstream services (such as ITSM tools) for fast response.
Best practices
AWS Security Hub automation rules offer capabilities for automatically updating findings and integrating with other tools. When implementing automation rules, follow these best practices:
- Centralized management: Only the Security Hub administrator account can create, edit, delete, and view automation rules. Ensure proper access control and management of this account.
- Regional deployment: Automation rules can be created in one AWS Region and then applied across configured Regions. When using Region aggregation, you can only create rules in the home Region. If you create an automation rule in an aggregation Region, it will be applied in all included Regions. If you create an automation rule in a non-linked Region, it will be applied only in that Region. For more information, see Creating automation rules in Security Hub.
- Define specific criteria: Clearly define the criteria that findings must match for the automation rule to apply. This can include finding attributes, severity levels, resource types, or member account IDs.
- Understand rule order: Rule order matters when multiple rules apply to the same finding or finding field. Security Hub applies rules with a lower numerical value first. If multiple findings have the same
RuleOrder, Security Hub applies a rule with an earlier value for theUpdatedAtfield first (that is, the rule which was most recently edited applies last). For more information, see Updating the rule order in Security Hub. - Provide clear descriptions: Include a detailed rule description to provide context for responders and resource owners, explaining the rule’s purpose and expected actions.
- Use automation for efficiency: Use automation rules to automatically update finding fields (such as severity and workflow status), suppress low-priority findings, or create tickets in third-party tools such as Jira or ServiceNow for findings matching specific attributes.
- Consider EventBridge for external actions: While automation rules handle internal Security Hub finding updates, use EventBridge rules to trigger actions outside of Security Hub, such as invoking Lambda functions or sending notifications to Amazon Simple Notification Service (Amazon SNS) topics based on specific findings. Automation rules take effect before EventBridge rules are applied. For more information, see Automation rules in EventBridge.
- Manage rule limits: This is a maximum limit of 100 automation rules per administrator account. Plan your rule creation strategically to stay within this limit.
- Regularly review and refine: Periodically review automation rules, especially suppression rules, to ensure they remain relevant and effective, adjusting them as your security posture evolves.
Conclusion
You can use Security Hub automation to triage, route, and respond to findings faster through a unified cloud security solution with centralized management. In this post, you learned how to create automation rules that route findings to ticketing systems integrations and upgrade critical findings for immediate response. Through the intuitive and flexible approach to automation that Security Hub provides, your security teams can make confident, data-driven decisions about Security Hub findings that align with your organization’s overall security strategy.
With Security Hub automation features, you can centrally manage security across hundreds of accounts while your teams focus on critical issues that matter most to your business. By implementing the automation capabilities described in this post, you can streamline response times at scale, reduce manual effort, and improve your overall security posture through consistent, automated workflows.
If you have feedback about this post, submit comments in the Comments section. If you have questions about this post, start a new thread on AWS Security, Identity, and Compliance re:Post or contact AWS Support.
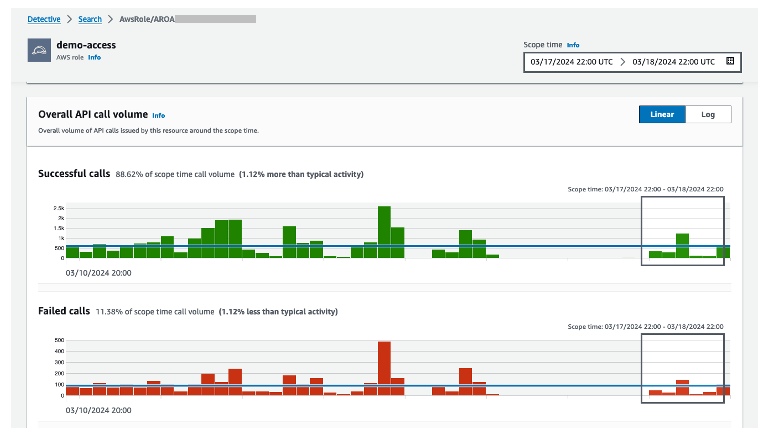
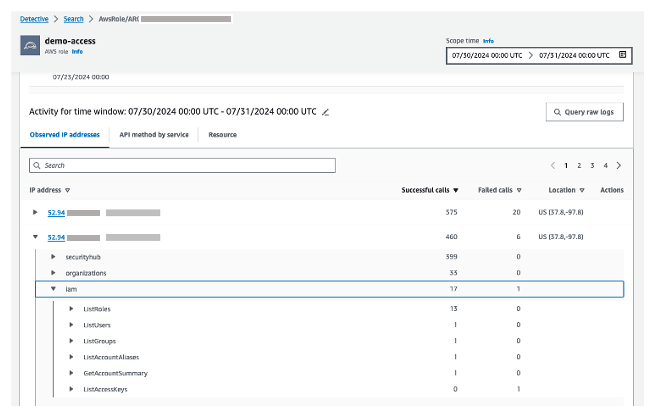
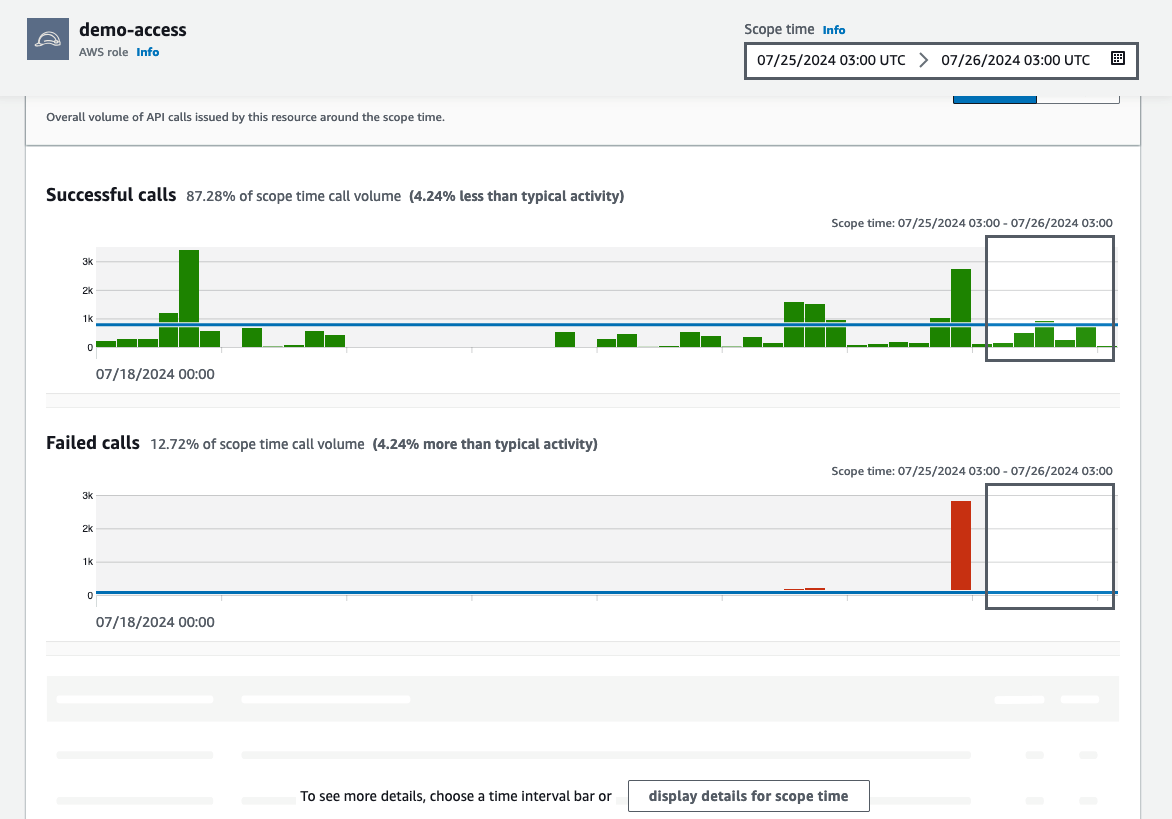 Figure 12: Overall API call volume during the specified scope time