Post Syndicated from Andrey Biba original https://blog.zabbix.com/how-to-write-a-webhook-for-zabbix/25298/
As you know, a picture is worth a thousand words. Therefore, I would like to share the process of creating a webhook from scratch. In this article, we will walk through the creation process step by step – starting with studying the target service with which Zabbix will integrate and finishing with tests for sending events from Zabbix. Although it may seem complicated, writing your own integrations is not so difficult.
Preparation
First, we need to decide what we want to see as a result of the webhook. In most cases, the services to which we will send events are divided into 2 types:
- Messengers to which you can send messages. For example, Telegram, Slack, Discord, etc.
- Service Desks where you can open, close, and update tickets. For example, Jira, Redmine, ServiceNow, etc.
In both cases, the principle of creating a webhook will not differ – the difference is only in the complexity of one type from the other.
In this article, I will describe the process of creating a webhook for messengers – and specifically for Line messenger.
After we have decided on the type, we need to find out whether this service supports the possibility of API requests and, if it does, what is required for this. Usually, all the services you want to integrate Zabbix with have somewhat detailed documentation about the API methods they support. By the way, Zabbix also has its own API, which is documented in detail.
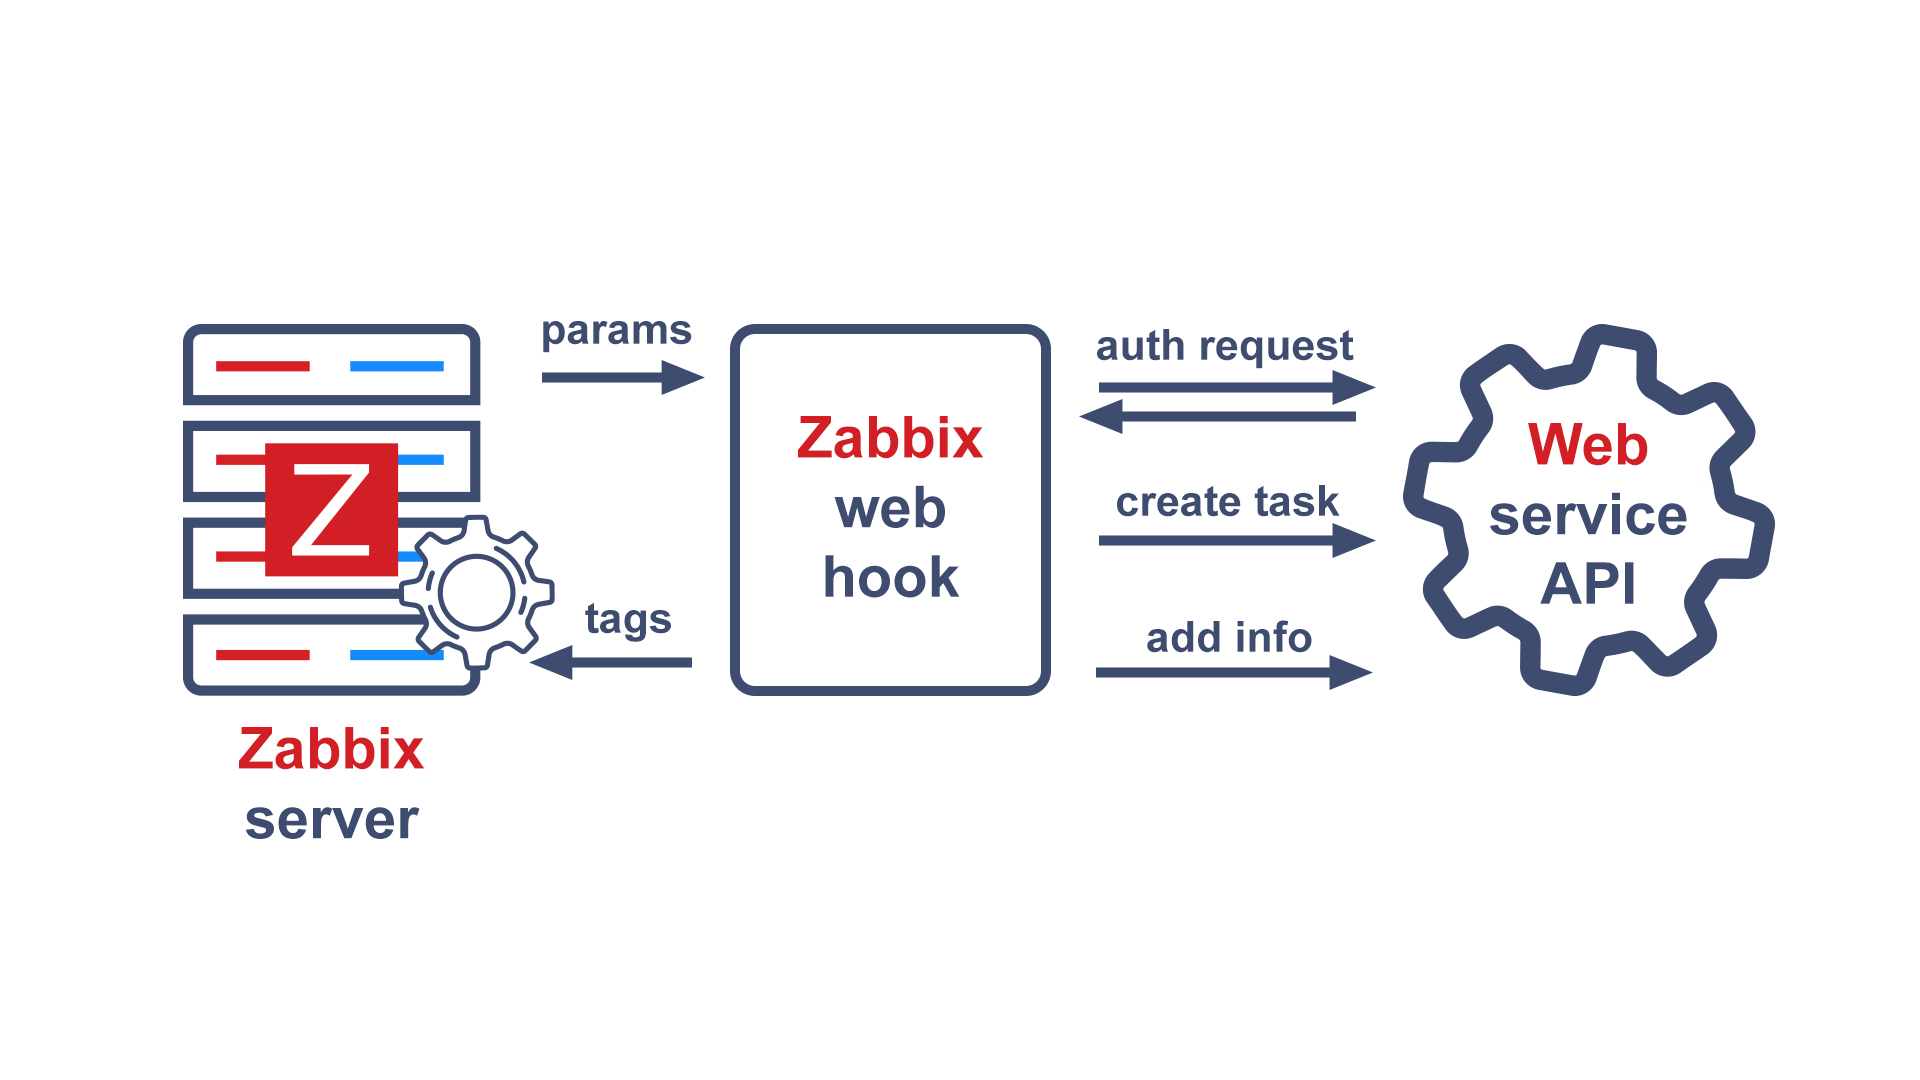
After we are done studying the Line documentation, we find out that messages are sent using the POST method to the https://api.line.me/v2/bot/message/push endpoint, using the Line bot token in the request header for authorization and passing a specially formatted JSON in the request body with the content of the message. Confused? No problem. Let’s take a closer look.
HTTP requests
The operation of the API is based on HTTP requests, which are executed with parameters provided by the developers of this API.
Several types of HTTP requests are used more often than others:
- GET – is perhaps the most common one that all of us encounter on a daily basis. This request only involves getting data. For example, the browser used a GET request from the web server to fetch the article you are currently reading.
- POST – is a request that sends data to a resource. This is exactly the case when we want to pass something to the service using API requests.
- PUT – is much less common than the previous 2, but no less important. This query replaces the values in a resource.
These are not all HTTP request methods, but these three will suffice for a general introduction.
We are done with methods. Let’s move on to the endpoint.
An endpoint is a permanent address of a resource via which we transfer, receive, or change data. In this case, https://api.line.me/v2/bot/message/push is the endpoint that accepts POST requests to send messages.
So, the method and the endpoint are defined. What’s next?
Generally, any HTTP request consists of:
- URL
- Method
- Headers
- Body

We have already dealt with the first two, but the headers and the request body remain.
Headers usually contain service information that allows you to process a request correctly. For example, the Content-Type: application/json header implies that our request body should be interpreted as a json object. Also, quite often, authorization information is passed in the headers. As in the case of Line, the Authorization: Bearer {channel access token} header contains the authorization token of the bot on behalf of which messages will be sent.
The request body usually contains the information we want to pass on to the service. In our case, this will be the subject and body of the event in Zabbix.
Checking the service API
The documentation is good, but it is necessary to check that everything we read works exactly how it is documented. It is not uncommon that a service can be developed faster than the documentation can keep up with it. So field testing never hurts. Excluding unexpected behavior will significantly reduce the time spent searching for problems.
I recommend using Postman to work with API requests – a handy tool that saves time. But for this article, we will use cURL due to its prevalence and ease of use.
I will not describe the process of creating the Line Bot API token because this is not directly related to the article. However, for those interested in this process, I will leave a link here.
As we have already found out, the request type will be POST, the access point URL is https://api.line.me/v2/bot/message/push, and additional headers must be passed: Content-Type: application/json which specifies the type of data to be sent (in our case it is JSON) and Authorization: Bearer {token value}. And the messages themselves are in JSON format. For example, I used 2 messages – “Hello, world1” and “Hello, world2”. As a result, I got the following query:


After executing the request, we got the expected result of 2 messages that came to the messenger, which were in the request body.
Excellent! So half of the work has already been done: there is a ready-made request that works in manual mode and successfully sends messages to Line. The only thing left is to put the necessary information in the right places and automate the process using JS and Zabbix.
Integration with Zabbix
After successfully completing the tests, go to Zabbix, create a new notification method in the Administration section, select the webhook type, and name it Line.
For webhook integrations with external services, Zabbix uses the built-in JavaScript engine on Duktape. Parameters are passed to the script, which is used to build the logic of the webhook. As a result of the script, tags can be returned that will be assigned to the event. This is usually necessary in case of integration with service desks in order to be able to update the status of tickets.
Let’s take a closer look at the webhook setup interface.

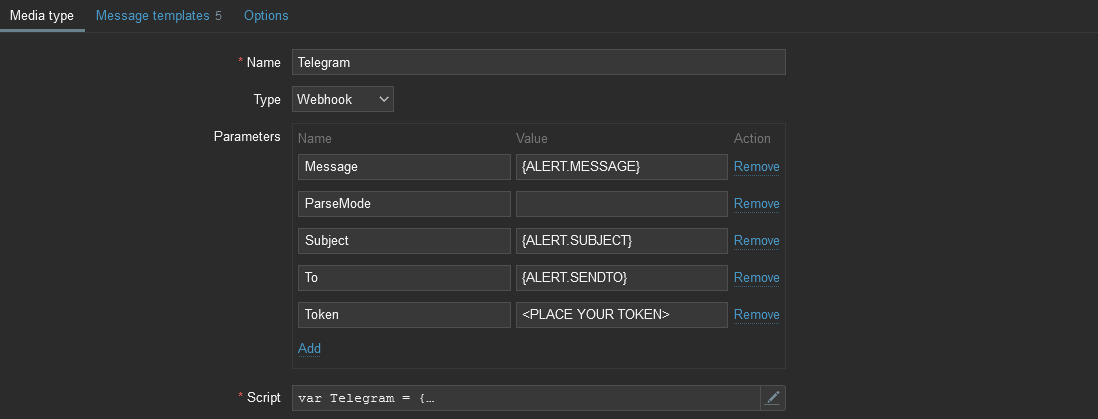
The Media type section contains the general settings for the new media type:
- Name – Name of the media type.
- Type – The type of media type. There are 4 types: email, SMS, webhook, and script.
- Parameters – This is a list of variables passed to the code. All necessary data can be passed through parameters: event id, event type, trigger severity, event source, etc. You can specify macros and text values in parameters. The parameters are passed as a JSON string, accessible through the built-in variable value.
- Script – JS script describing the logic of the webhook.
- Timeout – The time after which the script will be terminated.
- Process tags – If this option is enabled, the webhook will support generating tags for events sent using this hook.
- Include event menu entry – This option makes the Menu Entry Name and Menu Entry URL fields available for use.
- Menu entry name – The text displayed in the event dropdown menu for the Menu entry URL submitted using this hook.
- Menu entry URL – A link to an external resource in the event menu.
- Description – A text field that contains a description of the notification method.
- Enabled – an Option that allows enabling or disabling the media type.
The Message templates section contains templates that are used by webhook to send alerts. Each template contains:
- Message type – The event type to which the message will apply. For example, Problem – when the trigger fires and Problem recovery – when the problem is resolved.
- Subject – The headline of the message.
- Message – A message template that contains useful information about the event. For example, event time, date, event name, host name, etc.
The Options section contains additional options:
- Concurrent sessions – The number of concurrent sessions to send an alert.
- Attempts – The number of retries in case of send failure.
- Attempt interval – The frequency of attempts to send an alert.
When writing your own webhook, you can take an existing one as a basis – Zabbix has more than thirty ready-made webhook solutions of varying complexity. All basic functions are usually repeated from hook to hook with little or no change at all, as are the parameters passed to them.
Let’s set the following parameters:

It is convenient to set parameter values with macros. A macro is a variable in Zabbix that contains a specific value. Macros allow you to optimize and automate your work. They can be used in various places, such as triggers, filters, alerts, and so on.
A little more about each macro separately in order to understand why each of them is needed:
- {ALERT.SUBJECT} – The subject of the event message. This value is taken from the Subject field of the corresponding Message template type.
- {ALERT.MESSAGE} – The event message body. This value is taken from the Message field of the corresponding Message template type.
- {EVENT.ID} – The event id in Zabbix. Could be used for generating a link to an event
- {EVENT.NSEVERITY} – The numerical definition of the event’s severity from 0-5. We will use this to change the message in case of different severity.
- {EVENT.SOURCE} – The event source. Needed to handle events correctly. In most cases, we are interested in triggers; this corresponds to source value 0.
- {EVENT.UPDATE.STATUS} – Returns 1 if it is an update event. For example, in case of acknowledge operations or a change in severity.
- {EVENT.VALUE} – The event state. 0 for recovery and 1 for the problem.
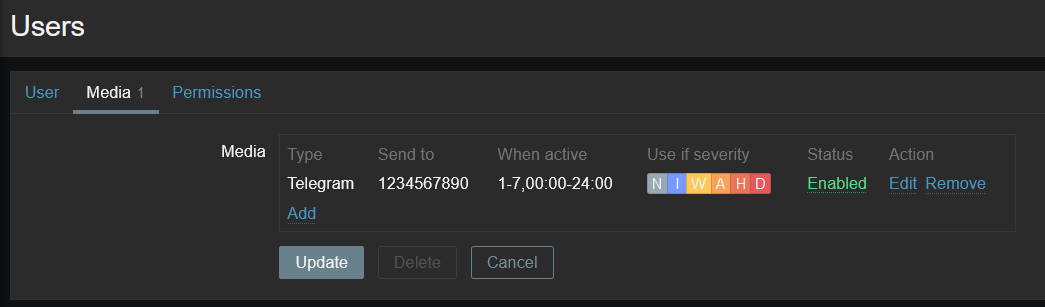
- {ALERT.SENDTO} – The field from the media type assigned to the user. It returns the ID of the user or group in the Line, where it will be necessary to send a message
- {TRIGGER.DESCRIPTION} – A macro that will be expanded if the event source is a trigger. Returns the description of the trigger
- {TRIGGER.ID} – The trigger ID. Required to generate a link to an event in Zabbix
Webhooks can use other macros if needed. A list of all macros can be viewed on the documentation page. Be careful – not all macros can be used in webhooks.
Writing the script
Before writing the script, let’s define the main points that the webhook will need to be able to perform:
- the script should describe the logic for sending messages
- handle possible errors
- logging for debugging
I will not describe the entire code in order not to repeat the same type of blocks and concentrate only on important aspects.
To send messages, let’s write a function that will accept messages and params variables. We got the following function:
function sendMessage(messages, params) {
    // Declaring variables
    var response,
        request = new HttpRequest();

    // Adding the required headers to the request
    request.addHeader('Content-Type: application/json');
    request.addHeader('Authorization: Bearer ' + params.bot_token);

    // Forming the request that will send the message
    response = request.post('https://api.line.me/v2/bot/message/push', JSON.stringify({
        "to": params.send_to,
        "messages": messages
    }));

    // If the response is different from 200 (OK), return an error with the content of the response
    if (request.getStatus() !== 200) {
        throw "API request failed: " + response;
    }
}
Of course, this is not a reference function, and depending on the requirements for the request may differ. There may be other required headers and a different request body. In some cases, it may be necessary to add an additional step to obtain authorization data through another API request.
In this case, the request to send a message returns an empty {} object, so it makes no sense to return it from the function. But for example, when sending a message to Telegram, an object with data about this message is returned. If you pass this data to tags, you can write logic that will change the already sent message – for example, in case of closing or updating the problem.
Now let’s describe a function that will accept webhook parameters and validate their values. In the example, we will not describe all the conditions because they are of the same type:
function validateParams(params) {
    // Checking that the bot_token parameter is a string and not empty
    if (typeof params.bot_token !== 'string' || params.bot_token.trim() === '') {
        throw 'Field "bot_token" cannot be empty';
    }

    // Checking that the event_source parameter is only a number from 0-3
    if ([0, 1, 2, 3].indexOf(parseInt(params.event_source)) === -1) {
        throw 'Incorrect "event_source" parameter given: "' + params.event_source + '".nMust be 0-3.';
    }

    // If an event of type "Discovery" or "Autoregistration" set event_value 1,
    // which means "Problem", and we will process these events same as problems
    if (params.event_source === '1' || params.event_source === '2') {
        params.event_value = '1';
    }

    ...

    // Checking that trigger_id is a number and not equal to zero
    if (isNaN(params.trigger_id) && params.event_source === '0') {
        throw 'field "trigger_id" is not a number';
    }
}
As you can see from the code, in most cases these are simple checks that allow you to avoid errors associated with the input data. Validation is necessary because there is no guarantee that the expected value will be in the parameter.
The main block of code is placed inside the try…catch block in order to correctly handle errors:
try {
    // Declaring the params variable and writing the webhook parameters to it
    var params = JSON.parse(value);

    // Calling the validation function and passing parameters to it for verification
    validateParams(params);

    // If the event is a trigger and it is in the problem status, compose the message body
    if (params.event_source === '0' && params.event_value === '1') {
        var line_message = [
            {
                "type": "text",
                "text": params.alert_subject + 'nn' +
                    params.alert_message + 'n' + params.trigger_description
            }
        ];
    }

    ...

    // Sending a composed message
    sendMessage(line_message, params);

    // Returning OK so that the webhook understands that the script has completed with OK status
    return 'OK';
}
catch (err) {
    // Adding a log function so in case of problems you can see the error in the Zabbix server console
    Zabbix.log(4, '[ Line Webhook ] Line notification failed : ' + err);

    // In case of an error, return it from the webhook
    throw 'Line notification failed : ' + err;
}
Here we assign parameter values to the params variable, then validate them using the validateParams() function, describe the main conditions for generating a message, and send this message to the messenger. At the same time, the try…catch block allows you to catch all errors, log them to Zabbix and return them in a readable form to the user in the web interface.
For writing webhooks in Zabbix, there is a guideline dedicated to this topic. Please read this information because it will help you write better code and avoid common mistakes.
Testing
After we’ve finished with the webhook script, it’s time to test how our code works. To do this, Zabbix provides a function to send test messages. Go to the Administration → Media types, find Line, and click on the Test button opposite it. In the window that appears, fill in all the fields with the necessary data and press the Test button. Check the messenger and see that the message came with the data we specified in the test.


Ready-made Line integration can be found in the Zabbix git repository and in all recent Zabbix instance builds.
Troubleshooting
Of course, everything in the article looks like I did it on the first attempt and did not encounter a single error or problem. Naturally, this is not the case in practice. Work with each new product includes Research & Development. How can you catch errors and, most importantly, understand the problem?
Well, as I wrote earlier – read the documentation and test all requests before writing code. At this stage, it is easiest to catch all the problems. The response to the HTTP request will explicitly describe the error. For example, if you make a mistake in the request body and send an object with incorrect values, the service will return the body with an error description and the response status 400 (Bad request).

There are several options for debugging in case of errors that may occur when writing a webhook script:
- Focus on the errors displayed when the notification method is executed. For example, if you mistyped or set the wrong name of the function and variable.
- Include logging in the code for displaying service information. For example, while you are in the script development stage, the result of the function can be logged using the Zabbix.log() function. Zabbix supports 6 debug levels (0-5), which can be set in this function. Usually, webhooks use level 4, which contains information for debugging.
- Use the zabbix_js utility. You can transfer a file with a script and parameters to it. You can read more about it here.
Conclusion
I hope this article has helped you better understand how webhooks work in Zabbix and highlighted the basic steps for creating, diagnosing, and preparing to write your integration. The Zabbix community is constantly adding custom templates and media types. I expect that after reading this article, more people will be interested in creating their own webhooks and sharing them with the community. We appreciate any contribution to the development and expansion of the base of integration solutions.
Questions
Q: I don’t know JS, but I know other languages. Is native support of other languages planned in Zabbix, such as Python?
A: For now, there are no such plans.
Q: Are there any restrictions with writing a JS script for a webhook?
A: Yes, there are. The built-in Duktape engine is used to execute the code, and it does not have all the functionality that is available in the latest JS releases. Therefore, I recommend that you read the documentation of this engine and the built-in objects to learn more about the available methods.