Post Syndicated from Manuel Heinkel original https://aws.amazon.com/blogs/security/saas-tenant-isolation-with-abac-using-aws-sts-support-for-tags-in-jwt/
As independent software vendors (ISVs) shift to a multi-tenant software-as-a-service (SaaS) model, they commonly adopt a shared infrastructure model to achieve cost and operational efficiency. The more ISVs move into a multi-tenant model, the more concern they may have about the potential for one tenant to access the resources of another tenant. SaaS systems include explicit mechanisms that help ensure that each tenant’s resources—even if they run on shared infrastructure—are isolated.
This is what we refer to as tenant isolation. The idea behind tenant isolation is that your SaaS architecture introduces constructs that tightly control access to resources and block attempts to access the resources of another tenant.
AWS Identity and Access Management (IAM) is a service you can use to securely manage identities and access to AWS services and resources. You can use IAM to implement tenant isolation. With IAM, there are three primary isolation methods, as the How to implement SaaS tenant isolation with ABAC and AWS IAM blog post outlines. These are dynamically-generated IAM policies, role-based access control (RBAC), and attribute-based access control (ABAC). The aforementioned blog post provides an example of using the AWS Security Token Service (AWS STS) AssumeRole API operation and session tags to implement tenant isolation with ABAC. If you aren’t familiar with these concepts, we recommend reading that blog post first to understand the security considerations for this pattern.
In this blog post, you will learn about an alternative approach to implement tenant isolation with ABAC by using the AWS STS AssumeRoleWithWebIdentity API operation and https://aws.amazon.com/tags claim in a JSON Web Token (JWT). The AssumeRoleWithWebIdentity API operation verifies the JWT and generates tenant-scoped temporary security credentials based on the tags in the JWT.
Architecture overview
Let’s look at an example multi-tenant SaaS application that uses a shared infrastructure model.
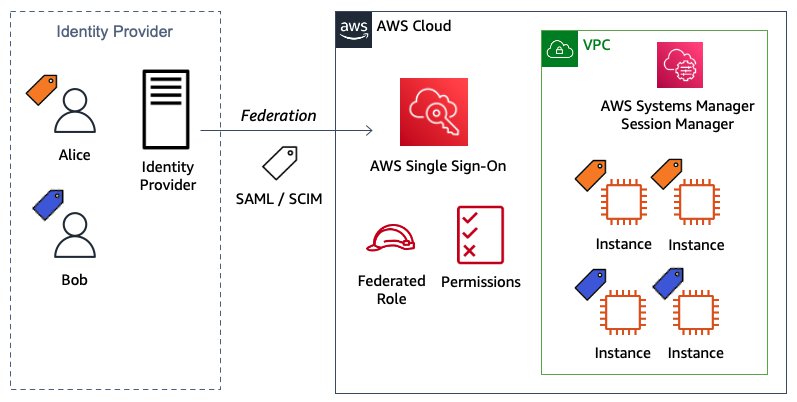
Figure 1 shows the application architecture and the data access flow. The application uses the AssumeRoleWithWebIdentity API operation to implement tenant isolation.

Figure 1: Example multi-tenant SaaS application
- The user navigates to the frontend application.
- The frontend application redirects the user to the identity provider for authentication. The identity provider returns a JWT to the frontend application. The frontend application stores the tokens on the server side. The identity provider adds the
https://aws.amazon.com/tagsclaim to the JWT as detailed in the configuration section that follows. The tags claim includes the user’s tenant ID. - The frontend application makes a server-side API call to the backend application with the JWT.
- The backend application calls
AssumeRoleWithWebIdentity, passing its IAM role Amazon Resource Name (ARN) and the JWT. AssumeRoleWithWebIdentityverifies the JWT, maps the tenant ID tag in the JWT https://aws.amazon.com/tags claim to a session tag, and returns tenant-scoped temporary security credentials.- The backend API uses the tenant-scoped temporary security credentials to get tenant data. The assumed IAM role’s policy uses the aws:PrincipalTag variable with the tenant ID to scope access.
Configuration
Let’s now have a look at the configuration steps that are needed to use this mechanism.
Step 1: Configure an OIDC provider with tags claim
The AssumeRoleWithWebIdentity API operation requires the JWT to include an https://aws.amazon.com/tags claim. You need to configure your identity provider to include this claim in the JWT it creates.
The following is an example token that includes TenantID as a principal tag (each tag can have a single value). Make sure to replace <TENANT_ID> with your own data.
Amazon Cognito recently launched improvements to the token customization flow that allow you to add arrays, maps, and JSON objects to identity and access tokens at runtime by using a pre token generation AWS Lambda trigger. You need to enable advanced security features and configure your user pool to accept responses to a version 2 Lambda trigger event.
Below is a Lambda trigger code snippet that shows how to add the tags claim to a JWT (an ID token in this example):
Step 2: Set up an IAM OIDC identity provider
Next, you need to create an OpenID Connect (OIDC) identity provider in IAM. IAM OIDC identity providers are entities in IAM that describe an external identity provider service that supports the OIDC standard. You use an IAM OIDC identity provider when you want to establish trust between an OIDC-compatible identity provider and your AWS account.
Before you create an IAM OIDC identity provider, you must register your application with the identity provider to receive a client ID. The client ID (also known as audience) is a unique identifier for your app that is issued to you when you register your app with the identity provider.
Step 3: Create an IAM role
The next step is to create an IAM role that establishes a trust relationship between IAM and your organization’s identity provider. This role must identify your identity provider as a principal (trusted entity) for the purposes of federation. The role also defines what users authenticated by your organization’s identity provider are allowed to do in AWS. When you create the trust policy that indicates who can assume the role, you specify the OIDC provider that you created earlier in IAM.
You can use AWS OIDC condition context keys to write policies that limit the access of federated users to resources that are associated with a specific provider, app, or user. These keys are typically used in the trust policy for a role. Define condition keys using the name of the OIDC provider (<YOUR_PROVIDER_ID>) followed by a claim, for an example client ID from Step 2 (:aud).
The following is an IAM role trust policy example. Make sure to replace <YOUR_PROVIDER_ID> and <AUDIENCE> with your own data.
As an example, the application may store tenant assets in Amazon Simple Storage Service (Amazon S3) by using a prefix per tenant. You can implement tenant isolation by using the aws:PrincipalTag variable in the Resource element of the IAM policy. The IAM policy can reference the principal tags as defined in the JWT https://aws.amazon.com/tags claim.
The following is an IAM policy example. Make sure to replace <S3_BUCKET> with your own data.
How AssumeRoleWithWebIdentity differs from AssumeRole
When using the AssumeRole API operation, the application needs to implement the following steps: 1) Verify the JWT; 2) Extract the tenant ID from the JWT and map it to a session tag; 3) Call AssumeRole to assume the application-provided IAM role. This approach provides applications the flexibility to independently define the tenant ID session tag format.
We see customers wrap this functionality in a shared library to reduce the undifferentiated heavy lifting for the application teams. Each application needs to install this library, which runs sensitive custom code that controls tenant isolation. The SaaS provider needs to develop a library for each programming language they use and run library upgrade campaigns for each application.
When using the AssumeRoleWithWebIdentity API operation, the application calls the API with an IAM role and the JWT. AssumeRoleWithWebIdentity verifies the JWT and generates tenant-scoped temporary security credentials based on the tenant ID tag in the JWT https://aws.amazon.com/tags claim. AWS STS maps the tenant ID tag to a session tag. Customers can use readily available AWS SDKs for multiple programming languages to call the API. See the AssumeRoleWithWebIdentity API operation documentation for more details.
Furthermore, the identity provider now enforces the tenant ID session tag format across applications. This is because AssumeRoleWithWebIdentity uses the tenant ID tag key and value from the JWT as-is.
Conclusion
In this post, we showed how to use the AssumeRoleWithWebIdentity API operation to implement tenant isolation in a multi-tenant SaaS application. The post described the application architecture, data access flow, and how to configure the application to use AssumeRoleWithWebIdentity. Offloading the JWT verification and mapping the tenant ID to session tags helps simplify the application architecture and improve security posture.
To try this approach, follow the instructions in the SaaS tenant isolation with ABAC using AWS STS support for tags in JWT walkthrough. To learn more about using session tags, see Passing session tags in AWS STS in the IAM documentation.
If you have feedback about this post, submit comments in the Comments section below. If you have questions about this post, contact AWS Support.