Traditionally, many businesses archive physical formats of their business documents. These can be invoices, sales memos, purchase orders, vendor-related documents, and inventory documents. As more and more businesses are moving towards digitizing their business processes, it is becoming challenging to effectively manage these documents and perform business analytics on them. For example, in the Oil and Gas (O&G) industry, companies have numerous documents that are generated through the exploration and production lifecycle of an oil well. These documents can provide many insights that can help inform business decisions.
As documents are usually stored in a paper format, information retrieval can be time consuming and cumbersome. Even those available in a digital format may not have adequate metadata associated to efficiently perform search and build insights.
In this post, you will learn how to build a text extraction solution using Amazon Textract service. This will automatically extract text and data from scanned documents and upload into Amazon Simple Storage Service (S3). We will show you how to find insights and relationships in the extracted text using Amazon Comprehend. This data is indexed and populated into Amazon OpenSearch Service to search and visualize it in a Kibana dashboard.
Figure 1 illustrates a solution built with AWS, which extracts O&G well data information from PDF documents. This solution is serverless and built using AWS Managed Services. This will help you to decrease system maintenance overhead while making your solution scalable and reliable.
Figure 1. Automated form data extraction architecture
Following are the high-level steps:
Upload an image file or PDF document to Amazon S3 for analysis. Amazon S3 is a durable document storage used for central document management.
Amazon S3 event initiates the AWS Lambda function Fn-A. AWS Lambda has functional logic to call the Amazon Textract and Comprehend services and processing.
AWS Lambda function Fn-A invokes Amazon Textract to extract text as key-value pairs from image or PDF. Amazon Textract automatically extracts data from the scanned documents.
Amazon Textract sends the extracted keys from image/PDF to Amazon SNS.
Amazon SNS notifies Amazon SQS when text extraction is complete by sending the extracted keys to Amazon SQS.
Amazon SQS initiates AWS Lambda function Fn-B with the extracted keys.
AWS Lambda function Fn-B invokes Amazon Comprehend for the custom entity recognition. Comprehend uses custom-trained machine learning (ML) to find discrepancies in key names from Amazon Textract.
The data is indexed and loaded into Amazon OpenSearch, which indexes and visualizes the data.
Kibana processes the indexed data.
User accesses Kibana to search documents.
Steps illustrated with more detail:
1. User uploads the document for analysis to Amazon S3. Uploaded document can be an image file or a PDF. Here we are using the S3 console for document upload. Figure 2 shows the sample file used for this demo.
3. AWS Lambda function Fn-A invokes Amazon Textract. Amazon Textract uses artificial intelligence (AI) to read as a human would, by extracting text, layouts, tables, forms, and structured data with context and without configuration, training, or custom code.
4. Amazon Textract starts processing the file as it is uploaded. This process takes few minutes since the file is a multipage document.
5. Amazon SNS notifies Amazon Textract of completion. Amazon Textract processing works asynchronously, as we decouple our architecture using Amazon SQS. To configure Amazon SNS to send data to Amazon SQS:
Create an SNS topic. ‘AmazonTextract-SNS’ is the SNS topic that we created for this demo.
Then create an SQS queue. ‘AmazonTextract-SQS’ is the queue that we created for this demo.
To receive messages published to a topic, you must subscribe an endpoint to the topic. When you subscribe an endpoint to a topic, the endpoint begins to receive messages published to the associated topic. Figure 3 shows the SNS topic ‘AmazonTextract-SNS’ subscribed to Amazon SQS queue.
Figure 3. Amazon SNS configuration
Figure 4. Amazon SQS configuration
6. Configure SQS queue to initiate the AWS Lambda function Fn-B. This should happen upon receiving extracted data via SNS topic. Refer to this SQS tutorial to learn about SQS Lambda configuration. See Sample code for Lambda FunctionB.
7. AWS Lambda function Fn-B invokes Amazon Comprehend for the custom entity recognition.
Figure 5. Lambda FunctionB configuration in Amazon Comprehend
Configure Amazon Comprehend to create a custom entity recognition (text-job2) for the entities. These can be API Number, Lease_Number, Water_Depth, Well_Number, and can use the model created in previous step (well_no, well#, well num). For instructions on labeling your data, see Developing NER models with Amazon SageMaker Ground Truth and Amazon Comprehend.
Figure 6. Comprehend job
Now create an endpoint for the custom entity recognition for the Lambda function, to send the data to Amazon Comprehend service, as shown in Figure 7 and 8.
Figure 7. Comprehend endpoint creation
Copy the Amazon Comprehend endpoint ARN to include it in the Lambda function as an environment variable (see Figure 5).
Figure 8. Comprehend endpoint created successfully
8. Launch an Amazon OpenSearch domain. See Creating and managing Amazon OpenSearch Service domains. The data is indexed and populated into Amazon OpenSearch. The Amazon OpenSearch domain name is configured at Lambda FnB as an environment variable to push the extracted data to OpenSearch.
9. Kibana processes the indexed data from Amazon OpenSearch. Amazon OpenSearch data is populated on Kibana, shown in Figure 9.
Figure 9. Kibana dashboard showing Amazon OpenSearch data
10. Access Kibana for document search. The selected fields can be viewed as a table using filters, see Figure 10.
Figure 10. Kibana dashboard table view for selected fields
You can search the LEASE_NUMBER = OCS-031, as shown in Figure 11.
Figure 11. Kibana dashboard search on Lease Number
OR you can search all the information for the WATER_DEPTH = 60, see Figure 12.
Figure 12. Kibana dashboard search on Water Depth
Cleanup
Shut down OpenSearch domain
Delete the Comprehend endpoint
Clear objects from S3 bucket
Conclusion
Data is growing at an enormous pace in all industries. As we have shown, you can build an ML-based text extraction solution to uncover the unstructured data from PDFs or images. You can derive intelligence from diverse data sources by incorporating a data extraction and optimization function. You can gain insights into the undiscovered data, by leveraging managed ML services, Amazon Textract, and Amazon Comprehend.
The extracted data from PDFs or images is indexed and populated into Amazon OpenSearch. You can use Kibana to search and visualize the data. By implementing this solution, customers can reduce the costs of physical document storage, in addition to labor costs for manually identifying relevant information.
This solution will drive decision-making efficiency. We discussed the oil and gas industry vertical as an example for this blog. But this solution can be applied to any industry that has physical/scanned documents such as legal documents, purchase receipts, inventory reports, invoices, and purchase orders.
Co-authored with Nirmal Tomar, Principal Consultant, Infosys Technologies Ltd.
Ease of creating on-demand resources on AWS can sometimes lead to over-provisioning or under-utilization of AWS resources like Amazon EC2 and Amazon RDS. This can lead to higher costs that can often be avoided with proper planning and monitoring. Non-critical environments, like development and test are often not monitored on a regular basis and can result in under-utilization of AWS resources.
In this blog, we discuss a common AWS cost optimization strategy, which is an automated and deployable solution to schedule the start/stop of AWS resources. For this example, we are considering non-production environments because in most scenarios these do not need to be available at all time. By following this solution, cloud architects can automate the start/stop of services per their usage pattern and can save up to 70% of costs while running their non-production environment.
In this solution, we also provide an option to exclude specific Amazon Resource Names (ARNs) of the aforementioned services. This helps cloud architects to exclude the start/stop function for various use cases like in a QA environment when they don’t want to stop Aurora or they want to start RDS in a Development environment. The solution can be used to start/stop the services mentioned previously on a scheduled interval but can also be used for other applicable services like Amazon ECS, Amazon SageMaker Notebook Instances, Amazon Redshift and many more.
Note – Don’t set up this solution in a production or other environment where you require continuous service availability.
Prerequisites
For this walkthrough, you should have the following prerequisites:
An AWS account with permission to spin up required resources.
A running Amazon Aurora instance in the source AWS account.
Walkthrough
To set up this solution, proceed with the following two steps:
Set up the step function workflow to stop services using a CloudFormation template. On a scheduled interval, this workflow will run and stop the chosen services.
Set up the step function workflow to start services using a CloudFormation template. On a scheduled interval, this workflow will run and start services as configured during the CloudFormation setup.
1. Stop Services using the Step Function workflow for a predefined duration
Figure 1 – Architecture showing the AWS Step Functions Workflow to stop services
The AWS Lambda functions involved in this workflow:
StopAuroraCluster: This Lambda function will stop all Aurora Cluster setup across Region including read replica.
StopRDSInstances: This Lambda function will stop all RDS Instances except the Aurora setup across the Region.
ScaleDownEKSNodeGroups: This Lambda function will downsize all nodegroups to zero instance across the Region.
ScaleDownASG: This Lambda function will downsize all Auto Scaling groups including the Elastic Beanstalk Auto Scaling group to zero instance across Region. We can edit CloudFormation templates to include the custom value.
StopEC2Instances: This Lambda function will stop all EC2 instances set up across the Region.
Using the following AWS CloudFormation Template, we set up the required services and workflow:
a. Launch the template in the source account and source Region:
b. Fill out the preceding form with the following details and select Next.
Stack name: Stack Name which you want to create.
ExcludeAuroraClusterArnListInCommaSeprated: Comma separated Aurora clusters ARN which enterprises don’t want to stop, keep the default value if there is no exclusion list.
e.g. arn:aws:rds:us-east-1:111111111111:cluster:aurorcluster1, arn:aws:rds:us-east-2:111111111111:cluster:auroracluster2
ExcludeRDSDBInstancesArnListInCommaSeprated: Comma separated DB instances ARN which enterprises don’t want to stop, keep the default value if there is no exclusion list.
e.g. arn:aws:rds:us-east-1:111111111111:db:rds-instance-1, arn:aws:rds:us-east-2:111111111111:db:rds-instance-2
ExcludeEKSClusterNodeGroupsArnListInCommaSeprated: Comma separated EKS Clusters ARN which enterprises don’t want to stop, leave it with default value if there is no exclusion list.
e.g. arn:aws:eks:us-east-2:111111111111:cluster/testcluster
ExcludeAutoScalingGroupIncludingBeanstalkListInCommaSeprated: Comma separated Beanstalk and other Auto Clusters groups ARN (except Amazon EKS) which enterprises don’t want to stop, keep the default value if there is no exclusion list.
e.g. arn:aws:autoscaling:us-east-1:111111111111:autoScalingGroup:6d5af669-eb3b-4530-894b-e314a667f2e7:autoScalingGroupName/test-0-ASG
ExcludeEC2InstancesIdListInCommaSeprated: Comma separated EC2 instance ID’s which you don’t want to stop, keep the default value if there is no exclusion list.
e.g. i-02185df0872f0f852, 0775f7e39513c50dd
ScheduleExpression: Schedule a cron expression when you want to run this workflow. Sample expressions are available in this guide, Schedule expressions using rate or cron.
c. Select IAM role to launch this template. As a best practice, select the AWS CloudFormation service role to manage AWS services and resources available to each user.
d. Acknowledge that you want to create various resources including IAM roles/policies and select Create Stack.
2. Start Services using the Step Function workflow in pre-configured time
Figure 2 – Architecture showing the AWS Step Functions Workflow to start services
The Lambda functions involved in this workflow:
StartAuroraCluster: This Lambda function will start all Aurora Cluster setup across Region including read-replica.
StartRDSInstances: This Lambda function will start all RDS Instances except for the Aurora setup across the Region.
ScaleUpEKSNodeGroups: This Lambda function will upsize all nodegroups to minimum 2 and maximum 4 instances across Region. We can edit CloudFormation templates for custom value.
ScaleUpASG: This Lambda function will Scale up all Auto Scaling group including Elastic Beanstalk Auto Scaling group to minimum 2 and maximum 4 instances across the Region. We can edit CloudFormation templates for custom value.
StartEC2Instances: This Lambda function will start all EC2 instances setup across the Region.
Using the following AWS CloudFormation template, we set up the required services and workflow:
a. Launch the template in the source account and source Region:
b. Fill out the preceding form with the following details and select Next.
Stack name: Stack Name which you want to create.
ExcludeAuroraClusterArnListInCommaSeprated: Comma separated Aurora clusters the ARN which you don’t want to start, keep the default value if there is no exclusion list.
For example: arn:aws:rds:us-east-1:111111111111:cluster:aurorcluster1, arn:aws:rds:us-east-2:111111111111:cluster:auroracluster2
ExcludeRDSDBInstancesArnListInCommaSeprated: Comma separated databaseinstances ARN which you don’t want to start, keep default value if there is no exclusion list.
For example: arn:aws:rds:us-east-1:111111111111:db:rds-instance-1, arn:aws:rds:us-east-2:111111111111:db:rds-instance-2
ExcludeEKSClusterNodeGroupsArnListInCommaSeprated: Comma separated EKS Clusters ARN which you don’t want to start, keep the default value if there is no exclusion list.
For example: arn:aws:eks:us-east-2:111111111111:cluster/testcluster
ExcludeAutoScalingGroupIncludingBeanstalkListInCommaSeprated: Comma separated Beanstalk and other Auto Clusters groups ARN (except EKS) which you don’t want to start, keep the default value if there is no exclusion list.
For example: arn:aws:autoscaling:us-east-1:111111111111:autoScalingGroup:6d5af669-eb3b-4530-894b-e314a667f2e7:autoScalingGroupName/test-0-ASG
ExcludeEC2InstancesIdListInCommaSeprated: Comma separated EC2 instance ID s you don’t want to start, keep the default value if there is no exclusion list.
For example: i-02185df0872f0f852, 0775f7e39513c50dd
ScheduleExpression: Schedule a cron expression when you want to run this workflow. Sample expressions are available in this guide, Schedule expressions using rate or cron.
d. Acknowledge that you want to create various resources including IAM roles and policies and select Create Stack.
Cleaning up
Delete any unused resources to avoid incurring future charges.
Conclusion
In this blog post, we outlined a solution to help you optimize cost by automating the stop/start of AWS services in non-production environments. Cost Optimization and Cloud Financial Management are ongoing initiatives. We hope you found this solution helpful and encourage you to explore additional ways to optimize cost on the AWS Architecture Center.
This post was co-authored by Ravi Intodia, Cloud Archiect, Infosys Technologies Ltd, Nirmal Tomar, Principal Consultant, Infosys Technologies Ltd and Ashutosh Pateriya, Solution Architect, AWS.
Today’s businesses must contend with fast-changing competitive environments, expanding security needs, and scalability issues. Businesses must find a way to reconcile the need for operational stability with the need for quick product development. Continuous integration and continuous delivery (CI/CD) enables rapid software iterations while maintaining system stability and security.
With an increase in AWS Cloud and DevOps adoption, many organizations seek solutions which go beyond geographical boundaries. AWS CodePipeline, along with its related services, lets you integrate and deploy your solutions across multiple AWS accounts and Regions. However, it becomes more challenging when you want to deploy your application in multiple AWS Regions as well as in China, due to the unavailability of AWS CodePipeline in the Beijing and Ningxia Regions.
In this blog post, you will learn how to overcome the unique challenges when deploying applications across many parts of the world, including China. For this solution, we will use the power and flexibility of AWS CodeBuild to implement AWS Command Line Interface (AWS CLI) commands to perform custom actions that are not directly supported by CodePipeline or AWS CodeDeploy.
CodePipeline for multi-account and multi-Region deployment consists of the following components:
CodeBuild and CodePipeline roles – In the AWS account which hosts CodePipeline there should be roles created that can be used or assumed by CodeBuild and CodePipeline projects for performing required actions.
Cross-account roles – In each AWS account where cross-account deployments are required, an AWS role with the necessary permissions must be created. The CodePipeline role of the deploying account must be allowed to assume this role for all required accounts. Cross-account roles will also have access to the required S3 buckets and AWS KMS keys for deploying accounts.
Figure 1. High-level solution for AWS Regions
Although the solution works for most Regions, we encounter challenges when we try to expand our current worldwide solutions into the China Regions.
The challenges are as follows:
Cross-account roles – Cross-account roles cannot be created between accounts in non-China Regions and the China Regions. This means that CodeDeploy will be unable to assume the target account role necessary to complete component deployment.
Availability of services – Services required to configure a cloud native CI/CD pipeline are unavailable in the China Regions.
Connectivity – There is no direct network connectivity available between the China Regions and other AWS Regions.
User management – Accounts by users in China are distinct from AWS Region user accounts, and must be maintained independently.
Due to the lack of cross-account roles and the CodePipeline service, setting up a worldwide CI/CD pipeline that includes the China Regions is not automatically supported.
High-level solution
In the proposed solution, we will build and deploy the application to both Regions using the AWS CI/CD services from the non-China Region, and we will create an access key in a China Region with access to deploy the application using services, such as AWS Lambda, AWS Elastic Beanstalk, Amazon Elastic Container Service, and Amazon Elastic Kubernetes Service. This access key is stored in a non-China account as an SSM parameter after encryption. On committing, the CodePipeline in the non-China Region is initiated, and it builds the package and deploys the application in both Regions from a single place.
Solution architecture
Figure 2. High-level solution for cross-account deployment from AWS Regions to a China Region
In this architecture, AWS CLI commands are used to set an AWS profile of CodeBuild instance with China credentials (retrieved from the AWS Systems Manager Parameter Store). This enables a CodeBuild instance to run an AWS CloudFormation package and deploy commands directly on the China account, thereby deploying required resources in the desired China Region.
This solution is not relying on any AWS CI/CD services like CodeDeploy in the China Region. With this solution we can create a complete CI/CD pipeline running in an AWS Region that can deploy an application in both Regions.
The following key components are needed for deployment:
AWS Identity and Access Management (IAM) user credentials – An IAM user needs to be created in the target account in China.
SSM parameter (secure string) – China IAM user access key (secret access key needs to be saved as a secure string SSM parameter in the deployment AWS account).
Update CloudFormation templates – CloudFormation templates need to be updated to support China Region mappings (such as using “arn:aws-cn” instead of “arn:aws”).
Enhance CodeBuild to support build and deployment – CodeBuild buildspec.yml needs to be enhanced to perform build and deployment to China accounts, as mentioned in the following.
Prerequisites
Two AWS accounts: One AWS account outside of China, and one account in China.
Practical experience in deploying Lambda functions using CodeBuild, CodeDeploy, and CodePipeline, and using AWS CLI. Because this example focuses specifically on extending CodePipeline from Regions outside of China to deploy in China Region, we are not going to explore a standard CodePipeline set up.
Detailed Implementation
This solution is built using CodePipeline, CodeCommit, CodeBuild, AWS CloudFormation templates, and IAM.
Steps
One-time key generation in an account in China with necessary access to deploy application, including creation of one S3 bucket for CodeBuild artifacts. Note: As a best practice, we suggest rotation of the access key every 30 days.
Complete the setup of CodePipeline to deploy application in Regions outside of China, as well as including China Region.
As a demonstration, let’s deploy a Lambda function in us-east-1 and cn-north-1 and discuss the steps in detail. The same steps can be followed to deploy any other AWS service.
Part 1 – In the account based in China Region: cn-north-1
Create an S3 bucket with default encryption enabled for CodeBuild artifacts.
Create an IAM user (with programmatic access only) with the required permissions to deploy Lambda functions and related resources. The IAM user will also have access to the S3 bucket created for CodeBuild artifacts.To create an IAM policy, refer to the AWS IAM Policy resource.
Part 2 – In AWS account based in non-China Region: us-east-1
Note: Creating secure SSM parameters is not supported by CloudFormation templates. Also, as a security best practice, you should not have any sensitive information as part of CloudFormation templates to avoid any possible security breach.
Create an AWS KMS key for encrypting CodeBuild or CodePipeline artifacts (for cross-Region deployments, create AWS KMS key in all Regions, and create SSM parameters for each in the Region having CodePipeline).
Create artifacts S3 bucket for CodeBuild or CodePipeline artifacts.
<Role ARN for Cross Account Service Role for Stage>
/US/Prod/CrossAccountStageRole
<Role ARN for Cross Account Service Role for Prod>
In CodeCommit, push the Lambda code and CloudFormation template for deploying Lambda resources (Lambda function, Lambda role, Lambda log group, and so forth).
In CodeCommit, push two buildspec yml files, one for us-east-1, and one for cn-north-1.
buildspec-china.yml: For cn-north-1 buildspec-china.yml will be customized for performing build and deployment both. Refer to the following for details.
# Buildspec Reference Doc: https://docs.aws.amazon.com/codebuild/latest/userguide/build-spec-ref.html
version: 0.2
phases:
  install:
    runtime-versions:
      python: 3.7

  pre_build:
    commands:
      - echo "[+] Updating PIP...."
      - pip install --upgrade pip
      - echo "[+] Installing dependencies...."
      #- Commands To Install required dependencies
      - yum install zip unzip -y -q
      - pip install awscli --upgrade
      # Setting China Region IAM User Profile
      - echo "Start setting User Profile  `date` in `pwd`"
      - USER_ACCESS_KEY=`aws ssm get-parameter --name ${USER_ACCESS_KEY_SSM} --with-decryption --query Parameter.Value --output text`
      - USER_SECRET_KEY=`aws ssm get-parameter --name ${USER_SECRET_KEY_SSM} --with-decryption --query Parameter.Value --output text`
      - aws configure --profile china set aws_access_key_id ${USER_ACCESS_KEY}
      - aws configure --profile china set aws_secret_access_key ${USER_SECRET_KEY}
      - echo "Setting User Profile Completed `date` in `pwd`"

  build:
    commands:
      # Creating Deployment Package
      - echo "Start build/packaging  `date` in `pwd`"
      - S3_BUCKET=`aws ssm get-parameter --name ${S3_BUCKET_SSM} --query Parameter.Value --output text`
      - zip -q -r package.zip *
      - >
        bash -c '
        aws cloudformation package
        --template-file cloudformation_template_china.yaml
        --s3-bucket ${S3_BUCKET}
        --output-template-file transformed-template-china.yaml
        --profile china
        --region cn-north-1'
      - echo "Completed build/packaging  `date` in `pwd`"
  post_build:
    commands:
      # Deploying
      - echo "Start deployment  `date` in `pwd`"
      - >
        bash -c '
        aws cloudformation deploy
        --capabilities CAPABILITY_NAMED_IAM
        --template-file transformed-template-china.yaml
        --stack-name ${ProjectName}-app-stack-dev
        --profile china
        --region cn-north-1'
      - echo "Completed deployment  `date` in `pwd`"
artifacts:
  type: zip
  files:
    - package.zip
    - transformed-template-china.yaml
Environment Variables: USER_ACCESS_KEY_SSM, USER_SECRET_KEY_SSM and S3_BUCKET_SSM
After creating and committing the previous files, your CodeCommit repository will look like the following.
Now that we have a CodeCommit repository, next we will create a CodePipeline for Lambda with the following stages:
Source – Use the previously created CodeCommit repository (CodeRepository-US-East-1) as the source.
Build – The CodeBuild project uses buildspec.yml by default, and takes output of Source stage as input and builds artifacts for us-east-1.
Deploy
Code-Deploy Project for deploying to us-east-1 This takes output of the previous CodeBuild stage as input and performs deployment in two steps: create-changeset and execute-changeset (assuming the required role attached to the Code-Deploy for deployment).
CodeBuild Project for deploying to cn-north-1 This takes output of Source stage as input and performs build and deployment both to cn-north-1 using buildspec-china.yml. Also, it uses China IAM user credentials and bucket SSM parameters from environment variables.CodeBuild project details are outlined in the following image.
Optional – Add further steps like manual approval, deployment to higher environment, and so forth, as required.
Congratulations! you have just created a CodePipeline with Lambda deployed in both a non-China Region and a China Region. Your CodePipeline should appear similar to the following.
Figure 3. CodePipeline implementation for both Regions
Note: Actual CodePipeline view will be vertical only where all environment deployment will be one after the other. For the purpose of this example, we have placed them side-by-side to more easily showcase multiple environments.
CodePipeline Implementation Steps
We have created this pipeline with the following high-level steps, and you can add or remove steps as needed.
Step 1. After you commit the source code, CodePipeline will launch in the non-China Region and fetch the source code.
Step 2. Build the package using using buildspec.yml.
Step 3. Deploy the application in both Regions by following the subsection steps for development environment.
Create the changeset for the development environment.
Implement the changeset for the development environment.
Step 4. Repeat step 3, but deploy the application in the staging environment.
Step 5. Wait for approval from your administrator or application owner before deploying application in production environment.
Step 6. Repeat steps 3 and 4 to deploy the application in the production environment.
Cleaning up
To avoid incurring future charges, clean up the resources created as part of this blog post.
Delete the CloudFormation stack created in the non-China Region.
Delete the SSM parameter created to store the access key.
Delete the access created in the China Region.
Conclusion
In this blog post, we have explored the question: how can you use AWS services to implement CI/CD in a China Region and keep them in sync with an AWS Region? Although we are using us-east-1 as an example here, this solution will work for any Region where CodePipeline services are available, including the China Region.
The question has been answered by dividing it into three problem statements as follows.
Problem 1: CodePipeline is not available in the China Regions. Solution: Set up CodePipeline in a non-China Region and deploy to a China Region.
Problem 2: AWS cross-account roles are not possible between a non-China Region and the China Regions. Solution: Use the power and flexibility of CodeBuild to build your application and also deploy your application using the AWS CLI.
Problem 3: Keep a non-China Region and the China Regions in sync. Solution: Maintain all code and managing deployments from a common deployment AWS account.
This post was co-written by Ashutosh Pateriya, Solution Architect at AWS and Nirmal Tomar, Principal Consultant at Infosys Technologies Ltd.
Various organizations have stringent regulatory compliance obligations or business requirements that require an effective cross-account and cross-region database setup. We recommend to establish a Disaster Recovery (DR) environment in different AWS accounts and Regions for a system design that can handle AWS Region failures.
Account-level separation is important for isolating production environments from other environments, that is, development, test, UAT and DR environments. These are defined by external compliance requirements, such as PCI-DSS or HIPAA. Cross-account replication helps an organization recover data from a replicated account, when the primary AWS account is compromised, and access to the account is lost. Using multiple Regions gives you greater control over the recovery time, if there is a hard dependency failure on a Regional AWS service.
You can use Amazon Aurora Global Database to replicate your RDS database across Regions, within the same AWS Account. In this blog, we show how to build a custom solution for Cross-Account, Cross-Region database replication with configurable Recovery Time Objective (RTO)/ Recovery Point Objective (RPO).
Solution Overview
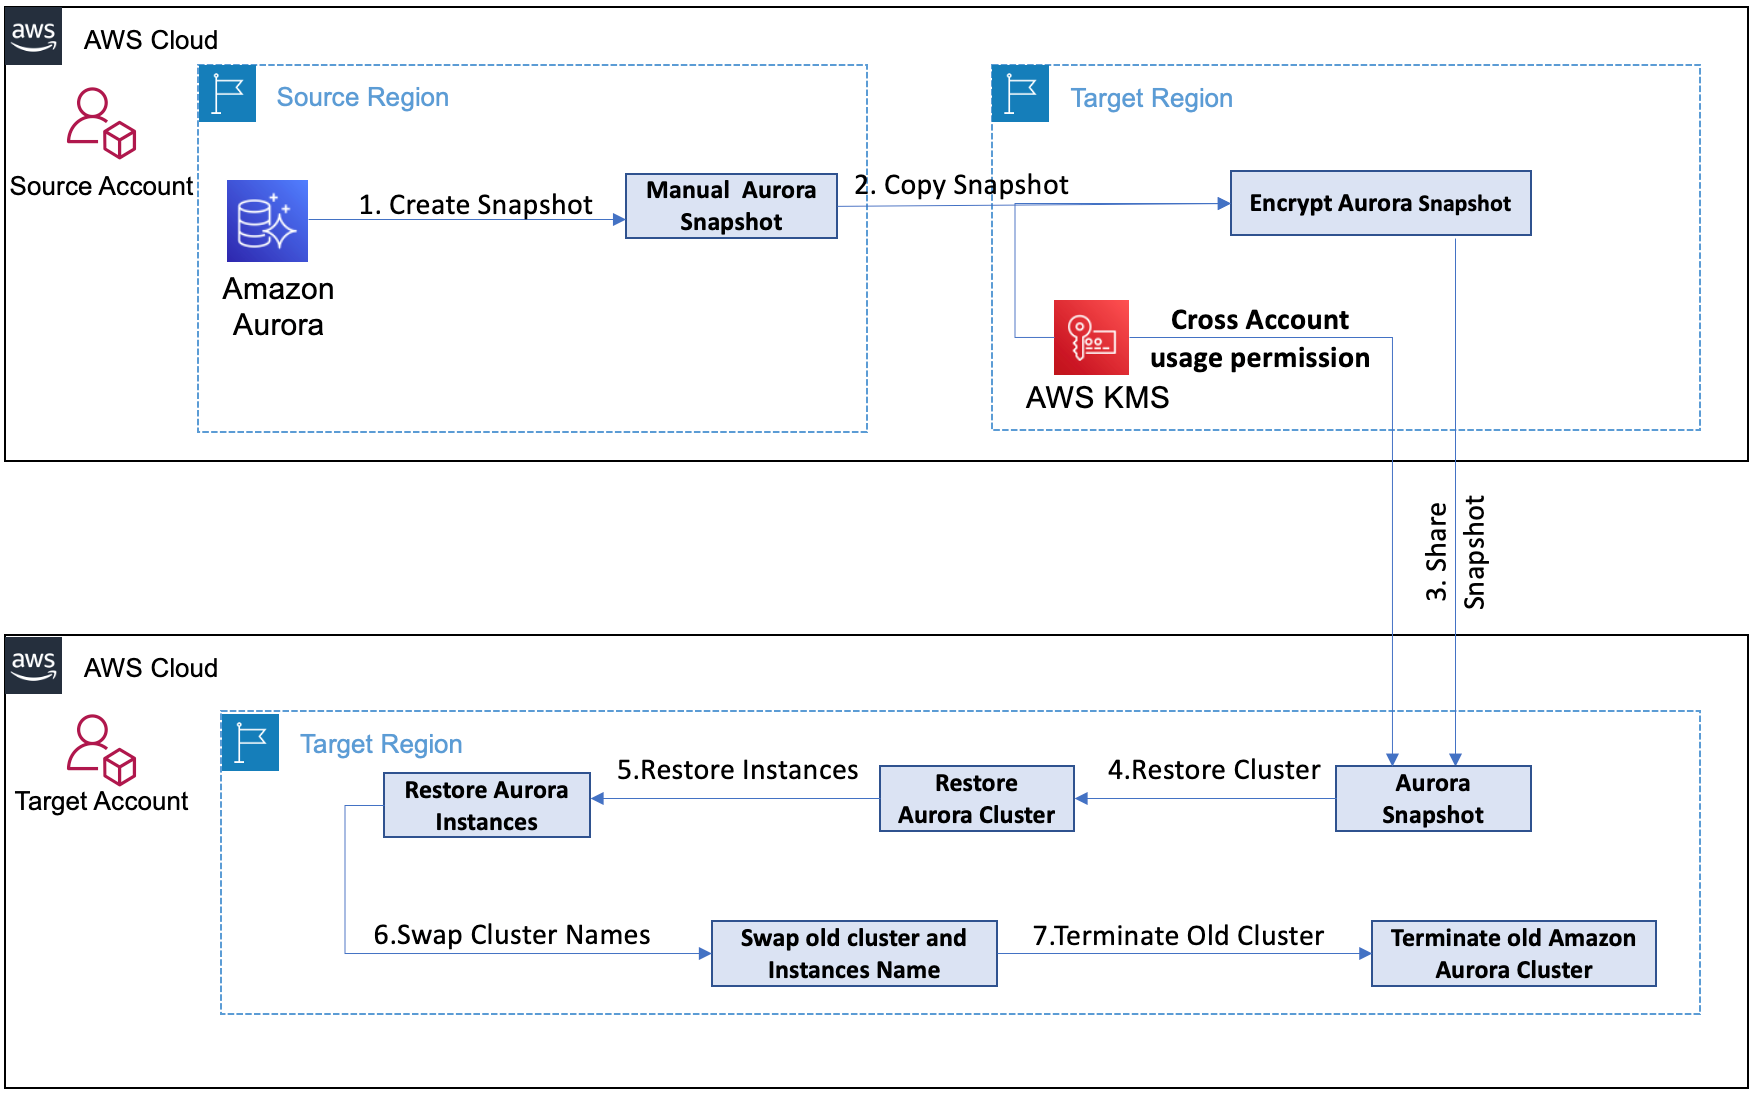
Figure 1 – Architecture of a Cross-Account, Cross-Region database replication with configurable Recovery Time Objective (RTO)/ Recovery Point Objective (RPO)
Step 1: Automated Amazon Aurora snapshots cannot be shared with other AWS accounts. Hence, create a manual version of the snapshot for the same.
Step 2: Amazon Aurora cannot be restored from the snapshot created in different AWS Regions. To overcome this, you must copy the snapshot in the target AWS Region after AWS KMS encryption.
Step 3: Share the DB cluster snapshot with the target account, in order to restore the cluster.
Step 4: Restore Aurora Cluster from the shared snapshot.
Step 5: Restore the required Aurora Instances.
Step 6: Swap the cluster and instance names, to make it accessible from the previous Reader/Writer endpoint.
Step 7: Perform a sanity test and shut down the old cluster.
Prerequisites
Two AWS accounts with permission to spin up required resources.
A running Aurora instance in the source AWS account.
Launch a one-time set up of the AWS KMS in the AWS source account to share the key with destination account. This key will be used by the destination account to restore the Aurora cluster from a KMS encrypted snapshot.
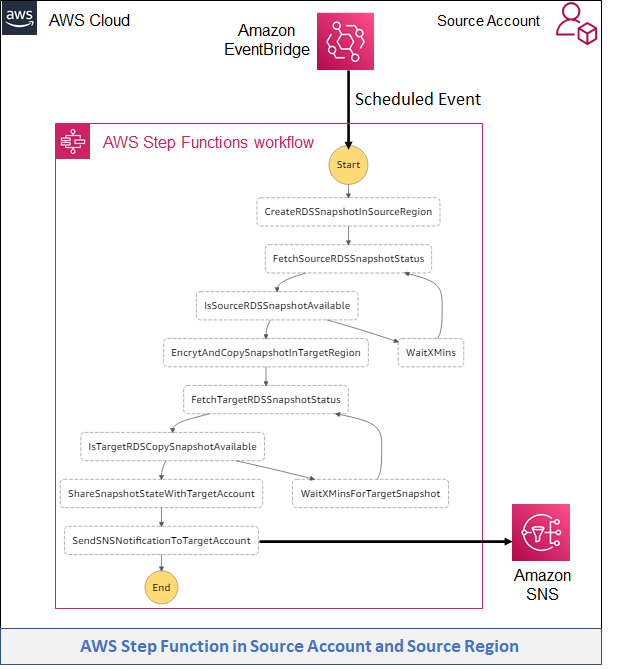
Set up the step function workflow in the AWS source account and source Region. On a scheduled interval, this workflow creates a snapshot in the source account and source Region. Copy it to the target Region and push a notification to the SNS topic and setup a Lambda function as a target for the SNS topic. Refer to the documentation to learn more about Using Lambda with Amazon SNS.
Set up the step function workflow in the AWS target account and in the target Region. This workflow is initiated from the previous workflow after sharing the snapshot. It restores the Aurora cluster from the shared snapshot in the target account and in the target Region.
Provide access to the Lambda function in the target account and target Region. Set it up to listen to the SNS topic in the source account and source Region.
Figure 2 – Architecture showing AWS Step Function in Source Account and Source Region
We can implement a Lambda function with different supported programming languages. For this solution, we selected Python to implement various Lambda functions used in both step function workflows.
Note: We are using us-west-2 as the source Region and us-west-1 as the target Region for this demo. You can choose Regions as per your design need.
Part 1: One Time AWS KMS key setup in the Source Account and Target Region for cross-account access of the Encrypted Snapshot
We can share a Customer Master Key (CMK) across multiple AWS accounts using different ways, such as using AWS CloudFormation templates, CLI, and AWS console.
Following are one-time steps that allow you to create an AWS KMS key in the source AWS account. You can then provide cross-account usage access of the same key to the destination account for restoring the Aurora cluster. You can achieve this with the AWS Console and AWS CloudFormation Template.
Note: Several AWS services being used do not fall under the AWS Free Tier. To avoid extra charges, make sure to delete resources once the demo is completed.
This workflow first creates a snapshot in the AWS source account and source Region> The snapshot copies it in target Region after KMS encryption, shares the snapshot with the target account and sends a notification to SNS Topic. A Lambda function is subscribed to the topic in the target account.
Figure 3 – Architecture showing the AWS Step Functions Workflow
The Import Lambda functions involved in this workflow:
a. CreateRDSSnapshotInSourceRegion: This Lambda function creates a snapshot in the source Account and Region for an existing Aurora cluster.
b. FetchSourceRDSSnapshotStatus: This Lambda function fetches the snapshot status and waits for its availability before moving to the next step.
c. EncrytAndCopySnapshotInTargetRegion: This Lambda function copies the source snapshot in the target AWS Region after encryption with AWS KMS keys.
d. FetchTargetRDSSnapshotStatus: This Lambda function fetch the snapshot status in the target Region and will wait to move to the next step once snapshot status changed to available.
e. ShareSnapshotStateWithTargetAccount: This Lambda function shares the snapshot with the target account and target Region.
f. SendSNSNotificationToTargetAccount: This option sends the notification to the SNS topic. An AWS Lambda function is subscribed to this topic for the destination AWS Account.
Using the following AWS CloudFormation Template, we set up the required services/workflow in the source account and source Region:
a. Launch the template in the source account and source Region:
b. Fill out the preceding form with the following details and select next.
Stack name: Stack Name which you want to create.
DestinationAccountNumber: Destination AWS Account number where you want to restore the Aurora cluster.
KMSKey: KMS key ARN number setup in previous steps.
ScheduleExpression: Schedule a cron expression when you want to run this workflow. Sample expressions are available in this guide, Schedule expressions using rate or cron.
SourceDBClusterIdentifier: The identifier of the DB cluster, for which a snapshot is created. It must match the identifier of an existing DBCluster. This parameter isn’t case-sensitive.
SourceDBSnapshotName: Snapshot name which we will use in this flow.
TargetAWSRegion: Destination AWS Account Region where you want to restore the Aurora cluster.
c. Select IAM role to launch this template per best practices.
d. Acknowledge to create various resources including IAM roles/policies and select Create Stack.
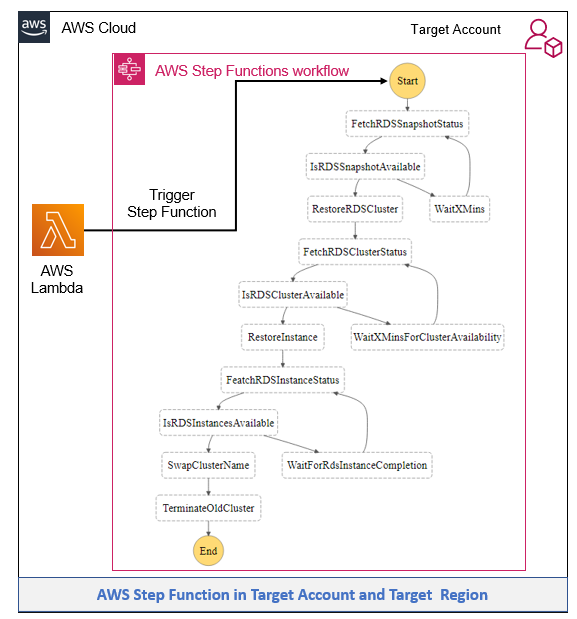
Part 3: Workflow to Restore the Aurora Cluster in the AWS Target Account and Target Region
Once AWS Lambda receives a cross-account sns notification for the shared snapshot, this workflow begins:
The Lambda function starts the AWS Step Function workflow in an asynchronous mode.
The workflow checks for the snapshot availability and starts restoring the Aurora cluster based on the configured engine, version, and other parameters.
Depending on the availability of the cluster, it adds instances based on a predefined configuration.
Once the instances are available, it swaps cluster names so that the updated database is available at the same reader and writer endpoints.
Once the databases are restored, the old Aurora cluster is shut down.
Note:
a) The database is restored in the default VPC, Availability Zone, and option group, with the default cluster version and option group. If you want to restore with the specific configurations, you can edit the restore cluster function with details available in the same section.
b) Database credentials will be the same as source account. If you want to override credential or change the authentication mechanism, you can edit the restore cluster function with details available in the same section.
Figure 4 – Architecture showing the AWS Step Functions Workflow
Import Lambda functions involved in this workflow:
a) FetchRDSSnapshotStatus: This Lambda function fetches the snapshot status and moves to RestoreCluster functionality once the snapshot is available.
b) RestoreRDSCluster: This Lambda function restores the cluster from the shared snapshot with the mandatory attribute only.
– You can edit the Lambda function as described following to add specific parameters like specific VPC, Subnets, AvailabilityZones, DBSubnetGroupName, Autoscaling for reader capacity, DBClusterParameterGroupName, BacktrackWindow and many more.
c) RestoreInstance: This Lambda function creates an instance for the restored cluster.
d) SwapClusterName: This Lambda function swaps the cluster name, so that the updated database is available at previous endpoints. Then the cluster url is swapped.
e) TerminateOldCluster: This Lambda function will shut down the previous cluster.
Using the following AWS CloudFormation Template, we can set up the required services/workflow in the target account and target Region:
a) Launch the template in target account and target Region:
b) Fill out the preceding form with the following details and click the next button.
Stack name: Stack name which you want to create.
Engine: The database engine to be used for the new DB cluster, such as aurora-mysql. It must be compatible with the engine of the source.
DBInstanceClass: The compute and memory capacity of the Amazon RDS DB instance, for example, db.t3.medium.
Not all DB instance classes are available in all AWS Regions, or for all database engines. For the full list of DB instance classes, and availability for your engine, see DB Instance Class in the Amazon RDS User Guide.
ExistingDBClusterIdentifier: Name of the existing DB cluster. In the final step, if the old cluster is available with this name, it will be deleted and a new cluster will be available with this name, so the reader/writer endpoint will not change. This parameter isn’t case-sensitive. It must contain from 1 to 63 letters, numbers, or hyphens. The first character must be a letter. DBClusterIdentifier can’t end with a hyphen or contain two consecutive hyphens.
TempDBClusterIdentifier: Temporary name of the DB cluster created from the DB snapshot or DB cluster snapshot. In the final step, this cluster name will be swapped with the original cluster and the previous cluster will be deleted. This parameter isn’t case-sensitive. Must contain from 1 to 63 letters, numbers, or hyphens. The first character must be a letter. DBClusterIdentifier can’t end with a hyphen or contain two consecutive hyphens.
ExistingDBInstanceIdentifier: Name of the existing DB instance identifier. In the final step, if an previous instance is available with this name, it will be deleted and a new instance will be available with this name. This parameter is stored as a lowercase string. Must contain from 1 to 63 letters, numbers, or hyphens. The first character must be a letter, can’t end with a hyphen or contain two consecutive hyphens.
TempDBInstanceIdentifier: Temporary name of the existing DB instance. In the final step, if a previous instance is available with this name, it will be deleted and a new instance will be available. This parameter is stored as a lowercase string. Must contain from 1 to 63 letters, numbers, or hyphens. The first character must be a letter, can’t end with a hyphen or contain two consecutive hyphens.
c) Select IAM role to launch this template as per best practices and select Next.
d) Acknowledge to create various resources including IAM roles/policies and select Create Stack.
After launching the CloudFormation steps, all resources like IAM roles, step function workflow and Lambda functions will be set up in the target account.
Part 4: Cross Account Role for Lambda Invocation to restore the Aurora Cluster
In this step, we provide access to Lambda function setup in the target account and target Region to listen to the SNS topic setup in the source account and source Region. An SNS notification is initiated by the first workflow after the snapshot sharing steps. The Lambda function initiates a workflow to restore the Aurora cluster in the target account and target Region.
Replace << targetAccountID >> with target AWS account number and <<snsTopicinSourceAccount>> with sns topic created as an output of part 2 CloudFormation template in the source account.
b) Configure the InvokeStepFunction Lambda function in target account to allow invocation from the SNS topic in source account by using following AWS CLI command in the target account. This policy allows the specific SNS topic in the source account to invoke the Lambda function.
Replace <<snsTopicinSourceAccount>> with sns topic created as an output of part 2 CloudFormation template.
c) Subscribe the Lambda function in the target account to the SNS topic in the source account by using the following AWS CLI command in the target account.
Initiate the CLI command in the source Region as sns topic is created there. Replace <<snsTopicinSourceAccount>> with sns topic created as an output of part 2 CloudFormation template execution and << InvokeStepFunctionArninTargetAccount >>with InvokeStepFunction Lambda in the target account created as an output of part 3 CloudFormation template launch.
Security Consideration:
1. We can share the snapshots with different accounts using public and private mode.
Public mode permits all AWS accounts to restore a DB instance from the shared snapshot.
Private mode permits only AWS accounts that you specify to restore a DB instance from the shared snapshot. We recommend sharing the snapshot with the destination account in private mode, as we are using the same in our solution.
2. Sharing a manual DB cluster snapshot (whether encrypted or unencrypted) enables authorized AWS accounts to directly restore a DB cluster from the snapshot. This is instead of taking a copy and restoring from that. We recommend sharing an encrypted snapshot with the destination account, as we are using the same in our solution.
Cleaning up
Delete the resources to avoid future incurring charges.
Conclusion
In this blog, you learned how to replicate databases across the Region and across different accounts. This helps in designing your DR environment and fulfilling compliance requirements. This solution can be customized for any RDS-based databases or Aurora Serverless, and you can achieve the desired level of RTO and RPO.
Field Notes provides hands-on technical guidance from AWS Solutions Architects, consultants, and technical account managers, based on their experiences in the field solving real-world business problems for customers.
The collective thoughts of the interwebz
Manage Consent
To provide the best experiences, we use technologies like cookies to store and/or access device information. Consenting to these technologies will allow us to process data such as browsing behavior or unique IDs on this site. Not consenting or withdrawing consent, may adversely affect certain features and functions.
Functional
Always active
The technical storage or access is strictly necessary for the legitimate purpose of enabling the use of a specific service explicitly requested by the subscriber or user, or for the sole purpose of carrying out the transmission of a communication over an electronic communications network.
Preferences
The technical storage or access is necessary for the legitimate purpose of storing preferences that are not requested by the subscriber or user.
Statistics
The technical storage or access that is used exclusively for statistical purposes.The technical storage or access that is used exclusively for anonymous statistical purposes. Without a subpoena, voluntary compliance on the part of your Internet Service Provider, or additional records from a third party, information stored or retrieved for this purpose alone cannot usually be used to identify you.
Marketing
The technical storage or access is required to create user profiles to send advertising, or to track the user on a website or across several websites for similar marketing purposes.