Post Syndicated from Koushik Mani original https://aws.amazon.com/blogs/messaging-and-targeting/streamline-sms-and-emailing-marketing-compliance-with-amazon-comprehend/
In today’s digital landscape, businesses heavily rely on SMS and email campaigns to engage with customers and deliver timely, relevant messages. The shift towards digital marketing has increased customer engagement, accelerated delivery, and expanded personalization options. Email and SMS marketing is essential to digital strategies according to 44% of Chief Marketing Officers and they allocate approximately 8% of their marketing towards this. Industries face stringent restrictions on the content they can send due to legal regulations and carrier filtering policies.
Messages related to the subjects listed below are considered restricted and are subject to heavy filtering or even being blocked outright. Failing to comply with these restrictions can result in severe consequences, including legal action, fines, and irreparable damage to a brand’s reputation. Marketers need a solution that will proactively scan their content used in campaigns and flag restricted content before sending it out to their customers without facing penalties and losing trust.:
- Gambling
- High-risk financial services
- Debt forgiveness
- S.H.A.F.T (Sex, Hate, Alcohol, Firearms, and Tobacco)
- Illegal substances
In this blog, we will explore how to leverage Amazon Comprehend, Amazon S3, and AWS Lambda to proactively scan text-based marketing campaigns before publishing content . This solution enables businesses to enhance their marketing efforts while maintaining compliance with industry regulations, avoiding costly fines, and preserving their hard-earned reputation, conforming to best practices.
Solution Overview
AWS provides a robust suite of services to meet the infrastructure needs of the booming digital marketing industry, including messaging capabilities through email, SMS, push, and other channels through Amazon Simple Email Service, Amazon Simple Notification Service, or Amazon Pinpoint.
The main goal for this approach is to flag any message that contains restricted content mentioned above before distribution.
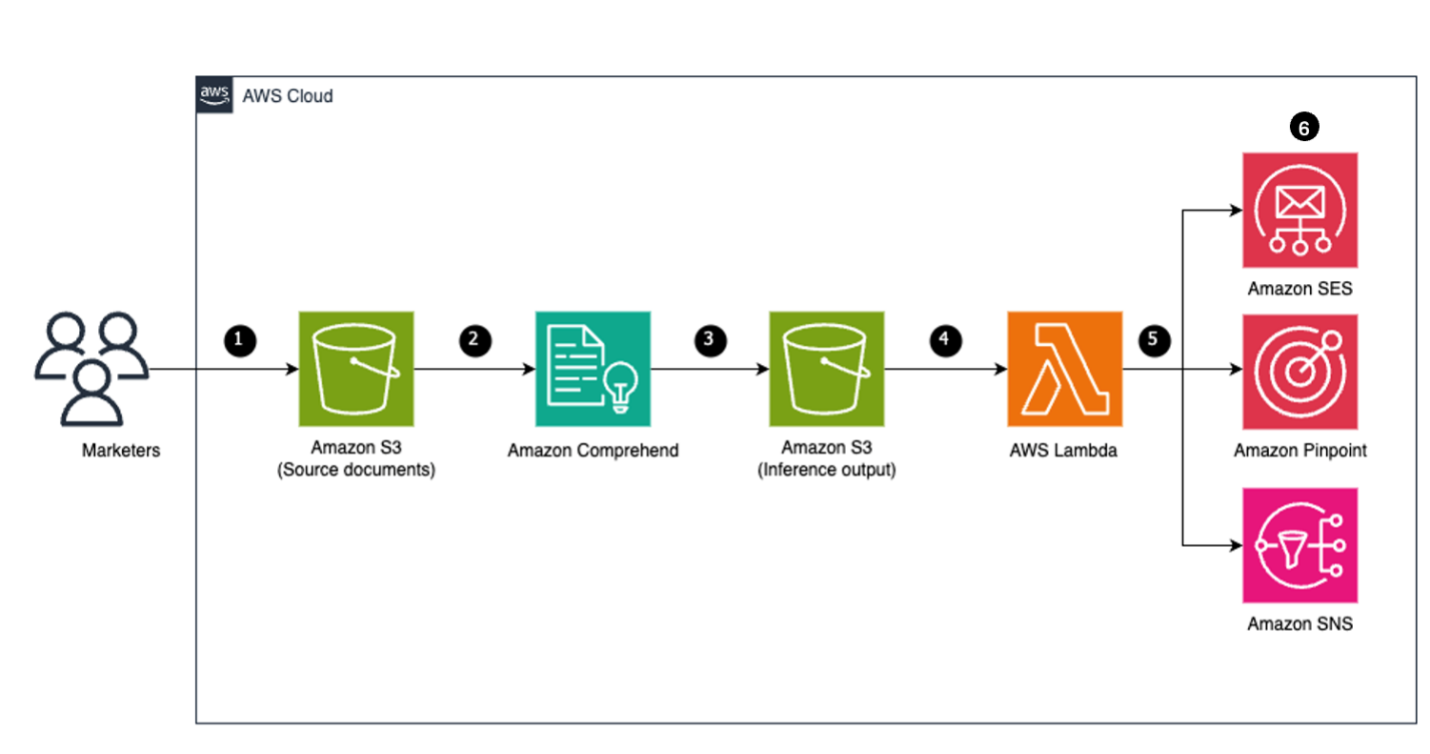
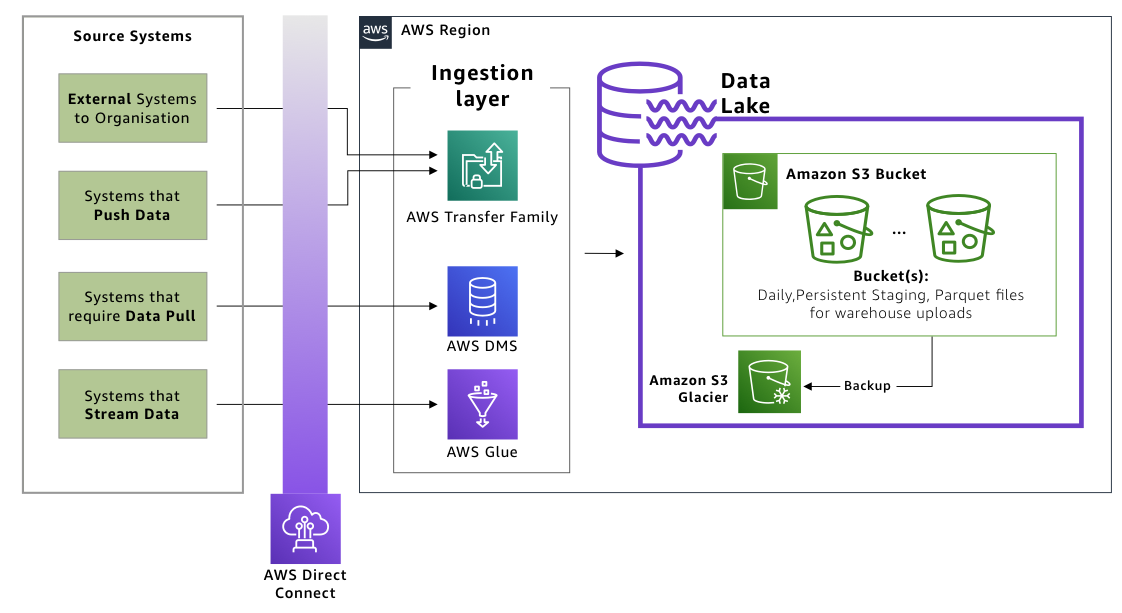
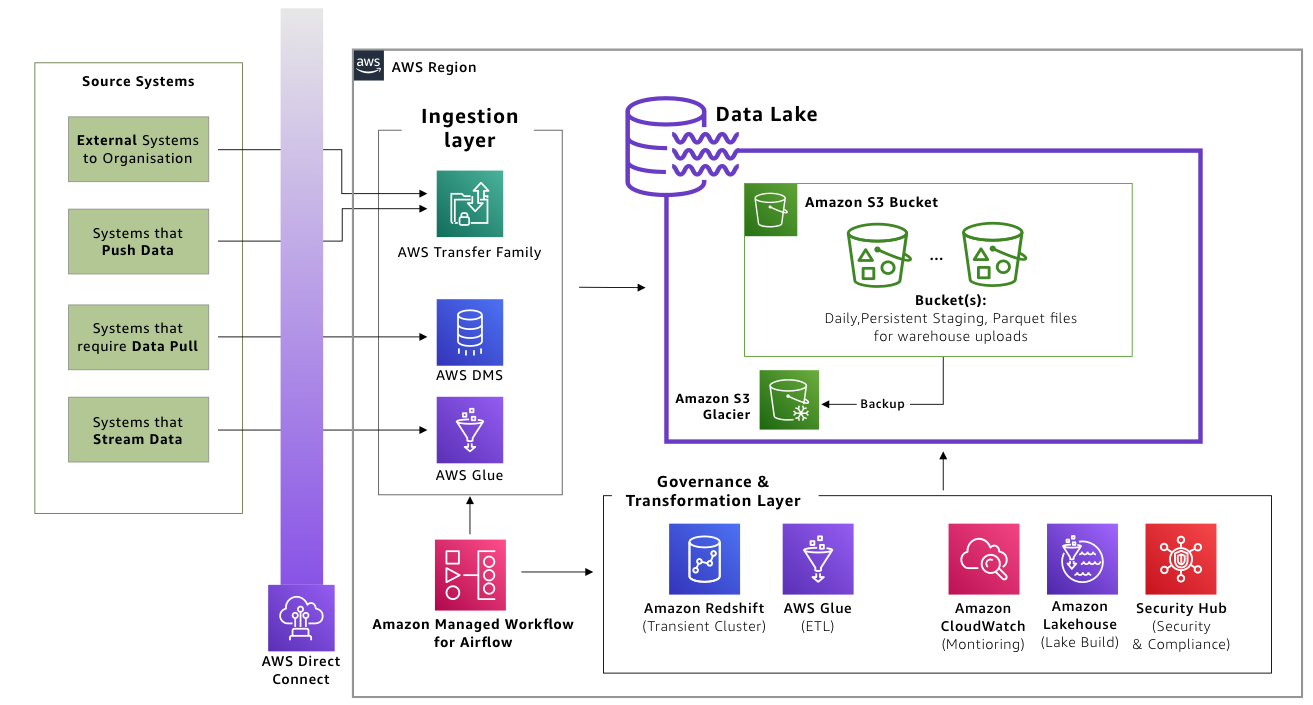
Figure 1: Architecture for proactive scanning of marketing content
Following are the high-level steps:
- Upload documents to be scanned to the S3 bucket.
- Utilize Amazon Comprehend custom classification for categorizing the documents uploaded.
- Create an Amazon Comprehend endpoint to perform analysis.
- Inference output is published to the destination S3 bucket.
- Utilize AWS Lambda function to consume the output from the destination S3 bucket.
- Send the compliant messages through various messaging channels.
Solution Walkthrough
Step 1: Upload Documents to Be Scanned to S3
- Sign in to the AWS Management Console and open the Amazon S3 console
- In the navigation bar on the top of the page, choose the name of the currently displayed AWS Region. Next, choose the Region in which you want to create a bucket.
- In the left navigation pane, choose Buckets.
- Choose Create bucket.
- The Create bucket page opens.
- Under General configuration, view the AWS Region where your bucket will be created.
- Under Bucket type, choose General purpose.
- For Bucket name, enter a name for your bucket.
- The bucket name must:
- Be unique within a partition. A partition is a grouping of Regions. AWS currently has three partitions: aws (Standard Regions), aws-cn (China Regions), and aws-us-gov (AWS GovCloud (US) Regions).
- Be between 3 and 63 characters long.
- Consist only of lowercase letters, numbers, dots (.), and hyphens (-). For best compatibility, we recommend that you avoid using dots (.) in bucket names, except for buckets that are used only for static website hosting.
- Begin and end with a letter or number.
- The bucket name must:
- In the Buckets list, choose the name of the bucket that you want to upload your folders or files to.
- Choose Upload.
- In the Upload window, do one of the following:
- Drag and drop files and folders to the Upload window.
- Choose Add file or Add folder, choose the files or folders to upload, and choose Open.
- To enable versioning, under Destination, choose Enable Bucket Versioning.
- To upload the listed files and folders without configuring additional upload options, at the bottom of the page, choose Upload.
- Amazon S3 uploads your objects and folders. When the upload is finished, you see a success message on the Upload: status page.
Step 2: Creating a Custom Classifiction Model
Custom Classification Model
Out-of-the-box models may not capture nuances and terminology specific to an organization’s industry or use case. Therefore, we train a custom model to identify compliant messages.
A custom classification model is a feature that allows you to train a machine learning model to classify text data based on categories that are specific to your use case or industry. It trains the model to recognize and sort different types of content which is used to power the endpoint. A custom classification model is designed to save costs and promote compliant messages and further prevent marketing companies from potential fines.
Requirements for custom classification:
- Dataset creation
- A CSV dataset with 1000 examples of marketing messages, each labeled as compliant (1) or non-compliant (0).
- Designed to train a model for accurate predictions on marketing message compliance.
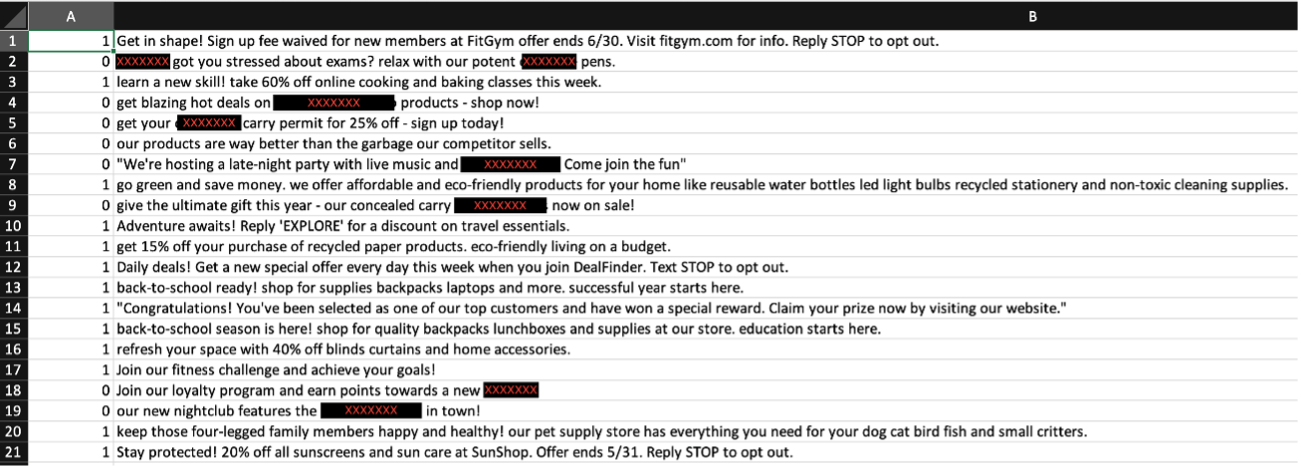
Figure 2: Screenshot of dataset – 20 entries of censored marketing messages
- Creating a Test Data Set
In addition to providing a dataset to power your customer classification model, a test dataset is also required to test the data that the model will be running on. Without a test dataset, Amazon Comprehend trains the model with 90 percent of the training data. It reserves 10 percent of the training data to use for testing. When using a test dataset, the test data must include at least one example for each unique label (0 or 1) in the training dataset.
- Upload the data set and test data set to an S3 Bucket, by following the steps in this user guide.
- In the AWS Console, search for Amazon Comprehend.
- Once selected, select custom classification on the left panel.
- Once there, select Create new model.
- Next specify model settings:
- Model name
- Specify the version (optional)
- Language: English

- Specify the data specifications:
- Training model type: Plain Text Documents
- Data format: CSV File
- Classifier Mode: Using Single-Label Mode
- Training Dataset: Give the name of the bucket you created in step 1
- Test Data set: Autosplit, i.e. how much of your data will be used for training and testing.


- Specify the location of the model output in S3

- Create an IAM Role
- Permissions to access: Train, Test and output data (if specified in your S3 Buckets)

- Once all parameters have been identified, select Create.
- Once the model has been created, you can view it under Custom Classification. To check and verify the accuracy and F1 score, select the version number of the model. Here, you can view the model details under the Performance tab.


Step 3: Creating an Endpoint in Amazon Comprehend
Next, an endpoint needs to be created to analyze documents. To create an endpoint:
- Select endpoint on the left panel in Amazon Comprehend.
- Select Create endpoint in the left panel.
- Specify Endpoints Settings :
- Provide a name
- Custom model type: Custom Classification
- Choose a custom model that you want to attach to the new endpoint. From the dropdown, you can search by model name.
 Figure 8: Amazon Comprehend – Endpoint settings
- Provide the number of inference units (IUs): 1
- Once all the parameters have been provided, ensure that the Acknowledge checkbox has been selected.
- Finally, select Create endpoint.

 Figure 8: Amazon Comprehend – Endpoint settings
Step 4: Scanning Text with the Custom Classification Endpoint
Once the endpoint has been successfully created, it can be used for real-time analysis or batch-processing jobs. Below is a walkthrough of how both options can be achieved.
Real-time analysis:
- On the left panel, select Realtime Analysis.
- Pick Analysis type: custom, to view real-time insights based on the custom models from an endpoint you’ve created
- Select custom model type
- Select your Endpoint
- Insert your input text.
- For this example, we have used a non-compliant message: Huge sale at Pine County Shooting Range 25% off for 6mm and 9mm bullets! Lazer add-ons on clearance too
- Once inserted, click Analyze.

- Once analyzed, you will see a confidence score under Classes. Because the dataset is labeled as 0 for non-compliant and 1 for compliant. The message that was inserted was non-compliant, the result of the real-time analysis is a high confidence score for non-compliant.


Real-time analysis in Amazon Comprehend:
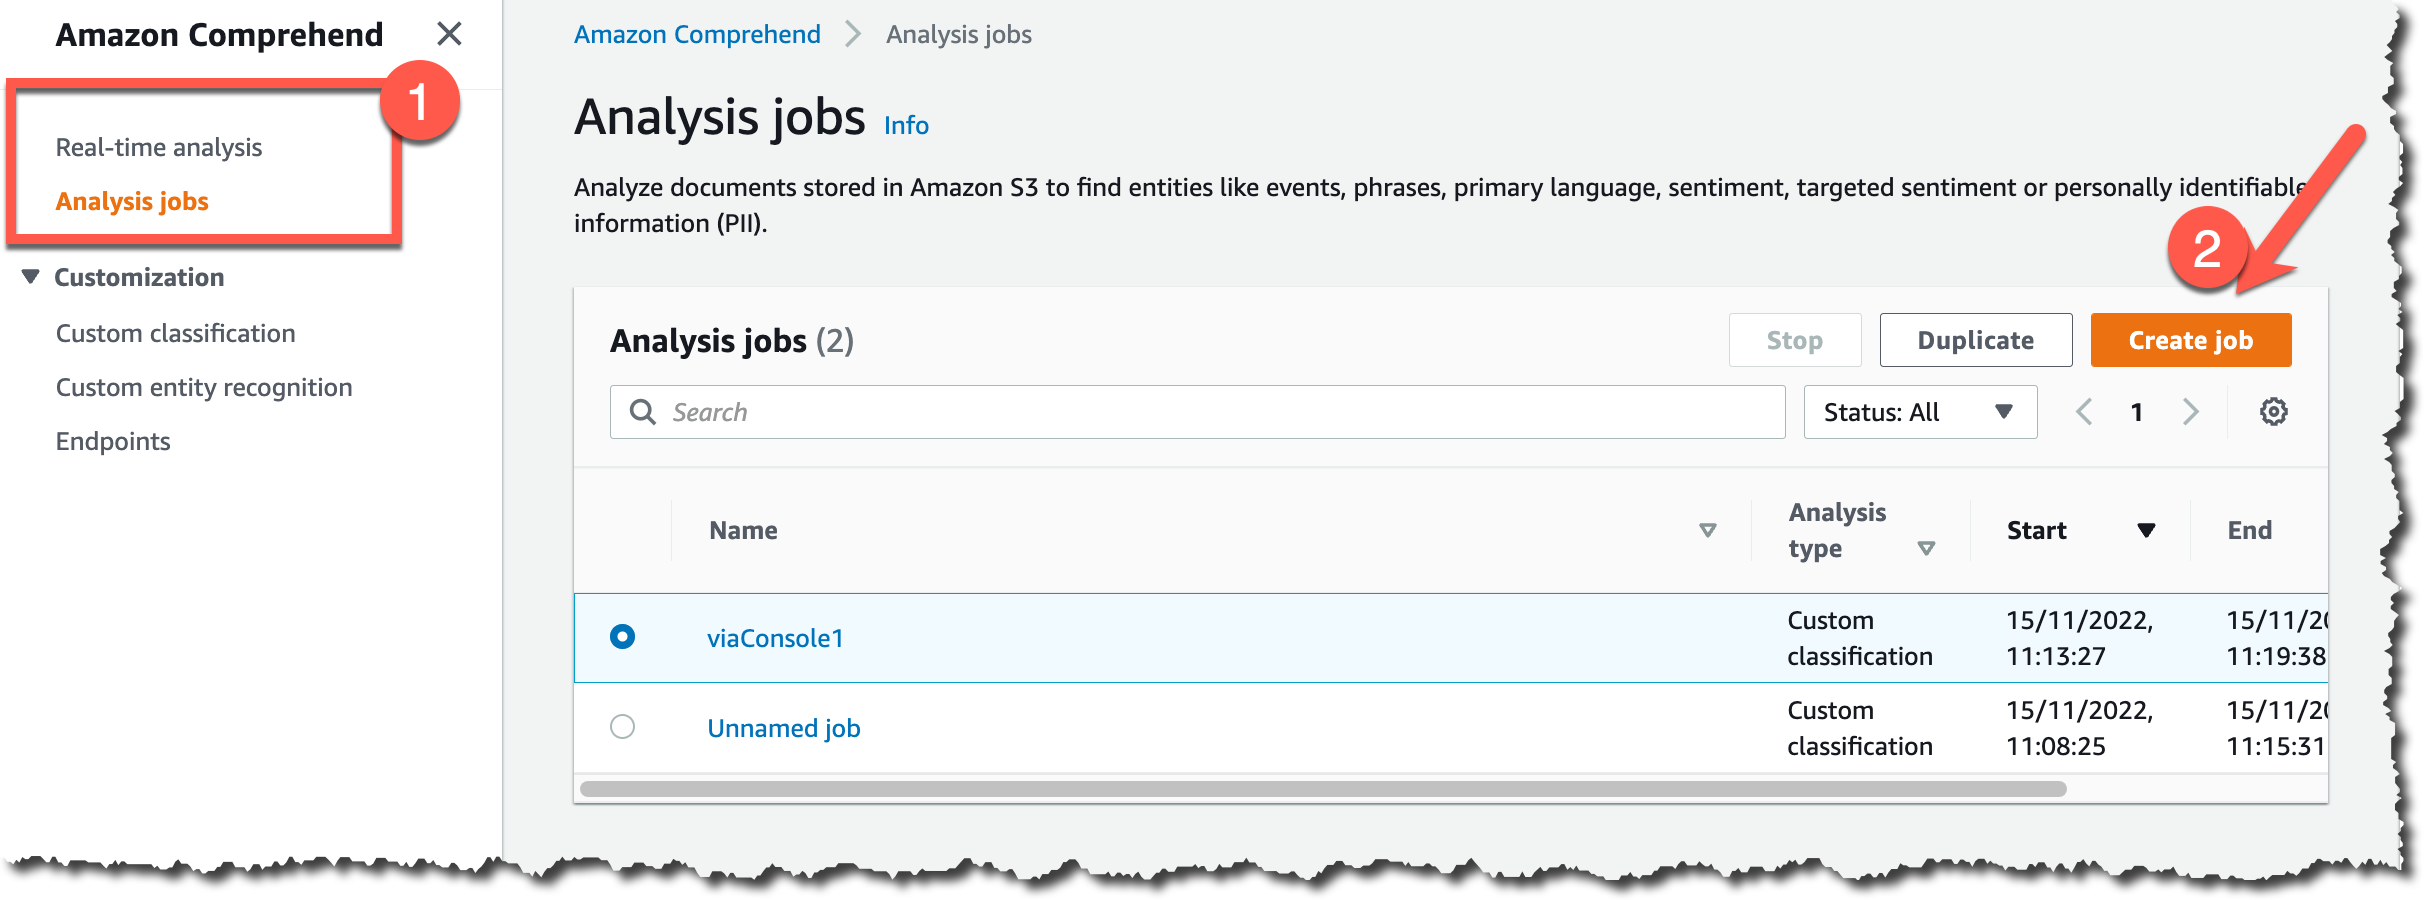
- On the left panel in Amazon Comprend, select Analysis Jobs.
- Select the Create Job button.
- Configure Job settings:
- Enter the Name
- Analysis Type: Custom Classification
- Classifications Model: The model you have created for your Classifier, as well as the version number of that model you would like to use for this job.

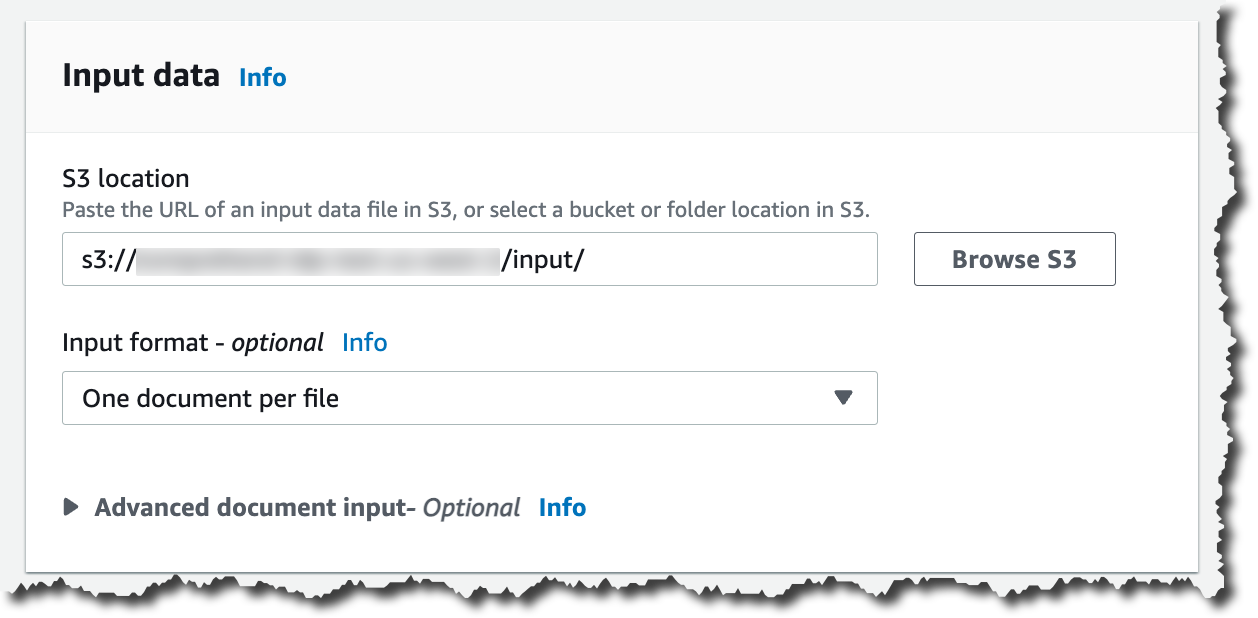
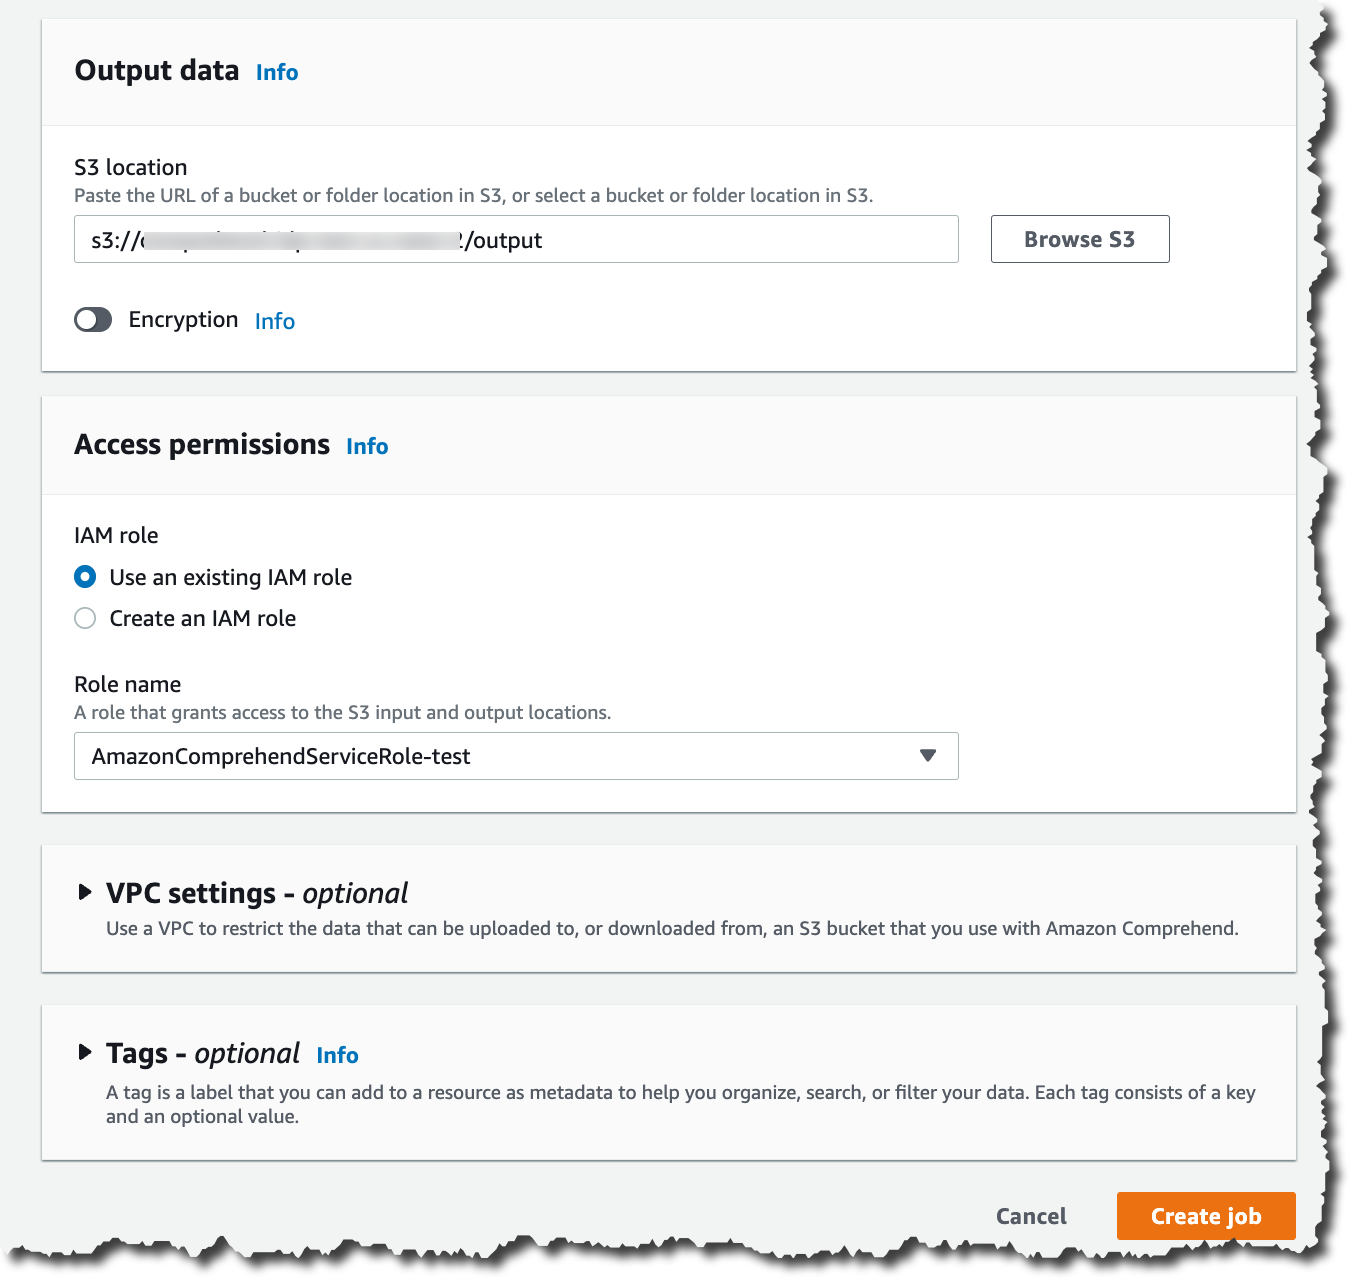
- Enter the location of the Input Data and Output Data in the form of an S3 bucket URL.

- Before creating a job the last thing, we want to do is provide the right access permission, by creating an IAM role that give access permissions to the S3 input and output locations.

- Once the batch processing job shows a status of completed, you can view the results in the output S3 bucket which was identified earlier. The results will be in a json file where each line represents the confidence score for each marketing message.


Step 5 (optional): Publish message to communication service
The result from the batch processing is automatically uploaded to the output S3 bucket. For each json file uploaded, S3 will initiate an S3 Event Notification which will inform a Lambda function that a new S3 object has been created.
The Lambda function will evaluate the results and automatically identify the messages labeled as compliant (label 0). These compliant messages will then be published to communication services using one of the following three APIs, depending on the desired service:
- Using the Amazon SES API to send email
- Send email by using the Amazon Pinpoint API
- Send SMS by using Amazon SNS API
To automatically trigger the AWS Lambda function, which will read the files uploaded into the S3 bucket and display the data using the Python Pandas library, we will use the boto3 API to read the files from the S3 bucket.
- Create an IAM Role in AWS.
- Create an AWS S3 bucket.
- Create the AWS Lambda function with S3 triggers enabled.
- Update the Lambda code with a Python script to read the data and send the communication to customer.
Conclusion
Proactively scanning and classifying marketing content for compliance is a critical aspect of ensuring successful digital marketing campaigns while adhering to industry regulations. Leveraging the powerful combination of Amazon Comprehend, Amazon S3, and AWS Lambda enables the automatic analysis of text-based marketing messages and flagging of any non-compliant content before sending them to your customer. Following these steps provides you with the tools and knowledge to implement proactive scanning for your marketing content. This solution will help mitigate the risks of non-compliance, avoiding costly fines and reputational damage, while freeing up time for your content creation teams to focus on ideation and crafting compelling marketing messages. Regular monitoring and fine-tuning of the custom classification model should be conducted to ensure accurate identification of non-compliant language.
To get started with proactively scanning and classifying marketing content for compliance, see Amazon Comprehend Custom Classification.
About the Authors

Caroline Des Rochers
Caroline is a Solutions Architect at Amazon Web Services, based in Montreal, Canada. She works closely with customers, in both English and French, to accelerate innovation and advise them through technical challenges. In her spare time, she is a passionate skier and cyclist, always ready for new outdoor adventures.

Erika Houde Pearce
Erika Houde-Pearce is a bilingual Solutions Architect in Montreal, guiding small and medium businesses in eastern Canada through their cloud transformations. Her expertise empowers organizations to unlock the full potential of cloud technology, accelerating their growth and agility. Away from work, she spends her spare time with her golden retriever, Scotia.

Koushik Mani
Koushik Mani is a Solutions Architect at AWS. He had worked as a Software Engineer for two years focusing on machine learning and cloud computing use cases at Telstra. He completed his masters in computer science from University of Southern California. He is passionate about machine learning and generative AI use cases and building solutions.


 Sakti Mishra is a Principal Solutions Architect at AWS, where he helps customers modernize their data architecture and define their end-to-end data strategy, including data security, accessibility, governance, and more. He is also the author of the book
  Bhavana Chirumamilla is a Senior Resident Architect at AWS with a strong passion for data and machine learning operations. She brings a wealth of experience and enthusiasm to help enterprises build effective data and ML strategies. In her spare time, Bhavana enjoys spending time with her family and engaging in various activities such as traveling, hiking, gardening, and watching documentaries.
 Sheela Sonone is a Senior Resident Architect at AWS. She helps AWS customers make informed choices and trade-offs about accelerating their data, analytics, and AI/ML workloads and implementations. In her spare time, she enjoys spending time with her family—usually on tennis courts.
 Daniel Bruno is a Principal Resident Architect at AWS. He had been building analytics and machine learning solutions for over 20 years and splits his time helping customers build data science programs and designing impactful ML products.