All posts by Bandana Das

Govern Amazon Redshift Data Warehouses Data Across Accounts using Amazon SageMaker Unified Studio

Post Syndicated from Bandana Das original https://aws.amazon.com/blogs/big-data/govern-amazon-redshift-data-across-accounts-with-sagemaker-unified-studio/

Managing data governance across multiple Amazon Redshift clusters in different AWS accounts presents significant challenges. Organizations operating multiple Amazon Redshift clusters across AWS accounts often rely on manual processes for secure data sharing, which increases operational overhead and governance requirements. In this post, we show you how to use Amazon SageMaker Unified Studio to implement cross-account data sharing in Amazon Redshift using data mesh principles. We demonstrate how to build a scalable data mesh architecture that supports secure, auditable data sharing across AWS accounts while reducing operational burden.

Amazon SageMaker Unified Studio as the backbone of our data mesh

Amazon SageMaker Unified Studio is a data and AI development service which brings together functionality and tools from existing AWS Analytics and AI and machine learning (ML) services, including Amazon EMR, AWS Glue, Amazon Athena, Amazon Redshift, Amazon Bedrock and Amazon SageMaker AI. With the service, organizations can catalog, discover, share, and govern data stored across Amazon Web Services (AWS) without relying on manual coordination between AWS accounts.

A data mesh is an architectural approach that treats data as a product, with decentralized ownership by data producers while maintaining centralized governance. This architecture separates source systems, data producers (data publishers), data consumers (data subscribers), and central governance. The solution we present is tailored for cross-AWS account usage, creating a foundation for data governance so you can share data across Amazon Redshift clusters in different AWS accounts.

Our proposed solution addresses the following common challenges that organizations face when sharing data across AWS accounts:

  • Manual, ad-hoc data sharing processes are replaced with automated, event-driven data publishing to the SageMaker Unified Studio catalog.
  • Inconsistent governance across different use cases is resolved through a consistent governance framework with proper access controls.
  • High load on producer Amazon Redshift clusters is reduced through decoupled publishing that lowers the operational burden on data producers.
  • Complex credential management is simplified using AWS Secrets Manager and AWS KMS encryption.
  • Lack of auditable data publishing is addressed with full traceability of access and permissions supported by the SageMaker Unified Studio service.

With this approach, you can help reduce the time and effort required for cross-account data sharing while maintaining security and governance standards.

Architectural overview
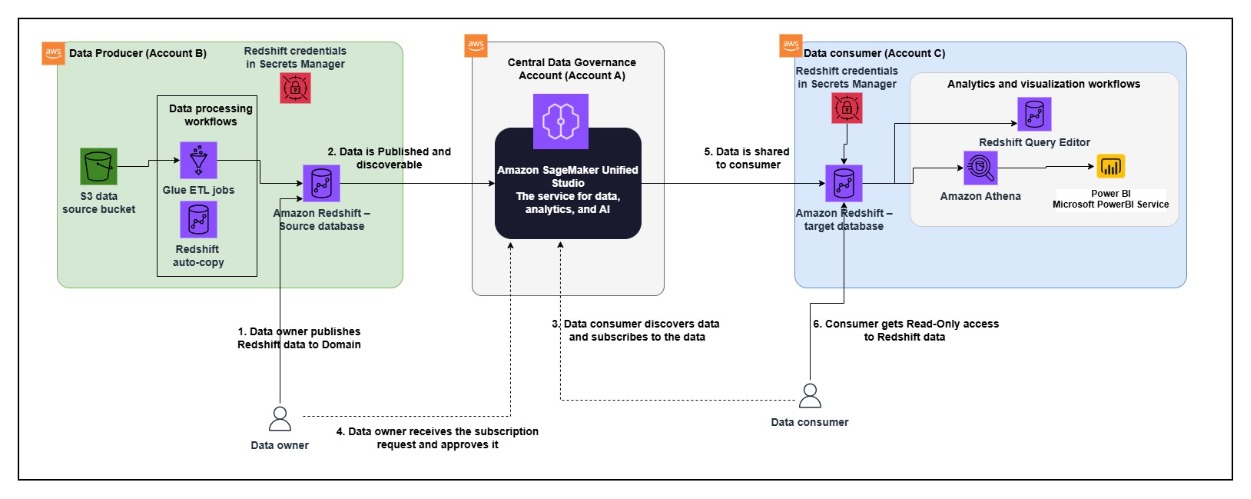
The architecture spans three AWS accounts, each with a distinct role in the data mesh:

Central Data Governance Account (Account A) hosts the Amazon SageMaker Unified Studio domain, which serves as the unified catalog and governance layer for data discovery, access control, and subscription management across accounts.

Data Producer (Account B) hosts the source of data and processing workflows. Raw data lands in an Amazon Simple Storage Service (Amazon S3) source bucket and is processed through AWS Glue extract, transform, and load (ETL) jobs or Amazon Redshift auto copy into the Amazon Redshift source database. Amazon Redshift credentials are securely stored in AWS Secrets Manager.

Data Consumer (Account C) hosts the target Amazon Redshift database and analytics workflows. After access is granted, consumers can query shared data and connect downstream visualization tools.

While this diagram shows a single producer and consumer for simplicity, in a real-world deployment there might be hundreds of producer and consumer accounts connecting through the central governance layer. Amazon SageMaker Unified Studio scales to support this by providing a single place for managing data products regardless of the number of participating accounts.

The data sharing workflow is driven by Amazon SageMaker Unified Studio. The data owner publishes data to the catalog, where it becomes discoverable by consumers across accounts. Consumers browse the catalog, subscribe to data products, and the data owner approves the request. After approval, Amazon SageMaker Unified Studio handles the cross-account sharing, granting the consumer access without requiring direct connectivity between producer and consumer Amazon Redshift clusters.

Publishing Amazon Redshift data assets to the data mesh

In a data mesh architecture, data producers need to make their data products discoverable and accessible across the organization. Amazon SageMaker Unified Studio provides a centralized catalog where data assets can be published for consumer subscription.

In practice, this means registering your data sources with the catalog so they can be discovered, governed, and subscribed to by consuming teams. This section walks through the steps required to register Amazon Redshift data sources with SageMaker Unified Studio.

Before you can publish data assets from your producer account, you need to complete several configuration steps across your Amazon Redshift cluster, AWS Secrets Manager, and Amazon SageMaker Unified Studio.

Prerequisites

  • Install the AWS Command Line Interface (AWS CLI) (v2.15+ recommended).
  • Obtain temporary credentials with permissions to administer each account (producer, consumer, and domain account)
  • IAM permissions required: redshift:* on the relevant clusters, secretsmanager:CreateSecret / PutResourcePolicy / TagResource, kms:CreateKey / PutKeyPolicy / TagResource, datazone:* for subscription-target creation, and iam:PassRole for the Amazon Redshift cluster role.
  • Amazon Redshift clusters must use RA3 node types (ra3.xlplus, ra3.4xlarge, or ra3.16xlarge). Data sharing is not supported on other node types.
  • Amazon SageMaker Unified Studio domain must already be created in Account A with the Tooling and LakeHouseCatalog blueprints available.
  • All resources must be in an AWS Region where Amazon SageMaker Unified Studio is available.

Step 1: Account association and blueprint enablement

To implement the data mesh architecture described in the previous section, you need to set up the following accounts and enable the required blueprints. This ensures that the central governance layer can discover and manage data assets across your producer and consumer accounts.

This post uses three separate AWS accounts to illustrate the cross-account data sharing pattern. However, Amazon SageMaker Unified Studio also supports publishing and subscribing to data within a single account or across any number of accounts depending on your organizational setup. Additionally, this walkthrough uses a provisioned Amazon Redshift cluster, but Amazon SageMaker Unified Studio also supports Amazon Redshift Serverless for both publishing and subscribing to data assets.

Step 2: Configure your Amazon Redshift cluster and credentials

  • In the producer account (Account B), the data to be shared resides in an Amazon Redshift cluster.
  • Verify that your Amazon Redshift cluster uses node types from the RA3 family.
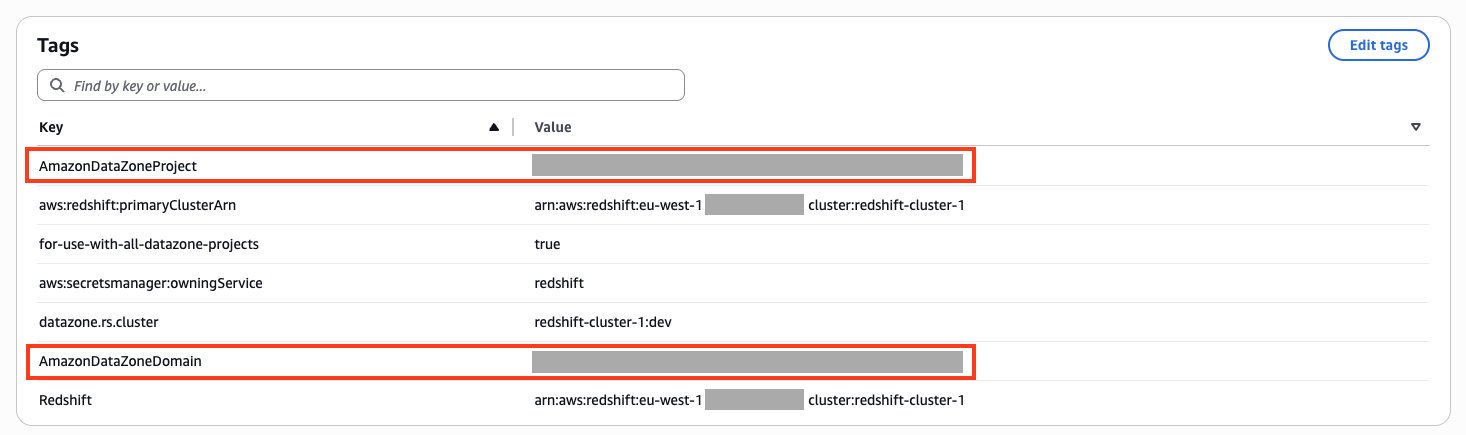
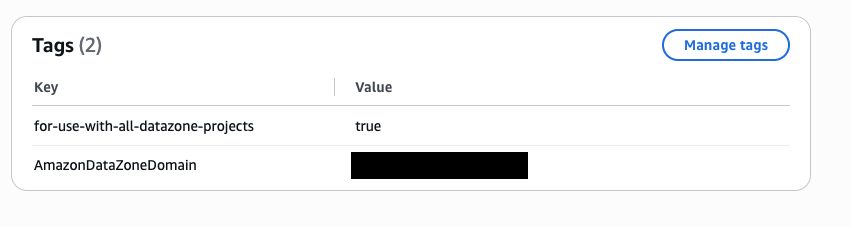
  • Add the following tags to your Amazon Redshift cluster.
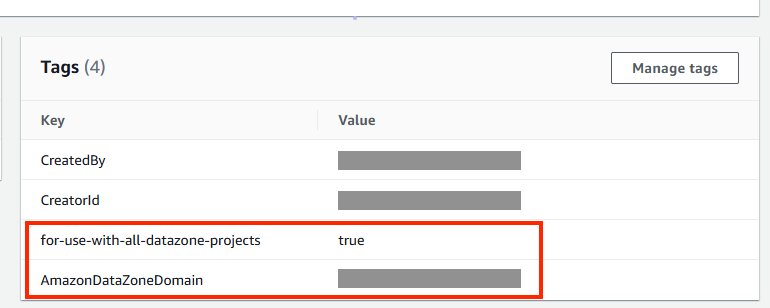
Amazon Redshift console showing tags added to the cluster

  • Create a superuser in Amazon Redshift for Amazon SageMaker Unified Studio. For the Amazon Redshift cluster, the database user you provide in AWS Secrets Manager must have superuser permissions. With superuser permission, your Amazon Redshift cluster can publish data and subscribe from the data mesh created with Amazon SageMaker Unified Studio, and it manages the subscriptions (access) on your behalf. For reference, see the note section in this QuickStart guide with sample Amazon Redshift data.
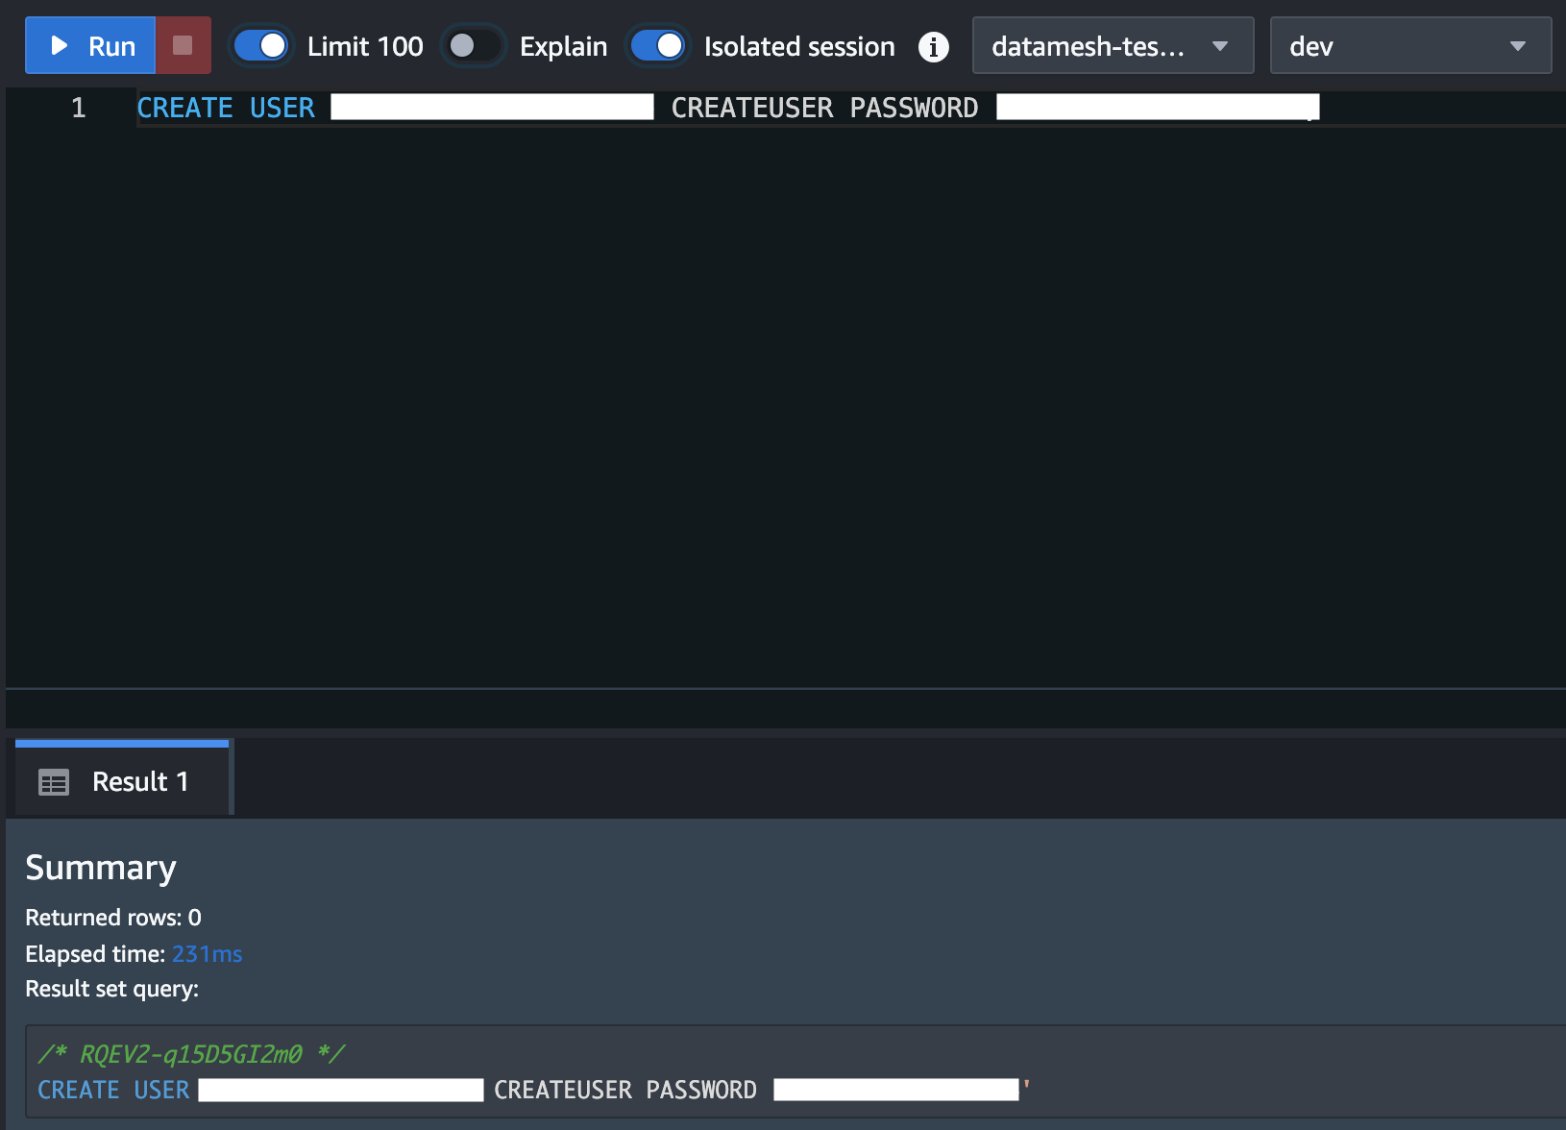
Tag key-value pairs configured on the Amazon Redshift cluster

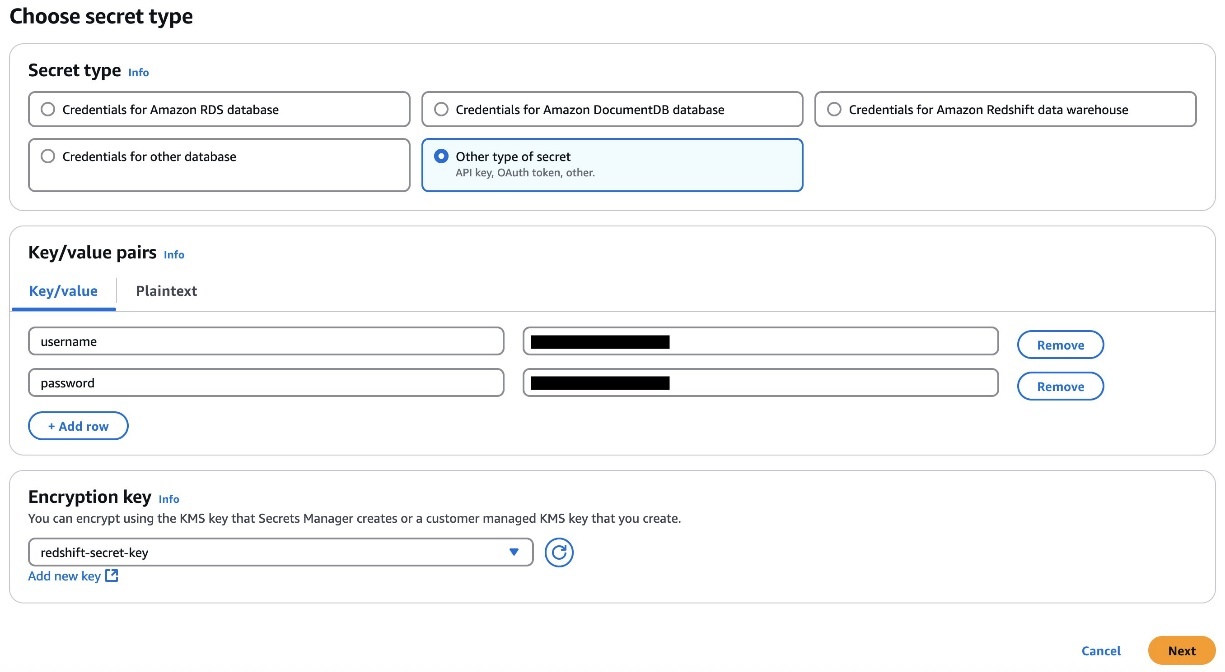
  • Store the user’s credentials in Secrets Manager. Select the credential type, enter the credential values, and choose the AWS Key Management Service (AWS KMS) key with which to encrypt the secret
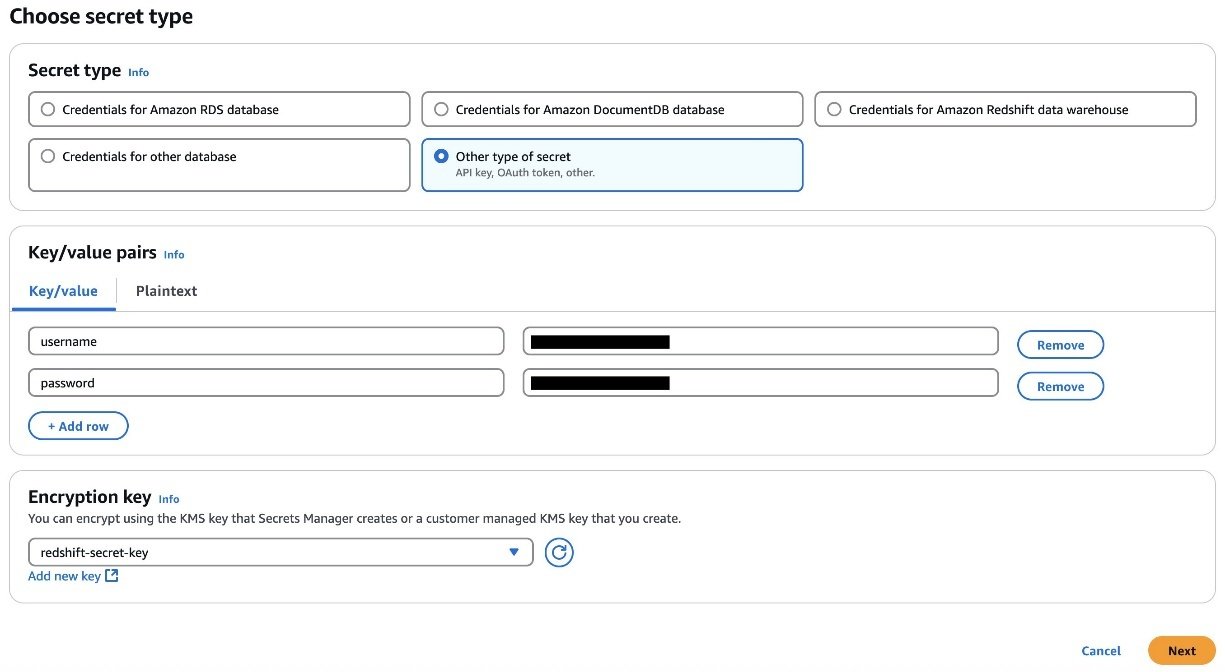
QuickStart guide note about providing superuser credentials for Amazon SageMaker Unified Studio

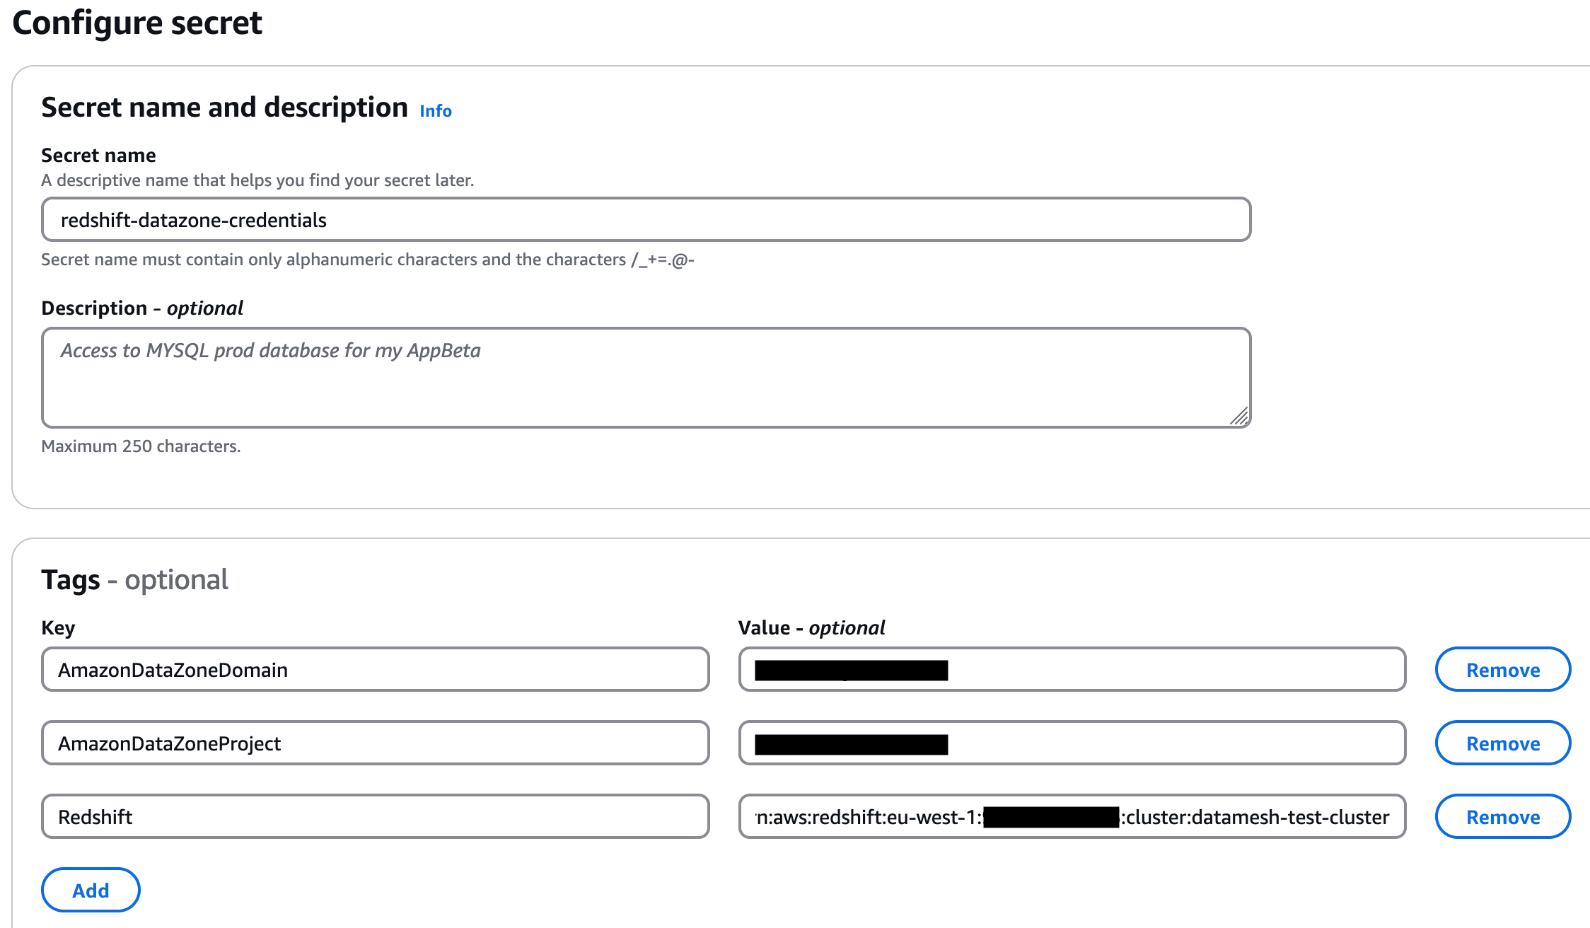
Tags on the AWS Secrets Manager secret including the Amazon Redshift cluster ARN

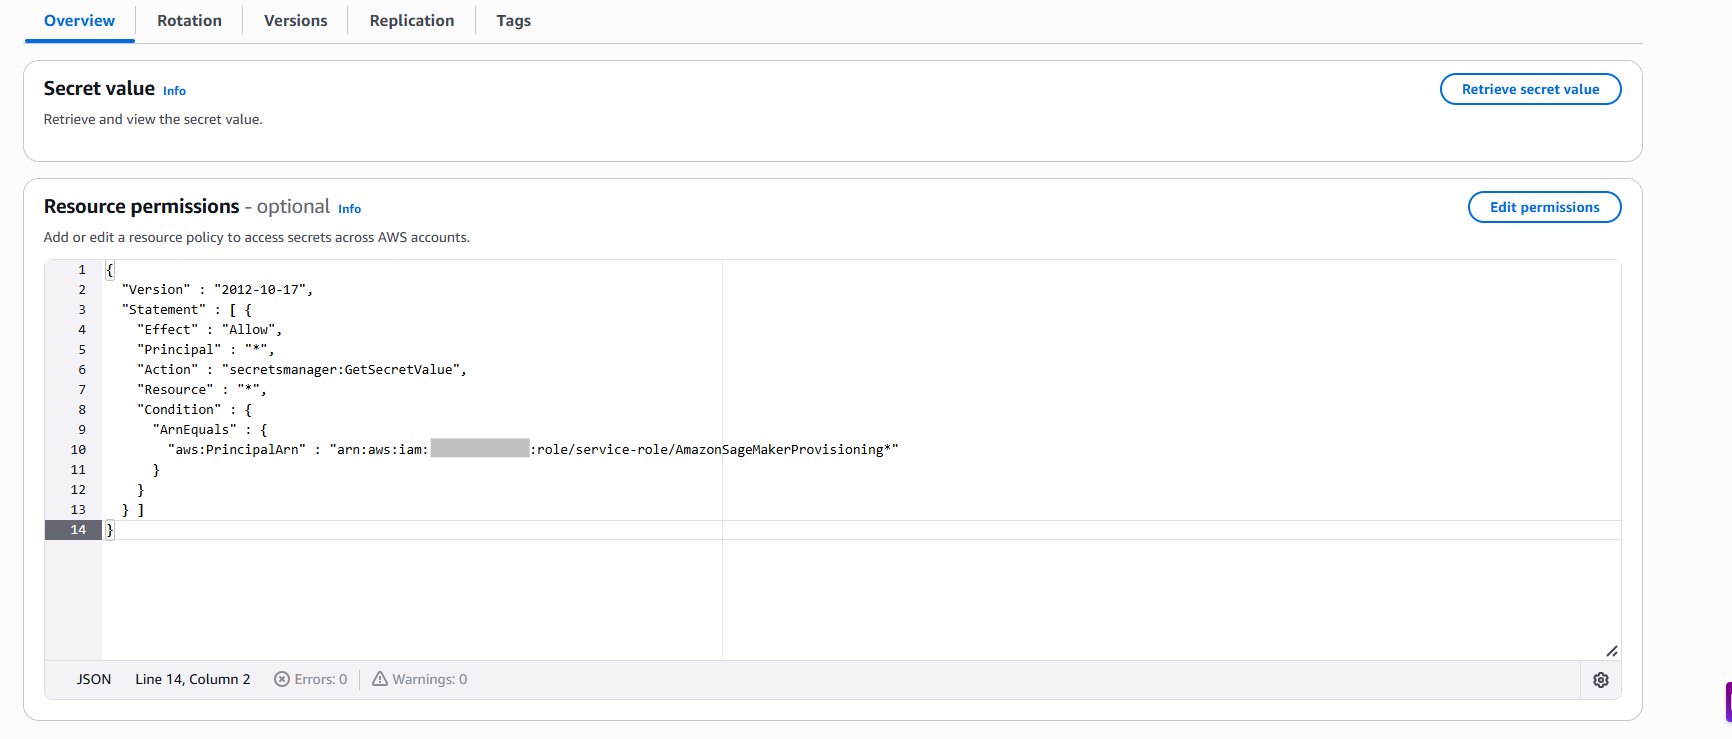
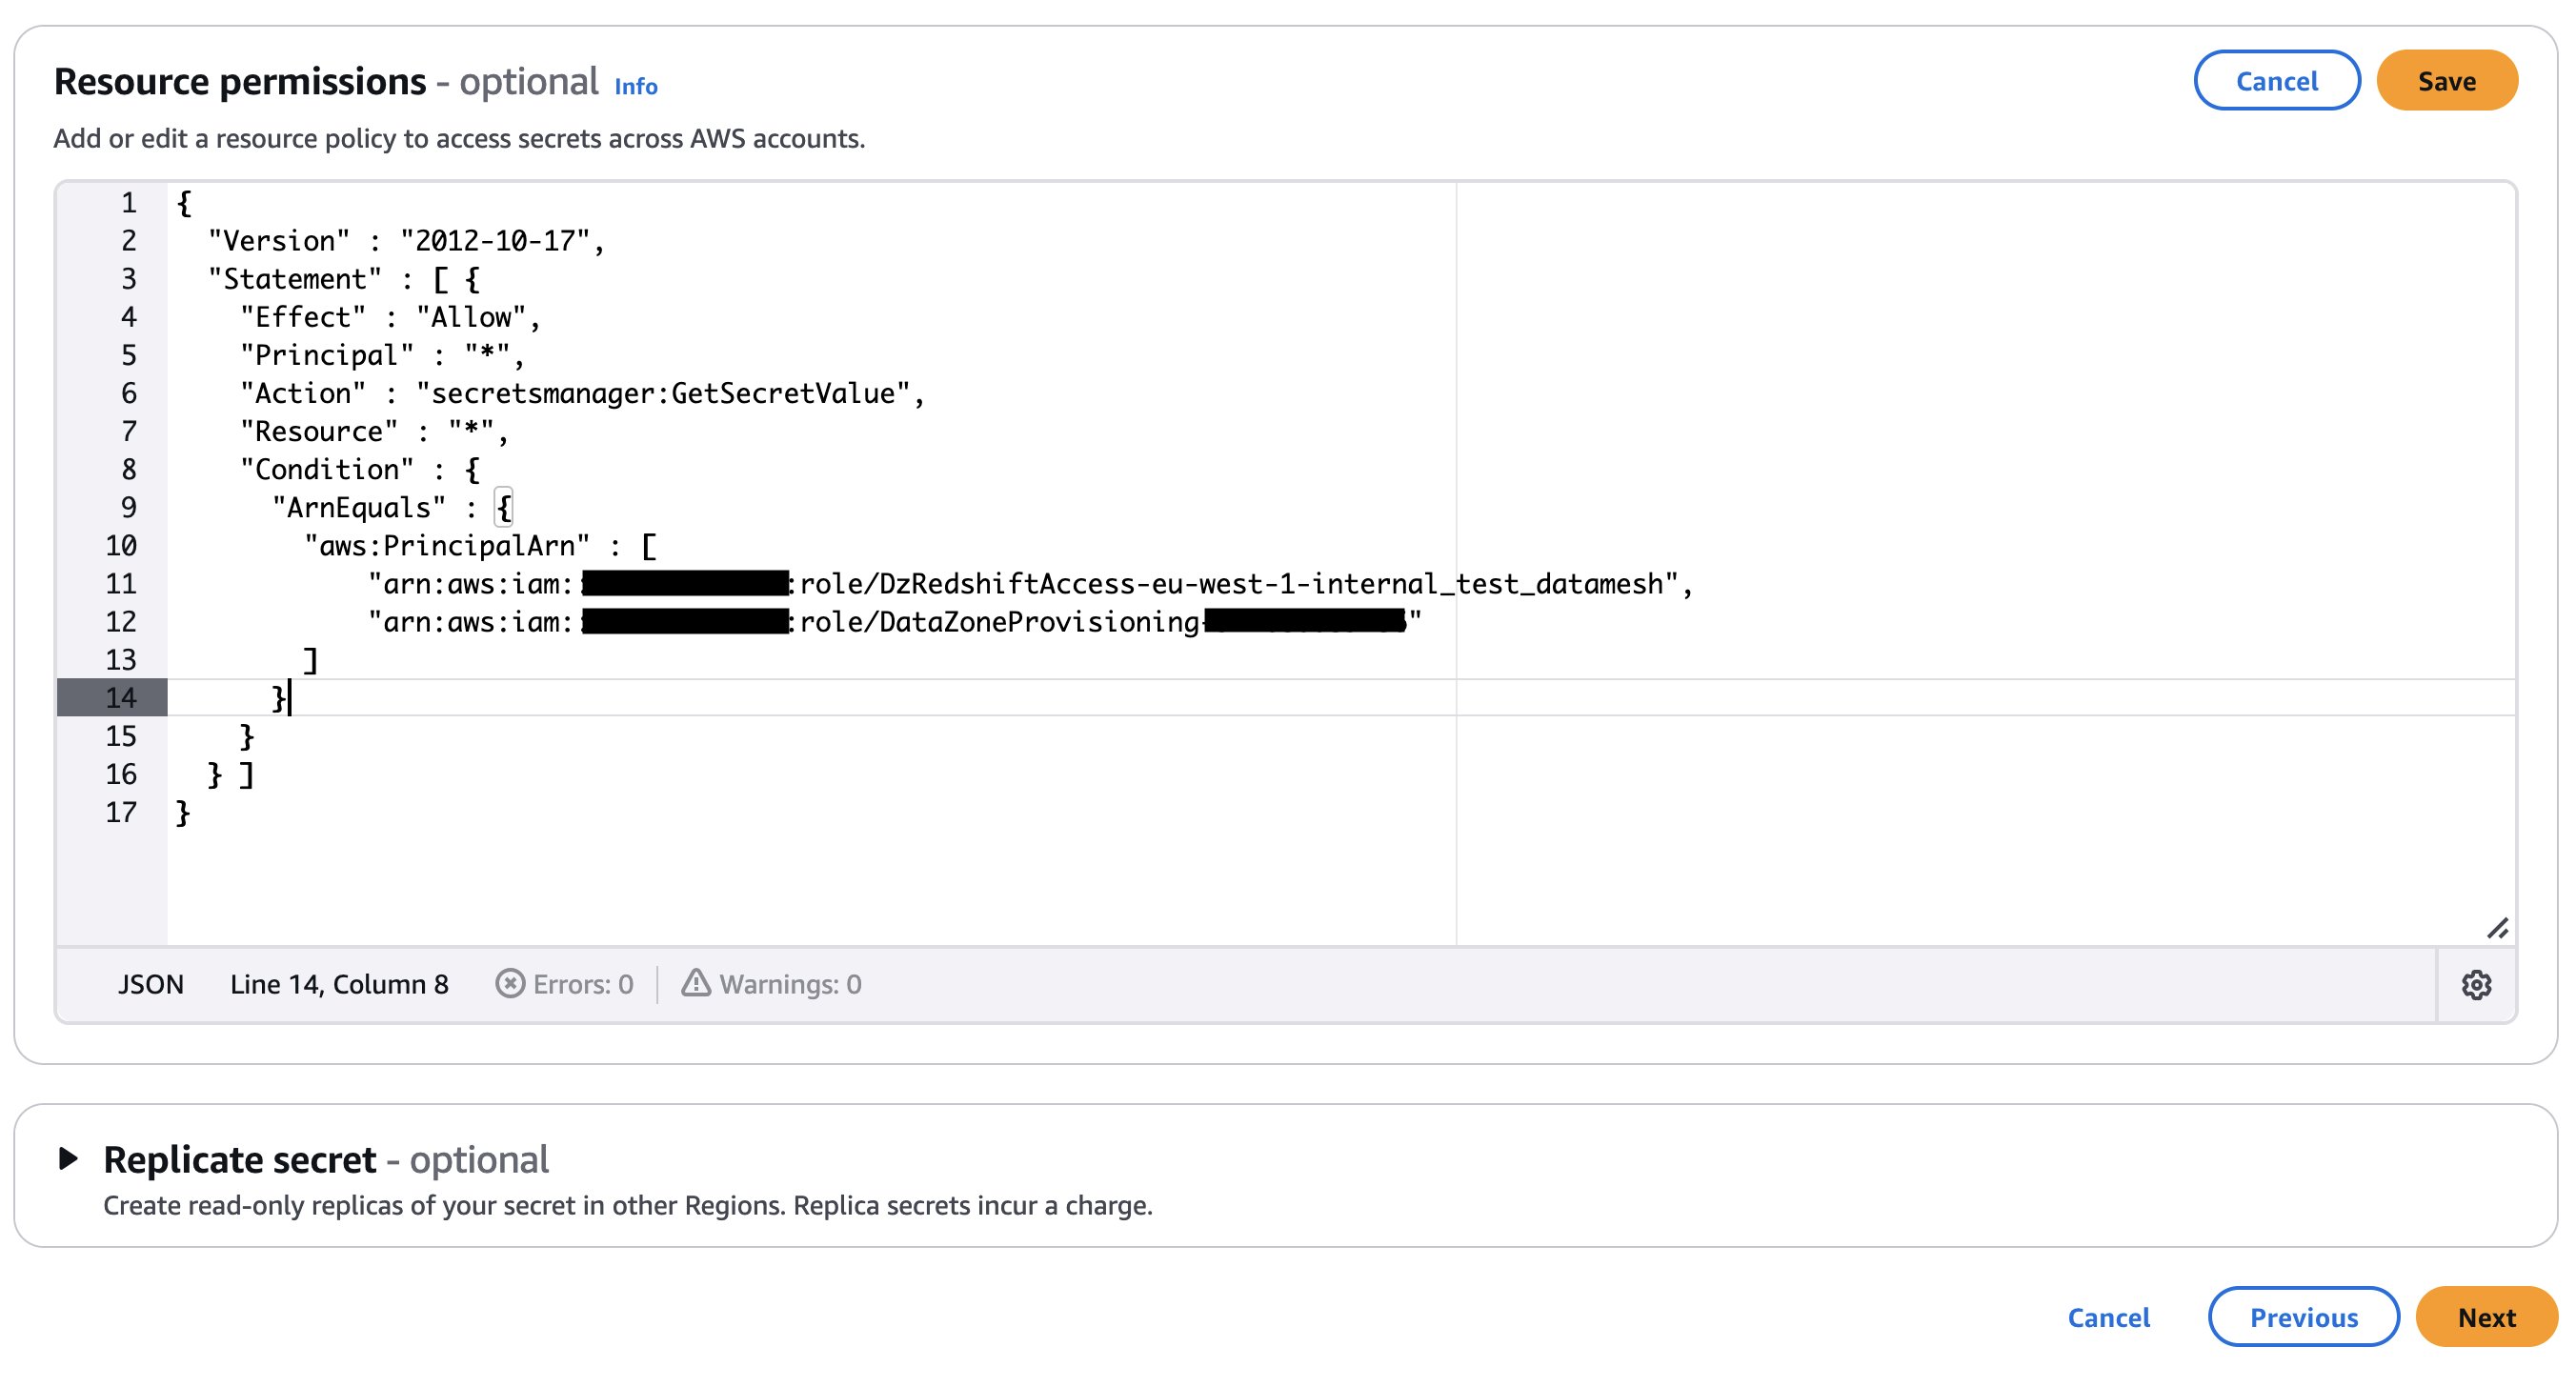
Resource policy added to the AWS Secrets Manager secret for Amazon SageMaker Unified Studio access

  • If your secret is encrypted with a customer managed AWS KMS key, append the key policy with the following statement and add a tag to the key: AmazonDataZoneEnvironment = All. You can skip this step if you’re using an AWS managed KMS key.
{
    "Sid": "AllowSMUSRolesSecretsAccess",
    "Effect": "Allow",
    "Principal": {
        "AWS": "*"
    },
    "Action": [
        "kms:Decrypt",
        "kms:DescribeKey",
        "kms:GenerateDataKey"
    ],
    "Resource": "*",
    "Condition": {
        "StringEquals": {
            "kms:ViaService": "secretsmanager.<<AWS_Region>>.amazonaws.com"
        },
        "StringLike": {
            "aws:PrincipalArn": [
                "arn:aws:iam::<<Data_Producer_Acct_Id(Account B)>>:role/aws-service-role/redshift.amazonaws.com/AWSServiceRoleForRedshift",
                "arn:aws:iam::<<Data_Producer_Acct_Id(Account B)>>:role/<<Redshift_Cluster_IAM_Role_Name>>",
                "arn:aws:iam::<<Data_Producer_Acct_Id(Account B)>>:role/datazone*",
                "arn:aws:iam::<<Data_Producer_Acct_Id(Account B)>>:role/service-role/AmazonSageMaker*"
            ]
        }
    }
},
{
    "Sid": "AllowSMUSRolesCreateGrant",
    "Effect": "Allow",
    "Principal": {
        "AWS": "*"
    },
    "Action": "kms:CreateGrant",
    "Resource": "*",
    "Condition": {
        "Bool": {
            "kms:GrantIsForAWSResource": "true"
        },
        "StringEquals": {
            "kms:ViaService": "secretsmanager.<<AWS_Region>>.amazonaws.com"
        },
        "StringLike": {
            "aws:PrincipalArn": [
                "arn:aws:iam::<<Data_Producer_Acct_Id(Account B)>>:role/aws-service-role/redshift.amazonaws.com/AWSServiceRoleForRedshift",
                "arn:aws:iam::<<Data_Producer_Acct_Id(Account B)>>:role/<<Redshift_Cluster_IAM_Role_Name>>"
            ]
        }
    }
}

Note: Enable automatic rotation. Configure Secrets Manager automatic rotation for this secret with a rotation interval appropriate to your security policy (for example, every 30 days). When implementing rotation, verify that the rotation Lambda function updates the credentials in both Secrets Manager and Amazon Redshift database users simultaneously. Note that Amazon SageMaker Unified Studio retrieves the secret at connection time, so rotation must produce credentials that are valid immediately upon storage: use the alternating-users rotation strategy if you need to avoid downtime during rotation. See the Secrets Manager rotation documentation for setup instructions.

Using Amazon Redshift Serverless?

  • Add the following Tags to the Amazon Redshift Serverless namespace and workgroup.

Tags added to the Amazon Redshift Serverless namespace and workgroup

  • In the Secrets Manager secret, verify the host points to your Serverless endpoint.
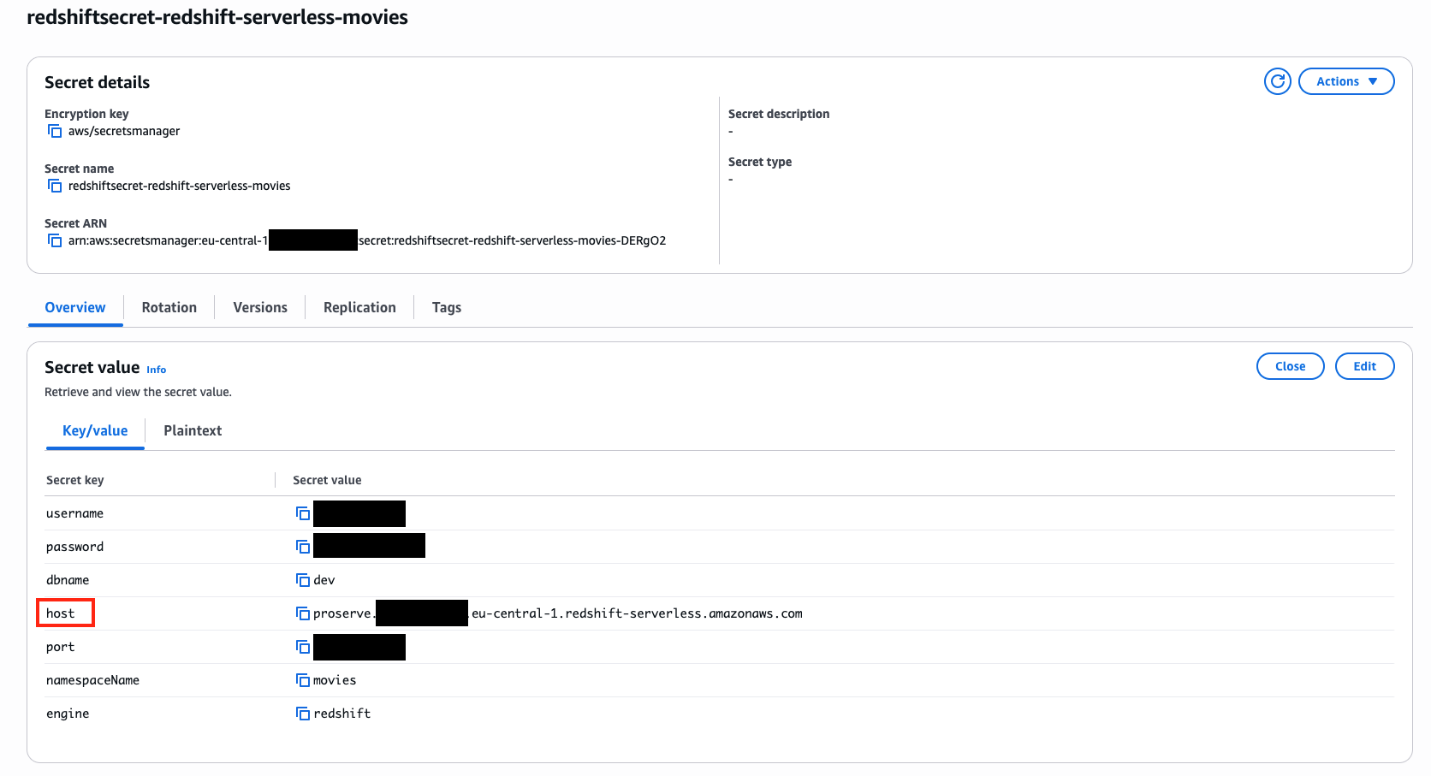
AWS Secrets Manager secret showing the host pointing to the Serverless endpoint

  • Add the following tags to the AWS Secrets Manager secret.
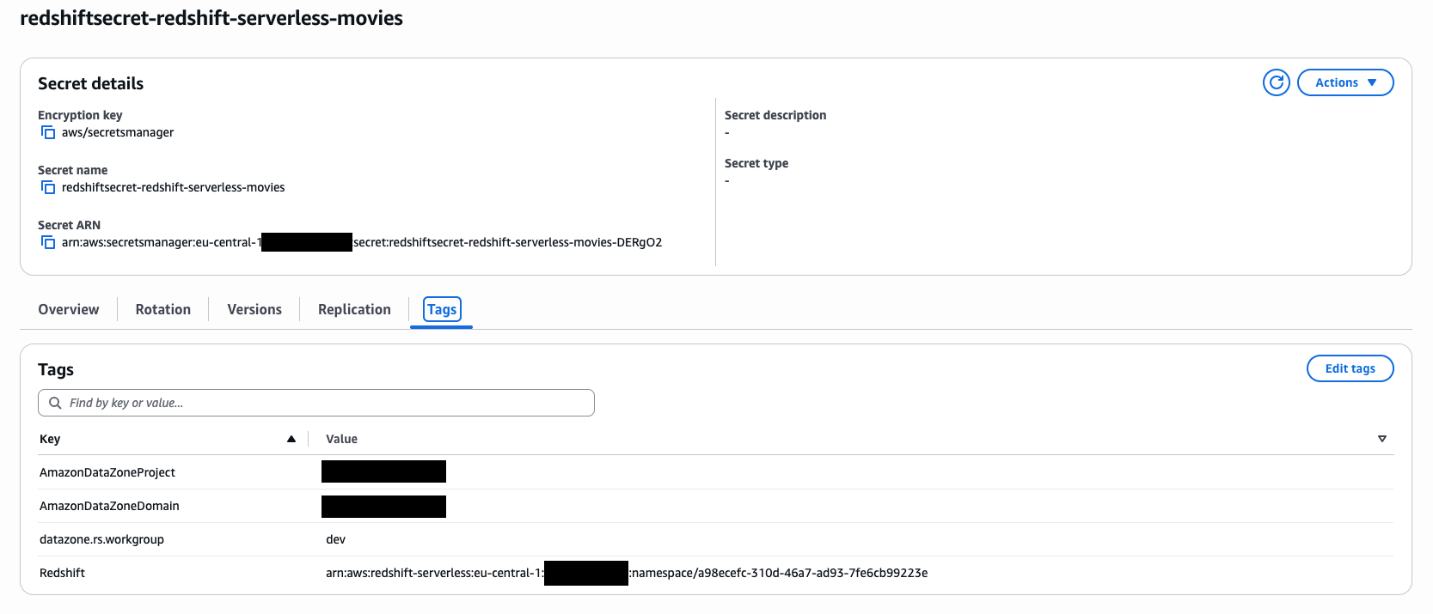
Tags added to the AWS Secrets Manager secret for the Redshift Serverless credentials

Publish Amazon Redshift data to the data mesh

With prerequisites complete, you can now register your Amazon Redshift cluster as a data source in Amazon SageMaker Unified Studio.

Step 1: Create an Amazon Redshift type connection

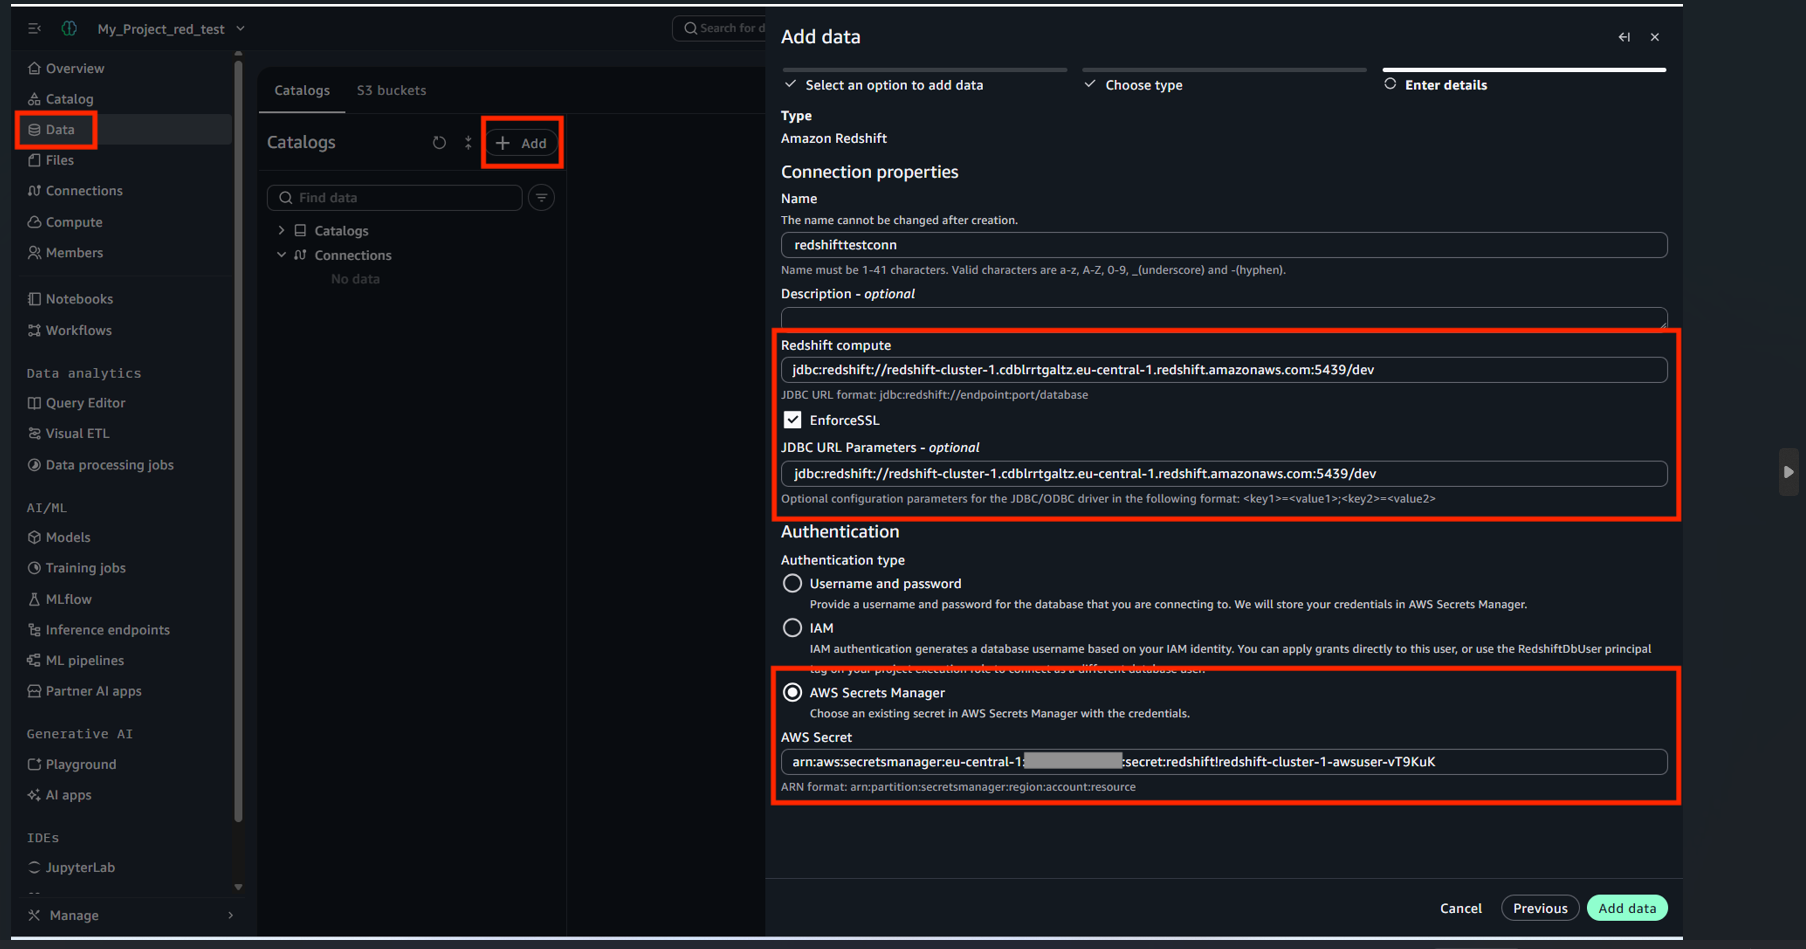
  • Sign in to Account B, navigate to your Amazon SageMaker Unified Studio associated domain, and open the Amazon SageMaker Unified Studio URL.
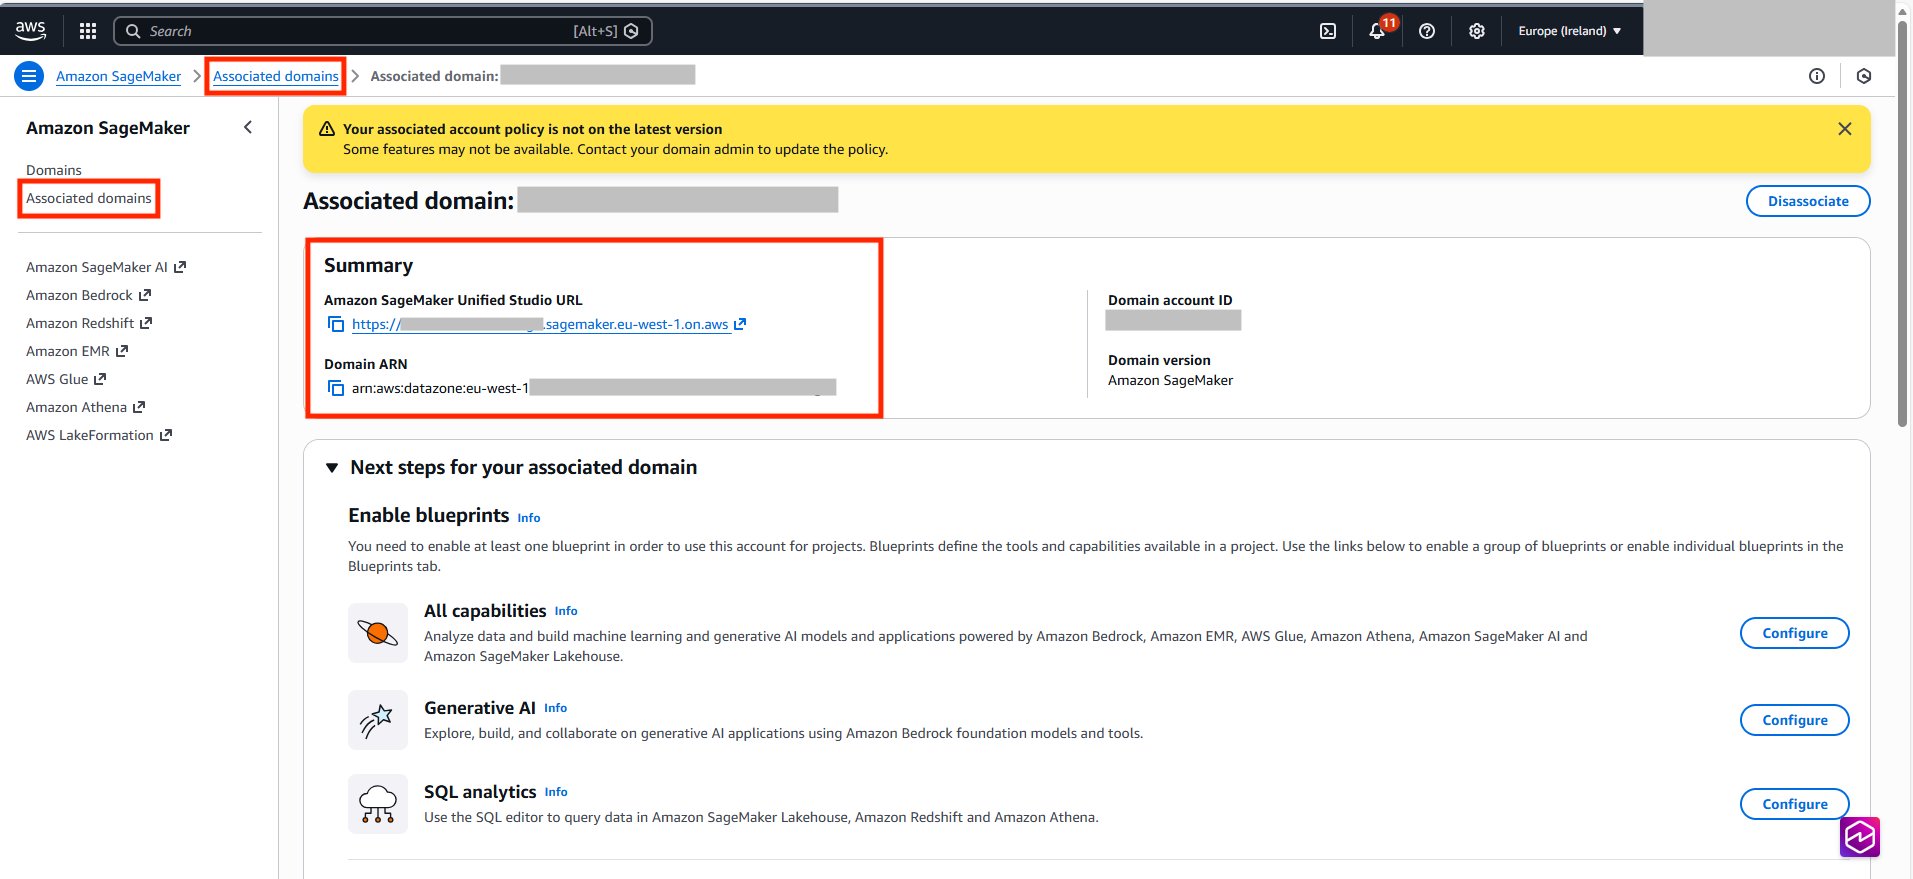
Amazon SageMaker Unified Studio associated domain sign-in page

Add an Amazon Redshift connection form in Amazon SageMaker Unified Studio

  • The newly created Amazon Redshift connection appears here.
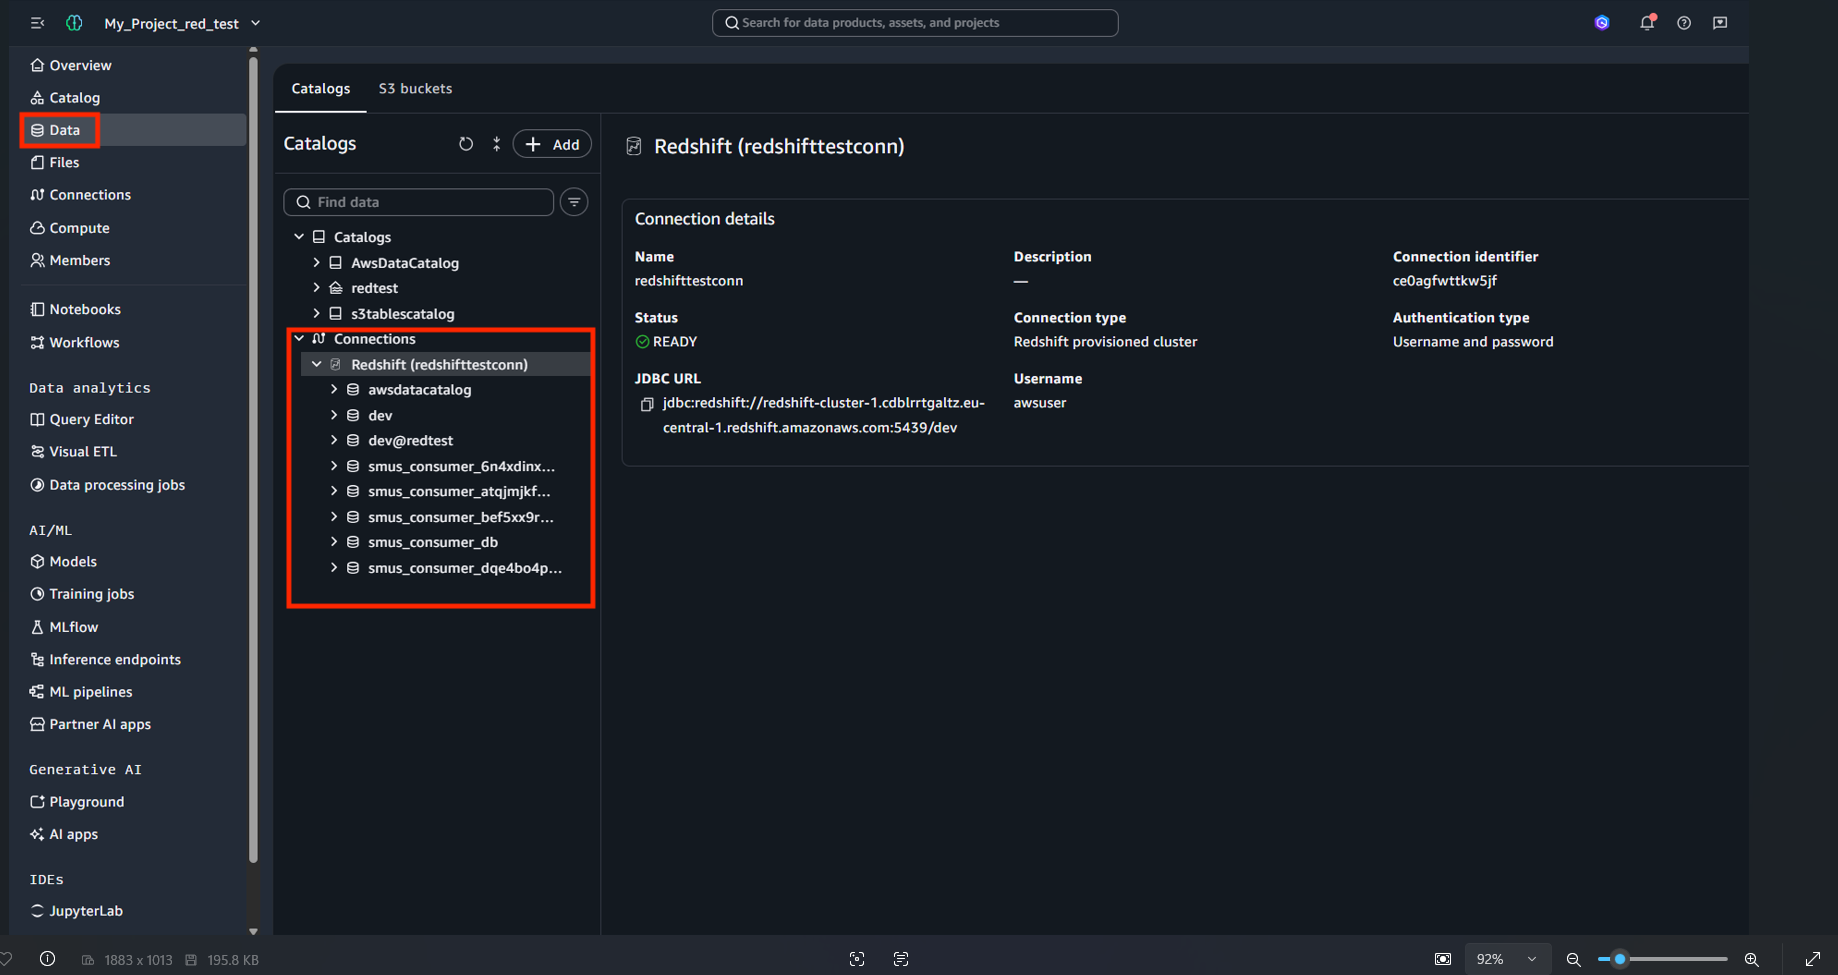
Newly created Amazon Redshift connection listed in Amazon SageMaker Unified Studio

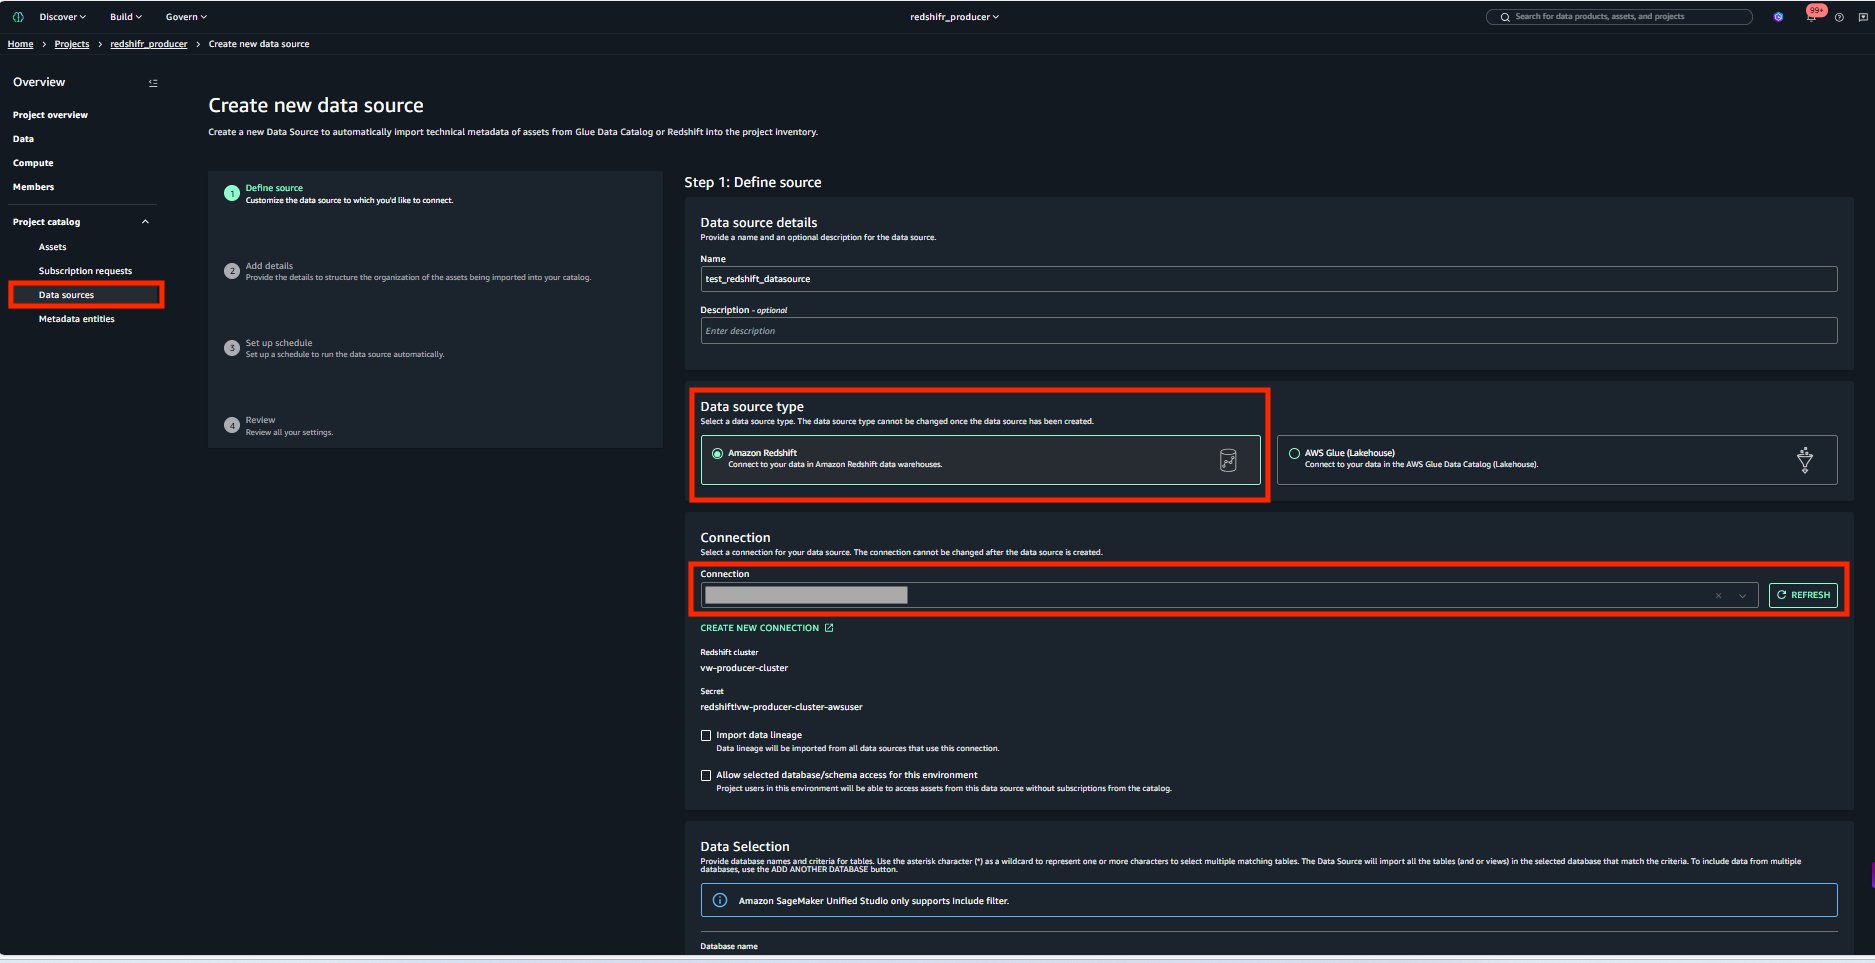
Step 2: Create the data source for your Amazon Redshift data warehouse

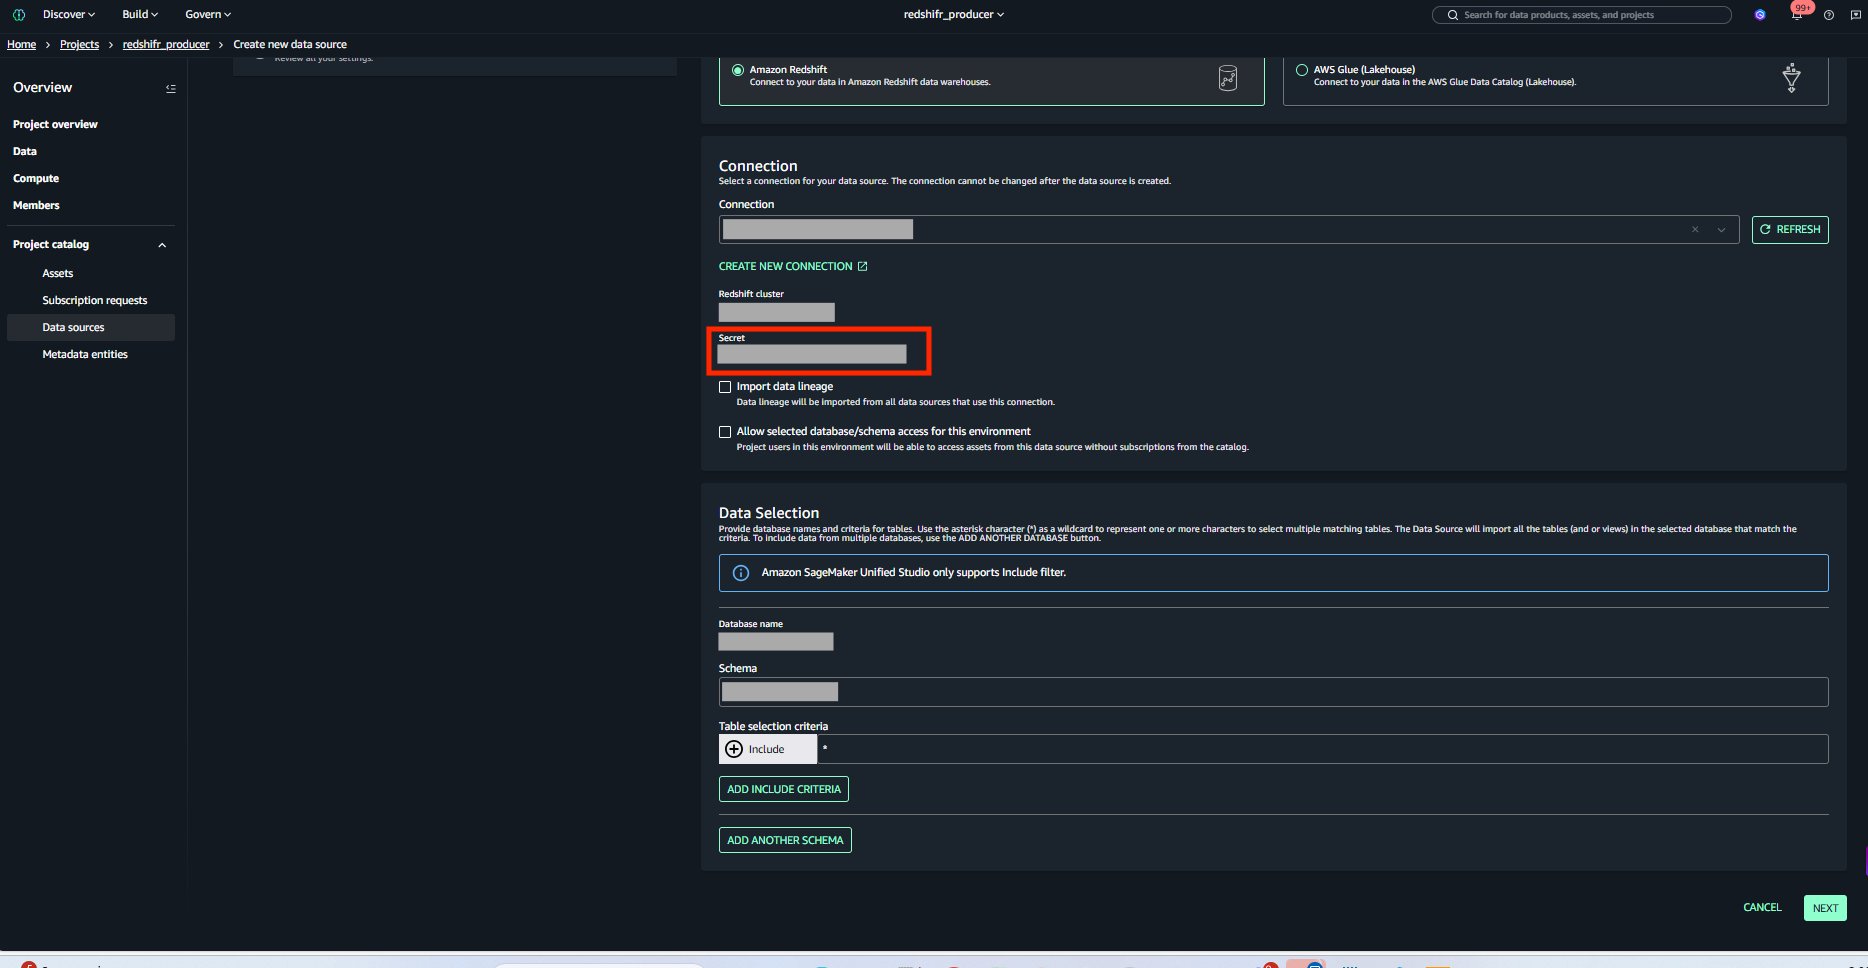
Add an Amazon Redshift data source form in Amazon SageMaker Unified Studio

Amazon Redshift data source configuration in Amazon SageMaker Unified Studio

  • For Publishing settings, choose whether assets are immediately discoverable in Amazon SageMaker Catalog.
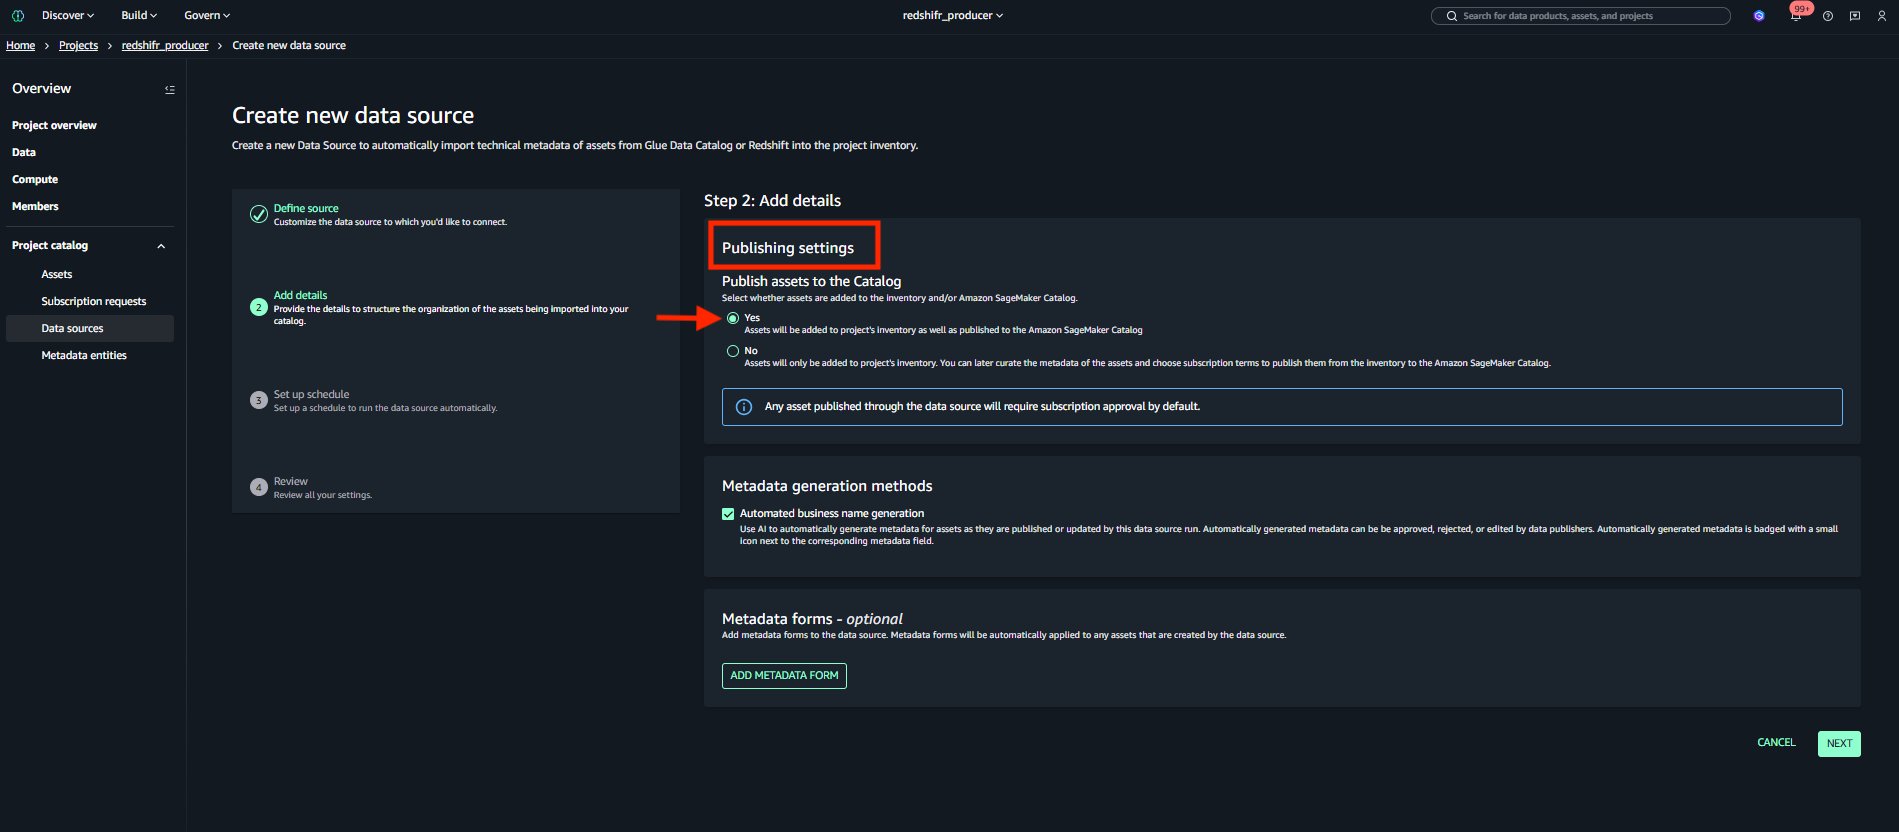
Publishing settings controlling asset discoverability in the Amazon SageMaker catalog

Using Amazon Redshift Serverless?

When creating the connection and data source, use your workgroupName instead of clusterName. The rest of the data source configuration remains the same.

Step 3: Run the data source and publish the data asset to the data mesh

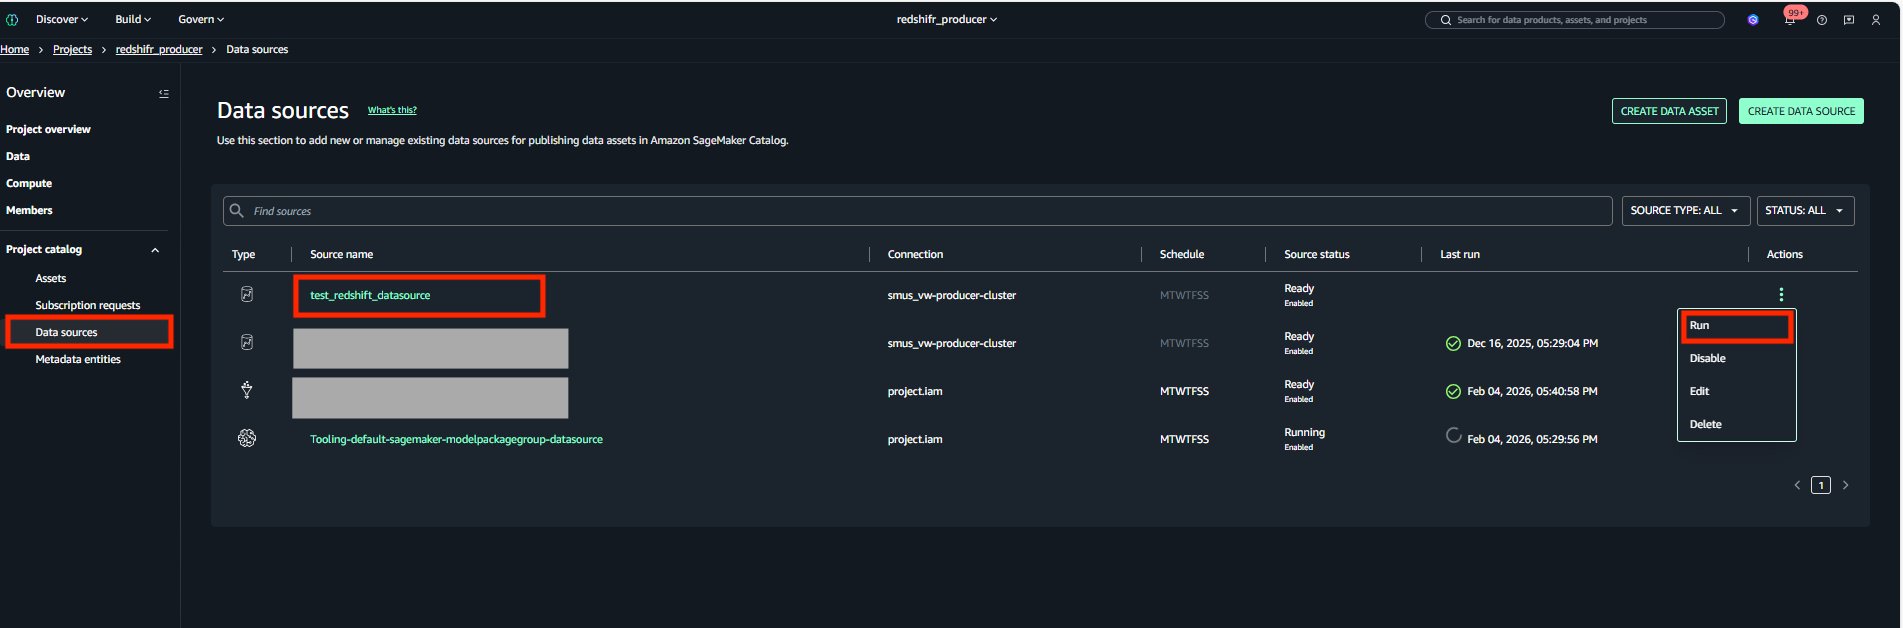
Data source run configuration in Amazon SageMaker Unified Studio

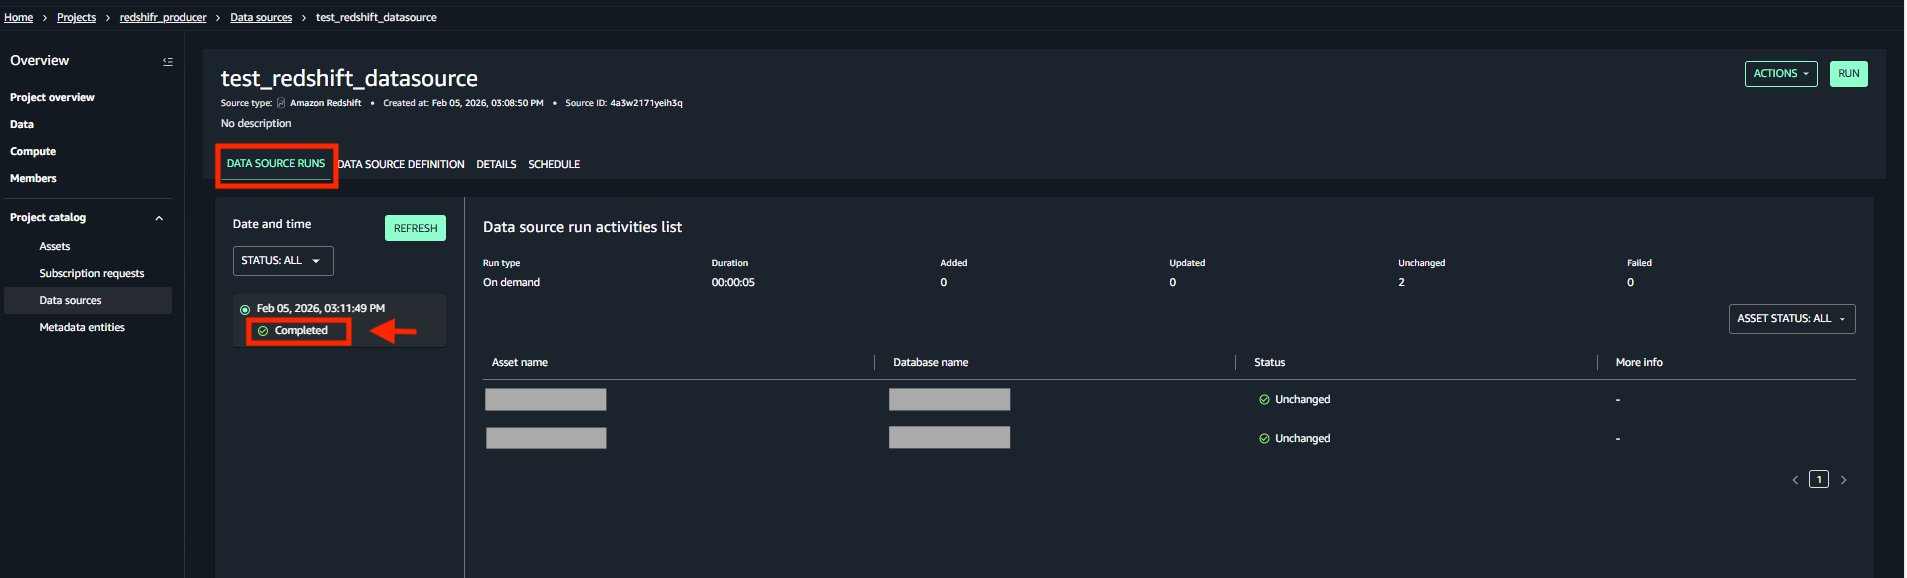
Data source run results in Amazon SageMaker Unified Studio

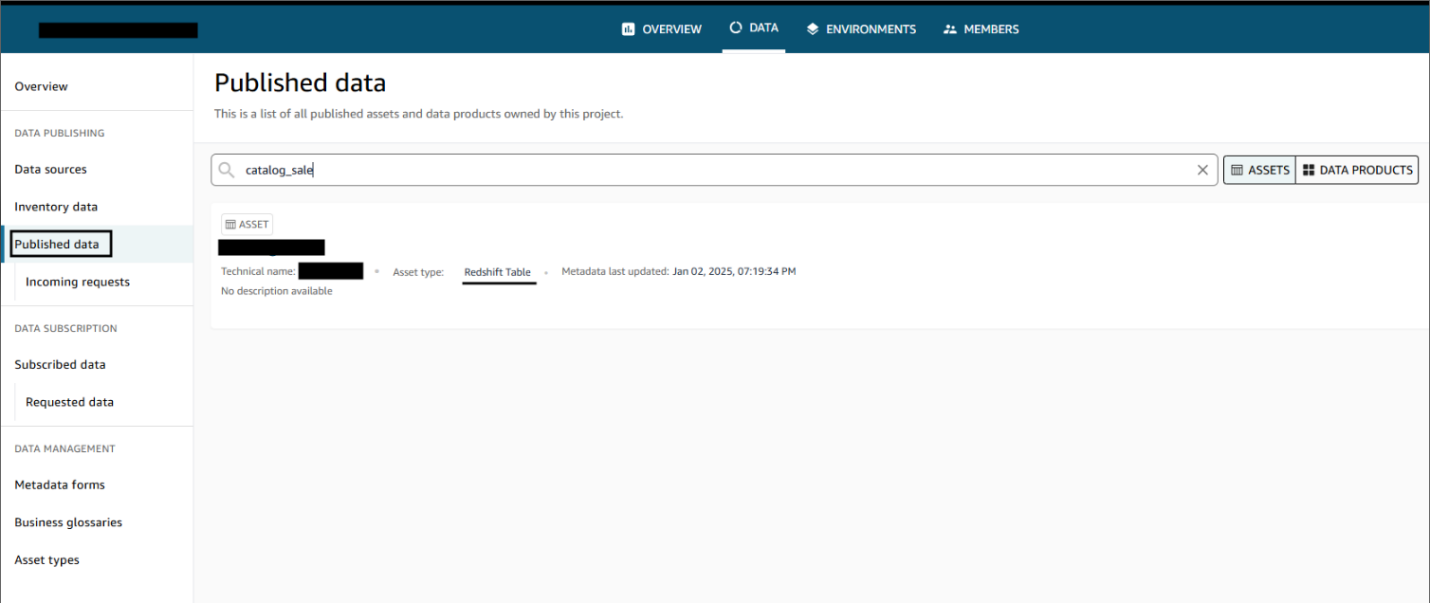
  • During creation of data source if you choose Publishing settings such as assets are immediately discoverable, the Amazon Redshift tables and views appear in the catalog as Published, ready for discovery and subscription by data consumers.
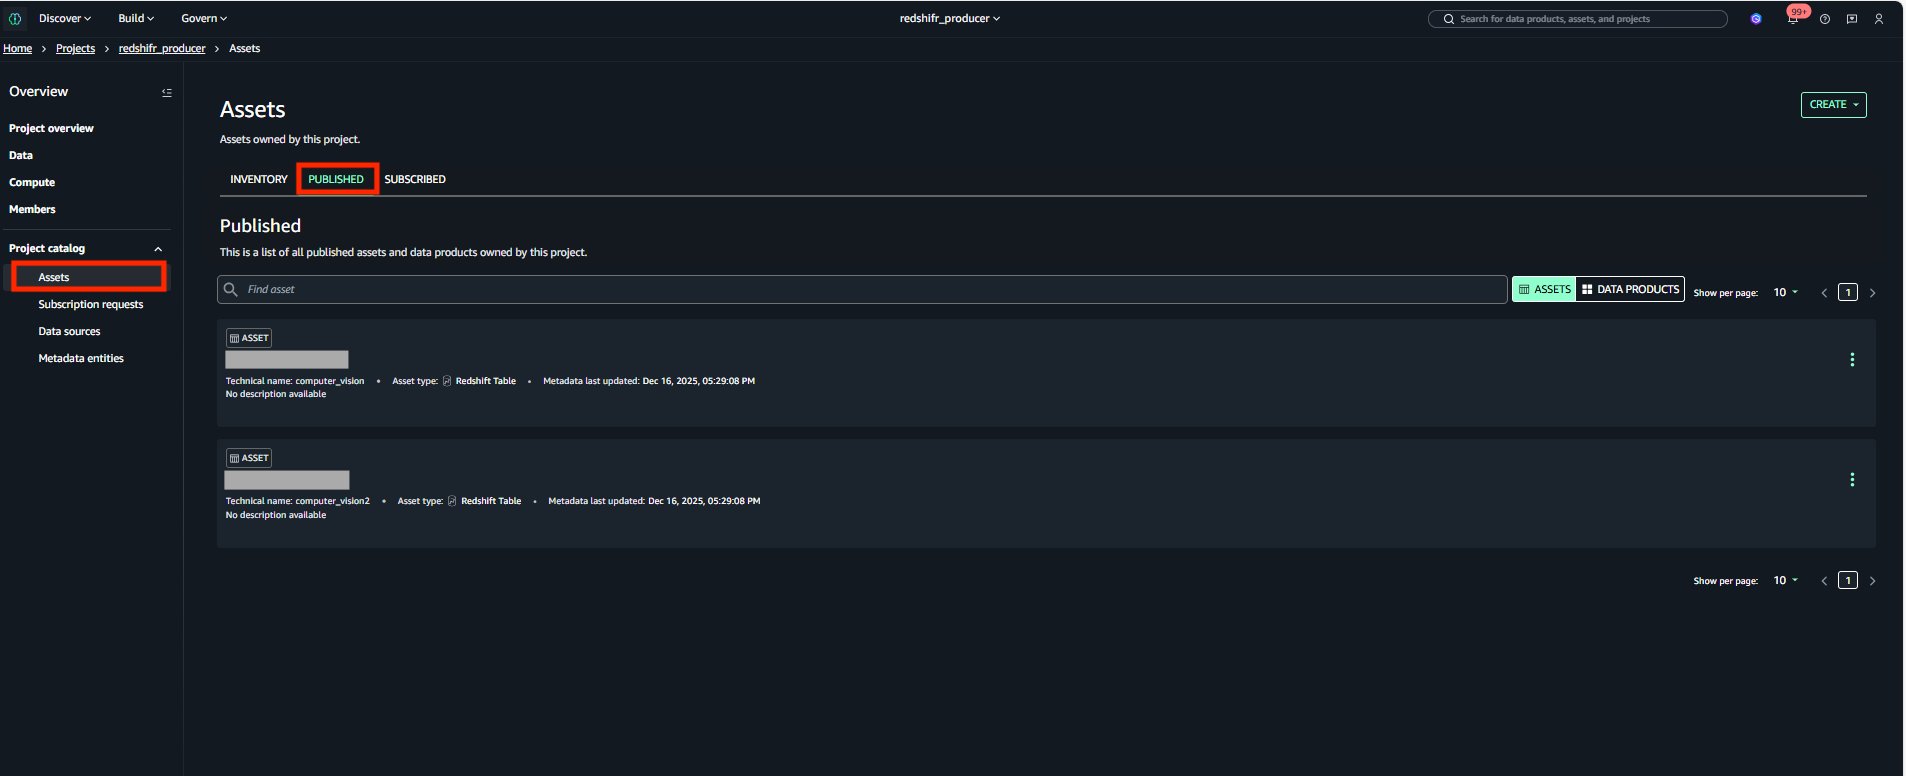
Published Amazon Redshift tables and views in the Amazon SageMaker catalog

Data discovery view in the Amazon SageMaker Unified Studio portal

Subscribe Amazon Redshift data through the data mesh

To complete the end-to-end test, you need to set up a consumer Amazon Redshift cluster in Account C.

Step 1: Setting up the consumer cluster

  • Follow the prerequisites from Steps 1 and 2 in the previous section, make sure the cluster and secret are properly tagged as in the following screenshots:
  • Amazon Redshift cluster tags:

Tags applied to the consumer Amazon Redshift cluster

  • Tags for the AWS Secrets Manager secret that stores the user credentials for the Amazon Redshift cluster:

Tags on the AWS Secrets Manager secret storing the consumer cluster credentials

Step 2: Connect the consumer cluster to the data mesh

  • Log into Amazon SageMaker Unified Studio and navigate to your consumer project.
  • In the Compute section of your project, choose Add compute, then choose Connect to existing compute resources.
  • Choose Amazon Redshift Provisioned.
  • Select your consumer Amazon Redshift cluster from the dropdown list and enter the Secrets Manager name.
  • Choose Add compute.
  • Your newly added Amazon Redshift cluster should now show as available.
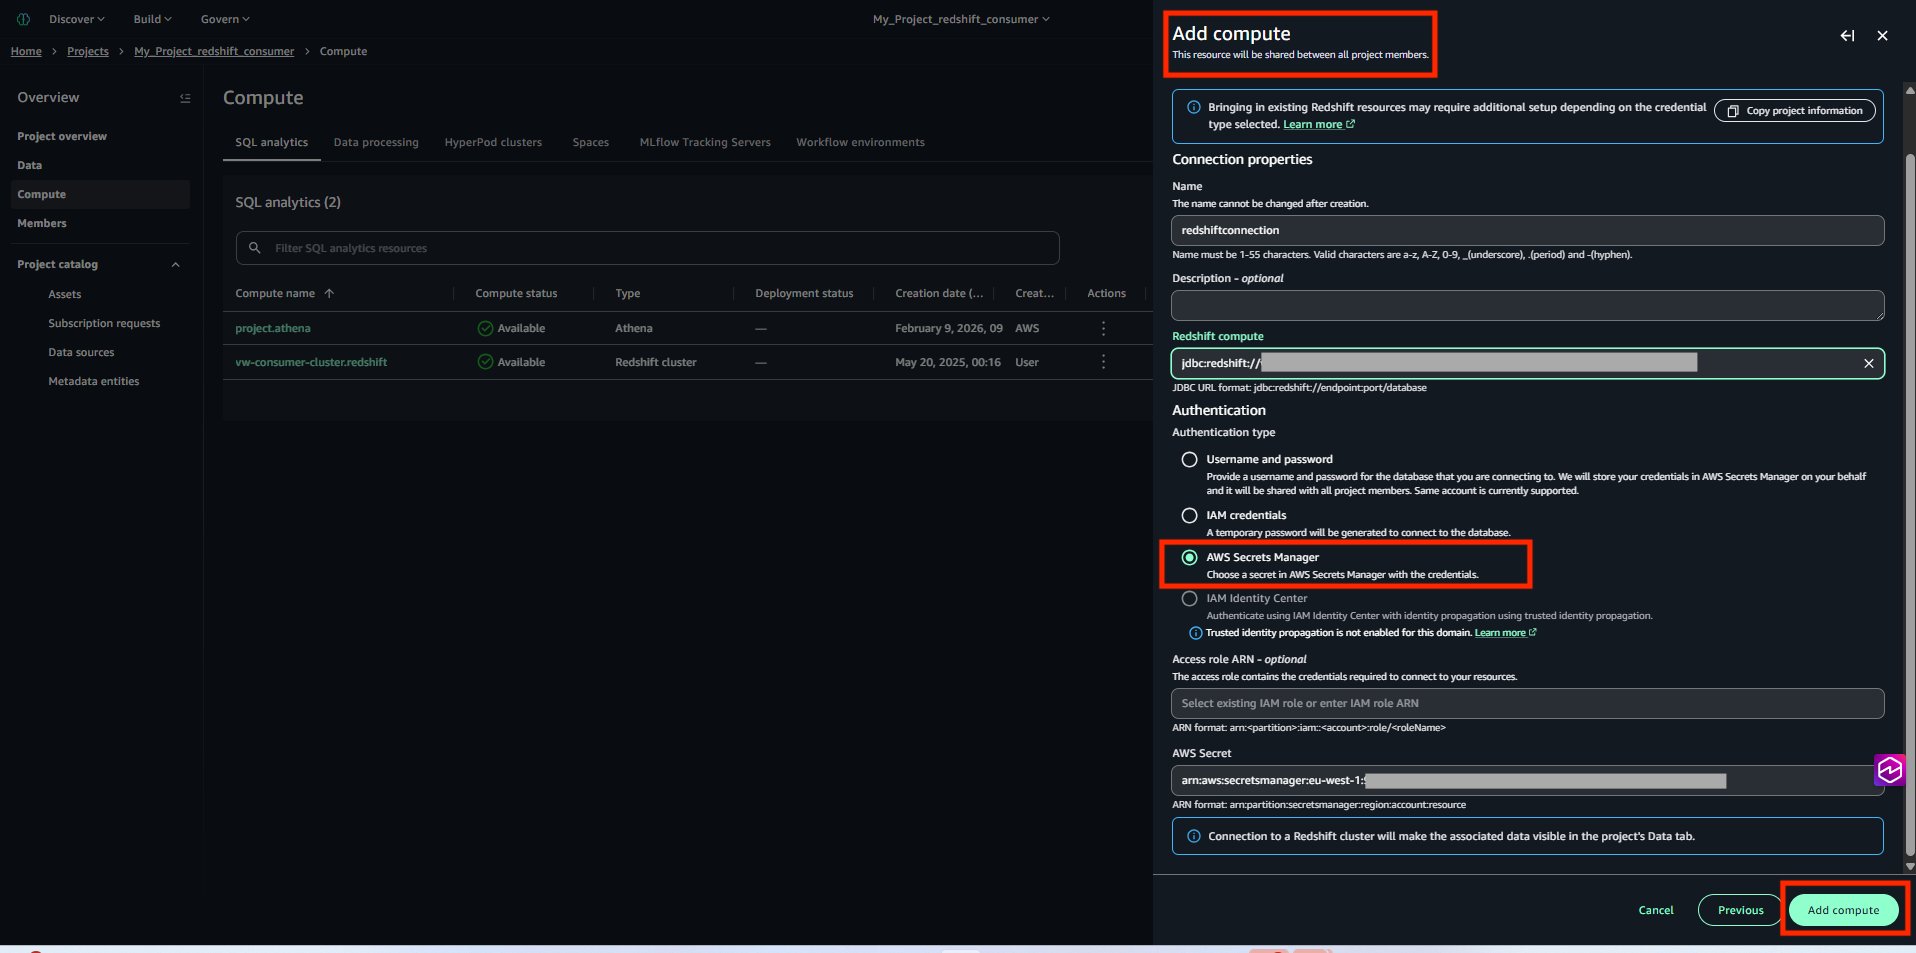
Consumer Amazon Redshift cluster added as compute in Amazon SageMaker Unified Studio

  • The newly added Amazon Redshift cluster shows an Available state.
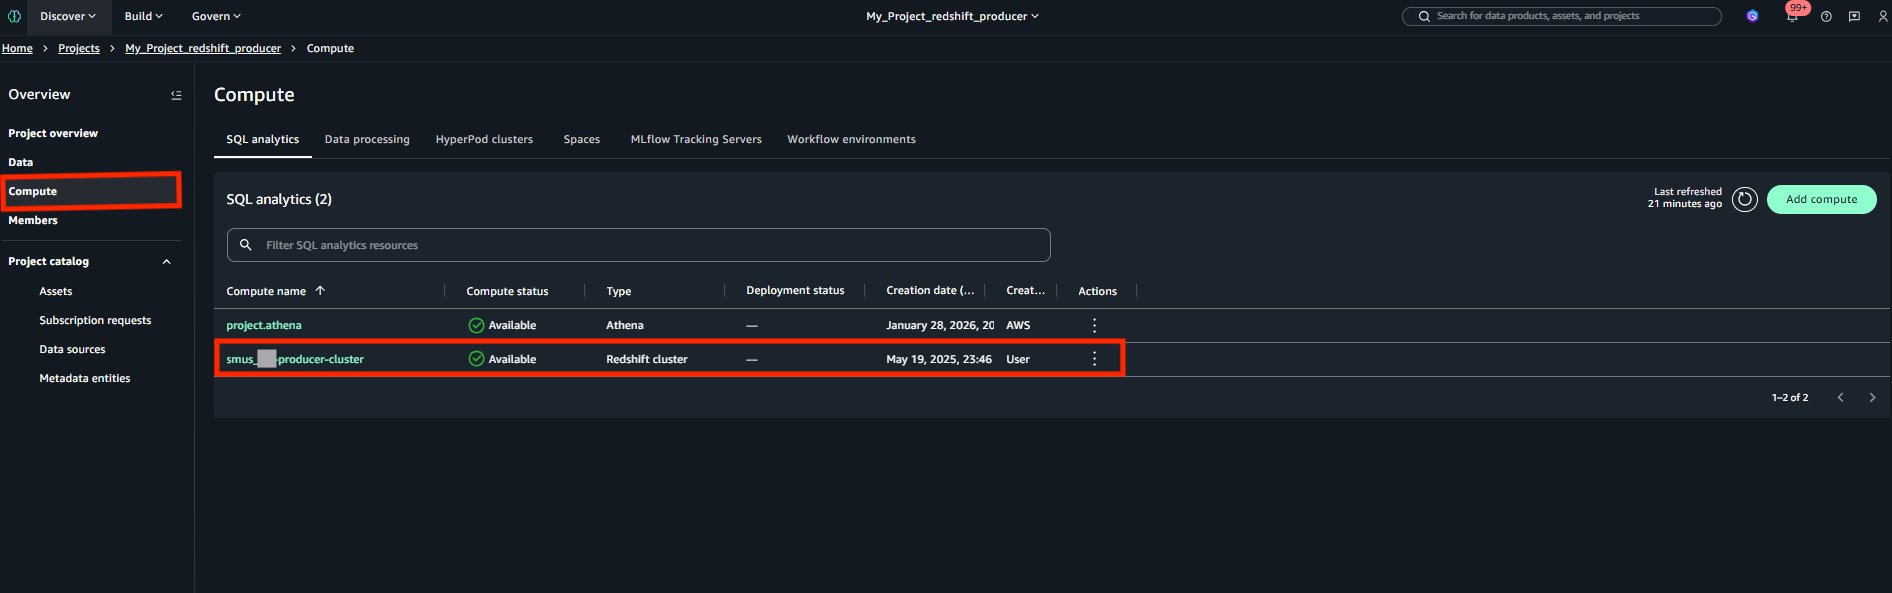
Consumer Amazon Redshift cluster showing an Available state

  • In the Data section you can see that objects (table/views) from Amazon Redshift cluster are visible and you can query them.
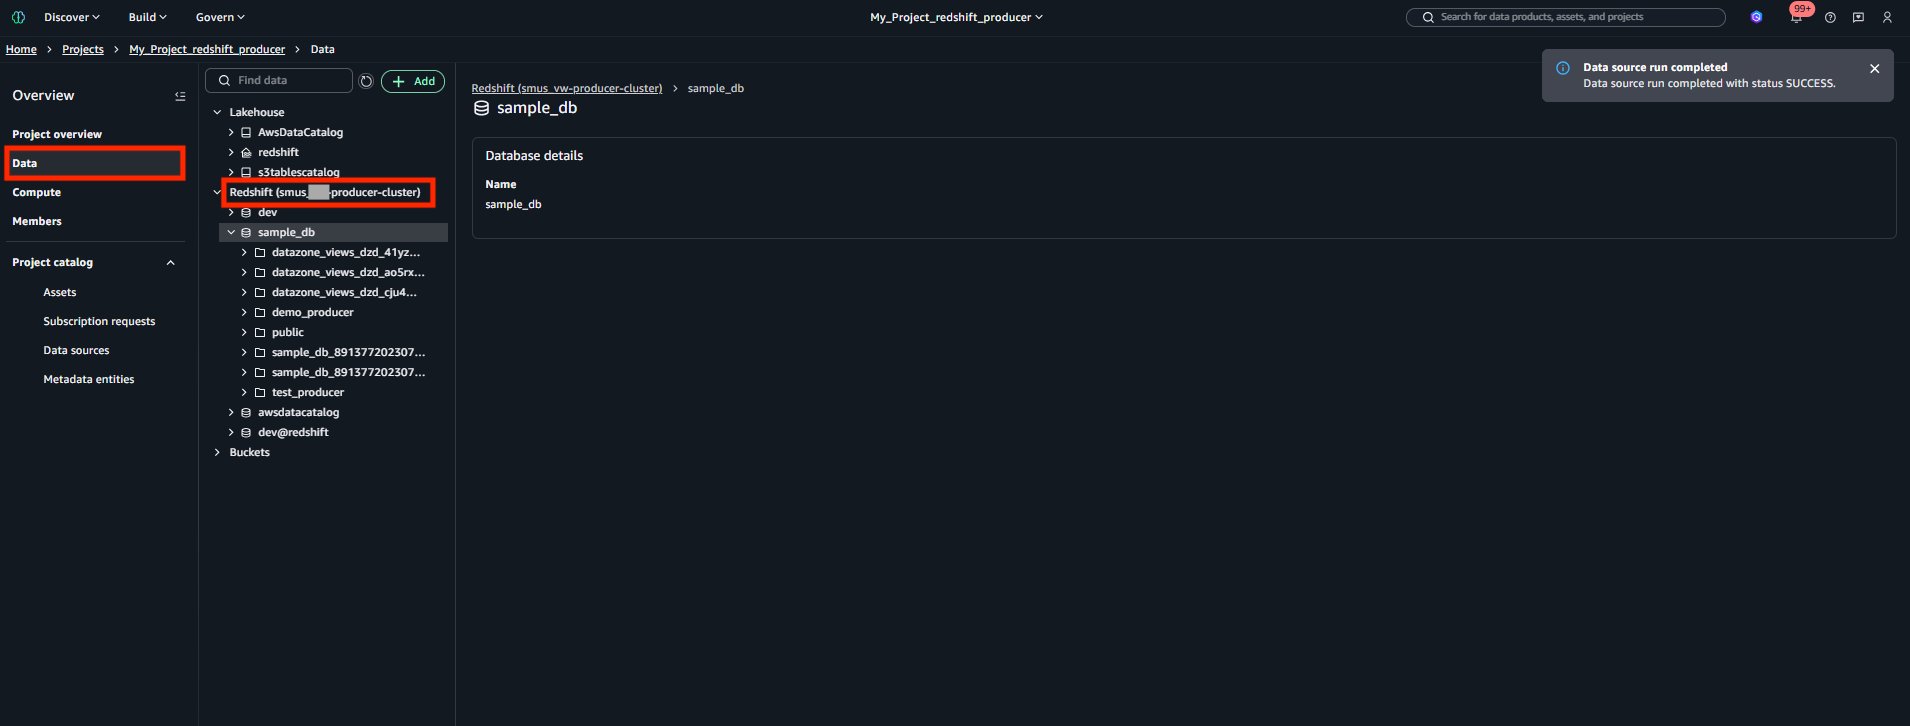
Data section showing Amazon Redshift tables and views available to query

Step 3: Creating a subscription target

  • Find the tooling environment ID: in your local terminal after obtaining correct credentials as a project member, run this command to find the tooling environment ID.
export REGION='<your-region>'
export SUBSCRIBER_PROJECT_ID='<your-project-id>'
export DOMAIN_ID='dzd-xxxxxxx'

aws datazone list-environments \
  --domain-identifier $DOMAIN_ID \
  --project-identifier $SUBSCRIBER_PROJECT_ID \
  --region $REGION
  • In the response, find and copy the tooling environment ID as shown in the following example.
{
    "items": [
        {
            "projectId": "<PROJECT_ID>",
            "id": "<ENVIRONMENT_ID>",
            "createdBy": "SYSTEM",
            "createdAt": "<TIMESTAMP>",
            "updatedAt": "<TIMESTAMP>",
            "name": "Tooling",
            "awsAccountId": "<AWS_ACCOUNT_ID>",
            "awsAccountRegion": "eu-west-1",
            "provider": "Amazon SageMaker",
            "status": "ACTIVE",
            "environmentConfigurationId": "<ENVIRONMENT_CONFIGURATION_ID>"
        }
    ]
}
  • Locate the Manage Access Role: In Account C, navigate to SageMaker Unified Studio and find the Tooling blueprint. In the Provisioning Tab you will find the Manage Access role and copy the value, as it is needed for the next CLI call.
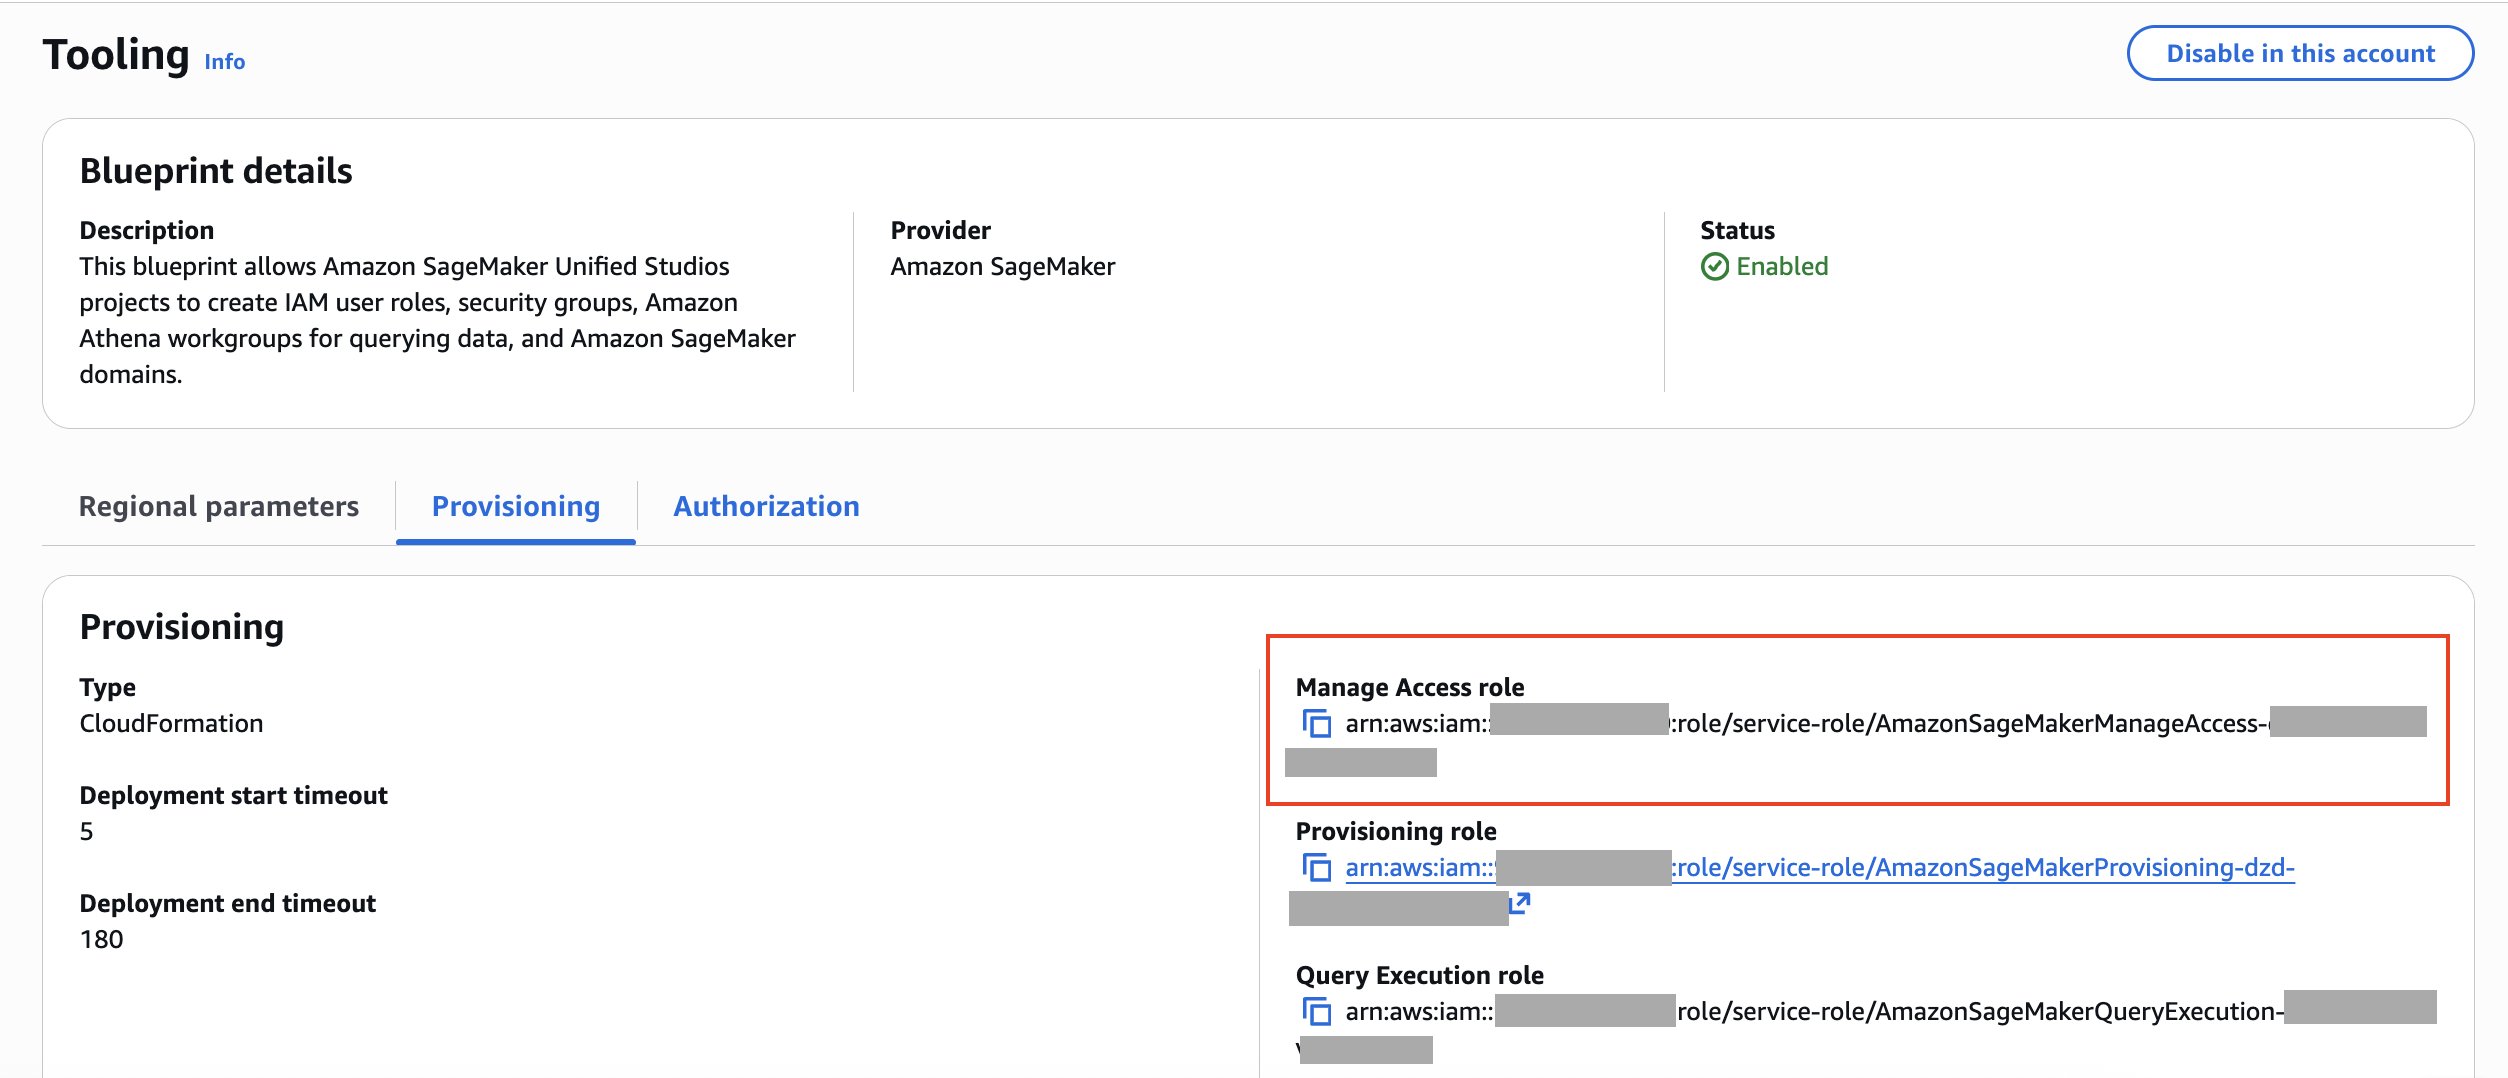
Provisioning tab showing the Manage Access role for the Tooling blueprint

  • Create the Subscription Target.

With all the information collected, you can create the subscription target for the Amazon Redshift cluster as shown by the CLI call.

export TOOLING_ENV_ID='<tooling-environment-id>'
export AUTHORIZED_PRINCIPAL='datazone_env_<tooling-env-id>'
export MANAGE_ACCESS_ROLE='arn:aws:iam::<account-id>:role/service-role/AmazonSageMakerManageAccess-<domain-id>'

aws datazone create-subscription-target \
  --domain-identifier $DOMAIN_ID \
  --environment-identifier $TOOLING_ENV_ID \
  --name "RedshiftCluster-default-target" \
  --subscription-target-config '[{
    "formName": "RedshiftSubscriptionTargetConfigForm",
    "content": "{\"databaseName\":\"<db-name>\",\"secretManagerArn\":\"arn:aws:secretsmanager:<region>:<account>:secret:<secret-name>\",\"clusterIdentifier\":\"<cluster-id>\",\"schemaName\":\"<schema-name>"}"
  }]' \
  --applicable-asset-types RedshiftViewAssetType RedshiftTableAssetType \
  --manage-access-role $MANAGE_ACCESS_ROLE \
  --provider "Amazon SageMaker" \
  --type RedshiftSubscriptionTargetType \
  --authorized-principals $AUTHORIZED_PRINCIPAL

Using Amazon Redshift Serverless?

Use RedshiftServerlessSubscriptionTargetType as the --type and RedshiftServerlessSubscriptionTargetConfigForm as the formName in the subscription target config. Replace clusterIdentifier with workgroupName in the content JSON.

  • Verify the Subscription Target.

To verify that the subscription target was created successfully, make a last CLI call. You should find in the return a new subscription target with the name RedshiftCluster-default-target.

aws datazone list-subscription-targets \
  --environment-identifier $TOOLING_ENV_ID \
  --domain-identifier $DOMAIN_ID \
  --region $REGION

Step 4: Subscribing to data assets

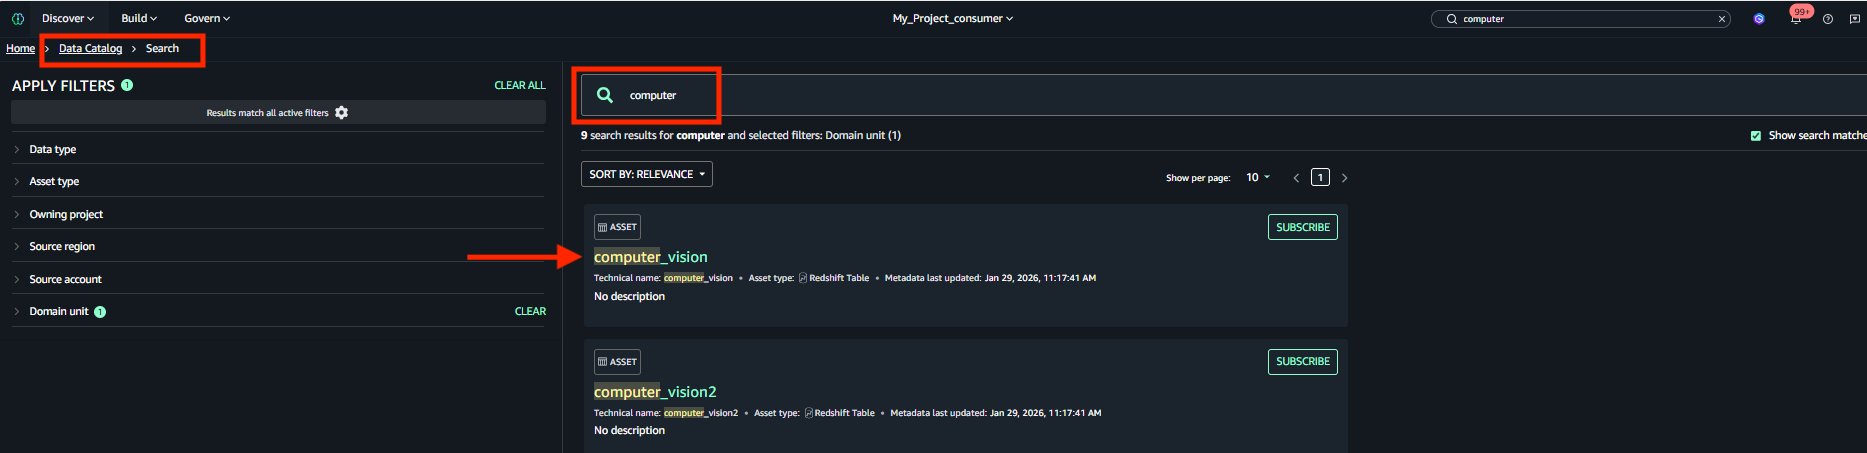
  • Open the data catalog inside SageMaker Unified Studio and search for the assets you want to subscribe to.
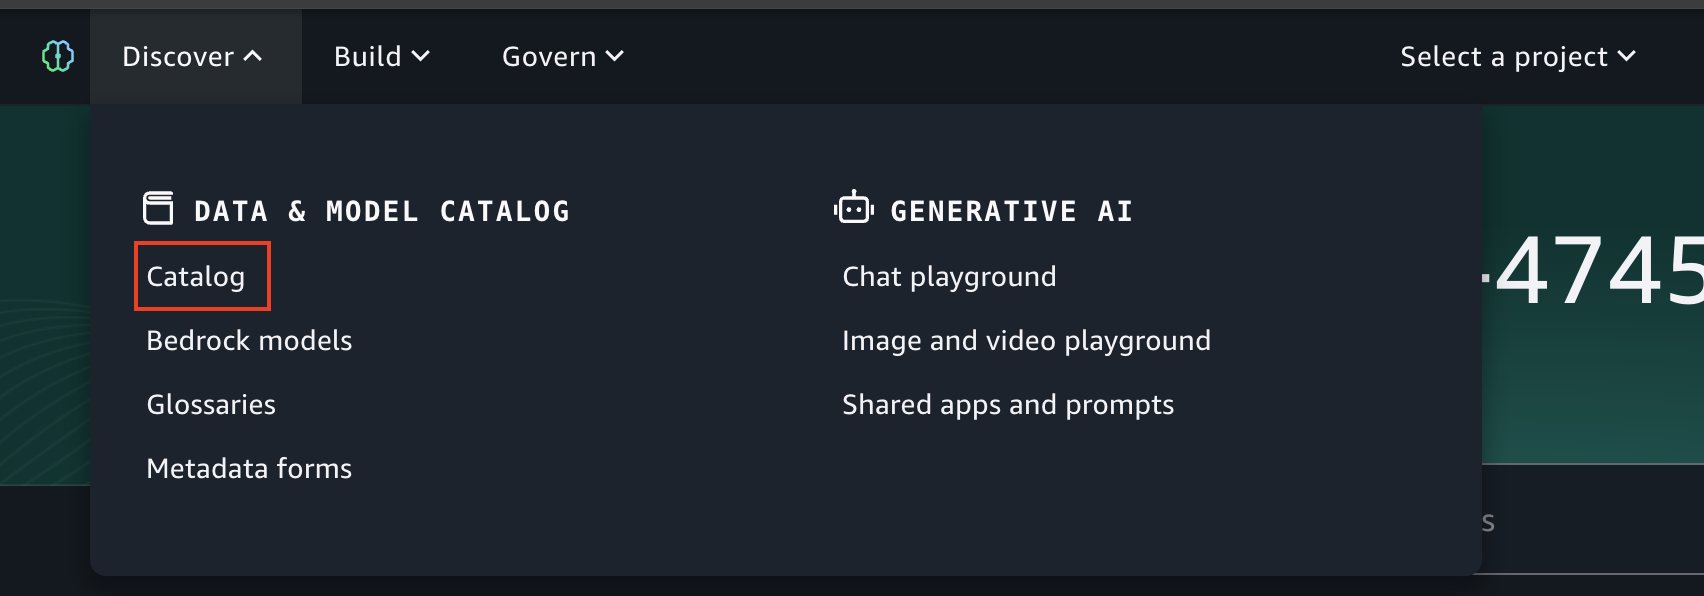
Data catalog search for assets to subscribe to in Amazon SageMaker Unified Studio

Adding multiple databases and schemas

To publish assets from entirely different databases on the same Amazon Redshift cluster, you need to create a separate data source for each database, meaning repeating the steps mentioned in the section before. Each data source points to the same cluster connection but specifies a different database name. This approach gives you independent control over scheduling, publishing settings, and metadata generation for each database’s assets.

On the consumer side, each subscription target is bound to a specific database and schema combination. This is the target location where SageMaker Unified Studio will create views that give the consumer access to subscribed assets. To receive subscribed data in multiple databases or schemas, you create one subscription target per database-schema combination. For example, different teams within the consumer account might want the data materialized in their own schema. The following example shows this pattern:

# Subscription target for the sales schema
aws datazone create-subscription-target \
  --domain-identifier $DOMAIN_ID \
  --environment-identifier $TOOLING_ENV_ID \
  --name "RedshiftCluster-sales-target" \
  --subscription-target-config '[{ "formName": "RedshiftSubscriptionTargetConfigForm", "content": "{\"databaseName\":\"consumer_db\",\"secretManagerArn\":\"arn:aws:secretsmanager:<region>:<account>:secret:<secret-name>\",\"host\":\"<endpoint>\",\"port\":\"5439\",\"schemaName\":\"sales\"}" }]' \
  --applicable-asset-types RedshiftViewAssetType RedshiftTableAssetType \
  --manage-access-role $MANAGE_ACCESS_ROLE \
  --provider "Amazon SageMaker" \
  --type RedshiftSubscriptionTargetType \
  --authorized-principals $AUTHORIZED_PRINCIPAL

# Subscription target for the marketing schema
aws datazone create-subscription-target \
  --domain-identifier $DOMAIN_ID \
  --environment-identifier $TOOLING_ENV_ID \
  --name "RedshiftCluster-marketing-target" \
  --subscription-target-config '[{ "formName": "RedshiftSubscriptionTargetConfigForm", "content": "{\"databaseName\":\"consumer_db\",\"secretManagerArn\":\"arn:aws:secretsmanager:<region>:<account>:secret:<secret-name>\",\"host\":\"<endpoint>\",\"port\":\"5439\",\"schemaName\":\"marketing\"}" }]' \
  --applicable-asset-types RedshiftViewAssetType RedshiftTableAssetType \
  --manage-access-role $MANAGE_ACCESS_ROLE \
  --provider "Amazon SageMaker" \
  --type RedshiftSubscriptionTargetType \
  --authorized-principals $AUTHORIZED_PRINCIPAL

Verifying the audit trail

To substantiate the governance and traceability claims in this architecture, enable AWS CloudTrail in all three accounts with data events for Secrets Manager and KMS. Enable Amazon Redshift audit logging on clusters to capture connection and query activity through STL_CONNECTION_LOG and STL_QUERY. Subscription approvals and rejections are recorded by SageMaker Unified Studio and emitted to CloudTrail under the datazone.amazonaws.com event source. Look for CreateSubscriptionRequest, AcceptSubscriptionRequest, and RejectSubscriptionRequest events.

Clean up

If you deployed this solution for testing or evaluation purposes and no longer need the resources, we recommend cleaning up to avoid unnecessary costs. Amazon Redshift clusters, Secrets Manager secrets, and SageMaker Unified Studio projects all incur charges when left running. The following steps guide you through a structured teardown in the correct order: subscriptions first, then data assets, and finally the infrastructure itself. This order verifies that no orphaned resources remain.

  • Remove all subscriptions
  • Delete your data assets
  • Delete the projects
    • Delete the project within your SageMaker Unified Studio Domain after all subscriptions are removed. Make sure to delete both the consumer and producer projects.
  • Delete the SageMaker Unified Studio Domain in Account A.

Conclusion

In this post, we demonstrated how Amazon SageMaker Unified Studio simplifies cross-account data governance for Amazon Redshift. By implementing this solution, organizations can move away from ad-hoc, non-auditable data sharing processes to a secure, scalable, and fully governed approach. Amazon SageMaker Unified Studio serves as the central governance layer that data producers and consumers use to publish, discover, and subscribe to data products across AWS accounts. This turns a fragmented data landscape into a well-governed data mesh without the need for custom tooling or manual coordination.

With cross-account data sharing and governance in place, the natural next step is to use this well-governed data for machine learning and generative AI workloads. Because Amazon SageMaker Unified Studio brings together data, analytics, and AI capabilities in a single environment, teams can more efficiently transition from discovering and subscribing to data products to building ML models and generative AI applications, all within the same environment. This reduces the traditional friction between data engineering and data science, accelerating time to value. To get started with establishing your organization’s data mesh using Amazon SageMaker Unified Studio, follow the guidance for Setting up Amazon SageMaker Unified Studio.
About the authors

Bandana Das

Bandana Das is a senior Data Architect in Amazon Web Services and specializes in Data and Analytics. She builds event-driven data architectures to support customers in Data management and data-driven decision making. She is also passionate about enabling customers on their Data management journey to the cloud.

Sindi Cali

Sindi Cali is a ProServe Consultant with AWS Professional Services. She supports customers in building data driven applications in AWS.

Anirban Saha

Anirban Saha is a DevOps Architect at AWS, specializing in architecting and implementation of solutions for customer challenges. He is passionate about well-architected infrastructures, automation, data-driven solutions and helping make the customer’s cloud journey as smooth as possible.

Stoyan Stoyanov

Stoyan Stoyanov works for AWS as a DevOps Engineer. He has more than 10 years of experience in software engineering, cloud technologies, DevOps, data engineering, and security.

Viral Thakkar

Viral Thakkar is a Software Engineer at AWS, working on Amazon DataZone and Amazon SageMaker Unified Studio with a primary focus on distributed systems and data governance with deep expertise in building large-scale data analytics and pipelining solutions. He is passionate about tackling complex distributed systems challenges while also creating tools and automated scripts that simplify day-to-day workflows and improve productivity.

Breaking down data silos: Volkswagen’s approach with Amazon DataZone

Post Syndicated from Bandana Das original https://aws.amazon.com/blogs/big-data/breaking-down-data-silos-volkswagens-approach-with-amazon-datazone/

Over the years, organizations have invested in building purpose-built cloud-based data warehouses that are siloed from one another. One of the major challenges these organizations encounter today is enabling cross-organization discovery and access to data across these siloed data warehouses built using different technology stacks. The data mesh pattern addresses these issues, founded in four principles: domain-oriented decentralized data ownership and architecture, treating data as a product, providing self-serve data infrastructure as a platform, and implementing federated governance. The data mesh pattern helps organizations mimic their organizational structure into data domains and makes it possible to share the data across the organization and beyond to improve their business models.

In 2019, Volkswagen AG and Amazon Web Services (AWS) started their collaboration to co-develop the Digital Production Platform (DPP), with the goal of enhancing production and logistics efficiency by 30% while reducing production costs by the same margin. The DPP was developed to streamline access to data from shop floor devices and manufacturing systems by handling integrations and providing a range of standardized interfaces. However, as applications and use cases evolved on the platform, a significant challenge emerged: the ability to share data across applications stored in isolated data warehouses (within Amazon Redshift in isolated AWS accounts designated for specific use cases), without the need to consolidate data into a central data warehouse. Another challenge was discovering all the available data stored across multiple data warehouses and facilitating a workflow to request access to data across business domains within each plant. The common method used was largely manual, relying on emails and general communication (through tickets and emails). The manual approach not only increased the overhead but also varied from one use case to another in terms of data governance.

In this post, we introduce Amazon DataZone and explore how Volkswagen used Amazon DataZone to build their data mesh, tackle the challenges encountered, and break the data silos. A key aspect of the solution was enabling data providers to automatically publish their data products to Amazon DataZone, serving as a central data mesh for enhanced data discoverability. Additionally, we provide code to guide you through the deployment and implementation process.

Introduction to Amazon DataZone

Amazon DataZone is a data management service that makes it faster and straightforward to catalog, discover, share, and govern data stored across AWS, on-premises, and third-party sources. Key features of Amazon DataZone include the business data catalog, with which users can search for published data, request access, and start working on data in days instead of weeks. In addition, the service facilitates collaboration across teams and helps them manage and monitor data assets across different organizational units. The service also includes the Amazon DataZone portal, which offers a personalized analytics experience for data assets through a web-based application or API. Lastly, Amazon DataZone offers governed data sharing, which makes sure the right data is accessed by the right user for the right purpose with a governed workflow.

Solution overview

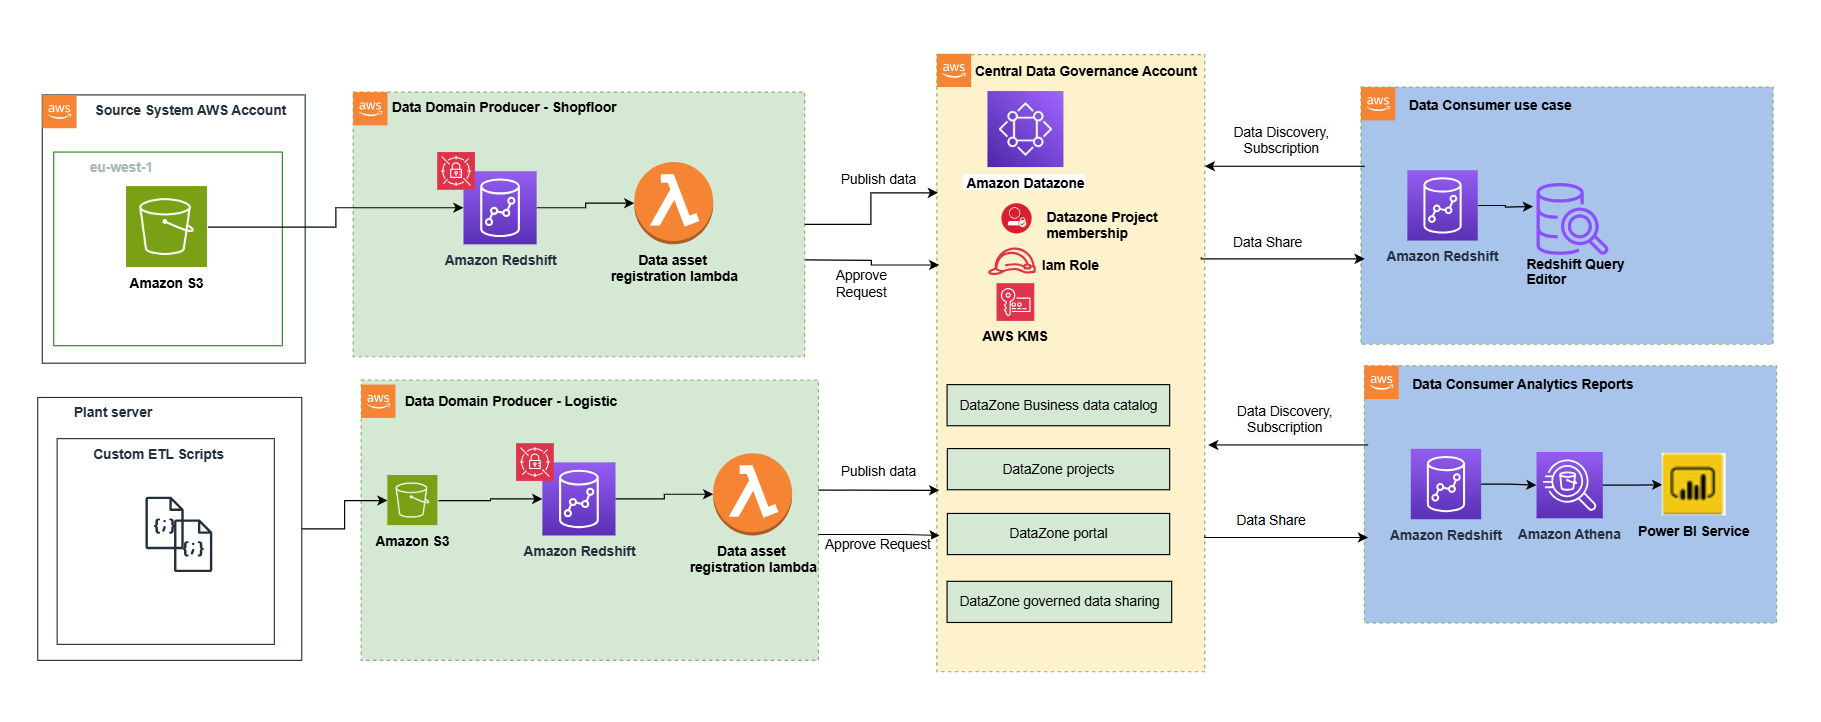
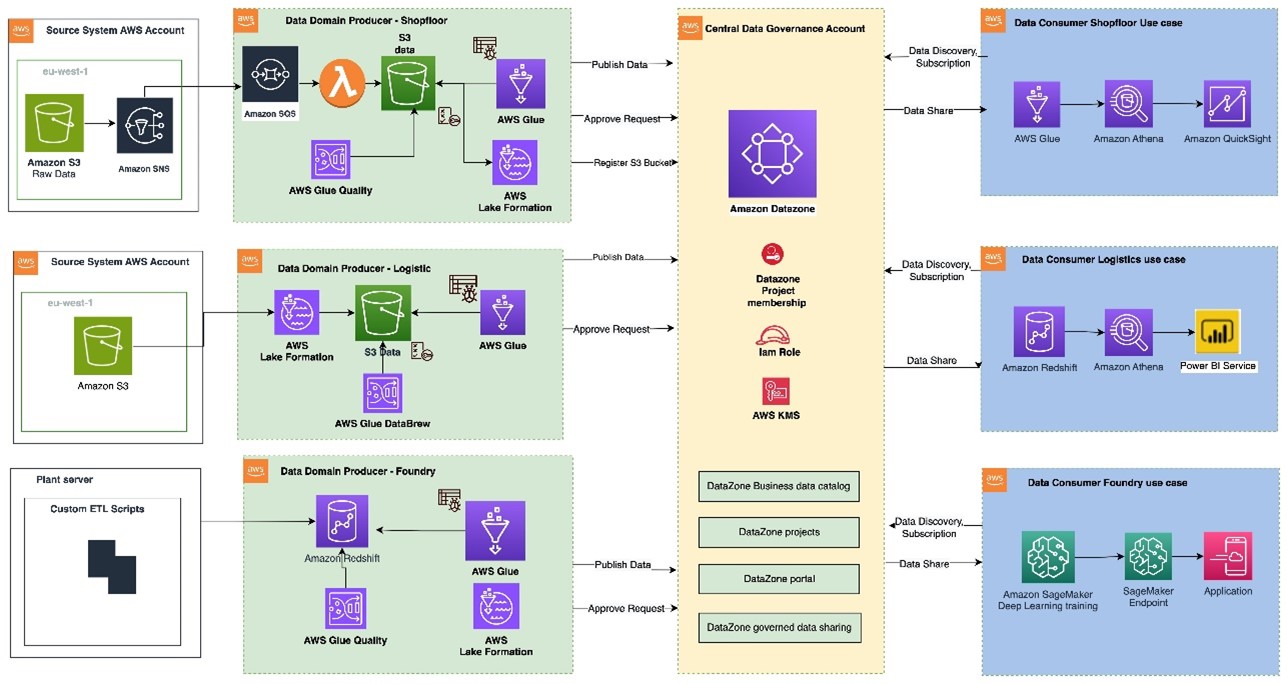
The following architecture diagram represents a high-level design that is built on top of the data mesh pattern. It separates source systems, data domain producers (data publishers), data domain subscribers (data consumers), and central governance to highlight the key aspects. This data mesh architecture is specially tailored for cross-AWS account usage. The objective of this approach is to create a foundation for building data governance on a scale, supporting the objectives of data producers and consumers with strong and consistent governance.

This architecture allows for the integration of multiple data warehouses into a centralized governance account that stores all the metadata from each environment.

A data domain producer uses Amazon Redshift as their analytical data warehouse to store, process, and manage structured and semi-structured data. The data domain producers load data into their respective Amazon Redshift clusters through extract, transform, and load (ETL) pipelines they manage, own, and operate. The producers maintain control over their data through Amazon Redshift security features, including column-level access controls and dynamic data masking, supporting data governance at the source. A data domain producer uses Amazon Redshift ETL and Amazon Redshift Spectrum to process and transform raw data into consumable data products. The data products could be Amazon Redshift tables, views, or materialized views.

Data domain producers expose datasets to the rest of the organization by registering them to Amazon DataZone service, which acts as a central data catalog. They can choose what data assets to share, for how long, and how consumers can interact with these. They’re also responsible for maintaining the data and making sure it’s accurate and current.

The data assets from the producers are then published using the data source run to Amazon DataZone in the central governance account. This process populates the technical metadata into the business data catalog for each data asset. The business metadata can be added by business users (data analysts) to provide business context, tags, and data classification for the datasets. This approach provides the required features to allow producers to create catalog entries with Amazon Redshift from all their data warehouses built in with Redshift clusters. In addition, the central data governance account is used to share datasets securely between producers and consumers. It’s important to note that sharing is done through metadata linking alone. No data (except logs) exists in the governance account. The data isn’t copied to the central account; just a reference to the data is used, so that the data ownership remains with the producer.

Amazon DataZone provides a streamlined way to search for data. The Amazon DataZone data portal provides a personalized view for users to discover and search data assets. An Amazon DataZone user (consumer) with permissions to access the data portal can search for assets and submit requests for subscription of data assets using a web-based application. An approver can then approve or reject the subscription request.

When a data domain consumer has access to an asset in the catalog, they can consume it (query and analyze) using the Amazon Redshift query editor. Each consumer runs their own workload based on their use case. In this way, the team can choose the tools for the job to perform analytics and machine learning activities in its AWS consumer environment.

Publishing and registering data assets to Amazon DataZone

To publish a data asset from the producer account, each asset must be registered in Amazon DataZone for consumer subscription. For more information, refer to Create and run an Amazon DataZone data source for Amazon Redshift. In the absence of an automated registration process, required tasks must be completed manually for each data asset.

Using the automated registration workflow, the manual steps can be automated for the Amazon Redshift data asset (Redshift table or view) that needs to be published in an Amazon DataZone domain or when there’s a schema change in an already published data asset.

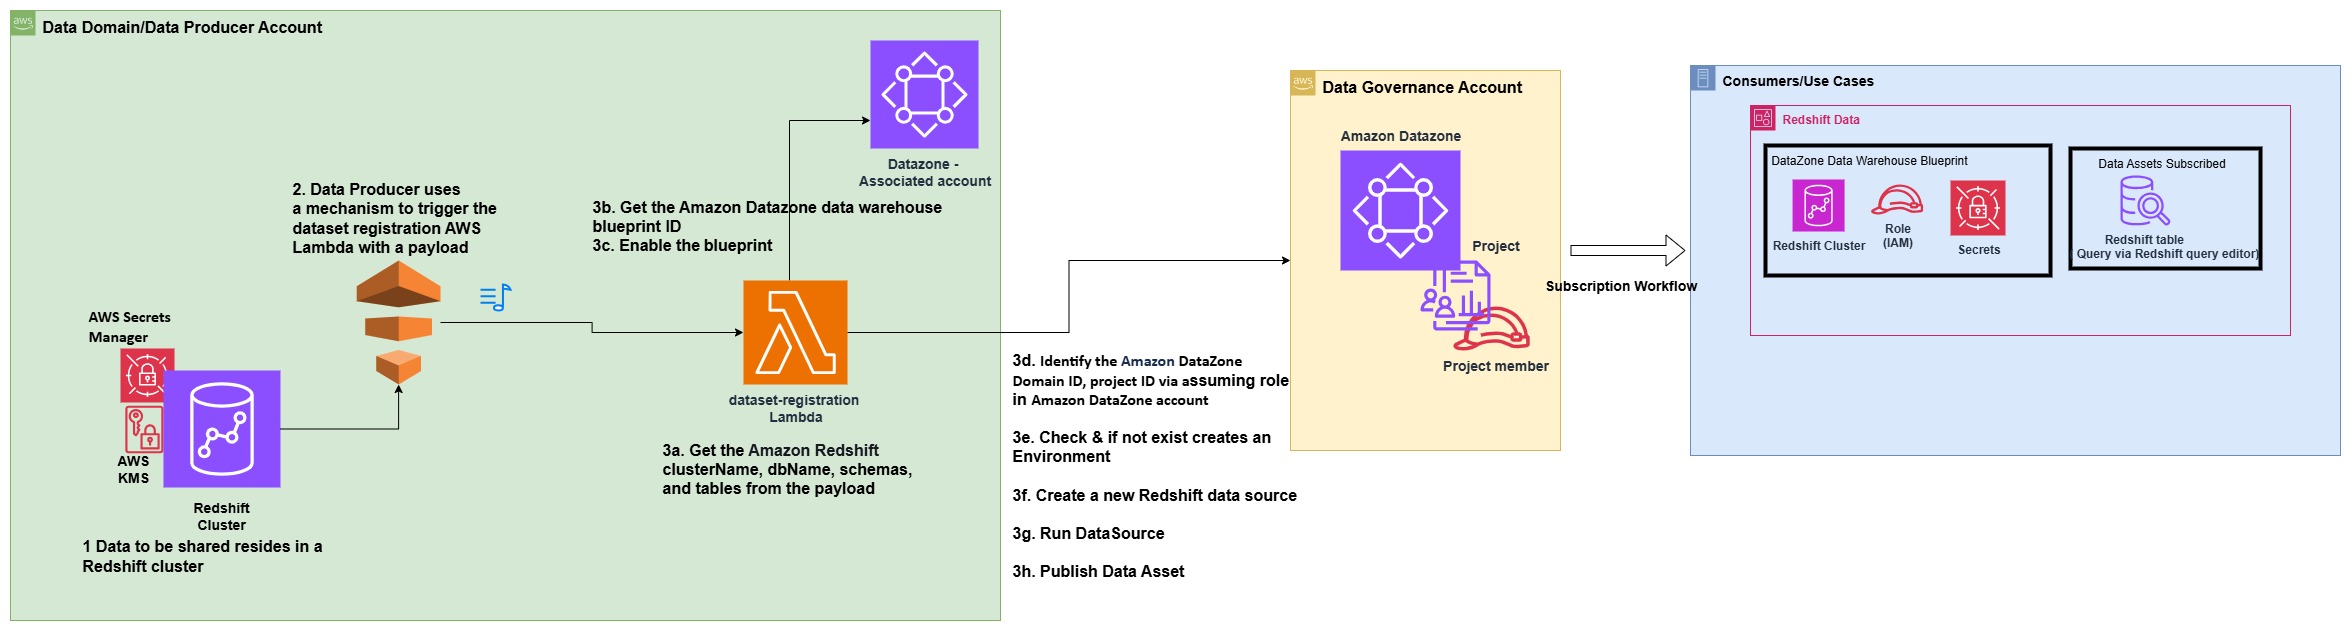
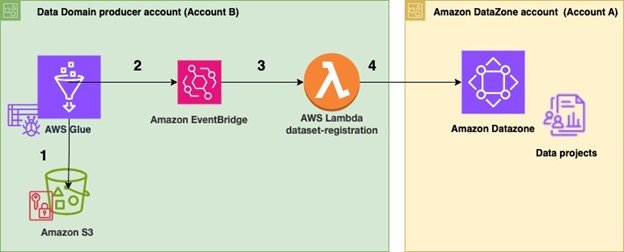
The following architecture diagram represents how data assets from Amazon Redshift data warehouses have been automatically published to the data mesh created with Amazon DataZone.

The process consists of the following steps:

  1. In the producer account (Account B), the data to be shared resides in a Redshift cluster.
  2. The producer account (Account B) uses a mechanism to trigger the dataset registration AWS Lambda function with a specific payload containing the information and name of the database, schema, table, or view that has a change in metadata.
  3. The Lambda function performs the steps to automatically register and publish the dataset in Amazon DataZone:
    1. Get the Amazon Redshift clusterName, dbName, schemas, and tables from the JSON payload, which is used as the event to trigger the Lambda function.
    2. Get the Amazon DataZone data warehouse blueprint ID.
    3. Enable the blueprint in the data producer account.
    4. Identify the Amazon DataZone Domain ID and project ID for the producer via assuming role in Amazon DataZone account (Account A).
    5. Check if an environment already exists in the project. If not, create an environment.
    6. Create a new Redshift data source by providing the correct Redshift database information in the newly created environment.
    7. Initiate a data source run request in the data source to make the Redshift tables or views available in Amazon DataZone.
    8. Publish the tables or views in the Amazon DataZone catalog.

Prerequisites

The following prerequisites are required before starting:

  • Two AWS accounts to implement the solution have been described in this post. However, you can also use Amazon DataZone to publish data within a single account or across multiple accounts.
    • Amazon DataZone account (Account A) – This is the central data governance account, which will have the Amazon DataZone domain and project.
    • Data domain producer account (Account B) – This account acts as the data domain producer. It has been added as an associated account to Account A.

Prerequisites in data domain producer account (Account B)

As part of this post, we want to publish assets and subscribe to assets from a Redshift cluster that already exists. Complete the following prerequisite steps to set up Account B:

  1. Set up the Redshift cluster, including database, schema, tables, and views (optional). The node type must be from the RA3 family. For more information, see Amazon Redshift provisioned clusters.

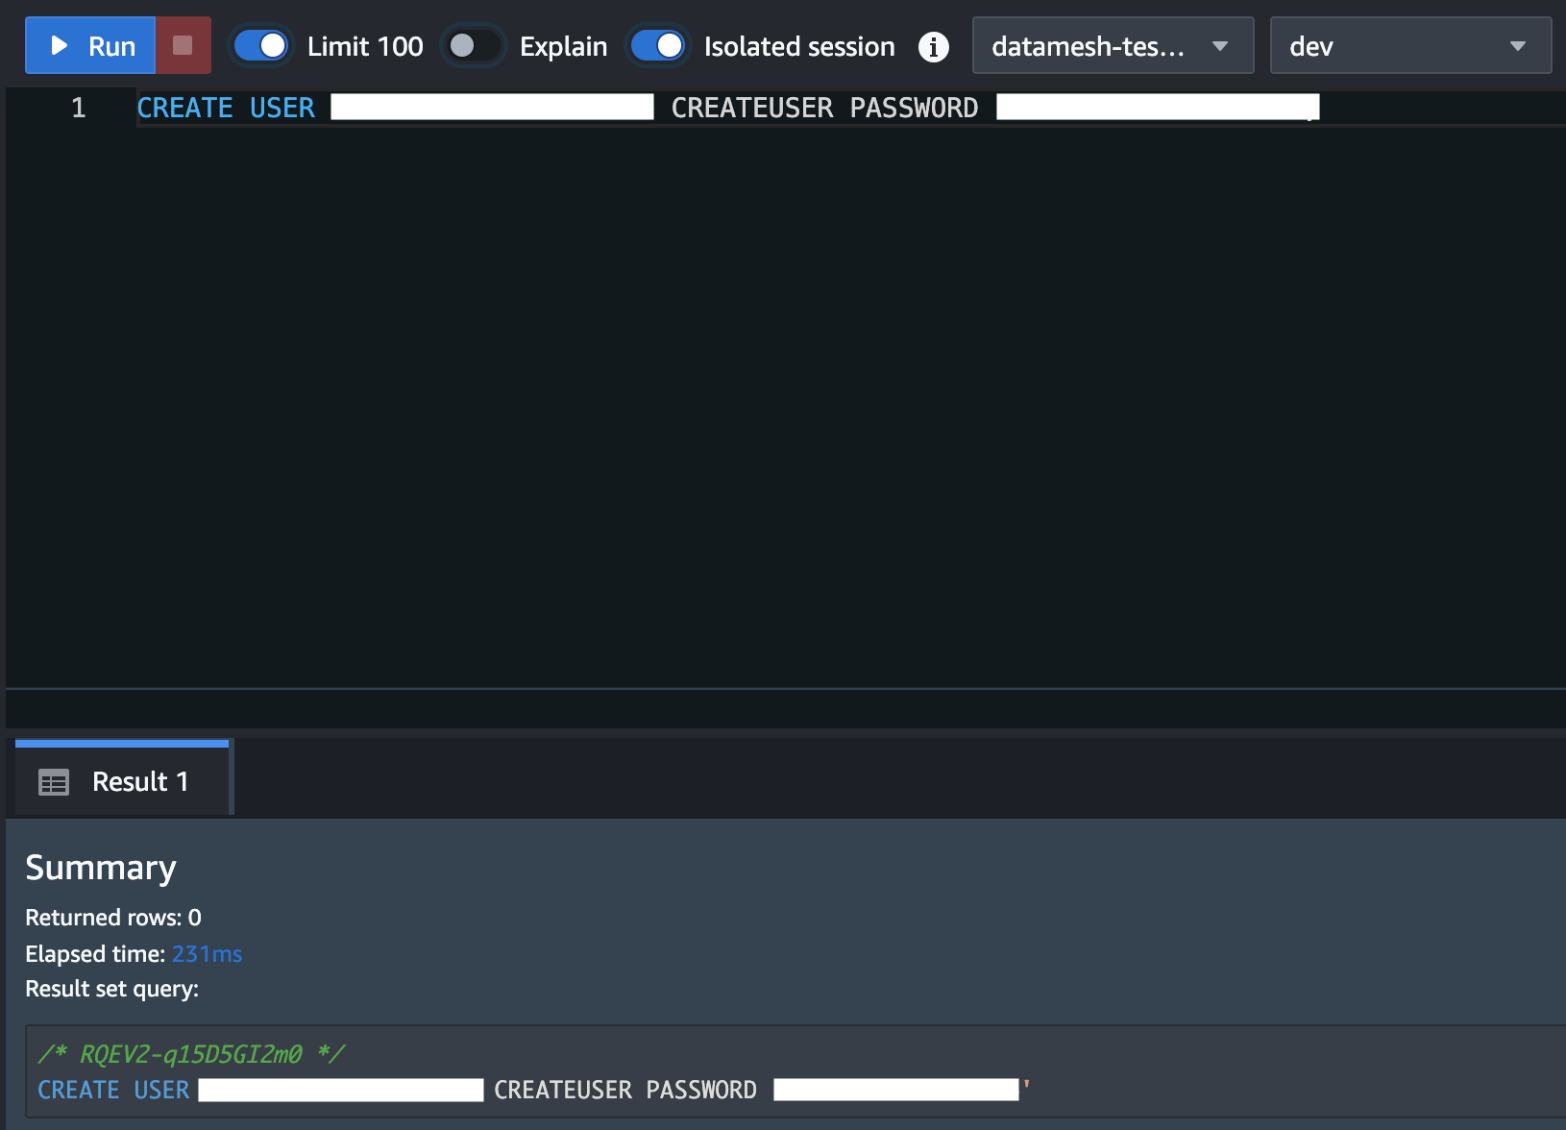
    Create a superuser in Amazon Redshift for Amazon DataZone. For the Redshift cluster, the database user you provide in AWS Secrets Manager must have superuser permissions. For reference please see the note section in this QuickStart guide with sample Amazon Redshift data

  2. Store the user’s credentials in Secrets Manager. Select the credential type, enter the credential values, and choose the AWS Key Management Service (AWS KMS) key with which to encrypt the secret.
  3. Add the tags to the Secret Manager secret to allow Amazon DataZone to find this secret and limit the access to a particular Amazon DataZone domain and Amazon DataZone project. The Redshift cluster Amazon Resource Name (ARN) must be added as a tag so it can be used by Amazon Redshift as a valid credential. For reference please see the note section in this QuickStart guide with sample Amazon Redshift data
  4. Add an Amazon DataZone provisioning IAM role and Amazon Redshift manage access IAM role in the secret’s resource policy. The AWS Identity and Access Management (IAM) roles are created as part of the AWS Cloud Development Kit (AWS CDK) deployment (discussed later in this post). The following code shows an example of the Secrets Manager secret’s resource policy. Store the secret ARN in an AWS Systems Manager parameter.
    {
      "Version" : "2012-10-17",
      "Statement" : [ {
        "Effect" : "Allow",
        "Principal" : "*",
        "Action" : "secretsmanager:GetSecretValue",
        "Resource" : "*",
        "Condition" : {
          "ArnEquals" : {
            "aws:PrincipalArn" : [ 
              "arn:aws:iam::<<Data_Producer_Acct_Id(Account B)>>:role/DzRedshiftAccess-<<AWS_Region>>-<< Amazon_DataZone _Domain_Name>>",
              "arn:aws:iam::<<Data_Producer_Acct_Id(Account B)>>:role/DataZoneProvisioning-<< Amazon_DataZone_Account_id(Account A)>>"
            ]
          }
        }
      } ]
    }

    If your secret is encrypted with a custom KMS key, append the key policy with the following statement and add a tag to the key: AmazonDatazoneEnvironment = All. You can skip this step if you’re using an AWS managed KMS key.
    {
        "Effect": "Allow",
        "Principal": {
            "Service": "logs.<<AWS_Region>>.amazonaws.com",
            "AWS": "arn:aws:iam::<<Data_Producer_Acct_Id(Account B)>>:root"
        },
        "Action": [
            "kms:Decrypt",
            "kms:Encrypt",
            "kms:GenerateDataKey*",
            "kms:ReEncrypt*"
        ],
        "Resource": "*"
     },
     {
        "Sid": "AllowDatazoneRoles-DEV",
        "Effect": "Allow",
        "Principal": {
            "AWS": "*"
        },
        "Action": [
            "kms:Decrypt",
            "kms:Describe*",
            "kms:Get*",
            "kms:Encrypt",
            "kms:GenerateDataKey",
            "kms:ReEncrypt*",
            "kms:CreateGrant"
        ],
        "Resource": "*",
        "Condition": {
            "StringLike": {
                "aws:PrincipalArn": [
                    "arn:aws:iam::<<Data_Producer_Acct_Id(Account B)>>:role/aws-service-role/redshift.amazonaws.com/AWSServiceRoleForRedshift",
                    "arn:aws:iam::<<Data_Producer_Acct_Id(Account B)>>:role/datazone_*",
                    "arn:aws:iam::<<Data_Producer_Acct_Id(Account B)>>:role/<<Redshift_Cluster_IAM_Role>>",
                    "arn:aws:iam::<<Data_Producer_Acct_Id(Account B)>>:role/service-role/AmazonDataZoneRedshiftAccess-<<AWS_Region>>-*"
                ]
             }
         }
     } 

  5. Place a mechanism to generate the following payload to trigger the dataset registration Lambda function. The payload must contain the relevant Redshift database, schema, and table or view that you want to publish in the Amazon DataZone domain. The following example code assumes you have three databases in your Redshift cluster and within those databases you have different schemas, tables, and views. You should adjust the payload based on your use case.
    {
        "source": "redshift-user-initiated",
        "detail-type": "Amazon Redshift dataset registration in Amazon DataZone",
        "datasets": [
            {
                "clusterName": "<<YOUR_REDSHIFT_CLUSTER_NAME>>",
                "dbName":"<<YOUR_REDSHIFT_DATABASE_NAME_1>>",
                "schemas": [
                    {
                        "schemaName":"<<YOUR_REDSHIFT_SCHEMA_NAME>>",
                        "addAllTables":false,
                        "addAllViews":false,
                        "tables":[
                            "<<YOUR_REDSHIFT_TABLE_NAME>>",
                            "<<YOUR_REDSHIFT_TABLE_NAME>>"
                        ],
                        "views":[
                            "<<YOUR_REDSHIFT_VIEW_NAME>>"
                        ]
                    }
                ]
            },
            {
                "clusterName": "<<YOUR_REDSHIFT_CLUSTER_NAME>>",
                "dbName":"<<YOUR_REDSHIFT_DATABASE_NAME_2>>",
                "schemas": [
                    {
                        "schemaName":"<<YOUR_REDSHIFT_SCHEMA_NAME>>",
                        "addAllTables":true,
                        "addAllViews":true,
                        "tables":[],
                        "views":[]
                    }
                ]
            },
            {
                "clusterName": "<<YOUR_REDSHIFT_CLUSTER_NAME>>",
                "dbName":"<<YOUR_REDSHIFT_DATABASE_NAME_3>>",
                "schemas": [
                    {
                        "schemaName":"<<YOUR_REDSHIFT_SCHEMA_NAME>>",
                        "addAllTables":true,
                        "addAllViews":false,
                        "tables":[],
                        "views":[
                            "<<YOUR_REDSHIFT_VIEW_NAME>>"
                        ]
                    }
                ]
            }
        ]
    }

Prerequisites in Amazon DataZone account (Account A)

Complete the following steps to set up your Amazon DataZone account (Account A):

  1. Sign in to Account A and make sure you have already deployed an Amazon DataZone domain and a project within that domain. Refer to Create Amazon DataZone domains for instructions to create a domain.
  2. If your Amazon DataZone domain is encrypted with a KMS key, add the data domain account (Account B) to the KMS key policy with the following actions:
    "Action": [
        "kms:Encrypt",
        "kms:Decrypt",
        "kms:ReEncrypt*",
        "kms:GenerateDataKey*",
        "kms:DescribeKey"
    ]

  3. Create an IAM role that is assumable by Account B and make sure the role has a following policy attached and is a member (as contributor) of your Amazon DataZone project. For this post, we call the role dz-assumable-env-dataset-registration-role. By adding this role, you can successfully run the registration Lambda function.
    1. In the following policy, provide the AWS Region and account ID corresponding to where your Amazon DataZone domain is created, and the KMS key ARN used to encrypt the domain:
        {
          "Version": "2012-10-17",
          "Statement": [
              {
                  "Action": [
                      "datazone:CreateDataSource",
                      "datazone:CreateEnvironment",
                      "datazone:CreateEnvironmentProfile",
                      "datazone:GetDataSource",
                      "datazone:GetDataSourceRun",
                      "datazone:GetEnvironment",
                      "datazone:GetEnvironmentProfile",
                      "datazone:GetIamPortalLoginUrl",
                      "datazone:ListDataSources",
                      "datazone:ListDomains",
                      "datazone:ListEnvironmentProfiles",
                      "datazone:ListEnvironments",
                      "datazone:ListProjectMemberships",
                      "datazone:ListProjects",
                      "datazone:StartDataSourceRun",
                      "datazone:UpdateDataSource",
                      "datazone:SearchUserProfiles"
                  ],
                  "Resource": "*",
                  "Effect": "Allow"
              },
              {
                  "Action": [
                      "kms:Decrypt",
                      "kms:DescribeKey",
                      "kms:GenerateDataKey"
                  ],
                  "Resource": "arn:aws:kms:<<account_region>>:<<Datazone_Account_id(Account A)>>
      
      
      }:key/${DataZonekmsKey}",
                  "Effect": "Allow"
              }
          ]
      }

    2. Add Account B in the trust relationship of this role with the following trust relationship:
      {
          "Version": "2012-10-17",
          "Statement": [
              {
                  "Effect": "Allow",
                  "Principal": {
                      "AWS": [
                          "arn:aws:iam::<<Data_Producer_Acct_Id(Account B)>>:root",
                          "arn:aws:iam::<<Datazone_Account_id(Account A)>>:root",
                      ]
                  },
                  "Action": "sts:AssumeRole"
              }
          ]
      }

    3. Add the role as a member of the Amazon DataZone project in which you want to register your data sources. For more information, see Add members to a project.

Additional tools

The following tools are needed to deploy the solution using the AWS CDK:

Deploy the solution

After you complete the prerequisites, use the AWS CDK stack provided on the GitHub repo to deploy the solution for automatic registration of data assets into the Amazon DataZone domain. Complete the following steps:

  1. Clone the repository from GitHub to your preferred integrated development environment (IDE) using the following commands:
    git clone https://github.com/aws-samples/sample-how-to-automate-amazon-redshift-cluster-data-asset-publish-to-amazon-datazone

    $ cd sample-how-to-automate-amazon-redshift-cluster-data-asset-publish-to-amazon-datazone

  2. At the base of the repository folder, run the following commands to build and deploy resources to AWS:
    $ npm install

    $ npm run lint

  3. Sign in to Account B (the data domain producer account) using the AWS CLI with your profile name.
  4. Make sure you have configured the Region in your credential’s configuration file.
  5. Bootstrap the AWS CDK environment with the following commands at the base of the repository folder. Provide the profile name of your deployment account (Account B). Bootstrapping is a one-time activity and is not needed if your AWS account is already bootstrapped.
    $ export AWS_PROFILE=<<PROFILE_NAME>>

    $ npm run cdk bootstrap

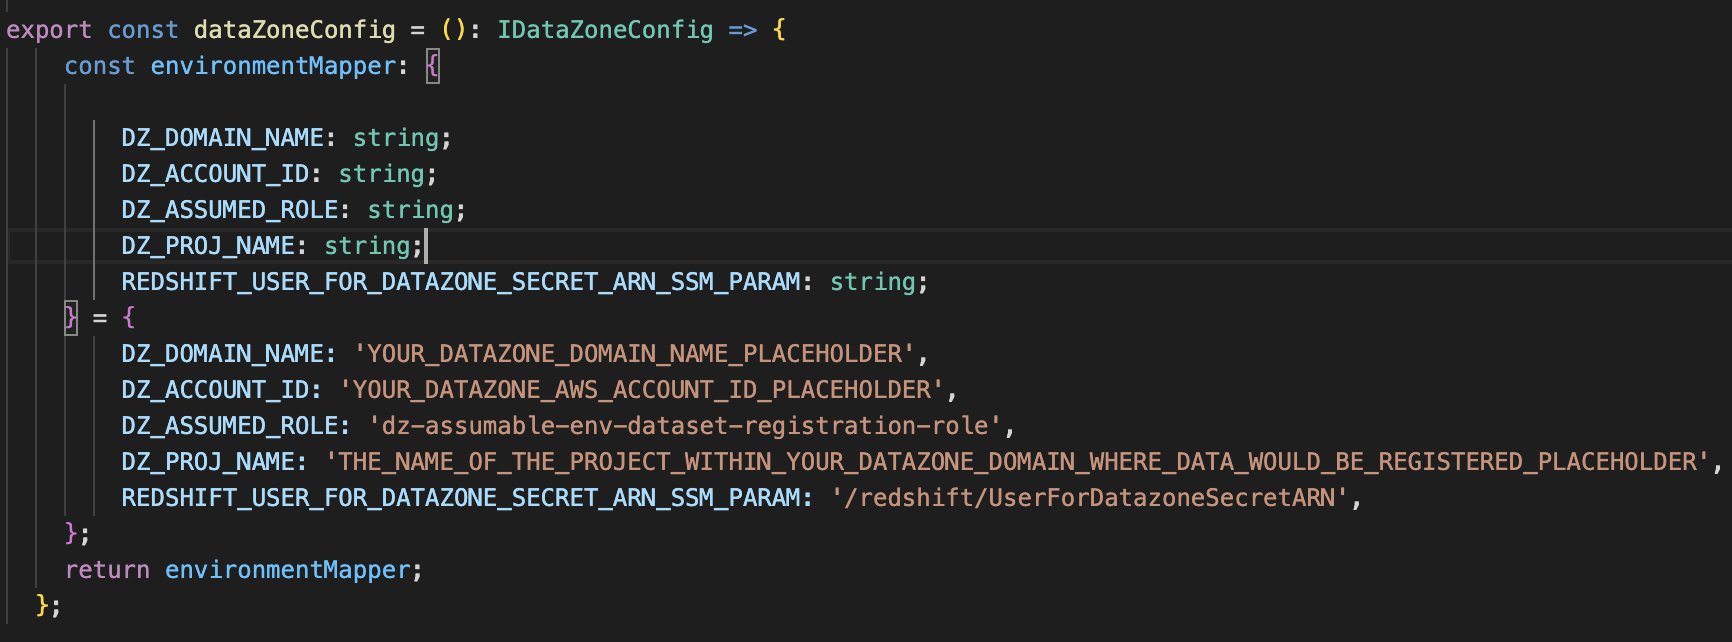
  6. Replace the placeholder parameters (marked with the suffix _PLACEHOLDER) in the file config/DataZoneConfig.ts:
    1. Amazon DataZone domain and project name of your Amazon DataZone instance. Make sure all names are in lowercase.
    2. The AWS account ID of the Amazon DataZone account (Account A).
    3. The assumable IAM role from the prerequisites.
    4. The AWS Systems Manager parameter name containing the Secrets Manager secret ARN of the Amazon Redshift credentials.

  7. Use the following command in the base folder to deploy the AWS CDK solution. During deployment, enter y if you want to deploy the changes for some stacks when you see the prompt Do you wish to deploy these changes (y/n)?
    npm run cdk deploy --all

  8. After the deployment is complete, sign in to Account B and open the AWS CloudFormation console to verify that the infrastructure was deployed.

Test automatic data registration to Amazon DataZone

Complete the following steps to test the solution:

  1. Sign in to Account B (producer account).
  2. On the Lambda console, open the datazone-redshift-dataset-registration function.
  3. Under TEST EVENTS, choose Create new test event.
  4. For Event name, enter Redshift, and for Event JSON, enter the following JSON structure (change the cluster, schema, database, and table names according to your environment):
    {
      "source": "redshift-user-initiated",
      "detail-type": "Amazon Redshift dataset registration in Amazon DataZone",
      "datasets": [
        {
          "clusterName": "YOUR_REDSHIFT_CLUSTER_NAME",
          "dbName": "DATABASE_NAME",
          "schemas": [
            {
              "schemaName": "SCHEMA_NAME_1",
              "addAllTables": false,
              "addAllViews": false,
              "tables": [
                "TABLE_NAME"
              ],
              "views": []
            },
            {
              "schemaName": "SCHEMA_NAME_2",
              "addAllTables": false,
              "addAllViews": false,
              "tables": [],
              "views": [
                "VIEW_NAME"
              ]
            }
          ]
        }
      ]
    }

  5. Choose Save.
  6. Choose Invoke.
  7. Open the Amazon DataZone console in Account A where you deployed the resources.
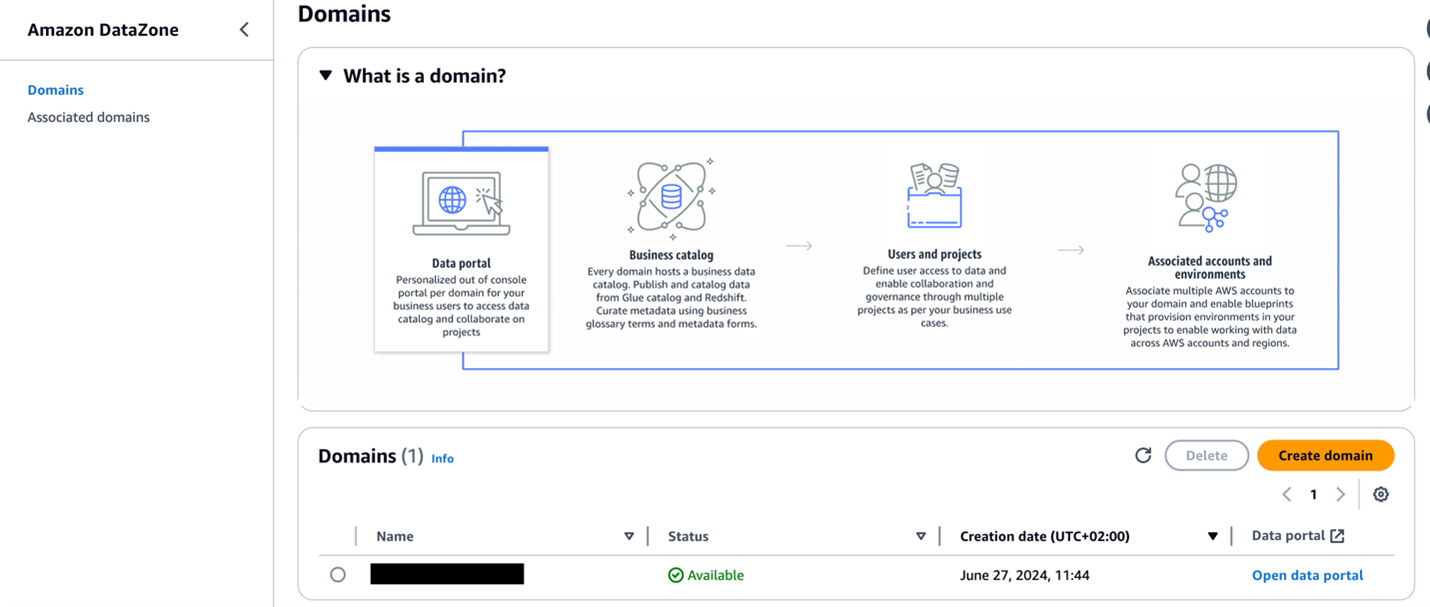
  8. Choose Domains in the navigation pane, then open your domain.
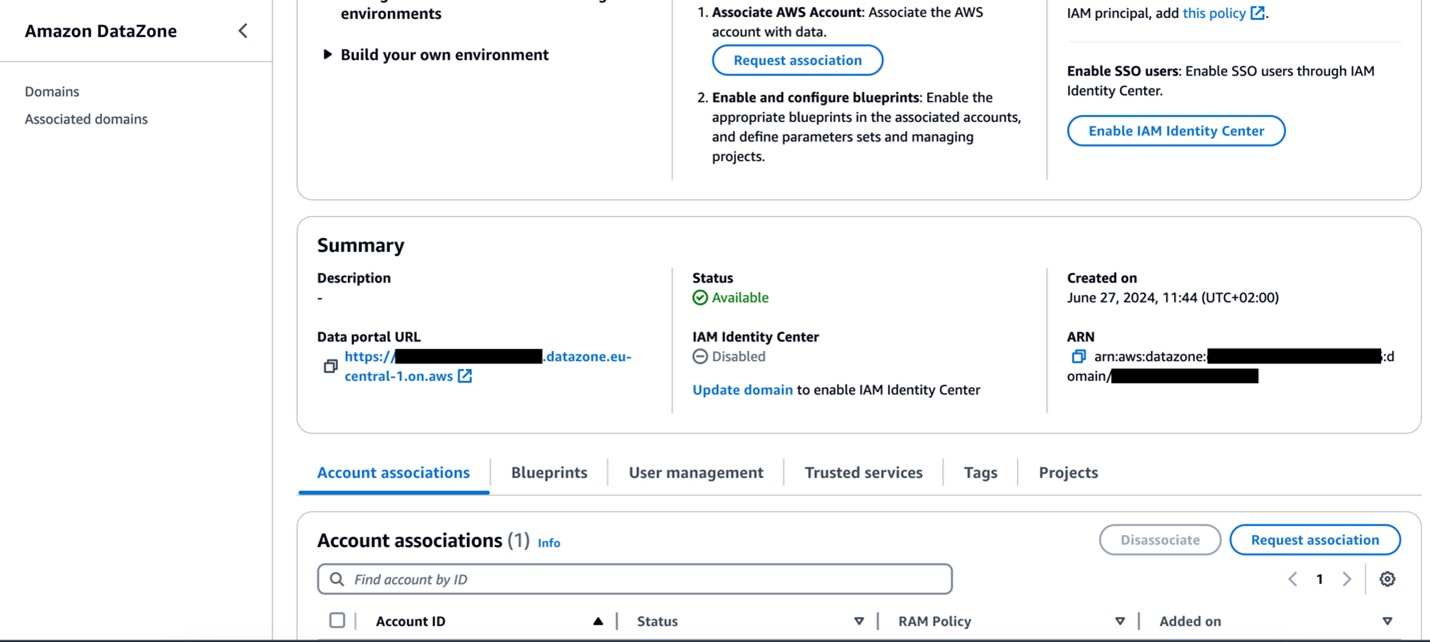
  9. On the domain details page, locate the Amazon DataZone data portal URL in the Summary section. Choose the link to the data portal.

    For more details about accessing Amazon DataZone, refer to How can I access Amazon DataZone?

  10. In the data portal, open your project and choose the Data tab.
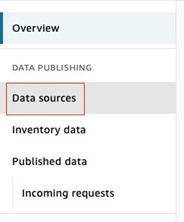
  11. In the navigation pane, choose Data sources and find the newly created data source for Amazon Redshift.
  12. Verify that the data source has been successfully published.

After the data sources are published, users can discover the published data and submit a subscription request. The data producer can approve or reject requests. Upon approval, users can consume the data by querying the data in the Amazon Redshift query editor. The following screenshot illustrates data discovery in the Amazon DataZone data portal.

Clean up

Complete the following steps to clean up the resources deployed through the AWS CDK:

  1. Sign in to Account B, go to the Amazon DataZone domain portal, and check there is no subscription for your published data asset. If there is a subscription, either ask the subscriber to unsubscribe or revoke the subscription request.
  2. Delete the published data assets that were created in the Amazon DataZone project by the dataset registration Lambda function.
  3. Delete the remaining resources created using the following command in the base folder:
    npm run cdk destroy –all

Conclusion

Amazon DataZone offers a seamless integration with AWS services, providing a powerful solution for organizations like Volkswagen to break down their data silos and implement effective data mesh architectures through a straightforward implementation highlighted in this post. By using Amazon DataZone, Volkswagen addressed its immediate data sharing hurdles and laid the groundwork for a more agile, data-driven future in automotive manufacturing. The automated data publishing from various warehouses, coupled with standardized governance workflows, has significantly reduced the manual overhead that once slowed down Volkswagen’s data engineering teams. Now, instead of navigating a labyrinth of emails, tickets, and communication, Volkswagen’s data engineers and data scientists can quickly discover and access the data they need, all while maintaining their security and compliance standards.

By using Amazon DataZone, organizations can bring their isolated data together in ways that make it simpler for teams to collaborate while maintaining security and compliance at scale. This approach not only addresses current data governance challenges but also creates a highly scalable foundation for future data-driven innovations. For guidance on establishing your organization’s data mesh with Amazon DataZone, contact your AWS team today.


About the Authors

Bandana Das

Bandana Das

Bandana is a Senior Data Architect in AWS and specializes in data and analytics. She builds event-driven data architectures to support customers in data management and data-driven decision-making. She is also passionate about helping customers on their data management journey to the cloud.

Anirban Saha

Anirban Saha

Anirban is a DevOps Architect at AWS, specializing in architecting and implementation of solutions for customer challenges in the automotive domain. He is passionate about well-architected infrastructures, automation, data-driven solutions, and helping make the customer’s cloud journey as seamless as possible. In his spare time, he likes to keep himself engaged with reading, painting, language learning, and traveling.

Stoyan Stoyanov

Stoyan Stoyanov

Stoyan works for AWS as a DevOps Engineer. He has more than 10 years of experience in software engineering, cloud technologies, DevOps, data engineering, and security.

Sindi Cali

Sindi Cali

Sindi is a ProServe Associate Consultant with AWS Professional Services. She supports customers in building data-driven applications in AWS.

Streamline your data governance by deploying Amazon DataZone with the AWS CDK

Post Syndicated from Bandana Das original https://aws.amazon.com/blogs/big-data/streamline-your-data-governance-by-deploying-amazon-datazone-with-the-aws-cdk/

Managing data across diverse environments can be a complex and daunting task. Amazon DataZone simplifies this so you can catalog, discover, share, and govern data stored across AWS, on premises, and third-party sources.

Many organizations manage vast amounts of data assets owned by various teams, creating a complex landscape that poses challenges for scalable data management. These organizations require a robust infrastructure as code (IaC) approach to deploy and manage their data governance solutions. In this post, we explore how to deploy Amazon DataZone using the AWS Cloud Development Kit (AWS CDK) to achieve seamless, scalable, and secure data governance.

Overview of solution

By using IaC with the AWS CDK, organizations can efficiently deploy and manage their data governance solutions. This approach provides scalability, security, and seamless integration across all teams, allowing for consistent and automated deployments.

The AWS CDK is a framework for defining cloud IaC and provisioning it through AWS CloudFormation. Developers can use any of the supported programming languages to define reusable cloud components known as constructs. A construct is a reusable and programmable component that represents AWS resources. The AWS CDK translates the high-level constructs defined by you into equivalent CloudFormation templates. AWS CloudFormation provisions the resources specified in the template, streamlining the usage of IaC on AWS.

Amazon DataZone core components are the building blocks to create a comprehensive end-to-end solution for data management and data governance. The following are the Amazon DataZone core components. For more details, see Amazon DataZone terminology and concepts.

  • Amazon DataZone domain – You can use an Amazon DataZone domain to organize your assets, users, and their projects. By associating additional AWS accounts with your Amazon DataZone domains, you can bring together your data sources.
  • Data portal – The data portal is outside the AWS Management Console. This is a browser-based web application where different users can catalog, discover, govern, share, and analyze data in a self-service fashion.
  • Business data catalog – You can use this component to catalog data across your organization with business context and enable everyone in your organization to find and understand data quickly.
  • Projects – In Amazon DataZone, projects are business use case-based groupings of people, assets (data), and tools used to simplify access to AWS analytics.
  • Environments – Within Amazon DataZone projects, environments are collections of zero or more configured resources on which a given set of AWS Identity and Access Management (IAM) principals (for example, users with a contributor permissions) can operate.
  • Amazon DataZone data source – In Amazon DataZone, you can publish an AWS Glue Data Catalog data source or Amazon Redshift data source.
  • Publish and subscribe workflows – You can use these automated workflows to secure data between producers and consumers in a self-service manner and make sure that everyone in your organization has access to the right data for the right purpose.

We use an AWS CDK app to demonstrate how to create and deploy core components of Amazon DataZone in an AWS account. The following diagram illustrates the primary core components that we create.

In addition to the core components deployed with the AWS CDK, we provide a custom resource module to create Amazon DataZone components such as glossaries, glossary terms, and metadata forms, which are not supported by AWS CDK constructs (at the time of writing).

Prerequisites

The following local machine prerequisites are required before starting:

Deploy the solution

Complete the following steps to deploy the solution:

  1. Clone the GitHub repository and go to the root of your downloaded repository folder:
    git clone https://github.com/aws-samples/amazon-datazone-cdk-example.git
    cd amazon-datazone-cdk-example

  2. Install local dependencies:
    $ npm ci ### this will install the packages configured in package-lock.json

  3. Sign in to your AWS account using the AWS CLI by configuring your credential file (replace <PROFILE_NAME> with the profile name of your deployment AWS account):
    $ export AWS_PROFILE=<PROFILE_NAME>

  4. Bootstrap the AWS CDK environment (this is a one-time activity and not needed if your AWS account is already bootstrapped):
    $ npm run cdk bootstrap

  5. Run the script to replace the placeholders for your AWS account and AWS Region in the config files:
    $ ./scripts/prepare.sh <<YOUR_AWS_ACCOUNT_ID>> <<YOUR_AWS_REGION>>

The preceding command will replace the AWS_ACCOUNT_ID_PLACEHOLDER and AWS_REGION_PLACEHOLDER values in the following config files:

  • lib/config/project_config.json
  • lib/config/project_environment_config.json
  • lib/constants.ts

Next, you configure your Amazon DataZone domain, project, business glossary, metadata forms, and environments with your data source.

  1. Go to the file lib/constants.ts. You can keep the DOMAIN_NAME provided or update it as needed.
  2. Go to the file lib/config/project_config.json. You can keep the example values for projectName and projectDescription or update them. An example value for projectMembers has also been provided (as shown in the following code snippet). Update the value of the memberIdentifier parameter with an IAM role ARN of your choice that you would like to be the owner of this project.
    "projectMembers": [
                {
                    "memberIdentifier": "arn:aws:iam::AWS_ACCOUNT_ID_PLACEHOLDER:role/Admin",
                    "memberIdentifierType": "UserIdentifier"
                }
            ]

  3. Go to the file lib/config/project_glossary_config.json. An example business glossary and glossary terms are provided for the projects; you can keep them as is or update them with your project name, business glossary, and glossary terms.
  4. Go to the lib/config/project_form_config.json file. You can keep the example metadata forms provided for the projects or update your project name and metadata forms.
  5. Go to the lib/config/project_enviornment_config.json file. Update EXISTING_GLUE_DB_NAME_PLACEHOLDER with the existing AWS Glue database name in the same AWS account where you are deploying the Amazon DataZone core components with the AWS CDK. Make sure you have at least one existing AWS Glue table in this AWS Glue database to publish as a data source within Amazon DataZone. Replace DATA_SOURCE_NAME_PLACEHOLDER and DATA_SOURCE_DESCRIPTION_PLACEHOLDER with your choice of Amazon DataZone data source name and description. An example of a cron schedule has been provided (see the following code snippet). This is the schedule for your data source run; you can keep the same or update it.
    "Schedule":{
       "schedule":"cron(0 7 * * ? *)"
    }

Next, you update the trust policy of the AWS CDK deployment IAM role to deploy a custom resource module.

  1. On the IAM console, update the trust policy of the IAM role for your AWS CDK deployment that starts with cdk-hnb659fds-cfn-exec-role- by adding the following permissions. Replace ${ACCOUNT_ID} and ${REGION} with your specific AWS account and Region.
         {
             "Effect": "Allow",
             "Principal": {
                 "Service": "lambda.amazonaws.com"
             },
             "Action": "sts:AssumeRole",
             "Condition": {
                 "ArnLike": {
                     "aws:SourceArn": [
                         
                         "arn:aws:lambda:${REGION}:{ACCOUNT_ID}:function:DataZonePreqStack-GlossaryLambda*",
                         "arn:aws:lambda:${REGION}:{ACCOUNT_ID}:function:DataZonePreqStack-GlossaryTermLambda*",
                         "arn:aws:lambda:${REGION}:{ACCOUNT_ID}:function:DataZonePreqStack-FormLambda*"
                     ]
                 }
             }
         }

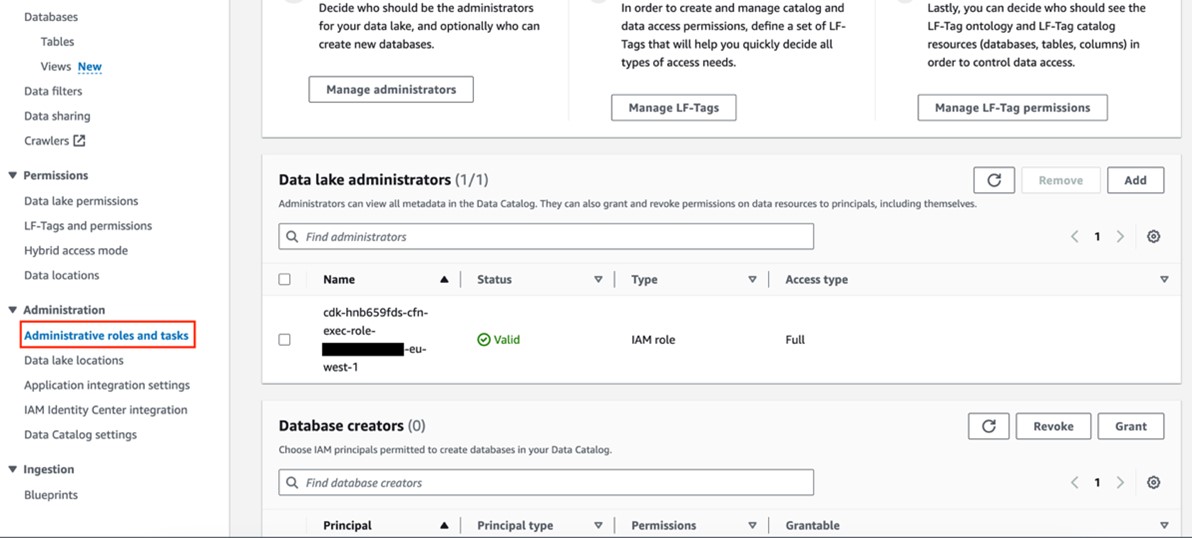
Now you can configure data lake administrators in Lake Formation.

  1. On the Lake Formation console, choose Administrative roles and tasks in the navigation pane.
  2. Under Data lake administrators, choose Add and add the IAM role for AWS CDK deployment that starts with cdk-hnb659fds-cfn-exec-role- as an administrator.

This IAM role needs permissions in Lake Formation to create resources, such as an AWS Glue database. Without these permissions, the AWS CDK stack deployment will fail.

  1. Deploy the solution:
    $ npm run cdk deploy --all

  2. During deployment, enter y if you want to deploy the changes for some stacks when you see the prompt Do you wish to deploy these changes (y/n)?.
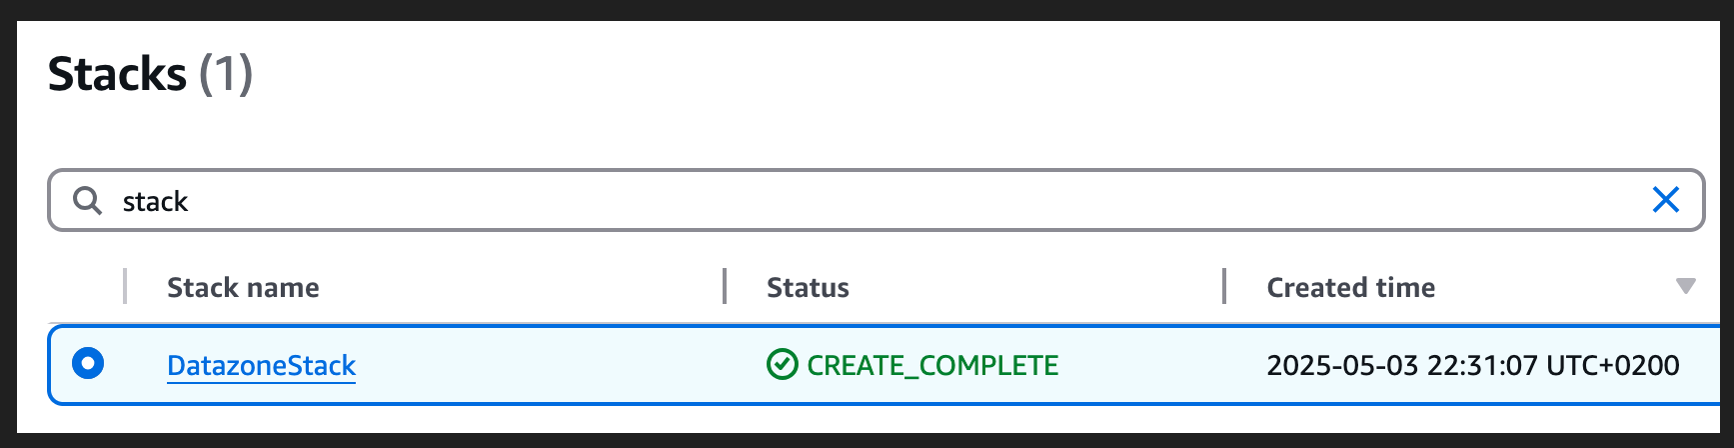
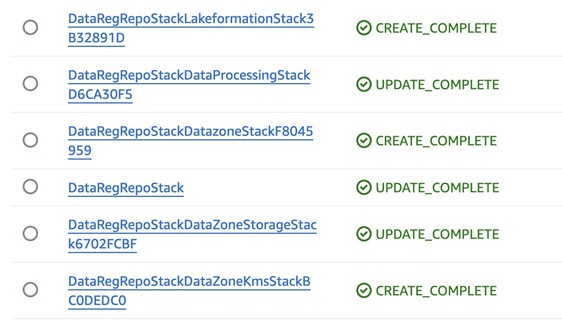
  3. After the deployment is complete, sign in to your AWS account and navigate to the AWS CloudFormation console to verify that the infrastructure deployed.

You should see a list of the deployed CloudFormation stacks, as shown in the following screenshot.

  1. Open the Amazon DataZone console in your AWS account and open your domain.
  2. Open the data portal URL available in the Summary section.
  3. Find your project in the data portal and run the data source job.

This is a one-time activity if you want to publish and search the data source immediately within Amazon DataZone. Otherwise, wait for the data source runs according to the cron schedule mentioned in the preceding steps.

Troubleshooting

If you get the message "Domain name already exists under this account, please use another one (Service: DataZone, Status Code: 409, Request ID: 2d054cb0-0 fb7-466f-ae04-c53ff3c57c9a)" (RequestToken: 85ab4aa7-9e22-c7e6-8f00-80b5871e4bf7, HandlerErrorCode: AlreadyExists), change the domain name under lib/constants.ts and try to deploy again.

If you get the message "Resource of type 'AWS::IAM::Role' with identifier 'CustomResourceProviderRole1' already exists." (RequestToken: 17a6384e-7b0f-03b3 -1161-198fb044464d, HandlerErrorCode: AlreadyExists), this means you’re accidentally trying to deploy everything in the same account but a different Region. Make sure to use the Region you configured in your initial deployment. For the sake of simplicity, the DataZonePreReqStack is in one Region in the same account.

If you get the message “Unmanaged asset” Warning in the data asset on your datazone project, you must explicitly provide Amazon DataZone with Lake Formation permissions to access tables in this external AWS Glue database. For instructions, refer to Configure Lake Formation permissions for Amazon DataZone.

Clean up

To avoid incurring future charges, delete the resources. If you have already shared the data source using Amazon DataZone, then you have to remove those manually first in the Amazon DataZone data portal because the AWS CDK isn’t able to automatically do that.

  1. Unpublish the data within the Amazon DataZone data portal.
  2. Delete the data asset from the Amazon DataZone data portal.
  3. From the root of your repository folder, run the following command:
    $ npm run cdk destroy --all

  4. Delete the Amazon DataZone created databases in AWS Glue. Refer to the tips to troubleshoot Lake Formation permission errors in AWS Glue if needed.
  5. Remove the created IAM roles from Lake Formation administrative roles and tasks.

Conclusion

Amazon DataZone offers a comprehensive solution for implementing a data mesh architecture, enabling organizations to address advanced data governance challenges effectively. Using the AWS CDK for IaC streamlines the deployment and management of Amazon DataZone resources, promoting consistency, reproducibility, and automation. This approach enhances data organization and sharing across your organization.

Ready to streamline your data governance? Dive deeper into Amazon DataZone by visiting the Amazon DataZone User Guide. To learn more about the AWS CDK, explore the AWS CDK Developer Guide.


About the Authors

Bandana Das is a Senior Data Architect at Amazon Web Services and specializes in data and analytics. She builds event-driven data architectures to support customers in data management and data-driven decision-making. She is also passionate about enabling customers on their data management journey to the cloud.

Gezim Musliaj is a Senior DevOps Consultant with AWS Professional Services. He is interested in various things CI/CD, data, and their application in the field of IoT, massive data ingestion, and recently MLOps and GenAI.

Sameer Ranjha is a Software Development Engineer on the Amazon DataZone team. He works in the domain of modern data architectures and software engineering, developing scalable and efficient solutions.

Sindi Cali is an Associate Consultant with AWS Professional Services. She supports customers in building data-driven applications in AWS.

Bhaskar Singh is a Software Development Engineer on the Amazon DataZone team. He has contributed to implementing AWS CloudFormation support for Amazon DataZone. He is passionate about distributed systems and dedicated to solving customers’ problems.
How Volkswagen streamlined access to data across multiple data lakes using Amazon DataZone – Part 1

Post Syndicated from Bandana Das original https://aws.amazon.com/blogs/big-data/how-volkswagen-streamlined-access-to-data-across-multiple-data-lakes-using-amazon-datazone-part-1/

Over the years, organizations have invested in creating purpose-built, cloud-based data lakes that are siloed from one another. A major challenge is enabling cross-organization discovery and access to data across these multiple data lakes, each built on different technology stacks. A data mesh addresses these issues with four principles: domain-oriented decentralized data ownership and architecture, treating data as a product, providing self-serve data infrastructure as a platform, and implementing federated governance. Data mesh enables organizations to organize around data domains with a focus on delivering data as a product.

In 2019, Volkswagen AG (VW) and Amazon Web Services (AWS) formed a strategic partnership to co-develop the Digital Production Platform (DPP), aiming to enhance production and logistics efficiency by 30 percent while reducing production costs by the same margin. The DPP was developed to streamline access to data from shop-floor devices and manufacturing systems by handling integrations and providing standardized interfaces. However, as applications evolved on the platform, a significant challenge emerged: sharing data across applications stored in multiple isolated data lakes in Amazon Simple Storage Service (Amazon S3) buckets in individual AWS accounts without having to consolidate data into a central data lake. Another challenge is discovering available data stored across multiple data lakes and facilitating a workflow to request data access across business domains within each plant. The current method is largely manual, relying on emails and general communication, which not only increases overhead but also varies from one use case to another in terms of data governance. This blog post introduces Amazon DataZone and explores how VW used it to build their data mesh to enable streamlined data access across multiple data lakes. It focuses on the key aspect of the solution, which was enabling data providers to automatically publish data assets to Amazon DataZone, which served as the central data mesh for enhanced data discoverability. Additionally, the post provides code to guide you through the implementation.

Introduction to Amazon DataZone

Amazon DataZone is a data management service that makes it faster and easier for customers to catalog, discover, share, and govern data stored across AWS, on premises, and third-party sources. Key features of Amazon DataZone include a business data catalog that allows users to search for published data, request access, and start working on data in days instead of weeks. Amazon DataZone projects enable collaboration with teams through data assets and the ability to manage and monitor data assets across projects. It also includes the Amazon DataZone portal, which offers a personalized analytics experience for data assets through a web-based application or API. Lastly, Amazon DataZone governed data sharing ensures that the right data is accessed by the right user for the right purpose with a governed workflow.

Architecture for Data Management with Amazon DataZone

Figure 1: Data mesh pattern implementation on AWS using Amazon DataZone

The architecture diagram (Figure 1) represents a high-level design based on the data mesh pattern. It separates source systems, data domain producers (data publishers), data domain consumers (data subscribers), and central governance to highlight key aspects. This cross-account data mesh architecture aims to create a scalable foundation for data platforms, supporting producers and consumers with consistent governance.

  1. A data domain producer resides in an AWS account and uses Amazon S3 buckets to store raw and transformed data. Producers ingest data into their S3 buckets through pipelines they manage, own, and operate. They are responsible for the full lifecycle of the data, from raw capture to a form suitable for external consumption.
  2. A data domain producer maintains its own ETL stack using AWS Glue, AWS Lambda to process, AWS Glue Databrew to profile the data and prepare the data asset (data product) before cataloguing it into AWS Glue Data Catalog in their account.
  3. A second pattern could be that a data domain producer prepares and stores the data asset as table within Amazon Redshift using AWS S3 Copy.
  4. Data domain producers publish data assets using datasource run to Amazon DataZone in the Central Governance account. This populates the technical metadata in the business data catalog for each data asset. The business metadata, can be added by business users to provide business context, tags, and data classification for the datasets. Producers control what to share, for how long, and how consumers interact with it.
  5. Producers can register and create catalog entries with AWS Glue from all their S3 buckets. The central governance account securely shares datasets between producers and consumers via metadata linking, with no data (except logs) existing in this account. Data ownership remains with the producer.
  6. With Amazon DataZone, once data is cataloged and published into the DataZone domain, it can be shared with multiple consumer accounts.
  7. The Amazon DataZone Data portal provides a personalized view for users to discover/search and submit requests for subscription of data assets using a web-based application. The data domain producer receives the notification of subscription requests in the Data portal and can approve/reject the requests.
  8. Once approved, the consumer account can read and further process data assets to implement various use cases with AWS Lambda, AWS Glue, Amazon Athena, Amazon Redshift query editor v2, Amazon QuickSight (Analytics use cases) and with Amazon Sagemaker (Machine learning use cases).

Manual process to publish data assets to Amazon DataZone

To publish a data asset from the producer account, each asset must be registered in Amazon DataZone as a data source for consumer subscription. The Amazon DataZone User Guide provides detailed steps to achieve this. In the absence of an automated registration process, all required tasks must be completed manually for each data asset.

How to automate publishing data assets from AWS Glue Data Catalog from the producer account to Amazon DataZone

Using the automated registration workflow, the manual steps can be automated for any new data asset that needs to be published in an Amazon DataZone domain or when there’s a schema change in an already published data asset.

The automated solution reduces the repetitive manual steps to publish the data sources (AWS Glue tables) into an Amazon DataZone domain.

Architecture for automated data asset publish

Figure 2 Architecture for automated data publish to Amazon DataZone

To automate publishing data assets:

  1. In the producer account (Account B), the data to be shared resides in an Amazon S3 bucket (Figure 2). An AWS Glue crawler is configured for the dataset to automatically create the schema using AWS Cloud Development Kit (AWS CDK).
  2. Once configured, the AWS Glue crawler crawls the Amazon S3 bucket and updates the metadata in the AWS Glue Data Catalog. The successful completion of the AWS Glue crawler generates an event in the default event bus of Amazon EventBridge.
  3. An EventBridge rule is configured to detect this event and invoke a dataset-registration AWS Lambda function.
  4. The AWS Lambda function performs all the steps to automatically register and publish the dataset in Amazon Datazone.

Steps performed in the dataset-registration AWS Lambda function

    • The AWS Lambda function retrieves the AWS Glue database and Amazon S3 information for the dataset from the Amazon Eventbridge event triggered by the successful run of the AWS Glue crawler.
    • It obtains the Amazon DataZone Datalake blueprint ID from the producer account and the Amazon DataZone domain ID and project ID by assuming an IAM role in the central governance account where the Amazon Datazone domain exists.
    • It enables the Amazon DataZone Datalake blueprint in the producer account.
    • It checks if the Amazon Datazone environment already exists within the Amazon DataZone project. If it does not, then it initiates the environment creation process. If the environment exists, it proceeds to the next step.
    • It registers the Amazon S3 location of the dataset in Lake Formation in the producer account.
    • The function creates a data source within the Amazon DataZone project and monitors the completion of the data source creation.
    • Finally, it checks whether the data source sync job in Amazon DataZone needs to be started. If new AWS Glue tables or metadata is created or updated, then it starts the data source sync job.

Prerequisites

As part of this solution, you will publish data assets from an existing AWS Glue database in a producer account into an Amazon DataZone domain for which the following prerequisites need to be performed.

  1. You need two AWS accounts to deploy the solution.
    • One AWS account will act as the data domain producer account (Account B) which will contain the AWS Glue dataset to be shared.
    • The second AWS account is the central governance account (Account A), which will have the Amazon DataZone domain and project deployed. This is the Amazon DataZone account.
    • Ensure that both the AWS accounts belong to the same AWS Organization
  2. Remove the IAMAllowedPrincipals permissions from the AWS Lake Formation tables for which Amazon DataZone handles permissions.
  3. Make sure in both AWS accounts that you have cleared the checkbox for Default permissions for newly created databases and tables under the Data Catalog settings in Lake Formation (Figure 3).

    Figure 3: Clear default permissions in AWS Lake Formation

  4. Sign in to Account A (central governance account) and make sure you have created an Amazon DataZone domain and a project within the domain.
  5. If your Amazon DataZone domain is encrypted with an AWS Key Management Service (AWS KMS) key, add Account B (producer account) to the key policy with the following actions:
    {
      "Sid": "Allow use of the key",
      "Effect": "Allow",
      "Principal": {
        "AWS": "arn:aws:iam::<Account B>:root"
      },
      "Action": [
        "kms:Encrypt",
        "kms:Decrypt",
        "kms:ReEncrypt*",
        "kms:GenerateDataKey*",
        "kms:DescribeKey"
      ],
      "Resource": "*"
    }

  6. Ensure you have created an AWS Identity and Access Management (IAM) role that Account B (producer account) can assume and this IAM role is added as a member (as contributor) of your Amazon DataZone project. The role should have the following permissions:
    • This IAM role is called dz-assumable-env-dataset-registration-role in this example. Adding this role will enable you to successfully run the dataset-registration Lambda function. Replace the account-region, account id, and DataZonekmsKey in the following policy with your information. These values correspond to where your Amazon DataZone domain is created and the AWS KMS key Amazon Resource Name (ARN) used to encrypt the Amazon DataZone domain.
      {
          "Version": "2012-10-17",
          "Statement": [
               {
                  "Action": [
                      "DataZone:CreateDataSource",
                     "DataZone:CreateEnvironment",
                     "DataZone:CreateEnvironmentProfile",
                     "DataZone:GetDataSource",
                     "DataZone:GetEnvironment",
                     "DataZone:GetEnvironmentProfile",
                     "DataZone:GetIamPortalLoginUrl",
                     "DataZone:ListDataSources",
                      "DataZone:ListDomains",
                      "DataZone:ListEnvironmentProfiles",
                      "DataZone:ListEnvironments",
                      "DataZone:ListProjectMemberships",
                     "DataZone:ListProjects",
                      "DataZone:StartDataSourceRun"
                  ],
                  "Resource": "*",
                  "Effect": "Allow"
              },
              {
                  "Action": [
                       "kms:Decrypt",
                      "kms:DescribeKey",
                      "kms:GenerateDataKey"
                  ],
                 "Resource": "arn:aws:kms:${account_region}:${account_id}:key/${DataZonekmsKey}",
                  "Effect": "Allow"
              }
          ]
      }

    • Add the AWS account in the trust relationship of this role with the following trust relationship. Replace ProducerAccountId with the AWS account ID of Account B (data domain producer account).
      {
          "Version": "2012-10-17",
          "Statement": [
              {
                  "Effect": "Allow",
                  "Principal": {
                      "AWS": [
                          "arn:aws:iam::${ProducerAccountId}:root",
                      ]
                  },
                  "Action": "sts:AssumeRole"
              }
          ]
      } }

  7. The following tools are needed to deploy the solution using AWS CDK:

Deployment Steps

After completing the pre-requisites, use the AWS CDK stack provided on GitHub to deploy the solution for automatic registration of data assets into DataZone domain

  1. Clone the repository from GitHub to your preferred IDE using the following commands.
    git clone https://github.com/aws-samples/automate-and-simplify-aws-glue-data-asset-publish-to-amazon-datazone.git
    
    cd automate-and-simplify-aws-glue-data-asset-publish-to-amazon-datazone

  2. At the base of the repository folder, run the following commands to build and deploy resources to AWS.
    npm install 
    npm run lint

  3. Sign in to the AWS account B (the data domain producer account) using AWS Command Line Interface (AWS CLI) with your profile name.
  4. Ensure you have configured the AWS Region in your credential’s configuration file.
  5. Bootstrap the CDK environment with the following commands at the base of the repository folder. Replace <PROFILE_NAME> with the profile name of your deployment account (Account B). Bootstrapping is a one-time activity and is not needed if your AWS account is already bootstrapped.
    export AWS_PROFILE=<PROFILE_NAME>
    npm run cdk bootstrap

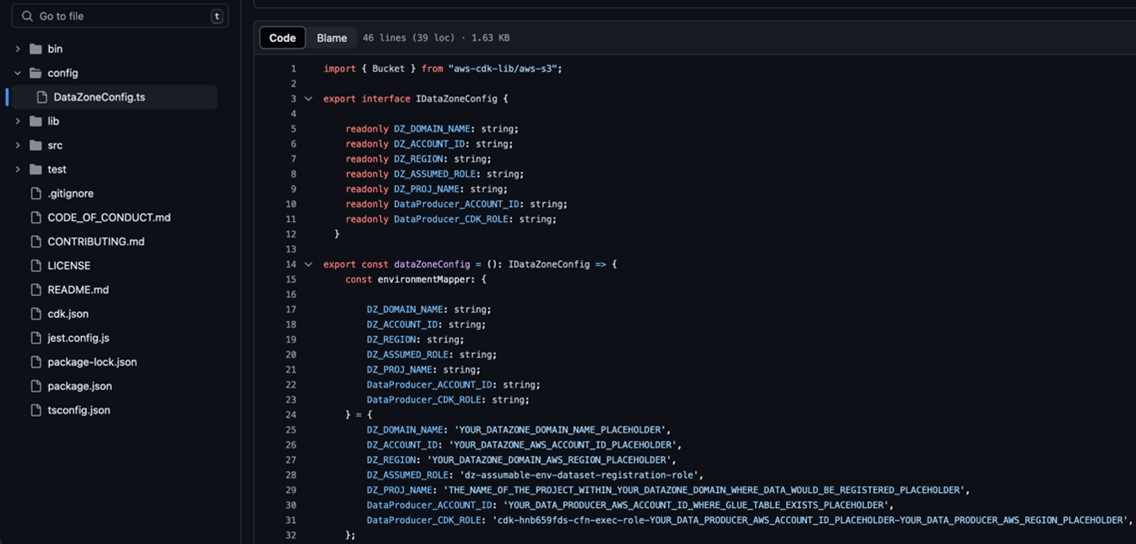
  6. Replace the placeholder parameters (marked with the suffix _PLACEHOLDER) in the file config/DataZoneConfig.ts (Figure 4).
    • Amazon DataZone domain and project name of your Amazon DataZone instance. Make sure all names are in lowercase.
    • The AWS account ID and Region.
    • The assumable IAM role from the prerequisites.
    • The deployment role starting with cfn-xxxxxx-cdk-exec-role-.

Figure 4: Edit the DataZoneConfig file

  1. In the AWS Management Console for Lake Formation, select Administrative roles and tasks from the navigation pane (Figure 5) and make sure the IAM role for AWS CDK deployment that starts with cfn-xxxxxx-cdk-exec-role- is selected as an administrator in Data lake administrators. This IAM role needs permissions in Lake Formation to create resources, such as an AWS Glue database. Without these permissions, the AWS CDK stack deployment will fail.

Figure 5: Add cfn-xxxxxx-cdk-exec-role- as a Data Lake administrator

  1. Use the following command in the base folder to deploy the AWS CDK solution
    npm run cdk deploy --all

During deployment, enter y if you want to deploy the changes for some stacks when you see the prompt Do you wish to deploy these changes (y/n)?

  1. After the deployment is complete, sign in to your AWS account B (producer account) and navigate to the AWS CloudFormation console to verify that the infrastructure deployed. You should see a list of the deployed CloudFormation stacks as shown in Figure 6.

Figure 6: Deployed CloudFormation stacks

Test automatic data registration to Amazon DataZone

To test, we use the Online Retail Transactions dataset from Kaggle as a sample dataset to demonstrate the automatic data registration.

  1. Download the Online Retail.csv file from Kaggle dataset.
  2. Login to AWS Account B (producer account) and navigate to the Amazon S3 console, find the DataZone-test-datasource S3 bucket, and upload the csv file there (Figure 7).

Figure 7: Upload the dataset CSV file

  1. The AWS Glue crawler is scheduled to run at a specific time each day. However for testing, you can manually run the crawler by going to the AWS Glue console and selecting Crawlers from the navigation pane. Run the on-demand crawler starting with DataZone-. After the crawler has run, verify that a new table has been created.
  2. Go to the Amazon DataZone console in AWS account A (central governance account) where you deployed the resources. Select Domains in the navigation pane (Figure 8), then Select and open your domain.

    Figure 8: Amazon DataZone domains

  3. After you open the Datazone Domain, you can find the Amazon Datazone data portal URL in the Summary section (Figure 9). Select and open data portal.

    Figure 9: Amazon DataZone data portal URL

  4. In the data portal find your project (Figure 10). Then select the Data tab at the top of the window.

    Figure 10: Amazon DataZone Project overview

  5. Select the section Data Sources (Figure 11) and find the newly created data source DataZone-testdata-db.

    Figure 11:  Select Data sources in the Amazon Datazone Domain Data portal

  6. Verify that the data source has been successfully published (Figure 12).

    Figure 12:  The data sources are visible in the Published data section

  7. After the data sources are published, users can discover the published data and can submit a subscription request. The data producer can approve or reject requests. Upon approval, users can consume the data by querying data in Amazon Athena. Figure 13 illustrates data discovery in the Amazon DataZone data portal.

    Figure 13: Example data discovery in the Amazon DataZone portal

Clean up

Use the following steps to clean up the resources deployed through the CDK.

  1. Empty the two S3 buckets that were created as part of this deployment.
  2. Go to the Amazon DataZone domain portal and delete the published data assets that were created in the Amazon DataZone project by the dataset-registration Lambda function.
  3. Delete the remaining resources created using the following command in the base folder:
    npm run cdk destroy --all

Conclusion

By using AWS Glue and Amazon DataZone, organizations can make their data management easier and allow teams to share and collaborate on data smoothly. Automatically sending AWS Glue data to Amazon DataZone not only makes the process simple but also keeps the data consistent, secure, and well-governed. Simplify and standardize publishing data assets to Amazon DataZone and streamline data management with Amazon DataZone. For guidance on establishing your organization’s data mesh with Amazon DataZone, contact your AWS team today.


About the Authors

Bandana Das is a Senior Data Architect at Amazon Web Services and specializes in data and analytics. She builds event-driven data architectures to support customers in data management and data-driven decision-making. She is also passionate about enabling customers on their data management journey to the cloud.

Anirban Saha is a DevOps Architect at AWS, specializing in architecting and implementation of solutions for customer challenges in the automotive domain. He is passionate about well-architected infrastructures, automation, data-driven solutions and helping make the customer’s cloud journey as seamless as possible. Personally, he likes to keep himself engaged with reading, painting, language learning and traveling.

Chandana Keswarkar is a Senior Solutions Architect at AWS, who specializes in guiding automotive customers through their digital transformation journeys by using cloud technology. She helps organizations develop and refine their platform and product architectures and make well-informed design decisions. In her free time, she enjoys traveling, reading, and practicing yoga.

Sindi Cali is a ProServe Associate Consultant with AWS Professional Services. She supports customers in building data driven applications in AWS.