Post Syndicated from Fola Bolodeoku original https://aws.amazon.com/blogs/security/automatically-update-aws-waf-ip-sets-with-aws-ip-ranges/
Note: This blog post describes how to automatically update AWS WAF IP sets with the most recent AWS IP ranges for AWS services. This related blog post describes how to perform a similar update for Amazon CloudFront IP ranges that are used in VPC Security Groups.
You can use AWS Managed Rules for AWS WAF to quickly create baseline protections for your web applications, including setting up lists of IP addresses to be blocked. In some cases, you might need to create an IP set in AWS WAF with the IP address ranges of Amazon Web Services (AWS) services that you use, so that traffic from these services is allowed. In this blog post, we provide a solution that automatically updates an AWS WAF IP set with the IP address ranges of the AWS services Amazon CloudFront, Amazon Route 53 health checks, and Amazon EC2 (and also the services that share the same IP address ranges, such as AWS Lambda, Amazon CloudWatch, and so on). These services are present in the AWS Managed Rules Anonymous IP list, and blocking them may cause inadvertent service impairment for applications that expect traffic from the services.
As an application owner, you can improve your security posture by using the Anonymous IP list in your AWS WAF web access control lists (web ACLs) to block source IP addresses from specific hosting providers and anonymization services, such as VPNs, proxies, and Tor nodes. Due to the generic nature of these rules, when you use the Anonymous IP list, you might want to exclude certain IPs from the list of IPs to be blocked, in order to allow web traffic from those sources. For example, you can allow traffic that originates from the AWS network.
Alternatively, you might want to permit only IP addresses from certain AWS services in a web ACL. This is a common requirement when you protect an Application Load Balancer by restricting all incoming traffic to CloudFront IP ranges. Creating your own custom list to allow expected traffic from the AWS network requires some effort, because you need to periodically update the list by using the IP ranges that we provide. With the solution we present here, you don’t have to manually manage the exclusion list. When the new AWS IP ranges are published, this solution will automatically fetch and update the list.
Note: This solution only works with AWS WAF, and will not work with AWS WAF Classic.
Solution overview
Figure 1 shows the solution architecture.

Figure 1: Automatic update process for service IPs
AWS sends Amazon Simple Notification Service (Amazon SNS) notifications to subscribers of the AmazonIPSpaceChanged SNS topic when updates are made to the public IP addresses for AWS services. This solution uses an AWS CloudFormation template to deploy an AWS Lambda function that is triggered by these SNS notifications. The function creates AWS WAF IP sets for IPv4 and IPv6 address ranges in your web ACL.
The solution workflow is as follows:
- In the CloudFormation template, you select the services that you want the AWS WAF IP set to be updated with.
- The template deploys the required AWS resources with the configuration that specifies what services to fetch from an AWS public IP address update.
- AWS Lambda function is manually invoked one first time to populate AWS WAF IP sets with selected IPs from AWS IP range.
- Once AWS IP range is updated, an Amazon SNS notification is sent to subscribers of the SNS topic.
- SNS notification triggers the AWS Lambda function.
- The Lambda function fetches the selected IP ranges and updates IP sets for IPv4 addresses and IPv6 addresses.
- The application owner adds a custom AWS WAF web ACL rule that uses the IP sets to allow traffic from the AWS services that you’ve selected. This way, the web ACL makes reference to always updated AWS WAF IP sets with no further action required from your side.
Solution prerequisites
The solution is automatically created when you deploy the AWS CloudFormation template that is available on the solution’s GitHub page. There are three resources that you must have in place before you deploy the template:
- The Python code that will be used as the Lambda function.
- Download the update_aws_waf_ipset.py Python code from the project’s AWS Lambda directory in GitHub. This function is responsible for constantly checking AWS IPs and making sure that your AWS WAF IP sets are always updated with the most recent set of IPs in use by the AWS service of choice.
- An Amazon Simple Storage Service (Amazon S3) bucket that you will use to store the compressed Python code.
- Compress the file to a .zip file and upload it to an Amazon Simple Storage Service (Amazon S3) bucket in the same AWS Region where you will deploy the template. For instructions on how to create an S3 bucket, see Creating a bucket.
- An AWS WAF web ACL to filter requests that come in from trusted sources. The web ACL uses the IP sets that the solution creates and updates with the necessary IP addresses.
- Create a new AWS WAF web ACL or use an existing one that is in the same Region where you will deploy the template.
Deploy the AWS CloudFormation template
The CloudFormation template deploys the required resources for this solution in your account. The following resources are deployed:
- Two AWS WAF IP sets, IPv4Set and IPv6Set that are used to store IPv4 and IPv6 IP addresses from the services you’re interested in allowing. Those IP sets are visible in the AWS WAF console under the same Region where the template is deployed.
- Note: The IP address 192.0.2.0/24 that appears in the template is a placeholder for the IP addresses that will be populated by the solution, and it is used for documentation purposes only.
- The update_aws_waf_ipset.py Python code is used in an AWS Lambda function called UpdateWAFIPSet. This is the function that will read which services the solution should collects IPs from, and which IP sets should be populated. If you don’t change those parameters, the function will use default IP set suffixes. By default, the solution will select ROUTE53_HEALTHCHECKS and CLOUDFRONT as the services for which to download IPs. You can update the list of IP addresses as needed, by referring to the AWS IP JSON document for a list of service names and IP ranges.
- A Lambda execution role with permissions restricted to least privilege required.
- The Lambda function is automatically subscribed to the AmazonIPSpaceChanged SNS topic, which is responsible for monitoring changes in the list of AWS IPs.
- A Lambda permission resource to allow the previously created SNS topic to invoke the template’s Lambda function.
Solution deployment through the console
You can download the AWS CloudFormation template, called template.yml, from the solution’s GitHub page.
After you’ve downloaded the template, access the CloudFormation console to create the stack. See the CloudFormation User Guide for instructions on selecting a downloaded template in the CloudFormation console to deploy a stack.
Note: The Region that you use when you deploy the template is where resources will be created.
On the Specify stack details page, you can enter the stack name, which will be the name used as a reference for resources created by the template, as well as six other stack parameters, shown in Figure 2.

Figure 2: Template parameters
The parameters are as follows:
- EC2REGIONS – This is the Region that the solution will use as a reference when it updates its list of IPs. Select all for all Regions, but you can also specify a Region of interest.
- IPV4SetNameSuffix – The solution will create an AWS WAF IPv4 IP set with the stack name as its name, but you can also add a suffix of your choice to the name.
- IPV6SetNameSuffix – Like the AWS WAF IPv4 IP set, the IPv6 IP set can also have a suffix of your choice.
- LambdaCodeS3Bucket – As mentioned in the Prerequisites section, you need to have previously uploaded the Lambda function Python code to an Amazon S3 bucket in the same Region where you’re deploying the stack. Enter the bucket name here, for example, mybucket.
- LambdaCodeS3Object – Enter the name of the .zip file of the compressed Lambda function in the S3 bucket, for example, myfunction.zip.
- SERVICES – Enter the list of AWS services for which you want the IP addresses populated in the AWS WAF IP sets. By default, this solution uses ROUTE53_HEALTHCHECKS and CLOUDFRONT, but you can change this parameter and add any service name, according to the list in the AWS IP ranges JSON.
After you deploy the template, its status will change to CREATE_COMPLETE.
Solution deployment through the AWS CLI
You can also deploy the solution template through the AWS Command Line Interface (AWS CLI). On the solution’s GitHub page, in the Setup section, follow the instructions for deploying the solution by using AWS CLI commands.
Note: To use the AWS CLI, you must have set it up in your environment. To set up the AWS CLI, follow the instructions in the AWS CLI installation documentation.
Invoke the Lambda function for the first time
After you successfully deploy the CloudFormation stack, it’s required that you run an initial Lambda invocation so that the AWS WAF IP sets are updated with AWS services IPs. This Lambda invocation is only required once, and after this initial call, the solution will handle future updates on your behalf.
To invoke this Lambda call through the AWS Management Console, open the Lambda console, select the Lambda function that was created by the template, and use the following event to create a test event. See Invoke the Lambda function in the AWS Lambda Developer Guide for step-by-step guidance on how to run a test event.
The success of the event will mean that the newly created AWS WAF IP sets now have the updated list of IPs from the services you’re working with.
You can also achieve Lambda function invocation through the AWS CLI by using the following command, where test_event.json is the test event I mentioned earlier.
You can use the documentation for invoking a Lambda function in the AWS CLI to explore this command and its parameters.
After successful invocation, status code 200 is returned on the AWS CLI to illustrate that invocation happened as expected. At this point, the AWS WAF IP sets are updated.
Use the solution IP sets in your AWS WAF web ACL
Now the AWS WAF IPv4 and IPv6 IP sets are populated, and you can obtain the IP lists either by using the AWS WAF console, or by calling the GetIPSet API through the AWS CLI command get-ip-set.
To use AWS WAF IP sets in your web ACL, see Creating and managing an IP set in the AWS WAF Developer Guide. You can use these IP sets in the same web ACL or rule group that contains the AWS Managed Rules Anonymous IP list and is associated to the AWS resource that AWS WAF is protecting. AWS WAF evaluation order and solution positioning within WebACL will be discussed in later section.
To associate your web ACL with an AWS resource, see Associating or disassociating a web ACL with an AWS resource.
Validate the solution
To validate the solution, let’s consider a scenario where you would like to allow requests from CloudFront to come through, while blocking any other anonymous and hosting provider sources. In this scenario, consider the following requests that are filtered by AWS WAF.
In the first one, a customer has the AWSManagedRulesAnonymousIpList rule group, and a request coming from an Amazon EC2 instance IP is blocked.
In the second request, this time coming in from CloudFront, you can see that AWS WAF didn’t block the request.
To achieve this result, you need to edit AWSManagedRulesAnonymousIpList and add a scope-down statement so that the rule set only blocks requests that aren’t sent from sources within this solution’s IPv4 and IPv6 IP sets.
To create a scope-down statement for AWSManagedRulesAnonymousIpList
- In the AWS WAF console, access your web ACL.
- Open the Rules tab.
- Select AWSManagedRulesAnonymousIpList rule set, and then choose Edit.
- Choose the arrow next to Scope-down statement – optional. You will see two options, Rule visual editor and Rule JSON editor.
- Choose Rule JSON editor and enter the following JSON. Replacing <IPv4-IPSET-ARN> and <IPv6-IPSET-ARN> with respective IP sets’ Amazon Resource Numbers (ARNs).
Note: You can use the AWS WAF ListIPSets action or the list-ip-sets CLI command to obtain the IP set Amazon Resource Numbers (ARNs) and enter that information in the provided JSON.
After making this change, your rule editing page will look like the following.
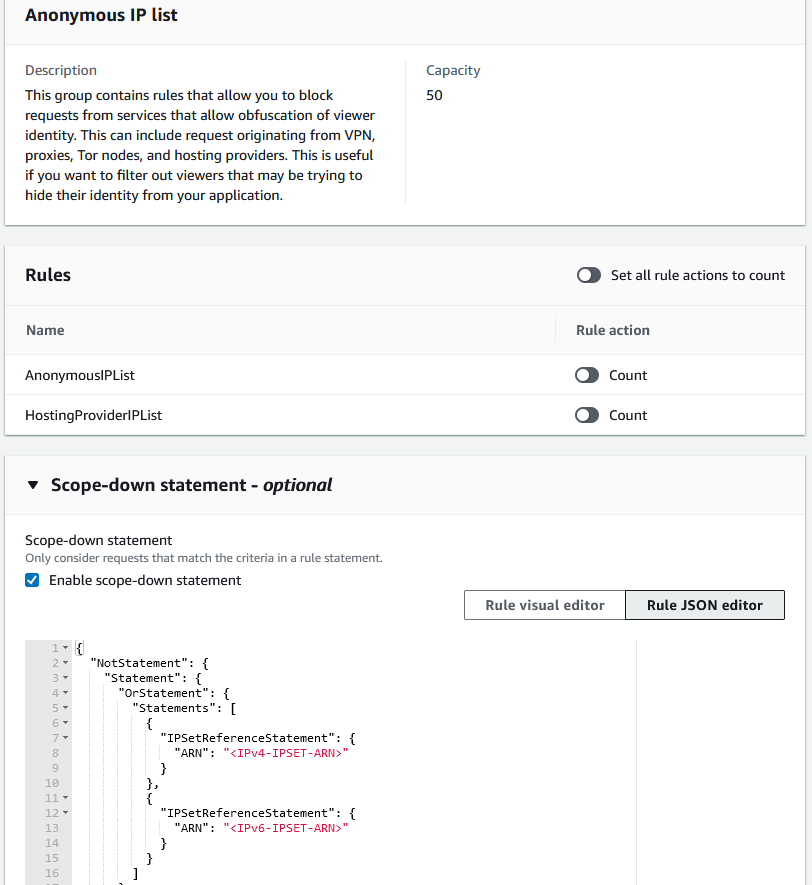
Figure 3: AWSManagedRulesAnonymousIpList scope-down statement
When you set the rule priority, consider using the AWSManagedRulesAnonymousIpList rule group with a lower priority than other rules within the web ACL. This causes that rule group to be evaluated prior to rules that are configured with terminating actions (that is, Allow and Block actions). The scope-down statement will match the request and allow traffic from the IP addresses within the IP set, and pass every other IP on to the next rule for further evaluation. Figure 4 shows an example of the suggested priority.
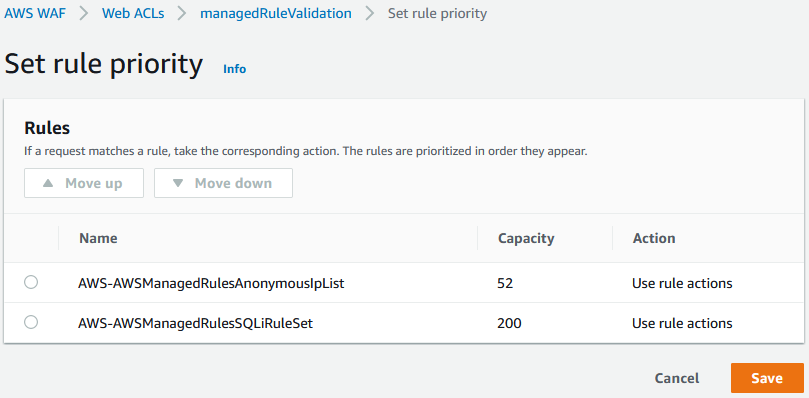
Figure 4: Example with suggested use of AWS WAF web ACL priority
Summary
This blog post provides you with a solution that is capable of automatically updating AWS WAF IP sets with the list of current IP ranges for one or more AWS services. You can use this solution in various ways, such as to allow requests from Amazon CloudFront when you’re using the AWS Managed Rules Anonymous IP List.
For best practices on AWS WAF implementation, see Guidelines for Implementing AWS WAF. For further reading on AWS WAF, see the AWS WAF Developer Guide.
If you have feedback about this post, submit comments in the Comments section below.
Want more AWS Security how-to content, news, and feature announcements? Follow us on Twitter.