All posts by Ignat Korchagin

Linux kernel security tunables everyone should consider adopting

Post Syndicated from Ignat Korchagin original https://blog.cloudflare.com/linux-kernel-hardening

The Linux kernel is the heart of many modern production systems. It decides when any code is allowed to run and which programs/users can access which resources. It manages memory, mediates access to hardware, and does a bulk of work under the hood on behalf of programs running on top. Since the kernel is always involved in any code execution, it is in the best position to protect the system from malicious programs, enforce the desired system security policy, and provide security features for safer production environments.

In this post, we will review some Linux kernel security configurations we use at Cloudflare and how they help to block or minimize a potential system compromise.

Secure boot

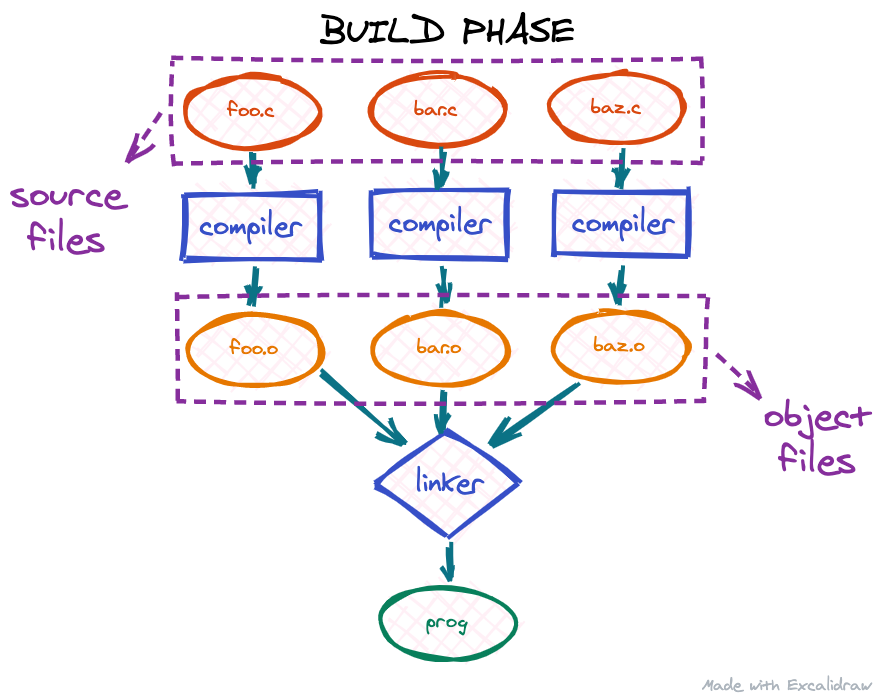
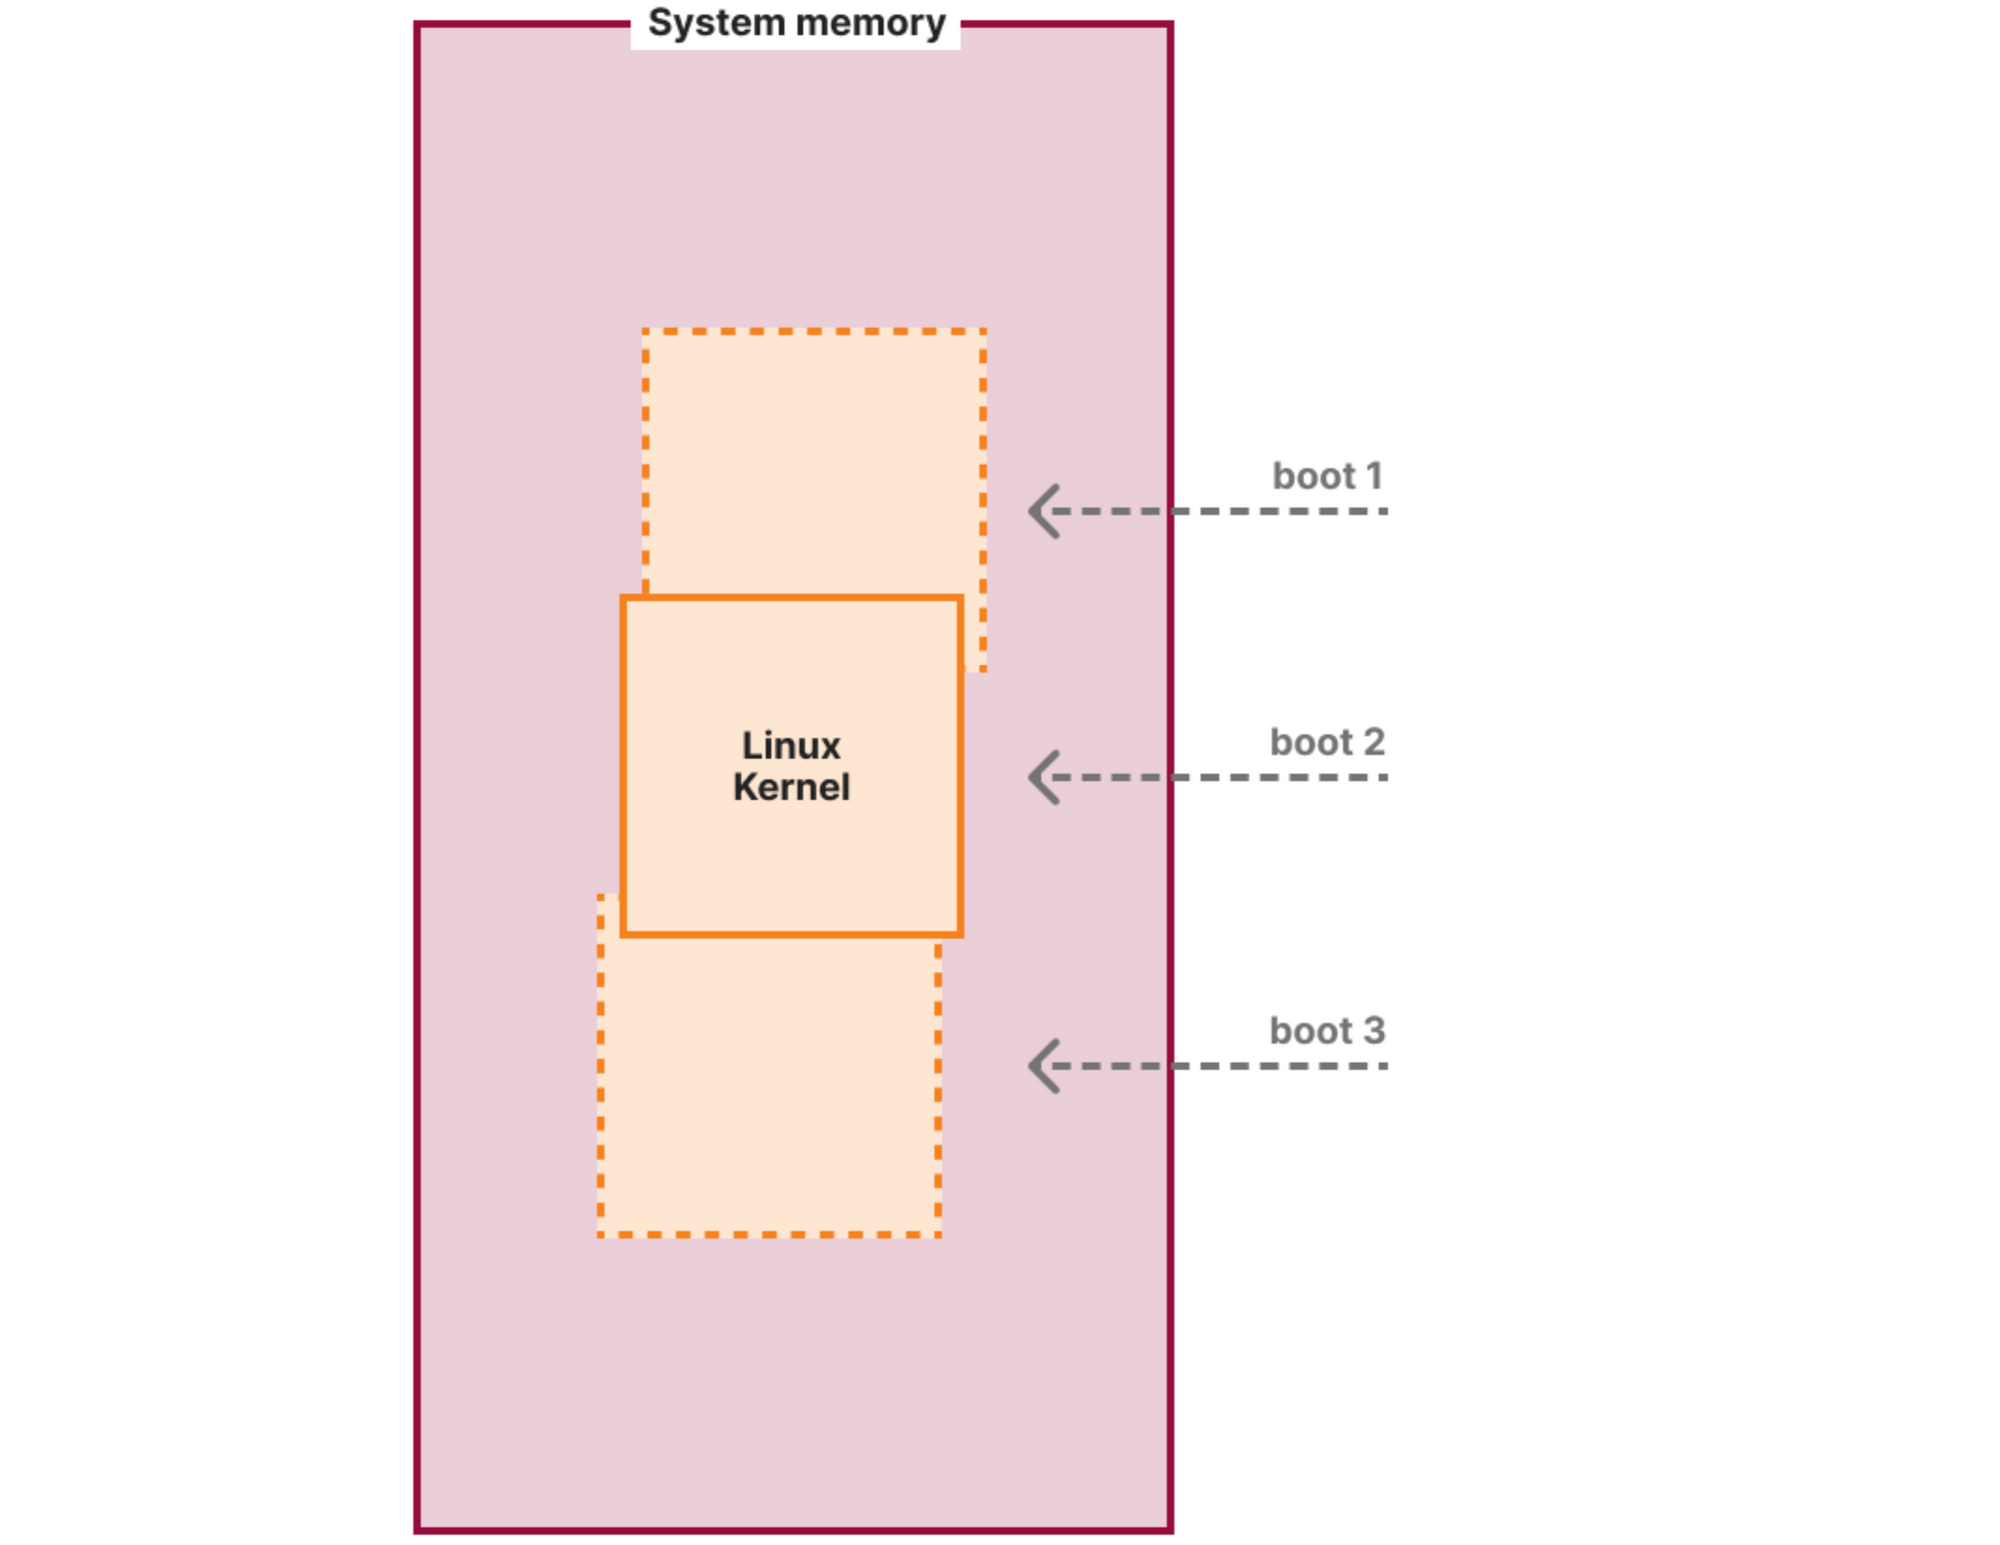
When a machine (either a laptop or a server) boots, it goes through several boot stages:

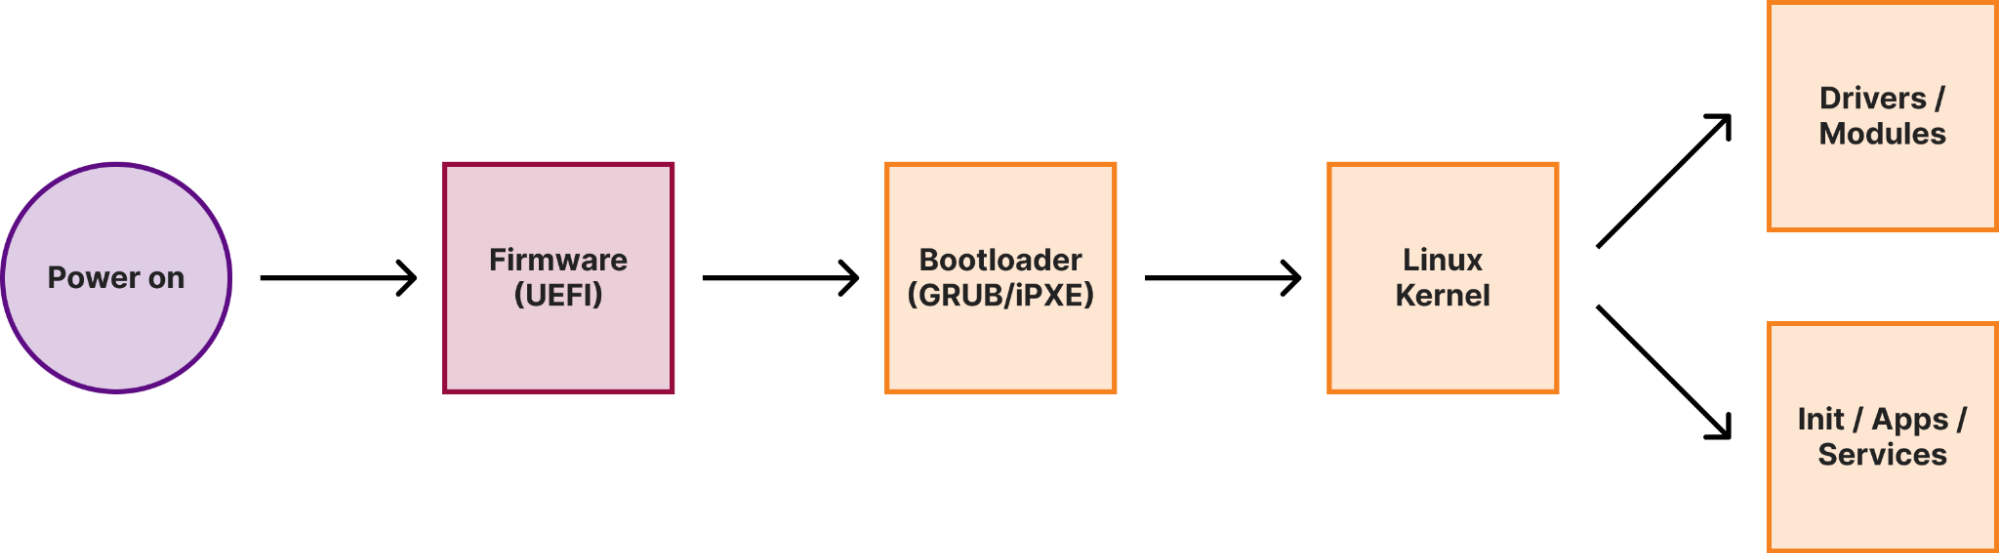
Within a secure boot architecture each stage from the above diagram verifies the integrity of the next stage before passing execution to it, thus forming a so-called secure boot chain. This way “trustworthiness” is extended to every component in the boot chain, because if we verified the code integrity of a particular stage, we can trust this code to verify the integrity of the next stage.

We have previously covered how Cloudflare implements secure boot in the initial stages of the boot process. In this post, we will focus on the Linux kernel.

Secure boot is the cornerstone of any operating system security mechanism. The Linux kernel is the primary enforcer of the operating system security configuration and policy, so we have to be sure that the Linux kernel itself has not been tampered with. In our previous post about secure boot we showed how we use UEFI Secure Boot to ensure the integrity of the Linux kernel.

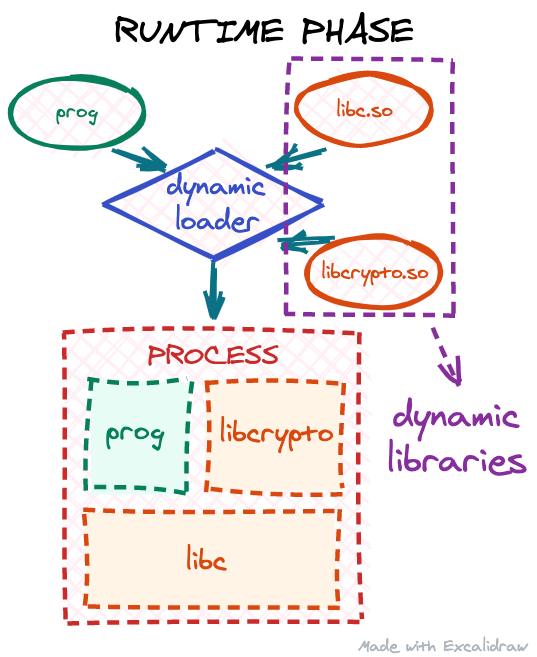
But what happens next? After the kernel gets executed, it may try to load additional drivers, or as they are called in the Linux world, kernel modules. And kernel module loading is not confined just to the boot process. A module can be loaded at any time during runtime — a new device being plugged in and a driver is needed, some additional extensions in the networking stack are required (for example, for fine-grained firewall rules), or just manually by the system administrator.

However, uncontrolled kernel module loading might pose a significant risk to system integrity. Unlike regular programs, which get executed as user space processes, kernel modules are pieces of code which get injected and executed directly in the Linux kernel address space. There is no separation between the code and data in different kernel modules and core kernel subsystems, so everything can access everything. This means that a rogue kernel module can completely nullify the trustworthiness of the operating system and make secure boot useless. As an example, consider a simple Debian 12 (Bookworm installation), but with SELinux configured and enforced:

ignat@dev:~$ lsb_release --all
No LSB modules are available.
Distributor ID:	Debian
Description:	Debian GNU/Linux 12 (bookworm)
Release:	12
Codename:	bookworm
ignat@dev:~$ uname -a
Linux dev 6.1.0-18-cloud-amd64 #1 SMP PREEMPT_DYNAMIC Debian 6.1.76-1 (2024-02-01) x86_64 GNU/Linux
ignat@dev:~$ sudo getenforce
Enforcing

Now we need to do some research. First, we see that we’re running 6.1.76 Linux Kernel. If we explore the source code, we would see that inside the kernel, the SELinux configuration is stored in a singleton structure, which is defined as follows:

struct selinux_state {
#ifdef CONFIG_SECURITY_SELINUX_DISABLE
	bool disabled;
#endif
#ifdef CONFIG_SECURITY_SELINUX_DEVELOP
	bool enforcing;
#endif
	bool checkreqprot;
	bool initialized;
	bool policycap[__POLICYDB_CAP_MAX];

	struct page *status_page;
	struct mutex status_lock;

	struct selinux_avc *avc;
	struct selinux_policy __rcu *policy;
	struct mutex policy_mutex;
} __randomize_layout;

From the above, we can see that if the kernel configuration has CONFIG_SECURITY_SELINUX_DEVELOP enabled, the structure would have a boolean variable enforcing, which controls the enforcement status of SELinux at runtime. This is exactly what the above $ sudo getenforce command returns. We can double check that the Debian kernel indeed has the configuration option enabled:

ignat@dev:~$ grep CONFIG_SECURITY_SELINUX_DEVELOP /boot/config-`uname -r`
CONFIG_SECURITY_SELINUX_DEVELOP=y

Good! Now that we have a variable in the kernel, which is responsible for some security enforcement, we can try to attack it. One problem though is the __randomize_layout attribute: since CONFIG_SECURITY_SELINUX_DISABLE is actually not set for our Debian kernel, normally enforcing would be the first member of the struct. Thus if we know where the struct is, we immediately know the position of the enforcing flag. With __randomize_layout, during kernel compilation the compiler might place members at arbitrary positions within the struct, so it is harder to create generic exploits. But arbitrary struct randomization within the kernel may introduce performance impact, so is often disabled and it is disabled for the Debian kernel:

ignat@dev:~$ grep RANDSTRUCT /boot/config-`uname -r`
CONFIG_RANDSTRUCT_NONE=y

We can also confirm the compiled position of the enforcing flag using the pahole tool and either kernel debug symbols, if available, or (on modern kernels, if enabled) in-kernel BTF information. We will use the latter:

ignat@dev:~$ pahole -C selinux_state /sys/kernel/btf/vmlinux
struct selinux_state {
	bool                       enforcing;            /*     0     1 */
	bool                       checkreqprot;         /*     1     1 */
	bool                       initialized;          /*     2     1 */
	bool                       policycap[8];         /*     3     8 */

	/* XXX 5 bytes hole, try to pack */

	struct page *              status_page;          /*    16     8 */
	struct mutex               status_lock;          /*    24    32 */
	struct selinux_avc *       avc;                  /*    56     8 */
	/* --- cacheline 1 boundary (64 bytes) --- */
	struct selinux_policy *    policy;               /*    64     8 */
	struct mutex               policy_mutex;         /*    72    32 */

	/* size: 104, cachelines: 2, members: 9 */
	/* sum members: 99, holes: 1, sum holes: 5 */
	/* last cacheline: 40 bytes */
};

So enforcing is indeed located at the start of the structure and we don’t even have to be a privileged user to confirm this.

Great! All we need is the runtime address of the selinux_state variable inside the kernel:
(shell/bash)

ignat@dev:~$ sudo grep selinux_state /proc/kallsyms
ffffffffbc3bcae0 B selinux_state

With all the information, we can write an almost textbook simple kernel module to manipulate the SELinux state:

Mymod.c:

#include <linux/module.h>

static int __init mod_init(void)
{
	bool *selinux_enforce = (bool *)0xffffffffbc3bcae0;
	*selinux_enforce = false;
	return 0;
}

static void mod_fini(void)
{
}

module_init(mod_init);
module_exit(mod_fini);

MODULE_DESCRIPTION("A somewhat malicious module");
MODULE_AUTHOR("Ignat Korchagin <[email protected]>");
MODULE_LICENSE("GPL");

And the respective Kbuild file:

obj-m := mymod.o

With these two files we can build a full fledged kernel module according to the official kernel docs:

ignat@dev:~$ cd mymod/
ignat@dev:~/mymod$ ls
Kbuild  mymod.c
ignat@dev:~/mymod$ make -C /lib/modules/`uname -r`/build M=$PWD
make: Entering directory '/usr/src/linux-headers-6.1.0-18-cloud-amd64'
  CC [M]  /home/ignat/mymod/mymod.o
  MODPOST /home/ignat/mymod/Module.symvers
  CC [M]  /home/ignat/mymod/mymod.mod.o
  LD [M]  /home/ignat/mymod/mymod.ko
  BTF [M] /home/ignat/mymod/mymod.ko
Skipping BTF generation for /home/ignat/mymod/mymod.ko due to unavailability of vmlinux
make: Leaving directory '/usr/src/linux-headers-6.1.0-18-cloud-amd64'

If we try to load this module now, the system may not allow it due to the SELinux policy:

ignat@dev:~/mymod$ sudo insmod mymod.ko
insmod: ERROR: could not load module mymod.ko: Permission denied

We can workaround it by copying the module into the standard module path somewhere:

ignat@dev:~/mymod$ sudo cp mymod.ko /lib/modules/`uname -r`/kernel/crypto/

Now let’s try it out:

ignat@dev:~/mymod$ sudo getenforce
Enforcing
ignat@dev:~/mymod$ sudo insmod /lib/modules/`uname -r`/kernel/crypto/mymod.ko
ignat@dev:~/mymod$ sudo getenforce
Permissive

Not only did we disable the SELinux protection via a malicious kernel module, we did it quietly. Normal sudo setenforce 0, even if allowed, would go through the official selinuxfs interface and would emit an audit message. Our code manipulated the kernel memory directly, so no one was alerted. This illustrates why uncontrolled kernel module loading is very dangerous and that is why most security standards and commercial security monitoring products advocate for close monitoring of kernel module loading.

But we don’t need to monitor kernel modules at Cloudflare. Let’s repeat the exercise on a Cloudflare production kernel (module recompilation skipped for brevity):

ignat@dev:~/mymod$ uname -a
Linux dev 6.6.17-cloudflare-2024.2.9 #1 SMP PREEMPT_DYNAMIC Mon Sep 27 00:00:00 UTC 2010 x86_64 GNU/Linux
ignat@dev:~/mymod$ sudo insmod /lib/modules/`uname -r`/kernel/crypto/mymod.ko
insmod: ERROR: could not insert module /lib/modules/6.6.17-cloudflare-2024.2.9/kernel/crypto/mymod.ko: Key was rejected by service

We get a Key was rejected by service error when trying to load a module, and the kernel log will have the following message:

ignat@dev:~/mymod$ sudo dmesg | tail -n 1
[41515.037031] Loading of unsigned module is rejected

This is because the Cloudflare kernel requires all the kernel modules to have a valid signature, so we don’t even have to worry about a malicious module being loaded at some point:

ignat@dev:~$ grep MODULE_SIG_FORCE /boot/config-`uname -r`
CONFIG_MODULE_SIG_FORCE=y

For completeness it is worth noting that the Debian stock kernel also supports module signatures, but does not enforce it:

ignat@dev:~$ grep MODULE_SIG /boot/config-6.1.0-18-cloud-amd64
CONFIG_MODULE_SIG_FORMAT=y
CONFIG_MODULE_SIG=y
# CONFIG_MODULE_SIG_FORCE is not set
…

The above configuration means that the kernel will validate a module signature, if available. But if not – the module will be loaded anyway with a warning message emitted and the kernel will be tainted.

Key management for kernel module signing

Signed kernel modules are great, but it creates a key management problem: to sign a module we need a signing keypair that is trusted by the kernel. The public key of the keypair is usually directly embedded into the kernel binary, so the kernel can easily use it to verify module signatures. The private key of the pair needs to be protected and secure, because if it is leaked, anyone could compile and sign a potentially malicious kernel module which would be accepted by our kernel.

But what is the best way to eliminate the risk of losing something? Not to have it in the first place! Luckily the kernel build system will generate a random keypair for module signing, if none is provided. At Cloudflare, we use that feature to sign all the kernel modules during the kernel compilation stage. When the compilation and signing is done though, instead of storing the key in a secure place, we just destroy the private key:

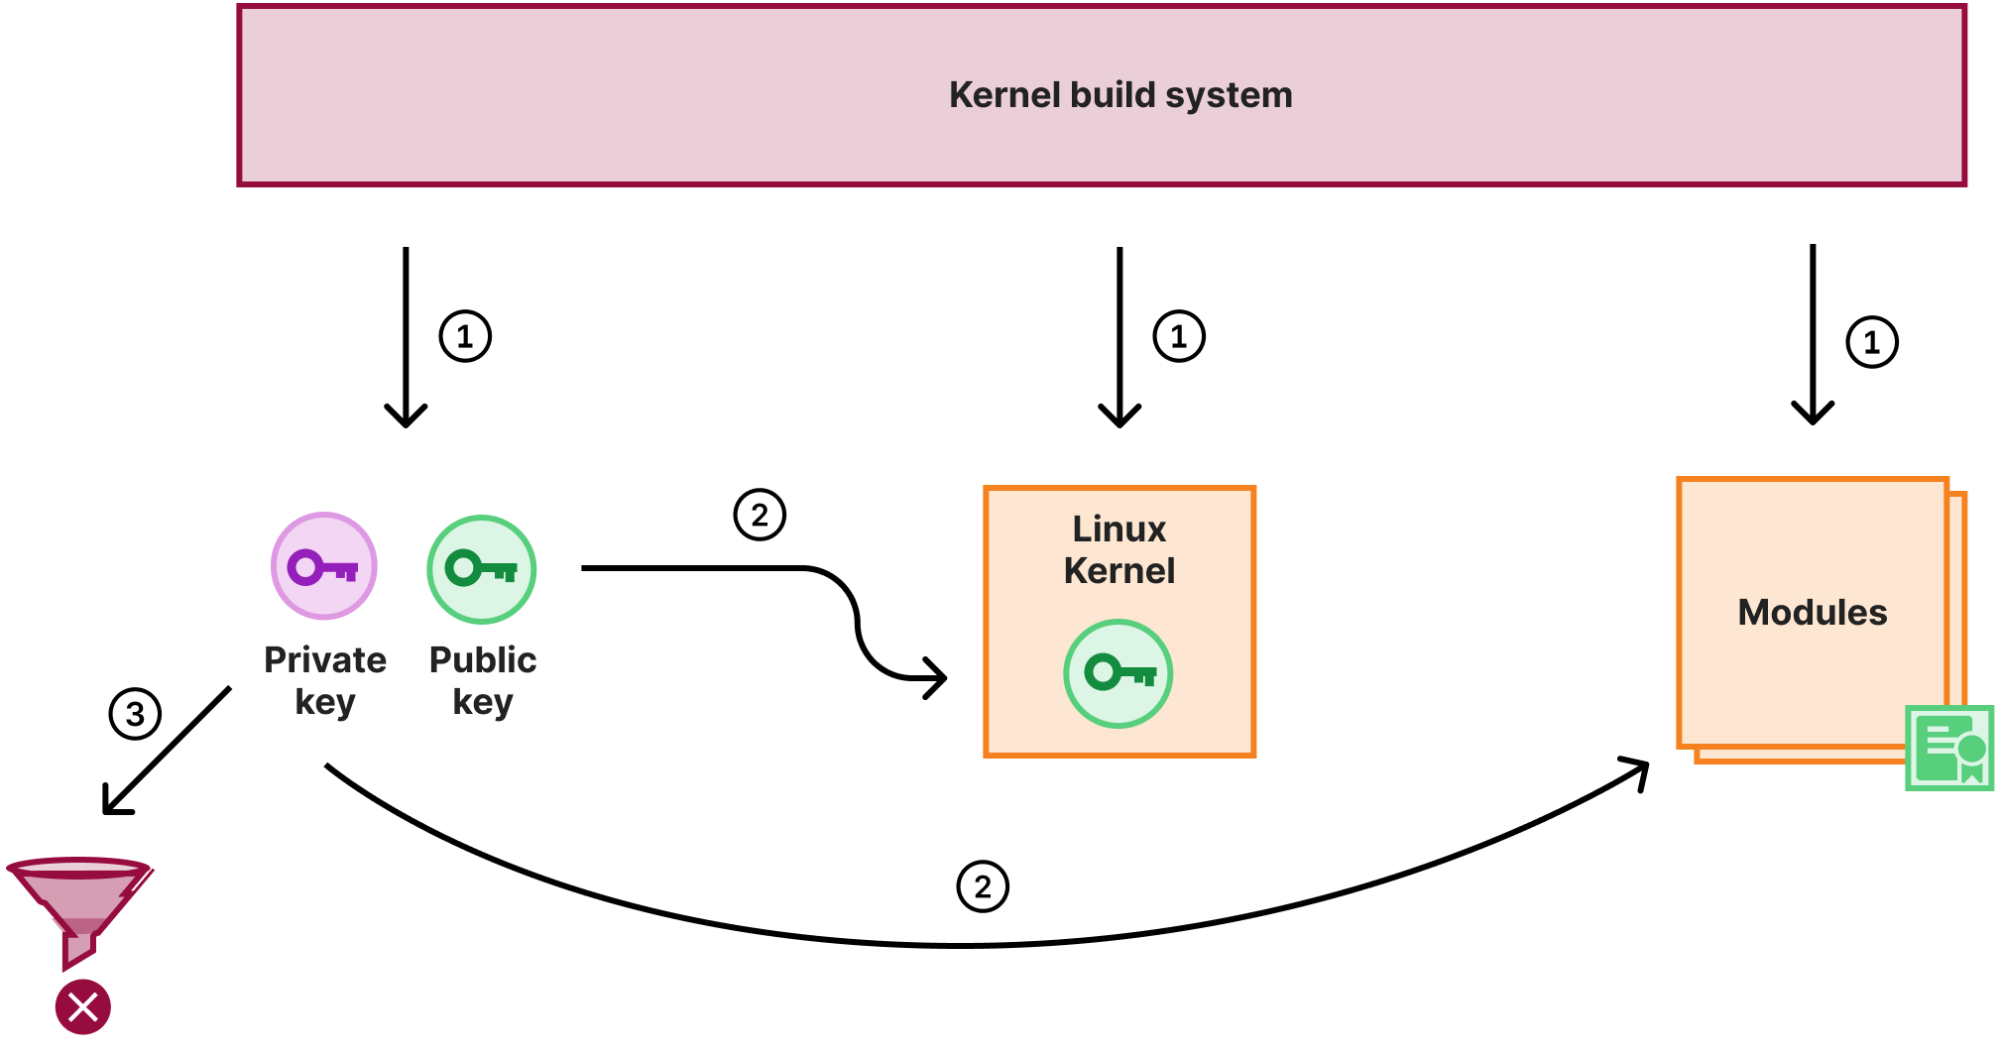
So with the above process:

  1. The kernel build system generated a random keypair, compiles the kernel and modules
  2. The public key is embedded into the kernel image, the private key is used to sign all the modules
  3. The private key is destroyed

With this scheme not only do we not have to worry about module signing key management, we also use a different key for each kernel we release to production. So even if a particular build process is hijacked and the signing key is not destroyed and potentially leaked, the key will no longer be valid when a kernel update is released.

There are some flexibility downsides though, as we can’t “retrofit” a new kernel module for an already released kernel (for example, for a new piece of hardware we are adopting). However, it is not a practical limitation for us as we release kernels often (roughly every week) to keep up with a steady stream of bug fixes and vulnerability patches in the Linux Kernel.

KEXEC

KEXEC (or kexec_load()) is an interesting system call in Linux, which allows for one kernel to directly execute (or jump to) another kernel. The idea behind this is to switch/update/downgrade kernels faster without going through a full reboot cycle to minimize the potential system downtime. However, it was developed quite a while ago, when secure boot and system integrity was not quite a concern. Therefore its original design has security flaws and is known to be able to bypass secure boot and potentially compromise system integrity.

We can see the problems just based on the definition of the system call itself:

struct kexec_segment {
	const void *buf;
	size_t bufsz;
	const void *mem;
	size_t memsz;
};
...
long kexec_load(unsigned long entry, unsigned long nr_segments, struct kexec_segment *segments, unsigned long flags);

So the kernel expects just a collection of buffers with code to execute. Back in those days there was not much desire to do a lot of data parsing inside the kernel, so the idea was to parse the to-be-executed kernel image in user space and provide the kernel with only the data it needs. Also, to switch kernels live, we need an intermediate program which would take over while the old kernel is shutting down and the new kernel has not yet been executed. In the kexec world this program is called purgatory. Thus the problem is evident: we give the kernel a bunch of code and it will happily execute it at the highest privilege level. But instead of the original kernel or purgatory code, we can easily provide code similar to the one demonstrated earlier in this post, which disables SELinux (or does something else to the kernel).

At Cloudflare we have had kexec_load() disabled for some time now just because of this. The advantage of faster reboots with kexec comes with a (small) risk of improperly initialized hardware, so it was not worth using it even without the security concerns. However, kexec does provide one useful feature — it is the foundation of the Linux kernel crashdumping solution. In a nutshell, if a kernel crashes in production (due to a bug or some other error), a backup kernel (previously loaded with kexec) can take over, collect and save the memory dump for further investigation. This allows to more effectively investigate kernel and other issues in production, so it is a powerful tool to have.

Luckily, since the original problems with kexec were outlined, Linux developed an alternative secure interface for kexec: instead of buffers with code it expects file descriptors with the to-be-executed kernel image and initrd and does parsing inside the kernel. Thus, only a valid kernel image can be supplied. On top of this, we can configure and require kexec to ensure the provided images are properly signed, so only authorized code can be executed in the kexec scenario. A secure configuration for kexec looks something like this:

ignat@dev:~$ grep KEXEC /boot/config-`uname -r`
CONFIG_KEXEC_CORE=y
CONFIG_HAVE_IMA_KEXEC=y
# CONFIG_KEXEC is not set
CONFIG_KEXEC_FILE=y
CONFIG_KEXEC_SIG=y
CONFIG_KEXEC_SIG_FORCE=y
CONFIG_KEXEC_BZIMAGE_VERIFY_SIG=y
…

Above we ensure that the legacy kexec_load() system call is disabled by disabling CONFIG_KEXEC, but still can configure Linux Kernel crashdumping via the new kexec_file_load() system call via CONFIG_KEXEC_FILE=y with enforced signature checks (CONFIG_KEXEC_SIG=y and CONFIG_KEXEC_SIG_FORCE=y).

Note that stock Debian kernel has the legacy kexec_load() system call enabled and does not enforce signature checks for kexec_file_load() (similar to module signature checks):

ignat@dev:~$ grep KEXEC /boot/config-6.1.0-18-cloud-amd64
CONFIG_KEXEC=y
CONFIG_KEXEC_FILE=y
CONFIG_ARCH_HAS_KEXEC_PURGATORY=y
CONFIG_KEXEC_SIG=y
# CONFIG_KEXEC_SIG_FORCE is not set
CONFIG_KEXEC_BZIMAGE_VERIFY_SIG=y
…

Kernel Address Space Layout Randomization (KASLR)

Even on the stock Debian kernel if you try to repeat the exercise we described in the “Secure boot” section of this post after a system reboot, you will likely see it would fail to disable SELinux now. This is because we hardcoded the kernel address of the selinux_state structure in our malicious kernel module, but the address changed now:

ignat@dev:~$ sudo grep selinux_state /proc/kallsyms
ffffffffb41bcae0 B selinux_state

Kernel Address Space Layout Randomization (or KASLR) is a simple concept: it slightly and randomly shifts the kernel code and data on each boot:

This is to combat targeted exploitation (like the malicious module in this post) based on the knowledge of the location of internal kernel structures and code. It is especially useful for popular Linux distribution kernels, like the Debian one, because most users use the same binary and anyone can download the debug symbols and the System.map file with all the addresses of the kernel internals. Just to note: it will not prevent the module loading and doing harm, but it will likely not achieve the targeted effect of disabling SELinux. Instead, it will modify a random piece of kernel memory potentially causing the kernel to crash.

Both the Cloudflare kernel and the Debian one have this feature enabled:

ignat@dev:~$ grep RANDOMIZE_BASE /boot/config-`uname -r`
CONFIG_RANDOMIZE_BASE=y

Restricted kernel pointers

While KASLR helps with targeted exploits, it is quite easy to bypass since everything is shifted by a single random offset as shown on the diagram above. Thus if the attacker knows at least one runtime kernel address, they can recover this offset by subtracting the runtime address from the compile time address of the same symbol (function or data structure) from the kernel’s System.map file. Once they know the offset, they can recover the addresses of all other symbols by adjusting them by this offset.

Therefore, modern kernels take precautions not to leak kernel addresses at least to unprivileged users. One of the main tunables for this is the kptr_restrict sysctl. It is a good idea to set it at least to 1 to not allow regular users to see kernel pointers:
(shell/bash)

ignat@dev:~$ sudo sysctl -w kernel.kptr_restrict=1
kernel.kptr_restrict = 1
ignat@dev:~$ grep selinux_state /proc/kallsyms
0000000000000000 B selinux_state

Privileged users can still see the pointers:

ignat@dev:~$ sudo grep selinux_state /proc/kallsyms
ffffffffb41bcae0 B selinux_state

Similar to kptr_restrict sysctl there is also dmesg_restrict, which if set, would prevent regular users from reading the kernel log (which may also leak kernel pointers via its messages). While you need to explicitly set kptr_restrict sysctl to a non-zero value on each boot (or use some system sysctl configuration utility, like this one), you can configure dmesg_restrict initial value via the CONFIG_SECURITY_DMESG_RESTRICT kernel configuration option. Both the Cloudflare kernel and the Debian one enforce dmesg_restrict this way:

ignat@dev:~$ grep CONFIG_SECURITY_DMESG_RESTRICT /boot/config-`uname -r`
CONFIG_SECURITY_DMESG_RESTRICT=y

Worth noting that /proc/kallsyms and the kernel log are not the only sources of potential kernel pointer leaks. There is a lot of legacy in the Linux kernel and [new sources are continuously being found and patched]. That’s why it is very important to stay up to date with the latest kernel bugfix releases.

Lockdown LSM

Linux Security Modules (LSM) is a hook-based framework for implementing security policies and Mandatory Access Control in the Linux Kernel. We have [covered our usage of another LSM module, BPF-LSM, previously].

BPF-LSM is a useful foundational piece for our kernel security, but in this post we want to mention another useful LSM module we use — the Lockdown LSM. Lockdown can be in three states (controlled by the /sys/kernel/security/lockdown special file):

ignat@dev:~$ cat /sys/kernel/security/lockdown
[none] integrity confidentiality

none is the state where nothing is enforced and the module is effectively disabled. When Lockdown is in the integrity state, the kernel tries to prevent any operation, which may compromise its integrity. We already covered some examples of these in this post: loading unsigned modules and executing unsigned code via KEXEC. But there are other potential ways (which are mentioned in the LSM’s man page), all of which this LSM tries to block. confidentiality is the most restrictive mode, where Lockdown will also try to prevent any information leakage from the kernel. In practice this may be too restrictive for server workloads as it blocks all runtime debugging capabilities, like perf or eBPF.

Let’s see the Lockdown LSM in action. On a barebones Debian system the initial state is none meaning nothing is locked down:

ignat@dev:~$ uname -a
Linux dev 6.1.0-18-cloud-amd64 #1 SMP PREEMPT_DYNAMIC Debian 6.1.76-1 (2024-02-01) x86_64 GNU/Linux
ignat@dev:~$ cat /sys/kernel/security/lockdown
[none] integrity confidentiality

We can switch the system into the integrity mode:

ignat@dev:~$ echo integrity | sudo tee /sys/kernel/security/lockdown
integrity
ignat@dev:~$ cat /sys/kernel/security/lockdown
none [integrity] confidentiality

It is worth noting that we can only put the system into a more restrictive state, but not back. That is, once in integrity mode we can only switch to confidentiality mode, but not back to none:

ignat@dev:~$ echo none | sudo tee /sys/kernel/security/lockdown
none
tee: /sys/kernel/security/lockdown: Operation not permitted

Now we can see that even on a stock Debian kernel, which as we discovered above, does not enforce module signatures by default, we cannot load a potentially malicious unsigned kernel module anymore:

ignat@dev:~$ sudo insmod mymod/mymod.ko
insmod: ERROR: could not insert module mymod/mymod.ko: Operation not permitted

And the kernel log will helpfully point out that this is due to Lockdown LSM:

ignat@dev:~$ sudo dmesg | tail -n 1
[21728.820129] Lockdown: insmod: unsigned module loading is restricted; see man kernel_lockdown.7

As we can see, Lockdown LSM helps to tighten the security of a kernel, which otherwise may not have other enforcing bits enabled, like the stock Debian one.

If you compile your own kernel, you can go one step further and set the initial state of the Lockdown LSM to be more restrictive than none from the start. This is exactly what we did for the Cloudflare production kernel:

ignat@dev:~$ grep LOCK_DOWN /boot/config-6.6.17-cloudflare-2024.2.9
# CONFIG_LOCK_DOWN_KERNEL_FORCE_NONE is not set
CONFIG_LOCK_DOWN_KERNEL_FORCE_INTEGRITY=y
# CONFIG_LOCK_DOWN_KERNEL_FORCE_CONFIDENTIALITY is not set

Conclusion

In this post we reviewed some useful Linux kernel security configuration options we use at Cloudflare. This is only a small subset, and there are many more available and even more are being constantly developed, reviewed, and improved by the Linux kernel community. We hope that this post will shed some light on these security features and that, if you haven’t already, you may consider enabling them in your Linux systems.

Watch on Cloudflare TV

Tune in for more news, announcements and thought-provoking discussions! Don’t miss the full Security Week hub page.

How to execute an object file: Part 3

Post Syndicated from Ignat Korchagin original https://blog.cloudflare.com/how-to-execute-an-object-file-part-3/

Dealing with external libraries

How to execute an object file: Part 3

In the part 2 of our series we learned how to process relocations in object files in order to properly wire up internal dependencies in the code. In this post we will look into what happens if the code has external dependencies — that is, it tries to call functions from external libraries. As before, we will be building upon the code from part 2. Let’s add another function to our toy object file:

obj.c:

#include <stdio.h>
 
...
 
void say_hello(void)
{
    puts("Hello, world!");
}

In the above scenario our say_hello function now depends on the puts function from the C standard library. To try it out we also need to modify our loader to import the new function and execute it:

loader.c:

...
 
static void execute_funcs(void)
{
    /* pointers to imported functions */
    int (*add5)(int);
    int (*add10)(int);
    const char *(*get_hello)(void);
    int (*get_var)(void);
    void (*set_var)(int num);
    void (*say_hello)(void);
 
...
 
    say_hello = lookup_function("say_hello");
    if (!say_hello) {
        fputs("Failed to find say_hello function\n", stderr);
        exit(ENOENT);
    }
 
    puts("Executing say_hello...");
    say_hello();
}
...

Let’s run it:

$ gcc -c obj.c
$ gcc -o loader loader.c
$ ./loader
No runtime base address for section

Seems something went wrong when the loader tried to process relocations, so let’s check the relocations table:

$ readelf --relocs obj.o
 
Relocation section '.rela.text' at offset 0x3c8 contains 7 entries:
  Offset          Info           Type           Sym. Value    Sym. Name + Addend
000000000020  000a00000004 R_X86_64_PLT32    0000000000000000 add5 - 4
00000000002d  000a00000004 R_X86_64_PLT32    0000000000000000 add5 - 4
00000000003a  000500000002 R_X86_64_PC32     0000000000000000 .rodata - 4
000000000046  000300000002 R_X86_64_PC32     0000000000000000 .data - 4
000000000058  000300000002 R_X86_64_PC32     0000000000000000 .data - 4
000000000066  000500000002 R_X86_64_PC32     0000000000000000 .rodata - 4
00000000006b  001100000004 R_X86_64_PLT32    0000000000000000 puts - 4
...

The compiler generated a relocation for the puts invocation. The relocation type is R_X86_64_PLT32 and our loader already knows how to process these, so the problem is elsewhere. The above entry shows that the relocation references 17th entry (0x11 in hex) in the symbol table, so let’s check that:

$ readelf --symbols obj.o
 
Symbol table '.symtab' contains 18 entries:
   Num:    Value          Size Type    Bind   Vis      Ndx Name
     0: 0000000000000000     0 NOTYPE  LOCAL  DEFAULT  UND
     1: 0000000000000000     0 FILE    LOCAL  DEFAULT  ABS obj.c
     2: 0000000000000000     0 SECTION LOCAL  DEFAULT    1
     3: 0000000000000000     0 SECTION LOCAL  DEFAULT    3
     4: 0000000000000000     0 SECTION LOCAL  DEFAULT    4
     5: 0000000000000000     0 SECTION LOCAL  DEFAULT    5
     6: 0000000000000000     4 OBJECT  LOCAL  DEFAULT    3 var
     7: 0000000000000000     0 SECTION LOCAL  DEFAULT    7
     8: 0000000000000000     0 SECTION LOCAL  DEFAULT    8
     9: 0000000000000000     0 SECTION LOCAL  DEFAULT    6
    10: 0000000000000000    15 FUNC    GLOBAL DEFAULT    1 add5
    11: 000000000000000f    36 FUNC    GLOBAL DEFAULT    1 add10
    12: 0000000000000033    13 FUNC    GLOBAL DEFAULT    1 get_hello
    13: 0000000000000040    12 FUNC    GLOBAL DEFAULT    1 get_var
    14: 000000000000004c    19 FUNC    GLOBAL DEFAULT    1 set_var
    15: 000000000000005f    19 FUNC    GLOBAL DEFAULT    1 say_hello
    16: 0000000000000000     0 NOTYPE  GLOBAL DEFAULT  UND _GLOBAL_OFFSET_TABLE_
    17: 0000000000000000     0 NOTYPE  GLOBAL DEFAULT  UND puts

Oh! The section index for the puts function is UND (essentially 0 in the code), which makes total sense: unlike previous symbols, puts is an external dependency, and it is not implemented in our obj.o file. Therefore, it can’t be a part of any section within obj.o.
So how do we resolve this relocation? We need to somehow point the code to jump to a puts implementation. Our loader actually already has access to the C library puts function (because it is written in C and we’ve used puts in the loader code itself already), but technically it doesn’t have to be the C library puts, just some puts implementation. For completeness, let’s implement our own custom puts function in the loader, which is just a decorator around the C library puts:

loader.c:

...
 
/* external dependencies for obj.o */
static int my_puts(const char *s)
{
    puts("my_puts executed");
    return puts(s);
}
...

Now that we have a puts implementation (and thus its runtime address) we should just write logic in the loader to resolve the relocation by instructing the code to jump to the correct function. However, there is one complication: in part 2 of our series, when we processed relocations for constants and global variables, we learned we’re mostly dealing with 32-bit relative relocations and that the code or data we’re referencing needs to be no more than 2147483647 (0x7fffffff in hex) bytes away from the relocation itself. R_X86_64_PLT32 is also a 32-bit relative relocation, so it has the same requirements, but unfortunately we can’t reuse the trick from part 2 as our my_puts function is part of the loader itself and we don’t have control over where in the address space the operating system places the loader code.

Luckily, we don’t have to come up with any new solutions and can just borrow the approach used in shared libraries.

Exploring PLT/GOT

Real world ELF executables and shared libraries have the same problem: often executables have dependencies on shared libraries and shared libraries have dependencies on other shared libraries. And all of the different pieces of a complete runtime program may be mapped to random ranges in the process address space. When a shared library or an ELF executable is linked together, the linker enumerates all the external references and creates two or more additional sections (for a refresher on ELF sections check out the part 1 of our series) in the ELF file. The two mandatory ones are the Procedure Linkage Table (PLT) and the Global Offset Table (GOT).

We will not deep-dive into specifics of the standard PLT/GOT implementation as there are many other great resources online, but in a nutshell PLT/GOT is just a jumptable for external code. At the linking stage the linker resolves all external 32-bit relative relocations with respect to a locally generated PLT/GOT table. It can do that, because this table would become part of the final ELF file itself, so it will be "close" to the main code, when the file is mapped into memory at runtime. Later, at runtime the dynamic loader populates PLT/GOT tables for every loaded ELF file (both the executable and the shared libraries) with the runtime addresses of all the dependencies. Eventually, when the program code calls some external library function, the CPU "jumps" through the local PLT/GOT table to the final code:

How to execute an object file: Part 3

Why do we need two ELF sections to implement one jumptable you may ask? Well, because real world PLT/GOT is a bit more complex than described above. Turns out resolving all external references at runtime may significantly slow down program startup time, so symbol resolution is implemented via a "lazy approach": a reference is resolved by the dynamic loader only when the code actually tries to call a particular function. If the main application code never calls a library function, that reference will never be resolved.

Implementing a simplified PLT/GOT

For learning and demonstrative purposes though we will not be reimplementing a full-blown PLT/GOT with lazy resolution, but a simple jumptable, which resolves external references when the object file is loaded and parsed. First of all we need to know the size of the table: for ELF executables and shared libraries the linker will count the external references at link stage and create appropriately sized PLT and GOT sections. Because we are dealing with raw object files we would have to do another pass over the .rela.text section and count all the relocations, which point to an entry in the symbol table with undefined section index (or 0 in code). Let’s add a function for this and store the number of external references in a global variable:

loader.c:

...
 
/* number of external symbols in the symbol table */
static int num_ext_symbols = 0;
...
static void count_external_symbols(void)
{
    const Elf64_Shdr *rela_text_hdr = lookup_section(".rela.text");
    if (!rela_text_hdr) {
        fputs("Failed to find .rela.text\n", stderr);
        exit(ENOEXEC);
    }
 
    int num_relocations = rela_text_hdr->sh_size / rela_text_hdr->sh_entsize;
    const Elf64_Rela *relocations = (Elf64_Rela *)(obj.base + rela_text_hdr->sh_offset);
 
    for (int i = 0; i < num_relocations; i++) {
        int symbol_idx = ELF64_R_SYM(relocations[i].r_info);
 
        /* if there is no section associated with a symbol, it is probably
         * an external reference */
        if (symbols[symbol_idx].st_shndx == SHN_UNDEF)
            num_ext_symbols++;
    }
}
...

This function is very similar to our do_text_relocations function. Only instead of actually performing relocations it just counts the number of external symbol references.

Next we need to decide the actual size in bytes for our jumptable. num_ext_symbols has the number of external symbol references in the object file, but how many bytes per symbol to allocate? To figure this out we need to design our jumptable format. As we established above, in its simple form our jumptable should be just a collection of unconditional CPU jump instructions — one for each external symbol. However, unfortunately modern x64 CPU architecture does not provide a jump instruction, where an address pointer can be a direct operand. Instead, the jump address needs to be stored in memory somewhere "close" — that is within 32-bit offset — and the offset is the actual operand. So, for each external symbol we need to store the jump address (64 bits or 8 bytes on a 64-bit CPU system) and the actual jump instruction with an offset operand (6 bytes for x64 architecture). We can represent an entry in our jumptable with the following C structure:

loader.c:

...
 
struct ext_jump {
    /* address to jump to */
    uint8_t *addr;
    /* unconditional x64 JMP instruction */
    /* should always be {0xff, 0x25, 0xf2, 0xff, 0xff, 0xff} */
    /* so it would jump to an address stored at addr above */
    uint8_t instr[6];
};
 
struct ext_jump *jumptable;
...

We’ve also added a global variable to store the base address of the jumptable, which will be allocated later. Notice that with the above approach the actual jump instruction will always be constant for every external symbol. Since we allocate a dedicated entry for each external symbol with this structure, the addr member would always be at the same offset from the end of the jump instruction in instr: -14 bytes or 0xfffffff2 in hex for a 32-bit operand. So instr will always be {0xff, 0x25, 0xf2, 0xff, 0xff, 0xff}: 0xff and 0x25 is the encoding of the x64 jump instruction and its modifier and 0xfffffff2 is the operand offset in little-endian format.

Now that we have defined the entry format for our jumptable, we can allocate and populate it when parsing the object file. First of all, let’s not forget to call our new count_external_symbols function from the parse_obj to populate num_ext_symbols (it has to be done before we allocate the jumptable):

loader.c:

...
 
static void parse_obj(void)
{
...
 
    count_external_symbols();
 
    /* allocate memory for `.text`, `.data` and `.rodata` copies rounding up each section to whole pages */
    text_runtime_base = mmap(NULL, page_align(text_hdr->sh_size)...
...
}

Next we need to allocate memory for the jumptable and store the pointer in the jumptable global variable for later use. Just a reminder that in order to resolve 32-bit relocations from the .text section to this table, it has to be "close" in memory to the main code. So we need to allocate it in the same mmap call as the rest of the object sections. Since we defined the table’s entry format in struct ext_jump and have num_ext_symbols, the size of the table would simply be sizeof(struct ext_jump) * num_ext_symbols:

loader.c:

...
 
static void parse_obj(void)
{
...
 
    count_external_symbols();
 
    /* allocate memory for `.text`, `.data` and `.rodata` copies and the jumptable for external symbols, rounding up each section to whole pages */
    text_runtime_base = mmap(NULL, page_align(text_hdr->sh_size) + \
                                   page_align(data_hdr->sh_size) + \
                                   page_align(rodata_hdr->sh_size) + \
                                   page_align(sizeof(struct ext_jump) * num_ext_symbols),
                                   PROT_READ | PROT_WRITE, MAP_PRIVATE | MAP_ANONYMOUS, -1, 0);
    if (text_runtime_base == MAP_FAILED) {
        perror("Failed to allocate memory");
        exit(errno);
    }
 
...
    rodata_runtime_base = data_runtime_base + page_align(data_hdr->sh_size);
    /* jumptable will come after .rodata */
    jumptable = (struct ext_jump *)(rodata_runtime_base + page_align(rodata_hdr->sh_size));
 
...
}
...

Finally, because the CPU will actually be executing the jump instructions from our instr fields from the jumptable, we need to mark this memory readonly and executable (after do_text_relocations earlier in this function has completed):

loader.c:

...
 
static void parse_obj(void)
{
...
 
    do_text_relocations();
 
...
 
    /* make the jumptable readonly and executable */
    if (mprotect(jumptable, page_align(sizeof(struct ext_jump) * num_ext_symbols), PROT_READ | PROT_EXEC)) {
        perror("Failed to make the jumptable executable");
        exit(errno);
    }
}
...

At this stage we have our jumptable allocated and usable — all is left to do is to populate it properly. We’ll do this by improving the do_text_relocations implementation to handle the case of external symbols. The No runtime base address for section error from the beginning of this post is actually caused by this line in do_text_relocations:

loader.c:

...
 
static void do_text_relocations(void)
{
...
    for (int i = 0; i < num_relocations; i++) {
...
        /* symbol, with respect to which the relocation is performed */
        uint8_t *symbol_address = = section_runtime_base(&sections[symbols[symbol_idx].st_shndx]) + symbols[symbol_idx].st_value;
...
}
...

Currently we try to determine the runtime symbol address for the relocation by looking up the symbol’s section runtime address and adding the symbol’s offset. But we have established above that external symbols do not have an associated section, so their handling needs to be a special case. Let’s update the implementation to reflect this:

loader.c:

...
 
static void do_text_relocations(void)
{
...
    for (int i = 0; i < num_relocations; i++) {
...
        /* symbol, with respect to which the relocation is performed */
        uint8_t *symbol_address;
        
        /* if this is an external symbol */
        if (symbols[symbol_idx].st_shndx == SHN_UNDEF) {
            static int curr_jmp_idx = 0;
 
            /* get external symbol/function address by name */
            jumptable[curr_jmp_idx].addr = lookup_ext_function(strtab +  symbols[symbol_idx].st_name);
 
            /* x64 unconditional JMP with address stored at -14 bytes offset */
            /* will use the address stored in addr above */
            jumptable[curr_jmp_idx].instr[0] = 0xff;
            jumptable[curr_jmp_idx].instr[1] = 0x25;
            jumptable[curr_jmp_idx].instr[2] = 0xf2;
            jumptable[curr_jmp_idx].instr[3] = 0xff;
            jumptable[curr_jmp_idx].instr[4] = 0xff;
            jumptable[curr_jmp_idx].instr[5] = 0xff;
 
            /* resolve the relocation with respect to this unconditional JMP */
            symbol_address = (uint8_t *)(&jumptable[curr_jmp_idx].instr);
 
            curr_jmp_idx++;
        } else {
            symbol_address = section_runtime_base(&sections[symbols[symbol_idx].st_shndx]) + symbols[symbol_idx].st_value;
        }
...
}
...

If a relocation symbol does not have an associated section, we consider it external and call a helper function to lookup the symbol’s runtime address by its name. We store this address in the next available jumptable entry, populate the x64 jump instruction with our fixed operand and store the address of the instruction in the symbol_address variable. Later, the existing code in do_text_relocations will resolve the .text relocation with respect to the address in symbol_address in the same way it does for local symbols in part 2 of our series.

The only missing bit here now is the implementation of the newly introduced lookup_ext_function helper. Real world loaders may have complicated logic on how to find and resolve symbols in memory at runtime. But for the purposes of this article we’ll provide a simple naive implementation, which can only resolve the puts function:

loader.c:

...
 
static void *lookup_ext_function(const char *name)
{
    size_t name_len = strlen(name);
 
    if (name_len == strlen("puts") && !strcmp(name, "puts"))
        return my_puts;
 
    fprintf(stderr, "No address for function %s\n", name);
    exit(ENOENT);
}
...

Notice though that because we control the loader logic we are free to implement resolution as we please. In the above case we actually "divert" the object file to use our own "custom" my_puts function instead of the C library one. Let’s recompile the loader and see if it works:

$ gcc -o loader loader.c
$ ./loader
Executing add5...
add5(42) = 47
Executing add10...
add10(42) = 52
Executing get_hello...
get_hello() = Hello, world!
Executing get_var...
get_var() = 5
Executing set_var(42)...
Executing get_var again...
get_var() = 42
Executing say_hello...
my_puts executed
Hello, world!

Hooray! We not only fixed our loader to handle external references in object files — we have also learned how to "hook" any such external function call and divert the code to a custom implementation, which might be useful in some cases, like malware research.

As in the previous posts, the complete source code from this post is available on GitHub.

How to execute an object file: Part 1

Post Syndicated from Ignat Korchagin original https://blog.cloudflare.com/how-to-execute-an-object-file-part-1/

Calling a simple function without linking

How to execute an object file: Part 1

When we write software using a high-level compiled programming language, there are usually a number of steps involved in transforming our source code into the final executable binary:

How to execute an object file: Part 1

First, our source files are compiled by a compiler translating the high-level programming language into machine code. The output of the compiler is a number of object files. If the project contains multiple source files, we usually get as many object files. The next step is the linker: since the code in different object files may reference each other, the linker is responsible for assembling all these object files into one big program and binding these references together. The output of the linker is usually our target executable, so only one file.

However, at this point, our executable might still be incomplete. These days, most executables on Linux are dynamically linked: the executable itself does not have all the code it needs to run a program. Instead it expects to "borrow" part of the code at runtime from shared libraries for some of its functionality:

How to execute an object file: Part 1

This process is called runtime linking: when our executable is being started, the operating system will invoke the dynamic loader, which should find all the needed libraries, copy/map their code into our target process address space, and resolve all the dependencies our code has on them.

One interesting thing to note about this overall process is that we get the executable machine code directly from step 1 (compiling the source code), but if any of the later steps fail, we still can’t execute our program. So, in this series of blog posts we will investigate if it is possible to execute machine code directly from object files skipping all the later steps.

Why would we want to execute an object file?

There may be many reasons. Perhaps we’re writing an open-source replacement for a proprietary Linux driver or an application, and want to compare if the behaviour of some code is the same. Or we have a piece of a rare, obscure program and we can’t link to it, because it was compiled with a rare, obscure compiler. Maybe we have a source file, but cannot create a full featured executable, because of the missing build time or runtime dependencies. Malware analysis, code from a different operating system etc – all these scenarios may put us in a position, where either linking is not possible or the runtime environment is not suitable.

A simple toy object file

For the purposes of this article, let’s create a simple toy object file, so we can use it in our experiments:

obj.c:

int add5(int num)
{
    return num + 5;
}

int add10(int num)
{
    return num + 10;
}

Our source file contains only 2 functions, add5 and add10, which adds 5 or 10 respectively to the only input parameter. It’s a small but fully functional piece of code, and we can easily compile it into an object file:

$ gcc -c obj.c 
$ ls
obj.c  obj.o

Loading an object file into the process memory

Now we will try to import the add5 and add10 functions from the object file and execute them. When we talk about executing an object file, we mean using an object file as some sort of a library. As we learned above, when we have an executable that utilises external shared libraries, the dynamic loader loads these libraries into the process address space for us. With object files, however, we have to do this manually, because ultimately we can’t execute machine code that doesn’t reside in the operating system’s RAM. So, to execute object files we still need some kind of a wrapper program:

loader.c:

#include <stdio.h>
#include <stdint.h>
#include <stdlib.h>
#include <string.h>

static void load_obj(void)
{
    /* load obj.o into memory */
}

static void parse_obj(void)
{
    /* parse an object file and find add5 and add10 functions */
}

static void execute_funcs(void)
{
    /* execute add5 and add10 with some inputs */
}

int main(void)
{
    load_obj();
    parse_obj();
    execute_funcs();

    return 0;
}

Above is a self-contained object loader program with some functions as placeholders. We will be implementing these functions (and adding more) in the course of this post.

First, as we established already, we need to load our object file into the process address space. We could just read the whole file into a buffer, but that would not be very efficient. Real-world object files might be big, but as we will see later, we don’t need all of the object’s file contents. So it is better to mmap the file instead: this way the operating system will lazily read the parts from the file we need at the time we need them. Let’s implement the load_obj function:

loader.c:

...
/* for open(2), fstat(2) */
#include <sys/types.h>
#include <sys/stat.h>
#include <fcntl.h>

/* for close(2), fstat(2) */
#include <unistd.h>

/* for mmap(2) */
#include <sys/mman.h>

/* parsing ELF files */
#include <elf.h>

/* for errno */
#include <errno.h>

typedef union {
    const Elf64_Ehdr *hdr;
    const uint8_t *base;
} objhdr;

/* obj.o memory address */
static objhdr obj;

static void load_obj(void)
{
    struct stat sb;

    int fd = open("obj.o", O_RDONLY);
    if (fd <= 0) {
        perror("Cannot open obj.o");
        exit(errno);
    }

    /* we need obj.o size for mmap(2) */
    if (fstat(fd, &sb)) {
        perror("Failed to get obj.o info");
        exit(errno);
    }

    /* mmap obj.o into memory */
    obj.base = mmap(NULL, sb.st_size, PROT_READ, MAP_PRIVATE, fd, 0);
    if (obj.base == MAP_FAILED) {
        perror("Maping obj.o failed");
        exit(errno);
    }
    close(fd);
}
...

If we don’t encounter any errors, after load_obj executes we should get the memory address, which points to the beginning of our obj.o in the obj global variable. It is worth noting we have created a special union type for the obj variable: we will be parsing obj.o later (and peeking ahead – object files are actually ELF files), so will be referring to the address both as Elf64_Ehdr (ELF header structure in C) and a byte pointer (parsing ELF files involves calculations of byte offsets from the beginning of the file).

A peek inside an object file

To use some code from an object file, we need to find it first. As I’ve leaked above, object files are actually ELF files (the same format as Linux executables and shared libraries) and luckily they’re easy to parse on Linux with the help of the standard elf.h header, which includes many useful definitions related to the ELF file structure. But we actually need to know what we’re looking for, so a high-level understanding of an ELF file is needed.

ELF segments and sections

Segments (also known as program headers) and sections are probably the main parts of an ELF file and usually a starting point of any ELF tutorial. However, there is often some confusion between the two. Different sections contain different types of ELF data: executable code (which we are most interested in in this post), constant data, global variables etc. Segments, on the other hand, do not contain any data themselves – they just describe to the operating system how to properly load sections into RAM for the executable to work correctly. Some tutorials say "a segment may include 0 or more sections", which is not entirely accurate: segments do not contain sections, rather they just indicate to the OS where in memory a particular section should be loaded and what is the access pattern for this memory (read, write or execute):

How to execute an object file: Part 1

Furthermore, object files do not contain any segments at all: an object file is not meant to be directly loaded by the OS. Instead, it is assumed it will be linked with some other code, so ELF segments are usually generated by the linker, not the compiler. We can check this by using the readelf command:

$ readelf --segments obj.o

There are no program headers in this file.

Object file sections

The same readelf command can be used to get all the sections from our object file:

$ readelf --sections obj.o
There are 11 section headers, starting at offset 0x268:

Section Headers:
  [Nr] Name              Type             Address           Offset
       Size              EntSize          Flags  Link  Info  Align
  [ 0]                   NULL             0000000000000000  00000000
       0000000000000000  0000000000000000           0     0     0
  [ 1] .text             PROGBITS         0000000000000000  00000040
       000000000000001e  0000000000000000  AX       0     0     1
  [ 2] .data             PROGBITS         0000000000000000  0000005e
       0000000000000000  0000000000000000  WA       0     0     1
  [ 3] .bss              NOBITS           0000000000000000  0000005e
       0000000000000000  0000000000000000  WA       0     0     1
  [ 4] .comment          PROGBITS         0000000000000000  0000005e
       000000000000001d  0000000000000001  MS       0     0     1
  [ 5] .note.GNU-stack   PROGBITS         0000000000000000  0000007b
       0000000000000000  0000000000000000           0     0     1
  [ 6] .eh_frame         PROGBITS         0000000000000000  00000080
       0000000000000058  0000000000000000   A       0     0     8
  [ 7] .rela.eh_frame    RELA             0000000000000000  000001e0
       0000000000000030  0000000000000018   I       8     6     8
  [ 8] .symtab           SYMTAB           0000000000000000  000000d8
       00000000000000f0  0000000000000018           9     8     8
  [ 9] .strtab           STRTAB           0000000000000000  000001c8
       0000000000000012  0000000000000000           0     0     1
  [10] .shstrtab         STRTAB           0000000000000000  00000210
       0000000000000054  0000000000000000           0     0     1
Key to Flags:
  W (write), A (alloc), X (execute), M (merge), S (strings), I (info),
  L (link order), O (extra OS processing required), G (group), T (TLS),
  C (compressed), x (unknown), o (OS specific), E (exclude),
  l (large), p (processor specific)

There are different tutorials online describing the most popular ELF sections in detail. Another great reference is the Linux manpages project. It is handy because it describes both sections’ purpose as well as C structure definitions from elf.h, which makes it a one-stop shop for parsing ELF files. However, for completeness, below is a short description of the most popular sections one may encounter in an ELF file:

  • .text: this section contains the executable code (the actual machine code, which was created by the compiler from our source code). This section is the primary area of interest for this post as it should contain the add5 and add10 functions we want to use.
  • .data and .bss: these sections contain global and static local variables. The difference is: .data has variables with an initial value (defined like int foo = 5;) and .bss just reserves space for variables with no initial value (defined like int bar;).
  • .rodata: this section contains constant data (mostly strings or byte arrays). For example, if we use a string literal in the code (for example, for printf or some error message), it will be stored here. Note, that .rodata is missing from the output above as we didn’t use any string literals or constant byte arrays in obj.c.
  • .symtab: this section contains information about the symbols in the object file: functions, global variables, constants etc. It may also contain information about external symbols the object file needs, like needed functions from the external libraries.
  • .strtab and .shstrtab: contain packed strings for the ELF file. Note, that these are not the strings we may define in our source code (those go to the .rodata section). These are the strings describing the names of other ELF structures, like symbols from .symtab or even section names from the table above. ELF binary format aims to make its structures compact and of a fixed size, so all strings are stored in one place and the respective data structures just reference them as an offset in either .shstrtab or .strtab sections instead of storing the full string locally.

The .symtab section

At this point, we know that the code we want to import and execute is located in the obj.o‘s .text section. But we have two functions, add5 and add10, remember? At this level the .text section is just a byte blob – how do we know where each of these functions is located? This is where the .symtab (the "symbol table") comes in handy. It is so important that it has its own dedicated parameter in readelf:

$ readelf --symbols obj.o

Symbol table '.symtab' contains 10 entries:
   Num:    Value          Size Type    Bind   Vis      Ndx Name
     0: 0000000000000000     0 NOTYPE  LOCAL  DEFAULT  UND
     1: 0000000000000000     0 FILE    LOCAL  DEFAULT  ABS obj.c
     2: 0000000000000000     0 SECTION LOCAL  DEFAULT    1
     3: 0000000000000000     0 SECTION LOCAL  DEFAULT    2
     4: 0000000000000000     0 SECTION LOCAL  DEFAULT    3
     5: 0000000000000000     0 SECTION LOCAL  DEFAULT    5
     6: 0000000000000000     0 SECTION LOCAL  DEFAULT    6
     7: 0000000000000000     0 SECTION LOCAL  DEFAULT    4
     8: 0000000000000000    15 FUNC    GLOBAL DEFAULT    1 add5
     9: 000000000000000f    15 FUNC    GLOBAL DEFAULT    1 add10

Let’s ignore the other entries for now and just focus on the last two lines, because they conveniently have add5 and add10 as their symbol names. And indeed, this is the info about our functions. Apart from the names, the symbol table provides us with some additional metadata:

  • The Ndx column tells us the index of the section, where the symbol is located. We can cross-check it with the section table above and confirm that indeed these functions are located in .text (section with the index 1).
  • Type being set to FUNC confirms that these are indeed functions.
  • Size tells us the size of each function, but this information is not very useful in our context. The same goes for Bind and Vis.
  • Probably the most useful piece of information is Value. The name is misleading, because it is actually an offset from the start of the containing section in this context. That is, the add5 function starts just from the beginning of .text and add10 is located from 15th byte and onwards.

So now we have all the pieces on how to parse an ELF file and find the functions we need.

Finding and executing a function from an object file

Given what we have learned so far, let’s define a plan on how to proceed to import and execute a function from an object file:

  1. Find the ELF sections table and .shstrtab section (we need .shstrtab later to lookup sections in the section table by name).
  2. Find the .symtab and .strtab sections (we need .strtab to lookup symbols by name in .symtab).
  3. Find the .text section and copy it into RAM with executable permissions.
  4. Find add5 and add10 function offsets from the .symtab.
  5. Execute add5 and add10 functions.

Let’s start by adding some more global variables and implementing the parse_obj function:

loader.c:

...

/* sections table */
static const Elf64_Shdr *sections;
static const char *shstrtab = NULL;

/* symbols table */
static const Elf64_Sym *symbols;
/* number of entries in the symbols table */
static int num_symbols;
static const char *strtab = NULL;

...

static void parse_obj(void)
{
    /* the sections table offset is encoded in the ELF header */
    sections = (const Elf64_Shdr *)(obj.base + obj.hdr->e_shoff);
    /* the index of `.shstrtab` in the sections table is encoded in the ELF header
     * so we can find it without actually using a name lookup
     */
    shstrtab = (const char *)(obj.base + sections[obj.hdr->e_shstrndx].sh_offset);

...
}

...

Now that we have references to both the sections table and the .shstrtab section, we can lookup other sections by their name. Let’s create a helper function for that:

loader.c:

...

static const Elf64_Shdr *lookup_section(const char *name)
{
    size_t name_len = strlen(name);

    /* number of entries in the sections table is encoded in the ELF header */
    for (Elf64_Half i = 0; i < obj.hdr->e_shnum; i++) {
        /* sections table entry does not contain the string name of the section
         * instead, the `sh_name` parameter is an offset in the `.shstrtab`
         * section, which points to a string name
         */
        const char *section_name = shstrtab + sections[i].sh_name;
        size_t section_name_len = strlen(section_name);

        if (name_len == section_name_len && !strcmp(name, section_name)) {
            /* we ignore sections with 0 size */
            if (sections[i].sh_size)
                return sections + i;
        }
    }

    return NULL;
}

...

Using our new helper function, we can now find the .symtab and .strtab sections:

loader.c:

...

static void parse_obj(void)
{
...

    /* find the `.symtab` entry in the sections table */
    const Elf64_Shdr *symtab_hdr = lookup_section(".symtab");
    if (!symtab_hdr) {
        fputs("Failed to find .symtab\n", stderr);
        exit(ENOEXEC);
    }

    /* the symbols table */
    symbols = (const Elf64_Sym *)(obj.base + symtab_hdr->sh_offset);
    /* number of entries in the symbols table = table size / entry size */
    num_symbols = symtab_hdr->sh_size / symtab_hdr->sh_entsize;

    const Elf64_Shdr *strtab_hdr = lookup_section(".strtab");
    if (!strtab_hdr) {
        fputs("Failed to find .strtab\n", stderr);
        exit(ENOEXEC);
    }

    strtab = (const char *)(obj.base + strtab_hdr->sh_offset);
    
...
}

...

Next, let’s focus on the .text section. We noted earlier in our plan that it is not enough to just locate the .text section in the object file, like we did with other sections. We would need to copy it over to a different location in RAM with executable permissions. There are several reasons for that, but these are the main ones:

  • Many CPU architectures either don’t allow execution of the machine code, which is unaligned in memory (4 kilobytes for x86 systems), or they execute it with a performance penalty. However, the .text section in an ELF file is not guaranteed to be positioned at a page aligned offset, because the on-disk version of the ELF file aims to be compact rather than convenient.
  • We may need to modify some bytes in the .text section to perform relocations (we don’t need to do it in this case, but will be dealing with relocations in future posts). If, for example, we forget to use the MAP_PRIVATE flag, when mapping the ELF file, our modifications may propagate to the underlying file and corrupt it.
  • Finally, different sections, which are needed at runtime, like .text, .data, .bss and .rodata, require different memory permission bits: the .text section memory needs to be both readable and executable, but not writable (it is considered a bad security practice to have memory both writable and executable). The .data and .bss sections need to be readable and writable to support global variables, but not executable. The .rodata section should be readonly, because its purpose is to hold constant data. To support this, each section must be allocated on a page boundary as we can only set memory permission bits on whole pages and not custom ranges. Therefore, we need to create new, page aligned memory ranges for these sections and copy the data there.

To create a page aligned copy of the .text section, first we actually need to know the page size. Many programs usually just hardcode the page size to 4096 (4 kilobytes), but we shouldn’t rely on that. While it’s accurate for most x86 systems, other CPU architectures, like arm64, might have a different page size. So hard coding a page size may make our program non-portable. Let’s find the page size and store it in another global variable:

loader.c:

...

static uint64_t page_size;

static inline uint64_t page_align(uint64_t n)
{
    return (n + (page_size - 1)) & ~(page_size - 1);
}

...

static void parse_obj(void)
{
...

    /* get system page size */
    page_size = sysconf(_SC_PAGESIZE);

...
}

...

Notice, we have also added a convenience function page_align, which will round up the passed in number to the next page aligned boundary. Next, back to the .text section. As a reminder, we need to:

  1. Find the .text section metadata in the sections table.
  2. Allocate a chunk of memory to hold the .text section copy.
  3. Actually copy the .text section to the newly allocated memory.
  4. Make the .text section executable, so we can later call functions from it.

Here is the implementation of the above steps:

loader.c:

...

/* runtime base address of the imported code */
static uint8_t *text_runtime_base;

...

static void parse_obj(void)
{
...

    /* find the `.text` entry in the sections table */
    const Elf64_Shdr *text_hdr = lookup_section(".text");
    if (!text_hdr) {
        fputs("Failed to find .text\n", stderr);
        exit(ENOEXEC);
    }

    /* allocate memory for `.text` copy rounding it up to whole pages */
    text_runtime_base = mmap(NULL, page_align(text_hdr->sh_size), PROT_READ | PROT_WRITE, MAP_PRIVATE | MAP_ANONYMOUS, -1, 0);
    if (text_runtime_base == MAP_FAILED) {
        perror("Failed to allocate memory for .text");
        exit(errno);
    }

    /* copy the contents of `.text` section from the ELF file */
    memcpy(text_runtime_base, obj.base + text_hdr->sh_offset, text_hdr->sh_size);

    /* make the `.text` copy readonly and executable */
    if (mprotect(text_runtime_base, page_align(text_hdr->sh_size), PROT_READ | PROT_EXEC)) {
        perror("Failed to make .text executable");
        exit(errno);
    }
}

...

Now we have all the pieces we need to locate the address of a function. Let’s write a helper for it:

loader.c:

...

static void *lookup_function(const char *name)
{
    size_t name_len = strlen(name);

    /* loop through all the symbols in the symbol table */
    for (int i = 0; i < num_symbols; i++) {
        /* consider only function symbols */
        if (ELF64_ST_TYPE(symbols[i].st_info) == STT_FUNC) {
            /* symbol table entry does not contain the string name of the symbol
             * instead, the `st_name` parameter is an offset in the `.strtab`
             * section, which points to a string name
             */
            const char *function_name = strtab + symbols[i].st_name;
            size_t function_name_len = strlen(function_name);

            if (name_len == function_name_len && !strcmp(name, function_name)) {
                /* st_value is an offset in bytes of the function from the
                 * beginning of the `.text` section
                 */
                return text_runtime_base + symbols[i].st_value;
            }
        }
    }

    return NULL;
}

...

And finally we can implement the execute_funcs function to import and execute code from an object file:

loader.c:

...

static void execute_funcs(void)
{
    /* pointers to imported add5 and add10 functions */
    int (*add5)(int);
    int (*add10)(int);

    add5 = lookup_function("add5");
    if (!add5) {
        fputs("Failed to find add5 function\n", stderr);
        exit(ENOENT);
    }

    puts("Executing add5...");
    printf("add5(%d) = %d\n", 42, add5(42));

    add10 = lookup_function("add10");
    if (!add10) {
        fputs("Failed to find add10 function\n", stderr);
        exit(ENOENT);
    }

    puts("Executing add10...");
    printf("add10(%d) = %d\n", 42, add10(42));
}

...

Let’s compile our loader and make sure it works as expected:

$ gcc -o loader loader.c 
$ ./loader 
Executing add5...
add5(42) = 47
Executing add10...
add10(42) = 52

Voila! We have successfully imported code from obj.o and executed it. Of course, the example above is simplified: the code in the object file is self-contained, does not reference any global variables or constants, and does not have any external dependencies. In future posts we will look into more complex code and how to handle such cases.

Security considerations

Processing external inputs, like parsing an ELF file from the disk above, should be handled with care. The code from loader.c omits a lot of bounds checking and additional ELF integrity checks, when parsing the object file. The code is simplified for the purposes of this post, but most likely not production ready, as it can probably be exploited by specifically crafted malicious inputs. Use it only for educational purposes!

The complete source code from this post can be found here.