In 2017, AWS announced the release of Rate-based Rules for AWS WAF, a new rule type that helps protect websites and APIs from application-level threats such as distributed denial of service (DDoS) attacks, brute force log-in attempts, and bad bots. Rate-based rules track the rate of requests for each originating IP address and invokes a rule action on IPs with rates that exceed a set limit.
While rate-based rules are useful to detect and mitigate a broad variety of bad actors, threats have evolved to bypass request-rate limit rules. For example, one bypass technique is to send a high volumes of requests by spreading them across thousands of unique IP addresses.
In May 2023, AWS announced AWS WAF enhancements to the existing rate-based rules feature that you can use to create more dynamic and intelligent rules by using additional HTTP request attributes for request rate limiting. For example, you can now choose from the following predefined keys to configure your rules: label namespace, header, cookie, query parameter, query string, HTTP method, URI path and source IP Address or IP Address in a header. Additionally, you can combine up to five composite keys as parameters for stronger rule development. These rule definition enhancements help improve perimeter security measures against sophisticated application-layer DDoS attacks using AWS WAF. For more information about the supported request attributes, see Rate-based rule statement in the AWS WAF Developer Guide.
In this blog post, you will learn more about these new AWS WAF feature enhancements and how you can use alternative request attributes to create more robust and granular sets of rules. In addition, you’ll learn how to combine keys to create a composite aggregation key to uniquely identify a specific combination of elements to improve rate tracking.
Getting started
Configuring advanced rate-based rules is similar to configuring simple rate-based rules. The process starts with creating a new custom rule of type rate-based rule, entering the rate limit value, selecting custom keys, choosing the key from the request aggregation key dropdown menu, and adding additional composite keys by choosing Add a request aggregation key as shown in Figure 1.
Figure 1: Creating an advanced rate-based rule with two aggregation keys
For existing rules, you can update those rate-based rules to use the new functionality by editing them. For example, you can add a header to be aggregated with the source IP address, as shown in Figure 2. Note that previously created rules will not be modified.
Figure 2: Add a second key to an existing rate-based rule
You still can set the same rule action, such as block, count, captcha, or challenge. Optionally, you can continue applying a scope-down statement to limit rule action. For example, you can limit the scope to a certain application path or requests with a specified header. You can scope down the inspection criteria so that only certain requests are counted towards rate limiting, and use certain keys to aggregate those requests together. A technique would be to count only requests that have /api at the start of the URI, and aggregate them based on their SessionId cookie value.
Target use cases
Now that you’re familiar with the foundations of advanced rate-based rules, let’s explore how they can improve your security posture using the following use cases:
Enhanced Application (Layer 7) DDoS protection
Improved API security
Enriched request throttling
Use case 1: Enhance Layer 7 DDoS mitigation
The first use case that you might find beneficial is to enhance Layer 7 DDoS mitigation. An HTTP request flood is the most common vector of DDoS attacks. This attack type aims to affect application availability by exhausting available resources to run the application.
Before the release of these enhancements to AWS WAF rules, rules were limited by aggregating requests based on the IP address from the request origin or configured to use a forwarded IP address in an HTTP header such as X-Forwarded-For. Now you can create a more robust rate-based rule to help protect your web application from DDoS attacks by tracking requests based on a different key or a combination of keys. Let’s examine some examples.
To help detect pervasive bots, such as scrapers, scanners, and crawlers, or common bots that are distributed across many unique IP addresses, a rule can look for static request data like a custom header — for example, User-Agent.
To uniquely identity users behind a NAT gateway, you can use a cookie in addition to an IP address. Before the aggregation keys feature, it was difficult to identify users who connected from a single IP address. Now, you can use the session cookie to aggregate requests by their session identifier and IP address.
Note that for Layer 7 DDoS mitigation, tracking by session ID in cookies can be circumvented, because bots might send random values or not send any cookie at all. It’s a good idea to keep an IP-based blanket rate-limiting rule to block offending IP addresses that reach a certain high rate, regardless of their request attributes. In that case, the keys would look like:
Key 1: Session cookie
Key 2: IP address
You can reduce false positives when using AWS Managed Rules (AMR) IP reputation lists by rate limiting based on their label namespace. Labelling functionality is a powerful feature that allows you to map the requests that match a specific pattern and apply custom rules to them. In this case, you can match the label namespace provided by the AMR IP reputation list that includes AWSManagedIPDDoSList, which is a list of IP addresses that have been identified as actively engaging in DDoS activities.
You might want to be cautious about using this group list in block mode, because there’s a chance of blocking legitimate users. To mitigate this, use the list in count mode and create an advanced rate-based rule to aggregate all requests with the label namespace awswaf:managed:aws:amazon-ip-list:, targeting captcha as the rule action. This lets you reduce false positives without compromising security. Applying captcha as an action for the rule reduces serving captcha to all users and instead only applies it when the rate of requests exceeds the defined limit. The key for this rule would be:
Labels (AMR IP reputation lists).
Use case 2: API security
In this second use case, you learn how to use an advanced rate-based rule to improve the security of an API. Protecting an API with rate-limiting rules helps ensure that requests aren’t being sent too frequently in a short amount of time. Reducing the risk from misusing an API helps to ensure that only legitimate requests are handled and not denied due to an overload of requests.
Now, you can create advanced rate-based rules that track API requests based on two aggregation keys. For example, HTTP method to differentiate between GET, POST, and other requests in combination with a custom header like Authorization to match a JSON Web Token (JWT). JWTs are not decrypted by AWS WAF, and AWS WAF only aggregates requests with the same token. This can help to ensure that a token is not being used maliciously or to bypass rate-limiting rules. An additional benefit of this configuration is that requests with no authorization headers are being aggregated together towards the rate limiting threshold. The keys for this use case are:
Key 1: HTTP method
Key 2: Custom header (Authorization)
In addition, you can configure a rule to block and add a custom response when the requests limit is reached. For example, by returning HTTP error code 429 (too many requests) with a Retry-After header indicating the requester should wait 900 seconds (15 minutes) before making a new request.
There are many situations where throttling should be considered. For example, if you want to maintain the performance of a service API by providing fair usage for all users, you can have different rate limits based on the type or purpose of the API, such as mutable or non-mutable requests. To achieve this, you can create two advanced rate-based rules using aggregation keys like IP address, combined with an HTTP request parameter for either mutable or non-mutable that indicates the type of request. Each rule will have its own HTTP request parameter, and you can set different maximum values for the rate limit. The keys for this use case are:
Key 1: HTTP request parameter
Key 2: IP address
Another example where throttling can be helpful is for a multi-tenant application where you want to track requests made by each tenant’s users. Let’s say you have a free tier but also a paying subscription model for which you want to allow a higher request rate. For this use case, it’s recommended to use two different URI paths to verify that the two tenants are kept separated. Additionally, it is advised to still use a custom header or query string parameter to differentiate between the two tenants, such as a tenant-id header or parameter that contains a unique identifier for each tenant. To implement this type of throttling using advanced rate-based rules, you can create two rules using an IP address in combination with the custom header as aggregation keys. Each rule can have its own maximum value for rate limiting, as well as a scope-down statement that matches requests for each URI path. The keys and scope-down statement for this use case are:
Key 1: Custom header (tenant-id)
Key 2: IP address
Scope down statement (URI path)
As a third example, you can rate-limit web applications based on the total number of requests that can be handled. For this use case, you can use the new Count all as aggregation option. The option counts and rate-limits the requests that match the rule’s scope-down statement, which is required for this type of aggregation. One option is to scope down and inspect the URI path to target a specific functionality like a /history-search page. An option when you need to control how many requests go to a specific domain is to scope down a single header to a specific host, creating one rule for a.example.com and another rule for b.example.com.
Request Aggregation: Count all
Scope down statement (URI path | Single header)
For these examples, you can block with a custom response when the requests exceed the limit. For example, by returning the same HTTP error code and header, but adding a custom response body with a message like “You have reached the maximum number of requests allowed.”
Logging
The AWS WAF logs now include additional information about request keys used for request-rate tracking and the values of matched request keys. In addition to the existing IP or Forwarded_IP values, you can see the updated log fieldslimitKey and customValue, where the limitKey field now shows either CustomKeys for custom aggregate key settings or Constant for count all requests. CustomValues shows an array of keys, names, and values.
Figure 3: Example log output for the advanced rate-based rule showing updated limitKey and customValues fields
As mentioned in the first use case, to get more detailed information about the traffic that’s analyzed by the web ACL, consider enabling logging. If you choose to enable Amazon CloudWatch Logs as the log destination, you can use CloudWatch Logs Insights and advanced queries to interactively search and analyze logs.
For example, you can use the following query to get the request information that matches rate-based rules, including the updated keys and values, directly from the AWS WAF console.
Figure 4 shows the CloudWatch Log Insights query and the logs output including custom keys, names, and values fields.
Figure 4: The CloudWatch Log Insights query and the logs output
Pricing
There is no additional cost for using advanced rate-base rules; standard AWS WAF pricing applies when you use this feature. For AWS WAF pricing information, see AWS WAF Pricing. You only need to be aware that using aggregation keys will increase AWS WAF web ACL capacity units (WCU) usage for the rule. WCU usage is calculated based on how many keys you want to use for rate limiting. The current model of 2 WCUs plus any additional WCUs for a nested statement is being updated to 2 WCUs as a base, and 30 WCUs for each custom aggregation key that you specify. For example, if you want to create aggregation keys with an IP address in combination with a session cookie, this will use 62 WCUs, and aggregation keys with an IP address, session cookie, and customer header will use 92 WCUs. For more details about the WCU-based cost structure, visit Rate-based rule statement in the AWS WAF Developer Guide.
Conclusion
In this blog post, you learned about AWS WAF enhancements to existing rate-based rules that now support request parameters in addition to IP addresses. Additionally, these enhancements allow you to create composite keys based on up to five request parameters. This new capability allows you to be either more coarse in aggregating requests (such as all the requests that have an IP reputation label associated with them) or finer (such as aggregate requests for a specific session ID, not its IP address).
For more rule examples that include JSON rule configuration, visit Rate-based rule examples in the AWS WAF Developer Guide.
If you have feedback about this post, submit comments in the Comments section below. If you have questions about this post, contact AWS Support.
Want more AWS Security news? Follow us on Twitter.
This blog post shows you how to use AWS CloudTrail Lake capabilities to investigate CloudTrail activity across AWS Organizations in response to a security incident scenario. We will walk you through two security-related scenarios while we investigate CloudTrail activity. The method described in this post will help you with the investigation process, allowing you to gain comprehensive understanding of the incident and its implications. CloudTrail Lake is a managed audit and security lake that allows you to aggregate, immutably store, and query your activity logs for auditing, security investigation, and operational troubleshooting.
Prerequisites
You must have the following AWS services enabled before you start the investigation.
CloudTrail Lake — To learn how to enable this service and use sample queries, see the blog post Announcing AWS CloudTrail Lake – a managed audit and security Lake. When you create a new event data store at the organization level, you will need to enable CloudTrail Lake for all of the accounts in the organization. We advise that you include not only management events but also data events.
When you use CloudTrail Lake with AWS Organizations, you can designate an account within the organization to be the CloudTrail Lake delegated administrator. This provides a convenient way to perform queries from a designated AWS security account—for example, you can avoid granting access to your AWS management account.
Amazon GuardDuty — This is a threat detection service that continuously monitors your AWS accounts and workloads for malicious activity and delivers detailed security findings for visibility and remediation. To learn about the benefits of the service and how to get started, see Amazon GuardDuty.
Incident scenario 1: AWS access keys compromised
In the first scenario, you have observed activity within your AWS account from an unauthorized party. This example covers a situation where a threat actor has obtained and misused one of your AWS access keys that was exposed publicly by mistake. This investigation starts after Amazon GuardDuty generates an IAM finding identifying that the malicious activity came from the exposed AWS access key. Following the Incident Response Playbook Compromised IAM Credentials, focusing on step 12 in the playbook ([DETECTION AND ANALYSIS] Review CloudTrail Logs), you will use CloudTrail Lake capabilities to investigate the activity that was performed with this key. To do so, you will use the following nine query examples that we provide for this first scenario.
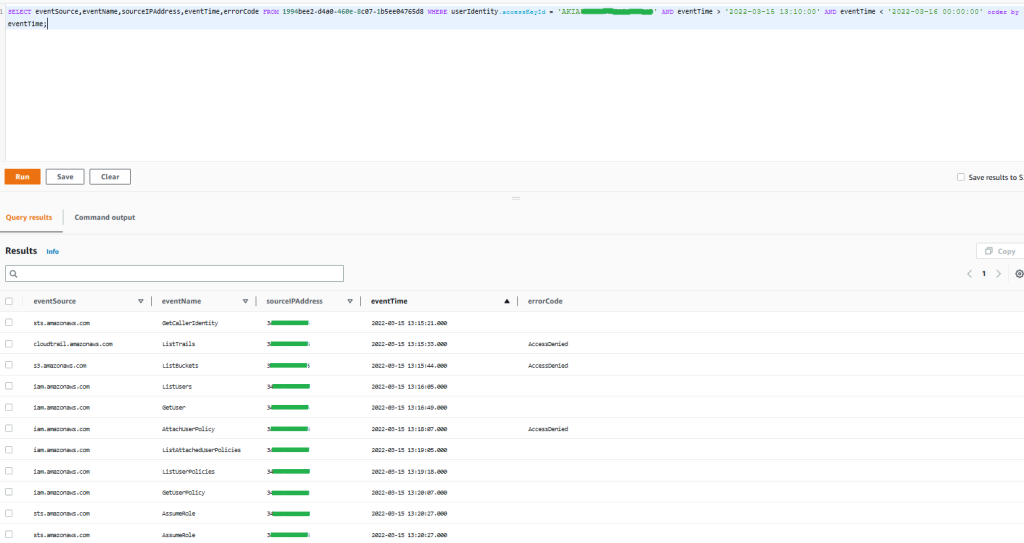
Query 1.1: Activity performed by access key during a specific time window
The first query is aimed at obtaining the specific activity that was performed by this key, either successfully or not, during the time the malicious activity took place. You can use the GuardDuty finding details “EventFirstSeen” and “EventLastSeen” to define the time window of the query. Also, and for further queries, you want to fetch artifacts that could be considered possible indicators of compromise (IoC) related to this security incident, such as IP addresses.
SELECT eventSource,eventName,sourceIPAddress,eventTime,errorCode FROM 1994bee2-d4a0-460e-8c07-1b5ee04765d8 WHERE userIdentity.accessKeyId = 'AKIAIOSFODNN7EXAMPLE' AND eventTime > '2022-03-15 13:10:00' AND eventTime < '2022-03-16 00:00:00' order by eventTime;
The results of the query are as follows:
Figure 1: Sample query 1.1 and results in the AWS Management Console
The results demonstrate that the activity performed by the access key tried to unsuccessfully list Amazon Simple Storage Services (Amazon S3) buckets and CloudTrail trails. You can also see specific write activity related to AWS Identity and Access Management (IAM) that was denied, and afterwards there was activity possibly related to reconnaissance tactics in IAM to finally be able to assume a role, which indicates a possible attempt to perform an escalation of privileges. You can observe only one source IP from which this activity was performed.
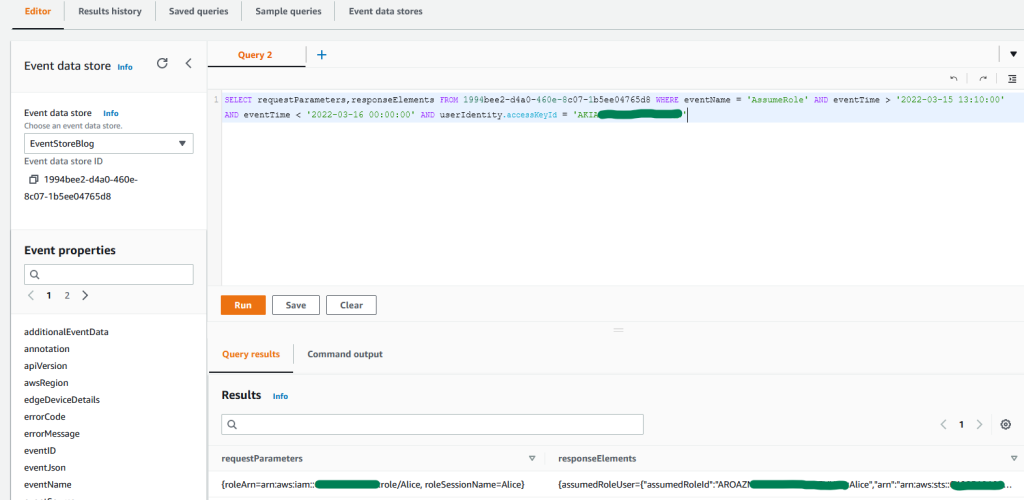
Query 1.2: Confirm which IAM role was assumed by the threat actor during a specific time window
As you observed from the previous query results, the threat actor was able to assume an IAM role. In this query, you would like to confirm which IAM role was assumed during the security incident.
Query 1.2
SELECT requestParameters,responseElements FROM 1994bee2-d4a0-460e-8c07-1b5ee04765d8 WHERE eventName = 'AssumeRole' AND eventTime > '2022-03-15 13:10:00' AND eventTime < '2022-03-16 00:00:00' AND userIdentity.accessKeyId = 'AKIAIOSFODNN7EXAMPLE'
The results of the query are as follows:
Figure 2: Sample query 1.2 and results in the console
The results show that an IAM role named “Alice” was assumed in a second account. For future queries, keep the temporary access key from the responseElements result to obtain activity performed by this role session.
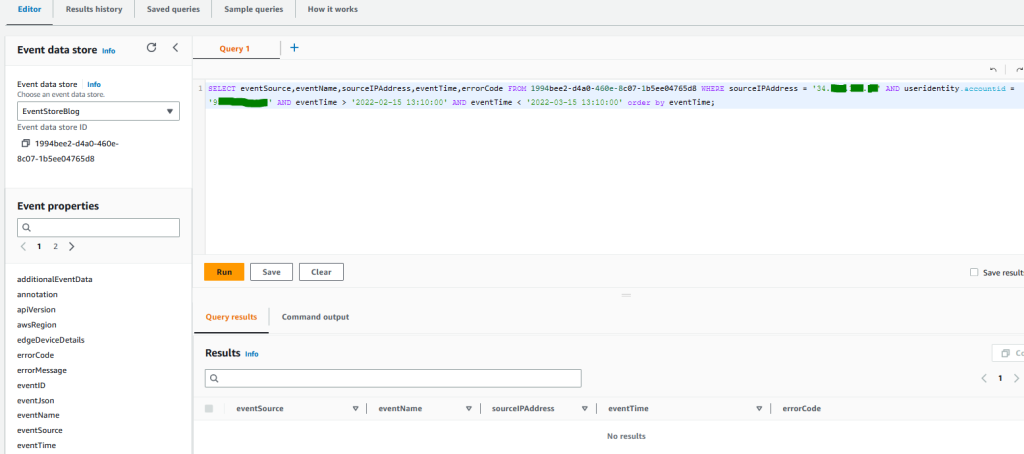
Query 1.3: Activity performed from an IP address in an expanded time window search
Investigating the incident only from the time of discovery may result in overlooking signs or indicators of potential past incidents that were not detected related to this threat actor. For this reason, you want to expand the investigation window time, which might result in expanding the search back weeks, months, or even years, depending on factors such as the nature and severity of the incident, available resources, and so on. In this example, for balance and urgency, the window of time searched is expanded to a month. You want to also review whether there is past activity related to this account by the IP you previously observed.
Query 1.3
The results of the query are as follows:
SELECT eventSource,eventName,sourceIPAddress,eventTime,errorCode FROM 1994bee2-d4a0-460e-8c07-1b5ee04765d8 WHERE sourceIPAddress = '192.0.2.76' AND useridentity.accountid = '555555555555 AND eventTime > '2022-02-15 13:10:00' AND eventTime < '2022-03-15 13:10:00' order by eventTime;
Figure 3: Sample query 1.3 and results in the console
As you can observe from the results, there is no activity coming from this IP address in this account in the previous month.
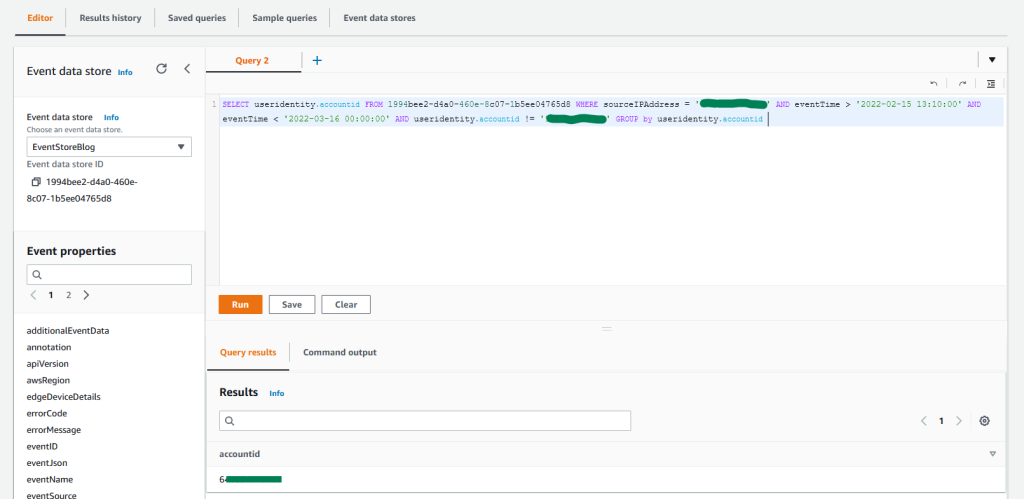
Query 1.4: Activity performed from an IP address in any other account in your organization during a specific time window
Before you start investigating what activity was performed by the role assumed in the second account, and considering that this malicious activity now involves cross-account access, you will want to review whether any other account in your organization has activity related to the specific IP address observed. You will need to expand the window of time to an entire month in order to see if previous activity was performed before this incident from this source IP, and you will need to exclude activity coming from the first account.
Query 1.4
SELECT useridentity.accountid,eventTime FROM 1994bee2-d4a0-460e-8c07-1b5ee04765d8 WHERE sourceIPAddress = '192.0.2.76' AND eventTime > '2022-02-15 13:10:00' AND eventTime < '2022-03-16 00:00:00' AND useridentity.accountid != '555555555555'GROUP by useridentity.accountid
The results of the query are as follows:
Figure 4: Sample query 1.4 and results in the console
As you can observe from the results, there is activity only in the second account where the role was assumed. You can also confirm that there was no activity performed in other accounts in the previous month from this IP address.
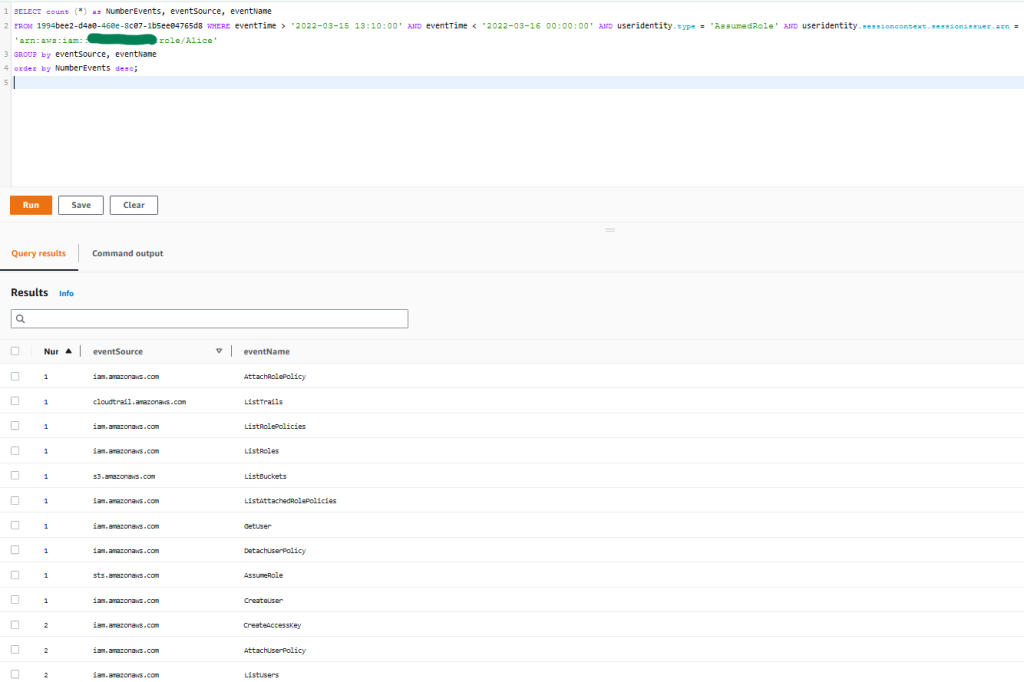
Query 1.5: Count activity performed by an IAM role during a specific time period
For the next query example, you want to count and group activity based on the API actions that were performed in each service by the role assumed. This query helps you quantify and understand the impact of the possible unauthorized activity that might have happened in this second account.
Query 1.5
 SELECT count (*) as NumberEvents, eventSource, eventName
 FROM 1994bee2-d4a0-460e-8c07-1b5ee04765d8 WHERE eventTime > '2022-03-15 13:10:00' AND eventTime < '2022-03-16 00:00:00' AND useridentity.type = 'AssumedRole' AND useridentity.sessioncontext.sessionissuer.arn = 'arn:aws:iam::111122223333:role/Alice'
 GROUP by eventSource, eventName
 order by NumberEvents desc;
The results of the query are as follows:
Figure 5: Sample query 1.5 and results in the console
You observe that the activity is consistent with what was shown in the first account, and the threat actor seems to be targeting trails, S3 buckets, and IAM activity related to possible further escalation of privileges.
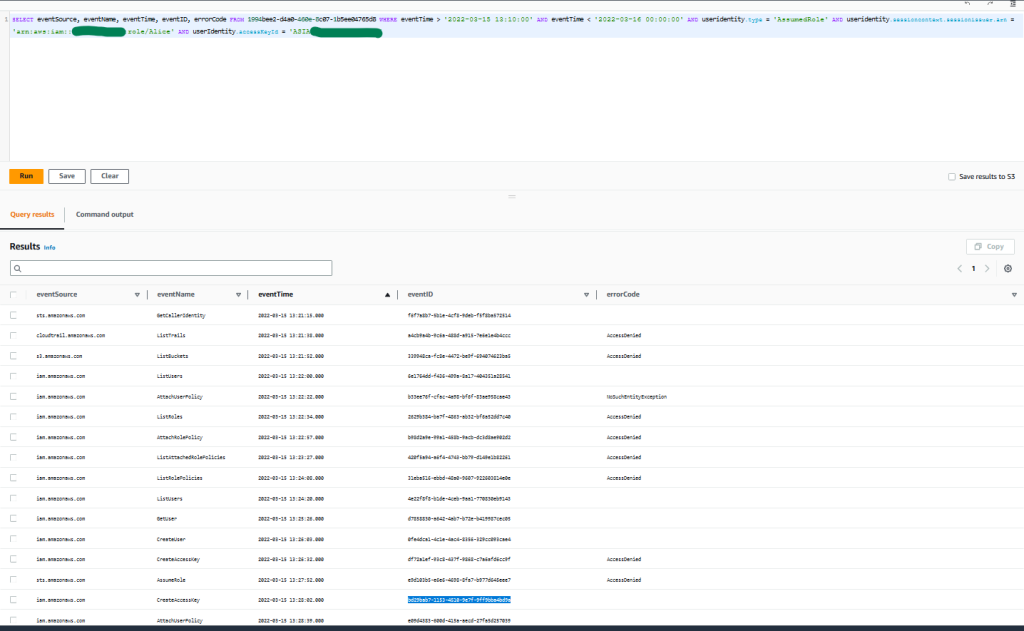
Query 1.6: Confirm successful activity performed by an IAM role during a specific time window
Following the example in query 1.1, you will fetch the information related to activity that was successful or denied. This helps you confirm modifications that took place in the environment, or the creation of new resources. For this example, you will also want to obtain the event ID in case you need to dig further into one specific API call. You will then filter out activity done by any other session by using the temporary access key obtained from query 1.2.
Query 1.6
SELECT eventSource, eventName, eventTime, eventID, errorCode FROM 1994bee2-d4a0-460e-8c07-1b5ee04765d8 WHERE eventTime > '2022-03-15 13:10:00' AND eventTime < '2022-03-16 00:00:00' AND useridentity.type = 'AssumedRole' AND useridentity.sessioncontext.sessionissuer.arn = 'arn:aws:iam::111122223333:role/Alice' AND userIdentity.accessKeyId = 'ASIAZNYXHMZ37EXAMPLE '
The results of the query are as follows:
Figure 6: Sample query 1.6 and results in the console
You can observe that the threat actor was again not able to perform activity upon the trails, S3 buckets, or IAM roles. But as you can see, the threat actor was able to perform specific IAM activity, which led to the creation of a new IAM user, policy attachment, and access key.
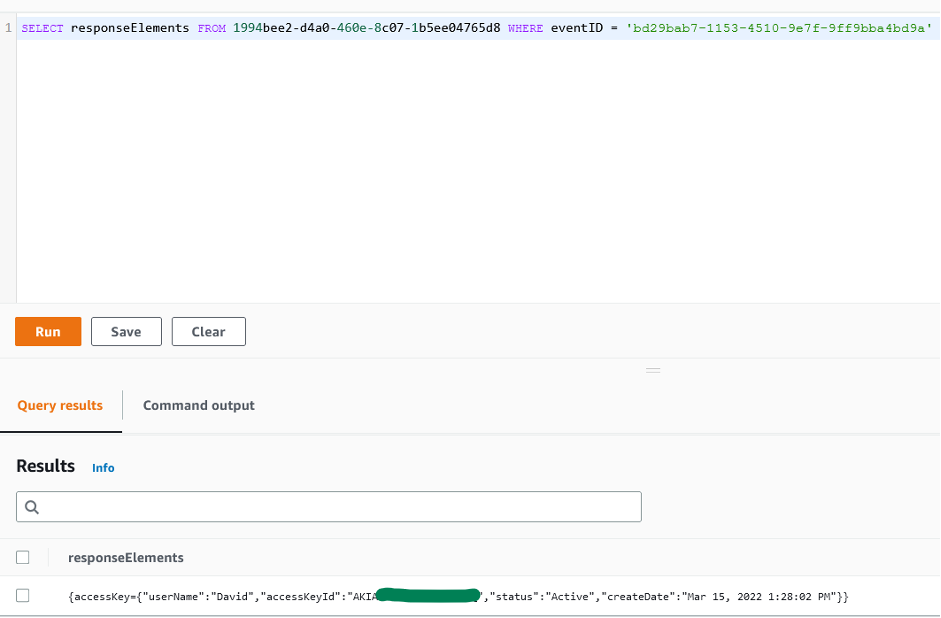
Query 1.7: Obtain new access key ID created
By making use of the event ID from the CreateAccesskey event displayed in the previous query, you can obtain the access key ID so that you can further dig into what activity was performed by it.
Query 1.7
SELECT responseElements FROM 1994bee2-d4a0-460e-8c07-1b5ee04765d8 WHERE eventID = 'bd29bab7-1153-4510-9e7f-9ff9bba4bd9a'
The results of the query are as follows:
Figure 7: Sample query 1.7 and results in the console
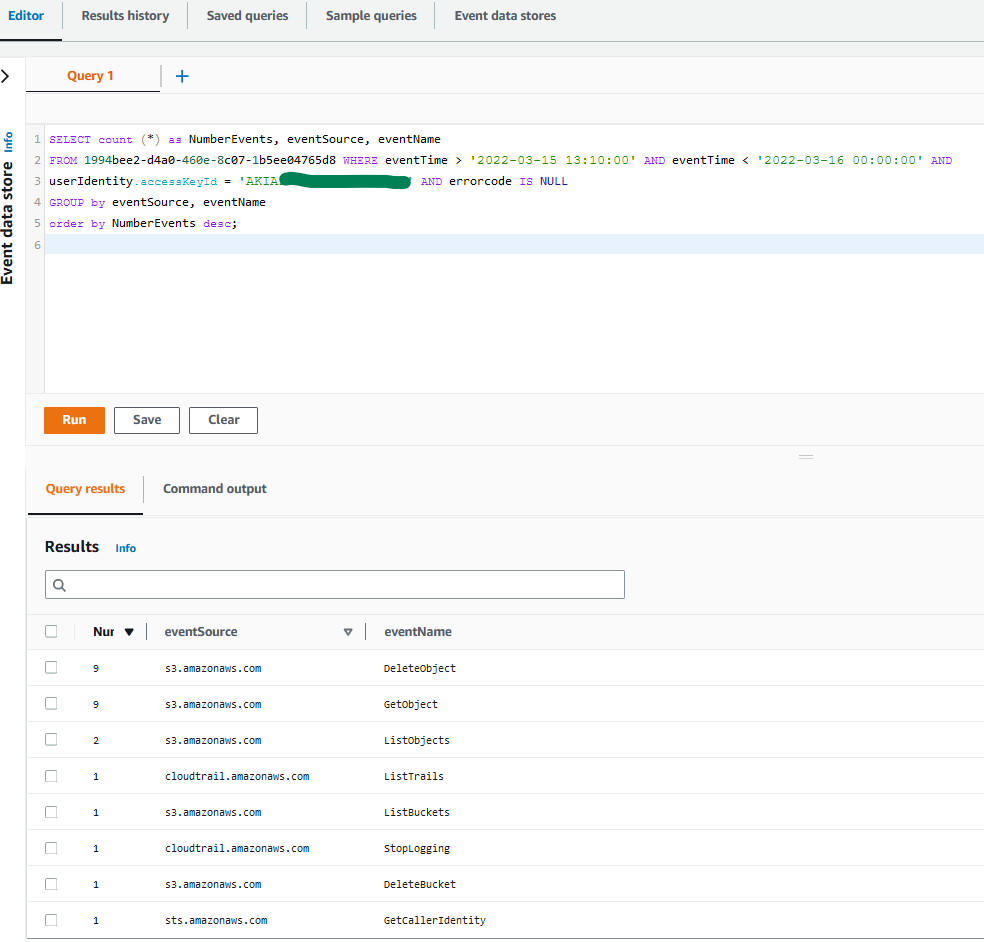
Query 1.8: Obtain successful API activity that was performed by the access key during a specific time window
Following previous examples, you will count and group the API activity that was successfully performed by this access key ID. This time, you will exclude denied activity in order to understand the activity that actually took place.
Query 1.8
 SELECT count (*) as NumberEvents, eventSource, eventName
 FROM 1994bee2-d4a0-460e-8c07-1b5ee04765d8 WHERE eventTime > '2022-03-15 13:10:00' AND eventTime < '2022-03-16 00:00:00' AND
 userIdentity.accessKeyId = 'AKIAI44QH8DHBEXAMPLE' AND errorcode IS NULL
 GROUP by eventSource, eventName
 order by NumberEvents desc;
The results of the query are as follows:
Figure 8: Sample query 1.8 and results in the console
You can observe that this time, the threat actor was able to perform specific activities targeting your trails and buckets due to privilege escalation. In these results, you observe that a trail was successfully stopped, and S3 objects were downloaded and deleted.
You can also see bucket deletion activity. At first glance, this might indicate activity related to a data exfiltration scenario in the case where the bucket was not properly secured, and possible future ransom demands could be made if proper preventive controls and measures to recover the data were not in place. For more details on this scenario, see this AWS Security blog post.
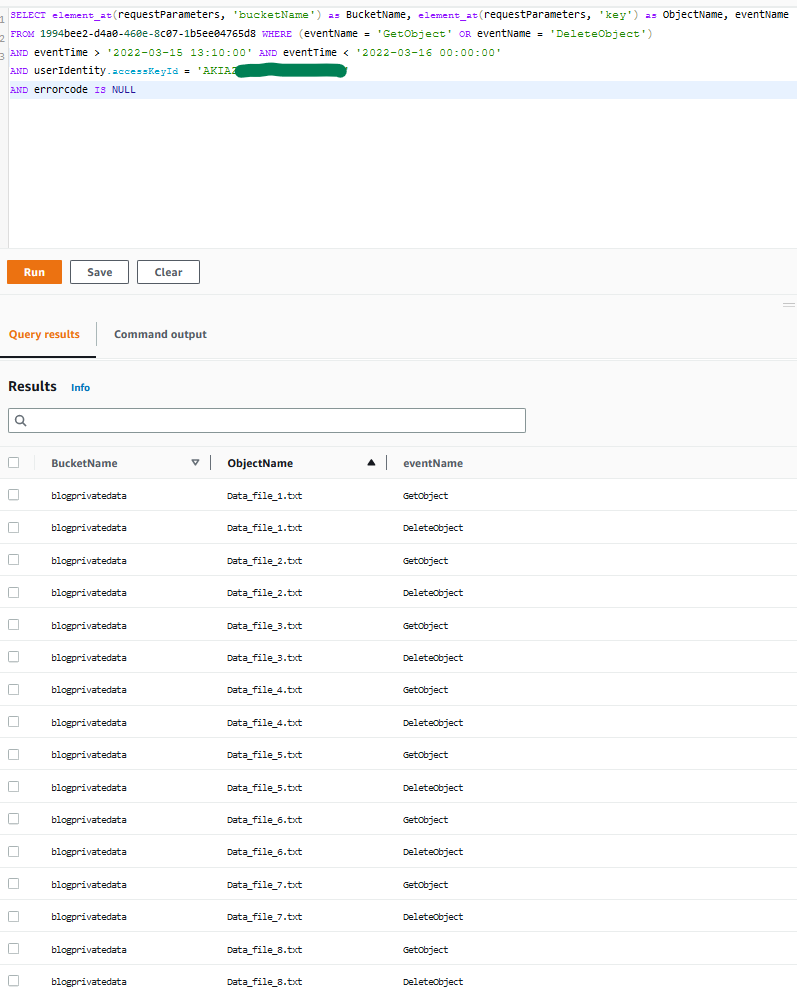
Query 1.9: Obtain bucket and object names affected during a specific time window
After you obtain the activities on the S3 buckets by using sample query 1.8, you can use the following query to show what objects this activity was related to, and from which buckets. You can expand the query to exclude denied activity.
Query 1.9
SELECT element_at(requestParameters, 'bucketName') as BucketName, element_at(requestParameters, 'key') as ObjectName, eventName FROM 1994bee2-d4a0-460e-8c07-1b5ee04765d8 WHERE (eventName = 'GetObject' OR eventName = 'DeleteObject') AND eventTime > '2022-03-15 13:10:00' AND eventTime < '2022-03-16 00:00:00' AND userIdentity.accessKeyId = 'AKIAI44QH8DHBEXAMPLE' AND errorcode IS NULL
The results of the query are as follows:
Figure 9: Sample query 1.9 and results in the console
As you can observe, the unauthorized user was able to first obtain and exfiltrate S3 objects, and then delete them afterwards.
Summary of incident scenario 1
This scenario describes a security incident involving a publicly exposed AWS access key that is exploited by a threat actor. Here is a summary of the steps taken to investigate this incident by using CloudTrail Lake capabilities:
Investigated AWS activity that was performed by the compromised access key
Observed possible adversary tactics and techniques that were used by the threat actor
Collected artifacts that could be potential indicators of compromise (IoC), such as IP addresses
Confirmed role assumption by the threat actor in a second account
Expanded the time window of your investigation and the scope to your entire organization in AWS Organizations; and searched for any activity that might have taken place originating from the IP address related to the unauthorized activity
Investigated AWS activity that was performed by the role assumed in the second account
Identified new resources that were created by the threat actor, and malicious activity performed by the actor
Confirmed the modifications caused by the threat actor and their impact in your environment
Incident scenario 2: AWS IAM Identity Center user credentials compromised
In this second scenario, you start your investigation from a GuardDuty finding stating that an Amazon Elastic Compute Cloud (Amazon EC2) instance is querying an IP address that is associated with cryptocurrency-related activity. There are several sources of logs that you might want to explore when you conduct this investigation, including network, operation system, or application logs, among others. In this example, you will use CloudTrail Lake capabilities to investigate API activity logged in CloudTrail for this security event. To understand what exactly happened and when, you start by querying information from the resource involved, in this case an EC2 instance, and then continue digging into the AWS IAM Identity Center (successor to AWS Single Sign-On) credentials that were used to launch that EC2 instance, to finally confirm what other actions were performed.
Query 2.1: Confirm who has launched the EC2 instance involved in the cryptocurrency-related activity
You can begin by looking at the finding CryptoCurrency:EC2/BitcoinTool.B to get more information related to this event, for example when (timestamp), where (AWS account and AWS Region), and also which resource (EC2 instance ID) was involved with the security incident and when it was launched. With this information, you can perform the first query for this scenario, which will confirm what type of user credentials were used to launch the instance involved.
Query 2.1
 SELECT userIdentity.principalid, eventName, eventTime, recipientAccountId, awsRegion FROM 467f2e52-84b9-4d41-8049-bc8f8fad35dd
 WHERE responseElements IS NOT NULL AND
 element_at(responseElements, 'instancesSet') like '%"instanceId":"i-053a7e6164c0f0473"%' AND
 eventTime > '2022-09-13 12:45:59' AND eventName='RunInstances'
The results of the query are as follows:
Figure 10: Sample query 2.1 and results in the console
The results demonstrate that the IAM Identity Center user as principal ID AROASVPO5CIEXAMPLE:[email protected] was used to launch the EC2 instance that was involved in the incident.
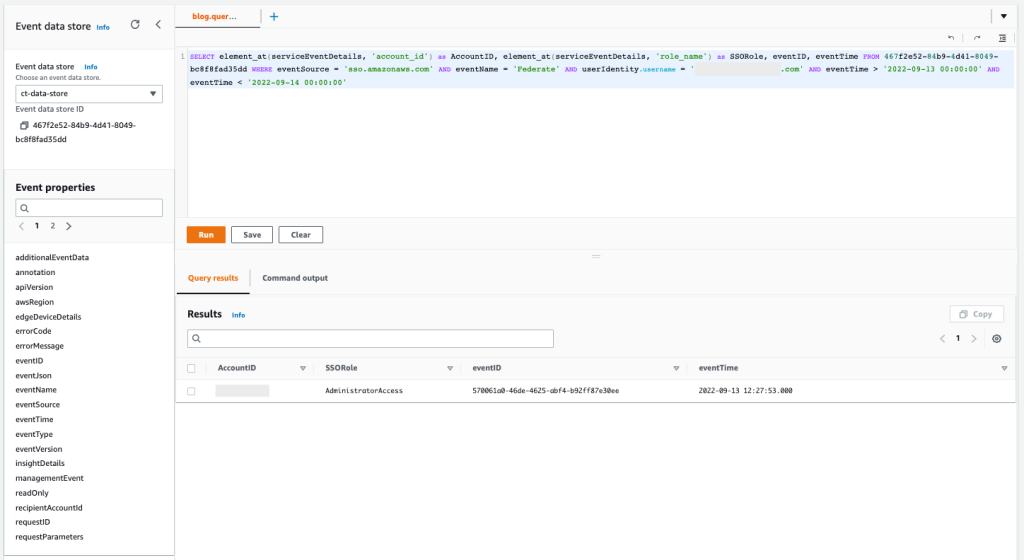
Query 2.2: Confirm in which AWS accounts the IAM Identity Center user has federated and authenticated
You want to confirm which AWS accounts this specific IAM Identity Center user has federated and authenticated with, and also which IAM role was assumed. This is important information to make sure that the security event happened only within the affected AWS account. The window of time for this query is based on the maximum value for the permission sets’ session duration in IAM Identity Center.
Query 2.2
SELECT element_at(serviceEventDetails, 'account_id') as AccountID, element_at(serviceEventDetails, 'role_name') as SSORole, eventID, eventTime FROM 467f2e52-84b9-4d41-8049-bc8f8fad35dd WHERE eventSource = 'sso.amazonaws.com' AND eventName = 'Federate' AND userIdentity.username = '[email protected]' AND eventTime > '2022-09-13 00:00:00' AND eventTime < '2022-09-14 00:00:00'
The results of the query are as follows:
Figure 11: Sample query 2.2 and results in the console
The results show that only one AWS account has been accessed during the time of the incident, and only one AWS role named AdministratorAccess has been used.
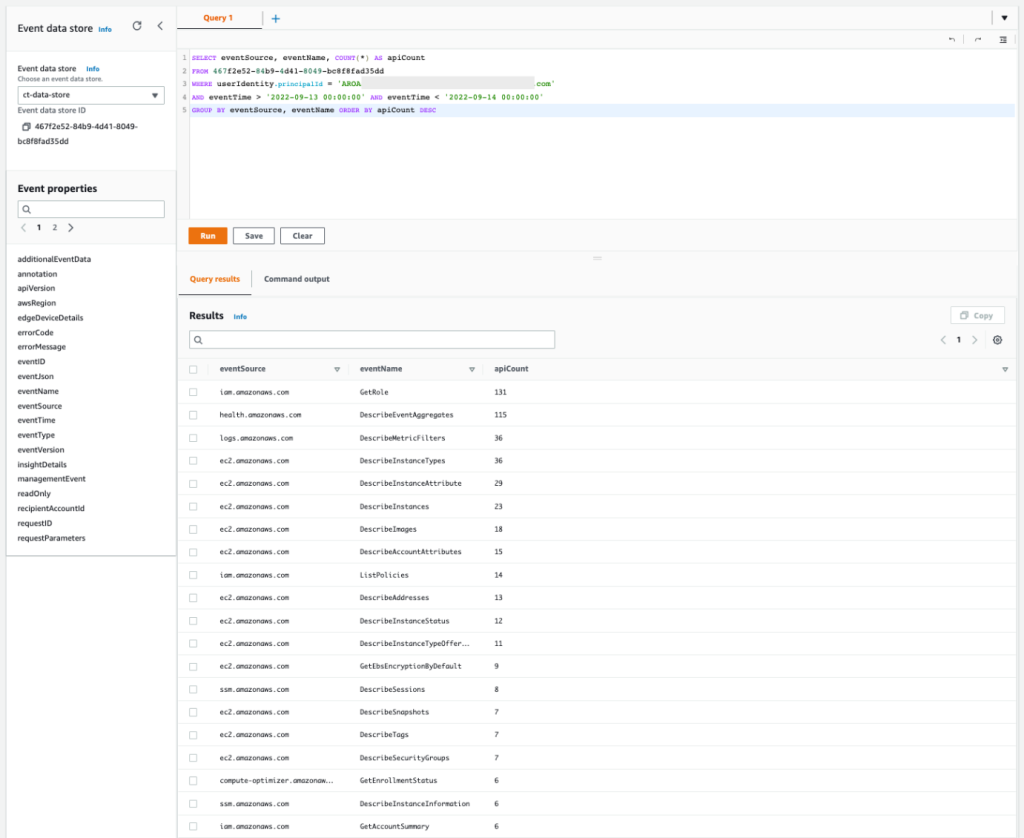
Query 2.3: Count and group activity based on API actions that were performed by the user in each AWS service
You now know exactly where the user has gained access, so next you can count and group the activity based on the API actions that were performed in each AWS service. This information helps you confirm the types of activity that were performed.
Query 2.3
 SELECT eventSource, eventName, COUNT(*) AS apiCount
 FROM 467f2e52-84b9-4d41-8049-bc8f8fad35dd
 WHERE userIdentity.principalId = 'AROASVPO5CIEXAMPLE:[email protected]'
 AND eventTime > '2022-09-13 00:00:00' AND eventTime < '2022-09-14 00:00:00'
 GROUP BY eventSource, eventName ORDER BY apiCount DESC
The results of the query are as follows:
Figure 12: Sample query 2.3 and results in the console
You can see that the list of APIs includes the read activities Get, Describe, and List. This activity is commonly associated with the discovery stage, when the unauthorized user is gathering information to determine credential permissions.
Query 2.4: Obtain mutable activity based on API actions performed by the user in each AWS service
To get a better understanding of the mutable actions performed by the user, you can add a new condition to hide the read-only actions by setting the readOnly parameter to false. You will want to focus on mutable actions to know whether there were new AWS resources created or if existing AWS resources were deleted or modified. Also, you can add the possible error code from the response element to the query, which will tell you if the actions were denied.
Query 2.4
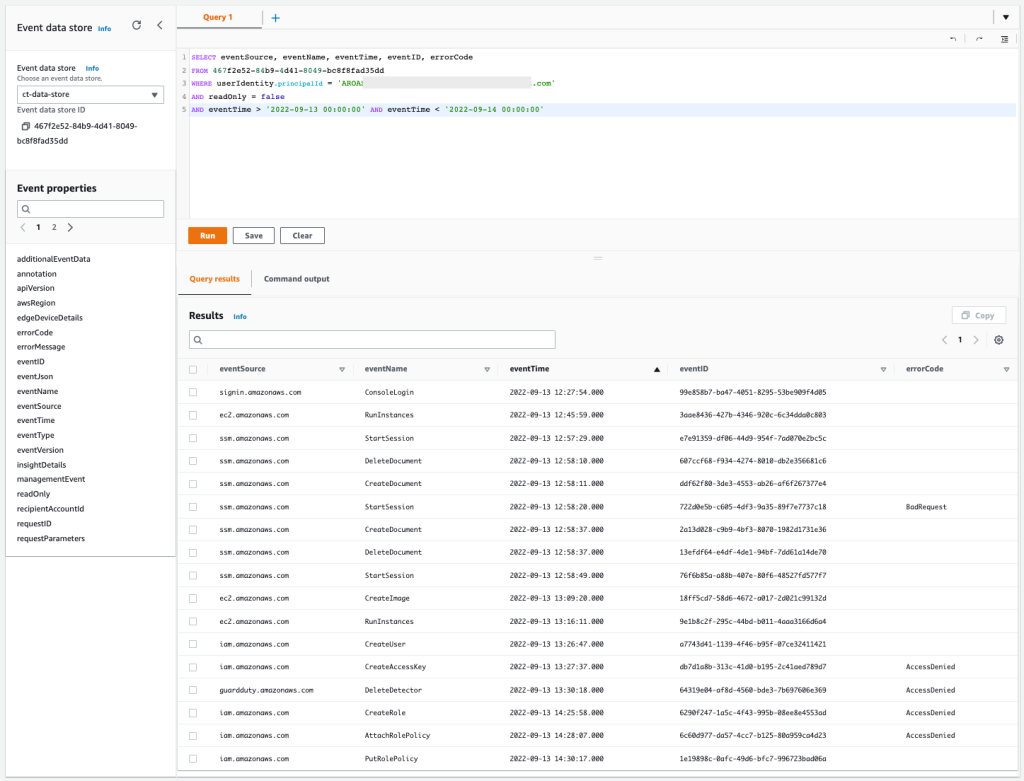
 SELECT eventSource, eventName, eventTime, eventID, errorCode
 FROM 467f2e52-84b9-4d41-8049-bc8f8fad35dd
 WHERE userIdentity.principalId = 'AROASVPO5CIEXAMPLE:[email protected]'
 AND readOnly = false
 AND eventTime > '2022-09-13 00:00:00' AND eventTime < '2022-09-14 00:00:00'
The results of the query are as follows:
Figure 13: Sample query 2.4 and results in the console
You can confirm that some actions, like EC2 RunInstances, EC2 CreateImage, SSM StartSession, IAM CreateUser, and IAM PutRolePolicy were allowed. And in contrast, IAM CreateAccessKey, IAM CreateRole, IAM AttachRolePolicy, and GuardDuty DeleteDetector were denied. The IAM-related denied actions are commonly associated with persistence tactics, where an unauthorized user may try to maintain access to the environment. The GuardDuty denied action is commonly associated with defense evasion tactics, where the unauthorized user is trying to cover their tracks and avoid detection.
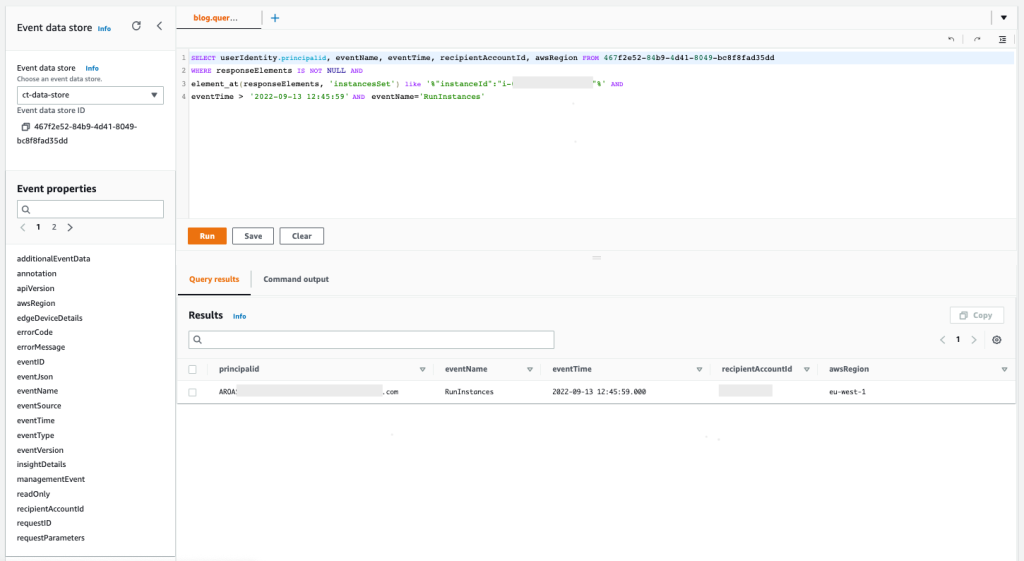
Query 2.5: Obtain more information about API action EC2 RunInstances
You can focus first on the API action EC2 RunInstances to understand how many EC2 instances were created by the same user. This information will confirm which other EC2 instances were involved in the security event.
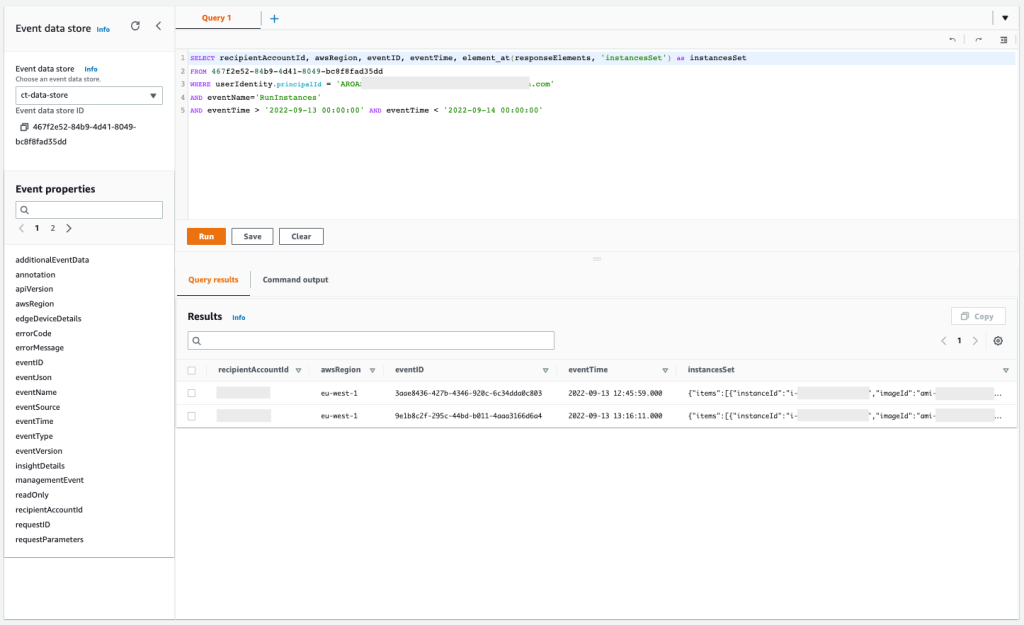
Query 2.5
 SELECT awsRegion, recipientAccountId, eventID, element_at(responseElements, 'instancesSet') as instances
 FROM 467f2e52-84b9-4d41-8049-bc8f8fad35dd
 WHERE userIdentity.principalId = 'AROASVPO5CIEXAMPLE:[email protected]'
 AND eventName='RunInstances'
 AND eventTime > '2022-09-13 00:00:00' AND eventTime < '2022-09-14 00:00:00'
The results of the query are as follows:
Figure 14: Sample query 2.5 and results in the console
You can confirm that the API was called twice, and if you expand the column InstanceSet in the response element, you will see the exact number of EC2 instances that were launched. Also, you can find that these EC2 instances were launched with an IAM instance profile called ec2-role-ssm-core. By checking in the IAM console, you can confirm that the IAM role associated has only the AWS managed policy AmazonSSMManagedInstanceCore attached, which enables AWS Systems Manager core functionality.
Query 2.6: Get the list of denied API actions performed by the user for each AWS service
Now, you can filter more to focus only on those denied API actions by performing the following query. This is important because it can help you to identify what kind of malicious event was attempted.
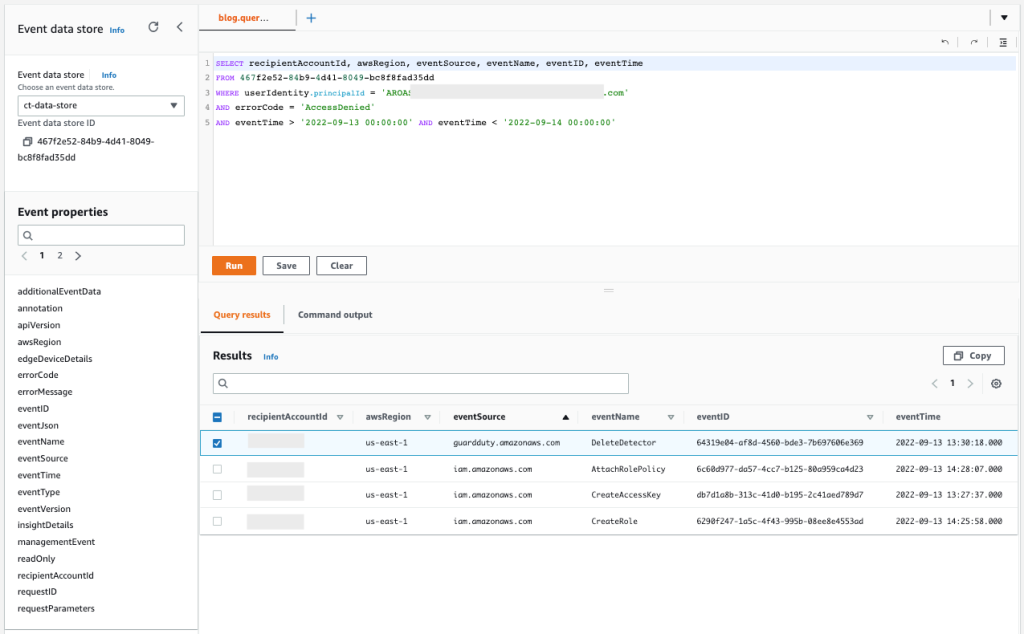
Query 2.6
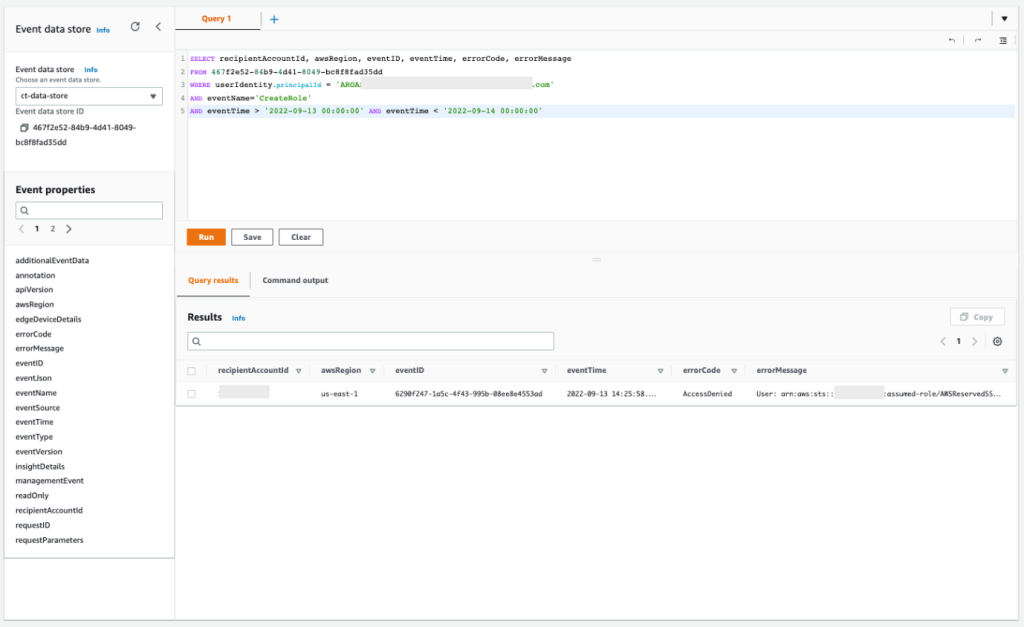
 SELECT recipientAccountId, awsRegion, eventSource, eventName, eventID, eventTime
 FROM 467f2e52-84b9-4d41-8049-bc8f8fad35dd
 WHERE userIdentity.principalId = 'AROASVPO5CIEXAMPLE:[email protected]'
 AND errorCode = 'AccessDenied'
 AND eventTime > '2022-09-13 00:00:00' AND eventTime < '2022-09-14 00:00:00'
The results of the query are as follows:
Figure 15: Sample query 2.6 and results in the console
You can see that the user has tried to stop GuardDuty by calling DeleteDetector, and has also performed actions within IAM that you should examine more closely to know if new unwanted access to the environment was created.
Query 2.7: Obtain more information about API action IAM CreateUserAccessKeys
With the previous query, you confirmed that more actions were denied within IAM. You can now focus on the failed attempt to create IAM user access keys that could have been used to gain persistent and programmatic access to the AWS account. With the following query, you can make sure that the actions were denied and determine the reason why.
Query 2.7
 SELECT recipientAccountId, awsRegion, eventID, eventTime, errorCode, errorMessage
 FROM 467f2e52-84b9-4d41-8049-bc8f8fad35dd
 WHERE userIdentity.principalId = 'AROASVPO5CIEXAMPLE:[email protected]'
 AND eventName='CreateAccessKey'
 AND eventTime > '2022-09-13 00:00:00' AND eventTime < '2022-09-14 00:00:00'
The results of the query are as follows:
Figure 16: Sample query 2.7 and results in the console
If you copy the errorMessage element from the response, you can confirm that the action was denied by a service control policy, as shown in the following example.
"errorMessage":"User: arn:aws:sts::111122223333:assumed-role/AWSReservedSSO_AdministratorAccess_f53d10b0f8a756ac/[email protected] is not authorized to perform: iam:CreateAccessKey on resource: user production-user with an explicit deny in a service control policy"
Query 2.8: Obtain more information about API IAM CreateUser
From the query error message in query 2.7, you can confirm the name of the IAM user that was used. Now you can check the allowed API action IAM CreateUser that you observed before to see if the IAM users match. This helps you confirm that there were no other IAM users involved in the security event.
Query 2.8
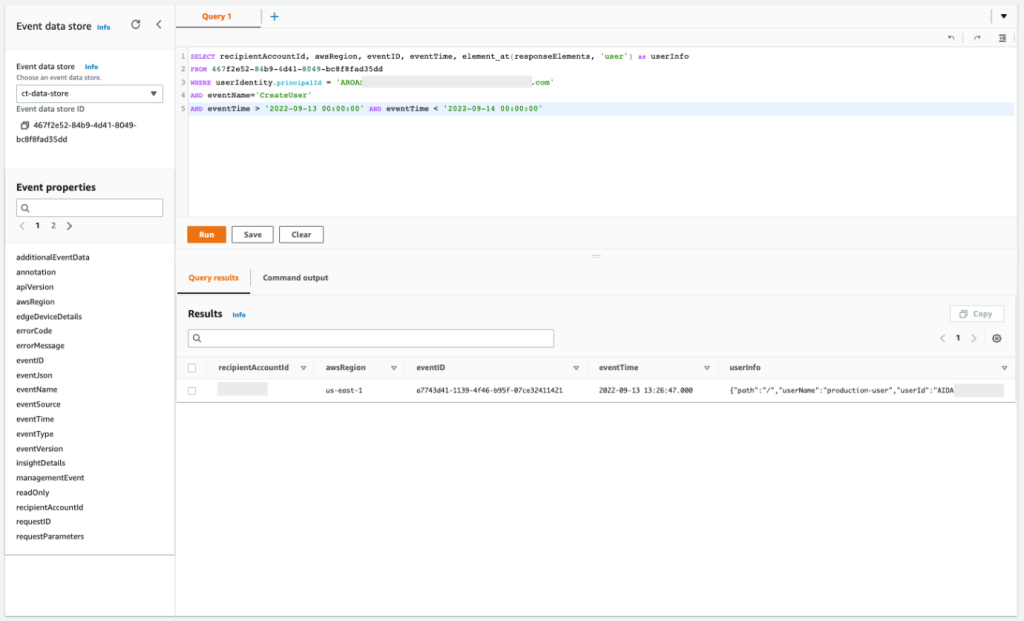
 SELECT recipientAccountId, awsRegion, eventID, eventTime, element_at(responseElements, 'user') as userInfo
 FROM 467f2e52-84b9-4d41-8049-bc8f8fad35dd
 WHERE userIdentity.principalId = 'AROASVPO5CIEXAMPLE:[email protected]'
 AND eventName='CreateUser'
 AND eventTime > '2022-09-13 00:00:00' AND eventTime < '2022-09-14 00:00:00'
The results of the query are as follows:
Figure 17: Sample query 2.8 and results in the console
Based on this output, you can confirm that the IAM user is indeed the same. This user was created successfully but was denied the creation of access keys, confirming the failed attempt to get new persistent and programmatic credentials.
Query 2.9: Get more information about the IAM role creation attempt
Now you can figure out what happened with the IAM CreateRole denied action. With the following query, you can see the full error message for the denied action.
Query 2.9
 SELECT recipientAccountId, awsRegion, eventID, eventTime, errorCode, errorMessage
 FROM 467f2e52-84b9-4d41-8049-bc8f8fad35dd
 WHERE userIdentity.principalId = 'AROASVPO5CIEXAMPLE:[email protected]'
 AND eventName='CreateRole'
 AND eventTime > '2022-09-13 00:00:00' AND eventTime < '2022-09-14 00:00:00'
The results of the query are as follows:
Figure 18: Sample query 2.9 and results in the console
If you copy the output of this query, you will see that the role was denied by a service control policy, as shown in the following example:
"errorMessage":"User: arn:aws:sts::111122223333:assumed-role/AWSReservedSSO_AdministratorAccess_f53d10b0f8a756ac/[email protected] is not authorized to perform: iam:CreateRole on resource: arn:aws:iam::111122223333:role/production-ec2-role with an explicit deny in a service control policy"
Query 2.10: Get more information about IAM role policy changes
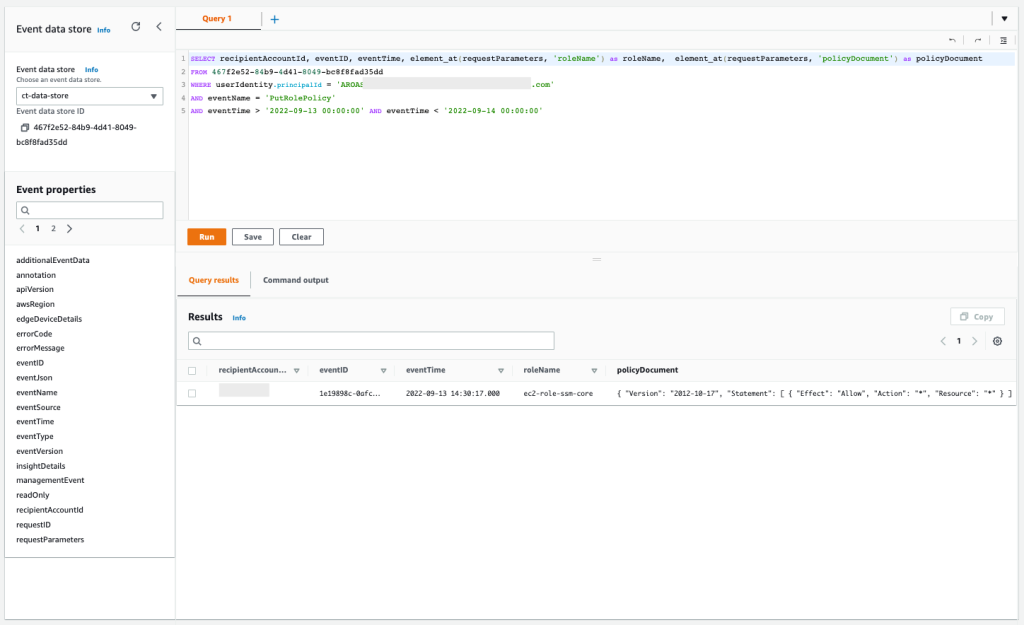
With the previous query, you confirmed that the unauthorized user failed to create a new IAM role to replace the existing EC2 instance profile in an attempt to grant more permissions. And with another of the previous queries, you confirmed that the IAM API action AttachRolePolicy was also denied, in another attempt for the same goal, but this time trying to attach a new AWS managed policy directly. However, with this new query, you can confirm that the unauthorized user successfully applied an inline policy to the EC2 role associated with the existing EC2 instance profile, with full admin access.
Query 2.10
SELECT recipientAccountId, eventID, eventTime, element_at(requestParameters, 'roleName') as roleName, element_at(requestParameters, 'policyDocument') as policyDocument FROM 467f2e52-84b9-4d41-8049-bc8f8fad35dd WHERE userIdentity.principalId = 'AROASVPO5CIEXAMPLE:[email protected]' AND eventName = 'PutRolePolicy' AND eventTime > '2022-09-13 00:00:00' AND eventTime < '2022-09-14 00:00:00'
The results of the query are as follows:
Figure 19: Sample query 2.10 and results in the console
Summary of incident scenario 2
This second scenario describes a security incident that involves an IAM Identity Center user that has been compromised. To investigate this incident by using CloudTrail Lake capabilities, you did the following:
Started the investigation by looking at metadata from the GuardDuty EC2 finding
Confirmed the AWS credentials that were used for the creation of that resource
Looked at whether the IAM Identity Center user credentials were used to access other AWS accounts
Did further investigation on the AWS APIs that were called by the IAM Identity Center user
Obtained the list of denied actions, confirming the unauthorized user’s attempt to get persistent access and cover their tracks
Obtained the list of EC2 resources that were successfully created in this security event
Conclusion
In this post, we’ve shown you how to use AWS CloudTrail Lake capabilities to investigate CloudTrail activity in response to security incidents across your organization. We also provided sample queries for two security incident scenarios. You now know how to use the capabilities of CloudTrail Lake to assist you and your security teams during the investigation process in a security incident. Additionally, you can find some of the sample queries related to this post and other topics in the following GitHub repository, and additional examples in the sample queries tab in the CloudTrail console. To learn more, see Working with CloudTrail Lake in the CloudTrail User Guide.
Regarding pricing for CloudTrail Lake, you pay for ingestion and storage together, where the billing is based on the amount of uncompressed data ingested. If you’re a new customer, you can try AWS CloudTrail Lake for a 30-day free trial or when you reach the free usage limits of 5GB of data. For more information, see see AWS CloudTrail pricing.
Finally, in combination with the investigation techniques shown in this post, we also recommend that you explore the use of Amazon Detective, an AWS managed and dedicated service that simplifies the investigative process and helps security teams conduct faster and more effective investigations. With the Amazon Detective prebuilt data aggregations, summaries, and context, you can quickly analyze and determine the nature and extent of possible security issues.
If you have feedback about this post, submit comments in the Comments section below. If you have questions about this post, contact AWS Support.
Want more AWS Security news? Follow us on Twitter.
In this blog post, I show you how to configure AWS Single Sign-On to define attribute-based access control (ABAC) permissions to manage Amazon Elastic Compute Cloud (Amazon EC2) instances and AWS Systems ManagerSession Manager for federated users. This combination allows you to control access to specific Amazon EC2 instances based on users’ attributes. I show you how defined AWS SSO identity source attributes like login and department can be used, and how custom attributes like SSMSessionRunAs can be used to pass these attributes into Amazon Web Services (AWS) from an external identity provider (IdP) using SAML 2.0 assertion.
AWS SSO added support for ABAC to enable you to create fine-grained permissions for your workforce in AWS using user attributes. Using user attributes as tags in AWS helps you simplify the process of creating fine-grained permissions in AWS and enables you to ensure that your workforce has access only to the AWS resources with matching tags.
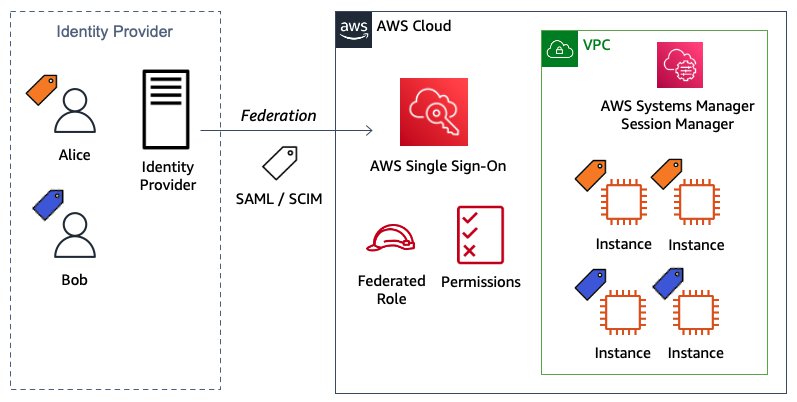
The following architecture diagram—Figure 1—presents an overview of the solution.
Figure 1: Solution architecture diagram
In the example in Figure 1, Alice and Bob are users who each have the attributes login, department, and SSMSessionRunAs. These attributes are created and updated in the external directory—Okta in this example—under those users’ profiles. The first two attributes are automatically synchronized by using System for Cross-domain Identity Management (SCIM) protocol between AWS SSO and Okta and configured within AWS SSO settings. The third custom attribute is passed directly from Okta into the AWS accounts as a new SAML assertion.
Both users are using the same AWS SSO custom permission set that allows them to launch a new Amazon EC2 instance with proper tags enforcement. Based on those tags, they can start, stop, and restart the EC2 instance if they are in the same department, and to terminate it if they are the owner. Also, they can connect using Session Manager if they’re in the same department. Users can sign in to those instances using the Linux OS user defined in the attribute SSMSessionRunAs.
Prerequisites
To perform the steps to use AWS SSO attributes for ABAC, you must already have deployed AWS SSO for your AWS Organizations and have connected with an external identity source using SAML and SCIM protocols. For more information, see Checklist: Configuring ABAC in AWS using AWS SSO.
You need two test users for implementing and testing the solution. You can use two existing users, or create new users named Alice and Bob to match the solution and testing described in the following sections.
Implement the solution
The basic steps to implement the solution are:
Confirm in AWS SSO settings that you have defined an external IdP, authentication via SAML 2.0, and provisioning via SCIM protocol.
Enable attributes for access control and define the two supported attributes: login and department.
Create a new user attribute in the Okta Directory.
Edit and confirm the users’ attributes defined in the Okta Directory profile.
Configure the SAML attribute statement in the Okta AWS SSO application.
Create a new permission set using an ABAC policy.
Create an AWS account assignment to the users using the permission set created in the previous step.
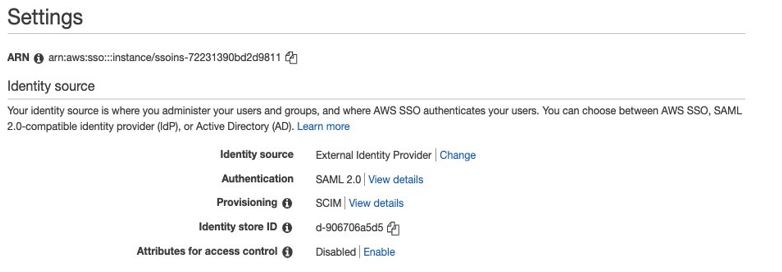
Confirm AWS SSO configuration
In this first step, you confirm that AWS SSO has been properly configured. Go to AWS SSO console SSO settings to check that the configuration of your identity source, authentication, and provisioning is as follows:
Confirm authentication is working as expected, by going to your user portal URL in a new browser instance (to ensure your user authentication doesn’t overwrite your existing authentication). The user portal offers a single place to access all the assigned AWS accounts, roles, and applications. For example, it should look like https://exampledomain.awsapps.com/start. Once you access it, the process automatically redirects the request to your external provider for authentication, and then returns the user to the AWS SSO user portal.
To confirm provisioning, go to the AWS SSO console and choose Users from the right panel. You should see your Okta users assigned to the AWS SSO application being synchronized by SCIM protocol. Select any user to see the Created by SCIM and Updated by SCIM information for that user.
Enable AWS SSO attributes for access control
In this step, you enable ABAC and then configure AWS SSO attributes. This solution uses the Attributes for access control page in the AWS Management Console to enter the key and value pairs.
On the Settings page, under Identity source, next to Attributes for access control, choose View details.
On the Attributes for access control page, notice the Key and Value columns. This is where you will be mapping the attribute from your identity source to an attribute that AWS SSO passes as a session tag. Set the first key and value pair by entering login as the key and ${path:userName} as the value. Set the second key and value pair to department and ${path:enterprise.department}. The settings are shown in Figure 3 below.
Figure 3: Map attributes using the Attributes for access control page
Choose Save changes.
Create a new attribute in Okta Directory
In this third step, you create the new custom attribute SSMSessionRunAs.
To create a new user attribute
Open the Okta console.
Under Directory, choose Profile Editor.
Choose Edit Profile for Okta User (default).
Under Attributes, choose Add Attribute as follows: Data type: Select String Display Name: Enter SSMSessionRunAs Variable Name: Enter SSMSessionRunAs Attribute Length: Select Less than and enter 10 (max).
Choose Save.
Edit and confirm users’ attributes defined in Okta Directory profile
Now that you have the new attribute SSMSessionRunAs created, go to the users’ profiles to enter the Department and SSMSessionRunAs values for both users.
To edit and confirm users’ attributes
Open the Okta console.
Under Directory, choose People.
Select user Bob.
Under Profile tab choose Edit as follows:
For the key Department, enter blue as the value.
For the key SSMSessionRunAs, enter bob as the value.
Choose Save.
Repeat steps 1 through 5 for Alice. For the key Department, enter amber as the value and for SSMSessionRunAs, enter alice as the value.
Confirm that the attributes of both users are defined in the external directory as follows:Username (login): [email protected] First name (firstName): Bob Last name (lastName): Rodriguez Display name (displayName): Bob Department (department): blue SSMSessionRunAs (SSMSessionRunAs): bob
Username (login): [email protected] First name (firstName): Alice Last name (lastName): Rosalez Display name (displayName): Alice Department (department): amber SSMSessionRunAs (SSMSessionRunAs): alice
Configure SAML attribute statement in Okta AWS SSO application
The attribute SSMSessionRunAs isn’t available as an attribute within AWS SSO. However, you can include it by defining SAML attribute statements, which are inserted into the SAML assertions.
To create a new SAML attribute
Open the Okta Application console.
Choose AWS Single Sign-on application.
On the Sign On tab, choose Edit Settings.
Under SAML 2.0 Attributes Statements enter the following:
For Name, enter https://aws.amazon.com/SAML/Attributes/AccessControl:SSMSessionRunAs
In this step, you create a permissions policy that determines who can access your AWS resources based on the configured attribute value. When you enable ABAC and specify attributes, AWS SSO passes the attribute value of the authenticated user into AWS Identity and Access Management (IAM) for use in policy evaluation.
On the Create new permission set page, choose Create a custom permission set.
Choose Next: Details.
Under Create a custom permission set, enter a name that will identify this permission set in AWS SSO. This name will also appear as an IAM role in the user portal for any users who have access to it. For this solution, name it myCustomPermissionSetEC2SSM.
Choose Create a custom permissions policy and paste in the following ABAC policy document:
Review the selections you made, and then choose Create.
The policy described above uses SAML session tags for the ABAC to define permissions based on attributes. These attributes are the tags passed in the AssumeRoleWithSAML operation when the SAML-based federation occurs.
A combination of global (aws:TagKeys, aws:PrincipalTag, aws:RequestTag) and service (ec2:ResourceTag, ec2:CreateAction, ssm:resourceTag) condition keys is used to assign the permissions.
Under the AWS organization tab, in the list of AWS accounts, select one or more accounts to which you want to assign access.
Choose Assign users.
On the Select users or groups page, select both test users from the list of users as shown in Figure 4.
Note: You can use the search box to look for specific users.
Figure 4: Select users to assign to AWS accounts
Choose Next: Permission sets.
On the Select permission sets page, select the permission sets that you created in step 5 to apply to the users from the table as shown in Figure 5.
Figure 5: Select permissions sets
Choose Finish to start the configuration of your AWS account. When configuration is complete, a message is displayed stating that you have successfully configured your AWS account as shown in Figure 6.
Figure 6: Confirmation that configuration is complete
Test the solution
Now that you have everything in place, let’s test the solution. To test the solution, you’ll log in to AWS SSO, access the AWS account and check the event logs, and test the Amazon EC2 operations.
Log in to AWS SSO as Bob through your external IdP
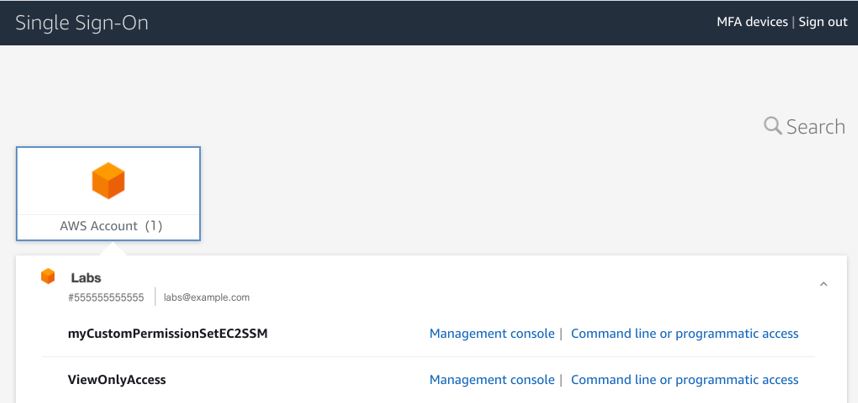
Enter the user portal URL in a browser window and log in to AWS SSO as Bob. AWS SSO redirects to the external provider for the log in process. After successful authentication, the external provider redirects to the AWS SSO portal, which shows you a list of the AWS accounts that you have access to. In this case, Bob has access to one AWS account as shown in Figure 7.
Figure 7: AWS SSO showing AWS accounts that the user has access to
Access the AWS account using the permission set and confirm the event logs
Select the Management console link for the AWS account that has the myCustomPermissionSetEC2SSM permission set that you created earlier. This action federates into the AWS account and is logged in to AWS CloudTrail with the API AssumeRoleWithSAML. To confirm that the SAML session tags are being passed in the session, look at the API event log in the CloudTrail Event history console. In the following example, you can check the principalTags keys and their values under requestParameters.
Open the Amazon EC2 console: For this example, when opening the Amazon EC2 console there are already three running EC2 instances to test the ABAC policy that have been created with proper tags explained in the following step. From the top menu, you can also confirm the federated login AWSReservedSSO_myCustomPermissionSetEC2SSM_9e80ec498218bbea/[email protected] that represents the AWS SSO managed role and the user as shown in Figure 8.
Figure 8: EC2 instances and user information
Launch a new EC2 instance: Start testing the ABAC policy by launching a new EC2 instance. This action is authorized only when you fill in the three required tags: Name, Owner, and Department.
From the Amazon EC2 console, choose Launch Instances.
Set the AMI, for this example select an Ubuntu-based OS.
Set the Instance Type, a t2.micro will work.
Configure the EC2 instance. Choose an IAM role to allow Systems Manager to manage the new EC2 instance. In this case, you have to create the IAM role EC2UbuntuSSMRole with the AWS managed policy AmazonEC2RoleforSSM attached in advanced with proper IAM permissions since the user Bob is not allow to do so. Then, you must use the user data to create the OS Ubuntu user—Bob—that you need to log in to the EC2 instance by using Session Manager. You can copy and paste the following to create the user “Bob”:#!/bin/bash sudo useradd -m bob
Add storage using the default settings.
Add tags. From the ABAC policy previously created, you can confirm that tag key Name can be anything as the condition StringLike is indicated with a wildcard (*). The tag keys Owner and Department have to match the principal session tags passed through federation. In this case, enter [email protected] as the key Owner, and enter blue as the Department, as shown in Figure 9.
Figure 9: EC2 tags describing key value pairs
Configure security groups. When configuring security groups, you can choose an existing security group that doesn’t allow any inbound traffic to the SSH port. Since when using Session Manager you connect to the EC2 instance through an API that is going to be an outbound connection. This way you can safely leave the security group inbound rules close.
Review and launch. It will ask you about selecting or creating a key pair. You don’t need one, because you’re using Session Manager. Proceed without selecting or creating a new SSH key pair. When launching the EC2 instance with the correct tag keys and values, you get the success message shown in Figure 10.
Figure 10: EC2 success message launching an instance with the correct tags
If there are any missing tag keys or the values aren’t correct, the action will be denied as shown in Figure 11. For more information, you can decode the authorization error message using the API DecodeAuthorizationMessage.
Figure 11: EC2 failed message launching an instance with incorrect tags
Stop, reboot, and terminate EC2 instances. The next tests are to be stop, reboot, and terminate the EC2 instances. In the ABAC policy you defined that only users who have the same department value as the resource can perform the first two actions. You can terminate and EC2 instance only if you are an owner. To stop, reboot, and terminate instances, open the EC2 Console, choose Instances, and select the instance you want to affect. Choose Instance state and choose the action you want to test: Stop instance, Reboot instance or Terminate instance.
Trying to stop the EC2 instance amber-instance where Department is amber is shown in Figure 12.
Figure 12: EC2 console showing how to stop an instance
The action should fail as shown in Figure 13.
Figure 13: EC2 instance failure message stopping an instance with wrong tags
Only when the department value of the EC2 instance is blue is it possible to stop or reboot the instance as shown in Figure 14.
Figure 14: EC2 success message stopping an instance with correct tags
Only when the owner who launched the EC2 instance matches with the federated login is it possible to terminate the instance. Trying to terminate an EC2 instance that was launched by anyone other than the owner will lead to a failed action as shown in Figure 15.
Figure 15: EC2 failed message terminating an instance with incorrect tags
Try to modify tags. Because ABAC policies rely on tags, you cannot modify tags after the resources have been created. This is set in the ABAC policy statement AllowCreateTagsOnRunInstance in Create a new permission set using an ABAC policy. If you try to modify any tag keys or values on existing resources, the changes will be denied. For example, if you try to modify the owner of a tag on an existing EC2 instance, you get the “Failed to update tags” error message as shown in Figure 16.
Figure 16: Failed message when attempting to modify tags
Connect to the EC2 instance using Session Manager.
Test logging in to the EC2 instance by choosing the new instance and choosing Connect as shown in Figure 17.
Figure 17: EC2 console selecting an instance to connect
Then choose the Session Manager tab and choose Connect as shown in Figure 18.
Figure 18: EC2 console selecting Session Manager to connect
This will open a new tab in the browser redirecting to a Systems Manager session where you can confirm that the Ubuntu OS user is Bob as shown in Figure 19.
Figure 19: Systems Manager session started confirming Ubunto OS user
Note: By default, sessions are launched using the credentials of a system-generated account named ssm-user that is created on a managed instance. However, you can instead launch sessions using any OS user by enabling the run as feature in SSM. To learn more about this, see Enable run as support for Linux and macOS instances in the Systems Manager Session Manager user guide.
Performing the same action in an EC2 instance with a different Department tag will lead to a denied action as shown in Figure 20. This is because the ABAC policy allows the StartSession action only when the Department key matches the Department value in the EC2 instance.
Figure 20: Systems Manager StartSession failed message
Conclusion
In this blog post, you learned how to use AWS SSO with the two methods of passing attributes to AWS account using session tags for ABAC. You also learned how to build policies with tags as conditions to simplify and reuse custom permission sets. You have seen working examples with services like EC2, and Systems Manager Session Manager. To learn more about ABAC policies, SAML session tags, and how to pass session tags in federation, see IAM tutorial: Use SAML session tags for ABAC and Passing session tags using AssumeRoleWithSAML.
If you have feedback about this post, submit comments in the Comments section below.
Want more AWS Security news? Follow us on Twitter.
The collective thoughts of the interwebz
Manage Consent
To provide the best experiences, we use technologies like cookies to store and/or access device information. Consenting to these technologies will allow us to process data such as browsing behavior or unique IDs on this site. Not consenting or withdrawing consent, may adversely affect certain features and functions.
Functional
Always active
The technical storage or access is strictly necessary for the legitimate purpose of enabling the use of a specific service explicitly requested by the subscriber or user, or for the sole purpose of carrying out the transmission of a communication over an electronic communications network.
Preferences
The technical storage or access is necessary for the legitimate purpose of storing preferences that are not requested by the subscriber or user.
Statistics
The technical storage or access that is used exclusively for statistical purposes.The technical storage or access that is used exclusively for anonymous statistical purposes. Without a subpoena, voluntary compliance on the part of your Internet Service Provider, or additional records from a third party, information stored or retrieved for this purpose alone cannot usually be used to identify you.
Marketing
The technical storage or access is required to create user profiles to send advertising, or to track the user on a website or across several websites for similar marketing purposes.