All posts by Sean M. Tracey

Announcing Amazon SageMaker Inference Recommender

Post Syndicated from Sean M. Tracey original https://aws.amazon.com/blogs/aws/announcing-amazon-sagemaker-inference-recommender/

Today, we’re pleased to announce Amazon SageMaker Inference Recommender — a brand-new Amazon SageMaker Studio capability that automates load testing and optimizes model performance across machine learning (ML) instances. Ultimately, it reduces the time it takes to get ML models from development to production and optimizes the costs associated with their operation.

SageMaker Inference Recommender Banner Image

Until now, no service has provided MLOps Engineers with a means to pick the optimal ML instances for their model. To optimize costs and maximize instance utilization, MLOps Engineers would have to use their experience and intuition to select an ML instance type that would serve them and their model well, given the requirements to run them. Moreover, given the vast array of ML instances available, and the practically infinite nuances of each model, choosing the right instance type could take more than a few attempts to get it right. SageMaker Inference Recommender now lets MLOps Engineers and get recommendations for the best available instance type to run their model. Once an instance has been selected, their model can be instantly deployed to the selected instance type with only a few clicks. Gone are the days of writing custom scripts to run performance benchmarks and load testing.

For MLOps Engineers who want to get data on how their model will perform ahead of pushing to a production environment, SageMaker Inference Recommender also lets them run a load test against their model in a simulated environment. Ahead of deployment, they can specify parameters, such as required throughput, sample payloads, and latency constraints, and test their model against these constraints on a selected set of instances. This lets MLOps Engineers gather data on how well their model will perform in the real world, thereby enabling them to feel confident in pushing it to production—or highlighting potential issues that must be addressed before putting it out into the world.

SageMaker Inference Recommender has even more tricks up its sleeve to make the lives of MLOps Engineers easier and make sure that their models continue to operate optimally. MLOps Engineers can use SageMaker Inference Recommender benchmarking features to perform custom load tests that estimate model performance when accessed under load in a production environment given certain requirements. Results from these tests can be loaded with either SageMaker Studio or the AWS SDK or AWS CLI, giving MLOps Engineers an overview of model performance, comparisons of numerous configurations, and the ability to share the results with any stakeholders.

Find Out More
MLOps Engineers can get started with Amazon SageMaker Inference Recommender through Amazon SageMaker Studio, AWS SDKs and CLI . Amazon SageMaker Inference Recommender is available in all AWS commercial regions where SageMaker is available (except for KIX). To find out more information, you can visit the Amazon SageMaker Inference Recommender landing page.

To get started, see the SageMaker Inference Recommender documentation.

New – Introducing SageMaker Training Compiler

Post Syndicated from Sean M. Tracey original https://aws.amazon.com/blogs/aws/new-introducing-sagemaker-training-compiler/

An image explaining the benefits of using Amazon SageMaker Training CompilerToday, we’re pleased to announce Amazon SageMaker Training Compiler, a new Amazon SageMaker capability that can accelerate the training of deep learning (DL) models by up to 50%.

As DL models grow in complexity, so too does the time it can take to optimize and train them. For example, it can take 25,000 GPU-hours to train popular natural language processing (NLP) model “RoBERTa“. Although there are techniques and optimizations that customers can apply to reduce the time it can take to train a model, these also take time to implement and require a rare skillset. This can impede innovation and progress in the wider adoption of artificial intelligence (AI).

How has this been done to date?
Typically, there are three ways to speed up training:

  1. Using more powerful, individual machines to process the calculations
  2. Distributing compute across a cluster of GPU instances to train the model in parallel
  3. Optimizing model code to run more efficiently on GPUs by utilizing less memory and compute.

In practice, optimizing machine learning (ML) code is difficult, time-consuming, and a rare skill set to acquire. Data scientists typically write their training code in a Python-based ML framework, such as TensorFlow or PyTorch, relying on ML frameworks to convert their Python code into mathematical functions that can run on GPUs, commonly known as kernels. However, this translation from the Python code of a user is often inefficient because ML frameworks use pre-built, generic GPU kernels, instead of creating kernels specific to the code and model of the user.

It can take even the most skilled GPU programmers months to create custom kernels for each new model and optimize them. We built SageMaker Training Compiler to solve this problem.

Today’s launch lets SageMaker Training Compiler automatically compile your Python training code and generate GPU kernels specifically for your model. Consequently, the training code will use less memory and compute, and therefore train faster. For example, when fine-tuning Hugging Face’s GPT-2 model, SageMaker Training Compiler reduced training time from nearly 3 hours to 90 minutes.

Automatically Optimizing Deep Learning Models
So, how have we achieved this acceleration? SageMaker Training Compiler accelerates training jobs by converting DL models from their high-level language representation to hardware-optimized instructions that train faster than jobs with off-the-shelf frameworks. Under the hood, SageMaker Training Compiler makes incremental optimizations beyond what the native PyTorch and TensorFlow frameworks offer to maximize compute and memory utilization on SageMaker GPU instances.

More specifically, SageMaker Training Compiler uses graph-level optimization (operator fusion, memory planning, and algebraic simplification), data flow-level optimizations (layout transformation, common sub-expression elimination), and back-end optimizations (memory latency hiding, loop oriented optimizations) to produce an optimized model that efficiently uses hardware resources. As a result, training is accelerated by up to 50%, and the returned model is the same as if SageMaker Training Compiler had not been used.

But how do you use SageMaker Training Compiler with your models? It can be as simple as adding two lines of code!

SageMaker Training Compiler Code Changes

The shortened training times mean that customers gain more time for innovating and deploying their newly-trained models at a reduced cost and a greater ability to experiment with larger models and more data.

Getting the most from SageMaker Training Compiler
Although many DL models can benefit from SageMaker Training Compiler, larger models with longer training will realize the greatest time and cost savings. For example, training time and costs fell by 30% on a long-running RoBERTa-base fine-tuning exercise.

Jorge Lopez Grisman, a Senior Data Scientist at Quantum Health – an organization on a mission to “make healthcare navigation smarter, simpler, and more cost-effective for everyone” – said:

“Iterating with NLP models can be a challenge because of their size: long training times bog down workflows and high costs can discourage our team from trying larger models that might offer better performance. Amazon SageMaker Training Compiler is exciting because it has the potential to alleviate these frictions. Achieving a speedup with SageMaker Training Compiler is a real win for our team that will make us more agile and innovative moving forward.”

Further Resources
To learn more about how Amazon SageMaker Training Compiler can benefit you, you can visit our page here. And to get started see our technical documentation here.

New – Create and Manage EMR Clusters and Spark Jobs with Amazon SageMaker Studio

Post Syndicated from Sean M. Tracey original https://aws.amazon.com/blogs/aws/new-create-and-manage-emr-clusters-and-spark-jobs-with-amazon-sagemaker-studio/

Today, we’re very excited to offer three new enhancements to our Amazon SageMaker Studio service.

As of now, users of SageMaker Studio can create, terminate, manage, discover, and connect to Amazon EMR clusters running within a single AWS account and in shared accounts across an organization—all directly from SageMaker Studio. Furthermore, SageMaker Studio Notebook users can able to utilize SparkUI to monitor and debug Spark jobs running on an Amazon EMR cluster—directly from the SageMaker Studio Notebooks!

The story so far…
Before today, SageMaker Studio users had some ability to find and connect with EMR clusters, provided that they were running in the same account as SageMaker Studio. While useful in many circumstances, if a cluster did not exist that would suit the requirements of the model or analysis being run, then data scientists would have to leave their development environment and manually configure a cluster that suited their needs. As well as being disruptive to workflow of data scientists, there are no guarantees that the data scientists would have either the permissions or depth of knowledge required to provision a cluster that would enable them to continue with their work. Additionally, being restricted to creating and managing clusters in a single account could become prohibitive in organizations working across many AWS accounts.

What’s new?
Data scientists can:

  • Discover, manage, create, terminate, and connect to Amazon EMR clusters from within SageMaker Studio
  • Utilize “templates” – a new way to configure and provision clusters for your workload needs with support from seasoned DevOps practitioners
  • Connect to, debug, and monitor Spark jobs running on an Amazon EMR cluster from within a SageMaker Studio Notebook

Creating, Connecting to, and Managing EMR Clusters

Connecting to an EMR Cluster from a SageMaker Studio Notebook

With the ability to connect to and manage EMR clusters from within SageMaker Studio, data scientists no longer have to leave their familiar environment to create, configure and provision the EMR clusters where they run their workloads.

Introducing Templates
A template is a collection of off-the-shelf cluster configurations optimized for numerous workloads. Templates can be created and managed by DevOps administrators and made available through the AWS Service Catalog to data scientists within SageMaker Studio. This lets them quickly spin up a cluster to meet their needs, all while safe in the knowledge that a trusted DevOps admin has correctly configured a cluster per the project’s requirements. Furthermore, this lets data scientists get on with the work they do best, and it gives DevOps administrators within these teams greater ability to manage the types of provisioned infrastructure.

Managing EMR Clusters from within SageMaker Studio Notebooks

Directly Connect to and monitor Spark Jobs
Finally, to make the job of data scientists even simpler, we’ve built the ability to connect to, debug, and monitor Spark jobs running on an Amazon EMR cluster from within a SageMaker Studio Notebook. Before now, to access the monitoring UI of a Spark Job, one needed to configure secure tunnels and web proxies to gain direct access to currently executing jobs, adding friction to the workflow of a data scientist trying to observe and debug their workloads. Now, with these new features, users will have one-click access directly from the interface that they already know. This enables them to build and put their workloads to work, rather than spending time on configuring infrastructure and workloads.

Connecting to a Spark Job from within a SageMaker Studio Notebook

These new features let data scientists can use a simple, consistent UI to provision and manage infrastructure as needed without ever having to leave SageMaker Studio or dive into the minutiae of the provisioning of such hardware – Moreover, they won’t have to spend time configuring proxies and SSH tunnels to debug and monitor ongoing Spark jobs.

Find out more
These features are generally available in all AWS Regions where SageMaker Studio is available, and there are no additional charges to use this capability. For complete information on pricing and regional availability, please refer to the SageMaker Studio pricing page .

To learn more, see our documentation.

Announcing Amazon SageMaker Ground Truth Plus

Post Syndicated from Sean M. Tracey original https://aws.amazon.com/blogs/aws/announcing-amazon-sagemaker-ground-truth-plus/

Today, we’re pleased to announce the latest service in the Amazon SageMaker suite that will make labeling datasets easier than ever before. Ground Truth Plus is a turn-key service that uses an expert workforce to deliver high-quality training datasets fast, and reduces costs by up to 40 percent.

The Challenges of Machine Learning Model Creation
One of the biggest challenges in building and training machine learning (ML) models is sourcing enough high-quality, labeled data at scale to feed into and train those models so that they can make an accurate prediction.

On the face of it, labeling data might seem like a fairly straightforward task…

  • Step 1: Get data
  • Step 2: Label it

…but this is far from the reality.

Even before you have labelers begin annotations, you need a custom labeling workflow and user interface specific to your project so that you get a high-quality dataset. This relies on a combination of robust tooling and skilled workers, and the effort spent can be significant.

Once the data labeling workflow and user interface has been constructed, a workforce to use those systems must be organized and trained – and this is all before a single point of data has been labeled!

Finally, once the labeling systems have been built, the workflows designed, and the workforce trained and deployed, the process of passing data through that system must be monitored and checked to ensure a consistent, high-quality output. After enough data has been passed through and labeled by the system, you have arrived at the point you’ve been trying to get to all along: you finally have enough data to train the ML model.

Each of these steps represents a significant investment in time, costs, and energy. You could be spending these resources building ML models instead of labeling and managing data, and using Ground Truth Plus can help free you up to do just that.

Introducing Amazon SageMaker Ground Truth Plus
Amazon SageMaker Ground Truth Plus enables you to easily create high-quality training datasets without having to build labeling applications and manage the labeling workforce on your own. Which means you don’t even need to have deep ML expertise or extensive knowledge of workflow design and quality management. You simply provide data along with labeling requirements and Ground Truth Plus sets up the data labeling workflows and manages them on your behalf in accordance with your requirements.

For example, if you need medical experts to label radiology images, you can specify that in the guidelines you provide to Ground Truth Plus. The service will then automatically select labelers trained in radiology to label your data, and from there an expert workforce that is trained on a variety of ML tasks will start labeling the data. Ground Truth Plus brings ML-powered automation to data labeling, which increases the quality of the output dataset and decreases the data labeling costs.

Amazon SageMaker Ground Truth Plus uses a multi-step labeling workflow including ML techniques for active learning, pre-labeling, and machine validation. This reduces the time required to label datasets for a variety of use cases including computer vision and natural language processing. Finally, Ground Truth Plus provides transparency into data labeling operations and quality management through interactive dashboards and user interfaces. This lets you monitor the progress of training datasets across multiple projects, track project metrics such as daily throughput, inspect labels for quality, and provide feedback on the labeled data.

How Does It Work?
A SageMaker Ground Truth Plus screenshot showing the request form
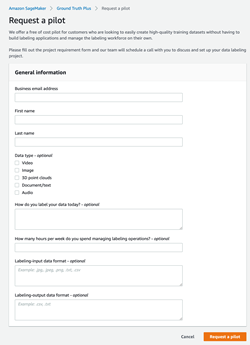
First, let’s head to the new Ground Truth Plus console and fill out a form outlining the requirements for the data labeling project. Following that, our team of AWS Experts will schedule a call to discuss your data labeling project.

After the call, you simply upload data in an Amazon Simple Storage Service (Amazon S3) bucket for labeling.

Once the data has been uploaded, our experts will set-up the data labeling workflow per your requirements and create a team of labelers with the expertise necessary to label your data effectively. This helps make sure that you have the best people possible working on your projects.

These expert labelers use the Ground Truth Plus tools we’ve built to label these datasets quickly and effectively.

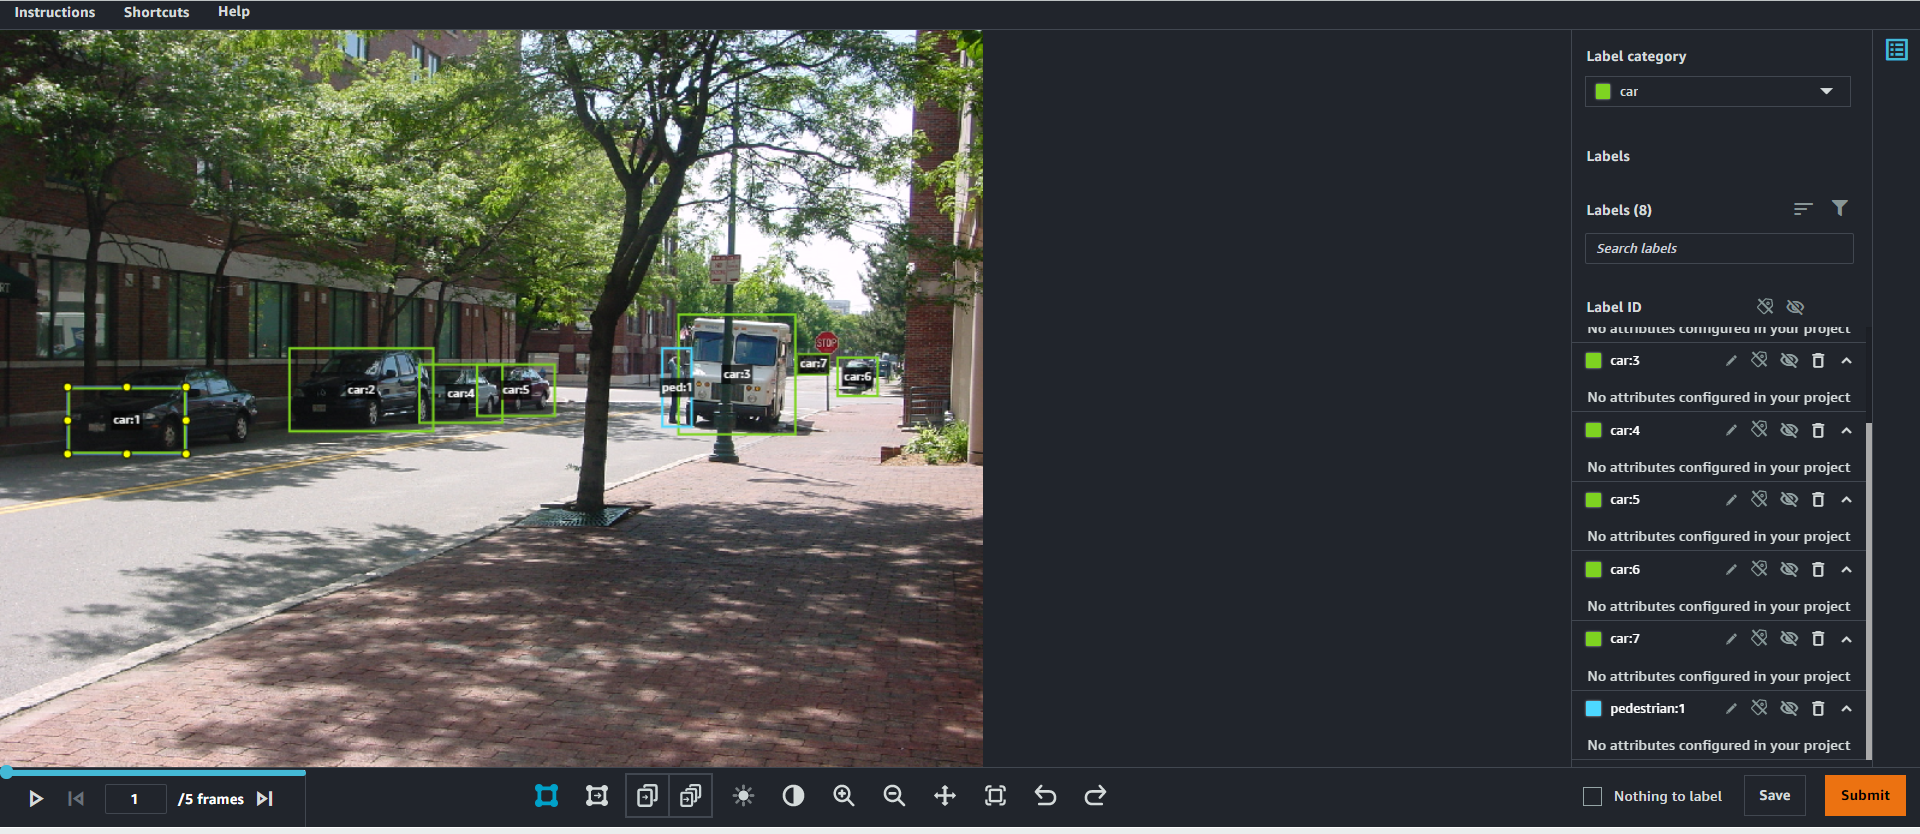
Initially, labelers will annotate the data you’ve uploaded, much like the following example image that we’ve uploaded from the CBCL StreetScenes dataset. However, as the labelers start to submit examples of labeled data, something cool begins happening: our ML systems kick in and start to pre-label the images on behalf of the expert workforce!

An example of the raw dataset used to demonstrate Amazon SageMaker Ground Truth Plus functionality

As more and more data is labeled by the expert workforce, the ML model becomes better at pre-labeling those images. This means that there’s less need for a human to spend as much time creating each individual label for every object of interest in a dataset. Less time spent on labeling means lower costs for you, and it also means a quicker turnaround in creating a dataset that can be used for training a model – all without sacrificing quality.

A screenshot showing one of the labelling interfaces for SageMaker Ground Truth Plus

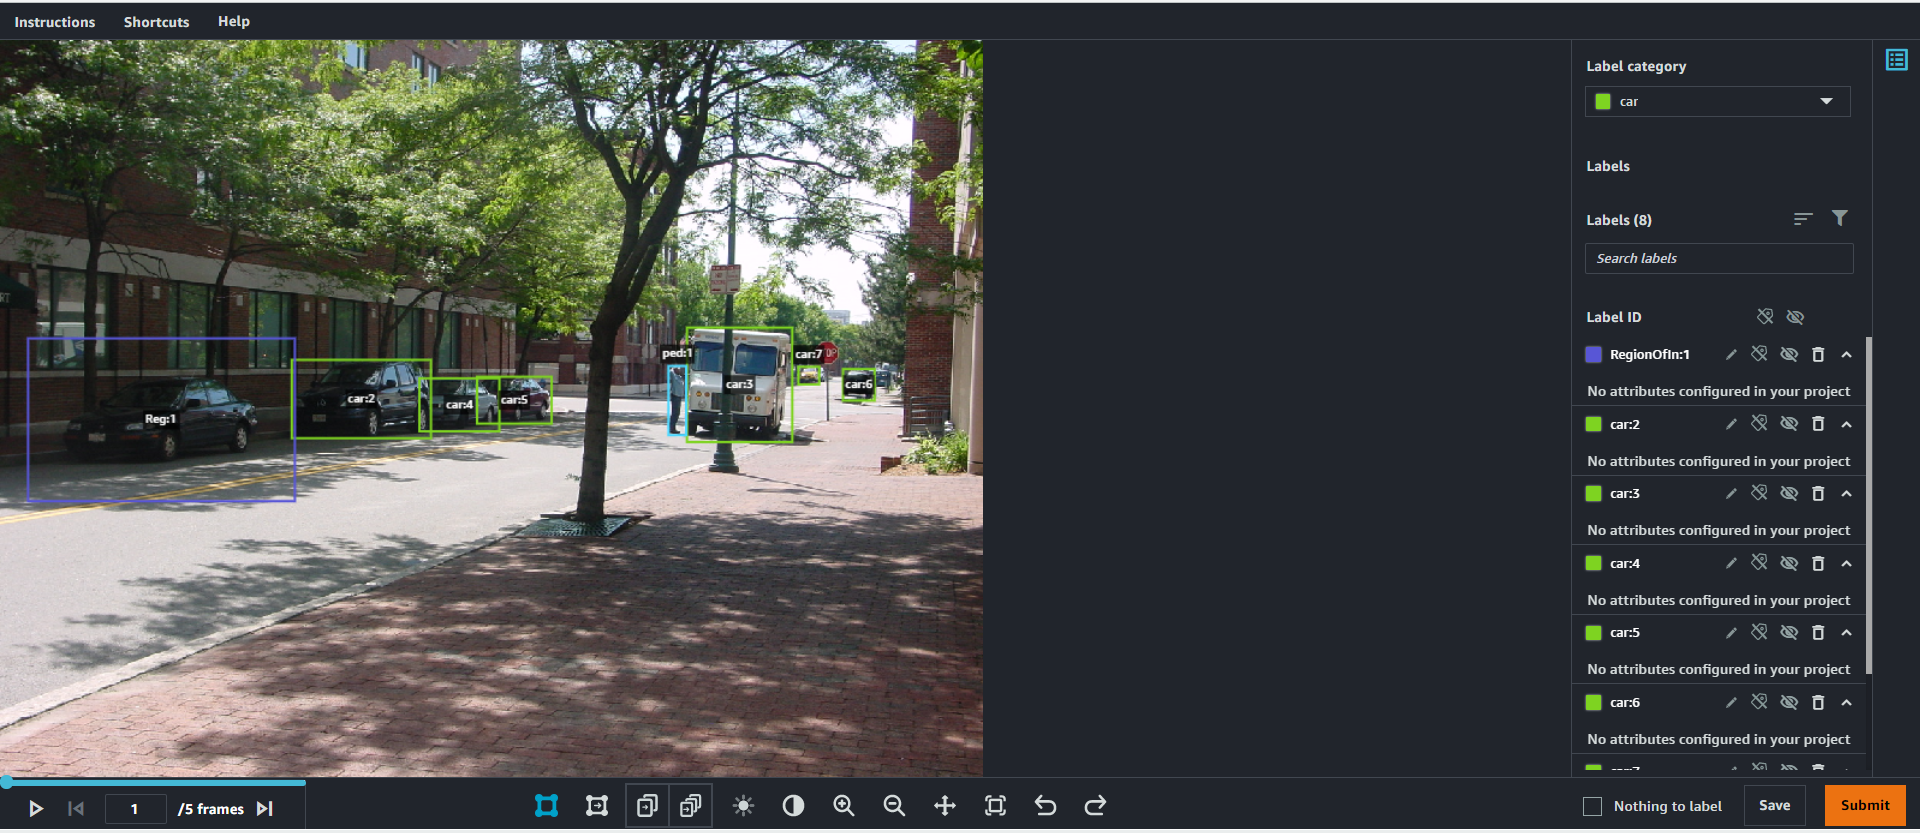
As the process continues, these ML models will also start to highlight potential areas of interest that the labeling workforce may have missed or incorrectly labeled through machine validation (indicated below by the purple box). Once an area of interest has been highlighted, a human labeler can view and either confirm or delete the suggestion that the model has made. This iteratively improves the pre-labeling and machine validation stages, further reducing the time needed by a labeler to manually label the data, and ensures a high-quality output throughout the process.

A screenshot showing one of the labelling interfaces filed in my a machine learning model for SageMaker Ground Truth Plus

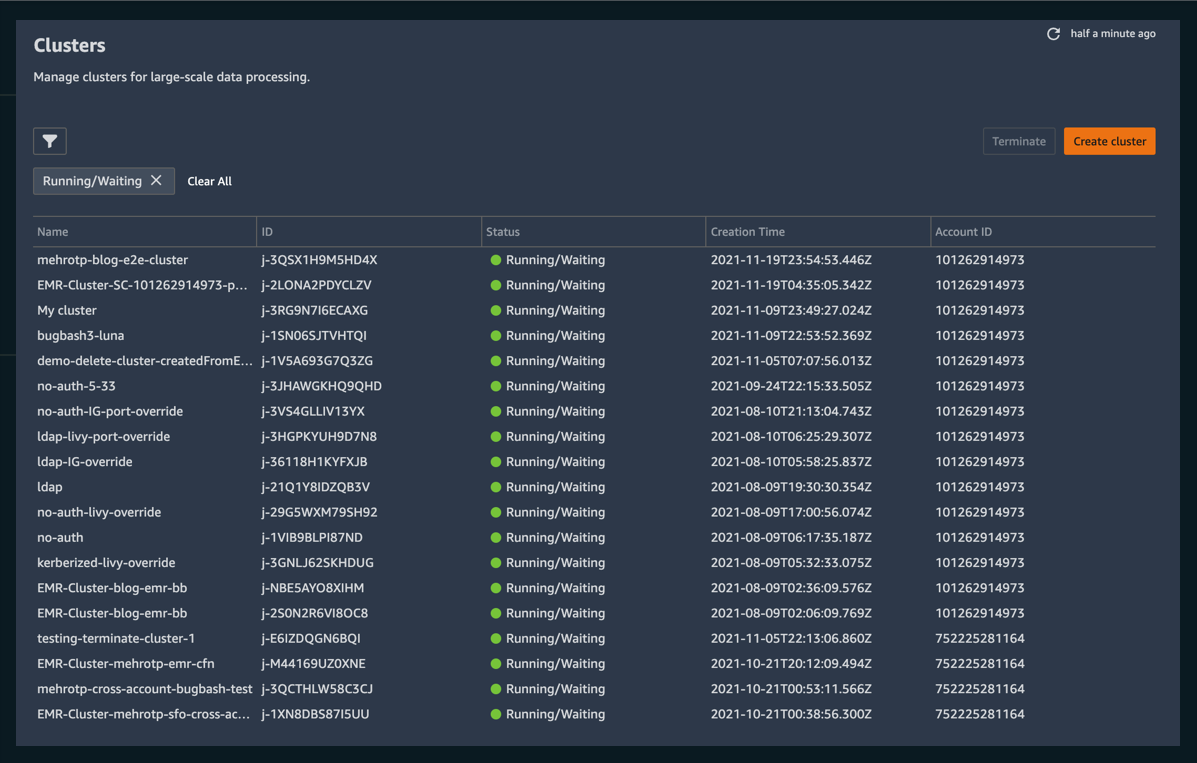
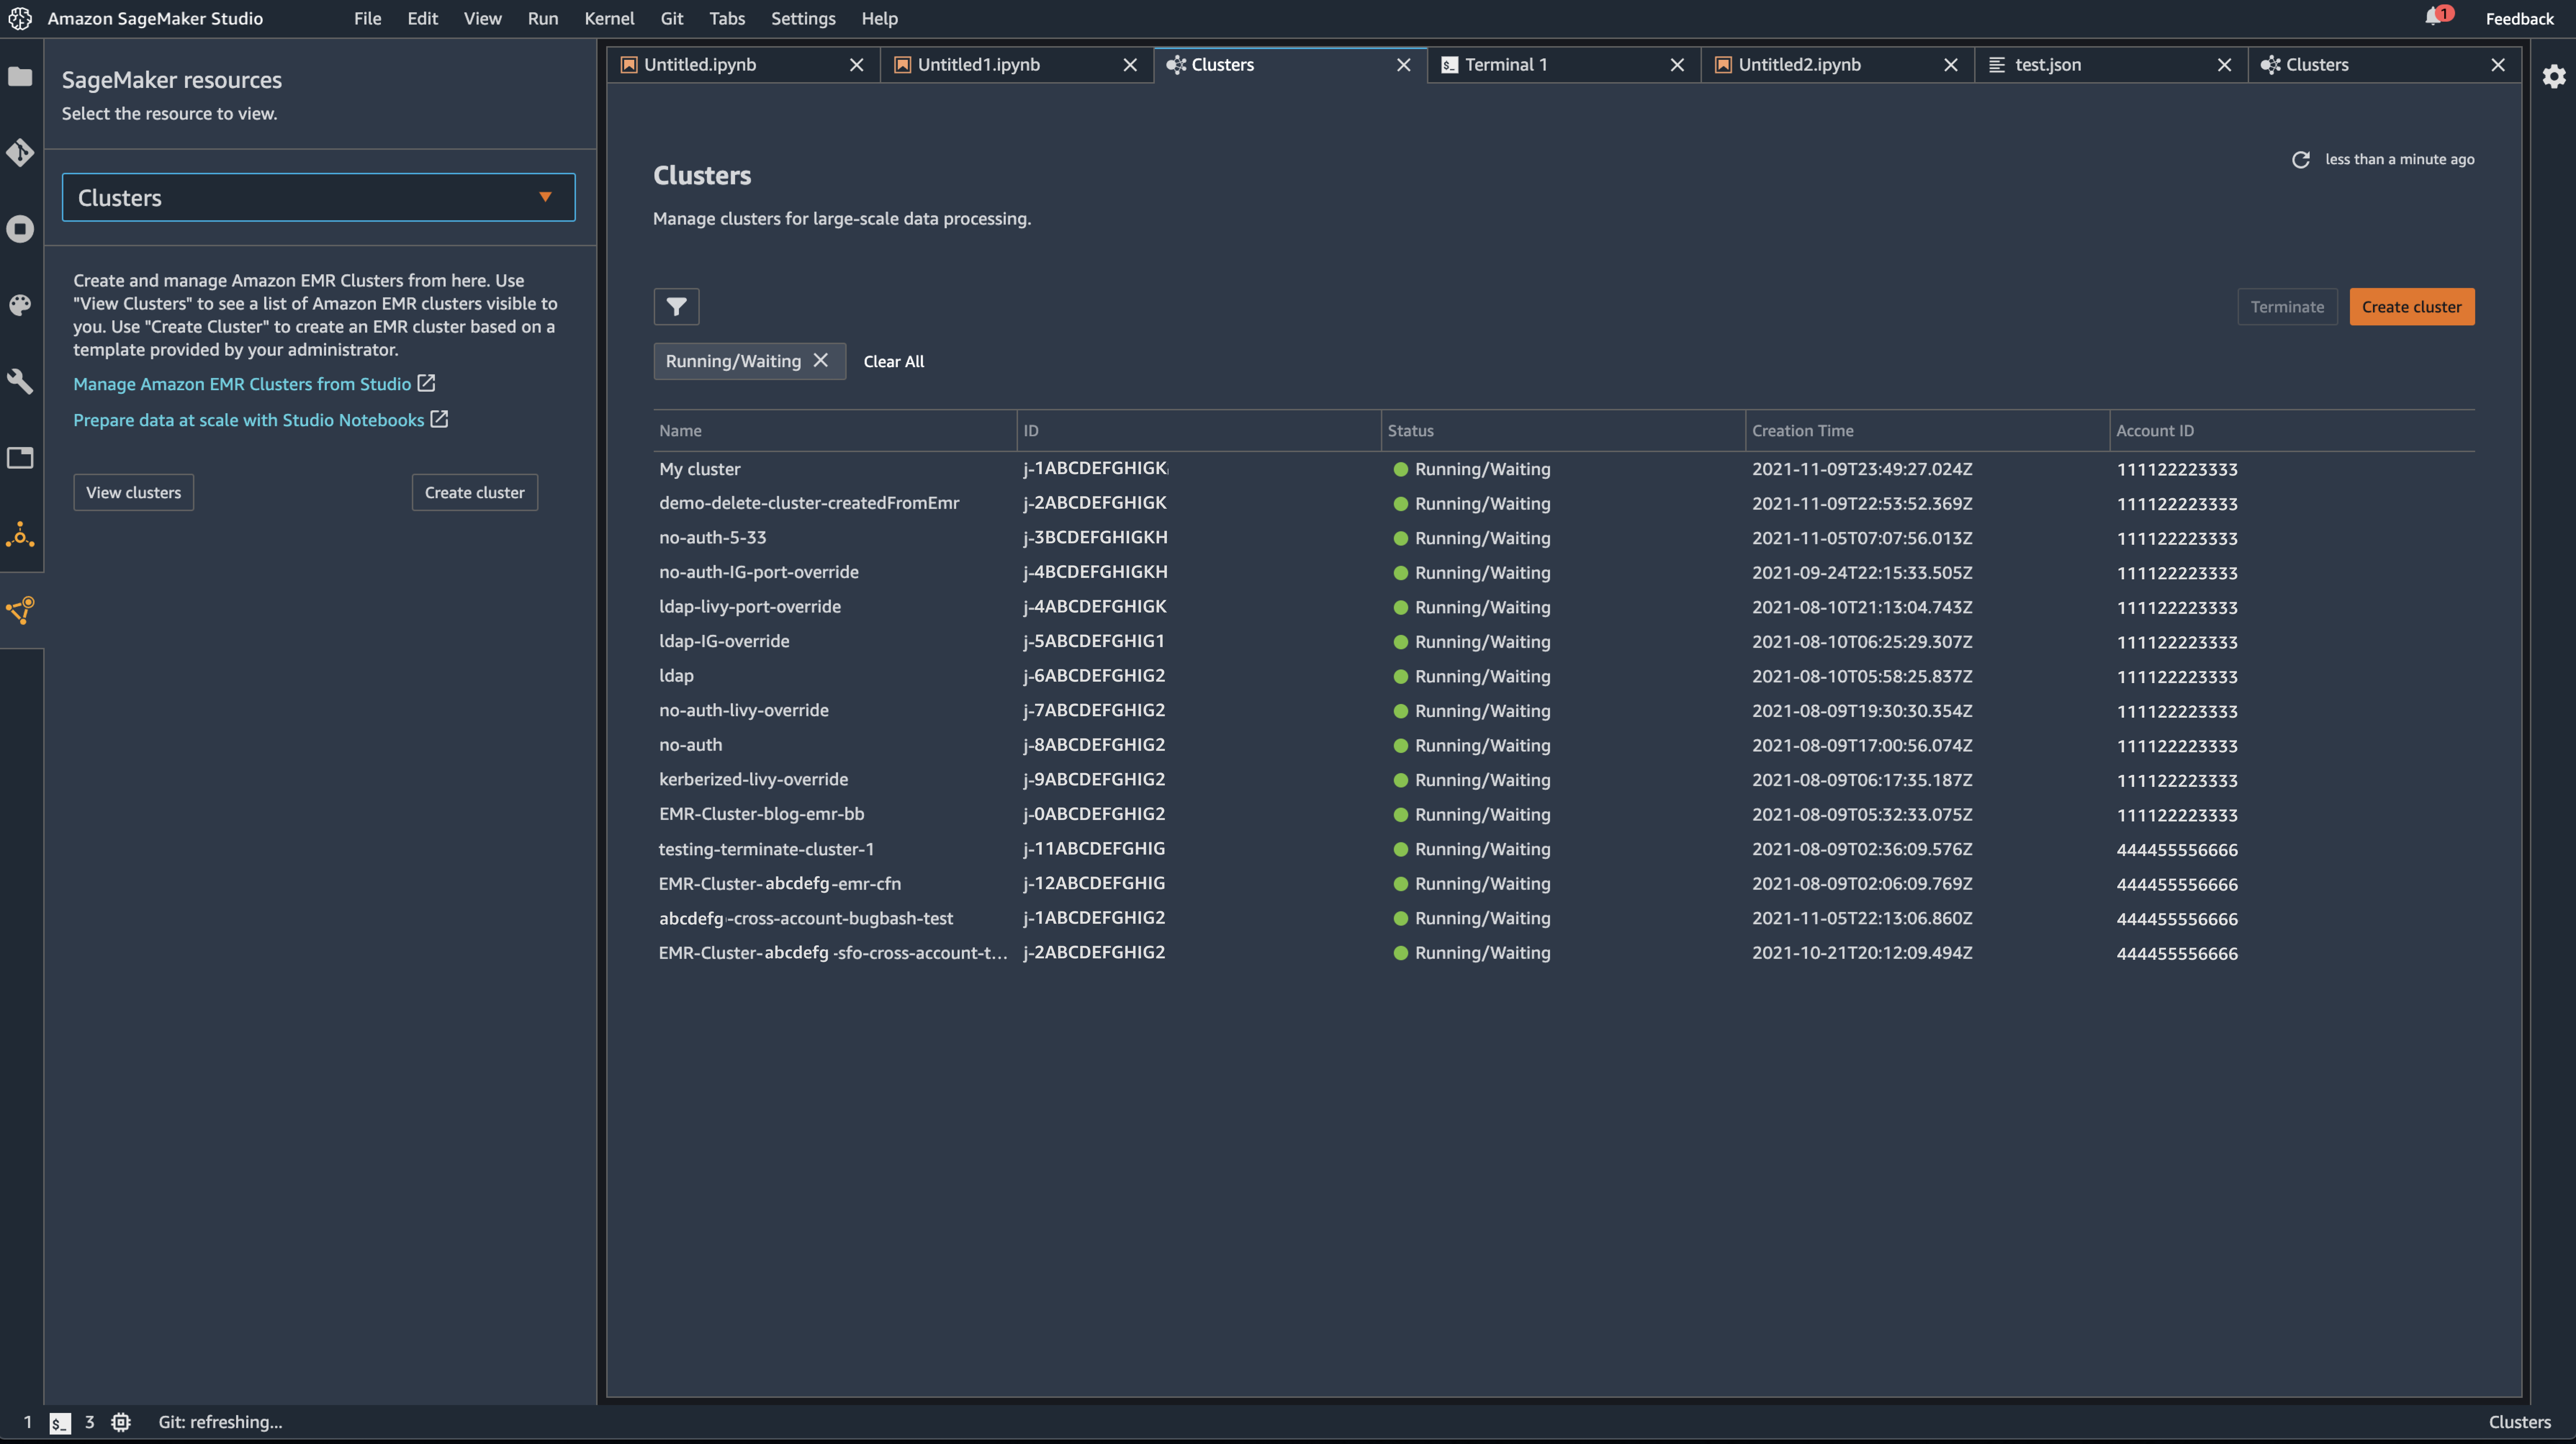
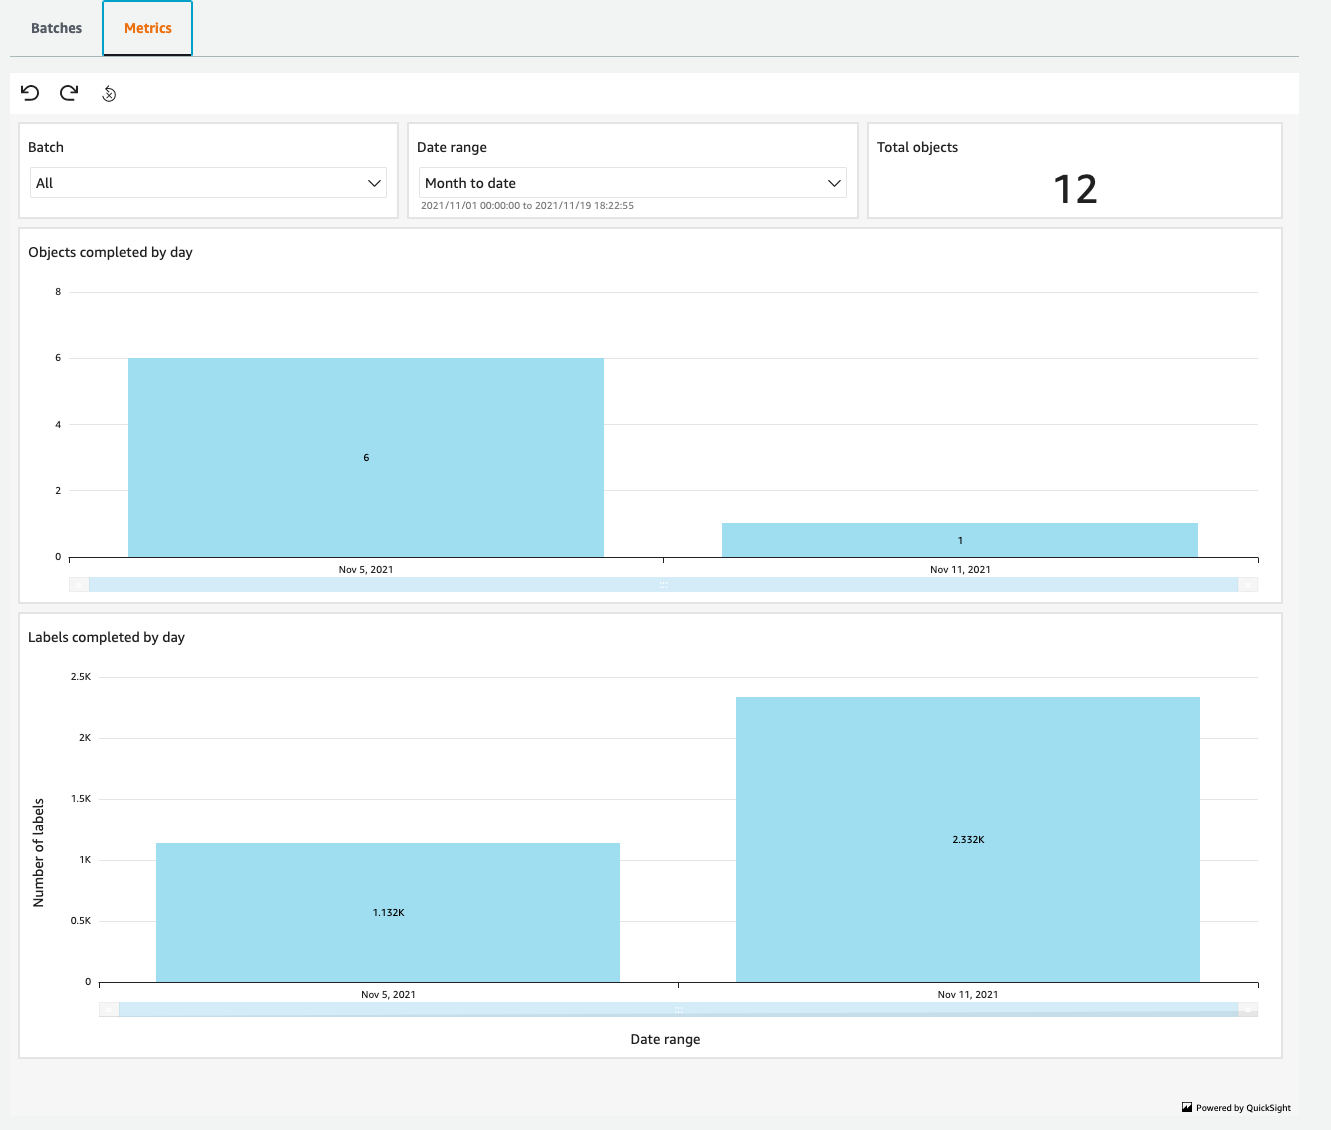
While this is all going on, you can monitor the progress and output of the project using the Ground Truth Plus Project Portal. Within this portal, you can track the amount of data labeled on a day-by-day basis, and make sure that the project is progressing at an acceptable rate.

A screenshot showing the metrics dashboard enabling users to track the progress of their labelling jobs in SageMaker Ground Truth Plus

With each batch of images uploaded and labeled, you can decide whether to accept them or send them back for relabeling if something has been missed.

Finally, when the labeling process has completed, you can retrieve the labeled data from a secure S3 bucket and get to the business of training models.

Find out more
Today, Amazon SageMaker Ground Truth Plus is available in the N. Virginia (us-east-1) region.

To learn more:

New – Securely manage your AWS IoT Greengrass edge devices using AWS Systems Manager

Post Syndicated from Sean M. Tracey original https://aws.amazon.com/blogs/aws/new-securely-manage-your-aws-iot-greengrass-edge-devices-using-aws-systems-manager/

A header image with the text AWS IoT Greengrass announces AWS System Manager

In 2020, we launched AWS IoT Greengrass 2.0, an open-source edge runtime and cloud service for building, deploying, and managing device software and applications. Today, we’re very excited to announce the ability to securely manage your AWS IoT Greengrass edge devices using AWS Systems Manager (SSM).

Managing vast fleets of varying systems and applications remotely can be a challenge for administrators of edge devices. AWS IoT Greengrass was built to enable these administrators to manage their edge device application stack. While this addressed the needs of many typical edge device administrators, system software on these devices still needed to be updated and maintained through operational policies consistent with those of their broader IT organizations. To this end, administrators would typically have to build or integrate tools to create a centralized interface for managing their edge and IT device software stacks – from security updates, to remote access, and operating system patches.

Until today, IT administrators have had to build or integrate custom tools to make sure edge devices can be managed alongside EC2 and on-prem instances, through a consistent set of policies. At scale, managing device and systems software across a wide variety of edge and IT systems becomes a significant investment in time and money. This is time that could be better spent deploying, optimizing, and managing the very edge devices that they’re maintaining.

What’s New?
Today, we have integrated IoT Greengrass and Systems Manager to simplify the management and maintenance of system software for edge devices. When coupled with the AWS IoT Greengrass Client Software, edge device administrators now can remotely access and securely manage with the multitude of devices that they own – from OS patching, to application deployments. Additionally, regularly scheduled operations that maintain edge compute systems can be automated, all without the need for creating additional custom processes. For IT administrators, this release gives a complete overview of all of their devices through a centralized interface, and a consistent set of tools and policies with the AWS Systems Manager.

For customers new to the AWS IoT Greengrass platform, the integration with Systems Manager simplifies setup even further with a new on- boarding wizard that can reduce the time it takes to create operational management systems for edge devices from weeks to hours.

How is this achieved?
This new capability is enabled by the AWS Systems Manager (SSM) Agent. As of today, customers can deploy the AWS Systems Manager Agent, via the AWS IoT Greengrass console, to their existing edge devices. Once installed on each device, AWS Systems Manager will list all of the devices in the Systems Manager Console, thereby giving administrators and IoT stakeholders an overview of their entire fleet. When coupled with the AWS IoT Greengrass console, administrators can manage their newly configured devices remotely; patching or updating operating systems, troubleshooting remotely, and deploying new applications, all through a centralized, integrated user interface. Devices can be patched individually, or in groups organized by tags or resource groups.

Further information
These new features are now available in all regions where AWS Systems Manager and AWS IoT Greengrass are available. To get started, please visit the IoT Greengrass home page.

Help Make BugBusting History at AWS re:Invent 2021

Post Syndicated from Sean M. Tracey original https://aws.amazon.com/blogs/aws/help-make-bugbusting-history-at-aws-reinvent-2021/

Earlier this year, we launched the AWS BugBust Challenge, the world’s first global competition to fix one million code bugs and reduce technical debt by over $100 million. As part of this endeavor, we are launching the first AWS BugBust re:Invent Challenge at this year’s AWS re:Invent conference, from 10 a.m. (PST) November 29 to 2 p.m (PST) December 2, and in doing so, hope to create a new World Record for “Largest Bug Fixing Competition” as recognized by Guinness World Records.

To date, AWS BugBust events have been run internally by organizations that want to reduce the number of code bugs and the impact they have on their external customers. At these events, an event administrator from within the organization invites internal developers to collaborate in a shared AWS account via a unique link allowing them to participate in the challenge. While this benefits the organizations, it limits the reach of the event, as it focuses only on their internal bugs. To increase the impact that the AWS BugBust events have, at this year’s re:Invent we will open up the challenge to anybody with Java or Python knowledge to help fix open-source code bases.

Historically, finding bugs has been a labor-intensive challenge. 620 million developer hours are wasted each year searching for potential bugs in a code base and patching them before they can cause any trouble in production – or worse yet, fix them on-the-fly when they’re already causing issues. The AWS BugBust re:Invent Challenge uses Amazon CodeGuru, an ML-powered developer tool that provides intelligent recommendations to improve code quality and identify an application’s most expensive lines of code. Rather than reacting to security and operational events caused by bugs, Amazon CodeGuru proactively highlights any potential issues in defined code bases as they’re being written and before they can make it into production. Using CodeGuru, developers can immediately begin picking off bugs and earning points for the challenge.

As part of this challenge, AWS will be including a myriad of open source projects that developers will be able to patch and contribute to throughout the event. Bugs can range from security issues, to duplicate code, to resource leaks and more. Once each bug has been submitted and CodeGuru determines that the issue is resolved, all of the patched software will be released back to the open source projects so that everyone can benefit from the combined efforts to squash software bugs.

The AWS BugBust re:Invent Challenge is open to all developers who have Python or Java knowledge regardless of whether or not they’re attending re:Invent. There will be an array of prizes, from hoodies and fly swatters to Amazon Echo Dots, available to all who participate and meet certain milestones in the challenge. There’s also the coveted title of “Ultimate AWS BugBuster” accompanied by a cash prize of $1500 for whomever earns the most points by squashing bugs during the event.

A screenshot of the AWS BugBust re:Invent challenge registration page

For those attending in-person, we have created the AWS BugBust Hub, a 500 square-foot space in the main exhibition hall. This space will give developers a place to join in with the challenge and track their progress on the AWS BugBust leadership board while maintaining appropriate social-distancing. In addition to the AWS BugBust Hub, there will be an AWS BugBust kiosk located within the event space where developers will be able to sign up to contribute toward the Largest Bug Fixing Challenge World Record attempt. Attendees will also be able to speak with Amazonians from the AWS BugBust SWAT team who will be able to answer questions about the event and provide product demos.

To take part in the AWS BugBust re:Invent Challenge, developers must have an AWS BugBust player account and a GitHub account. Pre-registration for the competition can be done online, or if you’re at re:Invent 2021 in-person you can register to participate at our AWS BugBust Hub or kiosk. If you’re not planning on joining us in person at re:Invent, you can still join us online, fix bugs and earn points to win prizes.

Amazon S3 Intelligent-Tiering – Improved Cost Optimizations for Short-Lived and Small Objects

Post Syndicated from Sean M. Tracey original https://aws.amazon.com/blogs/aws/amazon-s3-intelligent-tiering-further-automating-cost-savings-for-short-lived-and-small-objects/

In 2018, we first launched Amazon S3 Intelligent-Tiering (S3 Intelligent-Tiering). For customers managing data across business units, teams, and products, unpredictable access patterns are often the norm. With the S3 Intelligent-Tiering storage class, S3 automatically optimizes costs by moving data between access tiers as access patterns change.

Today, we’re pleased to announce two updates to further enhance savings.

  • S3 Intelligent-Tiering now has no minimum storage duration period for all objects.
  • Monitoring and automation charges are no longer collected for objects smaller than 128 KB.

How Does this Benefit Customers?
Amazon S3 Intelligent-Tiering can be used to store shared datasets, where data is aggregated and accessed by different applications, teams, and individuals, whether for analytics, machine learning, real-time monitoring, or other data lake use cases.

An image showing how S3 Intelligent-Tiering Optimises costs by moving objects between access tier

With these use cases, it’s common that many users within an organization will store data with a wide range of objects and delete subsets of data in less than 30 days.

To date, S3 Intelligent-Tiering was intended for objects larger than 128 KB stored for a minimum of 30 days. As of today, monitoring and automation charges will no longer be collected for objects smaller than 128 KB — this includes both new and already existing objects in the S3 Intelligent-Tiering storage class. Additionally, objects deleted, transitioned, or overwritten within 30 days will no longer accrue prorated charges.

With these changes, S3 Intelligent-Tiering is the ideal storage class for data with unknown, changing, or unpredictable access patterns, independent of object size or retention period.

How Can I Use This Now?
S3 Intelligent-Tiering can either be applied to objects individually, as they are written to S3 by adding the Intelligent-Tiering header to the PUT request for your object, or through the creation of a lifecycle rule.

One way you can explore the benefits of S3 Intelligent-Tiering is through the Amazon S3 Console.

Once there, select a bucket you wish to upload an object to and store with the S3 Intelligent-Tiering class, then select the Upload button on the object display view. This will take you to a page where you can upload files or folders to S3.

You can drag and drop or use either the Add Files or Add Folders button to upload objects to your bucket. Once selected, you will see a view like the following image.

A screenshot showing the upload of a file into an S3 bucket.

Next, scroll down the page and expand the Properties section. Here, we can select the storage class we wish for our object (or objects) to be stored in. Select Intelligent-Tiering from the storage class options list. Then select the Upload button at the bottom of the page.

Screenshot showing the properties section, choosing Intelligent-Tiering as the storage class

Your objects will now be stored in your S3 bucket utilizing the S3 Intelligent-Tiering storage class, further optimizing costs by moving data between access tiers as access patterns change.

S3 Intelligent-Tiering is available in all AWS Regions, including the AWS GovCloud (US) Regions, the AWS China (Beijing) Region, operated by Sinnet, and the AWS China (Ningxia) Region, operated by NWCD. To learn more, visit the S3 Intelligent-Tiering page.