Betas are useful for feedback and iteration, but at the end of the day, not everyone is willing to be a guinea pig or can tolerate the occasional sharp edge that comes along with beta software. Sometimes you need that big, shiny “Generally Available” label (or blog post), and now it’s Workflows’ turn.
Workflows, our serverless durable execution engine that allows you to build long-running, multi-step applications (some call them “step functions”) on Workers, is now GA.
In short, that means it’s production ready — but it also doesn’t mean Workflows is going to ossify. We’re continuing to scale Workflows (including more concurrent instances), bring new capabilities (like the new waitForEvent API), and make it easier to build AI agents with our Agents SDK and Workflows.
If you prefer code to prose, you can quickly install the Workflows starter project and start exploring the code and the API with a single command:
How does Workflows work? What can I build with it? How do I think about building AI agents with Workflows and the Agents SDK? Well, read on.
Building with Workflows
Workflows is a durable execution engine built on Cloudflare Workers that allows you to build resilient, multi-step applications.
At its core, Workflows implements a step-based architecture where each step in your application is independently retriable, with state automatically persisted between steps. This means that even if a step fails due to a transient error or network issue, Workflows can retry just that step without needing to restart your entire application from the beginning.
When you define a Workflow, you break your application into logical steps.
Each step can either execute code (step.do), put your Workflow to sleep (step.sleep or step.sleepUntil), or wait on an event (step.waitForEvent).
As your Workflow executes, it automatically persists the state returned from each step, ensuring that your application can continue exactly where it left off, even after failures or hibernation periods.
This durable execution model is particularly powerful for applications that coordinate between multiple systems, process data in sequence, or need to handle long-running tasks that might span minutes, hours, or even days.
Workflows are particularly useful at handling complex business processes that traditional stateless functions struggle with.
For example, an e-commerce order processing workflow might check inventory, charge a payment method, send an email confirmation, and update a database — all as separate steps. If the payment processing step fails due to a temporary outage, Workflows will automatically retry just that step when the payment service is available again, without duplicating the inventory check or restarting the entire process.
You can see how this works below: each call to a service can be modelled as a step, independently retried, and if needed, recovered from that step onwards:
import { WorkflowEntrypoint, WorkflowStep, WorkflowEvent } from 'cloudflare:workers';

// The params we expect when triggering this Workflow
type OrderParams = {
	orderId: string;
	customerId: string;
	items: Array<{ productId: string; quantity: number }>;
	paymentMethod: {
		type: string;
		id: string;
	};
};

// Our Workflow definition
export class OrderProcessingWorkflow extends WorkflowEntrypoint<Env, OrderParams> {
	async run(event: WorkflowEvent<OrderParams>, step: WorkflowStep) {
		// Step 1: Check inventory
		const inventoryResult = await step.do('check-inventory', async () => {
			console.log(`Checking inventory for order ${event.payload.orderId}`);

			// Mock: In a real workflow, you'd query your inventory system
			const inventoryCheck = await this.env.INVENTORY_SERVICE.checkAvailability(event.payload.items);

			// Return inventory status as state for the next step
			return {
				inStock: true,
				reservationId: 'inv-123456',
				itemsChecked: event.payload.items.length,
			};
		});

		// Exit workflow if items aren't in stock
		if (!inventoryResult.inStock) {
			return { status: 'failed', reason: 'out-of-stock' };
		}

		// Step 2: Process payment
		// Configure specific retry logic for payment processing
		const paymentResult = await step.do(
			'process-payment',
			{
				retries: {
					limit: 3,
					delay: '30 seconds',
					backoff: 'exponential',
				},
				timeout: '2 minutes',
			},
			async () => {
				console.log(`Processing payment for order ${event.payload.orderId}`);

				// Mock: In a real workflow, you'd call your payment processor
				const paymentResponse = await this.env.PAYMENT_SERVICE.processPayment({
					customerId: event.payload.customerId,
					orderId: event.payload.orderId,
					amount: calculateTotal(event.payload.items),
					paymentMethodId: event.payload.paymentMethod.id,
				});

				// If payment failed, throw an error that will trigger retry logic
				if (paymentResponse.status !== 'success') {
					throw new Error(`Payment failed: ${paymentResponse.message}`);
				}

				// Return payment info as state for the next step
				return {
					transactionId: 'txn-789012',
					amount: 129.99,
					timestamp: new Date().toISOString(),
				};
			},
		);

		// Step 3: Send email confirmation
		await step.do('send-confirmation-email', async () => {
			console.log(`Sending confirmation email for order ${event.payload.orderId}`);
			console.log(`Including payment confirmation ${paymentResult.transactionId}`);
			return await this.env.EMAIL_SERVICE.sendOrderConfirmation({ ... })
		});

		// Step 4: Update database
		const dbResult = await step.do('update-database', async () => {
			console.log(`Updating database for order ${event.payload.orderId}`);
			await this.updateOrderStatus(...)

			return { dbUpdated: true };
		});

		// Return final workflow state
		return {
			orderId: event.payload.orderId,
			processedAt: new Date().toISOString(),
		};
	}
}
This combination of durability, automatic retries, and state persistence makes Workflows ideal for building reliable distributed applications that can handle real-world failures gracefully.
Human-in-the-loop
Workflows are just code, and that makes them extremely powerful: you can define steps dynamically and on-the-fly, conditionally branch, and make API calls to any system you need. But sometimes you also need a Workflow to wait for something to happen in the real world.
For example:
Approval from a human to progress.
An incoming webhook, like from a Stripe payment or a GitHub event.
A state change, such as a file upload to R2 that triggers an Event Notification, and then pushes a reference to the file to the Workflow, so it can process the file (or run it through an AI model).
The new waitForEvent API in Workflows allows you to do just that:
let event = await step.waitForEvent<IncomingStripeWebhook>("receive invoice paid webhook from Stripe", { type: "stripe-webhook", timeout: "1 hour" })
You can then send an event to a specific instance from any external service that can make a HTTP request:
interface Env {
  MY_WORKFLOW: Workflow;
}

interface Payload {
  transaction: string;
  id: string;
}

export default {
  async fetch(req: Request, env: Env) {
    const instanceId = new URL(req.url).searchParams.get("instanceId")
    const webhookPayload = await req.json<Payload>()

    let instance = await env.MY_WORKFLOW.get(instanceId);
    // Send our event, with `type` matching the event type defined in
    // our step.waitForEvent call
    await instance.sendEvent({type: "stripe-webhook", payload: webhookPayload})

    return Response.json({
      status: await instance.status(),
    });
  },
};
You can even wait for multiple events, using the type parameter, and/or race multiple events using Promise.race to continue on depending on which event was received first:
export class MyWorkflow extends WorkflowEntrypoint<Env, Params> {
	async run(event: WorkflowEvent<Params>, step: WorkflowStep) {
		let state = await step.do("get some data", () => { /* step call here /* })
		// Race the events, resolving the Promise based on which event
// we receive first
		let value = Promise.race([
step.waitForEvent("payment success", { type: "payment-success-webhook", timeout: "4 hours" ),
step.waitForEvent("payment failure", { type: "payment-failure-webhook", timeout: "4 hours" ),
])
// Continue on based on the value and event received
	}
}
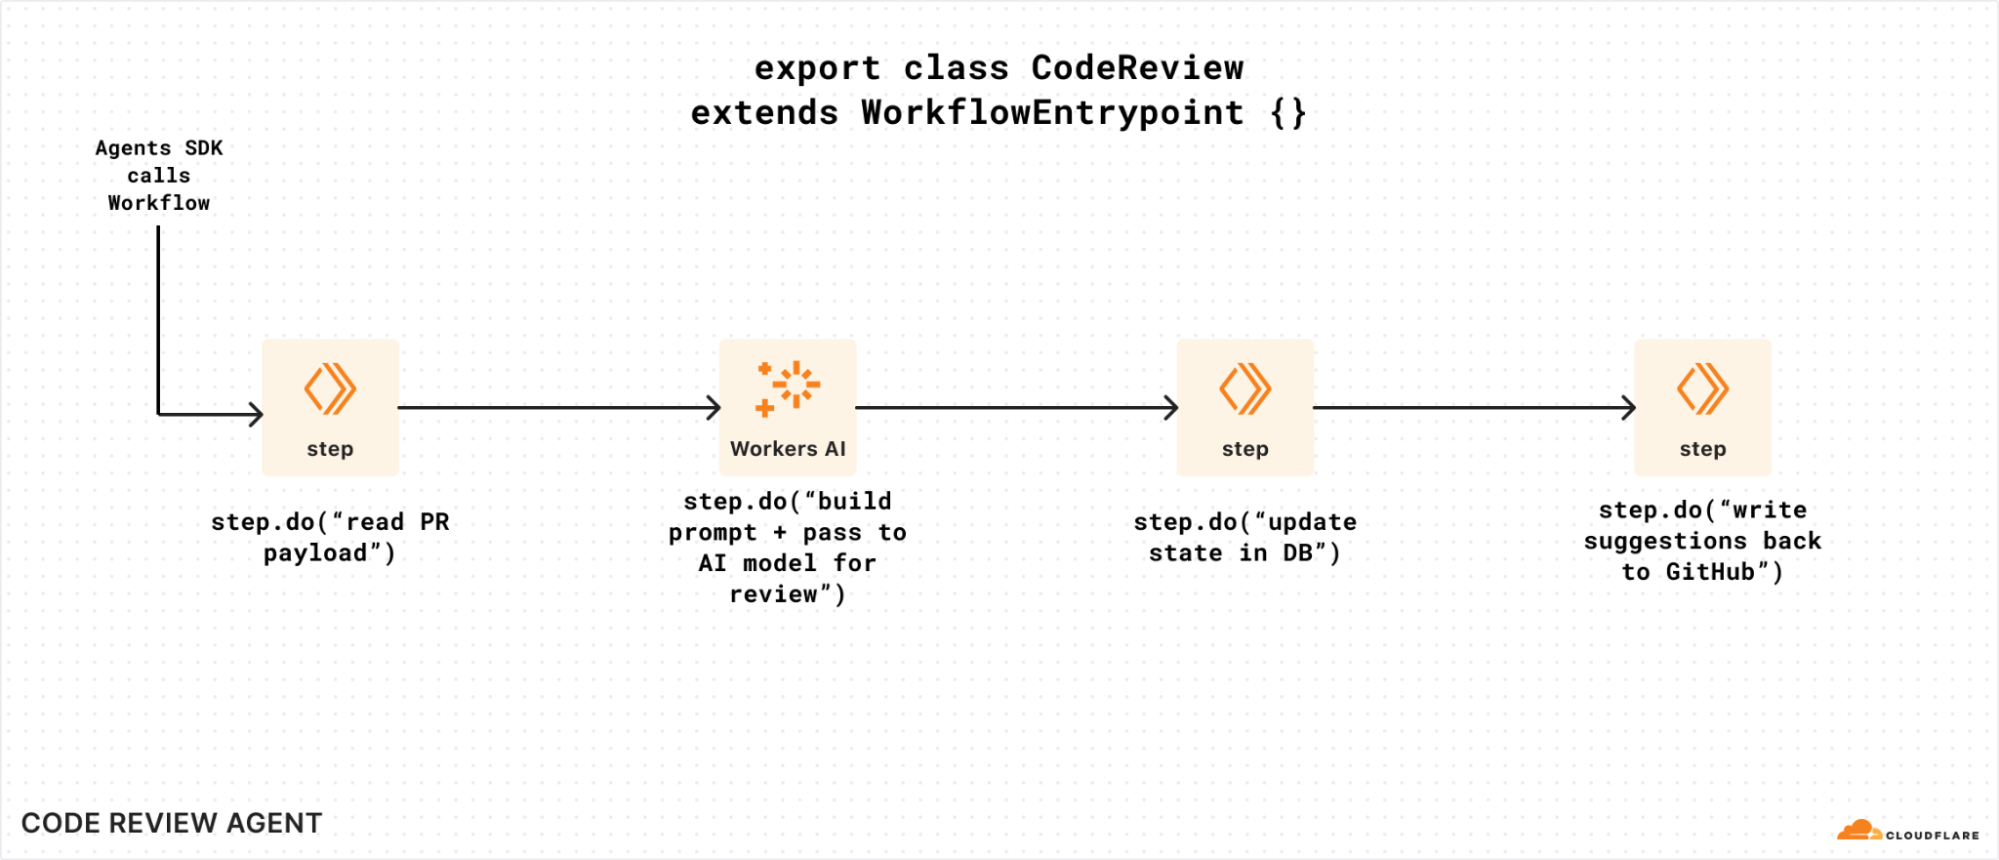
To visualize waitForEvent in a bit more detail, let’s assume we have a Workflow that is triggered by a code review agent that watches a GitHub repository.
Without the ability to wait on events, our Workflow can’t easily get human approval to write suggestions back (or even submit a PR of its own). It could potentially poll for some state that was updated, but that means we have to call step.sleep for arbitrary periods of time, poll a storage service for an updated value, and repeat if it’s not there. That’s a lot of code and room for error:
Without waitForEvent, it’s harder to send data to a Workflow instance that’s running
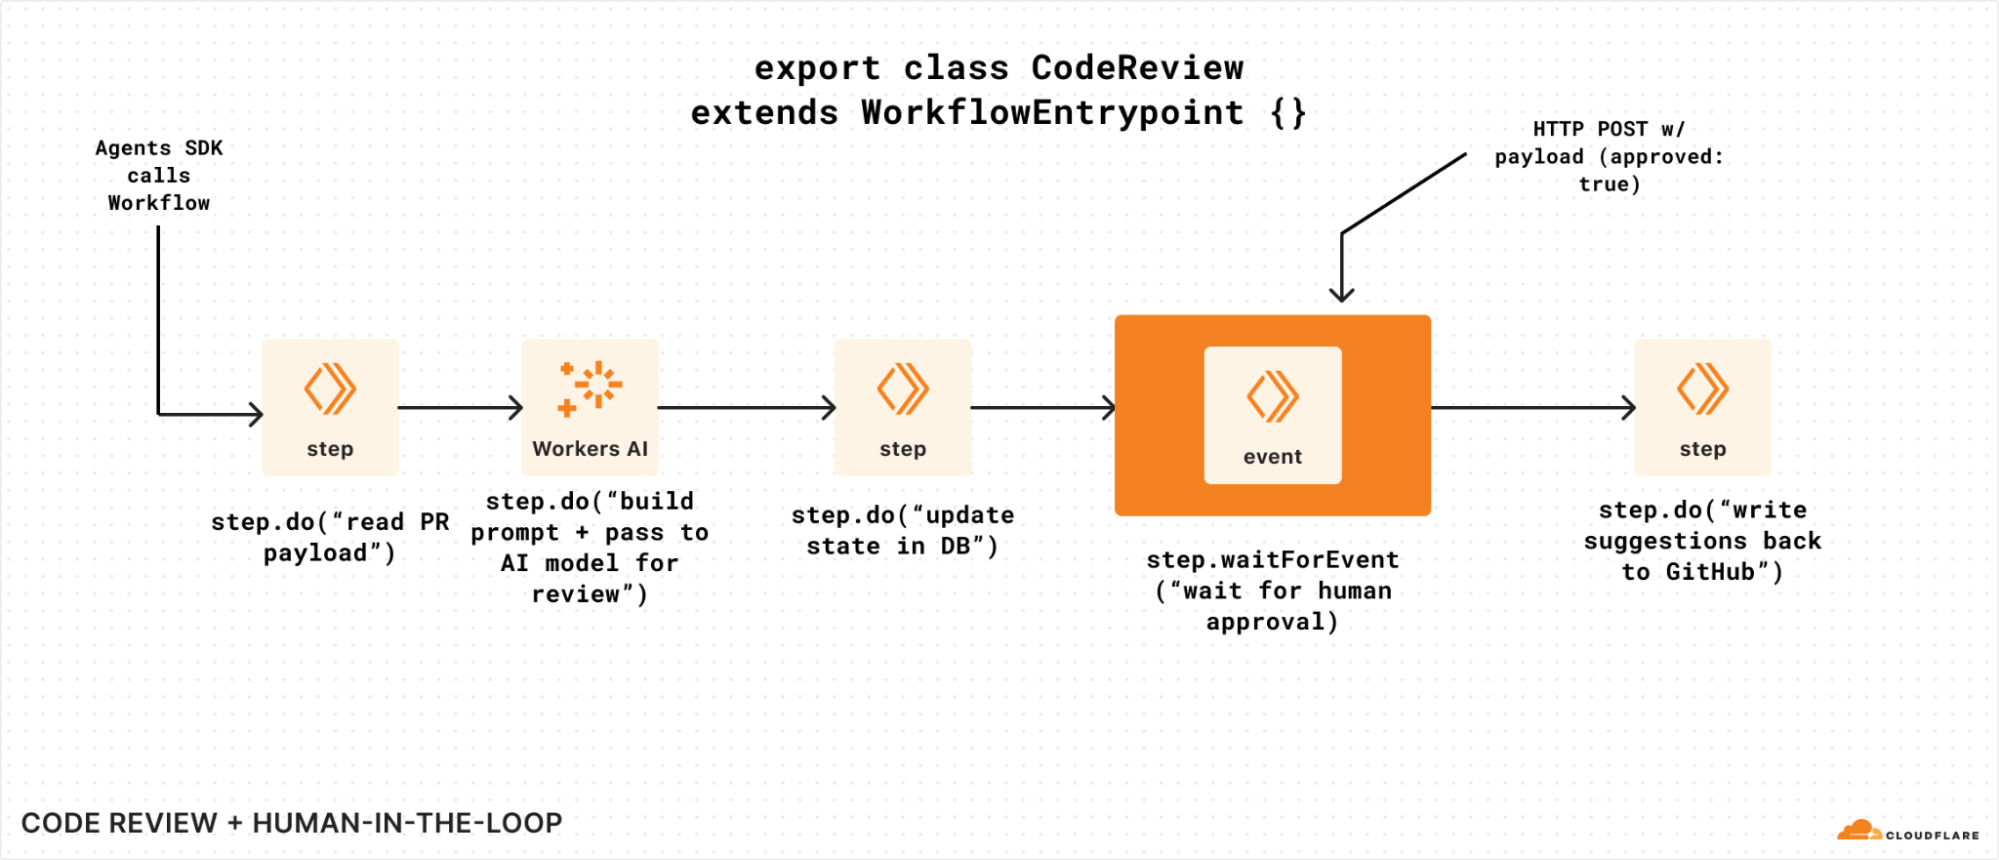
If we modified that same example to incorporate the new waitForEvent API, we could use it to wait for human approval before making a mutating change:
Adding waitForEvent to our code review Workflow, so it can seek explicit approval.
You could even imagine an AI agent itself sending and/or acting on behalf of a human here: waitForEvent simply exposes a way for a Workflow to retrieve and pause on something in the world to change before it continues (or not).
Critically, you can call waitForEvent just like any other step in Workflows: you can call it conditionally, and/or multiple times, and/or in a loop. Workflows are just Workers: you have the full power of a programming language and are not restricted by a domain specific language (DSL) or config language.
Pricing
Good news: we haven’t changed much since our original beta announcement! We’re adding storage pricing for state stored by your Workflows, and retaining our CPU-based and request (invocation) based pricing as follows:
Because the storage pricing is new, we will not actively bill for storage until September 15, 2025. We will notify users above the included 1 GB limit ahead of charging for storage, and by default, Workflows will expire stored state after three (3) days (Free plan) or thirty (30) days (Paid plan).
If you’re wondering what “CPU time” is here: it’s the time your Workflow is actively consuming compute resources. It doesn’t include time spent waiting on API calls, reasoning LLMs, or other I/O (like writing to a database). That might seem like a small thing, but in practice, it adds up: most applications have single digit milliseconds of CPU time, and multiple seconds of wall time: an API or two taking 100 – 250 ms to respond adds up!
Bill for CPU, not for time spent when a Workflow is idle or waiting.
Workflow engines, especially, tend to spend a lot of time waiting: reading data from object storage (like Cloudflare R2), calling third-party APIs or LLMs like o3-mini or Claude 3.7, even querying databases like D1, Postgres, or MySQL. With Workflows, just like Workers: you don’t pay for time your application is just waiting.
Start building
So you’ve got a good handle on Workflows, how it works, and want to get building. What next?
Workflows, Cloudflare’s durable execution engine that allows you to build reliable, repeatable multi-step applications that scale for you, is now in open beta. Any developer with a free or paid Workers plan can build and deploy a Workflow right now: no waitlist, no sign-up form, no fake line around-the-block.
Open the src/index.ts file, poke around, start extending it, and deploy it with a quick wrangler deploy.
If you want to learn more about how Workflows works, how you can use it to build applications, and how we built it, read on.
Workflows? Durable Execution?
Workflows—which we announced back during Developer Week earlier this year—is our take on the concept of “Durable Execution”: the ability to build and execute applications that are durable in the face of errors, network issues, upstream API outages, rate limits, and (most importantly) infrastructure failure.
As over 2.4 million developers continue to build applications on top of Cloudflare Workers, R2, and Workers AI, we’ve noticed more developers building multi-step applications and workflows that process user data, transform unstructured data into structured, export metrics, persist state as they progress, and automatically retry & restart. But writing any non-trivial application and making it durable in the face of failure is hard: this is where Workflows comes in. Workflows manages the retries, emitting the metrics, and durably storing the state (without you having to stand up your own database) as the Workflow progresses.
What makes Workflows different from other takes on “Durable Execution” is that we manage the underlying compute and storage infrastructure for you. You’re not left managing a compute cluster and hoping it scales both up (on a Monday morning) and down (during quieter periods) to manage costs, or ensuring that you have compute running in the right locations. Workflows is built on Cloudflare Workers — our job is to run your code and operate the infrastructure for you.
As an example of how Workflows can help you build durable applications, assume you want to post-process file uploads from your users that were uploaded to an R2 bucket directly via a pre-signed URL. That post-processing could involve multiple actions: text extraction via a Workers AI model, calls to a third-party API to validate data, updating or querying rows in a database once the file has been processed… the list goes on.
But what each of these actions has in common is that it could fail. Maybe that upstream API is unavailable, maybe you get rate-limited, maybe your database is down. Having to write extensive retry logic around each action, manage backoffs, and (importantly) ensure your application doesn’t have to start from scratch when a later step fails is more boilerplate to write and more code to test and debug.
What’s a step, you ask? The core building block of every Workflow is the step: an individually retriable component of your application that can optionally emit state. That state is then persisted, even if subsequent steps were to fail. This means that your application doesn’t have to restart, allowing it to not only recover more quickly from failure scenarios, but it can also avoid doing redundant work. You don’t want your application hammering an expensive third-party API (or getting you rate limited) because it’s naively retrying an API call that you don’t have to.
Notably, a Workflow can have hundreds of steps: one of the Rules of Workflows is to encapsulate every API call or stateful action within your application into its own step. Each step can also define its own retry strategy, automatically backing off, adding a delay and/or (eventually) giving up after a set number of attempts.
await step.do(
	'make a call to write that could maybe, just might, fail',
	// Define a retry strategy
	{
		retries: {
			limit: 5,
			delay: '5 seconds',
			backoff: 'exponential',
		},
		timeout: '15 minutes',
	},
	async () => {
		// Do stuff here, with access to the state from our previous steps
		if (Math.random() > 0.5) {
			throw new Error('API call to $STORAGE_SYSTEM failed');
		}
	},
);
To illustrate this further, imagine you have an application that reads text files from an R2 storage bucket, pre-processes the text into chunks, generates text embeddings using Workers AI, and then inserts those into a vector database (like Vectorize) for semantic search.
In the Workflows programming model, each of those is a discrete step, and each can emit state. For example, each of the four actions below can be a discrete step.do call in a Workflow:
Reading the files from storage and emitting the list of filenames
Chunking the text and emitting the results
Generating text embeddings
Upserting them into Vectorize and capturing the result of a test query
You can also start to imagine that some steps, such as chunking text or generating text embeddings, can be broken down into even more steps — a step per file that we chunk, or a step per API call to our text embedding model, so that our application is even more resilient to failure.
Steps can be created programmatically or conditionally based on input, allowing you to dynamically create steps based on the number of inputs your application needs to process. You do not need to define all steps ahead of time, and each instance of a Workflow may choose to conditionally create steps on the fly.
Building Cloudflare on Cloudflare
As the Cloudflare Developer platform continues to grow, almost all of our own products are built on top of it. Workflows is yet another example of how we built a new product from scratch using nothing but Workers and its vast catalog of features and APIs. This section of the blog has two goals: to explain how we built it, and to demonstrate that anyone can create a complex application or platform with demanding requirements and multiple architectural layers on our stack, too.
To understand how Workflows uses Workers & Durable Objects, here’s the high-level overview of our architecture:
There are three main blocks in this diagram:
The user-facing APIs are where the user interacts with the platform, creating and deploying new workflows or instances, controlling them, and accessing their state and activity logs. These operations can be executed through our public API gateway using REST calls, a Worker script using bindings, Wrangler (Cloudflare’s developer platform command line tool), or via the Dashboard user interface.
The managed platform holds the internal configuration APIs running on a Worker implementing a catalog of REST endpoints, the binding shim, which is supported by another dedicated Worker, every account controller, and their correspondent workflow engines, all powered by SQLite-backed Durable Objects. This is where all the magic happens and what we are sharing more details about in this technical blog.
Finally, there are the workflow instances, essentially independent clones of the workflow application. Instances are user account-owned and have a one-to-one relationship with a managed engine that powers them. You can run as many instances and engines as you want concurrently.
Let’s get into more detail…
Configuration API and Binding Shim
The Configuration API and the Binding Shim are two stateless Workers; one receives REST API calls from clients calling our API Gateway directly, using Wrangler, or navigating the Dashboard UI, and the other is the endpoint for the Workflows binding, an efficient and authenticated interface to interact with the Cloudflare Developer Platform resources from a Workers script.
The configuration API worker uses HonoJS and Zod to implement the REST endpoints, which are declared in an OpenAPI schema and exported to our API Gateway, thus adding our methods to the Cloudflare API catalog.
import { swaggerUI } from '@hono/swagger-ui';
import { createRoute, OpenAPIHono, z } from '@hono/zod-openapi';
import { Hono } from 'hono';
...
api.openapi(
createRoute({
method: 'get',
path: '/',
request: {
query: PaginationParams,
},
responses: {
200: {
content: {
'application/json': {
schema: APISchemaSuccess(z.array(WorkflowWithInstancesCountSchema)),
},
},
description: 'List of all Workflows belonging to a account.',
},
},
}),
async (ctx) => {
...
},
);
...
api.route('/:workflow_name', routes.workflows);
api.route('/:workflow_name/instances', routes.instances);
api.route('/:workflow_name/versions', routes.versions);
These Workers perform two different functions, but they share a large portion of their code and implement similar logic; once the request is authenticated and ready to travel to the next stage, they use the account ID to delegate the operation to a Durable Object called Account Controller.
// env.ACCOUNTS is the Account Controllers Durable Objects namespace
const accountStubId = c.env.ACCOUNTS.idFromName(accountId.toString());
const accountStub = c.env.ACCOUNTS.get(accountStubId);
As you can see, every account has its own Account Controller Durable Object.
Account Controllers
The Account Controller is a dedicated persisted database that stores the list of all the account’s workflows, versions, and instances. We scale to millions of account controllers, one per every Cloudflare account using Workflows, by leveraging the power of Durable Objects with SQLite backend.
Durable Objects (DOs) are single-threaded singletons that run in our data centers and are bound to a stateful storage API, in this case, SQLite. They are also Workers, just a special kind, and have access to all of our other APIs. This makes it easy to build consistent, highly available distributed applications with them.
Here’s what we get for free by using one Durable Object per Workflows account:
Sharding based on account boundaries aligns perfectly with the way we manage resources at Cloudflare internally. Also, due to the nature of DOs, there are other things that this model gets us for free: Not that we expect them, but eventual bugs or state inconsistencies during beta are confined to the affected account, and don’t impact everyone.
DO instances run close to the end user; Alice is in London and will call the config API through our LHR data center, while Bob is in Lisbon and will connect to LIS.
Because every account is a Worker, we can gradually upgrade them to new versions, starting with the internal users, thus derisking real customers.
Before SQLite, our only option was to use the Durable Object’s key-value storage API, but having a relational database at our fingertips and being able to create tables and do complex queries is a significant enabler. For example, take a look at how we implement the internal method getWorkflow():
async function getWorkflow(accountId: number, workflowName: string) {
  try {
    const res = this.ctx.storage.transactionSync(() => {
      const cursor = Array.from(
        this.ctx.storage.sql.exec(
          `
                    SELECT *,
                    (SELECT class_name
                        FROM   versions
                        WHERE  workflow_id = w.id
                        ORDER  BY created_on DESC
                        LIMIT  1) AS class_name
                    FROM   workflows w
                    WHERE  w.name = ?
                    `,
          workflowName
        )
      )[0] as Workflow;

      return cursor;
    });

    this.sendAnalytics(accountId, begin, "getWorkflow");
    return res as Workflow | undefined;
  } catch (err) {
    this.sendErrorAnalytics(accountId, begin, "getWorkflow");
    throw err;
  }
}
The other thing we take advantage of in Workflows is using the recently announced JavaScript-native RPC feature when communicating between components.
Before RPC, we had to fetch() between components, make HTTP requests, and serialize and deserialize the parameters and the payload. Now, we can async call the remote object’s method as if it was local. Not only does this feel more natural and simplify our logic, but it’s also more efficient, and we can take advantage of TypeScript type-checking when writing code.
This is how the Configuration API would call the Account Controller’s countWorkflows() method before:
The other powerful feature of our RPC system is that it supports passing not only Structured Cloneable objects back and forth but also entire classes. More on this later.
Let’s move on to Engine.
Engine and instance
Every instance of a workflow runs alongside an Engine instance. The Engine is responsible for starting up the user’s workflow entry point, executing the steps on behalf of the user, handling their results, and tracking the workflow state until completion.
When we started thinking about the Engine, we thought about modeling it after a state machine, and that was what our initial prototypes looked like. However, state machines require an ahead-of-time understanding of the userland code, which implies having a build step before running them. This is costly at scale and introduces additional complexity.
A few iterations later, we had another idea. What if we could model the engine as a game loop?
Unlike other computer programs, games operate regardless of a user’s input. The game loop is essentially a sequence of tasks that implement the game’s logic and update the display, typically one loop per video frame. Here’s an example of a game loop in pseudo-code:
while (game in running)
    check for user input
    move graphics
    play sounds
end while
Well, an oversimplified version of our Workflow engine would look like this:
while (last step not completed)
    iterate every step
       use memoized cache as response if the step has run already
       continue running step or timer if it hasn't finished yet
end while
A workflow is indeed a loop that keeps on going, performing the same sequence of logical tasks until the last step completes.
The Engine and the instance run hand-in-hand in a one-to-one relationship. The first is managed, and part of the platform. It uses SQLite and other platform APIs internally, and we can constantly add new features, fix bugs, and deploy new versions, while keeping everything transparent to the end user. The second is the actual account-owned Worker script that declares the Workflow steps.
For example, when someone passes a callback into step.do():
We switch execution over to the Engine. Again, this is possible because of the power of JS RPC. Besides passing Structured Cloneable objects back and forth, JS RPC allows us to create and pass entire application-defined classes that extend the built-in RpcTarget. So this is what happens behind the scenes when your Instance calls step.do() (simplified):
export class Context extends RpcTarget {

  async do<T>(name: string, callback: () => Promise<T>): Promise<T> {

    // First we check we have a cache of this step.do() already
    const maybeResult = await this.#state.storage.get(name);

    // We return the cache if it exists
    if (maybeValue) { return maybeValue; }

    // Else we run the user callback
    return doWrapper(callback);
  }

}
Here’s a more complete diagram of the Engine’s step.do() lifecycle:
Again, this diagram only partially represents everything we do in the Engine; things like logging for observability or handling exceptions are missing, and we don’t get into the details of how queuing is implemented. However, it gives you a good idea of how the Engine abstracts and handles all the complexities of completing a step under the hood, allowing us to expose a simple-to-use API to end users.
Also, it’s worth reiterating that every workflow instance is an Engine behind the scenes, and every Engine is an SQLite-backed Durable Object. This ensures that every instance runtime and state are isolated and independent of each other and that we can effortlessly scale to run billions of workflow instances, a solved problem for Durable Objects.
Durability
Durable Execution is all the rage now when we talk about workflow engines, and ours is no exception. Workflows are typically long-lived processes that run multiple functions in sequence where anything can happen. Those functions can time out or fail because of a remote server error or a network issue and need to be retried. A workflow engine ensures that your application runs smoothly and completes regardless of the problems it encounters.
Durability means that if and when a workflow fails, the Engine can re-run it, resume from the last recorded step, and deterministically re-calculate the state from all the successful steps’ cached responses. This is possible because steps are stateful and idempotent; they produce the same result no matter how many times we run them, thus not causing unintended duplicate effects like sending the same invoice to a customer multiple times.
We ensure durability and handle failures and retries by sharing the same technique we use for a step.sleep() that requires sleeping for days or months: a combination of using scheduler.wait(), a method of the upcoming WICG Scheduling API that we already support, and Durable Objects alarms, which allow you to schedule the Durable Object to be woken up at a time in the future.
These two APIs allow us to overcome the lack of guarantees that a Durable Object runs forever, giving us complete control of its lifecycle. Since every state transition through userland code persists in the Engine’s strongly consistent SQLite, we track timestamps when a step begins execution, its attempts (if it needs retries), and its completion.
This means that steps pending if a Durable Object is evicted — perhaps due to a two-month-long timer — get rerun on the next lifetime of the Engine (with its cache from the previous lifetime hydrated) that is triggered by an alarm set with the timestamp of the next expected state transition.
Real-life workflow, step by step
Let’s walk through an example of a real-life application. You run an e-commerce website and would like to send email reminders to your customers for forgotten carts that haven’t been checked out in a few days.
What would typically have to be a combination of a queue, a cron job, and querying a database table periodically can now simply be a Workflow that we start on every new cart:
import {
  WorkflowEntrypoint,
  WorkflowEvent,
  WorkflowStep,
} from "cloudflare:workers";
import { sendEmail } from "./legacy-email-provider";

type Params = {
  cartId: string;
};

type Env = {
  DB: D1Database;
};

export class Purchase extends WorkflowEntrypoint<Env, Params> {
  async run(
    event: WorkflowEvent<Params>,
    step: WorkflowStep
  ): Promise<unknown> {
    await step.sleep("wait for three days", "3 days");

    // Retrieve cart from D1
    const cart = await step.do("retrieve cart from database", async () => {
      const { results } = await this.env.DB.prepare(`SELECT * FROM cart WHERE id = ?`)
        .bind(event.payload.cartId)
        .all();
      return results[0];
    });

    if (!cart.checkedOut) {
      await step.do("send an email", async () => {
        await sendEmail("reminder", cart);
      });
    }
  }
}
This works great. However, sometimes the sendEmail function fails due to an upstream provider erroring out. While step.do automatically retries with a reasonable default configuration, we can define our settings:
The HTTP API makes it easy to trigger new instances of workflows from any system, even if it isn’t on Cloudflare, or from the command line. For example:
Wrangler goes one step further and gives us a friendlier set of commands to interact with workflows with fancy formatted outputs without needing to authenticate with tokens. Type npx wrangler workflows for help, or:
Furthermore, Workflows has first-party support in wrangler, and you can test your instances locally. A Workflow is similar to a regular WorkerEntrypoint in your Worker, which means that wrangler dev just naturally works.
❯ npx wrangler dev

 ⛅️ wrangler 3.82.0
----------------------------

Your worker has access to the following bindings:
- Workflows:
  - CART_WORKFLOW: EcommerceCartWorkflow
⎔ Starting local server...
[wrangler:inf] Ready on http://localhost:8787
╭───────────────────────────────────────────────╮
│  [b] open a browser, [d] open devtools        │
╰───────────────────────────────────────────────╯
Workflow APIs are also available as a Worker binding. You can interact with the platform programmatically from another Worker script in the same account without worrying about permissions or authentication. You can even have workflows that call and interact with other workflows.
import { WorkerEntrypoint } from "cloudflare:workers";

type Env = { DEMO_WORKFLOW: Workflow };
export default class extends WorkerEntrypoint<Env> {
  async fetch() {
    // Pass in a user defined name for this instance
    // In this case, we use the same as the cartId
    const instance = await this.env.DEMO_WORKFLOW.create({
      id: "f3bcc11b-2833-41fb-847f-1b19469139d1",
      params: {
          cartId: "f3bcc11b-2833-41fb-847f-1b19469139d1",
      }
    });
  }
  async scheduled() {
    // Restart errored out instances in a cron
    const instance = await this.env.DEMO_WORKFLOW.get(
      "f3bcc11b-2833-41fb-847f-1b19469139d1"
    );
    const status = await instance.status();
    if (status.error) {
      await instance.restart();
    }
  }
}
Observability
Having good observability and data on often long-lived asynchronous tasks is crucial to understanding how we’re doing under normal operation and, more importantly, when things go south, and we need to troubleshoot problems or when we are iterating on code changes.
We designed Workflows around the philosophy that there is no such thing as too much logging. You can get all the SQLite data for your workflow and its instances by calling the REST APIs. Here is the output of an instance:
As you can see, this is essentially a dump of the instance engine SQLite in JSON. You have the errors, messages, current status, and what happened with every step, all time stamped to the millisecond.
It’s one thing to get data about a specific workflow instance, but it’s another to zoom out and look at aggregated statistics of all your workflows and instances over time. Workflows data is available through our GraphQL Analytics API, so you can query it in aggregate and generate valuable insights and reports. In this example we ask for aggregated analytics about the wall time of all the instances of the “e-commerce-carts” workflow:
For convenience, you can evidently also use Wrangler to describe a workflow or an instance and get an instant and beautifully formatted response:
sid ~ npx wrangler workflows instances describe purchase-workflow latest

 ⛅️ wrangler 3.80.4

Workflow Name:         purchase-workflow
Instance Id:           d4280218-7756-41d2-bccd-8d647b82d7ce
Version Id:            0c07dbc4-aaf3-44a9-9fd0-29437ed11ff6
Status:                ✅ Completed
Trigger:               🌎 API
Queued:                14/10/2024, 16:25:17
Success:               ✅ Yes
Start:                 14/10/2024, 16:25:17
End:                   14/10/2024, 16:26:17
Duration:              1 minute
Last Successful Step:  wait for three days
Output:                false
Steps:

  Name:      wait for three days
  Type:      💤 Sleeping
  Start:     14/10/2024, 16:25:17
  End:       17/10/2024, 16:25:17
  Duration:  3 day
And finally, we worked really hard to get you the best dashboard UI experience when navigating Workflows data.
So, how much does it cost?
It’d be painful if we introduced a powerful new way to build Workers applications but made it cost prohibitive.
Workflows is priced just like Cloudflare Workers, where we introduced CPU-based pricing: only on active CPU time and requests, not duration (aka: wall time).
Workers Standard pricing model
This is especially advantageous when building the long-running, multi-step applications that Workflows enables: if you had to pay while your Workflow was sleeping, waiting on an event, or making a network call to an API, writing the “right” code would be at odds with writing affordable code.
There’s also no need to keep a Kubernetes cluster or a group of virtual machines running (and burning a hole in your wallet): we manage the infrastructure, and you only pay for the compute your Workflows consume.
What’s next?
Today, after months of developing the platform, we are announcing the open beta program, and we couldn’t be more excited to see how you will be using Workflows. Looking forward, we want to do things like triggering instances from queue messages and have other ideas, but at the same time, we are certain that your feedback will help us shape the roadmap ahead.
We hope that this blog post gets you thinking about how to use Workflows for your next application, but also that it inspires you on what you can build on top of Workers. Workflows as a platform is entirely built on top of Workers, its resources, and APIs. Anyone can do it, too.
In an era where visitors expect instant gratification and content on-demand, every millisecond counts. If you’re a web application developer, it’s an excellent time to be in this line of business, but with great power comes great responsibility. You’re tasked with creating an experience that is not only intuitive and delightful but also quick, reactive and responsive – sometimes with the two sides being at odds with each other. To add to this, if your business completely runs on the internet (say ecommerce), then your site’s Core Web Vitals could make or break your bottom line.
You don’t just need fast – you need magic fast. For the past two years, Cloudflare Pages has been serving up performant applications for users across the globe, but this week, we’re showing off our brand new, lightning fast architecture, decreasing the TTFB by up to 10X when serving assets.
And while a magician never reveals their secrets, this trick is too good to keep to ourselves. For all our application builders, we’re thrilled to share the juicy technical details on how we adopted Workers for Platforms — our extension of Workers to build SaaS businesses on top of — to make Pages one of the fastest ways to serve your sites.
The problem
When we launched Pages in 2021, we didn’t anticipate the exponential growth we would experience for our platform in the months and years to come. As our users began to adopt Pages into their development workflows, usage of our platform began to skyrocket. However, while riding the high of Pages’ success, we began to notice a problem – a rather large one. As projects grew in size, with every deployment came a pinch more latency, slowly affecting the end users visiting the Pages site. Customers with tens of thousands of deployments were at risk of introducing latency to their site – a problem that needed to be solved.
Before we dive into our technical solution, let’s first explore further the setup of Pages and the relationship between number of deployments and the observed latency.
How could this be?
Built on top of Cloudflare Workers, Pages serves static assets through a highly optimised Worker. We refer to this as the Asset Server Worker.
Users can also add dynamic content through Pages Functions which eventually get compiled into a separate Worker. Every single Pages deployment corresponds to unique instances of these Workers composed in a pipeline.
When a request hits Cloudflare we need to look up which pipeline to execute. As you’d expect, this is a function of the hostname in the URL.
Every Pages project has its own routing table which is used to look up the pipeline to execute. The routing table happens to be a JSON object with a list of regexes for possible paths in that project (in our case, one for every deployment) and their corresponding pipelines.
The script_hash in the example below refers to the pipeline identifier. Naming is hard indeed.
So to look up the pipeline in question, we would: download this JSON object from Quicksilver, parse it, and then iterate through this until it finds a regex that matches the current request.
Unsurprisingly, this is expensive. Let’s take a look at a quick real world example to see how expensive.
In one realistic case, it took us 107ms just to parse the JSON. The larger the JSON object gets, the more compute it takes to parse it — with tens of thousands of deployments (not unusual for very active projects that deploy immutable preview deployments for every git commit), this JSON could be several megabytes in size!
It doesn’t end there though. After parsing this, it took 29ms to then iterate and test several regexes to find the one that matched the current request.
To summarise, every single request to this project would take 136ms to just pick the right pipeline to execute. While this was the median case for projects with 10,000 deployments on average, we’ve seen projects with seconds in added latency making them unusable after 50,000 deployments, punishing users for using our platform.
Given most web sites load more than one asset for a page, this leads to timeouts and breakage leading to an unstable and unacceptable user experience.
The secret sauce is Workers for Platforms
We launched Workers for Platforms last year as a way to build ambitious platforms on top of Workers. Workers for Platforms lets one build complex pipelines where a request may be served by a Worker built and maintained by you but could then dispatch to a Worker written by a user of your platform. This allows your platform’s users to write their own Worker like they’ve been used to but while you control how and when they are executed.
This isn’t very different from what we do with Pages. Users write their Pages functions which compile into a Worker. Users also upload their own static assets which are then bound to our special Asset Server Worker in unique pipelines for each of their deployments. And we control how and when which Worker gets executed based on a hostname in their URL.
Runtime lookups shouldn’t be O(n) though but O(1). Because Workers for Platforms was designed to build entire platforms on top of, lookups when trying to dispatch to a user’s Worker were designed as O(1) ensuring latency wasn’t a function of number of Workers in an account.
The solution
By default, Workers for Platforms hashes the name of the Worker with a secret and uses that for lookups at runtime. However, because we need to dispatch by hostname, we had a different idea. At deployment time, we could hash the pipeline for the deployment by its hostname — 2b469e16.example.pages.dev, for example.
When a request comes in, we hash the hostname from the URL with our predefined secret and then use that value to look up the pipeline to execute. This entirely removes the necessity to fetch, parse and traverse the routing table JSON from before, now making our lookup O(1).
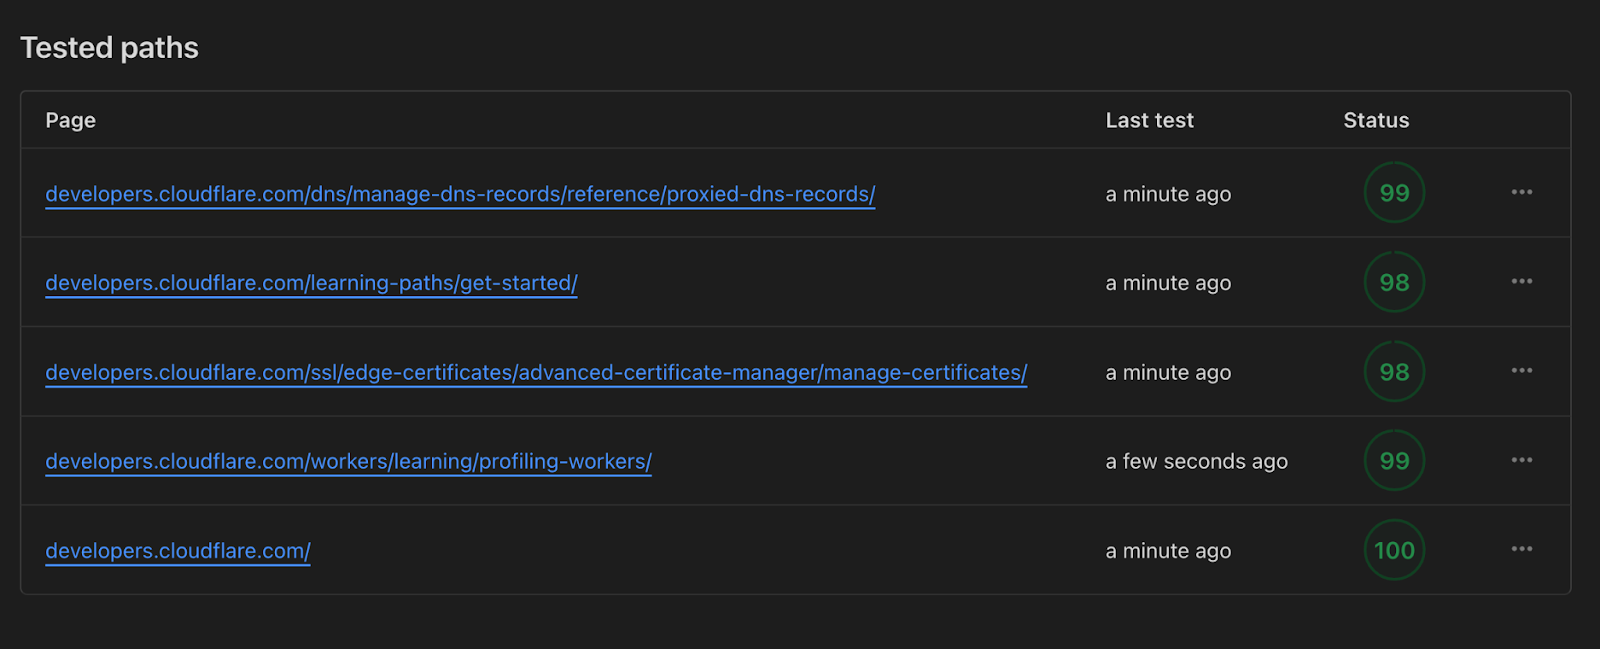
Once we were happy with our new setup from internal testing we wanted to onboard a real user. Our Developer Docs have been running on Pages since the start of 2022 and during that time, we’ve dogfooded many different features and experiments. Due to the great relationship between our two teams and them being a sizable customer of ours we wanted to bring them onto our new Workers for Platform routing.
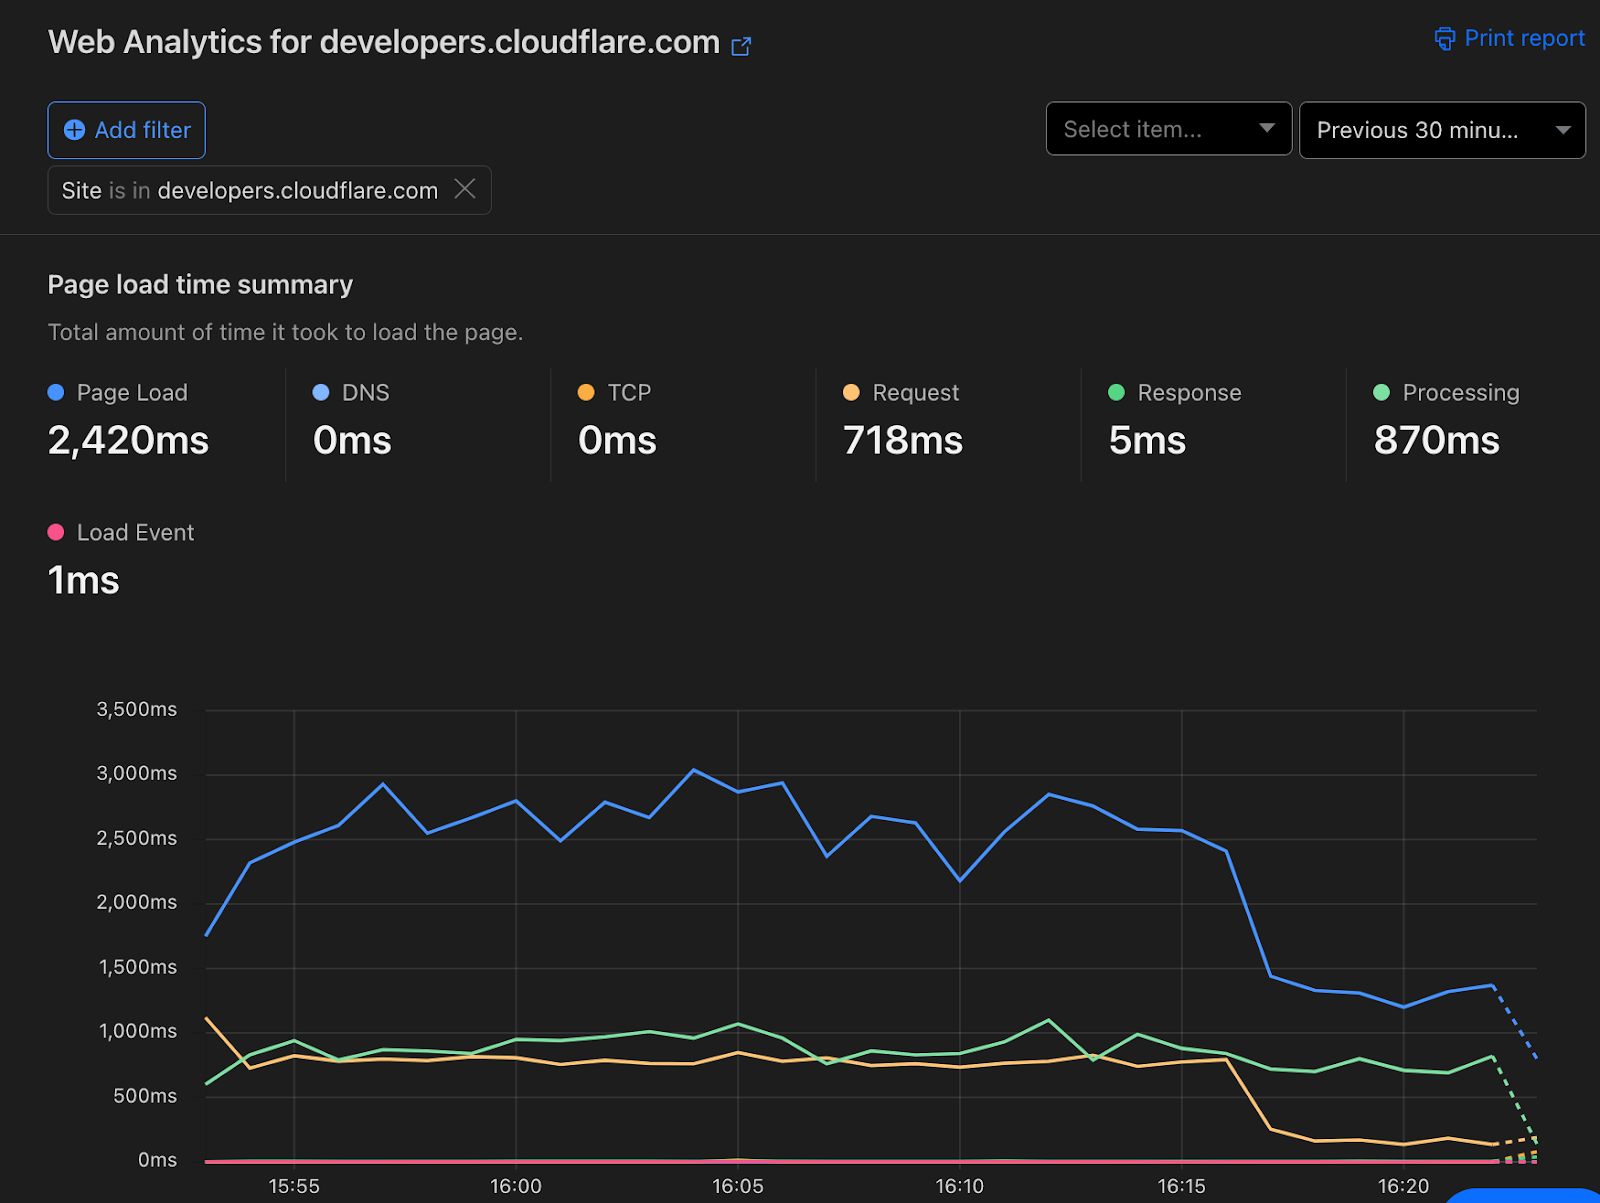
Before opting them in, TTFB was averaging at about 600ms.
After opting them in, TTFB is now 60ms. Web Analytics shows a noticeable drop in entire page load time as a result.
This improvement was also visible through Lighthouse scores now approaching a perfect score of 100 instead of 78 which was the average we saw previously.
The team was ecstatic about this especially given all of this happened under the hood with no downtime or required engineering team on their end. Not only is https://developers.cloudflare.com/ faster, we’re using less compute to serve it to all of you.
The big migration
Migrating developers.cloudflare.com was a big milestone for us and meant our new infrastructure was capable of handling traffic at scale. But a goal we were very certain of was migrating every Pages deployment ever created. We didn’t want to leave any users behind.
Turns out, that wasn’t a small number. There’d been over 14 million deployments so far over the years. This was about to be one of the biggest migrations we’d done to runtime assets and the risk was that we’d take down someone’s site.
We approached this migration with some key goals:
Customer impact in terms of downtime was a no go, all of this needed to happen under the hood without anyone’s site being affected;
We needed the ability to A/B test the old and new setup so we could revert on a per site basis if something went wrong or was incompatible;
Migrations at this scale have the ability to cause incidents because they exceed the typical request capacity of our APIs in a short window so they need to run slowly;
Because this was likely to be a long running migration, we needed the ability to look at metrics and retry failures.
The first step to all of this was to add the ability to A/B test between the legacy setup and the new one. To ensure we could A/B between the legacy setup and new one at any time, we needed to deploy both a regular pipeline (and updated routing table) and new Workers for Platforms hashed one for every deployment.
We also added a feature flag that allowed us to route to either the legacy setup or the new one per site or per data centre with the ability to explicitly opt out a site when an edgecase didn’t work.
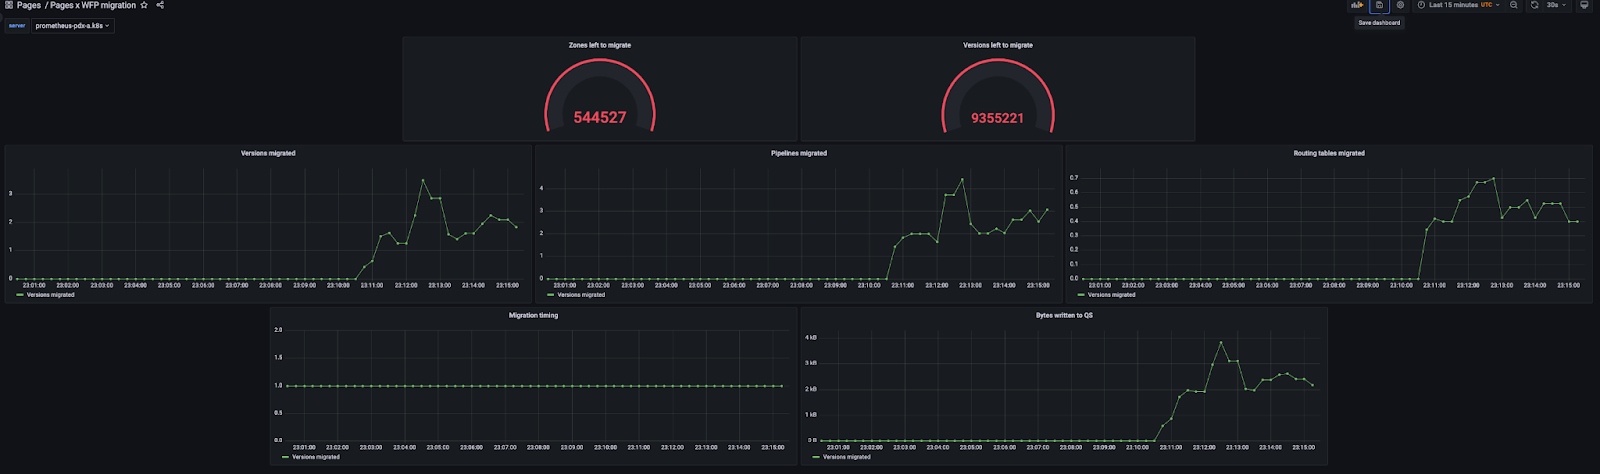
With this setup, we started running our long running migration behind the scenes that duplicated every single deployment to the new Workers for Platforms enabled pipelines.
Duplicating them instead of replacing them meant that risk was low and A/B would be possible with the tradeoff of more cleanup after we finished but we picked that with reliability for users in mind.
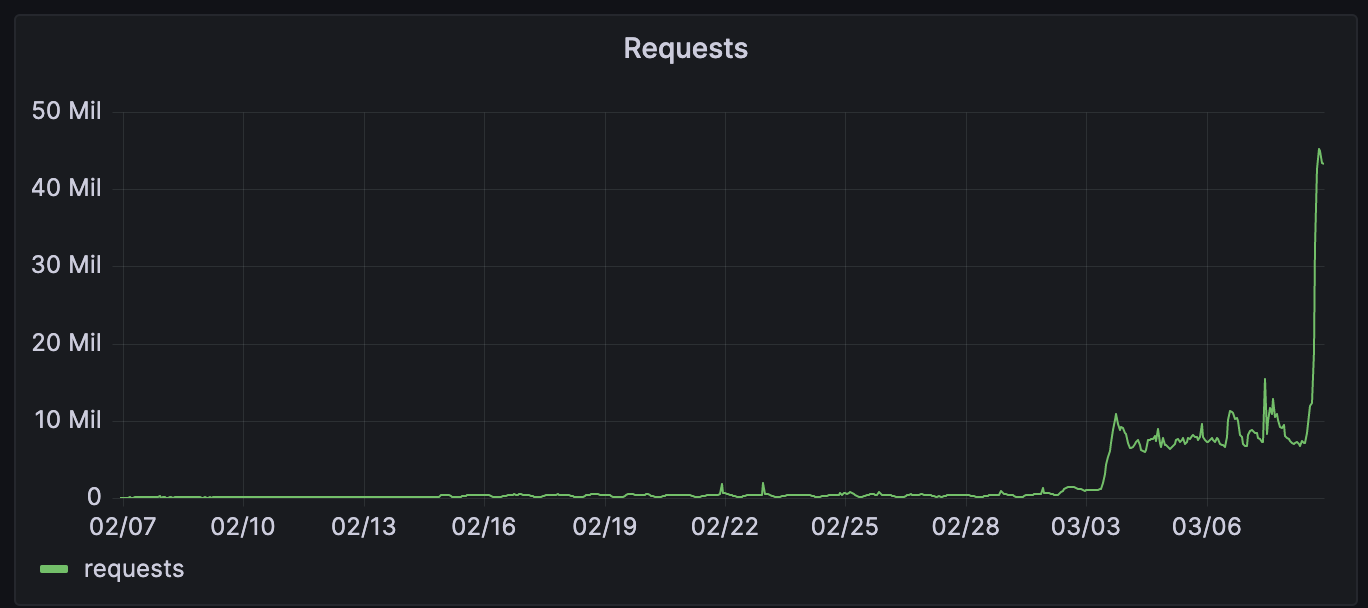
A few days in after all 14 million deployments had finished migrating over, we started rollout to the new infrastructure with a percentage based rollout. This was a great way for us to find issues and ensure we were ready to serve all runtime traffic for Pages without the risk of an incident.
Feeding three birds with one scone
Alongside the significant latency improvements for Pages projects, this change also gave improvements in other areas:
Lower CPU usage – Since we no longer need to parse a huge JSON blob and do potentially thousands of regex matches, we saved a nice amount of CPU time across thousands of machines across our data centres.
Higher LRU hit rate – We have LRU caches for things we fetch from Quicksilver this is to reduce load on Quicksilver and improve performance. However, with the large routing tables we had previously, we could easily fill up this cache with one or just a few routing tables. Now that we have turned this into tiny single entry JSONs, we have improved the cache hit rate for all Workers.
Quicksilver storage reduction – We also reduced the storage we take up with our routing tables by 92%. This is a reduction of approximately 12 GiB on each of our hundreds of data centres.
We’re just getting started
Pages is now the fastest way to serve your sites across Netlify, Vercel and many others and we’re so proud.
But it’s going to get even faster. With projects like Flame, we can’t wait to shave off many more milliseconds to every request a user makes to your site.
To a faster web for all of us.
The collective thoughts of the interwebz
Manage Consent
To provide the best experiences, we use technologies like cookies to store and/or access device information. Consenting to these technologies will allow us to process data such as browsing behavior or unique IDs on this site. Not consenting or withdrawing consent, may adversely affect certain features and functions.
Functional
Always active
The technical storage or access is strictly necessary for the legitimate purpose of enabling the use of a specific service explicitly requested by the subscriber or user, or for the sole purpose of carrying out the transmission of a communication over an electronic communications network.
Preferences
The technical storage or access is necessary for the legitimate purpose of storing preferences that are not requested by the subscriber or user.
Statistics
The technical storage or access that is used exclusively for statistical purposes.The technical storage or access that is used exclusively for anonymous statistical purposes. Without a subpoena, voluntary compliance on the part of your Internet Service Provider, or additional records from a third party, information stored or retrieved for this purpose alone cannot usually be used to identify you.
Marketing
The technical storage or access is required to create user profiles to send advertising, or to track the user on a website or across several websites for similar marketing purposes.