Developers can already use Cloudflare Workflows to build long-running, multi-step applications on Workers. Now, Python Workflows are here, meaning you can use your language of choice to orchestrate multi-step applications.
With Workflows, you can automate a sequence of idempotent steps in your application with built-in error handling and retry behavior. But Workflows were originally supported only in TypeScript. Since Python is the de facto language of choice for data pipelines, artificial intelligence/machine learning, and task automation – all of which heavily rely on orchestration – this created friction for many developers.
Over the years, we’ve been giving developers the tools to build these applications in Python, on Cloudflare. In 2020, we brought Python to Workers via Transcrypt before directly integrating Python into workerd in 2024. Earlier this year, we built support for CPython along with any packages built in Pyodide, like matplotlib and pandas, in Workers. Now, Python Workflows are supported as well, so developers can create robust applications using the language they know best.
Why Python for Workflows?
Imagine you’re training an LLM. You need to label the dataset, feed data, wait for the model to run, evaluate the loss, adjust the model, and repeat. Without automation, you’d need to start each step, monitor manually until completion, and then start the next one. Instead, you could use a workflow to orchestrate the training of the model, triggering each step pending the completion of its predecessor. For any manual adjustments needed, like evaluating the loss and adjusting the model accordingly, you can implement a step that notifies you and waits for the necessary input.
Consider data pipelines, which are a top Python use case for ingesting and processing data. By automating the data pipeline through a defined set of idempotent steps, developers can deploy a workflow that handles the entire data pipeline for them.
Take another example: building AI agents, such as an agent to manage your groceries. Each week, you input your list of recipes, and the agent (1) compiles the list of necessary ingredients, (2) checks what ingredients you have left over from previous weeks, and (3) orders the differential for pickup from your local grocery store. Using a Workflow, this could look like:
await step.wait_for_event() the user inputs the grocery list
step.do() compile list of necessary ingredients
step.do() check list of necessary ingredients against left over ingredients
step.do() make an API call to place the order
step.do() proceed with payment
Using workflows as a tool to build agents on Cloudflare can simplify agents’ architecture and improve their odds for reaching completion through individual step retries and state persistence. Support for Python Workflows means building agents with Python is easier than ever.
How Python Workflows work
Cloudflare Workflows uses the underlying infrastructure that we created for durable execution, while providing an idiomatic way for Python users to write their workflows. In addition, we aimed for complete feature parity between the Javascript and the Python SDK. This is possible because Cloudflare Workers support Python directly in the runtime itself.
Creating a Python Workflow
Cloudflare Workflows are fully built on top of Workers and Durable Objects. Each element plays a part in storing Workflow metadata, and instance level information. For more detail on how the Workflows platform works, check out this blog post.
At the very bottom of the Workflows control plane sits the user Worker, which is the WorkflowEntrypoint. When the Workflow instance is ready to run, the Workflow engine will call into the run method of the user worker via RPC, which in this case will be a Python Worker.
This is an example skeleton for a Workflow declaration, provided by the official documentation:
export class MyWorkflow extends WorkflowEntrypoint<Env, Params> {
  async run(event: WorkflowEvent<Params>, step: WorkflowStep) {
    // Steps here
  }
}
The run method, as illustrated above, provides a WorkflowStep parameter that implements the durable execution APIs. This is what users rely on for at-most-once execution. These APIs are implemented in JavaScript and need to be accessed in the context of the Python Worker.
A WorkflowStep must cross the RPC barrier, meaning the engine (caller) exposes it as an RpcTarget. This setup allows the user’s Workflow (callee) to substitute the parameter with a stub. This stub then enables the use of durable execution APIs for Workflows by RPCing back to the engine. To read more about RPC serialization and how functions can be passed from caller and callee, read the Remote-Procedure call documentation.
All of this is true for both Python and JavaScript Workflows, since we don’t really change how the user Worker is called from the Workflows side. However, in the Python case, there is another barrier – language bridging between Python and the JavaScript module. When an RPC request targets a Python Worker, there is a Javascript entrypoint module responsible for proxying the request to be handled by the Python script, and then returned to the caller. This process typically involves type translation before and after handling the request.
Overcoming the language barrier
Python workers rely on Pyodide, which is a port of CPython to WebAssembly. Pyodide provides a foreign function interface (FFI) to JavaScript which allows for calling into JavaScript methods from Python. This is the mechanism that allows other bindings and Python packages to work within the Workers platform. Therefore, we use this FFI layer not only to allow using the Workflow binding directly, but also to provide WorkflowStep methods in Python. In other words, by considering that WorkflowEntrypoint is a special class for the runtime, the run method is manually wrapped so that WorkflowStep is exposed as a JsProxy instead of being type translated like other JavaScript objects. Moreover, by wrapping the APIs from the perspective of the user Worker, we allow ourselves to make some adjustments to the overall development experience, instead of simply exposing a JavaScript SDK to a different language with different semantics.
Making the Python Workflows SDK Pythonic
A big part of porting Workflows to Python includes exposing an interface that Python users will be familiar with and have no problems using, similarly to what happens with our JavaScript APIs. Let’s take a step back and look at a snippet for a Workflow (written in Typescript) definition.
import { WorkflowEntrypoint, WorkflowStep, WorkflowEvent} from 'cloudflare:workers';

export class MyWorkflow extends WorkflowEntrypoint {
    async run(event: WorkflowEvent<YourEventType>, step: WorkflowStep) {
        let state = step.do("my first step", async () => {
          // Access your properties via event.payload
          let userEmail = event.payload.userEmail
          let createdTimestamp = event.payload.createdTimestamp
          return {"userEmail": userEmail, "createdTimestamp": createdTimestamp}
	    })

        step.sleep("my first sleep", "30 minutes");

        await step.waitForEvent<EventType>("receive example event", { type: "simple-event", timeout: "1 hour" })

   	 const developerWeek = Date.parse("22 Sept 2025 13:00:00 UTC");
        await step.sleepUntil("sleep until X times out", developerWeek)
    }
}
The Python implementation of the workflows API requires modification of the do method. Unlike other languages, Python does not easily support anonymous callbacks. This behavior is typically achieved through the use of decorators, which in this case allow us to intercept the method and expose it idiomatically. In other words, all parameters maintain their original order, with the decorated method serving as the callback.
The methods waitForEvent, sleep, and sleepUntil can retain their original signatures, as long as their names are converted to snake case.
Here’s the corresponding Python version for the same workflow, achieving similar behavior:
from workers import WorkflowEntrypoint

class MyWorkflow(WorkflowEntrypoint):
    async def run(self, event, step):
        @step.do("my first step")
        async def my_first_step():
            user_email = event["payload"]["userEmail"]
            created_timestamp = event["payload"]["createdTimestamp"]
            return {
                "userEmail": user_email,
                "createdTimestamp": created_timestamp,
            }

        await my_first_step()

        step.sleep("my first sleep", "30 minutes")

         await step.wait_for_event(
            "receive example event",
            "simple-event",
            timeout="1 hour",
        )

        developer_week = datetime(2024, 10, 24, 13, 0, 0, tzinfo=timezone.utc)
        await step.sleep_until("sleep until X times out", developer_week)
DAG Workflows
When designing Workflows, we’re often managing dependencies between steps even when some of these tasks can be handled concurrently. Even though we’re not thinking about it, many Workflows have a directed acyclic graph (DAG) execution flow. Concurrency is achievable in the first iteration of Python Workflows (i.e.: minimal port to Python Workers) because Pyodide captures Javascript thenables and proxies them into Python awaitables.
Consequently, asyncio.gather works as a counterpart to Promise.all. Although this is perfectly fine and ready to be used in the SDK, we also support a declarative approach.
One of the advantages of decorating the do method is that we can essentially provide further abstractions on the original API, and have them work on the entrypoint wrapper. Here’s an example of a Python API making use of the DAG capabilities introduced:
from workers import Response, WorkflowEntrypoint

class PythonWorkflowDAG(WorkflowEntrypoint):
    async def run(self, event, step):

        @step.do('dependency 1')
        async def dep_1():
            # does stuff
            print('executing dep1')

        @step.do('dependency 2')
        async def dep_2():
            # does stuff
            print('executing dep2')

        @step.do('demo do', depends=[dep_1, dep_2], concurrent=True)
        async def final_step(res1=None, res2=None):
            # does stuff
            print('something')

        await final_step()
This kind of approach makes the Workflow declaration much cleaner, leaving state management to the Workflows engine data plane, as well as the Python workers Workflow wrapper. Note that even though multiple steps can run with the same name, the engine will slightly modify the name of each step to ensure uniqueness. In Python Workflows, a dependency is considered resolved once the initial step involving it has been successfully completed.
Cloudflare Workflows is our take on “Durable Execution.” They provide a serverless engine, powered by the Cloudflare Developer Platform, for building long-running, multi-step applications that persist through failures. When Workflows became generally available earlier this year, they allowed developers to orchestrate complex processes that would be difficult or impossible to manage with traditional stateless functions. Workflows handle state, retries, and long waits, allowing you to focus on your business logic.
However, complex orchestrations require robust testing to be reliable. To date, testing Workflows was a black-box process. Although you could test if a Workflow instance reached completion through an await to its status, there was no visibility into the intermediate steps. This made debugging really difficult. Did the payment processing step succeed? Did the confirmation email step receive the correct data? You couldn’t be sure without inspecting external systems or logs.
Why was this necessary?
As developers ourselves, we understand the need to ensure reliable code, and we heard your feedback loud and clear: the developer experience for testing Workflows needed to be better.
The black box nature of testing was one part of the problem. Beyond that, though, the limited testing offered came at a high cost. If you added a workflow to your project, even if you weren’t testing the workflow directly, you were required to disable isolated storage because we couldn’t guarantee isolation between tests. Isolated storage is a vitest-pool-workers feature to guarantee that each test runs in a clean, predictable environment, free from the side effects of other tests. Being forced to have it disabled meant that state could leak between tests, leading to flaky, unpredictable, and hard-to-debug failures.
This created a difficult choice for developers building complex applications. If your project used Workers, Durable Objects, and R2 alongside Workflows, you had to either abandon isolated testing for your entire project or skip testing. This friction resulted in a poor testing experience, which in turn discouraged the adoption of Workflows. Solving this wasn’t just an improvement, it was a critical step in making Workflows part of any well-tested Cloudflare application.
Introducing isolated testing for Workflows
We’re introducing a new set of APIs that enable comprehensive, granular, and isolated testing for your Workflows, all running locally and offline with vitest-pool-workers, our testing framework that supports running tests in the Workers runtime workerd. This enables fast, reliable, and cheap test runs that don’t depend on a network connection.
They are available through the cloudflare:test module, with @cloudflare/vitest-pool-workers version 0.9.0 and above. The new test module provides two primary functions to introspect your Workflows:
introspectWorkflowInstance: useful for unit tests with known instance IDs
introspectWorkflow: useful for integration tests where IDs are typically generated dynamically.
Let’s walk through a practical example.
A practical example: testing a blog moderation workflow
Imagine a simple Workflow for moderating a blog. When a user submits a comment, the Workflow requests a review from workers-ai. Based on the violation score returned, it then waits for a moderator to approve or deny the comment. If approved, it calls a step.do to publish the comment via an external API.
Testing this without our new APIs would be impossible. You’d have no direct way to simulate the step’s outcomes and simulate the moderator’s approval. Now, you can mock everything.
Here’s the test code using introspectWorkflowInstance with a known instance ID:
This test mocks the outcomes of steps that require external API calls, such as the ‘AI content scan’, which calls Workers AI, and the ‘publish comment’ step, which calls an external blog API.
If the instance ID is not known, because you are either making a worker request that starts one/multiple Workflow instances with random generated ids, you can call introspectWorkflow(env.MY_WORKFLOW). Here’s the test code for that scenario, where only one Workflow instance is created:
Notice how in both examples we’re calling the introspectors with await using – this is the Explicit Resource Management syntax from modern JavaScript. It is crucial here because when the introspector objects go out of scope at the end of the test, its disposal method is automatically called. This is how we ensure each test works with its own isolated storage.
The modify and modifyAll functions are the gateway to controlling instances. Inside its callback, you get access to a modifier object with methods to inject behavior such as mocking step outcomes, events and disabling sleeps.
To understand the solution, you first need to understand the local architecture. When you run wrangler dev, your Workflows are powered by Miniflare, a simulator for testing Cloudflare Workers, and workerd. Each running workflow instance is backed by its own SQLite Durable Object, which we call the “Engine DO”. This Engine DO is responsible for executing steps, persisting state, and managing the instance’s lifecycle. It lives inside the local isolated Workers runtime.
Meanwhile, the Vitest test runner is a separate Node.js process living outside of workerd. This is why we have a Vitest custom pool that allows tests to run inside workerd called vitest-pool-workers. Vitest-pool-workers has a Runner Worker, which is a worker to run the tests with bindings to everything specified in the user wrangler.json file. This worker has access to the APIs under the “cloudflare:test” module. It communicates with Node.js through a special DO called Runner Object via WebSocket/RPC.
The first approach we considered was to use the test runner worker. In its current state, Runner worker has access to Workflow bindings from Workflows defined on the wrangler file. We considered also binding each Workflow’s Engine DO namespace to this runner worker. This would give vitest-pool-workers direct access to the Engine DOs where it would be possible to directly call Engine methods.
While promising, this approach would have required undesirable changes to the core of Miniflare and vitest-pool-workers, making it too invasive for this single feature.
Firstly, we would have needed to add a new unsafe field to Miniflare’s Durable Objects. Its sole purpose would be to specify the service name of our Engines, preventing Miniflare from applying its default user prefix which would otherwise prevent the Durable Objects from being found.
Secondly, vitest-pool-workers would have been forced to bind every Engine DO from the Workflows in the project to its runner, even those not being tested. This would introduce unwanted bindings into the test environment, requiring an additional cleanup to ensure they were not exposed to the user’s tests env.
The breakthrough
The solution is a combination of privileged local-only APIs and Remote Procedure Calls (RPC).
First, we added a set of unsafe functions to the local implementation of the Workflows binding, functions that are not available in the production environment. They act as a controlled access point, accessible from the test environment, allowing the test runner to get a stub to a specific Engine DO by providing its instance ID.
Once the test runner has this stub, it uses RPC to call specific, trusted methods on the Engine DO via a special RpcTarget called WorkflowInstanceModifier. Any class that extends RpcTarget has its objects replaced by a stub. Calling a method on this stub, in turn, makes an RPC back to the original object.
This simpler approach is far less invasive because it’s confined to the Workflows environment, which also ensures any future feature changes are safely isolated.
Introspecting Workflows with unknown IDs
When creating Workflows instances (either by create() or createBatch()) developers can provide a specific ID or have it automatically generated for them. This ID identifies the Workflow instance and is then used to create the associated Engine DO ID.
The logical starting point for implementation was introspectWorkflowInstance(binding, instanceID), as the instance ID is known in advance. This allows us to generate the Engine DO ID required to identify the engine associated with that Workflow instance.
But often, one part of your application (like an HTTP endpoint) will create a Workflow instance with a randomly generated ID. How can we introspect an instance when we don’t know its ID until after it’s created?
The answer was to use a powerful feature of JavaScript: Proxy objects.
When you use introspectWorkflow(binding), we wrap the Workflow binding in a Proxy. This proxy non-destructively intercepts all calls to the binding, specifically looking for .create() and .createBatch(). When your test triggers a workflow creation, the proxy inspects the call. It captures the instance ID — either one you provided or the random one generated — and immediately sets up the introspection on that ID, applying all the modifications you defined in the modifyAll call. The original creation call then proceeds as normal.
env[workflow] = new Proxy(env[workflow], {
  get(target, prop) {
    if (prop === "create") {
      return new Proxy(target.create, {
        async apply(_fn, _this, [opts = {}]) {

          // 1. Ensure an ID exists
          const optsWithId = "id" in opts ? opts : { id: crypto.randomUUID(), ...opts };

          // 2. Apply test modifications before creation
          await introspectAndModifyInstance(optsWithId.id);

          // 3. Call the original 'create' method
          return target.create(optsWithId);
        },
      });
    }

    // Same logic for createBatch()
  }
}
When the await using block from introspectWorkflow() finishes, or the dispose() method is called at the end of the test, the introspector is disposed of, and the proxy is removed, leaving the binding in its original state. It’s a low-impact approach that prioritizes developer experience and long-term maintainability.
Get started with testing Workflows
Ready to add tests to your Workflows? Here’s how to get started:
Update your dependencies: Make sure you are using @cloudflare/vitest-pool-workers version 0.9.0 or newer. Run the following command in your project: npm install @cloudflare/vitest-pool-workers@latest
Start writing tests: Import introspectWorkflowInstance or introspectWorkflow from cloudflare:test in your test files and use the patterns shown in this post to mock, control, and assert on your Workflow’s behavior. Also check out the official API reference.
Cloudflare plays a significant role in supporting the Internet’s infrastructure. As a reverse proxy by approximately 20% of all websites, we sit directly in the request path between users and the origin, helping to improve performance, security, and reliability at scale. Beyond that, our global network powers services like delivery, Workers, and R2 — making Cloudflare not just a passive intermediary, but an active platform for delivering and hosting content across the Internet.
Since Cloudflare’s launch in 2010, we have collaborated with the National Center for Missing and Exploited Children (NCMEC), a US-based clearinghouse for reporting child sexual abuse material (CSAM), and are committed to doing what we can to support identification and removal of CSAM content.
Members of the public, customers, and trusted organizations can submit reports of abuse observed on Cloudflare’s network. A minority of these reports relate to CSAM, which are triaged with the highest priority by Cloudflare’s Trust & Safety team. We will also forward details of the report, along with relevant files (where applicable) and supplemental information to NCMEC.
The process to generate and submit reports to NCMEC involves multiple steps, dependencies, and error handling, which quickly became complex under our original queue-based architecture. In this blog post, we discuss how Cloudflare Workflows helped streamline this process and simplify the code behind it.
Life before Cloudflare Workflows
When we designed our latest NCMEC reporting system in early 2024, Cloudflare Workflows did not exist yet. We used the Workers platform Queues as a solution for managing asynchronous tasks, and structured our system around them.
Our goal was to ensure reliability, fault tolerance, and automatic retries. However, without an orchestrator, we had to manually handle state, retries, and inter-queue messaging. While Queues worked, we needed something more explicit to help debug and observe the more complex asynchronous workflows we were building on top of the messaging system that Queues gave us.
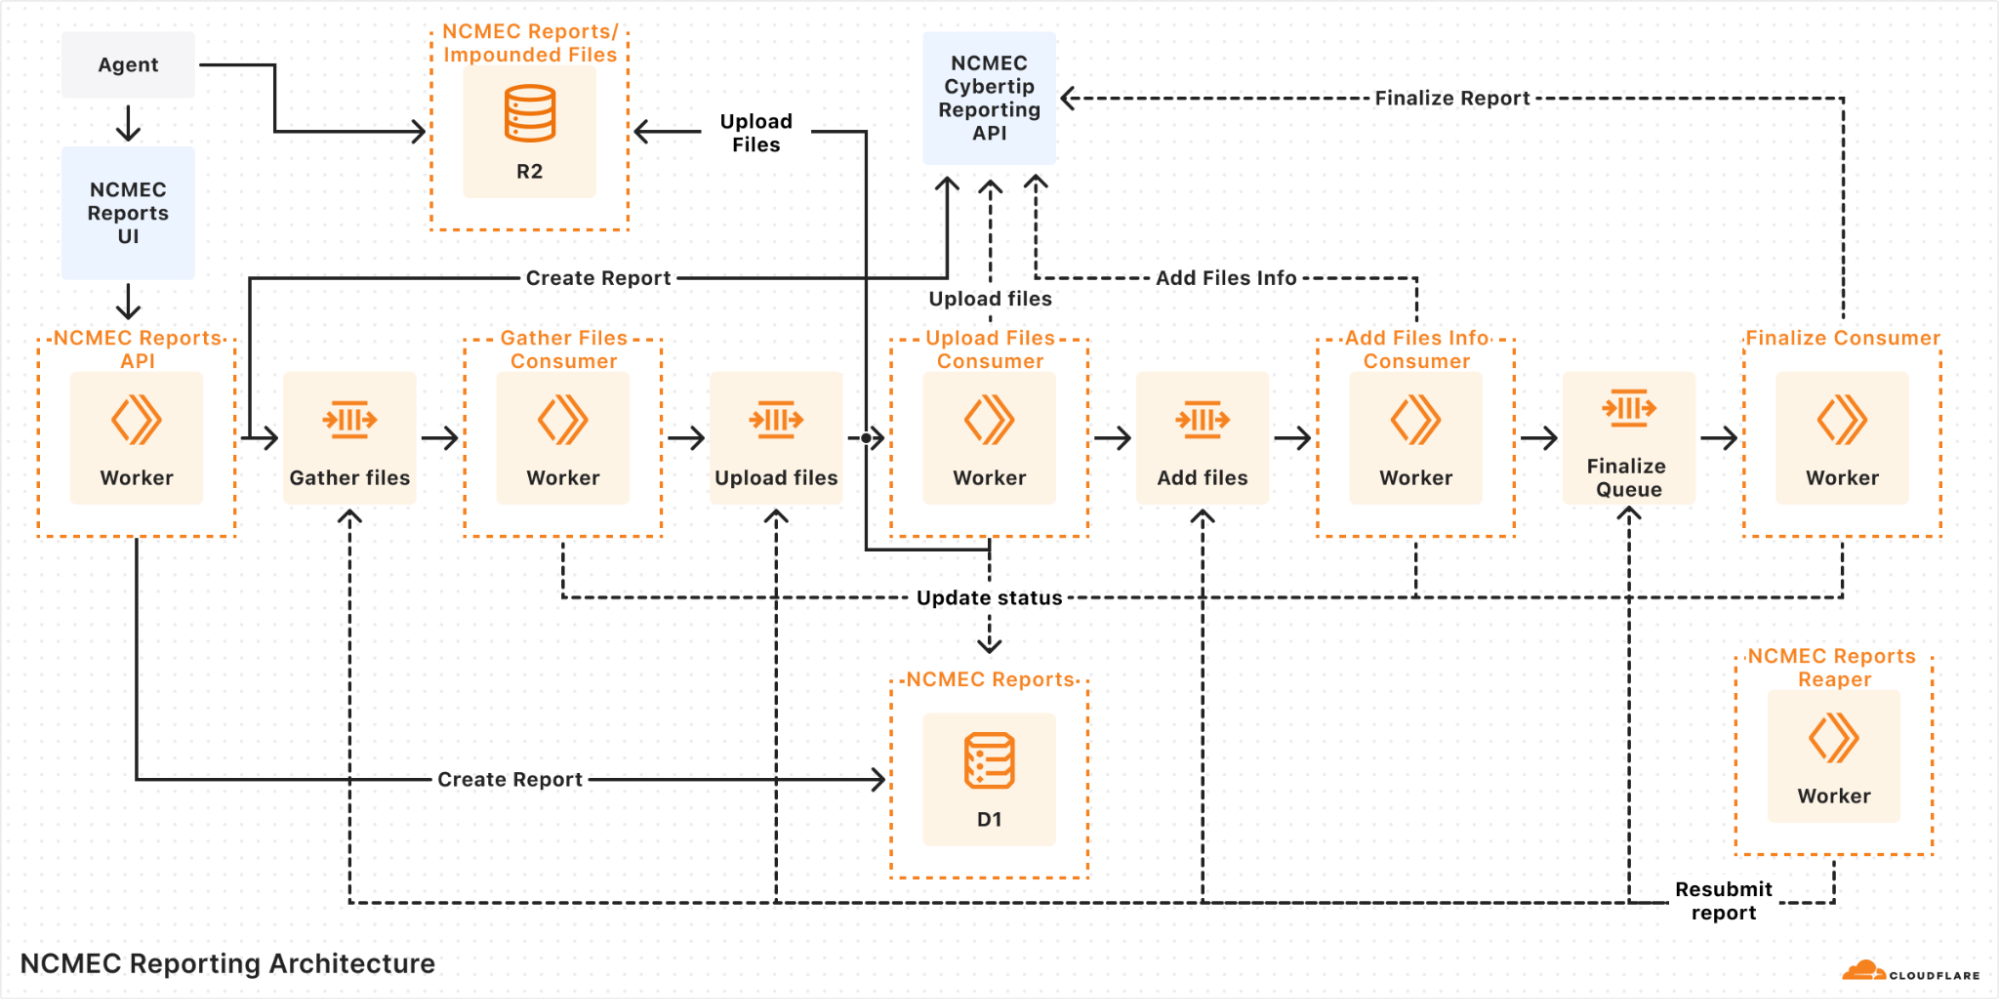
In our queue-based architecture each report would go through multiple steps:
Validate input: Ensure the report has all necessary details.
Initiate report: Call the NCMEC API to create a report.
Fetch impounded files (if applicable): Retrieve files stored in R2.
Upload files: Send files to NCMEC via API.
Finalize report: Mark the report as completed.
A diagram of our queue-based architecture
Each of these steps was handled by a separate queue, and if an error occurred, the system would retry the message several times before marking the report as failed. But errors weren’t always straightforward — for instance, if an external API call consistently failed due to bad input or returned an unexpected response shape, retries wouldn’t help. In those cases, the report could get stuck in an intermediate state, and we’d often have to manually dig through logs across different queues to figure out what went wrong.
Even more frustrating, when handling failed reports, we relied on a “Reaper” — a cron job that ran every hour to resubmit failed reports. Since a report could fail at any step, the Reaper had to deduce which queue failed and send a message to begin reprocessing. This meant:
Debugging was a nightmare: Tracing the journey of a single report meant jumping between logs for multiple queues.
Retries were unreliable: Some queues had retry logic, while others relied on the Reaper, leading to inconsistencies.
State management was painful: We had no clear way to track whether a report was halfway through the pipeline or completely lost, except by looking through the logs.
Operational overhead was high: Developers frequently had to manually inspect failed reports and resubmit them.
Queues gave us a solid foundation for moving messages around, but it wasn’t meant to handle orchestration. What we’d really done was build a bunch of loosely connected steps on top of a message bus and hoped it would all hold together. It worked, for the most part, but it was clunky, hard to reason about, and easy to break. Just understanding how a single report moved through the system meant tracing messages across multiple queues and digging through logs.
We knew we needed something better: a way to define workflows explicitly, with clear visibility into where things were and what had failed. But back then, we didn’t have a good way to do that without bringing in heavyweight tools or writing a bunch of glue code ourselves. When Cloudflare Workflows came along, it felt like the missing piece, finally giving us a simple, reliable way to orchestrate everything without duct tape.
The solution: Cloudflare Workflows
Once Cloudflare Workflows was announced, we saw an immediate opportunity to replace our queue-based architecture with a more structured, observable, and retryable system. Instead of relying on a web of multiple queues passing messages to each other, we now have a single workflow that orchestrates the entire process from start to finish. Critically, if any step failed, the Workflow could pick back up from where it left off, without having to repeat earlier processing steps, re-parsing files, or duplicating uploads.
With Cloudflare Workflows, each report follows a clear sequence of steps:
Creating the report: The system validates the incoming report and initiates it with NCMEC.
Checking for impounded files: If there are impounded files associated with the report, the workflow proceeds to file collection.
Gathering files: The system retrieves impounded files stored in R2 and prepares them for upload.
Uploading files to NCMEC: Each file is uploaded to NCMEC using their API, ensuring all relevant evidence is submitted.
Adding file metadata: Metadata about the uploaded files (hashes, timestamps, etc.) is attached to the report.
Finalizing the report: Once all files are processed, the report is finalized and marked as complete.
Here’s a simplified version of the orchestrator:
import { WorkflowEntrypoint, WorkflowEvent, WorkflowStep } from 'cloudflare:workers';


export class ReportWorkflow extends WorkflowEntrypoint<Env, ReportType> {
  async run(event: WorkflowEvent<ReportType>, step: WorkflowStep) {
    const reportToCreate: ReportType = event.payload;
    let reportId: number | undefined;


    try {
      await step.do('Create Report', async () => {
        const createdReport = await createReportStep(reportToCreate, this.env);
        reportId = createdReport?.id;
      });


      if (reportToCreate.hasImpoundedFiles) {
        await step.do('Gather Files', async () => {
          if (!reportId) throw new Error('Report ID is undefined.');
          await gatherFilesStep(reportId, this.env);
        });


        await step.do('Upload Files', async () => {
          if (!reportId) throw new Error('Report ID is undefined.');
          await uploadFilesStep(reportId, this.env);
        });


        await step.do('Add File Metadata', async () => {
          if (!reportId) throw new Error('Report ID is undefined.');
          await addFilesInfoStep(reportId, this.env);
        });
      }


      await step.do('Finalize Report', async () => {
        if (!reportId) throw new Error('Report ID is undefined.');
        await finalizeReportStep(reportId, this.env);
      });
    } catch (error) {
      console.error(error);
      throw error;
    }
  }
}
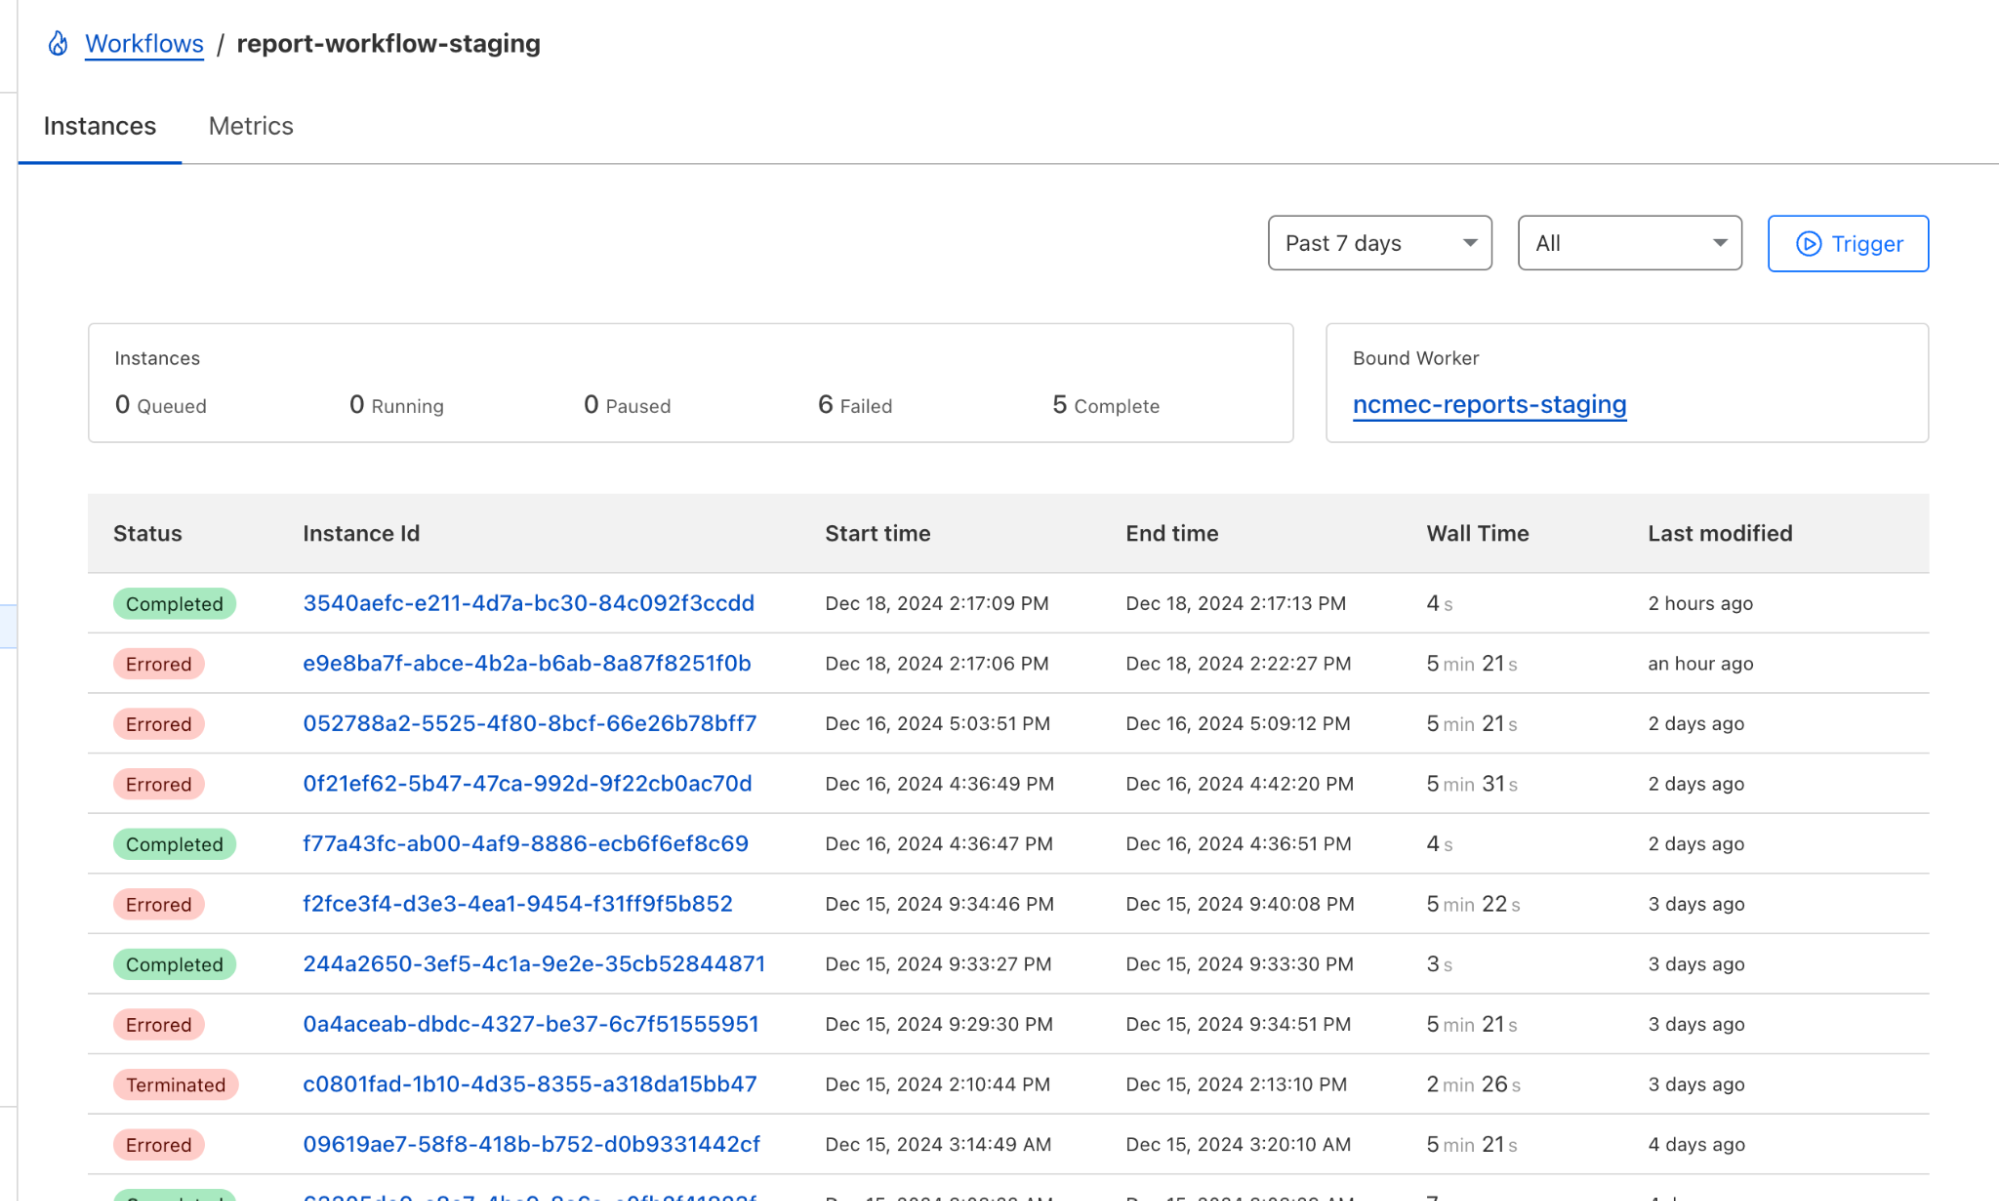
Not only can tasks be broken into discrete steps, but the Workflows dashboard gives us real-time visibility into each report processed and the status of each step in the workflow!
This allows us to easily see active and completed workflows, identify which steps failed and where, and retry failed steps or terminate workflows. These features revolutionize how we troubleshoot issues, providing us with a tool to deep dive into any issues that arise and retry steps with a click of a button.
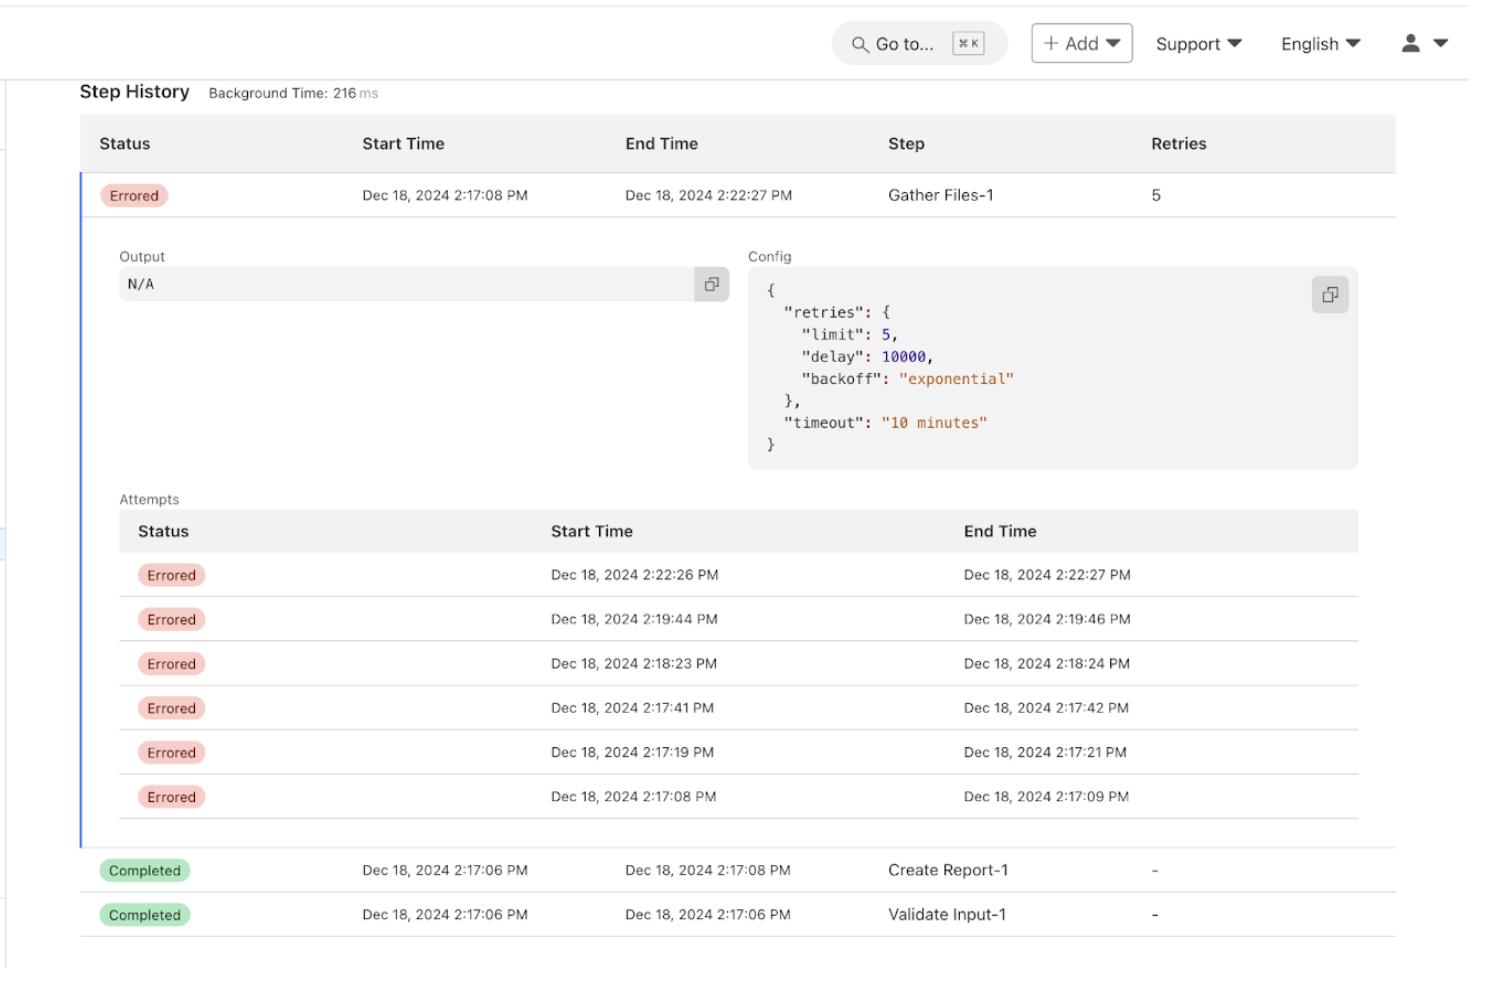
Below are two dashboard screenshots, one of our running workflows and the second of an inspection of the success and failures of each step in the workflow. Some workflows look slower or “stuck” — that’s because failed steps are retried with exponential backoff. This helps smooth over transient issues like flaky APIs without manual intervention.
Cloudflare Workflows Dashboard for our NCMEC Workflow
Cloudflare Workflows Dashboard containing a breakout of the NCMEC Workflow Steps
Cloudflare Workflows transformed how we handle NCMEC incident reports. What was once a complex, queue-based architecture is now a structured, retryable, and observable process. Debugging is easier, error handling is more robust, and monitoring is seamless.
Deploy your own Workflows
If you’re also building larger, multi-step applications, or have an existing Workers application that has started to approach what we ended up with for our incident reporting process, then you can typically wrap that code within a Workflow with minimal changes. Workflows can read from R2, write to KV, query D1 and call other APIs just like any other Worker, but are designed to help orchestrate asynchronous, long-running tasks.
To get started with Workflows, you can head to the Workflows developer documentation and/or pull down the starter project and dive into the code immediately:
Betas are useful for feedback and iteration, but at the end of the day, not everyone is willing to be a guinea pig or can tolerate the occasional sharp edge that comes along with beta software. Sometimes you need that big, shiny “Generally Available” label (or blog post), and now it’s Workflows’ turn.
Workflows, our serverless durable execution engine that allows you to build long-running, multi-step applications (some call them “step functions”) on Workers, is now GA.
In short, that means it’s production ready — but it also doesn’t mean Workflows is going to ossify. We’re continuing to scale Workflows (including more concurrent instances), bring new capabilities (like the new waitForEvent API), and make it easier to build AI agents with our Agents SDK and Workflows.
If you prefer code to prose, you can quickly install the Workflows starter project and start exploring the code and the API with a single command:
How does Workflows work? What can I build with it? How do I think about building AI agents with Workflows and the Agents SDK? Well, read on.
Building with Workflows
Workflows is a durable execution engine built on Cloudflare Workers that allows you to build resilient, multi-step applications.
At its core, Workflows implements a step-based architecture where each step in your application is independently retriable, with state automatically persisted between steps. This means that even if a step fails due to a transient error or network issue, Workflows can retry just that step without needing to restart your entire application from the beginning.
When you define a Workflow, you break your application into logical steps.
Each step can either execute code (step.do), put your Workflow to sleep (step.sleep or step.sleepUntil), or wait on an event (step.waitForEvent).
As your Workflow executes, it automatically persists the state returned from each step, ensuring that your application can continue exactly where it left off, even after failures or hibernation periods.
This durable execution model is particularly powerful for applications that coordinate between multiple systems, process data in sequence, or need to handle long-running tasks that might span minutes, hours, or even days.
Workflows are particularly useful at handling complex business processes that traditional stateless functions struggle with.
For example, an e-commerce order processing workflow might check inventory, charge a payment method, send an email confirmation, and update a database — all as separate steps. If the payment processing step fails due to a temporary outage, Workflows will automatically retry just that step when the payment service is available again, without duplicating the inventory check or restarting the entire process.
You can see how this works below: each call to a service can be modelled as a step, independently retried, and if needed, recovered from that step onwards:
import { WorkflowEntrypoint, WorkflowStep, WorkflowEvent } from 'cloudflare:workers';

// The params we expect when triggering this Workflow
type OrderParams = {
	orderId: string;
	customerId: string;
	items: Array<{ productId: string; quantity: number }>;
	paymentMethod: {
		type: string;
		id: string;
	};
};

// Our Workflow definition
export class OrderProcessingWorkflow extends WorkflowEntrypoint<Env, OrderParams> {
	async run(event: WorkflowEvent<OrderParams>, step: WorkflowStep) {
		// Step 1: Check inventory
		const inventoryResult = await step.do('check-inventory', async () => {
			console.log(`Checking inventory for order ${event.payload.orderId}`);

			// Mock: In a real workflow, you'd query your inventory system
			const inventoryCheck = await this.env.INVENTORY_SERVICE.checkAvailability(event.payload.items);

			// Return inventory status as state for the next step
			return {
				inStock: true,
				reservationId: 'inv-123456',
				itemsChecked: event.payload.items.length,
			};
		});

		// Exit workflow if items aren't in stock
		if (!inventoryResult.inStock) {
			return { status: 'failed', reason: 'out-of-stock' };
		}

		// Step 2: Process payment
		// Configure specific retry logic for payment processing
		const paymentResult = await step.do(
			'process-payment',
			{
				retries: {
					limit: 3,
					delay: '30 seconds',
					backoff: 'exponential',
				},
				timeout: '2 minutes',
			},
			async () => {
				console.log(`Processing payment for order ${event.payload.orderId}`);

				// Mock: In a real workflow, you'd call your payment processor
				const paymentResponse = await this.env.PAYMENT_SERVICE.processPayment({
					customerId: event.payload.customerId,
					orderId: event.payload.orderId,
					amount: calculateTotal(event.payload.items),
					paymentMethodId: event.payload.paymentMethod.id,
				});

				// If payment failed, throw an error that will trigger retry logic
				if (paymentResponse.status !== 'success') {
					throw new Error(`Payment failed: ${paymentResponse.message}`);
				}

				// Return payment info as state for the next step
				return {
					transactionId: 'txn-789012',
					amount: 129.99,
					timestamp: new Date().toISOString(),
				};
			},
		);

		// Step 3: Send email confirmation
		await step.do('send-confirmation-email', async () => {
			console.log(`Sending confirmation email for order ${event.payload.orderId}`);
			console.log(`Including payment confirmation ${paymentResult.transactionId}`);
			return await this.env.EMAIL_SERVICE.sendOrderConfirmation({ ... })
		});

		// Step 4: Update database
		const dbResult = await step.do('update-database', async () => {
			console.log(`Updating database for order ${event.payload.orderId}`);
			await this.updateOrderStatus(...)

			return { dbUpdated: true };
		});

		// Return final workflow state
		return {
			orderId: event.payload.orderId,
			processedAt: new Date().toISOString(),
		};
	}
}
This combination of durability, automatic retries, and state persistence makes Workflows ideal for building reliable distributed applications that can handle real-world failures gracefully.
Human-in-the-loop
Workflows are just code, and that makes them extremely powerful: you can define steps dynamically and on-the-fly, conditionally branch, and make API calls to any system you need. But sometimes you also need a Workflow to wait for something to happen in the real world.
For example:
Approval from a human to progress.
An incoming webhook, like from a Stripe payment or a GitHub event.
A state change, such as a file upload to R2 that triggers an Event Notification, and then pushes a reference to the file to the Workflow, so it can process the file (or run it through an AI model).
The new waitForEvent API in Workflows allows you to do just that:
let event = await step.waitForEvent<IncomingStripeWebhook>("receive invoice paid webhook from Stripe", { type: "stripe-webhook", timeout: "1 hour" })
You can then send an event to a specific instance from any external service that can make a HTTP request:
interface Env {
  MY_WORKFLOW: Workflow;
}

interface Payload {
  transaction: string;
  id: string;
}

export default {
  async fetch(req: Request, env: Env) {
    const instanceId = new URL(req.url).searchParams.get("instanceId")
    const webhookPayload = await req.json<Payload>()

    let instance = await env.MY_WORKFLOW.get(instanceId);
    // Send our event, with `type` matching the event type defined in
    // our step.waitForEvent call
    await instance.sendEvent({type: "stripe-webhook", payload: webhookPayload})

    return Response.json({
      status: await instance.status(),
    });
  },
};
You can even wait for multiple events, using the type parameter, and/or race multiple events using Promise.race to continue on depending on which event was received first:
export class MyWorkflow extends WorkflowEntrypoint<Env, Params> {
	async run(event: WorkflowEvent<Params>, step: WorkflowStep) {
		let state = await step.do("get some data", () => { /* step call here /* })
		// Race the events, resolving the Promise based on which event
// we receive first
		let value = Promise.race([
step.waitForEvent("payment success", { type: "payment-success-webhook", timeout: "4 hours" ),
step.waitForEvent("payment failure", { type: "payment-failure-webhook", timeout: "4 hours" ),
])
// Continue on based on the value and event received
	}
}
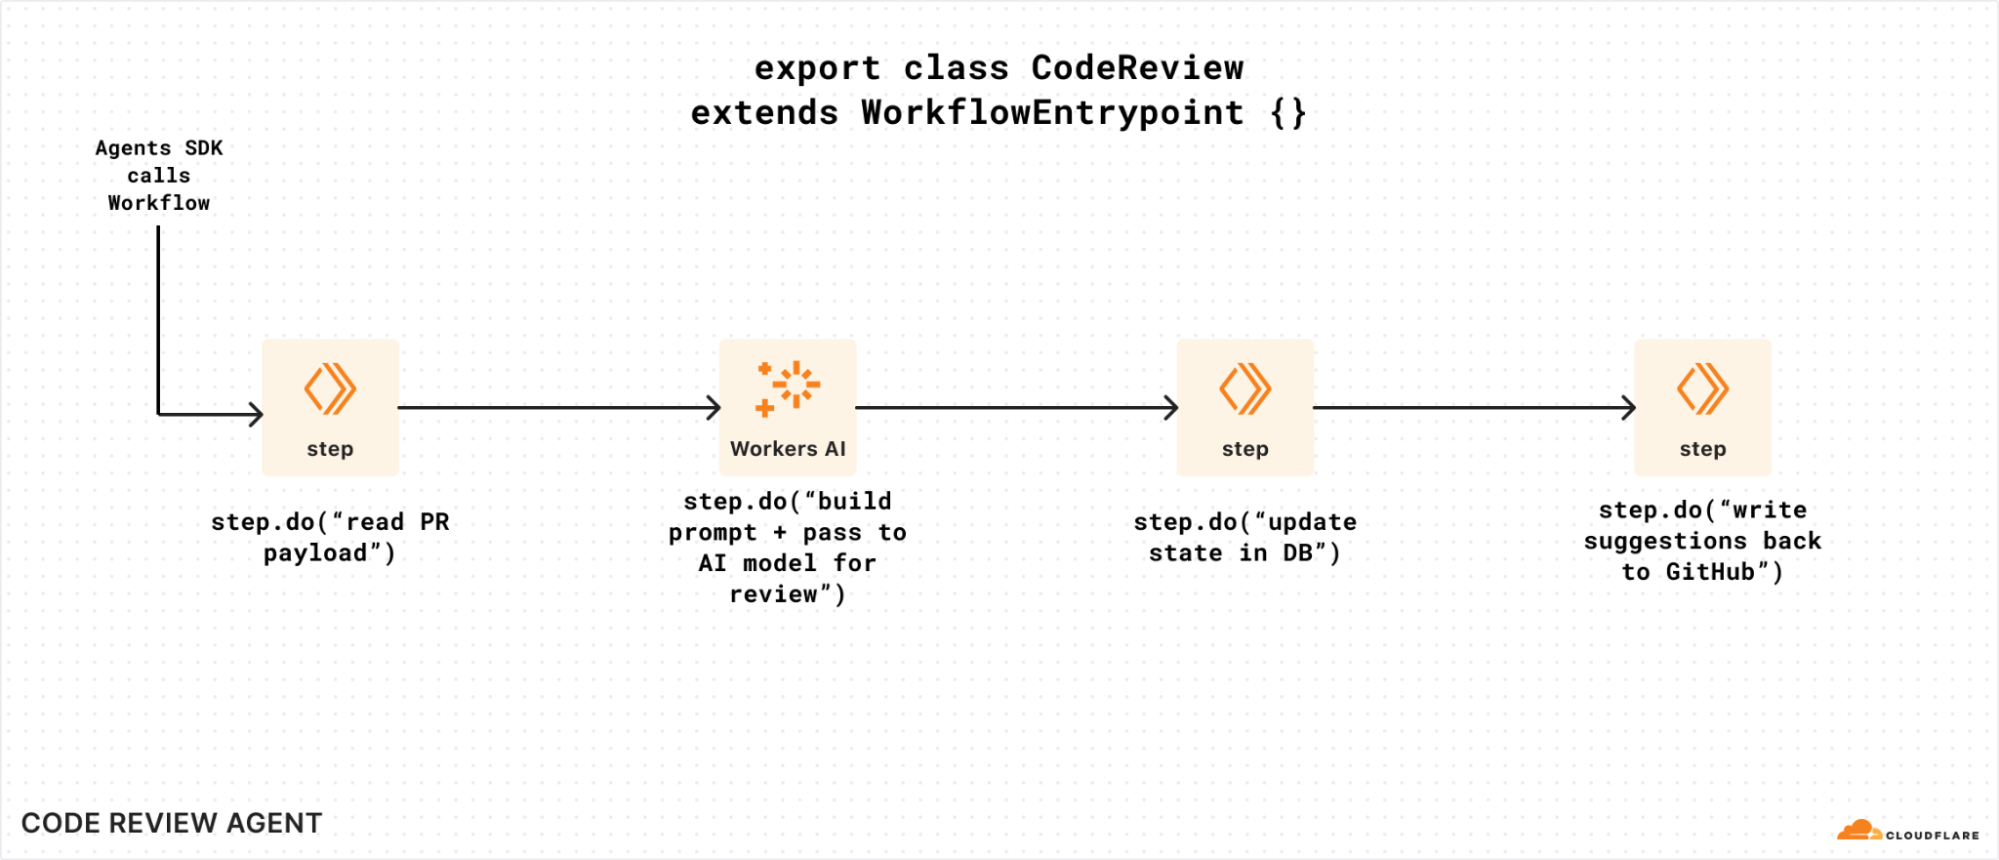
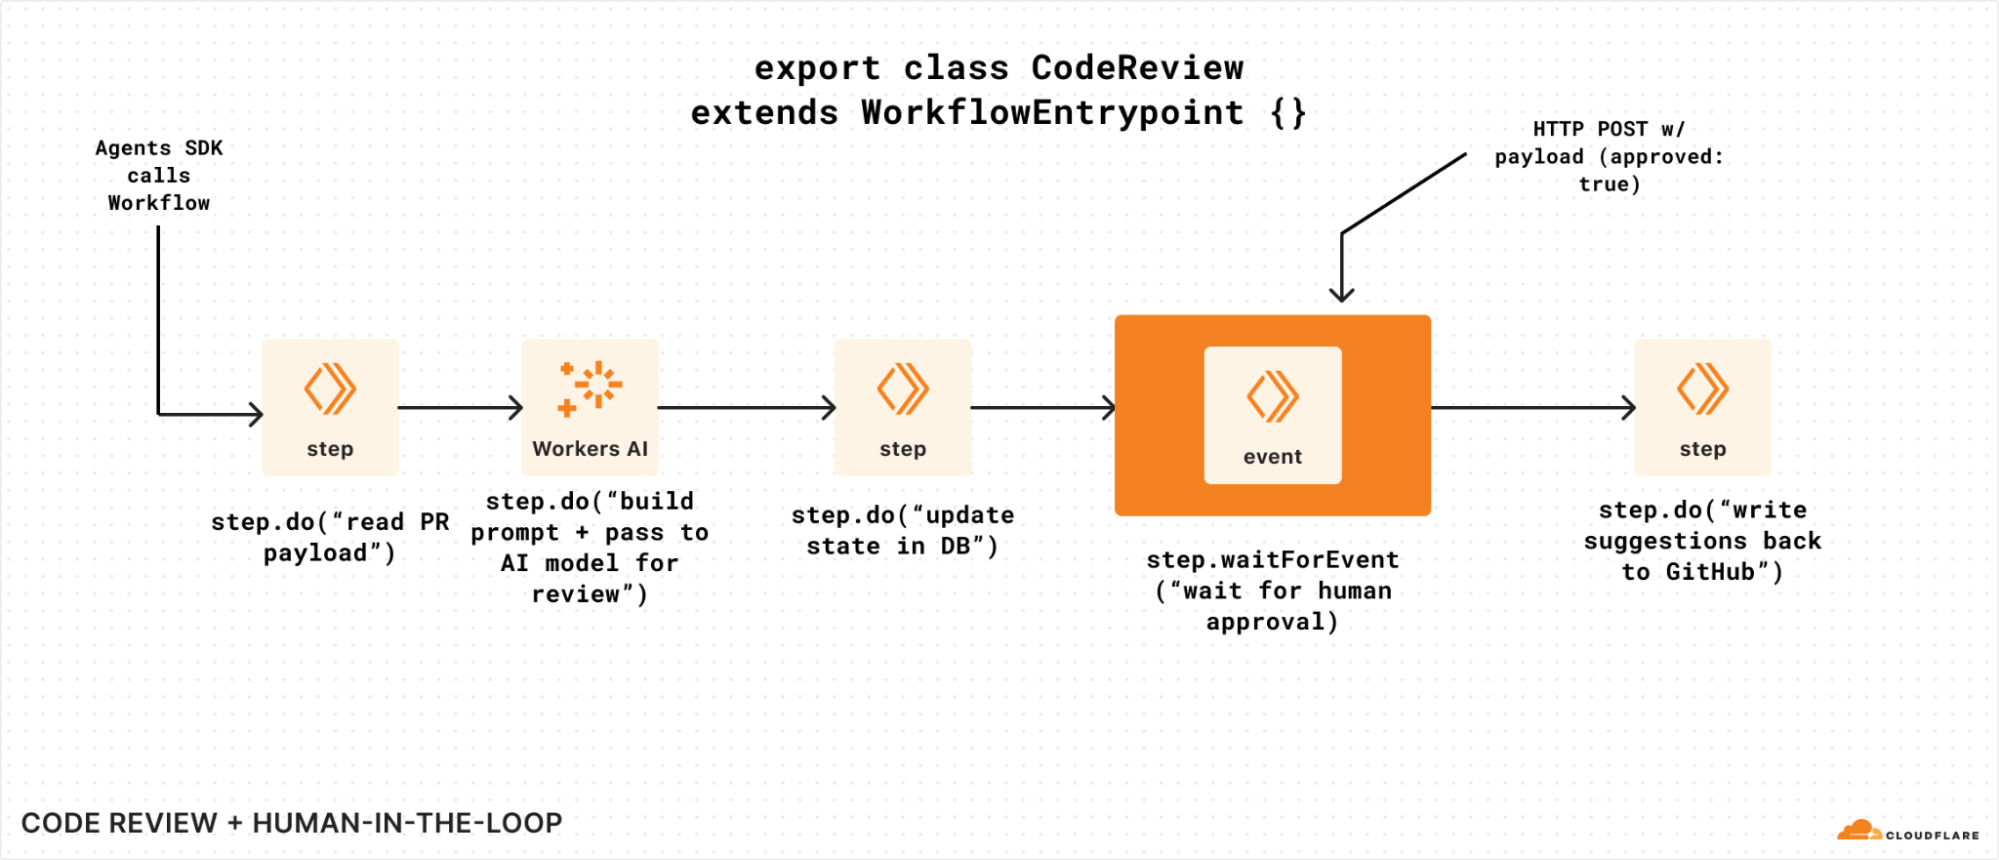
To visualize waitForEvent in a bit more detail, let’s assume we have a Workflow that is triggered by a code review agent that watches a GitHub repository.
Without the ability to wait on events, our Workflow can’t easily get human approval to write suggestions back (or even submit a PR of its own). It could potentially poll for some state that was updated, but that means we have to call step.sleep for arbitrary periods of time, poll a storage service for an updated value, and repeat if it’s not there. That’s a lot of code and room for error:
Without waitForEvent, it’s harder to send data to a Workflow instance that’s running
If we modified that same example to incorporate the new waitForEvent API, we could use it to wait for human approval before making a mutating change:
Adding waitForEvent to our code review Workflow, so it can seek explicit approval.
You could even imagine an AI agent itself sending and/or acting on behalf of a human here: waitForEvent simply exposes a way for a Workflow to retrieve and pause on something in the world to change before it continues (or not).
Critically, you can call waitForEvent just like any other step in Workflows: you can call it conditionally, and/or multiple times, and/or in a loop. Workflows are just Workers: you have the full power of a programming language and are not restricted by a domain specific language (DSL) or config language.
Pricing
Good news: we haven’t changed much since our original beta announcement! We’re adding storage pricing for state stored by your Workflows, and retaining our CPU-based and request (invocation) based pricing as follows:
Because the storage pricing is new, we will not actively bill for storage until September 15, 2025. We will notify users above the included 1 GB limit ahead of charging for storage, and by default, Workflows will expire stored state after three (3) days (Free plan) or thirty (30) days (Paid plan).
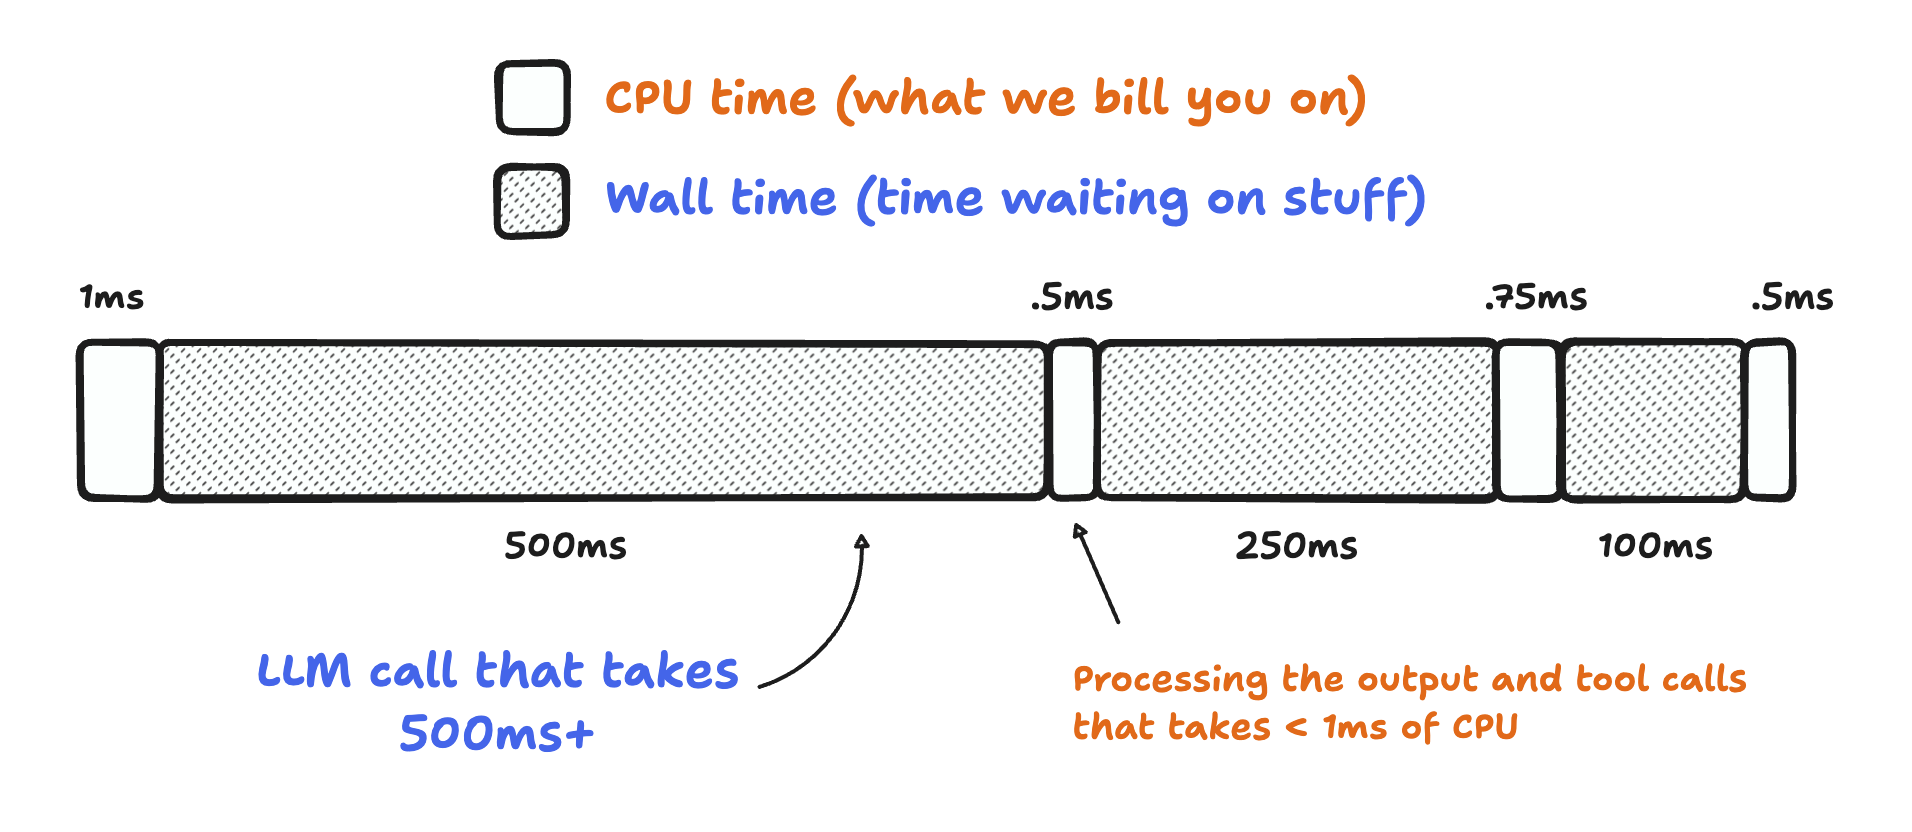
If you’re wondering what “CPU time” is here: it’s the time your Workflow is actively consuming compute resources. It doesn’t include time spent waiting on API calls, reasoning LLMs, or other I/O (like writing to a database). That might seem like a small thing, but in practice, it adds up: most applications have single digit milliseconds of CPU time, and multiple seconds of wall time: an API or two taking 100 – 250 ms to respond adds up!
Bill for CPU, not for time spent when a Workflow is idle or waiting.
Workflow engines, especially, tend to spend a lot of time waiting: reading data from object storage (like Cloudflare R2), calling third-party APIs or LLMs like o3-mini or Claude 3.7, even querying databases like D1, Postgres, or MySQL. With Workflows, just like Workers: you don’t pay for time your application is just waiting.
Start building
So you’ve got a good handle on Workflows, how it works, and want to get building. What next?
Workflows, Cloudflare’s durable execution engine that allows you to build reliable, repeatable multi-step applications that scale for you, is now in open beta. Any developer with a free or paid Workers plan can build and deploy a Workflow right now: no waitlist, no sign-up form, no fake line around-the-block.
Open the src/index.ts file, poke around, start extending it, and deploy it with a quick wrangler deploy.
If you want to learn more about how Workflows works, how you can use it to build applications, and how we built it, read on.
Workflows? Durable Execution?
Workflows—which we announced back during Developer Week earlier this year—is our take on the concept of “Durable Execution”: the ability to build and execute applications that are durable in the face of errors, network issues, upstream API outages, rate limits, and (most importantly) infrastructure failure.
As over 2.4 million developers continue to build applications on top of Cloudflare Workers, R2, and Workers AI, we’ve noticed more developers building multi-step applications and workflows that process user data, transform unstructured data into structured, export metrics, persist state as they progress, and automatically retry & restart. But writing any non-trivial application and making it durable in the face of failure is hard: this is where Workflows comes in. Workflows manages the retries, emitting the metrics, and durably storing the state (without you having to stand up your own database) as the Workflow progresses.
What makes Workflows different from other takes on “Durable Execution” is that we manage the underlying compute and storage infrastructure for you. You’re not left managing a compute cluster and hoping it scales both up (on a Monday morning) and down (during quieter periods) to manage costs, or ensuring that you have compute running in the right locations. Workflows is built on Cloudflare Workers — our job is to run your code and operate the infrastructure for you.
As an example of how Workflows can help you build durable applications, assume you want to post-process file uploads from your users that were uploaded to an R2 bucket directly via a pre-signed URL. That post-processing could involve multiple actions: text extraction via a Workers AI model, calls to a third-party API to validate data, updating or querying rows in a database once the file has been processed… the list goes on.
But what each of these actions has in common is that it could fail. Maybe that upstream API is unavailable, maybe you get rate-limited, maybe your database is down. Having to write extensive retry logic around each action, manage backoffs, and (importantly) ensure your application doesn’t have to start from scratch when a later step fails is more boilerplate to write and more code to test and debug.
What’s a step, you ask? The core building block of every Workflow is the step: an individually retriable component of your application that can optionally emit state. That state is then persisted, even if subsequent steps were to fail. This means that your application doesn’t have to restart, allowing it to not only recover more quickly from failure scenarios, but it can also avoid doing redundant work. You don’t want your application hammering an expensive third-party API (or getting you rate limited) because it’s naively retrying an API call that you don’t have to.
Notably, a Workflow can have hundreds of steps: one of the Rules of Workflows is to encapsulate every API call or stateful action within your application into its own step. Each step can also define its own retry strategy, automatically backing off, adding a delay and/or (eventually) giving up after a set number of attempts.
await step.do(
	'make a call to write that could maybe, just might, fail',
	// Define a retry strategy
	{
		retries: {
			limit: 5,
			delay: '5 seconds',
			backoff: 'exponential',
		},
		timeout: '15 minutes',
	},
	async () => {
		// Do stuff here, with access to the state from our previous steps
		if (Math.random() > 0.5) {
			throw new Error('API call to $STORAGE_SYSTEM failed');
		}
	},
);
To illustrate this further, imagine you have an application that reads text files from an R2 storage bucket, pre-processes the text into chunks, generates text embeddings using Workers AI, and then inserts those into a vector database (like Vectorize) for semantic search.
In the Workflows programming model, each of those is a discrete step, and each can emit state. For example, each of the four actions below can be a discrete step.do call in a Workflow:
Reading the files from storage and emitting the list of filenames
Chunking the text and emitting the results
Generating text embeddings
Upserting them into Vectorize and capturing the result of a test query
You can also start to imagine that some steps, such as chunking text or generating text embeddings, can be broken down into even more steps — a step per file that we chunk, or a step per API call to our text embedding model, so that our application is even more resilient to failure.
Steps can be created programmatically or conditionally based on input, allowing you to dynamically create steps based on the number of inputs your application needs to process. You do not need to define all steps ahead of time, and each instance of a Workflow may choose to conditionally create steps on the fly.
Building Cloudflare on Cloudflare
As the Cloudflare Developer platform continues to grow, almost all of our own products are built on top of it. Workflows is yet another example of how we built a new product from scratch using nothing but Workers and its vast catalog of features and APIs. This section of the blog has two goals: to explain how we built it, and to demonstrate that anyone can create a complex application or platform with demanding requirements and multiple architectural layers on our stack, too.
To understand how Workflows uses Workers & Durable Objects, here’s the high-level overview of our architecture:
There are three main blocks in this diagram:
The user-facing APIs are where the user interacts with the platform, creating and deploying new workflows or instances, controlling them, and accessing their state and activity logs. These operations can be executed through our public API gateway using REST calls, a Worker script using bindings, Wrangler (Cloudflare’s developer platform command line tool), or via the Dashboard user interface.
The managed platform holds the internal configuration APIs running on a Worker implementing a catalog of REST endpoints, the binding shim, which is supported by another dedicated Worker, every account controller, and their correspondent workflow engines, all powered by SQLite-backed Durable Objects. This is where all the magic happens and what we are sharing more details about in this technical blog.
Finally, there are the workflow instances, essentially independent clones of the workflow application. Instances are user account-owned and have a one-to-one relationship with a managed engine that powers them. You can run as many instances and engines as you want concurrently.
Let’s get into more detail…
Configuration API and Binding Shim
The Configuration API and the Binding Shim are two stateless Workers; one receives REST API calls from clients calling our API Gateway directly, using Wrangler, or navigating the Dashboard UI, and the other is the endpoint for the Workflows binding, an efficient and authenticated interface to interact with the Cloudflare Developer Platform resources from a Workers script.
The configuration API worker uses HonoJS and Zod to implement the REST endpoints, which are declared in an OpenAPI schema and exported to our API Gateway, thus adding our methods to the Cloudflare API catalog.
import { swaggerUI } from '@hono/swagger-ui';
import { createRoute, OpenAPIHono, z } from '@hono/zod-openapi';
import { Hono } from 'hono';
...
api.openapi(
createRoute({
method: 'get',
path: '/',
request: {
query: PaginationParams,
},
responses: {
200: {
content: {
'application/json': {
schema: APISchemaSuccess(z.array(WorkflowWithInstancesCountSchema)),
},
},
description: 'List of all Workflows belonging to a account.',
},
},
}),
async (ctx) => {
...
},
);
...
api.route('/:workflow_name', routes.workflows);
api.route('/:workflow_name/instances', routes.instances);
api.route('/:workflow_name/versions', routes.versions);
These Workers perform two different functions, but they share a large portion of their code and implement similar logic; once the request is authenticated and ready to travel to the next stage, they use the account ID to delegate the operation to a Durable Object called Account Controller.
// env.ACCOUNTS is the Account Controllers Durable Objects namespace
const accountStubId = c.env.ACCOUNTS.idFromName(accountId.toString());
const accountStub = c.env.ACCOUNTS.get(accountStubId);
As you can see, every account has its own Account Controller Durable Object.
Account Controllers
The Account Controller is a dedicated persisted database that stores the list of all the account’s workflows, versions, and instances. We scale to millions of account controllers, one per every Cloudflare account using Workflows, by leveraging the power of Durable Objects with SQLite backend.
Durable Objects (DOs) are single-threaded singletons that run in our data centers and are bound to a stateful storage API, in this case, SQLite. They are also Workers, just a special kind, and have access to all of our other APIs. This makes it easy to build consistent, highly available distributed applications with them.
Here’s what we get for free by using one Durable Object per Workflows account:
Sharding based on account boundaries aligns perfectly with the way we manage resources at Cloudflare internally. Also, due to the nature of DOs, there are other things that this model gets us for free: Not that we expect them, but eventual bugs or state inconsistencies during beta are confined to the affected account, and don’t impact everyone.
DO instances run close to the end user; Alice is in London and will call the config API through our LHR data center, while Bob is in Lisbon and will connect to LIS.
Because every account is a Worker, we can gradually upgrade them to new versions, starting with the internal users, thus derisking real customers.
Before SQLite, our only option was to use the Durable Object’s key-value storage API, but having a relational database at our fingertips and being able to create tables and do complex queries is a significant enabler. For example, take a look at how we implement the internal method getWorkflow():
async function getWorkflow(accountId: number, workflowName: string) {
  try {
    const res = this.ctx.storage.transactionSync(() => {
      const cursor = Array.from(
        this.ctx.storage.sql.exec(
          `
                    SELECT *,
                    (SELECT class_name
                        FROM   versions
                        WHERE  workflow_id = w.id
                        ORDER  BY created_on DESC
                        LIMIT  1) AS class_name
                    FROM   workflows w
                    WHERE  w.name = ?
                    `,
          workflowName
        )
      )[0] as Workflow;

      return cursor;
    });

    this.sendAnalytics(accountId, begin, "getWorkflow");
    return res as Workflow | undefined;
  } catch (err) {
    this.sendErrorAnalytics(accountId, begin, "getWorkflow");
    throw err;
  }
}
The other thing we take advantage of in Workflows is using the recently announced JavaScript-native RPC feature when communicating between components.
Before RPC, we had to fetch() between components, make HTTP requests, and serialize and deserialize the parameters and the payload. Now, we can async call the remote object’s method as if it was local. Not only does this feel more natural and simplify our logic, but it’s also more efficient, and we can take advantage of TypeScript type-checking when writing code.
This is how the Configuration API would call the Account Controller’s countWorkflows() method before:
The other powerful feature of our RPC system is that it supports passing not only Structured Cloneable objects back and forth but also entire classes. More on this later.
Let’s move on to Engine.
Engine and instance
Every instance of a workflow runs alongside an Engine instance. The Engine is responsible for starting up the user’s workflow entry point, executing the steps on behalf of the user, handling their results, and tracking the workflow state until completion.
When we started thinking about the Engine, we thought about modeling it after a state machine, and that was what our initial prototypes looked like. However, state machines require an ahead-of-time understanding of the userland code, which implies having a build step before running them. This is costly at scale and introduces additional complexity.
A few iterations later, we had another idea. What if we could model the engine as a game loop?
Unlike other computer programs, games operate regardless of a user’s input. The game loop is essentially a sequence of tasks that implement the game’s logic and update the display, typically one loop per video frame. Here’s an example of a game loop in pseudo-code:
while (game in running)
    check for user input
    move graphics
    play sounds
end while
Well, an oversimplified version of our Workflow engine would look like this:
while (last step not completed)
    iterate every step
       use memoized cache as response if the step has run already
       continue running step or timer if it hasn't finished yet
end while
A workflow is indeed a loop that keeps on going, performing the same sequence of logical tasks until the last step completes.
The Engine and the instance run hand-in-hand in a one-to-one relationship. The first is managed, and part of the platform. It uses SQLite and other platform APIs internally, and we can constantly add new features, fix bugs, and deploy new versions, while keeping everything transparent to the end user. The second is the actual account-owned Worker script that declares the Workflow steps.
For example, when someone passes a callback into step.do():
We switch execution over to the Engine. Again, this is possible because of the power of JS RPC. Besides passing Structured Cloneable objects back and forth, JS RPC allows us to create and pass entire application-defined classes that extend the built-in RpcTarget. So this is what happens behind the scenes when your Instance calls step.do() (simplified):
export class Context extends RpcTarget {

  async do<T>(name: string, callback: () => Promise<T>): Promise<T> {

    // First we check we have a cache of this step.do() already
    const maybeResult = await this.#state.storage.get(name);

    // We return the cache if it exists
    if (maybeValue) { return maybeValue; }

    // Else we run the user callback
    return doWrapper(callback);
  }

}
Here’s a more complete diagram of the Engine’s step.do() lifecycle:
Again, this diagram only partially represents everything we do in the Engine; things like logging for observability or handling exceptions are missing, and we don’t get into the details of how queuing is implemented. However, it gives you a good idea of how the Engine abstracts and handles all the complexities of completing a step under the hood, allowing us to expose a simple-to-use API to end users.
Also, it’s worth reiterating that every workflow instance is an Engine behind the scenes, and every Engine is an SQLite-backed Durable Object. This ensures that every instance runtime and state are isolated and independent of each other and that we can effortlessly scale to run billions of workflow instances, a solved problem for Durable Objects.
Durability
Durable Execution is all the rage now when we talk about workflow engines, and ours is no exception. Workflows are typically long-lived processes that run multiple functions in sequence where anything can happen. Those functions can time out or fail because of a remote server error or a network issue and need to be retried. A workflow engine ensures that your application runs smoothly and completes regardless of the problems it encounters.
Durability means that if and when a workflow fails, the Engine can re-run it, resume from the last recorded step, and deterministically re-calculate the state from all the successful steps’ cached responses. This is possible because steps are stateful and idempotent; they produce the same result no matter how many times we run them, thus not causing unintended duplicate effects like sending the same invoice to a customer multiple times.
We ensure durability and handle failures and retries by sharing the same technique we use for a step.sleep() that requires sleeping for days or months: a combination of using scheduler.wait(), a method of the upcoming WICG Scheduling API that we already support, and Durable Objects alarms, which allow you to schedule the Durable Object to be woken up at a time in the future.
These two APIs allow us to overcome the lack of guarantees that a Durable Object runs forever, giving us complete control of its lifecycle. Since every state transition through userland code persists in the Engine’s strongly consistent SQLite, we track timestamps when a step begins execution, its attempts (if it needs retries), and its completion.
This means that steps pending if a Durable Object is evicted — perhaps due to a two-month-long timer — get rerun on the next lifetime of the Engine (with its cache from the previous lifetime hydrated) that is triggered by an alarm set with the timestamp of the next expected state transition.
Real-life workflow, step by step
Let’s walk through an example of a real-life application. You run an e-commerce website and would like to send email reminders to your customers for forgotten carts that haven’t been checked out in a few days.
What would typically have to be a combination of a queue, a cron job, and querying a database table periodically can now simply be a Workflow that we start on every new cart:
import {
  WorkflowEntrypoint,
  WorkflowEvent,
  WorkflowStep,
} from "cloudflare:workers";
import { sendEmail } from "./legacy-email-provider";

type Params = {
  cartId: string;
};

type Env = {
  DB: D1Database;
};

export class Purchase extends WorkflowEntrypoint<Env, Params> {
  async run(
    event: WorkflowEvent<Params>,
    step: WorkflowStep
  ): Promise<unknown> {
    await step.sleep("wait for three days", "3 days");

    // Retrieve cart from D1
    const cart = await step.do("retrieve cart from database", async () => {
      const { results } = await this.env.DB.prepare(`SELECT * FROM cart WHERE id = ?`)
        .bind(event.payload.cartId)
        .all();
      return results[0];
    });

    if (!cart.checkedOut) {
      await step.do("send an email", async () => {
        await sendEmail("reminder", cart);
      });
    }
  }
}
This works great. However, sometimes the sendEmail function fails due to an upstream provider erroring out. While step.do automatically retries with a reasonable default configuration, we can define our settings:
The HTTP API makes it easy to trigger new instances of workflows from any system, even if it isn’t on Cloudflare, or from the command line. For example:
Wrangler goes one step further and gives us a friendlier set of commands to interact with workflows with fancy formatted outputs without needing to authenticate with tokens. Type npx wrangler workflows for help, or:
Furthermore, Workflows has first-party support in wrangler, and you can test your instances locally. A Workflow is similar to a regular WorkerEntrypoint in your Worker, which means that wrangler dev just naturally works.
❯ npx wrangler dev

 ⛅️ wrangler 3.82.0
----------------------------

Your worker has access to the following bindings:
- Workflows:
  - CART_WORKFLOW: EcommerceCartWorkflow
⎔ Starting local server...
[wrangler:inf] Ready on http://localhost:8787
╭───────────────────────────────────────────────╮
│  [b] open a browser, [d] open devtools        │
╰───────────────────────────────────────────────╯
Workflow APIs are also available as a Worker binding. You can interact with the platform programmatically from another Worker script in the same account without worrying about permissions or authentication. You can even have workflows that call and interact with other workflows.
import { WorkerEntrypoint } from "cloudflare:workers";

type Env = { DEMO_WORKFLOW: Workflow };
export default class extends WorkerEntrypoint<Env> {
  async fetch() {
    // Pass in a user defined name for this instance
    // In this case, we use the same as the cartId
    const instance = await this.env.DEMO_WORKFLOW.create({
      id: "f3bcc11b-2833-41fb-847f-1b19469139d1",
      params: {
          cartId: "f3bcc11b-2833-41fb-847f-1b19469139d1",
      }
    });
  }
  async scheduled() {
    // Restart errored out instances in a cron
    const instance = await this.env.DEMO_WORKFLOW.get(
      "f3bcc11b-2833-41fb-847f-1b19469139d1"
    );
    const status = await instance.status();
    if (status.error) {
      await instance.restart();
    }
  }
}
Observability
Having good observability and data on often long-lived asynchronous tasks is crucial to understanding how we’re doing under normal operation and, more importantly, when things go south, and we need to troubleshoot problems or when we are iterating on code changes.
We designed Workflows around the philosophy that there is no such thing as too much logging. You can get all the SQLite data for your workflow and its instances by calling the REST APIs. Here is the output of an instance:
As you can see, this is essentially a dump of the instance engine SQLite in JSON. You have the errors, messages, current status, and what happened with every step, all time stamped to the millisecond.
It’s one thing to get data about a specific workflow instance, but it’s another to zoom out and look at aggregated statistics of all your workflows and instances over time. Workflows data is available through our GraphQL Analytics API, so you can query it in aggregate and generate valuable insights and reports. In this example we ask for aggregated analytics about the wall time of all the instances of the “e-commerce-carts” workflow:
For convenience, you can evidently also use Wrangler to describe a workflow or an instance and get an instant and beautifully formatted response:
sid ~ npx wrangler workflows instances describe purchase-workflow latest

 ⛅️ wrangler 3.80.4

Workflow Name:         purchase-workflow
Instance Id:           d4280218-7756-41d2-bccd-8d647b82d7ce
Version Id:            0c07dbc4-aaf3-44a9-9fd0-29437ed11ff6
Status:                ✅ Completed
Trigger:               🌎 API
Queued:                14/10/2024, 16:25:17
Success:               ✅ Yes
Start:                 14/10/2024, 16:25:17
End:                   14/10/2024, 16:26:17
Duration:              1 minute
Last Successful Step:  wait for three days
Output:                false
Steps:

  Name:      wait for three days
  Type:      💤 Sleeping
  Start:     14/10/2024, 16:25:17
  End:       17/10/2024, 16:25:17
  Duration:  3 day
And finally, we worked really hard to get you the best dashboard UI experience when navigating Workflows data.
So, how much does it cost?
It’d be painful if we introduced a powerful new way to build Workers applications but made it cost prohibitive.
Workflows is priced just like Cloudflare Workers, where we introduced CPU-based pricing: only on active CPU time and requests, not duration (aka: wall time).
Workers Standard pricing model
This is especially advantageous when building the long-running, multi-step applications that Workflows enables: if you had to pay while your Workflow was sleeping, waiting on an event, or making a network call to an API, writing the “right” code would be at odds with writing affordable code.
There’s also no need to keep a Kubernetes cluster or a group of virtual machines running (and burning a hole in your wallet): we manage the infrastructure, and you only pay for the compute your Workflows consume.
What’s next?
Today, after months of developing the platform, we are announcing the open beta program, and we couldn’t be more excited to see how you will be using Workflows. Looking forward, we want to do things like triggering instances from queue messages and have other ideas, but at the same time, we are certain that your feedback will help us shape the roadmap ahead.
We hope that this blog post gets you thinking about how to use Workflows for your next application, but also that it inspires you on what you can build on top of Workers. Workflows as a platform is entirely built on top of Workers, its resources, and APIs. Anyone can do it, too.
If you’re an engineer, look for opportunities to work with us and help us improve Workflows or build other products.
The collective thoughts of the interwebz
Manage Consent
To provide the best experiences, we use technologies like cookies to store and/or access device information. Consenting to these technologies will allow us to process data such as browsing behavior or unique IDs on this site. Not consenting or withdrawing consent, may adversely affect certain features and functions.
Functional
Always active
The technical storage or access is strictly necessary for the legitimate purpose of enabling the use of a specific service explicitly requested by the subscriber or user, or for the sole purpose of carrying out the transmission of a communication over an electronic communications network.
Preferences
The technical storage or access is necessary for the legitimate purpose of storing preferences that are not requested by the subscriber or user.
Statistics
The technical storage or access that is used exclusively for statistical purposes.The technical storage or access that is used exclusively for anonymous statistical purposes. Without a subpoena, voluntary compliance on the part of your Internet Service Provider, or additional records from a third party, information stored or retrieved for this purpose alone cannot usually be used to identify you.
Marketing
The technical storage or access is required to create user profiles to send advertising, or to track the user on a website or across several websites for similar marketing purposes.