Post Syndicated from Sudhir Reddy Maddulapally original https://aws.amazon.com/blogs/security/new-iamctl-tool-compares-multiple-iam-roles-and-policies/
If you have multiple Amazon Web Services (AWS) accounts, and you have AWS Identity and Access Management (IAM) roles among those multiple accounts that are supposed to be similar, those roles can deviate over time from your intended baseline due to manual actions performed directly out-of-band called drift. As part of regular compliance checks, you should confirm that these roles have no deviations. In this post, we present a tool called IAMCTL that you can use to extract the IAM roles and policies from two accounts, compare them, and report out the differences and statistics. We will explain how to use the tool, and will describe the key concepts.
Prerequisites
Before you install IAMCTL and start using it, here are a few prerequisites that need to be in place on the computer where you will run it:
- Python 3.x
- Git
- AWS Command Line Interface (AWS CLI)
- Set up AWS CLI profiles for two accounts you want to compare, as described in Named Profiles.
To follow along in your environment, clone the files from the GitHub repository, and run the steps in order. You won’t incur any charges to run this tool.
Install IAMCTL
This section describes how to install and run the IAMCTL tool.
To install and run IAMCTL
- At the command line, enter the following command:
You will see output similar to the following.

Figure 1: IAMCTL tool installation output
- To confirm that your installation was successful, enter the following command.
You will see results similar to those in figure 2.

Figure 2: IAMCTL help message


Now that you’ve successfully installed the IAMCTL tool, the next section will show you how to use the IAMCTL commands.
Example use scenario
Here is an example of how IAMCTL can be used to find differences in IAM roles between two AWS accounts.
A system administrator for a product team is trying to accelerate a product launch in the middle of testing cycles. Developers have found that the same version of their application behaves differently in the development environment as compared to the QA environment, and they suspect this behavior is due to differences in IAM roles and policies.
The application called “app1” primarily reads from an Amazon Simple Storage Service (Amazon S3) bucket, and runs on an Amazon Elastic Compute Cloud (Amazon EC2) instance. In the development (DEV) account, the application uses an IAM role called “app1_dev” to access the S3 bucket “app1-dev”. In the QA account, the application uses an IAM role called “app1_qa” to access the S3 bucket “app1-qa”. This is depicted in figure 3.
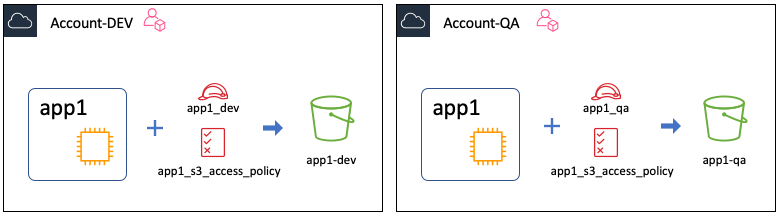
Figure 3: Showing the “app1” application in the development and QA accounts
Setting up the scenario
To simulate this setup for the purpose of this walkthrough, you don’t have to create the EC2 instance or the S3 bucket, but just focus on the IAM role, inline policy, and trust policy.
As noted in the prerequisites, you will switch between the two AWS accounts by using the AWS CLI named profiles “dev-profile” and “qa-profile”, which are configured to point to the DEV and QA accounts respectively.
Start by using this command:
The command creates a directory structure that looks like this:
Iamctl_test
|– qa
|– dev
Now, switch to the dev folder to run all the following example commands against the DEV account, by using this command:
To create the required policies, first create a file named “app1_s3_access_policy.json” and add the following policy to it. You will use this file’s content as your role’s inline policy.
Second, create a file called “app1_trust_policy.json” and add the following policy to it. You will use this file’s content as your role’s trust policy.
Now use the two files to create an IAM role with the name “app1_dev” in the account by using these command(s), run in the same order as listed here:
In the QA account, the IAM role is named “app1_qa” and the S3 bucket is named “app1-qa”.
Repeat the steps from the prior example against the QA account by changing dev to qa where shown in bold in the following code samples. Change the directory to qa by using this command:
To create the required policies, first create a file called “app1_s3_access_policy.json” and add the following policy to it.
Next, create a file, called “app1_trust_policy.json” and add the following policy.
Now, use the two files created so far to create an IAM role with the name “app1_qa” in your QA account by using these command(s), run in the same order as listed here:
So far, you have two accounts with an IAM role created in each of them for your application. In terms of permissions, there are no differences other than the name of the S3 bucket resource the permission is granted against.
You can expect IAMCTL to generate a minimal set of differences between the DEV and QA accounts, assuming all other IAM roles and policies are the same, but to be sure about the current state of both accounts, in IAMCTL you can run a process called baselining.
Through the process of baselining, you will generate an equivalency dictionary that represents all the known string patterns that reduce the noise in the generated deviations list, and then you will introduce a change into one of the IAM roles in your QA account, followed by a final IAMCTL diff to show the deviations.
Baselining
Baselining is the process of bringing two accounts to an “equivalence” state for IAM roles and policies by establishing a baseline, which future diff operations can leverage. The process is as simple as:
- Run the iamctl diff command.
- Capture all string substitutions into an equivalence dictionary to remove or reduce noise.
- Save the generated detailed files as a snapshot.
Now you can go through these steps for your baseline.
Go ahead and run the iamctl diff command against these two accounts by using the following commands.
The results of running the init command are shown in figure 4.
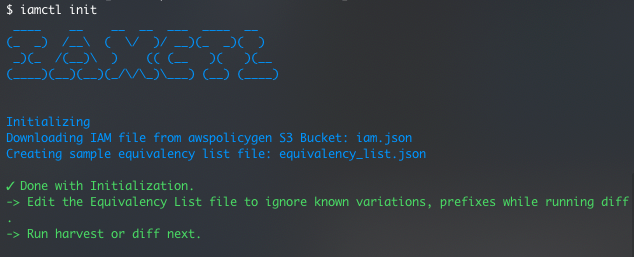
Figure 4: Output of the iamctl init command
If you look at the iamctl_test directory now, shown in figure 5, you can see that the init command created two files in the iamctl_test directory.
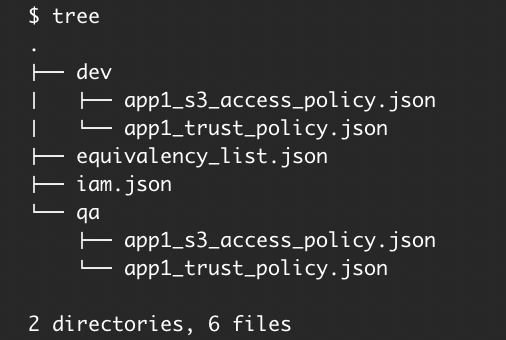
Figure 5: The directory structure after running the init command
These two files are as follows:
- iam.jsonA reference file that has all AWS services and actions listed, among other things. IAMCTL uses this to map the resource listed in an IAM policy to its corresponding AWS resource, based on Amazon Resource Name (ARN) regular expression.
- equivalency_list.jsonThe default sample dictionary that IAMCTL uses to suppress false alarms when it compares two accounts. This is where the known string patterns that need to be substituted are added.
Note: A best practice is to make the directory where you store the equivalency dictionary and from which you run IAMCTL to be a Git repository. Doing this will let you capture any additions or modifications for the equivalency dictionary by using Git commits. This will not only give you an audit trail of your historical baselines but also gives context to any additions or modifications to the equivalency dictionary. However, doing this is not necessary for the regular functioning of IAMCTL.
Next, run the iamctl diff command:
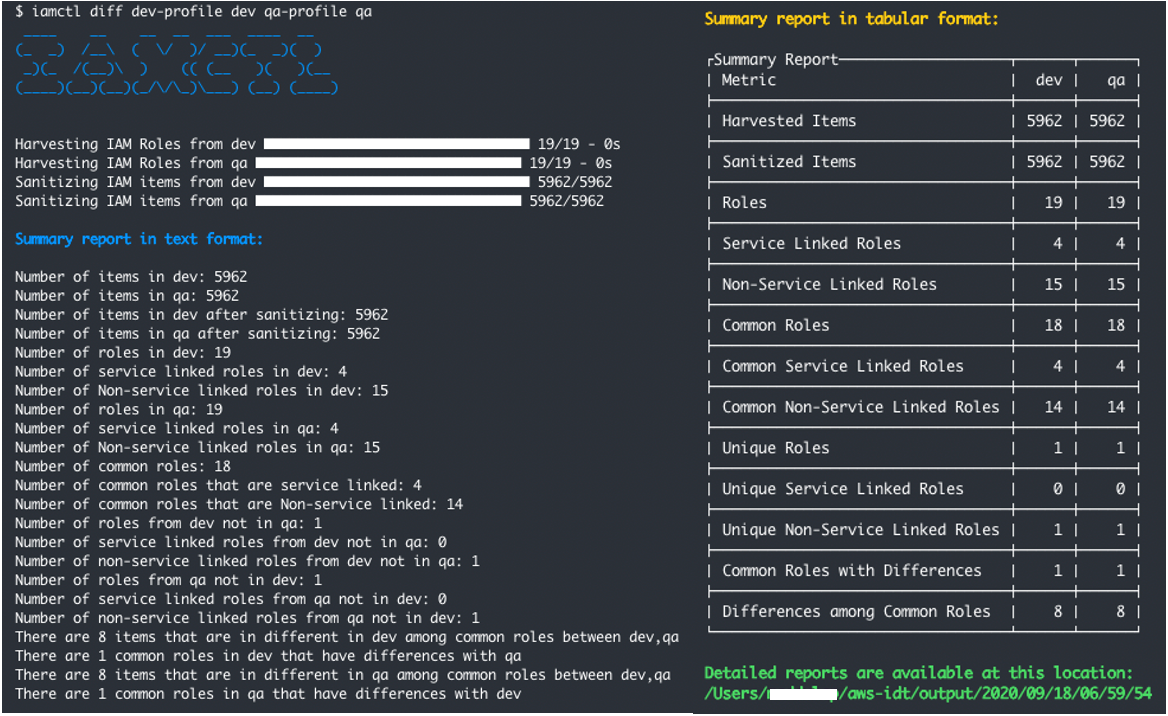
Figure 6: Result of diff command
Figure 6 shows the results of running the diff command. You can see that IAMCTL considers the app1_qa and app1_dev roles as unique to the DEV and QA accounts, respectively. This is because IAMCTL uses role names to decide whether to compare the role or tag the role as unique.
You will add the strings “dev” and “qa” to the equivalency dictionary to instruct IAMCTL to substitute occurrences of these two strings with “accountname” by adding the follow JSON to the equivalency_list.json file. You will also clean up some defaults already present in there.
Figure 7 shows the equivalency dictionary before you take these actions, and figure 8 shows the dictionary after these actions.
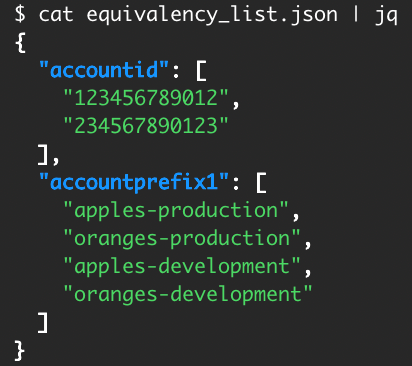
Figure 7: Equivalency dictionary before
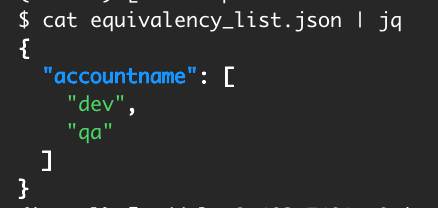
Figure 8: Equivalency dictionary after
There’s another thing to notice here. In this example, one common role was flagged as having a difference. To know which role this is and what the difference is, go to the detail reports folder listed at the bottom of the summary report. The directory structure of this folder is shown in figure 9.
Notice that the reports are created under your home directory with a folder structure that mimics the time stamp down to the second. IAMCTL does this to maintain uniqueness for each run.
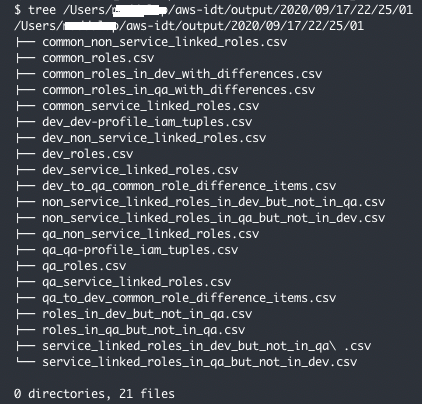
Figure 9: Files written to the output reports directory
You can see there is a file called common_roles_in_dev_with_differences.csv, and it lists a role called “AwsSecurity***Audit”.
You can see there is another file called dev_to_qa_common_role_difference_items.csv, and it lists the granular IAM items from the DEV account that belong to the “AwsSecurity***Audit” role as compared to QA, but which have differences. You can see that all entries in the file have the DEV account number in the resource ARN, whereas in the qa_to_dev_common_role_difference_items.csv file, all entries have the QA account number for the same role “AwsSecurity***Audit”.
Add both of the account numbers to the equivalency dictionary to substitute them with a placeholder number, because you don’t want this role to get flagged as having differences.
Now, re-run the diff command.
As you can see in figure 10, you get back the result of the diff command that shows that the DEV account doesn’t have any differences in IAM roles as compared to the QA account.
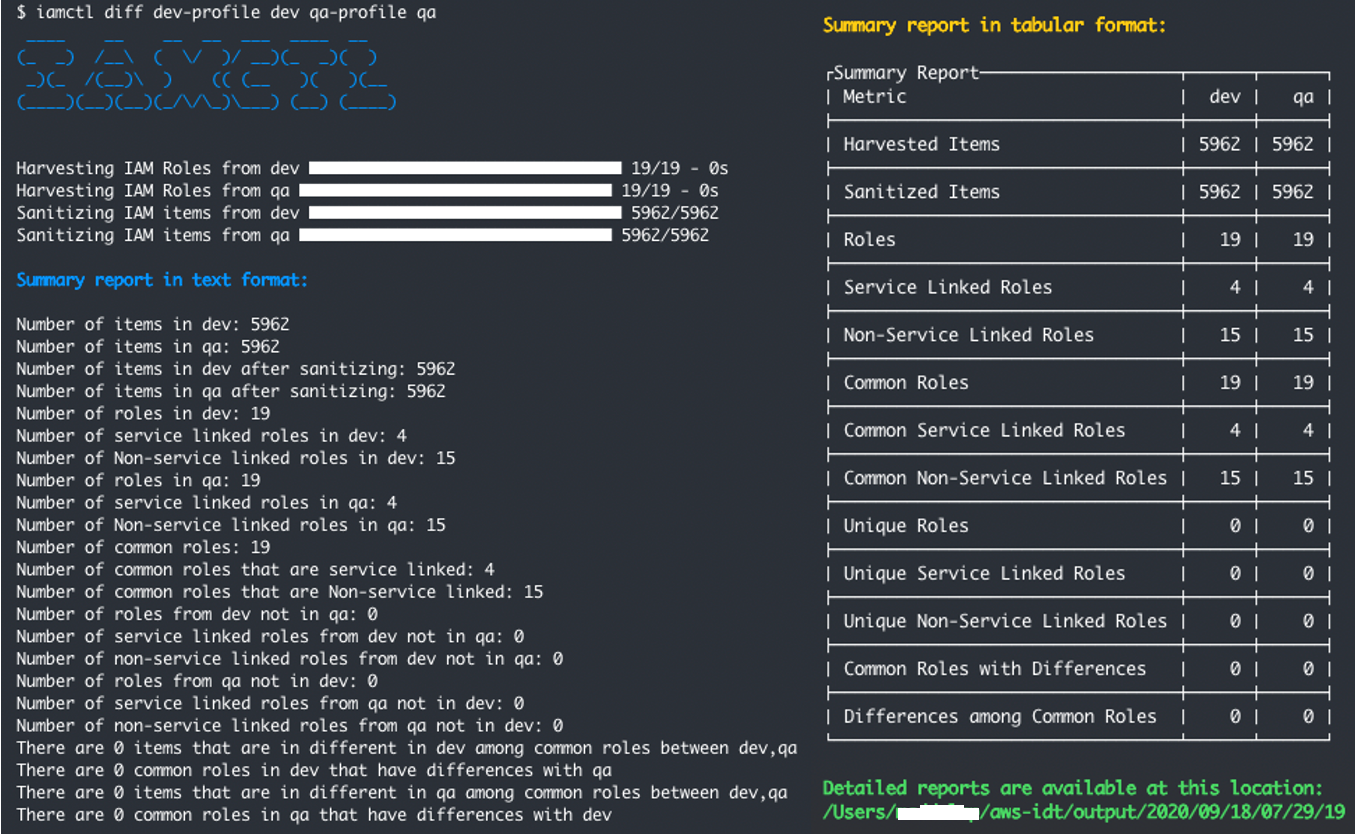
Figure 10: Output showing no differences after completion of baselining
This concludes the baselining for your DEV and QA accounts. Now you will introduce a change.
Introducing drift
Drift occurs when there is a difference in actual vs expected values in the definition or configuration of a resource. There are several reasons why drift occurs, but for this scenario you will use “intentional need to respond to a time-sensitive operational event” as a reason to mimic and introduce drift into what you have built so far.
To simulate this change, add “s3:PutObject” to the qa app1_s3_access_policy.json file as shown in the following example.
Put this new inline policy on your existing role “app1_qa” by using this command:
The following table represents the new drift in the accounts.
| Action | Account-DEV Role name: app1_dev |
Account-QA Role name: app1_qa |
| s3:Get* | Yes | Yes |
| s3:List* | Yes | Yes |
| s3: PutObject | No | Yes |
Next, run the iamctl diff command to see how it picks up the drift from your previously baselined accounts.
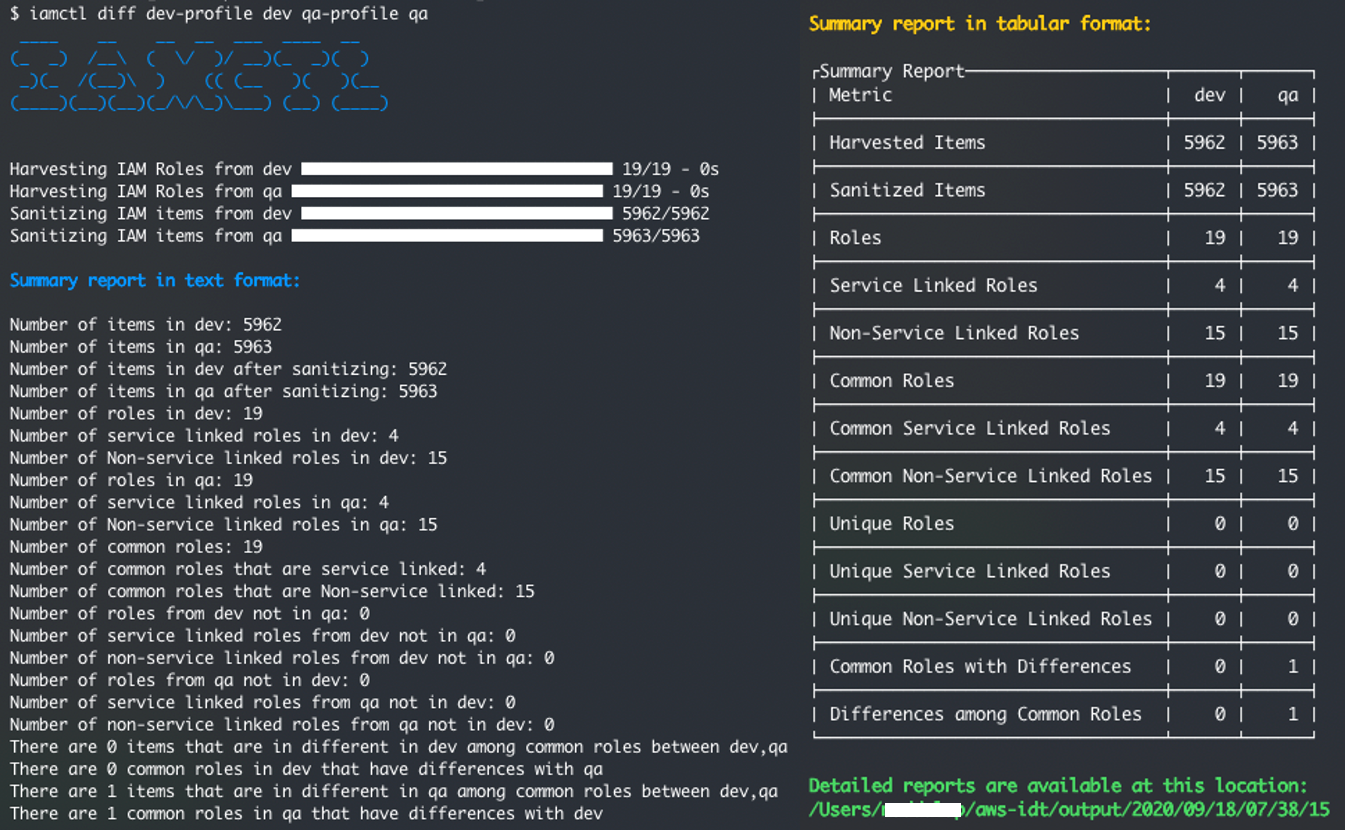
Figure 11: Output showing the one deviation that was introduced
You can see that IAMCTL now shows that the QA account has one difference as compared to DEV, which is what we expect based on the deviation you’ve introduced.
Open up the file qa_to_dev_common_role_difference_items.csv to look at the one difference. Again, adjust the following path example with the output from the iamctl diff command at the bottom of the summary report in Figure 11.
As shown in figure 12, you can see that the file lists the specific S3 action “PutObject” with the role name and other relevant details.

Figure 12: Content of file qa_to_dev_common_role_difference_items.csv showing the one deviation that was introduced
You can use this information to remediate the deviation by performing corrective actions in either your DEV account or QA account. You can confirm the effectiveness of the corrective action by re-baselining to make sure that zero deviations appear.
Conclusion
In this post, you learned how to use the IAMCTL tool to compare IAM roles between two accounts, to arrive at a granular list of meaningful differences that can be used for compliance audits or for further remediation actions. If you’ve created your IAM roles by using an AWS CloudFormation stack, you can turn on drift detection and easily capture the drift because of changes done outside of AWS CloudFormation to those IAM resources. For more information about drift detection, see Detecting unmanaged configuration changes to stacks and resources. Lastly, see the GitHub repository where the tool is maintained with documentation describing each of the subcommand concepts. We welcome any pull requests for issues and enhancements.
If you have feedback about this post, submit comments in the Comments section below. If you have questions about this post, start a new thread on the AWS IAM forum or contact AWS Support.
Want more AWS Security how-to content, news, and feature announcements? Follow us on Twitter.