Getting credentials for local development with AWS is now simpler and more secure. A new AWS Command Line Interface (AWS CLI) command, aws login, lets you start building immediately after signing up for AWS without creating and managing long-term access keys. You use the same sign-in method you already use for the AWS Management Console.
In this blog, we’ll show you how to get temporary credentials to your workstation for use with the AWS CLI, AWS Software Development Kits (AWS SDKs), and tools or applications built using them with the new aws login command.
Getting started with programmatic access to AWS
You can use the aws login command with your AWS Management Console sign-in method, as described in the following sections.
Scenario 1: Using IAM credentials (root or IAM user)
To obtain programmatic credentials using your root or IAM user username and password:
Install the latest AWS CLI (version 2.32.0 or later).
Run the aws login command.
If you have not set a default Region, the CLI prompts you to specify the AWS Region of your choice (e.g., us-east-2, eu-central-1). The CLI remembers which Region you set once you enter it into this prompt.
Figure 1: CLI Region prompt
The CLI opens your default browser.
Follow the instructions in the browser window:
If you have already signed into the AWS Management Console, you will see a screen that says, “Continue with an active session.”
Figure 2: Sign in to AWS – active session selection
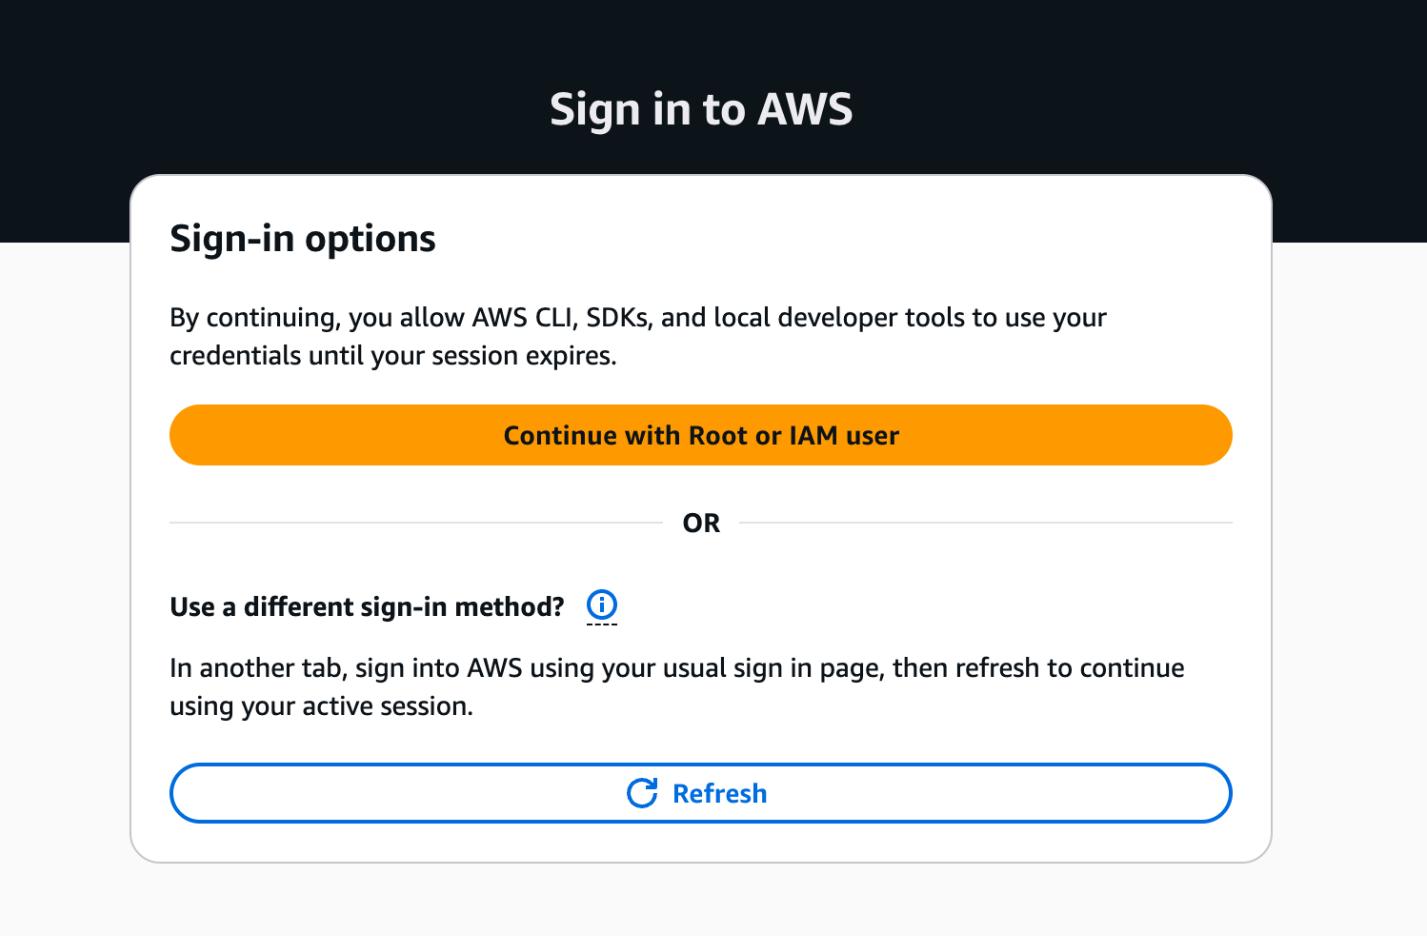
If you haven’t signed into the AWS Management Console, you will see the sign-in options page. Select “Continue with Root or IAM user” and log in to your AWS account.
Figure 3: AWS Sign in to AWS – Sign-in options
Success! You’re ready to run AWS CLI commands. Try the aws sts get-caller-identity command to verify the identity you’re currently using.
Figure 4: Sign in to AWS – completion
Scenario 2: Using federated sign-in
This scenario applies when you authenticate through your organization’s identity provider. To retrieve programmatic credentials for roles you assumed with federation:
Complete steps 1–4 from Scenario 1, then continue with the following instructions.
Follow the instructions in the browser window:
If you have already signed into the AWS Management Console, the browser provides you with the option to select your active IAM role session from federated sign-in to the console. This enables you to switch between 5 active AWS sessions if you have multi-session support enabled on your AWS Management Console.
Figure 5: Sign in to AWS – active IAM role session selection
If you have not signed into the AWS Management Console or want to get temporary credentials for a different IAM role, sign into your AWS account using your current authentication mechanism in another browser tab. Upon successful login, switch back to this tab and select the “Refresh” button. Your console session should now be available under the active sessions.
Return to the AWS CLI once you have successfully completed the aws login process.
Regardless of the console sign-in method you choose, the temporary credentials issued by the aws login command are automatically rotated by the AWS CLI, AWS Tools for PowerShell and AWS SDKs every 15 minutes. They are valid up to the set session duration of the IAM principal (maximum of 12 hours). After reaching the session duration limit, you will be prompted to log in again.
Figure 6: AWS Sign in – session expiration
Accessing AWS using local developer tools
The aws login command supports switching between multiple AWS accounts and roles using profiles. You can configure a profile with aws login --profile <PROFILE_NAME> and run AWS commands with the profile using: aws sts get-caller-identity --profile <PROFILE_NAME>. The short-term credentials issued by aws login work with more than the AWS CLI. You can also use them with:
AWS SDKs: If you use AWS SDKs for development, the SDK clients can use these temporary credentials to authenticate with AWS.
Remote development servers: Use aws login --remote on a remote server without browser access, to deliver temporary credentials from your device with browser access to the AWS console.
Older versions of AWS SDKs that do not support the new console credentials provider: Any software written using these older SDKs can support credentials delivered by aws login by using the credential_process provider with the AWS CLI.
Controlling access to aws login with IAM policies
The aws login command is controlled by two IAM actions: signin:AuthorizeOAuth2Access and signin:CreateOAuth2Token. Use the SignInLocalDevelopmentAccess managed policy or add these actions to your IAM policies to allow IAM users and IAM roles with console access to use this feature.
AWS Organizations customers looking to control the usage of this login feature on member accounts can deny the two actions above using Service Control Policies (SCPs). These IAM actions and their resources are usable in all relevant IAM policies.
AWS recommends using centralized root access management in AWS Organizations to eliminate long-term root credentials from member accounts. This feature allows security teams to perform privileged tasks through short-term, task-scoped root sessions from a central management account. After you enable centralized root management and delete root credentials on member accounts, root login to member accounts is denied, which also prevents programmatic access with root credentials using aws login. For developers using root credentials or IAM users, aws login delivers short-lived credentials to development tools, providing a secure alternative to long-term static access keys.
Logging and security of programmatic access using aws login
AWS Sign-In logs API activity through AWS CloudTrail, which now includes two new events specific to aws login. The service logs two new event names called AuthorizeOAuth2Access and CreateOauth2Token in the AWS Region where the user logs in.
Here’s a CloudTrail sample for an AuthorizeOAuth2Access event:
The aws login command uses the OAuth 2.0 authorization code flow with PKCE (Proof Key for Code Exchange) to protect against authorization code interception attacks. This provides a secure alternative to setting up IAM user access keys for getting started with development on AWS. For guidance on additional modern authentication approaches and alternatives to long-term IAM access keys, see the AWS Security Blog post “Beyond IAM access keys: Modern authentication approaches for AWS.”
Conclusion
The login for AWS local development feature is a secure-by-default enhancement that helps customers eliminate the use of long-term credentials for programmatic access with AWS. With aws login, you can start building immediately using the same credentials you use to sign in to the AWS Management Console. This feature is now available across all AWS commercial Regions (excluding China and GovCloud) at no additional cost to customers.
For more information, visit the authentication and access section in the CLI user guide.
If you have feedback about this post, submit comments in the Comments section below.
Amazon Web Services (AWS) is announcing the availability of universal macOS installers for the AWS Command Line Interface (AWS CLI) v2.
What’s new
Starting with AWS CLI v2 version 2.30.0, the AWS CLI installers will provide universal binary support for macOS that works natively on both Apple silicon and Intel processors with a single download. This eliminates the need for Rosetta translation, a compatibility layer that enables Intel-based applications to run on Apple silicon Macs.
Updating existing AWS CLI installations
If you’re using AWS CLI v2 on an Apple-silicon Mac, we recommend you upgrade to the latest version to install native binaries.
These changes only affect the official AWS CLI installers—building the AWS CLI from source will continue to natively support the host architecture.
Today, Amazon Q Developer introduces a new, interactive, agentic coding experience that is now available in the integrated development environments (IDE) for Visual Studio Code. This experience brings interactive coding capabilities, building upon existing prompt-based features. You now have a natural, real-time collaborative partner working alongside you while writing code, creating documentation, running tests, and reviewing changes.
Amazon Q Developer transforms how you write and maintain code by providing transparent reasoning for its suggestions and giving you the choice between automated modifications or step-by-step confirmation of changes. As a daily user of Amazon Q Developer command line interface (CLI) agent, I’ve experienced firsthand how Amazon Q Developer chat interface makes software development a more efficient and intuitive process. Having an AI-powered assistant only a q chat away in CLI has streamlined my daily development workflow, enhancing the coding process.
The new agentic coding experience in Amazon Q Developer in the IDE seamlessly interacts with your local development environment. You can read and write files directly, execute bash commands, and engage in natural conversations about your code. Amazon Q Developer comprehends your codebase context and helps complete complex tasks through natural dialog, maintaining your workflow momentum while increasing development speed.
To start, I select the Amazon Q icon in my IDE to open the chat interface. For this demonstration, I’ll create a web application that transforms Jupiter notebooks from the Amazon Nova sample repository into interactive applications.
I send the following prompt: In a new folder, create a web application for video and image generation that uses the notebooks from multimodal-generation/workshop-sample as examples to create the applications. Adapt the code in the notebooks to interact with models. Use existing model IDs
Amazon Q Developer then examines the files: the README file, notebooks, notes, and everything that is in the folder where the conversation is positioned. In our case it’s at the root of the repository.
After completing the repository analysis, Amazon Q Developer initiates the application creation process. Following the prompt requirements, it requests permission to execute the bash command for creating necessary folders and files.
With the folder structure in place, Amazon Q Developer proceeds to build the complete web application.
In a few minutes, the application is complete. Amazon Q Developer provides the application structure and deployment instructions, which can be converted into a README file upon request in the chat.
During my initial attempt to run the application, I encountered an error. I described it in Spanish using Amazon Q chat.
Amazon Q Developer responded in Spanish and gave me the solutions and code modifications in Spanish! I loved it!
After implementing the suggested fixes, the application ran successfully. Now I can create, modify, and analyze images and videos using Amazon Nova through this newly created interface.
The preceding images showcase my application’s output capabilities. Because I asked to modify the video generation code in Spanish, it gave me the message in Spanish.
Things to know Chatting in natural languages – Amazon Q Developer IDE supports many languages, including English, Mandarin, French, German, Italian, Japanese, Spanish, Korean, Hindi, and Portuguese. For detailed information, visit the Amazon Q Developer User Guide page.
Collaboration and understanding – The system examines your repository structure, files, and documentation while giving you the flexibility to interact seamlessly through natural dialog with your local development environment. This deep comprehension allows for more accurate and contextual assistance during development tasks.
Control and transparency – Amazon Q Developer provides continuous status updates as it works through tasks and lets you choose between automated code modifications or step-by-step review, giving you complete control over the development process.
Availability – Amazon Q Developer interactive, agentic coding experience is now available in the IDE for Visual Studio Code.
(This survey is hosted by an external company. AWS handles your information as described in the AWS Privacy Notice. AWS will own the data gathered via this survey and will not share the information collected with survey respondents.)
Command-line tools are meant to simplify infrastructure and DevOps workflows, but the reality is often the opposite. Instead of speeding things up, the vast array of commands, flags, and syntax turns the CLI into a puzzle. Tools meant to enhance productivity have developers endlessly tab-switching between searches, forums, and docs just to find basic commands.
Much like learning a new language, mastering the CLI involves navigating intricate and unfamiliar syntax. In the real world, we have translators to help bridge communication gaps—and now, there’s Amazon Q Developer to do the same for your CLI.
In this post, we’ll guide you through setting up Amazon Q Developer on your command line and demonstrate how it simplifies complex tasks.
To use Amazon Q Developer in your CLI, start by installing Amazon Q. Currently, Amazon Q’s CLI capability is only available for macOS and Linux users, so make sure you are on the right platform.
Once you have these prerequisites in place, you’re ready to see how Amazon Q Developer can simplify your CLI workflow. Let’s get started.
Transforming your CLI experience
Open a new terminal window, and type q translate, followed by a natural language prompt to execute a complex command. Amazon Q Developer will take your input and process it through a Large Language Model (LLM), generating the corresponding bash command.
Let’s start with something simple and fun: count down from 10 second by second in your terminal:
q translate “Count down from 10 second by second”
When you execute the command, you’ll see Amazon Q suggest an executable shell command with a few action items:
Execute command: executes the proposed command immediately
Edit command: allows you to modify the proposed command
Regenerate answer: proposes another command
Ask another question: allows you to enter a new prompt
Cancel: exits the session
For now, we can just execute the command and see it in action:
Building a website with AWS from the CLI
Now that we’ve covered the basics, let’s get our hands dirty with something practical. In this tutorial, we’ll walk through creating a static website hosted on AWS, entirely using the command line.
Step 1: Create an S3 Bucket to Host the Website
Amazon S3 is great for static website hosting. First, we need to create an S3 bucket to store our website files. We can simply instruct Amazon Q Developer to “create an S3 bucket called ‘ai-generated-bucket’ on us-west-2”:
Note: that if you already have a bucket with the same name, feel free to change it to something else.
We can see that Amazon Q Developer has correctly generated the command:
If you see something that’s not quite right, you can try to “Edit command” or “Regenerate answer”. For now, we can just execute that generated command and verify in the AWS S3 console that the S3 bucket has indeed been created.
Step 2: Create an HTML File with “Hello World”
Now, we need to upload a basic HTML file to the bucket. Instead of manually writing it, we can let Amazon Q Developer guide us. Prompt:
q translate "Create a simple index.html file with 'Hello World' message"
Amazon Q Developer is suggesting echo '<h1>Hello World</h1>' > index.html, which looks good. We can go ahead execute that command.
Step 3: Upload the HTML File to S3
Now, we’ll upload the index.html file to the S3 bucket:
q translate "Upload index.html to the 'ai-generated-bucket' S3 bucket"
After executing the command, we can check on the Amazon S3 console to see we have successfully uploaded the index.html file to our bucket.
Step 4: Set up CloudFront distribution
By default, Amazon S3 blocks public access to your account and buckets. We recommend keeping Block Public Access enabled for production use cases and securely serve your site through Amazon CloudFront, a global Content Delivery Network (CDN) that securely delivers your content with low latency and high transfer speeds, making it ideal for hosting static websites.
Use Amazon Q Developer to create a CloudFront distribution for your S3 bucket:
q translate "Create a CloudFront distribution for my S3 bucket 'ai-generated-bucket'"
Hmm, that doesn’t look right. Amazon Q Developer is trying to supply —distribution-config with an unspecified configuration file. To fix this, you can either manually provide the CloudFront distribution configuration or we can push the limit of what Amazon Q Developer can do.
Let’s try to refine our prompt so that we don’t use the --distribution-config flag:
q translate "Create a CloudFront distribution for my S3 bucket 'ai-generated-bucket' without using the ‘—distribution-config' flag"
Much better! Looks like we need to replace the ‘X’s with an actual origin domain name. In our case, the S3 bucket origin uses the following format:
bucket-name.s3.amazonaws.com
Navigate to and toggle the Edit command option on your CLI, and replace the ‘X’s. In our case, the replacement value would be ai-generated-bucket.s3.amazonaws.com. Execute the command, and upon success, you should be able to see the CloudFront configuration printed on the console:
Copy the “Id” from the output, we will need it for the next step.
Step 5: Preparing for public access
We want to set index.html as our default root object for the CloudFront distribution we just created, this will ensure that when users access your website’s root URL, CloudFront automatically serves the index.html file without requiring the user to explicitly specify it in the URL.
q translate "Update my CloudFront distribution CLOUDFRONT_ID to have 'index.html' as default root object without using the --distribution-config flag"
Don’t forget to replace CLOUDFRONT_ID with the Id you retrieved from the previous step. Once you execute that command, you should see the CloudFront configuration printed on the console like the step above.
Now, to securely serve our HTML file to the public, we need to perform the following:
q translate "Create an OAC named 'ai-generated-oac' for my CloudFront distribution CLOUDFRONT_ID"
When we execute the command, we get an error saying:
An error occurred (MalformedXML) when calling the CreateOriginAccessControl operation: 1 validation error detected: Value 'origin-access-identity' at 'originAccessControlConfig.originAccessControlOriginType' failed to satisfy constraint: Member must satisfy enum value set: [s3, lambda, mediastore, mediapackagev2]
It might be difficult to debug this error message without consulting the internet. Luckily, Amazon Q Developer offers another powerful capability, q chat, which is like a chatbot in your terminal. Let’s try it out to troubleshoot:
q chat "@history An error occurred (MalformedXML) when calling the CreateOriginAccessControl operation: 1 validation error detected: Value 'origin-access-identity' at 'originAccessControlConfig.originAccessControlOriginType' failed to satisfy constraint: Member must satisfy enum value set: [s3, lambda, mediastore, mediapackagev2]. Help me resolve this error"
Note that I included @history in the prompt to pass our shell history to Amazon Q so it can respond based on the context provided.
We get a detailed AI generated response on our terminal with step by step instructions and citations! By using the @history tag, Amazon Q Developer knows to relate the error message to the correct shell command we executed (we can see that it knows we want to create an OAC with name ai-generated-oac without us explicitly telling it so).
Take a note of the Id field, we will need it later.
We can now ask q chat about how to attach the generated OAC to our CloudFront distribution:
q chat "@history Update my CloudFront distribution CLOUDFRONT_ID with the OAC we just generated, be specific"
Notice how @history even helps Amazon Q fill in CLOUDFRONT_ID for me!
We just need to follow the instruction and once we completed the last step, we should see an updated CloudFront distribution in our console output:
It shows a “Status” of “InProgress”. To proceed to the next step, we will need to wait for CloudFront to finish deployment. Let’s ask Amazon Q Developer how to get the latest status:
q translate "Get the status of my CloudFront distribution with CLOUDFRONT_ID on us-west-2"
Replace $CLOUDFRONT_ID with your own and execute the command to get the latest status. It might take a few minutes, it’s time to grab a coffee or go for a short walk!
Once the status is Deployed, we can go ahead and update our S3 bucket policy to give public read access to our CloudFront distribution:
You can see we are using a very vague prompt but @history made sure that Amazon Q has enough context to generate helpful responses.
Simply follow the instruction and we’re ready to access the site!
Step 6: Access the site
Let’s get the public URL of our CloudFront distribution.
Once you get the URL, you can open it in a browser, and it should show “Hello World”!
Conclusion
In this post, we’ve successfully:
Created an S3 bucket to host our website files
Generated a simple HTML file with a “Hello World” message
Uploaded the HTML file to our S3 bucket
Created a CloudFront distribution to serve our website securely
Set up an Origin Access Control (OAC) for our CloudFront distribution
Updated our S3 bucket policy to allow access from CloudFront
Accessed our website through the CloudFront URL
All of these steps were accomplished on our terminal using Amazon Q Developer on the CLI.
You’ve seen how effortlessly complex CLI commands can be translated into natural language, making AWS more accessible than ever. But this is just the start. As your needs grow, Amazon Q scales with you, delivering faster deployments, enhanced productivity, and seamless access to the full AWS ecosystem.
We encourage you to explore AWS services you haven’t yet tried, with Amazon Q Developer simplifying the process every step of the way. Let it streamline your workflow and unlock new opportunities to innovate and grow.
Building with AWS requires you to interact with and manipulate your AWS resources, whether it’s to manage infrastructure, deploy applications, or troubleshoot issues and many AWS customers use AWS Cloud9 to do so today. However, developers want the ability to work with AWS resources within their own Integrated Development Environment (IDE) because it allows them to streamline their workflows and leverage familiar tools. Other customers still want the security and flexibility of working with their resources in the AWS Management Console, but with quicker access and portability across different pages. In this blog, we will discuss two solutions, the AWS IDE Toolkits and AWS CloudShell, and why you may want to migrate from AWS Cloud9 to one of these solutions.
Overview
The AWS IDE Toolkits are a set of open-source plugins that integrate AWS services directly into popular IDEs like Visual Studio Code, IntelliJ, and PyCharm. With these toolkits, you can manage AWS resources, deploy applications, and debug code without leaving your familiar development environment. Key features of the AWS IDE Toolkits include seamless access to AWS services, resource exploration and management, local debugging capabilities, and integration with AWS deployment tools like AWS CloudFormation and AWS SAM. The AWS IDE Toolkits saves you the hassle of deploying and managing an AWS Cloud9 EC2 instance in your account and allows you to interact with AWS services in the context of your IDE’s source code.
AWS CloudShell is a browser-based shell available directly in the AWS Management Console that provides a pre-authenticated and pre-configured environment for running interacting with AWS resources. AWS CLI is pre-installed in the AWS CloudShell environment, eliminating the need for you to install and configure the AWS CLI locally, making it easier to interact with AWS resources from anywhere. You can use AWS CloudShell to check or adjust a configuration file, make a quick fix to a production environment, or even experiment with new AWS services or features. Best of all, usage of AWS CloudShell is free. CloudShell’s accessibility from anywhere in the AWS Management Console makes it an ideal alternative when you want to interact with AWS resources via the command line over the web because you have limitations doing so on your local desktop.
Getting started
If you’re interested in leveraging the AWS IDE Toolkits, the onboarding process is straightforward. In many popular IDE’s like Visual Studio Code, you can simply install the AWS Toolkits extension in the IDE’s extension marketplace and authenticate with your AWS credentials to begin taking advantage of all of the AWS Toolkits features. For more detailed information about installation, you can see the onboarding steps for each supported IDE. To begin using AWS CloudShell, simply click the CloudShell icon in the AWS Management Console and follow the prompts to launch your shell environment. CloudShell leverages the credentials from your AWS Management Console sessions to provide a pre-authenticated shell environment. You can also explore detailed user guides and sample use cases to help you get familiar with the tool.
Figure 1: Click on the AWS CloudShell icon
Summary
Both the AWS IDE Toolkits and AWS CloudShell offer powerful capabilities for interacting with AWS resources. Whether you prefer working within your local IDE or a web-based terminal directly in the AWS Management Console, these solutions provide a seamless and efficient way to manage your AWS infrastructure and applications. Take the time to explore these options and see how they can enhance your development workflows. Finally, don’t forget to delete your AWS Cloud9 EC2 instances once you migrate to avoid incurring unnecessary future costs.
Amazon Simple Email Service (SES) is a cloud-based email sending service that helps businesses and developers send marketing and transactional emails. We introduced the SESv1 API in 2011 to provide developers with basic email sending capabilities through Amazon SES using HTTPS. In 2020, we introduced the redesigned Amazon SESv2 API, with new and updated features that make it easier and more efficient for developers to send email at scale.
This post will compare Amazon SESv1 API and Amazon SESv2 API and explain the advantages of transitioning your application code to the SESv2 API. We’ll also provide examples using the AWS Command-Line Interface (AWS CLI) that show the benefits of transitioning to the SESv2 API.
Amazon SESv1 API
The SESv1 API is a relatively simple API that provides basic functionality for sending and receiving emails. For over a decade, thousands of SES customers have used the SESv1 API to send billions of emails. Our customers’ developers routinely use the SESv1 APIs to verify email addresses, create rules, send emails, and customize bounce and complaint notifications. Our customers’ needs have become more advanced as the global email ecosystem has developed and matured. Unsurprisingly, we’ve received customer feedback requesting enhancements and new functionality within SES. To better support an expanding array of use cases and stay at the forefront of innovation, we developed the SESv2 APIs.
While the SESv1 API will continue to be supported, AWS is focused on advancing functionality through the SESv2 API. As new email sending capabilities are introduced, they will only be available through SESv2 API. Migrating to the SESv2 API provides customers with access to these, and future, optimizations and enhancements. Therefore, we encourage SES customers to consider the information in this blog, review their existing codebase, and migrate to SESv2 API in a timely manner.
Amazon SESv2 API
Released in 2020, the SESv2 API and SDK enable customers to build highly scalable and customized email applications with an expanded set of lightweight and easy to use API actions. Leveraging insights from current SES customers, the SESv2 API includes several new actions related to list and subscription management, the creation and management of dedicated IP pools, and updates to unsubscribe that address recent industry requirements.
One example of new functionality in SESv2 API is programmatic support for the SES Virtual Delivery Manager. Previously only addressable via the AWS console, VDM helps customers improve sending reputation and deliverability. SESv2 API includes vdmAttributes such as VdmEnabled and DashboardAttributes as well as vdmOptions. DashboardOptions and GaurdianOptions.
To improve developer efficiency and make the SESv2 API easier to use, we merged several SESv1 APIs into single commands. For example, in the SESv1 API you must make separate calls for createConfigurationSet, setReputationMetrics, setSendingEnabled, setTrackingOptions, and setDeliveryOption. In the SESv2 API, however, developers make a single call to createConfigurationSet and they can include trackingOptions, reputationOptions, sendingOptions, deliveryOptions. This can result in more concise code (see below).
Another example of SESv2 API command consolidation is the GetIdentity action, which is a composite of SESv1 API’s GetIdentityVerificationAttributes, GetIdentityNotificationAttributes, GetCustomMailFromAttributes, GetDKIMAttributes, and GetIdentityPolicies. See SESv2 documentation for more details.
Why migrate to Amazon SESv2 API?
The SESv2 API offers an enhanced experience compared to the original SESv1 API. Compared to the SESv1 API, the SESv2 API provides a more modern interface and flexible options that make building scalable, high-volume email applications easier and more efficient. SESv2 enables rich email capabilities like template management, list subscription handling, and deliverability reporting. It provides developers with a more powerful and customizable set of tools with improved security measures to build and optimize inbox placement and reputation management. Taken as a whole, the SESv2 APIs provide an even stronger foundation for sending critical communications and campaign email messages effectively at a scale.
Migrating your applications to SESv2 API will benefit your email marketing and communication capabilities with:
New and Enhanced Features: Amazon SESv2 API includes new actions as well as enhancements that provide better functionality and improved email management. By moving to the latest version, you’ll be able to optimize your email sending process. A few examples include:
Increase the maximum message size (including attachments) from 10Mb (SESv1) to 40Mb (SESv2) for both sending and receiving.
Access key actions for the SES Virtual Deliverability Manager (VDM) which provides insights into your sending and delivery data. VDM provides near-realtime advice on how to fix the issues that are negatively affecting your delivery success rate and reputation.
Meet Google & Yahoo’s June 2024 unsubscribe requirements with the SES v2 SendEmail action. For more information, see the “What’s New blog”
Future-proof Your Application: Avoid potential compatibility issues and disruptions by keeping your application up-to-date with the latest version of the Amazon SESv2 API via the AWS SDK.
Improve Usability and Developer Experience: Amazon SESv2 API is designed to be more user-friendly and consistent with other AWS services. It is a more intuitive API with better error handling, making it easier to develop, maintain, and troubleshoot your email sending applications.
Migrating to the latest SESv2 API and SDK positions customers for success in creating reliable and scalable email services for their businesses.
What does migration to the SESv2 API entail?
While SESv2 API builds on the v1 API, the v2 API actions don’t universally map exactly to the v1 API actions. Current SES customers that intend to migrate to SESv2 API will need to identify the SESv1 API actions in their code and plan to refactor for v2. When planning the migration, it is essential to consider several important considerations:
Customers with applications that receive email using SESv1 API’s CreateReceiptFilter, CreateReceiptRule or CreateReceiptRuleSet actions must continue using the SESv1 API client for these actions. SESv1 and SESv2 can be used in the same application, where needed.
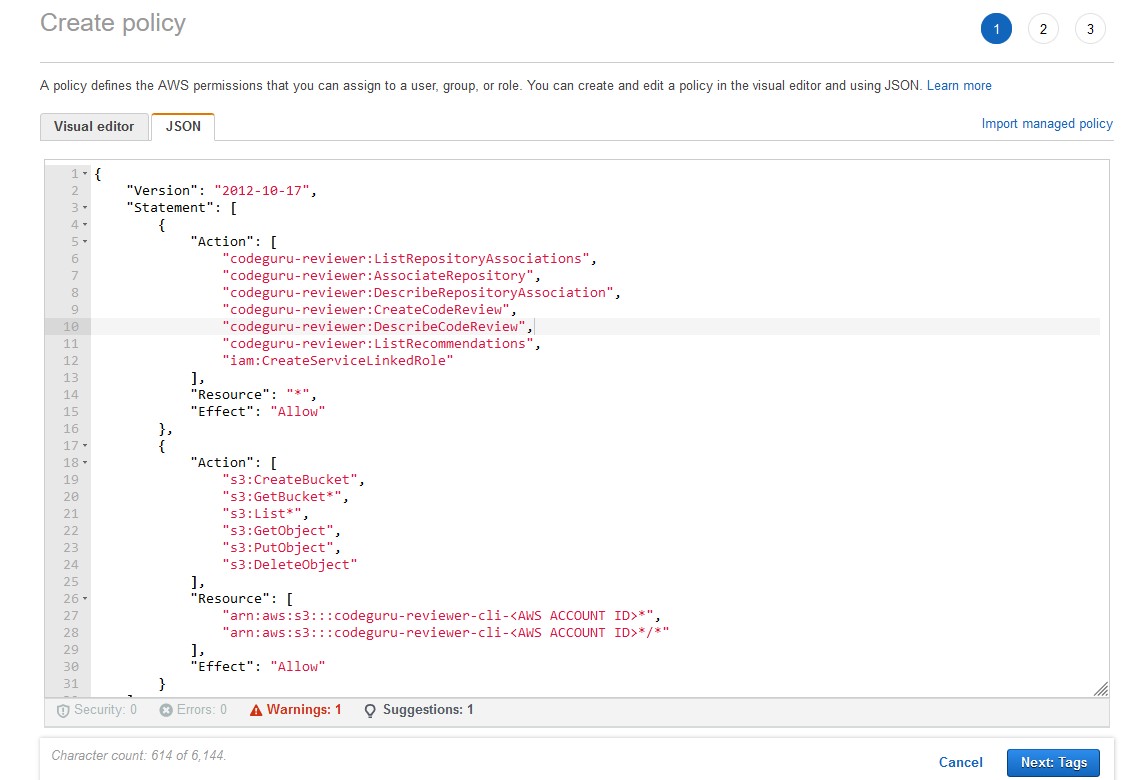
We recommend all customers follow the security best practice of “least privilege” with their IAM policies. As such, customers may need to review and update their policies to include the new and modified API actions introduced in SESv2 before migrating. Taking the time to properly configure permissions ensures a seamless transition while maintaining a securely optimized level of access. See documentation.
Below is an example of an IAM policy with a user with limited allow privileges related to several SESv1 Identity actions only:
When calling delete- with SESv1, SES returns 200 (or no response), even if the identity was previously deleted or doesn’t exist:
aws ses delete-identity --identity example.com
SESv2 provides better error handling and responses when calling the delete API:
aws sesv2 delete-email-identity --email-identity example.com

An error occurred (NotFoundException) when calling the DeleteEmailIdentity operation: Email identity example.com does not exist.
Hands-on with SESv1 API vs. SESv2 API
Below are a few examples you can use to explore the differences between SESv1 API and the SESv2 API. To complete these exercises, you’ll need:
AWS Account (setup) with enough permission to interact with the SES service via the CLI
SES enabled, configured and properly sending emails
A recipient email address with which you can check inbound messages (if you’re in the SES Sandbox, this email must be verified email identity). In the following examples, replace [email protected] with the verified email identity.
Your preferred IDE with AWS credentials and necessary permissions (you can also use AWS CloudShell)
Open the AWS CLI (or AWS CloudShell) and:
Create a test directory called v1-v2-test.
Create the following (8) files in the v1-v2-test directory:
destination.json (replace [email protected] with the verified email identity):
{
   "Subject": {
       "Data": "SESv1 API email sent using the AWS CLI",
       "Charset": "UTF-8"
   },
   "Body": {
       "Text": {
           "Data": "This is the message body from SESv1 API in text format.",
           "Charset": "UTF-8"
       },
       "Html": {
           "Data": "This message body from SESv1 API, it contains HTML formatting. For example - you can include links: <a class=\"ulink\" href=\"http://docs.aws.amazon.com/ses/latest/DeveloperGuide\" target=\"_blank\">Amazon SES Developer Guide</a>.",
           "Charset": "UTF-8"
       }
   }
}
ses-v1-raw-message.json (replace [email protected] with the verified email identity):
{
     "Data": "From: [email protected]\nTo: [email protected]\nSubject: Test email sent using the SESv1 API and the AWS CLI \nMIME-Version: 1.0\nContent-Type: text/plain\n\nThis is the message body from the SESv1 API SendRawEmail.\n\n"
}
ses-v1-template.json (replace [email protected] with the verified email identity):
my-template.json (replace [email protected] with the verified email identity):
{
  "Template": {
    "TemplateName": "my-template",
    "SubjectPart": "Greetings SES Developer, {{name}}!",
    "HtmlPart": "<h1>Hello {{name}},</h1><p>Your favorite animal is {{favoriteanimal}}.</p>",
    "TextPart": "Dear {{name}},\r\nYour favorite animal is {{favoriteanimal}}."
  }
}
ses-v2-simple.json (replace [email protected] with the verified email identity):
{
    "FromEmailAddress": "[email protected]",
    "Destination": {
        "ToAddresses": [
            "[email protected]"
        ]
    },
    "Content": {
        "Simple": {
            "Subject": {
                "Data": "SESv2 API email sent using the AWS CLI",
                "Charset": "utf-8"
            },
            "Body": {
                "Text": {
                    "Data": "SESv2 API email sent using the AWS CLI",
                    "Charset": "utf-8"
                }
            },
            "Headers": [
                {
                    "Name": "List-Unsubscribe",
                    "Value": "insert-list-unsubscribe-here"
                },
				{
                    "Name": "List-Unsubscribe-Post",
                    "Value": "List-Unsubscribe=One-Click"
                }
            ]
        }
    }
}
ses-v2-raw.json (replace [email protected] with the verified email identity):
{
     "FromEmailAddress": "[email protected]",
     "Destination": {
            "ToAddresses": [
                       "[email protected]"
              ]
       },
      "Content": {
             "Raw": {
                     "Data": "Subject: Test email sent using SESv2 API via the AWS CLI \nMIME-Version: 1.0\nContent-Type: text/plain\n\nThis is the message body from SendEmail Raw Content SESv2.\n\n"
              }
      }
}
ses-v2-tempate.json (replace [email protected] with the verified email identity):
As mentioned above, customers who are using least privilege permissions with SESv1 API must first update their IAM policies before running the SESv2 API examples below. See documentation for more info.
As you can see from the .json files we created for SES v2 API (above), you can modify or remove sections from the .json files, based on the type of email content (simple, raw or templated) you want to send.
As you can see from the examples above, SESv2 API shares much of its syntax and actions with the SESv1 API. As a result, most customers have found they can readily evaluate, identify and migrate their application code base in a relatively short period of time. However, it’s important to note that while the process is generally straightforward, there may be some nuances and differences to consider depending on your specific use case and programming language.
Regardless of the language, you’ll need anywhere from a few hours to a few weeks to:
Update your code to use SESv2 Client and change API signature and request parameters
Update permissions / policies to reflect SESv2 API requirements
Test your migrated code to ensure that it functions correctly with the SESv2 API
Stage, test
Deploy
Summary
As we’ve described in this post, Amazon SES customers that migrate to the SESv2 API will benefit from updated capabilities, a more user-friendly and intuitive API, better error handling and improved deliverability controls. The SESv2 API also provide for compliance with the industry’s upcoming unsubscribe header requirements, more flexible subscription-list management, and support for larger attachments. Taken collectively, these improvements make it even easier for customers to develop, maintain, and troubleshoot their email sending applications with Amazon Simple Email Service. For these, and future reasons, we recommend SES customers migrate their existing applications to the SESv2 API immediately.
For more information regarding the SESv2 APIs, comment on this post, reach out to your AWS account team, or consult the AWS SESv2 API documentation:
Zip is an Amazon Pinpoint and Amazon Simple Email Service Sr. Specialist Solutions Architect at AWS. Outside of work he enjoys time with his family, cooking, mountain biking and plogging.
Vinay Ujjini
Vinay is an Amazon Pinpoint and Amazon Simple Email Service Worldwide Principal Specialist Solutions Architect at AWS. He has been solving customer’s omni-channel challenges for over 15 years. He is an avid sports enthusiast and in his spare time, enjoys playing tennis and cricket.
Dmitrijs Lobanovskis
Dmitrijs is a Software Engineer for Amazon Simple Email service. When not working, he enjoys traveling, hiking and going to the gym.
The AWS Cloud spans more than 30 geographic regions around the world and is continuously adding new locations. When a new region launches, a core set of services are included with additional services launching within 12 months of a new region launch. As your business grows, so do your needs to expand to new regions and new markets, and it’s imperative that you understand which services and features are available in a region prior to launching your workload.
In this post, I’ll demonstrate how you can query the AWS CloudFormation registry to identify which services and features are supported within a region, so you can make informed decisions on which regions are currently compatible with your application’s requirements.
CloudFormation registry
The CloudFormation registry contains information about the AWS and third-party extensions, such as resources, modules, and hooks, that are available for use in your AWS account. You can utilize the CloudFormation API to provide a list of all the available AWS public extensions within a region. As resource availability may vary by region, you can refer to the CloudFormation registry for that region to gain an accurate list of that region’s service and feature offerings.
To view the AWS public extensions available in the region, you can use the following AWS Command Line Interface (AWS CLI) command which calls the list-types CloudFormation API. This API call returns summary information about extensions that have been registered with the CloudFormation registry. To learn more about the AWS CLI, please check out our Get started with the AWS CLI documentation page.
aws cloudformation list-types --visibility PUBLIC --filters Category=AWS_TYPES --region us-east-2
The output of this command is the list of CloudFormation extensions available in the us-east-2 region. The call has been filtered to restrict the visibility to PUBLIC which limits the returned list to extensions that are publicly visible and available to be activated within any AWS account. It is also filtered to AWS_TYPES only for Category to only list extensions available for use from Amazon. The region filter determines which region to use and therefore which region’s CloudFormation registry types to list. A snippet of the output of this command is below:
{
  "TypeSummaries": [
    {
      "Type": "RESOURCE",
      "TypeName": "AWS::ACMPCA::Certificate",
      "TypeArn": "arn:aws:cloudformation:us-east-2::type/resource/AWS-ACMPCA-Certificate",
      "LastUpdated": "2023-07-20T13:58:56.947000+00:00",
      "Description": "A certificate issued via a private certificate authority"
    },
    {
      "Type": "RESOURCE",
      "TypeName": "AWS::ACMPCA::CertificateAuthority",
      "TypeArn": "arn:aws:cloudformation:us-east-2::type/resource/AWS-ACMPCA-CertificateAuthority",
      "LastUpdated": "2023-07-19T14:06:07.618000+00:00",
      "Description": "Private certificate authority."
    },
    {
      "Type": "RESOURCE",
      "TypeName": "AWS::ACMPCA::CertificateAuthorityActivation",
      "TypeArn": "arn:aws:cloudformation:us-east-2::type/resource/AWS-ACMPCA-CertificateAuthorityActivation",
      "LastUpdated": "2023-07-20T13:45:58.300000+00:00",
      "Description": "Used to install the certificate authority certificate and update the certificate authority status."
    }
  ]
}
You can also perform client-side filtering and set the output format on the AWS CLI’s response to make the list of resource types easy to parse. In the command below the output parameter is set to text and used with the query parameter to return only the TypeName field for each resource type.
aws cloudformation list-types --visibility PUBLIC --filters Category=AWS_TYPES --region us-east-2 --output text --query 'TypeSummaries[*].[TypeName]'
It removes the extraneous definition information such as description and last updated sections. A snippet of the resulting output looks like this:
Now you have a method of generating a consolidated list of all the resource types CloudFormation supports within the us-east-2 region.
Comparing two regions
Now that you know how to generate a list of CloudFormation resource types in a region, you can compare with a region you plan to expand your workload to, such as the Israel (Tel Aviv) region which just launched in August of 2023. This region launched with core services available, and AWS service teams are hard at work bringing additional services and features to the region.
Adjust your command above by changing the region parameter from us-east-2 to il-central-1 which will allow you to list all the CloudFormation resource types in the Israel (Tel Aviv) region.
aws cloudformation list-types --visibility PUBLIC --filters Category=AWS_TYPES --region il-central-1 --output text --query 'TypeSummaries[*].[TypeName]'
Now compare the differences between the two regions to understand which services and features may not have launched in the Israel (Tel Aviv) region yet. You can use the diff command to compare the output of the two CloudFormation registry queries:
diff -y <(aws cloudformation list-types --visibility PUBLIC --filters Category=AWS_TYPES --region us-east-2 --output text --query 'TypeSummaries[*].[TypeName]') <(aws cloudformation list-types --visibility PUBLIC --filters Category=AWS_TYPES --region il-central-1 --output text --query 'TypeSummaries[*].[TypeName]')
Here’s an example snippet of the command’s output:
Here, you see regional service parity of services supported by CloudFormation, down to the feature level. Amazon Simple Storage Service (Amazon S3) is a core service that was available at Israel (Tel Aviv) region’s launch. However, certain Amazon S3 features such as Storage Lens and Multi-Region Access Points are not yet launched in the region.
With this level of detail, you are able to accurately determine if the region you’re considering for expansion currently has the service and feature offerings necessary to support your workload.
Evaluating CloudFormation stacks
Now that you know how to compare the CloudFormation resource types supported between two regions, you can make this more applicable by evaluating an existing CloudFormation stack and determining if the resource types specified in the stack are available in a region.
You can use the list-stack-resources API to query the stack and return the list of resource types used within it. You again use client-side filtering and set the output format on the AWS CLI’s response to make the list of resource types easy to parse.
Next, use the below command which uses grep with the -v flag to compare the Israel (Tel Aviv) region’s available CloudFormation registry resource types with the resource types used in the CloudFormation stack.
grep -v -f <(aws cloudformation list-types --visibility PUBLIC --filters Category=AWS_TYPES --region il-central-1 --output text --query 'TypeSummaries[*].[TypeName]') <(aws cloudformation list-stack-resources --stack-name PHPHelloWorldSample --region us-east-2 --output text --query 'StackResourceSummaries[*].[ResourceType]')
The output is blank, which indicates all of the CloudFormation resource types specified in the stack are available in the Israel (Tel Aviv) region.
Now try an example where a service or feature may not yet be launched in the region, AWS Cloud9 for example. Update the stack template to include the AWS::Cloud9::EnvironmentEC2 resource type. To do this, include the following lines within the CloudFormation template json file’s Resources section as shown below and update the stack. Instructions on how to modify a CloudFormation template and update the stack can be found in the AWS CloudFormation stack updates documentation.
grep -v -f <(aws cloudformation list-types --visibility PUBLIC --filters Category=AWS_TYPES --region il-central-1 --output text --query 'TypeSummaries[*].[TypeName]') <(aws cloudformation list-stack-resources --stack-name PHPHelloWorldSample --region us-east-2 --output text --query 'StackResourceSummaries[*].[ResourceType]')
The output returns the below line indicating the AWS::Cloud9::EnvironmentEC2 resource type is not present in the CloudFormation registry for the Israel (Tel Aviv), yet. You would not be able to deploy this resource type in that region.
AWS::Cloud9::EnvironmentEC2
To clean-up, delete the stack you deployed by following our documentation on Deleting a stack.
This solution can be expanded to evaluate all of your CloudFormation stacks within a region. To do this, you would use the list-stacks API to list all of your stack names and then loop through each one by calling the list-stack-resources API to generate a list of all the resource types used in your CloudFormation stacks within the region. Finally, you’d use the grep example above to compare the list of resource types contained in all of your stacks with the CloudFormation registry for the region.
A note on opt-in regions
If you intend to compare a newly launched region, you need to first enable the region which will then allow you to perform the AWS CLI queries provided above. This is because only regions introduced prior to March 20, 2019 are all enabled by default. For example, to query the Israel (Tel Aviv) region you must first enable the region. You can learn more about how to enable new AWS Regions on our documentation page, Specifying which AWS Regions your account can use.
Conclusion
In this blog post, I demonstrated how you can query the CloudFormation registry to compare resource availability between two regions. I also showed how you can evaluate existing CloudFormation stacks to determine if they are compatible in another region. With this solution, you can make informed decisions regarding your regional expansion based on the current service and feature offerings within a region. While this is an effective solution to compare regional availability, please consider these key points:
This is a point in time snapshot of a region’s service offerings and service teams are regularly adding services and features following a new region launch. I recommend you share your interest for local region delivery and/or request service roadmap information by contacting your AWS sales representative.
A feature may not yet have CloudFormation support within the region which means it won’t display in the registry, even though the feature may be available via Console or API within the region.
This solution will not provide details on the properties available within a resource type.
Amazon DevOps Guru is a fully managed AIOps service that uses machine learning (ML) to quickly identify when applications are behaving outside of their normal operating patterns and generates insights from its findings. These insights generated by DevOps Guru can be used to alert on-call teams to react to anomalies for business mission critical workloads. If you are already utilizing Datadog to automate infrastructure monitoring, application performance monitoring, and log management for real-time observability of your entire technology stack, then this blog is for you.
You might already be using Datadog for a consolidated view of your Datadog Events interface to search, analyze and filter events from many different sources in one place. Datadog Events are records of notable changes relevant for managing and troubleshooting IT Operations, such as code, deployments, service health, configuration changes and monitoring alerts.
Wherever DevOps Guru detects operational events in your AWS environment that could lead to outages, it generates insights and recommendations. These insights/recommendations are then pushed to a user specific Datadog endpoint using Datadog events API. Customers can then create dashboards, incidents, alarms or take corrective automated actions based on these insights and recommendations in Datadog.
Datadog collects and unifies all of the data streaming from these complex environments, with a 1-click integration for pulling in metrics and tags from over 90 AWS services. Companies can deploy the Datadog Agent directly on their hosts and compute instances to collect metrics with greater granularity—down to one-second resolution. And with Datadog’s out-of-the-box integration dashboards, companies get not only a high-level view into the health of their infrastructure and applications but also deeper visibility into individual services such as AWS Lambda and Amazon EKS.
This blogpost will show you how to utilize Amazon DevOps guru with Datadog to get real time insights and recommendations on their AWS Infrastructure. We will demonstrate how an insight generated by Amazon DevOps Guru for an anomaly can automatically be pushed to Datadog’s event streams which can then be used to create dashboards, create alarms and alerts to take corrective actions.
Solution Overview
When an Amazon DevOps Guru insight is created, an Amazon EventBridge rule is used to capture the insight as an event and routed to an AWS Lambda Function target. The lambda function interacts with Datadog using a REST API to push corresponding DevOps Guru events captured by Amazon EventBridge
The EventBridge rule can be customized to capture all DevOps Guru insights or narrowed down to specific insights. In this blog, we will be capturing all DevOps Guru insights and will be performing actions on Datadog for the below DevOps Guru events:
DevOps Guru New Insight Open
DevOps Guru New Anomaly Association
DevOps Guru Insight Severity Upgraded
DevOps Guru New Recommendation Created
DevOps Guru Insight Closed
Figure 1: Amazon DevOps Guru Integration with Datadog with Amazon EventBridge and AWS.
Solution Implementation Steps
Pre-requisites
Before you deploy the solution, complete the following steps.
Datadog Account Setup: We will be connecting your AWS Account with Datadog. If you do not have a Datadog account, you can request a free trial developer instance through Datadog.
Datadog Credentials: Gather the credentials of Datadog keys that will be used to connect with AWS. Follow the steps below to create an API Key and Application Key Add an API key or client token
To add a Datadog API key or client token:
Navigate to Organization settings, then click the API keys or Client Tokens
Click the New Key or New Client Token button, depending on which you’re creating.
Enter a name for your key or token.
Click Create API key or Create Client Token.
Note down the newly generated API Key value. We will need this in later steps
Figure 2: Create new API Key.
Add application keys
To add a Datadog application key, navigate to Organization Settings > Application Keys.If you have the permission to create application keys, click New Key.Note down the newly generated Application Key. We will need this in later steps
Add Application Key and API Key to AWS Secrets Manager : Secrets Manager enables you to replace hardcoded credentials in your code, including passwords, with an API call to Secrets Manager to retrieve the secret programmatically. This helps ensure the secret can’t be compromised by someone examining your code,because the secret no longer exists in the code. Follow below steps to create a new secret in AWS Secrets Manager.
In Key/value pairs, either enter your secret in Key/value pairs
Figure 3: Create new secret in Secret Manager.
Click next and enter “DatadogSecretManager” as the secret name followed by Review and Finish
Figure 4: Configure secret in Secret Manager.
Enable DevOps Guru for your applications by following these steps or you can follow this blog to deploy a sample serverless application that can be used to generate DevOps Guru insights for anomalies detected in the application.
Download and set up Java. The version should be matching to the runtime that you defined in the SAM template. yaml Serverless function configuration – Install the Java SE Development Kit 11
Option 1: Deploy Datadog Connector App from AWS Serverless Repository
The DevOps Guru Datadog Connector application is available on the AWS Serverless Application Repository which is a managed repository for serverless applications. The application is packaged with an AWS Serverless Application Model (SAM) template, definition of the AWS resources used and the link to the source code. Follow the steps below to quickly deploy this serverless application in your AWS account
Login to the AWS management console of the account to which you plan to deploy this solution.
The Lambda application deployment screen will be displayed where you can enter the Datadog Application name
Figure 5: DevOps Guru Datadog connector.
Figure 6: Serverless Application DevOps Guru Datadog connector.
After successful deployment the AWS Lambda Application page will display the “Create complete” status for the serverlessrepo-DevOps-Guru-Datadog-Connector application. The CloudFormation template creates four resources,
Lambda function which has the logic to integrate to the Datadog
Event Bridge rule for the DevOps Guru Insights
Lambda permission
IAM role
Now skip Option 2 and follow the steps in the “Test the Solution” section to trigger some DevOps Guru insights/recommendations and validate that the events are created and updated in Datadog.
Option 2: Build and Deploy sample Datadog Connector App using AWS SAM Command Line Interface
As you have seen above, you can directly deploy the sample serverless application form the Serverless Repository with one click deployment. Alternatively, you can choose to clone the GitHub source repository and deploy using the SAM CLI from your terminal.
The Serverless Application Model Command Line Interface (SAM CLI) is an extension of the AWS CLI that adds functionality for building and testing serverless applications. The CLI provides commands that enable you to verify that AWS SAM template files are written according to the specification, invoke Lambda functions locally, step-through debug Lambda functions, package and deploy serverless applications to the AWS Cloud, and so on. For details about how to use the AWS SAM CLI, including the full AWS SAM CLI Command Reference, see AWS SAM reference – AWS Serverless Application Model.
Before you proceed, make sure you have completed the pre-requisites section in the beginning which should set up the AWS SAM CLI, Maven and Java on your local terminal. You also need to install and set up Docker to run your functions in an Amazon Linux environment that matches Lambda.
$cd DatadogFunctions

$sam build
Building codeuri: $\amazon-devops-guru-connector-datadog\DatadogFunctions\Functions runtime: java11 metadata: {} architecture: x86_64 functions: Functions
Running JavaMavenWorkflow:CopySource
Running JavaMavenWorkflow:MavenBuild
Running JavaMavenWorkflow:MavenCopyDependency
Running JavaMavenWorkflow:MavenCopyArtifacts

Build Succeeded

Built Artifacts  : .aws-sam\build
Built Template   : .aws-sam\build\template.yaml

Commands you can use next
=========================
[*] Validate SAM template: sam validate
[*] Invoke Function: sam local invoke
[*] Test Function in the Cloud: sam sync --stack-name {{stack-name}} --watch
[*] Deploy: sam deploy --guided
This command will build the source of your application by installing dependencies defined in Functions/pom.xml, create a deployment package and saves it in the. aws-sam/build folder.
Deploy the sample application using SAM CLI
$sam deploy --guided
This command will package and deploy your application to AWS, with a series of prompts that you should respond to as shown below:
Stack Name: The name of the stack to deploy to CloudFormation. This should be unique to your account and region, and a good starting point would be something matching your project name.
AWS Region: The AWS region you want to deploy your application to.
Confirm changes before deploy: If set to yes, any change sets will be shown to you before execution for manual review. If set to no, the AWS SAM CLI will automatically deploy application changes.
Allow SAM CLI IAM role creation:Many AWS SAM templates, including this example, create AWS IAM roles required for the AWS Lambda function(s) included to access AWS services. By default, these are scoped down to minimum required permissions. To deploy an AWS CloudFormation stack which creates or modifies IAM roles, the CAPABILITY_IAM value for capabilities must be provided. If permission isn’t provided through this prompt, to deploy this example you must explicitly pass --capabilities CAPABILITY_IAM to the sam deploy command.
Disable rollback [y/N]: If set to Y, preserves the state of previously provisioned resources when an operation fails.
Save arguments to configuration file (samconfig.toml): If set to yes, your choices will be saved to a configuration file inside the project, so that in the future you can just re-run sam deploy without parameters to deploy changes to your application.
After you enter your parameters, you should see something like this if you have provided Y to view and confirm ChangeSets. Proceed here by providing ‘Y’ for deploying the resources.
Initiating deployment
=====================

        Uploading to sam-app-datadog/0c2b93e71210af97a8c57710d0463c8b.template  1797 / 1797  (100.00%)


Waiting for changeset to be created..

CloudFormation stack changeset
---------------------------------------------------------------------------------------------------------------------
Operation                     LogicalResourceId             ResourceType                  Replacement
---------------------------------------------------------------------------------------------------------------------
+ Add                         FunctionsDevOpsGuruPermissi   AWS::Lambda::Permission       N/A
                              on
+ Add                         FunctionsDevOpsGuru           AWS::Events::Rule             N/A
+ Add                         FunctionsRole                 AWS::IAM::Role                N/A
+ Add                         Functions                     AWS::Lambda::Function         N/A
---------------------------------------------------------------------------------------------------------------------


Changeset created successfully. arn:aws:cloudformation:us-east-1:867001007349:changeSet/samcli-deploy1680640852/bdc3039b-cdb7-4d7a-a3a0-ed9372f3cf9a


Previewing CloudFormation changeset before deployment
======================================================
Deploy this changeset? [y/N]: y

2023-04-04 15:41:06 - Waiting for stack create/update to complete

CloudFormation events from stack operations (refresh every 5.0 seconds)
---------------------------------------------------------------------------------------------------------------------
ResourceStatus                ResourceType                  LogicalResourceId             ResourceStatusReason
---------------------------------------------------------------------------------------------------------------------
CREATE_IN_PROGRESS            AWS::IAM::Role                FunctionsRole                 -
CREATE_IN_PROGRESS            AWS::IAM::Role                FunctionsRole                 Resource creation Initiated
CREATE_COMPLETE               AWS::IAM::Role                FunctionsRole                 -
CREATE_IN_PROGRESS            AWS::Lambda::Function         Functions                     -
CREATE_IN_PROGRESS            AWS::Lambda::Function         Functions                     Resource creation Initiated
CREATE_COMPLETE               AWS::Lambda::Function         Functions                     -
CREATE_IN_PROGRESS            AWS::Events::Rule             FunctionsDevOpsGuru           -
CREATE_IN_PROGRESS            AWS::Events::Rule             FunctionsDevOpsGuru           Resource creation Initiated
CREATE_COMPLETE               AWS::Events::Rule             FunctionsDevOpsGuru           -
CREATE_IN_PROGRESS            AWS::Lambda::Permission       FunctionsDevOpsGuruPermissi   -
                                                            on
CREATE_IN_PROGRESS            AWS::Lambda::Permission       FunctionsDevOpsGuruPermissi   Resource creation Initiated
                                                            on
CREATE_COMPLETE               AWS::Lambda::Permission       FunctionsDevOpsGuruPermissi   -
                                                            on
CREATE_COMPLETE               AWS::CloudFormation::Stack    sam-app-datadog               -
---------------------------------------------------------------------------------------------------------------------


Successfully created/updated stack - sam-app-datadog in us-east-1
Once the deployment succeeds, you should be able to see the successful creation of your resources. Also, you can find your Lambda, IAM Role and EventBridge Rule in the CloudFormation stack output values.
You can also choose to test and debug your function locally with sample events using the SAM CLI local functionality.Test a single function by invoking it directly with a test event. An event is a JSON document that represents the input that the function receives from the event source. Refer the Invoking Lambda functions locally – AWS Serverless Application Model link here for more details.
$ sam local invoke Functions -e ‘event/event.json’
Once you are done with the above steps, move on to “Test the Solution” section below to trigger some DevOps Guru insights and validate that the events are created and pushed to Datadog.
Test the Solution
To test the solution, we will simulate a DevOps Guru Insight. You can also simulate an insight by following the steps in this blog. After an anomaly is detected in the application, DevOps Guru creates an insight as shown below
Figure 7: DevOps Guru insight for DynamoDB
For the DevOps Guru insight shown above, a corresponding event is automatically created and pushed to Datadog as shown below. In addition to the events creation, any new anomalies and recommendations from DevOps Guru is also associated with the events
Figure 8 : DevOps Guru Insight pushed to Datadog event stream.
Cleaning Up
To delete the sample application that you created, In your Cloud 9 environment open a new terminal. Now type in the AWS CLI command below and pass the stack name you provided in the deploy step
Alternatively ,you could also use the AWS CloudFormation Console to delete the stack
Conclusion
This article highlights how Amazon DevOps Guru monitors resources within a specific region of your AWS account, automatically detecting operational issues, predicting potential resource exhaustion, identifying probable causes, and recommending remediation actions. It describes a bespoke solution enabling integration of DevOps Guru insights with Datadog, enhancing management and oversight of AWS services. This solution aids customers using Datadog to bolster operational efficiencies, delivering customized insights, real-time alerts, and management capabilities directly from DevOps Guru, offering a unified interface to swiftly restore services and systems.
To start gaining operational insights on your AWS Infrastructure with Datadog head over to Amazon DevOps Guru documentation page.
AWS recommends using automation where possible to keep people away from systems—yet not every action can be automated in practice, and some operations might require access by human users. Depending on their scope and potential impact, some human operations might require special treatment.
One such treatment is temporary elevated access, also known as just-in-time access. This is a way to request access for a specified time period, validate whether there is a legitimate need, and grant time-bound access. It also allows you to monitor activities performed, and revoke access if conditions change. Temporary elevated access can help you to reduce risks associated with human access without hindering operational capabilities.
In this post, we introduce a temporary elevated access management solution (TEAM) that integrates with AWS IAM Identity Center (successor to AWS Single Sign-On) and allows you to manage temporary elevated access to your multi-account AWS environment. You can download the TEAM solution from AWS Samples, deploy it to your AWS environment, and customize it to meet your needs.
The TEAM solution provides the following features:
Workflow and approval — TEAM provides a workflow that allows authorized users to request, review, and approve or reject temporary access. If a request is approved, TEAM activates access for the requester with the scope and duration specified in the request.
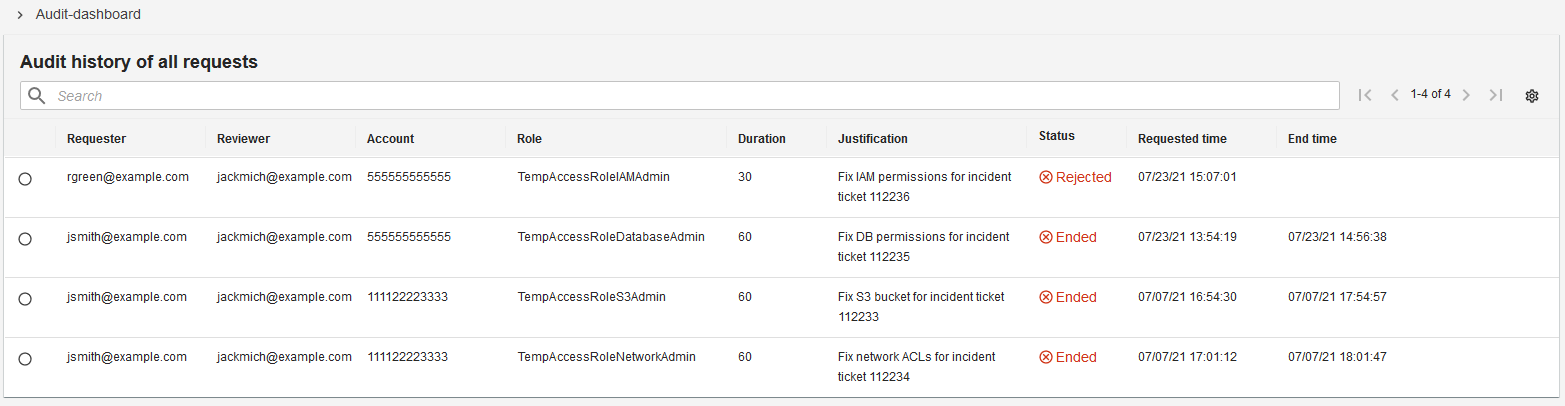
View request details and session activity — Authorized users can view request details and session activity related to current and historical requests from within the application’s web interface.
Ability to use managed identities and group memberships — You can either sync your existing managed identities and group memberships from an external identity provider into IAM Identity Center, or manage them directly in IAM Identity Center, in order to control user authorization in TEAM. Similarly, users can authenticate directly in IAM Identity Center, or they can federate from an external identity provider into IAM Identity Center, to access TEAM.
A rich authorization model — TEAM uses group memberships to manage eligibility (authorization to request temporary elevated access with a given scope) and approval (authorization to approve temporary elevated access with a given scope). It also uses group memberships to determine whether users can view historical and current requests and session activity, and whether they can administer the solution. You can manage both eligibility and approval policies at different levels of granularity within your organization in AWS Organizations.
TEAM overview
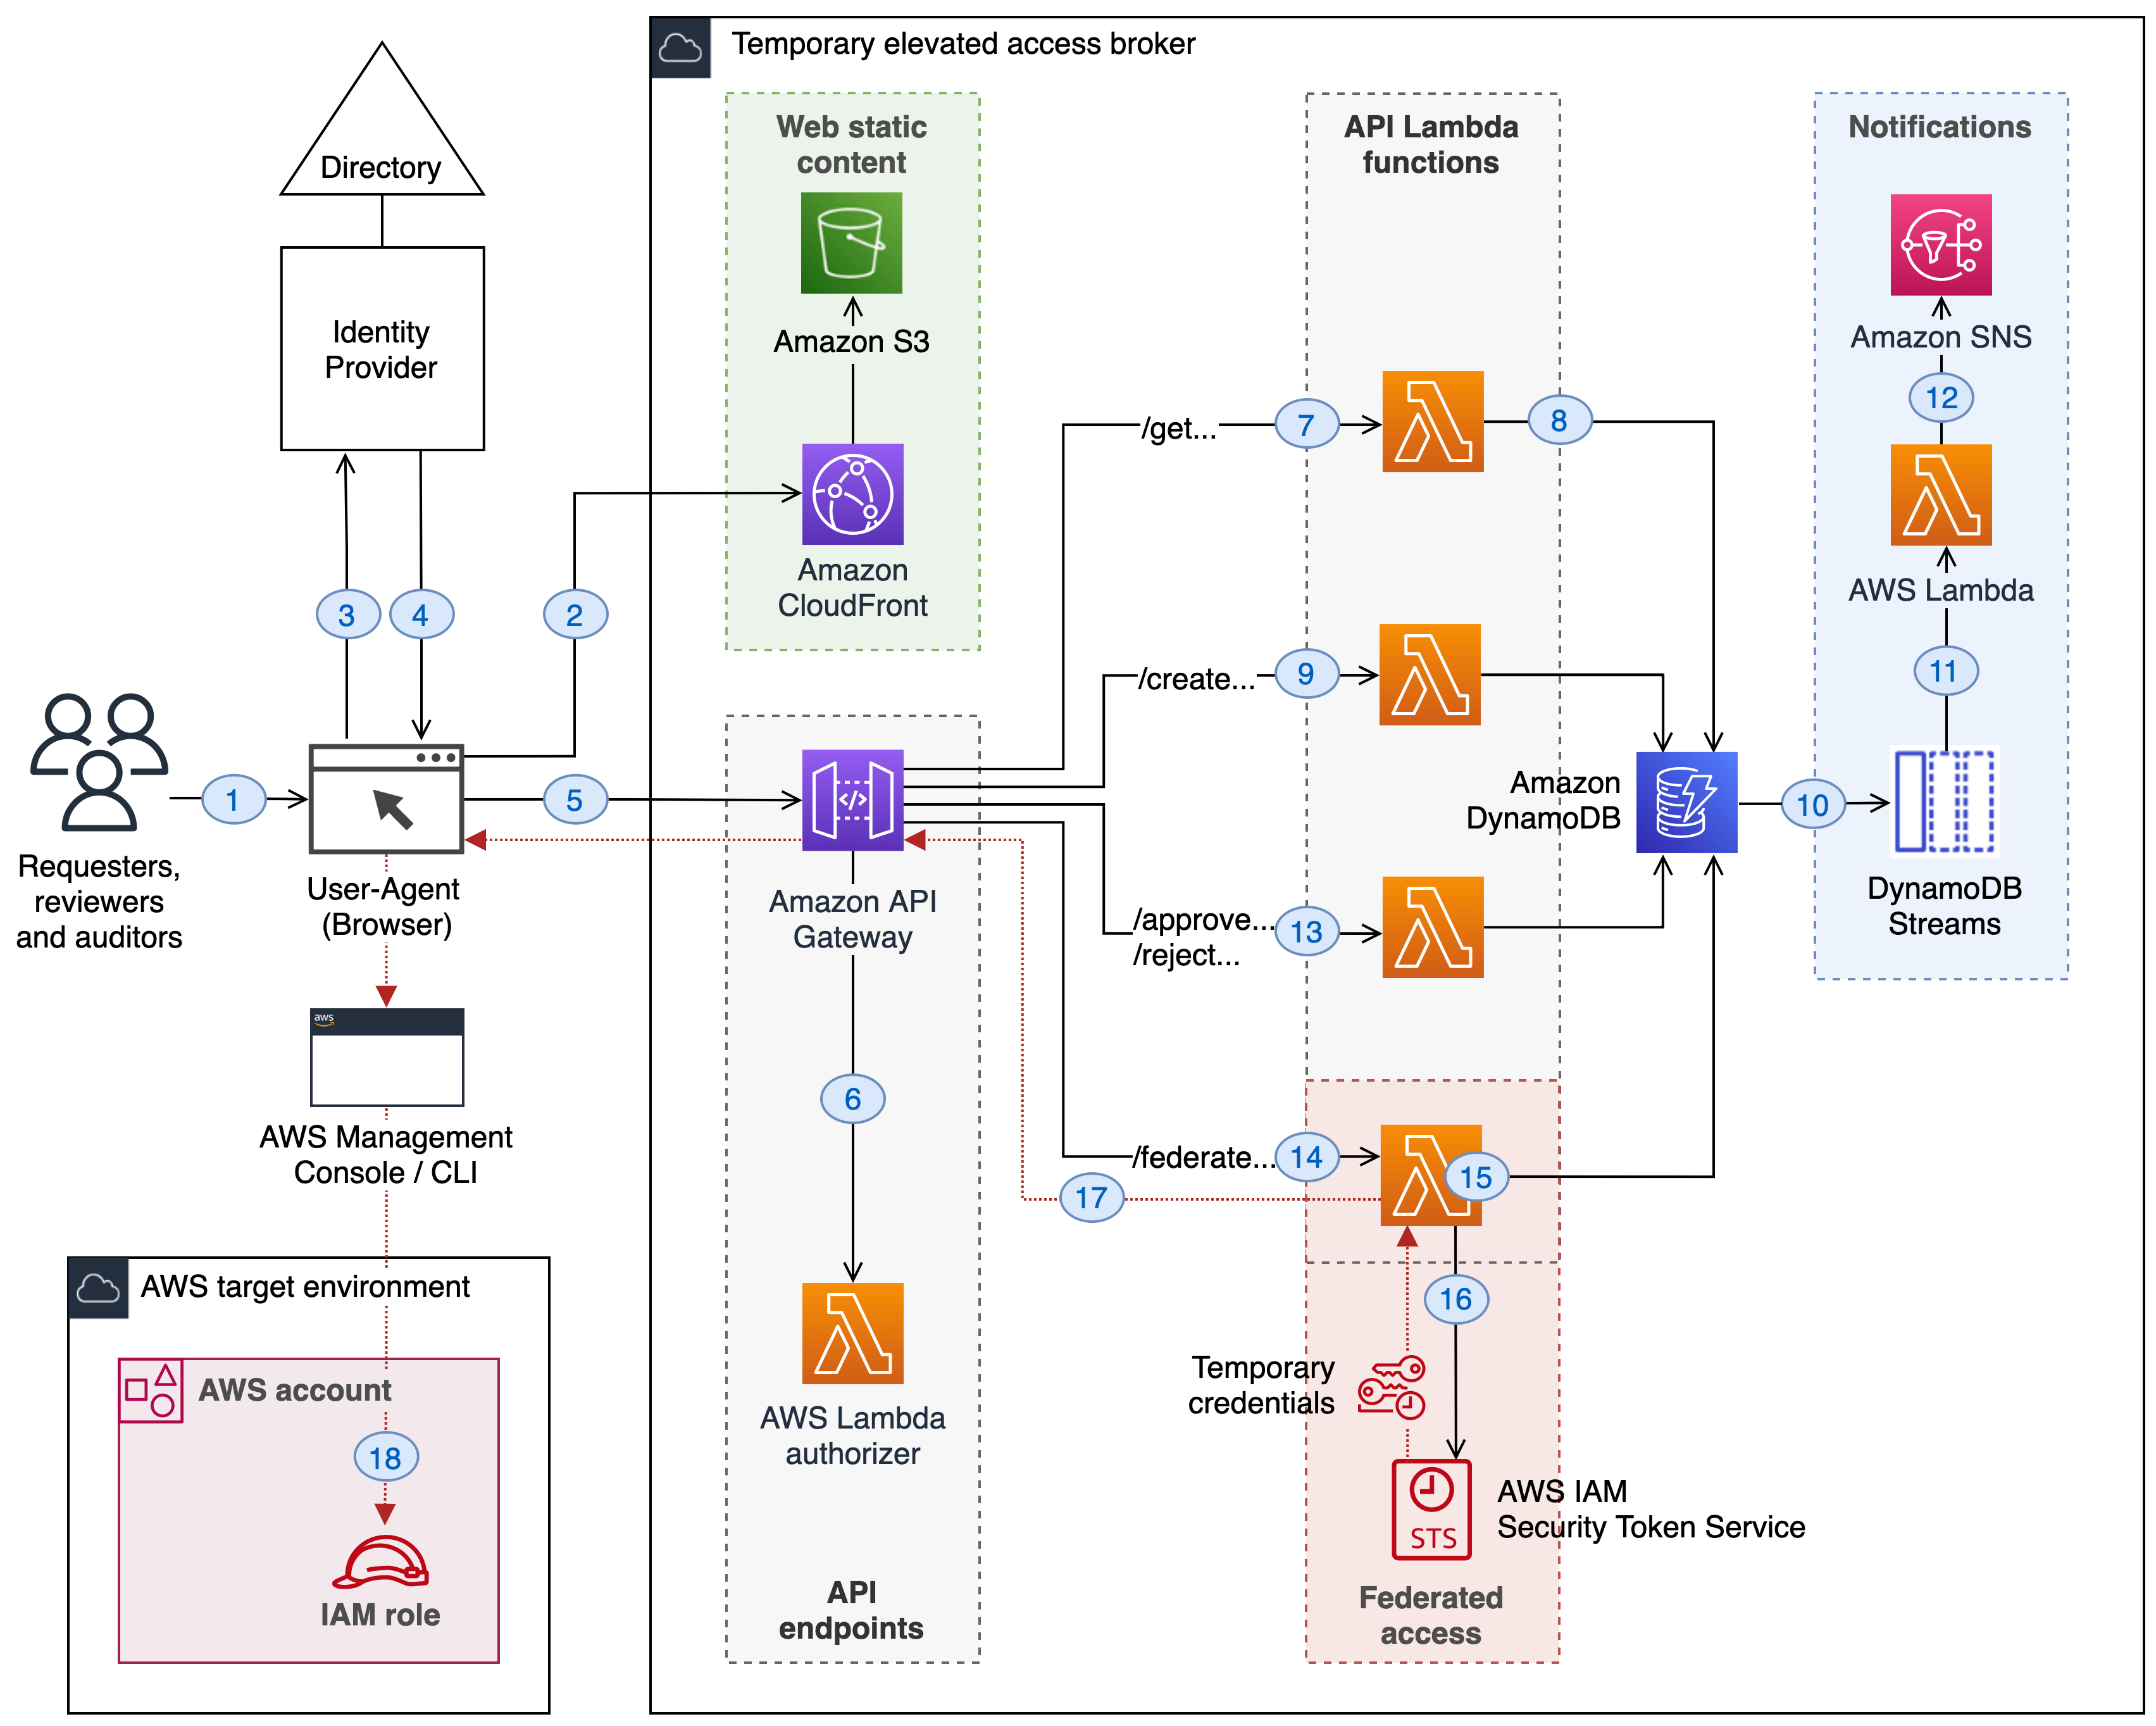
You can download the TEAM solution and deploy it into the same organization where you enable IAM Identity Center. TEAM consists of a web interface that you access from the IAM Identity Center access portal, a workflow component that manages requests and approvals, an orchestration component that activates temporary elevated access, and additional components involved in security and monitoring.
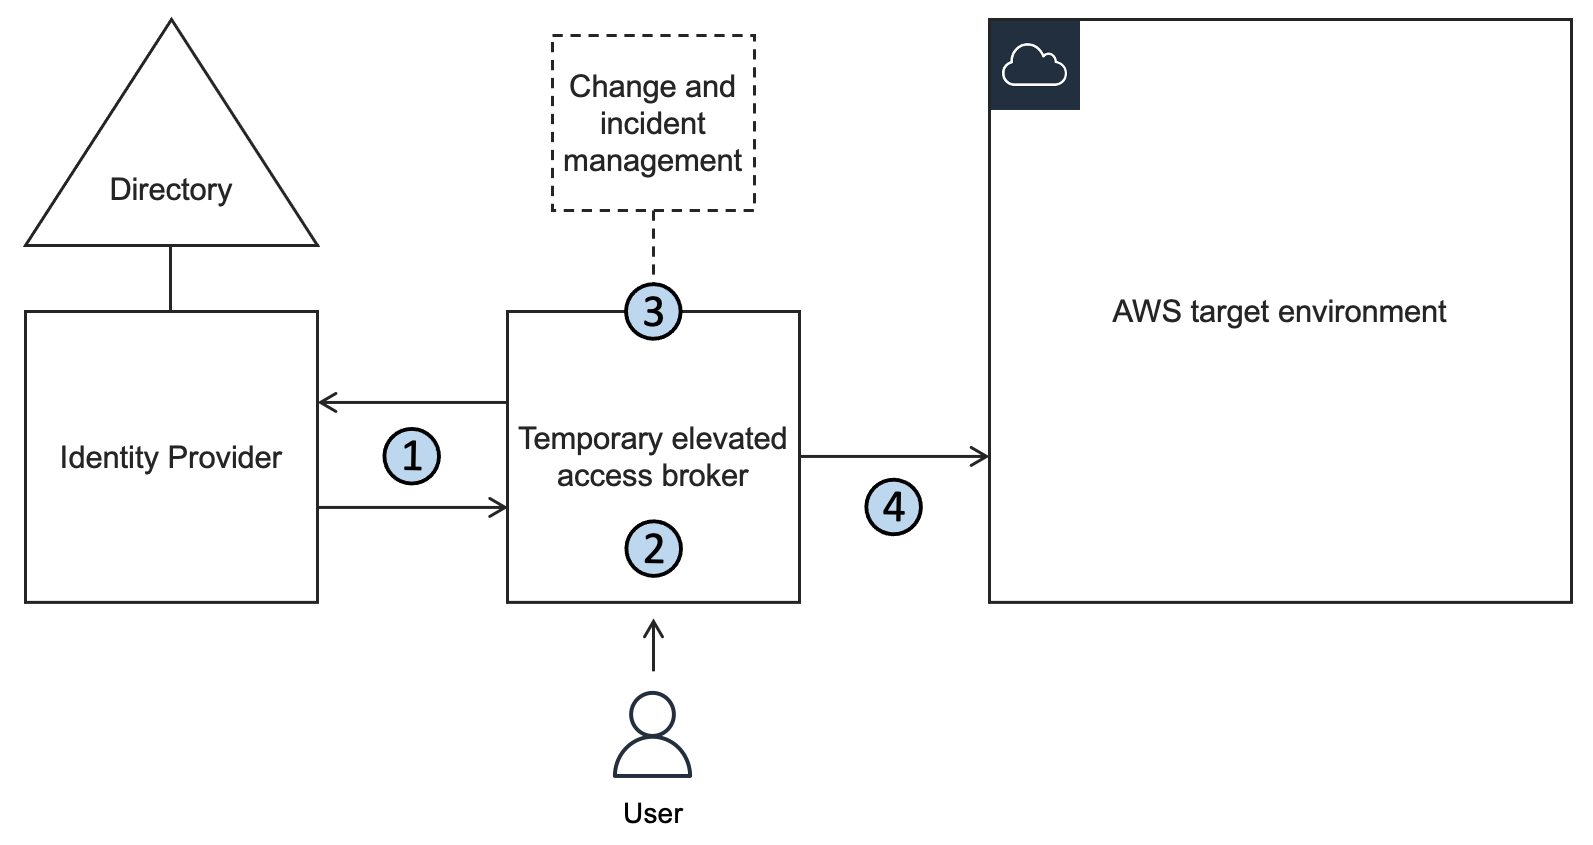
Figure 1 shows an organization with TEAM deployed alongside IAM Identity Center.
Figure 1: An organization using TEAM alongside IAM Identity Center
Figure 1 shows three main components:
TEAM — a self-hosted solution that allows users to create, approve, monitor and manage temporary elevated access with a few clicks in a web interface.
IAM Identity Center — an AWS service which helps you to securely connect your workforce identities and manage their access centrally across accounts.
AWS target environment — the accounts where you run your workloads, and for which you want to securely manage both persistent access and temporary elevated access.
There are four personas who can use TEAM:
Requesters — users who request temporary elevated access to perform operational tasks within your AWS target environment.
Approvers — users who review and approve or reject requests for temporary elevated access.
Auditors — users with read-only access who can view request details and session activity relating to current and historical requests.
Admins — users who can manage global settings and define policies for eligibility and approval.
TEAM determines a user’s persona from their group memberships, which can either be managed directly in IAM Identity Center or synced from an external identity provider into IAM Identity Center. This allows you to use your existing access governance processes and tools to manage the groups and thereby control which actions users can perform within TEAM.
The following steps describe how you use TEAM during normal operations to request, approve, and invoke temporary elevated access. The steps correspond to the numbered items in Figure 1:
Access the AWS access portal in IAM Identity Center (all personas)
Access the TEAM application (all personas)
Request elevated access (requester persona)
Approve elevated access (approver persona)
Activate elevated access (automatic)
Invoke elevated access (requester persona)
Log session activity (automatic)
End elevated access (automatic; or requester or approver persona)
View request details and session activity (requester, approver, or auditor persona)
In the TEAM walkthrough section later in this post, we provide details on each of these steps.
Deploy and set up TEAM
Before you can use TEAM, you need to deploy and set up the solution.
Prerequisites
To use TEAM, you first need to have an organization set up in AWS Organizations with IAM Identity Center enabled. If you haven’t done so already, create an organization, and then follow the Getting started steps in the IAM Identity Center User Guide.
Before you deploy TEAM, you need to nominate a member account for delegated administration in IAM Identity Center. This has the additional benefit of reducing the need to use your organization’s management account. We strongly recommend that you use this account only for IAM Identity Center delegated administration, TEAM, and associated services; that you do not deploy any other workloads into this account, and that you carefully manage access to this account using the principle of least privilege.
We recommend that you enforce multi-factor authentication (MFA) for users, either in IAM Identity Center or in your external identity provider. If you want to statically assign access to users or groups (persistent access), you can do that in IAM Identity Center, independently of TEAM, as described in Multi-account permissions.
Deploy TEAM
To deploy TEAM, follow the solution deployment steps in the TEAM documentation. You need to deploy TEAM in the same account that you nominate for IAM Identity Center delegated administration.
Access TEAM
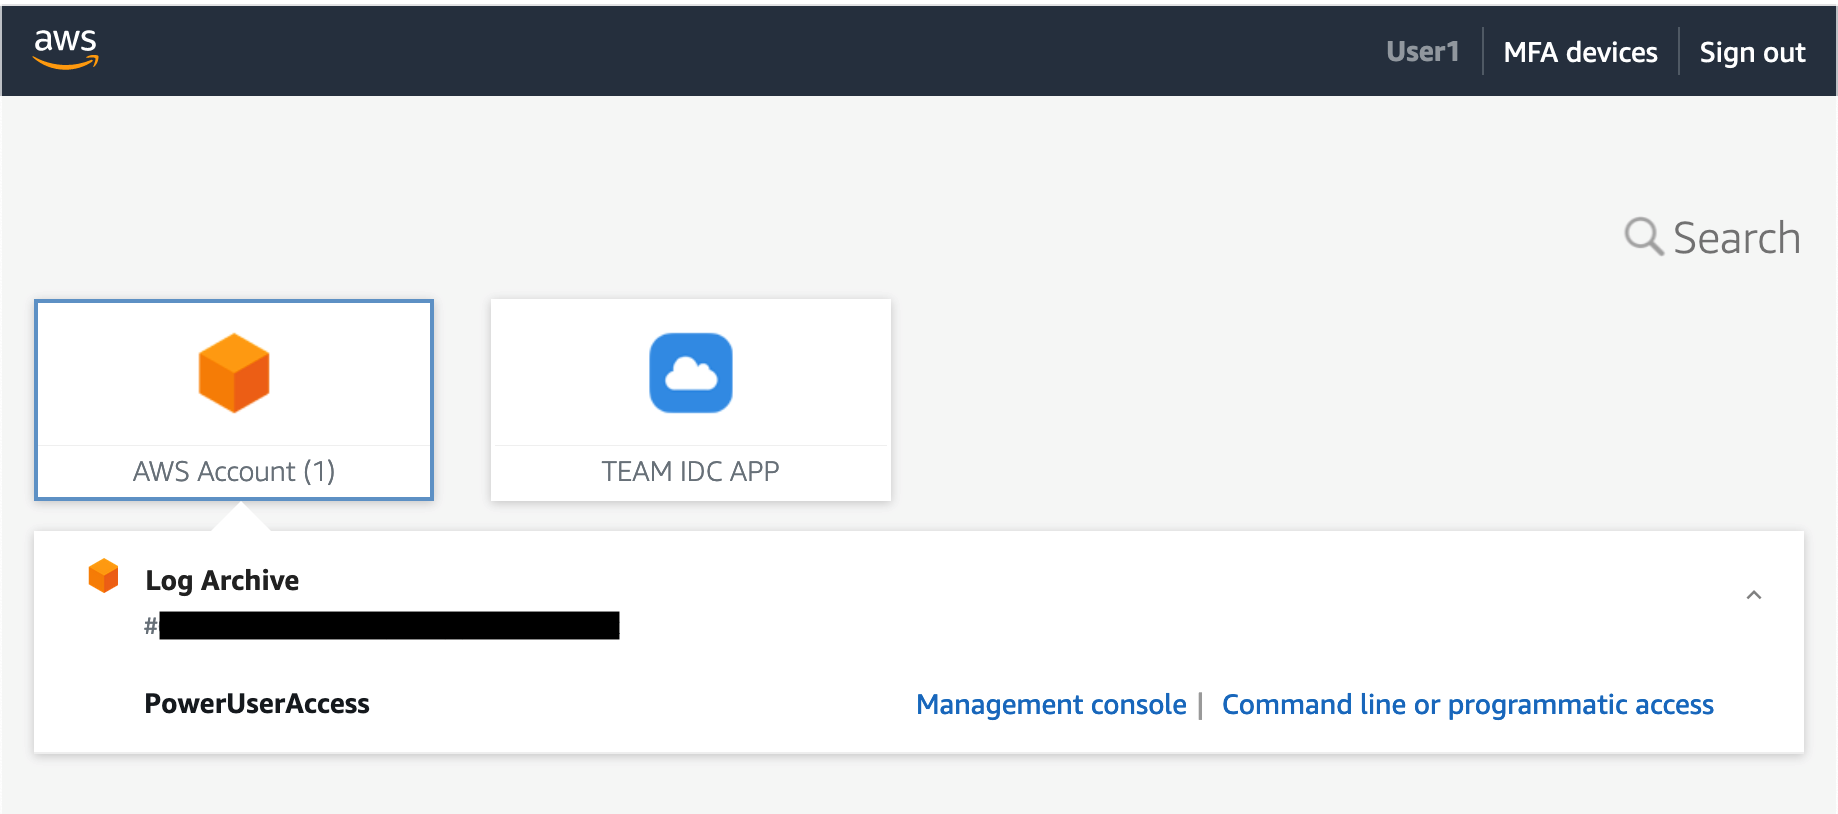
After you deploy TEAM, you can access it through the IAM Identity Center web interface, known as the AWS access portal. You do this using the AWS access portal URL, which is configured when you enable IAM Identity Center. Depending on how you set up IAM Identity Center, you are either prompted to authenticate directly in IAM Identity Center, or you are redirected to an external identity provider to authenticate. After you authenticate, the AWS access portal appears, as shown in Figure 2.
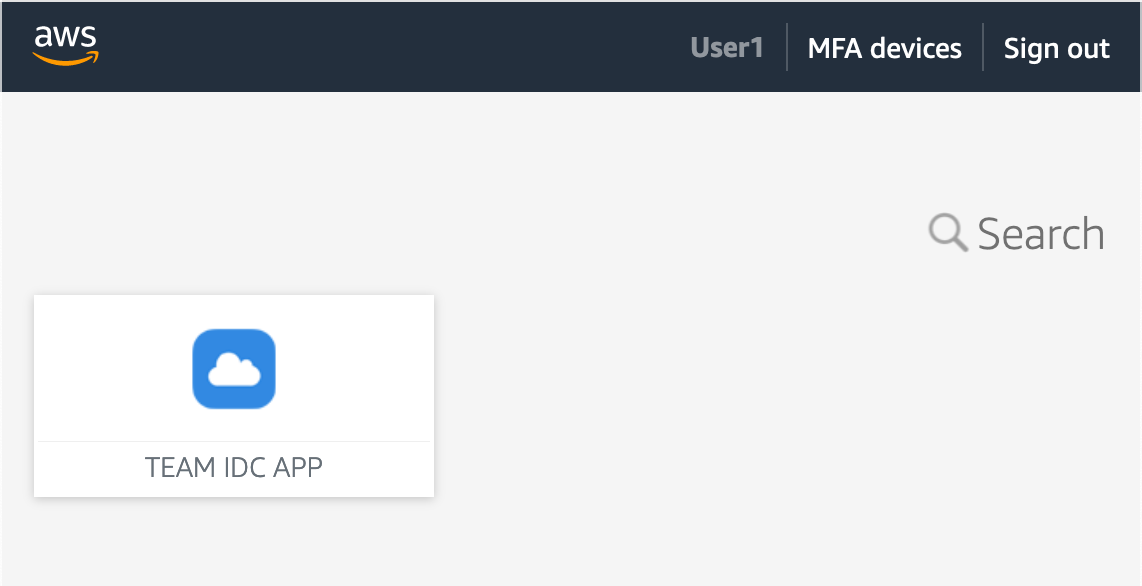
Figure 2: TEAM application icon in the AWS access portal of IAM Identity Center
You configure TEAM as an IAM Identity Center Custom SAML 2.0 application, which means it appears as an icon in the AWS access portal. To access TEAM, choose TEAM IDC APP.
When you first access TEAM, it automatically retrieves your identity and group membership information from IAM Identity Center. It uses this information to determine what actions you can perform and which navigation links are visible.
Set up TEAM
Before users can request temporary elevated access in TEAM, a user with the admin persona needs to set up the application. This includes defining policies for eligibility and approval. A user takes on the admin persona if they are a member of a named IAM Identity Center group that is specified during TEAM deployment.
Manage eligibility policies
Eligibility policies determine who can request temporary elevated access with a given scope. You can define eligibility policies to ensure that people in specific teams can only request the access that you anticipate they’ll need as part of their job function.
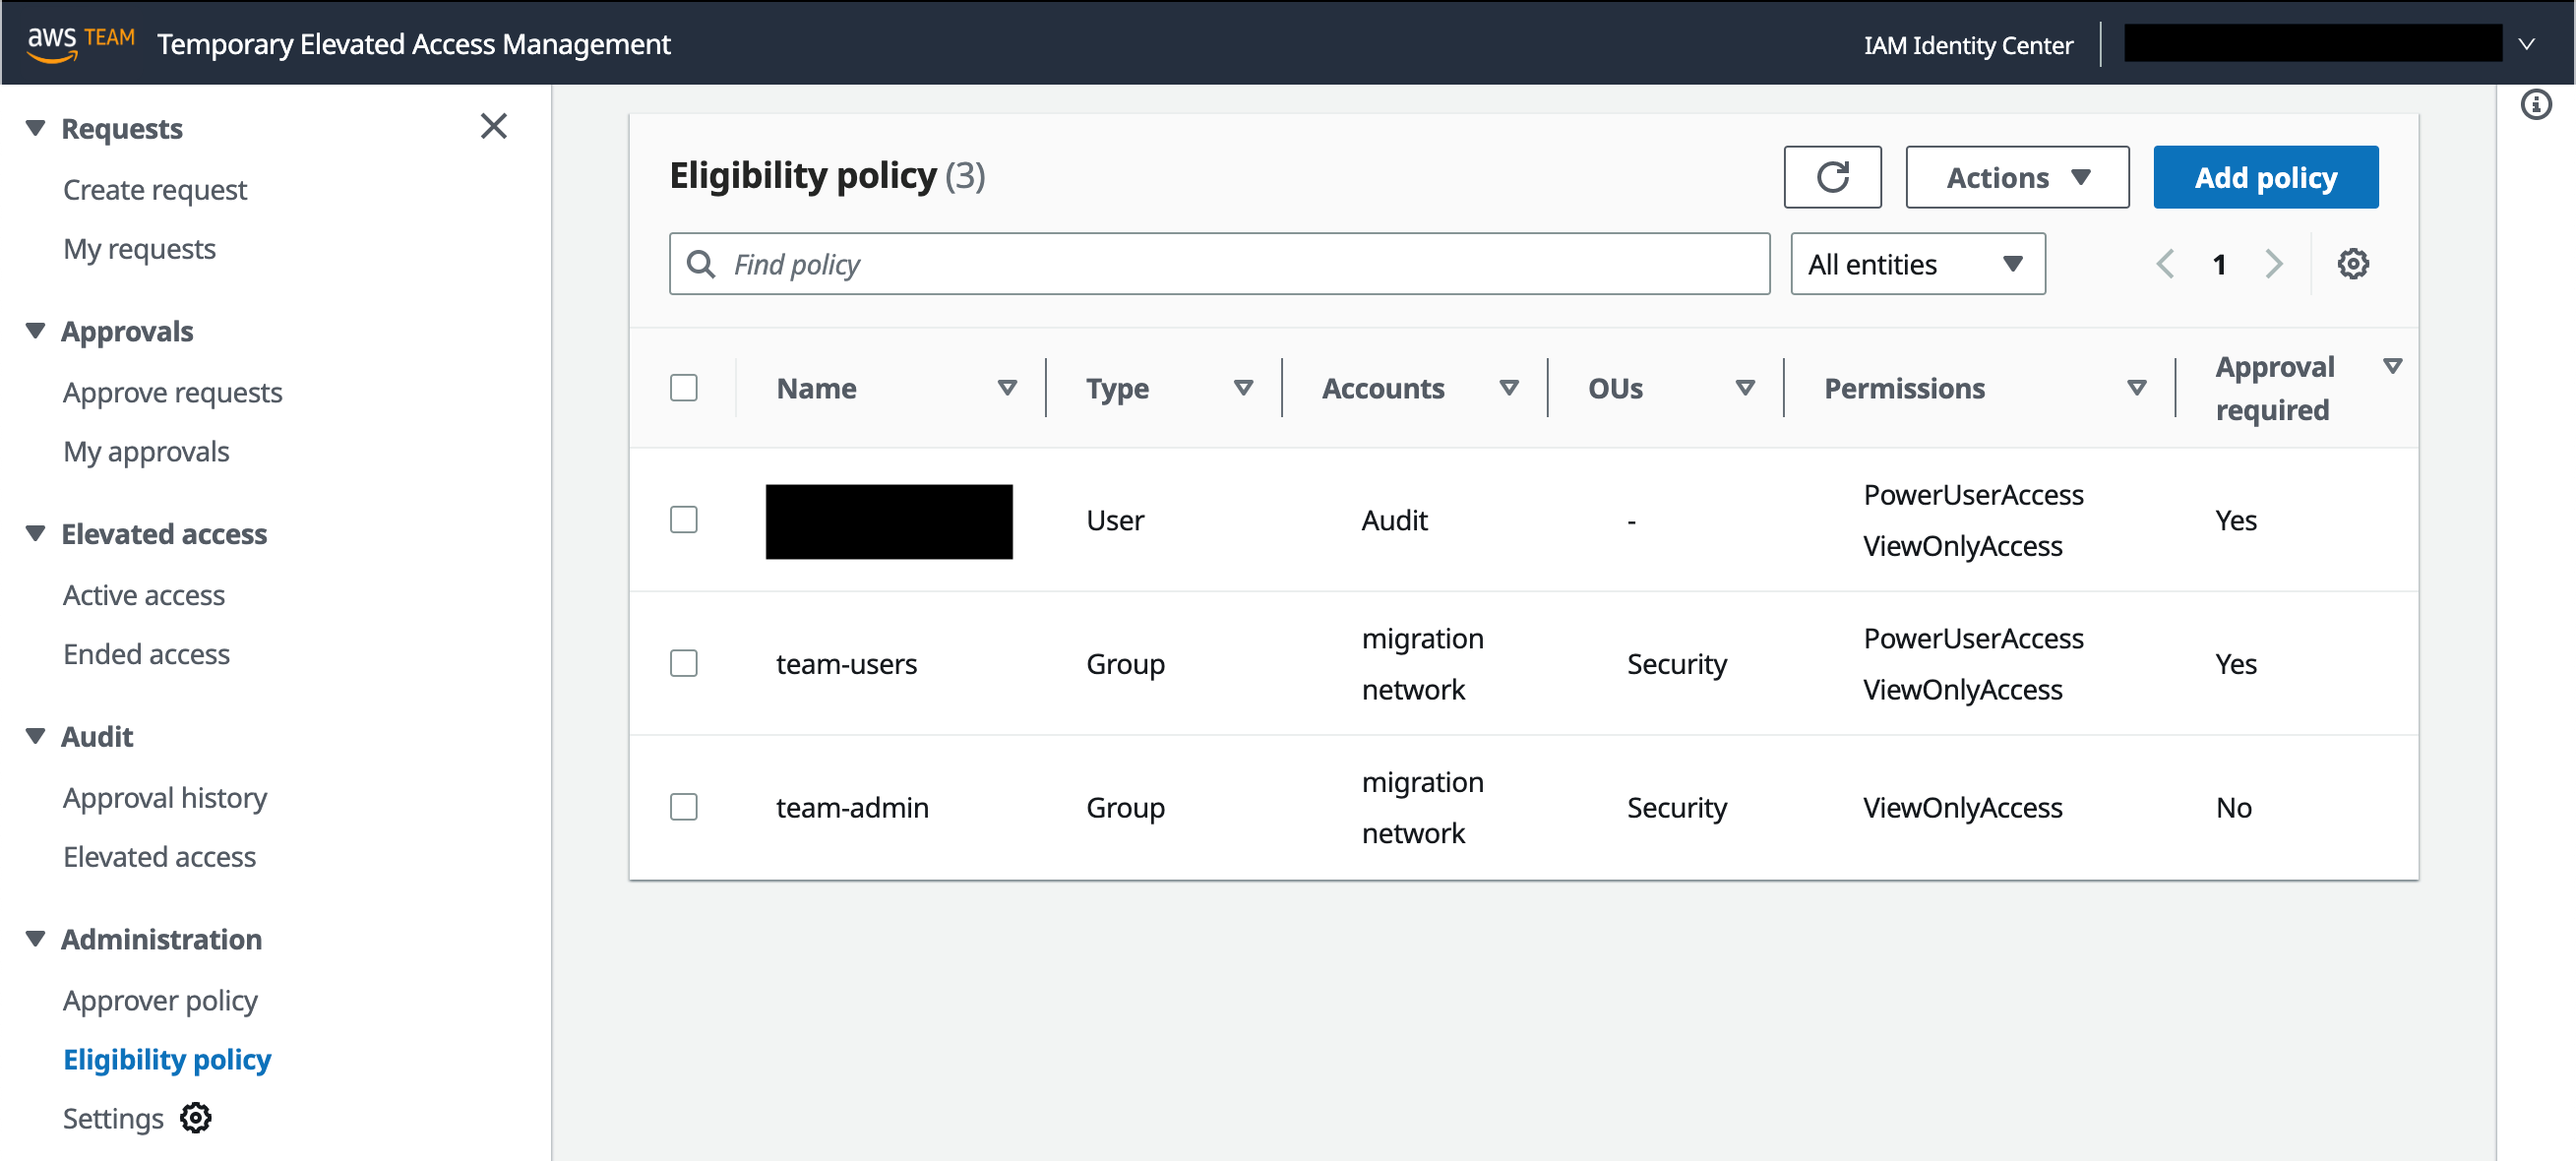
To manage eligibility policies, in the left navigation pane, under Administration, select Eligibility policy. Figure 3 shows this view with three eligibility policies already defined.
Figure 3: Manage eligibility policies
An eligibility policy has four main parts:
Name and Type — An IAM Identity Center user or group
Accounts or OUs — One or more accounts, organizational units (OUs), or both, which belong to your organization
Each eligibility policy allows the specified IAM Identity Center user, or a member of the specified group, to log in to TEAM and request temporary elevated access using the specified permission sets in the specified accounts. When you choose a permission set, you can either use a predefined permission set provided by IAM Identity Center, or you can create your own permission set using custom permissions to provide least-privilege access for particular tasks.
Note: If you specify an OU in an eligibility or approval policy, TEAM includes the accounts directly under that OU, but not those under its child OUs.
Manage approval policies
Approval policies work in a similar way as eligibility policies, except that they authorize users to approve temporary elevated access requests, rather than create them. If a specific account is referenced in an eligibility policy that is configured to require approval, then you need to create a corresponding approval policy for the same account. If there is no corresponding approval policy—or if one exists but its groups have no members — then TEAM won’t allow users to create temporary elevated access requests for that account, because no one would be able to approve them.
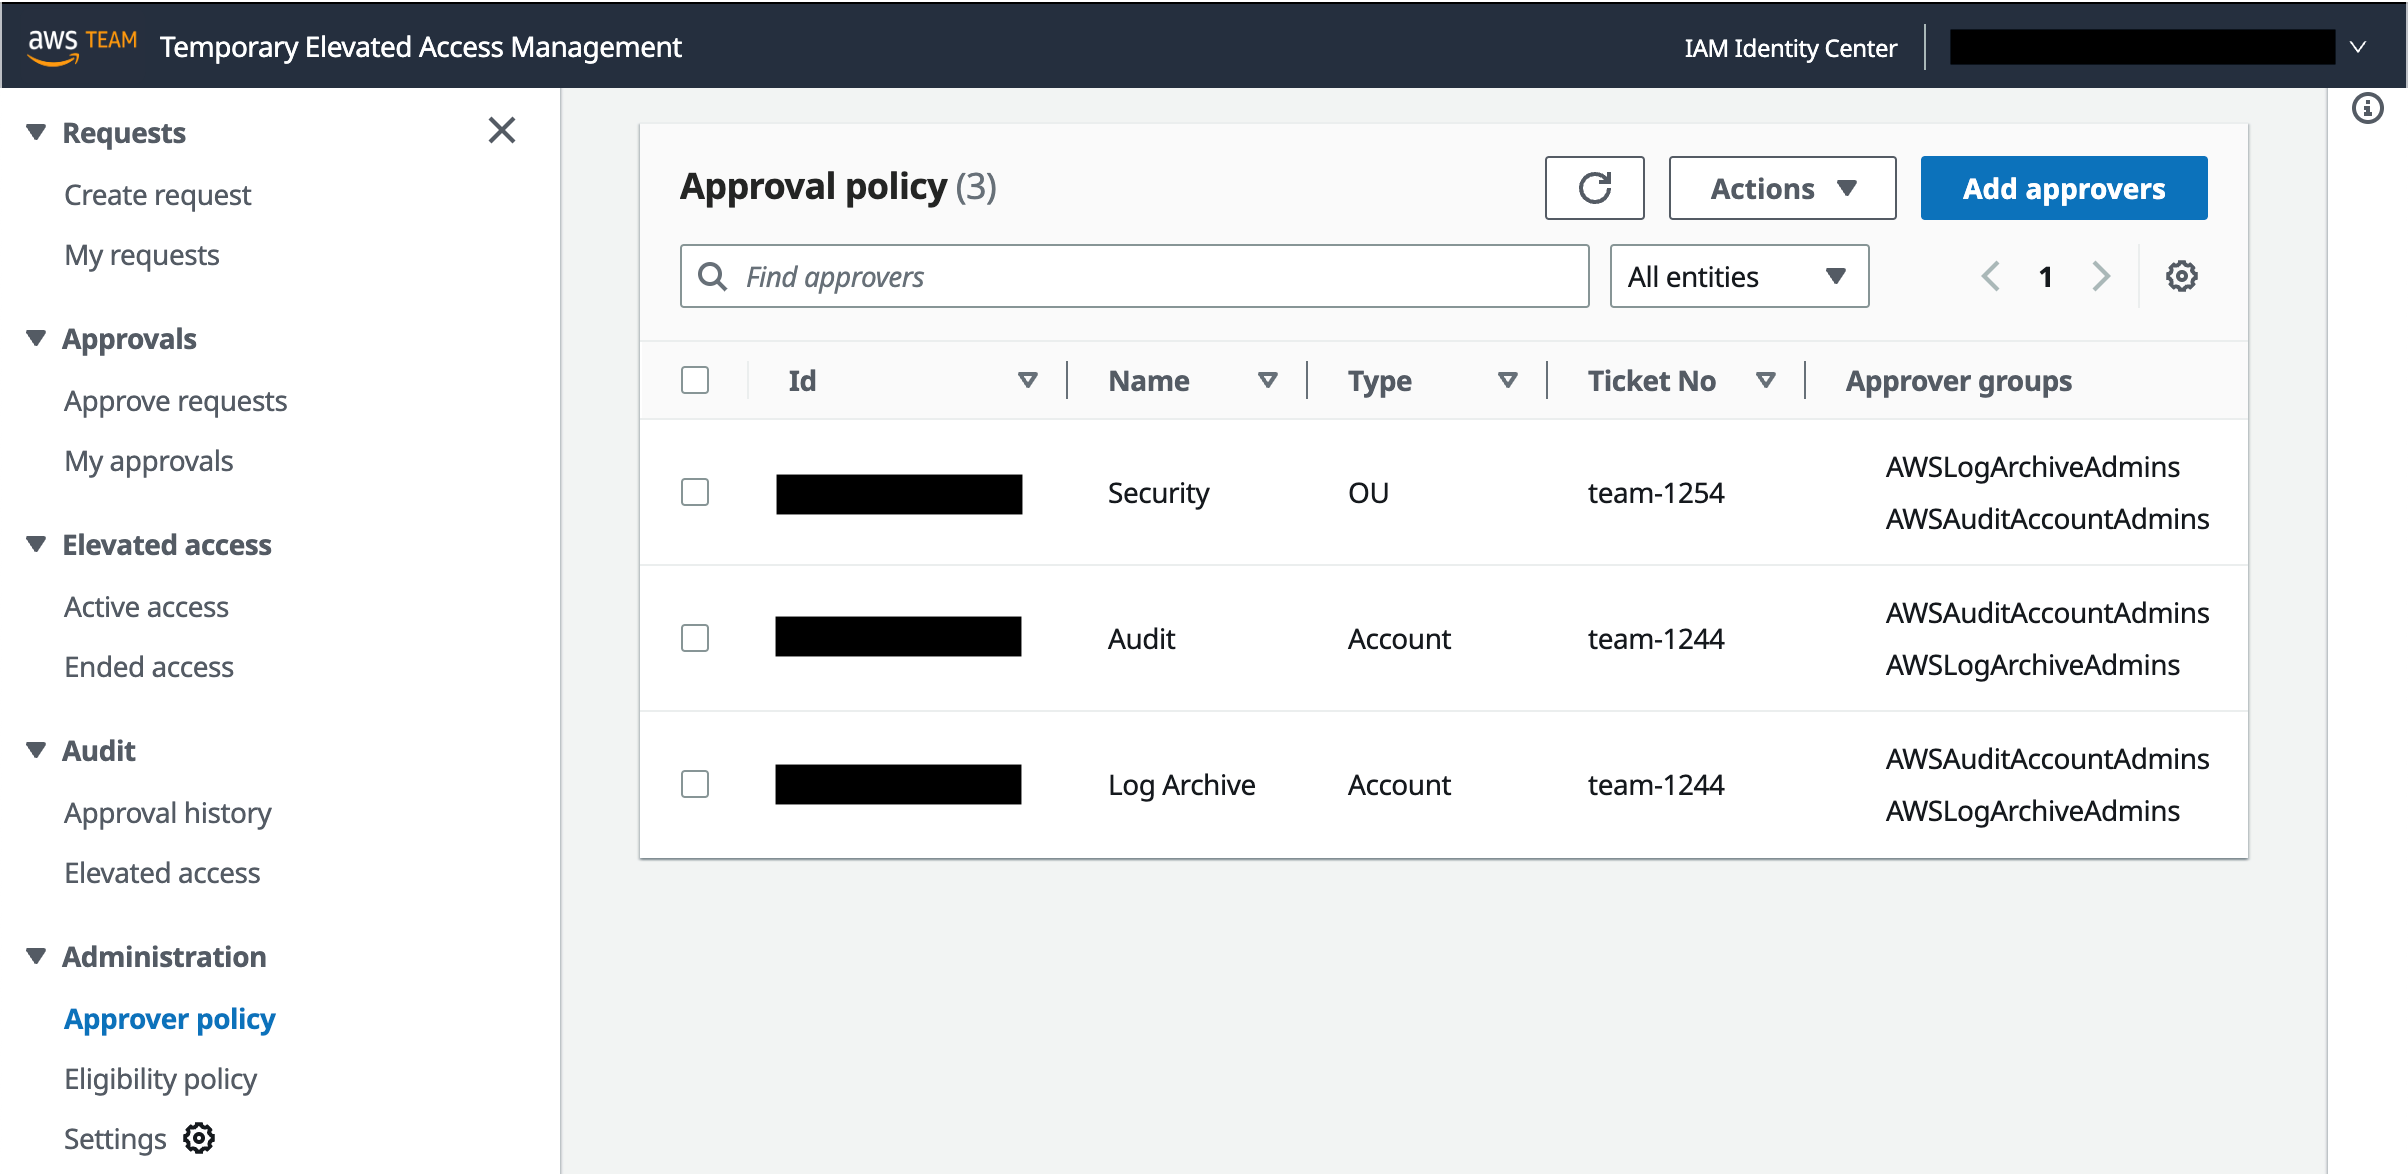
To manage approval policies, in the left navigation pane, under Administration, select Approval policy. Figure 4 shows this view with three approval policies already defined.
Approver groups — One or more IAM Identity Center groups
Each approval policy allows a member of a specified group to log in to TEAM and approve temporary elevated access requests for the specified account, or all accounts under the specified OU, regardless of permission set.
Note: If you specify the same group for both eligibility and approval in the same account, this means approvers can be in the same team as requesters for that account. This is a valid approach, sometimes known as peer approval. Nevertheless, TEAM does not allow an individual to approve their own request. If you prefer requesters and approvers to be in different teams, specify different groups for eligibility and approval.
TEAM walkthrough
Now that the admin persona has defined eligibility and approval policies, you are ready to use TEAM.
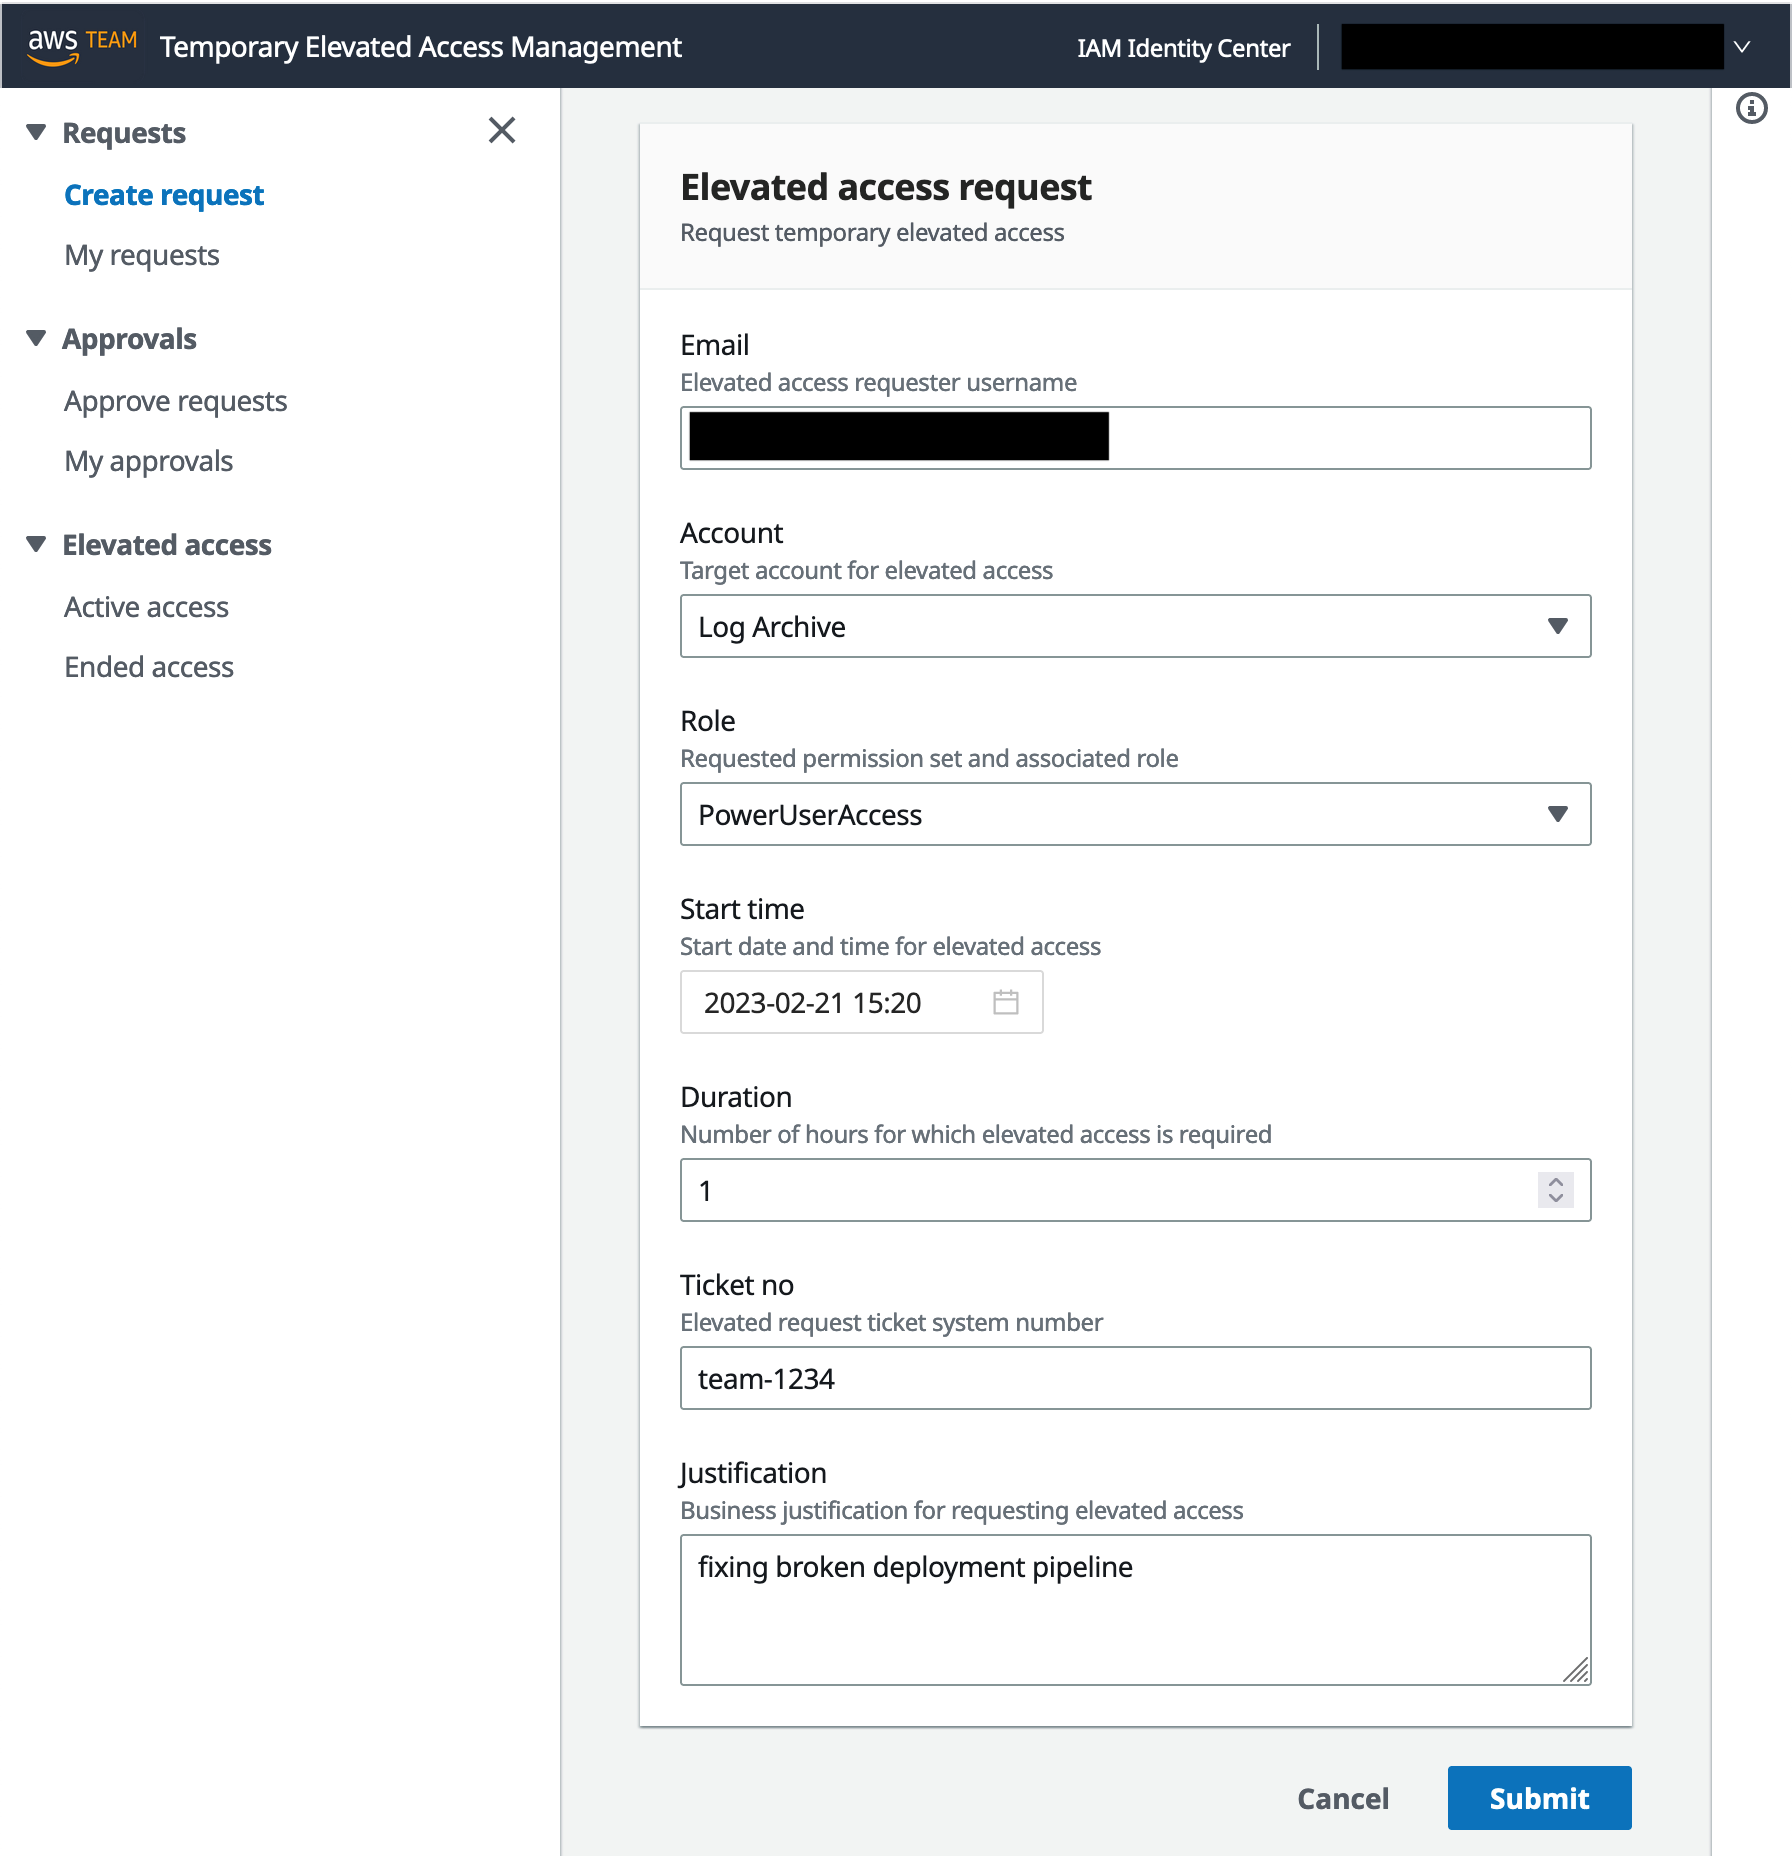
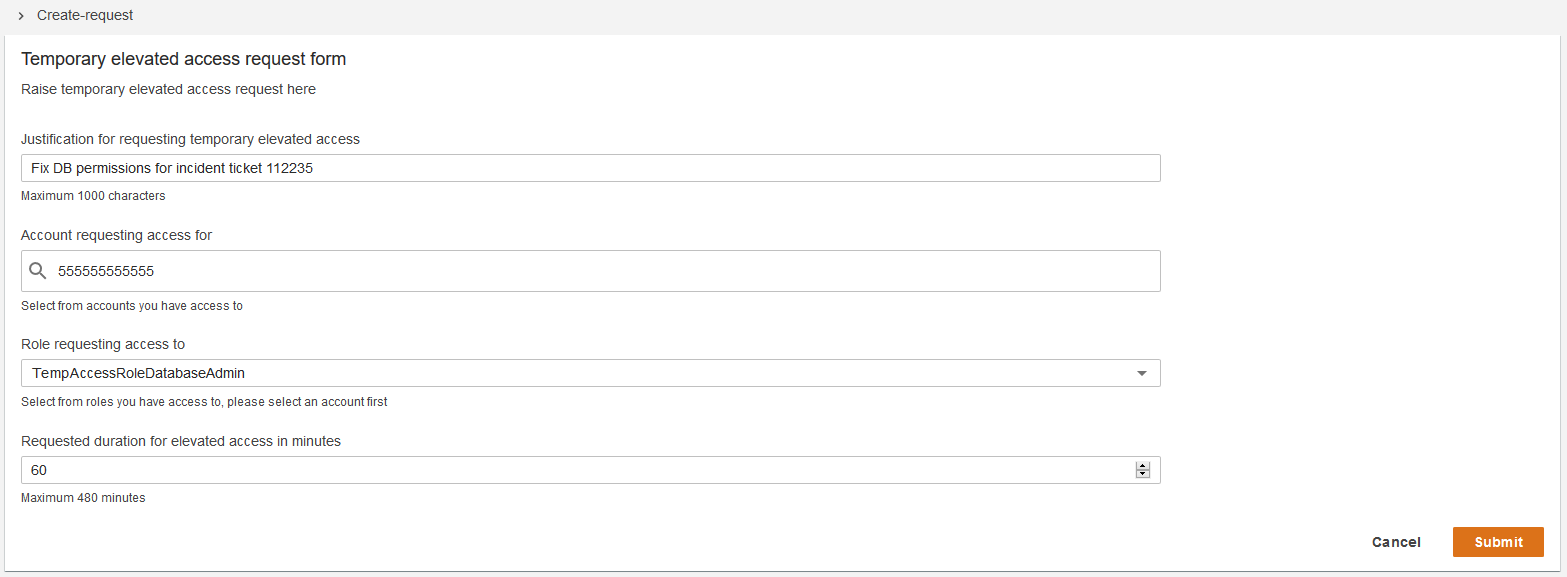
To begin this walkthrough, imagine that you are a requester, and you need to perform an operational task that requires temporary elevated access to your AWS target environment. For example, you might need to fix a broken deployment pipeline or make some changes as part of a deployment. As a requester, you must belong to a group specified in at least one eligibility policy that was defined by the admin persona.
Step 1: Access the AWS access portal in IAM Identity Center
To access the AWS access portal in IAM Identity Center, use the AWS access portal URL, as described in the Access TEAM section earlier in this post.
Step 2: Access the TEAM application
To access the TEAM application, select the TEAM IDC APP icon, as described in the Access TEAM section earlier.
Step 3: Request elevated access
The next step is to create a new elevated access request as follows:
Under Requests, in the left navigation pane, choose Create request.
In the Elevated access request section, do the following, as shown in Figure 5:
Select the account where you need to perform your task.
For Role, select a permission set that will give you sufficient permissions to perform the task.
Enter a start date and time, duration, ticket ID (typically representing a change ticket or incident ticket related to your task), and business justification.
Choose Submit.
Figure 5: Create a new request
When creating a request, consider the following:
In each request, you can specify exactly one account and one permission set.
You can only select an account and permission set combination for which you are eligible based on the eligibility policies defined by the admin persona.
As a requester, you should apply the principle of least privilege by selecting a permission set with the least privilege, and a time window with the least duration, that will allow you to complete your task safely.
TEAM captures a ticket identifier for audit purposes only; it does not try to validate it.
The duration specified in a request determines the time window for which elevated access is active, if your request is approved. During this time window, you can invoke sessions to access the AWS target environment. It doesn’t affect the duration of each session.
Session duration is configured independently for each permission set by an IAM Identity Center administrator, and determines the time period for which IAM temporary credentials are valid for sessions using that permission set.
Sessions invoked just before elevated access ends might remain valid beyond the end of the approved elevated access period. If this is a concern, consider minimizing the session duration configured in your permission sets, for example by setting them to 1 hour.
Step 4: Approve elevated access
After you submit your request, approvers are notified by email. Approvers are notified when there are new requests that fall within the scope of what they are authorized to approve, based on the approval policies defined earlier.
For this walkthrough, imagine that you are now the approver. You will perform the following steps to approve the request. As an approver, you must belong to a group specified in an approval policy that the admin persona configured.
Access the TEAM application in exactly the same way as for the other personas.
In the left navigation pane, under Approvals, choose Approve requests. TEAM displays requests awaiting your review, as shown in Figure 6.
To view the information provided by the requester, select a request and then choose View details.
Figure 6: Requests awaiting review
Select a pending request, and then do one of the following:
To approve the request, select Actions and then choose Approve.
To reject the request, select Actions and then choose Reject.
Figure 7 shows what TEAM displays when you approve a request.
Figure 7: Approve a request
After you approve or reject a request, the original requester is notified by email.
A requester can view the status of their requests in the TEAM application.
To see the status of your open requests in the TEAM application, in the left navigation pane, under Requests, select My requests. Figure 8 shows this view with one approved request.
Figure 8: Approved request
Step 5: Automatic activation of elevated access
After a request is approved, the TEAM application waits until the start date and time specified in the request and then automatically activates elevated access. To activate access, a TEAM orchestration workflow creates a temporary account assignment, which links the requester’s user identity in IAM Identity Center with the permission set and account in their request. Then TEAM notifies the requester by email that their request is active.
A requester can now view their active request in the TEAM application.
To see active requests, in the left navigation pane under Elevated access, choose Active access. Figure 9 shows this view with one active request.
Figure 9: Active request
To see further details for an active request, select a request and then choose View details. Figure 10 shows an example of these details.
Figure 10: Details of an active request
Step 6: Invoke elevated access
During the time period in which elevated access is active, the requester can invoke sessions to access the AWS target environment to complete their task. Each session has the scope (permission set and account) approved in their request. There are three ways to invoke access.
The first two methods involve accessing IAM Identity Center using the AWS access portal URL. Figure 11 shows the AWS access portal while a request is active.
Figure 11: Invoke access from the AWS access portal
From the AWS access portal, you can select an account and permission set that is currently active. You’ll also see the accounts and permission sets that have been statically assigned to you using IAM Identity Center, independently of TEAM. From here, you can do one of the following:
Choose Command line or programmatic access to copy and paste temporary credentials.
The third method is to initiate access directly from the command line using AWS CLI. To use this method, you first need to configure AWS CLI to integrate with IAM Identity Center. This method provides a smooth user experience for AWS CLI users, since you don’t need to copy and paste temporary credentials to your command line.
Regardless of how you invoke access, IAM Identity Center provides temporary credentials for the IAM role and account specified in your request, which allow you to assume that role in that account. The temporary credentials are valid for the duration specified in the role’s permission set, defined by an IAM Identity Center administrator.
When you invoke access, you can now complete the operational tasks that you need to perform in the AWS target environment. During the period in which your elevated access is active, you can invoke multiple sessions if necessary.
Step 7: Log session activity
When you access the AWS target environment, your activity is logged to AWS CloudTrail. Actions you perform in the AWS control plane are recorded as CloudTrail events.
Note: Each CloudTrail event contains the unique identifier of the user who performed the action, which gives you traceability back to the human individual who requested and invoked temporary elevated access.
Step 8: End elevated access
Elevated access ends when either the requested duration elapses or it is explicitly revoked in the TEAM application. The requester or an approver can revoke elevated access whenever they choose.
When elevated access ends, or is revoked, the TEAM orchestration workflow automatically deletes the temporary account assignment for this request. This unlinks the permission set, the account, and the user in IAM Identity Center. The requester is then notified by email that their elevated access has ended.
Step 9: View request details and session activity
You can view request details and session activity for current and historical requests from within the TEAM application. Each persona can see the following information:
Requesters can inspect elevated access requested by them.
Approvers can inspect elevated access that falls within the scope of what they are authorized to approve.
Auditors can inspect elevated access for all TEAM requests.
Session activity is recorded based on the log delivery times provided by AWS CloudTrail, and you can view session activity while elevated access is in progress or after it has ended. Figure 12 shows activity logs for a session displayed in the TEAM application.
Figure 12: Session activity logs
Security and resiliency considerations
The TEAM application controls access to your AWS environment, and you must manage it with great care to prevent unauthorized access. This solution is built using AWS Amplify to ease the reference deployment. Before operationalizing this solution, consider how to align it with your existing development and security practices.
AWS Security Partners provide temporary elevated access solutions that integrate with IAM Identity Center, and AWS has validated the integration of these partner offerings and assessed their capabilities against a common set of customer requirements. For further information, see temporary elevated access in the IAM Identity Center User Guide.
The blog post Managing temporary elevated access to your AWS environment describes an alternative self-hosted solution for temporary elevated access which integrates directly with an external identity provider using OpenID Connect, and federates users directly into AWS Identity and Access Management (IAM) roles in your accounts. The TEAM solution described in this blog post, on the other hand, integrates with IAM Identity Center, which provides a way to centrally manage user access to accounts across your organization and optionally integrates with an external identity provider.
Conclusion
In this blog post, you learned that your first priority should be to use automation to avoid the need to give human users persistent access to your accounts. You also learned that in the rare cases in which people need access to your accounts, not all access is equal; there are times when you need a process to verify that access is needed, and to provide temporary elevated access.
We introduced you to a temporary elevated access management solution (TEAM) that you can download from AWS Samples and use alongside IAM Identity Center to give your users temporary elevated access. We showed you the TEAM workflow, described the TEAM architecture, and provided links where you can get started by downloading and deploying TEAM.
If you have feedback about this post, submit comments in the Comments section below. If you have questions about this post, start a new thread on AWS IAM Identity Center re:Post or contact AWS Support.
Want more AWS Security news? Follow us on Twitter.
These critical applications require increased levels of availability to meet strict business Service Level Agreements (SLAs), even in extreme scenarios such as when EC2 functionality is impaired (see Advanced Multi-AZ Resilience Patterns for examples). Following AWS best practices such as architecting for flexibility will help here, but for some more rigid designs there can still be challenges around EC2 instance availability.
In this post, I detail an approach for Reserving Capacity for this type of scenario to mitigate the risk of the instance type(s) that your application needs being unavailable, including code for building it and ways of testing it.
Baseline: Multi-AZ application with restrictive instance needs
To focus on the problem of Capacity Reservation, our reference architecture is a simple horizontally scalable monolith. This consists of a single executable running across multiple instances as a cluster in an Auto Scaling group across three AZs for High Availability.
The application in this example is both business critical and memory intensive. It needs six r6i.4xlarge instances to meet the required specifications. R6i has been chosen to meet the required memory to vCPU requirements.
The third-party application we need to run, has a significant license cost, so we want to optimize our workload to make sure we run only the minimally required number of instances for the shortest amount of time.
The application should be resilient to issues in a single AZ. In the case of multi-AZ impact, it should failover to Disaster Recovery (DR) in an alternate Region, where service level objectives are instituted to return operations to defined parameters. But this is outside the scope for this post.
The problem: capacity during AZ failover
In this solution, the Auto Scaling Group automatically balances its instances across the selected AZs, providing a layer of resilience in the event of a disruption in a single AZ. However, this hinges on those instances being available for use in the Amazon EC2 capacity pools. The criticality of our application comes with SLAs which dictate that even the very low likelihood of instance types being unavailable in AWS must be mitigated.
The solution: Reserving Capacity
There are 2 main ways of Reserving Capacity for this scenario: (a) Running extra capacity 24/7, (b) On Demand Capacity Reservations (ODCRs).
In the past, another recommendation would have been to utilize Zonal Reserved Instances (Non Zonal will not Reserve Capacity). But although Zonal Reserved Instances do provide similar functionality as On Demand Capacity Reservations combined with Savings Plans, they do so in a less flexible way. Therefore, the recommendation from AWS is now to instead use On Demand Capacity Reservations in combination with Savings Plans for scenarios where Capacity Reservation is required.
The TCO impact of the licensing situation rules out the first of the two valid options. Merely keeping the spare capacity up and running all the time also doesn’t cover the scenario in which an instance needs to be stopped and started, for example for maintenance or patching. Without Capacity Reservation, there is a theoretical possibility that that instance type would not be available to start up again.
This leads us to the second option: On Demand Capacity Reservations.
How much capacity to reserve?
Our failure scenario is when functionality in one AZ is impaired and the Auto Scaling Group must shift its instances to the remaining AZs while maintaining the total number of instances. With a minimum requirement of six instances, this means that we need 6/2 = 3 instances worth of Reserved Capacity in each AZ (as we can’t know in advance which one will be affected).
Spinning up the solution
If you want to get hands-on experience with On Demand Capacity Reservations, refer to this CloudFormation template and its accompanying README file for details on how to spin up the solution that we’re using. The README also contains more information about the Stack architecture. Upon successful creation, you have the following architecture running in your account.
Note that the default instance type for the AWS CloudFormation stack has been downgraded to t2.micro to keep our experiment within the AWS Free Tier.
Testing the solution
Now we have a fully functioning solution with Reserved Capacity dedicated to this specific Auto Scaling Group. However, we haven’t tested it yet.
To interact with the resources created by CloudFormation, we need some names and IDs that have been collected in the “Outputs” section of the stack. These can be accessed from the console in a tab under the Stack that you have created.
We set these as variables for easy access later (replace the values with the values from your stack):
How does the solution react to scaling out the Auto Scaling Group beyond the Capacity Reservation?
First, let’s look at what happens if the Auto Scaling Group wants to Scale Out. Our requirements state that we should have a minimum of six instances running at any one time. But the solution should still adapt to increased load. Before knowing anything about how this works in AWS, imagine two scenarios:
The Auto Scaling Group can scale out to a total of nine instances, as that’s how many On Demand Capacity Reservations we have. But it can’t go beyond that even if there is On Demand capacity available.
The Auto Scaling Group can scale just as much as it could when On Demand Capacity Reservations weren’t used, and it continues to launch unreserved instances when the On Demand Capacity Reservations run out (assuming that capacity is in fact available, which is why we have the On Demand Capacity Reservations in the first place).
The instances section of the Amazon EC2 Management Console can be used to show our existing Capacity Reservations, as created by the CloudFormation stack.
As expected, this shows that we are currently using six out of our nine On Demand Capacity Reservations, with two in each AZ.
Now let’s scale out our Auto Scaling Group to 12, thus using up all On Demand Capacity Reservations in each AZ, as well as requesting one extra Instance per AZ.
The Auto Scaling Group now has the desired Capacity of 12:
And in the Capacity Reservation screen we can see that all our On Demand Capacity Reservations have been used up:
In the Auto Scaling Group we see that – as expected – we weren’t restricted to nine instances. Instead, the Auto Scaling Group fell back on launching unreserved instances when our On Demand Capacity Reservations ran out:
How does the solution react to adding a matching instance outside the Auto Scaling Group?
But what if someone else/another process in the account starts an EC2 instance of the same type for which we have the On Demand Capacity Reservations? Won’t they get that Reservation, and our Auto Scaling Group will be left short of its three instances per AZ, which would mean that we won’t have enough reservations for our minimum of six instances in case there are issues with an AZ?
This all comes down to the type of On Demand Capacity Reservation that we have created, or the “Eligibility”. Looking at our Capacity Reservations, we can see that they are all of the “targeted” type. This means that they are only used if explicitly referenced, like we’re doing in our Target Group for the Auto Scaling Group.
It’s time to prove that. First, we scale in our Auto Scaling Group so that only six instances are used, resulting in there being one unused capacity reservation in each AZ. Then, we try to add an EC2 instance manually, outside the target group.
We still have the three unutilized On Demand Capacity Reservations, as expected, proving that the On Demand Capacity Reservations with the “targeted” eligibility only get used when explicitly referenced:
How does the solution react to an AZ being removed?
Now we’re comfortable that the Auto Scaling Group can grow beyond the On Demand Capacity Reservations if needed, as long as there is capacity, and that other EC2 instances in our account won’t use the On Demand Capacity Reservations specifically purchased for the Auto Scaling Group. It’s time for the big test. How does it all behave when an AZ becomes unavailable?
For our purposes, we can simulate this scenario by changing the Auto Scaling Group to be across two AZs instead of the original three.
First, we scale out to seven instances so that we can see the impact of overflow outside the On Demand Capacity Reservations when we subsequently remove one AZ:
Give it some time, and we see that the Auto Scaling Group is now spread across two AZs, On Demand Capacity Reservations cover the minimum six instances as per our requirements, and the rest is handled by instances without Capacity Reservation:
Cleanup
It’s time to clean up, as those Instances and On Demand Capacity Reservations come at a cost!
Using a combination of Auto Scaling Groups, Resource Groups, and On Demand Capacity Reservations (ODCRs), we have built a solution that provides High Availability backed by reserved capacity, for those types of workloads where the requirements for availability in the case of an AZ becoming temporarily unavailable outweigh the increased cost of reserving capacity, and where the best practices for architecting for flexibility cannot be followed due to limitations on applicable architectures.
We have tested the solution and confirmed that the Auto Scaling Group falls back on using unreserved capacity when the On Demand Capacity Reservations are exhausted. Moreover, we confirmed that targeted On Demand Capacity Reservations won’t risk getting accidentally used by other solutions in our account.
Now it’s time for you to try it yourself! Download the IaC template and give it a try! And if you are planning on using On Demand Capacity Reservations, then don’t forget to look into Savings Plans, as they significantly reduce the cost of that Reserved Capacity..
DevSecOps refers to a set of best practices that integrate security controls into the continuous integration and delivery (CI/CD) workflow. One of the first controls is Static Application Security Testing (SAST). SAST tools run on every code change and search for potential security vulnerabilities before the code is executed for the first time. Catching security issues early in the development process significantly reduces the cost of fixing them and the risk of exposure.
This blog post, shows how we can set up a CI/CD using Bitbucket Pipelines and Amazon CodeGuru Reviewer . Bitbucket Pipelines is a cloud-based continuous delivery system that allows developers to automate builds, tests, and security checks with just a few lines of code. CodeGuru Reviewer is a cloud-based static analysis tool that uses machine learning and automated reasoning to generate code quality and security recommendations for Java and Python code.
We demonstrate step-by-step how to set up a pipeline with Bitbucket Pipelines, and how to call CodeGuru Reviewer from there. We then show how to view the recommendations produced by CodeGuru Reviewer in Bitbucket Code Insights, and how to triage and manage recommendations during the development process.
Bitbucket Overview
Bitbucket is a Git-based code hosting and collaboration tool built for teams. Bitbucket’s best-in-class Jira and Trello integrations are designed to bring the entire software team together to execute a project. Bitbucket provides one place for a team to collaborate on code from concept to cloud, build quality code through automated testing, and deploy code with confidence. Bitbucket makes it easy for teams to collaborate and reduce issues found during integration by providing a way to combine easily and test code frequently. Bitbucket gives teams easy access to tools needed in other parts of the feedback loop, from creating an issue to deploying on your hardware of choice. It also provides more advanced features for those customers that need them, like SAML authentication and secrets storage.
Solution Overview
Bitbucket Pipelines uses a Docker container to perform the build steps. You can specify any Docker image accessible by Bitbucket, including private images, if you specify credentials to access them. The container starts and then runs the build steps in the order specified in your configuration file. The build steps specified in the configuration file are nothing more than shell commands executed on the Docker image. Therefore, you can run scripts, in any language supported by the Docker image you choose, as part of the build steps. These scripts can be stored either directly in your repository or an Internet-accessible location. This solution demonstrates an easy way to integrate Bitbucket pipelines with AWS CodeReviewer using bitbucket-pipelines.yml file.
You can interact with your Amazon Web Services (AWS) account from your Bitbucket Pipeline using the OpenID Connect (OIDC) feature. OpenID Connect is an identity layer above the OAuth 2.0 protocol.
Now that you understand how Bitbucket and your AWS Account securely communicate with each other, let’s look into the overall summary of steps to configure this solution.
Step 2: Configure Bitbucket Pipelines as an Identity Provider on AWS
Configuring Bitbucket Pipelines as an IdP in IAM enables Bitbucket Pipelines to issue authentication tokens to users to connect to AWS. In your Bitbucket repo, go to Repository Settings > OpenID Connect. Note the provider URL and the Audience variable on that screen.
ari:cloud:bitbucket::workspace/ari:cloud:bitbucket::workspace/84c08677-e352-4a1c-a107-6df387cfeef7 – This is the recipient the token is intended for. See more detail about audience in Request For Comments (RFC) which is memorandum published by the Internet Engineering Task Force(IETF) describing methods and behavior for securely transmitting information between two parties usinf JSON Web Token ( JWT).
Figure 2 : Configure Bitbucket Pipelines as an Identity Provider on AWS
Next, navigate to the IAM dashboard > Identity Providers > Add provider, and paste in the above info. This tells AWS that Bitbucket Pipelines is a token issuer.
Step 3: Create a custom policy
You can always use the CLI with Admin credentials but if you want to have a specific role to use the CLI, your credentials must have at least the following permissions:
To create an IAM policy, navigate to the IAM dashboard > Policies > Create Policy
Now then paste the above mentioned json document into the json tab as shown in screenshot below and replace <AWS ACCOUNT ID> with your own AWS Account ID
Figure 3 : Create a Policy.
Name your policy; in our example, we name it CodeGuruReviewerOIDC.
Figure 4 : Review and Create a IAM policy.
Step 4: Create an IAM Role
Once you’ve enabled Bitbucket Pipelines as a token issuer, you need to configure permissions for those tokens so they can execute actions on AWS. To create an IAM web identity role, navigate to the IAM dashboard > Roles > Create Role, and choose the IdP and audience you just created.
Figure 5 : Create an IAM role
Next, select the “CodeGuruReviewerOIDC “ policy to attach to the role.
Figure 6 : Assign policy to role
Figure 7 : Review and Create role
Name your role; in our example, we name it CodeGuruReviewerOIDCRole.
After adding a role, copy the Amazon Resource Name (ARN) of the role created:
The Amazon Resource Name (ARN) will look like this:
we will need this in a later step when we create AWS_OIDC_ROLE_ARN as a repository variable.
Step 5: Add repository variables needed for pipeline
Variables are configured as environment variables in the build container. You can access the variables from the bitbucket-pipelines.yml file or any script that you invoke by referring to them. Pipelines provides a set of default variables that are available for builds, and can be used in scripts .Along with default variables we need to configure few additional variables called Repository Variables which are used to pass special parameter to the pipeline.
Figure 8 : Create repository variables
Figure 8 Create repository variables
Below mentioned are the few repository variables that need to be configured for this solution.
1.AWS_DEFAULT_REGION Create a repository variableAWS_DEFAULT_REGION with value “us-east-1”
2.BB_API_TOKEN Create a new repository variable BB_API_TOKEN and paste the below created App password as the value
App passwords are user-based access tokens for scripting tasks and integrating tools (such as CI/CD tools) with Bitbucket Cloud.These access tokens have reduced user access (specified at the time of creation) and can be useful for scripting, CI/CD tools, and testing Bitbucket connected applications while they are in development. To create an App password:
Select your avatar (Your profile and settings) from the navigation bar at the top of the screen.
Under Settings, select Personal settings.
On the sidebar, select App passwords.
Select Create app password.
Give the App password a name, usually related to the application that will use the password.
Select the permissions the App password needs. For detailed descriptions of each permission, see: App password permissions.
Select the Create button. The page will display the New app password dialog.
Copy the generated password and either record or paste it into the application you want to give access. The password is only displayed once and can’t be retrieved later.
3.BB_USERNAME Create a repository variable BB_USERNAME and add your bitbucket username as the value of this variable
4.AWS_OIDC_ROLE_ARN
After adding a role in Step 4, copy the Amazon Resource Name (ARN) of the role created:
The Amazon Resource Name (ARN) will look something like this:
and create AWS_OIDC_ROLE_ARN as a repository variable in the target Bitbucket repository.
Step 6: Adding the CodeGuru Reviewer CLI to your pipeline
In order to add CodeGuruRevewer CLi to your pipeline update the bitbucket-pipelines.yml file as shown below
#  Template maven-build

 #  This template allows you to test and build your Java project with Maven.
 #  The workflow allows running tests, code checkstyle and security scans on the default branch.

 # Prerequisites: pom.xml and appropriate project structure should exist in the repository.

 image: docker-public.packages.atlassian.com/atlassian/bitbucket-pipelines-mvn-python3-awscli

 pipelines:
  default:
    - step:
        name: Build Source Code
        caches:
          - maven
        script:
          - cd $BITBUCKET_CLONE_DIR
          - chmod 777 ./gradlew
          - ./gradlew build
        artifacts:
          - build/**
    - step:
        name: Download and Install CodeReviewer CLI
        script:
          - curl -OL https://github.com/aws/aws-codeguru-cli/releases/download/0.2.3/aws-codeguru-cli.zip
          - unzip aws-codeguru-cli.zip
        artifacts:
          - aws-codeguru-cli/**
    - step:
        name: Run CodeGuruReviewer
        oidc: true
        script:
          - export AWS_DEFAULT_REGION=$AWS_DEFAULT_REGION
          - export AWS_ROLE_ARN=$AWS_OIDC_ROLE_ARN
          - export S3_BUCKET=$S3_BUCKET

          # Setup aws cli
          - export AWS_WEB_IDENTITY_TOKEN_FILE=$(pwd)/web-identity-token
          - echo $BITBUCKET_STEP_OIDC_TOKEN > $(pwd)/web-identity-token
          - aws configure set web_identity_token_file "${AWS_WEB_IDENTITY_TOKEN_FILE}"
          - aws configure set role_arn "${AWS_ROLE_ARN}"
          - aws sts get-caller-identity

          # setup codegurureviewercli
          - export PATH=$PATH:./aws-codeguru-cli/bin
          - chmod 777 ./aws-codeguru-cli/bin/aws-codeguru-cli

          - export SRC=$BITBUCKET_CLONE_DIR/src
          - export OUTPUT=$BITBUCKET_CLONE_DIR/test-reports
          - export CODE_INSIGHTS=$BITBUCKET_CLONE_DIR/bb-report

          # Calling Code Reviewer CLI
          - ./aws-codeguru-cli/bin/aws-codeguru-cli --region $AWS_DEFAULT_REGION  --root-dir $BITBUCKET_CLONE_DIR --build $BITBUCKET_CLONE_DIR/build/classes/java --src $SRC --output $OUTPUT --no-prompt --bitbucket-code-insights $CODE_INSIGHTS
        artifacts:
          - test-reports/*.*
          - target/**
          - bb-report/**
    - step:
        name: Upload Code Insights Artifacts to Bitbucket Reports
        script:
          - chmod 777 upload.sh
          - ./upload.sh bb-report/report.json bb-report/annotations.json
    - step:
        name: Upload Artifacts to Bitbucket Downloads       # Optional Step
        script:
          - pipe: atlassian/bitbucket-upload-file:0.3.3
            variables:
              BITBUCKET_USERNAME: $BB_USERNAME
              BITBUCKET_APP_PASSWORD: $BB_API_TOKEN
              FILENAME: '**/*.json'
    - step:
          name: Validate Findings     #Optional Step
          script:
            # Looking into CodeReviewer results and failing if there are Critical recommendations
            - grep -o "Critical" test-reports/recommendations.json | wc -l
            - count="$(grep -o "Critical" test-reports/recommendations.json | wc -l)"
            - echo $count
            - if (( $count > 0 )); then
            - echo "Critical findings discovered. Failing."
            - exit 1
            - fi
          artifacts:
            - '**/*.json'
Let’s look into the pipeline file to understand various steps defined in this pipeline
Figure 9 : Bitbucket pipeline execution steps
Step 1) Build Source Code
In this step source code is downloaded into a working directory and build using Gradle.All the build artifacts are then passed on to next step
Step 2) Download and Install Amazon CodeGuru Reviewer CLI In this step Amazon CodeGuru Reviewer is CLI is downloaded from a public github repo and extracted into working directory. All artifacts downloaded and extracted are then passed on to next step
Step 3) Run CodeGuruReviewer
This step uses flag oidc: true which declares you are using the OIDC authentication method, while AWS_OIDC_ROLE_ARN declares the role created in the previous step that contains all of the necessary permissions to deal with AWS resources. Further repository variables are exported, which is then used to set AWS CLI .Amazon CodeGuruReviewer CLI which was downloaded and extracted in previous step is then used to invoke CodeGuruReviewer along with some parameters .
Following are the parameters that are passed on to the CodeGuruReviewer CLI --region $AWS_DEFAULT_REGION The AWS region in which CodeGuru Reviewer will run (in this blog we used us-east-1).
--root-dir $BITBUCKET_CLONE_DIR The root directory of the repository that CodeGuru Reviewer should analyze.
--build $BITBUCKET_CLONE_DIR/build/classes/java Points to the build artifacts. Passing the Java build artifacts allows CodeGuru Reviewer to perform more in-depth bytecode analysis, but passing the build artifacts is not required.
--src $SRC Points the source code that should be analyzed. This can be used to focus the analysis on certain source files, e.g., to exclude test files. This parameter is optional, but focusing on relevant code can shorten analysis time and cost.
--output $OUTPUT The directory where CodeGuru Reviewer will store its recommendations.
--no-prompt This ensures that CodeGuru Reviewer does run in interactive mode where it pauses for user input.
–-bitbucket-code-insights $CODE_INSIGHTS The location where recommendations in Bitbucket CodeInsights format should be written to.
Once Amazon CodeGuruReviewer scans the code based on the above parameters, it generates two json files (reports.json and annotations.json) Code Insight Reports which is then passed on as artifacts to the next step.
Step 4) Upload Code Insights Artifacts to Bitbucket Reports In this step code Insight Report generated by Amazon CodeGuru Reviewer is then uploaded to Bitbucket Reports. This makes the report available in the reports section in the pipeline as displayed in the screenshot
Figure 10 : CodeGuru Reviewer Report
Step 5) [Optional] Upload the copy of these reports to Bitbucket Downloads This is an Optional step where you can upload the artifacts to Bitbucket Downloads. This is especially useful because the artifacts inside a build pipeline gets deleted after 14 days of the pipeline run. Using Bitbucket Downloads, you can store these artifacts for a much longer duration.
Figure 11 : Bitbucket downloads
Step 6) [Optional] Validate Findings by looking into results and failing is there are any Critical Recommendations This is an optional step showcasing how the results for CodeGururReviewer can be used to trigger the success and failure of a Bitbucket pipeline. In this step the pipeline fails, if a critical recommendation exists in report.
Step 7: Review CodeGuru recommendations
CodeGuru Reviewer supports different recommendation formats, including CodeGuru recommendation summaries, SARIF, and Bitbucket CodeInsights.
Keeping your Pipeline Green
Now that CodeGuru Reviewer is running in our pipeline, we need to learn how to unblock ourselves if there are recommendations. The easiest way to unblock a pipeline after is to address the CodeGuru recommendation. If we want to validate on our local machine that a change addresses a recommendation using the same CLI that we use as part of our pipeline. Sometimes, it is not convenient to address a recommendation. E.g., because there are mitigations outside of the code that make the recommendation less relevant, or simply because the team agrees that they don’t want to block deployments on recommendations unless they are critical. For these cases, developers can add a .codeguru-ignore.yml file to their repository where they can use a variety of criteria under which a recommendation should not be reported. Below we explain all available criteria to filter recommendations. Developers can use any subset of those criteria in their .codeguru-ignore.yml file. We will give a specific example in the following sections.
version: 1.0 # The version number is mandatory. All other entries are optional.

# The CodeGuru Reviewer CLI produces a recommendations.json file which contains deterministic IDs for each
# recommendation. This ID can be excluded so that this recommendation will not be reported in future runs of the
# CLI.
 ExcludeById:
 - '4d2c43618a2dac129818bef77093730e84a4e139eef3f0166334657503ecd88d'
# We can tell the CLI to exclude all recommendations below a certain severity. This can be useful in CI/CD integration.
 ExcludeBelowSeverity: 'HIGH'
# We can exclude all recommendations that have a certain tag. Available Tags can be found here:
# https://docs.aws.amazon.com/codeguru/detector-library/java/tags/
# https://docs.aws.amazon.com/codeguru/detector-library/python/tags/
 ExcludeTags:
  - 'maintainability'
# We can also exclude recommendations by Detector ID. Detector IDs can be found here:
# https://docs.aws.amazon.com/codeguru/detector-library
 ExcludeRecommendations:
# Ignore all recommendations for a given Detector ID
  - detectorId: 'java/[email protected]'
# Ignore all recommendations for a given Detector ID in a provided set of locations.
# Locations can be written as Unix GLOB expressions using wildcard symbols.
  - detectorId: 'java/[email protected]'
    Locations:
      - 'src/main/java/com/folder01/*.java'
# Excludes all recommendations in the provided files. Files can be provided as Unix GLOB expressions.
 ExcludeFiles:
  - tst/**
The recommendations will still be reported in the CodeGuru Reviewer console, but not by the CodeGuru Reviewer CLI and thus they will not block the pipeline anymore.
Conclusion
In this post, we outlined how you can set up a CI/CD pipeline using Bitbucket Pipelines, and Amazon CodeGuru Reviewer and we outlined how you can integrate Amazon CodeGuru Reviewer CLI with the Bitbucket cloud-based continuous delivery system that allows developers to automate builds, tests, and security checks with just a few lines of code. We showed you how to create a Bitbucket pipeline job and integrate the CodeGuru Reviewer CLI to detect issues in your Java and Python code, and access the recommendations for remediating these issues.
We presented an example where you can stop the build upon finding critical violations. Furthermore, we discussed how you could upload these artifacts to BitBucket downloads and store these artifacts for a much longer duration. The CodeGuru Reviewer CLI offers you a one-line command to scan any code on your machine and retrieve recommendations .You can use the CLI to integrate CodeGuru Reviewer into your favorite CI tool, as a pre-commit hook, in your workflow. In turn, you can combine CodeGuru Reviewer with Dynamic Application Security Testing (DAST) and Software Composition Analysis (SCA) tools to achieve a hybrid application security testing method that helps you combine the inside-out and outside-in testing approaches, cross-reference results, and detect vulnerabilities that both exist and are exploitable.
If you need hands-on keyboard support, then AWS Professional Services can help implement this solution in your enterprise, and introduce you to our AWS DevOps services and offerings.
This blog post is written by Enrico Liguori, SA – Solutions Builder , WWPS Solution Architecture.
AWS Local Zones are a type of infrastructure deployment that places compute, storage,and other select AWS services close to large population and industry centers.
We now have a total of 32 Local Zones; 15 outside of the US (Bangkok, Buenos Aires, Copenhagen, Delhi, Hamburg, Helsinki, Kolkata, Lagos, Lima, Muscat, Perth, Querétaro, Santiago, Taipei, and Warsaw) and 17 in the US. We will continue to launch Local Zones in 21 metro areas in 18 countries, including Australia, Austria, Belgium, Brazil, Canada, Colombia, Czech Republic, Germany, Greece, India, Kenya, Netherlands, New Zealand, Norway, Philippines, Portugal, South Africa, and Vietnam.
Customers using AWS Local Zones can provision the infrastructure and services needed to host their workloads with the same APIs and tools for automation that they use in the AWS Region, included the AWS Cloud Development Kit (AWS CDK).
The AWS CDK is an open source software development framework to model and provision your cloud application resources using familiar programming languages, including TypeScript, JavaScript, Python, C#, and Java. For the solution in this post, we use Python.
Overview
In this post we demonstrate how to:
Programmatically enable the Local Zone of your interest.
Explore the supported APIs to check the types of Amazon Elastic Compute Cloud (Amazon EC2) instances available in a specific Local Zone and get their associated price per hour;
Deploy a simple WordPress application in the Local Zone through AWS CDK.
Prerequisites
To be able to try the examples provided in this post, you must configure:
To get started with Local Zones, you must first enable the Local Zone that you plan to use in your AWS account. In this tutorial, you can learn how to select the Local Zone that provides the lowest latency to your site and understand how to opt into the Local Zone from the AWS Management Console.
If you prefer to interact with AWS APIs programmatically, then you can enable the Local Zone of your interest by calling the ModifyAvailabilityZoneGroup API through the AWS CLI or one of the supported AWS SDKs.
The following examples show how to opt into the Atlanta Local Zone through the AWS CLI and through the Python SDK:
The opt in process takes approximately five minutes to complete. After this time, you can confirm the opt in status using the DescribeAvailabilityZones API.
From the AWS CLI, you can check the enabled Local Zones with:
The OptInStatus confirms that we successful enabled the Atlanta Local Zone and that we can now deploy resources in it.
How to check available EC2 instances in Local Zones
The set of instance types available in a Local Zone might change from one Local Zone to another. This means that before starting deploying resources, it’s a good practice to check which instance types are supported in the Local Zone.
After enabling the Local Zone, we can programmatically check the instance types that are available by using DescribeInstanceTypeOfferings. To use the API with Local Zones, we must pass availability-zone as the value of the LocationType parameter and use a Filter object to select the correct Local Zone that we want to check. The resulting AWS CLI command will look like the following example:
How to check prices of EC2 instances in Local Zones
EC2 instances and other AWS resources in Local Zones will have different prices than in the parent Region. Check the pricing page for the complete list of pricing options and associated price-per-hour.
To access the pricing list programmatically, we can use the GetProducts API. The API returns the list of pricing options available for the AWS service specified in the ServiceCode parameter. We also recommend defining Filters to restrict the number of results returned. For example, to retrieve the On-Demand pricing list of a T3 Medium instance in Atlanta from the AWS CLI, we can use the following:
Note that the Region specified in the CLI command and in Boto3, is the location of the AWS Price List service API endpoint. This API is available only in us-east-1 and ap-south-1 Regions.
Deploying WordPress in Local Zones using AWS CDK
In this section, we see how to use the AWS CDK and Python to deploy a simple non-production WordPress installation in a Local Zone.
Architecture overview
The AWS CDK stack will deploy a new standard Amazon Virtual Private Cloud (Amazon VPC) in the parent Region (us-east-1) that will be extended to the Local Zone. This creates two subnets associated with the Atlanta Local Zone: a public subnet to expose resources on the Internet, and a private subnet to host the application and database layers. Review the AWS public documentation for a definition of public and private subnets in a VPC.
The application architecture is made of the following:
A front-end in the private subnet where a WordPress application is installed, through a User Data script, in a type T3 medium EC2 instance.
A back-end in the private subnet where MySQL database is installed, through a User Data script, in a type T3 medium EC2 instance.
Together with the VPC CIDR (i.e. 172.31.100.0/24), we define also the subnets configuration through the subnet_configuration parameter.
Note that in the subnet definitions above there is no specification of the Availability Zone or Local Zone that we want to associate them with. We can define this setting at the VPC level, overwriting the availability_zones method as shown here:
As an alternative, you can use a Local Zone Name as the value of the availability_zones parameter in each Subnet definition. For a complete list of Local Zone Names, check out the Zone Names on the Local Zones Locations page.
Specifying ec2.SubnetType.PUBLIC in the subnet_type parameter, AWS CDK automatically creates an Internet Gateway (IGW) associated with our VPC and a default route in its routing table pointing to the IGW. With this setup, the Internet traffic will go directly to the IGW in the Local Zone without going through the parent AWS Region. For other connectivity options, check the AWS Local Zone User Guide.
The last piece of our networking infrastructure is a self-managed NAT instance. This will allow instances in the private subnet to communicate with services outside of the VPC and simultaneously prevent them from receiving unsolicited connection requests.
We can implement the best practices for NAT instances included in the AWS public documentation using a combination of parameters of the Instance construct, as shown here:
In the previous code example, we specify the following as parameters:
vpc – the VPC object created before.
security group – the Security Group containing the rules to allow HTTP and HTTPS traffic. The Security Group is created in create_nat_SG function provided in the code that we copied from the repository.
instance_type – the instance type, in our case a T3 Medium.
The other resources, including the front-end instance managed by AutoScaling, the back-end instance, and ALB are deployed using the standard AWS CDK constructs. Note that the ALB service is only available in some Local Zones. If you plan to use a Local Zone where ALB isn’t supported, then you must deploy a load balancer on a self-managed EC2 instance, or use a load balancer available in AWS Marketplace.
Stack deployment
Next, let’s go through the AWS CDK bootstrapping process. This is required only for the first time that we use AWS CDK in a specific AWS environment (an AWS environment is a combination of an AWS account and Region).
$ cdk bootstrap
Now we can deploy the stack with the following:
$ cdk deploy
After the deployment is completed, we can connect to the application with a browser using the URL returned in the output of the cdk deploy command:
The WordPress install wizard will be displayed in the browser, thereby confirming that the deployment worked as expected:
Note that in this post we use the Local Zone in Atlanta. Therefore, we must deploy the stack in its parent Region, US East (N. Virginia). To select the Region used by the stack, configure the AWS CLI default profile.
Cleanup
To terminate the resources that we created in this post, you can simply run the following:
$ cdk destroy
Conclusion
In this post, we demonstrated how to interact programmatically with the different AWS APIs available for Local Zones. Furthermore, we deployed a simple WordPress application in the Atlanta Local Zone after analyzing the AWS CDK code used for the deployment.
We encourage you to try the examples provided in this post and get familiar with the programmatic configuration and deployment of resources in a Local Zone.
Today, we’re making that easier. Using the new AWS Resource Explorer, you can search through the AWS resources in your account across Regions using metadata such as names, tags, and IDs. When you find a resource in the AWS Management Console, you can quickly go from the search results to the corresponding service console and Region to start working on that resource. In a similar way, you can use the AWS Command Line Interface (CLI) or any of the AWS SDKs to find resources in your automation tools.
Let’s see how this works in practice.
Using AWS Resource Explorer To start using Resource Explorer, I need to turn it on so that it creates and maintains the indexes that will provide fast responses to my search queries. Usually, the administrator of the account is the one taking these steps so that authorized users in that account can start searching.
To run a query, I need a view that gives access to an index. If the view is using an aggregator index, then the query can search across all indexed Regions.
If the view is using a local index, then the query has access only to the resources in that Region.
I can control the visibility of resources in my account by creating views that define what resource information is available for search and discovery. These controls are not based only on resources but also on the information that resources bring. For example, I can give access to the Amazon Resource Names (ARNs) of all resources but not to their tags which might contain information that I want to keep confidential.
In the Resource Explorer console, I choose Enable Resource Explorer. Then, I select the Quick setup option to have visibility for all supported resources within my account. This option creates local indexes in all Regions and an aggregator index in the selected Region. A default view with a filter that includes all supported resources in the account is also created in the same Region as the aggregator index.
With the Advanced setup option, I have access to more granular controls that are useful when there are specific governance requirements. For example, I can select in which Regions to create indexes. I can choose not to replicate resource information to any other Region so that resources from each AWS Region are searchable only from within the same Region. I can also control what information is available in the default view or avoid the creation of the default view.
With the Quick setup option selected, I choose Go to Resource Explorer. A quick overview shows the progress of enabling Resource Explorer across Regions. After the indexes have been created, it can take up to 36 hours to index all supported resources, and search results might be incomplete until then. When resources are created or deleted, your indexes are automatically updated. These updates are asynchronous, so it can take some time (usually a few minutes) to see the changes.
Searching With AWS Resource Explorer After resources have been indexed, I choose Proceed to resource search. In the Search criteria, I choose which View to use. Currently, I have the default view selected. Then, I start typing in the Query field to search through the resources in my AWS account across all Regions. For example, I have an application where I used the convention to start resource names with my-app. For the resources I created manually, I also added the Project tag with value MyApp.
To find the resource of this application, I start by searching for my-app.
The results include resources from multiple services and Regions and global resources from AWS Identity and Access Management (IAM). I have a service, tasks, and a task definition from Amazon ECS, roles and policies from AWS IAM, log groups from CloudWatch. Optionally, I can filter results by Region or resource type. If I choose any of the listed resources, the link will bring me to the corresponding service console and Region with the resource selected.
To look for something in a specific Region, such as Europe (Ireland), I can restrict the results by adding region:eu-west-1 to the query.
I can further restrict results to Amazon ECS resources by adding service:ecs to the query. Now I only see the ECS cluster, service, tasks, and task definition in Europe (Ireland). That’s the task definition I was looking for!
I can also search using tags. For example, I can see the resources where I added the MyApp tag by including tag.value:MyApp in a query. To specify the actual key-value pair of the tag, I can use tag:Project=MyApp.
Creating a Custom View Sometimes you need to control the visibility of the resources in your account. For example, all the EC2 instances used for development in my account are in US West (Oregon). I create a view for the development team by choosing a specific Region (us-west-2) and filtering the results with service:ec2 in the query. Optionally, I could further filter results based on resource names or tags. For example, I could add tag:Environment=Dev to only see resources that have been tagged to be in a development environment.
Now I allow access to this view to users and roles used by the development team. To do so, I can attach an identity-based policy to the users and roles of the development team. In this way, they can only explore and search resources using this view.
Unified Search in the AWS Management Console After I turn Resource Explorer on, I can also search through my AWS resources in the search bar at the top of the Management Console. We call this capability unified search as it gives results that include AWS services, features, blogs, documentation, tutorial, events, and more.
To focus my search on AWS resources, I add /Resources at the beginning of my search.
Note that unified search automatically inserts a wildcard character (*) at the end of the first keyword in the string. This means that unified search results include resources that match any string that starts with the specified keyword.
The search performed by the Query text box on the Resource search page in the Resource Explorer console does not automatically append a wildcard character but I can do it manually after any term in the search string to have similar results.
Unified search works when I have the default view in the same Region that contains the aggregator index. To check if unified search works for me, I look at the top of the Settings page.
Availability and Pricing You can start using AWS Resource Explorer today with a global console and via the AWS Command Line Interface (CLI) and the AWS SDKs. AWS Resource Explorer is available at no additional charge. Using Resource Explorer makes it much faster to find the resources you need and use them in your automation processes and in their service console.
Watts S. Humphrey, the father of Software Quality, had famously quipped, “Every business is a software business”. Software is indeed integral to any industry. The engineers who create software are also responsible for making sure that the underlying code adheres to industry and organizational standards, are performant, and are absolved of any security vulnerabilities that could make them susceptible to attack.
Traditionally, security testing has been the forte of a specialized security testing team, who would conduct their tests toward the end of the Software Development lifecycle (SDLC). The adoption of DevSecOps practices meant that security became a shared responsibility between the development and security teams. Now, development teams can, on their own or as advised by their security team, setup and configure various code scanning tools to detect security vulnerabilities much earlier in the software delivery process (aka “Shift Left”). Meanwhile, the practice of Static code analysis and security application testing (SAST) has become a standard part of the SDLC. Furthermore, it’s imperative that the development teams expect SAST tools that are easy to set-up, seamlessly fit into their DevOps infrastructure, and can be configured without requiring assistance from security or DevOps experts.
In this post, we’ll demonstrate how you can leverage Amazon CodeGuru Reviewer Command Line Interface (CLI) to integrate CodeGuru Reviewer into your Jenkins Continuous Integration & Continuous Delivery (CI/CD) pipeline. Note that the solution isn’t limited to Jenkins, and it would be equally useful with any other build automation tool. Moreover, it can be integrated at any stage of your SDLC as part of the White-box testing. For example, you can integrate the CodeGuru Reviewer CLI as part of your software development process, as well as run it on your dev machine before committing the code.
Launched in 2020, CodeGuru Reviewer utilizes machine learning (ML) and automated reasoning to identify security vulnerabilities, inefficient uses of AWS APIs and SDKs, as well as other common coding errors. CodeGuru Reviewer employs a growing set of detectors for Java and Python to provide recommendations via the AWS Console. Customers that leverage the CodeGuru Reviewer CLI within a CI/CD pipeline also receive recommendations in a machine-readable JSON format, as well as HTML.
CodeGuru Reviewer offers native integration with Source Code Management (SCM) systems, such as GitHub, BitBucket, and AWS CodeCommit. However, it can be used with any SCM via its CLI. The CodeGuru Reviewer CLI is a shim layer on top of the AWS Command Line Interface (AWS CLI) that simplifies the interaction with the tool by handling the uploading of artifacts, triggering of the analysis, and fetching of the results, all in a single command.
Many customers, including Mastercard, are benefiting from this new CodeGuru Reviewer CLI.
“During one of our technical retrospectives, we noticed the need to integrate Amazon CodeGuru recommendations in our build pipelines hosted on Jenkins. Not all our developers can run or check CodeGuru recommendations through the AWS console. Incorporating CodeGuru CLI in our build pipelines acts as an important quality gate and ensures that our developers can immediately fix critical issues.” Claudio Frattari, Lead DevOps at Mastercard
Solution overview
The application deployment workflow starts by placing the application code on a GitHub SCM. To automate the scenario, we have added GitHub to the Jenkins project under the “Source Code” section. We chose the GitHub option, which would clone the chosen GitHub repository in the Jenkins local workspace directory.
In the build stage of the pipeline (see Figure 1), we configure the appropriate build tool to perform the code build and security analysis. In this example, we will be using Maven as the build tool.
Figure 1: Jenkins pipeline with Amazon CodeGuru Reviewer
In the post-build stage, we configure the CodeGuru Reviewer CLI to generate the recommendations based on the review.
Lastly, in the concluding stage of the pipeline, we’ll be analyzing the JSON results using jq – a lightweight and flexible command-line JSON processor, and then failing the Jenkins job if we encounter observations that are of a “Critical” severity.
Jenkins will trigger the “CodeGuru Reviewer” (see Figure 1) based review process in the post-build stage, i.e., after the build finishes. Furthermore, you can configure other stages, such as automated testing or deployment, after this stage. Additionally, passing the location of the build artifacts to the CLI lets CodeGuru Reviewer perform a more in-depth security analysis. Build artifacts are either directories containing jar files (e.g., build/lib for Gradle or /target for Maven) or directories containing class hierarchies (e.g., build/classes/java/main for Gradle).
Walkthrough
Now that we have an overview of the workflow, let’s dive deep and walk you through the following steps in detail:
To run the CLI, we must have Git, Java, Maven, and the AWS CLI installed. Verify that they’re installed on our machine by running the following commands:
If they aren’t installed, then download and install Java here (Amazon Corretto is a no-cost, multiplatform, production-ready distribution of the Open Java Development Kit), Maven from here, and Git from here. Instructions for installing AWS CLI are available here.
We would need to create an Amazon Simple Storage Service (Amazon S3) bucket with the prefix codeguru-reviewer-. Note that the bucket name must begin with the mentioned prefix, since we have used the name pattern in the following AWS Identity and Access Management (IAM) permissions, and CodeGuru Reviewer expects buckets to begin with this prefix. Refer to the following section 4(a) “Specifying S3 bucket name” for more details.
Furthermore, we’ll need working credentials on our machine to interact with our AWS account. Learn more about setting up credentials for AWS here. You can find the minimal permissions to run the CodeGuru Reviewer CLI as follows.
b. Required Permissions
To use the CodeGuru Reviewer CLI, we need at least the following AWS IAM permissions, attached to an AWS IAM User or an AWS IAM role:
The CodeGuru Reviewer CLI only has one required parameter –root-dir (or just -r) to specify to the local directory that should be analyzed. Furthermore, the –src option can be used to specify one or more files in this directory that contain the source code that should be analyzed. In turn, for Java applications, the –build option can be used to specify one or more build directories.
For a demonstration, we’ll analyze the demo application. This will make sure that we’re all set for when we leverage the CLI in Jenkins. To proceed, first we download and install the sample application, as follows:
git clone https://github.com/aws-samples/amazon-codeguru-reviewer-sample-app
cd amazon-codeguru-reviewer-sample-app
mvn clean compile
Now that we have built our demo application, we can use the aws-codeguru-cli CLI command that we added to the path to trigger the code scan:
For additional assistance on the CLI command, reference the readme here.
2. Creating a Jenkins Pipeline job
CodeGuru Reviewer can be integrated in a Jenkins Pipeline as well as a Freestyle project. In this example, we’re leveraging a Pipeline.
a. Pipeline Job Configuration
Log in to Jenkins, choose “New Item”, then select “Pipeline” option.
Enter a name for the project (for example, “CodeGuruPipeline”), and choose OK.
Figure 2: Creating a new Jenkins pipeline
On the “Project configuration” page, scroll down to the bottom and find your pipeline. In the pipeline script, paste the following script (or use your own Jenkinsfile). The following example is a valid Jenkinsfile to integrate CodeGuru Reviewer with a project built using Maven.
pipeline {
    agent any
    stages {
        stage('Build') {
            steps {
                // Get code from a GitHub repository
                git clone https://github.com/aws-samples/amazon-codeguru-reviewer-java-detectors.git

                // Run Maven on a Unix agent
                sh "mvn clean compile"

                // To run Maven on a Windows agent, use following
                // bat "mvn -Dmaven.test.failure.ignore=true clean package"
            }
        }
        stage('CodeGuru Reviewer') {
            steps{
                sh 'ls -lsa *'
                sh 'pwd'
                // Here we’re setting an absolute path, but we can
                // also use JENKINS environment variables
                sh '''
                    export BASE=/var/jenkins_home/workspace/CodeGuruPipeline/amazon-codeguru-reviewer-java-detectors
                    export SRC=${BASE}/src
                    export OUTPUT = ./output
                    /home/codeguru/aws-codeguru-cli/bin/aws-codeguru-cli --root-dir $BASE --build $BASE/target/classes --src $SRC --output $OUTPUT -c $GIT_PREVIOUS_COMMIT:$GIT_COMMIT --no-prompt
                    '''
            }
        }
        stage('Checking findings'){
            steps{
                // In this example we are stopping our pipline on
                // detecting Critical findings. We are using jq
                // to count occurrences of Critical severity
                sh '''
                CNT = $(cat ./output/recommendations.json |jq '.[] | select(.severity=="Critical")|.severity' | wc -l)'
                if (( $CNT > 0 )); then
                  echo "Critical findings discovered. Failing."
                  exit 1
                fi
                '''
            }
        }
    }
}
Save the configuration and select “Build now” on the side bar to trigger the build process (see Figure 3).
Figure 3: Jenkins pipeline in triggered state
3. Reviewing the CodeGuru Reviewer recommendations
Once the build process is finished, you can view the review results from CodeGuru Reviewer by selecting the Jenkins build history for the most recent build job. Then, browse to Workspace output. The output is available in JSON and HTML formats (Figure 4).
Figure 4: CodeGuru CLI Output
Snippets from the HTML and JSON reports are displayed in Figure 5 and 6 respectively.
In this example, our pipeline analyzes the JSON results with jq based on severity equal to critical and failing the job if there are any critical findings. Note that this output path is set with the –output option. For instance, the pipeline will fail on noticing the “critical” finding at Line 67 of the EventHandler.java class (Figure 5), flagged due to use of an insecure code. Till the time the code is remediated, the pipeline would prevent the code deployment. The vulnerability could have gone to production undetected, in absence of the tool.
CodeGuru Reviewer needs one Amazon S3 bucket for the CLI to store the artifacts while the analysis is running. The artifacts are deleted after the analysis is completed. The same bucket will be reused for all the repositories that are analyzed in the same account and region (unless specified otherwise by the user). Note that CodeGuru Reviewer expects the S3 bucket name to begin with codeguru-reviewer-. At this time, you can’t use a different naming pattern. However, if you want to use a different bucket name, then you can use the –bucket-name option.
Select the Permissions tab of your S3 bucket. Update the Block public access and add the following S3 bucket policy.
Figure 7: S3 bucket settings
S3 bucket policy:
{
   "Version":"2012-10-17",
   "Statement":[
      {
         "Sid":"PublicRead",
         "Effect":"Allow",
         "Principal":"*",
         "Action":"s3:GetObject",
         "Resource":"[Change to ARN for your S3 bucket]/*"
      }
   ]
}
Note that if you must change the bucket’s name, then you can remove the associated S3 bucket in the AWS console under CodeGuru → CI workflows and select Disassociate Workflow.
b. Analyzing a single commit
The CLI also lets us specify a specific commit range to analyze. This can lead to faster and more cost-effective scans for the incremental code changes, instead of a full repository scan. For example, if we just want to analyze the last commit, we can run:
Here, we use the -c option to specify that we only want to analyze the commits between HEAD^ (the previous commit) and HEAD (the current commit). Moreover, we add the –no-prompt option to automatically answer questions by the CLI with yes. This option is useful if we plan to use the CLI in an automated way, such as in our CI/CD workflow.
c. Encrypting artifacts
CodeGuru Reviewer lets us use a customer managed key to encrypt the content of the S3 bucket that is used to store the source and build artifacts. To achieve this, create a customer owned key in AWS Key Management Service (AWS KMS) (see Figure 8).
Figure 8: KMS settings
We must grant CodeGuru Reviewer the permission to decrypt artifacts with this key by adding the following Statement to your Key policy:
{
   "Sid":"Allow CodeGuru to use the key to decrypt artifact",
   "Effect":"Allow",
   "Principal":{
      "AWS":"*"
   },
   "Action":[
      "kms:Decrypt",
      "kms:DescribeKey"
   ],
   "Resource":"*",
   "Condition":{
      "StringEquals":{
         "kms:ViaService":"codeguru-reviewer.amazonaws.com",
         "kms:CallerAccount":[
            "YOUR AWS ACCOUNT ID"
         ]
      }
   }
}
Then, enable server-side encryption for the S3 bucket that we’re using with CodeGuru Reviewer (Figure 9).
S3 bucket settings:
Figure 9: S3 bucket encryption settings
After we enable encryption on the bucket, we must delete all the CodeGuru repository associations that use this bucket, and then recreate them by analyzing the repositories while providing the key (as in the following example, Figure 10):
Figure 10: CodeGuru CI Workflow
Note that the first time you check out your repository, it will always trigger a full repository scan. Consider setting the -c option, as this will allow a commit range.
Cleaning Up
At this stage, you may choose to delete the resources created while following this blog, to avoid incurring any unwanted costs.
Delete the Jenkins installation, if not required further.
Conclusion
In this post, we outlined how you can integrate Amazon CodeGuru Reviewer CLI with the Jenkins open-source build automation tool to perform code analysis as part of your code build pipeline and act as a quality gate. We showed you how to create a Jenkins pipeline job and integrate the CodeGuru Reviewer CLI to detect issues in your Java and Python code, as well as access the recommendations for remediating these issues. We presented an example where you can stop the build upon finding critical violations. Furthermore, we discussed how you can specify a commit range to avoid a full repo scan, and how the S3 bucket used by CodeGuru Reviewer to store artifacts can be encrypted using customer managed keys.
The CodeGuru Reviewer CLI offers you a one-line command to scan any code on your machine and retrieve recommendations. You can run the CLI anywhere where you can run AWS commands. In other words, you can use the CLI to integrate CodeGuru Reviewer into your favourite CI tool, as a pre-commit hook, or anywhere else in your workflow. In turn, you can combine CodeGuru Reviewer with Dynamic Application Security Testing (DAST) and Software Composition Analysis (SCA) tools to achieve a hybrid application security testing method that helps you combine the inside-out and outside-in testing approaches, cross-reference results, and detect vulnerabilities that both exist and are exploitable.
Hopefully, you have found this post informative, and the proposed solution useful. If you need helping hands, then AWS Professional Services can help implement this solution in your enterprise, as well as introduce you to our AWS DevOps services and offerings.
In this post you’ll learn about temporary elevated access and how it can mitigate risks relating to human access to your AWS environment. You’ll also be able to download a minimal reference implementation and use it as a starting point to build a temporary elevated access solution tailored for your organization.
Introduction
While many modern cloud architectures aim to eliminate the need for human access, there often remain at least some cases where it is required. For example, unexpected issues might require human intervention to diagnose or fix, or you might deploy legacy technologies into your AWS environment that someone needs to configure manually.
AWS provides a rich set of tools and capabilities for managing access. Users can authenticate with multi-factor authentication (MFA), federate using an external identity provider, and obtain temporary credentials with limited permissions. AWS Identity and Access Management (IAM) provides fine-grained access control, and AWS Single Sign-On (AWS SSO) makes it easy to manage access across your entire organization using AWS Organizations.
For higher-risk human access scenarios, your organization can supplement your baseline access controls by implementing temporary elevated access.
What is temporary elevated access?
The goal of temporary elevated access is to ensure that each time a user invokes access, there is an appropriate business reason for doing so. For example, an appropriate business reason might be to fix a specific issue or deploy a planned change.
Traditional access control systems require users to be authenticated and authorized before they can access a protected resource. Becoming authorized is typically a one-time event, and a user’s authorization status is reviewed periodically—for example as part of an access recertification process.
With persistent access, also known as standing access, a user who is authenticated and authorized can invoke access at any time just by navigating to a protected resource. The process of invoking access does not consider the reason why they are invoking it on each occurrence. Today, persistent access is the model that AWS Single Sign-On supports, and is the most common model used for IAM users and federated users.
With temporary elevated access, also known as just-in-time access, users must be authenticated and authorized as before—but furthermore, each time a user invokes access an additional process takes place, whose purpose is to identify and record the business reason for invoking access on this specific occasion. The process might involve additional human actors or it might use automation. When the process completes, the user is only granted access if the business reason is appropriate, and the scope and duration of their access is aligned to the business reason.
Why use temporary elevated access?
You can use temporary elevated access to mitigate risks related to human access scenarios that your organization considers high risk. Access generally incurs risk when two elements come together: high levels of privilege, such as ability to change configuration, modify permissions, read data, or update data; and high-value resources, such as production environments, critical services, or sensitive data. You can use these factors to define a risk threshold, above which you enforce temporary elevated access, and below which you continue to allow persistent access.
Your motivation for implementing temporary elevated access might be internal, based on your organization’s risk appetite; or external, such as regulatory requirements applicable to your industry. If your organization has regulatory requirements, you are responsible for interpreting those requirements and determining whether a temporary elevated access solution is required, and how it should operate.
Regardless of the source of requirement, the overall goal is to reduce risk.
Important: While temporary elevated access can reduce risk, the preferred approach is always to automate your way out of needing human access in the first place. Aim to use temporary elevated access only for infrequent activities that cannot yet be automated. From a risk perspective, the best kind of human access is the kind that doesn’t happen at all.
How can temporary elevated access help reduce risk?
In scenarios that require human intervention, temporary elevated access can help manage the risks involved. It’s important to understand that temporary elevated access does not replace your standard access control and other security processes, such as access governance, strong authentication, session logging and monitoring, and anomaly detection and response. Temporary elevated access supplements the controls you already have in place.
The following are some of the ways that using temporary elevated access can help reduce risk:
1. Ensuring users only invoke elevated access when there is a valid business reason. Users are discouraged from invoking elevated access habitually, and service owners can avoid potentially disruptive operations during critical time periods.
2. Visibility of access to other people. With persistent access, user activity is logged—but no one is routinely informed when a user invokes access, unless their activity causes an incident or security alert. With temporary elevated access, every access invocation is typically visible to at least one other person. This can arise from their participation in approvals, notifications, or change and incident management processes which are multi-party by nature. With greater visibility to more people, inappropriate access by users is more likely to be noticed and acted upon.
3. A reminder to be vigilant. Temporary elevated access provides an overt reminder for users to be vigilant when they invoke high-risk access. This is analogous to the kind security measures you see in a physical security setting. Imagine entering a secure facility. You see barriers, fences, barbed wire, CCTV, lighting, guards, and signs saying “You are entering a restricted area.” Temporary elevated access has a similar effect. It reminds users there is a heightened level of control, their activity is being monitored, and they will be held accountable for any actions they perform.
4. Reporting, analytics, and continuous improvement. A temporary elevated access process records the reasons why users invoke access. This provides a rich source of data to analyze and derive insights. Management can see why users are invoking access, which systems need the most human access, and what kind of tasks they are performing. Your organization can use this data to decide where to invest in automation. You can measure the amount of human access and set targets to reduce it. The presence of temporary elevated access might also incentivize users to automate common tasks, or ask their engineering teams to do so.
Implementing temporary elevated access
Before you examine the reference implementation, first take a look at a logical architecture for temporary elevated access, so you can understand the process flow at a high level.
A typical temporary elevated access solution involves placing an additional component between your identity provider and the AWS environment that your users need to access. This is referred to as a temporary elevated access broker, shown in Figure 1.
Figure 1: A logical architecture for temporary elevated access
When a user needs to perform a task requiring temporary elevated access to your AWS environment, they will use the broker to invoke access. The broker performs the following steps:
1. Authenticate the user and determine eligibility. The broker integrates with your organization’s existing identity provider to authenticate the user with multi-factor authentication (MFA), and determine whether they are eligible for temporary elevated access.
Note: Eligibility is a key concept in temporary elevated access. You can think of it as pre-authorization to invoke access that is contingent upon additional conditions being met, described in step 3. A user typically becomes eligible by becoming a trusted member of a team of admins or operators, and the scope of their eligibility is based on the tasks they’re expected to perform as part of their job function. Granting and revoking eligibility is generally based on your organization’s standard access governance processes. Eligibility can be expressed as group memberships (if using role-based access control, or RBAC) or user attributes (if using attribute-based access control, or ABAC). Unlike regular authorization, eligibility is not sufficient to grant access on its own.
2. Initiate the process for temporary elevated access. The broker provides a way to start the process for gaining temporary elevated access. In most cases a user will submit a request on their own behalf—but some broker designs allow access to be initiated in other ways, such as an operations user inviting an engineer to assist them. The scope of a user’s requested access must be a subset of their eligibility. The broker might capture additional information about the context of the request in order to perform the next step.
3. Establish a business reason for invoking access. The broker tries to establish whether there is a valid business reason for invoking access with a given scope on this specific occasion. Why does this user need this access right now? The process of establishing a valid business reason varies widely between organizations. It might be a simple approval workflow, a quorum-based authorization, or a fully automated process. It might integrate with existing change and incident management systems to infer the business reason for access. A broker will often provide a way to expedite access in a time-critical emergency, which is a form of break-glass access. A typical broker implementation allows you to customize this step.
4. Grant time-bound access. If the business reason is valid, the broker grants time-bound access to the AWS target environment. The scope of access that is granted to the user must be a subset of their eligibility. Further, the scope and duration of access granted should be necessary and sufficient to fulfill the business reason identified in the previous step, based on the principle of least privilege.
A minimal reference implementation for temporary elevated access
To get started with temporary elevated access, you can deploy a minimal reference implementation accompanying this blog post. Information about deploying, running and extending the reference implementation is available in the Git repo README page.
Note: You can use this reference implementation to complement the persistent access that you manage for IAM users, federated users, or manage through AWS Single Sign-On. For example, you can use the multi-account access model of AWS SSO for persistent access management, and create separate roles for temporary elevated access using this reference implementation.
To establish a valid business reason for invoking access, the reference implementation uses a single-step approval workflow. You can adapt the reference implementation and replace this with a workflow or business logic of your choice.
To grant time-bound access, the reference implementation uses the identity broker pattern. In this pattern, the broker itself acts as an intermediate identity provider which conditionally federates the user into the AWS target environment granting a time-bound session with limited scope.
Figure 2 shows the architecture of the reference implementation.
Figure 2: Architecture of the reference implementation
To illustrate how the reference implementation works, the following steps walk you through a user’s experience end-to-end, using the numbers highlighted in the architecture diagram.
Starting the process
Consider a scenario where a user needs to perform a task that requires privileged access to a critical service running in your AWS environment, for which your security team has configured temporary elevated access.
Loading the application
The user first needs to access the temporary elevated access broker so that they can request the AWS access they need to perform their task.
The user navigates to the temporary elevated access broker in their browser.
The user’s browser loads a web application using web static content from an Amazon CloudFront distribution whose target is an Amazon S3 bucket.
The broker uses a web application that runs in the browser, known as a Single Page Application (SPA).
Note: CloudFront and S3 are only used for serving web static content. If you prefer, you can modify the solution to serve static content from a web server in your private network.
The user returns to the application as an authenticated user with an access token and ID token signed by the identity provider.
The access token grants delegated authority to the browser-based application to call server-side APIs on the user’s behalf. The ID token contains the user’s attributes and group memberships, and is used for authorization.
Calling protected APIs
The application calls APIs hosted by Amazon API Gateway and passes the access token and ID token with each request.
The Lambda authorizer checks whether the user’s access token and ID token are valid. It then uses the ID token to determine the user’s identity and their authorization based on their group memberships.
Displaying information
The application calls one of the /get… API endpoints to fetch data about previous temporary elevated access requests.
The /get… API endpoints invoke Lambda functions which fetch data from a table in Amazon DynamoDB.
The application displays information about previously-submitted temporary elevated access requests in a request dashboard, as shown in Figure 3.
Figure 3: The request dashboard
Submitting requests
A user who is eligible for temporary elevated access can submit a new request in the request dashboard by choosing Create request. As shown in Figure 4, the application then displays a form with input fields for the IAM role name and AWS account ID the user wants to access, a justification for invoking access, and the duration of access required.
Figure 4: Submitting requests
The user can only request an IAM role and AWS account combination for which they are eligible, based on their group memberships.
Note: The duration specified here determines a time window during which the user can invoke sessions to access the AWS target environment if their request is approved. It does not affect the duration of each session. Session duration can be configured independently.
When a user submits a new request for temporary elevated access, the application calls the /create… API endpoint, which writes information about the new request to the DynamoDB table.
The user can submit multiple concurrent requests for different role and account combinations, as long as they are eligible.
Generating notifications
The broker generates notifications when temporary elevated access requests are created, approved, or rejected.
When a request is created, approved, or rejected, a DynamoDB stream record is created for notifications.
The stream record then invokes a Lambda function to handle notifications.
By default, when a user submits a new request for temporary elevated access, an email notification is sent to all authorized reviewers. When a reviewer approves or rejects a request, an email notification is sent to the original requester.
Reviewing requests
A user who is authorized to review requests can approve or reject requests submitted by other users in a review dashboard, as shown in Figure 5. For each request awaiting their review, the application displays information about the request, including the business justification provided by the requester.
Figure 5: The review dashboard
The reviewer can select a request, determine whether the request is appropriate, and choose either Approve or Reject.
When a reviewer approves or rejects a request, the application calls the /approve… or /reject… API endpoint, which updates the status of the request in the DynamoDB table and initiates a notification.
Invoking sessions
After a requester is notified that their request has been approved, they can log back into the application and see their approved requests, as shown in Figure 6. For each approved request, they can invoke sessions. There are two ways they can invoke a session, by choosing either Access console or CLI.
If the user chooses Access console, then the broker federates them into the AWS Management Console.
Both options grant the user a session in which they assume the IAM role in the AWS account specified in their request.
When a user invokes a session, the broker performs the following steps.
When the user chooses Access console or CLI, the application calls one of the /federate… API endpoints.
The /federate… API endpoint invokes a Lambda function, which performs the following three checks before proceeding:
Is the user authenticated? The Lambda function checks that the access and ID tokens are valid and uses the ID token to determine their identity.
Is the user eligible? The Lambda function inspects the user’s group memberships in their ID token to confirm they are eligible for the AWS role and account combination they are seeking to invoke.
Is the user elevated? The Lambda function confirms the user is in an elevated state by querying the DynamoDB table, and verifying whether there is an approved request for this user whose duration has not yet ended for the role and account combination they are seeking to invoke.
If all three checks succeed, the Lambda function calls sts:AssumeRole to fetch temporary credentials on behalf of the user for the IAM role and AWS account specified in the request.
The application returns the temporary credentials to the user.
The user obtains a session with temporary credentials for the IAM role in the AWS account specified in their request, either in the AWS Management Console or AWS CLI.
Once the user obtains a session, they can complete the task they need to perform in the AWS target environment using either the AWS Management Console or AWS CLI.
The IAM roles that users assume when they invoke temporary elevated access should be dedicated for this purpose. They must have a trust policy that allows the broker to assume them. The trusted principal is the Lambda execution role used by the broker’s /federate… API endpoints. This ensures that the only way to assume those roles is through the broker.
In this way, when the necessary conditions are met, the broker assumes the requested role in your AWS target environment on behalf of the user, and passes the resulting temporary credentials back to them. By default, the temporary credentials last for one hour. For the duration of a user’s elevated access they can invoke multiple sessions through the broker, if required.
Session expiry
When a user’s session expires in the AWS Management Console or AWS CLI, they can return to the broker and invoke new sessions, as long as their elevated status is still active.
Ending elevated access
A user’s elevated access ends when the requested duration elapses following the time when the request was approved.
Figure 7: Ending elevated access
Once elevated access has ended for a particular request, the user can no longer invoke sessions for that request, as shown in Figure 7. If they need further access, they need to submit a new request.
Viewing historical activity
An audit dashboard, as shown in Figure 8, provides a read-only view of historical activity to authorized users.
Figure 8: The audit dashboard
Logging session activity
When a user invokes temporary elevated access, their session activity in the AWS control plane is logged to AWS CloudTrail. Each time they perform actions in the AWS control plane, the corresponding CloudTrail events contain the unique identifier of the user, which provides traceability back to the identity of the human user who performed the actions.
The following example shows the userIdentity element of a CloudTrail event for an action performed by user [email protected] using temporary elevated access.
The temporary elevated access broker controls access to your AWS environment, and must be treated with extreme care in order to prevent unauthorized access. It is also an inline dependency for accessing your AWS environment and must operate with sufficient resiliency.
The broker should be deployed in a dedicated AWS account with a minimum of dependencies on the AWS target environment for which you’ll manage access. It should use its own access control configuration following the principle of least privilege. Ideally the broker should be managed by a specialized team and use its own deployment pipeline, with a two-person rule for making changes—for example by requiring different users to check in code and approve deployments. Special care should be taken to protect the integrity of the broker’s code and configuration and the confidentiality of the temporary credentials it handles.
In this blog post you learned about temporary elevated access and how it can help reduce risk relating to human user access. You learned that you should aim to eliminate the need to use high-risk human access through the use of automation, and only use temporary elevated access for infrequent activities that cannot yet be automated. Finally, you studied a minimal reference implementation for temporary elevated access which you can download and customize to fit your organization’s needs.
If you have feedback about this post, submit comments in the Comments section below. If you have questions about this post, start a new thread on the AWS IAM forum or contact AWS Support.
Want more AWS Security how-to content, news, and feature announcements? Follow us on Twitter.
This series of blog posts uses the AWS Well-Architected Tool with the Serverless Lens to help customers build and operate applications using best practices. In each post, I address the serverless-specific questions identified by the Serverless Lens along with the recommended best practices. See the introduction post for a table of contents and explanation of the example application.
Reliability question REL2: How do you build resiliency into your serverless application?
Evaluate scaling mechanisms for serverless and non-serverless resources to meet customer demand. Build resiliency into your workload to make your serverless application resilient to withstand partial and intermittent failures across components that may only surface in production.
Required practice: Manage transaction, partial, and intermittent failures
Whenever one service or system calls another, there is a chance that failures can happen. Services or systems often don’t fail as a single unit, but rather suffer partial or transient failures. Applications should be designed to handle component failures as part of the architecture. The system should be designed to detect failure and, ideally, automatically heal itself.
Transaction failures can occur when a component is unavailable or under high load. Partial failures can occur when a percentage of requests succeeds, including during batch processing. Intermittent failures might occur when a request fails for a short period of time due to network or other transient issues.
AWS serverless services, including AWS Lambda, are fault-tolerant and designed to handle failures. If a service invokes a Lambda function and there is a service disruption, Lambda invokes the function in a different Availability Zone.
When you invoke a function directly, you determine the strategy for handling errors. You can retry, send the event to a destination or queue for debugging, or ignore the error. Clients such as the AWS Command Line Interface (CLI) and the AWS SDK retry on client timeouts, throttling errors (429), and other errors that are not caused by a bad request.
When you invoke a function indirectly, you must be aware of the retry behavior of the invoker and any service that the request encounters along the way. For more information, see “Error handling and automatic retries in AWS Lambda”. You can configure Maximum Retry Attempts and Maximum Event Age for asynchronous invocations.
When reading from Amazon Kinesis Data Streams and Amazon DynamoDB Streams, Lambda retries the entire batch of items. Retries continue until the records expire or exceed the maximum age that you configure on the event source mapping. You can also configure the event source mapping to split a failed batch into two batches. Retrying with smaller batches isolates bad records and works around timeout issues.
Partial failures can occur in non-atomic operations. PutRecords for Kinesis and BatchWriteItem for DynamoDB return a successful response if at least one record is ingested successfully. Always inspect the response when using such operations and programmatically deal with partial failures.
Use exponential backoff with jitter
The simplest technique for dealing with failures in a networked environment is to retry calls until they succeed. This technique increases the reliability of the application and reduces operational costs for the developer.
However, it is not always safe to retry. A retry can further increase the load on the system being called if the system is already failing due to an overload. To avoid this problem, use backoff. Instead of retrying immediately and aggressively, the client waits some amount of time between tries. The most common pattern is an exponential backoff, which uses exponentially longer wait times between retries. This is typically capped to a maximum delay and number of retries.
If all backoff retries are still happening at the same time, this can still overload a system or cause contention. To avoid this problem, use jitter. Jitter adds some amount of randomness to the backoff to spread the retries around in time. This can help prevent large bursts by spreading out the rate when clients connect. For more information see the Amazon Builders’ Library article “Timeouts, retries, and backoff with jitter” and AWS Architecture blog post “Exponential Backoff And Jitter”.
Exponential backoff and jitter
When your application responds to callers in fail-fast scenarios and when performance is degraded, inform the caller via headers or metadata when they can retry.
Each AWS SDK implements automatic retry logic including exponential backoff. For downstream calls, you can adjust AWS and third-party SDK retries, backoffs, TCP, and HTTP timeouts. This helps you decide when to stop retrying. For more information, see the documentation and troubleshooting steps for Lambda and the AWS SDK.
Use a dead-letter queue mechanism to retain, investigate and retry failed transactions
There are a number of ways to handle message failures including destinations and dead-letter queues.
You can configure Lambda to send records of asynchronous invocations to another destination service. These include Amazon Simple Queue Service (SQS), Amazon Simple Notification Service (SNS), Lambda, and Amazon EventBridge. You can configure separate destinations for events that fail processing and events that are successfully processed. The invocation record contains details about the event, the response, and the reason that the record was sent.
The following example shows a function that sends a record of a successful invocation to an EventBridge event bus. When an event fails all processing attempts, Lambda sends an invocation record to an SQS queue. It includes the function’s response in the invocation record.
AWS Lambda destinations for asynchronous invocation
SNS, SQS, Lambda, and EventBridge support dead-letter queues (DLQs). DLQs make your applications more resilient and durable by storing messages or events that can’t be processed correctly into a dedicated SQS queue. This helps you debug your application by isolating the problematic messages to determine why their processing failed. One you have resolved the issue, re-process the failed message. For more information, see “When should I use a dead-letter queue?” There is an example serverless application to redrive the messages from an SQS DLQ back to its source SQS queue.
For Lambda, DLQs provide an alternative to a failure destination. Lambda destinations is preferable for asynchronous invocations.
Good practice: Orchestrate long-running transactions
Long-running transactions can be processed by one or multiple components. Consider implementing the saga pattern using state machines for these types of transactions.
The saga pattern coordinates transactions between multiple microservices as part of a state machine. Each service that performs a transaction publishes an event to trigger the next transaction in the saga. This continues until the transaction chain is complete. If a transaction fails, saga orchestrates a series of compensating transactions that undo the changes that were made by the preceding transactions.
This is preferable to handling complex or long-running transactions within application code. State machines prevent cascading failures and avoid tightly coupling components with orchestrating logic and business logic.
Use a state machine to visualize distributed transactions, and to separate business logic from orchestration logic.
AWS Step Functions lets you coordinate multiple AWS services into serverless workflows via state machines. Within Step Functions, you can set separate retries, backoff rates, max attempts, intervals, and timeouts. These are set for every step of your state machine using a declarative language.
In the serverless airline example used in this series, Step Functions is used to orchestrate the Booking microservice. The ProcessBooking state machine handles all the necessary steps to create bookings, including payment.
Booking service Step Functions state machine
The state machine uses a combination of service integrations using DynamoDB, SQS, and Lambda functions to coordinate transactions and handle failures.
For example, the Reserve Booking task invokes a Lambda function. The task has retry and error handling configured as part of the task definition.
Step Functions supports direct service integrations, including DynamoDB. The Reserve Flight task directly updates the flightTable without requiring a Lambda function.
By default, when a state reports an error, Step Functions causes the execution to fail entirely.
Utilize dead-letter queues in response to failed state machine executions
Any state within the Step Functions workflow can encounter runtime errors. These include state machine definition issues, task failures such as Lambda function exceptions, or transient issues such as network connectivity issues. For more information, see “Error handling in Step Functions”.
Use the Step Functions service integration with SQS to send failed transactions to a DLQ as the final step. This adds a higher level of durability within your state machines.
For example, the airline Notify Failed Booking final task catches failed states from four previous steps. It sends the results to the Booking DLQ.
Booking service Step Functions DLQ
The message includes the output of the previous failed states for further troubleshooting.
The Step Functions documentation has more information on calling SQS.
Conclusion
Build resiliency into your workloads. This makes sure that your application can withstand partial and intermittent failures across components that may only surface in production.
In this post, I cover managing failures using retries, exponential backoff, and jitter. I explain how DLQs can isolate failed messages. I show how to use state machines to orchestrate long running transactions rather than handling these in application code.
This well-architected question continues in part 2 where I look at managing duplicate and unwanted events with idempotency and an event schema. I cover how to consider scaling patterns at burst rates by managing account limits and show relevant metrics to evaluate.
For more serverless learning resources, visit Serverless Land.
If you have multiple Amazon Web Services (AWS) accounts, and you have AWS Identity and Access Management (IAM) roles among those multiple accounts that are supposed to be similar, those roles can deviate over time from your intended baseline due to manual actions performed directly out-of-band called drift. As part of regular compliance checks, you should confirm that these roles have no deviations. In this post, we present a tool called IAMCTL that you can use to extract the IAM roles and policies from two accounts, compare them, and report out the differences and statistics. We will explain how to use the tool, and will describe the key concepts.
Prerequisites
Before you install IAMCTL and start using it, here are a few prerequisites that need to be in place on the computer where you will run it:
Set up AWS CLI profiles for two accounts you want to compare, as described in Named Profiles.
To follow along in your environment, clone the files from the GitHub repository, and run the steps in order. You won’t incur any charges to run this tool.
Install IAMCTL
This section describes how to install and run the IAMCTL tool.
To confirm that your installation was successful, enter the following command.
iamctl –h
You will see results similar to those in figure 2.
Figure 2: IAMCTL help message
Now that you’ve successfully installed the IAMCTL tool, the next section will show you how to use the IAMCTL commands.
Example use scenario
Here is an example of how IAMCTL can be used to find differences in IAM roles between two AWS accounts.
A system administrator for a product team is trying to accelerate a product launch in the middle of testing cycles. Developers have found that the same version of their application behaves differently in the development environment as compared to the QA environment, and they suspect this behavior is due to differences in IAM roles and policies.
The application called “app1” primarily reads from an Amazon Simple Storage Service (Amazon S3) bucket, and runs on an Amazon Elastic Compute Cloud (Amazon EC2) instance. In the development (DEV) account, the application uses an IAM role called “app1_dev” to access the S3 bucket “app1-dev”. In the QA account, the application uses an IAM role called “app1_qa” to access the S3 bucket “app1-qa”. This is depicted in figure 3.
Figure 3: Showing the “app1” application in the development and QA accounts
Setting up the scenario
To simulate this setup for the purpose of this walkthrough, you don’t have to create the EC2 instance or the S3 bucket, but just focus on the IAM role, inline policy, and trust policy.
As noted in the prerequisites, you will switch between the two AWS accounts by using the AWS CLI named profiles “dev-profile” and “qa-profile”, which are configured to point to the DEV and QA accounts respectively.
The command creates a directory structure that looks like this: Iamctl_test |– qa |– dev
Now, switch to the dev folder to run all the following example commands against the DEV account, by using this command:
cd iamctl_test/dev
To create the required policies, first create a file named “app1_s3_access_policy.json” and add the following policy to it. You will use this file’s content as your role’s inline policy.
Second, create a file called “app1_trust_policy.json” and add the following policy to it. You will use this file’s content as your role’s trust policy.
Now use the two files to create an IAM role with the name “app1_dev” in the account by using these command(s), run in the same order as listed here:
#create role with trust policy

aws --profile dev-profile iam create-role --role-name app1_dev --assume-role-policy-document file://app1_trust_policy.json

#put inline policy to the role created above

aws --profile dev-profile iam put-role-policy --role-name app1_dev --policy-name s3_inline_policy --policy-document file://app1_s3_access_policy.json
In the QA account, the IAM role is named “app1_qa” and the S3 bucket is named “app1-qa”.
Repeat the steps from the prior example against the QA account by changing dev to qa where shown in bold in the following code samples. Change the directory to qa by using this command:
cd ../qa
To create the required policies, first create a file called “app1_s3_access_policy.json” and add the following policy to it.
Now, use the two files created so far to create an IAM role with the name “app1_qa” in your QA account by using these command(s), run in the same order as listed here:
#create role with trust policy
aws --profile qa-profile iam create-role --role-name app1_qa --assume-role-policy-document file://app1_trust_policy.json

#put inline policy to the role create above
aws --profile qa-profile iam put-role-policy --role-name app1_qa --policy-name s3_inline_policy --policy-document file://app1_s3_access_policy.json
So far, you have two accounts with an IAM role created in each of them for your application. In terms of permissions, there are no differences other than the name of the S3 bucket resource the permission is granted against.
You can expect IAMCTL to generate a minimal set of differences between the DEV and QA accounts, assuming all other IAM roles and policies are the same, but to be sure about the current state of both accounts, in IAMCTL you can run a process called baselining.
Through the process of baselining, you will generate an equivalency dictionary that represents all the known string patterns that reduce the noise in the generated deviations list, and then you will introduce a change into one of the IAM roles in your QA account, followed by a final IAMCTL diff to show the deviations.
Baselining
Baselining is the process of bringing two accounts to an “equivalence” state for IAM roles and policies by establishing a baseline, which future diff operations can leverage. The process is as simple as:
Run the iamctl diff command.
Capture all string substitutions into an equivalence dictionary to remove or reduce noise.
Save the generated detailed files as a snapshot.
Now you can go through these steps for your baseline.
Go ahead and run the iamctl diff command against these two accounts by using the following commands.
#change directory from qa to iamctl-test
cd ..

#run iamctl init
iamctl init
The results of running the init command are shown in figure 4.
Figure 4: Output of the iamctl init command
If you look at the iamctl_test directory now, shown in figure 5, you can see that the init command created two files in the iamctl_test directory.
Figure 5: The directory structure after running the init command
These two files are as follows:
iam.jsonA reference file that has all AWS services and actions listed, among other things. IAMCTL uses this to map the resource listed in an IAM policy to its corresponding AWS resource, based on Amazon Resource Name (ARN) regular expression.
equivalency_list.jsonThe default sample dictionary that IAMCTL uses to suppress false alarms when it compares two accounts. This is where the known string patterns that need to be substituted are added.
Note: A best practice is to make the directory where you store the equivalency dictionary and from which you run IAMCTL to be a Git repository. Doing this will let you capture any additions or modifications for the equivalency dictionary by using Git commits. This will not only give you an audit trail of your historical baselines but also gives context to any additions or modifications to the equivalency dictionary. However, doing this is not necessary for the regular functioning of IAMCTL.
Next, run the iamctl diff command:
#run iamctl diff
iamctl diff dev-profile dev qa-profile qa
Figure 6: Result of diff command
Figure 6 shows the results of running the diff command. You can see that IAMCTL considers the app1_qa and app1_dev roles as unique to the DEV and QA accounts, respectively. This is because IAMCTL uses role names to decide whether to compare the role or tag the role as unique.
You will add the strings “dev” and “qa” to the equivalency dictionary to instruct IAMCTL to substitute occurrences of these two strings with “accountname” by adding the follow JSON to the equivalency_list.json file. You will also clean up some defaults already present in there.
Figure 7 shows the equivalency dictionary before you take these actions, and figure 8 shows the dictionary after these actions.
Figure 7: Equivalency dictionary before
Figure 8: Equivalency dictionary after
There’s another thing to notice here. In this example, one common role was flagged as having a difference. To know which role this is and what the difference is, go to the detail reports folder listed at the bottom of the summary report. The directory structure of this folder is shown in figure 9.
Notice that the reports are created under your home directory with a folder structure that mimics the time stamp down to the second. IAMCTL does this to maintain uniqueness for each run.
tree /Users/<username>/aws-idt/output/2020/08/24/08/38/49/
Figure 9: Files written to the output reports directory
You can see there is a file called common_roles_in_dev_with_differences.csv, and it lists a role called “AwsSecurity***Audit”.
You can see there is another file called dev_to_qa_common_role_difference_items.csv, and it lists the granular IAM items from the DEV account that belong to the “AwsSecurity***Audit” role as compared to QA, but which have differences. You can see that all entries in the file have the DEV account number in the resource ARN, whereas in the qa_to_dev_common_role_difference_items.csv file, all entries have the QA account number for the same role “AwsSecurity***Audit”.
Add both of the account numbers to the equivalency dictionary to substitute them with a placeholder number, because you don’t want this role to get flagged as having differences.
#run iamctl diff
iamctl diff dev-profile dev qa-profile qa
As you can see in figure 10, you get back the result of the diff command that shows that the DEV account doesn’t have any differences in IAM roles as compared to the QA account.
Figure 10: Output showing no differences after completion of baselining
This concludes the baselining for your DEV and QA accounts. Now you will introduce a change.
Introducing drift
Drift occurs when there is a difference in actual vs expected values in the definition or configuration of a resource. There are several reasons why drift occurs, but for this scenario you will use “intentional need to respond to a time-sensitive operational event” as a reason to mimic and introduce drift into what you have built so far.
To simulate this change, add “s3:PutObject” to the qa app1_s3_access_policy.json file as shown in the following example.
The following table represents the new drift in the accounts.
Action
Account-DEV Role name: app1_dev
Account-QA Role name: app1_qa
s3:Get*
Yes
Yes
s3:List*
Yes
Yes
s3: PutObject
No
Yes
Next, run the iamctl diff command to see how it picks up the drift from your previously baselined accounts.
#change directory from qa to iamctL-test
cd ..
iamctl diff dev-profile dev qa-profile qa
Figure 11: Output showing the one deviation that was introduced
You can see that IAMCTL now shows that the QA account has one difference as compared to DEV, which is what we expect based on the deviation you’ve introduced.
Open up the file qa_to_dev_common_role_difference_items.csv to look at the one difference. Again, adjust the following path example with the output from the iamctl diff command at the bottom of the summary report in Figure 11.
As shown in figure 12, you can see that the file lists the specific S3 action “PutObject” with the role name and other relevant details.
Figure 12: Content of file qa_to_dev_common_role_difference_items.csv showing the one deviation that was introduced
You can use this information to remediate the deviation by performing corrective actions in either your DEV account or QA account. You can confirm the effectiveness of the corrective action by re-baselining to make sure that zero deviations appear.
Conclusion
In this post, you learned how to use the IAMCTL tool to compare IAM roles between two accounts, to arrive at a granular list of meaningful differences that can be used for compliance audits or for further remediation actions. If you’ve created your IAM roles by using an AWS CloudFormation stack, you can turn on drift detection and easily capture the drift because of changes done outside of AWS CloudFormation to those IAM resources. For more information about drift detection, see Detecting unmanaged configuration changes to stacks and resources. Lastly, see the GitHub repository where the tool is maintained with documentation describing each of the subcommand concepts. We welcome any pull requests for issues and enhancements.
If you have feedback about this post, submit comments in the Comments section below. If you have questions about this post, start a new thread on the AWS IAM forum or contact AWS Support.
Want more AWS Security how-to content, news, and feature announcements? Follow us on Twitter.
Organizations are increasingly providing access to corporate resources from employee laptops and are required to apply the correct permissions to these computing devices to make sure that secrets and sensitive data are adequately protected. The combination of Amazon Web Services (AWS) long-term credentials and a YubiKey security token for multi-factor authentication (MFA) is an option for providing secure programmatic access to AWS for organizations that aren’t yet ready or able to use identity federation. For example, a user should be able to list AWS Identity and Access Management (IAM) roles with their default programmatic access, but would be required to provide MFA to assume an IAM role.
In this blog post, we show you how to use a YubiKey token for MFA with the AWS Command Line Interface (AWS CLI) to create temporary credentials with the permissions that developers need to perform tasks. The user will configure the long-term credentials and then temporarily assume a role with broader permissions by using MFA when needed. MFA adds extra security, because it requires users to provide second-factor authentication from an AWS-supported MFA mechanism in addition to static security credentials such as their user name and password.
The goal for any organization is to move to the recommended best practices for allowing individual programmatic access that include using temporary security credentials that aren’t stored with the user, but are generated dynamically and provided to the user when requested, such as identity federation due to the temporary nature of those credentials. If your organization uses AWS Single Sign-On (AWS SSO) along with an identity provider (IdP) such as Okta, Azure Active Directory (AD), or AWS Managed Microsoft AD, you can then use the instructions from this earlier blog post to leverage the AWS CLI v2 native integration with AWS SSO and take advantage of the multi-factor authentication support of your IdP.
Overview
This post describes the configuration of IAM users and roles and initialization of the YubiKey token as an MFA device by an administrator, and then how developers can use the YubiKey device to retrieve temporary credentials and assume a role with elevated permissions within the AWS CLI.
The overall process flow looks like this:
Create an IAM user with programmatic access, MFA, and a policy that allows you to assume a more privileged IAM role. The user will retrieve a Time-based One-time Password (TOTP) token code by using a YubiKey as MFA.
Assume the more privileged role, which is restricted by an MFA conditional, by using the TOTP token code.
Figure 1 shows the steps of the process.
Figure 1: A visual overview of the steps to assume roles with elevated permissions by using a YubiKey for MFA
Prerequisites
To get started you need:
An AWS account.
A YubiKey (available on Amazon.com). YubiKey 4 and 5 series are compatible, because they support the required OATH application.
Note: The Yubico Security Keys (the blue tokens) aren’t supported, because they lack the OATH application. If you already have a corporate YubiKey device, this capability might have been disabled.
AWS CLI v2 doesn’t yet support Universal 2nd factor (U2F) MFA. As a workaround, we use a YubiKey as a virtual device MFA.
OATH (Initiative for Open Authentication) is an organization that specifies two open authentication standards: TOTP and HMAC-based One-time Password (HOTP). For this solution, we use the TOTP standard.
Getting started
Initializing YubiKey for MFA
The following steps show you, as cloud administrator, how to initialize the YubiKey as a virtual MFA device and configure an IAM user that can assume a role with elevated permissions, on the condition that the user is using an MFA device. In this example, your developers will assume a role with permissions to access Amazon Elastic Compute Cloud (Amazon EC2).
To configure the IAM user and initialize the YubiKey device as MFA
Create a role with elevated permissions that your developers can assume.
Sign in to the AWS IAM console, and in the right-hand pane, choose Roles. Then choose Create role.
Figure 3: Select the type of trusted entity and provide the account ID
Search for the AmazonEC2FullAccess policy, and select the check box next to it. Choose Next:Tags, and add relevant tags if needed. Choose Next:Review.
Name the role developer-ec2-mfa, and then choose Create role.
Go back to the role you just created. Change the maximum session duration value to limit how long the developer’s session can be valid after assuming the role. For this example, we set the duration to 1 hour (3,600 seconds) by using a custom value. Limit this duration to abide by your organization’s recommended authentication time.
Take note of the Amazon Resource Name (ARN) for the new role as shown on the summary page.
Figure 4: Summary page of the new role
Create a new IAM policy that provides a limited scope of actions for users when they use their long-term credentials.
Navigate to the AWS IAM console, and in the navigation pane, choose Policies. Choose Create policy.
Figure 5: Create a policy in the IAM console
Because we’ve already written the policy in JSON, you don’t need to use the Visual Editor, so you can choose the JSON tab and paste the content of the following JSON policy document (remember to replace the placeholder for the role ARN).Following the least privilege approach, add only the Amazon Resource Names (ARNs) of the role or roles with required elevated permissions that the developer will be able to assume. In this case, use the developer-ec2-mfa ARN for the role that you created previously.
Note: The condition “aws:MultiFactorAuthPresent”: “true” requires that the user who assumes the role has been authenticated with an AWS MFA device.
Choose Review policy.
Name the policy yubi-policy-mfa-level-one. Choose Create policy.
Create a new IAM group that lets you specify permissions for multiple users and makes it easier to manage the permissions for those users.
Navigate to the IAM console, and in the navigation pane, choose Groups. Choose Create New Group.
Figure 6: Create a group in the IAM console
Enter developers-mfa as the group name. Choose Next Step.
On the Attach Policy screen, in the filter box, search for the policy yubi-policy-mfa-level-one that you created in the previous step. Make sure you select the check box next to the policy, and then choose Next Step.
Figure 7: Attach the policy to the IAM group
Review the group information, and then choose Create Group.
Create a user in IAM for the developer using the AWS CLI.
Navigate to the IAM console and in the navigation pane, choose Users. Choose Add user.
On the Add user screen, enter the name for your user. In this example, our developer is named JohnDoe. For Access type, select the check box next to Programmatic access. Choose Next: Permissions.
Figure 8: Create an IAM user with programmatic access
For permissions, select Add user to group, and select the developers-mfa group. Choose Next: Tags.
Add the relevant tags if needed, and then choose Next: Review.
Review the user configuration, and then choose Create user.
Make sure you save the access key ID and secret access key to share with your user. Choose Close.
Assign an MFA device to the user.
Go back to the Users section of the IAM console. Choose the IAM user that you created previously, and go to the Security credentials tab. For Assigned MFA device, choose Manage.
Figure 9: Assign MFA device to the IAM user
Select Virtual MFA device, because the AWS CLI doesn’t yet support U2F MFA. Choose Continue.
Figure 10: Select the Virtual MFA device type
Instead of using the QR code, choose Show secret key.
Note: The secret key is a randomly generated string shared between IAM and the physical YubiKey. It is used to generate a one-time password using a hash function with the current timestamp.
Figure 11: Retrieve the secret key on the virtual MFA device configuration page
Copy the secret key to use in the next step as the MFA_SECRET to configure the MFA device.
To obtain the TOTP token codes from the YubiKey to synchronize the key with the IAM user, do the following.
Insert the YubiKey token in your USB port, and verify that the OATH application is enabled for your YubiKey by running the following command and looking for Enabled USB interfaces: OTP+FIDO+CCID in the output.
$ ykman info

Device type: YubiKey 5 NFC
Serial number: 123456789
Firmware version: 5.2.4
Form factor: Keychain (USB-A)
Enabled USB interfaces: OTP+FIDO+CCID
NFC interface is enabled.

Applications USB NFC
OTP Enabled Enabled
FIDO U2F Enabled Enabled
OpenPGP Enabled Enabled
PIV Enabled Enabled
OATH Enabled Enabled
FIDO2 Enabled Enabled
For each MFA device, you need to generate a unique identifier that will be used during the process. We recommend that you create this identifier based on the ARN of the IAM user, by using the following template.
arn:aws:iam::<ACCOUNT_ID>:mfa/<IAM_USERNAME>
Add a new credential to your YubiKey based on the MFA device ARN. Use the MFA_SECRET that you copied in the previous step (step 5).
Obtain two TOTP token codes by using the following command (remember to replace the placeholder for the <MFA device ARN>). Wait up to 30 seconds for the device to generate the second token code (you will be prompted to touch the token).
ykman oath code <MFA device ARN>
After obtaining each of the TOTP token codes, go back to the IAM console where you were setting up the virtual MFA device, and enter the code in the MFA code box. After entering the two MFA codes, choose Assign MFA.
Figure 12: Enter the two consecutive YubiKey codes in the virtual MFA device configuration page
You can then provide the following information to your developer:
The YubiKey device along with the generated MFA device ARN
The ARNs for the roles that will be assumed
The long-term AWS credentials
Assuming a role with the YubiKey as MFA
The following steps show how you, as a developer, can retrieve temporary credentials using the YubiKey device as MFA, and assume a role with wider permissions. You can do this after the YubiKey device, one or more role ARNs, and long-term credentials have been shared with you by the cloud administrator.
To assume a role with broader permissions by using YubiKey
As part of the prerequisites, you should have the AWS CLI v2 already installed. Now configure the default profile with the long-term credentials provided by your cloud administrator, by using the following command.
$ aws configure

AWS Access Key ID [None]: <Enter your AWS access key>
AWS Secret Access Key [None]: <Enter your AWS secret access key>
Default region name [None]: <Enter your AWS default region>
Default output format [None]: <Enter your output default format>
Obtain a TOTP code from YubiKey (you will be prompted to touch the token). Submit your request immediately after generating the codes. If you generate the codes and then wait too long to submit the request, the code won’t be valid anymore.
Using the MFA token code you obtained by using the YubiKey, assume the relevant role that will provide access to larger permissions. In our example, the ARN is for the role developer-ec2-mfa that was provided by the IAM administrator. Enter a role session name that will uniquely identify a session when the same role is assumed by different principals.
Note: The user should only have access to sts:AssumeRole for a specific set of roles. Here we chose the session duration of one hour. You can edit the session duration so the developer can authenticate for the duration of a workday (the default value is 1 hour and can be up to 12 hours). Limit this duration to abide by your organization’s recommended authentication time.
Edit a new AWS CLI profile named johndoe-developer-role as seen following. Copy the access key and secret key that were retrieved as temporary credentials from the get-session-token command. Then set the additional parameter aws_session_token, which was returned along with the temporary credentials. Edit your CLI with the information for the new role.
Attempt to make a call to relevant services that are allowed by the newly assumed role. Here’s an example using the Amazon EC2 API to describe the EC2 instances.
The developer now has access to the larger permissions set through the assumed role for the next hour.
Summary
In this post, we introduced the capability to further secure long-term AWS credentials with a YubiKey for MFA, for organizations that are still using long-term credentials. These credentials are stored in the ~/.aws/credentials file. If an unauthorized user was able to retrieve these long-term credentials, they wouldn’t be able to use them, because the user needs to have the physical MFA in order to assume a role with broader permissions. The steps in this blog post can be converted to a script that your developers can use repeatedly to simplify the process.
In general, we recommend that all customers move away from using IAM users and static credentials and instead use IAM roles and temporary credentials wherever possible. An easy way to get started down that road is by using AWS SSO for identity federation.
If you have feedback about this post, submit comments in the Comments section below. If you have questions about this post, start a new thread on the AWS IAM forum or contact AWS Support.
Want more AWS Security how-to content, news, and feature announcements? Follow us on Twitter.
As a developer working in a large enterprise or for a group that supports multiple products, you may often find yourself accessing Git repositories from different organizations. Currently, to securely access multiple Git repositories in other popular tools, you need SSH keys, GPG keys, a Git credential helper, and a significant amount of setup by the developer hoping to commit to the repository. In addition, administrators must be aware of the various ways to remove all the permissions granted to the developer.
AWS CodeCommit is a managed source control service. Combined with AWS Single Sign-On (AWS SSO) and git-remote-codecommit, you can quickly and easily switch between repositories owned by different groups or even managed in separate AWS accounts. You can control those permissions with AWS Identity and Access Management (IAM) roles to allow for the automated removal of the user’s permission as part of their off-boarding procedure for the company.
This post demonstrates how to grant access to various CodeCommit repositories without access keys.
Solution overview
In this solution, the user’s access is controlled with federated login via AWS SSO. You can grant that access using AWS native authentication, which eliminates the need for a Git credential helper, SSH, and GPG keys. In addition, this allows the administrator to control access by adding or removing the user’s IAM role access.
The following diagram shows the code access pattern you can achieve by using AWS SSO and git-remote-codecommit to access CodeCommit across multiple accounts.
Prerequisites
To complete this tutorial, you must have the following prerequisites:
CodeCommit repositories in two separate accounts. For instructions, see Create an AWS CodeCommit repository.
AWS SSO set up to handle access federation. For instructions, see Enable AWS SSO.
Python 3.6 or higher installed on the developer’s local machine. To download and install the latest version of Python, see the Python website.
On a Mac, it can be difficult to ensure that you’re using Python 3.6, because 2.7 is installed and required by the OS. For more information about checking your version of Python, see the following GitHub repo.
Git installed on your local machine. To download Git, see Git Downloads.
PIP version 9.0.3 or higher installed on your local machine. For instructions, see Installation on the PIP website.
Configuring AWS SSO role permissions
As your first step, you should make sure each AWS SSO role has the correct permissions to access the CodeCommit repositories.
The preceding code grants access to all the repositories in the account. You could limit to a specific list of repositories, if needed.
Choose Create.
Creating your AWS SSO group
Next, we need to create the SSO Group we want to assign the permissions.
On the AWS SSO console, choose Groups.
Choose create group.
For Group name, enter CodeCommitAccessGroup.
For Description, enter Users assigned to this group will have access to work with CodeCommit.
Choose Create.
Assigning your group and permission sets to your accounts
Now that we have our group and permission sets created, we need to assign them to the accounts with the CodeCommit repositories.
On the AWS SSO console, choose AWS Accounts.
Choose the account you want to use in your new group.
On the account Details page, choose Assign Users.
On the Select users or groups page, choose Group.
Select CodeCommitGroup.
Choose NEXT: Permission Sets.
Choose the CodeCommitDeveloperAccess permission set and choose Finish
Choose Proceed to Accounts to return to the AWS SSO console.
Repeat these steps for each account that has a CodeCommit repository.
Assigning a user to the group
To wrap up our AWS SSO configuration, we need to assign the user to the group.
On the AWS SSO console, choose Groups.
Choose CodeCommitAccessGroup.
Choose Add user.
Select all the users you want to add to this group.
Choose Add user(s).
From the navigation pane, choose Settings.
Record the user portal URL to use later.
Enabling AWS SSO login
The second main feature we want to enable is AWS SSO login from the AWS Command Line Interface (AWS CLI) on our local machine.
Run the following command from the AWS CLI. You need to enter the user portal URL from the previous step and tell the CLI what Region has your AWS SSO deployment. The following code example has AWS SSO deployed in us-east-1:
After that solution is cloned locally, you can copy code from another federated profile by simply changing to that profile and referencing the repository in that account named MyDemoRepo2. See the following code:
At the end of this tutorial, complete the following steps to undo the changes you made to your local system and AWS:
On the AWS SSO console, remove the user from the group you created, so any future access requests fail.
To remove the AWS SSO login profiles, open the local config file with your preferred tool and remove the profile.
The config file is located at %UserProfile%/.aws/config for Windows and $HOME/.aws/config for Linux or Mac.
To remove git-remote-codecommit, run the PIP uninstall command:
pip uninstall git-remote-codecommit
With some operating systems, you might need to run the following code instead:
sudo pip uninstall git-remote-codecommit
Conclusion
This post reviewed an approach to securely switch between repositories and work without concerns about one Git repository’s security credentials interfering with the other Git repository. User access is controlled by the permissions assigned to the profile via federated roles from AWS SSO. This allows for access control to CodeCommit without needing access keys.
Developers building serverless applications often wonder how they can jump-start their local development environment. This blog post provides a broad guide for those developers wanting to set up a development environment for building serverless applications.
AWS and open source tools for a serverless development environment .
Command line tools are scripts, programs, and libraries that enable rapid application development and interactions from within a command line shell.
The AWS CLI
The AWS Command Line Interface (AWS CLI) is an open source tool that enables developers to interact with AWS services using a command line shell. In many cases, the AWS CLI increases developer velocity for building cloud resources and enables automating repetitive tasks. It is an important piece of any serverless developer’s toolkit. Follow these instructions to install and configure the AWS CLI on your operating system.
AWS enables you to build infrastructure with code. This provides a single source of truth for AWS resources. It enables development teams to use version control and create deployment pipelines for their cloud infrastructure. AWS CloudFormation provides a common language to model and provision these application resources in your cloud environment.
It provides shorthand syntax to define Lambda functions, APIs, databases, and event source mappings. During deployment, the AWS SAM syntax is transformed into AWS CloudFormation syntax, enabling you to build serverless applications faster.
The AWS SAM CLI is an open source command line tool used to locally build, test, debug, and deploy serverless applications defined with AWS SAM templates.
Test the installation by initializing a new quick start project with the following command:
$ sam init
Choose 1 for the “Quick Start Templates”
Choose 1 for the “Node.js runtime”
Use the default name.
The generated /sam-app/template.yaml contains all the resource definitions for your serverless application. This includes a Lambda function with a REST API endpoint, along with the necessary IAM permissions.
Resources:
  HelloWorldFunction:
    Type: AWS::Serverless::Function # More info about Function Resource: https://github.com/awslabs/serverless-application-model/blob/master/versions/2016-10-31.md#awsserverlessfunction
    Properties:
      CodeUri: hello-world/
      Handler: app.lambdaHandler
      Runtime: nodejs12.x
      Events:
        HelloWorld:
          Type: Api # More info about API Event Source: https://github.com/awslabs/serverless-application-model/blob/master/versions/2016-10-31.md#api
          Properties:
            Path: /hello
            Method: get
The AWS SAM CLI requires Docker containers to simulate the AWS Lambda runtime environment on your local development environment. To test locally, install Docker Engine and run the Lambda function with following command:
$ sam local invoke "HelloWorldFunction" -e events/event.json
The first time this function is invoked, Docker downloads the lambci/lambda:nodejs12.x container image. It then invokes the Lambda function with a pre-defined event JSON file.
Helper tools
There are a number of open source tools and packages available to help you monitor, author, and optimize your Lambda-based applications. Some of the most popular tools are shown in the following list.
Template validation tooling
CloudFormation Linter is a validation tool that helps with your CloudFormation development cycle. It analyses CloudFormation YAML and JSON templates to resolve and validate intrinsic functions and resource properties. By analyzing your templates before deploying them, you can save valuable development time and build automated validation into your deployment release cycle.
Once, installed, run the cfn-lint command with the path to your AWS SAM template provided as the first argument:
cfn-lint template.yaml
AWS SAM template validation with cfn-lint
The following example shows that the template is not valid because the !GettAtt function does not evaluate correctly.
IDE tooling
Use AWS IDE plugins to author and invoke Lambda functions from within your existing integrated development environment (IDE). AWS IDE toolkits are available for PyCharm, IntelliJ. Visual Studio.
The AWS Toolkit for Visual Studio Code provides an integrated experience for developing serverless applications. It enables you to invoke Lambda functions, specify function configurations, locally debug, and deploy—all conveniently from within the editor. The toolkit supports Node.js, Python, and .NET.
The AWS Toolkit for Visual Studio Code
From Visual Studio Code, choose the Extensions icon on the Activity Bar. In the Search Extensions in Marketplace box, enter AWS Toolkit and then choose AWS Toolkit for Visual Studio Code as shown in the following example. This opens a new tab in the editor showing the toolkit’s installation page. Choose the Install button in the header to add the extension.
AWS Toolkit extension for Visual Studio Code
AWS Cloud9
Another option to build a development environment without having to install anything locally is to use AWS Cloud9. AWS Cloud9 is a cloud-based integrated development environment (IDE) for writing, running, and debugging code from within the browser.
It provides a seamless experience for developing serverless applications. It has a preconfigured development environment that includes AWS CLI, AWS SAM CLI, SDKs, code libraries, and many useful plugins. AWS Cloud9 also provides an environment for locally testing and debugging AWS Lambda functions. This eliminates the need to upload your code to the Lambda console. It allows developers to iterate on code directly, saving time, and improving code quality.
Efficient configuration of Lambda functions is critical when expecting optimal cost and performance of your serverless applications. Lambda allows you to control the memory (RAM) allocation for each function.
Lambda charges based on the number of function requests and the duration, the time it takes for your code to run. The price for duration depends on the amount of RAM you allocate to your function. A smaller RAM allocation may reduce the performance of your application if your function is running compute-heavy workloads. If performance needs outweigh cost, you can increase the memory allocation.
Cost and performance optimization tooling
AWS Lambda power tuner is an open source tool that uses an AWS Step Functions state machine to suggest cost and performance optimizations for your Lambda functions. It invokes a given function with multiple memory configurations. It analyzes the execution log results to determine and suggest power configurations that minimize cost and maximize performance.
The Step Functions execution output produces a link to a visual summary of the suggested results:
AWS Lambda power tuning results
Monitoring and debugging tooling
Sls-dev-tools is an open source serverless tool that delivers serverless metrics directly to the terminal. It provides developers with feedback on their serverless application’s metrics and key bindings that deploy, open, and manipulate stack resources. Bringing this data directly to your terminal or IDE, reduces context switching between the developer environment and the web interfaces. This can increase application development speed and improve user experience.
Follow these instructions to install the tool onto your development environment.
To open the tool, run the following command:
$ Sls-dev-tools
Follow the in-terminal interface to choose which stack to monitor or edit.
The following example shows how the tool can be used to invoke a Lambda function with a custom payload from within the IDE.
Invoke an AWS Lambda function with a custom payload using sls-dev-tools
Serverless database tooling
NoSQL Workbench for Amazon DynamoDB is a GUI application for modern database development and operations. It provides a visual IDE tool for data modeling and visualization with query development features to help build serverless applications with Amazon DynamoDB tables. Define data models using one or more tables and visualize the data model to see how it works in different scenarios. Run or simulate operations and generate the code for Python, JavaScript (Node.js), or Java.
The following example illustrates a connection to a DynamoDB table. A data scan is built using the GUI, with Node.js code generated for inclusion in a Lambda function:
Connecting to an Amazon DynamoDB table with NoSQL Workbench for Amazon DynamoDB
Generating query code with NoSQL Workbench for Amazon DynamoDB
Conclusion
Building serverless applications allows developers to focus on business logic instead of managing and operating infrastructure. This is achieved by using managed services. Developers often struggle with knowing which tools, libraries, and frameworks are available to help with this new approach to building applications. This post shows tools that builders can use to create a serverless developer environment to help accelerate software development.
This list represents AWS and open source tools but does not include our APN Partners. For partner offers, check here.
Read more to start building serverless applications.
The collective thoughts of the interwebz
Manage Consent
To provide the best experiences, we use technologies like cookies to store and/or access device information. Consenting to these technologies will allow us to process data such as browsing behavior or unique IDs on this site. Not consenting or withdrawing consent, may adversely affect certain features and functions.
Functional
Always active
The technical storage or access is strictly necessary for the legitimate purpose of enabling the use of a specific service explicitly requested by the subscriber or user, or for the sole purpose of carrying out the transmission of a communication over an electronic communications network.
Preferences
The technical storage or access is necessary for the legitimate purpose of storing preferences that are not requested by the subscriber or user.
Statistics
The technical storage or access that is used exclusively for statistical purposes.The technical storage or access that is used exclusively for anonymous statistical purposes. Without a subpoena, voluntary compliance on the part of your Internet Service Provider, or additional records from a third party, information stored or retrieved for this purpose alone cannot usually be used to identify you.
Marketing
The technical storage or access is required to create user profiles to send advertising, or to track the user on a website or across several websites for similar marketing purposes.