All posts by Vincent Gromakowski

Streamline Spark application development on Amazon EMR with the Data Solutions Framework on AWS

Post Syndicated from Vincent Gromakowski original https://aws.amazon.com/blogs/big-data/streamline-spark-application-development-on-amazon-emr-with-the-data-solutions-framework-on-aws/

Today, organizations are heavily using Apache Spark for their big data processing needs. However, managing the entire development lifecycle of Spark applications—from local development to production deployment—can be complex and time-consuming. Managing the entire code base—including application code, infrastructure provisioning, and continuous integration and delivery (CI/CD) pipelines—is sometimes not fully automated and a shared responsibility across multiple teams, which slows down release cycles. This undifferentiated heavy lifting diverts valuable resources away from core business objectives: deriving value from data.

In this post, we explore how to use Amazon EMR, the AWS Cloud Development Kit (AWS CDK), and the Data Solutions Framework (DSF) on AWS to streamline the development process, from setting up a local development environment to deploying serverless Spark infrastructure, and implementing a CI/CD pipeline for automated testing and deployment.

By adopting this approach, developers gain full control over their code and the infrastructure responsible for running it, alleviating the need for cross-team dependency. Developers can customize the infrastructure to meet specific business needs and optimize performance. Additionally, they can customize CI/CD stages to facilitate comprehensive testing, using the self-mutation capability of AWS CDK Pipelines to automatically update and refine the deployment process. This level of control not only accelerates development cycles but also enhances the reliability and efficiency of the entire application lifecycle, so developers can focus more on innovation and less on manual infrastructure management.

Solution overview

The solution consists of the following key components:

  • The local development environment to develop and test your Spark code locally
  • The infrastructure as code (IaC) that will run your Spark application in AWS environments
  • The CI/CD pipeline running end-to-end tests and deploying into the different AWS environments

In the following sections, we discuss how to set up these components.

Prerequisites

To set up this solution, you must have an AWS account with appropriate permissions, Docker and the AWS CDK CLI.

Set up the local development environment

Developing Spark applications locally can be a challenging task due to the need for a consistent and efficient environment that mirrors your production setup. With Amazon EMR, Docker, and the Amazon EMR toolkit extension for Visual Studio Code, you can quickly set up a local development environment for Spark applications, developing and testing Spark code locally, and seamlessly port it to the cloud.

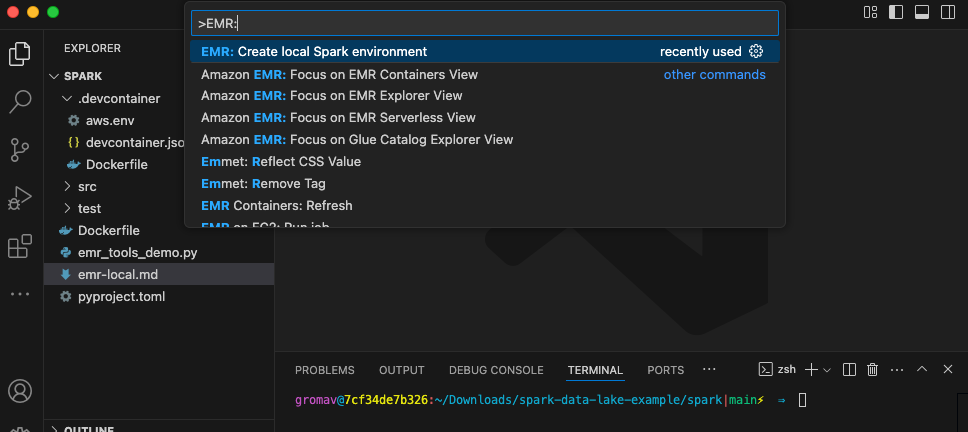
The Amazon EMR toolkit for VS Code includes an “EMR: Create Local Spark Environment” command that generates a development container. This container is based on an Amazon EMR on Amazon EKS image corresponding to the Amazon EMR version you select. You can develop Spark and PySpark code locally, with full compatibility with your remote Amazon EMR environment. Additionally, the toolkit provides helpers to make it straightforward to connect to the AWS Cloud, including an Amazon EMR explorer, an AWS Glue Data Catalog explorer, and commands to run Amazon EMR Serverless jobs from VS Code.

To set up your local environment, complete the following steps:

  1. Install VS Code and the Amazon EMR Toolkit for VS Code.
  2. Install and launch Docker.
  3. Create a local Amazon EMR environment in your working directory using the command EMR: Create Local Spark Environment.

Amazon EMR Toolkit bootstrap

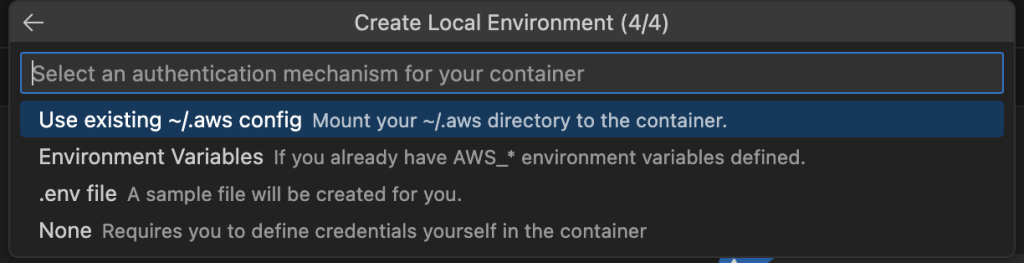
  1. Choose PySpark, Amazon EMR 7.5, and the AWS Region you want to use, and choose an authentication mechanism.

Amazon EMR toolkit local environment

  1. Log in to Amazon ECR with your AWS credentials using the following command so you can download the Amazon EMR image:
aws ecr get-login-password --region us-east-1 \
    | docker login \
    --username AWS \
    --password-stdin \
    12345678910.dkr.ecr.us-east-1.amazonaws.com
  1. Now you can launch your dev container using the VS Code command Dev Containers: Rebuild and Reopen in container.

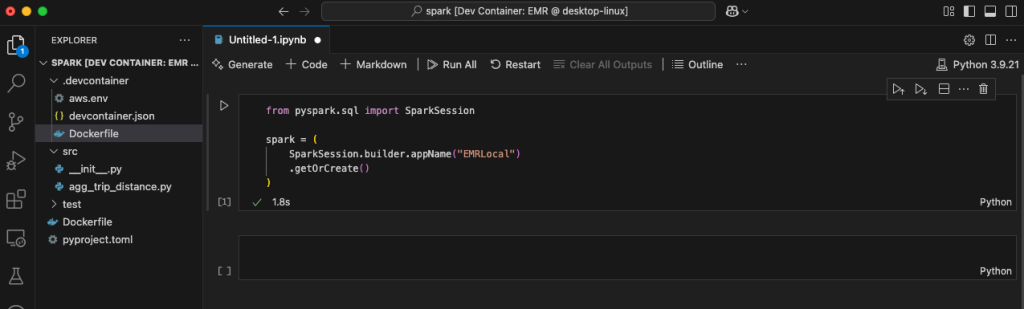
The container will install the latest operating system packages and run a local Spark history server on port 18080.

local Spark history server

The container provides spark-shell, spark-sql, and pyspark from the terminal and a Jupyter Python kernel for connecting a Jupyter notebook to execute interactive Spark code.

local Jupyter notebooks

Using the Amazon EMR Toolkit, you can develop your Spark application and test it locally using Pytest—for example, to validate the business logic. You can also connect to other AWS accounts where you have your development environment.

Build the AWS CDK application with DSF on AWS

After you validate the business logic into your local Spark application, you can implement the infrastructure responsible for running your application. DSF provides AWS CDK L3 Constructs that simplify the creation of Spark-based data pipelines on EMR Serverless or Amazon EMR on EKS.

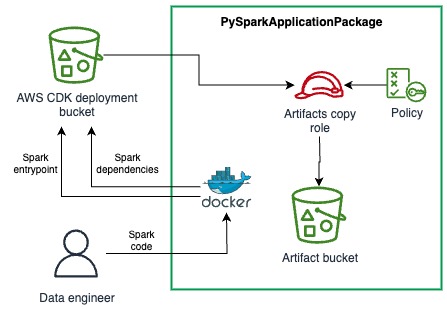
DSF provides the capability to package your local PySpark application, including the Python dependencies, into artifacts that can consumed by EMR Serverless jobs. The PySparkApplicationPackage is a construct that uses a Dockerfile to perform the packaging of dependencies into a Python virtual environment archive and then upload the archive and the PySpark entrypoint file into a secured Amazon Simple Storage Service (Amazon S3) bucket. The following diagram illustrates this architecture.

PySparkApplicationPackage L3 construct

See the following example code:

spark_app = dsf.processing.PySparkApplicationPackage(
    self,
    "SparkApp",
    entrypoint_path="./../spark/src/agg_trip_distance.py",
    application_name="TaxiAggregation",
    # Path of the Dockerfile used to package the dependencies as a Python venv
    dependencies_folder='./../spark',
    # Path of the venv archive in the docker image
    venv_archive_path="/venv-package/pyspark-env.tar.gz",
    removal_policy=RemovalPolicy.DESTROY)

You just need to provide the paths for the following:

  • The PySpark entrypoint. This is the main Python script of your Spark application.
  • The Dockerfile containing the logic for packaging a virtual environment into an archive.
  • The path of the resulting archive in the container file system.

DSF provides helpers to connect the application package to the EMR Serverless job. The PySparkApplicationPackage construct exposes properties that can directly be used into the SparkEmrServerlessJob construct parameters. This construct simplifies the configuration of a batch job using an AWS Step Functions state machine. The following diagram illustrates this architecture.

EmrServerlessJob L3 construct

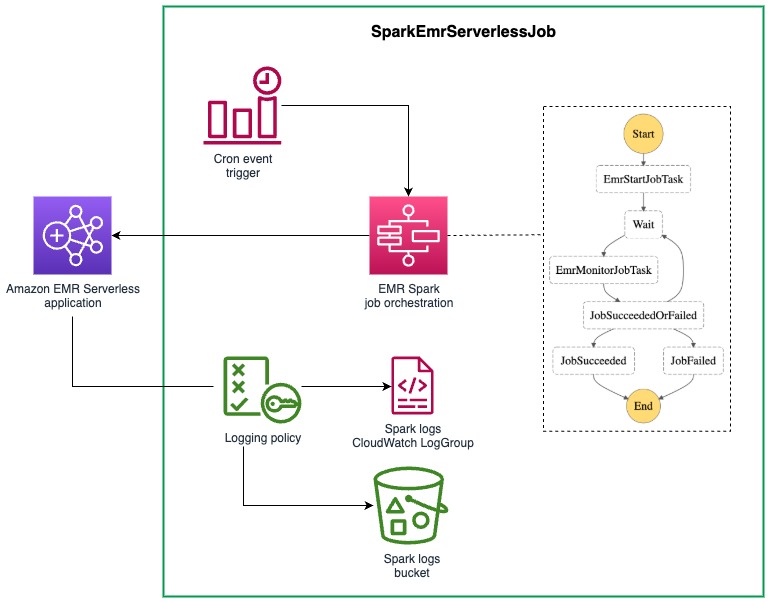
The following code is an example of an EMR Serverless job:

spark_job = dsf.processing.SparkEmrServerlessJob(
    self,
    "SparkProcessingJob",
    dsf.processing.SparkEmrServerlessJobProps(
        name=f"taxi-agg-job-{Names.unique_resource_name(self)}",
        # ID of the previously created EMR Serverless runtime
        application_id=spark_runtime.application.attr_application_id,
        # The IAM role used by the EMR Job with permissions required by the application
        execution_role=processing_exec_role,
        spark_submit_entry_point=spark_app.entrypoint_uri,
        # Add the Spark parameters from the PySpark package to configure the dependencies (using venv)
        spark_submit_parameters=spark_app.spark_venv_conf + spark_params,
        removal_policy=RemovalPolicy.DESTROY,
        schedule=schedule))

Note the two parameters of SparkEmrServerlessJob that are provided by PySparkApplicationPackage:

  • entrypoint_uri, which is the S3 URI of the entrypoint file
  • spark_venv_conf, which contains the Spark submit parameters for using the Python virtual environment

DSF also provides a SparkEmrServerlessRuntime to simplify the creation of the EMR Serverless application responsible for running the job.

Deploy the Spark application using CI/CD

The final step is to implement a CI/CD pipeline that can test your Spark code and promote from dev/test/stage and then to production. DSF provides a L3 Construct that simplifies the creation of the CI/CD pipeline for your Spark applications. DSF’s implementation of the Spark CI/CD pipeline construct uses the AWS CDK built-in pipeline functionality. One of the key capabilities when using an AWS CDK pipeline is its self-mutating capability. It can update itself whenever you change its definition, avoiding the traditional chicken-and-egg problem of pipeline updates and helping developers fully control their CI/CD pipeline.

When the pipeline runs, it follows a carefully orchestrated sequence. First, it retrieves your code from your repository and synthesizes it into AWS CloudFormation templates. Before doing anything else, it examines these templates to see if you’ve made any changes to the pipeline’s own structure. If the pipeline detects that its definition has changed, it will pause its normal operation and update itself first. After the pipeline has updated itself, it will continue with its regular stages, such as deploying your application.

DSF provides an opinionated implementation of CDK Pipelines for Spark applications, where the PySpark code is automatically unit tested using Pytest and where the configuration is simplified. You only need to configure four components:

  • The CI/CD stages (testing, staging, production, and so on). This includes the AWS account ID and Region where these environments reside in.
  • The AWS CDK stack that is deployed in each environment.
  • (Optional) The integration test script that you want to run against the deployed stack.
  • The SparkEmrCICDPipeline AWS CDK construct.

The following diagram illustrates how everything works together.

SparkCICDPipeline L3 construct

Let’s dive into each of these components.

Define cross-account deployment and CI/CD stages

With the SparkEmrCICDPipeline construct, you can deploy your Spark application stack across different AWS accounts. For example, you can have a separate account for your CI/CD processes and different accounts for your staging and production environments.To set this up, first bootstrap the various AWS accounts (staging, production, and so on):

cdk bootstrap --profile <ENVIRONMENT_ACCOUNT_PROFILE> \ 
    aws://<ENVIRONMENT_ACCOUNT_ID&gt;/&lt;REGION> \ 
    --trust <CICD_ACCOUNT_ID> \ 
    --cloudformation-execution-policies "POLICY_ARN"

This step sets up the necessary resources in the environment accounts and creates a trust relationship between those accounts and the CI/CD account where the pipeline will run.Next, choose between two options to define the environments (both options require the relevant configuration in the cdk.context.json file.The first option is to use pre-defined environments, which is defined as follows:

{ 
    "staging": { 
        "account": "<STAGING_ACCOUNT_ID>", 
        "region": "<REGION>" 
    }, 
    "prod": { 
        "account": "<PROD_ACCOUNT_ID>", 
        "region": "<REGION>" 
    } 
}

Alternatively, you can use user-defined environments, which is defined as follows:

{
   "environments":[
      {
         "stageName":"<STAGE_NAME_1>",
         "account":"<STAGE_ACCOUNT_ID>",
         "region":"<REGION>",
         "triggerIntegTest":"<OPTIONAL_BOOLEAN_CAN_BE_OMMITTED>"
      },
      {
         "stageName":"<STAGE_NAME_2>",
         "account":"<STAGE_ACCOUNT_ID>",
         "region":"<REGION>",
         "triggerIntegTest":"<OPTIONAL_BOOLEAN_CAN_BE_OMMITTED>"
      },
      {
         "stageName":"<STAGE_NAME_3>",
         "account":"<STAGE_ACCOUNT_ID>",
         "region":"<REGION>",
         "triggerIntegTest":"<OPTIONAL_BOOLEAN_CAN_BE_OMMITTED>"
      }
   ]
}

Customize the stack to be deployed

Now that the environments have been bootstrapped and configured, let’s look at the actual stack that contains the resources that will be deployed in the various environments. Two classes must be implemented:

  • A class that extends the stack – This is where the resources that are going to be deployed in each of the environments are defined. This can be a normal AWS CDK stack, but it can be deployed in another AWS account depending on the environment configuration defined in the previous section.
  • A class that extends ApplicationStackFactory – This is DSF specific, and makes it possible to configure and then return the stack that is created.

The following code shows a full example:

class MyApplicationStack(cdk.Stack): 
    def __init__(self, scope, *, stage): 
        super().__init__(scope, "MyApplicationStack") 
        bucket = Bucket(self, "TestBucket",
                        auto_delete_objects=True, 
                        removal_policy=cdk.RemovalPolicy.DESTROY) 
        cdk.CfnOutput(self, "BucketName", value=bucket.bucket_name) 
        
class MyStackFactory(dsf.utils.ApplicationStackFactory): 
    def create_stack(self, scope, stage): 
        return MyApplicationStack(scope, stage=stage)

ApplicationStackFactory supports customization of the stack before returning the initialized object to be deployed by the CI/CD pipeline. You can customize your stack behavior by passing the current stage to your stack. For example, you can skip scheduling the Spark application in the integration tests stage because the integration tests trigger it manually as part of the CI/CD pipeline. For the production stage, the scheduling facilitates automatic execution of the Spark application.

Write the integration test script

The integration test script is a bash script that is triggered after the main application stack has been deployed. Inputs to the bash script can come from the AWS CloudFormation outputs of the main application stack. These outputs are mapped into environment variables that the bash script can access directly.

In the Spark CI/CD example, the application stack uses the SparkEMRServerlessJob CDK construct. This construct uses a Step Functions state machine to manage the execution and monitoring of the Spark job. The following is an example integration test bash script that we use to test that the deployed stack can run the associated Spark job successfully:

#!/bin/bash 
EXECUTION_ARN=$(aws stepfunctions start-execution --state-machine-arn $STEP_FUNCTION_ARN | jq -r '.executionArn')

while true 
do 
    STATUS=$(aws stepfunctions describe-execution --execution-arn $EXECUTION_ARN | jq -r '.status') 
    if [ $STATUS = "SUCCEEDED" ]; then 
        exit 0 
    elif [ $STATUS = "FAILED" ] || [ $STATUS = "TIMED_OUT" ] || [ $STATUS = "ABORTED" ]; then 
        exit 1 
    else 
        sleep 10
        continue 
    fi
done

The integration test scripts are executed within an AWS CodeBuild project. As part of the IntegrationTestStack, we’ve included a custom resource that periodically checks the status of the integration test script as it runs. Failure of the CodeBuild execution causes the parent pipeline (residing in the pipeline account) to fail. This helps teams only promote changes that pass all the required testing.

Bring all the components together

When you have your components ready, you can use the SparkEmrCICDPipeline to bring them together. See the following example code:

dsf.processing.SparkEmrCICDPipeline(
    self,
    "SparkCICDPipeline",
    spark_application_name="SparkTest",
    # The Spark image to use in the CICD unit tests
    spark_image=dsf.processing.SparkImage.EMR_7_5,
    # The factory class to dynamically pass the Application Stack
    application_stack_factory=SparkApplicationStackFactory(),
    # Path of the CDK python application to be used by the CICD build and deploy phases
    cdk_application_path="infra",
    # Path of the Spark application to be built and unit tested in the CICD
    spark_application_path="spark",
    # Path of the bash script responsible to run integration tests 
    integ_test_script='./infra/resources/integ-test.sh',
    # Environment variables used by the integration test script, value is the CFN output name
    integ_test_env={
        "STEP_FUNCTION_ARN": "ProcessingStateMachineArn"
    },
    # Additional permissions to give to the CICD to run the integration tests
    integ_test_permissions=[
        PolicyStatement(
            actions=["states:StartExecution", "states:DescribeExecution"
            ],
            resources=["*"]
        )
    ],
    source= CodePipelineSource.connection("your/repo", "branch",
        connection_arn="arn:aws:codeconnections:us-east-1:222222222222:connection/7d2469ff-514a-4e4f-9003-5ca4a43cdc41"
    ),
    removal_policy=RemovalPolicy.DESTROY,
)

The following elements of the code are worth highlighting:

  • With the integ_test_env parameter, you can define the environment variable mapping with the output of your application stack that’s defined in the application_stack_factory parameter
  • The integ_test_permissions parameter specifies the AWS Identity and Access Management (IAM) permissions that are attached to the CodeBuild project where the integration test script runs in
  • CDK Pipelines needs an AWS code connection Amazon Resource Name (ARN) to connect to your Git repository when you host your code

Now you can deploy the stack containing the CI/CD pipeline. This is a one-time operation because the CI/CD pipeline will dynamically be updated based on code changes that impact the CI/CD pipeline itself:

cd infra 
cdk deploy CICDPipeline

Then you can commit and push the code into the source code repository defined in the source parameter. This step triggers the pipeline and deploys the application in the configured environments. You can check the pipeline definition and status on the AWS CodePipeline console.

AWS CodePipeline

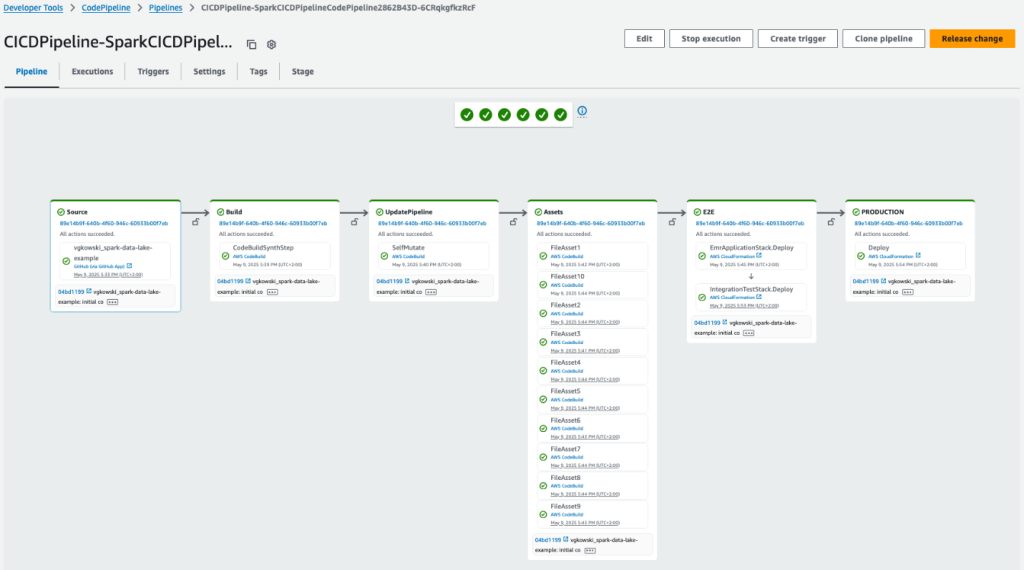
You can find the full example on the Data Solutions Framework GitHub repository.

Clean up

Follow the readme guide to delete the resources created by the solution.

Conclusion

By using Amazon EMR, the AWS CDK, DSF on AWS, and the Amazon EMR toolkit, developers can now streamline their Spark application development process. The solution described in this post helps developers gain full control over their code and infrastructure, making it possible to set up local development environments, implement automated CI/CD pipelines, and deploy serverless Spark infrastructure across multiple environments.

DSF supports other patterns, such as streaming governance and data sharing and Amazon Redshift data warehousing. The DSF roadmap is publicly available, and we look forward to your feature requests, contributions, and feedback. You can get started using DSF by following our Quick start guide.


About the authors

Jan Michael Go Tan

Jan Michael Go Tan

Jan is a Principal Solutions Architect for Amazon Web Services. He helps customers design scalable and innovative solutions with the AWS Cloud.

Vincent Gromakowski

Vincent Gromakowski

Vincent is an Analytics Specialist Solutions Architect at AWS where he enjoys solving customers’ analytics, NoSQL, and streaming challenges. He has a strong expertise on distributed data processing engines and resource orchestration platform.

Lotfi Mouhib

Lotfi Mouhib

Lotfi is a Principal Solutions Architect working for the Public Sector team with Amazon Web Services. He helps public sector customers across EMEA realize their ideas, build new services, and innovate for citizens. In his spare time, Lotfi enjoys cycling and running.

Governing streaming data in Amazon DataZone with the Data Solutions Framework on AWS

Post Syndicated from Vincent Gromakowski original https://aws.amazon.com/blogs/big-data/governing-streaming-data-in-amazon-datazone-with-the-data-solutions-framework-on-aws/

Effective data governance has long been a critical priority for organizations seeking to maximize the value of their data assets. It encompasses the processes, policies, and practices an organization uses to manage its data resources. The key goals of data governance are to make data discoverable and usable by those who need it, accurate and consistent, secure and protected from unauthorized access or misuse, and compliant with relevant regulations and standards. Data governance involves establishing clear ownership and accountability for data, including defining roles, responsibilities, and decision-making authority related to data management.

Traditionally, data governance frameworks have been designed to manage data at rest—the structured and unstructured information stored in databases, data warehouses, and data lakes. Amazon DataZone is a data governance and catalog service from Amazon Web Services (AWS) that allows organizations to centrally discover, control, and evolve schemas for data at rest including AWS Glue tables on Amazon Simple Storage Service (Amazon S3), Amazon Redshift tables, and Amazon SageMaker models.

However, the rise of real-time data streams and streaming data applications impacts data governance, necessitating changes to existing frameworks and practices to effectively manage the new data dynamics. Governing these rapid, decentralized data streams presents a new set of challenges that extend beyond the capabilities of many conventional data governance approaches. Factors such as the ephemeral nature of streaming data, the need for real-time responsiveness, and the technical complexity of distributed data sources require a reimagining of how we think about data oversight and control.

In this post, we explore how AWS customers can extend Amazon DataZone to support streaming data such as Amazon Managed Streaming for Apache Kafka (Amazon MSK) topics. Developers and DevOps managers can use Amazon MSK, a popular streaming data service, to run Kafka applications and Kafka Connect connectors on AWS without becoming experts in operating it. We explain how they can use Amazon DataZone custom asset types and custom authorizers to: 1) catalog Amazon MSK topics, 2) provide useful metadata such as schema and lineage, and 3) securely share Amazon MSK topics across the organization. To accelerate the implementation of Amazon MSK governance in Amazon DataZone, we use the Data Solutions Framework on AWS (DSF), an opinionated open source framework that we announced earlier this year. DSF relies on AWS Cloud Development Kit (AWS CDK) and provides several AWS CDK L3 constructs that accelerate building data solutions on AWS, including streaming governance.

High-level approach for governing streaming data in Amazon DataZone

To anchor the discussion on supporting streaming data in Amazon DataZone, we use Amazon MSK as an integration example, but the approach and the architectural patterns remain the same for other streaming services (such as Amazon Kinesis Data Streams). At a high level, to integrate streaming data, you need the following capabilities:

  • A mechanism for the Kafka topic to be represented in the Amazon DataZone catalog for discoverability (including the schema of the data flowing inside the topic), tracking of lineage and other metadata, and for consumers to request access against.
  • A mechanism to handle the custom authorization flow when a consumer triggers the subscription grant to an environment. This flow consists of the following high-level steps:
    • Collect metadata of target Amazon MSK cluster or topic that’s being subscribed to by the consumer
    • Update the producer Amazon MSK cluster’s resource policy to allow access from the consumer role
    • Provide Kafka topic level AWS Identity and Access Management (IAM) permission to the consumer roles (more on this later) so that it has access to the target Amazon MSK cluster
    • Finally, update the internal metadata of Amazon DataZone so that it’s aware of the existing subscription between producer and consumer

Amazon DataZone catalog

Before you can represent the Kafka topic as an entry in the Amazon DataZone catalog, you need to define:

  1. A custom asset type that describes the metadata that’s needed to describe a Kafka topic. To describe the schema as part of the metadata, use the built-in form type amazon.datazone.RelationalTableFormType and create two more custom form types:
    1. MskSourceReferenceFormType that contains the cluster_ARN and the cluster_type. The type is used to determine whether the Amazon MSK cluster is provisioned or serverless, given that there’s a different process to grant consume permissions.
    1. KafkaSchemaFormType, which contains various metadata on the schema, including the kafka_topic, the schema_version, schema_arn, registry_arn, compatibility_mode (for example, backward-compatible or forward-compatible) and data_format (for example, Avro or JSON), which is helpful if you plan to integrate with the AWS Glue Schema registry.
  1. After the custom asset type has been defined, you can now create an asset based on the custom asset type. The asset describes the schema, the Amazon MSK cluster, and the topic that you want to be made discoverable and accessible to consumers.

Data source for Amazon MSK clusters with AWS Glue Schema registry

In Amazon DataZone, you can create data sources for AWS Glue Data Catalog to import technical metadata of database tables from AWS Glue and have the assets registered in the Amazon DataZone project. For importing metadata related to Amazon MSK, you need to use a custom data source, which can be an AWS Lambda function, using the Amazon DataZone APIs.

We provide as part of the solution a custom Amazon MSK data source with the AWS Glue Schema registry, for automating the creation, update, and deletion of custom Amazon MSK assets. It uses AWS Lambda to extract schema definitions from a Schema registry and metadata from the Amazon MSK clusters and then creates or updates the corresponding assets in Amazon DataZone.

Before explaining how the data source works, you need to know that every custom asset in Amazon DataZone has a unique identifier. When the data source creates an asset, it stores the asset’s unique identifier in Parameter Store, a capability of AWS Systems Manager.

The steps for how the data source works are as follows:

  1. The Amazon MSK AWS Glue Schema registry data source can be scheduled to be triggered on a given interval or by listening to AWS Glue Schema events such as Create, Update or Delete Schema. It can also be invoked manually through the AWS Lambda console.
  2. When triggered, it retrieves all the existing unique identifiers from Parameter Store. These parameters serve as reference to identify if an Amazon MSK asset already exists in Amazon DataZone.
  3. The function lists the Amazon MSK clusters and retrieves the Amazon Resource Name (ARN) for the given Amazon MSK name and additional metadata related to the Amazon MSK cluster type (serverless or provisioned). This metadata will be used later by the custom authorization flow.
  4. Then the function lists all the schemas in the Schema registry for a given registry name. For each schema, it retrieves the latest version and schema definition. The schema definition is what will allow you to add schema information when creating the asset in Amazon DataZone.
  5. For each schema retrieved in the Schema registry, the Lambda function checks if the assets already exist by looking into the Systems Manager parameters retrieved in the second step.
    1. If the asset exists, the Lambda function updates the asset in Amazon DataZone, creating a new revision with the updated schema or forms.
    2. If the asset doesn’t exist, the Lambda function creates the asset in Amazon DataZone and stores its unique identifier in Systems Manager for future reference.
  6. If there are schemas registered in Parameter Store that are no longer in the Schema registry, the data source deletes the corresponding Amazon DataZone assets and removes the associated parameters from Systems Manager.

The Amazon MSK AWS Glue Schema registry data source for Amazon DataZone enables seamless registration of Kafka topics as custom assets in Amazon DataZone. It does require that the topics in the Amazon MSK cluster are using the Schema registry for schema management.

Custom authorization flow

For managed assets such as AWS Glue Data Catalog and Amazon Redshift assets, the process to grant access to the consumer is managed by Amazon DataZone. Custom asset types are considered unmanaged assets, and the process to grant access needs to be implemented outside of Amazon DataZone.

The high-level steps for the end-to-end flow are as follows:

  1. (Conditional) If the consumer environment doesn’t have a subscription target, create it through the CreateSubscriptionTarget API call. The subscription target tells Amazon DataZone which environments are compatible with an asset type.
  2. The consumer triggers a subscription request by subscribing to the relevant streaming data asset through the Amazon DataZone portal.
  3. The producer receives the subscription request and approves (or denies) the request.
  4. After the subscription request has been approved by the producer, the consumer can observe the streaming data asset in their project under the Subscribed data section.
  5. The consumer can opt to trigger a subscription grant to a target environment directly from the Amazon DataZone portal, and this action triggers the custom authorization flow.

For steps 2–4, you rely on the default behavior of Amazon DataZone and no change is required. The focus of this section is then step 1 (subscription target) and step 5 (subscription grant process).

Subscription target

Amazon DataZone has a concept called environments within a project, which indicates where the resources are located and the related access configuration (for example, the IAM role) that is used to access those resources. To allow an environment to have access to the custom asset type, consumers have to use the Amazon DataZone CreateSubscriptionTarget API prior to the subscription grants. The creation of the subscription target is a one-time operation per custom asset type per environment. In addition, the authorizedPrincipals parameter inside the CreateSubscriptionTarget API lists the various IAM principals given access to the Amazon MSK topic as part of the grant authorization flow. Lastly, when calling CreateSubscriptionTarget, the underlying principle used to call the API must belong to the target environment’s AWS account ID.

After the subscription target has been created for a custom asset type and environment, the environment is eligible as a target for subscription grants.

Subscription grant process

Amazon DataZone emits events based on user actions, and you use this mechanism to trigger the custom authorization process when a subscription grant has been triggered for Amazon MSK topics. Specifically, you use the Subscription grant requested event. These are the steps of the authorization flow:

  1. A Lambda function collects metadata on the following:
    1. Producer Amazon MSK cluster or Kinesis data stream that the consumer is requesting access to. Metadata is collected using the GetListing API.
    2. Metadata about the target environment using a call to GetEnvironment API.
    3. Metadata about the subscription target using a call to GetSubscriptionTarget API to collect the consumer roles to grant.
    4. In parallel, Amazon DataZone internal metadata about the status of the subscription grant needs to be updated, and this happens in this step. Depending on the type of action that’s being done (such as GRANT or REVOKE), the status of the subscription grant is updated respectively (for example, GRANT_IN_PROGRESS, REVOKE_IN_PROGRESS).

After the metadata has been collected, it’s passed downstream as part of the AWS Step Functions state.

  1. Update the resource policy of the target resource (for example, Amazon MSK cluster or Kinesis data stream) in the producer account. The update allows authorized principals from the consumer to access or read the target resource. Example of the policy is as follows:
{
    "Effect": "Allow",
    "Principal": {
        "AWS": [
            "<CONSUMER_ROLES_ARN>"
        ]
    },
    "Action": [
        'kafka-cluster:Connect',
        'kafka-cluster:DescribeTopic',
        'kafka-cluster:DescribeGroup',
        'kafka-cluster:AlterGroup',
        'kafka-cluster:ReadData',
        "kafka:CreateVpcConnection",
        "kafka:GetBootstrapBrokers",
        "kafka:DescribeCluster",
        "kafka:DescribeClusterV2"
    ],
    "Resource": [
        "<CLUSTER_ARN>",
        "<TOPIC_ARN>",
        "<GROUP_ARN>"
    ]
}
  1. Update the configured authorized principals by attaching additional IAM permissions depending on specific scenarios. The following examples illustrate what’s being added.

The base access or read permissions are as follows:

{
    "Effect": "Allow",
    "Action": [
        'kafka-cluster:Connect',
        'kafka-cluster:DescribeTopic',
        'kafka-cluster:DescribeGroup',
        'kafka-cluster:AlterGroup',
        'kafka-cluster:ReadData'
    ],
    "Resource": [
        "<CLUSTER_ARN>",
        "<TOPIC_ARN>",
        "<GROUP_ARN>"
    ]
}

If there’s an AWS Glue Schema registry ARN provided as part of the AWS CDK construct parameter, then additional permissions are added to allow access to both the registry and the specific schema:

{
    "Effect": "Allow",
    "Action": [
        "glue:GetRegistry",
        "glue:ListRegistries",
        "glue:GetSchema",
        "glue:ListSchemas",
        "glue:GetSchemaByDefinition",
        "glue:GetSchemaVersion",
        "glue:ListSchemaVersions",
        "glue:GetSchemaVersionsDiff",
        "glue:CheckSchemaVersionValidity",
        "glue:QuerySchemaVersionMetadata",
        "glue:GetTags"
    ],
    "Resource": [
        "<REGISTRY_ARN>",
        "<SCHEMA_ARN>"
    ]
}

If this grant is for a consumer in a different account, the following permissions are also added to allow managed VPC connections to be created by the consumer:

{
    "Effect": "Allow",
    "Action": [
        "kafka:CreateVpcConnection",
        "ec2:CreateTags",
        "ec2:CreateVPCEndpoint"
    ],
    "Resource": "*"
}
  1. Update the Amazon DataZone internal metadata on the progress of the subscription grant (for example, GRANTED or REVOKED). If there’s an exception in a step, it’s handled inside Step Functions and the subscription grant metadata is updated with a failed state (for example, GRANT_FAILED or REVOKE_FAILED).

Because Amazon DataZone supports multi-account architecture, the subscription grant process is a distributed workflow that needs to perform actions across different accounts, and it’s orchestrated from the Amazon DataZone domain account where all the events are received.

Implement streaming governance in Amazon DataZone with DSF

In this section, we deploy an example to illustrate the solution using DSF on AWS, which provides all the required components to accelerate the implementation of the solution. We use the following CDK L3 constructs from DSF:

  • DataZoneMskAssetType creates the custom asset type representing an Amazon MSK topic in Amazon DataZone
  • DataZoneGsrMskDataSource automatically creates Amazon MSK topic assets in Amazon DataZone based on schema definitions in the Schema registry
  • DataZoneMskCentralAuthorizer and DataZoneMskEnvironmentAuthorizer implement the subscription grant process for Amazon MSK topics and IAM authentication

The following diagram is the architecture for the solution.

Overall solution

In this example, we use Python for the example code. DSF also supports TypeScript.

Deployment steps

Follow the steps in the data-solutions-framework-on-aws README to deploy the solution. You need to deploy the CDK stack first, then create the custom environment and redeploy the stack with additional information.

Verify the example is working

To verify the example is working, produce sample data using the Lambda function StreamingGovernanceStack-ProducerLambda. Follow these steps:

  1. Use the AWS Lambda console to test the Lambda function by running a sample test event. The event JSON should be empty. Save your test event and click Test.

AWS Lambda run test

  1. Producing test events will generate a new schema producer-data-product in the Schema registry. Check the schema is created from the AWS Glue console using the Data Catalog menu from the left and selecting Stream schema registries.

AWS Glue schema registry

  1. New data assets should be in the Amazon DataZone portal, under the PRODUCER project
  2. On the DATA tab, in the left navigation pane, select Inventory data, as shown in the following screenshot
  3. Select producer-data-product

Streaming data product

  1. Select the BUSINESS METADATA tab to view the business metadata, as shown in the following screenshot.

business metadata

  1. To view the schema, select the SCHEMA tab, as shown in the following screenshot

data product schema

  1. To view the lineage, select the LINEAGE tab
  2. To publish the asset, select PUBLISH ASSET, as shown in the following screenshot

asset publication 

Subscribe

To subscribe, follow these steps:

  1. Switch to the consumer project by selecting CONSUMER in the top left of the screen
  2. Select Browse Catalog
  3. Choose producer-data-product and choose SUBSCRIBE, as shown in the following screenshot

subscription

  1. Return to the PRODUCER project and choose producer-data-product, as shown in the following screenshot

subscription grant

  1. Choose APPROVE, as shown in the following screenshot

subscription grant approval

  1. Go to the AWS Identity and Access Management (IAM) console and search for the consumer role. In the role definition, you should see an IAM inline policy with permissions on the Amazon MSK cluster, the Kafka topic, the Kafka consumer group, the AWS Glue schema registry and the schema from the producer.

IAM consumer policy

  1. Now let’s switch to the consumer’s environment in the Amazon Managed Service for Apache Flink console and run the Flink application called flink-consumer using the Run button.

Flink consumer

  1. Go back to the Amazon DataZone portal, and confirm that the lineage under the CONSUMER project was updated and the new Flink job run node was added to the lineage graph, as shown in the following screenshot

lineage

Clean up

To clean up the resources you created as part of this walkthrough, follow these steps:

  1. Stop the Amazon Managed Streaming for Apache Flink job.
  2. Revoke the subscription grant from the Amazon DataZone console.
  3. Run cdk destroy in your local terminal to delete the stack. Because you marked the constructs with a RemovalPolicy.DESTROY and configured DSF to remove data on destroy, running cdk destroy or deleting the stack from the AWS CloudFormation console will clean up the provisioned resources.

Conclusion

In this post, we shared how you can integrate streaming data from Amazon MSK within Amazon DataZone to create a unified data governance framework that spans the entire data lifecycle, from the ingestion of streaming data to its storage and eventual consumption by diverse producers and consumers.

We also demonstrated how to use the AWS CDK and the DSF on AWS to quickly implement this solution using built-in best practices. In addition to the Amazon DataZone streaming governance, DSF supports other patterns, such as Spark data processing and Amazon Redshift data warehousing. Our roadmap is publicly available, and we look forward to your feature requests, contributions, and feedback. You can get started using DSF by following our Quick start guide.


About the Authors

Vincent GromakowskiVincent Gromakowski is a Principal Analytics Solutions Architect at AWS where he enjoys solving customers’ data challenges. He uses his strong expertise on analytics, distributed systems and resource orchestration platform to be a trusted technical advisor for AWS customers.

Francisco MorilloFrancisco Morillo is a Sr. Streaming Solutions Architect at AWS, specializing in real-time analytics architectures. With over five years in the streaming data space, Francisco has worked as a data analyst for startups and as a big data engineer for consultancies, building streaming data pipelines. He has deep expertise in Amazon Managed Streaming for Apache Kafka (Amazon MSK) and Amazon Managed Service for Apache Flink. Francisco collaborates closely with AWS customers to build scalable streaming data solutions and advanced streaming data lakes, ensuring seamless data processing and real-time insights.

Jan Michael Go TanJan Michael Go Tan is a Principal Solutions Architect for Amazon Web Services. He helps customers design scalable and innovative solutions with the AWS Cloud.

Sofia ZilbermanSofia Zilberman is a Sr. Analytics Specialist Solutions Architect at Amazon Web Services. She has a track record of 15 years of creating large-scale, distributed processing systems. She remains passionate about big data technologies and architecture trends, and is constantly on the lookout for functional and technological innovations.