Post Syndicated from Zip Zieper original https://aws.amazon.com/blogs/messaging-and-targeting/how-to-improve-email-sender-reputation-with-amazon-ses-email-validation/
If you’re sending emails at scale with Amazon Simple Email Service (Amazon SES), maintaining high deliverability depends on more than the content you send. It’s about who receives those emails. Mailbox providers like Gmail, Yahoo, and Outlook assign reputation scores based on your sending practices, domain and IP authentication records, message quality, and recipient engagement. These providers use their own algorithms to decide whether your emails reach the inbox, are filtered as spam, or aren’t delivered at all. For more information about managing your email reputation, see The Four Pillars of Managing Email Reputation. In this post, we show you how the Amazon SES Email Validation feature can help you to protect your sender reputation.
The email bounce rate is the percentage of emails that fail to deliver and is one of the most critical factors affecting your sender reputation. Every bounce damages your sender reputation. Mailbox providers like Gmail and Outlook closely monitor bounce rates, and accounts that bounce over 5% trigger warnings. If your account bounce rate exceeds 10%, the email services providers might throttle, or completely block sending. For customers sending email at scale with Amazon SES, a high bounce rate may trigger immediate consequences: damaged sender reputation, blocked deliverability, and ISP penalties that can throttle or suspend your entire email program. Traditional approaches to email quality are reactive, because you will only discover problems after bounces have damaged your reputation. While account suppression lists protect against known problematic addresses, they can’t protect you from the normal decay of email address quality that occurs because of job changes, abandoned mailboxes, domain expirations, or bots and bad actors looking to damage your email reputation.
Use Amazon SES Email Validation to help you protect your sender reputation
Amazon SES Email Validation shifts bounce management from reactive to proactive, helping you detect problems before they damage your sender reputation. The feature provides two validation approaches: the Email Validation API for timely checks during registration and Auto Validation to automatically review all outbound email addresses before sending and only deliver messages to recipients that meet your selected validation threshold. Both methods are intended to catch problem addresses before they become bounces, helping to protect your sender reputation.
In this post, we guide you through implementing both validation approaches using AnyCompany—a fictitious ecommerce website—as our example. You will see how AnyCompany might use the Email Validation API for timely registration checks on address acquisition and Auto Validation at time of sending. You’ll learn how to protect your sender reputation proactively and integrate validation into existing workflows with minimal disruption. We also show you how to use Amazon CloudWatch metrics to improve email list health over time. After you’re done reading and experimenting, you’ll understand how Amazon SES Email Validation can help transform your email operations from reactive bounce management to proactive quality assurance.
Solution overview – how to use the Email Validation API to avoid ingesting invalid email addresses
You can use the Email Validation API to validate email addresses through synchronous API calls to check addresses at the point of collection. This method gives you immediate feedback about address validity and helps prevent invalid addresses from entering your database. You control when validation occurs and how to handle the results. The Email Validation API costs $0.01 per validation using the API or the AWS Management Console for Amazon SES. See Amazon SES pricing for details.
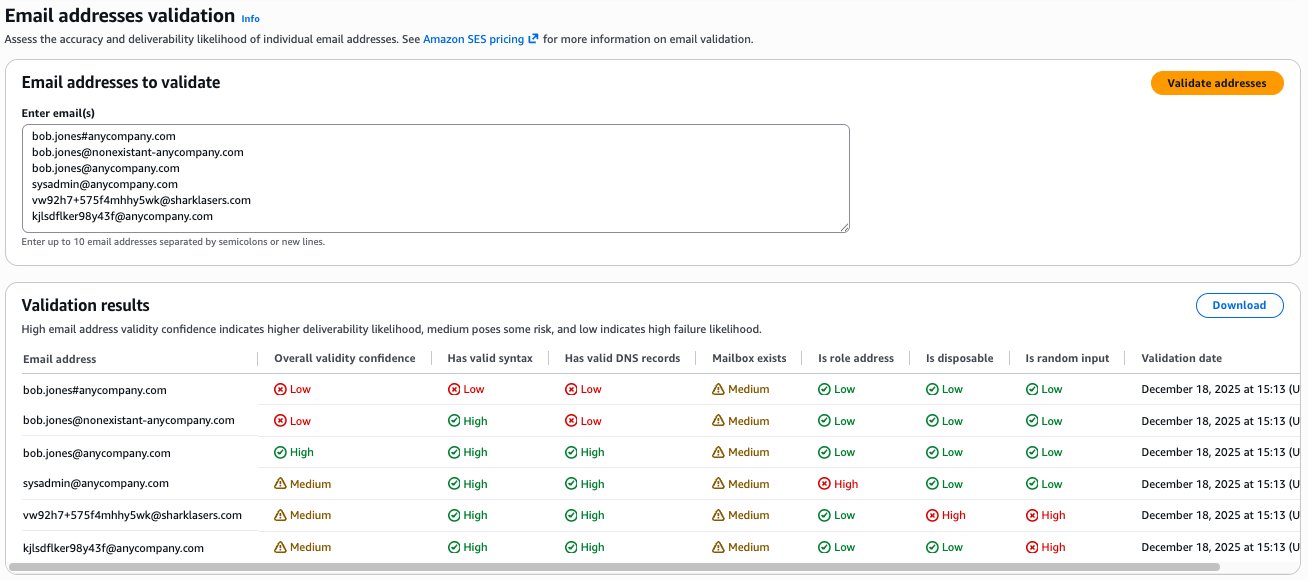
The Amazon SES console uses the Email Validation API to manually validate up to 10 email addresses at a time. The results are shown in the console—shown in the following screenshot—and you can export the results to a CSV file.
The Email Validate API can be used in your code or using the AWS Command Line Interface (AWS CLI) to validate individual email addresses through synchronous API calls. This method is well-suited for validating addresses at the point of collection—during user registration, subscription form submission, or during an email list import to help prevent invalid addresses from entering your database. The following is an example using the AWS CLI.
The API returns a response structure similar to the following example:
Understanding Email Validation API verdicts
For each email, the Email Validation API returns an overall validity confidence with three possible aggregate verdicts:
- HIGH – The email address passed all critical validation checks and is highly likely to be deliverable. These addresses can be accepted without additional scrutiny.
- MEDIUM – The email address passed basic validation but has characteristics that might affect deliverability (such as being a role address or having uncertain mailbox existence). Your use case and bounce risk tolerance should be used to determine whether to accept these addresses.
- LOW – The email address failed one or more critical validation checks and is unlikely to be deliverable. Your use case and bounce risk tolerance will most likely cause you to reject these addresses.
To reach the overall validity confidence, the Email Validation API performs six detailed checks on each email address:
- Syntax validation (
HasValidSyntax) – Confirms the address follows RFC 5321 and RFC 5322 standards for email address formatting. This catches obvious errors such as missing @ symbols or invalid characters. - DNS verification (
HasValidDnsRecords) – Validates that the domain exists and has proper mail exchange (MX) records and corresponding A records configured. This helps confirm that the domain can receive email. - Mailbox existence (
MailboxExists) – Predicts whether the specific mailbox exists and can receive messages. - Role address detection (
IsRoleAddress) – Identifies generic addresses like [email protected] or [email protected] that typically represent shared mailboxes rather than individual recipients. - Disposable email detection (
IsDisposable) – Checks temporary email services like mailinator.com or guerrillamail.com that users often employ to avoid providing real contact information. - Random input detection (
IsRandomInput) – Checks randomly generated patterns.
For more information about response values and data types, see the MailboxValidation data type in the Amazon SES API v2 reference.
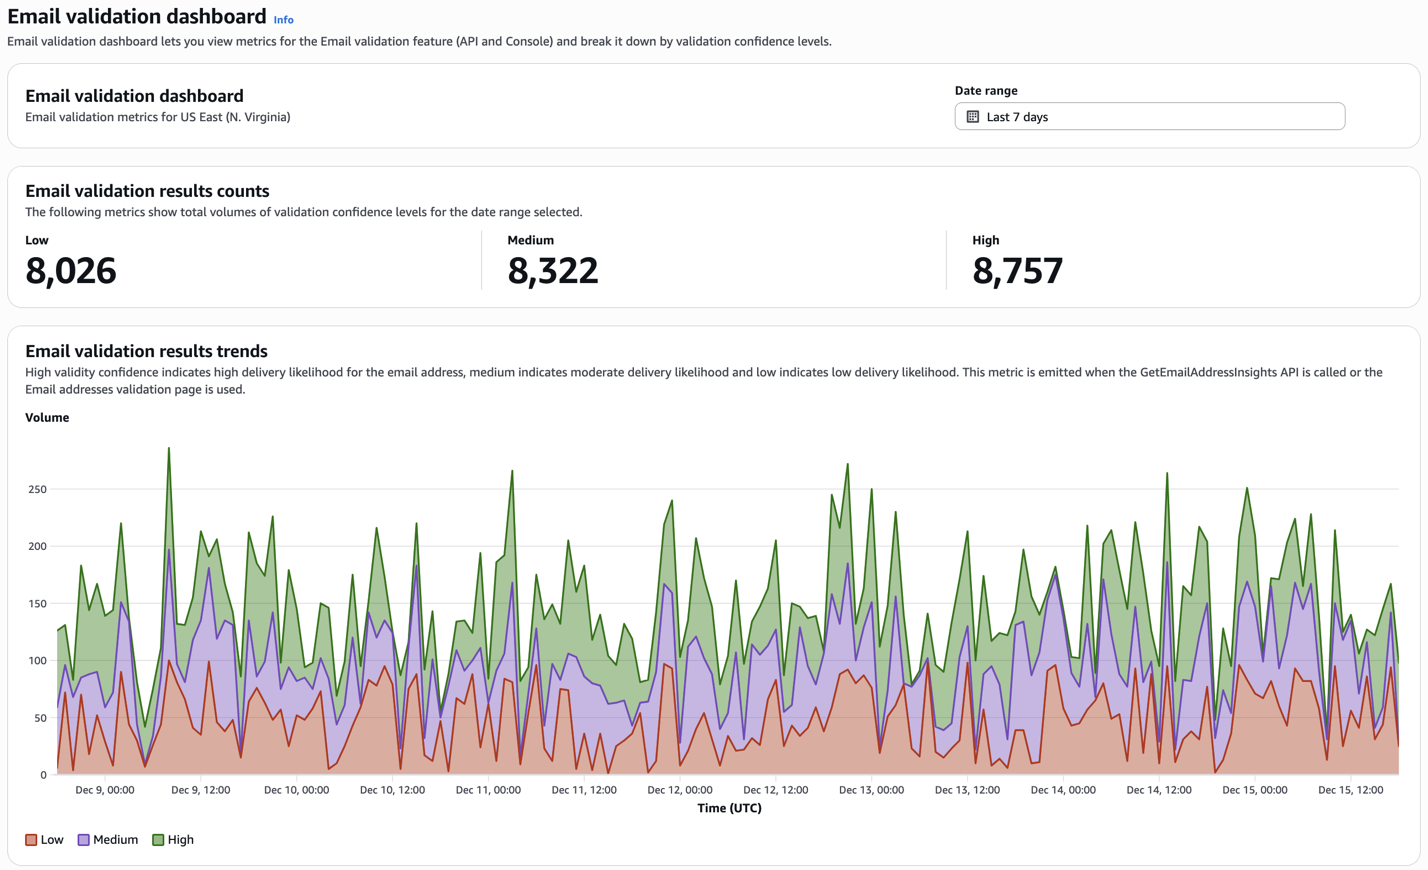
The Email Validation API provides a dashboard in the Amazon SES console that you can use to view email address verification results over time, with the ability to look back for up to one month, as shown in the following screenshot.
Use auto validation to help prevent bounces when sending from Amazon SES
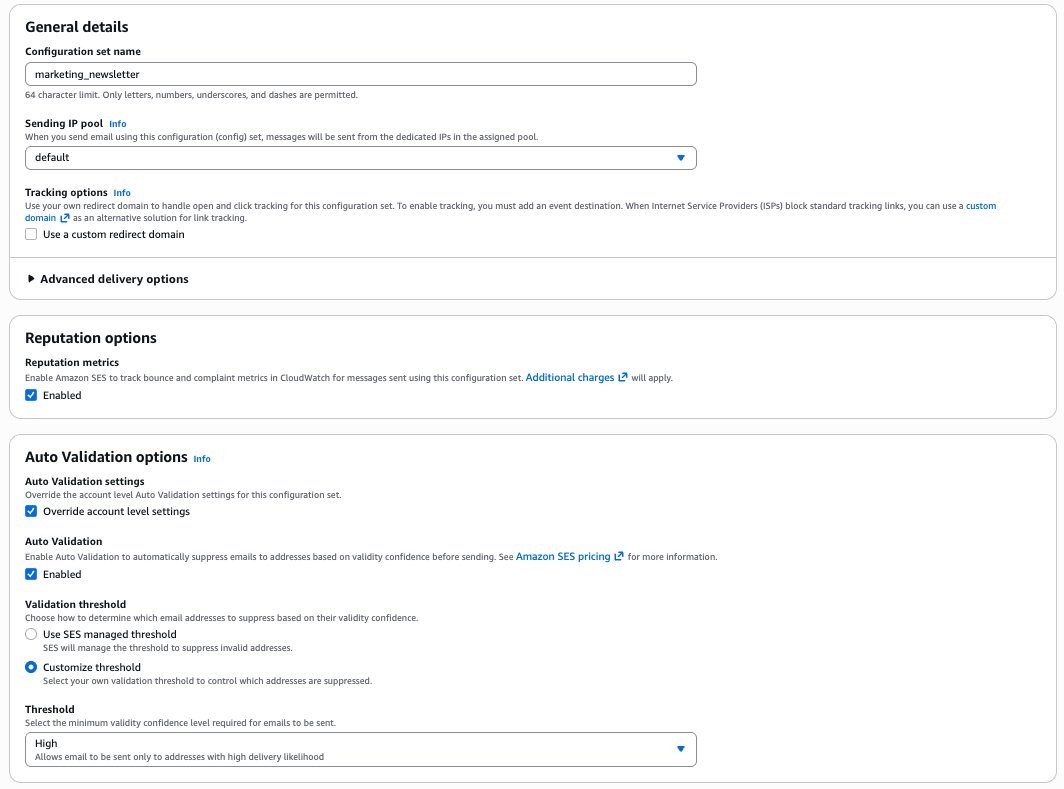
Amazon SES Auto Validation automatically performs comprehensive address validation through multiple checks such as syntax validation, DNS records, and others before each message is sent. When auto validation is enabled, Amazon SES will only deliver messages to recipients that meet your selected validation threshold. This helps you protect your sender reputation by preventing sends to addresses that have a high probability of being invalid or risky without requiring manual intervention or API integration. Auto Validation must be enabled separately for each AWS region in your account. For example, if you enable it in us-east-1, it will not be active in us-west-2 unless you explicitly enable it there as well. You can enable it at the account level for an entire region, or selectively within configuration sets. Auto validation costs $0.01 per 1,000 validations. Be aware that sends suppressed by Auto Validation count towards your daily send quota, and you will be charged the standard outgoing message fee for suppressed sends (in addition to the fee for auto validation). See Amazon SES pricing for more information.
When enabled at the AWS account level, you set the Validation threshold to determine which email addresses to suppress based on their validity confidence, as shown in the following screenshot.
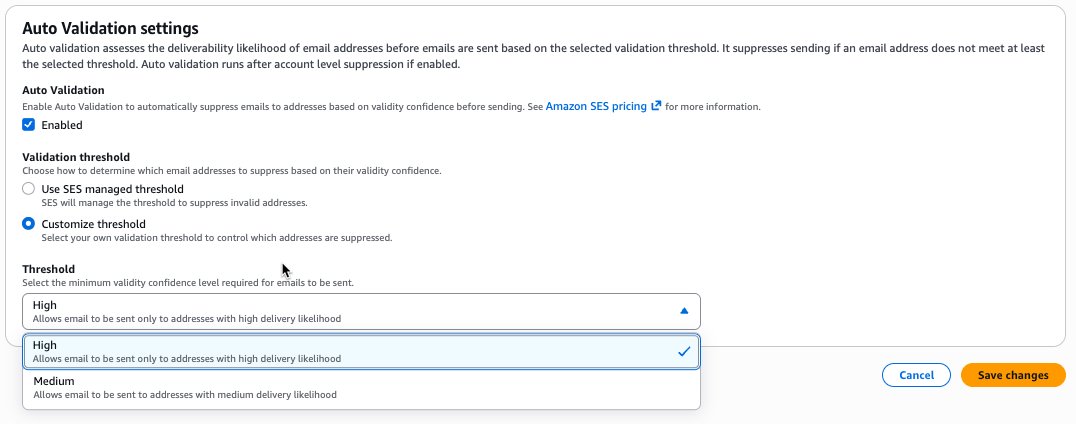
- Amazon SES managed threshold (recommended) – Amazon SES automatically manages the threshold to suppress invalid addresses based on your sending patterns and reputation. This option allows Amazon SES to optimize the validation threshold dynamically. Use this threshold when you want AWS to handle validation decisions based on your account’s specific characteristics.
- Custom threshold –
- High – Delivers emails only to addresses with high delivery likelihood. This provides maximum protection for your sender reputation but might suppress some legitimate addresses with medium delivery confidence. Use this threshold for critical transactional emails or when protecting sender reputation is your top priority.
- Medium – Delivers emails to addresses with medium or high delivery likelihood. This balances reputation protection with delivery reach by allowing addresses with moderate deliverability scores. Use this threshold for marketing campaigns where you want to maximize reach while still filtering obviously invalid addresses.
You will usually find that using the recommended Amazon SES managed threshold works best for the bulk of your sending, however for certain use cases you might want to override the account setting and use a custom threshold in your configuration set. If you choose High or Medium thresholds instead of Amazon SES managed (as shown in the following screenshot), it’s important that you monitor your delivery metrics and validation results regularly.
Auto Validation applies to all outbound emails sent through your account. Addresses that don’t meet your threshold will be suppressed with the bounceSubType of EmailValidationSuppressed. Suppressed sends count towards your daily send quota, and you will be charged the standard outgoing message fee for suppressed sends in addition to the fee for auto validation.
How AnyCompany might use the Email Validation API and auto validation
AnyCompany runs an ecommerce platform for both business and consumer office supplies. The company’s website hosts various web-forms for customers to create accounts and sign up to receive newsletters and discount offers. When they place orders through the platform, AnyCompany’s system sends order confirmations and delivery tracking emails. Today, when a new user registers through one of the web forms, AnyCompany sends a verification email to confirm the user’s email address, contact details, and opt-in to the company’s emails. If a user misspells their email address, they will never receive this verification email. Frustrated, they might move on to another provider. Similarly, if a bot or bad actor deliberately submits invalid addresses to the web form, verification emails will bounce. Both scenarios cost AnyCompany money with no return; at scale, a high bounce rate might cause email service providers to throttle or block future sends. AnyCompany previously investigated various third-party email validation services, but the engineering work, security reviews, and costs outweighed the expected benefits. This necessitated the cloud team’s constant and careful vigilance over the company’s bounce rate and reputation, diverting resources that the company would prefer to deploy elsewhere. As an ecommerce company, AnyCompany needs to be highly protective of its sender reputation. With email validation now built directly into Amazon SES, AnyCompany can bypass the complexity and cost of third-party tools and directly benefit from proactive bounce prevention across all email use cases. In the following section, we guide you through the simple steps AnyCompany might take to implement Amazon SES Email Validation.
Prerequisites
Before implementing Email Validation, you’ll need:
AWS account :
- An AWS account with Amazon SES enabled in your desired AWS Region
- AWS CLI version 2.0 or later installed and configured
Required IAM permissions:
Your IAM user or role needs the following permissions to configure Email Validation:
ses:PutAccountSuppressionAttributes– To enable and configure Email Validation at the account levelses:GetAccountto verify Email Validation configurationses:CreateConfigurationSetwhen creating a new configuration setses:PutConfigurationSetSuppressionOptionsto override validation settings for specific configuration setsses:GetEmailAddressInsightsto call the Email Validation APIiam:CreateServiceLinkedRolecreates an IAM service-linked role that is used by Amazon SES to publish CloudWatch metricscloudwatch:GetMetricStatistics– To retrieve validation metrics
Development environment:
- Familiarity with AWS CLI commands and JSON configuration files
- For API integration, SDK support for Amazon SES API v2 in your preferred programming language
- Access to your application’s user registration code
Existing Amazon SES configuration:
- At least one verified email address or domain in Amazon SES
While the Email Validation API works with an AWS account that is in the Amazon SES sandbox, auto validation is best demonstrated after your AWS account has been granted production access.
- (Optional) Configuration sets created for different email types (transactional, marketing, and so on)
Validating email addresses at acquisition with the Email Validation API
To prevent bad addresses from entering their customer database at time of acquisition, AnyCompany will integrate the Email Validation API directly into their registration form. When a user submits their contact details, including email address, the Email Validation API is used. Results arrive within 100 milliseconds, with the overall validity confidence and six detailed checks of the email address. AnyCompany will then use the results and custom business logic they designed for their different use cases. For example, for their B2B business, they might allow registrations with high overall confidences and a role address, such as [email protected]. For the consumer business, they might accept registrations with medium overall confidences, but always reject emails that the API identifies as disposable, such as [email protected] or random, such as [email protected].
Sample code snippets
The code snippets in this section are examples only and are not intended for production use.
Step 1: Validate email address on form submission
When a user submits the registration form, AnyCompany’s application calls the Email Validation API before creating the account:
Step 2: Apply business rules based on verdict
AnyCompany’s business logic handles different validation outcomes:
Step 3: Provide user-friendly error messages
When validation fails, AnyCompany provides specific, actionable feedback (you can add more conditions based on your requirements):
Step 4: Suggest corrections for common mistakes
For addresses that fail DNS validation, AnyCompany suggests common corrections to popular domain typos.
Key benefits of the Email Validation API
The Email Validation API provide proactive quality control by preventing invalid addresses from entering AnyCompany’s database, preventing the reputation damage that occurs when they send to addresses that bounce.
- Immediate user feedback – Because validation results return within milliseconds, AnyCompany can provide real-time feedback during registration without impacting user experience.
- Flexible policy enforcement – AnyCompany can use individual check results to define custom validation policies that match their various business requirements, accepting or rejecting addresses based on use case-specific risk tolerance.
- Cost-effective validation – AnyCompany pays only for the addresses they validate, with no infrastructure to provision or manage and no license fees. Preventing a single bounce might save more than the cost of validation.
By integrating the Email Validation API into their registration workflow, AnyCompany can transform their approach from reactive bounce management to proactive quality assurance. Invalid addresses are prevented from entering their database, legitimate customers receive verification emails reliably, and their sender reputation remains protected with little to no ongoing effort.
Set up a CloudWatch alarm for high rates of LOW verdicts
You can configure CloudWatch alarms to notify you when validation patterns indicate a consistently high rate of LOW verdicts. This might indicate malicious bots attempting to sign up through a web-form or other mechanism.
The following example creates a CloudWatch alarm that fires when the rate of LOW verdicts exceeds 20%.
How AnyCompany uses validation metrics
AnyCompany monitors their Email Validation dashboard in the Amazon SES console to track list quality trends. For example, if they notice an increase in disposable email failures, they can add additional client-side validation to their registration forms to discourage this behavior. When Auto Validation blocks a spike of invalid addresses from a specific partner marketing campaign, they avoid the problems associated with a spike in bounces while being better informed when investigating the list source and removing or cleaning it for future campaigns.
Validating email addresses at send time with Auto Validation
AnyCompany has been operating its online platform for many years without a way to validate email addresses. The company also makes frequent acquisitions and partnerships that regularly introduce new email addresses into their sending. This means that no matter how well the new registration for with the Email Validation API performs, they will always have some invalid email addresses in their outbound sends.
This is one of the scenarios that can be addressed with no code or process changes by using Auto Validation. When enabled at the AWS account level, Auto Validation checks each address before sending, automatically suppressing the send of invalid addresses, adding those addresses to the account suppression list, and generating bounce notification events. These bounce events appear in Amazon SES event publishing and can be monitored using Amazon CloudWatch, Amazon Simple Notification Service (Amazon SNS), or Amazon EventBridge or written to an Amazon Simple Storage Service (Amazon S3) bucket. Auto Validation bounce events appear as:
- Bounce type:
Permanentfor addresses that will never be deliverable - Bounce subtype:
EmailValidationSuppressedindicating Auto Validation blocked the send
Because it’s implemented in Amazon SES events, AnyCompany can handle address validation failures the same way they currently handle actual bounces from mailbox providers, maintaining consistency in their email processing workflows.
Conclusion
Amazon SES Email Validation addresses critical needs for organizations sending email at scale: preventing invalid addresses at registration and automatically filtering risky recipients before sending. The feature’s two complementary approaches—the Email Validation API for real-time checks and Auto Validation for automatic send-time filtering—give you flexibility to implement validation where it makes the most sense for your workflows.
Use the Email Validation API to:
- Validate at point of collection (registration, imports)
- Receive immediate user feedback
- Build custom validation workflows
- Validate before database entry
- Validate up to 10 addresses
Use Auto Validation to:
- Automatically protect ongoing campaigns automatically
- Avoid code changes to sending logic
- Provide consistent quality across all sends
- Set organization-wide quality standards
By implementing both features of Amazon SES Email Validation, you can better protect your sender reputation by proactively preventing bounces, reducing the possibility of high bounce rates that can damage your deliverability.
Next steps
Start improving your email deliverability today:
- Enable Email Validation in your AWS account using the Amazon SES console or the AWS CLI
- Implement API validation at your registration points to improve data quality from the start
- Configure Auto Validation policies to protect your sender reputation across all campaigns
- Set up CloudWatch dashboards to track validation performance and identify list quality trends
- Review validation metrics weekly to refine your validation policies based on actual patterns
For more information about Amazon SES Email Validation, see the Amazon SES Developer Guide.


 Figure 2. Security controls applied by Proofpoint SER before routing emails back to Amazon SES for distribution.