Email continues to be a critical communication channel for businesses, powering essential communications across time zones and locations. But as cyber threats grow more sophisticated, how can organizations protect their most vulnerable communication channel? With the increasing complexity of email-based security risks, businesses need robust solutions to safeguard their digital communications. Today, we’re excited to announce the launch of Hornetsecurity’sVade Advanced Email Security Add On for Amazon Simple Email Service (SES) Mail Manager, a powerful new tool in the fight against email-borne threats.
Amazon SES: Powering email communication at scale
Amazon SES is a cloud-based email service that helps you automate high-volume email communications seamlessly. In May 2024, we launched Mail Manager, introducing email relay and gateway features that help you manage email traffic, ensure compliance and enforce corporate policies. The launch also included an introduction to Mail Manager Email Add Ons which provides optional access to a collection of powerful security tools from certified providers that help you manage and filter incoming emails. Add Ons from our partners deliver advanced email security with flexible, meter-based pricing that is easily activated and integrated into your email workflows directly from the Mail Manager console or Mail Manager APIs.
In this blog, we’ll introduce Hornetsecurity’s Vade Email Add On for Amazon SES Mail Manager, and demonstrate how to enable its advanced email security capabilities to help protect your critical email communications.
Introducing the Vade Email Add On by Hornet Security
Hornetsecurity, a global leader in email security, produces next-generation cloud-based security, compliance, backup, and security awareness solutions that help companies and organizations of all sizes around the world. Its email filters process billions of emails daily, using a vast global email database to power their artificial intelligence (AI) engine. This approach allows the Vade Email Add On to continuously refine and adapt to the latest email threats and filter-bypassing techniques.
The Vade Email Add On brings Vade’s expertise directly to you, providing a seamless and powerful email security solution within the familiar AWS environment:
“Enhance your email service with advanced cybersecurity capabilities by integrating Vade Email Security’s state-of-the-art filtering solution. This Add On empowers users with automated, real-time defense against spam, malware, and phishing—ensuring safer communication. Vade’s AI-powered technology employs a multi-layered approach—combining heuristics, behavioral analysis, and natural language processing—to analyze messages in real time. Strengthen your platform by ensuring ongoing protection against evolving cyber threats.”
Advanced Email Security with the Vade Add On for Mail Manager
Hornetsecurity’s Vade Add On for Mail Manager provides automated, real-time defense against spam, malware, and phishing, which help ensure safer communication, including:
Advanced Threat Detection: Identifies and blocks sophisticated phishing attempts, malware, and ransomware, providing comprehensive protection against a wide range of cyber threats.
Behavioral Analysis: Examines the behavior patterns of message senders and content based on over 130 potential data points in each message to detect anomalies and potential threats.
Patented AI Technology: Leverages proprietary AI algorithms to analyze communication patterns and detect misuse of your service’s digital assets. This technology is powered by our global network of over 1 billion protected mailboxes.
Real-Time Scanning: Instantly analyze attachments without delaying delivery, thanks to its real time code interpreter.
Ease of Use: Seamless integration with Mail Manager rules, scanning only messages that meet specific criteria.
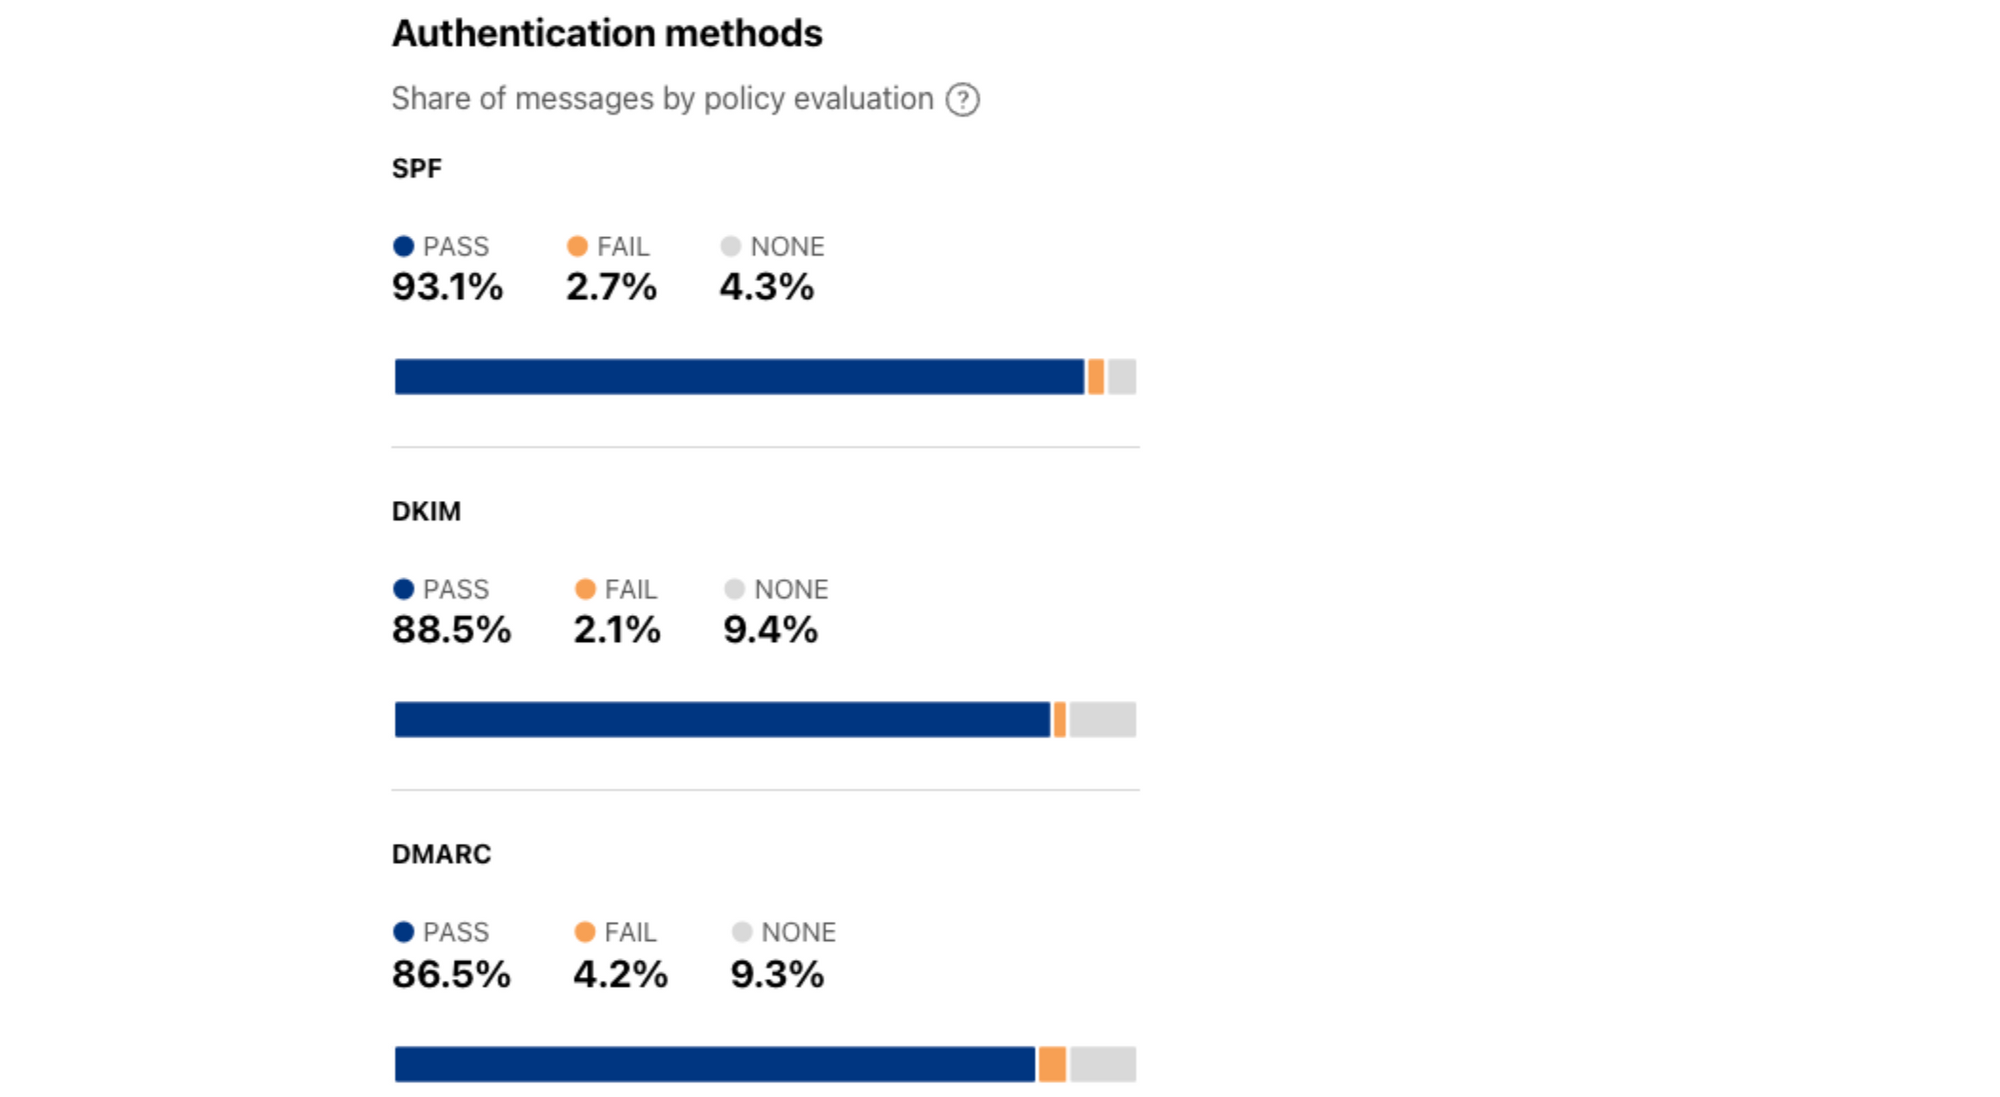
The Vade Email Add-On integrates with Mail Manager’s rules engine. This engine routes messages based on Vade’s scan results and optional detailed verdicts. These verdicts enable precise categorization and handling of incoming emails, improving security and email management.
Configure the Vade Email Add On
In the following example, we’ll walk thru the steps needed to subscribe and configure a rule set with two rules that are processed in priority order:
Rule 1 – drop-all-malicious-emails This rule has a condition that uses Vade to scan all incoming email and identify messages that are malicious (contain malware or phishing). These messages are then processed by Rule 1’s “Drop action“. Messages that are deemed “safe” are passed to Rule 2 after automatically being inspected and marked as “likely to be spam”, or “not-spam”.
Rule 2 – forward-to-mailbox Messages passed into Rule 2 are immediately forwarded to the user’s mailbox. In our example, we’re using Amazon WorkMail and Mail Manager’s built-in “Deliver to mailbox” action.
The Vade Add On also distinguishes between spam and clean email, and automatically adds a corresponding header to each message (see below) that can be used to route spam into the user’s “junk” folder.
Thanks to the seamless integration between Mail Manager Add Ons and WorkMail, messages marked as spam are automatically sent to the user’s Junk folder, enhancing both security and user experience.
Follow the steps below to configure the Vade Email Add On using the Amazon SES console for the simple mail flow described above (note – the SES Mail Manager API can be used in lieu of the console).
Open the Amazon SES console and in the left navigation rail, expand Mail Manager and click Email Add Ons.
Select the Vade Add On, read the description. Click Subscribe and read the Terms and Conditions. Click Subscribe again to activate the Vade Advanced Email Security Add On in your SES account.
Pricing is detailed in the Email Add On description page. When this blog was published the price per 1,000 emails processed = $0.415 USD (subject to change, please refer to SES Pricing for the most up to date information).
In the left navigation rail under Mail Manager, click Rule Sets.
Create a new Rule set ( process-via-vade ) (or modify an existing Rule set).
Create a rule ( drop-all-malicious-emails )
Under Rule conditions, click select property and select Vade Advanced Email Security Category from the drop-down menu (note the property modifiers allow for increasingly detailed inspection / results for the scan).
Click the Select operator drop-down and select Equals from the menu.
Click the Value drop-down and select Phishing and Malware.
Under Actions, select Drop action to stop processing and discard messages that are found to be malicious.
Create rule ( forward-to-mailbox ) to process messages that were passed along by Rule 1.
Under Actions, select Deliver to mailbox (note – if not using Amazon WorkMail, you would select a previously configured SMTPRelay action to send messages to your inbox provider. See this blog for more info).
Provide your WorkMail ARN
Select an IAM role that has permission for SES Mail Manager to access to your WorkMail mailbox
Save the Rule set (it will look like this):
To use this new Rule set, add it to an active Mail Manager Ingress endpoint. When you click save, the Ingress endpoint will begin using the new Rule set immediately.
The Vade Add-On’s rule conditions (below) enable granular control of email routing. When combined with customizable actions, these rules create an automated email handling system that matches your business needs.
Conclusion
Hornetsecurity’s Vade Email Add On for Amazon SES Mail Manager represents a significant step forward in email security for Amazon SES Mail Manager customers. By combining an advanced artificial intelligence (AI)-driven security engine with the powerful management capabilities of Mail Manager, you can enhance your defense against email-borne threats while maintaining precise control over your email workflows.
Get started today and take your email security to the next level with the Vade Add On for Amazon SES Mail Manager
We encourage you to try the Vade Add On for Amazon SES Mail Manager and experience the benefits of enhanced email security firsthand. To learn more about implementation details and best practices, please visit:
Join the Conversation: Connect with other administrators and security professionals on the AWS re:Post community to share insights and learn best practices.
[Amazon Simple Email Service] provides a secure email solution that scales with your business needs. Unfortunately, all email systems, including Amazon SES, remain the primary target for spammers and bad actors due to email’s widespread use and accessibility.
While SES offers powerful features for application-based email sending, its SMTP credentials require careful management to prevent unauthorized access. Compromised credentials enable bad actors to send malicious emails through legitimate domains, which can bypass security filters and damage sender reputation.
To protect your SES implementation, you must encrypt SMTP credentials during storage and transmission. Additionally, implementing role-based access controls helps restrict credential access to authorized personnel only. Regular credential rotation at fixed intervals, typically every 90 days, minimizes potential security breaches. Automating this rotation process eliminates human error and ensures consistent security practices across your organization.
Problem Statement
Imagine you are the administrator for a large financial institution. You recently began using Amazon SES to send email from two dozen on-premises servers. Your email servers authenticate with SES using SMTP credentials to access the SES SMTP interface. Your organization’s security policies mandate regular credential rotation, including the ability to rotate them on-demand. How can you automate SMTP credential rotation such that you can meet your organization’s security policies?
This blog post will present two solutions that automate the secure management and automatic rotation of SMTP credentials for Amazon SES. Each will help enhance email security, comply with regulations, and minimize operational overhead.
Both solutions provide SES customers who use SMTP with additional tools to improve email security, ensure compliance, and reduce operational overhead. You can deploy the option that best suites your needs by following the guidance in this blog post.
If your environment supports automated rotation, AWS Systems Manager Documents (SSM Documents) can help by providing pre-defined or custom automation workflows for securely managing secrets rotation, deploy Option 1.
If your environment does not support automated rotation, you can still implement an auditable, managed rotation solution by storing your secrets in AWS Systems Manager Parameter Store by deploying Option 2.
As a pay-per-use platform, the underlying AWS services used in either deployment option will only charge you for the resources that you actually consume. You can leverage the AWS Pricing Calculator to estimate the run-time costs for your specific workload. Alternatively, you can work directly with your AWS account team to understand the pricing for these solutions.
Getting SES SMTP Credentials
To send emails through the Amazon SES SMTP interface, email servers must first authenticate with SES using dedicated SES SMTP credentials. Typically, a systems administrator logs into the AWS SES console, clicks the Create SMTP Credentials button, and navigates to the AWS Identity and Access Management] (IAM) console. There, the administrator creates an IAM user with permissions for SES. The administrator then uses the IAM user’s secret access key to generate the SES SMTP password, which they use to configure their email servers or SMTP-enabled applications for use with SES.
The SES SMTP interface authenticates requests using an SMTP credential derived from an IAM user’s access key ID and secret access key. Since temporary access keys cannot be used to derive SES SMTP credentials, you must deploy and regularly rotate a long-lived key.
While the manual process of creating SES SMTP credentials works for a small number of credentials, it becomes cumbersome for customers with numerous email servers or strict password rotation policies. These customers may find the automated credential rotation mechanisms described in the following solutions better suited to their production needs.
Option 1 – Fully Automated Credential Rotation:
The fully automated version of this solution uses a custom Lambda function to create an SMTP password, which is stored in AWS Secrets Manager. AWS Secrets Manager’s built-in rotation feature then triggers the rotation of SES SMTP credentials. AWS Systems Manager Documents utilize AWS Systems Manager Agents to automatically make the changes to the authentication configuration on email servers.
The key advantages of using AWS Systems Manager to make the email server configuration changes include:
Ability to deploy changes to on-premises and Amazon EC2 hosts, allowing rotation of secrets across a hybrid estate. Customization of the document to specific email software configurations. Targeting the secret (SMTP credential) rotation document on all email servers based on tags.
Let’s dive deep into Option 1 – Fully Automated Credential Rotation.
How Option 1 works:
Refer to the image above for the workflow:
AWS Secrets Manager initiates a rotation request, either on a schedule or via an authorized user’s request, triggering the “rotation Lambda” to rotate the SES SMTP credentials.
The SES Secret Rotation Function Lambda (see figure x above):
a. Creates a new IAM secret access key for the designated SES IAM user, derives the new SES SMTP password, and stores it in AWS Secrets Manager.
b. Connects to SES to verify the new SMTP password can authenticate.
c. Initiates an AWS Systems Manager Run Command to update the new SMTP password on target email servers using a pre-configured Systems Manager Document.
d. (and e.) Monitors the status of the Systems Manager Document execution until all updates complete successfully
f. Deletes the old IAM access and secret access keys.
With this fully automated solution, SES SMTP credentials can be rotated on a schedule or triggered manually, with no impact to email service uptime.
Deploying the Fully Automated Solution in Your AWS Account (Option 1)
Prerequisites for the Fully Automated Solution
AWS Account Access, typically with admin-level permission to allow for the deployment.
Alternatively, you can use the AWS CLI from the AWS CloudShell in your browser.
Clone the Github repository (for this solution, you only need the README.md and sesautomaticrotation.yaml files found in /ses-credential-rotation/automatic-rotation).
Note – We follow the principles of least privilege in this solution. The CloudFormation templates we’ve supplied require you to specify an identity, or configuration-set resource to use in the SES sending operation. You can find guidance on defining these values at Actions, resources, and condition keys for Amazon SES. Additionally, we’ve limited the IAM User to the ses:SendRawEmail action, which you can adjust as appropriate).
Console access to your AWS SES account that is properly configured to send emails via at least one verified identity.
Target email server(s) properly configured to send email via SES using SES SMTP authentication.
The AWS Systems Manager agent(s) must be correctly installed and configured on your target email server(s) as detailed in Setting up AWS Systems Manager.
The target email servers must be decorated with the tag (“SSMServerTag“) and value (“SSMServerTagValue“). These values allow the Systems Manager Document to identify them.
We use the tag “EmailServer” and the value “True” in our example, but you can use any tag and value that you wish).
An email address (or list) to receive SMTP rotation notifications.
Console access to your AWS Secrets Manager.
Console access to your AWS Systems Manager.
Deployment Steps
Clone the GitHub repository to your IDE
If using AWS CloudShell, ensure you are in the same region as your AWS Systems and Secrets Manager
Update the appropriate AWS Systems Manager sample document created by the CloudFormation Template to reflect your email server environments. These can be found in the AWS Systems Manager console under Documents > Owned by me
The ExampleWindowsIISSMTPSESpasswordrotator sample provides an example for Microsoft Windows hosts using the runPowerShellScript action to update the server’s SMTP credentials.
The ExamplePostfixSESpasswordrotator sample provides an example for Linux hosts using the runShellScript action to update the server’s SMTP credentials.
The partially automated version uses a custom AWS Lambda function to create an SMTP password, which is stored in AWS Systems Manager Parameter Store. This solution simplifies credential rotation, where manual changes must be conducted by support staff. By wrapping the manual change process with AWS Step Functions, you can ensure a robust and auditable process to regularly rotate the SES SMTP credential.
How Option 2 works:
The credential rotation AWS Step Function creates a new SES SMTP credential and updates it in AWS Systems Manager Parameter Store.
It retrieves a list of servers from an Amazon DynamoDB table and launches a manual confirmation AWS Step Function execution for each server to initiate and track the manual step.
The manual confirmation AWS Step Function emails the designated address, requesting support staff to arrange the rotation. The email includes a link specific to that server.
The person completing the manual change confirms back to the AWS Step Function via the link that the rotation is complete.
Once the rotation on a server is confirmed, the manual confirmation AWS Step Function for that server is marked as complete.
After all server rotations are complete, the credential rotation AWS Step Function continues, disabling the old SES SMTP credential and deleting it after a few days.
AWS Step Function executions can last up to 365 days, providing sufficient time for the manual rotation and confirmation.
The screenshot below shows a graphical representation of the credential rotation AWS Step Function execution status, providing a real-time view of the rotation progress.
You can also track the status of individual servers via the manual rotation step function execution list.
The partially automated solution for rotating Amazon SES SMTP credentials is illustrated and detailed below:
Refer to the image above for the option 2 workflow:
EventBridge Scheduler Trigger: An EventBridge scheduler rule triggers a custom Starter Function Lambda (SF Lambda) on the last day of every 3rd month (this can be adjusted to suit your needs in the CloudFormation template).
Credential Rotation Step Function: The Starter Function Lambda triggers the Credential Rotation AWS Step Function, providing a clearly defined name to facilitate auditing (“password-rotation-dd-mm-yy“).
Credential Rotation Step Function Actions:
Creates a new IAM (Identity and Access Management) secret access key for the SES IAM user.
Triggers the SMTP Credential Generator Lambda to derive the SES SMTP password from the newly created IAM secret access key (using the algorithm provided in the SES documentation.
Reads a list of servers that are utilizing this credential from a DynamoDB table.
Manual Confirmation Step Function:
For each server, a manual confirmation AWS Step Function is triggered, sending a message on the Amazon Simple Notification Service (SNS) topic.
The SNS notification prompts the server administrator via email to manually rotate the SMTP credentials on the on-premises email server.
The server administrator uses a link in the email to confirm the credential has been rotated and tested on the server.
The link triggers the Confirmation Lambda exposed via API Gateway, which marks the ManualConfirmation step function as complete.
Credential Rotation Completion: The CredentialRotation step function waits until all manual confirmation step functions have completed before proceeding.
Old IAM Access Key Deletion: Once confirmation has been received for all servers, the step function deletes the old IAM access key.
Deployment
To deploy the partially automated solution in your AWS account, you will need the following prerequisites:
Prerequisites for the Partially Automated Solution
AWS Account Access, typically with admin-level permission to allow for the deployment.
SES enabled, configured, and properly sending emails.
External email server(s) currently configured to use SES with SMTP.
Administrator email address to receive notifications.
AWS Secrets Manager and AWS Systems Manager set up.
AWS Systems Manager agent(s) correctly installed and configured on your target email servers as detailed in Setting up AWS Systems Manager.
Amazon EC2 instance with Postfix configured to send emails through SES
Target email servers must be decorated with a tag (“SSMServerTag“) and value (“SSMServerTagValue“) that will be used to identify them by the Systems Manager Document (we used “server” and “email”)
AWS Parameter Store and AWS Step Functions.
Once you have the prerequisites in place, follow the instructions in the GitHub project.
Conclusion
Implementing an automated credential rotation process for Amazon SES SMTP enhances security and compliance, streamlines operations, and reduces the risk of downtime and human error. By leveraging AWS Secrets Manager and AWS Systems Manager (option 1) or AWS Systems Manager Parameter Store and Step Functions (option 2), organizations can centralize SES SMTP credential management, maintain an audit trail, and quickly update email application servers with new SMTP credentials.
Need additional guidance?
Join the conversation and connect with other administrators and security professionals on the AWS re:Post community to share insights and learn best practices.
Amazon Simple Email Service (SES) recently announced Global Endpoints, a major enhancement to its email sending features. This new capability improves the availability and reliability of SES API v2 email sending workloads by automatically distributing messages, in an active/active configuration across the Primary and Secondary AWS regions. When Global Endpoints detects degradation in either the Primary or Secondary SES region, the feature automatically shifts all traffic to the healthy region, no customer intervention is needed.
Multi-Region SES Configuration Challenges
Customers face significant difficulties in correctly implementing a multi-region setup or disaster recovery setup. The process requires careful curation of systems along the failover path and ensuring high availability of these systems. Ironically, the system designed to trigger failover can itself fail when needed most. For many SES customers, the effort required to design, build test, monitor and maintain a two-region SES system outweighs the benefits.
SES Global Endpoints eliminates the need for these complex, custom workarounds. The feature provides a straightforward solution for maintaining email sending during unexpected regional disruptions. Global Endpoints’ built-in safeguards ensure email infrastructure remains resilient when it matters most. Please note that at launch, Global Endpoints does not support SMTP or VPC endpoint access.
SES Global Endpoints: Key Technological Components
Global Endpoints utilizes four new SES components that work together to provide a seamless and reliable multi-region email sending experience:
Multi-Region Endpoint (MREP) is a new type of SES endpoint that automatically distributes email traffic across two AWS regions.
Deterministic Easy DKIM Identities (DEED) makes it easy to setup multi-region identities without having to make any DNS changes.
Updated AWS SES Console Tool walks you through the process and simplifies the duplication of Domain Identities, Configuration sets, and Sending limits across regions.
Readiness Checks in the SES console verify uniformity between configurations of key resources in both the Parent and Secondary SES regions.
How SES Global Endpoints work
Figure 1 – SES Global Endpoints with two healthy regions.
Global Endpoints are resources that distribute your SES outbound workloads across two AWS Regions. When you set up Global Endpoints, you select a Primary Region (where the actual Endpoint is created) and a Secondary Region. When configured, a new Global Endpoints resource, called “multi-region endpoint” (MREP) is created and managed. Developers will need to update their SES v2 API enabled applications and services to use their unique MREP as the entry point to SES for their email sending requests.
The Global Endpoints configuration requires that your sending domain identity(s) is verified in both the Primary and Secondary regions. SES Global Endpoints uses DEED to simplify this process. DEED is a new feature that generates consistent DKIM tokens across all AWS Regions based on a Parent Domain Identity that is configured with Easy DKIM. This consistency allows SES to automatically verify a domain identity in the Secondary region once it’s verified in the Primary region, without requiring additional DNS record updates. Customers do not need to make any additional changes other than activating the DEED identity type. When customers expand their sending workload’s geographic footprint, or reconfigure their Global Endpoints settings in the future, their DEED identities will continue to be available and managed automatically. You can learn more about DEED from this post.
Global Endpoints works alongside other SES services, such as Virtual Deliverability Manager (VDM). Once Global Endpoints are enabled, you’ll continue to see per-region data on email sending performance in VDM. If you’ve configured event destinations like CloudWatch, SNS, or Firehose, you can make use of those same monitoring and alerting tools in your second region as soon as you’re ready. As noted below, although Configuration Sets are automatically duplicated in the Secondary region, you must manually duplicate your SES event destinations in those Configuration Sets.
It is important to understand that Global Endpoints is not a failover solution for SES, it’s an active-active implementation; when no regional impairment exists, SES Global Endpoints distributes sending traffic across two AWS regions. Customers who use SES’ shared IP sending pool do not need to make any changes, Global Endpoints will utilize the SES shared IP pool in the Secondary region. Customers who use standard, dedicated IPs must manually set up equivalent number of dedicated IPs in the Secondary region. Once properly configured, Global Endpoints will keep the dedicated IPs warm in both regions as long as you use the MREP and maintain a steady sending volume.
For example, when SES’s regional health monitoring detects degradation in the Primary region (as shown in the diagram below), The MREP automatically shifts all traffic to the healthy region. This illustrates the need for matching configurations in both regions, since all traffic will be sent through a single region, in this example the Secondary region, as long as the impairment exists. When SES’s regional health monitoring detects the impaired region is back to normal, traffic is once again redistributed across both regions. Importantly, no customer intervention is needed; SES Global Endpoints automatically and dynamically monitors and manages the traffic distribution via the MREP.
Figure 2 – SES Global Endpoints with one impaired region.
The key benefits of using Global Endpoints include:
Simplified multi-region configuration
Automatic routing between two regions with no delay
More resilient email sending
Global Endpoints: Setup and Use
Using the SES Console, the Global Endpoint setup process assists in duplicating the key artifacts and sending limits from your Primary Region to your Secondary Region. This process ensures that both regions have equivalent verified identities, configuration sets, and approved sending limits sufficient for all of the expected volume. Customers can manually duplicate these key artifacts using the SES v2API or CloudFormation, but we recommend using the SES console because these steps are simplified.
Once the Global Endpoint is ready, key resources duplicated and the application or service has been updated to use the new MREP, SES Global Endpoints automatically routes your outbound traffic evenly between your primary and secondary regions using the multi-region endpoint (MREP). If the MREP detects degraded performance in the Primary or Secondary region, it will automatically route all SES traffic to the healthy region until the impairment is resolved.
Preparing the Parent Region
The high-level steps to setup Global Endpoints using the SES Console are below. Note – you must already have a primary SES region fully operational with at least 1 fully verified sending identity with production access before setting up Global Endpoints.
Open the SES console in the Primary AWS region.
In the navigation pane, choose Global Endpoints.
Choose Create Global Endpoint.
Select a Secondary Region from the dropdown menu. (Your Primary Region defaults to the region to which you signed into the console)
Review the configuration and choose Create.
The creation process may take a few seconds. Once completed, the status of your Global Endpoint will change to “Ready.”
Preparing the secondary region
Once your Global Endpoint is ready, you must now ensure that the your email sending configuration, including all its components (Domain Identities, Configuration sets, email templates, and sending limits), is consistent across the primary and secondary regions before utilizing the Global endpoint for sending emails. This alignment is crucial to avoid potential issues and ensure proper email delivery and tracking.
The new Region duplication feature in the SES console assists you by automatically duplicating resources and duplicating account-level settings from the primary to the secondary region, ensuring that both regions have equivalent configurations.
The high-level steps to setup the secondary region for use with Global Endpoints using the SES Console are below. If you’d like to use the AWS CLI to manually duplicate these resources, consult with the SES v2 API documentation.
Duplicating verified domain identities
Next you’ll use the Duplicate verified domain identities feature in the SES console to create one or more domain identities in the Secondary Region. SES will then use DEED to verify the domain identities in the Secondary Region. Note that DEED can only be used if the Primary Domain Identity is already configured with Easy DKIM. Domain identities that are verified with BYODKIM will need to be created manually in the Secondary Region, as DEED is not applicable in this case.
Important – It’s crucial that both Primary and Secondary Regions have the equivalent verified identities and configuration sets that you intend to send email with, along with matching sending limits to ensure proper functionality of the Global endpoint. Any discrepancies could cause delivery failures, diminished failover reliability, and missing metrics.
To duplicate identities from the SES console:
On the Global endpoints page, choose the Global endpoint you want to duplicate by selecting it from the Name column.
Under the Region duplication tab, choose Duplicate identities.
Select the identities you want to duplicate followed by Confirm.
To duplicate configuration sets from the SES console:
On the Global endpoints page, choose the Global endpoint you want to duplicate by selecting it from the Name column.
From the Region duplication tab, choose Duplicate configuration sets.
Select the configuration sets you want to duplicate followed by Confirm.
Important Notes:
When duplicating configuration sets across regions, Event destinations and Reputation settings require manual reconfiguration in the Secondary Region to match the Primary Region’s setup. Since SES event destinations are region-specific, you’ll need to manually recreate these configurations in each region. For cross-regional monitoring and event routing, you can refer to additional AWS documentation for services like CloudWatch (cross-region dashboards), SNS (cross-region message delivery), and EventBridge (cross-region event routing) to develop a comprehensive multi-region event strategy.
If you are using SES email template resources, those templates need to be manually duplicated into the Secondary Region (the console is currently unable to perform this action).
You must manually synchronize any changes made to the Parent Region’s configuration sets to the Secondary Region to maintain sending integrity. This includes adding or removing standard dedicated IPs to both regions to ensure either region has the required IPs to manage the expected throughput in the case of a regional event or impairment.
The Duplicate production limits feature allows you to:
Check if production limits are aligned between primary and secondary regions
Request a limit increase in the secondary region if needed
To duplicate production limits from the SES console:
On the Global endpoints page, choose the Global endpoint you want to duplicate by selecting it from the Name column.
From the Region duplication tab, verify the status in the Duplicate production limits card. If the status displays Sending limits not aligned, choose Duplicate production limits.
The Service Quotas page opens in the secondary region where you can request increases to “Sending quota” and “Sending rate” to match the values from the primary region.
Note – SES checks if sending limits are aligned between regions and allows you to request limit increases in the secondary region if needed. We recommend that you request the maximum quota you’re eligible for in both regions. While email traffic is distributed amongst both regions under normal operating conditions, during a failover event, the full volume of email traffic will be sent to one region and its limits should be enough to handle the full volume load.
If any manual steps are required to complete the Global Endpoint creation, they will be shown in the SES Console:
When the Global Endpoint is fully configured, a MREP will be created with an Endpoint ID (see below). You will use this new endpoint ID when re-configuring your SendEmail and SendBulkEmail API calls. (note – Global Endpoints MREP are only supported by SES APIv2. The feature is not available using SMTP or VPC endpoints).
Now you’re ready to send your first email through SES Global Endpoints and your MREP!
Once you’ve obtained the Endpoint ID of your Global endpoint (this is the MREP), you should update your applications’ SendEmail or SendBulkEmail API calls to include the Endpoint ID value for the -endpoint-id parameter.
Here’s an example of how to specify the Endpoint ID in a SendEmail API call using the AWS CLI (modify the from & to email addresses and the --endpoint-id accordingly):
aws sesv2 send-email \ --from-email-address "[[email protected]](mailto:[email protected])" \ --destination "ToAddresses=[[email protected]](mailto:[email protected])" \ --content "Subject={Data=Test email,Charset=UTF-8},Body={Text={Data=This is a test email sent using Amazon SES Global endpoints.,Charset=UTF-8}}" \ --endpoint-id "abcdef12.g3h"
The Global Endpoints console page provides summary observability metrics on the combined workload and a unified view of your email sending volume across both the primary and secondary regions. You can access these metrics through the Cross-region metrics tab on the Global endpoint details page in the SES console..
Conclusion
By using a SES Global Endpoint in their SES API v2 applications and services, SES customers benefit from uninterrupted email delivery during regional service issues. SES Global Endpoints automatically distributes sending workloads across two AWS Regions, significantly enhancing resilience against regional outages. The Global Endpoints feature maintains warmed-up dedicated IP addresses in both regions, when used, and automatically shifts traffic to the healthy region when the other is impaired, without requiring customer intervention. SES Global Endpoints eliminates the pain points typically associated with manually-built, multi-region SES sending systems.
Global Endpoint’s console tools provide quick and easy setup and includes readiness checks to identify and mitigate potential misconfigurations. These enhancements simplify the configuration and management process, making it easier for customers to maintain a robust email sending infrastructure.
Overall, SES Global Endpoints addresses customer needs for a more reliable and easily managed email sending system, automating critical processes and providing robust tools for setup and maintenance. This significant improvement to the email sending experience is expected to benefit AWS customers across various industries and use cases.
Call to Action
Get started with SES Global Endpoints today to enhance your email sending resilience!
Visit the AWS Console to enable this feature for your account
Review the comprehensive documentation for step-by-step guidance.
For personalized assistance, don’t hesitate to contact AWS Support or your AWS account team.
Elevate your email infrastructure now to ensure uninterrupted communication with your customers, even in the face of regional disruptions.
Businesses and organizations today struggle to effectively communicate with their customers, employees, or other stakeholders across the diverse range of digital channels they now use. One common problem arises when the requirement to exchange information quickly and reliably extends beyond traditional email. This issue challenges organizations where recipients lack immediate access to email. This applies to field workers, remote teams, or customers who prefer to communicate via text messages. It is vital to bridge this gap between email and SMS communication for timely updates, urgent notifications, and seamless collaboration. However, separate management of these disparate channels independently proves cumbersome and leads to inefficiencies.
To address this challenge, one approach is to leverage Amazon Simple Email Service (SES) and Amazon End User Messaging services to create a robust, scalable, and cost-effective messaging system. This system seamlessly bridges the gap between email and SMS, enhances the reach and delivery of your messages and streamlines your communication workflows. Ultimately, this approach delivers a superior experience for your audience, ensuring that critical information reaches recipients through their preferred channels in a timely and efficient manner.
This blog post will delve into the step-by-step process of building a solution that enables both Email-to-SMS and SMS-to-Email communication. This solution allows you to send SMS messages using email and receive any SMS replies on the same email address you used to send the original message. Furthermore, you can continue the conversation by replying to the email you receive in response. By the end, you’ll have the knowledge and tools necessary to revolutionize your communication strategy and deliver a superior experience to your audience.
Here are some of the use cases for this solution:
Real estate agents can use this solution to send listing updates to clients via SMS, and then receive client inquiries and responses as emails.
Customer service team can leverage the Email to SMS functionality to proactively reach out to customers with important notifications. Customers are able to respond directly via SMS.
Retailers can use this solution to send order confirmations, shipping updates, and promotional offers to customers via SMS. Customers are able to respond with inquiries or feedback that are then received as emails.
Medical practices and hospitals can leverage the Email to SMS functionality to quickly notify patients of appointment reminders, prescription refills, or other time-sensitive information. Patients can then respond via SMS, which gets converted to an email that the healthcare staff can access.
Solution Overview
The following figure shows the high level architecture for this solution.
Email Users send an email to the email address formatted as “mobile-number@verified-domain”. Amazon SES email receiving receives the email and triggers a receipt rule.
The email is published to Amazon Simple Notification Service (SNS) topic (EmailToSMS) based on the receipt rule action, which triggers an AWS Lambda function (ConvertEmailToSMS). The ConvertEmailToSMS Lambda function performs the following actions:
Receives the event from SNS and constructs a text message using the email body content.
The SMS message ID and source email address are stored as items in the Amazon DynamoDB table (MessageTrackingTable). This tracks email addresses for replies from SMS users.
Mobile Users receive the SMS, and they have the option to reply to the phone number with two-way SMS messaging
AWS End User Messaging receives the incoming SMS message from the Mobile Users. It then publishes this message to a SNS topic (SMSToEmail) for two-way SMS integration, which triggers a Lambda function (ConvertSMSToEmail). The ConvertSMSToEmail Lambda function performs the following actions:
Retrieves the item from “MessageTrackingTable” using “previousPublishedMessageId” (SMS message ID) from the SNS event, and locate the corresponding email address.
Sends the SMS message body to the Email Users using SES. This step uses “mobile-number@verified-domain” as the source email address, and the email address retrieved from the previous step as the destination.
Email Users receive the email, and they have the option to reply to the email to continue the conversation. Mobile Users will receive the latest reply from Email Users.
Walkthrough
This section will dive into the step-by step process for the deployment. There are 4 steps to deploy this solution:
Note: the Lambda code for this solution is developed based on phone numbers and long code as the supported origination identity in Australia. You need to adjust the Lambda code (“format_phone_number” function) accordingly for this to work in your country.
Follow the steps outlined in Creating a domain identity to create a verified identity for your domain in your AWS account. Confirm your domain identity is in the “Verified” status before proceeding to the next step:
Step 2: Deploy Email to SMS functionality
The following steps create a CloudFormation stack to deploy the required components for Email to SMS functionality:
Choose Create stack, and then choose With new resources (standard).
Choose Upload a template file and upload the CloudFormation template that you downloaded earlier: email-to-sms.yaml. Then choose Next.
Enter the stack name Email-To-SMS.
Enter the following values for the parameters:
RuleName: The name of your SES Rule Set and receipt rule.
Recipient1: Domain name used for recipient condition in the SES Rule Set.
Recipient2: Domain name used for recipient condition in the SES Rule Set if you need additional recipients.
PhoneNumberId: Phone number ID of the phone number to send SMS messages.
Choose Next, and then optionally enter tags and choose Submit. Wait for the stack creation to finish.
Now you have the required components to convert email to text, and sending it as SMS to a phone number using AWS End User Messaging SMS.
Note: if required, modify the following code in email-to-sms.yaml to format your phone numbers accordingly:
def format_phone_number(email_address):

    # Extract the local part of the email address (before @)

    local_part = email_address.split('@')[0]

    # Remove the leading '0' and add '+61' for phone number (Australia)

    if local_part.startswith('0'):

        formatted_number = '+61' + local_part[1:]

    return formatted_number
Step 3: Deploy SMS to Email functionality
The following steps create a CloudFormation stack to deploy the required components for SMS to Email functionality:
Choose Create stack, and then choose With new resources (standard).
Choose Upload a template file and upload the CloudFormation template that you downloaded earlier: sms-to-email.yaml. Then choose Next.
Enter the stack name SMS-To-Email.
Enter the following values for the parameters:
EmailDomain: The email domain to use for the SMS-to-Email function
Choose Next, and then optionally enter tags and choose Submit. Wait for the stack creation to finish.
Note: if required, modify the following code in sms-to-email.yaml to format your phone numbers accordingly:
def format_phone_number(phone_number):

    # Replace the '+61' with '0' from the phone number (Australia)

    formatted_number = f"0{mobile_number[3:]}"

    return formatted_number
Step 4: Set up Two-Way Messaging in AWS End User Messaging SMS
For Incoming messages destination, choose the SNS topic created from Step 3 (default topic name is SMSToEmailTopic).
For Two-way channel role, choose Use SNS topic policies.
Choose Save changes.
This allows your origination identity (phone number) to receive incoming messages, which is then published to an SNS topic and converted into emails by Lambda.
Testing
To test the solution, send an email with the destination address of “mobile-number@verified-domain”. You should receive a SMS on your mobile with the following information:
Note: AWS End User Messaging SMS has character limit for SMS messages depending on the type of characters the message contains. This solution takes the first 160 characters of the email body by default, you can adjust the EmailToSMS Lambda function as required.
Reply directly to the SMS, you should receive an email at the same email address that sent the original email, with the following information:
If you require Email to SMS, but not SMS-to-Email, consider using Sender IDs where this option is available. Not all countries support SenderID, and SenderID doesn’t support 2-way SMS (inbound).
This blog has explored how organizations can leverage AWS services to build a flexible, two-way communication solution bridging the gap between email and SMS channels. By integrating Amazon SES and Amazon End User Messaging, businesses can reach their audience through multiple channels, ensuring timely and effective delivery of critical messages.
The detailed guide provided the knowledge to create a scalable, cost-effective system tailored to evolving communication needs – whether facilitating email-to-SMS or SMS-to-email exchanges. This unified approach to email and SMS capabilities empowers companies to address the common challenge of managing disparate communication platforms, streamlining workflows and enhancing responsiveness.
If you run into issues or want to submit a feature request, use the New issue button under the issues tab in the GitHub repository.
Sending automated transactional emails, such as account verifications and password resets, is a common requirement for web applications hosted on Amazon EC2 instances. Amazon SES provides multiple interfaces for sending emails, including SMTP, API, and the SES console itself. The type of SES credential you use with Amazon SES depends on the method through which you are sending the emails.
In this blog post, we describe how to leverage IAM roles for EC2 instances to securely send emails via the Amazon SES API, without the need to embed IAM credentials directly in the application code, link to a shared credentials file, or manage IAM credentials within the EC2 instance. By adopting the approach outlined in this blog, you can enhance security by eliminating the risk of credential exposure and simplify credential management for your web applications.
Solution Overview
Below we provide step-by-step instructions to configure an IAM role with SES permissions to use on your EC2 instance. This allows the EC2 hosted web application to securely send emails via Amazon SES without storing or managing IAM credentials within the EC2 instance. We present an option for running EC2 and SES in the same AWS account, as well as an option to accommodate running EC2 and SES in different AWS accounts. Both options offer a way to enhance security and simplify credential management.
Either option begins with creating an IAM role with SES permissions. Next, the IAM role is attached to your EC2 instance, providing it with the necessary permissions for SES without needing to embed IAM credentials in your application code or on a file in the EC2 instance. In option 2, we’ll add cross-account permissions that allow the code on the EC2 instance in account “A” to send email via the SES API in account “B”. We also provide a sample Python script that demonstrates how to send an email from your EC2 instance using the attached IAM role.
Option 1 – SES and EC2 are in a single AWS account
In a typical scenario where an EC2 instance is operating in the same AWS account as SES, the process of using an IAM role to send emails via SES is straightforward. In the steps below, you’ll configure and attach an IAM role to the EC2 instance. You’ll then update a sample Python script to use the permissions provided by the attached IAM role to send emails via SES. This direct access simplifies the SES sending process, as no explicit credential management is required in the code, nor do you need to include a shared credentials file on the EC2 instance.
EC2 & SES in the same AWS Account
Prerequisites – single AWS account for EC2 and SES
Make note of a verified sending email address here: ___________
EC2 instance (Linux) in running state
If you don’t have a EC2 instance create one (Linux)
Administrative Access to Amazon SES, IAM and EC2 consoles.
Access to a recipient email address to receive test emails from the python script.
Make note of a SES verified recipient email address to send test emails here: ___________
Step 1 – Create IAM Role for EC2 instance with SES Permissions
To start, create an IAM role that grants the necessary permissions to send emails using Amazon SES by following these steps:
Sign in to the AWS Management Console and open the IAM console.
In the navigation pane, choose “Roles,” and then choose “Create role.”
Choose the trusted entity type as “AWS service” and select “EC2” as the service that will use this role, then click ‘Next’
Search for and select the “AmazonSESFullAccess” policy from the list (or create a custom policy with the necessary SES permissions), then click ‘Next’.
Provide a name for your role (e.g., EC2_SES_SendEmail_Role).
In the navigation pane, choose “Instances,” and select the running EC2 instance to which you want to attach the IAM role.
With the instance selected, choose “Actions,” then “Security,” and “Modify IAM role.“
Choose the IAM role you created (EC2_SES_SendEmail_Role) from the drop-down menu and click “Update IAM role.”
Step 3 – Create a sample python script that sends emails from the EC2 instance with the attached role.
Now that your EC2 instance is configured with the necessary permissions, you can set up an example Python script to send emails via Amazon SES using the IAM Role. Here, we’re using the AWS SDK for Python (Boto3), a powerful and versatile library to interact with the SES API endpoint. Before running the example script, ensure that Python, pip (the package installer for Python), and the Boto3 library are installed on your EC2 instance:
Run the ‘python3 –version‘ command to check if Python is installed on your EC2 instance. If Python is installed, the version will be displayed, otherwise you’ll receive a ‘command not found’ or similar error message.
If python is not installed, run the command ‘sudo yum install python3 -y‘
Run the ‘pip3 --version‘ command to check if pip is installed on your EC2 instance. If pip3 is installed, is installed, the version will be displayed, otherwise you’ll receive a ‘command not found’ or similar error message.
If pip3 is not installed, run the command ‘sudo yum install python3-pip‘
Install the Boto3 Library which allows Python scripts to interact with AWS services including SES. Run the command ‘pip3 install boto3‘ to install (or update) Boto3 using pip.
Save the code below as a Python file named ‘sesemail.py‘ on your EC2 instance.
Edit 'sesemail.py‘ and replace the placeholder values of SENDER, RECIPIENT, and AWS_REGION with your values (see prerequisites). Do not modify any “” marks.
[copy]
import boto3
from botocore.exceptions import ClientError

SENDER = "[email protected]"
RECIPIENT = "[email protected]"
#CONFIGURATION_SET = "ConfigSet"
AWS_REGION = "us-west-2"
SUBJECT = "Amazon SES Test Email (SDK for Python) using IAM Role"
BODY_TEXT = ("Amazon SES Test (Python)\r\n"
             "This email was sent with Amazon SES using the "
             "AWS SDK for Python (Boto)."
            )

BODY_HTML = """<html>
<head></head>
<body>
  <h1>Amazon SES Test (SDK for Python) using IAM Role</h1>
  <p>This email was sent with
    <a href='https://aws.amazon.com/ses/'>Amazon SES</a> using the
    <a href='https://aws.amazon.com/sdk-for-python/'>
      AWS SDK for Python (Boto)</a>.</p>
</body>
</html>
            """

CHARSET = "UTF-8"

client = boto3.client('ses',region_name=AWS_REGION)

try:
    response = client.send_email(
        Destination={
            'ToAddresses': [
                RECIPIENT,
            ],
        },
        Message={
            'Body': {
                'Html': {
                    'Charset': CHARSET,
                    'Data': BODY_HTML,
                },
                'Text': {
                    'Charset': CHARSET,
                    'Data': BODY_TEXT,
                },
            },
            'Subject': {
                'Charset': CHARSET,
                'Data': SUBJECT,
            },
        },
        Source=SENDER,
    )
except ClientError as e:
    print(e.response['Error']['Message'])
else:
    print("Email sent! Message ID:"),
    print(response['MessageId'])
Run ‘python3 sesmail.py‘ to execute the Python script.
When ‘python3 sesmail.py‘ runs successfully, an email is sent to the RECIPIENT(check the inbox), and the command line will display the sent Message ID.
Option 2 – SES and EC2 are in different AWS accounts
In some scenarios, your EC2 instance might operate in a different AWS account than SES. Let’s call the EC2 AWS account “A” and SES AWS account “B”. Because the AWS resources in account A don’t automatically have permission to access AWS resources account B, we need some way to allow the code on EC2 to assume a role in the SES Account using the AWS Security Token Service (STS). This involves a method that generates temporary credentials that include an access key, secret access key, and session token, which are only valid for a limited time.
EC2 & SES in different AWS Accounts
In the steps below, you’ll configure and attach an IAM role to the EC2 instance in account “A” such that it can run an example Python script. This Python script can use the permissions provided by the attached IAM role to send emails via SES in account “B”. This approach leverages cross-account access and simplifies sending email from the EC2 in account A via SES in account B. As with Option 1, no explicit credential management is required in the code running on EC2, nor do you need to include a shared credentials file on the Ec2 instance.
Prerequisites – different AWS accounts for EC2 and SES (use cross-account access)
Make note of a verified sending email address here: ___________
Administrative Access to Amazon SES and IAM consoles.
Make note of your “B” AWS account ID here: ________________
In the steps below, you will create a “SES_Role_for_account_A” role.
Make note of the ARN of the “SES_Role_for_account_A” role here: ___________
Access to a recipient email address to receive test emails from the python script.
Make note of a SES verified recipient email address to send test emails here: ___________
Step 1 – Create IAM Role in the SES “B” account
Sign in to the SES “B” account via the AWS Management Console and open the IAM console.
In the navigation pane, choose “Roles,” and then choose “Create role“.
Choose the trusted entity type as ‘AWS account’ and select ‘Another AWS account’.
Add the AWS account ID where your EC2 instance resides (AWS account “A” in the prerequisites) and click ‘Next’.
Search for and select the “AmazonSESFullAccess” policy or create a custom policy with the necessary SES permissions, then click ‘Next’.
Provide a name for your role (e.g., ‘SES_Role_for_account_A').
Click “Create role“.
Copy the arn for the new SES_Role_for_account_A (you’ll need the arn in the next step).
Step 2 – Create a IAM policy in the EC2 “A” account that allows this role to assume the SES_Role_for_account_A role you just created in the SES “B” Account.
Sign in to the EC2 “A” account via the AWS Management Console and open the IAM console.
In the navigation pane, choose “Policies,” and then choose “Create Policy”.
Choose the service as ‘EC2’ and select policy editor as JSON.
Copy the policy below, and in the policy editor, replace the Resource with the arn of theSES_Role_for_account_A in the SES account “B” (you created this in step 1).
[copy, paste into policy editor & replace the arn with SES_Role_for_account_A]
Click ‘Next’ and provide a name for your role (e.g., EC2_Policy_for_account_B).
Click ‘Create the Policy’
Step 3 – Create an IAM role in the EC2 “A” account, and attach the previously created IAM policy (EC2_Policy_for_account_B) to it.
In the EC2 “A” account IAM console navigation pane, choose “Roles,” and then choose “Create role.”
Choose the trusted entity type as “AWS service” and select “EC2” as the service, then click ‘Next’.
Filter by type “customer managed”, search for (EC2_Policy_for_account_B) and select that policy and ‘Next’ (note – if you are using AWS Session Manger to remotely connect to your EC2 instance, you may need to add the “AmazonSSMManagedInstanceCore” policy to the role).
Provide a name for your role (e.g., EC2_SES_in_account_B_role).
Click “Create role“.
Step 4 – Attach the IAM Role (EC2_SES_in_account_B_role) to the EC2 instance in AWS account “A”.
In the navigation pane, choose “Instances,” and select the instance to which you want to attach the EC2_SES_in_account_B_role IAM role.
With the instance selected, choose “Actions,” then “Security,” and “Modify IAM role.”
Choose the IAM role you created (EC2_SES_in_account_B_role) from the drop-down menu.
Click “Update IAM role.”
Step 5 – Create a sample python script that sends emails via SES in AWS account “B” from the EC2 instance in AWS account “A” using the EC2 attached role.
Now that your EC2 instance is configured with the necessary permissions, you can set up an example Python script to send emails via Amazon SES in AWS Account “B” using the IAM Role on EC2 in AWS Account “A”. We’ll use the AWS SDK for Python (Boto3), a powerful and versatile library to interact with the SES API endpoint. Before running the example script, ensure that Python, pip (the package installer for Python), and the Boto3 library are installed on your EC2 instance:
Run the ‘python3 –version‘ command to check if Python is installed on your EC2 instance. If Python is installed, the version will be displayed, otherwise you’ll receive a ‘command not found’ or similar error message.
If python is not installed, run the command ‘sudo yum install python3 -y‘
Run the ‘pip3 --version‘ command to check if pip is installed on your EC2 instance. If pip3 is installed, is installed, the version will be displayed, otherwise you’ll receive a ‘command not found’ or similar error message.
If pip3 is not installed, run the command ‘sudo yum install python3-pip‘
Install the Boto3 Library which allows Python scripts to interact with AWS services including SES. Run the command ‘pip3 install boto3‘ to install (or update) Boto3 using pip.
Save the code below as a Python file named cross_sesemail.py on your EC2 instance. 4b. Edit cross_sesemail.py and replace the placeholder values of the ROLE_ARN with ARN of the SES_Role_for_account_A you created in SES Account “B” (see prerequisites), SENDER, RECIPIENT, and AWS_REGION with your values (see prerequisites). Do not modify any “” marks.
[copy, edit & replace the ROLE_ARN]
import boto3
from botocore.exceptions import ClientError

# Replace with your role ARN in SES Account
ROLE_ARN = "arn:aws:iam::<Account_ID>:role/<Role_Name>"

# Create an STS client
sts_client = boto3.client('sts')

# Assume the role
assumed_role = sts_client.assume_role(
    RoleArn=ROLE_ARN,
    RoleSessionName="SESSession"
)

# Extract the temporary credentials
credentials = assumed_role['Credentials']

# Create an SES client using the assumed role credentials
ses_client = boto3.client(
    'ses',
    region_name='us-west-2',
    aws_access_key_id=credentials['AccessKeyId'],
    aws_secret_access_key=credentials['SecretAccessKey'],
    aws_session_token=credentials['SessionToken']
)

# Email parameters
SENDER = "[email protected]"
RECIPIENT = "[email protected]"
SUBJECT = "Amazon SES Test (SDK for Python) using cross-account IAM Role"
BODY_TEXT = ("Amazon SES Test (Python)\r\n"
             "This email was sent with Amazon SES using the "
             "AWS SDK for Python (Boto) using IAM Role."
            )
BODY_HTML = """<html>
<head></head>
<body>
  <h1>Amazon SES Test (SDK for Python) using IAM Role</h1>
  <p>This email was sent with
    <a href='https://aws.amazon.com/ses/'>Amazon SES</a> using the
    <a href='https://aws.amazon.com/sdk-for-python/'>
      AWS SDK for Python (Boto)</a> using IAM Role.</p>
</body>
</html>
            """
CHARSET = "UTF-8"

# Send the email
try:
    response = ses_client.send_email(
        Destination={
            'ToAddresses': [RECIPIENT],
        },
        Message={
            'Body': {
                'Html': {
                    'Charset': CHARSET,
                    'Data': BODY_HTML,
                },
                'Text': {
                    'Charset': CHARSET,
                    'Data': BODY_TEXT,
                },
            },
            'Subject': {
                'Charset': CHARSET,
                'Data': SUBJECT,
            },
        },
        Source=SENDER,
    )
except ClientError as e:
    print(e.response['Error']['Message'])
else:
    print("Email sent! Message ID:"),
    print(response['MessageId'])
Run the python script python3 cross_sesemail.py. When the email is sent successfully, the command line output will display the message ID of the sent email, and the recipient will receive an email.
Conclusion:
By implementing IAM roles for EC2 instances with SES permissions, you can securely send emails via the SES APIs from your web applications without the need to store or manage IAM credentials within the EC2 instance or application code. This approach not only enhances security by eliminating the risk of credential exposure, but also simplifies the management of credentials. With the step-by-step guide provided in this blog post, you can easily configure IAM roles for your EC2 instances and start sending emails via the Amazon SES API in a secure and efficient manner, regardless of whether your EC2 and SES resources reside in the same or different AWS accounts.
Next Steps:
Sign up for the AWS Free Tier and try out Amazon SES with IAM roles for EC2 instances as demonstrated in this blog post.
Join the AWS Community Forums to ask questions, share experiences, and learn from other AWS users who have implemented similar solutions for secure email sending from their web applications.
About the Authors
Manas Murali M
Manas Murali M is a Cloud Support Engineer II at AWS and subject matter expert in Amazon Simple Email Service (SES) and Amazon CloudFront. With over 5 years of experience in the IT industry, he is passionate about resolving technical issues for customers. In his free time, he enjoys spending time with friends, traveling, and exploring emerging technologies.
Zip
Zip is an Amazon Pinpoint and Amazon Simple Email Service Sr. Specialist Solutions Architect at AWS. Outside of work he enjoys time with his family, cooking, mountain biking and plogging.
August 8, 2024, is the first anniversary of Project Cybersafe Schools, Cloudflare’s initiative to provide free security tools to small school districts in the United States.
Cloudflare announced Project Cybersafe Schools at the White House on August 8, 2023 as part of the Back to School Safely: K-12 Cybersecurity Summit hosted by First Lady Dr. Jill Biden. The White House highlighted Cloudflare’s commitment to provide free resources to small school districts in the United States. Project Cybersafe Schools supports eligible K-12 public school districts with a package of Zero Trust cybersecurity solutions – for free, and with no time limit. These tools help eligible school districts minimize their exposure to common cyber threats.
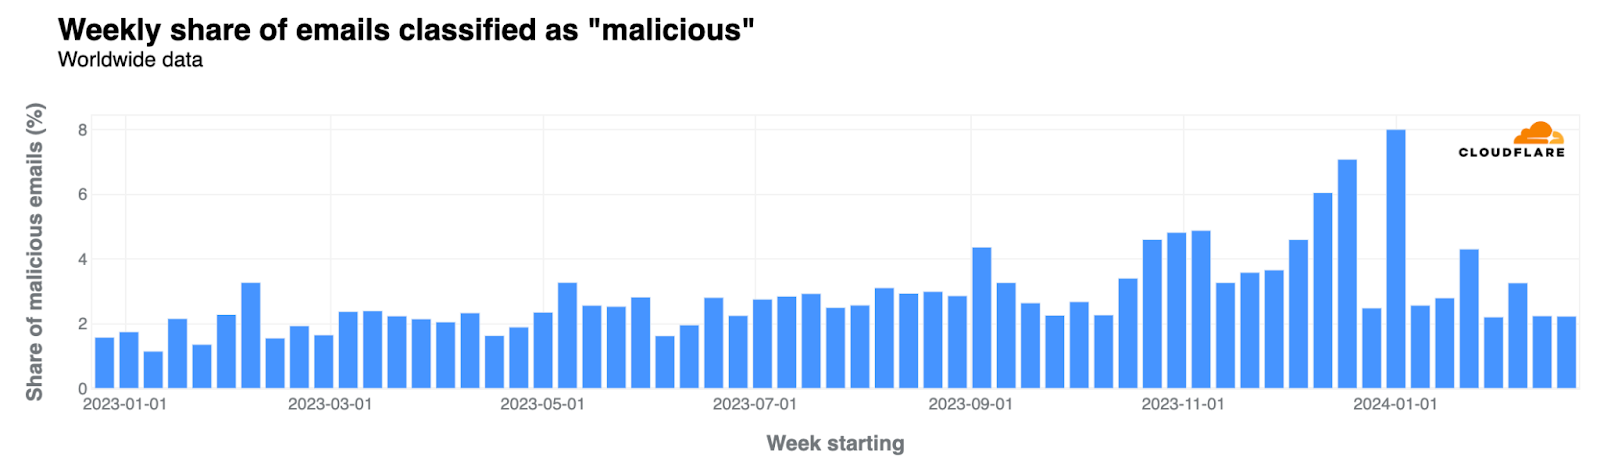
In Q2 2024, education ranked 4th on the list of most attacked industries. Between 2016 and 2022, there were 1,619 K-12 cyber incidents. Since we launched Project Cybersafe Schools in August 2023, there have been a number of cyber attacks targeting hundreds of thousands of students. In August 2023, Prince George’s County Public Schools in Maryland fell victim to a ransomware attack that affected the personal data of more than 100,000 people. Then, in December 2023, a Cincinnati area school district suffered a cyber attack that resulted in the loss of $1.7M. In 2024, there have been numerous incidents affecting K-12 schools across the U.S., including in Massachusetts, New Jersey, and Washington state. The smallest school districts are often the most vulnerable because of a lack of resources or capacity. Sometimes, the person responsible for cybersecurity does so in addition to another primary role, whether as a teacher, coach or administrator.
We are proud of our impact, but we can do more
There are about 14,000 school districts in the United States, and about 9,800 of them have fewer than 2,500 students. All 9,800 of those small public school districts are eligible for Project Cybersafe Schools (for free, and with no time limit – see below for all the details), and we want to help as many as possible. We are proud of the number of school districts that we have onboarded since August 2023, but it is not enough. We want to do more, and we can onboard more school districts by getting the word out about Project Cybersafe Schools. When we published an update in December 2023 encouraging school districts to sign up before the holiday break, we saw a noticeable bump in the number of inquiries from eligible school districts. If you work at a small school district in the United States, we encourage you to see if you qualify for this program.
Nearly 30 states have school districts now enrolled in Project Cybersafe Schools, representing every region of the country. Since we launched the program, we have onboarded nearly 120 qualifying school districts. As a result, more than 160,000 students, teachers, and staff are protected by Cloudflare’s cloud email security to protect against a broad spectrum of threats including Business Email Compromise, multichannel phishing, credential harvesting, and other targeted attacks. These school districts are also receiving protection against Internet threats with DNS filtering by preventing users from reaching unwanted or harmful online content like ransomware or phishing sites.
Attacks prevented by Project Cybersafe Schools in 2024
When the White House launched its National Cybersecurity Strategy in March 2023, Acting National Cyber Director Kemba Walden noted in her remarks that “we expect school districts to go toe-to-toe with transnational criminal organizations largely by themselves. This isn’t just unfair; it’s ineffective.” Cloudflare agrees, and this is one of the reasons we launched Project Cybersafe Schools after conversations with officials from the Cybersecurity & Infrastructure Security Agency (CISA), the Department of Education, and the White House about how we could help to protect small school districts in the United States from cyber threats.
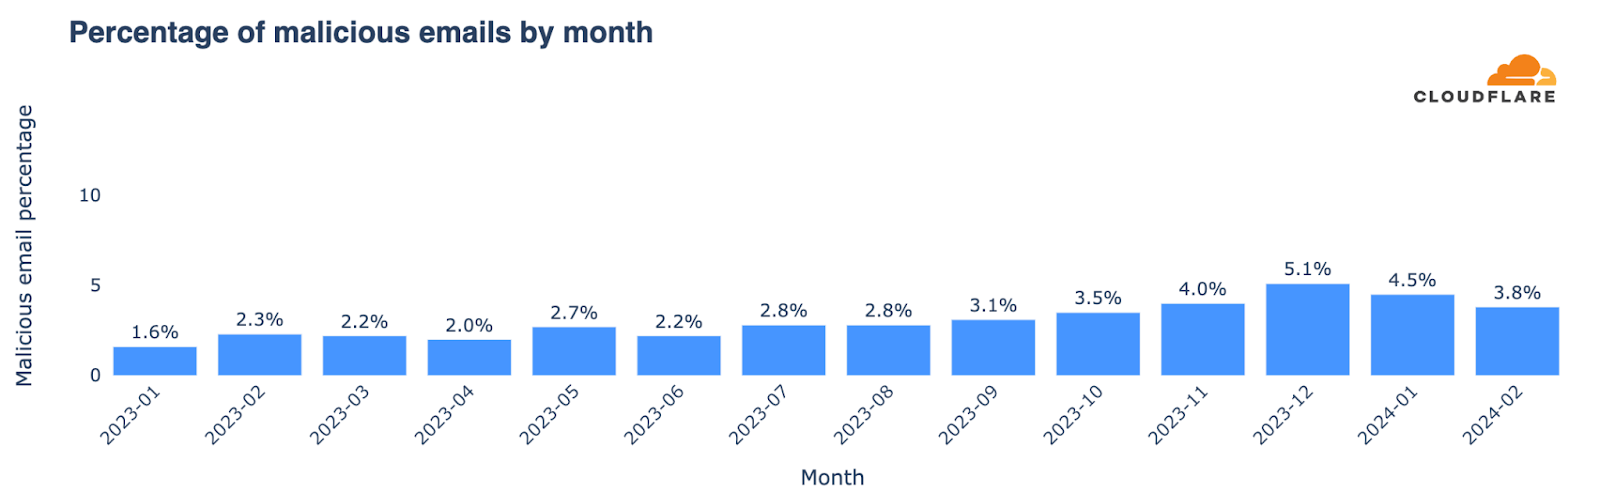
Year to date, Cloudflare’s cloud email security solution has identified and blocked more than 2 million malicious emails targeting the school districts enrolled in Project Cybersafe Schools. This represents roughly 3.5% of their total email traffic, though certain school districts are attacked at a far higher rate. In one district, malicious emails blocked by Cloudflare represented more than 15% of all email traffic.
Another challenge facing these schools is the large volume of spam emails sent their way. While some of this spam is promotional and not overtly malicious, it can often be used in a variety of attacks. Project Cybersafe Schools has prevented more than 2.2 million spam emails from clogging the inboxes of the school districts who have enrolled.
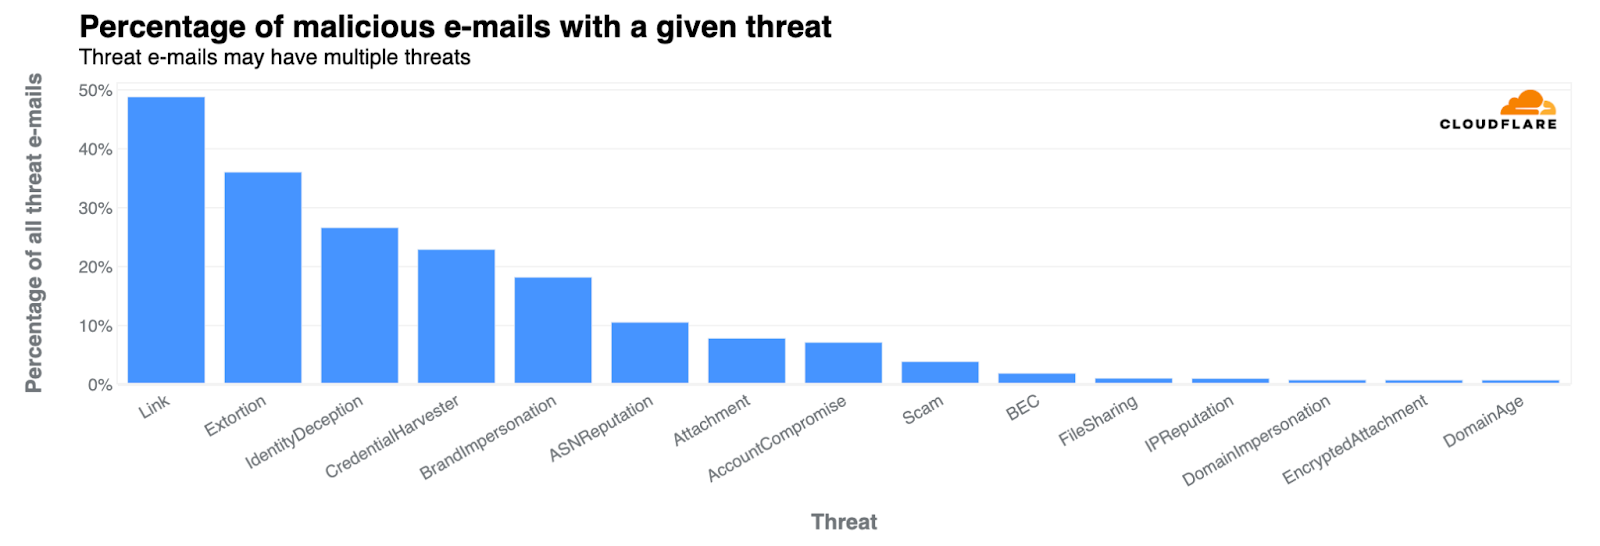
According to CISA, more than 90% of all cyber attacks begin with a phishing email. So helping these school districts secure their email inboxes is a critical factor in reducing their cyber risk. With email providing a relatively high success rate for gaining initial access, it’s no surprise that attackers continue to exploit email users with increasingly sophisticated and evasive techniques that bypass native security controls. And the consequences of these attacks can be severe: Recovery time can extend from two all the way up to nine months – that’s almost an entire school year.
Here’s what a few Project Cybersafe Schools participants have to say about the impact of the program on their school district:
“What Cloudflare’s Project Cybersafe Schools has allowed us to do as a rural district is add a missing layer of protection to our devices, providing a previously missing and unique layer of security even off our secure network. Where other options would cost us somewhere in the thousands, we are now able to secure devices for free using one of the simplest and scalable platforms, featuring one of the easiest learning curves I’ve worked with. Cloudflare’s feature set as a whole for districts are unparalleled and integration is a must for schools looking to add an additional layer of protection to their network architecture, which by my estimation should be everyone.” – Wyatt Determan, Technology Specialist (HLWW Public School District, Minnesota)
“Since implementing the Cybersafe Schools program as our secure email gateway, we’ve saved over $5,000 per year compared to similar solutions. The program has effectively filtered out numerous malicious emails, greatly enhancing our security posture. Its seamless integration and user-friendly interface make it easy for our IT team to manage. Cybersafe Schools has become a critical part of our IT infrastructure, ensuring a safe and secure educational environment.” – Paul Strout, Network Manager (Regional School Unit RSU71, Belfast, Maine)
What Zero Trust services are available?
Eligible K-12 public school districts in the United States have access to a package of enterprise-level Zero Trust cybersecurity servicesfor free and with no time limit – there is no catch and no underlying obligations. Eligible organizations will benefit from:
Email Protection: Safeguards inboxes with cloud email security by protecting against a broad spectrum of threats including malware-less Business Email Compromise, multichannel phishing, credential harvesting, and other targeted attacks.
DNS Filtering: Protects against Internet threats with DNS filtering by preventing users from reaching unwanted or harmful online content like ransomware or phishing sites and can be deployed to comply with the Children’s Internet Protection Act (CIPA).
Who can apply?
To be eligible, Project Cybersafe Schools participants must be:
K-12 public school districts located in the United States
Up to 2,500 students in the district
If you think your school district may be eligible, we welcome you to contact us to learn more. Please fill out the form today.
For schools or school districts that do not qualify for Project Cybersafe Schools, Cloudflare has other packages available with educational pricing. If you do not qualify for Project Cybersafe Schools, but are interested in our educational services, please contact us at [email protected].
In today’s digital landscape, where email communication plays a vital role in business operations, Keeping your email archive secure, compliant, and retrievable is crucial for any business. However, managing the large volume of email data can lead to operational difficulties, including regulatory compliance, maintaining an audit trail, and preventing data loss. That’s where Amazon Simple Email Service (SES) Mail Manager’s email archiving feature comes in.
In this blog post, we will explore how Amazon SES Mail Manager’s email archiving and search features can improve email security and compliance. If you’re a newcomer to Mail Manager, look at this blog post on Amazon SES Mail Manager. It provides valuable information on important features, such as Ingress Endpoint, Traffic Policy, Rule Sets, and SMTP Relay.
Problem Statement:
Imagine a scenario where a critical email from a key client is buried deep within your organization’s email archives, and you need to retrieve it for an important audit. The challenge of ensuring your business remains compliant with stringent data retention policies across every email communication for thousands of employees for a certain period or permanently.
Solution explained:
Amazon SES Mail Manager Email archiving is a powerful tool that addresses many of the challenges organizations face dealing with the difficulty and expense of archiving email at scale. Compliance and regulatory frameworks like GDPR, HIPAA, and SOX often require email archiving, which is a common objective identified by customers needing to comply with those regulatory frameworks. For regulated businesses, failure to comply with email archiving regulations can result in severe financial penalties and reputational damage.
Amazon SES Mail Manager securely archives and safeguards your emails, providing easy search and export functionality. It provides full-time, enterprise-level archiving without increasing the storage requirements of your mailbox server. The feature provides a reliable and efficient solution to address most compliance requirements. By automatically archiving the types of emails you specify, the service ensures that your organization maintains a comprehensive audit trail of its communications, enabling quick retrieval and review as needed.
The email archiving feature of Mail Manager provides organizations the ability to archive email while in transit rather than archiving at the user’s mailbox. Many organizations prefer archiving in transit for email archiving to meet compliance requirements and maintain comprehensive records. If you would like to learn more about in transit archiving, visit this blog – Email Archiving with Mail Manager: Why To Archive In Transit vs At The Mailbox.
How email flows with an Amazon SES Mail Manager Email Archiving
For instructional purposes in this blog post, we’ll focus on how you can introduce Mail Manager archiving into your existing email infrastructure. We’ll cover how to seamlessly integrate Mail Manager with reference architectures. Later in the blog, we are going to explore Mail Manager’s archiving capabilities, including search, export and retention policies.
Current setup
Our example organization has an existing mail server (it might be a on-premises Microsoft Exchange Server, Microsoft 365, Google Workspace, etc). Their DNS is configured to route all email directly to this mail server. There is currently no archiving capacity within the existing email infrastructure, when needed, archiving is handled by individual mailbox users and PST files. While this method is suitable for personal email archiving, it fails to meet the organizations’ security requirements and compliance standards.
Figure 1: Example organization’s existing inbound email workflow.
Email Archiving in transit
We are going to introduce Mail Manager into the current mail flow (see figure 1) to archive all incoming messages from our example enterprise’s email infrastructure.
Figure 2: Example organization’s proposed inbound email workflow, with Mail Manager archiving in-transit prior to delivery.
In the new architecture (see figure 2), we’ve introduced Mail Manager into the organization’s inbound email workflow. This new workflow leverages Mail Manager’s ability to archive either all inbound emails, or only those that match specified criteria. By using a Mail Manager Rule set, our example organization can selectively store and preserve emails that meet their configured criteria.
Mail Manager Email Archiving and Search and Export Capabilities
Mail Manager’s archive search capabilities are designed to be user-friendly and efficient. You can perform searches based on various criteria, such as sender, recipient, subject line, date range, or even specific keywords in the Subject line. The search results provide options to either export the search to Amazon Simple Storage Service (S3), or you can choose to download a single email.
Let’s explore using Mail Manager’s archive search to find a specific email by the sender’s address:
Figure 3: Mail Manager’s archive search interface
Once found, we can click on the results to review the email in the console:
Figure 4: Mail Manager’s archive search results
Once we’ve found the target email, it can be downloaded by clicking on “View details“. The image below shows an example message details page with information about the email, including message headers such as In-Reply-To, X-Original-Mailer and X-Mailer.
Figure 5: Mail Manager’s archived email detailed page
Mail Manager’s archive search history tab allows us to find archive searches created in the last 30 days, and view the search results, as shown in the image below:
Figure 6: Mail Manager’s archive search history
Mail Manager’s archive export history tab lists all of the archived email searches you exported to an Amazon S3 Bucket within the last 30 days.
Figure 7: Export History
Step by Step Setup:
Now that we have explained how Mail Manger can be inserted into our example organization’s email workflow to provide email archiving, let’s explore how you can implement Mail Manager’s archiving capabilities in your inbound email workflows. The following diagram (Figure 3) illustrates the overall structure and components involved in this architecture:
Figure 8: End-to-End Mail workflow
Follow the steps below to configure Mail Manager in your AWS account to implement this architecture:
Log into the SES Console and select Mal Manager from the left navigation menu.
Note, as of this writing, Mail Manager is generally available in the following AWS Regions: US East (N. Virginia), US West (Oregon), Europe (Ireland, Frankfurt), Asia Pacific (Tokyo, Sydney).
Under Mail Manger navigation, create an archive (or multiple archives for different use cases)
Enter a unique name in the Archive name field.
(Optional) Select a retention period in the Retention period field to override the default retention period of 180 days.
(Optional) You can encrypt your archive either by entering your own AWS KMS key into the KMS key ARN field, or by selecting Create new key.
Choose Create archive.
Under Mail Manger navigation, create a traffic policy to determine the email you want to block or allow.
Create traffic policy.
On the Create a traffic policy page, enter a unique name for your traffic policy.
(Optional) If you want to discard any messages above a certain size, enter a value in bytes in the Maximum message size field.
In Default action, choose whether the traffic policy is to either Allow or Deny (block) messages that fall outside of (are not addressed by) the conditions of your policy statements.
Select Add new policy statement to create a statement for your traffic policy.
Choose either Allow or Deny (block) for the action to be taken when the statement’s conditions are met.
Build a condition by selecting an email protocol and a conditional operator for the value you enter. Select Add new condition if you want to add more conditions to this policy statement. To learn more about a condition property and its operators and valid values, see the Policy statement conditions reference.
If you’re subscribed to an Email Add On, you’ll be able to select it here as an email protocol.
If you want add more policy statements and conditions, repeat steps above.
Select Create traffic policy.
Under Mail Manger navigation, create a rule set to perform actions on the email you allow in.
Create rule set and enter a unique name for your rule set.
Create new rule on the edit page.
In the Rule details sidebar, enter a unique name for your rule.
Select Add new condition to create a condition that the message must match; or check the EXCEPT in the case of: box followed by Add new exception to create a condition that the message must not match.
Build the condition or exception by selecting an email property and a conditional operator for the value you enter. Select Add new condition or Add new exception if you want to add more conditions or exceptions to this rule. To learn more about a condition property and its operators and valid values, see the Rule conditions reference.
Select Add new action to define the action to be taken when the rule’s conditions are matched and/or exceptions are not matched. To add more actions to be taken, select Add new action. To learn more about actions and their parameters, see the Rule actions reference.
Create an Archive rule. Save rule set
Under Mail Manger navigation, Create your ingress endpoint and assign to it the traffic policy and rule set.
choose Ingress endpoints under Mail Manager.
On the Ingress endpoints page, select Create ingress endpoint.
On the Create new ingress endpoint page, enter a unique name for your ingress endpoint.
Choose whether it will be a Open or Authenticated endpoint.
Select a traffic policy to determine the email you want to block or allow.
Select a rule set containing the rule actions you want to perform on the email you allow in.
Select Create ingress endpoint.
Configure your environment to use the ingress endpoint.
At the time you create an ingress endpoint, an “A” record for the endpoint will be generated and its value displayed on the ingress endpoint’s summary screen in the SES console. The way you use the value of this record depends on the type of endpoint you created and your use case.
Under Mail Manger navigation, create an SMTP Relay to send mail on to your existing mail server.
choose SMTP relays under Mail Manager.
On the SMTP relays page, select Create SMTP relay.
On the Create SMTP relay page, enter a unique name for your SMTP relay.
Depending on what type of SMTP Realy you want to configure, follow the respective instructions:
inbound (non-authenticated)
outbound (authenticated) SMTP relay
Update your DNS MX records to point to your new Mail Manager’s ingress point, instead of the existing mail server.
Note: Make sure that you have tested the steps above in your development environment and that you understand the steps before deploying into your production environment.
Conclusion
Amazon SES Mail Manager’s email archiving capabilities are designed for organizations that are seeking to enhance the security, compliance, and audit-ability of their email communications. By seamlessly integrating this feature into their existing email infrastructure, organizations can now archive all inbound messages in transit, ensuring a comprehensive, tamper-proof record of their email activities. The powerful search and export functionality of Mail Manager makes it easy to quickly locate and access specific emails when needed, whether for compliance audits, legal requests, or internal investigations.
This level of email visibility and control is particularly crucial for organizations operating in highly regulated industries like government, healthcare and finance, where the stakes for non-compliance can be severe. Beyond the compliance benefits, Mail Manager’s email archiving also helps to alleviate the operational headaches and expenses associated with traditional in-house archiving systems. By offloading this responsibility to AWS, organizations can focus their resources on their core business priorities, while still maintaining the security and accessibility of their critical email data.
If you’re looking to strengthen your email security posture, simplify your compliance efforts, and improve the overall management of your email archives, we encourage you to explore how Amazon SES Mail Manager’s email archiving capabilities can be seamlessly integrated into your existing email infrastructure. Take the first step towards a more secure, compliant, and efficient email management solution by contacting us today.
About the Authors
Sesan Komaiya
Sesan is a Solutions Architect at Amazon Web Services. He works with a variety of customers, helping them with cloud adoption, cost optimization and emerging technologies. Sesan has over 15 year’s experience in Enterprise IT and has been at AWS for 5 years. In his free time, Sesan enjoys watching various sporting activities like Soccer, Tennis and Moto sport. He has 2 kids that also keeps him busy at home.
Alexey Kurbatsky
Alexey is a Senior Software Development Engineer at AWS, specializing in building distributed and scalable services. Outside of work, he enjoys exploring nature thru hiking as well as playing guitar.
Jesse Thompson is an Email Deliverability Manager with the Amazon Simple Email Service team. His background is in enterprise development and operations, with a focus on email abuse mitigation and encouragement of authenticity practices with open standard protocols. Jesse’s favorite activity outside of technology is recreational curling.
Zip
Zip is a Sr. Specialist Solutions Architect at AWS, working with Amazon Pinpoint and Simple Email Service and WorkMail. Outside of work he enjoys time with his family, cooking, mountain biking, boating, learning and beach plogging.
When designing Amazon Simple Email Service’s (SES) Mail Manager, we often heard from customers about the “PST-file problem” inherent with user-side mailbox-based archiving. This occurs when, for a variety of reasons, end users decide to archive their emails to local PST files or other local storage. These PST files are fragile and easily corrupted. Furthermore, they are subject to the backup practices of individual workstations. Lastly, PST files are readily are portable and can be easily copied and moved outside the visibility of the email system and your IT and IP controls.
We developed Amazon Simple Email Service (SES) Mail Manager archiving features in response to this problem, and based on additional customer feedback: the need for consistent email retention behaviors, for all email. Customers also wanted the flexibility to determine which messages to archive, where to put them, and how long to retain those messages.
To make the feature applicable to the widest set of use cases, we designed Mail Manager to be able to archive any email traversing the SES service, not just those that have already been delivered to a user’s mailbox. This added flexibility ensures organizations can maintain a complete record of exactly those email communications they wish to preserve. Rather than require external tools to search and export Mail Manager’s archives, we built these functions directly into the SES console.
In fact, the entire Media Manager archiving solution is fully managed by SES within the customer’s Mail Manager account, reducing the operational overhead traditionally associated with email archiving and compliance.
Figure 1 – Mail Manager Archiving
At the core of the SES Mail Manager archiving solution is the ability to capture and retain any message, regardless of its source or destination, as it flows through the service’s rules engine. This design approach ensures that every email message traversing Mail Manager can be subject to archiving and retention policies, rather than requiring organizations to manage different systems and tools for mail flowing through mail servers, internal relays and other email infrastructure. The result is a unified, comprehensive compliance solution that provides visibility and control over an organization’s email archiving.
Archiving on its own isn’t an innovation; it’s an email primitive – an essential capability that can be used to enable other, more complex solutions. Historically, retention of email was configured as a function of your on-premises mail server, where your mailboxes themselves were resident. Personally-authored emails were considered the high-value material to retain, and adding archiving as a function of mailbox configurations was the simplest approach.
In practice, we find that the mail captured at the mailbox server, or end user’s inbox, represents only a fraction of of the mail a typical enterprise generates. As organizations grow, the number of applications generating Application To Person (A2P) messages tends to increase dramatically. Similarly, as corporate environments become more complex, SaaS-based solutions that are external to the primary email infrastructure often use email to update employees along with workflow-management systems. Much of that mail eludes archiving as it bypasses individual user mailboxes.
The SES strategy for archiving is to capture mail from anywhere, to anywhere, as long as it transits an ingress endpoint as part of your Mail Manager configuration. You have two choices: you can write those messages directly to an S3 bucket you control, and then ingest it into any other tool you like. Alternately, you can send messages into a managed archive within Mail Manager, and gain access to search, export, and configurable retention features. By default, SES configures retention for 6 months, but it’s adjustable up to permanent retention for customers who require it.
Mail Manager’s archiving feature captures any message which matches your rule, or all messages traversing any ingress endpoint. You can choose to write all messages to or from your senior leadership team into one archive, or you can organize by other envelope metadata. The rules operate the same way whether the message is A2P or Person to Person (P2P), ensuring uniform policies and retention options.
With Mail Manager’s managed archives, you pay for each gigabyte ingested, indexed, and available for search, and a separate storage fee for each gigabyte retained every month. Note that the storage fee includes both the raw content of the messages, and the size of the computed index required for search and export functions.
For messages you write to your S3 buckets, you also have the option to invoke an S3 trigger action that calls an Amazon Lambda to drive various automatation workflows. Regulated industries might want to write all messages to S3 to leverage S3’s glacier storage option for very long-term storage.
You can even split your workload between Mail Manager’s managed archive, for emails you are likely to need readily discoverable, and the Write to S3 option, for content which you don’t expect to ever need to search with granularity, but still needs to be archived to “check the box” for your retention policy. In fact, AWS encourages such a builder-oriented approach, because it rewards thoughtful decisions and resource utilization, and conforms to the broad goal of consumption-based pricing, which Mail Manager embraces fully at every step.
Figure 2 – Rule Set with conditions for archivingMail Manager provides a more comprehensive, resilient archiving approach that increases both the overall scope of mail that can be captured, and the fidelity of the archived data. You don’t need any special adapters or plugins to capture mail from any source. All email that comes through your Mail Manager Ingress Endpoint can be archived.
Figure 3 – Create archive
Why not try Mail Manager today and experience the benefits of a centralized, scalable email archiving solution? You’ll pay only for the data you ingest and retain each month, without the fragility and visibility issues of user-managed archives. Visit the SES website to start your free trial of Mail Manager and take control of your organization’s critical email records. To start with Mail Manager, visit https://aws.amazon.com/ses/, click on Mail Manager, and set up your first workload today.
If you have any questions or need further guidance, feel free to reach out to us via the SES Forums or in the comments section of this blog post. We’re here to help you navigate the evolving email landscape and unlock the full potential of your Amazon SES investment.
About the Authors
Toby Weir-Jones
Toby is a Principal Product Manager for Amazon SES and WorkMail. He joined AWS in January 2021 and has significant experience in both business and consumer information security products and services. His focus on email solutions at SES is all about tackling a product that everyone uses and finding ways to bring innovation and improved performance to one of the most ubiquitous IT tools.
Brett Ezell
Brett is an Amazon Pinpoint and Amazon Simple Email Service Specialist Solutions Architect at AWS. As a Navy veteran, he joined AWS in 2020 through an AWS technical military apprenticeship program. When he isn’t deep diving into solutions for customer challenges, Brett spends his time collecting vinyl, attending live music, and training at the gym. An admitted comic book nerd, he feeds his addiction every Wednesday by combing through his local shop for new books.
Zip
Zip is a Sr. Specialist Solutions Architect at AWS, working with Amazon Pinpoint and Simple Email Service and WorkMail. Outside of work he enjoys time with his family, cooking, mountain biking, boating, learning and beach plogging.
In today’s digital landscape, efficient and secure email management is essential for businesses facing the complexities of cyber threats and regulatory compliance. Companies are seeking ways to safeguard against unauthorized access and apply audit rules, while maintaining operational efficiency. Amazon SES Mail Manager is designed to meet these challenges, offering a suite of features that enhance both inbound and outbound email flows.
Mail Manager provides key components such as traffic policies for detailed email filtering, authenticated ingress endpoints that ensure emails are received only from verified senders, and customizable rule sets that enable administrators to precisely manage email traffic. These tools aim to bolster security and streamline the email management process.
The blog explores Mail Manager’s capabilities by demonstrating how each component works and can be utilized in practical business scenarios. Some common use cases include security, where Mail Manager blocks harmful emails based on IP ranges, TLS versions, and authentication checks while leveraging third-party security add-ons. Another use case is email archiving, where you can use Mail Manager to set up multiple archives with customizable retention periods and encryption, ensuring compliance and easy searchability.
Familiarize with some of mail manager’s key components below before proceeding with the customer use cases.
Open ingress endpoint: a SMTP endpoint responsible for accepting connections, and process SMTP conversation key infrastructure. It’s a key component that utilizes traffic polices and rules that you can configure to determine which emails should be allowed into your organization and which ones should be rejected.
Authenticated ingress endpoint: Mail sent to your domain has to come from authorized senders whom you’ve shared your SMTP credentials with, such as your on-premise email servers.
Traffic policies:let you determine the email you want to allow or block from your ingress endpoint. A traffic policy consists of one or more policy statements where you allow or deny traffic based on a variety of protocols including recipient address, sender IP address and TLS protocol version.
Rules sets:A Rule set is a container for an ordered set of rules you create to perform actions on your email. Each rule consists of conditions and rules.
Email add-ons: A suite of 3rd party applications that are seamlessly integrated with Amazon SES mail manager. Some of them are Trend Micro Virus Scanning, Abusix Mail intelligence and Spamhaus Domain Block List.
For a deep dive into Mail Manager’s capabilities, ready this blog.
Customer background and use case
Nutrition.co is an online retail business with multiple departments, including marketing, tech, and sales, that send and receive emails. Nutrition.co is looking for a solution to monitor both outbound and inbound emails and apply various controls such as filtering, message processing, and archiving. Nutrition.co uses Outlook as an enterprise mailbox environment for its employees.
Use case 1: Nutrition.co to the world
This use case focuses on the outbound email flow, where Nutrition.co employees are sending emails outside of Nutrition.co. Some of the requirements include the archival of all outbound emails originated by the marketing department, blocking any tech emails exceeding 1mb and scanning the email content of emails originated by sales. These controls should be centrally managed and provide flexibility to edit/create/delete new ones.
Solution: Each department will direct its outbound emails to an authenticated ingress endpoint by configuring an Exchange transport rule. These endpoints ensure that only authorized senders with SMTP credentials can send emails. Each ingress endpoint generates an A record, which is added as an MX record to the DNS provider for each department’s subdomain. Additionally, each ingress endpoint is associated with a specific traffic policy and rule set. According to Nutrition.co’s requirements, all connections between the departments and the ingress endpoints must use TLS 1.3 or higher. Emails that comply with the traffic policies are processed through distinct rule sets. Emails from marketing that comply with DKIM and SPF are first archived and then sent to the recipient via the Send to Internet action. Tech emails have their recipient’s address rewritten to a test email address, while emails from the sales department undergo content scanning before being sent to the final recipients via the Send to Internet action.
Use case 2: World to Nutrition.co
This use case focuses on the inbound email flow, where third parties send emails to Nutrition.co. Nutrition.co requires inbound emails to align with SPF and DKIM and have TLS 1.3 or higher to be archived. Emails originating from warehouse.com, Nutrition.co’s fulfilment partner, are containing customer order updates. These emails should be processed by Nutrition.co and accordingly update the customers’ order status database. Furthermore, warehouse.com emails should originate from a certain IP range, have TLS 1.3 or higher and align with SPF and DKIM.
Solution: Nutrition.co will use an open ingress endpoint without authentication for all inbound external emails. This is achieved by adding an MX record generated by Mail Manager upon the creation of the ingress endpoint. This ingress endpoint will be associated with a traffic policy that evaluates TLS. If the inbound email conforms to the traffic policy, it will proceed through the rule set condition and actions. The rule set condition is to align with SPF and DKIM and the actions are to be archived and then sent to the final recipient (Nutrition.co employee) via SMTP Relay. Emails containing parcel delivery updates from warehouse.com will be directed to a separate Nutrition.co subdomain, which routes all inbound emails to an authenticated ingress endpoint. Emails from warehouse.com with TLS 1.3 or higher will meet the traffic policy requirements. If they are SPF and DKIM aligned, they will be stored in a Nutrition.co Amazon S3 bucket as part of the rule set. Using Amazon S3 notifications, an AWS Lambda function is invoked upon receiving an email. This function processes the email payload, and performs an API call to update the Nutrition.co customers’ order status database.
Archiving inbound emails
In the following section, you will use AWS CloudShell and AWS CLI commands to create a traffic policy that rejects emails with TLS versions lower than 1.3, includes an open ingress endpoint, and establishes a ruleset that archives emails that are DKIM aligned.
Prerequisites: Own a domain and have access to its DNS provider, in order to add the MX record.
Navigate to the AWS Management Console and open CloudShell, find CloudShell availability here. Follow the steps below by copying and pasting the AWS CLI commands to the CloudShell terminal. Note that creating and configuring these resources, can also be done from the AWS Console.
To view the resources created above, navigate to the Amazon SES console > Mail Manager and view Traffic policies and Rule sets. Below, you can see the rule in edit mode.
Navigate to Amazon SES > Mail Manager > Ingress endpoint, select the ingress endpoint named Archiving and copy the ARecord, which looks like this <unique-id>.fips.wmjb.mail-manager-smtp.amazonaws.com – see screenshot below. Add this value to your MX record.
To test if the MX record has been added successfully, open your local terminal and execute the command below: nslookup -type=MX <your-domain.com> The response should return the MX preference and mail exchanger containing the A record value.
Testing
To test if the inbound emails are archived successfully, send an email to an address within the domain for which you have added the MX record. Wait for 3-5 minutes to allow for email processing. Then, navigate to the AWS Management Console, go to Amazon SES, and select Mail Manager. Under Email Archiving, select NutritionCo under Archive and click on Search. This should return all the emails you have sent.
Conclusion & Next steps
In this blog, we delved into the essential features of Amazon SES Mail Manager and its application in managing both inbound and outbound email flows. We explored key components such as traffic policies, authenticated ingress endpoints, and customizable rule sets that enhance security and operational efficiency. Through practical use cases, this blog demonstrates how these features can be implemented to meet the specific needs of a business like Nutrition.co. By leveraging Amazon SES Mail Manager, businesses can significantly enhance their email security and management processes, safeguarding against cyber threats while ensuring compliance and efficiency.
Pavlos Ioannou Katidis is an Amazon Pinpoint and Amazon Simple Email Service Senior Specialist Solutions Architect at AWS. He enjoys diving deep into customers’ technical issues and help in designing communication solutions. In his spare time, he enjoys playing tennis, watching crime TV series, playing FPS PC games, and coding personal projects.
Alexey Kiselev
Alexey Kiselev is a Senior SDE working on Amazon Email. Alexey has played a pivotal role in shaping the design, infrastructure, and delivery of MailManager. With years of experience, deep understanding of the industry and a passion for innovation he is enthusiast and a builder with a core area of interest on scalable and cost-effective email management and email security solutions.
A sender’s domain and IP reputation strongly indicate email deliverability success. Maintaining a high reputation ensures optimal recipient inboxing. This blog outlines how Amazon SES protects its network reputation to help customers deliver high-quality email consistently. Understanding sender reputation nuances across diverse mailbox providers can be challenging, making issue identification and root cause analysis difficult. We’ll explore SES’ approach to managing domain and IP reputation.
What are Domain and IP Reputation?
Domain and IP reputation are measured by mailbox providers to indicate how reputable a sender is based primarily on how recipients engage with their email. Mailbox providers have their own way of measuring reputation and typically consider indicators such as:
A history of the emails received from the domain/IP
The authentication technologies used during delivery (SPF, DKIM, DMARC)
The rate of user engagement for the messages
The rate of complaints generated by the messages
The rate of which the mailbox providers’ spam filter determines mail to be spam from a domain/IP
While not an exhaustive list, these are some of the inputs into the reputation of a sender. Of this list, 4 of the 5 have nothing to do with the body, or viewable content, of the email that is received. This illustrates how important it is to have effective processes in place to set up sending from your domain/IPs and the management of your email sending programs.
How does Amazon SES manage Domain and IP Reputation
Management of reputation requires a multi-faceted approach distilled into four distinct pillars: Prevention, Monitoring, Analysis, and Response. Let’s dive deeper into these four pillars to see how Amazon SES operates to protect sending reputation for our service and our customers.
Prevention
Prevention is arguably the most important of the four pillars of reputation management. Abuse, or misuse, is the leading cause of poor reputation. Abuse, or misuse, can be characterized as sending phishing emails, unsolicited emails, or aggressive sending practices ignoring user feedback or lack of engagement, but this is not an exhaustive list. Prevention of abuse is accomplished through customer education (blogs, public documentation, and customer correspondence), service terms, acceptable use policies, and strict rules on setup. These abuse prevention mechanisms aid in educating customers before they use SES on prohibited sending practices as well as providing guidance on email sending best practices. SES implements several mechanisms to mitigate abuse and misuse, including:
Production access reviews – Every customer must request access to send email outbound. This step plays two parts: 1\ giving customers an opportunity to test sending from and to verified identities and 2\ preventing malicious senders from being able to open an account and begin uninhibited sending of low-quality mail. Every customer requesting access to send via SES provides information on their sending practices and volume estimates. This information is used in three ways: first to ensure that a customer is following best practices for sending email, second to provide the appropriate limits needed for their business, and third to determine if a customer’s sending practices are a risk to other senders.
Restricted sending from only verified identities/domains – Every customer, must verify ownership of an email address or sending domain to send an email on SES. This can be done for email addresses by clicking a verification link or for domains by placing DNS records that SES is able to verify.
Daily volume and sending rate limits – SES applies sending limits to an account for the following reasons: prevention of reputational damage and limiting costs should a bug occur within a customer’s application, and limiting the damage an elusive bad actor may cause.
Monitoring
The second pillar of reputation management is accurately monitoring your sending performance. Amazon SES tracks metrics like bounces, complaints, abuse reports, and mailbox provider status codes. Establishing overall sending baselines is crucial to measure the impact of deliverability and reputation changes. Granular monitoring is equally important, including metrics at the account, domain, IP, and blocklist levels.
Having granular data regarding our customer’s sending performance gives SES, and our customers, the opportunity to identify mechanisms in which a customer’s sending can improve, or indicators of when a bad actor may intend to misuse SES. Some of the mechanisms that we use to reduce the risk of reputation degradation include:
Monitoring new customer activity closely – The riskiest time for SES is when a new customer begins using SES and we have no historical precedent for the mail they are attempting to send. While the overwhelming majority of our customers send quality email, it’s important to ensure that a customer that is onboarding exhibits good sending practices. A customer may be inexperienced in their sending practices and SES will notify customers early to aid them in improving their sending. This limits the damage that can be done to both SES reputation and that of our customer.
Monitor any customers that trend away from the baseline – SES looks to determine what customers are doing well and where they could improve. Should they be given access to send freely, or should there be restrictions?
Monitor high-performing customers as well as low-performing customers – For SES, it’s crucial to prevent events that can degrade our reputation, such as sender compromises, uploading purchased lists, or using unsolicited recipient lists. Thoroughly reviewing all customers is essential to avoid reputational degradation from unnoticed compromises or misused recipient lists.
Providing our customers with a way to monitor more than bounce and complaint rates – SES provides a feature called the Virtual Deliverability Manager (VDM) which gives customers the added insight into how their messages are received by mailbox providers. These insights are provided in a dashboard that customers can review and dig into problems at the domain level, and broken down by provider.
Analysis
The third of the pillars of reputation management is analysis. Understanding the history of a sender, normal behavior and trends, mailbox provider feedback patterns, and monitoring reputation from a reputation provider enables SES to build a picture of a sender. Lets speak on some specifics about each of these data points further.
Sending Behavior – Is this a new sender, or one with an established reputation? Do they have a history of previous bounce/complaint issues? What historical volume is sent?
Tip: Understanding the baseline or history of the sender gives you the ability to know when things have changed for the better or worse.
Mailbox provider feedback – Amazon SES reviews mailbox provider feedback patterns to analyze responses when sending mail. If normally all SES mail is received successfully and we begin to see a spike in throttles with a negative response message such as this one from Gmail:
421-4.7.28 Gmail has detected an unusual rate of unsolicited mail originating from your DKIM domain [example.com 36]. To protect our users from spam, mail sent from your domain has been temporarily rate limited. For more information, go to https://support.google.com/mail/?p=UnsolicitedRateLimitError to review our Bulk Email Senders Guidelines. m25-20020ae9e019000000b0078edf1f4c40si26277545qkk.197 – gsmtp
this could be the first sign of reputation degradation.
Tip: Mailbox provider feedback is a good data point for degradation, however this is a late sign as the damage has already occurred. More proactive measures should be in place to ensure this step doesn’t occur.
Using reputation providers – External feedback on Amazon SES reputation is critical to validate our processes and identify potential gaps. Selecting a reputation provider has helped SES close this gap.
Tip: As a mail provider, you rely on sending metrics and historical data for monitoring senders. However, you may not know how customers acquired their recipient lists – whether through confirmed opt-ins or purchased lists. Purchased lists risk your domain being blocklisted since recipients didn’t sign up for your mail. Lacking visibility into subscription workflows makes it hard to determine why blocklisting occurred. Refer to our FAQ for more on blocklists.
Response
The fourth of the pillars of reputation management is response. Understanding what to do when your reputation begins to show signs of decline is important. Some signals that show reputation declines are: low inbox rates, mail being throttled, mail being blocked, or external reputation tools showing poor reputation for your domain/IP. For Amazon SES, we take action to do the following:
Contact customers where metrics breach alarm thresholds.
Respond timely to signs of abuse or reputation degradation.
Stop sending based on continued, or high-risk, signals of abuse or reputation degradation.
Support customers in resolving sending issues to maintain the overall reputation of SES.
It is important to respond quickly to the signals of reputation degradation. The decision to impact a customer’s ability to send mail is not one that Amazon SES takes lightly. A decision to impact a customer’s ability to send mail is made when the quality of mail is abusive in nature (phishing) or if there are signals that the mail being sent is not well received by mailbox providers at scale. In some cases, a customer may not be aware that their sending patterns, practices, or content may be problematic. This can be due to a gap in monitoring, logging, or an issue with credentials being compromised. If the decision to impact a customer’s sending is made, a communication will be sent to that customer so that we can partner with them to resolve the issue.
Amazon SES doesn’t only make the decision to communicate with our customers when there is a problem. SES also communicates with customers, when appropriate, earlier in the reputation management cycle to warn of a negative trend in sending. This can be seen in the review periods that are triggered when increases in bounces, complaints, or mailbox provider feedback is seen. These review periods give SES customers the ability and time to understand the problem, and to work on fixes to avoid serious reputation impact. Being involved early in the discovery phase of a sending event improves the customer experience without the need to negatively impact sending.
Conclusion
Maintaining a positive sending reputation necessitates a diligent approach to prevent abusive emails. The four pillars outlined serve as guidelines to improve email quality: prevention, monitoring, analysis, and response. This is an iterative process that requires moving fluidly between pillars.
About the author:
Dustin Taylor
Dustin is the Manager of anti-abuse and email deliverability for Amazon SES. His focus is both external and internal in helping improve inbox placement for SES customers and finding new ways to fight email abuse. In his off-time he enjoys going bass fishing and is a hobbyist woodworker.
In the ever-evolving landscape of cyber threats, a subtle yet potent form of phishing has emerged — quishing, short for QR phishing. It has been 30 years since the invention of QR codes, yet quishing still poses a significant risk, especially after the era of COVID, when QR codes became the norm to check statuses, register for events, and even order food.
Since 2020, Cloudflare’s cloud email security solution (previously known as Area 1) has been at the forefront of fighting against quishing attacks, taking a proactive stance in dissecting them to better protect our customers. Let’s delve into the mechanisms behind QR phishing, explore why QR codes are a preferred tool for attackers, and review how Cloudflare contributes to the fight against this evolving threat.
How quishing works
The impact of phishing and quishing are quite similar, as both can result in users having their credentials compromised, devices compromised, or even financial loss. They also leverage malicious attachments or websites to provide bad actors the ability to access something they normally wouldn’t be able to. Where they differ is that quishing is typically highly targeted and uses a QR code to further obfuscate itself from detection.
Since phish detection engines require inputs like URLs or attachments inside an email in order to detect, quish succeeds by hampering the detection of these inputs. In Example A below, the phish’s URL was crawled and after two redirects landed on a malicious website that automatically tries to run key logging malware that copies login names and passwords. For Example A, this clearly sets off the detectors, but Example B has no link to crawl and therefore the same detections that worked on Example A are rendered inert.
Strange you say, if my phone can scan that QR code then can’t a detection engine recognize the QR code as well? Simply put, no, because phish detection engines are optimized for catching phish, but to identify and scan QR codes requires a completely different engine – a computer vision engine. This brings us to why QR codes are a preferred tool for attackers.
Why QR codes for phishing?
There are three main reasons QR codes are popular in phishing attacks. First, QR codes boast strong error correction capabilities, allowing them to withstand resizing, pixel shifting, variations in lighting, partial cropping, and other distortions. Indeed, computer vision models can scan QR codes, but identifying which section of an email, image, or webpage linked in an email has a QR code is quite difficult for a machine, and even more so if the QR codes have been obfuscated to hide themselves from some computer vision models. For example, by inverting them, blending them with other colors or images, or making them extremely small, computer vision models will have trouble even identifying the presence of QR codes, much less even being able to scan them. Though filters and additional processing can be applied to any image, not knowing what or where to apply makes the deobfuscation of a QR code an extremely expensive computational problem. This not only makes catching all quish hard, but is likely to cause frustration for an end user who won’t get their emails quickly because an image or blob of text looks similar to a QR code, resulting in delivery delays.
Even though computer vision models may have difficulty deobfuscating QR codes, we have discovered from experience that when a human encounters these obfuscated QR codes, with enough time and effort, they are usually able to scan the QR code. By doing everything from increasing the brightness of their screen, to printing out the email, to resizing the codes themselves, they can make a QR code that has been hidden from machines scan successfully.
Don’t believe us? Try it for yourself with the QR codes that have been obfuscated for machines. They all link to https://blog.cloudflare.com/
If you scanned any of the example QR codes above, you have just proven the next reason bad actors favor quish. The devices used for accessing QR codes are typically personal devices with a limited security posture, making them susceptible to exploitation. While secured corporate devices typically have measures to warn, stop, or sandbox users when they access malicious links, these protections are not available natively on personal devices. This can be especially worrisome, as we have seen a trend towards custom QR codes targeting executives in organizations.
QR codes can also be seamlessly layered in with other obfuscation techniques, such as encrypted attachments, mirrors that mimic well-known websites, validations to prove you are human before malicious content is revealed, and more. This versatility makes them an attractive choice for cybercriminals seeking innovative ways to deceive unsuspecting users by adding QR codes to previously successful phishing vectors that have now been blocked by security products.
Cloudflare’s protection strategy
Cloudflare has been at the forefront of defending against quishing attacks. We employ a multi-faceted approach, and instead of focusing on archaic, layered email configuration rules, we have trained our machine learning (ML) detection models on almost a decade’s worth of detection data and have a swath of proactive computer vision models to ensure all of our customers start with a turnkey solution.
For quish detections, we break it into two parts: 1) identification and scanning of QR codes 2) analysis of decoded QR codes.
The first part is solved by our own QR code detection heuristics that inform how, when, and where for our computer vision models to execute. We then leverage the newest libraries and tools to help identify, process, and most importantly decode QR codes. While it is relatively easy for a human to identify a QR code, there is almost no limit to how many ways they can be obfuscated to machines. The examples we provided above are just a small sample of what we’ve seen in the wild, and bad actors are constantly discovering new methods to make QR codes hard to quickly find and identify, making it a constant cat and mouse game that requires us to regularly update our tools for the trending obfuscation technique.
The second part, analysis of decoded QR codes, goes through all the same treatment we apply to phish and then some. We have engines that deconstruct complex URLs and drill down to the final URL, from redirect to redirect, whether they are automatic or not. Along the way, we scan for malicious attachments and malicious websites and log findings for future detections to cross-reference. If we encounter any files or content that are encrypted or password protected, we leverage another group of engines that attempt to decrypt and unprotect them, so we can identify if there was any obfuscated malicious content. Most importantly, with all of this information, we continuously update our databases with this new data, including the obfuscation of the QR code, to make better assessments of similar attacks that leverage the methods we have documented.
However, even with a well-trained suite of phish detection tools, quite often the malicious content is at the end of a long chain of redirects that prevent automated web crawlers from identifying anything at all, much less malicious content. In between redirects, there might be a hard block that requires human validation, such as a CAPTCHA, which makes it virtually impossible for an automated process to crawl past, and therefore unable to classify any content at all. Or there might be a conditional block with campaign identification requirements, so if anyone is outside the original target’s region or has a web browser and operating system version that doesn’t meet the campaign requirements, they would simply view a benign website, while the target would be exposed to the malicious content. Over the years, we have built tools to identify and pass these validations, so we can determine malicious content that may be there.
However, even with all the technologies we’ve built over the years, there are cases where we aren’t able to easily get to the final content. In those cases, our link reputation machine learning models, which have been trained on multiple years of scanned links and their metadata, have proven to be quite valuable and are easily applied after QR codes are decoded as well. By correlating things like domain metadata, URL structure, URL query strings, and our own historical data sets, we are able to make inferences to protect our customers. We also take a proactive approach and leverage our ML models to tell us where to hunt for QR codes, even if they aren’t immediately obvious, and by scrutinizing domains, sentiment, context, IP addresses, historical use, and social patterns between senders and recipients, Cloudflare identifies and neutralizes potential threats before they can inflict harm.
Creative examples and real world instances
With the thousands of QR codes we process daily, we see some interesting trends. Notable companies, including Microsoft and DocuSign, have frequently been the subjects of impersonation for quishing attacks. What makes this more confusing for users, and even more likely to scan them, is that these companies actually use QR codes in their legitimate workflows. This further underscores the urgency for organizations to fortify their defenses against this evolving threat.
Below are three examples of the most interesting quish we have found and compared against the real use cases by the respective companies. The QR codes used in these emails have been masked.
Microsoft Authenticator
Microsoft uses QR codes as a faster way to complete MFA instead of sending six digit SMS codes to users’ phones that can be delayed and are also considered safer, as SMS MFA can be intercepted through SIM swap attacks. Users would have independently registered their devices and would have previously seen the registration screen on the right, so receiving an email that says they need to re-authenticate doesn’t seem especially odd.
DocuSign
DocuSign uses QR codes to make it easier for users to download their mobile app tosign documents, identity verification via a mobile device to take photos, and supports embedding DocuSign features in third party apps which have their own QR code scanning functionality. The use of QR codes in native DocuSign apps and non-native apps makes it confusing for frequent DocuSign users and not at all peculiar for users that rarely use DocuSign. While the QR code for downloading the DocuSign app is not used in signature requests, to a frequent user, it might just seem like a fast method to open the request in the app they already have downloaded on their mobile device.
Microsoft Teams
Microsoft uses QR codes for Teams to allow users to quickly join a team via a mobile device, and while Teams doesn’t use QR codes for voicemails, it does have a voicemail feature. The email on the left seems like a reminder to check voicemail in Teams and combines the two real use cases on the right.
How you can help prevent quishing
As we confront the persistent threat of quishing, it’s crucial for individuals and organizations to be vigilant. While no solution can guarantee 100% protection, collective diligence can significantly reduce the risk, and we encourage collaboration in the fight against quishing.
If you are already a Cloud Email Security customer, we remind you to submit instances of quish from within our portal to help stop current threats and enhance the capabilities of future machine learning models, leading to more proactive defense strategies. If you aren’t a customer, you can still submit original quish samples as an attachment in EML format to [email protected], and remember to leverage your email security provider’s submission process to inform them of these quishing vectors as well.
The battle against quishing is ongoing, requiring continuous innovation and collaboration. To support submissions of quish, we are developing new methods for customers to provide targeted feedback to our models and also adding additional transparency to our metrics to facilitate tracking a variety of vectors, including quish.
Amazon WorkMail’s new audit logging capability equips email system administrators with powerful visibility into mailbox activities and system events across their organization. As announced in our recent “What’s New” post, this feature enables the comprehensive capture and delivery of critical email data, empowering administrators to monitor, analyze, and maintain compliance.
With audit logging, WorkMail records a wide range of events, including metadata about messages sent, received, and failed login attempts, and configuration changes. Administrators have the option to deliver these audit logs to their preferred AWS services, such as Amazon Simple Storage System (S3) for long-term storage, Amazon Kinesis Data Firehose for real-time data streaming, or Amazon CloudWatch Logs for centralized log management. Additionally, standard CloudWatch metrics on audit logs provide deep insights into the usage and health of WorkMail mailboxes within the organization.
By leveraging Amazon WorkMail’s audit logging capabilities, enterprises have the ability to strengthen their security posture, fulfill regulatory requirements, and gain critical visibility into the email activities that underpin their daily operations. This post will explore the technical details and practical use cases of this powerful new feature.
In this blog, you will learn how to configure your WorkMail organization to send email audit logs to Amazon CloudWatch Logs, Amazon S3, and Amazon Data Firehose . We’ll also provide examples that show how to monitor access to your Amazon WorkMail Organization’s mailboxes by querying the logs via CloudWatch Log Insights.
Email security
Imagine you are the email administrator for a biotech company, and you’ve received a report about spam complaints coming from your company’s email system. When you investigate, you learn these complaints point to unauthorized emails originating from several of your company’s mailboxes. One or more of your company’s email accounts may have been compromised by a hacker. You’ll need to determine the specific mailboxes involved, understand who has access to those mailboxes, and how the mailboxes have been accessed. This will be useful in identifying mailboxes with multiple failed logins or unfamiliar IP access, which can indicate unauthorized attempts or hacking. To identify the cause of the security breach, you require access to detailed audit logs and familiar tools to analyze extensive log data and locate the root of your issues.
Amazon WorkMail Audit Logging
Amazon WorkMail is a secure, managed business email service that hosts millions of mailboxes globally. WorkMail features robust audit logging capabilities, equipping IT administrators and security experts with in-depth analysis of mailbox usage patterns. Audit logging provides detailed insights into user activities within WorkMail. Organizations can detect potential security vulnerabilities by utilizing audit logs. These logs document user logins, access permissions, and other critical activities. WorkMail audit logging facilitates compliance with various regulatory requirements, providing a clear audit trail of data privacy and security. WorkMail’s audit logs are crucial for maintaining the integrity, confidentiality, and reliability of your organization’s email system.
Understanding WorkMail Audit Logging
Amazon WorkMail’s audit logging feature provides you with the data you need to have a thorough understanding of your email mailbox activities. By sending detailed logs to Amazon CloudWatch Logs, Amazon S3, and Amazon Data Firehose, administrators can identify mailbox access issues, track access by IP addresses, and review mailbox data movements or deletions using familiar tools. It is also possible to configure multiple destinations for each log to meet the needs of a variety of use cases, including compliance archiving.
ACCESS CONTROL LOGS – These logs record evaluations of access control rules, noting whether access to the endpoint was granted or denied in accordance with the configured rules;
AUTHENTICATION LOGS – These logs capture details of login activities, chronicling both successful and failed authentication attempts;
AVAILABILITY PROVIDER LOGS – These logs document the use of the Availability Providers feature, tracking its operational status and interactions feature;
MAILBOX ACCESS LOGS – Logs in this category record each attempt to access mailboxes within the WorkMail Organization, providing a detailed account of credential and protocol access patterns.
Once audit logging is enabled, alerts can be configured to warn of authentication or access anomalies that surpass predetermined thresholds. JSON formatting allows for advanced processing and analysis of audit logs by third party tools. Audit logging stores all interactions with the exception of web mail client authentication metrics.
WorkMail audit logging in action
Below are two examples that show how WorkMail’s audit logging can be used to investigate unauthorized login attempts, and diagnose a misconfigured email client. In both examples, we’ll use WorkMail’s Mailbox Access Control Logs and query the mailbox access control logs in CloudWatch Log Insights.
In our first example, we’re looking for unsuccessful login attempts in a target timeframe. In CloudWatch Log Insights we run this query:
CloudWatch Log Insights returns all records in the timeframe, providing auth_succesful = 0 (false) and auth_failed_reason = Invalid username or password. We also see the source_ip, which we may decide to block in a WorkMail access control rule, or any other network security system.
Mailbox Access Control Log – an unsuccessful login attempt
In this next example, consider a WorkMail organization that has elected to block the IMAP protocol using a WorkMail access control rule (below):
WorkMail Access Control Rule – block IMAP protocol
Because some email clients use IMAP by default, occasionally new users in this example organization are denied access to email due to an incorrectly configured email client. Using WorkMail’s mailbox access control logs in CloudWatch Log Insights we run this query:
And we see the user’s attempt to access their email inbox via IMAP has been denied by the access control rule_id (below):
WorkMail Access Control logs – IMAP blocked by access rule
Conclusion
Amazon WorkMail’s audit logging feature offers comprehensive view of your organization’s email activities. Four different logs provide visibility into access controls, authentication attempts, interactions with external systems, and mailbox activities. It provides flexible log delivery through native integration with AWS services and tools. Enabling WorkMail’s audit logging capabilities helps administrators meet compliance requirements and enhances the overall security and reliability of their email system.
To learn more about audit logging on Amazon WorkMail, you may comment on this post (below), view the WorkMail documentation, or reach out to your AWS account team.
To learn more about Amazon WorkMail, or to create a no-cost 30-day test organization, see Amazon WorkMail.
About the Authors
Luis Miguel Flores dos Santos
Miguel is a Solutions Architect at AWS, boasting over a decade of expertise in solution architecture, encompassing both on-premises and cloud solutions. His focus lies on resilience, performance, and automation. Currently, he is delving into serverless computing. In his leisure time, he enjoys reading, riding motorcycles, and spending quality time with family and friends.
Andy Wong
Andy Wong is a Sr. Product Manager with the Amazon WorkMail team. He has 10 years of diverse experience in supporting enterprise customers and scaling start-up companies across different industries. Andy’s favorite activities outside of technology are soccer, tennis and free-diving.
Zip
Zip is a Sr. Specialist Solutions Architect at AWS, working with Amazon Pinpoint and Simple Email Service and WorkMail. Outside of work he enjoys time with his family, cooking, mountain biking, boating, learning and beach plogging.
The US Cyber Safety Review Board released a report on the summer 2023 hack of Microsoft Exchange by China. It was a serious attack by the Chinese government that accessed the emails of senior US government officials.
From the executive summary:
The Board finds that this intrusion was preventable and should never have occurred. The Board also concludes that Microsoft’s security culture was inadequate and requires an overhaul, particularly in light of the company’s centrality in the technology ecosystem and the level of trust customers place in the company to protect their data and operations. The Board reaches this conclusion based on:
the cascade of Microsoft’s avoidable errors that allowed this intrusion to succeed;
Microsoft’s failure to detect the compromise of its cryptographic crown jewels on its own, relying instead on a customer to reach out to identify anomalies the customer had observed;
the Board’s assessment of security practices at other cloud service providers, which maintained security controls that Microsoft did not;
Microsoft’s failure to detect a compromise of an employee’s laptop from a recently acquired company prior to allowing it to connect to Microsoft’s corporate network in 2021;
Microsoft’s decision not to correct, in a timely manner, its inaccurate public statements about this incident, including a corporate statement that Microsoft believed it had determined the likely root cause of the intrusion when in fact, it still has not; even though Microsoft acknowledged to the Board in November 2023 that its September 6, 2023 blog post about the root cause was inaccurate, it did not update that post until March 12, 2024, as the Board was concluding its review and only after the Board’s repeated questioning about Microsoft’s plans to issue a correction;
the Board’s observation of a separate incident, disclosed by Microsoft in January 2024, the investigation of which was not in the purview of the Board’s review, which revealed a compromise that allowed a different nation-state actor to access highly-sensitive Microsoft corporate email accounts, source code repositories, and internal systems; and
how Microsoft’s ubiquitous and critical products, which underpin essential services that support national security, the foundations of our economy, and public health and safety, require the company to demonstrate the highest standards of security, accountability, and transparency.
The report includes a bunch of recommendations. It’s worth reading in its entirety.
The board was established in early 2022, modeled in spirit after the National Transportation Safety Board. This is their third report.
The email your manager received and forwarded to you was something completely innocent, such as a potential customer asking a few questions. All that email was supposed to achieve was being forwarded to you. However, the moment the email appeared in your inbox, it changed. The innocent pretext disappeared and the real phishing email became visible. A phishing email you had to trust because you knew the sender and they even confirmed that they had forwarded it to you.
This attack is possible because most email clients allow CSS to be used to style HTML emails. When an email is forwarded, the position of the original email in the DOM usually changes, allowing for CSS rules to be selectively applied only when an email has been forwarded.
An attacker can use this to include elements in the email that appear or disappear depending on the context in which the email is viewed. Because they are usually invisible, only appear in certain circumstances, and can be used for all sorts of mischief, I’ll refer to these elements as kobold letters, after the elusive sprites of mythology.
You’re browsing your inbox and spot an email that looks like it’s from a brand you trust. Yet, something feels off. This might be a phishing attempt, a common tactic where cybercriminals impersonate reputable entities — we’ve written about the top 50 most impersonated brands used in phishing attacks. One factor that can be used to help evaluate the email’s legitimacy is its Top-Level Domain (TLD) — the part of the email address that comes after the dot.
In this analysis, we focus on the TLDs responsible for a significant share of malicious or spam emails since January 2023. For the purposes of this blog post, we are considering malicious email messages to be equivalent to phishing attempts. With an average of 9% of 2023’s emails processed by Cloudflare’s Cloud Email Security service marked as spam and 3% as malicious, rising to 4% by year-end, we aim to identify trends and signal which TLDs have become more dubious over time. Keep in mind that our measurements represent where we observe data across the email delivery flow. In some cases, we may be observing after initial filtering has taken place, at a point where missed classifications are likely to cause more damage. This information derived from this analysis could serve as a guide for Internet users, corporations, and geeks like us, searching for clues, as Internet detectives, in identifying potential threats. To make this data readily accessible, Cloudflare Radar, our tool for Internet insights, now includes a new section dedicated to email security trends.
Cyber attacks often leverage the guise of authenticity, a tactic Cloudflare thwarted following a phishing scheme similar to the one that compromised Twilio in 2022. The US Cybersecurity and Infrastructure Security Agency (CISA) notes that 90% of cyber attacks start with phishing, and fabricating trust is a key component of successful malicious attacks. We see there are two forms of authenticity that attackers can choose to leverage when crafting phishing messages, visual and organizational. Attacks that leverage visual authenticity rely on attackers using branding elements, like logos or images, to build credibility. Organizationally authentic campaigns rely on attackers using previously established relationships and business dynamics to establish trust and be successful.
Our findings from 2023 reveal that recently introduced generic TLDs (gTLDs), including several linked to the beauty industry, are predominantly used both for spam and malicious attacks. These TLDs, such as .uno, .sbs, and .beauty, all introduced since 2014, have seen over 95% of their emails flagged as spam or malicious. Also, it’s important to note that in terms of volume, “.com” accounts for 67% of all spam and malicious emails (more on that below).
TLDs
2023 Spam %
2023 Malicious %
2023 Spam + malicious %
TLD creation
.uno
62%
37%
99%
2014
.sbs
64%
35%
98%
2021
.best
68%
29%
97%
2014
.beauty
77%
20%
97%
2021
.top
74%
23%
97%
2014
.hair
78%
18%
97%
2021
.monster
80%
17%
96%
2019
.cyou
34%
62%
96%
2020
.wiki
69%
26%
95%
2014
.makeup
32%
63%
95%
2021
Email and Top-Level Domains history
In 1971, Ray Tomlinson sent the first networked email over ARPANET, using the @ character in the address. Five decades later, email remains relevant but also a key entry point for attackers.
Before the advent of the World Wide Web, email standardization and growth in the 1980s, especially within academia and military communities, led to interoperability. Fast forward 40 years, and this interoperability is once again a hot topic, with platforms like Threads, Mastodon, and other social media services aiming for the open communication that Jack Dorsey envisioned for Twitter. So, in 2024, it’s clear that social media, messaging apps like Slack, Teams, Google Chat, and others haven’t killed email, just as “video didn’t kill the radio star.”
The structure of a domain name.
The domain name system, managed by ICANN, encompasses a variety of TLDs, from the classic “.com” (1985) to the newer generic options. There are also the country-specific (ccTLDs), where the Internet Assigned Numbers Authority (IANA) is responsible for determining an appropriate trustee for each ccTLD. An extensive 2014 expansion by ICANN was designed to “increase competition and choice in the domain name space,” introducing numerous new options for specific professional, business, and informational purposes, which in turn, also opened up new possibilities for phishing attempts.
3.4 billion unwanted emails
Cloudflare’s Cloud Email Security service is helping protect our customers, and that also comes with insights. In 2022, Cloudflare blocked 2.4 billion unwanted emails, and in 2023 that number rose to over 3.4 billion unwanted emails, 26% of all messages processed. This total includes spam, malicious, and “bulk” (practice of sending a single email message, unsolicited or solicited, to a large number of recipients simultaneously) emails. That means an average of 9.3 million per day, 6500 per minute, 108 per second.
Bear in mind that new customers also make the numbers grow — in this case, driving a 42% increase in unwanted emails from 2022 to 2023. But this gives a sense of scale in this email area. Those unwanted emails can include malicious attacks that are difficult to detect, becoming more frequent, and can have devastating consequences for individuals and businesses that fall victim to them. Below, we’ll give more details on email threats, where malicious messages account for almost 3% of emails averaged across all of 2023 and it shows a growth tendency during the year, with higher percentages in the last months of the year. Let’s take a closer look.
Top phishing TLDs (and types of TLDs)
First, let’s start with an 2023 overview of top level domains with a high percentage of spam and malicious messages. Despite excluding TLDs with fewer than 20,000 emails, our analysis covers unwanted emails considered to be spam and malicious from more than 350 different TLDs (and yes, there are many more).
A quick overview highlights the TLDs with the highest rates of spam and malicious attacks as a proportion of their outbound email, those with the largest volume share of spam or malicious emails, and those with the highest rates of just-malicious and just-spam TLD senders. It reveals that newer TLDs, especially those associated with the beauty industry (generally available since 2021 and serving a booming industry), have the highest rates as a proportion of their emails. However, it’s relevant to recognize that “.com” accounts for 67% of all spam and malicious emails. Malicious emails often originate from recently created generic TLDs like “.bar”, “.makeup”, or “.cyou”, as well as certain country-code TLDs (ccTLDs) employed beyond their geographical implications.
Highest % of spam and malicious emails
Volume share of spam + malicious
Highest % of malicious
Highest % of spam
TLD
Spam + mal %
TLD
Spam + mal %
TLD
Malicious %
TLD
Spam %
.uno
99%
.com
67%
.bar
70%
.autos
93%
.sbs
98%
.shop
5%
.makeup
63%
.today
92%
.best
97%
.net
4%
.cyou
62%
.directory
91%
.beauty
97%
.no
3%
.ml
56%
.boats
87%
.top
97%
.org
2%
.tattoo
54%
.center
85%
.hair
97%
.ru
1%
.om
47%
.monster
80%
.monster
96%
.jp
1%
.cfd
46%
.lol
79%
.cyou
96%
.click
1%
.skin
39%
.hair
78%
.wiki
95%
.beauty
1%
.uno
37%
.shop
78%
.makeup
95%
.cn
1%
.pw
37%
.beauty
77%
Focusing on volume share, “.com” dominates the spam + malicious list at 67%, and is joined in the top 3 by another “classic” gTLD, “.net”, at 4%. They also lead by volume when we look separately at the malicious (68% of all malicious emails are “.com” and “.net”) and spam (71%) categories, as shown below. All of the generic TLDs introduced since 2014 represent 13.4% of spam and malicious and over 14% of only malicious emails. These new TLDs (most of them are only available since 2016) are notable sources of both spam and malicious messages. Meanwhile, country-code TLDs contribute to more than 12% of both categories of unwanted emails.
This breakdown highlights the critical role of both established and new generic TLDs, which surpass older ccTLDs in terms of malicious emails, pointing to the changing dynamics of email-based threats.
Type of TLDs
Spam
Malicious
Spam + malicious
ccTLDs
13%
12%
12%
.com and .net only
71%
68%
71%
new gTLDs
13%
14%
13.4%
That said, “.shop” deserves a highlight of its own. The TLD, which has been available since 2016, is #2 by volume of spam and malicious emails, accounting for 5% of all of those emails. It also represents, when we separate those two categories, 5% of all malicious emails, and 5% of all spam emails. As we’re going to see below, its influence is growing.
Full 2023 top 50 spam & malicious TLDs list
For a more detailed perspective, below we present the top 50 TLDs with the highest percentages of spam and malicious emails during 2023. We also include a breakdown of those two categories.
It’s noticeable that even outside the top 10, other recent generic TLDs are also higher in the ranking, such as “.autos” (the #1 in the spam list), “.today”, “.bid” or “.cam”. TLDs that seem to promise entertainment or fun or are just leisure or recreational related (including “.fun” itself), occupy a position in our top 50 ranking.
2023 Top 50 spam & malicious TLDs (by highest %)
Rank
TLD
Spam %
Malicious %
Spam + malicious %
1
.uno
62%
37%
99%
2
.sbs
64%
35%
98%
3
.best
68%
29%
97%
4
.beauty
77%
20%
97%
5
.top
74%
23%
97%
6
.hair
78%
18%
97%
7
.monster
80%
17%
96%
8
.cyou
34%
62%
96%
9
.wiki
69%
26%
95%
10
.makeup
32%
63%
95%
11
.autos
93%
2%
95%
12
.today
92%
3%
94%
13
.shop
78%
16%
94%
14
.bid
74%
18%
92%
15
.cam
67%
25%
92%
16
.directory
91%
0%
91%
17
.icu
75%
15%
91%
18
.ml
33%
56%
89%
19
.lol
79%
10%
89%
20
.skin
49%
39%
88%
21
.boats
87%
1%
88%
22
.tattoo
34%
54%
87%
23
.click
61%
27%
87%
24
.ltd
70%
17%
86%
25
.rest
74%
11%
86%
26
.center
85%
0%
85%
27
.fun
64%
21%
85%
28
.cfd
39%
46%
84%
29
.bar
14%
70%
84%
30
.bio
72%
11%
84%
31
.tk
66%
17%
83%
32
.yachts
58%
23%
81%
33
.one
63%
17%
80%
34
.ink
68%
10%
78%
35
.wf
76%
1%
77%
36
.no
76%
0%
76%
37
.pw
39%
37%
75%
38
.site
42%
31%
73%
39
.life
56%
16%
72%
40
.homes
62%
10%
72%
41
.services
67%
2%
69%
42
.mom
63%
5%
68%
43
.ir
37%
29%
65%
44
.world
43%
21%
65%
45
.lat
40%
24%
64%
46
.xyz
46%
18%
63%
47
.ee
62%
1%
62%
48
.live
36%
26%
62%
49
.pics
44%
16%
60%
50
.mobi
41%
19%
60%
Change in spam & malicious TLD patterns
Let’s look at TLDs where spam + malicious emails comprised the largest share of total messages from that TLD, and how that list of TLDs changed from the first half of 2023 to the second half. This shows which TLDs were most problematic at different times during the year.
Highlighted in bold in the following table are those TLDs that climbed in the rankings for the percentage of spam and malicious emails from July to December 2023, compared with January to June. Generic TLDs “.uno”, “.makeup” and “.directory” appeared in the top list and in higher positions for the first time in the last six months of the year.
January – June 2023
July – Dec 2023
tld
Spam + malicious %
tld
Spam + malicious %
.click
99%
.uno
99%
.best
99%
.sbs
98%
.yachts
99%
.beauty
97%
.hair
99%
.best
97%
.autos
99%
.makeup
95%
.wiki
98%
.monster
95%
.today
98%
.directory
95%
.mom
98%
.bid
95%
.sbs
97%
.top
93%
.top
97%
.shop
92%
.monster
97%
.today
92%
.beauty
97%
.cam
92%
.bar
96%
.cyou
92%
.rest
95%
.icu
91%
.cam
95%
.boats
88%
.homes
94%
.wiki
88%
.pics
94%
.rest
88%
.lol
94%
.hair
87%
.quest
93%
.fun
87%
.cyou
93%
.cfd
86%
.ink
92%
.skin
85%
.shop
92%
.ltd
84%
.skin
91%
.one
83%
.ltd
91%
.center
83%
.tattoo
91%
.services
81%
.no
90%
.lol
78%
.ml
90%
.wf
78%
.center
90%
.pw
76%
.store
90%
.life
76%
.icu
89%
.click
75%
From the rankings, it’s clear that the recent generic TLDs have the highest spam and malicious percentage of all emails. The top 10 TLDs in both halves of 2023 are all recent and generic, with several introduced since 2021.
Reasons for the prominence of these gTLDs include the availability of domain names that can seem legitimate or mimic well-known brands, as we explain in this blog post. Cybercriminals often use popular or catchy words. Some gTLDs allow anonymous registration. Their low cost and the delay in updated security systems to recognize new gTLDs as spam and malicious sources also play a role — note that, as we’ve seen, cyber criminals also like to change TLDs and methods.
The impact of a lawsuit?
There’s also been a change in the types of domains with the highest malicious percentage in 2023, possibly due to Meta’s lawsuit against Freenom, filed in December 2022 and refiled in March 2023. Freenom provided domain name registry services for free in five ccTLDs, which wound up being used for purposes beyond local businesses or content: “.cf” (Central African Republic), “.ga” (Gabon), “.gq” (Equatorial Guinea), “.ml” (Mali), and “.tk” (Tokelau). However, Freenom stopped new registrations during 2023 following the lawsuit, and in February 2024, announced its decision to exit the domain name business.
Focusing on Freenom TLDs, which appeared in our top 50 ranking only in the first half of 2023, we see a clear shift. Since October, these TLDs have become less relevant in terms of all emails, including malicious and spam percentages. In February 2023, they accounted for 0.17% of all malicious emails we tracked, and 0.04% of all spam and malicious. Their presence has decreased since then, becoming almost non-existent in email volume in September and October, similar to other analyses.
TLDs ordered by volume of spam + malicious
In addition to looking at their share, another way to examine the data is to identify the TLDs that have a higher volume of spam and malicious emails — the next table is ordered that way. This means that we are able to show more familiar (and much older) TLDs, such as “.com”. We’ve included here the percentage of all emails in any given TLD that are classified as spam or malicious, and also spam + malicious to spotlight those that may require more caution. For instance, with high volume “.shop”, “.no”, “.click”, “.beauty”, “.top”, “.monster”, “.autos”, and “.today” stand out with a higher spam and malicious percentage (and also only malicious email percentage).
In the realm of country-code TLDs, Norway’s “.no” leads in spam, followed by China’s “.cn”, Russia’s “.ru”, Ukraine’s “.ua”, and Anguilla’s “.ai”, which recently has been used more for artificial intelligence-related domains than for the country itself.
In bold and red, we’ve highlighted the TLDs where spam + malicious represents more than 20% of all emails in that TLD — already what we consider a high number for domains with a lot of emails.
TLDs with more spam + malicious emails (in volume) in 2023
Rank
TLD
Spam %
Malicious %
Spam + mal %
1
.com
3.6%
0.8%
4.4%
2
.shop
77.8%
16.4%
94.2%
3
.net
2.8%
1.0%
3.9%
4
.no
76.0%
0.3%
76.3%
5
.org
3.3%
1.8%
5.2%
6
.ru
15.2%
7.7%
22.9%
7
.jp
3.4%
2.5%
5.9%
8
.click
60.6%
26.6%
87.2%
9
.beauty
77.0%
19.9%
96.9%
10
.cn
25.9%
3.3%
29.2%
11
.top
73.9%
22.8%
96.6%
12
.monster
79.7%
16.8%
96.5%
13
.de
13.0%
2.1%
15.2%
14
.best
68.1%
29.4%
97.4%
15
.gov
0.6%
2.0%
2.6%
16
.autos
92.6%
2.0%
94.6%
17
.ca
5.2%
0.5%
5.7%
18
.uk
3.2%
0.8%
3.9%
19
.today
91.7%
2.6%
94.3%
20
.io
3.6%
0.5%
4.0%
21
.us
5.7%
1.9%
7.6%
22
.co
6.3%
0.8%
7.1%
23
.biz
27.2%
14.0%
41.2%
24
.edu
0.9%
0.2%
1.1%
25
.info
20.4%
5.4%
25.8%
26
.ai
28.3%
0.1%
28.4%
27
.sbs
63.8%
34.5%
98.3%
28
.it
2.5%
0.3%
2.8%
29
.ua
37.4%
0.6%
38.0%
30
.fr
8.5%
1.0%
9.5%
The curious case of “.gov” email spoofing
When we concentrate our research on message volume to identify TLDs with more malicious emails blocked by our Cloud Email Security service, we discover a trend related to “.gov”.
TLDs ordered by malicious email volume
% of all malicious emails
.com
63%
.net
5%
.shop
5%
.org
3%
.gov
2%
.ru
2%
.jp
2%
.click
1%
.best
0.9%
.beauty
0.8%
The first three domains, “.com” (63%), “.net” (5%), and “.shop” (5%), were previously seen in our rankings and are not surprising. However, in fourth place is “.org”, known for being used by non-profit and other similar organizations, but it has an open registration policy. In fifth place is “.gov”, used only by the US government and administered by CISA. Our investigation suggests that it appears in the ranking because of typical attacks where cybercriminals pretend to be a legitimate address (email spoofing, creation of email messages with a forged sender address). In this case, they use “.gov” when launching attacks.
The spoofing behavior linked to “.gov” is similar to that of other TLDs. It includes fake senders failing SPF validation and other DNS-based authentication methods, along with various other types of attacks. An email failing SPF, DKIM, and DMARC checks typically indicates that a malicious sender is using an unauthorized IP, domain, or both. So, there are more straightforward ways to block spoofed emails without examining their content for malicious elements.
Ranking TLDs by proportions of malicious and spam email in 2023
In this section, we have included two lists: one ranks TLDs by the highest percentage of malicious emails — those you should exercise greater caution with; the second ranks TLDs by just their spam percentage. These contrast with the previous top 50 list ordered by combined spam and malicious percentages. In the case of malicious emails, the top 3 with the highest percentage are all generic TLDs. The #1 was “.bar”, with 70% of all emails being categorized as malicious, followed by “.makeup”, and “.cyou” — marketed as the phrase “see you”.
The malicious list also includes some country-code TLDs (ccTLDs) not primarily used for country-related topics, like .ml (Mali), .om (Oman), and .pw (Palau). The list also includes other ccTLDs such as .ir (Iran) and .kg (Kyrgyzstan), .lk (Sri Lanka).
In the spam realm, it’s “autos”, with 93%, and other generic TLDs such as “.today”, and “.directory” that take the first three spots, also seeing shares over 90%.
2023 ordered by malicious email %
2023 ordered by spam email %
tld
Malicious %
tld
Spam %
.bar
70%
.autos
93%
.makeup
63%
.today
92%
.cyou
62%
.directory
91%
.ml
56%
.boats
87%
.tattoo
54%
.center
85%
.om
47%
.monster
80%
.cfd
46%
.lol
79%
.skin
39%
.hair
78%
.uno
37%
.shop
78%
.pw
37%
.beauty
77%
.sbs
35%
.no
76%
.site
31%
.wf
76%
.store
31%
.icu
75%
.best
29%
.bid
74%
.ir
29%
.rest
74%
.lk
27%
.top
74%
.work
27%
.bio
72%
.click
27%
.ltd
70%
.wiki
26%
.wiki
69%
.live
26%
.best
68%
.cam
25%
.ink
68%
.lat
24%
.cam
67%
.yachts
23%
.services
67%
.top
23%
.tk
66%
.world
21%
.sbs
64%
.fun
21%
.fun
64%
.beauty
20%
.one
63%
.mobi
19%
.mom
63%
.kg
19%
.uno
62%
.hair
18%
.homes
62%
How it stands in 2024: new higher-risk TLDs
2024 has seen new players enter the high-risk zone for unwanted emails. In this list we have only included the new TLDs that weren’t in the top 50 during 2023, and joined the list in January. New entrants include Samoa’s “.ws”, Indonesia’s “.id” (also used because of its “identification” meaning), and the Cocos Islands’ “.cc”. These ccTLDs, often used for more than just country-related purposes, have shown high percentages of malicious emails, ranging from 20% (.cc) to 95% (.ws) of all emails.
January 2024: Newer TLDs in the top 50 list
TLD
Spam %
Malicious %
Spam + mal %
.ws
3%
95%
98%
.company
96%
0%
96%
.digital
72%
2%
74%
.pro
66%
6%
73%
.tz
62%
4%
65%
.id
13%
39%
51%
.cc
25%
21%
46%
.space
32%
8%
40%
.enterprises
2%
37%
40%
.lv
30%
1%
30%
.cn
26%
3%
29%
.jo
27%
1%
28%
.info
21%
5%
26%
.su
20%
5%
25%
.ua
23%
1%
24%
.museum
0%
24%
24%
.biz
16%
7%
24%
.se
23%
0%
23%
.ai
21%
0%
21%
Overview of email threat trends since 2023
With Cloudflare’s Cloud Email Security, we gain insight into the broader email landscape over the past months. The spam percentage of all emails stood at 8.58% in 2023. As mentioned before, keep in mind with these percentages that our protection typically kicks in after other email providers’ filters have already removed some spam and malicious emails.
How about malicious emails? Almost 3% of all emails were flagged as malicious during 2023, with the highest percentages occurring in Q4. Here’s the “malicious” evolution, where we’re also including the January and February 2024 perspective:
The week before Christmas and the first week of 2024 experienced a significant spike in malicious emails, reaching an average of 7% and 8% across the weeks, respectively. Not surprisingly, there was a noticeable decrease during Christmas week, when it dropped to 3%. Other significant increases in the percentage of malicious emails were observed the week before Valentine’s Day, the first week of September (coinciding with returns to work and school in the Northern Hemisphere), and late October.
Threat categories in 2023
We can also look to different types of threats in 2023. Links were present in 49% of all threats. Other categories included extortion (36%), identity deception (27%), credential harvesting (23%), and brand impersonation (18%). These categories are defined and explored in detail in Cloudflare’s 2023 phishing threats report. Extortion saw the most growth in Q4, especially in November and December reaching 38% from 7% of all threats in Q1 2023.
Other trends: Attachments are still popular
Other less “threatening” trends show that 20% of all emails included attachments (as the next chart shows), while 82% contained links in the body. Additionally, 31% were composed in plain text, and 18% featured HTML, which allows for enhanced formatting and visuals. 39% of all emails used remote content.
Conclusion: Be cautious, prepared, safe
The landscape of spam and malicious (or phishing) emails constantly evolves alongside technology, the Internet, user behaviors, use cases, and cybercriminals. As we’ve seen through Cloudflare’s Cloud Email Security insights, new generic TLDs have emerged as preferred channels for these malicious activities, highlighting the need for vigilance when dealing with emails from unfamiliar domains.
There’s no shortage of advice on staying safe from phishing. Email remains a ubiquitous yet highly exploited tool in daily business operations. Cybercriminals often bait users into clicking malicious links within emails, a tactic used by both sophisticated criminal organizations and novice attackers. So, always exercise caution online.
Cloudflare’s Cloud Email Security provides insights that underscore the importance of robust cybersecurity infrastructure in fighting the dynamic tactics of phishing attacks.
Amazon Simple Email Service (SES) is a cloud-based email sending service that helps businesses and developers send marketing and transactional emails. We introduced the SESv1 API in 2011 to provide developers with basic email sending capabilities through Amazon SES using HTTPS. In 2020, we introduced the redesigned Amazon SESv2 API, with new and updated features that make it easier and more efficient for developers to send email at scale.
This post will compare Amazon SESv1 API and Amazon SESv2 API and explain the advantages of transitioning your application code to the SESv2 API. We’ll also provide examples using the AWS Command-Line Interface (AWS CLI) that show the benefits of transitioning to the SESv2 API.
Amazon SESv1 API
The SESv1 API is a relatively simple API that provides basic functionality for sending and receiving emails. For over a decade, thousands of SES customers have used the SESv1 API to send billions of emails. Our customers’ developers routinely use the SESv1 APIs to verify email addresses, create rules, send emails, and customize bounce and complaint notifications. Our customers’ needs have become more advanced as the global email ecosystem has developed and matured. Unsurprisingly, we’ve received customer feedback requesting enhancements and new functionality within SES. To better support an expanding array of use cases and stay at the forefront of innovation, we developed the SESv2 APIs.
While the SESv1 API will continue to be supported, AWS is focused on advancing functionality through the SESv2 API. As new email sending capabilities are introduced, they will only be available through SESv2 API. Migrating to the SESv2 API provides customers with access to these, and future, optimizations and enhancements. Therefore, we encourage SES customers to consider the information in this blog, review their existing codebase, and migrate to SESv2 API in a timely manner.
Amazon SESv2 API
Released in 2020, the SESv2 API and SDK enable customers to build highly scalable and customized email applications with an expanded set of lightweight and easy to use API actions. Leveraging insights from current SES customers, the SESv2 API includes several new actions related to list and subscription management, the creation and management of dedicated IP pools, and updates to unsubscribe that address recent industry requirements.
One example of new functionality in SESv2 API is programmatic support for the SES Virtual Delivery Manager. Previously only addressable via the AWS console, VDM helps customers improve sending reputation and deliverability. SESv2 API includes vdmAttributes such as VdmEnabled and DashboardAttributes as well as vdmOptions. DashboardOptions and GaurdianOptions.
To improve developer efficiency and make the SESv2 API easier to use, we merged several SESv1 APIs into single commands. For example, in the SESv1 API you must make separate calls for createConfigurationSet, setReputationMetrics, setSendingEnabled, setTrackingOptions, and setDeliveryOption. In the SESv2 API, however, developers make a single call to createConfigurationSet and they can include trackingOptions, reputationOptions, sendingOptions, deliveryOptions. This can result in more concise code (see below).
Another example of SESv2 API command consolidation is the GetIdentity action, which is a composite of SESv1 API’s GetIdentityVerificationAttributes, GetIdentityNotificationAttributes, GetCustomMailFromAttributes, GetDKIMAttributes, and GetIdentityPolicies. See SESv2 documentation for more details.
Why migrate to Amazon SESv2 API?
The SESv2 API offers an enhanced experience compared to the original SESv1 API. Compared to the SESv1 API, the SESv2 API provides a more modern interface and flexible options that make building scalable, high-volume email applications easier and more efficient. SESv2 enables rich email capabilities like template management, list subscription handling, and deliverability reporting. It provides developers with a more powerful and customizable set of tools with improved security measures to build and optimize inbox placement and reputation management. Taken as a whole, the SESv2 APIs provide an even stronger foundation for sending critical communications and campaign email messages effectively at a scale.
Migrating your applications to SESv2 API will benefit your email marketing and communication capabilities with:
New and Enhanced Features: Amazon SESv2 API includes new actions as well as enhancements that provide better functionality and improved email management. By moving to the latest version, you’ll be able to optimize your email sending process. A few examples include:
Increase the maximum message size (including attachments) from 10Mb (SESv1) to 40Mb (SESv2) for both sending and receiving.
Access key actions for the SES Virtual Deliverability Manager (VDM) which provides insights into your sending and delivery data. VDM provides near-realtime advice on how to fix the issues that are negatively affecting your delivery success rate and reputation.
Meet Google & Yahoo’s June 2024 unsubscribe requirements with the SES v2 SendEmail action. For more information, see the “What’s New blog”
Future-proof Your Application: Avoid potential compatibility issues and disruptions by keeping your application up-to-date with the latest version of the Amazon SESv2 API via the AWS SDK.
Improve Usability and Developer Experience: Amazon SESv2 API is designed to be more user-friendly and consistent with other AWS services. It is a more intuitive API with better error handling, making it easier to develop, maintain, and troubleshoot your email sending applications.
Migrating to the latest SESv2 API and SDK positions customers for success in creating reliable and scalable email services for their businesses.
What does migration to the SESv2 API entail?
While SESv2 API builds on the v1 API, the v2 API actions don’t universally map exactly to the v1 API actions. Current SES customers that intend to migrate to SESv2 API will need to identify the SESv1 API actions in their code and plan to refactor for v2. When planning the migration, it is essential to consider several important considerations:
Customers with applications that receive email using SESv1 API’s CreateReceiptFilter, CreateReceiptRule or CreateReceiptRuleSet actions must continue using the SESv1 API client for these actions. SESv1 and SESv2 can be used in the same application, where needed.
We recommend all customers follow the security best practice of “least privilege” with their IAM policies. As such, customers may need to review and update their policies to include the new and modified API actions introduced in SESv2 before migrating. Taking the time to properly configure permissions ensures a seamless transition while maintaining a securely optimized level of access. See documentation.
Below is an example of an IAM policy with a user with limited allow privileges related to several SESv1 Identity actions only:
When calling delete- with SESv1, SES returns 200 (or no response), even if the identity was previously deleted or doesn’t exist:
aws ses delete-identity --identity example.com
SESv2 provides better error handling and responses when calling the delete API:
aws sesv2 delete-email-identity --email-identity example.com

An error occurred (NotFoundException) when calling the DeleteEmailIdentity operation: Email identity example.com does not exist.
Hands-on with SESv1 API vs. SESv2 API
Below are a few examples you can use to explore the differences between SESv1 API and the SESv2 API. To complete these exercises, you’ll need:
AWS Account (setup) with enough permission to interact with the SES service via the CLI
SES enabled, configured and properly sending emails
A recipient email address with which you can check inbound messages (if you’re in the SES Sandbox, this email must be verified email identity). In the following examples, replace [email protected] with the verified email identity.
Your preferred IDE with AWS credentials and necessary permissions (you can also use AWS CloudShell)
Open the AWS CLI (or AWS CloudShell) and:
Create a test directory called v1-v2-test.
Create the following (8) files in the v1-v2-test directory:
destination.json (replace [email protected] with the verified email identity):
{
   "Subject": {
       "Data": "SESv1 API email sent using the AWS CLI",
       "Charset": "UTF-8"
   },
   "Body": {
       "Text": {
           "Data": "This is the message body from SESv1 API in text format.",
           "Charset": "UTF-8"
       },
       "Html": {
           "Data": "This message body from SESv1 API, it contains HTML formatting. For example - you can include links: <a class=\"ulink\" href=\"http://docs.aws.amazon.com/ses/latest/DeveloperGuide\" target=\"_blank\">Amazon SES Developer Guide</a>.",
           "Charset": "UTF-8"
       }
   }
}
ses-v1-raw-message.json (replace [email protected] with the verified email identity):
{
     "Data": "From: [email protected]\nTo: [email protected]\nSubject: Test email sent using the SESv1 API and the AWS CLI \nMIME-Version: 1.0\nContent-Type: text/plain\n\nThis is the message body from the SESv1 API SendRawEmail.\n\n"
}
ses-v1-template.json (replace [email protected] with the verified email identity):
my-template.json (replace [email protected] with the verified email identity):
{
  "Template": {
    "TemplateName": "my-template",
    "SubjectPart": "Greetings SES Developer, {{name}}!",
    "HtmlPart": "<h1>Hello {{name}},</h1><p>Your favorite animal is {{favoriteanimal}}.</p>",
    "TextPart": "Dear {{name}},\r\nYour favorite animal is {{favoriteanimal}}."
  }
}
ses-v2-simple.json (replace [email protected] with the verified email identity):
{
    "FromEmailAddress": "[email protected]",
    "Destination": {
        "ToAddresses": [
            "[email protected]"
        ]
    },
    "Content": {
        "Simple": {
            "Subject": {
                "Data": "SESv2 API email sent using the AWS CLI",
                "Charset": "utf-8"
            },
            "Body": {
                "Text": {
                    "Data": "SESv2 API email sent using the AWS CLI",
                    "Charset": "utf-8"
                }
            },
            "Headers": [
                {
                    "Name": "List-Unsubscribe",
                    "Value": "insert-list-unsubscribe-here"
                },
				{
                    "Name": "List-Unsubscribe-Post",
                    "Value": "List-Unsubscribe=One-Click"
                }
            ]
        }
    }
}
ses-v2-raw.json (replace [email protected] with the verified email identity):
{
     "FromEmailAddress": "[email protected]",
     "Destination": {
            "ToAddresses": [
                       "[email protected]"
              ]
       },
      "Content": {
             "Raw": {
                     "Data": "Subject: Test email sent using SESv2 API via the AWS CLI \nMIME-Version: 1.0\nContent-Type: text/plain\n\nThis is the message body from SendEmail Raw Content SESv2.\n\n"
              }
      }
}
ses-v2-tempate.json (replace [email protected] with the verified email identity):
As mentioned above, customers who are using least privilege permissions with SESv1 API must first update their IAM policies before running the SESv2 API examples below. See documentation for more info.
As you can see from the .json files we created for SES v2 API (above), you can modify or remove sections from the .json files, based on the type of email content (simple, raw or templated) you want to send.
As you can see from the examples above, SESv2 API shares much of its syntax and actions with the SESv1 API. As a result, most customers have found they can readily evaluate, identify and migrate their application code base in a relatively short period of time. However, it’s important to note that while the process is generally straightforward, there may be some nuances and differences to consider depending on your specific use case and programming language.
Regardless of the language, you’ll need anywhere from a few hours to a few weeks to:
Update your code to use SESv2 Client and change API signature and request parameters
Update permissions / policies to reflect SESv2 API requirements
Test your migrated code to ensure that it functions correctly with the SESv2 API
Stage, test
Deploy
Summary
As we’ve described in this post, Amazon SES customers that migrate to the SESv2 API will benefit from updated capabilities, a more user-friendly and intuitive API, better error handling and improved deliverability controls. The SESv2 API also provide for compliance with the industry’s upcoming unsubscribe header requirements, more flexible subscription-list management, and support for larger attachments. Taken collectively, these improvements make it even easier for customers to develop, maintain, and troubleshoot their email sending applications with Amazon Simple Email Service. For these, and future reasons, we recommend SES customers migrate their existing applications to the SESv2 API immediately.
For more information regarding the SESv2 APIs, comment on this post, reach out to your AWS account team, or consult the AWS SESv2 API documentation:
Zip is an Amazon Pinpoint and Amazon Simple Email Service Sr. Specialist Solutions Architect at AWS. Outside of work he enjoys time with his family, cooking, mountain biking and plogging.
Vinay Ujjini
Vinay is an Amazon Pinpoint and Amazon Simple Email Service Worldwide Principal Specialist Solutions Architect at AWS. He has been solving customer’s omni-channel challenges for over 15 years. He is an avid sports enthusiast and in his spare time, enjoys playing tennis and cricket.
Dmitrijs Lobanovskis
Dmitrijs is a Software Engineer for Amazon Simple Email service. When not working, he enjoys traveling, hiking and going to the gym.
During 2021’s Birthday Week, we announced our Email Routing service, which allows users to direct different types of email messages (such as marketing, transactional, or administrative) to separate accounts based on criteria such as the recipient’s address or department. Its capabilities and the volume of messages routed have grown significantly since launch.
Just a few months later, on February 23, 2022, we announced our intent to acquire Area 1 Security to protect users from phishing attacks in email, web, and network environments. Since the completion of the acquisition on April 1, 2022, Area 1’s email security capabilities have been integrated into Cloudflare’s secure access service edge (SASE) solution portfolio, and now processes tens of millions of messages daily.
Processing millions of email messages each day on behalf of our customers gives us a unique perspective on the threats posed by malicious emails, spam volume, the adoption of email authentication methods like SPF, DMARC, and DKIM, and the use of IPv4/IPv6 and TLS by email servers. Today, we are launching a new Email Security section on Cloudflare Radar to share these perspectives with you. The insights in this new section can help you better understand the state of email security as viewed across various metrics, as well as understanding real-time trends in email-borne threats. (For instance, correlating an observed increase within your organization in messages containing malicious links with a similar increase observed by Cloudflare.) Below, we review the new metrics that are now available on Radar.
Tracking malicious email
As Cloudflare’s email security service processes email messages on behalf of customers, we are able to identify and classify offending messages as malicious. As examples, malicious emails may attempt to trick recipients into sharing personal information like login details, or the messages could attempt to spread malware through embedded images, links, or attachments. The new Email Security section on Cloudflare Radar now provides insight at a global level into the aggregate share of processed messages that we have classified as malicious over the selected timeframe. During February 2024, as shown in the figure below, we found that an average of 2.1% of messages were classified as being malicious. Spikes in malicious email volume were seen on February 10 and 11, accounting for as much as 29% of messages. These spikes occurred just ahead of the Super Bowl, in line with previous observations of increases in malicious email volume in the week ahead of the game. Other notable (but lower) spikes were seen on February 13, 15, 17, 24, and 25. The summary and time series data for malicious email share are available through the Radar API.
Threat categorization
The Cloudflare Radar 2023 Year in Review highlighted some of the techniques used by attackers when carrying out attacks using malicious email messages. As noted above, these can include links or attachments leading to malware, as well as approaches like identity deception, where the message appears to be coming from a trusted contact, and brand impersonation, where the message appears to be coming from a trusted brand. In analyzing malicious email messages, Cloudflare’s email security service categorizes the threats that it finds these messages contain. (Note that a single message can contain multiple types of threats — the sender could be impersonating a trusted contact while the body of the email contains a link leading to a fake login page.)
Based on these assessments, Cloudflare Radar now provides insights into trends observed across several different groups of threat types including “Attachment”, “Link”, “Impersonation”, and “Other”. “Attachment” groups individual threat types where the attacker has attached a file to the email message, “Link” groups individual threat types where the attacker is trying to get the user to click on something, and “Impersonation” groups individual threat types where the attacker is impersonating a trusted brand or contact. The “Other” grouping includes other threat types not covered by the previous three.
During February 2024 for the “Link” grouping, as the figure below illustrates, link-based threats were unsurprisingly the most common, and were found in 58% of malicious emails. Since the display text for a link (i.e., hypertext) in HTML can be arbitrarily set, attackers can make a URL appear as if it links to a benign site when, in fact, it is actually malicious. Nearly a third of malicious emails linked to something designed to harvest user credentials. The summary and time series data for these threat categories are available through the Radar API.
For the “Attachment” grouping, during February 2024, nearly 13% of messages were found to have a malicious attachment that when opened or executed in the context of an attack, includes a call-to-action (e.g. lures target to click a link) or performs a series of actions set by an attacker. The share spiked several times throughout the month, reaching as high as 70%. The attachments in nearly 6% of messages attempted to download additional software (presumably malware) once opened.
If an email message appears to be coming from a trusted brand, users may be more likely to open it and take action, like checking the shipping status of a package or reviewing a financial transaction. During February 2024, on average, over a quarter of malicious emails were sent by attackers attempting to impersonate well-known brands. Similar to other threat categories, this one also saw a number of significant spikes, reaching as high as 88% of February 17. Just over 18% of messages were found to be trying to extort users in some fashion. It appears that such campaigns were very active in the week ahead of Valentine’s Day (February 14), although the peak was seen on February 15, at over 95% of messages.
Identity deception occurs when an attacker or someone with malicious intent sends an email claiming to be someone else, whether through use of a similar-looking domain or display name manipulation. This was the top threat category for the “Other” grouping, seen in over 36% of malicious emails during February 2024. The figure below shows three apparent “waves” of the use of this technique — the first began at the start of the month, the second around February 9, and the third around February 20. Over 11% of messages were categorized as malicious because of the reputation of the network (autonomous system) that they were sent from; some network providers are well-known sources of malicious and unwanted email.
Dangerous domains
Top-level domains, also known as TLDs, are found in the right-most portion of a hostname. For example, radar.cloudflare.com is in the .comgeneric Top Level Domain (gTLD), while bbc.co.uk is in the .ukcountry code Top Level Domain (ccTLD). As of February 2024, there are nearly 1600 Top Level Domains listed in the IANA Root Zone Database. Over the last 15 years or so, several reports have been published that look at the “most dangerous TLDs” — that is, which TLDs are most favored by threat actors. The “top” TLDs in these reports are often a mix of ccTLDs from smaller counties and newer gTLDs. On Radar, we are now sharing our own perspective on these dangerous TLDs, highlighting those where we have observed the largest shares of malicious and spam emails. The analysis is based on the sending domain’s TLD, found in the From: header of an email message. For example, if a message came from [email protected], then example.com is the sending domain, and .com is the associated TLD.
On Radar, users can view shares of spam and malicious email, and can also filter by timeframe and “type” of TLD, with options to view all (the complete list), ccTLDs (country codes), or “classic” TLDs (the original set of gTLDs specified in RFC 1591). Note that spam percentages shown here may be lower than those published in other industry analyses. Cloudflare cloud email security customers may be performing initial spam filtering before messages arrive at Cloudflare for processing, resulting in a lower percentage of messages characterized as spam by Cloudflare.
Looking back across February 2024, we found that new gTLD associates and the ccTLD zw (Zimbabwe) were the TLDs with domains originating the largest shares of malicious email, at over 85% each. New TLDs academy, directory, and bar had the largest shares of spam in email sent by associated domains, at upwards of 95%.
TLDs with the highest percentage of malicious email in February 2024TLDs with the highest percentage of spam email in February 2024
The figure below breaks out ccTLDs, where we found that at least half of the messages coming from domains in zw (Zimbabwe, at 85%) and bd (Bangladesh, at 50%) were classified as malicious. While the share of malicious email vastly outweighed the share of spam seen from zw domains, it was much more balanced in bd and pw (Palau). A total of 80 ccTLDs saw fewer than 1% of messages classified as malicious in February 2024.
ccTLDs with the highest percentage of malicious email in February 2024
Among the “classic” TLDs, we can see that the shares of both malicious emails and spam are relatively low. Perhaps unsurprisingly, as the largest TLD, com has the largest shares of both in February 2024. Given the restrictions around registering int and gov domains, it is interesting to see that even 2% of the messages from associated domains are classified as malicious.
Classic TLDs with the highest percentage of malicious email in February 2024.
The reasons that some TLDs are responsible for a greater share of malicious and/or spam email vary — some may have loose or non-existent registration requirements, some may be more friendly to so-called “domain tasting”, and some may have particularly low domain registration fees.The malicious and spam summary shares per TLD are available through the Radar API.
Sender Policy Framework (SPF) is a way for a domain to list all the servers they send emails from, with SPF records in the DNS listing the IP addresses of all the servers that are allowed to send emails from the domain. Mail servers that receive an email message can check it against the SPF record before passing it on to the recipient’s inbox. DomainKeys Identified Mail (DKIM) enables domain owners to automatically “sign” emails from their domain with a digital “signature” that uses cryptography to mathematically verify that the email came from the domain. Domain-based Message Authentication Reporting and Conformance (DMARC) tells a receiving email server what to do, given the results after checking SPF and DKIM. A domain’s DMARC policy, stored in DMARC records, can be set in a variety of ways, instructing mail servers to quarantine emails that fail SPF or DKIM (or both), to reject such emails, or to deliver them.
These authentication methods have recently taken on increased importance, as both Google and Yahoo! have announced that during the first quarter of 2024, as part of a more aggressive effort to reduce spam, they will require bulk senders to follow best practices that include implementing stronger email authentication using standards like SPF, DKIM, and DMARC. When a given email message is evaluated against these three methods, the potential outcomes are PASS, FAIL, and NONE. The first two are self-explanatory, while NONE means that there was no associated SPF/DKIM/DMARC policy associated with the message’s sending domain.
Reviewing the average shares across February 2024, we find that over 93% of messages passed SPF authentication, while just 2.7% failed. When considering this metric, FAIL is the outcome of greater interest because SPF is easier to spoof than DKIM, and also because failure may be driven by “shadow IT” situations, such as when a company’s Marketing department uses a third party to send email on behalf of the company, but fails to add that third party to the associated SPF records. An average of 88.5% of messages passed DKIM evaluation in February, while just 2.1% failed. For DKIM, the focus should be on PASS, as there are potential non-malicious reasons that a given signature may fail to verify. For DMARC, 86.5% of messages passed authentication, while 4.2% failed, and the combination of PASS and FAIL is the focus, as the presence of an associated policy is of greatest interest for this metric, and whether the message passed or failed less so. For all three methods in this section, NONE indicates the lack of an associated policy. SPF (summary, time series), DKIM (summary, time series), and DMARC (summary, time series) data is available through the Radar API.
Protocol usage
Cloudflare has long evangelized IPv6 adoption, although it has largely been focused on making Web resources available via this not-so-new version of the protocol. However, it’s also important that other Internet services begin to support and use IPv6, and this is an area where our recent research shows that providers may be lacking.
Through analysis of inbound connections from senders’ mail servers to Cloudflare’s email servers, we can gain insight into the distribution of these connections across IPv4 and IPv6. Looking at this distribution for February 2024, we find that 95% of connections were made over IPv4, while only 5% used IPv6. This distribution is in sharp contrast to the share of IPv6 requests for IPv6-capable (dual stacked) Web content, which was 37% for the same time period. The summary and time series data for IPv4/v6 distribution are available through the Radar API.
Cloudflare has also been a long-time advocate for secure connections, launching Universal SSL during 2014’s Birthday Week, to enable secure connections between end users and Cloudflare for all of our customers’ sites (which numbered ~2 million at the time). Over the last 10 years, SSL has completed its evolution to TLS, and although many think of TLS as only being relevant for Web content, possibly due to years of being told to look for the 🔒 padlock in our browser’s address bar, TLS is also used to encrypt client/server connections across other protocols including SMTP (email), FTP (file transfer), and XMPP (messaging).
Similar to the IPv4/v6 analysis discussed above, we can also calculate the share of inbound connections to Cloudflare’s email servers that are using TLS. Messages are encrypted in transit when the connection is made over TLS, while messages sent over unencrypted connections can potentially be read or modified in transit. Fortunately, the vast majority of messages received by Cloudflare’s email servers are made over encrypted connections, with just 6% sent unencrypted during February 2024. The summary and time series data for TLS usage are available through the Radar API.
Conclusion
Although younger Internet users may eschew email in favor of communicating through a variety of messaging apps, email remains an absolutely essential Internet service, relied on by individuals, enterprises, online and offline retailers, governments, and more. However, because email is so ubiquitous, important, and inexpensive, it has also become an attractive threat vector. Cloudflare’s email routing and security services help customers manage and secure their email, and Cloudflare Radar’s new Email Security section can help security researchers, email administrators, and other interested parties understand the latest trends around threats found in malicious email, sources of spam and malicious email, and the adoption of technologies designed to prevent abuse of email.
As the last school bell rings before winter break, one thing school districts should keep in mind is that during the winter break, schools can become particularly vulnerable to cyberattacks as the reduced staff presence and extended downtime create an environment conducive to security lapses. Criminal actors make their move when organizations are most vulnerable: on weekends and holiday breaks. With fewer personnel on-site, routine monitoring and response to potential threats may be delayed, providing cybercriminals with a window of opportunity. Schools store sensitive student and staff data, including personally identifiable information, financial records, and confidential academic information, and therefore consequences of a successful cyberattack can be severe. It is imperative that educational institutions implement robust cybersecurity measures to safeguard their digital infrastructure.
If you are a small public school district in the United States, Project Cybersafe Schools is here to help. Don’t let the Cyber Grinch ruin your winter break.
The response from school districts across the United States exceeded our expectations. We have had inquiries from over 200 school districts in over 30 states and Guam. Over the past few months, we have onboarded dozens of qualifying school districts into the program. As a result, over 60,000 students, teachers, and staff are protected by Cloudflare’s cloud email security to protect against a broad spectrum of threats including Business Email Compromise, multichannel phishing, credential harvesting, and other targeted attacks. These school districts are also receiving protection against Internet threats with DNS filtering by preventing users from reaching unwanted or harmful online content like ransomware or phishing sites. There are more than 9,000 small public school districts across the United States with fewer than 2,500 students. All of those school districts are eligible for Project Cybersafe Schools (for free, and with no time limit — see below for all the details), and we want to help as many as possible.
Since we launched the program, the White House has continued to amplify awareness around the risks for schools as well as the opportunities school districts have to protect themselves. Cloudflare hosted a series of live onboarding sessions at the start of the program and also created a Cybersafe School Resource Hub for school districts to learn more about the program and submit an inquiry.
What our participants are saying about the program
Here’s what a few Project Cybersafe Schools have to say about the impact of the program on small school districts.
“Project Cybersafe Schools has been incredibly helpful, especially for school districts with smaller enrollments, to provide resources, tools and information that otherwise might be out of grasp. Often, these smaller districts have individuals with many responsibilities and cybersecurity may not always be at the forefront. The tools Cloudflare offers as part of the White House focus to strengthen Cybersecurity across the K-12 spectrum allow us greater visibility into the threats experienced through E-Mail as well as protect our devices by layering DNS-based filtering on top of our existing environment to protect against threats that may come through via ransomware or phishing sites. Being able to leverage multiple layers of security helps us be more robust in protecting our student and teacher devices and ensure our learning environment is successful, safe and productive in the current digital landscape.” – Randy Saeks, Network Manager, Glencoe School District 35, Glencoe, Illinois
“Quitman School District was excited to add another layer of security for our staff and students with Cloudflare Project Cybersafe Schools. Living in a low income, rural community, we were grateful for the opportunity to add a world-class free service to our school’s network architecture. Partnering with Cloudflare allowed us to continue to modernize and strengthen our security measures and protect our staff and students from a wide variety of threats. This implementation was quick and easy, and we were ecstatic that there was no expiration date for this service. We were amazed to see that Cloudflare caught nearly 4,000 malicious emails in the first month of implementation! We are confident that Cloudflare will continue to keep our district and infrastructure safe from harmful threats.” – Matt Champion, Technology Coordinator, Quitman School District, Quitman, Mississippi
What Zero Trust services are available?
Eligible K-12 public school districts in the United States will have access to a package of enterprise-level Zero Trust cybersecurity services for free and with no time limit – there is no catch and no underlying obligations. Eligible organizations will benefit from:
Email Protection: Safeguards inboxes with cloud email security by protecting against a broad spectrum of threats including malware-less Business Email Compromise, multichannel phishing, credential harvesting, and other targeted attacks.
DNS Filtering: Protects against Internet threats with DNS filtering by preventing users from reaching unwanted or harmful online content like ransomware or phishing sites and can be deployed to comply with the Children’s Internet Protection Act (CIPA).
Who can apply?
To be eligible, Project Cybersafe Schools participants must be:
K-12 public school districts located in the United States
For schools or school districts that do not qualify for Project Cybersafe Schools, Cloudflare has other packages available with educational pricing. If you do not qualify for Project Cybersafe Schools, but are interested in our educational services, please contact us at [email protected].
Like other under-resourced organizations, schools face cyber attacks from malicious actors that can impact their ability to safely perform their basic function: teach children. Schools face email, phishing, and ransomware attacks that slow access and threaten leaks of confidential student data. And these attacks have real effects. In a report issued at the end of 2022, the U.S. Government Accountability Office concluded that schools serving kindergarten through 12th grade (K-12) reported significant educational impact and monetary loss due to cybersecurity incidents, such as ransomware attacks. Recovery time can extend from 2 all the way up to 9 months — that’s almost an entire school year.
Cloudflare’s mission is to help build a better Internet, and we have always believed in helping protect those who might otherwise not have the resources to protect themselves from cyberattack.
It is against this backdrop that we’re very excited to introduce an initiative aimed at small K-12 public school districts: Project Cybersafe Schools. Announced as part of the Back to School Safely: K-12 Cybersecurity Summit at the White House on August 8, 2023, Project Cybersafe Schools will support eligible K-12 public school districts with a package of Zero Trust cybersecurity solutions — for free, and with no time limit. These tools will help eligible school districts minimize their exposure to common cyber threats.
Schools are prime targets for cyberattacks
In Q2 2023 alone, Cloudflare blocked an average of 70 million cyber threats each day targeting the U.S. education sector, and saw a 47% increase in DDoS attacks quarter-over-quarter. In September 2022, the Los Angeles Unified School District suffered a cyber attack, and the perpetrators later posted students’ private information on the dark web. Then, in January 2022, the public school system in Albuquerque, New Mexico was forced to close down for two days following a cyber attack that compromised student data. The list goes on. Between 2016 and 2022, there were 1,619 publicly reported cybersecurity-related incidents aimed at K-12 public schools and districts in the United States.
As an alliance member of the Joint Cyber Defense Collaborative, Cloudflare began conversations with officials from the Cybersecurity & Infrastructure Security Agency (CISA), the Department of Education, and the White House about how we could partner to protect K-12 schools in the United States from cyber threats. We think that we are particularly well-suited to help protect K-12 schools against cyber attacks. For almost a decade, Cloudflare has supported organizations that are particularly vulnerable to cyber threats and lack the resources to protect themselves through projects like Project Galileo, the Athenian Project, the Critical Infrastructure Defense Project, and Project Safekeeping.
Unlike many colleges, universities, and even some larger school districts, smaller school districts often lack the capacity to manage cyber threats. The lack of funding and staff make schools prime targets for hackers. These attacks prevent students from learning, put students’ personal information at risk, and cost school districts time and money in the aftermath of the attacks.
Project Cybersafe Schools: protecting the smallest K-12 public school districts
Project Cybersafe Schools will help support small K-12 public school districts by providing cloud email security to protect against a broad spectrum of threats including Business Email Compromise, multichannel phishing, credential harvesting, and other targeted attacks. Project Cybersafe Schools will also protect against Internet threats with DNS filtering by preventing users from reaching unwanted or harmful online content like ransomware or phishing sites. It can also be deployed to comply with the Children’s Internet Protection Act (CIPA), which Congress passed in 2000, to address concerns about children’s access to obscene or harmful content on the Internet.
We believe that Cloudflare can make a meaningful impact on the cybersecurity needs of our small school districts, which allows the schools to focus on what they do best: teaching students. Hopefully, this project will bring privacy, security, and peace of mind to school managers, staff, teachers, and students, allowing them to focus solely on teaching and learning fearlessly.
What Zero Trust services are available?
Eligible K-12 public school districts in the United States will have access to a package of enterprise-level Zero Trust cybersecurity services for free and with no time limit – there is no catch and no underlying obligations. Eligible organizations will benefit from:
Email Protection: Safeguards inboxes with cloud email security by protecting against a broad spectrum of threats including malware-less Business Email Compromise, multichannel phishing, credential harvesting, and other targeted attacks.
DNS Filtering: Protects against Internet threats with DNS filtering by preventing users from reaching unwanted or harmful online content like ransomware or phishing sites and can be deployed to comply with the Children’s Internet Protection Act (CIPA).
Who can apply?
To be eligible, Project Cybersafe Schools participants must be:
K-12 public school districts located in the United States
For schools or school districts that do not qualify for Project Cybersafe Schools, Cloudflare has other packages available with educational pricing. If you do not qualify for Project Cybersafe Schools, but are interested in our educational services, please contact us at [email protected].
This is part two of the two-part guest series on extending Simple Email Services with advanced functionality. Find part one here.
quirion, founded in 2013, is an award-winning German robo-advisor with more than 1 billion Euro under management. At quirion, we send out five thousand emails a day to more than 60,000 customers.
Managing many email templates can be challenging
We chose Amazon Simple Email Service (SES) because it is an easy-to-use and cost-effective email platform. In particular, we benefit from email templates in SES, which ensure a consistent look and feel of our communication. These templates come with a styled and personalized HTML email body, perfect for transactional emails. However, managing many email templates can be challenging. Several templates share common elements, such as the company’s logo, name or imprint. Over time, some of these elements may change. If they are not updated across all templates, the result is an inconsistent set of templates. To overcome this problem, we created an application to extend the SES template functionality with an interface for creating and managing nested templates.
Solution: compose email from nested templates using AWS Lambda
The solution we built is fully serverless, which means we do not have to manage the underlying infrastructure. We use AWS Cloud Development Kit (AWS CDK) to deploy the architecture.
The figure below describes the architecture diagram for the proposed solution.
The entry point to the application is an API Gateway that routes requests to a Lambda function. A request consists of an HTML file that represents a part of an email template and metadata that describes the structure of the template.
The Lambda function is the key component of the application. It takes the HTML file and the metadata and stores them in a S3 Bucket and a DynamoDB table.
Depending on the metadata, it takes an existing template from storage, inserts the HTML from the request into it and creates a SES email template.
The solution is simplified for this blog post and is used to show the possibilities of SES. We will not discuss the code of the Lambda function as there are several ways to implement it depending on your preferred programming language.
Prerequisites
An AWS Account that provides access to AWS services.
An Amazon Simple Email Service (Amazon SES) verified identity. You can create and verify a sending identity by following the steps described in the documentation.
Step 1: Use the AWS CDK to deploy the application To download and deploy the application run the following commands:
$ git clone https://github.com/quirionit/aws-ses-examples.git
$ cd aws-ses-examples/projects/go-src
$ go mod tidy
$ cd ../../projects/template-api
$ npm install
$ cdk deploy
Step 2: Create nested email templates
To create a nested email template, complete the following steps:
On the AWS Console, choose the API Gateway.
You should see an API with a name that includes SesTemplateApi.
Click on the name and note the Invoke URL from the details page.
In your terminal, navigate to aws-ses-examples/projects/template-api/files and run the following command. Note that you must use your gateway’s Invoke URL.
The request triggers the Lambda function, which creates a template in DynamoDB and S3. In addition, the Lambda function uses the properties of the request to decide when and how to create a template in SES. With “isWrapper=true” the template is marked as a template that wraps another template and therefore no template is created in SES. “child=content” specifies the entry point for the child template that is used within m-full.html. It also uses FIRSTNAME and LASTNAME as replacement tags for personalization.
In your terminal, run the following command to create a SES email template that uses the template created in step 4 as a wrapper.
Step 3: Analyze the result
On the AWS Console, choose DynamoDB.
From the sidebar, choose Tables.
Select the table with the name that includes SesTemplateTable.
Choose Explore table items. It should now return two new items. The table stores the metadata that describes how to create a SES email template. Creating an email template in SES is initiated when an element’s Child attribute is empty or null. This is the case for the item with the name order-confirmation. It uses the BucketKey attribute to identify the required HTML stored in S3 and the Parent attribute to determine the metadata from the parent template. The Variables attribute is used to describe the placeholders that are used in the template.
On the AWS Console, choose S3.
Select the bucket with the name that starts with ses-email-templates.
Select the template/ folder. It should return two objects. The m-full.html contains the structure and the design of an email template and is used with the order-confirmation.html which contains the content.
On the AWS Console, choose the Amazon Simple Email Service.
From the sidebar, choose Email templates. It should return the following template.
Step 4: Send an email with the created template
Open the send-order-confirmation.json file from aws-ses-examples/projects/template-api/files in a text editor.
Set a verified email address as Source and ToAddresses and save the file.
Navigate your terminal to aws-ses-examples/projects/template-api/files and run the following command: aws ses send-templated-email --cli-input-json file://send-order-confirmation.json
As a result, you should get an email.
Step 5: Cleaning up
Navigate your terminal to aws-ses-examples/projects/template-api.
Delete all resources with cdk destroy.
Delete the created SES email template with: aws ses delete-template --template-name order-confirmation
Next Steps
There are several ways to extend this solution’s functionality, including the ones below:
If you send an email that contains invalid personalization content, Amazon SES might accept the message, but won’t be able to deliver it. For this reason, if you plan to send personalized email, you should configure Amazon SES to send Rendering Failure event notifications.
The Amazon SES template feature does not support sending attachments, but you can add the functionality yourself. See part one of this blog series for instructions.
When you create a new Amazon SES account, by default your emails are sent from IP addresses that are shared with other SES users. You can also use dedicated IP addresses that are reserved for your exclusive use. This gives you complete control over your sender reputation and enables you to isolate your reputation for different segments within email programs.
Conclusion
In this blog post, we explored how to use Amazon SES with email templates to easily create complex transactional emails. The AWS CLI was used to trigger SES to send an email, but that could easily be replaced by other AWS services like Step Functions. This solution as a whole is a fully serverless architecture where we don’t have to manage the underlying infrastructure. We used the AWS CDK to deploy a predefined architecture and analyzed the deployed resources.
About the authors
Mark Kirchner is a backend engineer at quirion AG. He uses AWS CDK and several AWS services to provide a cloud backend for a web application used for financial services. He follows a full serverless approach and enjoys resolving problems with AWS.
Dominik Richter is a Solutions Architect at Amazon Web Services. He primarily works with financial services customers in Germany and particularly enjoys Serverless technology, which he also uses for his own mobile apps.
The content and opinions in this post are those of the third-party author and AWS is not responsible for the content or accuracy of this post.
The collective thoughts of the interwebz
Manage Consent
To provide the best experiences, we use technologies like cookies to store and/or access device information. Consenting to these technologies will allow us to process data such as browsing behavior or unique IDs on this site. Not consenting or withdrawing consent, may adversely affect certain features and functions.
Functional
Always active
The technical storage or access is strictly necessary for the legitimate purpose of enabling the use of a specific service explicitly requested by the subscriber or user, or for the sole purpose of carrying out the transmission of a communication over an electronic communications network.
Preferences
The technical storage or access is necessary for the legitimate purpose of storing preferences that are not requested by the subscriber or user.
Statistics
The technical storage or access that is used exclusively for statistical purposes.The technical storage or access that is used exclusively for anonymous statistical purposes. Without a subpoena, voluntary compliance on the part of your Internet Service Provider, or additional records from a third party, information stored or retrieved for this purpose alone cannot usually be used to identify you.
Marketing
The technical storage or access is required to create user profiles to send advertising, or to track the user on a website or across several websites for similar marketing purposes.


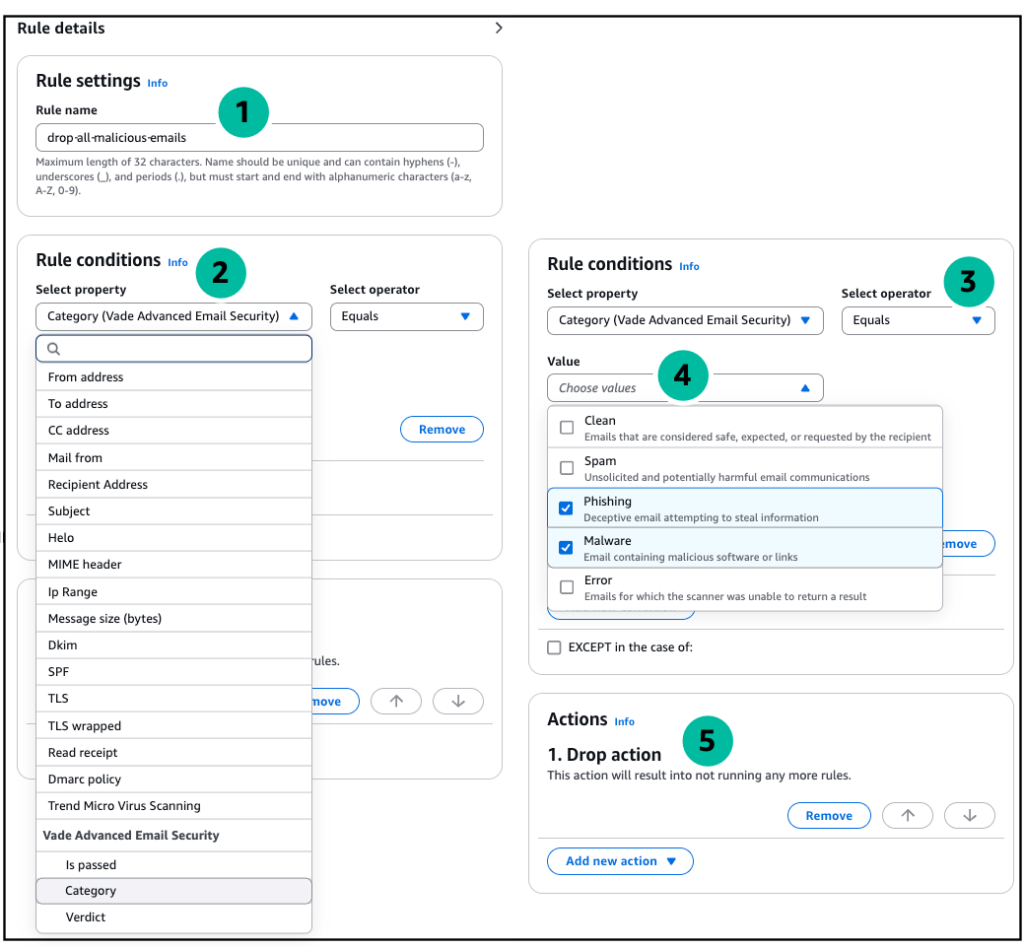


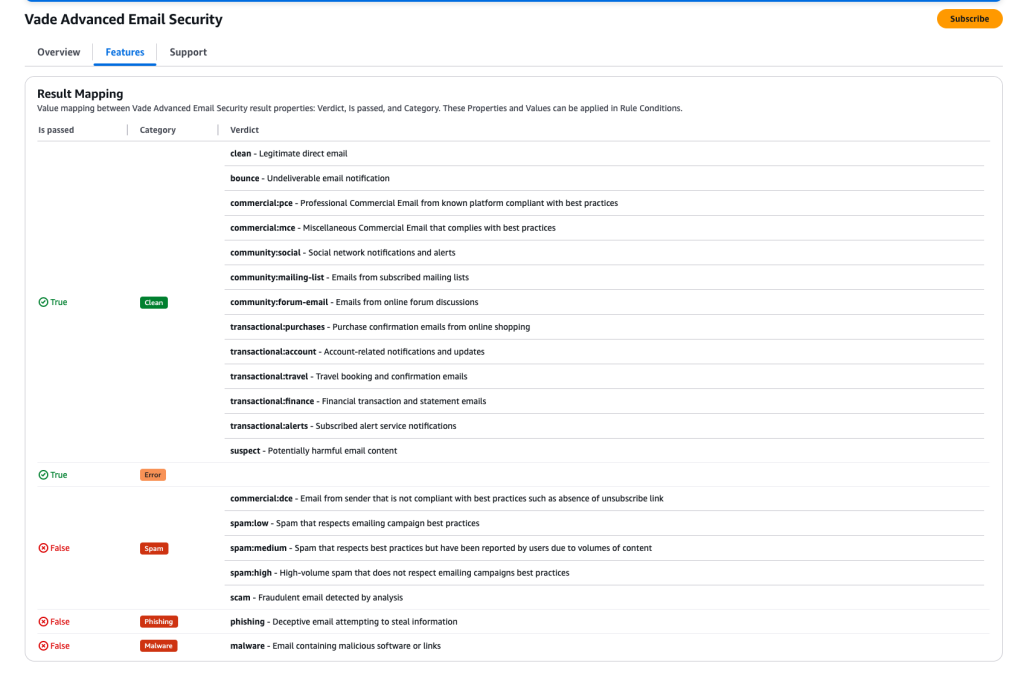


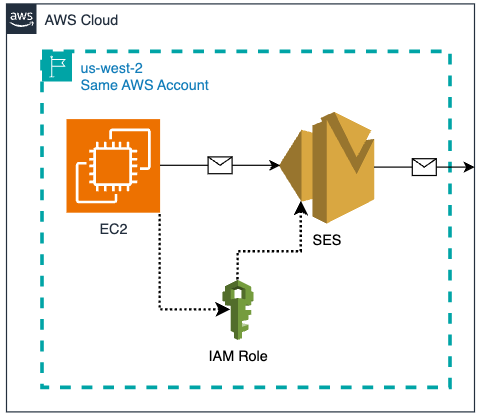


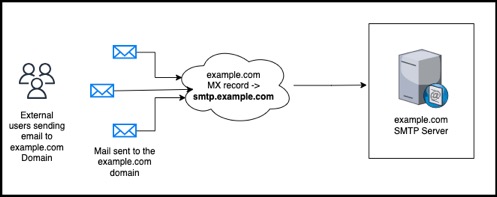
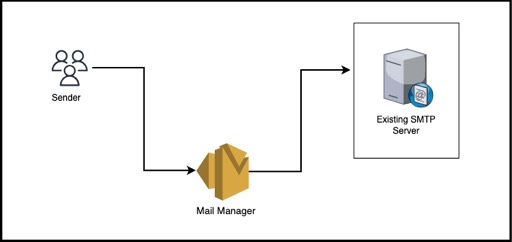


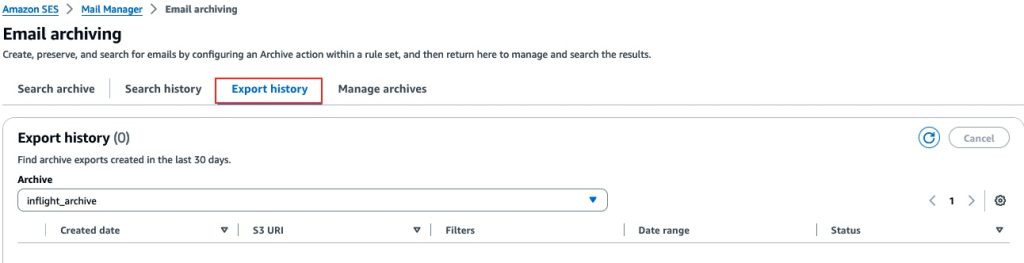
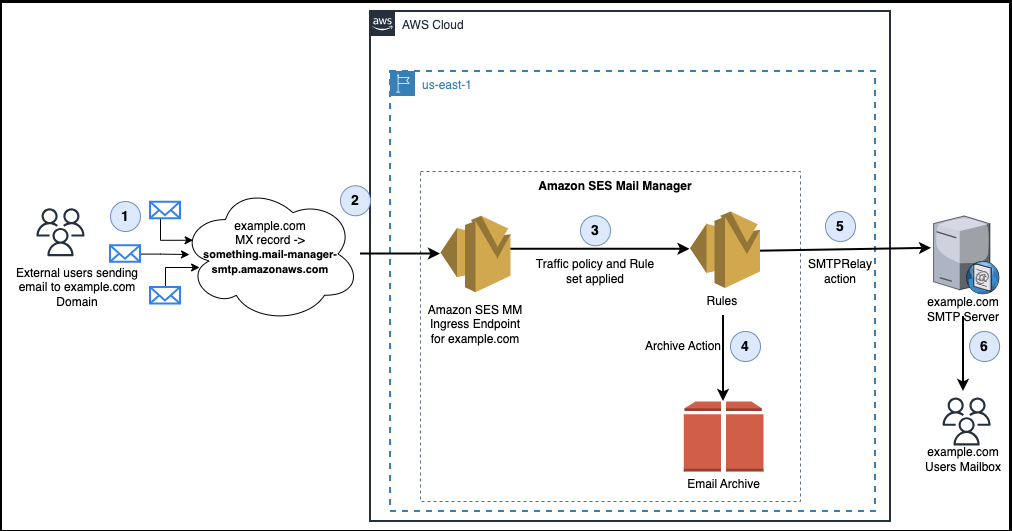


 Navigate to Amazon SES > Mail Manager > Ingress endpoint, select the ingress endpoint named Archiving and copy the ARecord, which looks like this <unique-id>.fips.wmjb.mail-manager-smtp.amazonaws.com – see screenshot below. Add this value to your MX record.