Tag Archives: SES

Use AI agents and the Model Context Protocol with Amazon SES

Post Syndicated from Zip Zieper original https://aws.amazon.com/blogs/messaging-and-targeting/use-ai-agents-and-the-model-context-protocol-with-amazon-ses/

Amazon Simple Email Service (Amazon SES) delivers a cloud-based email solution that empowers businesses to send emails more efficiently and at a larger scale. Its powerful, scalable platform enables organizations from startups to global brands to send personalized, high-volume email communications while maintaining exceptional deliverability and performance.

Amazon SES caters to a wide range of users, from developers and technical marketing professionals to business communicators. In addition to offering robust programmatic access through APIs and SMTP protocols, Amazon SES provides a comprehensive web console and intuitive dashboards that make email configuration and performance monitoring accessible to users with varying technical backgrounds. Historically, navigating email workflows and configuring advanced email capabilities in Amazon SES has required specialized knowledge, resulting in a learning curve for new users. As seen in many other areas, today’s AI tools can offer more intuitive ways to manage Amazon SES to get the most out of your email communications. We have found, however, that these AI tools occasionally produce inconsistent results, often as a result of the underlying large language model’s (LLM’s) training data.

Recognizing the need for a specialized, service-aware, AI-friendly Amazon SES solution, we are introducing the SESv2 MCP Server, a sample Model Context Protocol (MCP) for Amazon SES. We’ve integrated the SESv2 MCP Server sample with the Amazon SES v2 APIs to provide more precise and reliable AI-assisted use, management, and configuration for Amazon SES.

MCP is an open protocol that enables seamless integration between your AI-powered integrated development environment (IDE) or AI assistant, enriching the capabilities of the AI and enabling you to use Amazon SES using natural language. For more info, see the GitHub repo.

We’ve released the SESv2 MCP Server sample on GitHub and invite current and prospective customers to experiment with it in non-production environments. You can use it with your AI tools to explore ways in which AI can be used with Amazon SES to send emails, check configurations, and review deliverability. We’re interested in learning how you use your AI tools and the SESv2 MCP Server to test out email sending in different services or applications. We’re also curious if new customers find it helpful when configuring and learning about their Amazon SES service. No matter how you use it, we are eager for your feedback, comments, and contributions through the GitHub project’s issues.

Solution overview

You can use the SESv2 MCP Server sample with AI assistant applications like Anthropic’s Claude Desktop. You can also integrate it into MCP-compatible agentic AI coding assistants such as Amazon Q Developer, Amazon Q for command line, Cline, Cursor, and Windsurf. When used as an AI coding assistant, the SESv2 MCP Server sample helps developers add Amazon SES email capabilities to their applications and services using plain, natural language prompting. For recommendations from AWS on how to improve your vibe coding experience, refer to Vibe coding tips and tricks.

After you’ve configured the sample and authenticated with your AWS credentials, you can use natural language in your chosen AI tool. For example, an email marketing manager might want to ask Anthropic’s Claude Desktop “provide me with the status of the verified identities in my SES account, along with any recommendations to improve deliverability.” Someone new to Amazon SES can ask the Amazon Q CLI “create a new Amazon SES configuration set for the octank.com identity, enable it for event publishing for bounces and complaints.” Similarly, the developer of an AI-enabled restaurant booking application might ask the Amazon Q CLI “my application needs to send email confirmation of a customers online booking. Can you walk me thru adding this capability to my app using my SES account?”

As you can see from these examples, although it’s helpful to know a bit about email, and Amazon SES in general, with the help of your AI tool and the SESv2 MCP Server sample, you don’t need to be an email or Amazon SES expert. The combination of your creativity, AI tool, and the SESv2 MCP Server sample empowers even non-developers to create, test, and monitor Amazon SES workflows using natural language.

The SESv2 MCP Server sample release uses the open source Smithy Java project, which is still in development. As such, the SESv2 MCP Server is considered a sample, and we do not recommend employing it for production use. When a stable version is available, we might update this post and the GitHub repository accordingly.

Prerequisites

To follow along with the example use cases, make sure you have the following prerequisites set up:

  • AWS credentials with appropriate permissions.
  • An MCP-compatible LLM client (such as Anthropic’s Claude Desktop, Cline, Amazon Q CLI, or Cursor). For this post, we use the Amazon Q Developer CLI. For installation instructions, refer to Installing Amazon Q for command line.
  • Java 21 (or later) runtime (as required by Smithy Java).
  • Access to GitHub.
  • Git installed locally. For instructions, see Getting Started – Installing Git.

Best practices for using MCPs

To maximize the benefits of MCP-assisted development while maintaining security and code quality, we suggest you follow these essential guidelines:

  • Always review generated code for security implications before deployment
  • Use MCP servers as accelerators, not replacements for developer judgment and expertise
  • Keep MCP servers updated with the latest AWS security best practices
  • Follow the principle of least privilege when configuring AWS credentials
  • Run security scanning tools on generated infrastructure code

Configure the AWS CLI

Use the following command to configure the AWS Command Line Interface (AWS CLI) with the AWS credentials for your Amazon SES account and AWS Region:

aws configure

Clone and build the GitHub repository locally

To use macOS or Linux, use the following command to clone and build the GitHub repo:

git clone https://github.com/aws-samples/sample-for-amazon-ses-mcp.git
cd sample-for-amazon-ses-mcp
./build.sh

For Windows, use the following command:

git clone https://github.com/aws-samples/sample-for-amazon-ses-mcp.git
cd sample-for-amazon-ses-mcp
.\build.bat

Copy the absolute path to the .jar file (JAR_PATH_FROM_BUILD_OUTPUT). This will be printed at the end of the build script:

/<your path>/sample-for-amazon-ses-mcp/artifacts/sample-for-amazon-ses-mcp-all.jar

Configure your AI tool to use SESv2 MCP Server

When the build is complete, add SESv2 MCP Server to your AI tool’s MCP configuration:

{
  "mcpServers": {
    "sesv2-mcp-server": {
      "command": "java",
      "args": [
        "-jar",
        "JAR_PATH_FROM_BUILD_OUTPUT"
      ]
    }
  }
}

See MCP configuration for configuration steps. See the Claude Desktop MCP configuration guide for setup instructions.

After you build the SESv2 MCP Server and configure your AWS credentials, you’re ready to interact with Amazon SES. Keep in mind that effective, thoughtful prompting is crucial for successful AI-assisted development. For more information about vibe coding, see Vibe coding tips and tricks.

Example use cases

In this section, we provide some guided examples using the Amazon Q Developer CLI to interact with Amazon SES. Feel free to experiment on your own use cases, and share your comments and ideas through the GitHub project’s issues. Do not disclose any personal, commercially sensitive, or confidential information.

Get information, recommendations, and configurations your Amazon SES account

Open your AI tool; for these examples, we use a macOS terminal and initiate a chat session with the Amazon Q CLI:

q chat

We’ve found it useful to provide your AI tool with some guidance:

You're connected to the SESv2 MCP Server and have access to the AWS SESv2 APIs.

Ask the Amazon Q CLI about your AWS account’s SES email identities:

Tell me about the identities in my account, and also if the account is in the SES sandbox?

The Amazon Q CLI will request permission to use the SESv2 MCP Server (which provides the Amazon Q CLI with the SESv2 APIs ListEmailIdentities and GetAccount) to query your AWS SES account and reply with a detailed summary.

Ask the Amazon Q CLI if it has any recommendations related to improving deliverability for your Amazon SES account:

Do you have any recommendations to improve email deliverability for my SES account?

The Amazon Q CLI will use the SESv2 MCP Server (which provides the CLI with the SESv2 API ListRecommendations) to query your Amazon SES account and reply with a detailed summary.

Ask the Amazon Q CLI to set up Amazon SES click tracking for one of your domains. We have found it helpful to remind the CLI that it has access to additional knowledge of the AWS service APIs. It’s also a good idea to make sure the AI tool doesn’t invent nonexistent APIs.

You also have access to other AWS service APIs via the AWS CLI and your general knowledge, but you may only use known, documented APIs - do not invent or create any APIs or commands.
Set up Amazon SES click tracking with CloudWatch integration for the domain <my verified identity> to monitor email metrics. Use Amazon's default tracking domain (no SSL or https) for the click tracking to ensure immediate functionality without requiring custom domain setup. Include all necessary configuration steps and verify the setup works correctly. Create a test HTML email to <my email address> from <no-reply@verified domain> with subject "Testing SES click tracking". Create an HTML (with fallback to text) body with links and short descriptions taken from the public AWS webpages for Amazon SES, AWS End User Messaging and Amazon Connect. 

Send emails with your Amazon SES account

Using its knowledge of Amazon SES from the SESv2 MCP Server and permissions to use your Amazon SES account (aws configure), you can use your AI tool to create and send emails using Amazon SES.

If your Amazon SES account is in the Amazon SES sandbox, you are limited to sending and receiving email from verified email addresses. You are also limited to 200 messages in 24 hours. For more information about the Amazon SES sandbox, see Request production access (Moving out of the Amazon SES sandbox). If you’re in the sandbox, you can simply ask your AI tool “verify my email address <[email protected]>.”

Ask the Amazon Q CLI to send a test email with a sample HTML body:

Send a test email to <my verified email address> from <verified SES email identity>. Set the from email display name to "MCP testing". Make the email subject "Test sending an email via SES MCP". Use the information found on the Amazon SES website to create an HTML message body with a few sentences and bullet points about SES. Provide a text version of the message body in case of fallback.

Check your email, where you will receive a response.

You can get creative and ask the Amazon Q CLI to create a formatted email template with personalization using a simple table with email recipients, the product they bought, and their postal code:

Use the table below to send each person in the table an html formatted (with fallback) email message. 
-- table --
email,name,product,zipcode
<my verified email address>,Alice,an umbrella,98101
<my verified email address>,Bob,lots of sunscreen,10001
-- end table --
Use the template below. Create a 5-day weather forecast graphic similar to popular weather app graphics based on estimated weather for their ZIP code.
-- template --
"Hi {{name}}, thanks for buying {{product}}; it looks like you'll need it soon based on the 5-day weather forecast for your local area: <5-day weather forecast graphic>.

As we’ve demonstrated, you don’t need to be a seasoned developer to create and test Amazon SES workflows when you have an AI tool and the SESv2 MCP Server sample.

Conclusion

The SESv2 MCP Server sample democratizes the ability to configure, manage, and create sophisticated email automation workflows with Amazon SES.

The examples and guidance in this post demonstrate how even newcomers can use AI tools like the Amazon Q CLI to test out configuring, monitoring, and sending emails with Amazon SES using natural language. More technical users, including developers, can use the SESv2 MCP Server sample to build and test intelligent email applications that use Amazon SES, or to test out building Amazon SES sending into their own application.

We hope you will experiment with the SESv2 MCP Server sample and provide us with your thoughts and feedback, and perhaps contribute to the project through the GitHub project’s issues.

Additional resources

Navigate Bulk Sender Requirements with Amazon SES

Post Syndicated from Vinay Ujjini original https://aws.amazon.com/blogs/messaging-and-targeting/navigate-bulk-sender-requirements-with-amazon-ses/

Introduction

Email communication remains a critical component of business operations and customer engagement. As the digital landscape evolves, major mailbox providers continually update their policies to enhance security and user experience. This blog will explore the changes implemented by Microsoft for bulk senders trying to reach Outlook.com (supporting Hotmail.com, live.com consumer domain addresses). This follows the Google & Yahoo! bulk sender requirements changes in February of 2024. Microsoft is implementing the enforcement of sender requirements for bulk email senders, particularly those sending over 5,000 messages daily, starting May 5, 2025. These requirements focus on improving email authentication and trust. This will ensure Outlook and Hotmail recipients are receiving messages that are authenticated and from who they claim to be from. These measures will help reduce spoofing, phishing, and spam, and safeguarding individuals and businesses relying on email.

This blog will discuss what these changes mean for you, and how Amazon Simple Email Service (Amazon SES) can help you maintain compliance and optimize your email sending practices.

Background

In February 2024, Google and Yahoo implemented new requirements for bulk email senders, building upon industry efforts to combat spam and improve email deliverability. These changes aligned with Google’s 2024 bulk sender requirements initiative, signaling a unified approach among major mailbox providers to enhance the privacy and compliance in email.

What does this mean for customers and email senders?

What’s Changing?

Microsoft’s New Requirements

  1. DMARC enforcement with at least a p=none policy
  2. Sender domain authentication (SPF, DKIM)
  3. Functional unsubscribe links required in the email
  4. Requirement for From and Reply-to addresses to be deliverable

Why These Changes Matter?

These new requirements serve several crucial purposes:

  1. Enhances trust in your sending domain: Validates that the sender is who they are claiming to be. Enhances trust by delivering messages that are authenticated and aligned with the bulk sender requirements.
  2. Improved Deliverability: Ensuring legitimate emails reach the recipients who have subscribed to sender’s messages.
  3. User-Centric: Providing recipients with control over their inboxes.
  4. Industry Standardization: Aligning sender requirements across major email providers

Best Practices for Compliance

To adhere to these new requirements and optimize your email sending practices, consider the following best practices:

1. Implement Strong Authentication

  • Configure SPF: SPF (Sender Policy Framework) is an email authentication standard that’s designed to prevent email spoofing. Domain owners use SPF to tell email providers which servers are allowed to send email from their domains. Follow setup instructions to authenticate your email with SPF. Must pass SPF for sending domain.
    • Configure “custom MAIL FROM“, which is how senders can ensure that the SPF-authenticated domain is aligned with the From header domain’s DMARC policy.
  • Enable DKIM signing: DomainKeys Identified Mail (DKIM) is an email security standard. It is designed to ensure that an email that claims to have come from a specific domain, was indeed authorized by the owner of that domain. It uses public-key cryptography to sign an email with a private key. Recipient servers use a public key, published to a domain’s DNS to verify that parts of the email have not been modified during the transit. Follow these set up instructions to authenticate email with DKIM in SES. Must pass to validate email integrity and authenticity.
    • Verify your domain with Easy DKIM. If currently using email identities, you have to move to domain
    • If you utilize email identities only, you will default all authentication to amazonses.com. That will not align with your friendly from address which will not satisfy the bulk sender requirements. This means that when you send email to mailbox providers, your messages will be rejected because you do not have proper authentication on your emails. To satisfy the bulk sender requirements, you must use domain verified identities which ensure that you have ownership of or permission to use the sending domain. That will allow SES to sign the outgoing emails with a DKIM signature that aligns with the friendly from domain.
  • Set up DMARC with an appropriate policy: Domain-based Message Authentication, Reporting and Conformance (DMARC) is an email authentication protocol that uses SPF and DKIM to detect email spoofing and phishing. To comply with DMARC, messages must be authenticated through either SPF or DKIM. Ideally, when both are used with DMARC, you’ll be ensuring the highest level of protection possible for your email sending.
Name Type Value
_dmarc.example.com TXT “v=DMARC1;p=none;rua=mailto:[email protected]

In the preceding records:

    • example.com is your domain
    • Value of the TXT record contains the DMARC policy that applies to your domain.
    • In this example, the policy tells email providers to do the following:
      • At least p=none should be implemented.

2. Optimize Email Content

  • Clearly identify yourself as the sender: Use a recognizable “From” name and email address that accurately represents your brand or organization. For example, use “[email protected]” instead of a generic or misleading address.
  • Implement user friendly unsubscribe mechanisms: Include a visible, easy-to-use unsubscribe link in every email, typically in the header. Ensure the unsubscribe process is simple and honors requests promptly, ideally within 24-48 hours. Visit this guide on how Amazon SES helps you do that.
  • Subject line aligns with content: Avoid deceptive subject lines that don’t match the email content.
  • Clearly identify commercial content: If your email is promotional, make it obvious. Use clear language in the subject line and body that indicates the nature of the email, such as “Special Offer” or “Newsletter.”
  • Include a valid physical address: Add your company’s physical mailing address in the email footer. This is not only a legal requirement in many jurisdictions but builds trust with recipients.
  • Verify URLS in the emails: Verify that links in the emails you send work and are not misleading to the reader/subscriber. Be transparent with URLs/links in the email content.

3. Monitor and Maintain

  • Monitor bounces: A bounce typically indicates why a message was not delivered. The SMTP response in the bounce message will have details on why the message was bounced. For example: if it is missing authentication records (fix: include authentication records for the domain – quick fix) versus an IP or domain reputation bounce reason (this maybe a longer term fix).
    • Track both hard bounces (permanent delivery failures) and soft bounces (temporary issues). High bounce rates can indicate list quality problems or delivery issues. Visit this blog to set up notifications for bounces & complaints. Virtual Deliverability Manager (VDM) is an Amazon SES feature that helps you enhance email deliverability. It helps increasing inbox deliverability and email conversions, by providing insights into your sending and delivery data. VDM advices on how to fix the issues that are negatively affecting your delivery success rate and reputation.
  • Track complaint rates: Regularly monitor the number of spam complaints your emails receive with a goal of keeping the complaint rate under 0.2%. Not all mailbox providers have complaint feedback loop data, so use aggregate data from the mailbox providers that do, such as Hotmail and Yahoo. Email providers that don’t provide complaint feedback loops, such as Gmail may have alternative dashboards or tools available like Google Postmaster tools.
  • Perform regular authentication checks: Periodically verify that your SPF, DKIM, and DMARC records are correctly set up and functioning. Alternative to manual DNS checks, Amazon SES has a feature in Virtual Deliverability Manager that performs authentication checks for your sending identities.
  • Maintain list hygiene: Regularly clean your email list by removing inactive subscribers, correcting typos in email addresses, and honoring unsubscribe requests. This helps improve deliverability and engagement rates.

How Amazon SES Helps

Amazon SES provides a robust set of features to help you meet these new requirements and optimize your email sending practices:

Authentication Support

  • Easy DKIM configuration
  • SPF record management
  • DMARC implementation guidance

Comprehensive Monitoring

  • Virtual Deliverability Manager
  • Complaint tracking
  • Bounce rate monitoring
  • Event publishing to Amazon CloudWatch, SNS , Kinesis Firehose and Event Bridge
  • Detailed sending statistics

Compliance Tools

  • List management capabilities (included with SES)
  • Suppression list handling (included with SES)
  • Feedback loop processing (included with SES)
  • Authentication status tracking: This is done through Amazon SES feature Virtual Deliverability Manager (VDM).

Implementation Strategy

To successfully implement these changes, consider the following strategy:

  1. Assessment: Audit your current email practices, review authentication status, and evaluate compliance gaps.
  2. Technical Implementation: Configure authentication protocols, update DNS records, and implement required unsubscribe mechanisms.
  3. Monitoring and Optimization: Track deliverability metrics, monitor complaint rates, and adjust sending practices as needed.

Measuring Success

To ensure ongoing compliance and optimize your email practices, track these key metrics:

  1. Delivery rates
  2. Complaint rates
  3. Authentication pass rates
  4. Engagement metrics (open rates, click-through rates)

Conclusion

The new bulk sender requirements from Microsoft and Yahoo represent an important step towards a more secure and reliable email ecosystem. By leveraging Amazon SES’s powerful features and following industry best practices, you can maintain compliance, improve deliverability, and enhance the overall effectiveness of your email communications.

Amazon SES is committed to helping you navigate these changes and optimize your email sending practices. For the most up-to-date guidance and support, please consult SES’s documentation or contact Amazon SES support.

Additional Resources

The email landscape is constantly evolving. Stay informed and adaptable to ensure your email practices remain effective and compliant.

About the authors:

Automate the Creation & Rotation of Amazon Simple Email Service SMTP Credentials

Post Syndicated from Zip Zieper original https://aws.amazon.com/blogs/messaging-and-targeting/automate-the-creation-rotation-of-amazon-simple-email-service-smtp-credentials/

[Amazon Simple Email Service] provides a secure email solution that scales with your business needs. Unfortunately, all email systems, including Amazon SES, remain the primary target for spammers and bad actors due to email’s widespread use and accessibility.

While SES offers powerful features for application-based email sending, its SMTP credentials require careful management to prevent unauthorized access. Compromised credentials enable bad actors to send malicious emails through legitimate domains, which can bypass security filters and damage sender reputation.

To protect your SES implementation, you must encrypt SMTP credentials during storage and transmission. Additionally, implementing role-based access controls helps restrict credential access to authorized personnel only. Regular credential rotation at fixed intervals, typically every 90 days, minimizes potential security breaches. Automating this rotation process eliminates human error and ensures consistent security practices across your organization.

Problem Statement

Imagine you are the administrator for a large financial institution. You recently began using Amazon SES to send email from two dozen on-premises servers. Your email servers authenticate with SES using SMTP credentials to access the SES SMTP interface. Your organization’s security policies mandate regular credential rotation, including the ability to rotate them on-demand. How can you automate SMTP credential rotation such that you can meet your organization’s security policies?

This blog post will present two solutions that automate the secure management and automatic rotation of SMTP credentials for Amazon SES. Each will help enhance email security, comply with regulations, and minimize operational overhead.

Both solutions provide SES customers who use SMTP with additional tools to improve email security, ensure compliance, and reduce operational overhead. You can deploy the option that best suites your needs by following the guidance in this blog post.

If your environment supports automated rotation, AWS Systems Manager Documents (SSM Documents) can help by providing pre-defined or custom automation workflows for securely managing secrets rotation, deploy Option 1.

If your environment does not support automated rotation, you can still implement an auditable, managed rotation solution by storing your secrets in AWS Systems Manager Parameter Store by deploying Option 2.

As a pay-per-use platform, the underlying AWS services used in either deployment option will only charge you for the resources that you actually consume. You can leverage the AWS Pricing Calculator to estimate the run-time costs for your specific workload. Alternatively, you can work directly with your AWS account team to understand the pricing for these solutions.

Getting SES SMTP Credentials

To send emails through the Amazon SES SMTP interface, email servers must first authenticate with SES using dedicated SES SMTP credentials. Typically, a systems administrator logs into the AWS SES console, clicks the Create SMTP Credentials button, and navigates to the AWS Identity and Access Management] (IAM) console. There, the administrator creates an IAM user with permissions for SES. The administrator then uses the IAM user’s secret access key to generate the SES SMTP password, which they use to configure their email servers or SMTP-enabled applications for use with SES.

Multiple SMTP Credentials

The SES SMTP interface authenticates requests using an SMTP credential derived from an IAM user’s access key ID and secret access key. Since temporary access keys cannot be used to derive SES SMTP credentials, you must deploy and regularly rotate a long-lived key.

While the manual process of creating SES SMTP credentials works for a small number of credentials, it becomes cumbersome for customers with numerous email servers or strict password rotation policies. These customers may find the automated credential rotation mechanisms described in the following solutions better suited to their production needs.

Option 1 – Fully Automated Credential Rotation:

The fully automated version of this solution uses a custom Lambda function to create an SMTP password, which is stored in AWS Secrets Manager. AWS Secrets Manager’s built-in rotation feature then triggers the rotation of SES SMTP credentials. AWS Systems Manager Documents utilize AWS Systems Manager Agents to automatically make the changes to the authentication configuration on email servers.

The key advantages of using AWS Systems Manager to make the email server configuration changes include:

  • Ability to deploy changes to on-premises and Amazon EC2 hosts, allowing rotation of secrets across a hybrid estate.
    Customization of the document to specific email software configurations.
    Targeting the secret (SMTP credential) rotation document on all email servers based on tags.

Let’s dive deep into Option 1 – Fully Automated Credential Rotation.

Option 1 - Fully Automated Credential Rotation

How Option 1 works:

Refer to the image above for the workflow:

  1. AWS Secrets Manager initiates a rotation request, either on a schedule or via an authorized user’s request, triggering the “rotation Lambda” to rotate the SES SMTP credentials.
  2. The SES Secret Rotation Function Lambda (see figure x above):
    • a. Creates a new IAM secret access key for the designated SES IAM user, derives the new SES SMTP password, and stores it in AWS Secrets Manager.
    • b. Connects to SES to verify the new SMTP password can authenticate.
    • c. Initiates an AWS Systems Manager Run Command to update the new SMTP password on target email servers using a pre-configured Systems Manager Document.
    • d. (and e.) Monitors the status of the Systems Manager Document execution until all updates complete successfully
    • f. Deletes the old IAM access and secret access keys.

With this fully automated solution, SES SMTP credentials can be rotated on a schedule or triggered manually, with no impact to email service uptime.

Deploying the Fully Automated Solution in Your AWS Account (Option 1)

Prerequisites for the Fully Automated Solution

  1. AWS Account Access, typically with admin-level permission to allow for the deployment.
  2. Your preferred IDE with AWS CLI version 2 and named profile setup.
    • Alternatively, you can use the AWS CLI from the AWS CloudShell in your browser.
  3. Clone the Github repository (for this solution, you only need the README.md and sesautomaticrotation.yaml files found in /ses-credential-rotation/automatic-rotation).
    • git clone -b ses-credential-rotation https://github.com/aws-samples/serverless-mail.git
    • Note – We follow the principles of least privilege in this solution. The CloudFormation templates we’ve supplied require you to specify an identity, or configuration-set resource to use in the SES sending operation. You can find guidance on defining these values at Actions, resources, and condition keys for Amazon SES. Additionally, we’ve limited the IAM User to the ses:SendRawEmail action, which you can adjust as appropriate).
  4. Console access to your AWS SES account that is properly configured to send emails via at least one verified identity.
  5. Target email server(s) properly configured to send email via SES using SES SMTP authentication.
    • The AWS Systems Manager agent(s) must be correctly installed and configured on your target email server(s) as detailed in Setting up AWS Systems Manager.
    • The target email servers must be decorated with the tag (“SSMServerTag“) and value (“SSMServerTagValue“). These values allow the Systems Manager Document to identify them.
      • We use the tag “EmailServer” and the value “True” in our example, but you can use any tag and value that you wish).
  6. An email address (or list) to receive SMTP rotation notifications.
  7. Console access to your AWS Secrets Manager.
  8. Console access to your AWS Systems Manager.

Deployment Steps

  1. Clone the GitHub repository to your IDE
    • If using AWS CloudShell, ensure you are in the same region as your AWS Systems and Secrets Manager
    • run: git clone https://github.com/aws-samples/serverless-mail.git
    • Navigate to the directory ses-credential-rotation/automatic-rotation
  2. Follow the steps in README.md to
    • Create a S3 bucket to deploy the CloudFormation Template.
    • Package the Lambda functions and upload them to Amazon S3.
    • Deploy the Cloud Formation Template.
    • Update the appropriate AWS Systems Manager sample document created by the CloudFormation Template to reflect your email server environments. These can be found in the AWS Systems Manager console under Documents > Owned by me
      • The ExampleWindowsIISSMTPSESpasswordrotator sample provides an example for Microsoft Windows hosts using the runPowerShellScript action to update the server’s SMTP credentials.
      • The ExamplePostfixSESpasswordrotator sample provides an example for Linux hosts using the runShellScript action to update the server’s SMTP credentials.

Testing Option 1 – Fully Automated Credential Rotation

To test the Fully Automated Credential Rotation solution, have Secrets Manager perform an immediate rotation by following these steps:

  1. Open AWS Secrets Manager console
  2. Locate the secret SESSendSecret
  3. Select the Rotation tab
  4. Click the “Rotate Secret immediately” button.

You can track the progress of the rotation by locating the logs of the Lambda that is deployed to manage the rotation.

  1. In the AWS console, go to CloudFormationStack’s Resources tab
  2. Find the LogicalID = SESSecretRotationFunction
  3. Click the PhysicalID link to open the Lambda
  4. Under the Monitor Tab, select the “View CloudWatch logs” button in the top right
  5. The logs should show the rotation flow through 4 stages below (more details of each stage are available here):
    1. create_secret
    2. set_secret
    3. test_secret
    4. finish_secret

Option 2 – Partially Automated Credential Rotation:

The partially automated version uses a custom AWS Lambda function to create an SMTP password, which is stored in AWS Systems Manager Parameter Store. This solution simplifies credential rotation, where manual changes must be conducted by support staff. By wrapping the manual change process with AWS Step Functions, you can ensure a robust and auditable process to regularly rotate the SES SMTP credential.

How Option 2 works:

  1. The credential rotation AWS Step Function creates a new SES SMTP credential and updates it in AWS Systems Manager Parameter Store.
  2. It retrieves a list of servers from an Amazon DynamoDB table and launches a manual confirmation AWS Step Function execution for each server to initiate and track the manual step.
  3. The manual confirmation AWS Step Function emails the designated address, requesting support staff to arrange the rotation. The email includes a link specific to that server.
  4. The person completing the manual change confirms back to the AWS Step Function via the link that the rotation is complete.
  5. Once the rotation on a server is confirmed, the manual confirmation AWS Step Function for that server is marked as complete.
  6. After all server rotations are complete, the credential rotation AWS Step Function continues, disabling the old SES SMTP credential and deleting it after a few days.

AWS Step Function executions can last up to 365 days, providing sufficient time for the manual rotation and confirmation.

The screenshot below shows a graphical representation of the credential rotation AWS Step Function execution status, providing a real-time view of the rotation progress.

SMTP credential rotation AWS Step Function

You can also track the status of individual servers via the manual rotation step function execution list.

SMTP manual rotation step function execution list

The partially automated solution for rotating Amazon SES SMTP credentials is illustrated and detailed below:

Option 2 - partially automated solution

Refer to the image above for the option 2 workflow:

  1. EventBridge Scheduler Trigger: An EventBridge scheduler rule triggers a custom Starter Function Lambda (SF Lambda) on the last day of every 3rd month (this can be adjusted to suit your needs in the CloudFormation template).
  2. Credential Rotation Step Function: The Starter Function Lambda triggers the Credential Rotation AWS Step Function, providing a clearly defined name to facilitate auditing (“password-rotation-dd-mm-yy“).
  3. Credential Rotation Step Function Actions:
    1. Creates a new IAM (Identity and Access Management) secret access key for the SES IAM user.
    2. Triggers the SMTP Credential Generator Lambda to derive the SES SMTP password from the newly created IAM secret access key (using the algorithm provided in the SES documentation.
    3. Stores the new SES SMTP credential in AWS Systems Manager Parameter Store.
    4. Reads a list of servers that are utilizing this credential from a DynamoDB table.
  4. Manual Confirmation Step Function:
    1. For each server, a manual confirmation AWS Step Function is triggered, sending a message on the Amazon Simple Notification Service (SNS) topic.
    2. The SNS notification prompts the server administrator via email to manually rotate the SMTP credentials on the on-premises email server.
    3. The server administrator uses a link in the email to confirm the credential has been rotated and tested on the server.
    4. The link triggers the Confirmation Lambda exposed via API Gateway, which marks the ManualConfirmation step function as complete.
  5. Credential Rotation Completion: The CredentialRotation step function waits until all manual confirmation step functions have completed before proceeding.
  6. Old IAM Access Key Deletion: Once confirmation has been received for all servers, the step function deletes the old IAM access key.

Deployment

To deploy the partially automated solution in your AWS account, you will need the following prerequisites:

Prerequisites for the Partially Automated Solution

  1. AWS Account Access, typically with admin-level permission to allow for the deployment.
  2. Your preferred IDE with AWS CLI version 2 and named profile setup. Alternatively, you can use the AWS CLI from the AWS CloudShell in your browser.
  3. SES enabled, configured, and properly sending emails.
  4. External email server(s) currently configured to use SES with SMTP.
  5. Administrator email address to receive notifications.
  6. AWS Secrets Manager and AWS Systems Manager set up.
  7. AWS Systems Manager agent(s) correctly installed and configured on your target email servers as detailed in Setting up AWS Systems Manager.
  8. Amazon EC2 instance with Postfix configured to send emails through SES
  9. Target email servers must be decorated with a tag (“SSMServerTag“) and value (“SSMServerTagValue“) that will be used to identify them by the Systems Manager Document (we used “server” and “email”)
  10. AWS Parameter Store and AWS Step Functions.

Once you have the prerequisites in place, follow the instructions in the GitHub project.

Conclusion

Implementing an automated credential rotation process for Amazon SES SMTP enhances security and compliance, streamlines operations, and reduces the risk of downtime and human error. By leveraging AWS Secrets Manager and AWS Systems Manager (option 1) or AWS Systems Manager Parameter Store and Step Functions (option 2), organizations can centralize SES SMTP credential management, maintain an audit trail, and quickly update email application servers with new SMTP credentials.

Need additional guidance?

Cyber Security Cloud, Inc. accelerates sales with CloudSmart Insights and Amazon SES

Post Syndicated from Anne Grahn original https://aws.amazon.com/blogs/messaging-and-targeting/cyber-security-cloud-inc-accelerates-sales-with-cloudsmart-insights-and-amazon-ses/

In today’s rapidly evolving digital landscape, effective content curation is essential for businesses to stand out and connect with their target audience.

Optimizing customer outreach can be a difficult task. Sales intelligence can help you use data to understand customer behavior, attract prospects with relevant messaging, and focus sales and marketing efforts where they’ll make the most impact.

Web security service provider Cyber Security Cloud Inc. (CSC) is using CloudSmart Insights and Amazon Simple Email Service (SES) to curate and deliver targeted content, and to drive sales of its web application firewall (WAF) automation service, WafCharm.

What is CloudSmart Insights?
CloudSmart Insights is a go-to-market (GTM) and co-sell intelligence solution for Amazon Web Services (AWS) Marketplace sellers. CloudSmart Insights helps remove guesswork, and the need for manual authoring and analyzing of reports from AWS Marketplace seller operations. With CloudSmart Insights, AWS Marketplace sellers can easily visualize sales and forecasts without the need for custom coding, business intelligence (BI) authoring, or data science skills.

CloudSmart Insights’ private offer feature on the AWS Marketplace empowers other Marketplace sellers to deliver personalized customer experiences tailored to individual needs. By curating targeted messages, CloudSmart Insights can provide their customers with valuable resources, guidance, and access to relevant features, helping to maximize investments from the outset. The feature allows CloudSmart Insights’ customers to create customized rules for cost, quantity, and duration, streamlining both single private offers and large-scale sales plays.

What is Amazon SES?
Amazon Simple Email Service (Amazon SES) is a cloud-based email service provider that can integrate into any application for high-volume email automation. Amazon SES supports a variety of deployments including dedicated, shared, or owned IP addresses. Reports on sender statistics and email deliverability tools can help you make every email count. Whether you use an email software to send transactional emails, marketing emails, or promotional emails, you pay only for what you use.

Who is Cyber Security Cloud, Inc.?
CSC provides web application security services powered by advanced artificial intelligence (AI) and global threat intelligence. CSC’s WafCharm is a managed cloud-based web application firewall (WAF) service that seamlessly integrates with AWS WAF to enhance the security of web applications deployed on AWS. WafCharm simplifies the process of configuring, managing, and updating AWS WAF rules, making it easier for your organization to protect web applications from threats.

The opportunity
CSC wanted to increase customer engagement and provide detailed guidance to facilitate the acceptance of private offers from AWS Marketplace. Delivering curated content was a central objective to increase the efficacy of communications. CSC turned to CloudSmart Insights to support customized messaging built on Amazon SES.

The solution
CSC chose CloudSmart Insights’ private offer curation feature to engage with existing and prospective customers using AWS Marketplace. Customers who  discover, purchase, and deploy CSC WafCharm now receive personalized communications directly from CloudSmart Insights through Amazon SES.

CSC uses the CloudSmart insight offer report to preview upcoming renewals, and creates curated messages via the CloudSmart private offer messaging feature. The integration with Amazon SES allows transactional messages to be curated to the customer’s needs, providing additional instructions, resources, and details of the offer. With this flexibility, CSC can manage renewals efficiently and deploy targeted promotional offers that increase engagement with buyers. Amazon SES also allows CSC to confirm that messages are sent from a trusted source.

CloudSmart Insights uses an Amazon QuickSight serverless architecture to allow automatic scaling and meet user requirements, without manual server management. This architecture helps keep dashboards responsive during peak usage periods.

By embedding Amazon QuickSight into CloudSmart Insights, CSC uses the systems they have already found to be effective and decreases the amount of individual configuration needed to examine data. AWS Marketplace provides CSC with APIs for creating and managing catalog products, offers, and agreements. The APIs also provide read-and-write actions to create, list, and manage private offers.

The steps for creating a custom private offer with CloudSmart Insights are fully detailed in this blog post.

The outcome

Integrating CloudSmart Insights with Amazon SES allowed CSC to target specific customer segments based on their interests, purchasing behavior, or demographics, reducing the time taken to send private offers from one hour to 5 minutes per offer extended.

“With CloudSmart Insights, CSC was able to incorporate Amazon SES features such as verified identities into their sales cycle for WafCharm. This helped to improve email deliverability by establishing the authenticity of sellers’ emails, and enhance security by protecting accounts from unauthorized use.” – Takashi Yoshimi, U.S. COO, Cyber Security Cloud Inc.

By tailoring email messages to provide acceptance instructions for individual recipients, CSC increased their closure rate by 5%. Automated email workflows allowed them to nurture leads and drive sales, making it easier for customers to understand the capabilities of WafCharm.

Errors and repetitive work within the CSC marketplace deal desk were reduced, allowing CSC’s customer satisfaction, marketing, and sales teams to gather and analyze areas of customer improvement more efficiently.

Reach the right targets
CloudSmart Insights is available through AWS Marketplace to help your organization create curated private offers, and enhance your AWS Marketplace journey. Visit AWS Marketplace for more information.

To learn more about optimizing email sending, visit Amazon SES. To learn more about CSC WafCharm, please visit the WafCharm website or contact Anri Nakayama, Vice President, Partner Relations at CSC.

Amazon SES celebrates 14 years of email sending and deliverability

Post Syndicated from Medha Karri original https://aws.amazon.com/blogs/messaging-and-targeting/amazon-ses-celebrates-14-years-of-email-sending-and-deliverability/

On this day, 14 years ago, we launched Amazon Simple Email Service (Amazon SES), a highly scalable email sending service that allow businesses and developers to reliably and cost-effectively deliver email from the cloud without having to manage the underlying infrastructure and other operational complexities.

Fast forward to 2025: Amazon Simple Email Service (Amazon SES) processes over a trillion email each year for customers worldwide across various industries, from small startups to large enterprises for their transactional and marketing email workloads, including the emails for Amazon retail’s Prime Day events. Today, we take the celebration of SES’s 14th birthday to introduce some of the recently launched features and enhancements to SES features.

Email is a critical communication channel for businesses. With email marketing potentially delivering a $42 ROI for every dollar spent, businesses are eager to send and ensure their emails land in the inbox (called as deliverability). However, Email Service Providers (ESPs) have become more vigilant, implementing advanced filters to block unwanted or suspicious messages. ESPs now require long-standing best practices and bulk-sender requirements that all email senders must adhere to in order to achieve good deliverability and reputation with mailbox providers. Our reputation management systems analyze millions of data points daily (such as IPs, domains, bounces, complaints, and delivery notifications) to help your emails reach their intended inboxes.

SES started as a simple email sending service and as the years passed (since 2011), we became increasingly passionate about email and our vision grew more exciting and innovative. Today, we are not only sending emails; we expanded into email relay and infrastructure features like Mail Manager, we added a secure, managed business email and calendar solution (Amazon WorkMail) to the SES portfolio and released features that help you analyze, monitor and optimize your email deliverability such as Virtual Deliverability Manager (VDM), and introduced Managed Dedicated IP (M-DIP) to help manage and improve your sender reputation. We’ll explore each of these features in more detail later in the post. Industry leaders like Spamhaus recognize SES’s four pillar framework of Prevention, Monitoring, Analysis and Response efforts and effectiveness in maintaining high email deliverability and reputation standards. You can read more about the framework on the official Spamhaus blog post here.

Ensuring Email Resilience & Reliability with Global Endpoints:
An email that is not delivered or an email that is delivered late could be a lost opportunity. Therefore, ensuring your email messages keep flowing is important. Global Endpoints (launched in Dec 2024) is a feature for resilient sending through two commercial AWS Regions. Global Endpoints allows customers to choose a primary and secondary region which accommodate email sending workloads in an equal split under normal circumstances. If either region suffers an impairment, traffic shifts away from the affected Region towards the other, ensuring that email sending continues.

Unlike manual multi-region setups, Global Endpoints synchronizes critical parameters between your two chosen Regions, and highlights remaining differences you must resolve. Once active, the load-balanced sending ensures both Regions have warmed-up IP addresses ready for your workloads, and no manual effort is required to respond to outages.

Global Endpoints

You can learn more about Global Endpoints by reading this blog here.

Modernizing Email Infrastructure with Amazon SES Mail Manager:
Mail Manager (launched in May 2024) is a set of Amazon SES email relay and gateway features designed to help you with governance, risk management, and compliance goals around all your corporate email workloads. At its core, Mail Manager acts as a routing and delivery relay, effectively managing email traffic and ensuring compliance. It’s like having a digital traffic controller for your emails, efficiently processing rules while seamlessly integrating with your existing email infrastructure whether they are self-hosted or already at AWS. Mail Manager permits standard inspection and enforcement of routing, tracking, archiving, security and compliance rules whether messages are incoming, outgoing, or internal-to-internal. Mail Manager allows simple, cost-effective, and usage-based monitoring and enforcement of corporate policies while creating an easy migration path for application modernization and the wind-down of shadow IT mail servers throughout your organization.

Recently, we announced full lifecycle logging, which means customers have the ability to configure end to end logging for ingress endpoints and rules engine actions to various destinations such as CloudWatch, S3, and Firehose. Organizations can also deliver emails to Q Business for indexing and queries and get a complete visibility into their email communications, enhancing transparency and security. With Mail Manager, you can also setup email journaling, prevent attacks such as email echo spoofing and modernize your email sending by connecting with advanced security solutions like Proofpoint.


You can learn more about Mail Manager in this blog post.

Engagement, Deliverability and Maximizing Email Success with Virtual Deliverability Manager (VDM):
Email deliverability is a complex and multifaceted challenge. Businesses need tools to monitor and optimize their email delivery success rates to make every email count. Virtual Deliverability Manager (VDM) (launched in Sep 2022), is an Amazon SES feature that helps you enhance email deliverability, like increasing inbox deliverability and email conversions, by providing insights into your sending and delivery data, and giving advice on how to fix the issues that are negatively affecting your delivery success rate and reputation. Recently, we enhanced VDM with an adaptive setup, added complaint rate and delivery improvement recommendations.

VDM tracks every email’s journey, uncovering opportunities to improve delivery and engagement rates. Customers can dig deep into deliverability metrics such as bounce, complaint, open, click-through, and successful delivery rates in their accounts at multiple levels such as by sending email address, by email provider, or by SES configuration set. This makes it easy to quickly check the status and trend of sending health.

VDM also analyzes sending configurations and provides automatic recommendations about how to increase sending success. This helps customers make changes such as DKIM configuration (Domain Keys Identified Mail) to increase the likelihood of successful delivery.

Advanced features like BIMI gap detection ensure your emails aren’t just sent, but strategically positioned for maximum impact. The automated complaint rate insights act as an early warning system, helping businesses proactively protect their sender reputation.

VDM Dashboard

If you’d like to learn more, you can check out the blog posts by my colleagues Samuel Koppes (post) and Vinay Ujjini (post).

Reputation Management with Dedicated IPs (managed):

When customers sign up for Amazon SES, their email sending is automatically handled through shared IP addresses. While this shared IP approach is cost-effective and safe, it also means customers don’t have full control over their own sending reputation. The reputation of the IP they send from is determined by the quality and engagement levels of all emails sent from that IP. Some organizations can achieve exceptionally high reputation, and have turned to leasing dedicated IP addresses, where they are the sole sender on that IP. This helps them grow and maintain a positive sending reputation, building trust with ISPs and mailbox providers. Customers estimate how many dedicated IPs they need and request them before use. Dedicated IPs also require a careful “warm-up” process, where senders gradually increase their email volume to avoid triggering spam filters.

Dedicated IPs (Managed) makes it easier to manage dedicated IPs, by automating process of provisioning, leasing, warming up, and managing dedicated IP addresses. Customers can create a managed dedicated IP pool through the API, CLI, or Console and start using it for dedicated sending without having to open support cases. The IP pool automatically scales in and out based on usage, taking into account the specific policies of each ISP. SES tracks the warmup level for each IP in the pool individually for each ISP, ensuring a gradual ramp-up of email volume. The warmup percentage calculation adapts to actual sending patterns, optimizing the warmup schedule. Excess sending is deferred and retried, with early-stage traffic leveraging the shared IP infrastructure.

By automating the management of dedicated IPs, Dedicated IPs (Managed) helps SES customers focus on their email content and strategy, while AWS handles the underlying infrastructure and reputation management. This allows senders to improve their deliverability and ensure more of their emails reach the intended inboxes.

You can learn more about dedicated IPs (managed) by reading the blog post here.

Elevating the Email Experience:
Understanding the evolving needs of our customers, we’ve released a number of new features to make email sending more seamless, secure, and transparent. SES now offers inline email templates that allow developers to seamlessly provide template content directly within their API requests, eliminating the process of managing template resources. We’ve also enhanced tracking capabilities with HTTPS support for custom domains and introduced options to set maximum deliverability times for time-sensitive messages. Our AutoTag enhancements now include insights into TLS version for outgoing messages and customers now have the ability to set custom values in feedback headers, providing better transparency and control. In addition to these improvements, we’ve also expanded Amazon SES to 24 regions, including AWS Govcloud (US-East).

As we celebrate Amazon SES’s 14th birthday, we’re not just looking back – we’re looking forward. The future of email is here, and we’re proud to be leading the way.

Thank you.

Get started with Amazon SES

Enhance Your Email Campaigns using Amazon SES SendBulkEmail APIs Inline Templates

Post Syndicated from Satya S Tripathy original https://aws.amazon.com/blogs/messaging-and-targeting/enhance-your-email-campaigns-using-amazon-ses-sendbulkemail-apis-inline-templates/

Amazon Simple Email Service (SES) is a cloud-based email sending service provided by Amazon Web Services (AWS), handling both inbound and outbound email traffic for your applications. It allows users to send and receive email using SES’s reliable and cost-effective infrastructure without having to provision email servers yourself. Customers use Amazon SES to send emails like one time passwords (OTPs), transactional emails such as order confirmation, and promotional/marketing emails.

For this post, you should be familiar with the following:

Amazon SES continues to evolve, offering new features that help you simplify and optimize your email campaigns. We’re excited to announce the addition of inline template support for both the SendEmail and SendBulkEmail APIs. This new capability allows you to include template content directly in your API requests, reducing complexity and eliminating the need to manage separate template resources in your SES account.

What are inline templates?

Inline templates allow you to provide the subject, HTML body, and text body of an email directly in the API request, along with dynamic placeholders for personalized content. Instead of creating and storing a separate email template in SES, you can define the template as part of your API call. This feature is especially useful for organizations that need flexibility in managing numerous templates or want to make quick adjustments to email content.

How inline templates simplify your workflow

Previously, Amazon SES required you to create and store email templates in your SES account, which you would then reference by name or Amazon Resource Name (ARN) when sending an email. This process adds some management overhead, particularly for organizations that frequently create new templates or exceed the limit of templates per AWS Region. With inline templates, you can reduce complexity by defining your email content directly in the API payload, avoiding the need to create and manage stored templates. This approach can improve flexibility, allowing you to quickly make changes to your email content without updating stored templates. Additionally, it can simplify your integration by providing template content directly within your application logic, making the process more seamless and efficient. When using the and SendBulkEmail API, you can include personalized content for up to 50 destinations in a single call, making large-scale communication more efficient.

How to use inline templates

To use inline templates, you simply provide the email content (subject, text, HTML) and the replacement data directly in the SendBulkEmail API request payload within TemplateContent parameter.

Inline-template API

Here’s an example for using the SendBulkEmail API with inline templates:

file://mybulkemail-inline-template-conten.json:

{
    "FromEmailAddress": "Mary Major <[email protected]>",
    "DefaultContent": {
        "Template": {
            "TemplateContent": {
                "Subject": "Greetings, {{name}}!",
                "Text": "Dear {{name}},\r\nYour favorite animal is {{favoriteanimal}}.",
                "Html": "<h1>Hello {{name}},</h1><p>Your favorite animal is {{favoriteanimal}}.</p>"
            },
            "TemplateData": "{ \"name\":\"friend\", \"favoriteanimal\":\"unknown\" }"
        }
    },
    "BulkEmailEntries": [
        {
            "Destination": {
                "ToAddresses": [
                    "[email protected]"
                ]
            },
            "ReplacementEmailContent": {
                "ReplacementTemplate": {
                    "ReplacementTemplateData": "{ \"name\":\"Anaya\", \"favoriteanimal\":\"angelfish\" }"
                }
            }
        },
        {
            "Destination": {
                "ToAddresses": [
                    "[email protected]"
                ]
            },
            "ReplacementEmailContent": {
                "ReplacementTemplate": {
                    "ReplacementTemplateData": "{ \"name\":\"Liu\", \"favoriteanimal\":\"lion\" }"
                }
            }
        }
    ],
    "ConfigurationSetName": "ConfigSet"
}

SES SendBulkEmail API call:

aws sesv2 send-bulk-email -cli-input-json file://mybulkemail-inline-template-conten.json

Output:

{
    "BulkEmailEntryResults": [
        {
            "Status": "SUCCESS",
            "MessageId": "010001xxxxxx-xxxxxxxx-xxxx-xxxx-000000"
        },
        {
            "Status": "SUCCESS",
            "MessageId": "020002xxxxxx-xxxxxxxx-xxxx-xxxx-000000"
        }
    ]
}

Backward compatibility

If you’re currently using stored templates, don’t worry – Amazon SES still supports the use of stored templates, and you can continue to use them without any changes. Inline templates are simply an additional option for customers who need more flexibility or wish to avoid managing stored templates altogether. Since inline templates only support the use of simple substitution, stored templates remain the solution for advanced personalization options such as conditional logic or complex formatting. More details in our doc link: How to use Bulk email template.

Get started today

The inline template feature is now available in all AWS Regions where Amazon SES is offered. To start using inline templates, refer to the Amazon SES Developer Guide and what’s new announcement. There are no additional charges applicable for using inline template feature.

Conclusion

The inline templating feature in SendBulkEmail allows you to avoid worrying about template management by updating / creating new email templates whenever a minor modification or alteration is required in the existing templates, as well as cleaning up unused templates on a regular basis. Therefore, if your business has a high number of email template requirements, there are no predefined rules or patterns for creating email templates, and you need to generate many templates simultaneously within Amazon SES, you must use inline templating feature of SendBulkEmail API . If you do not want to use the Inline templating capability, you can continue to use the templated SendBulkEmail API from Amazon SES.

How to Make Simple Email Service Resilient Across Two AWS Regions with Global Endpoints

Post Syndicated from Zip Zieper original https://aws.amazon.com/blogs/messaging-and-targeting/how-to-make-simple-email-service-resilient-across-two-aws-regions-with-global-endpoints/

Introduction

Amazon Simple Email Service (SES) recently announced Global Endpoints, a major enhancement to its email sending features. This new capability improves the availability and reliability of SES API v2 email sending workloads by automatically distributing messages, in an active/active configuration across the Primary and Secondary AWS regions. When Global Endpoints detects degradation in either the Primary or Secondary SES region, the feature automatically shifts all traffic to the healthy region, no customer intervention is needed.

Multi-Region SES Configuration Challenges

Customers face significant difficulties in correctly implementing a multi-region setup or disaster recovery setup. The process requires careful curation of systems along the failover path and ensuring high availability of these systems. Ironically, the system designed to trigger failover can itself fail when needed most. For many SES customers, the effort required to design, build test, monitor and maintain a two-region SES system outweighs the benefits.

SES Global Endpoints eliminates the need for these complex, custom workarounds. The feature provides a straightforward solution for maintaining email sending during unexpected regional disruptions. Global Endpoints’ built-in safeguards ensure email infrastructure remains resilient when it matters most. Please note that at launch, Global Endpoints does not support SMTP or VPC endpoint access.

SES Global Endpoints: Key Technological Components

Global Endpoints utilizes four new SES components that work together to provide a seamless and reliable multi-region email sending experience:

  1. Multi-Region Endpoint (MREP) is a new type of SES endpoint that automatically distributes email traffic across two AWS regions.
  2. Deterministic Easy DKIM Identities (DEED) makes it easy to setup multi-region identities without having to make any DNS changes.
    1. Read the blog introducing SES DEED for more information.
  3. Updated AWS SES Console Tool walks you through the process and simplifies the duplication of Domain Identities, Configuration sets, and Sending limits across regions.
  4. Readiness Checks in the SES console verify uniformity between configurations of key resources in both the Parent and Secondary SES regions.

How SES Global Endpoints work

GE-MREP-healthy

Figure 1 – SES Global Endpoints with two healthy regions.

Global Endpoints are resources that distribute your SES outbound workloads across two AWS Regions. When you set up Global Endpoints, you select a Primary Region (where the actual Endpoint is created) and a Secondary Region. When configured, a new Global Endpoints resource, called “multi-region endpoint” (MREP) is created and managed. Developers will need to update their SES v2 API enabled applications and services to use their unique MREP as the entry point to SES for their email sending requests.

The Global Endpoints configuration requires that your sending domain identity(s) is verified in both the Primary and Secondary regions. SES Global Endpoints uses DEED to simplify this process. DEED is a new feature that generates consistent DKIM tokens across all AWS Regions based on a Parent Domain Identity that is configured with Easy DKIM. This consistency allows SES to automatically verify a domain identity in the Secondary region once it’s verified in the Primary region, without requiring additional DNS record updates. Customers do not need to make any additional changes other than activating the DEED identity type. When customers expand their sending workload’s geographic footprint, or reconfigure their Global Endpoints settings in the future, their DEED identities will continue to be available and managed automatically. You can learn more about DEED from this post.

Global Endpoints works alongside other SES services, such as Virtual Deliverability Manager (VDM). Once Global Endpoints are enabled, you’ll continue to see per-region data on email sending performance in VDM. If you’ve configured event destinations like CloudWatch, SNS, or Firehose, you can make use of those same monitoring and alerting tools in your second region as soon as you’re ready. As noted below, although Configuration Sets are automatically duplicated in the Secondary region, you must manually duplicate your SES event destinations in those Configuration Sets.

It is important to understand that Global Endpoints is not a failover solution for SES, it’s an active-active implementation; when no regional impairment exists, SES Global Endpoints distributes sending traffic across two AWS regions. Customers who use SES’ shared IP sending pool do not need to make any changes, Global Endpoints will utilize the SES shared IP pool in the Secondary region. Customers who use standard, dedicated IPs must manually set up equivalent number of dedicated IPs in the Secondary region. Once properly configured, Global Endpoints will keep the dedicated IPs warm in both regions as long as you use the MREP and maintain a steady sending volume.

For example, when SES’s regional health monitoring detects degradation in the Primary region (as shown in the diagram below), The MREP automatically shifts all traffic to the healthy region. This illustrates the need for matching configurations in both regions, since all traffic will be sent through a single region, in this example the Secondary region, as long as the impairment exists. When SES’s regional health monitoring detects the impaired region is back to normal, traffic is once again redistributed across both regions. Importantly, no customer intervention is needed; SES Global Endpoints automatically and dynamically monitors and manages the traffic distribution via the MREP.

GE-MREP-impaired

Figure 2 – SES Global Endpoints with one impaired region.

The key benefits of using Global Endpoints include:

  • Simplified multi-region configuration
  • Automatic routing between two regions with no delay
  • More resilient email sending

Global Endpoints: Setup and Use

Using the SES Console, the Global Endpoint setup process assists in duplicating the key artifacts and sending limits from your Primary Region to your Secondary Region. This process ensures that both regions have equivalent verified identities, configuration sets, and approved sending limits sufficient for all of the expected volume. Customers can manually duplicate these key artifacts using the SES v2API or CloudFormation, but we recommend using the SES console because these steps are simplified.

Once the Global Endpoint is ready, key resources duplicated and the application or service has been updated to use the new MREP, SES Global Endpoints automatically routes your outbound traffic evenly between your primary and secondary regions using the multi-region endpoint (MREP). If the MREP detects degraded performance in the Primary or Secondary region, it will automatically route all SES traffic to the healthy region until the impairment is resolved.

Preparing the Parent Region

The high-level steps to setup Global Endpoints using the SES Console are below.  Note – you must already have a primary SES region fully operational with at least 1 fully verified sending identity with production access before setting up Global Endpoints.

Create Global Endpoint

  1. Open the SES console in the Primary AWS region.
  2. In the navigation pane, choose Global Endpoints.
  3. Choose Create Global Endpoint.
  4. Select a Secondary Region from the dropdown menu. (Your Primary Region defaults to the region to which you signed into the console)
  5. Review the configuration and choose Create.

The creation process may take a few seconds. Once completed, the status of your Global Endpoint will change to “Ready.”

Global Endpoints "ready" status

Preparing the secondary region

Once your Global Endpoint is ready, you must now ensure that the your email sending configuration, including all its components (Domain Identities, Configuration sets, email templates, and sending limits), is consistent across the primary and secondary regions before utilizing the Global endpoint for sending emails. This alignment is crucial to avoid potential issues and ensure proper email delivery and tracking.

The new Region duplication feature in the SES console assists you by automatically duplicating resources and duplicating account-level settings from the primary to the secondary region, ensuring that both regions have equivalent configurations.

The high-level steps to setup the secondary region for use with Global Endpoints using the SES Console are below. If you’d like to use the AWS CLI to manually duplicate these resources, consult with the SES v2 API documentation.

Duplicating verified domain identities

Next you’ll use the Duplicate verified domain identities feature in the SES console to create one or more domain identities in the Secondary Region. SES will then use DEED to verify the domain identities in the Secondary Region. Note that DEED can only be used if the Primary Domain Identity is already configured with Easy DKIM. Domain identities that are verified with BYODKIM will need to be created manually in the Secondary Region, as DEED is not applicable in this case.

Important – It’s crucial that both Primary and Secondary Regions have the equivalent verified identities and configuration sets that you intend to send email with, along with matching sending limits to ensure proper functionality of the Global endpoint. Any discrepancies could cause delivery failures, diminished failover reliability, and missing metrics.

To duplicate identities from the SES console:

  1. On the Global endpoints page, choose the Global endpoint you want to duplicate by selecting it from the Name column.
  2. Under the Region duplication tab, choose Duplicate identities.
  3. Select the identities you want to duplicate followed by Confirm.

To duplicate configuration sets from the SES console:

  1. On the Global endpoints page, choose the Global endpoint you want to duplicate by selecting it from the Name column.
  2. From the Region duplication tab, choose Duplicate configuration sets.
  3. Select the configuration sets you want to duplicate followed by Confirm.

Important Notes:

  • When duplicating configuration sets across regions, Event destinations and Reputation settings require manual reconfiguration in the Secondary Region to match the Primary Region’s setup. Since SES event destinations are region-specific, you’ll need to manually recreate these configurations in each region. For cross-regional monitoring and event routing, you can refer to additional AWS documentation for services like CloudWatch (cross-region dashboards), SNS (cross-region message delivery), and EventBridge (cross-region event routing) to develop a comprehensive multi-region event strategy.
  • If you are using SES email template resources, those templates need to be manually duplicated into the Secondary Region (the console is currently unable to perform this action).
  • You must manually synchronize any changes made to the Parent Region’s configuration sets to the Secondary Region to maintain sending integrity. This includes adding or removing standard dedicated IPs to both regions to ensure either region has the required IPs to manage the expected throughput in the case of a regional event or impairment.

The Duplicate production limits feature allows you to:

  • Check if production limits are aligned between primary and secondary regions
  • Request a limit increase in the secondary region if needed

To duplicate production limits from the SES console:

  1. On the Global endpoints page, choose the Global endpoint you want to duplicate by selecting it from the Name column.
  2. From the Region duplication tab, verify the status in the Duplicate production limits card. If the status displays Sending limits not aligned, choose Duplicate production limits.
  3. The Service Quotas page opens in the secondary region where you can request increases to “Sending quota” and “Sending rate” to match the values from the primary region.

Note – SES checks if sending limits are aligned between regions and allows you to request limit increases in the secondary region if needed. We recommend that you request the maximum quota you’re eligible for in both regions. While email traffic is distributed amongst both regions under normal operating conditions, during a failover event, the full volume of email traffic will be sent to one region and its limits should be enough to handle the full volume load.

If any manual steps are required to complete the Global Endpoint creation, they will be shown in the SES Console:

manual steps warning

When the Global Endpoint is fully configured, a MREP will be created with an Endpoint ID (see below). You will use this new endpoint ID when re-configuring your SendEmail and SendBulkEmail API calls. (note – Global Endpoints MREP are only supported by SES APIv2. The feature is not available using SMTP or VPC endpoints).

Now you’re ready to send your first email through SES Global Endpoints and your MREP!

Once you’ve obtained the Endpoint ID of your Global endpoint (this is the MREP), you should update your applications’ SendEmail or SendBulkEmail API calls to include the Endpoint ID value for the -endpoint-id parameter.

Here’s an example of how to specify the Endpoint ID in a SendEmail API call using the AWS CLI (modify the from & to email addresses and the --endpoint-id accordingly):

aws sesv2 send-email \
--from-email-address "[[email protected]](mailto:[email protected])" \
--destination "ToAddresses=[[email protected]](mailto:[email protected])" \
--content "Subject={Data=Test
email,Charset=UTF-8},Body={Text={Data=This is a test email sent using Amazon SES
Global endpoints.,Charset=UTF-8}}" \
--endpoint-id "abcdef12.g3h"

The Global Endpoints console page provides summary observability metrics on the combined workload and a unified view of your email sending volume across both the primary and secondary regions. You can access these metrics through the Cross-region metrics tab on the Global endpoint details page in the SES console..

Conclusion

By using a SES Global Endpoint in their SES API v2 applications and services, SES customers benefit from uninterrupted email delivery during regional service issues. SES Global Endpoints automatically distributes sending workloads across two AWS Regions, significantly enhancing resilience against regional outages. The Global Endpoints feature maintains warmed-up dedicated IP addresses in both regions, when used, and automatically shifts traffic to the healthy region when the other is impaired, without requiring customer intervention. SES Global Endpoints eliminates the pain points typically associated with manually-built, multi-region SES sending systems.

Global Endpoint’s console tools provide quick and easy setup and includes readiness checks to identify and mitigate potential misconfigurations. These enhancements simplify the configuration and management process, making it easier for customers to maintain a robust email sending infrastructure.

Overall, SES Global Endpoints addresses customer needs for a more reliable and easily managed email sending system, automating critical processes and providing robust tools for setup and maintenance. This significant improvement to the email sending experience is expected to benefit AWS customers across various industries and use cases.

Call to Action

Get started with SES Global Endpoints today to enhance your email sending resilience!

  • Visit the AWS Console to enable this feature for your account
  • Review the comprehensive documentation for step-by-step guidance.
  • For personalized assistance, don’t hesitate to contact AWS Support or your AWS account team.

Elevate your email infrastructure now to ensure uninterrupted communication with your customers, even in the face of regional disruptions.

How to use Mail Manager to Archive Inbound Emails

Post Syndicated from Sesan Komaiya original https://aws.amazon.com/blogs/messaging-and-targeting/archiving-and-sending-to-final-smtp-server/

In today’s digital landscape, where email communication plays a vital role in business operations, Keeping your email archive secure, compliant, and retrievable is crucial for any business. However, managing the large volume of email data can lead to operational difficulties, including regulatory compliance, maintaining an audit trail, and preventing data loss. That’s where Amazon Simple Email Service (SES) Mail Manager’s email archiving feature comes in.

In this blog post, we will explore how Amazon SES Mail Manager’s email archiving and search features can improve email security and compliance. If you’re a newcomer to Mail Manager, look at this blog post on Amazon SES Mail Manager. It provides valuable information on important features, such as Ingress Endpoint, Traffic Policy, Rule Sets, and SMTP Relay.

Problem Statement:

Imagine a scenario where a critical email from a key client is buried deep within your organization’s email archives, and you need to retrieve it for an important audit. The challenge of ensuring your business remains compliant with stringent data retention policies across every email communication for thousands of employees for a certain period or permanently.

Solution explained:

Amazon SES Mail Manager Email archiving is a powerful tool that addresses many of the challenges organizations face dealing with the difficulty and expense of archiving email at scale. Compliance and regulatory frameworks like GDPR, HIPAA, and SOX often require email archiving, which is a common objective identified by customers needing to comply with those regulatory frameworks. For regulated businesses, failure to comply with email archiving regulations can result in severe financial penalties and reputational damage.

Amazon SES Mail Manager securely archives and safeguards your emails, providing easy search and export functionality. It provides full-time, enterprise-level archiving without increasing the storage requirements of your mailbox server. The feature provides a reliable and efficient solution to address most compliance requirements. By automatically archiving the types of emails you specify, the service ensures that your organization maintains a comprehensive audit trail of its communications, enabling quick retrieval and review as needed.

The email archiving feature of Mail Manager provides organizations the ability to archive email while in transit rather than archiving at the user’s mailbox. Many organizations prefer archiving in transit for email archiving to meet compliance requirements and maintain comprehensive records. If you would like to learn more about in transit archiving, visit this blog –  Email Archiving with Mail Manager: Why To Archive In Transit vs At The Mailbox.

How email flows with an Amazon SES Mail Manager Email Archiving

For instructional purposes in this blog post, we’ll focus on how you can introduce Mail Manager archiving into your existing email infrastructure. We’ll cover how to seamlessly integrate Mail Manager with reference architectures. Later in the blog, we are going to explore Mail Manager’s archiving capabilities, including search, export and retention policies.

Current setup

Our example organization has an existing mail server (it might be a on-premises Microsoft Exchange Server, Microsoft 365, Google Workspace, etc). Their DNS is configured to route all email directly to this mail server. There is currently no archiving capacity within the existing email infrastructure, when needed, archiving is handled by individual mailbox users and PST files. While this method is suitable for personal email archiving, it fails to meet the organizations’ security requirements and compliance standards.

Figure 1: Example organization’s existing inbound email workflow.

Email Archiving in transit

We are going to introduce Mail Manager into the current mail flow (see figure 1) to archive all incoming messages from our example enterprise’s email infrastructure.

Figure 2: Example organization’s proposed inbound email workflow, with Mail Manager archiving in-transit prior to delivery.

In the new architecture (see figure 2), we’ve introduced Mail Manager into the organization’s inbound email workflow. This new workflow leverages Mail Manager’s ability to archive either all inbound emails, or only those that match specified criteria. By using a Mail Manager Rule set, our example organization can selectively store and preserve emails that meet their configured criteria.

Mail Manager Email Archiving and Search and Export Capabilities

Mail Manager’s archive search capabilities are designed to be user-friendly and efficient. You can perform searches based on various criteria, such as sender, recipient, subject line, date range, or even specific keywords in the Subject line. The search results provide options to either export the search to Amazon Simple Storage Service (S3), or you can choose to download a single email.

Let’s explore using Mail Manager’s archive search to find a specific email by the sender’s address:

Figure 3: Mail Manager’s archive search interface

Once found, we can click on the results to review the email in the console:

Figure 4: Mail Manager’s archive search results

Once we’ve found the target email, it can be downloaded by clicking on “View details“. The image below shows an example message details page with information about the email, including message headers such as In-Reply-To, X-Original-Mailer and X-Mailer.

Figure 5: Mail Manager’s archived email detailed page

Mail Manager’s archive search history tab allows us to find archive searches created in the last 30 days, and view the search results, as shown in the image below:

Figure 6: Mail Manager’s archive search history

Mail Manager’s archive export history tab lists all of the archived email searches you exported to an Amazon S3 Bucket within the last 30 days.

Figure 7: Export History

Step by Step Setup:

Now that we have explained how Mail Manger can be inserted into our example organization’s email workflow to provide email archiving, let’s explore how you can implement Mail Manager’s archiving capabilities in your inbound email workflows. The following diagram (Figure 3) illustrates the overall structure and components involved in this architecture:

Figure 8: End-to-End Mail workflow

Follow the steps below to configure Mail Manager in your AWS account to implement this architecture:

  1. Log into the SES Console and select Mal Manager from the left navigation menu.
    1. Note, as of this writing, Mail Manager is generally available in the following AWS Regions: US East (N. Virginia), US West (Oregon), Europe (Ireland, Frankfurt), Asia Pacific (Tokyo, Sydney).
  2. Under Mail Manger navigation, create an archive (or multiple archives for different use cases)
    1. Enter a unique name in the Archive name field.
    2. (Optional) Select a retention period in the Retention period field to override the default retention period of 180 days.
    3. (Optional) You can encrypt your archive either by entering your own AWS KMS key into the KMS key ARN field, or by selecting Create new key.
    4. Choose Create archive.
  3. Under Mail Manger navigation, create a traffic policy to determine the email you want to block or allow.
    1. Create traffic policy.
    2. On the Create a traffic policy page, enter a unique name for your traffic policy.
    3. (Optional) If you want to discard any messages above a certain size, enter a value in bytes in the Maximum message size field.
    4. In Default action, choose whether the traffic policy is to either Allow or Deny (block) messages that fall outside of (are not addressed by) the conditions of your policy statements.
    5. Select Add new policy statement to create a statement for your traffic policy.
    6. Choose either Allow or Deny (block) for the action to be taken when the statement’s conditions are met.
    7. Build a condition by selecting an email protocol and a conditional operator for the value you enter. Select Add new condition if you want to add more conditions to this policy statement. To learn more about a condition property and its operators and valid values, see the Policy statement conditions reference.
    8. If you’re subscribed to an Email Add On, you’ll be able to select it here as an email protocol.
    9. If you want add more policy statements and conditions, repeat steps above.
    10. Select Create traffic policy.
  4. Under Mail Manger navigation, create a rule set to perform actions on the email you allow in.
    1. Create rule set and enter a unique name for your rule set.
    2. Create new rule on the edit page.
    3. In the Rule details sidebar, enter a unique name for your rule.
    4. Select Add new condition to create a condition that the message must match; or check the EXCEPT in the case of: box followed by Add new exception to create a condition that the message must not match.
    5. Build the condition or exception by selecting an email property and a conditional operator for the value you enter. Select Add new condition or Add new exception if you want to add more conditions or exceptions to this rule. To learn more about a condition property and its operators and valid values, see the Rule conditions reference.
    6. Select Add new action to define the action to be taken when the rule’s conditions are matched and/or exceptions are not matched. To add more actions to be taken, select Add new action. To learn more about actions and their parameters, see the Rule actions reference.
    7. Create an Archive rule. Save rule set
  5. Under Mail Manger navigation, Create your ingress endpoint and assign to it the traffic policy and rule set.
    1. choose Ingress endpoints under Mail Manager.
    2. On the Ingress endpoints page, select Create ingress endpoint.
    3. On the Create new ingress endpoint page, enter a unique name for your ingress endpoint.
    4. Choose whether it will be a Open or Authenticated endpoint.
    5. Select a traffic policy to determine the email you want to block or allow.
    6. Select a rule set containing the rule actions you want to perform on the email you allow in.
    7. Select Create ingress endpoint.
  6. Configure your environment to use the ingress endpoint.
    1. At the time you create an ingress endpoint, an “A” record for the endpoint will be generated and its value displayed on the ingress endpoint’s summary screen in the SES console. The way you use the value of this record depends on the type of endpoint you created and your use case.
    2. DNS providers have different procedures and interfaces for configuring email records. The key pieces of information you need to put into your DNS settings are listed in our documentation – https://docs.aws.amazon.com/ses/latest/dg/eb-ingress.html#eb-ingress-a-record
  7. Under Mail Manger navigation, create an SMTP Relay to send mail on to your existing mail server.
    1. choose SMTP relays under Mail Manager.
    2. On the SMTP relays page, select Create SMTP relay.
    3. On the Create SMTP relay page, enter a unique name for your SMTP relay.
    4. Depending on what type of SMTP Realy you want to configure, follow the respective instructions:
      1. inbound (non-authenticated)
      2. outbound (authenticated) SMTP relay
  8. Update your DNS MX records to point to your new Mail Manager’s ingress point, instead of the existing mail server.

Note: Make sure that you have tested the steps above in your development environment and that you understand the steps before deploying into your production environment.

Conclusion

Amazon SES Mail Manager’s email archiving capabilities are designed for organizations that are seeking to enhance the security, compliance, and audit-ability of their email communications. By seamlessly integrating this feature into their existing email infrastructure, organizations can now archive all inbound messages in transit, ensuring a comprehensive, tamper-proof record of their email activities. The powerful search and export functionality of Mail Manager makes it easy to quickly locate and access specific emails when needed, whether for compliance audits, legal requests, or internal investigations.

This level of email visibility and control is particularly crucial for organizations operating in highly regulated industries like government, healthcare and finance, where the stakes for non-compliance can be severe. Beyond the compliance benefits, Mail Manager’s email archiving also helps to alleviate the operational headaches and expenses associated with traditional in-house archiving systems. By offloading this responsibility to AWS, organizations can focus their resources on their core business priorities, while still maintaining the security and accessibility of their critical email data.

If you’re looking to strengthen your email security posture, simplify your compliance efforts, and improve the overall management of your email archives, we encourage you to explore how Amazon SES Mail Manager’s email archiving capabilities can be seamlessly integrated into your existing email infrastructure. Take the first step towards a more secure, compliant, and efficient email management solution by contacting us today.

About the Authors

Sesan Komaiya

Sesan Komaiya

Sesan is a Solutions Architect at Amazon Web Services. He works with a variety of customers, helping them with cloud adoption, cost optimization and emerging technologies. Sesan has over 15 year’s experience in Enterprise IT and has been at AWS for 5 years. In his free time, Sesan enjoys watching various sporting activities like Soccer, Tennis and Moto sport. He has 2 kids that also keeps him busy at home.

Alexey Kurbatsky

Alexey Kurbatsky

Alexey is a Senior Software Development Engineer at AWS, specializing in building distributed and scalable services. Outside of work, he enjoys exploring nature thru hiking as well as playing guitar.

Jesse Thompson
Jesse Thompson is an Email Deliverability Manager with the Amazon Simple Email Service team. His background is in enterprise development and operations, with a focus on email abuse mitigation and encouragement of authenticity practices with open standard protocols. Jesse’s favorite activity outside of technology is recreational curling.
Zip

Zip

Zip is a Sr. Specialist Solutions Architect at AWS, working with Amazon Pinpoint and Simple Email Service and WorkMail. Outside of work he enjoys time with his family, cooking, mountain biking, boating, learning and beach plogging.

Upgrade Your Email Tech Stack with Amazon SESv2 API

Post Syndicated from Zip Zieper original https://aws.amazon.com/blogs/messaging-and-targeting/upgrade-your-email-tech-stack-with-amazon-sesv2-api/

Amazon Simple Email Service (SES) is a cloud-based email sending service that helps businesses and developers send marketing and transactional emails. We introduced the SESv1 API in 2011 to provide developers with basic email sending capabilities through Amazon SES using HTTPS. In 2020, we introduced the redesigned Amazon SESv2 API, with new and updated features that make it easier and more efficient for developers to send email at scale.

This post will compare Amazon SESv1 API and Amazon SESv2 API and explain the advantages of transitioning your application code to the SESv2 API. We’ll also provide examples using the AWS Command-Line Interface (AWS CLI) that show the benefits of transitioning to the SESv2 API.

Amazon SESv1 API

The SESv1 API is a relatively simple API that provides basic functionality for sending and receiving emails. For over a decade, thousands of SES customers have used the SESv1 API to send billions of emails. Our customers’ developers routinely use the SESv1 APIs to verify email addresses, create rules, send emails, and customize bounce and complaint notifications. Our customers’ needs have become more advanced as the global email ecosystem has developed and matured. Unsurprisingly, we’ve received customer feedback requesting enhancements and new functionality within SES. To better support an expanding array of use cases and stay at the forefront of innovation, we developed the SESv2 APIs.

While the SESv1 API will continue to be supported, AWS is focused on advancing functionality through the SESv2 API. As new email sending capabilities are introduced, they will only be available through SESv2 API. Migrating to the SESv2 API provides customers with access to these, and future, optimizations and enhancements. Therefore, we encourage SES customers to consider the information in this blog, review their existing codebase, and migrate to SESv2 API in a timely manner.

Amazon SESv2 API

Released in 2020, the SESv2 API and SDK enable customers to build highly scalable and customized email applications with an expanded set of lightweight and easy to use API actions. Leveraging insights from current SES customers, the SESv2 API includes several new actions related to list and subscription management, the creation and management of dedicated IP pools, and updates to unsubscribe that address recent industry requirements.

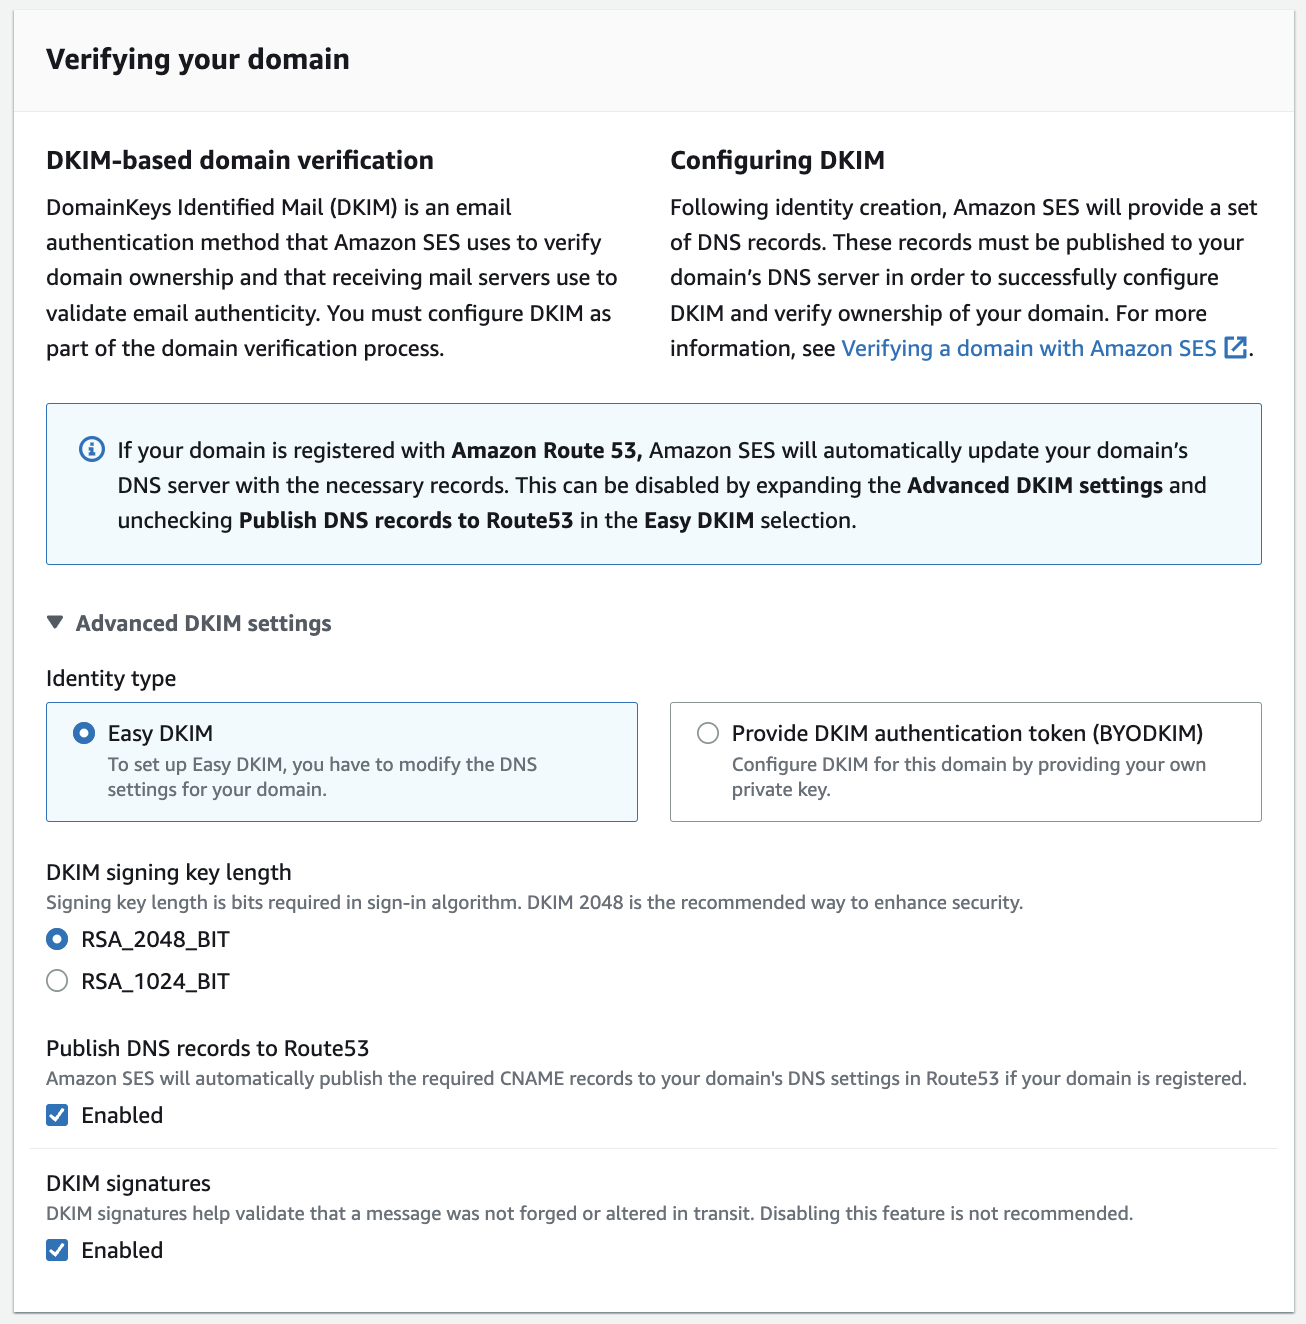
One example of new functionality in SESv2 API is programmatic support for the SES Virtual Delivery Manager. Previously only addressable via the AWS console, VDM helps customers improve sending reputation and deliverability. SESv2 API includes vdmAttributes such as VdmEnabled and DashboardAttributes as well as vdmOptions. DashboardOptions and GaurdianOptions.

To improve developer efficiency and make the SESv2 API easier to use, we merged several SESv1 APIs into single commands. For example, in the SESv1 API you must make separate calls for createConfigurationSet, setReputationMetrics, setSendingEnabled, setTrackingOptions, and setDeliveryOption. In the SESv2 API, however, developers make a single call to createConfigurationSet and they can include trackingOptions, reputationOptions, sendingOptions, deliveryOptions. This can result in more concise code (see below).

SESv1-vs-SESv2

Another example of SESv2 API command consolidation is the GetIdentity action, which is a composite of SESv1 API’s GetIdentityVerificationAttributes, GetIdentityNotificationAttributes, GetCustomMailFromAttributes, GetDKIMAttributes, and GetIdentityPolicies. See SESv2 documentation for more details.

Why migrate to Amazon SESv2 API?

The SESv2 API offers an enhanced experience compared to the original SESv1 API. Compared to the SESv1 API, the SESv2 API provides a more modern interface and flexible options that make building scalable, high-volume email applications easier and more efficient. SESv2 enables rich email capabilities like template management, list subscription handling, and deliverability reporting. It provides developers with a more powerful and customizable set of tools with improved security measures to build and optimize inbox placement and reputation management. Taken as a whole, the SESv2 APIs provide an even stronger foundation for sending critical communications and campaign email messages effectively at a scale.

Migrating your applications to SESv2 API will benefit your email marketing and communication capabilities with:

  1. New and Enhanced Features: Amazon SESv2 API includes new actions as well as enhancements that provide better functionality and improved email management. By moving to the latest version, you’ll be able to optimize your email sending process. A few examples include:
    • Increase the maximum message size (including attachments) from 10Mb (SESv1) to 40Mb (SESv2) for both sending and receiving.
    • Access key actions for the SES Virtual Deliverability Manager (VDM) which provides insights into your sending and delivery data. VDM provides near-realtime advice on how to fix the issues that are negatively affecting your delivery success rate and reputation.
    • Meet Google & Yahoo’s June 2024 unsubscribe requirements with the SES v2 SendEmail action. For more information, see the “What’s New blog”
  2. Future-proof Your Application: Avoid potential compatibility issues and disruptions by keeping your application up-to-date with the latest version of the Amazon SESv2 API via the AWS SDK.
  3. Improve Usability and Developer Experience: Amazon SESv2 API is designed to be more user-friendly and consistent with other AWS services. It is a more intuitive API with better error handling, making it easier to develop, maintain, and troubleshoot your email sending applications.

Migrating to the latest SESv2 API and SDK positions customers for success in creating reliable and scalable email services for their businesses.

What does migration to the SESv2 API entail?

While SESv2 API builds on the v1 API, the v2 API actions don’t universally map exactly to the v1 API actions. Current SES customers that intend to migrate to SESv2 API will need to identify the SESv1 API actions in their code and plan to refactor for v2. When planning the migration, it is essential to consider several important considerations:

  1. Customers with applications that receive email using SESv1 API’s CreateReceiptFilter, CreateReceiptRule or CreateReceiptRuleSet actions must continue using the SESv1 API client for these actions. SESv1 and SESv2 can be used in the same application, where needed.
  2. We recommend all customers follow the security best practice of “least privilege” with their IAM policies. As such, customers may need to review and update their policies to include the new and modified API actions introduced in SESv2 before migrating. Taking the time to properly configure permissions ensures a seamless transition while maintaining a securely optimized level of access. See documentation.

Below is an example of an IAM policy with a user with limited allow privileges related to several SESv1 Identity actions only:

{
    "Version": "2012-10-17",
    "Statement": [
        {
            "Sid": "VisualEditor0",
            "Effect": "Allow",
            "Action": [
                "ses:VerifyEmailIdentity",
                "ses:Deleteldentity",
                "ses:VerifyDomainDkim",
                "ses:ListIdentities",
                "ses:VerifyDomainIdentity"
            ],
            "Resource": "*"
        }
    ]
}

When updating to SESv2, you need to update this user’s permissions with the SESv2 actions shown below:

{
    "Version": "2012-10-17",
    "Statement": [
        {
            "Sid": "VisualEditor0",
            "Effect": "Allow",
            "Action": [
                "ses:CreateEmailIdentity",
                "ses:DeleteEmailIdentity",
                "ses:GetEmailIdentity",
                "ses:ListEmailIdentities"
            ],
            "Resource": "*"
        }
    ]
}

Examples of SESv1 vs. SESv2 APIs

Let’s look at a three examples that compare the SESv1 API with the SESv2 API.

LIST APIs

When listing identities in SESv1 list API, you need to specify type which requires multiple calls to API to list all resources:

aws ses list-identities --identity-type Domain
{
    "Identities": [
        "example.com"
    ]
}
aws ses list-identities --identity-type EmailAddress
{
    "Identities": [
        "[email protected]",
        "[email protected]",
        "[email protected]"
    ]
}

With SESv2, you can simply call a single API. Additionally, SESv2 also provides extended feedback:

aws sesv2 list-email-identities
{
    "EmailIdentities": [
        {
            "IdentityType": "DOMAIN",
            "IdentityName": "example.com",
            "SendingEnabled": false,
            "VerificationStatus": "FAILED"
        },
        {
            "IdentityType": "EMAIL_ADDRESS",
            "IdentityName": "[email protected]",
            "SendingEnabled": true,
            "VerificationStatus": "SUCCESS"
        },
        {
            "IdentityType": "EMAIL_ADDRESS",
            "IdentityName": "[email protected]",
            "SendingEnabled": false,
            "VerificationStatus": "FAILED"
        },
        {
            "IdentityType": "EMAIL_ADDRESS",
            "IdentityName": "[email protected]",
            "SendingEnabled": true,
            "VerificationStatus": "SUCCESS"
        }
    ]
}

CREATE APIs

With SESv1, creating email addresses or domains requires calling two different APIs:

aws ses verify-email-identity --email-address [email protected]
aws ses verify-domain-dkim --domain example.com
{
    "DkimTokens": [
        "mwmzhwhcebfh5kvwv7zahdatahimucqi",
        "dmlozjwrdbrjfwothoh26x6izvyts7qx",
        "le5fy6pintdkbxg6gdoetgbrdvyp664v"
    ]
}

With SESv2, we build an abstraction so you can call a single API. Additionally, SESv2 provides more detailed responses and feedback:

aws sesv2 create-email-identity --email-identity [email protected]
{
    "IdentityType": "EMAIL_ADDRESS",
    "VerifiedForSendingStatus": false
}
aws sesv2 create-email-identity --email-identity example.com
{
    "IdentityType": "DOMAIN",
    "VerifiedForSendingStatus": false,
    "DkimAttributes": {
        "SigningEnabled": true,
        "Status": "NOT_STARTED",
        "Tokens": [
            "mwmzhwhcebfh5kvwv7zahdatahimucqi",
            "dmlozjwrdbrjfwothoh26x6izvyts7qx",
            "le5fy6pintdkbxg6gdoetgbrdvyp664v"
        ],
        "SigningAttributesOrigin": "AWS_SES",
        "NextSigningKeyLength": "RSA_2048_BIT",
        "CurrentSigningKeyLength": "RSA_2048_BIT",
        "LastKeyGenerationTimestamp": "2024-02-23T15:01:53.849000+00:00"
    }
}

DELETE APIs

When calling delete- with SESv1, SES returns 200 (or no response), even if the identity was previously deleted or doesn’t exist:

 aws ses delete-identity --identity example.com

SESv2 provides better error handling and responses when calling the delete API:

aws sesv2 delete-email-identity --email-identity example.com

An error occurred (NotFoundException) when calling the DeleteEmailIdentity operation: Email identity example.com does not exist.

Hands-on with SESv1 API vs. SESv2 API

Below are a few examples you can use to explore the differences between SESv1 API and the SESv2 API. To complete these exercises, you’ll need:

  1. AWS Account (setup) with enough permission to interact with the SES service via the CLI
  2. Upgrade to the latest version of the AWS CLI (aws-cli/2.15.27 or greater)
  3. SES enabled, configured and properly sending emails
  4. A recipient email address with which you can check inbound messages (if you’re in the SES Sandbox, this email must be verified email identity). In the following examples, replace [email protected] with the verified email identity.
  5. Your preferred IDE with AWS credentials and necessary permissions (you can also use AWS CloudShell)

Open the AWS CLI (or AWS CloudShell) and:

  1. Create a test directory called v1-v2-test.
  2. Create the following (8) files in the v1-v2-test directory:

destination.json (replace [email protected] with the verified email identity):

{ 
    "ToAddresses": ["[email protected]"] 
}

ses-v1-message.json

{
   "Subject": {
       "Data": "SESv1 API email sent using the AWS CLI",
       "Charset": "UTF-8"
   },
   "Body": {
       "Text": {
           "Data": "This is the message body from SESv1 API in text format.",
           "Charset": "UTF-8"
       },
       "Html": {
           "Data": "This message body from SESv1 API, it contains HTML formatting. For example - you can include links: <a class=\"ulink\" href=\"http://docs.aws.amazon.com/ses/latest/DeveloperGuide\" target=\"_blank\">Amazon SES Developer Guide</a>.",
           "Charset": "UTF-8"
       }
   }
}

ses-v1-raw-message.json (replace [email protected] with the verified email identity):

{
     "Data": "From: [email protected]\nTo: [email protected]\nSubject: Test email sent using the SESv1 API and the AWS CLI \nMIME-Version: 1.0\nContent-Type: text/plain\n\nThis is the message body from the SESv1 API SendRawEmail.\n\n"
}

ses-v1-template.json (replace [email protected] with the verified email identity):

{
  "Source":"SES Developer<[email protected]>",
  "Template": "my-template",
  "Destination": {
    "ToAddresses": [ "[email protected]"
    ]
  },
  "TemplateData": "{ \"name\":\"SESv1 Developer\", \"favoriteanimal\": \"alligator\" }"
}

my-template.json (replace [email protected] with the verified email identity):

{
  "Template": {
    "TemplateName": "my-template",
    "SubjectPart": "Greetings SES Developer, {{name}}!",
    "HtmlPart": "<h1>Hello {{name}},</h1><p>Your favorite animal is {{favoriteanimal}}.</p>",
    "TextPart": "Dear {{name}},\r\nYour favorite animal is {{favoriteanimal}}."
  }
}

ses-v2-simple.json (replace [email protected] with the verified email identity):

{
    "FromEmailAddress": "[email protected]",
    "Destination": {
        "ToAddresses": [
            "[email protected]"
        ]
    },
    "Content": {
        "Simple": {
            "Subject": {
                "Data": "SESv2 API email sent using the AWS CLI",
                "Charset": "utf-8"
            },
            "Body": {
                "Text": {
                    "Data": "SESv2 API email sent using the AWS CLI",
                    "Charset": "utf-8"
                }
            },
            "Headers": [
                {
                    "Name": "List-Unsubscribe",
                    "Value": "insert-list-unsubscribe-here"
                },
				{
                    "Name": "List-Unsubscribe-Post",
                    "Value": "List-Unsubscribe=One-Click"
                }
            ]
        }
    }
}

ses-v2-raw.json (replace [email protected] with the verified email identity):

{
     "FromEmailAddress": "[email protected]",
     "Destination": {
            "ToAddresses": [
                       "[email protected]"
              ]
       },
      "Content": {
             "Raw": {
                     "Data": "Subject: Test email sent using SESv2 API via the AWS CLI \nMIME-Version: 1.0\nContent-Type: text/plain\n\nThis is the message body from SendEmail Raw Content SESv2.\n\n"
              }
      }
}

ses-v2-tempate.json (replace [email protected] with the verified email identity):

{
     "FromEmailAddress": "[email protected]",
     "Destination": {
       "ToAddresses": [
         "[email protected]"
       ]
     },
     "Content": {
        "Template": {
          "TemplateName": "my-template",
          "TemplateData": "{ \"name\":\"SESv2 Developer\",\"favoriteanimal\":\"Dog\" }",
          "Headers": [
                {
                   "Name": "List-Unsubscribe",
                   "Value": "insert-list-unsubscribe-here"
                },
                {
                   "Name": "List-Unsubscribe-Post",
                   "Value": "List-Unsubscribe=One-Click"
                }
             ]
         }
     }
}

Perform the following commands using the SESv1 API:

send-email (simple):

aws ses send-email --from [email protected] --destination file://destination.json --message file://ses-v1-message.json 
  • The response will return a valid MessageID (signaling the action was successful). An email will be received by the verified email identity.
{
    "MessageId": "0100018dc7649400-Xx1x0000x-bcec-483a-b97c-123a4567890d-xxxxx"
}

send-raw-email:

  • In the CLI, run:
aws ses send-raw-email  --cli-binary-format raw-in-base64-out --raw-message file://ses-v1-raw-message.json 
  • The response will return a valid MessageID (signaling the action was successful). An email will be received by the verified email identity.
{
   "MessageId": "0200018dc7649400-Xx1x1234x-bcec-483a-b97c-123a4567890d-
}

send templated mail:

  • In the CLI, run the following to create the template:
aws ses create-template  --cli-input-json file://my-template.json
  • In the CLI, run:

aws ses send-templated-email --cli-input-json file://ses-v1-template.json

  • The response will return a valid MessageID (signaling the action was successful). An email will be received by the verified email identity.
 {
    "MessageId": "0000018dc7649400-Xx1x1234x-bcec-483a-b97c-123a4567890d-xxxxx"
 }

Perform similar commands using the SESv2 API:

As mentioned above, customers who are using least privilege permissions with SESv1 API must first update their IAM policies before running the SESv2 API examples below. See documentation for more info.

As you can see from the .json files we created for SES v2 API (above), you can modify or remove sections from the .json files, based on the type of email content (simple, raw or templated) you want to send.

Please ensure you are using the latest version of the AWS CLI (aws-cli/2.15.27 or greater).

Send simple email

  • In the CLI, run:
aws sesv2 send-email --cli-input-json file://ses-v2-simple.json
  • The response will return a valid MessageID (signaling the action was successful). An email will be received by the verified email identity
{
    "MessageId": "0100018dc83ba7e0-7b3149d7-3616-49c2-92b6-00e7d574f567-000000"
}

Send raw email (note – if the only reason is to set custom headers, you don’t need to send raw email)

  • In the CLI, run:
aws sesv2 send-email --cli-binary-format raw-in-base64-out --cli-input-json file://ses-v2-raw.json
  • The response will return a valid MessageID (signaling the action was successful). An email will be received by the verified email identity.
{
    "MessageId": "0100018dc877bde5-fdff0df3-838e-4f51-8582-a05237daecc7-000000"
}

Send templated email

  • In the CLI, run:
aws sesv2 send-email --cli-input-json file://ses-v2-tempate.json
  • The response will return a valid MessageID (signaling the action was successful). An email will be received by the verified email identity.
{
    "MessageId": "0100018dc87fe72c-f2c547a1-2325-4be4-bf78-b91d6648cd12-000000"
}

Migrating your application code to SESv2 API

As you can see from the examples above, SESv2 API shares much of its syntax and actions with the SESv1 API. As a result, most customers have found they can readily evaluate, identify and migrate their application code base in a relatively short period of time. However, it’s important to note that while the process is generally straightforward, there may be some nuances and differences to consider depending on your specific use case and programming language.

Regardless of the language, you’ll need anywhere from a few hours to a few weeks to:

  • Update your code to use SESv2 Client and change API signature and request parameters
  • Update permissions / policies to reflect SESv2 API requirements
  • Test your migrated code to ensure that it functions correctly with the SESv2 API
  • Stage, test
  • Deploy

Summary

As we’ve described in this post, Amazon SES customers that migrate to the SESv2 API will benefit from updated capabilities, a more user-friendly and intuitive API, better error handling and improved deliverability controls. The SESv2 API also provide for compliance with the industry’s upcoming unsubscribe header requirements, more flexible subscription-list management, and support for larger attachments. Taken collectively, these improvements make it even easier for customers to develop, maintain, and troubleshoot their email sending applications with Amazon Simple Email Service. For these, and future reasons, we recommend SES customers migrate their existing applications to the SESv2 API immediately.

For more information regarding the SESv2 APIs, comment on this post, reach out to your AWS account team, or consult the AWS SESv2 API documentation:

About the Authors

zip

Zip

Zip is an Amazon Pinpoint and Amazon Simple Email Service Sr. Specialist Solutions Architect at AWS. Outside of work he enjoys time with his family, cooking, mountain biking and plogging.

Vinay_Ujjini

Vinay Ujjini

Vinay is an Amazon Pinpoint and Amazon Simple Email Service Worldwide Principal Specialist Solutions Architect at AWS. He has been solving customer’s omni-channel challenges for over 15 years. He is an avid sports enthusiast and in his spare time, enjoys playing tennis and cricket.

Dmitrijs_Lobanovskis

Dmitrijs Lobanovskis

Dmitrijs is a Software Engineer for Amazon Simple Email service. When not working, he enjoys traveling, hiking and going to the gym.

Amazon SES: Email Authentication and Getting Value out of Your DMARC Policy

Post Syndicated from Bruno Giorgini original https://aws.amazon.com/blogs/messaging-and-targeting/email-authenctication-dmarc-policy/

Amazon SES: Email Authentication and Getting Value out of Your DMARC Policy

Introduction

For enterprises of all sizes, email is a critical piece of infrastructure that supports large volumes of communication. To enhance the security and trustworthiness of email communication, many organizations turn to email sending providers (ESPs) like Amazon Simple Email Service (Amazon SES). These ESPs allow users to send authenticated emails from their domains, employing industry-standard protocols such as the Sender Policy Framework (SPF) and DomainKeys Identified Mail (DKIM). Messages authenticated with SPF or DKIM will successfully pass your domain’s Domain-based Message Authentication, Reporting, and Conformance (DMARC) policy. This blog post will focus on the DMARC policy enforcement mechanism. The blog will explore some of the reasons why email may fail DMARC policy evaluation and propose solutions to fix any failures that you identify. For an introduction to DMARC and how to carefully choose your email sending domain identity, you can refer to Choosing the Right Domain for Optimal Deliverability with Amazon SES The relationship between DMARC compliance and email deliverability rates is crucial for organizations aiming to maintain a positive sender reputation and ensure successful email delivery. There are many advantages when organizations have this correctly setup, these include:

  • Improved Email Deliverability
  • Reduction in Email Spoofing and Phishing
  • Positive Sender Reputation
  • Reduced Risk of Email Marked as Spam
  • Better Email Engagement Metrics
  • Enhanced Brand Reputation

With this foundation, let’s explore the intricacies of DMARC and how it can benefit your organization’s email communication.

What is DMARC?

DMARC is a mechanism for domain owners to advertise SPF and DKIM protection and to tell receivers how to act if those authentication methods fail. The domain’s DMARC policy protects your domain from third parties attempting to spoof the domain in the “From” header of emails. Malicious email messages that aim to send phishing attempts using your domain will be subject to DMARC policy evaluation, which may result in their quarantine or rejection by the email receiving organization. This stringent policy ensures that emails received by email recipients are genuinely from the claimed sending domain, thereby minimizing the risk of people falling victim to email-based scams. Domain owners publish DMARC policies as a TXT record in the domain’s _dmarc.<domain> DNS record. For example, if the domain used in the “From” header is example.com, then the domain’s DMARC policy would be located in a DNS TXT record named _dmarc.example.com. The DMARC policy can have one of three policy modes:

  • A typical DMARC deployment of an existing domain will start with publishing "p=none". A none policy means that the domain owner is in a monitoring phase; the domain owner is monitoring for messages that aren’t authenticated with SPF and DKIM and seeks to ensure all email is properly authenticated
  • When the domain owner is comfortable that all legitimate use cases are properly authenticated with SPF and/or DKIM, they may change the DMARC policy to "p=quarantine". A quarantine policy means that messages which fail to produce a domain-aligned authenticated identifier via SPF or DKIM will be quarantined by the mail receiving organization. The mail receiving organization may filter these messages into Junk folders, or take another action that they feel best protects their recipients.
  • Finally, domain owners who are confident that all of the legitimate messages using their domain are authenticated with SPF or DKIM, may change the DMARC policy to "p=reject". A reject policy means that messages which fail to produce a domain-aligned authenticated identifier via SPF or DKIM will be rejected by the mail receiving organization.

The following are examples of a TXT record that contains a DMARC policy, depending on the desired policy (the ‘p’ tag):

  Name Type Value
1 _dmarc.example.com TXT “v=DMARC1;p=reject;rua=mailto:[email protected]
2 _dmarc.example.com TXT “v=DMARC1;p=quarantine;rua=mailto:[email protected]
3 _dmarc.example.com TXT “v=DMARC1;p=none;rua=mailto:[email protected]
Table 1 – Example DMARC policy

This policy tells email providers to apply the DMARC policy to messages that fail to produce a DKIM or SPF authenticated identifier that is aligned to the domain in the “From” header. Alignment means that one or both of the following occurs:

  • The messages pass the SPF policy for the MAIL FROM domain and the MAIL FROM domain is the same as the domain in the “From” header, or a subdomain. Reference Using a custom MAIL FROM domain to learn more about how to send SPF aligned messages with SES.
  • The messages have a DKIM signature signed by a public key in DNS at a location within the domain of the “From” header. Reference Authenticating Email with DKIM in Amazon SES to learn more about how to send DKIM aligned messages with SES.

DMARC reporting

The rua tag in the domain’s DMARC policy indicates the location to which mail receiving organizations should send aggregate reports about messages that pass or fail SPF and DKIM alignment. Domain owners analyze these reports to discover messages which are using the domain in the “From” header but are not properly authenticated with SPF or DKIM. The domain owner will attempt to ensure that all legitimate messages are authenticated through analysis of the DMARC aggregate reports over time. Mail receiving organizations which support sending DMARC reports typically send these aggregated reports once per day, although these practices differ from provider to provider.

What does a typical DMARC deployment look like?

A DMARC deployment is the process of:

  1. Ensuring that all emails using the domain in the “From” header are authenticated with DKIM and SPF domain-aligned identifiers. Focus on DKIM as the primary means of authentication.
  2. Publishing a DMARC policy (none, quarantine, or reject) for the domain that reflects how the domain owner would like mail receiving organizations to handle unauthenticated email claiming to be from their domain.

New domains and subdomains

Deploying a DMARC policy is easy for organizations that have created a new domain or subdomain for the purpose of a new email sending use case on SES; for example email marketing, transaction emails, or one-time pass codes (OTP). These domains can start with the "p=reject" DMARC enforcement policy because the policy will not affect existing email sending programs. This strict enforcement is to ensure that there is no unauthenticated use of the domain and its subdomains.

Existing domains

For existing domains, a DMARC deployment is an iterative process because the domain may have a history of email sending by one or multiple email sending programs. It is important to gain a complete understanding of how the domain and its subdomains are being used for email sending before publishing a restrictive DMARC policy (p=quarantine or p=reject) because doing so would affect any unauthenticated email sending programs using the domain in the “From” header of messages. To get started with the DMARC implementation, these are a few actions to take:

  • Publish a p=none DMARC policy (sometimes referred to as monitoring mode), and set the rua tag to the location in which you would like to receive aggregate reports.
  • Analyze the aggregate reports. Mail receiving organizations will send reports which contain information to determine if the domain, and its subdomains, are being used for sending email, and how the messages are (or are not) being authenticated with a DKIM or SPF domain-aligned identifier. An easy to use analysis tool is the Dmarcian XML to Human Converter.
  • Avoid prematurely publishing a “p=quarantine” or “p=reject” policy. Doing so may result in blocked or reduced delivery of legitimate messages of existing email sending programs.

The image below illustrates how DMARC will be applied to an email received by the email receiving server and actions taken based on the enforcement policy:

DMARC flow 
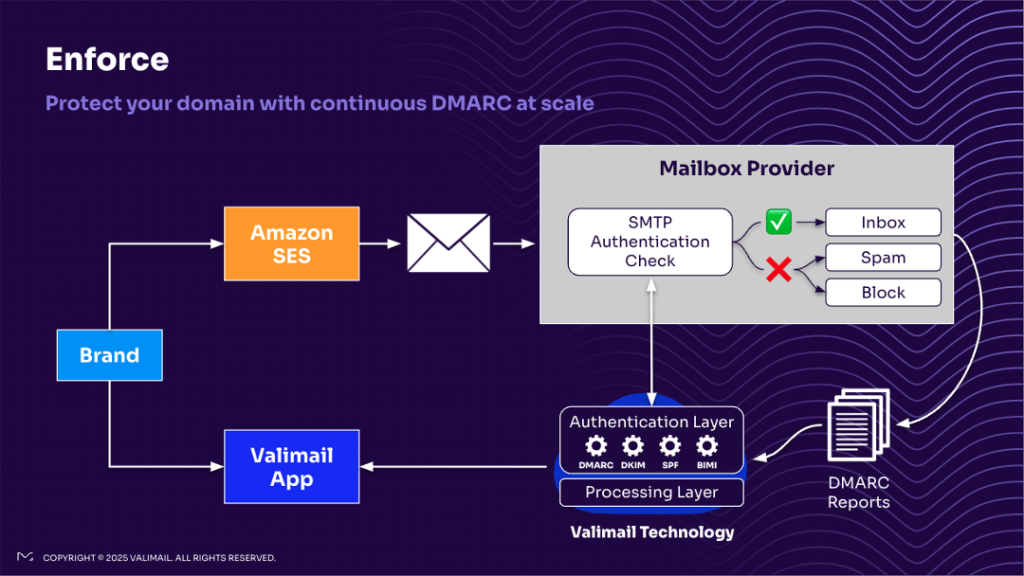
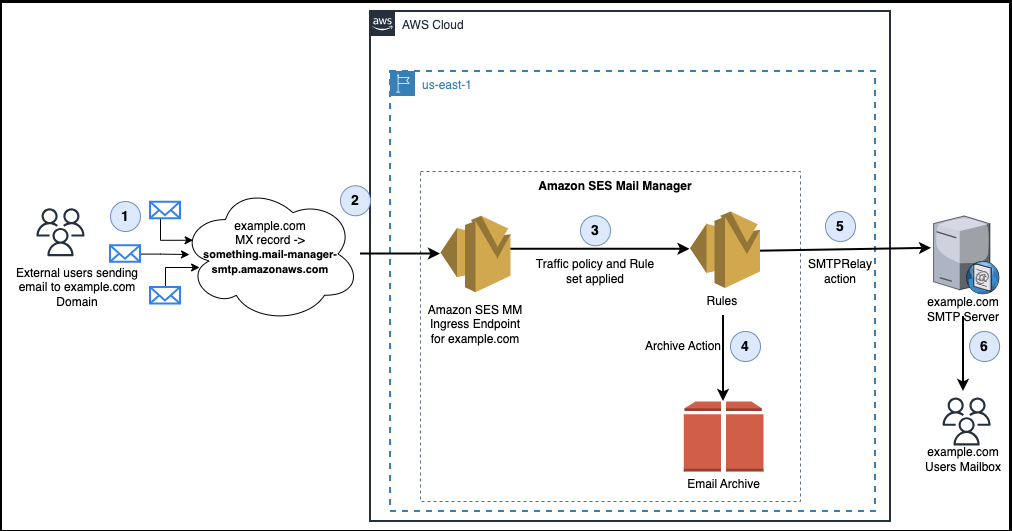
Figure 1 – DMARC Flow

How do SPF and DKIM cause DMARC policies to pass

When you start sending emails using Amazon SES, messages that you send through Amazon SES automatically use a subdomain of amazonses.com as the default MAIL FROM domain. SPF evaluators will see that these messages pass the SPF policy evaluation because the default MAIL FROM domain has a SPF policy which includes the IP addresses of the SES infrastructure that sent the message. SPF authentication will result in an “SPF=PASS” and the authenticated identifier is the domain of the MAIL FROM address. The published SPF record applies to every message that is sent using SES regardless of whether you are using a shared or dedicated IP address. The amazonses.com SPF record lists all shared and dedicated IP addresses, so it is inclusive of all potential IP addresses that may be involved with sending email as the MAIL FROM domain. You can use ‘dig’ to look up the IP addresses that SES will use to send email:

dig txt amazonses.com | grep "v=spf1" amazonses.com. 850 IN TXT "v=spf1 ip4:199.255.192.0/22 ip4:199.127.232.0/22 ip4:54.240.0.0/18 ip4:69.169.224.0/20 ip4:23.249.208.0/20 ip4:23.251.224.0/19 ip4:76.223.176.0/20 ip4:54.240.64.0/19 ip4:54.240.96.0/19 ip4:52.82.172.0/22 ip4:76.223.128.0/19 -all"

Custom MAIL FROM domains

It is best practice for customers to configure a custom MAIL FROM domain, and not use the default amazonses.com MAIL FROM domain. The custom MAIL FROM domain will always be a subdomain of the customer’s verified domain identity. Once you configure the MAIL FROM domain, messages sent using SES will continue to result in an “SPF=PASS” as it does with the default MAIL FROM domain. Additionally, DMARC authentication will result in “DMARC=PASS” because the MAIL FROM domain and the domain in the “From” header are in alignment. It’s important to understand that customers must use a custom MAIL FROM domain if they want “SPF=PASS” to result in a “DMARC=PASS”.

For example, an Amazon SES-verified example.com domain will have the custom MAIL FROM domain “bounce.example.com”. The configured SPF record will be:

dig txt bounce.example.com | grep "v=spf1" "v=spf1 include:amazonses.com ~all"

Note: The chosen MAIL FROM domain could be any sub-domain of your choice. If you have the same domain identity configured in multiple regions, then you should create region-specific custom MAIL FROM domains for each region. e.g. bounce-us-east-1.example.com and bounce-eu-west-2.example.com so that asynchronously bounced messages are delivered directly to the region from which the messages were sent.

DKIM results in DMARC pass

For customers that establish Amazon SES Domain verification using DKIM signatures, DKIM authentication will result in a DKIM=PASS, and DMARC authentication will result in “DMARC=PASS” because the domain that publishes the DKIM signature is aligned to the domain in the “From” header (the SES domain identity).

DKIM and SPF together

Email messages are fully authenticated when the messages pass both DKIM and SPF, and both DKIM and SPF authenticated identifiers are domain-aligned. If only DKIM is domain-aligned, then the messages will still pass the DMARC policy, even if the SPF “pass” is unaligned. Mail receivers will consider the full context of SPF and DKIM when determining how they will handle the disposition of the messages you send, so it is best to fully authenticate your messages whenever possible. Amazon SES has taken care of the heavy lifting of the email authentication process away from our customers, and so, establishing SPF, DKIM and DMARC authentication has been reduced to a few clicks which allows SES customers to get started easily and scale fast.

Why is DMARC failing?

There are scenarios when you may notice that messages fail DMARC, whether your messages are fully authenticated, or partially authenticated. The following are things that you should look out for:

Email Content Modification

Sometimes email content is modified during the delivery to the recipients’ mail servers. This modification could be as a result of a security device or anti-spam agent along the delivery path (for example: the message Subject may be modified with an “[EXTERNAL]” warning to recipients). The modified message invalidates the DKIM signature which causes a DKIM failure. Remember, the purpose of DKIM is to ensure that the content of an email has not been tampered with during the delivery process. If this happens, the DKIM authentication will fail with an authentication error similar to “DKIM-signature body hash not verified“.

Solutions:

  • If you control the full path that the email message will traverse from sender to recipient, ensure that no intermediary mail servers modify the email content in transit.
  • Ensure that you configure a custom MAIL FROM domain so that the messages have a domain-aligned SPF identifier.
  • Keep the DMARC policy in monitoring mode (p=none) until these issues are identified/solved.

Email Forwarding

Email Forwarding There are multiple scenarios in which a message may be forwarded, and they may result in both/either SPF and DKIM failing to produce a domain-aligned authenticated identifier. For SPF, it means that the forwarding mail server is not listed in the MAIL FROM domain’s SPF policy. It is best practice for a forwarding mail server to avoid SPF failures and assume responsibility of mail handling for the messages it forwards by rewriting the MAIL FROM address to be in the domain controlled by the forwarding server. Forwarding servers that do not rewrite the MAIL FROM address pose a risk of impersonation attacks and phishing. Do not add the IP addresses of forwarding servers to your MAIL FROM domain’s SPF policy unless you are in complete control of all sources of mail being forwarded through this infrastructure. For DKIM, it means that the messages are being modified in some way that causes DKIM signature validation failure (see Email Content Modification section above). A responsible forwarding server will rewrite the MAIL FROM domain so that the messages pass SPF with a non-aligned authenticated identifier. These servers will attempt to forward the message without alteration in order to preserve DKIM signatures, but that is sometimes challenging to do in practice. In this scenario, since the messages carry no domain-aligned authenticated identifier, the messages will fail the DMARC policy.

Solution:

  • Email forwarding is an expected type of failure of which you will see in the DMARC aggregate reports. The domain owner must weigh the risk of causing forwarded messages to be rejected against the risk of not publishing a reject DMARC policy. Reference 8.6. Interoperability Considerations. Forwarding servers that wish to forward messages that they know will result in a DMARC failure will commonly rewrite the “From” header address of messages it forwards so that the messages pass a DMARC policy for a domain that the forwarding server is responsible for. The way to identify forwarding servers that rewrite the “From” header in this situation is to publish “p=quarantine pct=0 t=y” in your domain’s DMARC policy before publishing “p=reject”.

Multiple email sending providers are sending using the same domain

Multiple email sending providers: There are situations where an organization will have multiple business units sending email using the same domain, and these business units may be using an email sending provider other than SES. If neither SPF nor DKIM is configured with domain-alignment for these email sending providers, you will see DMARC failures in the DMARC aggregate report.

Solution:

  • Analyze the DMARC aggregate reports to identify other email sending providers, track down the business units responsible for each email sending program, and follow the instructions offered by the email sending provider about how to configure SPF and DKIM to produce a domain-aligned authenticated identifier.

What does a DMARC aggregate report look like?

The following XML example shows the general format of a DMARC aggregate report that you will receive from participating email service providers.

<?xml version="1.0" encoding="UTF-8" ?> 
<feedback> 
  <report_metadata> 
    <org_name>email-service-provider-domain.com</org_name> 
    <email>[email protected]</email> 
    <extra_contact_info>https://email-service-provider-domain.com/> 
    <report_id>620501112281841510</report_id> 
    <date_range> 
      <begin>1685404800</begin> 
      <end>1685491199</end> 
    </date_range> 
  </report_metadata> 
  <policy_published> 
    <domain>example.com</domain>
    <adkim>r</adkim> 
    <aspf>r</aspf> 
    <p>none</p> 
    <sp>none</sp> 
    <pct>100</pct> 
  </policy_published> 
  <record> 
    <row> 
      <source_ip>192.0.2.10</source_ip>
      <count>1</count> 
      <policy_evaluated> 
        <disposition>none</disposition> 
        <dkim>pass</dkim> 
        <spf>fail</spf> 
      </policy_evaluated> 
    </row> 
    <identifiers> 
      <header_from>example.com</header_from>
    </identifiers> 
    <auth_results> 
      <dkim> 
        <domain>example.com</domain> 
        <result>pass</result> 
        <selector>gm5h7da67oqhnr3ccji35fdskt</selector> 
      </dkim> 
      <dkim> 
        <domain>amazonses.com</domain> 
        <result>pass</result> 
        <selector>224i4yxa5dv7c2xz3womw6peua</selector> 
      </dkim> 
      <spf> 
        <domain>amazonses.com</domain> 
        <result>pass</result> 
      </spf> 
    </auth_results> 
  </record> 
</feedback> 


How to address DMARC deployment for domains confirmed to be unused for email (dangling or otherwise)

Deploying DMARC for unused or dangling domains is a proactive step to prevent abuse or unauthorized use of your domain. Once you have confirmed that all subdomains being used for sending email have the desired DMARC policies, you can publish a ‘p=reject’ tag on the organizational domain, which will prevent unauthorized usage of unused subdomains without the need to publish DMARC policies for every conceivable subdomain. For more advanced subdomain policy scenarios, read the “tree walk” definitions in https://datatracker.ietf.org/doc/draft-ietf-dmarc-dmarcbis/

Conclusion:

In conclusion, DMARC is not only a technology but also a commitment to email security, integrity, and trust. By embracing DMARC best practices, organizations can protect their users, maintain a positive brand reputation, and ensure seamless email deliverability. Every message from SES passes SPF and DKIM for “amazonses.com”, but the authenticated identifiers are not always in alignment with the domain in the “From” header which carries the DMARC policy. If email authentication is not fully configured, your messages are susceptible to delivery issues like spam filtering, or being rejected or blocked by the recipient ESP. As a best practice, you can configure both DKIM and SPF to attain optimum deliverability while sending email with SES.


About the Authors

Bruno Giorgini Bruno Giorgini is a Senior Solutions Architect specializing in Pinpoint and SES. With over two decades of experience in the IT industry, Bruno has been dedicated to assisting customers of all sizes in achieving their objectives. When he is not crafting innovative solutions for clients, Bruno enjoys spending quality time with his wife and son, exploring the scenic hiking trails around the SF Bay Area.
Jesse Thompson Jesse Thompson is an Email Deliverability Manager with the Amazon Simple Email Service team. His background is in enterprise IT development and operations, with a focus on email abuse mitigation and encouragement of authenticity practices with open standard protocols. Jesse’s favorite activity outside of technology is recreational curling.
Sesan Komaiya Sesan Komaiya is a Solutions Architect at Amazon Web Services. He works with a variety of customers, helping them with cloud adoption, cost optimization and emerging technologies. Sesan has over 15 year’s experience in Enterprise IT and has been at AWS for 5 years. In his free time, Sesan enjoys watching various sporting activities like Soccer, Tennis and Moto sport. He has 2 kids that also keeps him busy at home.
Mudassar Bashir Mudassar Bashir is a Solutions Architect at Amazon Web Services. He has over ten years of experience in enterprise software engineering. His interests include web applications, containerization, and serverless technologies. He works with different customers, helping them with cloud adoption strategies.
Priya Priya Singh is a Cloud Support Engineer at AWS and subject matter expert in Amazon Simple Email Service. She has a 6 years of diverse experience in supporting enterprise customers across different industries. Along with Amazon SES, she is a Cloudfront enthusiast. She loves helping customers in solving issues related to Cloudfront and SES in their environment.


How to list over 1000 email addresses from account-level suppression list

Post Syndicated from vmgaddam original https://aws.amazon.com/blogs/messaging-and-targeting/how-to-list-over-1000-email-addresses-from-account-level-suppression-list/

Overview of solution

Amazon Simple Email Service (SES) offers an account-level suppression list, which assists customers in avoiding sending emails to addresses that have previously resulted in bounce or complaint events. This feature is designed to protect the sender’s reputation and enhance message delivery rates. There are various types of suppression lists available, including the global suppression List, account-level suppression list, and configuration set-level suppression. The account-level suppression list is owned and managed by the customer, providing them with control over their list and account reputation. Additionally, customers can utilize the configuration set-level suppression feature for more precise control over suppression list management, which overrides the account-level suppression list.

Maintaining a healthy sender reputation with email providers (such as Gmail, Yahoo, or Hotmail) increases the probability of emails reaching recipients’ inboxes instead of being marked as spam. One effective approach to uphold sender reputation involves refraining from sending emails to invalid email addresses and disinterested recipients.

The account-level suppression list can be managed using Amazon SES console or AWS CLI which provides an easy way to manage addresses including bulk actions to add or remove addresses.

Currently, If the account-level suppression list contains more than 1000 records, we need to use NextToken to obtain a complete list of email addresses in a paginated manner. If the email address you are looking for is not within the first 1000 records of the response, you won’t be able to obtain the information from the account-level suppression list with one single command. To list all the email addresses within the account-level suppression, we use Amazon SES ListSuppressedDestinations API. This API allows you to fetch the NextToken and pass it to a follow-up request in order to retrieve another page of results.

The code below creates a loop that makes multiple requests, in each iteration, the next token is replaced, aiding in retrieving all email addresses that have been added to the account-level suppression list.

Prerequisite

The code below can be used to run in your local machine or using AWS CloudShell As part of this blog spot, we will be using AWS CloudShell to fetch the list.

Note: Python 3 and Python 2 are both ready to use in the shell environment. Python 3 is now considered the default version of the programming language (support for Python 2 ended in January 2020).

1) An active AWS account.
2) User logged in to AWS management console must have “ses:ListSuppressedDestinations” permissions.

Walkthrough

  1. Sign in to AWS management console and select the region where you are using Amazon SES
  2. Launch AWS CloudShell
  3. Save the code specified below as a file in your local environment. Example: List_Account_Level.py
  4. Click Actions and Upload File (List_Account_Level.py)

Upload File to AWS CloudShell

5. Run Python code.

Python3 List_Account_Level.py >> Email_Addresses_List.json

6. The file Email_Addresses_List.json will be saved in current directory
7. To download the file – Click Actions and Download File providing File name Email_Addresses_List.json

Download File from AWS CloudShell

List the Email addresses in your Amazon SES account suppression list added to recent bounce or complaint event using Python.

We used the ListSuppressedDestinations operation in the SES API v2 to create a list with all the email addresses that are on your account-level suppression list for your account including bounces and complaints.

Note: SES account-level suppression list applies to your AWS account in the current AWS Region.

import boto3
from datetime import datetime
import json

def showTimestamp(results):
    updated_results = []
    for eachAddress in results:
        updated_address = eachAddress.copy()
        updated_address['LastUpdateTime'] = eachAddress['LastUpdateTime'].strftime("%m/%d/%Y, %H:%M:%S")
        updated_results.append(updated_address)
    return updated_results

def get_resources_from(supression_details):
    results = supression_details['SuppressedDestinationSummaries']
    next_token = supression_details.get('NextToken', None)
    return results, next_token

def main():
    client = boto3.client('sesv2')
    next_token = ''  # Variable to hold the pagination token
    results = []   # List for the entire resource collection
    # Call the `list_suppressed_destinations` method in a loop

    while next_token is not None:
        if next_token:
            suppression_response = client.list_suppressed_destinations(
                PageSize=1000,
                NextToken=next_token
            )
        else:
            suppression_response = client.list_suppressed_destinations(
                PageSize=1000
            )
        current_batch, next_token = get_resources_from(suppression_response)
        results += current_batch

    results = showTimestamp(results)

    print(json.dumps(results, indent=2, sort_keys=False))

if __name__ == "__main__":
    main()

Sample Response

Returns all of the email addresses and the output resembles the following example:

[{
    "EmailAddress": "[email protected]",
    "Reason": "BOUNCE",
    "LastUpdateTime": "04/30/2021, 15:43:01"
}, {
    "EmailAddress": "[email protected]",
    "Reason": "BOUNCE",
    "LastUpdateTime": "04/30/2021, 15:43:01"
}, {
    "EmailAddress": "[email protected]",
    "Reason": "BOUNCE",
    "LastUpdateTime": "04/30/2021, 15:43:01"
}, {
    "EmailAddress": "[email protected]",
    "Reason": "BOUNCE",
    "LastUpdateTime": "04/30/2021, 15:43:00"
}, {
    "EmailAddress": "[email protected]",
    "Reason": "COMPLAINT",
    "LastUpdateTime": "06/22/2023, 12:59:31"
}]

Cleaning up

The response file Email_Addresses_List.json will contain the list of all the email addresses on your account-level suppression list even if there are more than 1000 records. Please free to delete files that were created as part of the process if you no longer need them.

Conclusion

In this blog post, we explained listing of all email addresses if the account-level suppression list contains more than 1000 records using AWS CouldShell. Having complete list of email addresses will help you identify email addresses you are looking for and that are not included in the first 1000 records of the response. You can validate email address and determine who can receive email that can be removed from the account-level suppression list. This protect the sender reputations and improving delivery rates.

Follow-up

  1. https://docs.aws.amazon.com/ses/latest/dg/sending-email-suppression-list.html
  2. https://repost.aws/knowledge-center/ses-remove-email-from-suppresion-list

About the Author

vmgaddam

Venkata Manoj Gaddam is Cloud Support Engineer II at AWS and Service Matter Expert in Amazon Simple Email Service (SES) and Amazon Simple Storage Service (S3). Along with Amazon SES and S3, he is AWS Snow Family enthusiast. In his free time, he enjoys hanging out with friends and traveling.

How to verify an email address in SES which does not have an inbox

Post Syndicated from ajibho original https://aws.amazon.com/blogs/messaging-and-targeting/how-to-verify-an-email-address-in-ses-which-does-not-have-an-inbox/

Overview of solution

Amazon Simple Email Service (Amazon SES) is an email platform that provides a straightforward and cost-effective solution for sending and receiving emails using your own email addresses and domains.

One of the most common use cases for using separate verified from email address is in online retails/e-commerce platforms. Online/e-commerce platform need to send emails to their customers where the from address should look like “[email protected]. In these cases, the From addresses like [email protected] does not have inbox setup for receiving emails. Using the following solution, you can avoid setting up an inbox for the email identity while still verifying the email address for sending and receiving.

In order to send emails from SES using email/domain identity, we need to have the From email identity or domain verified in Amazon SES in a supported region. When verifying a domain,you have the option to use Easy DKIM or Bring Your Own DKIM(BYOD). For verifying an email address, you need to create an identity in Amazon SES for the respective region. Once the required email address identity is created, you will receive a verification link in your inbox. To successfully verify the email address, simply open the link in your browser. In this case, you would need to have inbox setup for email address to receive the verification link from [email protected].

Verifying a domain in Amazon SES allows you to send emails from any identity associated with that domain. For example, if you create and verify a domain identity called example.com, you don’t need to create separate subdomain identities for a.example.com, a.b.example.com, nor separate email address identities for [email protected], [email protected], and so on. Therefore, the settings for the domain remain the same for all From addresses and you cannot separate you sending activity. You can use this solution to verify the From address without setting up an inbox and differentiate sending activity and tracking based on settings. The benefits of having different email settings from the domain are mentioned below.

Benefits of verifying the email separately for the same domain:

1) When you verify the email along with your domain, you can keep the settings different for the two Identities. You can setup different Configuration sets, notifications and dedicated IP pools for the verified email. This separation enables you to manage domain and email settings independently.
2) You can have two separate emails for sending transaction ([email protected]) and Marketing emails ([email protected]). After assigning different configuration sets, you can monitor the bounces and complaints separately for the sender. A best practice here would be separating the Transactional and Marketing in sub domains. Having both types in the same domain can adversely affect the reputation for your domain, and reduce deliverability of your transactional emails.
3) Using different dedicated IP pools, you can separate the sending IPs for Marketing and transaction or any other emails. Thus, your IP reputation for one use case is not affected by any other emails.

Prerequisite

1) An active AWS account.
2) Administrative Access to the Amazon SES Console and Amazon Simple Storage Service(S3) console.
3) A verified identity (Domain) with an MX record for the domain pointing to a Receiving Endpoint in one of the following region in Amazon SES.

Region Name Region Receiving Endpoint
US East (N. Virginia) us-east-1 inbound-smtp.us-east-1.amazonaws.com
US West (Oregon) us-west-2 inbound-smtp.us-west-2.amazonaws.com
Europe (Ireland) eu-west-1 inbound-smtp.eu-west-1.amazonaws.com

Solution walkthrough

In order to verify the email in SES, we need to verify the link send from Amazon SES in the email inbox. We will setup receiving rule set and add S3 bucket with required permissions to store emails from Amazon SES in S3 bucket. After receiving the email in S3 bucket, download the email to get the verification link. Open the verification link in a browser to complete the process.

Step 1 : How to setup SES Email Receiving Ruleset for S3 bucket

1) Open the Amazon SES console.
2) In the navigation pane, under Configuration, choose Email Receiving.
Email Receiving Rule set

3) To create a new rule set, choose Create a Rule Set, enter a rule set name, and then choose Create a Rule Set.
Note: If you create a new rule set, select the rule set, and then choose Set as Active Rule Set. Only one of your receipt rule sets can be the active rule set at any given time.


4) Choose Active Rule Set and Choose Create Rule.

Active Ruleset

5) Enter a unique rule name. If your use case requires TLS or spam and virus scanning, then choose Require TLS or Enable spam and virus scanning. To make this an active rule, select the Enabled checkbox. Choose Next.
Receiving Rule Setting

6) To receive emails for specific verified domain, click Add new recipient condition and enter the domain/email address. You can leave it blank and it will store for all the verified domain addresses with receiving setup.
Add recipient condition

7) Choose Add new action, and then choose Deliver to S3 bucket
Action Deliver to S3 bucket

8) Click on Create S3 bucket
Create S3 bucket

9) Enter a unique S3 bucket name and click on ‘Create Bucket’
Note: S3 Bucket policy will be added automatically.
Provide Unique S3 bucket name

(Optional) Choose Message encryption for Amazon SES to use an Amazon Key Management Server (Amazon KMS) key to encrypt your emails.
(Optional) For SNS topic, select an Amazon Simple Notification Service (Amazon SNS) topic to notify you when Amazon SES delivers an email to the S3 bucket.
Add Action in Receiving rule set

10) Click Next and Create Rule.
Review and Create Ruleset

Step 2: Verifying email address in Amazon SES using S3

The following procedure shows you how to verify Email address in Amazon SES.
1) Open the Amazon SES console.
2) In the navigation pane, under Configuration, choose Verified identities.
3) Choose Create identity.
Create Verified Identity

4) Under Identity details, choose Email address as the identity type you want to create.
5) For Email address, enter the email address that you want to use. The email address must be an address that’s able to receive mail and that you have access to.
(Optional) If you want to Assign a default configuration set, select the check box.
6) To create your email address identity, choose Create identity. After it’s created, you should receive a verification email within five minutes from [email protected].

Create Verified identity and Enter
7) Open the Amazon S3 console.
Go to S3 bucket

8) Open the S3 Bucket that you configured to store the Amazon SES emails. Verify that the bucket contains the test email that you sent. It can take a few minutes for the test email to appear.
Select the Received Email in S3 bucket

9) Select the email/object received in S3 bucket. Click Download.
Download the received email/object

10) Open the Downloaded file in Notepad and copy the verification link under the Subject. Paste the link in your Browser and confirm it.
Open the Downloaded email in Notepad

11) Once the link is confirmed, you can check in SES console and confirm under verified identities that your email address is in verified Status.
Browser link after pasting the verification link

Verified Identity confirmation in SES console

Cleaning up:

You should have successfully verified email address in Amazon SES using S3 bucket. To avoid incurring any extra charges, remember to delete any resources created manually if you no longer need them for monitoring.

Steps for removing the resources:

1) Delete all the created/verified Identities.
2) Delete data regarding Amazon SES receiving Rules.
3) Delete data regarding Amazon S3 bucket.

Conclusion:

In this blog post, we explained the benefits of verifying a separate email address for the verified domain without setting up an inbox. Having separate identities for different use cases helps in efficient management of bounces, complaints, and delivery. You can setup different IP pools using configuration set for different use cases.

Follow-up:

https://aws.amazon.com/blogs/messaging-and-targeting/manage-incoming-emails-with-ses/
https://docs.aws.amazon.com/ses/latest/dg/receiving-email.html
https://repost.aws/knowledge-center/ses-receive-inbound-emails

About the Author

Ajinkya bhoite_1Ajinkya Bhoite is Cloud Support Engineer II in AWS and Service Matter Expert in Amazon Simple Email Service(SES). Along with Amazon SES, he is an Amazon S3 enthusiast. He loves helping customers in solving issues related to SES and S3 in their environment. He loves reading, writing and running but not in the same order. He has a fictional novel published on Amazon Kindle by the name Shiva Stone: Hampi’s Hidden treasure.

Amazon SES – How to track email deliverability to domain level with CloudWatch

Post Syndicated from Alaa Hammad original https://aws.amazon.com/blogs/messaging-and-targeting/amazon-ses-how-to-track-email-deliverability-to-domain-level-with-cloudwatch/

Why is it important to track email deliverability per domain with Amazon Simple Email Service (SES)?

Amazon Simple Email Service (Amazon SES) is a scalable cloud email service provider that enables businesses to build a large-scale email solution and host multiple domains from the same SES account for different purposes ex: one domain for sending marketing emails such as special offers, another domain to send transactional emails such as order confirmations, and other types of correspondence such as newsletters.

As your product, service or solution built on Amazon SES grows and you require multiple domains verified, it is important to track email deliverability for emails you send from each domain for business continuity, billing purposes or incidents investigations. This can be useful to identify if you have low email deliverability for your business domain or if you have a domain generating high bounce or complaint rates and take proactive actions before impacting the account’s ability to send emails from any other domains.

SES offers features that automatically manage deliverability per domain through Virtual Deliverability Manager. Virtual Deliverability Manager helps enhance email deliverability and provides insights into sending and delivery data, as well as offering solutions to fix negative email sending reputation. You can learn more about Virtual Deliverability Manager here.

Solution Walkthrough

Amazon SES provides a way to monitor sender reputation metrics such as bounce and complaint rates per account or configuration sets using event publishing. This blog will discuss how you can use Amazon SES message auto-tags to monitor and publish email deliverability events (Send, Delivery, Bounce, Complaints) to CloudWatch custom metrics per domain. In addition, you will see how to create a custom CloudWatch dashboard that’s easy to access in a single view to monitor your domain metrics. This CloudWatch dashboard can help to provide guidance for your team members during operational events about how to respond to specific incidents for your sending domain.

What are Amazon SES Auto-Tags:

Message tags are a form of name/value pairs to categorize the email you are sending. For example, if you advertise books, you could name a message tag general, and assign a value of sci-fi or western, when you send an email for the associated campaign. Depending on which email sending interface you use, you can provide the message tag as a parameter to the API call (SendEmail, SendRawEmail) or as an Amazon SES-specific email header.

In addition to the message tags you add to any emails you send, Amazon SES adds a set of Auto-Tags that are automatically included in any emails you send. You don’t need to pass the parameters of the auto-tags to the API call or email headers since SES does this automatically.

The auto-tags in the list below are used to track the email deliverability for specific events ( ex: Send, Delivery, Bounce, Complaint). SES does this by using the name/value pairs of the auto-tag name as a dimension in CloudWatch metric to track the count of events of specific auto-tag. This blog post will use “ses:from-domain” auto-tag to configure event publishing for tracking and publish email deliverability events (Send, Delivery, Bounce, Complaints) you receive per domain to CloudWatch metrics and CloudWatch dashboard.

Amazon SES auto-tags added to messages you send

Prerequisites:

For this walkthrough, you should have the following prerequisites:

Configure Amazon SES to publish email deliverability events to CloudWatch destination:

To configure event publishing for tracking email deliverability events, you first need to create a configuration set. Configuration sets in SES are groups of rules, that you can apply to your verified identities. When you apply a configuration set to an email, all of the rules in that configuration set are applied to the email.

After your configuration set is created, you need to create Amazon SES event destination. Amazon SES will send all email deliverability events you intend to track to this event destination. In this blog the event destination is Amazon CloudWatch.

    1. Sign in to the Amazon SES console.
    2. In the navigation pane, under Configuration, choose Configuration sets. Choose Create set.
    3. Enter Configuration set name, leave the rest of fields to default, scroll to the send and click on Create set.
    4. Under configuration set home page click on Event destinations tab and select Add destination
    5. Add SES event destination to configuration set
    6. Under Select event types, check Sends, Deliveries, Hard bounces and Complaints boxes and click Next.
    7. selecting event types to track
    8. Under Specify destination, Select Amazon CloudWatch.
    9. Select event destination as Amazon CloudWatch
    10. Name – enter the name of the destination for this configuration set. The name can include letters, numbers, dashes, and hyphens. (example : Tracking_per_Domain)
    11. Under Amazon CloudWatch dimensions, Select Value source: Message tag , Dimension name: ses:from-domain and Default value: example.com (you will need to add the verified domain name you want to track) as shown below:
    12. add message auto-tag as CloudWatch dimension to track
    13. Review, When you are satisfied that your entries are correct, Click Add destination to add your event destination.

Send a test email via Amazon SES mailbox simulator to trigger events in CloudWatch custom metric.

After selected Amazon CloudWatch as event destination , Amazon CloudWatch will create a custom metric with the auto-tag dimension and value you chose. For this custom metric to appear in CloudWatch Console, you must send an email to trigger each selected event. We recommend using the Amazon SES Mailbox Simulator to avoid generating real bounces or complaints that could impact your account’s reputation.

In the below section, This blog will show how to send those test emails to the following recipients manually using CLI. If you would like to use the console method to send those emails. you will need to send three separate test emails since the console will only allow one recipient per message:

Amazon SES Mailbox Simulator recipients to trigger the events in CloudWatch metrics:
[email protected]
[email protected]
[email protected]

Note: You must pass the name of the configuration set when sending an email. This can be done by either specifying the configuration set name in the headers of emails, or specifying it as a default configuration set. This can be done at the time of identity creation, or later while editing a verified identity.

The following example uses send-emailCLI command to send a formatted email to the Amazon SES simulator recipients:

Before you run any commands, set your default credentials by following Configuring the AWS CLI. The IAM user must has “ses:SendEmail” permission to send email.

  1. Navigate to your terminal where the AWS CLI is installed and configured. Create message.json file for the message to send and add the following content:
  2. {
    "Subject": {
    "Data": "Testing CW events with email simulator",
    "Charset": "UTF-8"
    },
    "Body": {
    "Text": {
    "Data": "This is the message body of testing CW events with email similulator.",
    "Charset": "UTF-8"
    }
    }
    }
  3. Create a destination.json file to add Amazon SES simulator recipients for bounces, complaints and delivery events as shown below:
  4. { 
    
    "ToAddresses": ["[email protected]", "[email protected]" , "[email protected]"]
    
    }
  5. Send a test email using send-email CLI command to send a formatted email to the Amazon SES simulator recipients:
  6. aws ses send-email --from [email protected] --destination file://destination.json --message file://message.json --configuration-set-name SES_Config_Set --region <AWS Region>
  7. After the message sent, you are expected to see the following output:
  8. {
    
    "MessageId": "EXAMPLEf3a5efcd1-51adec81-d2a4-4e3f-9fe2-5d85c1b23783-000000"
    
    }

Now you sent a test email to trigger the events you want to track in CloudWatch custom metrics. Lets create the CloudWatch dashboard to see those metrics.

Create CloudWatch dashboard to track the email deliverability events for my domain.

  1. Sign in to the Amazon CloudWatch console.
  2. In the navigation pane, choose Dashboards, and then choose Create dashboard.
  3. In the Create new dashboard dialog box, enter a name like ‘CW_Domain_Tracking’ for the dashboard, and then choose Create dashboard.
  4. In the Add Widget dialog box, Choose Number to add a number displaying a metric to the dashboard and then choose Next
  5. Under Add metric graph, click on edit sign to rename the graph with your domain example.com . this will make it easy for you to select the dashboard of the domain if you have multiple domains.
  6. In the Browse tab , Select the AWS region where you are running your SES account and in the search bar, search for “ses:from-domain”.
  7. You will get four metrics returned with your domain name “example.com”. Select checkbox beside the four metrics and click Create widget.
  8. CloudWatch dashboard with the metrics
  9. Save dashboard in the top right corner of the dashboard page to save the widget settings.
  10. Save CloudWatch dashboard settings

After the CloudWatch dashboard created, for any email you send from example.com domain with configuration set name passed in the email header, The email deliverability events will be counted in your CloudWatch metrics and you will be able to see them in the CloudWatch dashboard.

As an additional step. You can also setup a CloudWatch alarms for this custom metrics and add a threshold for each metric. When the metric breach the threshold, the alarm goes on and send an SNS notification to you to take the necessary actions.

Cleaning Up:

This setup includes Amazon CloudWatch and Amazon SES service charges. To avoid incurring any extra charges, remember to delete any resources created manually if you no longer need them for monitoring.

Resources to delete from Amazon SES console.

  1. In the navigation pane, under Configuration, choose Configuration sets.
  2. Check the box beside Configuration set you created and select Delete.

Resources to delete from Amazon CloudWatch console.

  1. In the navigation pane, choose Dashboards, and then choose the dashboard you created.
  2. In the upper-right corner of the graph that you want to remove, choose Actions, and then choose Delete Dashboard.
  3. Save dashboard.

Conclusion:

You have now seen how to configure Amazon SES to track email deliverability at domain level with CloudWatch dashboard. Tracking email deliverability for emails you send from each domain is essential for business continuity, billing purposes or incidents investigations. Using SES message auto-tags and CloudWatch metrics you can identify the domains that have low email deliverability quickly and take necessary actions to maximize your email deliverability and take proactive actions before impacting the account’s ability to send emails from any other domains.

About the author:

Alaa Hammad

Alaa Hammad is a Senior Cloud Support Engineer at AWS and subject matter expert in Amazon Simple Email Service and AWS Backup service. She has a 10 years of diverse experience in supporting enterprise customers across different industries. She enjoys cooking and try new recipes from different cuisines.

How to send your first email on SES

Post Syndicated from Dustin Taylor original https://aws.amazon.com/blogs/messaging-and-targeting/how-to-send-your-first-email-on-ses/

Introduction

Sending your first email on any service can be complicated. In this blog we will walk you through how to send your first email on Amazon Simple Email Service (SES) through the SES Console and to direct you to examples of how you can send email through the AWS SDK. Our public documentation includes additional information on how you can configure SES. We encourage you to read through these documents to learn about these other mechanisms in the future.

Getting Started

Getting started with sending an email on SES requires three actions which are: 1) verifying a domain or email address 2) requesting production access to SES and 3) sending your first email. Let’s walk through each of these steps and send our first email.

Verifying an Identity

To start, you will configure what email address or domain your customers will receive emails from. As part of this verification, you will need to be able to either receive a confirmation email at the email address you are trying to setup, or to publish CNAME records for your intended domain. Generally, we recommend using a domain for your email sending as this gives you the ability to set up SPF, DKIM, and DMARC alignment which will increase recipient trust in your emails. Email addresses can be used for account-specific email sending where a customer may not own a domain, but this type of use-case is prone to receiving entities having low trust in the sender and a lower probability of inbox placement. For more in-depth instructions please review our public documentation as I will briefly touch on the most important pieces to verifying a domain or email address.

To verify an identity, you can go to the SES Console and click the ‘Verified identities’ link on the left-hand side of the screen. It will then present you with a list of verified domains or email addresses currently in your account if they were previously verified. There is a yellow button that states ‘Create identity’, when you click this you will be presented with a screen to choose whether to verify an email address or domain.

Email Address Verification

To verify an email address, you will be prompted with the following dialog:

The dialog presented to a sender when they choose to verify an email address in the SES console.

To verify an email address to use as your sending identity, you will include the address in the ‘Email address’ field and then click the ‘Create identity’ button. This will trigger an automated email to the address with a verification link that will need to be clicked to verify ownership of the email address. Once verified, you can begin sending emails from your new email address identity.

Domain Verification

To start verifying a domain you will click the ‘Verified identities’ option from the ‘Configuration’ dropdown which can be found on the left side of the screen. When choosing to verify a domain, you will be presented with a series of dialogs which include:

The dialog presented to a sender that prompts a decision to verify a domain or email address.

Here you will need to include the domain you intend to use for email sending. If you are keeping to a basic configuration on SES this will be the only data you need to add to this dialog. However, it is recommended to also use a custom mail-from. A custom mail-from is a way for you to remove the amazonses.com domain from your mail-from header to ensure domain alignment throughout your headers. You can find more information about the custom mail-from addresses in our documentation.

After finishing your changes in the first dialog you will then be presented with a second dialog that looks like the following:

The dialog which allows a sender to verify the domain they intend to use to send email.

To verify the domain, you will need to utilize either the Easy DKIM feature, or to provide a DKIM authentication token if you plan to DKIM sign your own messages. In selecting the ‘Easy DKIM’ option, you will be presented with the option to use either 1024 bit or 2048 bit signing key length. We would recommend utilizing the 2048 bit signing key length for most customers as this is the more secure key.

If you use Amazon Route53 as your DNS provider, SES can automatically publish DNS records for your domain. If not, this step will require you to edit your DNS records to include three CNAME records which are used for the DKIM signature process and as a mechanism to prove domain ownership. An example of the CNAME records is as follows:

An example dialog of the CNAME records that are generated when attempting to verify an identity.

Once you have placed these DNS records SES will periodically attempt to look-up the records to change the status of your domain verification. If SES doesn’t automatically update the status, you are presented with the option to force another check to verify the records are present.

After your domain verification is successful, you are now ready to send emails from any email address for your domain.

Requesting Production Access

Now that you’ve verified an identity, the next step is to be able to send an email to an unverified identity you will need to request production access. If you only want to test to your own domain or email address you can skip this step until you are ready to send to unverified recipients.

Note: This is region-based, a request for production access is limited to the region in which you are requesting. 

To begin this process, you will navigate to the SES Console and the ‘Account dashboard’ section. Once you are on this page you will be presented with the following dialog at the top of your screen.

Clicking the ‘Request production access’ button will then navigate to the ‘Request details’ page which you can reference below.

The dialog from the SES console showing that the SES account is still in the sandbox.
Fill out each section with the details of your mail-type, website URL, use case description, and then acknowledging that you have read and agree to the AWS Service Terms and Acceptable Use Policy (AUP). When filling out the use case description, provide as much detail as you can for your request as our teams will review to determine if we need more information before approving or denying your request. An example of a good use case description would look like the following:

“Example.com is the domain my company intends to use to send our transactional emails. Our recipients are all customers who have either signed up for an account, requested a new password, or have made purchases through our website. We require confirmation of opt-in for all our new accounts and if no confirmation is received, we do not attempt to send an email to that address.”

Note: SES will review your production access request and will provide feedback on your use case and whether it could pose a risk to the sending reputation of SES, our customers, or your own sending domain.

Finally, click the ‘Submit request’ button to submit your request for production access. This will create an AWS Support case and will be reviewed by our team. These requests are reviewed with a 24-hour Service Level Agreement (SLA). While you are waiting for production access you can send test emails to any of the Mailbox Simulator endpoints or to your own verified domain(s) or email address(es).

Sending Your First Email

From the Console

To send your first email from the SES Console you will need to start by clicking the ‘Verified identities’ option from the ‘Configuration’ dropdown which can be found on the left side of the screen. From here you will select the domain and/or email address you want to send your email from and then click the ‘Send test email’ button, which will open the following screen:

The message details dialog where a sender can send an email from the SES console

From here you will fill out the ‘From-address’ box with the local name (anything before the @ sign) that you want to use to send the email. If you want to test SES functionality you can choose any of the dropdown events present, or you can choose the ‘Custom’ option which will allow you to set a ‘Custom recipient’ address of your choosing. Then you will fill out the ‘Subject’ and ‘Body’ fields with the content you will use for this first test email and then click the ‘Send test email’ button.

Congratulations, you’ve sent your first email from the SES Console! Now, utilizing SES to send single emails from the console isn’t the most scalable way to send email. In the next section, I will provide you links to our documentation for the 5 programming languages supported with the AWS SDK so that you can begin building your integration with SES.

From Code

The AWS Documentation includes some code snippets on how to send an email with SES via the AWS SDK. You can find examples of how to send an email from languages such as: .NET, Java, PHP, Ruby, and Python. We highly recommend reviewing our documentation to see these introductory code snippets to get you started.

Conclusion

Hopefully this blog post has aided you in your journey to send your first email through SES. From verifying a domain, requesting production access, and finally sending an email through the console. Take this knowledge and build upon it for future success in sending email through SES. Happy sending!

How to send messages to multiple recipients with Amazon Simple Email Service (SES)

Post Syndicated from Joydeep Dutta original https://aws.amazon.com/blogs/messaging-and-targeting/how-to-send-messages-to-multiple-recipients-with-amazon-simple-email-service-ses/

Introduction

Customers frequently ask what is the best way to send messages to multiple recipients using Amazon Simple Email Service (SES) with the best deliverability and without exceeding the maximum recipient’s per message limit. In this blog, we will show you how to determine the best approach for sending a message to multiple recipients based on different use-cases. We will also discuss why in most situations sending messages to a single recipient at a time is the best approach.

Difference between message Header addresses and Envelope addresses

Before we dive into the use cases, let’s discuss how message addressing works in SES. When a client makes a request, SES constructs an email message compliant with the RFC 5322 Internet Message Format specification . An email comprises of a header, a body, and an RFC 5321 envelope, as described in the Email format in Amazon SES document.

The email addresses in the RFC 5322 To, Cc and Bcc headers are for display. These headers enable your email client interface to display to whom the message was addressed. These addresses do not control which recipients receive the messages; the envelope addresses do. The sending mail client provides the envelope recipient addresses to a mail server using the RFC 5321 RCPT TO commands. RCPT is an abbreviation for recipient.

An apt analogy (see diagram below) is how a physical letter within an envelope can address a person whose address is not the envelope. The address on the envelope is what the mail carrier to deliver the envelope. The postal worker should not need to open the envelope to know which address to deliver the mail.

Analogy to show physical mail compares to electronic mail

As an example, a school district may send letters informing residents of enrollment details for their children, but they do not know all of the names of the people who live at each address. The envelope may only list the address, and the letter may just be addressed “To Resident” if the school district doesn’t have a name to address the letter. The message is delivered to the resident’s address regardless of the accuracy of the information on the letter.

To simplify, let’s summarize the differences between To & Cc header and envelope addresses:

Header To & Cc Addresses Envelope Addresses (RCPT)
Used by email clients to display the list of recipients Used by mail servers to deliver the email message
Not used for mail delivery Used for mail delivery
Displayed to recipients Not displayed to recipients

The Bcc address is different than the To and Cc headers because it is used to send a copy of the message to an additional set of recipients that are “blind” to the other recipients. Bcc addresses are only defined by envelope addresses, not as a header address. Mail servers will commonly remove a Bcc header when handling a message, but delivery to the envelope recipient address still occurs.

When to use multiple recipients in a Destination

SES supports sending messages to multiple recipients in a single SendEmail operation. The Destination argument of the SendEmail operation represents the destination of the message. A Destination consists of To, Cc, and Bcc fields which represent both the header addresses and the envelope addresses.

When multiple recipients are defined in the Destination argument to the SendEmail operation, the defining characteristic is that every recipient receives the exact same message with the same message-id. A message-id is used for event handling (bounces, complaints, etc) among other purposes. A message-id pertains to exactly one version of a particular message.

Did you know: The use cases for recipients having a message with the same message-id are limited to situations in which the recipients are expected to interact with the message as a group. For example, recipients may reply-all to the email and have a resulting email conversation. The original message-id is used by email client applications to display a “conversation” view using the References and In-Reply-To headers. This behavior may be a good fit if the use case is a mailing list or internal announcement to employees within a company.

The recipient limit in the Destination argument is 50 because that is a reasonable break-point when the “conversational” use case runs the risk of the “reply all storm“ described in the next section. Consider using a robust mailing list solution or hosted service with capabilities similar to GNU Mailman to facilitate large group email conversations.

Why bulk mail recipients should not see other recipients

For bulk sending purposes, and most transactional sending, the recipients don’t need to know that other recipients also received the message:

  • The recipients likely gain no value from seeing the other recipient addresses, as they may be arbitrarily segmented into batches of 50 or less, and most email client interfaces have trouble displaying more than 50 addresses.
  • There is a risk of a “reply-all storm“, which is when a recipient replies to all of the To and Cc addresses from the original message, and then those people reply back asking everyone to stop replying. This scenario is fun to talk about around the water cooler, but should be avoided.
  • If recipients are defined as Bcc recipients in the Destinations argument of the SendEmail operation, it would not contain a To address, and that can look suspicious when read by the recipients.

Note: There is no authentication mechanism protecting the To or Cc headers from spoofing, so be careful about assuming any trust placed into the values of those headers. This means that it is possible for an attacker to spoof the To or Cc headers in an email message. Therefor the only meaningful address to include in the To header is the recipient’s own address, which they know isn’t spoofed because of the fact that they are reading the message.

For bulk mail it is best practice to have each recipient see only their own name and email address in the To header of the messages they receive. This makes the messages look more personable and can improve deliverability and recipient engagement.

This approach can be achieved by sending the message to each recipient individually via the SendEmail operation. You would use a single address in the “ToAddressses” field of the “Destination” argument.

Use the ToAddress field to individual message in the SendEmail API

How email event notifications are associated with recipients

If you need email event notifications to be associated to each recipient, then you will need each recipient to receive a message with a unique message-id; one recipient per Destination.

The following event types will be associated with every recipient in the Destination:

  • asynchronous bounces
  • complaints
  • opens
  • clicks

Learn more about Amazon SES events in the documentation: how email sending works in Amazon SES

For example, if one of the recipients triggers a open engagement event, and if that recipient was in a group of 50 recipients within the Destination argument to the SendEmail operation, then all 50 of those recipients will be registered as having opened the message.

Other considerations:

  • If the recipients are defined by ToAddresses and CcAddresses they will all appear in the message headers, but the To and Cc headers will be truncated in the event notifications if the headers are over 10 KB. Multi-recipient Destinations may cause you to lose observability needed to troubleshoot deliverability issues.
  • SES Virtual Deliverability Manager only tracks metrics from emails that have one recipient. Multi-recipient Destinations are not counted in any of the Virtual Deliverability Manager dashboard metrics.
  • SES counts the number of envelope recipients in an email toward the account’s sending quotas. Multi-recipient Destinations is not a way to achieve higher sending limits.
  • SES charges for each recipient receiving a message regardless of how many recipients are included in the Destination for each API invocation. Multi-recipient Destinations is not a way to reduce costs.

For bulk sending use cases, it is best practice to have each recipient have a copy of the message with a unique message-id to achieve the highest level of observability of your email sending program. High observability leads to high deliverability. This can be achieved by sending the message to each recipient individually.

How to send Emails to multiple recipients with SES

At this point, you should understand why it is a best practice to send a message to multiple recipients by iteratively using a single recipient in the Destination argument of the SendEmail operation.

Sending a message to a single recipient at a time is the best way to get started delivering messages to multiple recipients. Sending email in this fashion ensures that your deliverability metrics are giving you the observability needed to achieve the highest engagement with your recipients.

The following example uses the SES version 2 command line interface (CLI) to send a message to a list of recipients. If you do not want to use the CLI, use SES with an AWS SDK and adapt the commands into the syntax of the SDK of your choice.

#!/bin/bash

# Replace these variables with your own values
# sender 
# - Consider not using no-reply@, and instead use SES Inbound to receive replies
# - Consider a descriptive username@; some mobile clients will display it prominently, so it should make sense to the recipient.
# - Consider using a subdomain for bulk and transactional mail. Don't use the domain used by your users.
# - Consider using a verified domain identity. Don't use an email address identity within a domain that has a DMARC policy.
sender="[email protected]"
subject="Email subject"
body="Email body"
region="us-east-1"

# List of recipients, one per line. Defaults to SES mailbox simulator addresses (https://docs.aws.amazon.com/ses/latest/dg/send-an-email-from-console.html#send-email-simulator-how-to-use)
recipients=(
  "[email protected]"
# ... 
  "[email protected]"
)

# Send an email to each recipient
# Iterate through the list of recipients.
# Invoke the AWS SES SendEmail operation with a single recipient defined in the Destination
for recipient in "${recipients[@]}"; do
  aws sesv2 send-email \
    --from-email-address "$sender" \
    --destination "ToAddresses=$recipient" \
    --content "Simple={Subject={Data='$subject',Charset='UTF-8'},Body={Text={Data='$body',Charset='UTF-8'}}}" \
    --region "$region"
done

# The output will look similar to this, with a unique MessageID associated with each recipent.
# {
#    "MessageId": "010001874edd1765-be4ea5c2-d2b1-4ffb-bfb9-46461d18d80c-000000"
# }
# ... 51 total message-ids
# {
#    "MessageId": "010001874edd1b94-468ecee9-9198-4356-9f53-a108097777e5-000000"
# }

In this example script, the SendEmail operation is invoked multiple times using the CLI to deliver the message individually to each recipient, and each recipient only sees their own address in the To header. We called the SendEmail operation 51 times and a total of 51 Message Ids were returned in the response.

How to use SendEmail for multiple recipient advanced use cases

Consider a scenario where a memo needs to be sent to an entire team, the team is large, and only a few of the recipients need to be displayed in the headers. In this use case, it is desirable to send multiple copies of an email to many recipients who all receive the same To and Cc headers.

To customize the headers, you must use the Raw field of the Content argument instead of the Simple field.

The example below will reference another internet standard called Multipurpose Internet Mail Extensions (MIME): Format of Internet Message Bodies.

What’s in a MIME object:

  • Headers (such as From, Subject, and Reply-to)
  • Body – Plain text and HTML
  • Attachments – Files and images

MIME extends the capabilities of RFC 5322 and is used to format most email messages to this day. There are a variety of packages that can assist in creating a MIME structured messages, which you can find by searching relevant package managers.

This is an example in Python to create a MIME formatted message for the next script.

#!/usr/bin/env python
from email.mime.multipart import MIMEMultipart
from email.mime.text import MIMEText
import base64

# You must change the 'fromAddress' variable for this example to work in your environment.
#
# When choosing a From header address:
# - Consider not using no-reply@, and instead use SES Inbound to receive replies
# - Consider a descriptive username@; some mobile clients will display it prominently, so it should make sense to the recipient.
# - Consider using a subdomain for bulk and transactional mail. Don't use the domain used by your users.
# - Consider using a verified domain identity. Don't use an email address identity within a domain that has a DMARC policy.

fromAddress = "Descriptive Name <[email protected]>"

# The To and Cc addresses here are for the email header. They are what will be displayed to the recipient.
# The actual recipient, or evelope recipient, will be set later.
toAddresses = ['Founder Name <[email protected]>']
ccAddresses = ['President <[email protected]>', 'Director <[email protected]>']
subjectTxt = "Success and Scale Bring Broad Responsibility"
messageTxt = "We started in a garage, but we’re not there anymore. We are big, we impact the world, and we are far from perfect. We must be humble and thoughtful about even the secondary effects of our actions. Our local communities, planet, and future generations need us to be better every day. We must begin each day with a determination to make better, do better, and be better for our customers, our employees, our partners, and the world at large. And we must end every day knowing we can do even more tomorrow. Leaders create more than they consume and always leave things better than how they found them."
messageHtml = "<html><body><p>" + messageTxt + "</p></body></html>"
CHARSET = "utf-8"

multiPartEmail = MIMEMultipart()
multiPartEmail['From'] = fromAddress
toAddressesJoined = ",".join(toAddresses)
multiPartEmail['To'] = toAddressesJoined
ccAddressesJoined = ",".join(ccAddresses)
multiPartEmail['Cc'] = ccAddressesJoined
multiPartEmail['Subject'] = subjectTxt
msg_body = MIMEMultipart('alternative')
textpart = MIMEText(messageTxt.encode(CHARSET), 'plain', CHARSET)
htmlpart = MIMEText(messageHtml.encode(CHARSET), 'html', CHARSET)
msg_body.attach(textpart)
msg_body.attach(htmlpart)
multiPartEmail.attach(msg_body)

print("Human readable blob:")
print((multiPartEmail.as_string()))
print("Base64 Encoded Blob:")
print(base64.b64encode(multiPartEmail.as_bytes()))
Running this script will produce output similar to the following:
Human readable blob:
Content-Type: multipart/mixed; boundary="===============0865862865556646150=="
MIME-Version: 1.0
From: [email protected]
To: [email protected]
Cc: [email protected], [email protected]
Subject: Success and Scale Bring Broad Responsibility

--===============0865862865556646150==
Content-Type: text/text/plain; charset="us-ascii"
MIME-Version: 1.0
Content-Transfer-Encoding: 7bit

We started in a garage, but we’re not there anymore. We are big, we impact the world, and we are far from perfect. We must be humble and thoughtful about even the secondary effects of our actions. Our local communities, planet, and future generations need us to be better every day. We must begin each day with a determination to make better, do better, and be better for our customers, our employees, our partners, and the world at large. And we must end every day knowing we can do even more tomorrow. Leaders create more than they consume and always leave things better than how they found them.

--===============0865862865556646150==--

Base64 Encoded Blob:
b'Q29udGVudC1U...TRIMMED...'

The following script has an option to divide the list into batches of 50 or fewer for each SendEmail operation and will send a Base 64 encoded MIME object to a list of recipients. The headers of the message are always the same for every recipient because the headers are defined within the MIME object, which is obtained from running the previous script With SendEmail, the Destination argument does not define the To or Cc headers.

#!/bin/bash

# Replace these variables with your own values
region="us-east-1"

# List of recipients, one per line. Defaults to SES mailbox simulator addresses (https://docs.aws.amazon.com/ses/latest/dg/send-an-email-from-console.html#send-email-simulator-how-to-use)
# These are the actual envelope recipients who will get the above email in their inbox. The To and Cc addresses set above will be displayed, not these.
recipients=(
"[email protected]"
# ...
"[email protected]"
)

# Raw message content
# Paste the base64 encoded message blob that is returned from the python script (the string within b'')
content=''

# Maximum number of recipients per batch
# Increase batch_size up to 50 if your use case requires every recipient have the same message-it. This sacrifices observability into deliverability metrics.
batch_size=1

# Send an email to batch size of 1 to 50 recipients
recipients_count=${#recipients[@]}
echo $recipients_count
for ((i=0; i<$recipients_count; i+=batch_size)); do
to_addresses="${recipients[@]:${i}:${batch_size}}"
to_addresses="${to_addresses// /,}"
aws sesv2 send-email \
--destination "ToAddresses=$to_addresses" \
--content "Raw={Data='$content'}" \
--region "$region"
done

# The output will look similar to this, with a unique MessageID associated with each send-email.
#{
# "MessageId": "010001874ee5cdca-3fe4fb4b-4d36-4ae7-b4e4-cc7fae988a42-000000"
#}
#... 51 total message-ids
#{
# "MessageId": "010001874ee5d210-9225f471-e330-4f01-9044-63a941358477-000000"
#}

Screenshot of email client, viewing email sent by the above code. The sender of the email is “Descriptive Name”, the To recipient is Founder Name, and the President and Director are displayed as Cc addresses.

Remember: If you increase the batch size to greater than 1. Every recipient in each batch will have a message with the same message-id and will all be treated the same for event processing.

Running these scripts will have the effect of each team member receiving exactly the same looking message regardless of how many recipients were defined in each SendEmail Destination. The To and CC addresses were set in the email headers, but the actual envelope recipients were set in the API operation.

SES SendEmail and SendBulkEmail APIs

The latest version of SES API (version 2) offers SendEmail and SendBulkEmail APIs.

With SendBulkEmail, you can only use a pre-defined SES template while, with SendEmail, you can send any email format including raw, text, HTML and templates.

SendEmail operation can send a single email to one Destination (50 recipients across the To:, Cc:, and Bc: fields) while the SendBulkEmail operation can send 50 unique emails to 50 Destinations by leveraging a SES template.

Both operations have the capability to send templated emails, but the SendBulkEmail operation requires less computational resources. This is due to its ability to send emails to 50 Destinations using just a single API call.

Conclusion

In this blog post we discussed how message recipient addresses are displayed by email clients, how message delivery is defined by envelope recipients, and how email sending events are associated with the recipients. Defining multiple recipients in a message destination can lead to poor observability and therefore poor deliverability and should not be used unless your use case specifically requires it

Sending messages to one recipient at a time is a best practice and leads to the highest engagement with your recipients.

About the authors

Jesse Thompson is an Email Deliverability Manager with the Amazon Simple Email Service team. His background is in enterprise IT development and operations, with a focus on email abuse mitigation and encouragement of authenticity practices with open standard protocols. Jesse’s favorite activity outside of technology is recreational curling.
Samuel Wallan is a Software Development Engineer at AWS Simple Email Service. Within SES, Sam works on the Digital User Experience Deliverability team. In his free time, he enjoys hanging out with friends and staying fit.
Farnam Farshneshani is a Technical Account Manager at AWS. He specializes in AWS Simple Email service and helps customers with operational and architectural issues.  In his free time, he enjoys traveling and participating in various outdoor activities.
Joydeep Dutta is a Senior Solutions architect at AWS. Joydeep enjoys working with AWS customers to migrate their workloads to the AWS Cloud, optimize for cost and help with architectural best practices. He is passionate about enterprise architecture to help reduce cost and complexity in the enterprise. He lives in New Jersey and enjoys listening to music and spending time in the outdoors in his spare time.

Manage Incoming Emails at Scale with Amazon SES

Post Syndicated from Bruno Giorgini original https://aws.amazon.com/blogs/messaging-and-targeting/manage-incoming-emails-with-ses/

Introduction

Are you looking for an efficient way to handle incoming emails and streamline your email processing workflows? In this blog post, we’ll guide you through setting up Amazon Simple Email Service (SES) for incoming email, focusing on the setup, monitoring, and use of receipt rules to optimize your email handling.

Amazon SES is a powerful and flexible cloud-based email service that enables you to send and receive emails at scale, while ensuring high deliverability and maintaining compliance with email best practices. By using Amazon SES for incoming email, you can customize your email processing pipeline and seamlessly integrate with other AWS services such as Amazon S3, AWS Lambda, and Amazon SNS.

We’ll start by walking you through the process of verifying your domain and setting up DomainKeys Identified Mail (DKIM) to ensure your emails are secure and authenticated. Next, we’ll explain how to create and manage receipt rule sets and add receipt rules with various actions for different processing scenarios. We’ll also cover monitoring your email processing using Amazon CloudWatch metrics.

As we progress, we’ll dive into advanced topics such as conditional receipt rules and chaining receipt rules, which can help you build complex and tailored email processing workflows, including multi-tenant scenarios. By the end of this post, you’ll have a comprehensive understanding of how to harness the power of Amazon SES for your incoming email needs.

So, let’s get started on simplifying your incoming email processing with Amazon SES!

Setting up Amazon SES for email receiving

Identifying the AWS region

For new users of the Amazon Simple Email Service (SES) inbound feature, it’s important to understand that all AWS resources used for receiving email with Amazon SES, except for Amazon S3 buckets, need to be in the same AWS Region as the Amazon SES endpoint. This means that if you are using Amazon SES in a specific region, such as US West (Oregon), any additional resources like Amazon SNS topics, AWS KMS keys, and Lambda functions also need to be created in the same US West (Oregon) Region. Additionally, to successfully receive email with Amazon SES within a particular Region, you must create an active receipt rule set specifically in that Region. By adhering to these guidelines, new users can effectively configure and utilize the inbound feature of Amazon SES, ensuring seamless email reception and efficient management of related resources. Amazon SES only supports email receiving in certain AWS Regions. For a complete list of Regions where email receiving is supported, see Amazon Simple Email Service endpoints and quotas in the AWS General Reference.

Verifying your domain

Before you can start receiving emails with Amazon SES, you must verify your domain. Domain verification is a crucial step in the setup process, as it confirms your ownership of the domain and helps prevent unauthorized use. In this section, we’ll walk you through the process of verifying your domain in the Amazon SES console.

  1. Sign in to the AWS Management Console and open the Amazon SES console.
  2. In the navigation pane, under Configuration, choose Verified identities.
  3. In the list of Identities section, choose Create identity.
  4. Under Identity details, choose Domain as the Identity type field. You must have access to the domain’s DNS settings to complete the domain verification process.
  5. Enter the name of the domain or subdomain in the Domain field.
  6. You must configure DKIM as part of the domain verification process. For Advanced DKIM settings, ensure that the Enabled box is checked in the DKIM signatures field.
  7. Choose Create identity. 
  8. This will generate a list of DNS records that you need to add to your domain’s DNS configuration. These can be found in the DomainKeys Identified Mail (DKIM) container, under Publish DNS records.

    SES DomainKeys Identified Mail (DKIM)

    Publish DNS records

  9. Add the generated DNS records to your domain’s DNS configuration. These records include a Legacy TXT record for domain verification and CNAME records for DKIM authentication. You may need to consult your domain registrar’s documentation for instructions on adding DNS records.
  10. Once the DNS records have been added, return to the Amazon SES console and wait for your domain’s verification status to change from “Verification pending” to “Verified.” This process may take up to 72 hours, depending on your domain registrar’s DNS propagation time.

Publishing an MX record for Amazon SES email receiving

To enable email receiving with Amazon SES, you need to publish an MX (Mail Exchange) record in your domain’s DNS configuration. The MX record directs incoming emails to Amazon SES for processing. Follow these steps to publish the MX record:

  1. Log in to your domain registrar or DNS management console.
  2. Locate the DNS management section for your domain.
  3. Create a new MX record by specifying the following details:
    • Host/Name/Record: Leave this field blank or enter “@” to represent the root domain.
    • Value/Points to/Target: Enter the value “10 inbound-smtp.[AWS Region].amazonaws.com“, replacing [AWS Region] with the AWS region where you are using Amazon SES for email receiving. For example, if you are using US West (Oregon) region, the value should be “10 inbound-smtp.us-west-2.amazonaws.com“.
    • TTL (Time to Live): Set a TTL value according to your preference or leave it as the default.
  4. Save the MX record.

Once the MX record is published with the correct value, incoming emails addressed to your domain will be routed to Amazon SES for processing. Remember to ensure that any other email-related resources, such as SNS topics or Lambda functions, are also created in the same AWS region as your Amazon SES endpoint.

For more detailed information on publishing MX records for Amazon SES email receiving, you can refer to the official documentation.

Creating a Receipt Rule set

A receipt rule set is a collection of rules that define how Amazon SES processes incoming emails for your domain. Each rule contains one or more actions that determine the processing flow of incoming emails. In this section, we’ll guide you through the process of creating a new receipt rule set in the Amazon SES console and activating it for your domain.

  1. Sign in to the AWS Management Console and open the Amazon SES console.
  2. In the navigation pane, under Configuration, choose Email receiving.
    • Note: if you don’t see the Email receiving option in the menu, check again that you’re in fact in a region supporting this feature.
  3. Under the Receipt rule sets tab in the Email receiving pane, choose Create rule setimage-20230523131953561.png
  4. Enter a name for your new rule set in the Rule set name field. This name should be descriptive and easy to identify, such as “MyApp-IncomingEmail.”
  5. After entering a unique name, choose Create rule setimage-20230523132526096.png
  6. To activate the newly created rule set, choose Set as active next to your rule set’s name. This action will ensure that Amazon SES uses this rule set for processing incoming emails to your domain. Your new rule set will now be listed in the Active rule set section.

For more information on creating and managing receipt rule sets, you can refer to the official documentation.

In the next section, we’ll explore adding receipt rules to your rule set, which define the specific actions to be taken for incoming emails.

Adding Receipt Rules

Receipt rules define the specific actions that Amazon SES should take when processing incoming emails for your domain. Common actions include saving the email to an Amazon S3 bucket, invoking an AWS Lambda function, or publishing a notification to an Amazon SNS topic. In this section, we’ll guide you through the process of adding receipt rules to your rule set in the Amazon SES console and provide examples of when to use each action.

  1. Sign in to the AWS Management Console and open the Amazon SES console.
  2. In the navigation pane, under Configuration, choose Email receiving.
  3. Under the Email receiving pane, in the Receipt rule sets tab, select the name of your active rule set from the All rule sets section. This will navigate to the details page for that rule set.
  4. Choose Create rule to begin creating a new receipt rule.
  5. On the Define rule settings page, under Receipt rule details, enter a unique Rule name.
    • For Status, only clear the Enabled checkbox if you don’t want to run this rule after creation.
    • (Optional) For Transport Layer Security (TLS), by selecting Required you can enforce a specific TLS policy for incoming emails that match this rule. By default, Amazon SES will use the Optional policy, which means it will attempt to use TLS but will not require it.
    • For Spam and virus scanning, only clear the Enabled checkbox if you don’t want Amazon SES to scan incoming messages for spam and viruses.
  6. After entering a unique rule name, choose Next.
  7. On the Add recipients conditions page, under Recipients conditions, use the following procedure to specify one or more recipient conditions. You can have a maximum of 100 recipient conditions per receipt rule.
    • Under Recipient condition, specify the email addresses or domains that this rule should apply to. You can use wildcards to match multiple addresses or domains. For example, you can enter example.com and .example.com to apply the rule to all email addresses within the example.com domain and within all of its subdomains.
    • Repeat this step for each recipient condition you want to add. When you finish adding recipient conditions, choose Next.
  8. On the Add actions page, open the Add new action menu and select the desired action from the list, such as Deliver to S3 bucket, Invoke AWS Lambda function, or Publish to Amazon SNS topic. Configure the selected action’s settings as required.
    • Deliver to S3 bucket: Choose this action if you’re expecting emails with large attachments, need to store emails for archival purposes, or plan to process emails using other AWS services that integrate with Amazon S3. You’ll need to specify the Amazon S3 bucket where the incoming emails should be stored.
    • Invoke AWS Lambda function: Choose this action if you want to process incoming emails using custom logic, such as filtering, parsing, or modifying the email content. You’ll need to specify the AWS Lambda function that should be invoked when an incoming email matches this rule.
    • Publish to Amazon SNS topic: Choose this action if you’re processing smaller emails or want to receive real-time notifications when an email arrives. You’ll need to specify the Amazon SNS topic where notifications should be published.
    • For more information and additional actions, see the Action options section of the Developer Guide.
  9. Once configured, choose Next to proceed to the Review page.
  10. On the Review page, review the settings and actions of the rule. If you need to make changes, choose the Edit option.
  11. When finished, choose Create rule to add the new receipt rule to your rule set. The rule will now be applied to incoming emails that match the specified recipient conditions.
image.png

You can create multiple receipt rules within a rule set, each with different actions and conditions. Amazon SES will apply the rules in the order they appear in the rule set. For more information on creating and managing receipt rules, you can refer to the official documentation.

Monitoring your incoming email

Configuring Amazon CloudWatch metrics

Once you have enabled email receiving in Amazon SES and created receipt rules for your emails, you can monitor and view the metrics using Amazon CloudWatch. Follow these steps to configure Amazon CloudWatch metrics for Amazon SES email receiving:

  1. Open the Amazon CloudWatch console.
  2. Navigate to the Metrics section and select All metrics.
  3. In the list of available metrics, locate and select SES to view SES-related metrics.
  4. Expand the Receipt Rule Set Metrics and Receipt Rule Metrics sections to access the specific metrics for your receipt rule sets and rules.
  5. Under Receipt Rule Set Metrics, you will find the following metrics:
    • “Received”: Indicates whether SES successfully received a message that has at least one rule applying. The metric value is always 1.
    • “PublishSuccess”: Indicates whether SES successfully executed all rules within a rule set.
    • “PublishFailure”: Indicates if SES encountered an error while executing rules within a rule set. The error may allow for retrying the execution.
    • “PublishExpired”: Indicates that SES will no longer retry executing the rules within a rule set after four hours.

These metrics can be filtered by the dimension RuleSetName to obtain data specific to individual rule sets.

  1. Under Receipt Rule Metrics, you will find the following metrics:
    • “Received”: Indicates whether SES successfully received a message and will try to process the applied rule. The metric value is always 1.
    • “PublishSuccess”: Indicates whether SES successfully executed a rule that applies to the received message.
    • “PublishFailure”: Indicates if SES encountered an error while executing the actions in a rule. The error may allow for retrying the execution.
    • “PublishExpired”: Indicates that SES will no longer retry executing the actions of a rule after four hours.

These metrics can be filtered by the dimension RuleName to obtain data specific to individual rules.

  1. Note that the metrics will only appear in the CloudWatch console if you have enabled email receiving, created receipt rules, and received mail that matches any of your rules.
  2. Keep in mind that changes made to fix your receipt rule set will only apply to emails received by Amazon SES after the update. Emails are always evaluated against the receipt rule set in place at the time of receipt.

Amazon SES also provides an Automatic Dashboard for SES in the CloudWatch console, which offers a preconfigured set of SES metrics and alarms to monitor your email sending and receiving activity. This dashboard provides a consolidated view of key metrics, making it easier to track the performance and health of your Amazon SES environment.

By configuring Amazon CloudWatch metrics, you can gain valuable insights into the performance and execution of your receipt rule sets and rules within Amazon SES. For more detailed information on viewing metrics for Amazon SES email receiving using Amazon CloudWatch, refer to the official documentation.

Using receipt rules effectively

Chaining Receipt Rules

Chaining receipt rules enable you to create sophisticated email processing workflows by linking multiple rules together, allowing each rule to apply specific actions based on the outcome of the previous rule. This advanced technique can help you achieve greater flexibility and precision in handling your incoming emails with Amazon SES. In this section, we’ll explain how to create chained receipt rules and provide examples of common use cases.

  1. Sign in to the AWS Management Console and open the Amazon SES console.
  2. Under the Email receiving pane, in the Receipt rule sets tab, select the name of your active rule set from the All rule sets section
  3. Review the existing rules in your rule set and ensure that they are ordered correctly. Chaining relies on the order of the rules, as each rule’s conditions and actions are evaluated sequentially. Under the Reorder tab, the rule orders can be modified by selecting the corresponding arrow associated with each.
  4. To chain additional rules, follow the steps previously outlined in the Adding Receipt Rules section and adjust the rule orders as necessary.

Chaining receipt rules can help you build complex email processing workflows with Amazon SES. Some common use cases include:

  • Executing multiple filtering criteria in an order that you specify. For example, adding a specific header value and then sending to additional AWS services such as Amazon S3, Amazon SNS, or AWS Lambda.
  • Creating multi-stage processing pipelines, where the output of one action (e.g., saving an email to Amazon S3) is used as the input for the next action (e.g., processing the email with AWS Lambda).
  • Implementing fallback actions, where the first rule in the chain attempts a specific action (e.g., saving an email to a primary S3 bucket), and if it fails, the next rule in the chain applies a different action (e.g., saving the email to a secondary S3 bucket).

The following figure shows how receipt rules, rule sets, and actions relate to each other.

SES Chaining multiple rules in a rule set

For more information on creating and managing receipt rules, you can refer to the official documentation.

Handling the 200 Receipt Rules per Rule Set limit

For each AWS account, Amazon SES imposes a limit of 200 receipt rules per receipt rule set. While this limit is sufficient for most use cases, there might be situations where you need to process a higher volume of incoming emails with more complex rule sets. These are some strategies to work around the 200 receipt rule limit using Amazon SES and other AWS services:

  • Utilize rule chaining: As mentioned earlier, chaining receipt rules allows you to link multiple rules together, effectively extending the number of actions you can perform for a single email. By chaining rules, you can create more complex processing workflows without exceeding the 200 rule limit.
  • Combine rules with actions: Instead of creating separate rules for each scenario, consider combining multiple actions within a single rule. This approach can help you reduce the total number of rules while still catering to various email processing requirements.
  • Use AWS Lambda for custom processing: Leverage AWS Lambda to perform custom processing on incoming emails. By incorporating Lambda functions in your receipt rules, you can handle more complex processing tasks without increasing the number of rules. This approach also allows you to offload some processing logic from Amazon SES to Lambda, providing additional flexibility.
  • Consolidate similar actions: If you have several rules performing similar actions, it is advisable to consolidate them into a single rule with multiple actions. This consolidation can help you reduce the total number of rules while maintaining the desired functionality.
  • Evaluate rule usage: Regularly review and evaluate your existing receipt rules to identify any rules that are no longer in use or can be optimized. Removing or consolidating unnecessary rules can help you stay within the 200 rule limit while still addressing your email processing requirements.

By implementing these strategies, you can effectively work around the 200 receipt rule limit in Amazon SES and build more complex email processing workflows to cater to your specific needs. Remember to monitor and optimize your rule sets regularly to make the most of the available resources and maintain efficient email processing.

For more information on the inbound quotas and limits in Amazon SES, you can refer to the official AWS documentation at Quotas related to email receiving.

Best Practices for multi-tenant scenarios

When dealing with multi-tenant scenarios in your application, it’s crucial to manage incoming emails efficiently to ensure smooth operation and a seamless experience for your users. In this section, we’ll provide best practices to handle incoming emails in multi-tenant environments using Amazon SES.

In a multi-tenant scenario, where multiple customers or tenants share a single AWS account, it’s important to consider the limit of 200 receipt rules per receipt rule set imposed by Amazon SES. To ensure compliance with this limit and maintain optimal email processing, the following practices are recommended:

  • Segregate tenants using email subdomains: Create unique subdomains for each tenant and route their incoming emails accordingly. This approach makes it easier to manage email processing rules and helps isolate tenants from potential issues.
  • Create separate rule sets for each tenant: By creating dedicated rule sets for each tenant, you can maintain better control over email processing rules and actions specific to their needs. This can simplify management and make it easier to update rules for individual tenants without affecting others.
  • Use tags to identify tenant-specific emails: Apply tags to incoming emails using the AddHeader action in your receipt rules. These tags can include tenant-specific identifiers, which will help you route and process emails correctly. You can later use these tags in other AWS services (e.g., AWS Lambda) to process tenant-specific emails.
  • Leverage conditional receipt rules: Utilize conditional receipt rules to apply tenant-specific processing based on email headers, recipients, or other criteria. This way, you can ensure that the right actions are taken for each tenant’s incoming emails.
  • Monitor tenant-specific metrics: Configure Amazon CloudWatch metrics and alarms for each tenant to track their email processing performance separately. This enables you to keep a close eye on individual tenants and take appropriate actions when needed.
  • Implement rate limiting: To prevent tenants from overwhelming your email processing pipeline, consider implementing rate limiting based on the number of incoming emails per tenant. This can help ensure fair resource allocation and prevent potential abuse.
  • Ensure security and privacy: Always encrypt tenant data at rest and in transit, and follow best practices for data protection and privacy. Consider using AWS Key Management Service (KMS) to manage encryption keys for each tenant.
  • Test and validate rule sets: Before deploying rule sets for tenants, thoroughly test and validate them to ensure they function as intended. This can help prevent unexpected behavior and maintain a high level of service quality.

By following these best practices for handling incoming emails in multi-tenant scenarios with Amazon SES, you can ensure a robust and efficient email processing pipeline that caters to each tenant’s unique requirements. As you continue to work with Amazon SES in multi-tenant environments, stay up to date with AWS documentation and best practices to further optimize your email processing workflows.

Conclusion

In this blog post, we’ve explored how to set up Amazon Simple Email Service (SES) for incoming email processing using receipt rules, rule sets, and various actions. We’ve covered domain verification, DKIM setup, creating and managing rule sets, adding receipt rules, and configuring Amazon CloudWatch metrics and alarms. We’ve also delved into advanced topics such as chaining receipt rules for more complex email processing workflows.

By following this guide, you can effectively leverage Amazon SES to process and manage your incoming emails, optimizing your email workflows, and maintaining high email deliverability standards. With Amazon SES, you can customize your email processing pipeline to meet your specific needs and seamlessly integrate with other AWS services such as Amazon S3, AWS Lambda, Amazon SNS, and Amazon CloudWatch.

In future blog posts, we will explore monitoring and alerting in more detail, providing you with additional insights on how to effectively monitor your email processing pipelines and set up alerts for critical events. Stay tuned for more information on this important aspect of managing your email infrastructure.

As you continue to work with Amazon SES and its email receiving capabilities, remember to review AWS best practices and documentation to stay up to date with new features and improvements. Don’t hesitate to experiment with different rule sets, actions, and conditions to find the perfect email processing solution for your use case.

A Guide to Maintaining a Healthy Email Database

Post Syndicated from nnatri original https://aws.amazon.com/blogs/messaging-and-targeting/guide-to-maintaining-healthy-email-database/

Introduction

In the digital age, email remains a powerful tool for businesses to communicate with their customers. Whether it’s for marketing campaigns, customer service updates, or important announcements, a well-maintained email database is crucial for ensuring that your messages reach their intended recipients. However, managing an email database is not just about storing email addresses. It involves keeping the database healthy, which means it’s up-to-date, accurate, and filled with engaged subscribers.

Amazon Simple Email Service (SES) offers robust features that help businesses manage their email environments effectively. Trusted by customers such as Amazon.com, Netflix, Duolingo and Reddit, SES helps customers deliver high-volume email campaigns of hundreds of billions of emails per year. Introduced in 2020, the list and subscription management feature of Amazon SES has added a new dimension to email database management, thereby reducing effort and time-to-value of managing a subscription list by allowing you to manage your list of contacts via its REST API, SDK or AWS CLI.

In this blog post, we will delve into the world of email database management in Amazon SES. You will explore two ways to manage your email database: building out your own email database functionality and using the built-in list and subscription management service. You will also learn the pros and cons of each approach and provide examples of customer use cases that would benefit from each approach. Regardless of the approach you ultimately decide to take, the blog will also share updated strategies for email database management to help with improving deliverability and customer engagement.

This guide is designed to help you navigate the complexities of email database management and make informed decisions that best suit your business needs. So, whether you’re new to Amazon SES or looking to optimize your existing email database management practices, this guide is for you. Let’s get started!

Email Database Management in Amazon SES

Amazon Simple Email Service (SES) offers two primary ways to manage your email database: building out your own email database functionality and using the built-in list and subscription management service. Each approach has its own set of advantages and potential drawbacks, and the best choice depends on your specific use case and business needs.

Building Out Your Email Database Functionality

When you choose to build out your own email database functionality, you have the flexibility to customize the database to suit your specific needs and leverage SES’ scalability as an email channel to send email at high volumes to your customer. Depending on the business requirement, the customizations could involve creating custom fields for subscriber data, implementing complex logic for categorizing and segmenting users, or integrating with other systems in your tech stack.

Using the Built-in List and Subscription Management Service

Alternatively, you can look at Amazon SES’s built-in list and subscription management service, which offers a ready-made solution for managing your email database. It handles tasks such as managing subscriptions to different topics and maintaining your customer email database through contact lists. Additionally, you can insert up to two links per email to the subscription preference page, which allow users to manage their topic preferences within Amazon SES.

SubscriptionPage

The non-configurable subscription page will automatically populate the customer’s current subscribed topic and allow setting of granular topic’s preferences. More information on how to configure that can be found here.

The following table should serve as a guideline to help you with deciding your approach for Email Database Management.
Building Your Own Email Database Functionality Using Built-in List and Subscription Management Service
Pros

Customization: Full control over the database structure and functionality, allowing for tailoring to specific needs. This includes creating custom fields for subscriber data, implementing own algorithms for handling bounces and complaints, and integrating with other systems in the tech stack.

Integration: Flexible flow of data across the business due to the ability to integrate the email database with other systems in the tech stack. You’ve already built your own email database or have one in mind which supports querying, building that database external to Amazon SES would make for a more customizable implementation.

Data Ownership: When you manage your own database, you have full ownership and control over your data. This can be important for businesses with strict data governance or regulatory requirements.

Ease of Use: The built-in service provides readily-available API to create, update and delete contacts. These operations are also available via REST API, AWS CLI and SDK. Once you’ve set up the subscription topics and contact lists, you can leverage the preference center to allow your customers to easily sub/unsubscribe from different topics.

Cost-Effective: More cost-effective than building own functionality as it requires less time and resources. The built-in service is also available free of charge unlike building out own infrastructure which would require ongoing infrastructure service costs.

Cons

Time and Resources: Building your own email database functionality requires a significant investment of time and resources. This includes the initial setup of the database, designing the schema, setting up the servers, and configuring the database software. Additionally, you’ll need to develop the functionality for managing subscriptions, and database cleanup in upon receiving bounces and complaints. Databases require ongoing maintenance to ensure they remain operational and efficient. This includes tasks like updating the database software, managing backups, optimizing queries, and scaling the database as your subscriber base grows.

Complexity: As your subscriber base grows, managing your own email database can become increasingly complex. You’ll need to handle more data, which can slow down queries and make the database more difficult to manage. You’ll also need to deal with more complex issues like data integrity, redundancy, and normalization. Additionally, as you add more features to your email database functionality, the codebase can become more complex, making it harder to maintain and debug.

Security: When you manage your own email database, you’re responsible for its security. This includes protecting the data from unauthorized access, ensuring the confidentiality of your subscribers’ information, and complying with data protection regulations. You’ll need to implement security measures like encryption, access controls, and regular security audits. If your database is compromised, it could lead to data loss or a breach of your subscribers’ privacy, which could damage your reputation and potentially lead to legal consequences.

Limited Customization: The built-in service may not offer the same level of customization as building own functionality. It may not meet all needs if there are specific requirements. For example, the preference center management page cannot be customized.

Dependence: Using the built-in service means you’re reliant on Amazon SES for your email database management. If the service experiences downtime or issues, it could impact your ability to manage your email database. This could potentially disrupt your email campaigns and affect your relationship with your subscribers. Furthermore, if you decide to switch to a different email service provider in the future, migrating your email database from the built-in service could be a complex and time-consuming process. Additionally, if your email database needs to be accessed or manipulated by other systems in your tech stack, this dependency on Amazon SES could complicate the integration process and limit your flexibility.

Customer Use Cases Best suited for businesses with specific needs that aren’t met by standard list management services, or those who wish to integrate their email database with other systems. For example, a large e-commerce company might choose to build out their own email database functionality to integrate with their customer relationship management (CRM) and inventory systems. Ideal for small to medium-sized businesses that need a straightforward, cost-effective solution for managing their email database. It’s also a good fit for businesses without the resources or technical expertise to build their own email database functionality.

Strategies for Email Database Management with Amazon Simple Email Service

Once you’ve made the decision on whether to manage your email database within Amazon SES or build your own, that’s only half of the equation. It’s important to recognize that your email databases will only work best to serve the business needs when you have processes in place to maintain them. In this section, let’s go through some of the best practices on how to do so.

  • Maintaining email list hygiene:
    • Both Amazon SES and a custom-built email database require maintaining a healthy email list. This involves regularly cleaning your list to remove invalid email addresses, hard bounces, and unengaged subscribers. With Amazon SES, the process to handle hard bounces and complaints is automated.
    • With a custom-built email database, you have more control over how and when this cleaning occurs. Rather than focusing on only email addresses that either hard bounces or complained, you can remove unengaged users. Every business will have their own definition of an un-engaged users based on business needs. Regardless, you will need to store the engagement attribute (e.g. days since last interaction). This will be simpler to architect in an external database which supports querying and bulk modification.
  • Managing Subscriptions:
    • With Amazon SES, you can easily manage subscriptions using the built-in functionality. This includes adding new subscribers, removing unsubscribed users, and updating user topic preferences. However, you will not be able to customize the look-and-feel of your subscription preference pages.
    • If you build your own email database, you’ll need to create your own system for managing subscriptions, which could require significant time and resources. The trade-off is that you can fully customize your subscription management system to showcase your branding on the subscription preference page and also handle custom logic for subscription/unsubscription.
  • Encouraging Engagement: Low engagement rates can indicate that your recipients are not interested in your content. To stimulate action, you can include a survey in the email, ask for feedback, or run a giveaway. You can then filter out inactive subscribers who still aren’t interacting with your emails. For engaged subscribers, you can segment these audiences into sub-groups by preference and send tailored email marketing campaigns. Before removing less active subscribers, consider what other kinds of content you could provide that might be more appealing. Unengaged subscribers can sometimes be re-engaged with the right offer, such as a free gift, a special perk, or exclusive content.
  • Renewing Opt-In: For your disengaged subscribers, send a re-optin campaign and remove them if they don’t re-subscribe. Be transparent! Notify inactive subscribers that you’ve noticed their lack of engagement and let them know that you don’t want to clutter their inbox if they’re not interested. Ask them if they want to continue to receive emails with a clear call-to-action button that will re-sign them up for future emails.
  • Making It Easy to Unsubscribe: Including an easy-to-find unsubscribe button and a one-step opt-out process won’t encourage subscribers to leave if you’re giving them a reason to stay. If recipients feel like they can’t leave, they’ll just mark your emails as spam, which counts as a big strike against your sender reputation.

Remember, effective email database management is a continuous process that requires regular attention and maintenance. By following these best practices, you can maximize the effectiveness of your email marketing efforts and build strong relationships with your subscribers.

Conclusion

In conclusion, maintaining a healthy email database is a critical aspect of successful email marketing. Whether you choose to build out your own email database functionality or use Amazon SES’s built-in list and subscription management service, it’s important to understand the pros and cons of each approach and align your decision with your business needs.

Building your own email database functionality offers the advantage of customization and integration with other systems in your tech stack. However, it requires significant time, resources, and technical expertise. On the other hand, Amazon SES’s built-in service is easy to use, cost-effective, and handles many complexities of email database management, but it may not offer the same level of customization.

Regardless of the approach you choose, following best practices for email database management is essential. This includes handling bounces and complaints, managing subscriptions, encouraging engagement, sending re-engagement email campaigns, renewing opt-ins, and making it easy to unsubscribe.

These practices will help you maintain a healthy email list, improve engagement rates, and ultimately, enhance the effectiveness of your email marketing efforts.It’s important to stay updated with the latest trends and strategies in email database management. So, keep exploring, learning, and implementing the best practices that suit your business needs.

For more information on Amazon SES and its features, visit the Amazon SES Documentation. Here, you’ll find comprehensive guides, tutorials, and API references to help you make the most of Amazon SES.