Post Syndicated from Bruno Giorgini original https://aws.amazon.com/blogs/messaging-and-targeting/build-a-secure-one-time-password-architecture-with-aws/
In today’s digital landscape, where cyberattacks continue to grow more sophisticated, the need for robust security measures has never been more paramount. One-Time Passwords (OTPs) have long been a crucial component of multi-factor authentication. They provide an additional layer of security to protect user accounts from unauthorized access.
The landscape of OTP delivery is evolving rapidly. While organizations increasingly favor more secure, phishing-resistant methods like passwordless solutions and hardware security keys, many still rely on SMS-based OTPs or require time to transition to newer technologies.
For organizations already leveraging Okta as their identity provider, AWS offers a comprehensive guidance on implementing phone-based multi-factor authentication. The “AWS Guidance for Okta Phone-Based Multi-Factor Authentication on AWS” provides a detailed reference architecture and implementation steps for integrating Okta with AWS services to deliver OTPs via SMS or voice calls.
This blog post offers a comprehensive guide for implementing a reliable, multi-channel OTP solution using AWS services including Amazon DynamoDB, Amazon Simple Email Service (SES), and AWS End User Messaging.
By the end of this blog, you’ll understand how to generate, store, and deliver OTPs via email, SMS, and voice. You’ll also learn best practices for secure OTP implementation. This solution serves organizations that need to maintain SMS-based OTP capabilities.
Let’s explore how to build a secure, multi-channel OTP solution on AWS.
AWS End User Messaging is the new name for Amazon Pinpoint’s SMS, MMS, push, WhatsApp, and text to voice messaging capabilities.
The authentication flow
Let’s imagine a hypothetical scenario where a bank customer want’s to access his online account:
Alex, a customer of the XYZ financial institution, needed to access their online account. They initiated the login process and requested an OTP from the mobile or web application provided by the bank. Upon receiving the request, the bank’s server created a user-specific session to handle the OTP generation and verification. A unique one-time password was then generated and sent to Alex’s registered mobile number via SMS. Alex received the OTP on their phone and had three attempts to enter the correct code within a 10-minute timeframe. This security measure prevented unauthorized access to their account. If Alex couldn’t receive the SMS, they had another option. They could request the bank to send the same OTP to their registered email address, if they had one on file. If Alex entered the correct OTP, the login process would be successful, and they would be granted access to their online banking services. However, if they exceeded the three attempts in the 10-minute time limit, their ability to login to the account would be temporarily suspended for security reasons and Alex would have to call the bank to lift the suspension or wait 2 hours to retry again. The bank implements this multi-factor authentication process with an alternative email-based OTP delivery. This approach safeguards Alex’s sensitive financial information and enhances the security of digital banking services. It also provides a backup option if the primary SMS channel is unavailable.

Prerequisites
To use the code examples provided in this blog post, you’ll need to have the following AWS resources in place:
- AWS Account: Sign up for an AWS account at AWS website if you don’t have one.
- Verified Email Address in Amazon SES: Enable email delivery of OTPs by verifying an email address in Amazon SES service.
- AWS End User Messaging Configuration: You’ll need to configure the necessary origination identity in the AWS End User Messaging service to deliver the OTPs via SMS or voice.
With these prerequisites in place, you’ll be ready to use the code examples provided in the following sections to implement your secure OTP solution.
Architecture:

Flow Explained:
- The user initiates the process by requesting an OTP.
- The request is sent through Amazon API Gateway.
- AWS Lambda receives the request and processes it.
- AWS KMS is used to encrypt the OTP for secure storage.
- The encrypted OTP and related information are stored in Amazon DynamoDB.
- AWS End User Messaging is used to send the OTP to the user via SMS, email, or voice, Amazon SES is used to send the OTP over email.
- When the user receives the OTP, they enter it in the portal for verification. The verification process encrypts the value with the key from AWS KMS and goes through the same flow (API Gateway -> Lambda)
- The Lambda decrypts the OTP for verification using KMS and compares it with the stored value in DynamoDB, which is also decrypted using the same KMS key.
Typical architecture for a secure one-time password (OTP) solution would involve the following components:
- Front-end Application: The OTP functionality is typically exposed through a web or mobile application, which serves as the user-facing interface.
- API Gateway: The front-end application interacts with the OTP solution through an API Gateway. This gateway serves as the entry point, providing scalable and secure access to underlying services.
- AWS Lambda: The business logic for generating, storing, and verifying the OTPs is handled by one or more AWS Lambda functions. These serverless functions are responsible for the core OTP-related operations.
- AWS KMS: Encrypts the OTP submitted for verification by the customer on the client side. AWS Lambda then decrypts it before verifying it against the OTP stored in Amazon DynamoDB.
- Amazon DynamoDB: The generated OTP encrypted and associated metadata, such as creation timestamp and expiration, are securely stored in an Amazon DynamoDB table.
- AWS End User Messaging: Used to deliver the OTPs to the users through various communication channels, such as SMS, and voice.
- Amazon SES: Deliver the OTPs to the users via email.
In a production environment, it’s also important to consider the following security measures:
- AWS WAF (Web Application Firewall): To protect the API Gateway from common web-based attacks, such as SQL injection and cross-site scripting (XSS).
- Authentication and Authorization Services: Ensuring that the front-end application and users are properly authenticated and authorized before accessing the OTP-related functionality. Visit Control and manage access to REST APIs in API Gateway to view the available methods of managing access to Amazon API Gateway.
This architecture enables organizations to build a comprehensive and secure one-time password solution. It protects users’ sensitive information and offers a seamless authentication experience.
Generating OTPs
To generate the OTPs, the server used the pyotp (link) library in Python. This library provides a secure random number generator to create unique, hexadecimal-encoded tokens. The server-side generation ensures that the OTPs are truly random and unpredictable, a crucial requirement for effective one-time password authentication.
The server generates a 6-character hexadecimal OTP, creating approximately 16.8 million possible unique combinations. This approach keeps codes short and easy for users to enter while maintaining security. After generation, the server securely stores the OTP and sends it to the user through the chosen delivery channel (SMS, email, or voice).
Sample Code:
import secrets
import pyotp

def generate_otp():
    """
    Generates a secure one-time password using the pyotp library.

    Returns:
        str: The generated one-time password.
    """
    # Generate a random base32 secret - https://pyauth.github.io/pyotp/
    totp = pyotp.TOTP(pyotp.random_base32())

    # Use the Time-based One-Time Password (TOTP) algorithm to generate a 6-digit OTP
    return totp.now()
It’s important to note that the generated OTP values should be encrypted on the client-side before being sent to the server for storage. This can be achieved by using AWS Key Management Service (KMS) to securely encrypt the OTP values.
By encrypting the OTP values before storing them in the DynamoDB table, you can further enhance the security of the solution and protect against potential data breaches. The encrypted values ensure that even if the database is compromised, the raw OTP values are not directly accessible.
Next, the encrypted OTP values are stored in the DynamoDB table, along with necessary metadata to manage the OTP lifecycle. This metadata includes creation timestamp, expiration, and verification attempts. The specifics of this storage process are covered in the ‘Securely Storing OTPs’ section.
Securely Storing OTPs
Once generated, the OTPs will be stored in an Amazon DynamoDB table. DynamoDB is a fully managed NoSQL database service that provides reliable, high-performance data storage and retrieval, making it an ideal choice for our secure OTP solution. To store the OTPs, you’ll create a DynamoDB table with the user_id as the primary key. This approach ensures that the same user can’t generate multiple OTPs. The put_item() operation will fail if it encounters a duplicate user_id value. Depending your use case, you can change this to be a random id or a concatenation of the user id and a random id.
Once generated, the OTPs are stored in an Amazon DynamoDB table. DynamoDB, a fully managed NoSQL database service, provides reliable, high-performance data storage and retrieval, making it ideal for our secure OTP solution.
To store the OTPs, create a DynamoDB table with the user_id as the primary key. This approach allows for efficient retrieval of a user’s current OTP. When storing a new OTP for a user:
- If no existing entry is found for the user_id, a new item is created.
- If an entry already exists, it’s updated with the new OTP, effectively overwriting the old one.
This method ensures that each user has only one active OTP at a time, while still allowing users to request new OTPs when needed (for example, if the previous one expired).
Depending on your use case, you can modify the primary key to be a random id or a concatenation of the user id and a random id for additional security.
In addition to the user_id and otp_code, we’ll also include the following attributes:
-
creation_timestamp: The timestamp indicating when the OTP was generated. This is compared with the timestamp of each attempt to ensure all attempts fall within the allowed time window.ttl: The Unix timestamp representing the time-to-live (TTL) for the OTP, after which the DynamoDB item will be automatically deleted. Set this value to 24 hours from the creation time. This allows for a reasonable cleanup period while ensuring expired OTPs are removed from the database.attempts: The number of remaining verification attempts for the OTP.verified: A boolean flag indicating whether the OTP has been successfully verified.locked: A boolean flag indicating whether the user’s account has been locked due to exhausted verification attempts.
Sample Code:
import time
import boto3
from datetime import datetime, timedelta

dynamodb = boto3.resource('dynamodb')
table = dynamodb.Table('otp_main')
def store_otp(user_id, otp_code):
    """
    Stores the generated one-time password in an Amazon DynamoDB table with a creation timestamp, TTL, and remaining attempts.

    Args:
        user_id (str): The unique identifier for the user.
        otp_code (str): The generated one-time password.

    Returns:
        dict: The response from the DynamoDB put_item operation.
    """
    # Get the current timestamp
    creation_timestamp = datetime.now().isoformat()

    # Calculate the expiration time for the OTP (10 minutes from now)
    expiration_time = datetime.now() + timedelta(minutes=10)

    # Convert the expiration time to a Unix timestamp for the DynamoDB TTL
    ttl_value = int(time.mktime(expiration_time.timetuple()))

    # Store the OTP, creation timestamp, TTL, remaining attempts, and verification status in the DynamoDB table
    response = table.put_item(
        Item={
            'user_id': user_id,
            'otp_code': otp_code,
            'creation_timestamp': creation_timestamp,
            'ttl': ttl_value,
            'attempts': 3,
            'verified': False,
            'locked': False
        }
    )

    return response
We use the user_id as the primary key and store creation timestamp, TTL, remaining attempts, verification status, and account lock status. This approach ensures a secure and efficient OTP storage and retrieval process. This approach also allows for precise management of OTP expiration and account locking, as demonstrated in the Verifying OTPs section.
The encrypted OTP values are stored in the otp_code attribute. Encryption is performed on the client-side using a secure key management solution, like the AWS KMS client-side library. This ensures that the raw OTP values are never transmitted or stored in plain text, further enhancing the security of the solution.
Note: As an optional enhancement, you could use Amazon SQS with a visibility timeout set to the OTP validity period. A payload containing the user_id is sent to a Lambda function. After the visibility timeout, the function processes the SQS message and deletes the corresponding DynamoDB item. This approach provides greater precision compared to relying solely on DynamoDB TTL, though it adds complexity to the implementation. The current solution compares each verification attempt’s timestamp with the creation timestamp, ensuring that no attempts occur after the OTP has expired.
Delivering OTPs via Multiple Channels
Now that we have a secure way to generate and store the OTPs, it’s time to focus on delivering them to your users. Our solution leverages the AWS End User Messaging capabilities to provide a seamless and redundant OTP delivery experience across multiple communication channels.
Sending OTPs via SMS and Voice
AWS End User Messaging offers a versatile platform for OTP delivery across multiple channels, including email, SMS, voice calls, push notifications, and WhatsApp. This provides a redundant and convenient authentication experience for your users, ensuring they can receive their one-time passwords via their preferred method.
Sample Code:
import boto3

def send_otp_sms(mobile_number, otp_code, user_id, region_name):
    """
    Sends an OTP code to the user's mobile number using AWS End User Messaging SMS.

    Args:
        mobile_number (str): The phone number to send the OTP to.
        otp_code (str): The one-time password to be sent.
        user_id (str): The unique identifier for the user.
        region_name (str): The AWS region to use for the SESv2 client.

    Returns:
        dict: The response from the End User Messaging SMS send_text_message operation.
    """
    # Construct the SMS message with the OTP code
    message = f"""
    This is an AWS End User Messaging OTP message.

    Your one-time password is: {otp_code}.
    """

    try:
        # Create a new SMS-Voice v2 client
        aws_sms = boto3.client('pinpoint-sms-voice-v2')
        # Use the End User Messaging SMS client to send the SMS message
        response = aws_sms.send_text_message(
            DestinationPhoneNumber=mobile_number,
            MessageBody=message,
            MessageType='TRANSACTIONAL'
        )
        return {'StatusCode': 200, 'Response': response['MessageId']}
    except ClientError as e:
        error_message = e.response['Error']['Message']
        return {'StatusCode': 500, 'Response': error_message}
Sending OTPs via Email
To deliver OTPs via email, we’ll use the Amazon SES (Simple Email Service) SendEmail API. SES is a highly scalable and cost-effective email service. It can send notifications, alerts, and in our case, one-time passwords to users.
Sample Code:
import boto3
from botocore.exceptions import ClientError

def send_otp_email(user_id, email_address, otp_code, region_name):
    """
    Sends an OTP code to the user's email address using Amazon SESv2.

    Args:
        user_id (str): The unique identifier for the user.
        email_address (str): The email address to send the OTP to.
        otp_code (str): The one-time password to be sent.
        region_name (str): The AWS region to use for the SESv2 client.

    Returns:
        dict: The response from the SESv2 send_email operation.
    """
    try:
        # Create a new SESv2 client
        ses = boto3.client('sesv2', region_name=region_name)

        # Construct the email message with the OTP code
        message = "<p>Your one-time password is: </p> {otp_code}"
        html_body = message.format(otp_code=otp_code)

        # Use the SESv2 client to send the email
        response = aws_email.send_email(
            FromEmailAddress='[email protected]',
            Destination={
                'ToAddresses': [
                    email_address,
                ]
            },
            Content={
                'Simple': {
                    'Subject': {
                        'Charset': 'UTF-8',
                        'Data': 'Your AWS OTP code'
                    },
                    'Body': {
                        'Html': {
                            'Charset': 'UTF-8',
                            'Data': html_body
                        }
                    }
                }
            }
        )
        return {'StatusCode': 200, 'Response': response['MessageId']}
    except ClientError as e:
        error_message = e.response['Error']['Message']
        return {'StatusCode': 500, 'Response': error_message}
Verifying OTPs
The final piece of our secure OTP solution is the process of verifying the one-time passwords entered by your users. This is a crucial step in the authentication flow, as it ensures that only legitimate users are granted access to your applications or services.
The OTP verification logic is handled by a Lambda function that interacts directly with the DynamoDB table where the OTPs are stored. This Lambda function performs the following steps:
- Retrieve the stored OTP and its associated metadata from the DynamoDB table, using the
user_id as the primary key. This metadata includes the creation timestamp and the number of remaining attempts.
- Decrypt the retrieved OTP value using the KMS client-side library, as the OTP was encrypted on the client side before being stored.
- Compare the unencrypted OTP value with the one entered by the user.
- Verify that the OTP has not expired by comparing the creation timestamp with the current time.
- If the OTP is valid and not expired, update the verification status in the DynamoDB table and delete the corresponding item.
- If the OTP is invalid or expired, deduct an attempt from the remaining attempts count stored in the DynamoDB table.
- If the remaining attempts count reaches zero, lock the user’s account and return an appropriate response.
Sample Code:
import boto3
from boto3.dynamodb.conditions import Key
from datetime import datetime, timedelta

dynamodb = boto3.resource('dynamodb')
table = dynamodb.Table('otp_main')

def verify_otp(otp_entered, user_id):
    """
    Verifies the one-time password entered by the user against the stored OTP in DynamoDB.

    Args:
        otp_entered (str): The one-time password entered by the user.
        user_id (str): The unique identifier for the user.

    Returns:
        dict: The result of the OTP verification, containing the verification status and the OTP code.
    """
    try:
        # Query the DynamoDB table to find the stored OTP for the given user
        response = table.query(
            KeyConditionExpression=Key('user_id').eq(user_id)
        )

        if 'Items' in response and response['Items']:
            for item in response['Items']:
                # decrypt the retrieved OTP value using the KMS client-side library
                if str(otp_entered) == decrypt_otp(item['otp_code'], user_id):
                    # Check if the OTP has expired
                    creation_timestamp = datetime.fromisoformat(item['creation_timestamp'])
                    if datetime.now() - creation_timestamp < timedelta(minutes=10):
                        # Update the verification status and delete the DynamoDB item
                        update_item = table.update_item(
                            Key={'user_id': user_id},
                            UpdateExpression='SET verified = :verified',
                            ExpressionAttributeValues={':verified': True}
                        )
                        table.delete_item(Key={'user_id': user_id})
                        return {'result': True, 'otp': item['otp_code']}
                    else:
                        # Deduct an attempt from the remaining attempts count
                        update_item = table.update_item(
                            Key={'user_id': user_id},
                            UpdateExpression='SET attempts = attempts - :1',
                            ExpressionAttributeValues={':1': 1}
                        )
                        if item['attempts'] <= 0:
                            # Lock the account if the attempts are exhausted
                            update_item = table.update_item(
                                Key={'user_id': user_id},
                                UpdateExpression='SET locked = :locked',
                                ExpressionAttributeValues={':locked': True}
                            )
                        return {'result': False, 'otp': item['otp_code']}
                else:
                    # Handle invalid OTPs
                    pass

        # If the OTP is not found or does not match, return a failure result
        return {'result': False, 'otp': None}
    except Exception as e:
        error_message = str(e)
        return {'result': False, 'error': error_message}

def decrypt_otp(encrypted_otp, user_id):
    """
    decryptes the OTP value using the KMS client-side library.

    Args:
        encrypted_otp (str): The encrypted OTP value stored in DynamoDB.
        user_id (str): The unique identifier for the user.

    Returns:
        str: The unencrypted OTP value.
    """
    # decrypt the OTP value using the KMS client-side library
    return decrypt_using_kms(encrypted_otp, user_id)
In this implementation, a Lambda function handles the OTP verification logic. This ensures sensitive operations like OTP decryption and managing expiration and attempt counts occur in a secure, serverless environment.
Best Practices
As you implement a secure one-time password solution, it’s important to consider the following best practices:
OTP Message Best Practices
When delivering OTPs via email, SMS, or voice, clearly specify the sender and the content of the message. For example, the email subject and body, as well as the SMS or voice message, should include information like:
“This is a one-time password from [Company Name] for payment confirmation of your flight ABC123.”
Security Reminder in OTP Messages
Include a security reminder in the OTP message to encourage users to report any unauthorized access attempts. For example:
“If you did not request this OTP, please call [phone number] to report it.”
This helps raise user awareness and provides a clear course of action if they suspect their account has been compromised.
Configuration Set / Originating Identity
Include appropriate configuration sets and Context or EmailTags when using AWS End User Messaging services to deliver OTPs. This records message delivery events and traces them to your organization. Read more about Amazon SES and AWS End User Messaging configuration sets.
For example, in the send_otp_sms() and send_otp_email() functions, you should include the following parameters:
response = aws_sms.send_text_message(
    DestinationPhoneNumber=mobile_number,
    MessageBody=message,
    MessageType='TRANSACTIONAL',
    ConfigurationSetName='otp-config-set',
    OriginationNumber='+12345678901',
    Context={
        'user_id': user_id
    }
)
response = ses.send_email(
    FromEmailAddress='[email protected]',
    Destination={'ToAddresses': [email_address]},
    Content={
        # ...
    },
    ConfigurationSetName='otp-config-set',
    EmailTags=[
        {
            'Name': 'user_id',
            'Value': user_id
        }
    ]
)
Deleting OTPs After Verification
After a successful OTP verification, it’s recommended to delete the corresponding DynamoDB item. This helps maintain a clean and up-to-date database, reducing the risk of unauthorized access or potential data breaches.
Tracking Verification Attempts
Consider adding a column in the DynamoDB table to track the number of verification attempts for each OTP. This can help you implement rate-limiting and other security measures to prevent brute-force attacks.
Encrypting OTPs on the Client-side
As mentioned earlier, the OTP values should be encrypted on the client-side using a secure key management solution, such as the AWS KMS client-side library. This ensures that the raw OTP values are never transmitted or stored in plain text, further enhancing the security of the solution.
Following these best practices ensures your one-time password solution is secure and user-friendly. It also maintains necessary controls and traceability for production use cases.
Conclusion
In this guide, we’ve demonstrated a secure, multi-channel One-Time Password (OTP) solution using AWS services. You can now generate, store, and deliver OTPs via email, SMS, and voice channels using Amazon DynamoDB, Amazon SES, and AWS End User Messaging.
We’ve covered several important points throughout this process. We discussed using a secure random number generator and encrypting algorithms to generate and store OTPs. This ensures strong protection for your users’ sensitive information. By integrating with Amazon SES and AWS End User Messaging, you provide users with a convenient, redundant authentication experience through multiple channels.
This guide equips you with tools to maintain SMS-based OTP capabilities. However, it’s important to note the industry’s shift towards more secure, phishing-resistant authentication methods. These include passwordless solutions and hardware security keys. We encourage you to explore and implement these newer technologies as you develop your OTP solution.
Looking ahead, consider potential enhancements to this solution. Integrating support for standards like FIDO2 WebAuthn and Passkeys could allow seamless authentication without traditional OTPs. Keep these options as backup or alternative methods. Also, consider incorporating a mechanism to escalate users to live support for authentication issues.
Implement the secure OTP solution outlined in this guide and continuously update your authentication strategies. This approach ensures your organization remains equipped to protect users and assets from evolving digital threats.


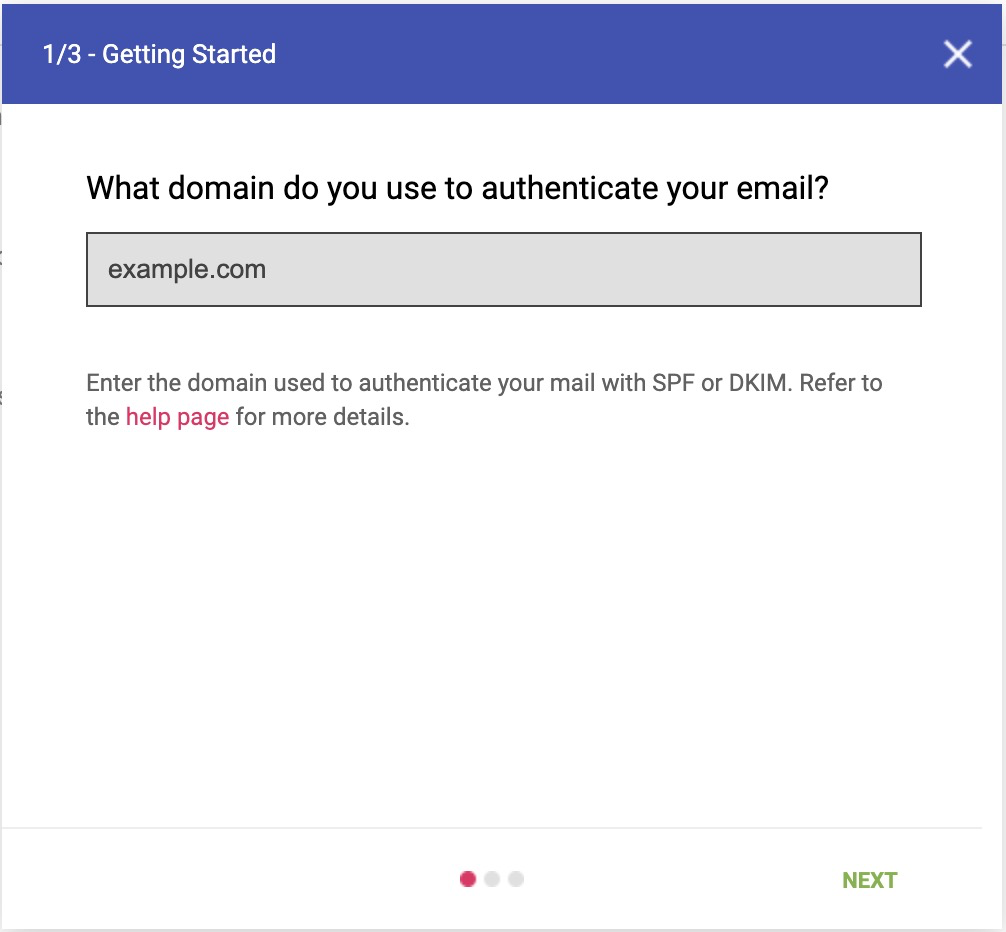
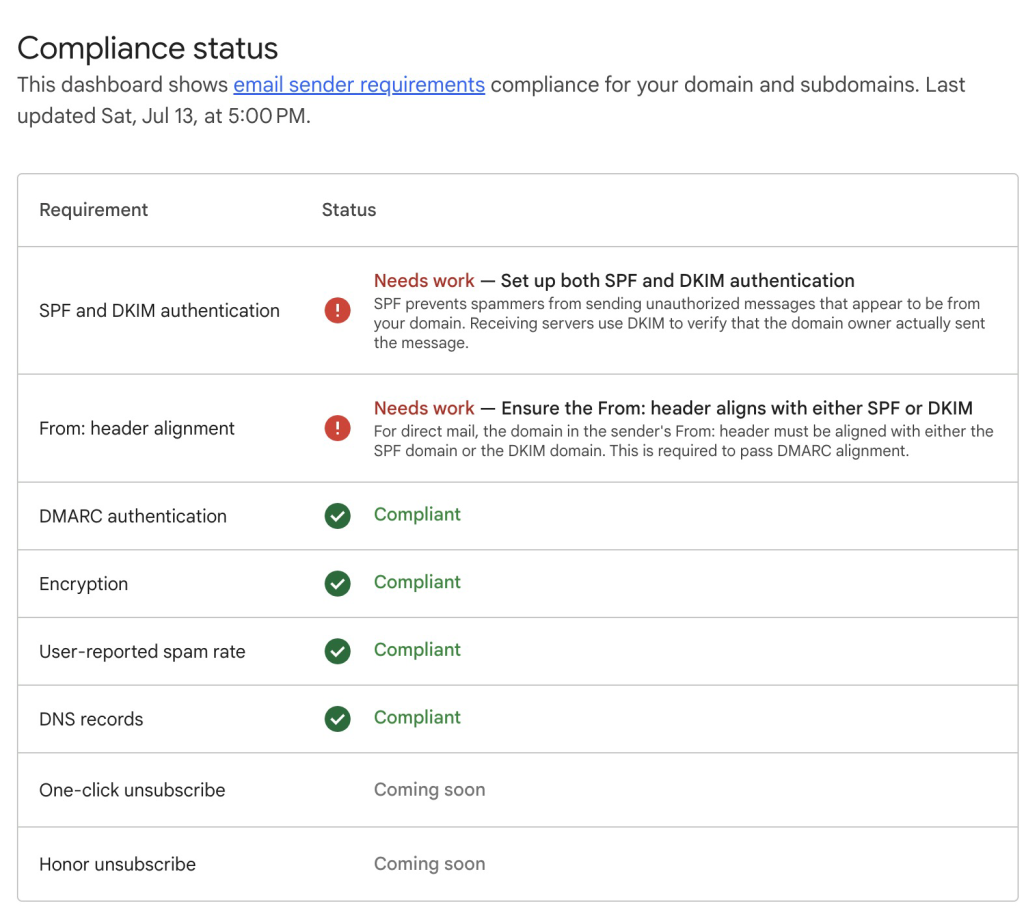
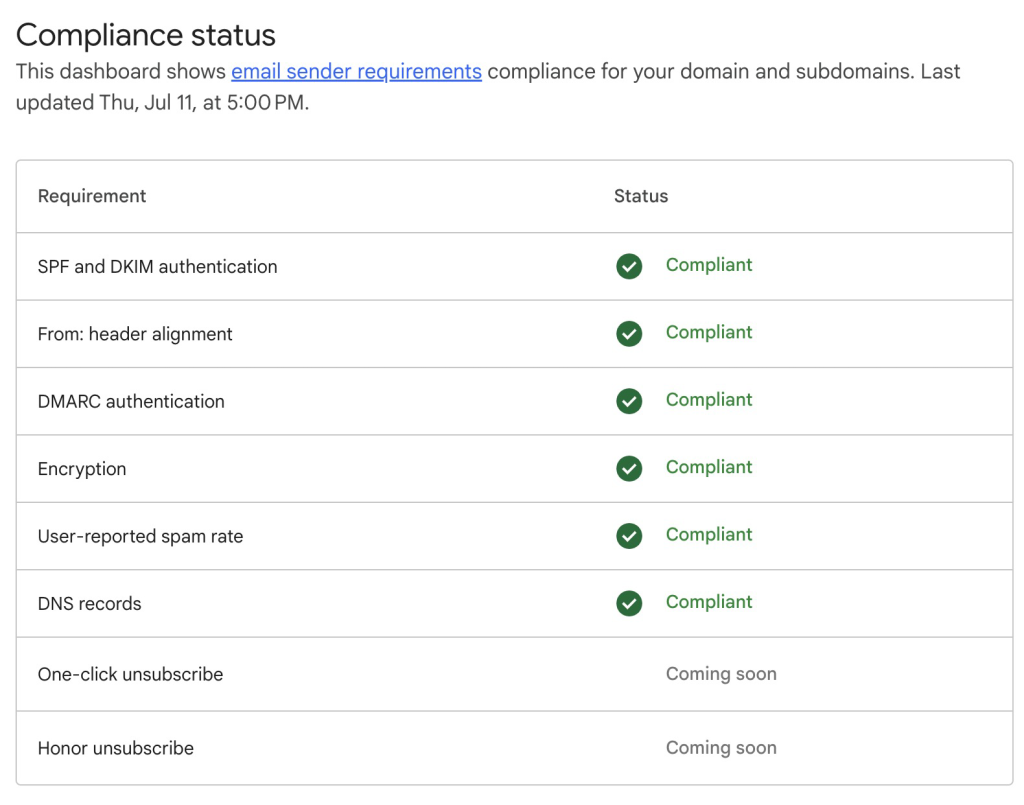

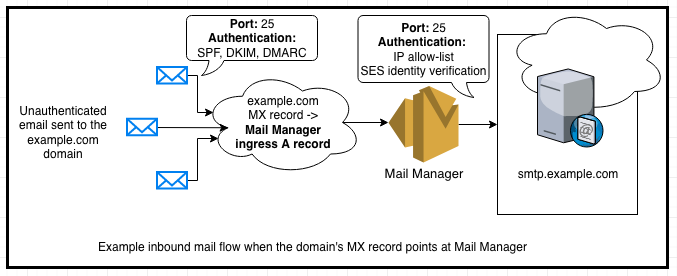
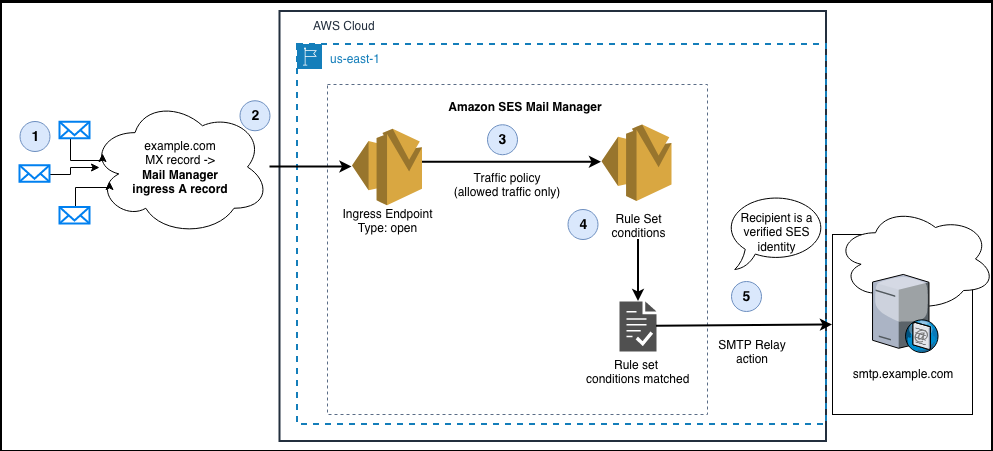

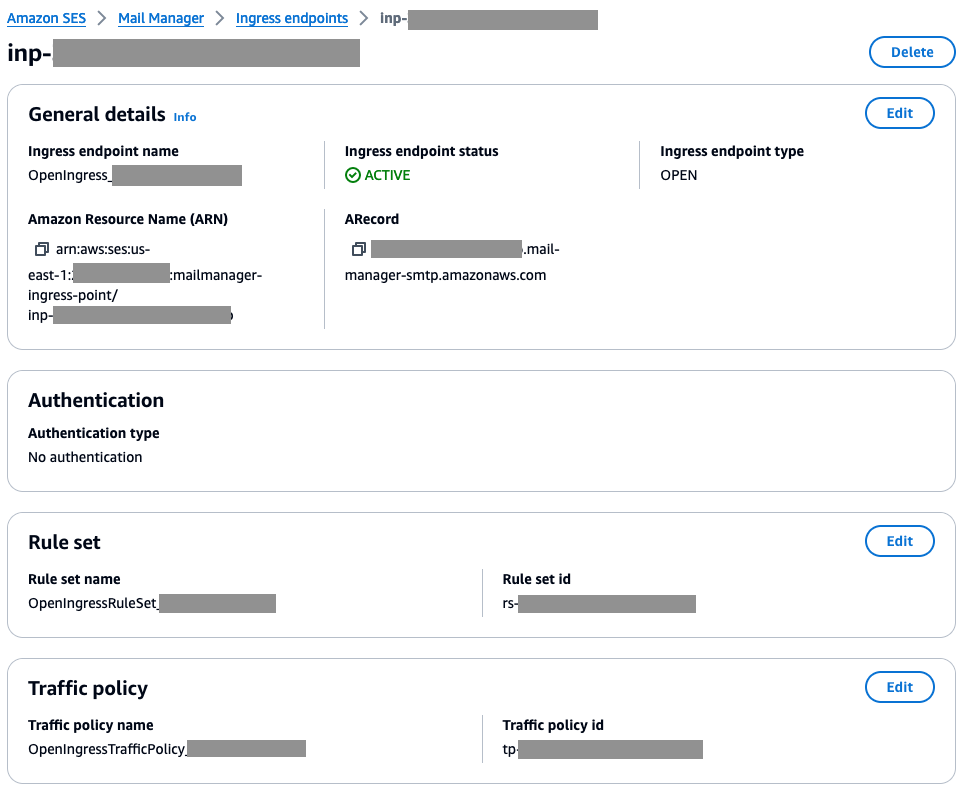


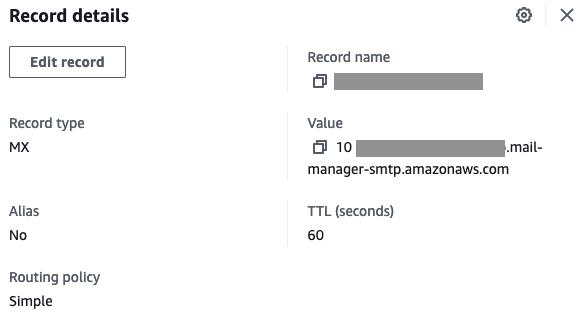


 Navigate to Amazon SES > Mail Manager > Ingress endpoint, select the ingress endpoint named Archiving and copy the ARecord, which looks like this <unique-id>.fips.wmjb.mail-manager-smtp.amazonaws.com – see screenshot below. Add this value to your MX record.


 ” width=”1611″ height=”680″>
 ” width=”964″ height=”732″>
 ” width=”1800″ height=”563″>


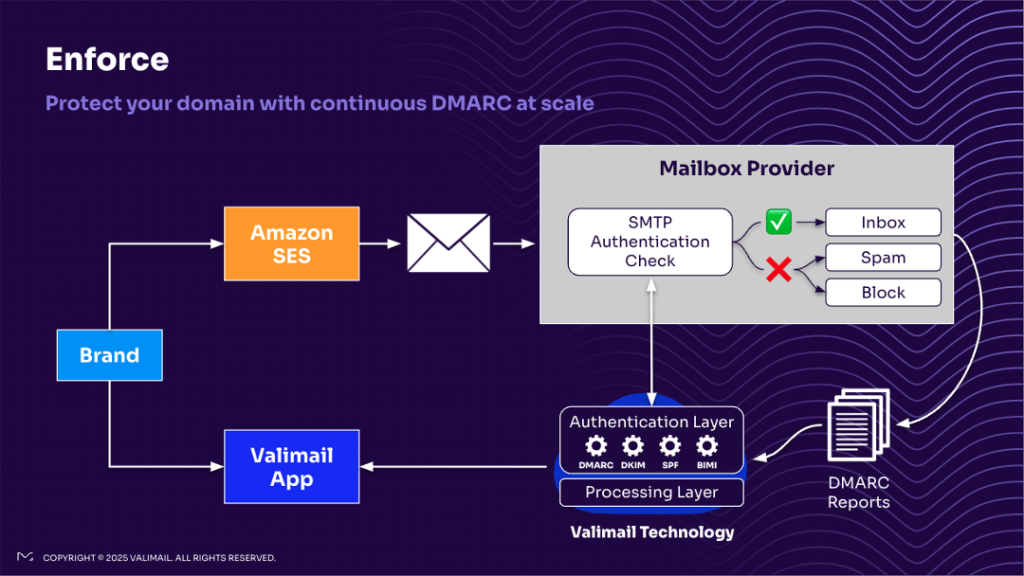
 Figure 1 – DMARC Flow


Maintain an Engaged Subscriber List by Removing Inactive Recipients
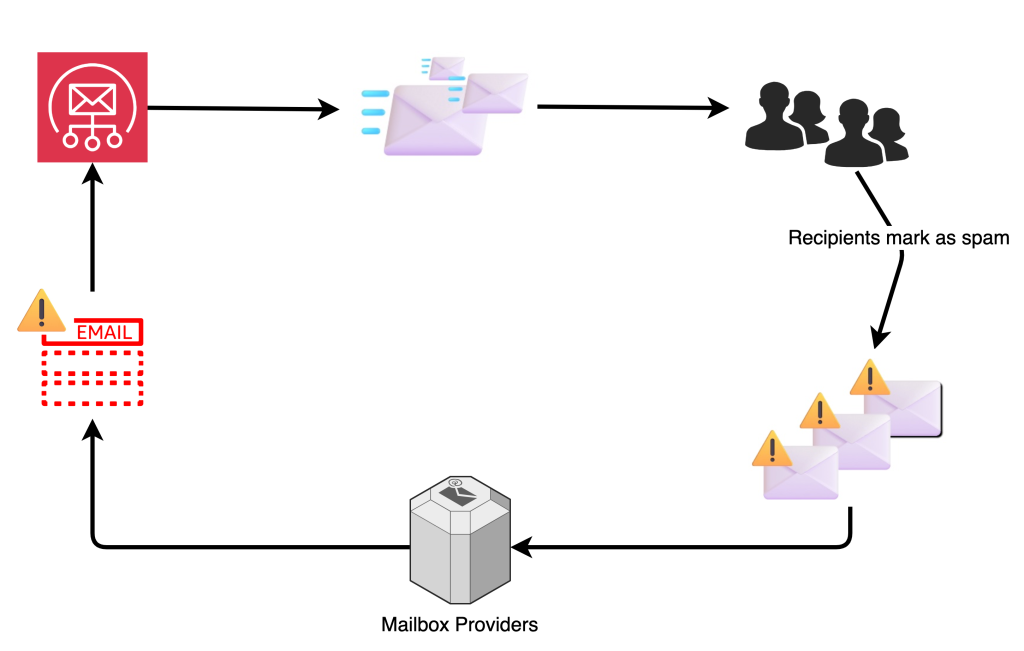
As an email marketer, you must operate under the assumption that if a subscriber is not opening your emails, or is no longer engaging with the calls-to-action in your emails, they are no longer interested in the content that you are sending. Subscribers who fall into this category should be periodically removed from your mailing lists to help ensure your subscriber lists are healthy and engaged. Increase campaign success and deliverability by periodically reviewing and updating your subscription lists with this two-pronged approach:
Track Subscriber Engagement with Amazon SES
Amazon SES provides methods to monitor your sending activity using events, metrics, and statistics. These monitoring methods can be used to measure the rates at which your customers engage with the emails you send. For example, you can identify your overall open and click through rates by utilizing SES’ event publishing when using custom email domains that you associate with configuration sets as discussed in the SES documentation.
Figure 3: Serverless Architecture to Analyze Amazon SES events
To track your email sending activities at a granular level, refer to the AWS blog post, Analyzing Amazon SES event data with AWS Analytics Services.